
HPX documentation#
Welcome to the HPX documentation!
If you’re new to HPX you can get started with the Quick start guide. Don’t forget to read the Terminology section to learn about the most important concepts in HPX. The Examples give you a feel for how it is to write real HPX applications and the Manual contains detailed information about everything from building HPX to debugging it. There are links to blog posts and videos about HPX in Additional material.
You can find a comprehensive list of contact options on Support for deploying and using HPX. Do not hesitate to contact us if you can’t find what you are looking for in the documentation!
See Citing HPX for details on how to cite HPX in publications. See HPX users for a list of institutions and projects using HPX.
There are also available a PDF version of this documentation as well as a Single HTML Page.
What is HPX?#
HPX is a C++ Standard Library for Concurrency and Parallelism. It implements all of the corresponding facilities as defined by the C++ Standard. Additionally, in HPX we implement functionalities proposed as part of the ongoing C++ standardization process. We also extend the C++ Standard APIs to the distributed case. HPX is developed by the STE||AR group (see People).
The goal of HPX is to create a high quality, freely available, open source implementation of a new programming model for conventional systems, such as classic Linux based Beowulf clusters or multi-socket highly parallel SMP nodes. At the same time, we want to have a very modular and well designed runtime system architecture which would allow us to port our implementation onto new computer system architectures. We want to use real-world applications to drive the development of the runtime system, coining out required functionalities and converging onto a stable API which will provide a smooth migration path for developers.
The API exposed by HPX is not only modeled after the interfaces defined by the C++11/14/17/20 ISO standard. It also adheres to the programming guidelines used by the Boost collection of C++ libraries. We aim to improve the scalability of today’s applications and to expose new levels of parallelism which are necessary to take advantage of the exascale systems of the future.
HPX is a member of the High-Performance Software Foundation (HPSF) network, which signals its commitment to the open-source, high-performance computing (HPC) community. By joining HPSF - and, concurrently, the Linux Foundation - HPX gains access to a broader collaborative ecosystem that promotes shared standards, interoperable tools, and joint research initiatives, all of which accelerates the development of scalable parallel applications. This dual affiliation enhances HPX’s credibility, attracting contributors and industry partners who value the rigorous governance and transparent development practices upheld by both organizations. Consequently, HPX can more effectively influence the direction of future HPC frameworks while benefiting from the collective expertise, resources, and industry backing provided by HPSF and the Linux Foundation.
What’s so special about HPX?#
HPX exposes a uniform, standards-oriented API for ease of programming parallel and distributed applications.
It enables programmers to write fully asynchronous code using hundreds of millions of threads.
HPX provides unified syntax and semantics for local and remote operations.
HPX makes concurrency manageable with dataflow and future based synchronization.
It implements a rich set of runtime services supporting a broad range of use cases.
HPX exposes a uniform, flexible, and extendable performance counter framework which can enable runtime adaptivity
It is designed to solve problems conventionally considered to be scaling-impaired.
HPX has been designed and developed for systems of any scale, from hand-held devices to very large scale systems.
It is the first fully functional implementation of the ParalleX execution model.
HPX is published under a liberal open-source license and has an open, active, and thriving developer community.
Quick start#
The following steps will help you get started with HPX. Before getting started, make sure you have all the necessary prerequisites, which are listed in _prerequisites. After Installing HPX, you can check how to run a simple example Hello, World!. Writing task-based applications explains how you can get started with HPX. You can refer to our Migration guide if you use other APIs for parallelism (like OpenMP, MPI or Intel Threading Building Blocks (TBB)) and you would like to convert your code to HPX code.
Installing HPX#
The easiest way to install HPX on your system is by choosing one of the steps below:
vcpkg
You can download and install HPX using the vcpkg dependency manager:
$ vcpkg install hpxSpack
Another way to install HPX is using Spack:
$ spack install hpxFedora
Installation can be done with Fedora as well:
$ dnf install hpx*Arch Linux
HPX is available in the Arch User Repository (AUR) as
hpxtoo.
More information or alternatives regarding the installation can be found in the Building HPX, a detailed guide with thorough explanation of ways to build and use HPX.
Hello, World!#
To get started with this minimal example you need to create a new project
directory and a file CMakeLists.txt with the contents below in order to
build an executable using CMake and HPX:
cmake_minimum_required(VERSION 3.19)
project(my_hpx_project CXX)
find_package(HPX REQUIRED)
add_executable(my_hpx_program main.cpp)
target_link_libraries(my_hpx_program HPX::hpx HPX::wrap_main hpx::iostreams_component)
The next step is to create a main.cpp with the contents below:
// Including 'hpx/hpx_main.hpp' instead of the usual 'hpx/hpx_init.hpp' enables
// to use the plain C-main below as the direct main HPX entry point.
#include <hpx/hpx_main.hpp>
#include <hpx/iostream.hpp>
int main()
{
// Say hello to the world!
hpx::cout << "Hello World!\n" << std::flush;
return 0;
}
Then, in your project directory run the following:
$ mkdir build && cd build
$ cmake -DHPX_DIR=</path/to/hpx/installation> ..
$ make all
$ ./my_hpx_program
$ ./my_hpx_program
Hello World!
The program looks almost like a regular C++ hello world with the exception of
the two includes and hpx::cout.
When you include
hpx_main.hppHPX makes sure thatmainactually gets launched on the HPX runtime. So while it looks almost the same you can now use futures,async, parallel algorithms and more which make use of the HPX runtime with lightweight threads.hpx::coutis a replacement forstd::coutto make sure printing never blocks a lightweight thread. You can read more abouthpx::coutin The HPX I/O-streams component.
Note
You will most likely have more than one
main.cppfile in your project. See the section on Using HPX with CMake-based projects for more details on how to useadd_hpx_executable.HPX::wrap_mainis required if you are implicitly usingmain()as the runtime entry point. See Re-use the main() function as the main HPX entry point for more information.hpx::iostreams_componentis optional for a minimal project but lets us use the HPX equivalent ofstd::cout, i.e., the HPX The HPX I/O-streams component functionality in our application.You do not have to let HPX take over your main function like in the example. See Starting the HPX runtime for more details on how to initialize and run the HPX runtime.
Caution
Ensure that HPX is installed with HPX_WITH_DISTRIBUTED_RUNTIME=ON to
prevent encountering an error indicating that the HPX::iostreams_component
target is not found.
When including hpx_main.hpp the user-defined main gets renamed and
the real main function is defined by HPX. This means that the
user-defined main must include a return statement, unlike the real
main. If you do not include the return statement, you may end up with
confusing compile time errors mentioning user_main or even runtime
errors.
Writing task-based applications#
So far we haven’t done anything that can’t be done using the C++ standard library. In this section we will give a short overview of what you can do with HPX on a single node. The essence is to avoid global synchronization and break up your application into small, composable tasks whose dependencies control the flow of your application. Remember, however, that HPX allows you to write distributed applications similarly to how you would write applications for a single node (see Why HPX? and Writing distributed applications).
If you are already familiar with async and future from the C++ standard
library, the same functionality is available in HPX.
The following terminology is essential when talking about task-based C++ programs:
lightweight thread: Essential for good performance with task-based programs. Lightweight refers to smaller stacks and faster context switching compared to OS threads. Smaller overheads allow the program to be broken up into smaller tasks, which in turns helps the runtime fully utilize all processing units.
async: The most basic way of launching tasks asynchronously. Returns afuture<T>.future<T>: Represents a value of typeTthat will be ready in the future. The value can be retrieved withget(blocking) and one can check if the value is ready withis_ready(non-blocking).shared_future<T>: Same asfuture<T>but can be copied (similar tostd::unique_ptrvsstd::shared_ptr).continuation: A function that is to be run after a previous task has run (represented by a future).
thenis a method offuture<T>that takes a function to run next. Used to build up dataflow DAGs (directed acyclic graphs).shared_futures help you split up nodes in the DAG and functions likewhen_allhelp you join nodes in the DAG.
The following example is a collection of the most commonly used functionality in HPX:
#include <hpx/algorithm.hpp>
#include <hpx/future.hpp>
#include <hpx/init.hpp>
#include <iostream>
#include <random>
#include <vector>
void final_task(hpx::future<hpx::tuple<hpx::future<double>, hpx::future<void>>>)
{
std::cout << "in final_task" << std::endl;
}
int hpx_main()
{
// A function can be launched asynchronously. The program will not block
// here until the result is available.
hpx::future<int> f = hpx::async([]() { return 42; });
std::cout << "Just launched a task!" << std::endl;
// Use get to retrieve the value from the future. This will block this task
// until the future is ready, but the HPX runtime will schedule other tasks
// if there are tasks available.
std::cout << "f contains " << f.get() << std::endl;
// Let's launch another task.
hpx::future<double> g = hpx::async([]() { return 3.14; });
// Tasks can be chained using the then method. The continuation takes the
// future as an argument.
hpx::future<double> result = g.then([](hpx::future<double>&& gg) {
// This function will be called once g is ready. gg is g moved
// into the continuation.
return gg.get() * 42.0 * 42.0;
});
// You can check if a future is ready with the is_ready method.
std::cout << "Result is ready? " << result.is_ready() << std::endl;
// You can launch other work in the meantime. Let's sort a vector.
std::vector<int> v(1000000);
// We fill the vector synchronously and sequentially.
hpx::generate(hpx::execution::seq, std::begin(v), std::end(v), &std::rand);
// We can launch the sort in parallel and asynchronously.
hpx::future<void> done_sorting =
hpx::sort(hpx::execution::par( // In parallel.
hpx::execution::task), // Asynchronously.
std::begin(v), std::end(v));
// We launch the final task when the vector has been sorted and result is
// ready using when_all.
auto all = hpx::when_all(result, done_sorting).then(&final_task);
// We can wait for all to be ready.
all.wait();
// all must be ready at this point because we waited for it to be ready.
std::cout << (all.is_ready() ? "all is ready!" : "all is not ready...")
<< std::endl;
return hpx::local::finalize();
}
int main(int argc, char* argv[])
{
return hpx::local::init(hpx_main, argc, argv);
}
Try copying the contents to your main.cpp file and look at the output. It can
be a good idea to go through the program step by step with a debugger. You can
also try changing the types or adding new arguments to functions to make sure
you can get the types to match. The type of the then method can be especially
tricky to get right (the continuation needs to take the future as an argument).
Note
HPX programs accept command line arguments. The most important one is
--hpx:threads=N to set the number of OS threads used by
HPX. HPX uses one thread per core by default. Play around with the
example above and see what difference the number of threads makes on the
sort function. See Launching and configuring HPX applications for more details on
how and what options you can pass to HPX.
Tip
The example above used the construction hpx::when_all(...).then(...). For
convenience and performance it is a good idea to replace uses of
hpx::when_all(...).then(...) with dataflow. See
Dataflow for more details on dataflow.
Tip
If possible, try to use the provided parallel algorithms instead of writing your own implementation. This can save you time and the resulting program is often faster.
Next steps#
If you haven’t done so already, reading the Terminology section will help you get familiar with the terms used in HPX.
The Examples section contains small, self-contained walkthroughs of example HPX programs. The Local to remote example is a thorough, realistic example starting from a single node implementation and going stepwise to a distributed implementation.
The Manual contains detailed information on writing, building and running HPX applications.
Tutorials#
This section provides structured, video-based learning resources for HPX. The tutorials complement the reference documentation with guided, example-driven explanations of core concepts and advanced features.
Each tutorial introduces the relevant concepts and then applies them step by step through practical code examples. The focus is on demonstrating how to design, implement, and reason about parallel and distributed applications using HPX. While the main documentation emphasizes API descriptions and detailed reference material, the tutorial series adopts a practical, code-oriented approach.
The tutorials are intended for a broad audience: from beginners setting up HPX for the first time to advanced users exploring performance tuning, custom executors, and SIMD vectorization. Together, they form a structured learning path that lowers the entry barrier while progressively introducing more advanced features.
The complete video series is available on YouTube:
The code is available on Github:
HPX Tutorial Code <https://github.com/STEllAR-GROUP/HPX_Tutorials_Code>
Available Modules#
- Introduction to |hpx|
Foundational overview of HPX, including its architecture, design principles, and key capabilities in the context of high-performance computing.
- Building |hpx| on Windows/Unix
Step-by-step guidance on installing HPX and setting up the environment based on your operating system.
- Running |hpx| applications
Demonstation on how to build and run a simple Hello World example using HPX.
- Algorithms in |hpx|
Overview of the parallel algorithms provided by HPX and explanation on how execution policies unlock high-performance C++ computing.
- Vectorization and SIMD in |hpx|
Introduction to data-parallel programming, SIMD execution policies, and vectorization techniques relevant to modern C++ and HPC workloads.
- Futures and Asynchronous Programming
Explanation of the asynchronous programming model in HPX, including futures, async, and dataflow-based execution patterns.
- Performance Analysis and Optimization
Guidance on profiling HPX applications, analyzing performance counters, identifying bottlenecks, and applying optimization strategies.
- Task Scheduling and Custom Executors
Detailed discussion of the execution model in HPX, built-in executors, and mechanisms for defining custom execution strategies.
- Migration Guides
Best practices and recommendations for transitioning from other HPC frameworks to HPX.
- HPX in Practice
Examples of open-source libraries and applications using HPX, illustrating real-world usage patterns and ecosystem integration.
Examples#
The following sections analyze some examples to help you get familiar with the HPX style of programming. We start off with simple examples that utilize basic HPX elements and then begin to expose the reader to the more complex and powerful HPX concepts. Section Building tests and examples shows how you can build the examples.
Asynchronous execution#
The Fibonacci sequence is a sequence of numbers starting with 0 and 1 where every subsequent number is the sum of the previous two numbers. In this example, we will use HPX to calculate the value of the n-th element of the Fibonacci sequence. In order to compute this problem in parallel, we will use a facility known as a future.
As shown in the Fig. 1 below, a future encapsulates a delayed computation. It acts as a proxy for a result initially not known, most of the time because the computation of the result has not completed yet. The future synchronizes the access of this value by optionally suspending any HPX-threads requesting the result until the value is available. When a future is created, it spawns a new HPX-thread (either remotely with a parcel or locally by placing it into the thread queue) which, when run, will execute the function associated with the future. The arguments of the function are bound when the future is created.
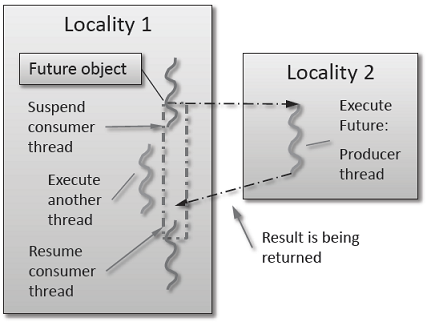
Fig. 1 Schematic of a future execution.#
Once the function has finished executing, a write operation is performed on the future. The write operation marks the future as completed, and optionally stores data returned by the function. When the result of the delayed computation is needed, a read operation is performed on the future. If the future’s function hasn’t completed when a read operation is performed on it, the reader HPX-thread is suspended until the future is ready. The future facility allows HPX to schedule work early in a program so that when the function value is needed it will already be calculated and available. We use this property in our Fibonacci example below to enable its parallel execution.
Setup#
The source code for this example can be found here:
fibonacci_local.cpp.
To compile this program, go to your HPX build directory (see Building HPX for information on configuring and building HPX) and enter:
$ make examples.quickstart.fibonacci_local
To run the program type:
$ ./bin/fibonacci_local
This should print (time should be approximate):
fibonacci(10) == 55
elapsed time: 0.002430 [s]
This run used the default settings, which calculate the tenth element of the
Fibonacci sequence. To declare which Fibonacci value you want to calculate, use
the --n-value option. Additionally you can use the --hpx:threads
option to declare how many OS-threads you wish to use when running the program.
For instance, running:
$ ./bin/fibonacci --n-value 20 --hpx:threads 4
Will yield:
fibonacci(20) == 6765
elapsed time: 0.062854 [s]
Walkthrough#
Now that you have compiled and run the code, let’s look at how the code works.
Since this code is written in C++, we will begin with the main() function.
Here you can see that in HPX, main() is only used to initialize the
runtime system. It is important to note that application-specific command line
options are defined here. HPX uses Boost.Program_options for command line
processing. You can see that our programs --n-value option is set by calling
the add_options() method on an instance of
hpx::program_options::options_description. The default value of the
variable is set to 10. This is why when we ran the program for the first time
without using the --n-value option the program returned the 10th value of
the Fibonacci sequence. The constructor argument of the description is the text
that appears when a user uses the --hpx:help option to see what
command line options are available. HPX_APPLICATION_STRING is a macro that
expands to a string constant containing the name of the HPX application
currently being compiled.
In HPX main() is used to initialize the runtime system and pass the
command line arguments to the program. If you wish to add command line options
to your program you would add them here using the instance of the Boost class
options_description, and invoking the public member function
.add_options() (see Boost Documentation for more details). hpx::init
calls hpx_main() after setting up HPX, which is where the logic of our
program is encoded.
int main(int argc, char* argv[])
{
// Configure application-specific options
hpx::program_options::options_description desc_commandline(
"Usage: " HPX_APPLICATION_STRING " [options]");
// clang-format off
desc_commandline.add_options()
("n-value",
hpx::program_options::value<std::uint64_t>()->default_value(10),
"n value for the Fibonacci function")
;
// clang-format on
// Initialize and run HPX
hpx::local::init_params init_args;
init_args.desc_cmdline = desc_commandline;
return hpx::local::init(hpx_main, argc, argv, init_args);
}
The hpx::init function in main() starts the runtime system, and
invokes hpx_main() as the first HPX-thread. Below we can see that the
basic program is simple. The command line option --n-value is read in, a
timer (hpx::chrono::high_resolution_timer) is set up to record the
time it takes to do the computation, the fibonacci function is invoked
synchronously, and the answer is printed out.
int hpx_main(hpx::program_options::variables_map& vm)
{
hpx::threads::add_scheduler_mode(
hpx::threads::policies::scheduler_mode::fast_idle_mode);
// extract command line argument, i.e. fib(N)
std::uint64_t n = vm["n-value"].as<std::uint64_t>();
{
// Keep track of the time required to execute.
hpx::chrono::high_resolution_timer t;
std::uint64_t r = fibonacci(n);
char const* fmt = "fibonacci({1}) == {2}\nelapsed time: {3} [s]\n";
hpx::util::format_to(std::cout, fmt, n, r, t.elapsed());
}
return hpx::local::finalize(); // Handles HPX shutdown
}
The fibonacci function itself is synchronous as the work done inside is
asynchronous. To understand what is happening we have to look inside the
fibonacci function:
std::uint64_t fibonacci(std::uint64_t n)
{
if (n < 2)
return n;
hpx::future<std::uint64_t> n1 = hpx::async(fibonacci, n - 1);
std::uint64_t n2 = fibonacci(n - 2);
return n1.get() + n2; // wait for the Future to return their values
}
This block of code looks similar to regular C++ code. First, if (n < 2),
meaning n is 0 or 1, then we return 0 or 1 (recall the first element of the
Fibonacci sequence is 0 and the second is 1). If n is larger than 1 we spawn two
new tasks whose results are contained in n1 and n2. This is done using
hpx::async which takes as arguments a function (function pointer,
object or lambda) and the arguments to the function. Instead of returning a
std::uint64_t like fibonacci does, hpx::async returns a future of a
std::uint64_t, i.e. hpx::future<std::uint64_t>. Each of these futures
represents an asynchronous, recursive call to fibonacci. After we’ve created
the futures, we wait for both of them to finish computing, we add them together,
and return that value as our result. We get the values from the futures using
the get method. The recursive call tree will continue until n is equal to 0
or 1, at which point the value can be returned because it is implicitly known.
When this termination condition is reached, the futures can then be added up,
producing the n-th value of the Fibonacci sequence.
Note that calling get potentially blocks the calling HPX-thread, and lets
other HPX-threads run in the meantime. There are, however, more efficient ways
of doing this. examples/quickstart/fibonacci_futures.cpp contains many more
variations of locally computing the Fibonacci numbers, where each method makes
different tradeoffs in where asynchrony and parallelism is applied. To get
started, however, the method above is sufficient and optimizations can be
applied once you are more familiar with HPX. The example
Dataflow presents dataflow, which is a way to more
efficiently chain together multiple tasks.
Parallel algorithms#
This program will perform a matrix multiplication in parallel. The output will look something like this:
Matrix A is :
4 9 6
1 9 8
Matrix B is :
4 9
6 1
9 8
Resultant Matrix is :
124 93
130 82
Setup#
The source code for this example can be found here:
matrix_multiplication.cpp.
To compile this program, go to your HPX build directory (see Building HPX for information on configuring and building HPX) and enter:
$ make examples.quickstart.matrix_multiplication
To run the program type:
$ ./bin/matrix_multiplication
or:
$ ./bin/matrix_multiplication --n 2 --m 3 --k 2 --s 100 --l 0 --u 10
where the first matrix is n x m and the second m x k, s is the seed for creating the random values of the matrices and the range of these values is [l,u]
This should print:
Matrix A is :
4 9 6
1 9 8
Matrix B is :
4 9
6 1
9 8
Resultant Matrix is :
124 93
130 82
Notice that the numbers may be different because of the random initialization of the matrices.
Walkthrough#
Now that you have compiled and run the code, let’s look at how the code works.
First, main() is used to initialize the runtime system and pass the command line arguments to the program.
hpx::init calls hpx_main() after setting up HPX, which is where our program is implemented.
int main(int argc, char* argv[])
{
using namespace hpx::program_options;
options_description cmdline("usage: " HPX_APPLICATION_STRING " [options]");
// clang-format off
cmdline.add_options()
("n",
hpx::program_options::value<std::size_t>()->default_value(2),
"Number of rows of first matrix")
("m",
hpx::program_options::value<std::size_t>()->default_value(3),
"Number of columns of first matrix (equal to the number of rows of "
"second matrix)")
("k",
hpx::program_options::value<std::size_t>()->default_value(2),
"Number of columns of second matrix")
("seed,s",
hpx::program_options::value<unsigned int>(),
"The random number generator seed to use for this run")
("l",
hpx::program_options::value<int>()->default_value(0),
"Lower limit of range of values")
("u",
hpx::program_options::value<int>()->default_value(10),
"Upper limit of range of values");
// clang-format on
hpx::local::init_params init_args;
init_args.desc_cmdline = cmdline;
return hpx::local::init(hpx_main, argc, argv, init_args);
}
Proceeding to the hpx_main() function, we can see that matrix multiplication can be done very easily.
int hpx_main(hpx::program_options::variables_map& vm)
{
using element_type = int;
// Define matrix sizes
std::size_t const rowsA = vm["n"].as<std::size_t>();
std::size_t const colsA = vm["m"].as<std::size_t>();
std::size_t const rowsB = colsA;
std::size_t const colsB = vm["k"].as<std::size_t>();
std::size_t const rowsR = rowsA;
std::size_t const colsR = colsB;
// Initialize matrices A and B
std::vector<int> A(rowsA * colsA);
std::vector<int> B(rowsB * colsB);
std::vector<int> R(rowsR * colsR);
// Define seed
unsigned int seed = std::random_device{}();
if (vm.count("seed"))
seed = vm["seed"].as<unsigned int>();
gen.seed(seed);
std::cout << "using seed: " << seed << std::endl;
// Define range of values
int const lower = vm["l"].as<int>();
int const upper = vm["u"].as<int>();
// Matrices have random values in the range [lower, upper]
std::uniform_int_distribution<element_type> dis(lower, upper);
auto generator = std::bind(dis, gen);
hpx::ranges::generate(A, generator);
hpx::ranges::generate(B, generator);
// Perform matrix multiplication
hpx::experimental::for_loop(hpx::execution::par, 0, rowsA, [&](auto i) {
hpx::experimental::for_loop(0, colsB, [&](auto j) {
R[i * colsR + j] = 0;
hpx::experimental::for_loop(0, rowsB, [&](auto k) {
R[i * colsR + j] += A[i * colsA + k] * B[k * colsB + j];
});
});
});
// Print all 3 matrices
print_matrix(A, rowsA, colsA, "A");
print_matrix(B, rowsB, colsB, "B");
print_matrix(R, rowsR, colsR, "R");
return hpx::local::finalize();
}
First, the dimensions of the matrices are defined. If they were not given as command-line arguments, their default values are 2 x 3 for the first matrix and 3 x 2 for the second. We use standard vectors to define the matrices to be multiplied as well as the resultant matrix.
To give some random initial values to our matrices, we use std::uniform_int_distribution. Then, std::bind() is used
along with hpx::ranges::generate() to yield two matrices A and B, which contain values in the range of [0, 10] or in
the range defined by the user at the command-line arguments. The seed to generate the values can also be defined by the user.
The next step is to perform the matrix multiplication in parallel. This can be done by just using an hpx::experimental::for_loop
combined with a parallel execution policy hpx::execution::par as the outer loop of the multiplication. Note that the execution
of hpx::experimental::for_loop without specifying an execution policy is equivalent to specifying hpx::execution::seq
as the execution policy.
Finally, the matrices A, B that are multiplied as well as the resultant matrix R are printed using the following function.
void print_matrix(std::vector<int> const& M, std::size_t rows, std::size_t cols,
char const* message)
{
std::cout << "\nMatrix " << message << " is:" << std::endl;
for (std::size_t i = 0; i < rows; i++)
{
for (std::size_t j = 0; j < cols; j++)
std::cout << M[i * cols + j] << " ";
std::cout << "\n";
}
}
Asynchronous execution with actions#
This example extends the previous example by
introducing actions: functions that can be run remotely. In this
example, however, we will still only run the action locally. The mechanism to
execute actions stays the same: hpx::async. Later
examples will demonstrate running actions on remote localities
(e.g. Remote execution with actions).
Setup#
The source code for this example can be found here:
fibonacci.cpp.
To compile this program, go to your HPX build directory (see Building HPX for information on configuring and building HPX) and enter:
$ make examples.quickstart.fibonacci
To run the program type:
$ ./bin/fibonacci
This should print (time should be approximate):
fibonacci(10) == 55
elapsed time: 0.00186288 [s]
This run used the default settings, which calculate the tenth element of the
Fibonacci sequence. To declare which Fibonacci value you want to calculate, use
the --n-value option. Additionally you can use the --hpx:threads
option to declare how many OS-threads you wish to use when running the program.
For instance, running:
$ ./bin/fibonacci --n-value 20 --hpx:threads 4
Will yield:
fibonacci(20) == 6765
elapsed time: 0.233827 [s]
Walkthrough#
The code needed to initialize the HPX runtime is the same as in the previous example:
int main(int argc, char* argv[])
{
// Configure application-specific options
hpx::program_options::options_description desc_commandline(
"Usage: " HPX_APPLICATION_STRING " [options]");
desc_commandline.add_options()("n-value",
hpx::program_options::value<std::uint64_t>()->default_value(10),
"n value for the Fibonacci function");
// Initialize and run HPX
hpx::init_params init_args;
init_args.desc_cmdline = desc_commandline;
return hpx::init(argc, argv, init_args);
}
The hpx::init function in main() starts the runtime system, and
invokes hpx_main() as the first HPX-thread. The command line option
--n-value is read in, a timer
(hpx::chrono::high_resolution_timer) is set up to record the time it
takes to do the computation, the fibonacci action is invoked
synchronously, and the answer is printed out.
int hpx_main(hpx::program_options::variables_map& vm)
{
// extract command line argument, i.e. fib(N)
std::uint64_t n = vm["n-value"].as<std::uint64_t>();
{
// Keep track of the time required to execute.
hpx::chrono::high_resolution_timer t;
// Wait for fib() to return the value
fibonacci_action fib;
std::uint64_t r = fib(hpx::find_here(), n);
char const* fmt = "fibonacci({1}) == {2}\nelapsed time: {3} [s]\n";
hpx::util::format_to(std::cout, fmt, n, r, t.elapsed());
}
return hpx::finalize(); // Handles HPX shutdown
}
Upon a closer look we see that we’ve created a std::uint64_t to store the
result of invoking our fibonacci_action fib. This action will
launch synchronously (as the work done inside of the action will be
asynchronous itself) and return the result of the Fibonacci sequence. But wait,
what is an action? And what is this fibonacci_action? For starters,
an action is a wrapper for a function. By wrapping functions, HPX can
send packets of work to different processing units. These vehicles allow users
to calculate work now, later, or on certain nodes. The first argument to our
action is the location where the action should be run. In this
case, we just want to run the action on the machine that we are
currently on, so we use hpx::find_here. To
further understand this we turn to the code to find where fibonacci_action
was defined:
// forward declaration of the Fibonacci function
std::uint64_t fibonacci(std::uint64_t n);
// This is to generate the required boilerplate we need for the remote
// invocation to work.
HPX_PLAIN_ACTION(fibonacci, fibonacci_action)
A plain action is the most basic form of action. Plain
actions wrap simple global functions which are not associated with any
particular object (we will discuss other types of actions in
Components and actions). In this block of code the function fibonacci()
is declared. After the declaration, the function is wrapped in an action
in the declaration HPX_PLAIN_ACTION. This function takes two
arguments: the name of the function that is to be wrapped and the name of the
action that you are creating.
This picture should now start making sense. The function fibonacci() is
wrapped in an action fibonacci_action, which was run synchronously
but created asynchronous work, then returns a std::uint64_t representing the
result of the function fibonacci(). Now, let’s look at the function
fibonacci():
std::uint64_t fibonacci(std::uint64_t n)
{
if (n < 2)
return n;
// We restrict ourselves to execute the Fibonacci function locally.
hpx::id_type const locality_id = hpx::find_here();
// Invoking the Fibonacci algorithm twice is inefficient.
// However, we intentionally demonstrate it this way to create some
// heavy workload.
fibonacci_action fib;
hpx::future<std::uint64_t> n1 = hpx::async(fib, locality_id, n - 1);
hpx::future<std::uint64_t> n2 = hpx::async(fib, locality_id, n - 2);
return n1.get() +
n2.get(); // wait for the Futures to return their values
}
This block of code is much more straightforward and should look familiar from
the previous example. First, if (n < 2),
meaning n is 0 or 1, then we return 0 or 1 (recall the first element of the
Fibonacci sequence is 0 and the second is 1). If n is larger than 1 we spawn two
tasks using hpx::async. Each of these futures represents an
asynchronous, recursive call to fibonacci. As previously we wait for both
futures to finish computing, get the results, add them together, and return that
value as our result. The recursive call tree will continue until n is equal to 0
or 1, at which point the value can be returned because it is implicitly known.
When this termination condition is reached, the futures can then be added up,
producing the n-th value of the Fibonacci sequence.
Remote execution with actions#
This program will print out a hello world message on every OS-thread on every locality. The output will look something like this:
hello world from OS-thread 1 on locality 0
hello world from OS-thread 1 on locality 1
hello world from OS-thread 0 on locality 0
hello world from OS-thread 0 on locality 1
Setup#
The source code for this example can be found here:
hello_world_distributed.cpp.
To compile this program, go to your HPX build directory (see Building HPX for information on configuring and building HPX) and enter:
$ make examples.quickstart.hello_world_distributed
To run the program type:
$ ./bin/hello_world_distributed
This should print:
hello world from OS-thread 0 on locality 0
To use more OS-threads use the command line option --hpx:threads and
type the number of threads that you wish to use. For example, typing:
$ ./bin/hello_world_distributed --hpx:threads 2
will yield:
hello world from OS-thread 1 on locality 0
hello world from OS-thread 0 on locality 0
Notice how the ordering of the two print statements will change with subsequent runs. To run this program on multiple localities please see the section How to use HPX applications with PBS.
Walkthrough#
Now that you have compiled and run the code, let’s look at how the code works,
beginning with main():
// Here is the main entry point. By using the include 'hpx/hpx_main.hpp' HPX
// will invoke the plain old C-main() as its first HPX thread.
int main()
{
// Get a list of all available localities.
std::vector<hpx::id_type> localities = hpx::find_all_localities();
// Reserve storage space for futures, one for each locality.
std::vector<hpx::future<void>> futures;
futures.reserve(localities.size());
for (hpx::id_type const& node : localities)
{
// Asynchronously start a new task. The task is encapsulated in a
// future, which we can query to determine if the task has
// completed.
typedef hello_world_foreman_action action_type;
futures.push_back(hpx::async<action_type>(node));
}
// The non-callback version of hpx::wait_all takes a single parameter,
// a vector of futures to wait on. hpx::wait_all only returns when
// all of the futures have finished.
hpx::wait_all(futures);
return 0;
}
In this excerpt of the code we again see the use of futures. This time the
futures are stored in a vector so that they can easily be accessed.
hpx::wait_all is a family of functions that wait on for an
std::vector<> of futures to become ready. In this piece of code, we are
using the synchronous version of hpx::wait_all, which takes one
argument (the std::vector<> of futures to wait on). This function will not
return until all the futures in the vector have been executed.
In Asynchronous execution with actions we used hpx::find_here to specify the
target of our actions. Here, we instead use
hpx::find_all_localities, which returns an std::vector<>
containing the identifiers of all the machines in the system, including the one
that we are on.
As in Asynchronous execution with actions our futures are set using
hpx::async<>. The hello_world_foreman_action is declared
here:
// Define the boilerplate code necessary for the function 'hello_world_foreman'
// to be invoked as an HPX action.
HPX_PLAIN_ACTION(hello_world_foreman, hello_world_foreman_action)
Another way of thinking about this wrapping technique is as follows: functions (the work to be done) are wrapped in actions, and actions can be executed locally or remotely (e.g. on another machine participating in the computation).
Now it is time to look at the hello_world_foreman() function which was
wrapped in the action above:
void hello_world_foreman()
{
// Get the number of worker OS-threads in use by this locality.
std::size_t const os_threads = hpx::get_os_thread_count();
// Populate a set with the OS-thread numbers of all OS-threads on this
// locality. When the hello world message has been printed on a particular
// OS-thread, we will remove it from the set.
std::set<std::size_t> attendance;
for (std::size_t os_thread = 0; os_thread < os_threads; ++os_thread)
attendance.insert(os_thread);
// As long as there are still elements in the set, we must keep scheduling
// HPX-threads. Because HPX features work-stealing task schedulers, we have
// no way of enforcing which worker OS-thread will actually execute
// each HPX-thread.
while (!attendance.empty())
{
// Each iteration, we create a task for each element in the set of
// OS-threads that have not said "Hello world". Each of these tasks
// is encapsulated in a future.
std::vector<hpx::future<std::size_t>> futures;
futures.reserve(attendance.size());
for (std::size_t worker : attendance)
{
// Asynchronously start a new task. The task is encapsulated in a
// future that we can query to determine if the task has completed.
//
// We give the task a hint to run on a particular worker thread
// (core) and suggest binding the scheduled thread to the given
// core, but no guarantees are given by the scheduler that the task
// will actually run on that worker thread. It will however try as
// hard as possible to place the new task on the given worker
// thread.
hpx::execution::parallel_executor exec(
hpx::threads::thread_priority::bound);
hpx::threads::thread_schedule_hint hint(
hpx::threads::thread_schedule_hint_mode::thread,
static_cast<std::int16_t>(worker));
// Annotate the created threads with the given thread name
hpx::execution::experimental::annotating_executor annotating_exec(
hpx::execution::experimental::with_hint(exec, hint),
std::string("hello_world_worker#") + std::to_string(worker));
futures.push_back(
hpx::async(annotating_exec, hello_world_worker, worker));
}
// Wait for all of the futures to finish. The callback version of the
// hpx::wait_each function takes two arguments: a vector of futures,
// and a binary callback. The callback takes two arguments; the first
// is the index of the future in the vector, and the second is the
// return value of the future. hpx::wait_each doesn't return until
// all the futures in the vector have returned.
hpx::spinlock mtx;
hpx::wait_each(hpx::unwrapping([&](std::size_t t) {
if (std::size_t(-1) != t)
{
std::lock_guard<hpx::spinlock> lk(mtx);
attendance.erase(t);
}
}),
futures);
}
}
Now, before we discuss hello_world_foreman(), let’s talk about the
hpx::wait_each function.
The version of hpx::wait_each invokes a callback function
provided by the user, supplying the callback function with the result of the
future.
In hello_world_foreman(), an std::set<> called attendance keeps
track of which OS-threads have printed out the hello world message. When the
OS-thread prints out the statement, the future is marked as ready, and
hpx::wait_each in hello_world_foreman(). If it is not
executing on the correct OS-thread, it returns a value of -1, which causes
hello_world_foreman() to leave the OS-thread id in attendance.
std::size_t hello_world_worker(std::size_t desired)
{
// Returns the OS-thread number of the worker that is running this
// HPX-thread.
std::size_t current = hpx::get_worker_thread_num();
if (current == desired)
{
// The HPX-thread has been run on the desired OS-thread.
char const* msg = "hello world from OS-thread {1} on locality {2}\n";
hpx::util::format_to(hpx::cout, msg, desired, hpx::get_locality_id())
<< std::flush;
return desired;
}
// This HPX-thread has been run by the wrong OS-thread, make the foreman
// try again by rescheduling it.
return std::size_t(-1);
}
Because HPX features work stealing task schedulers, there is no way to guarantee that an action will be scheduled on a particular OS-thread. This is why we must use a guess-and-check approach.
Components and actions#
The accumulator examples demonstrate the use of components. Components are C++ classes that expose methods as a type of HPX action. These actions are called component actions. There are three examples: - accumulator - template accumulator - template function accumulator
Components are globally named, meaning that a component action can be called remotely (e.g., from another machine). There are two accumulator examples in HPX.
In the Asynchronous execution with actions and the Remote execution with actions, we introduced plain actions, which wrapped global functions. The target of a plain action is an identifier which refers to a particular machine involved in the computation. For plain actions, the target is the machine where the action will be executed.
Component actions, however, do not target machines. Instead, they target component instances. The instance may live on the machine that we’ve invoked the component action from, or it may live on another machine.
The components in these examples expose three different functions:
reset()- Resets the accumulator value to 0.add(arg)- Addsargto the accumulators value.query()- Queries the value of the accumulator.
These examples create an instance of the (template or template function) accumulator, and then allow the user to enter commands at a prompt, which subsequently invoke actions on the accumulator instance.
Accumulator#
Setup#
The source code for this example can be found here:
accumulator_client.cpp.
To compile this program, go to your HPX build directory (see Building HPX for information on configuring and building HPX) and enter:
$ make examples.accumulators.accumulator
To run the program type:
$ ./bin/accumulator_client
Once the program starts running, it will print the following prompt and then wait for input. An example session is given below:
commands: reset, add [amount], query, help, quit
> add 5
> add 10
> query
15
> add 2
> query
17
> reset
> add 1
> query
1
> quit
Walkthrough#
Now, let’s take a look at the source code of the accumulator example. This
example consists of two parts: an HPX component library (a library that
exposes an HPX component) and a client application which uses the library.
This walkthrough will cover the HPX component library. The code for the client
application can be found here: accumulator_client.cpp.
An HPX component is represented by two C++ classes:
A server class - The implementation of the component’s functionality.
A client class - A high-level interface that acts as a proxy for an instance of the component.
Typically, these two classes both have the same name, but the server class
usually lives in different sub-namespaces (server). For example, the full
names of the two classes in accumulator are:
examples::server::accumulator(server class)examples::accumulator(client class)
The following code is from server/accumulator.hpp.
All HPX component server classes must inherit publicly from the HPX
component base class: hpx::components::component_base
The accumulator component inherits from
hpx::components::locking_hook. This allows the runtime system to
ensure that all action invocations are serialized. That means that the system
ensures that no two actions are invoked at the same time on a given component
instance. This makes the component thread safe and no additional locking has to
be implemented by the user. Moreover, an accumulator component is a component
because it also inherits from hpx::components::component_base (the
template argument passed to locking_hook is used as its base class). The
following snippet shows the corresponding code:
class accumulator
: public hpx::components::locking_hook<
hpx::components::component_base<accumulator>>
Our accumulator class will need a data member to store its value in, so let’s declare a data member:
argument_type value_;
The constructor for this class simply initializes value_ to 0:
accumulator()
: value_(0)
{
}
Next, let’s look at the three methods of this component that we will be exposing as component actions:
Here are the action types. These types wrap the methods we’re exposing. The wrapping technique is very similar to the one used in the Asynchronous execution with actions and the Remote execution with actions:
HPX_DEFINE_COMPONENT_ACTION(accumulator, reset)
HPX_DEFINE_COMPONENT_ACTION(accumulator, add)
HPX_DEFINE_COMPONENT_ACTION(accumulator, query)
The last piece of code in the server class header is the declaration of the action type registration code:
HPX_REGISTER_ACTION_DECLARATION(
examples::server::accumulator::reset_action, accumulator_reset_action)
HPX_REGISTER_ACTION_DECLARATION(
examples::server::accumulator::add_action, accumulator_add_action)
HPX_REGISTER_ACTION_DECLARATION(
examples::server::accumulator::query_action, accumulator_query_action)
Note
The code above must be placed in the global namespace.
The rest of the registration code is in accumulator.cpp
///////////////////////////////////////////////////////////////////////////////
// Add factory registration functionality.
HPX_REGISTER_COMPONENT_MODULE()
///////////////////////////////////////////////////////////////////////////////
typedef hpx::components::component<examples::server::accumulator>
accumulator_type;
HPX_REGISTER_COMPONENT(accumulator_type, accumulator)
///////////////////////////////////////////////////////////////////////////////
// Serialization support for accumulator actions.
HPX_REGISTER_ACTION(
accumulator_type::wrapped_type::reset_action, accumulator_reset_action)
HPX_REGISTER_ACTION(
accumulator_type::wrapped_type::add_action, accumulator_add_action)
HPX_REGISTER_ACTION(
accumulator_type::wrapped_type::query_action, accumulator_query_action)
Note
The code above must be placed in the global namespace.
The following code is from accumulator.hpp
The client class is the primary interface to a component instance. Client classes are used to create components:
// Create a component on this locality.
examples::accumulator c = hpx::new_<examples::accumulator>(hpx::find_here());
and to invoke component actions:
c.add(hpx::launch::apply, 4);
Clients, like servers, need to inherit from a base class, this time,
hpx::components::client_base:
class accumulator
: public hpx::components::client_base<accumulator, server::accumulator>
For readability, we typedef the base class like so:
typedef hpx::components::client_base<accumulator, server::accumulator>
base_type;
Here are examples of how to expose actions through a client class:
There are a few different ways of invoking actions:
Non-blocking: For actions that don’t have return types, or when we do not care about the result of an action, we can invoke the action using fire-and-forget semantics. This means that once we have asked HPX to compute the action, we forget about it completely and continue with our computation. We use
hpx::postto invoke an action in a non-blocking fashion.
void reset(hpx::launch::apply_policy)
{
HPX_ASSERT(this->get_id());
typedef server::accumulator::reset_action action_type;
hpx::post(action_type(), this->get_id());
}
Asynchronous: Futures, as demonstrated in Asynchronous execution, Asynchronous execution with actions, and the Remote execution with actions, enable asynchronous action invocation. Here’s an example from the accumulator client class:
hpx::future<argument_type> query(hpx::launch::async_policy)
{
HPX_ASSERT(this->get_id());
typedef server::accumulator::query_action action_type;
return hpx::async(action_type(), this->get_id());
}
Synchronous: To invoke an action in a fully synchronous manner, we can simply call
hpx::syncwhich is semantically equivalent tohpx::async().get()(i.e., create a future and immediately wait on it to be ready). Here’s an example from the accumulator client class:
void add(argument_type arg)
{
HPX_ASSERT(this->get_id());
typedef server::accumulator::add_action action_type;
action_type()(this->get_id(), arg);
}
Note that this->get_id() references a data member of the
hpx::components::client_base base class which identifies the server
accumulator instance.
hpx::id_type is a type which represents a global identifier
in HPX. This type specifies the target of an action. This is the type that is
returned by hpx::find_here in which case it represents the
locality the code is running on.
Template accumulator#
Walkthrough#
The following code is from server/template_accumulator.hpp.
Similarly to the accumulator example, the component server class
inherits publicly from hpx::components::component_base and from
hpx::components::locking_hook ensuring thread-safe method invocations.
template <typename T>
class template_accumulator
: public hpx::components::locking_hook<
hpx::components::component_base<template_accumulator<T>>>
The body of the template accumulator class remains mainly the same as the accumulator with the difference that it uses templates in the data types.
typedef T argument_type;
template_accumulator()
: value_(0)
{
}
///////////////////////////////////////////////////////////////////////
// Exposed functionality of this component.
/// Reset the components value to 0.
void reset()
{
// set value_ to 0.
value_ = 0;
}
/// Add the given number to the accumulator.
void add(argument_type arg)
{
// add value_ to arg, and store the result in value_.
value_ += arg;
}
/// Return the current value to the caller.
argument_type query() const
{
// Get the value of value_.
return value_;
}
///////////////////////////////////////////////////////////////////////
// Each of the exposed functions needs to be encapsulated into an
// action type, generating all required boilerplate code for threads,
// serialization, etc.
HPX_DEFINE_COMPONENT_ACTION(template_accumulator, reset)
HPX_DEFINE_COMPONENT_ACTION(template_accumulator, add)
HPX_DEFINE_COMPONENT_ACTION(template_accumulator, query)
The last piece of code in the server class header is the declaration of the action type registration code. REGISTER_TEMPLATE_ACCUMULATOR_DECLARATION(type) declares actions for the specified type, while REGISTER_TEMPLATE_ACCUMULATOR(type) registers the actions and the component for the specified type, using macros to handle boilerplate code.
#define REGISTER_TEMPLATE_ACCUMULATOR_DECLARATION(type) \
HPX_REGISTER_ACTION_DECLARATION( \
examples::server::template_accumulator<type>::reset_action, \
HPX_PP_CAT(__template_accumulator_reset_action_, type)) \
\
HPX_REGISTER_ACTION_DECLARATION( \
examples::server::template_accumulator<type>::add_action, \
HPX_PP_CAT(__template_accumulator_add_action_, type)) \
\
HPX_REGISTER_ACTION_DECLARATION( \
examples::server::template_accumulator<type>::query_action, \
HPX_PP_CAT(__template_accumulator_query_action_, type)) \
/**/
#define REGISTER_TEMPLATE_ACCUMULATOR(type) \
HPX_REGISTER_ACTION( \
examples::server::template_accumulator<type>::reset_action, \
HPX_PP_CAT(__template_accumulator_reset_action_, type)) \
\
HPX_REGISTER_ACTION( \
examples::server::template_accumulator<type>::add_action, \
HPX_PP_CAT(__template_accumulator_add_action_, type)) \
\
HPX_REGISTER_ACTION( \
examples::server::template_accumulator<type>::query_action, \
HPX_PP_CAT(__template_accumulator_query_action_, type)) \
\
typedef ::hpx::components::component< \
examples::server::template_accumulator<type>> \
HPX_PP_CAT(__template_accumulator_, type); \
HPX_REGISTER_COMPONENT(HPX_PP_CAT(__template_accumulator_, type)) \
/**/
Note
The code above must be placed in the global namespace.
Finally, HPX_REGISTER_COMPONENT_MODULE() in file server/template_accumulator.cpp adds the factory registration functionality.
The client class of the template accumulator can be found in template_accumulator.hpp and is very similar to the client class of the accumulator with the only difference that it uses templates and hence can work with different types.
Template function accumulator#
Walkthrough#
The following code is from server/template_function_accumulator.hpp.
The component server class inherits publicly from hpx::components::component_base.
class template_function_accumulator
: public hpx::components::component_base<template_function_accumulator>
typedef hpx::spinlock mutex_type defines a mutex_type as hpx::spinlock for thread safety, while the code that follows exposes the functionality of this component.
///////////////////////////////////////////////////////////////////////
// Exposed functionality of this component.
/// Reset the value to 0.
void reset()
{
// Atomically set value_ to 0.
std::lock_guard<mutex_type> l(mtx_);
value_ = 0;
}
/// Add the given number to the accumulator.
template <typename T>
void add(T arg)
{
// Atomically add value_ to arg, and store the result in value_.
std::lock_guard<mutex_type> l(mtx_);
value_ += static_cast<double>(arg);
}
/// Return the current value to the caller.
double query() const
{
// Get the value of value_.
std::lock_guard<mutex_type> l(mtx_);
return value_;
}
reset(): Resets the accumulator value to 0 in a thread-safe manner using std::lock_guard.
add(): Adds a value to the accumulator, allowing any type T that can be cast to double.
query(): Returns the current value of the accumulator in a thread-safe manner.
To define the actions for reset() and query() we can use the macro HPX_DEFINE_COMPONENT_ACTION. However, actions with template arguments require special type definitions. Therefore, we use make_action() to define add().
///////////////////////////////////////////////////////////////////////
// Each of the exposed functions needs to be encapsulated into an
// action type, generating all required boilerplate code for threads,
// serialization, etc.
HPX_DEFINE_COMPONENT_ACTION(template_function_accumulator, reset)
HPX_DEFINE_COMPONENT_ACTION(template_function_accumulator, query)
// Actions with template arguments (see add<>() above) require special
// type definitions. The simplest way to define such an action type is
// by deriving from the HPX facility make_action.
template <typename T>
struct add_action
: hpx::actions::make_action<void (template_function_accumulator::*)(
T),
&template_function_accumulator::template add<T>,
add_action<T>>::type
{
};
The last piece of code in the server class header is the action registration:
HPX_REGISTER_ACTION_DECLARATION(
examples::server::template_function_accumulator::reset_action,
managed_accumulator_reset_action)
HPX_REGISTER_ACTION_DECLARATION(
examples::server::template_function_accumulator::query_action,
managed_accumulator_query_action)
Note
The code above must be placed in the global namespace.
The rest of the registration code is in accumulator.cpp
///////////////////////////////////////////////////////////////////////////////
// Add factory registration functionality.
HPX_REGISTER_COMPONENT_MODULE()
///////////////////////////////////////////////////////////////////////////////
typedef hpx::components::component<
examples::server::template_function_accumulator>
accumulator_type;
HPX_REGISTER_COMPONENT(accumulator_type, template_function_accumulator)
///////////////////////////////////////////////////////////////////////////////
// Serialization support for managed_accumulator actions.
HPX_REGISTER_ACTION(accumulator_type::wrapped_type::reset_action,
managed_accumulator_reset_action)
HPX_REGISTER_ACTION(accumulator_type::wrapped_type::query_action,
managed_accumulator_query_action)
Note
The code above must be placed in the global namespace.
The client class of the template accumulator can be found in template_function_accumulator.hpp and is very similar to the client class of the accumulator with the only difference that it uses templates and hence can work with different types.
Dataflow#
HPX provides its users with several different tools to simply express parallel concepts. One of these tools is a local control object (LCO) called dataflow. An LCO is a type of component that can spawn a new thread when triggered. They are also distinguished from other components by a standard interface that allow users to understand and use them easily. A Dataflow, being an LCO, is triggered when the values it depends on become available. For instance, if you have a calculation X that depends on the results of three other calculations, you could set up a dataflow that would begin the calculation X as soon as the other three calculations have returned their values. Dataflows are set up to depend on other dataflows. It is this property that makes dataflow a powerful parallelization tool. If you understand the dependencies of your calculation, you can devise a simple algorithm that sets up a dependency tree to be executed. In this example, we calculate compound interest. To calculate compound interest, one must calculate the interest made in each compound period, and then add that interest back to the principal before calculating the interest made in the next period. A practical person would, of course, use the formula for compound interest:
where \(F\) is the future value, \(P\) is the principal value, \(i\) is the interest rate, and \(n\) is the number of compound periods.
However, for the sake of this example, we have chosen to manually calculate the future value by iterating:
and
Setup#
The source code for this example can be found here:
interest_calculator.cpp.
To compile this program, go to your HPX build directory (see Building HPX for information on configuring and building HPX) and enter:
$ make examples.quickstart.interest_calculator
To run the program type:
$ ./bin/interest_calculator --principal 100 --rate 5 --cp 6 --time 36
Final amount: 134.01
Amount made: 34.0096
Walkthrough#
Let us begin with main. Here we can see that we again are using
Boost.Program_options to set our command line variables (see
Asynchronous execution with actions for more details). These options set the principal,
rate, compound period, and time. It is important to note that the units of time
for cp and time must be the same.
int main(int argc, char** argv)
{
options_description cmdline("Usage: " HPX_APPLICATION_STRING " [options]");
cmdline.add_options()("principal", value<double>()->default_value(1000),
"The principal [$]")("rate", value<double>()->default_value(7),
"The interest rate [%]")("cp", value<int>()->default_value(12),
"The compound period [months]")("time",
value<int>()->default_value(12 * 30),
"The time money is invested [months]");
hpx::init_params init_args;
init_args.desc_cmdline = cmdline;
return hpx::init(argc, argv, init_args);
}
Next we look at hpx_main.
int hpx_main(variables_map& vm)
{
{
using hpx::dataflow;
using hpx::make_ready_future;
using hpx::shared_future;
using hpx::unwrapping;
hpx::id_type here = hpx::find_here();
double init_principal =
vm["principal"].as<double>(); //Initial principal
double init_rate = vm["rate"].as<double>(); //Interest rate
int cp = vm["cp"].as<int>(); //Length of a compound period
int t = vm["time"].as<int>(); //Length of time money is invested
init_rate /= 100; //Rate is a % and must be converted
t /= cp; //Determine how many times to iterate interest calculation:
//How many full compound periods can fit in the time invested
// In non-dataflow terms the implemented algorithm would look like:
//
// int t = 5; // number of time periods to use
// double principal = init_principal;
// double rate = init_rate;
//
// for (int i = 0; i < t; ++i)
// {
// double interest = calc(principal, rate);
// principal = add(principal, interest);
// }
//
// Please note the similarity with the code below!
shared_future<double> principal = make_ready_future(init_principal);
shared_future<double> rate = make_ready_future(init_rate);
for (int i = 0; i < t; ++i)
{
shared_future<double> interest =
dataflow(unwrapping(calc), principal, rate);
principal = dataflow(unwrapping(add), principal, interest);
}
// wait for the dataflow execution graph to be finished calculating our
// overall interest
double result = principal.get();
std::cout << "Final amount: " << result << std::endl;
std::cout << "Amount made: " << result - init_principal << std::endl;
}
return hpx::finalize();
}
Here we find our command line variables read in, the rate is converted from a
percent to a decimal, the number of calculation iterations is determined, and
then our shared_futures are set up. Notice that we first place our principal and
rate into shares futures by passing the variables init_principal and
init_rate using hpx::make_ready_future.
In this way hpx::shared_future<double> principal
and rate will be initialized to init_principal and init_rate when
hpx::make_ready_future<double> returns a future containing
those initial values. These shared futures then enter the for loop and are
passed to interest. Next principal and interest are passed to the
reassignment of principal using a hpx::dataflow. A dataflow
will first wait for its arguments to be ready before launching any callbacks, so
add in this case will not begin until both principal and interest
are ready. This loop continues for each compound period that must be calculated.
To see how interest and principal are calculated in the loop, let us look
at calc_action and add_action:
// Calculate interest for one period
double calc(double principal, double rate)
{
return principal * rate;
}
///////////////////////////////////////////////////////////////////////////////
// Add the amount made to the principal
double add(double principal, double interest)
{
return principal + interest;
}
After the shared future dependencies have been defined in hpx_main, we see the following statement:
double result = principal.get();
This statement calls hpx::future::get on the shared future
principal which had its value calculated by our for loop. The program will wait
here until the entire dataflow tree has been calculated and the value assigned
to result. The program then prints out the final value of the investment and the
amount of interest made by subtracting the final value of the investment from
the initial value of the investment.
Local to remote#
When developers write code they typically begin with a simple serial code and build upon it until all of the required functionality is present. The following set of examples were developed to demonstrate this iterative process of evolving a simple serial program to an efficient, fully-distributed HPX application. For this demonstration, we implemented a 1D heat distribution problem. This calculation simulates the diffusion of heat across a ring from an initialized state to some user-defined point in the future. It does this by breaking each portion of the ring into discrete segments and using the current segment’s temperature and the temperature of the surrounding segments to calculate the temperature of the current segment in the next timestep as shown by Fig. 2 below.
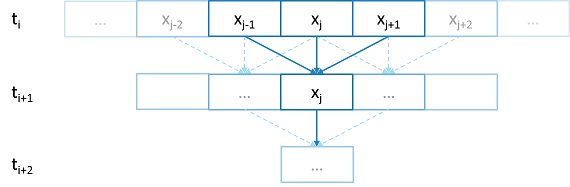
Fig. 2 Heat diffusion example program flow.#
We parallelize this code over the following eight examples:
The first example is straight serial code. In this code we instantiate a vector
U that contains two vectors of doubles as seen in the structure
stepper.
struct stepper
{
// Our partition type
typedef double partition;
// Our data for one time step
typedef std::vector<partition> space;
// Our operator
static double heat(double left, double middle, double right)
{
return middle + (k * dt / (dx * dx)) * (left - 2 * middle + right);
}
// do all the work on 'nx' data points for 'nt' time steps
space do_work(std::size_t nx, std::size_t nt)
{
// U[t][i] is the state of position i at time t.
std::vector<space> U(2);
for (space& s : U)
s.resize(nx);
// Initial conditions: f(0, i) = i
for (std::size_t i = 0; i != nx; ++i)
U[0][i] = double(i);
// Actual time step loop
for (std::size_t t = 0; t != nt; ++t)
{
space const& current = U[t % 2];
space& next = U[(t + 1) % 2];
next[0] = heat(current[nx - 1], current[0], current[1]);
for (std::size_t i = 1; i != nx - 1; ++i)
next[i] = heat(current[i - 1], current[i], current[i + 1]);
next[nx - 1] = heat(current[nx - 2], current[nx - 1], current[0]);
}
// Return the solution at time-step 'nt'.
return U[nt % 2];
}
};
Each element in the vector of doubles represents a single grid point. To
calculate the change in heat distribution, the temperature of each grid point,
along with its neighbors, is passed to the function heat. In order to
improve readability, references named current and next are created
which, depending on the time step, point to the first and second vector of
doubles. The first vector of doubles is initialized with a simple heat ramp.
After calling the heat function with the data in the current vector, the
results are placed into the next vector.
In example 2 we employ a technique called futurization. Futurization is a method
by which we can easily transform a code that is serially executed into a code
that creates asynchronous threads. In the simplest case this involves replacing
a variable with a future to a variable, a function with a future to a function,
and adding a .get() at the point where a value is actually needed. The code
below shows how this technique was applied to the struct stepper.
struct stepper
{
// Our partition type
typedef hpx::shared_future<double> partition;
// Our data for one time step
typedef std::vector<partition> space;
// Our operator
static double heat(double left, double middle, double right)
{
return middle + (k * dt / (dx * dx)) * (left - 2 * middle + right);
}
// do all the work on 'nx' data points for 'nt' time steps
hpx::future<space> do_work(std::size_t nx, std::size_t nt)
{
using hpx::dataflow;
using hpx::unwrapping;
// U[t][i] is the state of position i at time t.
std::vector<space> U(2);
for (space& s : U)
s.resize(nx);
// Initial conditions: f(0, i) = i
for (std::size_t i = 0; i != nx; ++i)
U[0][i] = hpx::make_ready_future(double(i));
auto Op = unwrapping(&stepper::heat);
// Actual time step loop
for (std::size_t t = 0; t != nt; ++t)
{
space const& current = U[t % 2];
space& next = U[(t + 1) % 2];
// WHEN U[t][i-1], U[t][i], and U[t][i+1] have been computed, THEN we
// can compute U[t+1][i]
for (std::size_t i = 0; i != nx; ++i)
{
next[i] =
dataflow(hpx::launch::async, Op, current[idx(i, -1, nx)],
current[i], current[idx(i, +1, nx)]);
}
}
// Now the asynchronous computation is running; the above for-loop does not
// wait on anything. There is no implicit waiting at the end of each timestep;
// the computation of each U[t][i] will begin as soon as its dependencies
// are ready and hardware is available.
// Return the solution at time-step 'nt'.
return hpx::when_all(U[nt % 2]);
}
};
In example 2, we redefine our partition type as a shared_future and, in
main, create the object result, which is a future to a vector of
partitions. We use result to represent the last vector in a string of
vectors created for each timestep. In order to move to the next timestep, the
values of a partition and its neighbors must be passed to heat once the
futures that contain them are ready. In HPX, we have an LCO (Local Control
Object) named Dataflow that assists the programmer in expressing this
dependency. Dataflow allows us to pass the results of a set of futures to a
specified function when the futures are ready. Dataflow takes three types of
arguments, one which instructs the dataflow on how to perform the function call
(async or sync), the function to call (in this case Op), and futures to the
arguments that will be passed to the function. When called, dataflow immediately
returns a future to the result of the specified function. This allows users to
string dataflows together and construct an execution tree.
After the values of the futures in dataflow are ready, the values must be pulled
out of the future container to be passed to the function heat. In order to
do this, we use the HPX facility unwrapping, which underneath calls
.get() on each of the futures so that the function heat will be passed
doubles and not futures to doubles.
By setting up the algorithm this way, the program will be able to execute as quickly as the dependencies of each future are met. Unfortunately, this example runs terribly slow. This increase in execution time is caused by the overheads needed to create a future for each data point. Because the work done within each call to heat is very small, the overhead of creating and scheduling each of the three futures is greater than that of the actual useful work! In order to amortize the overheads of our synchronization techniques, we need to be able to control the amount of work that will be done with each future. We call this amount of work per overhead grain size.
In example 3, we return to our serial code to figure out how to control the
grain size of our program. The strategy that we employ is to create “partitions”
of data points. The user can define how many partitions are created and how many
data points are contained in each partition. This is accomplished by creating
the struct partition, which contains a member object data_, a vector of
doubles that holds the data points assigned to a particular instance of
partition.
In example 4, we take advantage of the partition setup by redefining space
to be a vector of shared_futures with each future representing a partition. In
this manner, each future represents several data points. Because the user can
define how many data points are in each partition, and, therefore, how
many data points are represented by one future, a user can control the
grainsize of the simulation. The rest of the code is then futurized in the same
manner as example 2. It should be noted how strikingly similar
example 4 is to example 2.
Example 4 finally shows good results. This code scales equivalently to the OpenMP version. While these results are promising, there are more opportunities to improve the application’s scalability. Currently, this code only runs on one locality, but to get the full benefit of HPX, we need to be able to distribute the work to other machines in a cluster. We begin to add this functionality in example 5.
In order to run on a distributed system, a large amount of boilerplate code must
be added. Fortunately, HPX provides us with the concept of a component,
which saves us from having to write quite as much code. A component is an object
that can be remotely accessed using its global address. Components are made of
two parts: a server and a client class. While the client class is not required,
abstracting the server behind a client allows us to ensure type safety instead
of having to pass around pointers to global objects. Example 5 renames example
4’s struct partition to partition_data and adds serialization support.
Next, we add the server side representation of the data in the structure
partition_server. Partition_server inherits from
hpx::components::component_base, which contains a server-side component
boilerplate. The boilerplate code allows a component’s public members to be
accessible anywhere on the machine via its Global Identifier (GID). To
encapsulate the component, we create a client side helper class. This object
allows us to create new instances of our component and access its members
without having to know its GID. In addition, we are using the client class to
assist us with managing our asynchrony. For example, our client class
partition‘s member function get_data() returns a future to
partition_data get_data(). This struct inherits its boilerplate code from
hpx::components::client_base.
In the structure stepper, we have also had to make some changes to
accommodate a distributed environment. In order to get the data from a
particular neighboring partition, which could be remote, we must retrieve the data from all
of the neighboring partitions. These retrievals are asynchronous and the function
heat_part_data, which, amongst other things, calls heat, should not be
called unless the data from the neighboring partitions have arrived. Therefore,
it should come as no surprise that we synchronize this operation with another
instance of dataflow (found in heat_part). This dataflow receives futures
to the data in the current and surrounding partitions by calling get_data()
on each respective partition. When these futures are ready, dataflow passes them
to the unwrapping function, which extracts the shared_array of doubles and
passes them to the lambda. The lambda calls heat_part_data on the
locality, which the middle partition is on.
Although this example could run distributed, it only runs on one
locality, as it always uses hpx::find_here() as the target for the
functions to run on.
In example 6, we begin to distribute the partition data on different nodes. This
is accomplished in stepper::do_work() by passing the GID of the
locality where we wish to create the partition to the partition
constructor.
for (std::size_t i = 0; i != np; ++i)
U[0][i] = partition(localities[locidx(i, np, nl)], nx, double(i));
We distribute the partitions evenly based on the number of localities used,
which is described in the function locidx. Because some of the data needed
to update the partition in heat_part could now be on a new locality,
we must devise a way of moving data to the locality of the middle
partition. We accomplished this by adding a switch in the function
get_data() that returns the end element of the buffer data_ if it is
from the left partition or the first element of the buffer if the data is from
the right partition. In this way only the necessary elements, not the whole
buffer, are exchanged between nodes. The reader should be reminded that this
exchange of end elements occurs in the function get_data() and, therefore, is
executed asynchronously.
Now that we have the code running in distributed, it is time to make some
optimizations. The function heat_part spends most of its time on two tasks:
retrieving remote data and working on the data in the middle partition. Because
we know that the data for the middle partition is local, we can overlap the work
on the middle partition with that of the possibly remote call of get_data().
This algorithmic change, which was implemented in example 7, can be seen below:
// The partitioned operator, it invokes the heat operator above on all elements
// of a partition.
static partition heat_part(
partition const& left, partition const& middle, partition const& right)
{
using hpx::dataflow;
using hpx::unwrapping;
hpx::shared_future<partition_data> middle_data =
middle.get_data(partition_server::middle_partition);
hpx::future<partition_data> next_middle = middle_data.then(
unwrapping([middle](partition_data const& m) -> partition_data {
HPX_UNUSED(middle);
// All local operations are performed once the middle data of
// the previous time step becomes available.
std::size_t size = m.size();
partition_data next(size);
for (std::size_t i = 1; i != size - 1; ++i)
next[i] = heat(m[i - 1], m[i], m[i + 1]);
return next;
}));
return dataflow(hpx::launch::async,
unwrapping([left, middle, right](partition_data next,
partition_data const& l, partition_data const& m,
partition_data const& r) -> partition {
HPX_UNUSED(left);
HPX_UNUSED(right);
// Calculate the missing boundary elements once the
// corresponding data has become available.
std::size_t size = m.size();
next[0] = heat(l[size - 1], m[0], m[1]);
next[size - 1] = heat(m[size - 2], m[size - 1], r[0]);
// The new partition_data will be allocated on the same locality
// as 'middle'.
return partition(middle.get_id(), std::move(next));
}),
std::move(next_middle),
left.get_data(partition_server::left_partition), middle_data,
right.get_data(partition_server::right_partition));
}
Example 8 completes the futurization process and utilizes the full potential of
HPX by distributing the program flow to multiple localities, usually defined as
nodes in a cluster. It accomplishes this task by running an instance of HPX main
on each locality. In order to coordinate the execution of the program,
the struct stepper is wrapped into a component. In this way, each
locality contains an instance of stepper that executes its own instance
of the function do_work(). This scheme does create an interesting
synchronization problem that must be solved. When the program flow was being
coordinated on the head node, the GID of each component was known. However, when
we distribute the program flow, each partition has no notion of the GID of its
neighbor if the next partition is on another locality. In order to make
the GIDs of neighboring partitions visible to each other, we created two buffers
to store the GIDs of the remote neighboring partitions on the left and right
respectively. These buffers are filled by sending the GID of newly created
edge partitions to the right and left buffers of the neighboring localities.
In order to finish the simulation, the solution vectors named result are then
gathered together on locality 0 and added into a vector of spaces
overall_result using the HPX functions gather_id and gather_here.
Example 8 completes this example series, which takes the serial code of example 1 and incrementally morphs it into a fully distributed parallel code. This evolution was guided by the simple principles of futurization, the knowledge of grainsize, and utilization of components. Applying these techniques easily facilitates the scalable parallelization of most applications.
Serializing user-defined types#
In order to facilitate the sending and receiving of complex datatypes HPX provides a serialization abstraction.
Just like boost, hpx allows users to serialize user-defined types by either providing the serializer as a member function or defining the serialization as a free function.
Unlike Boost HPX doesn’t acknowledge second unsigned int parameter, it is solely there to preserve API compatibility with Boost Serialization
This is tutorial was heavily inspired by Boost’s serialization concepts.
Setup#
The source code for this example can be found here:
custom_serialization.cpp.
To compile this program, go to your HPX build directory (see Building HPX for information on configuring and building HPX) and enter:
$ make examples.quickstart.custom_serialization
To run the program type:
$ ./bin/custom_serialization
This should print:
Rectangle(Point(x=0,y=0),Point(x=0,y=5))
gravity.g = 9.81%
Serialization Requirements#
In order to serialize objects in HPX, at least one of the following criteria must be met:
In the case of default constructible objects:
The object is an empty type.
Has a serialization function as shown in this tutorial.
All members are accessible publicly and they can be used in structured binding contexts.
Otherwise:
They need to have special serialization support.
Member function serialization#
struct point_member_serialization
{
int x{0};
int y{0};
// Required when defining the serialization function as private
// In this case it isn't
// Provides serialization access to HPX
friend class hpx::serialization::access;
// Second argument exists solely for compatibility with boost serialize
// it is NOT processed by HPX in any way.
template <typename Archive>
void serialize(Archive& ar, unsigned int const)
{
// clang-format off
ar & x & y;
// clang-format on
}
};
// Allow bitwise serialization
HPX_IS_BITWISE_SERIALIZABLE(point_member_serialization)
Notice that point_member_serialization is defined as bitwise serializable
(see Bitwise serialization for bitwise copyable data for more details).
HPX is also able to recursively serialize composite classes and structs
given that its members are serializable.
struct rectangle_member_serialization
{
point_member_serialization top_left;
point_member_serialization lower_right;
template <typename Archive>
void serialize(Archive& ar, unsigned int const)
{
// clang-format off
ar & top_left & lower_right;
// clang-format on
}
};
Free function serialization#
In order to decouple your models from HPX, HPX also allows for the definition of free function serializers.
struct rectangle_free
{
point_member_serialization top_left;
point_member_serialization lower_right;
};
template <typename Archive>
void serialize(Archive& ar, rectangle_free& pt, unsigned int const)
{
// clang-format off
ar & pt.lower_right & pt.top_left;
// clang-format on
}
Even if you can’t modify a class to befriend it, you can still be able to serialize your class provided that your class is default constructable and you are able to reconstruct it yourself.
class point_class
{
public:
point_class(int x, int y)
: x(x)
, y(y)
{
}
point_class() = default;
[[nodiscard]] int get_x() const noexcept
{
return x;
}
[[nodiscard]] int get_y() const noexcept
{
return y;
}
private:
int x;
int y;
};
template <typename Archive>
void load(Archive& ar, point_class& pt, unsigned int const)
{
int x, y;
ar >> x >> y;
pt = point_class(x, y);
}
template <typename Archive>
void save(Archive& ar, point_class const& pt, unsigned int const)
{
ar << pt.get_x() << pt.get_y();
}
// This tells HPX that you have spilt your serialize function into
// load and save
HPX_SERIALIZATION_SPLIT_FREE(point_class)
Serializing non default constructable classes#
Some classes don’t provide any default constructor.
class planet_weight_calculator
{
public:
explicit planet_weight_calculator(double g)
: g(g)
{
}
template <class Archive>
friend void save_construct_data(
Archive&, planet_weight_calculator const*, unsigned int);
[[nodiscard]] double get_g() const
{
return g;
}
private:
// Provides serialization access to HPX
friend class hpx::serialization::access;
template <class Archive>
void serialize(Archive&, unsigned int const)
{
// Serialization will be done in the save_construct_data
// Still needs to be defined
}
double g;
};
In this case you have to define a save_construct_data and load_construct_data in which you
do the serialization yourself.
template <class Archive>
inline void save_construct_data(Archive& ar,
planet_weight_calculator const* weight_calc, unsigned int const)
{
ar << weight_calc->g; // Do all of your serialization here
}
template <class Archive>
inline void load_construct_data(
Archive& ar, planet_weight_calculator* weight_calc, unsigned int const)
{
double g;
ar >> g;
// ::new(ptr) construct new object at given address
hpx::construct_at(weight_calc, g);
}
Bitwise serialization for bitwise copyable data#
When sending non arithmetic types not defined by
std::is_arithmetic, HPX has to (de)serialize each object
separately. However, if the class you are trying to send classes consists only of bitwise copyable datatypes,
you may mark your class as such.
Then HPX will serialize your object bitwise instead of element wise.
This has enormous benefits, especially when sending a vector/array of your class.
To define your class as such you need to call HPX_IS_BITWISE_SERIALIZABLE(T) with your desired custom class.
struct point_member_serialization
{
int x{0};
int y{0};
// Required when defining the serialization function as private
// In this case it isn't
// Provides serialization access to HPX
friend class hpx::serialization::access;
// Second argument exists solely for compatibility with boost serialize
// it is NOT processed by HPX in any way.
template <typename Archive>
void serialize(Archive& ar, unsigned int const)
{
// clang-format off
ar & x & y;
// clang-format on
}
};
// Allow bitwise serialization
HPX_IS_BITWISE_SERIALIZABLE(point_member_serialization)
Termination detection#
This example demonstrates how to use HPX’s termination detection API to ensure all asynchronous work has completed before shutting down the runtime. This is particularly useful when you need to guarantee that all posted tasks have finished execution before the application exits.
Overview#
The termination detection API provides a way to wait for all local HPX-threads
to complete their work. This is essential in scenarios where you spawn
asynchronous tasks using hpx::post or hpx::async and
need to ensure they all finish before the runtime shuts down.
The API supports several use cases:
Basic usage: Wait indefinitely for all tasks to complete
Timeout: Wait for a specified duration
Deadline: Wait until a specific time point
Cancellation: Support for cancellation tokens to interrupt the wait
Setup#
The source code for this example can be found here:
termination_detection.cpp.
To compile this program, go to your HPX build directory (see Building HPX for information on configuring and building HPX) and enter:
$ make examples.quickstart.termination_detection
To run the program type:
$ ./bin/termination_detection
This will execute all four examples demonstrating different usage patterns of the termination detection API.
Walkthrough#
The example demonstrates four different usage patterns of the termination detection API. Let’s examine each one:
Basic usage#
The simplest form waits indefinitely for all local threads to complete:
This is useful when you want to ensure all work is done before shutting down, and you don’t have time constraints.
Timeout usage#
You can specify a maximum duration to wait:
The function returns true if all threads completed within the timeout, or
false if the timeout elapsed. This is useful when you want to give tasks a
reasonable amount of time to complete but don’t want to wait indefinitely.
Deadline usage#
Similar to timeout, but you specify an absolute time point:
This is useful when you have a specific deadline by which all work must be completed.
Cancellation support#
The most flexible form supports cancellation tokens:
This allows external control over the wait operation. You can request cancellation from another thread, which is useful in scenarios like graceful shutdown with user interruption support.
API Reference#
The termination detection API is available in the hpx::local namespace:
-
bool hpx::local::termination_detection(hpx::chrono::steady_duration const &timeout)#
Wait for all local HPX-threads to complete, with a timeout.
- Parameters
timeout – Maximum duration to wait
- Returns
trueif all threads completed,falseif timeout elapsed
-
bool hpx::local::termination_detection(hpx::chrono::steady_time_point const &deadline)#
Wait for all local HPX-threads to complete, until a deadline.
- Parameters
deadline – Absolute time point to wait until
- Returns
trueif all threads completed,falseif deadline passed
-
bool hpx::local::termination_detection(hpx::stop_token stop_token, hpx::chrono::steady_duration const &timeout)#
Wait for all local HPX-threads to complete, with cancellation support.
- Parameters
stop_token – Token that can be used to request cancellation
timeout – Maximum duration to wait (defaults to maximum duration)
- Returns
trueif all threads completed,falseif timeout elapsed or stop was requested
Use cases#
The termination detection API is particularly useful in the following scenarios:
Graceful shutdown: Ensure all background tasks complete before exiting
Testing: Verify that all spawned tasks have finished in unit tests
Batch processing: Wait for all work items in a batch to complete
Resource cleanup: Ensure all tasks using shared resources have finished before cleanup
See also#
hpx::post- Fire-and-forget asynchronous executionhpx::async- Asynchronous execution with a futurehpx::finalize- Shut down the HPX runtime
Manual#
The manual is your comprehensive guide to HPX. It contains detailed information on how to build and use HPX in different scenarios.
Prerequisites#
Supported platforms#
At this time, HPX supports the following platforms. Other platforms may work, but we do not test HPX with other platforms, so please be warned.
Name |
Minimum Version |
Architectures |
|---|---|---|
Linux |
2.6 |
x86-32, x86-64, k1om |
BlueGeneQ |
V1R2M0 |
PowerPC A2 |
Windows |
Any Windows system |
x86-32, x86-64 |
Mac OSX |
Any OSX system |
x86-64 |
ARM |
Any ARM system |
Any architecture |
RISC-V |
Any RISC-V system |
Any architecture |
Supported compilers#
The table below shows the supported compilers for HPX.
Name |
Minimum Version |
Latest tested |
|---|---|---|
12.0 |
15.0 |
|
16.0 |
20.0 |
|
Visual C++ (x64) |
2022 |
2022 |
Software and libraries#
The table below presents all the necessary prerequisites for building HPX.
Name |
Minimum Version |
Latest tested |
|
|---|---|---|---|
Build System |
3.20 |
4.1 |
|
Required Libraries |
1.71.0 |
1.88.0 |
|
1.5 |
2.4 |
The most important dependencies are Boost and Portable Hardware Locality (HWLOC). The installation of Boost is described in detail in Boost’s Getting Started document. A recent version of hwloc is required in order to support thread pinning and NUMA awareness and can be found in Hwloc Downloads.
HPX is written in 99.99% Standard C++ (the remaining 0.01% is platform specific assembly code). As such, HPX is compilable with almost any standards compliant C++ compiler. The code base takes advantage of C++ language and standard library features when available.
Note
When building Boost using gcc, please note that it is required to specify a
cxxflags=-std=c++20 command line argument to b2 (bjam).
Note
In most configurations, HPX depends only on header-only Boost. Boost.Filesystem is required if the standard library does not support filesystem. The following are not needed by default, but are required in certain configurations: Boost.Chrono, Boost.DateTime, Boost.Log, Boost.LogSetup, Boost.Regex, and Boost.Thread.
Depending on the options you chose while building and installing HPX, you will find that HPX may depend on several other libraries such as those listed below.
Note
In order to use a high speed parcelport, we currently recommend configuring
HPX to use MPI so that MPI can be used for communication between different
localities. Please set the CMake variable MPI_CXX_COMPILER to your MPI
C++ compiler wrapper if not detected automatically.
Name |
Minimum version |
1.7.1 |
|
2.1.0 |
|
1.0.0 |
|
Performance Application Programming Interface (PAPI) |
Getting HPX#
Download a tarball of the latest release from HPX Downloads and
unpack it or clone the repository directly using git:
$ git clone https://github.com/STEllAR-GROUP/hpx.git
It is also recommended that you check out the latest stable tag:
$ cd hpx
$ git checkout v2.0.0
Building HPX#
Basic information#
The build system for HPX is based on CMake, a cross-platform build-generator tool which is not responsible for building the project but rather generates the files needed by your build tool (GNU make, Visual Studio, etc.) for building HPX. If CMake is not already installed in your system, you can download it and install it here: CMake Downloads.
Once CMake has been run, the build process can be started. The build process consists of the following parts:
The HPX core libraries (target
core): This forms the basic set of HPX libraries.HPX Examples (target
examples): This target is enabled by default and builds all HPX examples (disable by settingHPX_WITH_EXAMPLES:BOOL=Off). HPX examples are part of thealltarget and are included in the installation if enabled.HPX Tests (target
tests): This target builds the HPX test suite and is enabled by default (disable by settingHPX_WITH_TESTS:BOOL=Off). They are not built by thealltarget and have to be built separately.HPX Documentation (target
docs): This target builds the documentation, and is not enabled by default (enable by settingHPX_WITH_DOCUMENTATION:BOOL=On. For more information see Documentation.
The HPX build process is highly configurable through CMake, and various CMake variables influence the build process. A list with the most important CMake variables can be found in the section that follows, while the complete list of available CMake variables is in CMake options. These variables can be used to refine the recipes that can be found at Platform specific build recipes, a section that shows some basic steps on how to build HPX for a specific platform.
In order to use HPX, only the core libraries are required. In order to use the optional libraries, you need to specify them as link dependencies in your build (See Creating HPX projects).
Most important CMake options#
While building HPX, you are provided with multiple CMake options which correspond to different configurations. Below, there is a set of the most important and frequently used CMake options.
- HPX_WITH_MALLOC#
Use a custom allocator. Using a custom allocator tuned for multithreaded applications is very important for the performance of HPX applications. When debugging applications, it’s useful to set this to
system, as custom allocators can hide some memory-related bugs. Note that setting this to something other thansystemrequires an external dependency.
- HPX_WITH_CUDA#
Enable support for CUDA. Use
CMAKE_CUDA_COMPILERto set the CUDA compiler. This is a standard CMake variable, likeCMAKE_CXX_COMPILER.
- HPX_WITH_PARCELPORT_MPI#
Enable the MPI parcelport. This enables the use of MPI for the networking operations in the HPX runtime. The default value is
OFFbecause it’s not available on all systems and/or requires another dependency. However, it is the recommended parcelport.
- HPX_WITH_PARCELPORT_TCP#
Enable the TCP parcelport. Enables the use of TCP for networking in the runtime. The default value is
ON. However, it’s only recommended for debugging purposes, as it is slower than the MPI parcelport.
- HPX_WITH_PARCELPORT_LCI#
Enable the LCI parcelport. This enables the use of LCI for the networking operations in the HPX runtime. The default value is
OFFbecause it’s not available on all systems and/or requires another dependency. However, this experimental parcelport may provide better performance than the MPI parcelport. Please refer to Using the LCI parcelport for more information about the LCI parcelport.
- HPX_WITH_APEX#
Enable APEX integration. APEX can be used to profile HPX applications. In particular, it provides information about individual tasks in the HPX runtime.
- HPX_WITH_GENERIC_CONTEXT_COROUTINES#
Enable Boost. Context for task context switching. It must be enabled for non-x86 architectures such as ARM and Power.
- HPX_WITH_MAX_CPU_COUNT#
Set the maximum CPU count supported by HPX. The default value is 64, and should be set to a number at least as high as the number of cores on a system including virtual cores such as hyperthreads.
- HPX_WITH_CXX_STANDARD#
Set a specific C++ standard version e.g.
HPX_WITH_CXX_STANDARD=23. The default and minimum value is20. Possible values are20,23, or26.
- HPX_WITH_EXAMPLES#
Build examples.
- HPX_WITH_TESTS#
Build tests.
- HPX_WITH_DEBUG_POSTFIX#
Set the postfix for debug libraries. The default is
d. This variable is used to setCMAKE_DEBUG_POSTFIXand is only relevant for Debug builds or multi-configuration generators. The default rarely needs to be changed. It ensures that generated debug binaries have a different name than release binaries, which is important to avoid ABI problems when both debug and release binaries are installed on the same system.
For a complete list of available CMake variables that influence the build of HPX, see CMake options.
Build types#
CMake can be configured to generate project files suitable for builds that
have enabled debugging support or for an optimized build (without debugging
support). The CMake variable used to set the build type is
CMAKE_BUILD_TYPE (for more information see the CMake Documentation).
Available build types are:
Debug: Full debug symbols are available as well as additional assertions to help debugging. To enable the debug build type for the HPX API, the C++ Macro
HPX_DEBUGis defined.RelWithDebInfo: Release build with debugging symbols. This is most useful for profiling applications
Release: Release build. This disables assertions and enables default compiler optimizations.
RelMinSize: Release build with optimizations for small binary sizes.
Important
We currently don’t guarantee ABI compatibility between Debug and Release
builds. Please make sure that applications built against HPX use the same
build type as you used to build HPX. For CMake builds, this means that
the CMAKE_BUILD_TYPE variables have to match and for projects not using
CMake, the HPX_DEBUG macro has to be set in debug mode.
Using CMake Presets#
HPX provides a CMakePresets.json file which includes a variety of pre-defined build configurations.
These presets allow you to easily configure the build for common scenarios without needing to manually specify multiple CMake variables.
To use a preset, you can use the --preset option with CMake:
$ cmake --preset <preset-name>
$ cmake --build --preset <preset-name>
Some of the available presets include:
default: Standard release build with tests and examples enabled.minimal: Minimal build with only core features (no tests, examples, or tools).full: Full build with all standard features enabled.debug: Debug build with symbols and debug-optimized settings.performance: Build optimized for performance analysis with APEX profiling.cuda: Build with CUDA support (requires CUDA toolkit).sycl: Build with SYCL support (requires compatible compiler).sanitizer-address: Build with AddressSanitizer enabled.
For a full list of available presets, you can run:
$ cmake --list-presets
Platform specific build recipes#
Unix variants#
Once you have the source code and the dependencies and assuming all your dependencies are in paths known to CMake, the following gets you started:
First, set up a separate build directory to configure the project:
$ mkdir build && cd build
To configure the project you have the following options:
To build the core HPX libraries and examples, and install them to your chosen location (recommended):
$ cmake -DCMAKE_INSTALL_PREFIX=/install/path ..
Tip
If you want to change CMake variables for your build, it is usually a good idea to start with a clean build directory to avoid configuration problems. It is especially important that you use a clean build directory when changing between
ReleaseandDebugmodes.To install HPX to the default system folders, simply leave out the
CMAKE_INSTALL_PREFIXoption:
$ cmake ..If your dependencies are in custom locations, you may need to tell CMake where to find them by passing one or more options to CMake as shown below:
$ cmake -DBoost_ROOT=/path/to/boost -DHwloc_ROOT=/path/to/hwloc -DTcmalloc_ROOT=/path/to/tcmalloc -DJemalloc_ROOT=/path/to/jemalloc [other CMake variable definitions] /path/to/source/tree
For instance:
$ cmake -DBoost_ROOT=~/packages/boost -DHwloc_ROOT=/packages/hwloc -DCMAKE_INSTALL_PREFIX=~/packages/hpx ~/downloads/hpx_1.5.1
If you want to try HPX without using a custom allocator pass
-DHPX_WITH_MALLOC=systemto CMake:
$ cmake -DCMAKE_INSTALL_PREFIX=/install/path -DHPX_WITH_MALLOC=system ..
Note
Please pay special attention to the section about
HPX_WITH_MALLOC:STRINGas this is crucial for getting decent performance.Important
If you are building HPX for a system with more than 64 processing units, you must change the CMake variable
HPX_WITH_MAX_CPU_COUNT(to a value at least as big as the number of (virtual) cores on your system). Note that the default value is 64.Caution
Compiling and linking HPX needs a considerable amount of memory. It is advisable that at least 2 GB of memory per parallel process is available.
Once the configuration is complete, to build the project you run:
$ cmake --build . --target install
Windows#
Note
The following build recipes are mostly user-contributed and may be outdated. We always welcome updated and new build recipes.
To build HPX under Windows 10 x64 with Visual Studio 2015:
Download the CMake V3.19 installer (or latest version) from here
Download the hwloc V1.11.0 (or the latest version) from here and unpack it.
Download the latest Boost libraries from here and unpack them.
Build the Boost DLLs and LIBs by using these commands from Command Line (or PowerShell). Open CMD/PowerShell inside the Boost dir and type in:
.\bootstrap.batThis batch file will set up everything needed to create a successful build. Now execute:
.\b2.exe link=shared variant=release,debug architecture=x86 address-model=64 threading=multi --build-type=complete install
This command will start a (very long) build of all available Boost libraries. Please, be patient.
Open CMake-GUI.exe and set up your source directory (input field ‘Where is the source code’) to the base directory of the source code you downloaded from HPX’s GitHub pages. Here’s an example of CMake path settings, which point to the
Documents/GitHub/hpxfolder: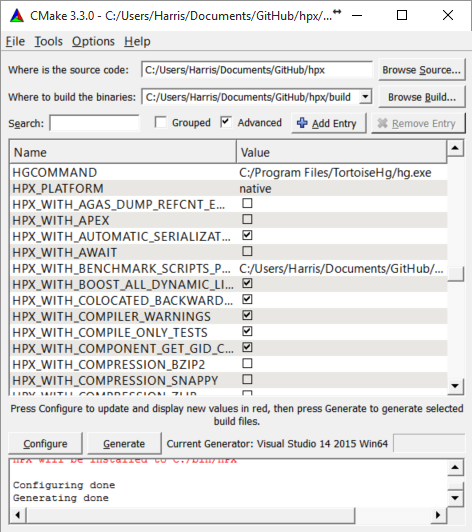
Fig. 3 Example CMake path settings.#
Inside ‘Where is the source-code’ enter the base directory of your HPX source directory (do not enter the “src” sub-directory!). Inside ‘Where to build the binaries’ you should put in the path where all the building processes will happen. This is important because the building machinery will do an “out-of-tree” build. CMake will not touch or change the original source files in any way. Instead, it will generate Visual Studio Solution Files, which will build HPX packages out of the HPX source tree.
Set new configuration variables (in CMake, not in Windows environment):
Boost_ROOT,Hwloc_ROOT,Asio_ROOT,CMAKE_INSTALL_PREFIX. The meaning of these variables is as follows:Boost_ROOTthe HPX root directory of the unpacked Boost headers/cpp files.Hwloc_ROOTthe HPX root directory of the unpacked Portable Hardware Locality files.Asio_ROOTthe HPX root directory of the unpacked ASIO files. Alternatively useHPX_WITH_FETCH_ASIOwith valueTrue.CMAKE_INSTALL_PREFIXthe HPX root directory where the future builds of HPX should be installed.Note
HPX is a very large software collection, so it is not recommended to use the default
C:\Program Files\hpx. Many users may prefer to use simpler paths without whitespace, likeC:\bin\hpxorD:\bin\hpxetc.
To insert new env-vars click on “Add Entry” and then insert the name inside “Name”, select
PATHas Type and put the path-name in the “Path” text field. Repeat this for the first three variables.This is how variable insertion will look:
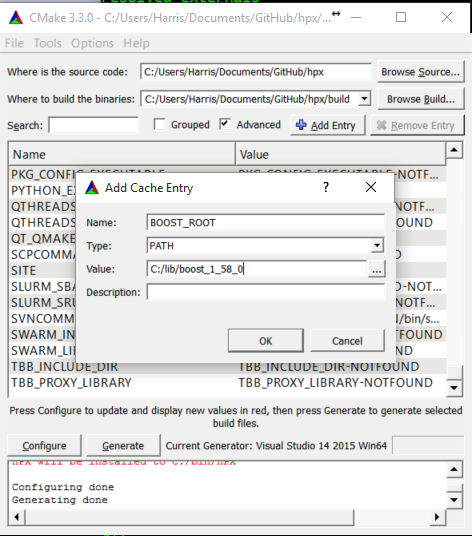
Fig. 4 Example CMake adding entry.#
Alternatively, users could provide
Boost_LIBRARYDIRinstead ofBoost_ROOT; the difference is thatBoost_LIBRARYDIRshould point to the subdirectory inside Boost root where all the compiled DLLs/LIBs are. For example,Boost_LIBRARYDIRmay point to thebin.v2subdirectory under the Boost rootdir. It is important to keep the meanings of these two variables separated from each other:Boost_DIRpoints to the ROOT folder of the Boost library.Boost_LIBRARYDIRpoints to the subdir inside the Boost root folder where the compiled binaries are.Click the ‘Configure’ button of CMake-GUI. You will be immediately presented with a small window where you can select the C++ compiler to be used within Visual Studio. This has been tested using the latest v14 (a.k.a C++ 2015) but older versions should be sufficient too. Make sure to select the 64Bit compiler.
After the generate process has finished successfully, click the ‘Generate’ button. Now, CMake will put new VS Solution files into the BUILD folder you selected at the beginning.
Open Visual Studio and load the
HPX.slnfrom your build folder.Go to
CMakePredefinedTargetsand build theINSTALLproject:
Fig. 5 Visual Studio INSTALL target.#
It will take some time to compile everything, and in the end you should see an output similar to this one:
Fig. 6 Visual Studio build output.#
CMake options#
In order to configure HPX, you can set a variety of options to allow CMake to generate your specific makefiles/project files. A list of the most important CMake options can be found in Most important CMake options, while this section includes the comprehensive list.
Variables that influence how HPX is built#
The options are split into these categories:
Generic options#
- HPX_WITH_AUTOMATIC_SERIALIZATION_REGISTRATION:BOOL#
Use automatic serialization registration for actions and functions. This affects compatibility between HPX applications compiled with different compilers (default ON)
- HPX_WITH_BENCHMARK_SCRIPTS_PATH:PATH#
Directory to place batch scripts in
- HPX_WITH_BUILD_BINARY_PACKAGE:BOOL#
Build HPX on the build infrastructure on any LINUX distribution (default: OFF).
- HPX_WITH_CHECK_MODULE_DEPENDENCIES:BOOL#
Verify that no modules are cross-referenced from a different module category (default: OFF)
- HPX_WITH_COMPILER_WARNINGS:BOOL#
Enable compiler warnings (default: ON)
- HPX_WITH_COMPILER_WARNINGS_AS_ERRORS:BOOL#
Turn compiler warnings into errors (default: OFF)
- HPX_WITH_COMPRESSION_BZIP2:BOOL#
Enable bzip2 compression for parcel data (default: OFF).
- HPX_WITH_COMPRESSION_SNAPPY:BOOL#
Enable snappy compression for parcel data (default: OFF).
- HPX_WITH_COMPRESSION_ZLIB:BOOL#
Enable zlib compression for parcel data (default: OFF).
- HPX_WITH_CUDA:BOOL#
Enable support for CUDA (default: OFF)
- HPX_WITH_CXX_MODULES:BOOL#
Enable exposing C++20 modules (default: OFF).
- HPX_WITH_CXX_STANDARD:STRING#
Set the C++ standard to use when compiling HPX itself. (default: 20)
- HPX_WITH_DATAPAR:BOOL#
Enable data parallel algorithm support using Vc library (default: ON)
- HPX_WITH_DATAPAR_BACKEND:STRING#
Define which vectorization library should be used. Options are: VC, EVE, STD_EXPERIMENTAL_SIMD, SVE; NONE
- HPX_WITH_DATAPAR_VC_NO_LIBRARY:BOOL#
Don’t link with the Vc static library (default: OFF)
- HPX_WITH_DEPRECATION_WARNINGS:BOOL#
Enable warnings for deprecated facilities (default: ON).
- HPX_WITH_DISABLED_SIGNAL_EXCEPTION_HANDLERS:BOOL#
Disables the mechanism that produces debug output for caught signals and unhandled exceptions (default: OFF)
- HPX_WITH_DYNAMIC_HPX_MAIN:BOOL#
Enable dynamic overload of system
main()(Linux and Apple only, default: ON)
- HPX_WITH_FAULT_TOLERANCE:BOOL#
Build HPX to tolerate failures of nodes, i.e. ignore errors in active communication channels (default: OFF)
- HPX_WITH_FULL_RPATH:BOOL#
Build and link HPX libraries and executables with full RPATHs (default: ON)
- HPX_WITH_GCC_VERSION_CHECK:BOOL#
Don’t ignore version reported by gcc (default: ON)
- HPX_WITH_GENERIC_CONTEXT_COROUTINES:BOOL#
Use Boost.Context as the underlying coroutines context switch implementation.
- HPX_WITH_HIDDEN_VISIBILITY:BOOL#
Use -fvisibility=hidden for builds on platforms which support it (default OFF)
- HPX_WITH_HIP:BOOL#
Enable compilation with HIPCC (default: OFF)
- HPX_WITH_HIPSYCL:BOOL#
Use hipsycl cmake integration (default: OFF)
- HPX_WITH_IGNORE_COMPILER_COMPATIBILITY:BOOL#
Ignore compiler incompatibility in dependent projects (default: ON).
- HPX_WITH_LOGGING:BOOL#
Build HPX with logging enabled (default: ON).
- HPX_WITH_MALLOC:STRING#
Define which allocator should be linked in. Options are: system, tcmalloc, jemalloc, mimalloc, tbbmalloc, and custom (default is: tcmalloc)
- HPX_WITH_MODULES_AS_STATIC_LIBRARIES:BOOL#
Compile HPX modules as STATIC (whole-archive) libraries instead of OBJECT libraries (Default: ON)
- HPX_WITH_MODULE_COMPATIBILITY_HEADERS:BOOL#
Generate backwards-compatibility headers for HPX Modules (default: OFF)
- HPX_WITH_NICE_THREADLEVEL:BOOL#
Set HPX worker threads to have high NICE level (may impact performance) (default: OFF)
- HPX_WITH_PARCEL_COALESCING:BOOL#
Enable the parcel coalescing plugin (default: ON).
- HPX_WITH_PKGCONFIG:BOOL#
Enable generation of pkgconfig files (default: ON on Linux without CUDA/HIP, otherwise OFF)
- HPX_WITH_PRECOMPILED_HEADERS:BOOL#
Enable precompiled headers for certain build targets (experimental) (default OFF)
- HPX_WITH_RUN_MAIN_EVERYWHERE:BOOL#
Run hpx_main by default on all localities (default: OFF, deprecated, will be removed).
- HPX_WITH_STACKOVERFLOW_DETECTION:BOOL#
Enable stackoverflow detection for HPX threads/coroutines (default: OFF, debug: ON).
- HPX_WITH_STATIC_LINKING:BOOL#
Compile HPX statically linked libraries (Default: OFF)
- HPX_WITH_SUPPORT_NO_UNIQUE_ADDRESS_ATTRIBUTE:BOOL#
Enable the use of the [[no_unique_address]] attribute (default: ON)
- HPX_WITH_SYCL:BOOL#
Enable support for Sycl (default: OFF)
- HPX_WITH_SYCL_FLAGS:STRING#
Sycl compile flags for selecting specific targets (default: empty)
- HPX_WITH_UNITY_BUILD:BOOL#
Enable unity build for certain build targets (default OFF)
- HPX_WITH_VIM_YCM:BOOL#
Generate HPX completion file for VIM YouCompleteMe plugin
- HPX_WITH_ZERO_COPY_SERIALIZATION_THRESHOLD:STRING#
The threshold in bytes to when perform zero copy optimizations (default: 8192)
Build Targets options#
- HPX_WITH_ASIO_TAG:STRING#
Asio repository tag or branch
- HPX_WITH_COMPILE_ONLY_TESTS:BOOL#
Create build system support for compile time only HPX tests (default ON)
- HPX_WITH_DEBUG_POSTFIX:STRING#
Postfix for debug libraries. (default: “d”)
- HPX_WITH_DISTRIBUTED_RUNTIME:BOOL#
Enable the distributed runtime (default: ON). Turning off the distributed runtime completely disallows the creation and use of components and actions. Turning this option off is experimental!
- HPX_WITH_DOCUMENTATION:BOOL#
Build the HPX documentation (default OFF).
- HPX_WITH_DOCUMENTATION_OUTPUT_FORMATS:STRING#
List of documentation output formats to generate. Valid options are html;singlehtml;latexpdf;man. Multiple values can be separated with semicolons. (default html).
- HPX_WITH_EXAMPLES:BOOL#
Build the HPX examples (default ON)
- HPX_WITH_EXAMPLES_HDF5:BOOL#
Enable examples requiring HDF5 support (default: OFF).
- HPX_WITH_EXAMPLES_OPENMP:BOOL#
Enable examples requiring OpenMP support (default: OFF).
- HPX_WITH_EXAMPLES_QT4:BOOL#
Enable examples requiring Qt4 support (default: OFF).
- HPX_WITH_EXAMPLES_QTHREADS:BOOL#
Enable examples requiring QThreads support (default: OFF).
- HPX_WITH_EXAMPLES_TBB:BOOL#
Enable examples requiring TBB support (default: OFF).
- HPX_WITH_EXECUTABLE_PREFIX:STRING#
Executable prefix (default none), ‘hpx_’ useful for system install.
- HPX_WITH_FAIL_COMPILE_TESTS:BOOL#
Create build system support for fail compile HPX tests (default ON)
- HPX_WITH_FETCH_APEX:BOOL#
Use FetchContent to fetch APEX. By default an installed APEX will be used. (default: OFF)
- HPX_WITH_FETCH_ASIO:BOOL#
Use FetchContent to fetch Asio. By default an installed Asio will be used. (default: OFF)
- HPX_WITH_FETCH_BOOST:BOOL#
Use FetchContent to fetch Boost. By default an installed Boost will be used. (default: OFF)
- HPX_WITH_FETCH_GASNET:BOOL#
Use FetchContent to fetch GASNET. By default an installed GASNET will be used. (default: OFF).
- HPX_WITH_FETCH_HWLOC:BOOL#
Use FetchContent to fetch Hwloc. By default an installed Hwloc will be used. (default: OFF)
- HPX_WITH_FETCH_LCI:BOOL#
Use FetchContent to fetch LCI. By default an installed LCI will be used. (default: OFF)
- HPX_WITH_FETCH_LCW:BOOL#
Use FetchContent to fetch LCW. By default an installed LCW will be used. (default: OFF)
- HPX_WITH_IO_COUNTERS:BOOL#
Enable IO counters (default: ON)
- HPX_WITH_LCI_BOOTSTRAP_MPI:BOOL#
Configure the autofetched LCI with mpi bootstrap support (default: OFF)
- HPX_WITH_LCI_TAG:STRING#
LCI repository tag or branch
- HPX_WITH_LCW_TAG:STRING#
LCW repository tag or branch
- HPX_WITH_NANOBENCH:BOOL#
Use Nanobench for performance tests. Nanobench will be fetched using FetchContent (default: OFF)
- HPX_WITH_PARALLEL_LINK_JOBS:STRING#
Number of Parallel link jobs while building hpx (only for Ninja as generator) (default 2)
- HPX_WITH_TESTS:BOOL#
Build the HPX tests (default ON)
- HPX_WITH_TESTS_BENCHMARKS:BOOL#
Build HPX benchmark tests (default: ON)
- HPX_WITH_TESTS_EXAMPLES:BOOL#
Add HPX examples as tests (default: ON)
- HPX_WITH_TESTS_EXTERNAL_BUILD:BOOL#
Build external cmake build tests (default: ON)
- HPX_WITH_TESTS_HEADERS:BOOL#
Build HPX header tests (default: OFF)
- HPX_WITH_TESTS_REGRESSIONS:BOOL#
Build HPX regression tests (default: ON)
- HPX_WITH_TESTS_UNIT:BOOL#
Build HPX unit tests (default: ON)
- HPX_WITH_THRUST:BOOL#
Enable support for NVIDIA Thrust integration (default: ON when CUDA is enabled, OFF otherwise)
- HPX_WITH_TOOLS:BOOL#
Build HPX tools (default: OFF)
Thread Manager options#
- HPX_COROUTINES_WITH_SWAP_CONTEXT_EMULATION:BOOL#
Emulate SwapContext API for coroutines (Windows only, default: OFF)
- HPX_COROUTINES_WITH_THREAD_SCHEDULE_HINT_RUNS_AS_CHILD:BOOL#
Futures attempt to run associated threads directly if those have not been started (default: OFF)
- HPX_WITH_COROUTINE_COUNTERS:BOOL#
Enable keeping track of coroutine creation and rebind counts (default: OFF)
- HPX_WITH_IO_POOL:BOOL#
Disable internal IO thread pool, do not change if not absolutely necessary (default: ON)
- HPX_WITH_MAX_CPU_COUNT:STRING#
HPX applications will not use more that this number of OS-Threads (empty string means dynamic) (default: “”)
- HPX_WITH_MAX_NUMA_DOMAIN_COUNT:STRING#
HPX applications will not run on machines with more NUMA domains (default: 8)
- HPX_WITH_SCHEDULER_LOCAL_STORAGE:BOOL#
Enable scheduler local storage for all HPX schedulers (default: OFF)
- HPX_WITH_SPINLOCK_DEADLOCK_DETECTION:BOOL#
Enable spinlock deadlock detection (default: OFF)
- HPX_WITH_SPINLOCK_POOL_NUM:STRING#
Number of elements a spinlock pool manages (default: 128)
- HPX_WITH_STACKTRACES:BOOL#
Attach backtraces to HPX exceptions (default: ON)
- HPX_WITH_STACKTRACES_DEMANGLE_SYMBOLS:BOOL#
Thread stack back trace symbols will be demangled (default: ON)
- HPX_WITH_STACKTRACES_STATIC_SYMBOLS:BOOL#
Thread stack back trace will resolve static symbols (default: OFF)
- HPX_WITH_THREAD_BACKTRACE_DEPTH:STRING#
Thread stack back trace depth being captured (default: 20)
- HPX_WITH_THREAD_BACKTRACE_ON_SUSPENSION:BOOL#
Enable thread stack back trace being captured on suspension (default: OFF)
- HPX_WITH_THREAD_CREATION_AND_CLEANUP_RATES:BOOL#
Enable measuring thread creation and cleanup times (default: OFF)
- HPX_WITH_THREAD_CUMULATIVE_COUNTS:BOOL#
Enable keeping track of cumulative thread counts in the schedulers (default: ON)
- HPX_WITH_THREAD_IDLE_RATES:BOOL#
Enable measuring the percentage of overhead times spent in the scheduler (default: OFF)
- HPX_WITH_THREAD_LOCAL_STORAGE:BOOL#
Enable thread local storage for all HPX threads (default: OFF)
- HPX_WITH_THREAD_MANAGER_IDLE_BACKOFF:BOOL#
HPX scheduler threads do exponential backoff on idle queues (default: ON)
- HPX_WITH_THREAD_QUEUE_WAITTIME:BOOL#
Enable collecting queue wait times for threads (default: OFF)
- HPX_WITH_THREAD_STACK_MMAP:BOOL#
Use mmap for stack allocation on appropriate platforms
- HPX_WITH_THREAD_STEALING_COUNTS:BOOL#
Enable keeping track of counts of thread stealing incidents in the schedulers (default: OFF)
- HPX_WITH_THREAD_TARGET_ADDRESS:BOOL#
Enable storing target address in thread for NUMA awareness (default: OFF)
- HPX_WITH_TIMER_POOL:BOOL#
Disable internal timer thread pool, do not change if not absolutely necessary (default: ON)
- HPX_WITH_WORK_REQUESTING_SCHEDULERS:BOOL#
Enable work requesting scheduler (default: ON)
AGAS options#
- HPX_WITH_AGAS_DUMP_REFCNT_ENTRIES:BOOL#
Enable dumps of the AGAS refcnt tables to logs (default: OFF)
Parcelport options#
- HPX_WITH_NETWORKING:BOOL#
Enable support for networking and multi-node runs (default: ON)
- HPX_WITH_PARCELPORT_ACTION_COUNTERS:BOOL#
Enable performance counters reporting parcelport statistics on a per-action basis.
- HPX_WITH_PARCELPORT_COUNTERS:BOOL#
Enable performance counters reporting parcelport statistics.
- HPX_WITH_PARCELPORT_GASNET:BOOL#
Enable the GASNET based parcelport.
- HPX_WITH_PARCELPORT_LCI:BOOL#
Enable the LCI based parcelport.
- HPX_WITH_PARCELPORT_LCI_LOG:STRING#
Enable the LCI-parcelport-specific logger
- HPX_WITH_PARCELPORT_LCI_PCOUNTER:STRING#
Enable the LCI-parcelport-specific performance counter
- HPX_WITH_PARCELPORT_LCW:BOOL#
Enable the LCW based parcelport.
- HPX_WITH_PARCELPORT_LCW_LOG:STRING#
Enable the LCW-parcelport-specific logger
- HPX_WITH_PARCELPORT_LCW_PCOUNTER:STRING#
Enable the LCW-parcelport-specific performance counter
- HPX_WITH_PARCELPORT_LIBFABRIC:BOOL#
Enable the libfabric based parcelport. This is currently an experimental feature
- HPX_WITH_PARCELPORT_MPI:BOOL#
Enable the MPI based parcelport.
- HPX_WITH_PARCELPORT_TCP:BOOL#
Enable the TCP based parcelport.
- HPX_WITH_PARCEL_PROFILING:BOOL#
Enable profiling data for parcels
Profiling options#
- HPX_LIKWID_WITH_LIKWID:BOOL#
Enable Likwid instrumentation support.
- HPX_TRACY_WITH_TRACY:BOOL#
Enable Tracy instrumentation support.
- HPX_WITH_APEX:BOOL#
Enable APEX instrumentation support.
- HPX_WITH_ITTNOTIFY:BOOL#
Enable Amplifier (ITT) instrumentation support.
- HPX_WITH_PAPI:BOOL#
Enable the PAPI based performance counter.
Debugging options#
- HPX_WITH_ASSERTS_AS_CONTRACT_ASSERTS:BOOL#
Swap hpx_assert with hpx_contract_assert
- HPX_WITH_ATTACH_DEBUGGER_ON_TEST_FAILURE:BOOL#
Break the debugger if a test has failed (default: OFF)
- HPX_WITH_CONTRACTS:BOOL#
Enable C++ contracts support in HPX
- HPX_WITH_PARALLEL_TESTS_BIND_NONE:BOOL#
Pass –hpx:bind=none to tests that may run in parallel (cmake -j flag) (default: OFF)
- HPX_WITH_SANITIZERS:BOOL#
Configure with sanitizer instrumentation support.
- HPX_WITH_TESTS_COMMAND_LINE:STRING#
Add given command line options to all tests run
- HPX_WITH_TESTS_DEBUG_LOG:BOOL#
Turn on debug logs (–hpx:debug-hpx-log) for tests (default: OFF)
- HPX_WITH_TESTS_DEBUG_LOG_DESTINATION:STRING#
Destination for test debug logs (default: cout)
- HPX_WITH_TESTS_MAX_THREADS_PER_LOCALITY:STRING#
Maximum number of threads to use for tests (default: 0, use the number of threads specified by the test)
- HPX_WITH_THREAD_DEBUG_INFO:BOOL#
Enable thread debugging information (default: OFF, implicitly enabled in debug builds)
- HPX_WITH_THREAD_DESCRIPTION_FULL:BOOL#
Use function address for thread description (default: OFF)
- HPX_WITH_THREAD_GUARD_PAGE:BOOL#
Enable thread guard page (default: ON)
- HPX_WITH_VALGRIND:BOOL#
Enable Valgrind instrumentation support.
- HPX_WITH_VERIFY_LOCKS:BOOL#
Enable lock verification code (default: OFF, enabled in debug builds)
- HPX_WITH_VERIFY_LOCKS_BACKTRACE:BOOL#
Enable thread stack back trace being captured on lock registration (to be used in combination with HPX_WITH_VERIFY_LOCKS=ON, default: OFF)
Modules options#
HPX_COMMAND_LINE_HANDLING_LOCAL_WITH_JSON_CONFIGURATION_FILES:BOOLHPX_ITERATOR_SUPPORT_WITH_BOOST_ITERATOR_TRAVERSAL_TAG_COMPATIBILITY:BOOLHPX_SERIALIZATION_WITH_ALL_TYPES_ARE_BITWISE_SERIALIZABLE:BOOL
- HPX_ALLOCATOR_SUPPORT_WITH_CACHING:BOOL#
Enable caching allocator. (default: ON)
- HPX_COMMAND_LINE_HANDLING_LOCAL_WITH_JSON_CONFIGURATION_FILES:BOOL#
Enable reading JSON formatted configuration files on the command line.
(default: On)
- HPX_DATASTRUCTURES_WITH_ADAPT_STD_TUPLE:BOOL#
Enable compatibility of hpx::get with std::tuple. (default: ON)
- HPX_DATASTRUCTURES_WITH_ADAPT_STD_VARIANT:BOOL#
Enable compatibility of hpx::get with std::variant.
(default: OFF)
- HPX_FILESYSTEM_WITH_BOOST_FILESYSTEM_COMPATIBILITY:BOOL#
Enable Boost.FileSystem compatibility. (default: OFF)
- HPX_FUNCTIONAL_WITH_BOOST_PLACEHOLDERS:BOOL#
Enable support for Boost placeholder types. (default: OFF)
- HPX_IOSTREAM_WITH_WIDE_STREAMS:BOOL#
Enable wide IO streams. (default: OFF)
- HPX_ITERATOR_SUPPORT_WITH_BOOST_ITERATOR_TRAVERSAL_TAG_COMPATIBILITY:BOOL#
Enable Boost.Iterator traversal tag compatibility. (default: OFF)
- HPX_LOGGING_WITH_SEPARATE_DESTINATIONS:BOOL#
Enable separate logging channels for AGAS, timing, and parcel transport. (default: ON)
- HPX_SERIALIZATION_WITH_ALLOW_AUTO_GENERATE:BOOL#
Enable automatic generation of serialization functions using C++26 reflection capabilities. (default: OFF)
- HPX_SERIALIZATION_WITH_ALLOW_CONST_TUPLE_MEMBERS:BOOL#
Enable serializing std::tuple with const members. (default: OFF)
- HPX_SERIALIZATION_WITH_ALLOW_RAW_POINTER_SERIALIZATION:BOOL#
Enable serializing raw pointers. (default: OFF)
- HPX_SERIALIZATION_WITH_ALL_TYPES_ARE_BITWISE_SERIALIZABLE:BOOL#
Assume all types are bitwise serializable. (default: OFF)
- HPX_SERIALIZATION_WITH_BOOST_TYPES:BOOL#
Enable serialization of certain Boost types. (default: OFF)
- HPX_SERIALIZATION_WITH_SUPPORTS_ENDIANESS:BOOL#
Support endian conversion on inout and output archives. (default: OFF)
- HPX_TOPOLOGY_WITH_ADDITIONAL_HWLOC_TESTING:BOOL#
Enable HWLOC filtering that makes it report no cores, this is purely an
option supporting better testing - do not enable under normal circumstances. (default: OFF)
- HPX_WITH_POWER_COUNTER:BOOL#
Enable use of performance counters based on pwr library (default: OFF)
Additional tools and libraries used by HPX#
Here is a list of additional libraries and tools that are either optionally supported by the build system or are optionally required for certain examples or tests. These libraries and tools can be detected by the HPX build system.
Each of the tools or libraries listed here will be automatically detected if
they are installed in some standard location. If a tool or library is installed
in a different location, you can specify its base directory by appending
_ROOT to the variable name as listed below. For instance, to configure a
custom directory for Boost, specify Boost_ROOT=/custom/boost/root.
- Boost_ROOT:PATH#
Specifies where to look for the Boost installation to be used for compiling HPX. Set this if CMake is not able to locate a suitable version of Boost. The directory specified here can be either the root of an installed Boost distribution or the directory where you unpacked and built Boost without installing it (with staged libraries).
- Hwloc_ROOT:PATH#
Specifies where to look for the hwloc library. Set this if CMake is not able to locate a suitable version of hwloc. Hwloc provides platform- independent support for extracting information about the used hardware architecture (number of cores, number of NUMA domains, hyperthreading, etc.). HPX utilizes this information if available.
- Papi_ROOT:PATH#
Specifies where to look for the PAPI library. The PAPI library is needed to compile a special component exposing PAPI hardware events and counters as HPX performance counters. This is not available on the Windows platform.
- Amplifier_ROOT:PATH#
Specifies where to look for one of the tools of the Intel Parallel Studio product, either Intel Amplifier or Intel Inspector. This should be set if the CMake variable
HPX_USE_ITT_NOTIFYis set toON. Enabling ITT support in HPX will integrate any application with the mentioned Intel tools, which customizes the generated information for your application and improves the generated diagnostics.
In addition, some of the examples may need the following variables:
- Hdf5_ROOT:PATH#
Specifies where to look for the Hierarchical Data Format V5 (HDF5) include files and libraries.
Migration guide#
The Migration Guide serves as a valuable resource for developers seeking to transition their parallel computing applications from different APIs (i.e. OpenMP, Intel Threading Building Blocks (TBB), MPI) to HPX. HPX, an advanced C++ library, offers a versatile and high-performance platform for parallel and distributed computing, providing a wide range of features and capabilities. This guide aims to assist developers in understanding the key differences between different APIs and HPX, and it provides step-by-step instructions for converting code to HPX code effectively.
Some general steps that can be used to migrate code to HPX code are the following:
Install HPX using the Quick start guide.
Include the HPX header files:
Add the necessary header files for HPX at the beginning of your code, such as:
#include <hpx/init.hpp>
Replace your code with HPX code using the guide that follows.
Use HPX-specific features and APIs:
HPX provides additional features and APIs that can be used to take advantage of the library’s capabilities. For example, you can use the HPX asynchronous execution to express fine-grained tasks and dependencies, or utilize HPX’s distributed computing features for distributed memory systems.
Compile and run the HPX code:
Compile the converted code with the HPX library and run it using the appropriate HPX runtime environment.
OpenMP#
The OpenMP API supports multi-platform shared-memory parallel programming in C/C++. Typically it is used for loop-level parallelism, but it also supports function-level parallelism. Below are some examples on how to convert OpenMP to HPX code:
OpenMP parallel for loop#
OpenMP code:
#pragma omp parallel for
for (int i = 0; i < n; ++i) {
// loop body
}
HPX equivalent:
#include <hpx/algorithm.hpp>
hpx::experimental::for_loop(hpx::execution::par, 0, n, [&](int i) {
// loop body
});
In the above code, the OpenMP #pragma omp parallel for directive is replaced with
hpx::experimental::for_loop from the HPX library. The loop body within the lambda
function will be executed in parallel for each iteration.
OpenMP code:
int x = 0;
#pragma omp parallel for private(x)
for (int i = 0; i < n; ++i) {
// loop body
}
HPX equivalent:
#include <hpx/algorithm.hpp>
hpx::experimental::for_loop(hpx::execution::par, 0, n, [&](int i) {
int x = 0; // Declare 'x' as a local variable inside the loop body
// loop body
});
The variable x is declared as a local variable inside the loop body, ensuring that it is private to each thread.
OpenMP code:
#pragma omp parallel for num_threads(2)
for (int i = 0; i < n; ++i) {
// loop body
}
HPX equivalent:
#include <hpx/algorithm.hpp>
#include <hpx/execution.hpp>
hpx::execution::experimental::num_cores nc(2);
hpx::experimental::for_loop(hpx::execution::par.with(nc), 0, n, [&](int i) {
// loop body
});
To declare the number of threads to be used for the parallel region, you can use
hpx::execution::experimental::num_cores and pass the number of cores (nc) to
hpx::experimental::for_loop using hpx::execution::par.with(nc).
This example uses 2 threads for the parallel loop.
OpenMP code:
int s = 0;
#pragma omp parallel for reduction(+: s)
for (int i = 0; i < n; ++i) {
s += i;
// loop body
}
HPX equivalent:
#include <hpx/algorithm.hpp>
#include <hpx/execution.hpp>
int s = 0;
hpx::experimental::for_loop(hpx::execution::par, 0, n, reduction(s, 0, plus<>()), [&](int i, int& accum) {
accum += i;
// loop body
});
The reduction clause specifies that the variable s should be reduced across iterations using the plus<> operation. It initializes s to 0 at the beginning of the loop and accumulates the values of s from each iteration using the + operator. The lambda function representing the loop body takes two parameters: i, which represents the loop index, and accum, which is the reduction variable s. The lambda function is executed for each iteration of the loop. The reduction ensures that the accum value is correctly accumulated across different iterations and threads.
OpenMP code:
int s = 0;
// static scheduling with chunk size 1000
#pragma omp parallel for schedule(static, 1000)
for (int i = 0; i < n; ++i) {
// loop body
}
HPX equivalent:
#include <hpx/algorithm.hpp>
#include <hpx/execution.hpp>
hpx::execution::experimental::static_chunk_size cs(1000);
hpx::experimental::for_loop(hpx::execution::par.with(cs), 0, n, [&](int i) {
// loop body
});
To define the scheduling type, you can use the corresponding execution policy from
hpx::execution::experimental, define the chunk size (cs, here declared as 1000) and pass
it to the to hpx::experimental::for_loop using hpx::execution::par.with(cs).
Accordingly, other types of scheduling are available and can be used in a similar manner:
#include <hpx/execution.hpp>
hpx::execution::experimental::dynamic_chunk_size cs(1000);
#include <hpx/execution.hpp>
hpx::execution::experimental::guided_chunk_size cs(1000);
#include <hpx/execution.hpp>
hpx::execution::experimental::auto_chunk_size cs(1000);
OpenMP single thread#
OpenMP code:
{ // parallel code
#pragma omp single
{
// single-threaded code
}
// more parallel code
}
HPX equivalent:
#include <hpx/mutex.hpp>
hpx::mutex mtx;
{ // parallel code
{ // single-threaded code
std::scoped_lock l(mtx);
}
// more parallel code
}
To make sure that only one thread accesses a specific code within a parallel section
you can use hpx::mutex and std::scoped_lock to take ownership of the given
mutex mtx. For more information about mutexes please refer to Mutex.
OpenMP tasks#
OpenMP code:
// executed asynchronously by any available thread
#pragma omp task
{
// task code
}
HPX equivalent:
#include <hpx/future.hpp>
auto future = hpx::async([](){
// task code
});
or
#include <hpx/future.hpp>
hpx::post([](){
// task code
}); // fire and forget
The tasks in HPX can be defined simply by using the async function and passing as argument
the code you wish to run asynchronously. Another alternative is to use post which is a
fire-and-forget method.
Tip
If you think you will like to synchronize your tasks later on, we suggest you use
hpx::async which provides synchronization options, while hpx::post
explicitly states that there is no return value or way to synchronize with the function
execution. Synchronization options are listed below.
OpenMP code:
#pragma omp task
{
// task code
}
#pragma omp taskwait
// code after completion of task
HPX equivalent:
#include <hpx/future.hpp>
hpx::async([](){
// task code
}).get(); // wait for the task to complete
// code after completion of task
The get() function can be used to ensure that the task created with hpx::async
is completed before the code continues executing beyond that point.
OpenMP code:
#pragma omp task
{
// task 1 code
}
#pragma omp task
{
// task 2 code
}
#pragma omp taskwait
// code after completion of both tasks 1 and 2
HPX equivalent:
#include <hpx/future.hpp>
auto future1 = hpx::async([](){
// task 1 code
});
auto future2 = hpx::async([](){
// task 2 code
});
auto future = hpx::when_all(future1, future2).then([](auto&&){
// code after completion of both tasks 1 and 2
});
If you would like to synchronize multiple tasks, you can use the hpx::when_all function
to define which futures have to be ready and the then() function to declare what should
be executed once these futures are ready.
OpenMP code:
int a = 10;
int b = 20;
int c = 0;
#pragma omp task depend(in: a, b) depend(out: c)
{
// task code
c = 100;
}
HPX equivalent:
#include <hpx/future.hpp>
int a = 10;
int b = 20;
int c = 0;
// Create a future representing 'a'
auto future_a = hpx::make_ready_future(a);
// Create a future representing 'b'
auto future_b = hpx::make_ready_future(b);
// Create a task that depends on 'a' and 'b' and executes 'task_code'
auto future_c = hpx::dataflow(
[]() {
// task code
return 100;
},
future_a, future_b);
c = future_c.get();
If one of the arguments of hpx::dataflow is a future, then it will wait for the
future to be ready to launch the thread. Hence, to define the dependencies of tasks
you have to create futures representing the variables that create dependencies and pass
them as arguments to hpx::dataflow. get() is used to save the result of the future
to the desired variable.
OpenMP code:
#pragma omp task
{
// Outer task code
#pragma omp task
{
// Inner task code
}
}
HPX equivalent:
#include <hpx/future.hpp>
auto future_outer = hpx::async([](){
// Outer task code
hpx::async([](){
// Inner task code
});
});
or
#include <hpx/future.hpp>
auto future_outer = hpx::post([](){ // fire and forget
// Outer task code
hpx::post([](){ // fire and forget
// Inner task code
});
});
If you have nested tasks, you can simply use nested hpx::async or
hpx::post calls. The implementation is similar if you want to take
care of synchronization:
OpenMP code:
#pragma omp taskwait
{
// Outer task code
#pragma omp taskwait
{
// Inner task code
}
}
HPX equivalent:
#include <hpx/future.hpp>
auto future_outer = hpx::async([]() {
// Outer task code
hpx::async([]() {
// Inner task code
}).get(); // Wait for the inner task to complete
});
future_outer.get(); // Wait for the outer task to complete
OpenMP code:
#pragma omp task
{
// code before yielding
#pragma omp taskyield
// code after yielding
}
HPX equivalent:
#include <hpx/future.hpp>
#include <hpx/thread.hpp>
auto future = hpx::async([](){
// code before yielding
});
// yield execution to potentially allow other tasks to run
hpx::this_thread::yield();
// code after yielding
After creating a task using hpx::async, hpx::this_thread::yield
can be used to reschedule the execution of threads, allowing other threads to run.
OpenMP code:
#pragma omp taskgroup
{
#pragma omp task
{
// task 1 code
}
#pragma omp task
{
// task 2 code
}
}
HPX equivalent:
#include <hpx/task_group.hpp>
// Declare a task group
hpx::experimental::task_group tg;
// Run the tasks
tg.run([](){
// task 1 code
});
tg.run(
// task 2 code
});
// Wait for the task group
tg.wait();
To create task groups, you can use hpx::experimental::task_group. The function
run() can be used to run each task within the task group, while wait() can be used to
achieve synchronization. If you do not care about waiting for the task group to complete
its execution, you can simply remove the wait() function.
OpenMP sections#
OpenMP code:
#pragma omp sections
{
#pragma omp section
// section 1 code
#pragma omp section
// section 2 code
} // implicit synchronization
HPX equivalent:
#include <hpx/future.hpp>
auto future_section1 = hpx::async([](){
// section 1 code
});
auto future_section2 = hpx::async([](){
// section 2 code
);
// synchronization: wait for both sections to complete
hpx::wait_all(future_section1, future_section2);
Unlike tasks, there is an implicit synchronization barrier at the end of each sections
directive in OpenMP. This synchronization is achieved using hpx::wait_all function.
Note
If the nowait clause is used in the sections directive, then you can just remove
the hpx::wait_all function while keeping the rest of the code as it is.
Intel Threading Building Blocks (TBB)#
Intel Threading Building Blocks (TBB) provides a high-level interface for parallelism and concurrent programming using standard ISO C++ code. Below are some examples on how to convert Intel Threading Building Blocks (TBB) to HPX code:
parallel_for#
Intel Threading Building Blocks (TBB) code:
auto values = std::vector<double>(10000);
tbb::parallel_for( tbb::blocked_range<int>(0,values.size()),
[&](tbb::blocked_range<int> r)
{
for (int i=r.begin(); i<r.end(); ++i)
{
// loop body
}
});
HPX equivalent:
#include <hpx/algorithm.hpp>
auto values = std::vector<double>(10000);
hpx::experimental::for_loop(hpx::execution::par, 0, values.size(), [&](int i) {
// loop body
});
In the above code, tbb::parallel_for is replaced with hpx::experimental::for_loop
from the HPX library. The loop body within the lambda function will be executed in
parallel for each iteration.
parallel_for_each#
Intel Threading Building Blocks (TBB) code:
auto values = std::vector<double>(10000);
tbb::parallel_for_each(values.begin(), values.end(), [&](){
// loop body
});
HPX equivalent:
#include <hpx/algorithm.hpp>
auto values = std::vector<double>(10000);
hpx::for_each(hpx::execution::par, values.begin(), values.end(), [&](){
// loop body
});
By utilizing hpx::for_each and specifying a parallel execution policy with
hpx::execution::par, it is possible to transform tbb::parallel_for_each into its
equivalent counterpart in HPX.
parallel_invoke#
Intel Threading Building Blocks (TBB) code:
tbb::parallel_invoke(task1, task2, task3);
HPX equivalent:
#include <hpx/future.hpp>
hpx::wait_all(hpx::async(task1), hpx::async(task2), hpx::async(task3));
To convert tbb::parallel_invoke to HPX, we use hpx::async to asynchronously
execute each task, which returns a future representing the result of each task.
We then pass these futures to hpx::when_all, which waits for all the futures
to complete before returning.
parallel_pipeline#
Intel Threading Building Blocks (TBB) code:
tbb::parallel_pipeline(4,
tbb::make_filter<void, int>(tbb::filter::serial_in_order,
[](tbb::flow_control& fc) -> int {
// Generate numbers from 1 to 10
static int i = 1;
if (i <= 10) {
return i++;
}
else {
fc.stop();
return 0;
}
}) &
tbb::make_filter<int, int>(tbb::filter::parallel,
[](int num) -> int {
// Multiply each number by 2
return num * 2;
}) &
tbb::make_filter<int, void>(tbb::filter::serial_in_order,
[](int num) {
// Print the results
std::cout << num << " ";
})
);
HPX equivalent:
#include <iostream>
#include <vector>
#include <ranges>
#include <hpx/algorithm.hpp>
// generate the values
auto range = std::views::iota(1) | std::views::take(10);
// materialize the output vector
std::vector<int> results(10);
// in parallel execution of pipeline and transformation
hpx::ranges::transform(
hpx::execution::par, range, result.begin(), [](int i) { return 2 * i; });
// print the modified vector
for (int i : result)
{
std::cout << i << " ";
}
std::cout << std::endl;
The line auto range = std::views::iota(1) | std::views::take(10); generates a range of values using the std::views::iota function. It starts from the value 1 and generates an infinite sequence of incrementing values. The std::views::take(10) function is then applied to limit the sequence to the first 10 values. The result is stored in the range variable.
Hint
A view is a lightweight object that represents a particular view of a sequence or range. It acts as a read-only interface to the original data, providing a way to query and traverse the elements without making any copies or modifications.
Views can be composed and chained together to form complex pipelines of operations. These operations are evaluated lazily, meaning that the actual computation is performed only when the result is needed or consumed.
Since views perform lazy evaluation, we use std::vector<int> results(10); to meterialize the vector that will store the transformed values. The hpx::ranges::transform function is then used to perform a parallel transformation on the range. The transformed values will be written to the results vector.
Hint
Ranges enable loop fusion by combining multiple operations into a single parallel loop, eliminating waiting time and reducing overhead. Using ranges, you can express these operations as a pipeline of transformations on a sequence of elements. This pipeline is evaluated in a single pass, performing all the desired operations in parallel without the need to wait between them.
In addition, HPX enhances the benefits of range fusion by offering parallel execution policies, which can be used to optimize the execution of the fused loop across multiple threads.
parallel_reduce#
Intel Threading Building Blocks (TBB) code:
auto values = std::vector<double>{1,2,3,4,5,6,7,8,9};
auto total = tbb::parallel_reduce(
tbb::blocked_range<int>(0,values.size()),
0.0,
[&](tbb::blocked_range<int> r, double running_total)
{
for (int i=r.begin(); i<r.end(); ++i)
{
running_total += values[i];
}
return running_total;
},
std::plus<double>());
HPX equivalent:
#include <hpx/numeric.hpp>
auto values = std::vector<double>{1,2,3,4,5,6,7,8,9};
auto total = hpx::reduce(
hpx::execution::par, values.begin(), values.end(), 0, std::plus{});
By utilizing hpx::reduce and specifying a parallel execution policy with
hpx::execution::par, it is possible to transform tbb::parallel_reduce into its
equivalent counterpart in HPX. As demonstrated in the previous example, the management
of intermediate results is seamlessly handled internally by HPX, eliminating the need
for explicit consideration.
Intel Threading Building Blocks (TBB) code:
auto values = std::vector<double>{1,2,3,4,5,6,7,8,9};
auto transform_function(double current_value){
// transformation code
}
auto total = tbb::parallel_reduce(
tbb::blocked_range<int>(0,values.size()),
0.0,
[&](tbb::blocked_range<int> r, double transformed_val)
{
for (int i=r.begin(); i<r.end(); ++i)
{
transformed_val += transform_function(values[i]);
}
return transformed_val;
},
std::plus<double>());
HPX equivalent:
#include <hpx/numeric.hpp>
auto values = std::vector<double>{1,2,3,4,5,6,7,8,9};
auto transform_function(double current_value)
{
// transformation code
}
auto total = hpx::transform_reduce(hpx::execution::par, values.begin(),
values.end(), 0, std::plus{},
[&](double current_value) { return transform_function(current_value); });
In situations where certain values require transformation before the reduction process,
HPX provides a straightforward solution through hpx::transform_reduce. The
transform_function() allows for the application of the desired transformation to each value.
parallel_scan#
Intel Threading Building Blocks (TBB) code:
tbb::parallel_scan(tbb::blocked_range<size_t>(0, input.size()),
0,
[&input, &output](const tbb::blocked_range<size_t>& range, int& partial_sum, bool is_final_scan) {
for (size_t i = range.begin(); i != range.end(); ++i) {
partial_sum += input[i];
if (is_final_scan) {
output[i] = partial_sum;
}
}
return partial_sum;
},
[](int left_sum, int right_sum) {
return left_sum + right_sum;
}
);
HPX equivalent:
#include <hpx/numeric.hpp>
hpx::inclusive_scan(hpx::execution::par, input.begin(), input.end(),
output.begin(),
[](const int& left, const int& right) { return left + right; });
hpx::inclusive_scan with hpx::execution::par as execution policy
can be used to perform a prefix scan in parallel. The management of intermediate
results is seamlessly handled internally by HPX, eliminating the need
for explicit consideration. input.begin() and input.end() refer to the beginning
and end of the sequence of elements the algorithm will be applied to respectively.
output.begin() refers to the beginning of the destination, while the last argument
specifies the function which will be invoked for each of the values of the input sequence.
Apart from hpx::inclusive_scan, HPX provides its users with hpx::exclusive_scan.
The key difference between inclusive scan and exclusive scan lies in the treatment of the current element
during the scan operation. In an inclusive scan, each element in the output sequence includes the
contribution of the corresponding element in the input sequence, while in an exclusive scan, the current
element in the input sequence does not contribute to the corresponding element in the output sequence.
parallel_sort#
Intel Threading Building Blocks (TBB) code:
std::vector<int> numbers = {9, 2, 7, 1, 5, 3};
tbb::parallel_sort(numbers.begin(), numbers.end());
HPX equivalent:
#include <hpx/algorithm.hpp>
std::vector<int> numbers = {9, 2, 7, 1, 5, 3};
hpx::sort(hpx::execution::par, numbers.begin(), numbers.end());
hpx::sort provides an equivalent functionality to tbb::parallel_sort.
When given a parallel execution policy with hpx::execution::par, the algorithm employs
parallel execution, allowing for efficient sorting across available threads.
task_group#
Intel Threading Building Blocks (TBB) code:
// Declare a task group
tbb::task_group tg;
// Run the tasks
tg.run(task1);
tg.run(task2);
// Wait for the task group
tg.wait();
HPX equivalent:
#include <hpx/task_group.hpp>
// Declare a task group
hpx::experimental::task_group tg;
// Run the tasks
tg.run(task1);
tg.run(task2);
// Wait for the task group
tg.wait();
HPX drew inspiration from Intel Threading Building Blocks (TBB) to introduce the hpx::experimental::task_group
feature. Therefore, utilizing hpx::experimental::task_group provides an
equivalent functionality to tbb::task_group.
MPI#
MPI is a standardized communication protocol and library that allows multiple processes or nodes in a parallel computing system to exchange data and coordinate their execution.
List of MPI-HPX functions#
MPI function
HPX equivalent
hpx::collectives::broadcast_to()andhpx::collectives::broadcast_from()used withget()
hpx::get_locality_id()
hpx::collectives::exclusive_scan()used withget()
hpx::collectives::gather_here()andhpx::collectives::gather_there()used withget()
hpx::collectives::reduce_hereandhpx::collectives::reduce_thereused withget()
hpx::collectives::inclusive_scan()used withget()
hpx::collectives::scatter_to()andhpx::collectives::scatter_from()
hpx::collectives::get()used with a future i.e.setf.get()
MPI_Send & MPI_Recv#
Let’s assume we have the following simple message passing code where each process sends a message to the next process in a circular manner. The exchanged message is modified and printed to the console.
MPI code:
#include <cstddef>
#include <cstdint>
#include <iostream>
#include <mpi.h>
#include <vector>
constexpr int times = 2;
int main(int argc, char *argv[]) {
MPI_Init(&argc, &argv);
int num_localities;
MPI_Comm_size(MPI_COMM_WORLD, &num_localities);
int this_locality;
MPI_Comm_rank(MPI_COMM_WORLD, &this_locality);
int next_locality = (this_locality + 1) % num_localities;
std::vector<int> msg_vec = {0, 1};
int cnt = 0;
int msg = msg_vec[this_locality];
int recv_msg;
MPI_Request request_send, request_recv;
MPI_Status status;
while (cnt < times) {
cnt += 1;
MPI_Isend(&msg, 1, MPI_INT, next_locality, cnt, MPI_COMM_WORLD,
&request_send);
MPI_Irecv(&recv_msg, 1, MPI_INT, next_locality, cnt, MPI_COMM_WORLD,
&request_recv);
MPI_Wait(&request_send, &status);
MPI_Wait(&request_recv, &status);
std::cout << "Time: " << cnt << ", Locality " << this_locality
<< " received msg: " << recv_msg << "\n";
recv_msg += 10;
msg = recv_msg;
}
MPI_Finalize();
return 0;
}
HPX equivalent:
#include <hpx/config.hpp>
#if !defined(HPX_COMPUTE_DEVICE_CODE)
#include <hpx/algorithm.hpp>
#include <hpx/hpx_init.hpp>
#include <hpx/modules/collectives.hpp>
#include <cstddef>
#include <cstdint>
#include <iostream>
#include <utility>
#include <vector>
using namespace hpx::collectives;
constexpr char const* channel_communicator_name =
"/example/channel_communicator/";
// the number of times
constexpr int times = 2;
int hpx_main()
{
std::uint32_t num_localities = hpx::get_num_localities(hpx::launch::sync);
std::uint32_t this_locality = hpx::get_locality_id();
// allocate channel communicator
// NOTE: The communicator object must be kept alive until all
// participating sites have successfully connected. Destroying it
// prematurely may cause other sites to hang. Consider using a barrier
// after creation if the communicator would otherwise go out of scope.
auto comm = create_channel_communicator(hpx::launch::sync,
channel_communicator_name, num_sites_arg(num_localities),
this_site_arg(this_locality));
std::uint32_t next_locality = (this_locality + 1) % num_localities;
std::vector<int> msg_vec = {0, 1};
int cnt = 0;
int msg = msg_vec[this_locality];
// send values to another locality
auto setf = set(comm, that_site_arg(next_locality), msg, tag_arg(cnt));
auto got_msg = get<int>(comm, that_site_arg(next_locality), tag_arg(cnt));
setf.get();
while (cnt < times)
{
cnt += 1;
auto done_msg = got_msg.then([&](auto&& f) {
int rec_msg = f.get();
std::cout << "Time: " << cnt << ", Locality " << this_locality
<< " received msg: " << rec_msg << "\n";
// change msg by adding 10
rec_msg += 10;
// start next round
setf =
set(comm, that_site_arg(next_locality), rec_msg, tag_arg(cnt));
got_msg =
get<int>(comm, that_site_arg(next_locality), tag_arg(cnt));
setf.get();
});
done_msg.get();
}
return hpx::finalize();
}
#endif
int main(int argc, char* argv[])
{
#if !defined(HPX_COMPUTE_DEVICE_CODE)
hpx::init_params params;
params.cfg = {"--hpx:run-hpx-main"};
return hpx::init(argc, argv, params);
#else
(void) argc;
(void) argv;
return 0;
#endif
}
To perform message passing between different processes in HPX we can use a channel communicator. To understand this example, let’s focus on the hpx_main() function:
hpx::get_num_localities(hpx::launch::sync) retrieves the number of localities, while hpx::get_locality_id() returns the ID of the current locality.
create_channel_communicator function is used to create a channel to serve the communication. This function takes several arguments, including the launch policy (hpx::launch::sync), the name of the communicator (channel_communicator_name), the number of localities, and the ID of the current locality.
The communication follows a ring pattern, where each process (or locality) sends a message to its neighbor in a circular manner. This means that the messages circulate around the localities, ensuring that the communication wraps around when reaching the end of the locality sequence. To achieve this, the next_locality variable is calculated as the ID of the next locality in the ring.
The initial values for the communication are set (msg_vec, cnt, msg).
The set() function is called to send the message to the next locality in the ring. The message is sent asynchronously and is associated with a tag (cnt).
The get() function is called to receive a message from the next locality. It is also associated with the same tag as the set() operation.
The setf.get() call blocks until the message sending operation is complete.
A continuation is set up using the function then() to handle the received message. Inside the continuation:
The received message value (rec_msg) is retrieved using f.get().
The received message is printed to the console and then modified by adding 10.
The set() and get() operations are repeated to send and receive the modified message to the next locality.
The setf.get() call blocks until the new message sending operation is complete.
The done_msg.get() call blocks until the continuation is complete for the current loop iteration.
Having said that, we conclude to the following table:
MPI_Gather#
The following code gathers data from all processes to the root process and verifies the gathered data in the root process.
MPI code:
#include <iostream>
#include <mpi.h>
#include <numeric>
#include <vector>
int main(int argc, char *argv[]) {
MPI_Init(&argc, &argv);
int num_localities, this_locality;
MPI_Comm_size(MPI_COMM_WORLD, &num_localities);
MPI_Comm_rank(MPI_COMM_WORLD, &this_locality);
std::vector<int> local_data; // Data to be gathered
if (this_locality == 0) {
local_data.resize(num_localities); // Resize the vector on the root process
}
// Each process calculates its local data value
int my_data = 42 + this_locality;
for (std::uint32_t i = 0; i != 10; ++i) {
// Gather data from all processes to the root process (process 0)
MPI_Gather(&my_data, 1, MPI_INT, local_data.data(), 1, MPI_INT, 0,
MPI_COMM_WORLD);
// Only the root process (process 0) will print the gathered data
if (this_locality == 0) {
std::cout << "Gathered data on the root: ";
for (int i = 0; i < num_localities; ++i) {
std::cout << local_data[i] << " ";
}
std::cout << std::endl;
}
}
std::cout << std::endl;
MPI_Finalize();
return 0;
}
HPX equivalent:
std::uint32_t num_localities = hpx::get_num_localities(hpx::launch::sync);
std::uint32_t this_locality = hpx::get_locality_id();
// test functionality based on immediate local result value
auto gather_direct_client = create_communicator(gather_direct_basename,
num_sites_arg(num_localities), this_site_arg(this_locality));
for (std::uint32_t i = 0; i != 10; ++i)
{
if (this_locality == 0)
{
hpx::future<std::vector<std::uint32_t>> overall_result =
gather_here(gather_direct_client, std::uint32_t(42));
std::vector<std::uint32_t> sol = overall_result.get();
std::cout << "Gathered data on the root:";
for (std::size_t j = 0; j != sol.size(); ++j)
{
HPX_TEST(j + 42 == sol[j]);
std::cout << " " << sol[j];
}
std::cout << std::endl;
}
else
{
hpx::future<void> overall_result =
gather_there(gather_direct_client, this_locality + 42);
overall_result.get();
}
}
This code will print 10 times the following message:
Gathered data on the root: 42 43
HPX uses two functions to implement the functionality of MPI_Gather: gather_here and gather_there. gather_here is gathering data from all localities to the locality with ID 0 (root locality). gather_there allows non-root localities to participate in the gather operation by sending data to the root locality. In more detail:
hpx::get_num_localities(hpx::launch::sync) retrieves the number of localities, while hpx::get_locality_id() returns the ID of the current locality.
The function create_communicator() is used to create a communicator called gather_direct_client.
If the current locality is the root (its ID is equal to 0):
The gather_here function is used to perform the gather operation. It collects data from all other localities into the overall_result future object. The function arguments provide the necessary information, such as the base name for the gather operation (gather_direct_basename), the value to be gathered (value), the number of localities (num_localities), the current locality ID (this_locality), and the generation number (related to the gather operation).
The get() member function of the overall_result future is used to retrieve the gathered data.
The next for loop is used to verify the correctness of the gathered data (sol). HPX_TEST is a macro provided by the HPX testing utilities to perform similar testing with the Standard C++ macro assert.
If the current locality is not the root:
The gather_there function is used to participate in the gather operation initiated by the root locality. It sends the data (in this case, the value this_locality + 42) to the root locality, indicating that it should be included in the gathering.
The get() member function of the overall_result future is used to wait for the gather operation to complete for this locality.
MPI_Scatter#
The following code gathers data from all processes to the root process and verifies the gathered data in the root process.
MPI code:
#include <iostream>
#include <mpi.h>
#include <vector>
int main(int argc, char *argv[]) {
MPI_Init(&argc, &argv);
int num_localities, this_locality;
MPI_Comm_size(MPI_COMM_WORLD, &num_localities);
MPI_Comm_rank(MPI_COMM_WORLD, &this_locality);
int num_localities = num_localities;
std::vector<int> data(num_localities);
if (this_locality == 0) {
// Fill the data vector on the root locality (locality 0)
for (int i = 0; i < num_localities; ++i) {
data[i] = 42 + i;
}
}
int local_data; // Variable to store the received data
// Scatter data from the root locality to all other localities
MPI_Scatter(&data[0], 1, MPI_INT, &local_data, 1, MPI_INT, 0, MPI_COMM_WORLD);
// Now, each locality has its own local_data
// Print the local_data on each locality
std::cout << "Locality " << this_locality << " received " << local_data
<< std::endl;
MPI_Finalize();
return 0;
}
HPX equivalent:
std::uint32_t num_localities = hpx::get_num_localities(hpx::launch::sync);
HPX_TEST_LTE(std::uint32_t(2), num_localities);
std::uint32_t this_locality = hpx::get_locality_id();
auto scatter_direct_client =
hpx::collectives::create_communicator(scatter_direct_basename,
num_sites_arg(num_localities), this_site_arg(this_locality));
// test functionality based on immediate local result value
for (std::uint32_t i = 0; i != 10; ++i)
{
if (this_locality == 0)
{
std::vector<std::uint32_t> data(num_localities);
std::iota(data.begin(), data.end(), 42 + i);
hpx::future<std::uint32_t> result =
scatter_to(scatter_direct_client, std::move(data));
HPX_TEST_EQ(i + 42 + this_locality, result.get());
}
else
{
hpx::future<std::uint32_t> result =
scatter_from<std::uint32_t>(scatter_direct_client);
HPX_TEST_EQ(i + 42 + this_locality, result.get());
std::cout << "Locality " << this_locality << " received "
<< i + 42 + this_locality << std::endl;
}
}
For num_localities = 2 and since we run for 10 iterations this code will print the following message:
Locality 1 received 43
Locality 1 received 44
Locality 1 received 45
Locality 1 received 46
Locality 1 received 47
Locality 1 received 48
Locality 1 received 49
Locality 1 received 50
Locality 1 received 51
Locality 1 received 52
HPX uses two functions to implement the functionality of MPI_Scatter: hpx::scatter_to and hpx::scatter_from. hpx::scatter_to is distributing the data from the locality with ID 0 (root locality) to all other localities. hpx::scatter_from allows non-root localities to receive the data from the root locality. In more detail:
hpx::get_num_localities(hpx::launch::sync) retrieves the number of localities, while hpx::get_locality_id() returns the ID of the current locality.
The function hpx::collectives::create_communicator() is used to create a communicator called scatter_direct_client.
If the current locality is the root (its ID is equal to 0):
The data vector is filled with values ranging from 42 + i to 42 + i + num_localities - 1.
The hpx::scatter_to function is used to perform the scatter operation using the communicator scatter_direct_client. This scatters the data vector to other localities and returns a future representing the result.
HPX_TEST_EQ is a macro provided by the HPX testing utilities to test the distributed values.
If the current locality is not the root:
The hpx::scatter_from function is used to collect the data by the root locality.
HPX_TEST_EQ is a macro provided by the HPX testing utilities to test the collected values.
MPI_Allgather#
The following code gathers data from all processes and sends the data to all processes.
MPI code:
#include <cstdint>
#include <iostream>
#include <mpi.h>
#include <vector>
int main(int argc, char **argv) {
MPI_Init(&argc, &argv);
int rank, size;
MPI_Comm_rank(MPI_COMM_WORLD, &rank);
MPI_Comm_size(MPI_COMM_WORLD, &size);
// Get the number of MPI processes
int num_localities = size;
// Get the MPI process rank
int here = rank;
std::uint32_t value = here;
std::vector<std::uint32_t> r(num_localities);
// Perform an all-gather operation to gather values from all processes.
MPI_Allgather(&value, 1, MPI_UINT32_T, r.data(), 1, MPI_UINT32_T,
MPI_COMM_WORLD);
// Print the result.
std::cout << "Locality " << here << " has values:";
for (size_t j = 0; j < r.size(); ++j) {
std::cout << " " << r[j];
}
std::cout << std::endl;
MPI_Finalize();
return 0;
}
HPX equivalent:
std::uint32_t num_localities = hpx::get_num_localities(hpx::launch::sync);
std::uint32_t here = hpx::get_locality_id();
// test functionality based on immediate local result value
auto all_gather_direct_client =
create_communicator(all_gather_direct_basename,
num_sites_arg(num_localities), this_site_arg(here));
std::uint32_t value = here;
hpx::future<std::vector<std::uint32_t>> overall_result =
all_gather(all_gather_direct_client, value);
std::vector<std::uint32_t> r = overall_result.get();
std::cout << "Locality " << here << " has values:";
for (std::size_t j = 0; j != r.size(); ++j)
{
std::cout << " " << j;
}
std::cout << std::endl;
For num_localities = 2 this code will print the following message:
Locality 0 has values: 0 1
Locality 1 has values: 0 1
HPX uses the function all_gather to implement the functionality of MPI_Allgather. In more detail:
hpx::get_num_localities(hpx::launch::sync) retrieves the number of localities, while hpx::get_locality_id() returns the ID of the current locality.
The function hpx::collectives::create_communicator() is used to create a communicator called all_gather_direct_client.
The values that the localities exchange with each other are equal to each locality’s ID.
The gather operation is performed using all_gather. The result is stored in an hpx::future object called overall_result, which represents a future result that can be retrieved later when needed.
The get() function waits until the result is available and then stores it in the vector called r.
MPI_Allreduce#
The following code combines values from all processes and distributes the result back to all processes.
MPI code:
#include <cstdint>
#include <iostream>
#include <mpi.h>
int main(int argc, char **argv) {
MPI_Init(&argc, &argv);
int rank, size;
MPI_Comm_rank(MPI_COMM_WORLD, &rank);
MPI_Comm_size(MPI_COMM_WORLD, &size);
// Get the number of MPI processes
int num_localities = size;
// Get the MPI process rank
int here = rank;
// Create a communicator for the all reduce operation.
MPI_Comm all_reduce_direct_client;
MPI_Comm_split(MPI_COMM_WORLD, 0, rank, &all_reduce_direct_client);
// Perform the all reduce operation to calculate the sum of 'here' values.
std::uint32_t value = here;
std::uint32_t res = 0;
MPI_Allreduce(&value, &res, 1, MPI_UINT32_T, MPI_SUM,
all_reduce_direct_client);
std::cout << "Locality " << rank << " has value: " << res << std::endl;
MPI_Finalize();
return 0;
}
HPX equivalent:
std::uint32_t const num_localities =
hpx::get_num_localities(hpx::launch::sync);
std::uint32_t const here = hpx::get_locality_id();
auto const all_reduce_direct_client =
create_communicator(all_reduce_direct_basename,
num_sites_arg(num_localities), this_site_arg(here));
std::uint32_t value = here;
hpx::future<std::uint32_t> overall_result =
all_reduce(all_reduce_direct_client, value, std::plus<std::uint32_t>{});
std::uint32_t res = overall_result.get();
std::cout << "Locality " << here << " has value: " << res << std::endl;
For num_localities = 2 this code will print the following message:
Locality 0 has value: 1
Locality 1 has value: 1
HPX uses the function all_reduce to implement the functionality of MPI_Allreduce. In more detail:
hpx::get_num_localities(hpx::launch::sync) retrieves the number of localities, while hpx::get_locality_id() returns the ID of the current locality.
The function hpx::collectives::create_communicator() is used to create a communicator called all_reduce_direct_client.
The value of each locality is equal to its ID.
The reduce operation is performed using all_reduce. The result is stored in an hpx::future object called overall_result, which represents a future result that can be retrieved later when needed.
The get() function waits until the result is available and then stores it in the variable res.
MPI_Alltoall#
The following code gathers data from and scatters data to all processes.
MPI code:
#include <algorithm>
#include <cstdint>
#include <iostream>
#include <mpi.h>
#include <vector>
int main(int argc, char **argv) {
MPI_Init(&argc, &argv);
int rank, size;
MPI_Comm_rank(MPI_COMM_WORLD, &rank);
MPI_Comm_size(MPI_COMM_WORLD, &size);
// Get the number of MPI processes
int num_localities = size;
// Get the MPI process rank
int this_locality = rank;
// Create a communicator for all-to-all operation.
MPI_Comm all_to_all_direct_client;
MPI_Comm_split(MPI_COMM_WORLD, 0, rank, &all_to_all_direct_client);
std::vector<std::uint32_t> values(num_localities);
std::fill(values.begin(), values.end(), this_locality);
// Create vectors to store received values.
std::vector<std::uint32_t> r(num_localities);
// Perform an all-to-all operation to exchange values with other localities.
MPI_Alltoall(values.data(), 1, MPI_UINT32_T, r.data(), 1, MPI_UINT32_T,
all_to_all_direct_client);
// Print the results.
std::cout << "Locality " << this_locality << " has values:";
for (std::size_t j = 0; j != r.size(); ++j) {
std::cout << " " << r[j];
}
std::cout << std::endl;
MPI_Finalize();
return 0;
}
HPX equivalent:
std::uint32_t num_localities = hpx::get_num_localities(hpx::launch::sync);
std::uint32_t this_locality = hpx::get_locality_id();
auto all_to_all_direct_client =
create_communicator(all_to_all_direct_basename,
num_sites_arg(num_localities), this_site_arg(this_locality));
std::vector<std::uint32_t> values(num_localities);
std::fill(values.begin(), values.end(), this_locality);
hpx::future<std::vector<std::uint32_t>> overall_result =
all_to_all(all_to_all_direct_client, std::move(values));
std::vector<std::uint32_t> r = overall_result.get();
std::cout << "Locality " << this_locality << " has values:";
for (std::size_t j = 0; j != r.size(); ++j)
{
std::cout << " " << r[j];
}
std::cout << std::endl;
For num_localities = 2 this code will print the following message:
Locality 0 has values: 0 1
Locality 1 has values: 0 1
HPX uses the function all_to_all to implement the functionality of MPI_Alltoall. In more detail:
hpx::get_num_localities(hpx::launch::sync) retrieves the number of localities, while hpx::get_locality_id() returns the ID of the current locality.
The function hpx::collectives::create_communicator() is used to create a communicator called all_to_all_direct_client.
The value each locality sends is equal to its ID.
The all-to-all operation is performed using all_to_all. The result is stored in an hpx::future object called overall_result, which represents a future result that can be retrieved later when needed.
The get() function waits until the result is available and then stores it in the variable r.
MPI_Barrier#
The following code shows how barrier is used to synchronize multiple processes.
MPI code:
#include <cstdlib>
#include <iostream>
#include <mpi.h>
int main(int argc, char **argv) {
MPI_Init(&argc, &argv);
std::size_t iterations = 5;
int rank, size;
MPI_Comm_rank(MPI_COMM_WORLD, &rank);
MPI_Comm_size(MPI_COMM_WORLD, &size);
for (std::size_t i = 0; i != iterations; ++i) {
MPI_Barrier(MPI_COMM_WORLD);
if (rank == 0) {
std::cout << "Iteration " << i << " completed." << std::endl;
}
}
MPI_Finalize();
return 0;
}
HPX equivalent:
std::size_t iterations = 5;
std::uint32_t this_locality = hpx::get_locality_id();
char const* const barrier_test_name = "/test/barrier/multiple";
hpx::distributed::barrier b(barrier_test_name);
for (std::size_t i = 0; i != iterations; ++i)
{
b.wait();
if (this_locality == 0)
{
std::cout << "Iteration " << i << " completed." << std::endl;
}
}
This code will print the following message:
Iteration 0 completed.
Iteration 1 completed.
Iteration 2 completed.
Iteration 3 completed.
Iteration 4 completed.
HPX uses the function barrier to implement the functionality of MPI_Barrier. In more detail:
After defining the number of iterations, we use hpx::get_locality_id() to get the ID of the current locality.
char const* const barrier_test_name = “/test/barrier/multiple”: This line defines a constant character array as the name of the barrier. This name is used to identify the barrier across different localities. All participating threads that use this name will synchronize at this barrier.
Using hpx::distributed::barrier b(barrier_test_name), we create an instance of the distributed barrier with the previously defined name. This barrier will be used to synchronize the execution of threads across different localities.
Running for all the desired iterations, we use b.wait() to synchronize the threads. Each thread waits until all other threads also reach this point before any of them can proceed further.
MPI_Bcast#
The following code broadcasts data from one process to all other processes.
MPI code:
#include <iostream>
#include <mpi.h>
int main(int argc, char *argv[]) {
MPI_Init(&argc, &argv);
int num_localities;
MPI_Comm_size(MPI_COMM_WORLD, &num_localities);
int here;
MPI_Comm_rank(MPI_COMM_WORLD, &here);
int value;
for (int i = 0; i < 5; ++i) {
if (here == 0) {
value = i + 42;
}
// Broadcast the value from process 0 to all other processes
MPI_Bcast(&value, 1, MPI_INT, 0, MPI_COMM_WORLD);
if (here != 0) {
std::cout << "Locality " << here << " received " << value << std::endl;
}
}
MPI_Finalize();
return 0;
}
HPX equivalent:
std::uint32_t num_localities = hpx::get_num_localities(hpx::launch::sync);
std::uint32_t here = hpx::get_locality_id();
auto broadcast_direct_client =
create_communicator(broadcast_direct_basename,
num_sites_arg(num_localities), this_site_arg(here));
// test functionality based on immediate local result value
for (std::uint32_t i = 0; i != 5; ++i)
{
if (here == 0)
{
hpx::future<std::uint32_t> result =
broadcast_to(broadcast_direct_client, i + 42);
result.get();
}
else
{
hpx::future<std::uint32_t> result =
hpx::collectives::broadcast_from<std::uint32_t>(
broadcast_direct_client);
uint32_t r = result.get();
std::cout << "Locality " << here << " received " << r << std::endl;
}
}
For num_localities = 2 this code will print the following message:
Locality 1 received 42
Locality 1 received 43
Locality 1 received 44
Locality 1 received 45
Locality 1 received 46
HPX uses two functions to implement the functionality of MPI_Bcast: broadcast_to and broadcast_from. broadcast_to is broadcasting the data from the root locality to all other localities. broadcast_from allows non-root localities to collect the data sent by the root locality. In more detail:
hpx::get_num_localities(hpx::launch::sync) retrieves the number of localities, while hpx::get_locality_id() returns the ID of the current locality.
The function create_communicator() is used to create a communicator called broadcast_direct_client.
If the current locality is the root (its ID is equal to 0):
The broadcast_to function is used to perform the broadcast operation using the communicator broadcast_direct_client. This sends the data to other localities and returns a future representing the result.
The get() member function of the result future is used to wait for and retrieve the result.
If the current locality is not the root:
The broadcast_from function is used to collect the data by the root locality.
The get() member function of the result future is used to wait for the result.
MPI_Exscan#
The following code computes the exclusive scan (partial reductions) of data on a collection of processes.
MPI code:
#include <iostream>
#include <mpi.h>
#include <numeric>
#include <vector>
int main(int argc, char *argv[]) {
MPI_Init(&argc, &argv);
int num_localities;
MPI_Comm_size(MPI_COMM_WORLD, &num_localities);
int here;
MPI_Comm_rank(MPI_COMM_WORLD, &here);
// Calculate the value for this locality (here)
int value = here;
// Perform an exclusive scan
std::vector<int> result(num_localities);
MPI_Exscan(&value, &result[0], 1, MPI_INT, MPI_SUM, MPI_COMM_WORLD);
if (here != 0) {
int r = result[here - 1]; // Result is in the previous rank's slot
std::cout << "Locality " << here << " has value " << r << std::endl;
}
MPI_Finalize();
return 0;
}
HPX equivalent:
std::uint32_t num_localities = hpx::get_num_localities(hpx::launch::sync);
std::uint32_t here = hpx::get_locality_id();
auto exclusive_scan_client = create_communicator(exclusive_scan_basename,
num_sites_arg(num_localities), this_site_arg(here));
// test functionality based on immediate local result value
std::uint32_t value = here;
hpx::future<std::uint32_t> overall_result = exclusive_scan(
exclusive_scan_client, value, std::plus<std::uint32_t>{});
uint32_t r = overall_result.get();
if (here != 0)
{
std::cout << "Locality " << here << " has value " << r << std::endl;
}
For num_localities = 2 this code will print the following message:
Locality 1 has value 0
HPX uses the function exclusive_scan to implement MPI_Exscan. In more detail:
hpx::get_num_localities(hpx::launch::sync) retrieves the number of localities, while hpx::get_locality_id() returns the ID of the current locality.
The function create_communicator() is used to create a communicator called exclusive_scan_client.
The exclusive_scan function is used to perform the exclusive scan operation using the communicator exclusive_scan_client. std::plus<std::uint32_t>{} specifies the binary associative operator to use for the scan. In this case, it’s addition for summing values.
The get() member function of the overall_result future is used to wait for the result.
MPI_Scan#
The following code Computes the inclusive scan (partial reductions) of data on a collection of processes.
MPI code:
#include <iostream>
#include <mpi.h>
#include <numeric>
#include <vector>
int main(int argc, char *argv[]) {
MPI_Init(&argc, &argv);
int num_localities;
MPI_Comm_size(MPI_COMM_WORLD, &num_localities);
int here;
MPI_Comm_rank(MPI_COMM_WORLD, &here);
// Calculate the value for this locality (here)
int value = here;
std::vector<int> result(num_localities);
MPI_Scan(&value, &result[0], 1, MPI_INT, MPI_SUM, MPI_COMM_WORLD);
std::cout << "Locality " << here << " has value " << result[0] << std::endl;
MPI_Finalize();
return 0;
}
HPX equivalent:
std::uint32_t num_localities = hpx::get_num_localities(hpx::launch::sync);
std::uint32_t here = hpx::get_locality_id();
auto inclusive_scan_client = create_communicator(inclusive_scan_basename,
num_sites_arg(num_localities), this_site_arg(here));
std::uint32_t value = here;
hpx::future<std::uint32_t> overall_result = inclusive_scan(
inclusive_scan_client, value, std::plus<std::uint32_t>{});
uint32_t r = overall_result.get();
std::cout << "Locality " << here << " has value " << r << std::endl;
For num_localities = 2 this code will print the following message:
Locality 0 has value 0
Locality 1 has value 1
HPX uses the function inclusive_scan to implement MPI_Scan. In more detail:
hpx::get_num_localities(hpx::launch::sync) retrieves the number of localities, while hpx::get_locality_id() returns the ID of the current locality.
The function create_communicator() is used to create a communicator called inclusive_scan_client.
The inclusive_scan function is used to perform the exclusive scan operation using the communicator inclusive_scan_client. std::plus<std::uint32_t>{} specifies the binary associative operator to use for the scan. In this case, it’s addition for summing values.
The get() member function of the overall_result future is used to wait for the result.
MPI_Reduce#
The following code performs a global reduce operation across all processes.
MPI code:
#include <iostream>
#include <mpi.h>
int main(int argc, char *argv[]) {
MPI_Init(&argc, &argv);
int num_processes;
MPI_Comm_size(MPI_COMM_WORLD, &num_processes);
int this_rank;
MPI_Comm_rank(MPI_COMM_WORLD, &this_rank);
int value = this_rank;
int result = 0;
// Perform the reduction operation
MPI_Reduce(&value, &result, 1, MPI_INT, MPI_SUM, 0, MPI_COMM_WORLD);
// Print the result for the root process (process 0)
if (this_rank == 0) {
std::cout << "Locality " << this_rank << " has value " << result
<< std::endl;
}
MPI_Finalize();
return 0;
}
HPX equivalent:
std::uint32_t num_localities = hpx::get_num_localities(hpx::launch::sync);
std::uint32_t this_locality = hpx::get_locality_id();
auto reduce_direct_client = create_communicator(reduce_direct_basename,
num_sites_arg(num_localities), this_site_arg(this_locality));
std::uint32_t value = hpx::get_locality_id();
if (this_locality == 0)
{
hpx::future<std::uint32_t> overall_result = reduce_here(
reduce_direct_client, value, std::plus<std::uint32_t>{});
uint32_t r = overall_result.get();
std::cout << "Locality " << this_locality << " has value " << r
<< std::endl;
}
else
{
hpx::future<void> overall_result =
reduce_there(reduce_direct_client, std::move(value));
overall_result.get();
}
This code will print the following message:
Locality 0 has value 1
HPX uses two functions to implement the functionality of MPI_Reduce: reduce_here and reduce_there. reduce_here is gathering data from all localities to the locality with ID 0 (root locality) and then performs the defined reduction operation. reduce_there allows non-root localities to participate in the reduction operation by sending data to the root locality. In more detail:
hpx::get_num_localities(hpx::launch::sync) retrieves the number of localities, while hpx::get_locality_id() returns the ID of the current locality.
The function create_communicator() is used to create a communicator called reduce_direct_client.
If the current locality is the root (its ID is equal to 0):
The reduce_here function initiates a reduction operation with addition (std::plus) as the reduction operator. The result is stored in overall_result.
The get() member function of the overall_result future is used to wait for the result.
If the current locality is not the root:
The reduce_there initiates a remote reduction operation.
The get() member function of the overall_result future is used to wait for the remote reduction operation to complete. This is done to ensure synchronization among localities.
Building tests and examples#
Tests#
To build the tests:
$ cmake --build . --target tests
To control which tests to run use ctest:
To run single tests, for example a test for
for_loop:
$ ctest --output-on-failure -R tests.unit.modules.algorithms.algorithms.for_loop
To run a whole group of tests:
$ ctest --output-on-failure -R tests.unit
Examples#
To build (and install) all examples invoke:
$ cmake -DHPX_WITH_EXAMPLES=On .
$ make examples
$ make install
To build the
hello_world_1example run:
$ make hello_world_1
HPX executables end up in the bin directory in your build directory. You
can now run hello_world_1 and should see the following output:
$ ./bin/hello_world_1
Hello World!
You’ve just run an example which prints Hello World! from the HPX runtime.
The source for the example is in examples/quickstart/hello_world_1.cpp. The
hello_world_distributed example (also available in the
examples/quickstart directory) is a distributed hello world program, which is
described in Remote execution with actions. It provides a gentle introduction to
the distributed aspects of HPX.
Tip
Most build targets in HPX have two names: a simple name and
a hierarchical name corresponding to what type of example or
test the target is. If you are developing HPX it is often helpful to run
make help to get a list of available targets. For example, make help |
grep hello_world outputs the following:
... examples.quickstart.hello_world_2
... hello_world_2
... examples.quickstart.hello_world_1
... hello_world_1
... examples.quickstart.hello_world_distributed
... hello_world_distributed
It is also possible to build, for instance, all quickstart examples using make
examples.quickstart.
Creating HPX projects#
Using HPX with pkg-config#
How to build HPX applications with pkg-config#
After you are done installing HPX, you should be able to build the following
program. It prints Hello World! on the locality you run it on.
// Including 'hpx/hpx_main.hpp' instead of the usual 'hpx/hpx_init.hpp' enables
// to use the plain C-main below as the direct main HPX entry point.
#include <hpx/hpx_main.hpp>
#include <hpx/iostream.hpp>
int main()
{
// Say hello to the world!
hpx::cout << "Hello World!\n" << std::flush;
return 0;
}
Copy the text of this program into a file called hello_world.cpp.
Now, in the directory where you put hello_world.cpp, issue the following
commands (where $HPX_LOCATION is the build directory or
CMAKE_INSTALL_PREFIX you used while building HPX):
$ export PKG_CONFIG_PATH=$PKG_CONFIG_PATH:$HPX_LOCATION/lib/pkgconfig
$ c++ -o hello_world hello_world.cpp \
`pkg-config --cflags --libs hpx_application`\
-lhpx_iostreams -DHPX_APPLICATION_NAME=hello_world
Important
When using pkg-config with HPX, the pkg-config flags must go after the
-o flag.
Note
HPX libraries have different names in debug and release mode. If you want
to link against a debug HPX library, you need to use the _debug suffix
for the pkg-config name. That means instead of hpx_application or
hpx_component, you will have to use hpx_application_debug or
hpx_component_debug Moreover, all referenced HPX components need to
have an appended d suffix. For example, instead of -lhpx_iostreams you will
need to specify -lhpx_iostreamsd.
Important
If the HPX libraries are in a path that is not found by the dynamic
linker, you will need to add the path $HPX_LOCATION/lib to your linker search
path (for example LD_LIBRARY_PATH on Linux).
To test the program, type:
$ ./hello_world
which should print Hello World! and exit.
How to build HPX components with pkg-config#
Let’s try a more complex example involving an HPX component. An HPX component is a class that exposes HPX actions. HPX components are compiled into dynamically loaded modules called component libraries. Here’s the source code:
hello_world_component.cpp
#include <hpx/config.hpp>
#if !defined(HPX_COMPUTE_DEVICE_CODE)
#include <hpx/iostream.hpp>
#include "hello_world_component.hpp"
#include <iostream>
namespace examples { namespace server {
void hello_world::invoke()
{
hpx::cout << "Hello HPX World!" << std::endl;
}
}} // namespace examples::server
HPX_REGISTER_COMPONENT_MODULE()
typedef hpx::components::component<examples::server::hello_world>
hello_world_type;
HPX_REGISTER_COMPONENT(hello_world_type, hello_world)
HPX_REGISTER_ACTION(
examples::server::hello_world::invoke_action, hello_world_invoke_action)
#endif
hello_world_component.hpp
#pragma once
#include <hpx/config.hpp>
#if !defined(HPX_COMPUTE_DEVICE_CODE)
#include <hpx/hpx.hpp>
#include <hpx/include/actions.hpp>
#include <hpx/include/components.hpp>
#include <hpx/include/lcos.hpp>
#include <hpx/serialization.hpp>
#include <utility>
namespace examples { namespace server {
struct HPX_COMPONENT_EXPORT hello_world
: hpx::components::component_base<hello_world>
{
void invoke();
HPX_DEFINE_COMPONENT_ACTION(hello_world, invoke)
};
}} // namespace examples::server
HPX_REGISTER_ACTION_DECLARATION(
examples::server::hello_world::invoke_action, hello_world_invoke_action)
namespace examples {
struct hello_world
: hpx::components::client_base<hello_world, server::hello_world>
{
typedef hpx::components::client_base<hello_world, server::hello_world>
base_type;
hello_world(hpx::future<hpx::id_type>&& f)
: base_type(std::move(f))
{
}
hello_world(hpx::id_type&& f)
: base_type(std::move(f))
{
}
void invoke()
{
hpx::async<server::hello_world::invoke_action>(this->get_id())
.get();
}
};
} // namespace examples
#endif
hello_world_client.cpp
#include <hpx/config.hpp>
#if defined(HPX_COMPUTE_HOST_CODE)
#include <hpx/wrap_main.hpp>
#include "hello_world_component.hpp"
int main()
{
{
// Create a single instance of the component on this locality.
examples::hello_world client =
hpx::new_<examples::hello_world>(hpx::find_here());
// Invoke the component's action, which will print "Hello World!".
client.invoke();
}
return 0;
}
#endif
Copy the three source files above into three files (called
hello_world_component.cpp, hello_world_component.hpp and
hello_world_client.cpp, respectively).
Now, in the directory where you put the files, run the following command to
build the component library. (where $HPX_LOCATION is the build directory or
CMAKE_INSTALL_PREFIX you used while building HPX):
$ export PKG_CONFIG_PATH=$PKG_CONFIG_PATH:$HPX_LOCATION/lib/pkgconfig
$ c++ -o libhpx_hello_world.so hello_world_component.cpp \
`pkg-config --cflags --libs hpx_component` \
-lhpx_iostreams -DHPX_COMPONENT_NAME=hpx_hello_world
Now pick a directory in which to install your HPX component libraries. For
this example, we’ll choose a directory named my_hpx_libs:
$ mkdir ~/my_hpx_libs
$ mv libhpx_hello_world.so ~/my_hpx_libs
Note
HPX libraries have different names in debug and release mode. If you want
to link against a debug HPX library, you need to use the _debug suffix
for the pkg-config name. That means instead of hpx_application or
hpx_component you will have to use hpx_application_debug or
hpx_component_debug. Moreover, all referenced HPX components need to
have a appended d suffix, e.g. instead of -lhpx_iostreams you will
need to specify -lhpx_iostreamsd.
Important
If the HPX libraries are in a path that is not found by the dynamic linker.
You need to add the path $HPX_LOCATION/lib to your linker search path
(for example LD_LIBRARY_PATH on Linux).
Now, to build the application that uses this component (hello_world_client.cpp),
we do:
$ export PKG_CONFIG_PATH=$PKG_CONFIG_PATH:$HPX_LOCATION/lib/pkgconfig
$ c++ -o hello_world_client hello_world_client.cpp \
``pkg-config --cflags --libs hpx_application``\
-L${HOME}/my_hpx_libs -lhpx_hello_world -lhpx_iostreams
Important
When using pkg-config with HPX, the pkg-config flags must go after the
-o flag.
Finally, you’ll need to set your LD_LIBRARY_PATH before you can run the program. To run the program, type:
$ export LD_LIBRARY_PATH="$LD_LIBRARY_PATH:$HOME/my_hpx_libs"
$ ./hello_world_client
which should print Hello HPX World! and exit.
Using HPX with CMake-based projects#
In addition to the pkg-config support discussed on the previous pages, HPX comes with full CMake support. In order to integrate HPX into existing or new CMakeLists.txt, you can leverage the find_package command integrated into CMake. Following, is a Hello World component example using CMake.
Let’s revisit what we have. We have three files that compose our example application:
hello_world_component.hpphello_world_component.cpphello_world_client.hpp
The basic structure to include HPX into your CMakeLists.txt is shown here:
# Require a recent version of cmake
cmake_minimum_required(VERSION 3.18 FATAL_ERROR)
# This project is C++ based.
project(your_app CXX)
# Instruct cmake to find the HPX settings
find_package(HPX)
In order to have CMake find HPX, it needs to be told where to look for the
HPXConfig.cmake file that is generated when HPX is built or installed. It is
used by find_package(HPX) to set up all the necessary macros needed to use
HPX in your project. The ways to achieve this are:
Set the
HPX_DIRCMake variable to point to the directory containing theHPXConfig.cmakescript on the command line when you invoke CMake:$ cmake -DHPX_DIR=$HPX_LOCATION/lib/cmake/HPX ...
where
$HPX_LOCATIONis the build directory orCMAKE_INSTALL_PREFIXyou used when building/configuring HPX.Set the
CMAKE_PREFIX_PATHvariable to the root directory of your HPX build or install location on the command line when you invoke CMake:$ cmake -DCMAKE_PREFIX_PATH=$HPX_LOCATION ...
The difference between
CMAKE_PREFIX_PATHandHPX_DIRis that CMake will add common postfixes, such aslib/cmake/<project, to theCMAKE_PREFIX_PATHand search in these locations too. Note that if your project uses HPX as well as other CMake-managed projects, the paths to the locations of these multiple projects may be concatenated in theCMAKE_PREFIX_PATH.The variables above may be set in the CMake GUI or curses ccmake interface instead of the command line.
Additionally, if you wish to require HPX for your project, replace the
find_package(HPX) line with find_package(HPX REQUIRED).
You can check if HPX was successfully found with the HPX_FOUND CMake variable.
Using CMake targets#
The recommended way of setting up your targets to use HPX is to link to the
HPX::hpx CMake target:
target_link_libraries(hello_world_component PUBLIC HPX::hpx)
This requires that you have already created the target like this:
add_library(hello_world_component SHARED hello_world_component.cpp)
target_include_directories(hello_world_component PUBLIC ${CMAKE_CURRENT_SOURCE_DIR})
When you link your library to the HPX::hpx CMake target, you will be able
use HPX functionality in your library. To use main() as the implicit entry
point in your application you must additionally link your application to the
CMake target HPX::wrap_main. This target is automatically linked to
executables if you are using the macros described below
(Using macros to create new targets). See Re-use the main() function as the main HPX entry point for more information on
implicitly using main() as the entry point. If you want the same wrapping
behavior without including hpx/hpx_main.hpp, link to
the HPX::auto_wrap_main target instead. This enables the runtime
initialization around main() unconditionally and is useful for codebases
where adding the header to main.cpp is impractical
Note
The use of HPX::auto_wrap_main is not supported when using the
native Windows MSVC toolchain.
If you want to use the facilities exposed by hpx::runtime_manager in binaries
that were not linked as executables (e.g., in shared libraries), you will need
make your cmake target explicitly depend on the HPX::init target:
add_library(hello_world_component SHARED hello_world_component.cpp)
target_link_libraries(hello_world_component PRIVATE HPX::init)
Otherwise you may see compilation errors complaining about the header file
hpx/runtime_manager.hpp not being found.
Creating a component requires setting two additional compile definitions:
target_compile_options(hello_world_component
HPX_COMPONENT_NAME=hello_world
HPX_COMPONENT_EXPORTS)
Instead of setting these definitions manually you may link to the
HPX::component target, which sets HPX_COMPONENT_NAME to
hpx_<target_name>, where <target_name> is the target name of your
library. Note that these definitions should be PRIVATE to make sure these
definitions are not propagated transitively to dependent targets.
In addition to making your library a component you can make it a plugin. To do
so link to the HPX::plugin target. Similarly to HPX::component this will
set HPX_PLUGIN_NAME to hpx_<target_name>. This definition should also be
PRIVATE. Unlike regular shared libraries, plugins are loaded at runtime from
certain directories and will not be found without additional configuration.
Plugins should be installed into a directory containing only plugins. For
example, the plugins created by HPX itself are installed into the hpx
subdirectory in the library install directory (typically lib or lib64).
When using the HPX::plugin target you need to install your plugins into an
appropriate directory. You may also want to set the location of your plugin in
the build directory with the *_OUTPUT_DIRECTORY* CMake target properties to
be able to load the plugins in the build directory. Once you’ve set the install
or output directory of your plugin you need to tell your executable where to
find it at runtime. You can do this either by setting the environment variable
HPX_COMPONENT_PATHS or the ini setting hpx.component_paths (see
--hpx:ini) to the directory containing your plugin.
Using macros to create new targets#
In addition to the targets described above, HPX provides convenience macros to hide optional boilerplate code that may be useful for your project. The link to the targets described above. We recommend that you use the targets directly whenever possible as they tend to compose better with other targets.
The macro for adding an HPX component is add_hpx_component. It can be
used in your CMakeLists.txt file like this:
# build your application using HPX
add_hpx_component(hello_world
SOURCES hello_world_component.cpp
HEADERS hello_world_component.hpp
COMPONENT_DEPENDENCIES iostreams)
Note
add_hpx_component adds a _component suffix to the target name. In the
example above, a hello_world_component target will be created.
The available options to add_hpx_component are:
SOURCES: The source files for that componentHEADERS: The header files for that componentDEPENDENCIES: Other libraries or targets this component depends onCOMPONENT_DEPENDENCIES: The components this component depends onPLUGIN: Treats this component as a plugin-able libraryCOMPILE_FLAGS: Additional compiler flagsLINK_FLAGS: Additional linker flagsFOLDER: Adds the headers and source files to this Source Group folder
EXCLUDE_FROM_ALL: Do not build this component as part of thealltarget
After adding the component, the way you add the executable is as follows:
# build your application using HPX
add_hpx_executable(hello_world
SOURCES hello_world_client.cpp
COMPONENT_DEPENDENCIES hello_world)
Note
add_hpx_executable automatically adds a _component suffix to dependencies
specified in COMPONENT_DEPENDENCIES, meaning you can directly use the name given
when adding a component using add_hpx_component.
When you configure your application, all you need to do is set the HPX_DIR
variable to point to the installation of HPX.
Note
All library targets built with HPX are exported and readily available to be
used as arguments to target_link_libraries
in your targets. The HPX include directories are available with the
HPX_INCLUDE_DIRS CMake variable.
Using the HPX compiler wrapper hpxcxx#
The hpxcxx compiler wrapper helps to compile a HPX component, application,
or object file, based on the arguments passed to it.
$ hpxcxx [--exe=<APPLICATION_NAME> | --comp=<COMPONENT_NAME> | -c] FLAGS FILES
The hpxcxx command requires that either an application or a component is
built or -c flag is specified. If the build is against a debug build, the
-g is to be specified while building.
FLAGS#-l <LIBRARY> | -l<LIBRARY>: Links<LIBRARY>to the build-g: Specifies that the application or component build is against a debug build-rd: Setsrelease-with-debug-infooption-mr: Setsminsize-releaseoption
All other flags (like -o OUTPUT_FILE) are directly passed to the underlying
C++ compiler.
Using macros to set up existing targets to use HPX#
In addition to the add_hpx_component and add_hpx_executable, you can use
the hpx_setup_target macro to have an already existing target to be used
with the HPX libraries:
hpx_setup_target(target)
Optional parameters are:
EXPORT: Adds it to the CMake export list HPXTargetsINSTALL: Generates an install rule for the targetPLUGIN: Treats this component as a plugin-able libraryTYPE: The type can be: EXECUTABLE, LIBRARY or COMPONENTDEPENDENCIES: Other libraries or targets this component depends onCOMPONENT_DEPENDENCIES: The components this component depends onCOMPILE_FLAGS: Additional compiler flagsLINK_FLAGS: Additional linker flags
If you do not use CMake, you can still build against HPX, but you should refer to the section on How to build HPX components with pkg-config.
Note
Since HPX relies on dynamic libraries, the dynamic linker needs to know
where to look for them. If HPX isn’t installed into a path that is
configured as a linker search path, external projects need to either set
RPATH or adapt LD_LIBRARY_PATH to point to where the HPX libraries
reside. In order to set RPATHs, you can include HPX_SetFullRPATH in
your project after all libraries you want to link against have been added.
Please also consult the CMake documentation here.
Using HPX with Makefile#
A basic project building with HPX is through creating makefiles. The process
of creating one can get complex depending upon the use of cmake parameter
HPX_WITH_HPX_MAIN (which defaults to ON).
How to build HPX applications with makefile#
If HPX is installed correctly, you should be able to build and run a simple
Hello World program. It prints Hello World! on the locality you
run it on.
// Including 'hpx/hpx_main.hpp' instead of the usual 'hpx/hpx_init.hpp' enables
// to use the plain C-main below as the direct main HPX entry point.
#include <hpx/hpx_main.hpp>
#include <hpx/iostream.hpp>
int main()
{
// Say hello to the world!
hpx::cout << "Hello World!\n" << std::flush;
return 0;
}
Copy the content of this program into a file called hello_world.cpp.
Now, in the directory where you put hello_world.cpp, create a Makefile. Add the following code:
CXX=(CXX) # Add your favourite compiler here or let makefile choose default.
CXXFLAGS=-O3 -std=c++17
Boost_ROOT=/path/to/boost
Hwloc_ROOT=/path/to/hwloc
Tcmalloc_ROOT=/path/to/tcmalloc
HPX_ROOT=/path/to/hpx
INCLUDE_DIRECTIVES=$(HPX_ROOT)/include $(Boost_ROOT)/include $(Hwloc_ROOT)/include
LIBRARY_DIRECTIVES=-L$(HPX_ROOT)/lib $(HPX_ROOT)/lib/libhpx_init.a $(HPX_ROOT)/lib/libhpx.so $(Boost_ROOT)/lib/libboost_atomic-mt.so $(Boost_ROOT)/lib/libboost_filesystem-mt.so $(Boost_ROOT)/lib/libboost_program_options-mt.so $(Boost_ROOT)/lib/libboost_regex-mt.so $(Boost_ROOT)/lib/libboost_system-mt.so -lpthread $(Tcmalloc_ROOT)/libtcmalloc_minimal.so $(Hwloc_ROOT)/libhwloc.so -ldl -lrt
LINK_FLAGS=$(HPX_ROOT)/lib/libhpx_wrap.a -Wl,-wrap=main # should be left empty for HPX_WITH_HPX_MAIN=OFF
hello_world: hello_world.o
$(CXX) $(CXXFLAGS) -o hello_world hello_world.o $(LIBRARY_DIRECTIVES) $(LINK_FLAGS)
hello_world.o:
$(CXX) $(CXXFLAGS) -c -o hello_world.o hello_world.cpp $(INCLUDE_DIRECTIVES)
Important
LINK_FLAGS should be left empty if HPX_WITH_HPX_MAIN is set to OFF.
Boost in the above example is build with --layout=tagged. Actual Boost
flags may vary on your build of Boost.
To build the program, type:
$ make
A successful build should result in hello_world binary. To test, type:
$ ./hello_world
How to build HPX components with makefile#
Let’s try a more complex example involving an HPX component. An HPX component is a class that exposes HPX actions. HPX components are compiled into dynamically-loaded modules called component libraries. Here’s the source code:
hello_world_component.cpp
#include <hpx/config.hpp>
#if !defined(HPX_COMPUTE_DEVICE_CODE)
#include <hpx/iostream.hpp>
#include "hello_world_component.hpp"
#include <iostream>
namespace examples { namespace server {
void hello_world::invoke()
{
hpx::cout << "Hello HPX World!" << std::endl;
}
}} // namespace examples::server
HPX_REGISTER_COMPONENT_MODULE()
typedef hpx::components::component<examples::server::hello_world>
hello_world_type;
HPX_REGISTER_COMPONENT(hello_world_type, hello_world)
HPX_REGISTER_ACTION(
examples::server::hello_world::invoke_action, hello_world_invoke_action)
#endif
hello_world_component.hpp
#pragma once
#include <hpx/config.hpp>
#if !defined(HPX_COMPUTE_DEVICE_CODE)
#include <hpx/hpx.hpp>
#include <hpx/include/actions.hpp>
#include <hpx/include/components.hpp>
#include <hpx/include/lcos.hpp>
#include <hpx/serialization.hpp>
#include <utility>
namespace examples { namespace server {
struct HPX_COMPONENT_EXPORT hello_world
: hpx::components::component_base<hello_world>
{
void invoke();
HPX_DEFINE_COMPONENT_ACTION(hello_world, invoke)
};
}} // namespace examples::server
HPX_REGISTER_ACTION_DECLARATION(
examples::server::hello_world::invoke_action, hello_world_invoke_action)
namespace examples {
struct hello_world
: hpx::components::client_base<hello_world, server::hello_world>
{
typedef hpx::components::client_base<hello_world, server::hello_world>
base_type;
hello_world(hpx::future<hpx::id_type>&& f)
: base_type(std::move(f))
{
}
hello_world(hpx::id_type&& f)
: base_type(std::move(f))
{
}
void invoke()
{
hpx::async<server::hello_world::invoke_action>(this->get_id())
.get();
}
};
} // namespace examples
#endif
hello_world_client.cpp
#include <hpx/config.hpp>
#if defined(HPX_COMPUTE_HOST_CODE)
#include <hpx/wrap_main.hpp>
#include "hello_world_component.hpp"
int main()
{
{
// Create a single instance of the component on this locality.
examples::hello_world client =
hpx::new_<examples::hello_world>(hpx::find_here());
// Invoke the component's action, which will print "Hello World!".
client.invoke();
}
return 0;
}
#endif
Now, in the directory, create a Makefile. Add the following code:
CXX=(CXX) # Add your favourite compiler here or let makefile choose default.
CXXFLAGS=-O3 -std=c++17
Boost_ROOT=/path/to/boost
Hwloc_ROOT=/path/to/hwloc
Tcmalloc_ROOT=/path/to/tcmalloc
HPX_ROOT=/path/to/hpx
INCLUDE_DIRECTIVES=$(HPX_ROOT)/include $(Boost_ROOT)/include $(Hwloc_ROOT)/include
LIBRARY_DIRECTIVES=-L$(HPX_ROOT)/lib $(HPX_ROOT)/lib/libhpx_init.a $(HPX_ROOT)/lib/libhpx.so $(Boost_ROOT)/lib/libboost_atomic-mt.so $(Boost_ROOT)/lib/libboost_filesystem-mt.so $(Boost_ROOT)/lib/libboost_program_options-mt.so $(Boost_ROOT)/lib/libboost_regex-mt.so $(Boost_ROOT)/lib/libboost_system-mt.so -lpthread $(Tcmalloc_ROOT)/libtcmalloc_minimal.so $(Hwloc_ROOT)/libhwloc.so -ldl -lrt
LINK_FLAGS=$(HPX_ROOT)/lib/libhpx_wrap.a -Wl,-wrap=main # should be left empty for HPX_WITH_HPX_MAIN=OFF
hello_world_client: libhpx_hello_world hello_world_client.o
$(CXX) $(CXXFLAGS) -o hello_world_client $(LIBRARY_DIRECTIVES) libhpx_hello_world $(LINK_FLAGS)
hello_world_client.o: hello_world_client.cpp
$(CXX) $(CXXFLAGS) -o hello_world_client.o hello_world_client.cpp $(INCLUDE_DIRECTIVES)
libhpx_hello_world: hello_world_component.o
$(CXX) $(CXXFLAGS) -o libhpx_hello_world hello_world_component.o $(LIBRARY_DIRECTIVES)
hello_world_component.o: hello_world_component.cpp
$(CXX) $(CXXFLAGS) -c -o hello_world_component.o hello_world_component.cpp $(INCLUDE_DIRECTIVES)
To build the program, type:
$ make
A successful build should result in hello_world binary. To test, type:
$ ./hello_world
Note
Due to high variations in CMake flags and library dependencies, it is recommended to build HPX applications and components with pkg-config or CMakeLists.txt. Writing Makefile may result in broken builds if due care is not taken. pkg-config files and CMake systems are configured with CMake build of HPX. Hence, they are stable when used together and provide better support overall.
Starting the HPX runtime#
In order to write an application that uses services from the HPX runtime system, you need to initialize the HPX library by inserting certain calls into the code of your application. Depending on your use case, this can be done in 3 different ways:
Minimally invasive: Re-use the
main()function as the main HPX entry point.Balanced use case: Supply your own main HPX entry point while blocking the main thread.
Most flexibility: Supply your own main HPX entry point while avoiding blocking the main thread.
Suspend and resume: As above but suspend and resume the HPX runtime to allow for other runtimes to be used.
Re-use the main() function as the main HPX entry point#
This method is the least intrusive to your code. However, it provides you with the smallest flexibility in terms of initializing the HPX runtime system. The following code snippet shows what a minimal HPX application using this technique looks like:
#include <hpx/hpx_main.hpp>
int main(int argc, char* argv[])
{
return 0;
}
The only change to your code you have to make is to include the file
hpx/hpx_main.hpp. In this case the function main() will be invoked as
the first HPX thread of the application. The runtime system will be
initialized behind the scenes before the function main() is executed and
will automatically stop after main() has returned. For this method to work
you must link your application to the CMake target HPX::wrap_main. This is
done automatically if you are using the provided macros
(Using macros to create new targets) to set up your application, but must be done
explicitly if you are using targets directly (Using CMake targets).
All HPX API functions can be used from within the main() function now. If
you cannot or do not want to include hpx/hpx_main.hpp in main.cpp, you
can instead link against HPX::auto_wrap_main. That target enables the same
runtime startup path without needing the header-triggered opt-in.
Note
The use of HPX::auto_wrap_main is not supported when using the
native Windows MSVC toolchain.
Note
The function main() does not need to expect receiving argc and
argv as shown above, but could expose the signature int main(). This
is consistent with the usually allowed prototypes for the function main()
in C++ applications.
All command line arguments specific to HPX will still be processed by the
HPX runtime system as usual. However, those command line options will be
removed from the list of values passed to argc/argv of the function
main(). The list of values passed to main() will hold only the
commandline options that are not recognized by the HPX runtime system (see
the section HPX Command Line Options for more details on what options are recognized
by HPX).
Note
In this mode all one-letter shortcuts that are normally
available on the HPX command line are disabled (such as -t or -l see
HPX Command Line Options). This is done to minimize any possible interaction
between the command line options recognized by the HPX runtime system and
any command line options defined by the application.
The value returned from the function main() as shown above will be returned
to the operating system as usual.
Important
To achieve this seamless integration, the header file hpx/hpx_main.hpp
defines a macro:
#define main hpx_startup::user_main
which could result in unexpected behavior.
Important
To achieve this seamless integration, we use different implementations for
different operating systems. In case of Linux or macOS, the code present in
hpx_wrap.cpp is put into action. We hook into the system function in case
of Linux and provide alternate entry point in case of macOS. For other
operating systems we rely on a macro:
#define main hpx_startup::user_main
provided in the header file hpx/hpx_main.hpp. This implementation can
result in unexpected behavior.
Caution
We make use of an override variable include_libhpx_wrap in the header
file hpx/hpx_main.hpp to swiftly choose the function call stack at
runtime. Therefore, the header file should only be included in the main
executable. Including it in the components will result in multiple definition
of the variable.
Supply your own main HPX entry point while blocking the main thread#
With this method you need to provide an explicit main-thread function named
hpx_main at global scope. This function will be invoked as the main entry
point of your HPX application on the console locality only (this
function will be invoked as the first HPX thread of your application). All
HPX API functions can be used from within this function.
The thread executing the function hpx::init will block waiting for
the runtime system to exit. The value returned from hpx_main will be
returned from hpx::init after the runtime system has stopped.
The function hpx::finalize has to be called on one of the HPX
localities in order to signal that all work has been scheduled and the runtime
system should be stopped after the scheduled work has been executed.
This method of invoking HPX has the advantage of the user being able to decide
which version of hpx::init to call. This allows to pass
additional configuration parameters while initializing the HPX runtime system.
#include <hpx/hpx_init.hpp>
int hpx_main(int argc, char* argv[])
{
// Any HPX application logic goes here...
return hpx::finalize();
}
int main(int argc, char* argv[])
{
// Initialize HPX, run hpx_main as the first HPX thread, and
// wait for hpx::finalize being called.
return hpx::init(argc, argv);
}
Note
The function hpx_main does not need to expect receiving argc/argv
as shown above, but could expose one of the following signatures:
int hpx_main();
int hpx_main(int argc, char* argv[]);
int hpx_main(hpx::program_options::variables_map& vm);
This is consistent with (and extends) the usually allowed prototypes for the
function main() in C++ applications.
The header file to include for this method of using HPX is
hpx/hpx_init.hpp.
There are many additional overloads of hpx::init available, such as
the ability to provide your own entry-point function instead of hpx_main.
Please refer to the function documentation for more details (see: hpx/hpx_init.hpp).
Supply your own main HPX entry point while avoiding blocking the main thread#
With this method you need to provide an explicit main thread function named
hpx_main at global scope. This function will be invoked as the main entry
point of your HPX application on the console locality only (this
function will be invoked as the first HPX thread of your application). All
HPX API functions can be used from within this function.
The thread executing the function hpx::start will not block
waiting for the runtime system to exit, but will return immediately.
The function hpx::finalize has to be called on one of the HPX
localities in order to signal that all work has been scheduled and the runtime
system should be stopped after the scheduled work has been executed.
This method of invoking HPX is useful for applications where the main thread
is used for special operations, such a GUIs. The function hpx::stop
can be used to wait for the HPX runtime system to exit and should at least be
used as the last function called in main(). The value returned from
hpx_main will be returned from hpx::stop after the runtime
system has stopped.
#include <hpx/hpx_start.hpp>
int hpx_main(int argc, char* argv[])
{
// Any HPX application logic goes here...
return hpx::finalize();
}
int main(int argc, char* argv[])
{
// Initialize HPX, run hpx_main.
hpx::start(argc, argv);
// ...Execute other code here...
// Wait for hpx::finalize being called.
return hpx::stop();
}
Note
The function hpx_main does not need to expect receiving argc/argv
as shown above, but could expose one of the following signatures:
int hpx_main();
int hpx_main(int argc, char* argv[]);
int hpx_main(hpx::program_options::variables_map& vm);
This is consistent with (and extends) the usually allowed prototypes for the
function main() in C++ applications.
The header file to include for this method of using HPX is
hpx/hpx_start.hpp.
There are many additional overloads of hpx::start available, such as
the option for users to provide their own entry point function instead of hpx_main.
Please refer to the function documentation for more details (see:
hpx/hpx_start.hpp).
Supply your own explicit startup function as the main HPX entry point#
There is also a way to specify any function (besides hpx_main) to be used as
the main entry point for your HPX application:
#include <hpx/hpx_init.hpp>
int application_entry_point(int argc, char* argv[])
{
// Any HPX application logic goes here...
return hpx::finalize();
}
int main(int argc, char* argv[])
{
// Initialize HPX, run application_entry_point as the first HPX thread,
// and wait for hpx::finalize being called.
return hpx::init(&application_entry_point, argc, argv);
}
Note
The function supplied to hpx::init must have one of the following
prototypes:
int application_entry_point(int argc, char* argv[]); int application_entry_point(hpx::program_options::variables_map& vm);
Note
If nullptr is used as the function argument, HPX will not run any
startup function on this locality.
Suspending and resuming the HPX runtime#
In some applications it is required to combine HPX with other runtimes. To
support this use case, HPX provides two functions: hpx::suspend and
hpx::resume. hpx::suspend is a blocking call which will
wait for all scheduled tasks to finish executing and then put the thread pool OS
threads to sleep. hpx::resume simply wakes up the sleeping threads
so that they are ready to accept new work. hpx::suspend and
hpx::resume can be found in the header hpx/hpx_suspend.hpp.
#include <hpx/hpx_start.hpp>
#include <hpx/hpx_suspend.hpp>
int main(int argc, char* argv[])
{
// Initialize HPX, don't run hpx_main
hpx::start(nullptr, argc, argv);
// Schedule a function on the HPX runtime
hpx::post(&my_function, ...);
// Wait for all tasks to finish, and suspend the HPX runtime
hpx::suspend();
// Execute non-HPX code here
// Resume the HPX runtime
hpx::resume();
// Schedule more work on the HPX runtime
// hpx::finalize has to be called from the HPX runtime before hpx::stop
hpx::post([]() { hpx::finalize(); });
return hpx::stop();
}
Note
hpx::suspend does not wait for hpx::finalize to be
called. Only call hpx::finalize when you wish to fully stop the
HPX runtime.
Warning
hpx::suspendonly waits for local tasks, i.e. tasks on thecurrent locality, to finish executing. When using
hpx::suspendin a multi-locality scenario the user is responsible for ensuring that any work required from other localities has also finished.
HPX also supports suspending individual thread pools and threads. For details
on how to do that, see the documentation for hpx::threads::thread_pool_base.
Automatically suspending worker threads#
The previous method guarantees that the worker threads are suspended when you ask for it and that they stay suspended. An alternative way to achieve the same effect is to tweak how quickly HPX suspends its worker threads when they run out of work. The following configuration values make sure that HPX idles very quickly:
hpx.max_idle_backoff_time = 1000
hpx.max_idle_loop_count = 0
They can be set on the command line using
--hpx:ini=hpx.max_idle_backoff_time=1000 and
--hpx:ini=hpx.max_idle_loop_count=0. See Launching and configuring HPX applications
for more details on how to set configuration parameters.
After setting idling parameters the previous example could now be written like this instead:
#include <hpx/hpx_start.hpp>
int main(int argc, char* argv[])
{
// Initialize HPX, don't run hpx_main
hpx::start(nullptr, argc, argv);
// Schedule some functions on the HPX runtime
// NOTE: run_as_hpx_thread blocks until completion.
hpx::run_as_hpx_thread(&my_function, ...);
hpx::run_as_hpx_thread(&my_other_function, ...);
// hpx::finalize has to be called from the HPX runtime before hpx::stop
hpx::post([]() { hpx::finalize(); });
return hpx::stop();
}
In this example each call to hpx::run_as_hpx_thread acts as a
“parallel region”.
Working of hpx_main.hpp#
In order to initialize HPX from main(), we make use of linker tricks.
It is implemented differently for different operating systems. The method of implementation is as follows:
Linux: Using linker
--wrapoption.Mac OSX: Using the linker
-eoption.Windows: Using
#define main hpx_startup::user_main
Linux implementation#
We make use of the Linux linker ld‘s --wrap option to wrap the
main() function. This way any calls to main() are redirected to our own
implementation of main. It is here that we check for the existence of
hpx_main.hpp by making use of a shadow variable include_libhpx_wrap. The
value of this variable determines the function stack at runtime.
The implementation can be found in libhpx_wrap.a.
Important
It is necessary that hpx_main.hpp be not included more than once.
Multiple inclusions can result in multiple definition of
include_libhpx_wrap.
Mac OSX implementation#
Here we make use of yet another linker option -e to change the entry point
to our custom entry function initialize_main. We initialize the HPX
runtime system from this function and call main from the initialized system. We
determine the function stack at runtime by making use of the shadow variable
include_libhpx_wrap.
The implementation can be found in libhpx_wrap.a.
Important
It is necessary that hpx_main.hpp be not included more than once.
Multiple inclusions can result in multiple definition of
include_libhpx_wrap.
Windows implementation#
We make use of a macro #define main hpx_startup::user_main to take care of
the initializations.
This implementation could result in unexpected behaviors.
Launching and configuring HPX applications#
Configuring HPX applications#
All HPX applications can be configured using special command line options and/or using special configuration files. This section describes the available options, the configuration file format, and the algorithm used to locate possible predefined configuration files. Additionally, this section describes the defaults assumed if no external configuration information is supplied.
During startup any HPX application applies a predefined search pattern to locate one or more configuration files. All found files will be read and merged in the sequence they are found into one single internal database holding all configuration properties. This database is used during the execution of the application to configure different aspects of the runtime system.
In addition to the ini files, any application can supply its own configuration
files, which will be merged with the configuration database as well. Moreover,
the user can specify additional configuration parameters on the command line
when executing an application. The HPX runtime system will merge all command
line configuration options (see the description of the --hpx:ini,
--hpx:config, and --hpx:app-config command line options).
The HPX ini file format#
All HPX applications can be configured using a special file format that is
similar to the well-known Windows INI file format. This is a structured text format
that allows users to group key/value pairs (properties) into sections. The basic element
contained in an ini file is the property. Every property has a name and a
value, delimited by an equal sign '='. The name appears to the left of the
equal sign:
name=value
The value may contain equal signs as only the first '=' character
is interpreted as the delimiter between name and value. Whitespace before
the name, after the value and immediately before and after the delimiting equal
sign is ignored. Whitespace inside the value is retained.
Properties may be grouped into arbitrarily named sections. The section name appears on a line by itself, in square brackets. All properties after the section declaration are associated with that section. There is no explicit “end of section” delimiter; sections end at the next section declaration or the end of the file:
[section]
In HPX sections can be nested. A nested section has a name composed of
all section names it is embedded in. The section names are concatenated using
a dot '.':
[outer_section.inner_section]
Here, inner_section is logically nested within outer_section.
It is possible to use the full section name concatenated with the property name to refer to a particular property. For example, in:
[a.b.c]
d = e
the property value of d can be referred to as a.b.c.d=e.
In HPX ini files can contain comments. Hash signs '#' at the beginning
of a line indicate a comment. All characters starting with '#' until the
end of the line are ignored.
If a property with the same name is reused inside a section, the second occurrence of this property name will override the first occurrence (discard the first value). Duplicate sections simply merge their properties together, as if they occurred contiguously.
In HPX ini files a property value ${FOO:default} will use the environmental
variable FOO to extract the actual value if it is set and default otherwise.
No default has to be specified. Therefore, ${FOO} refers to the environmental
variable FOO. If FOO is not set or empty, the overall expression will evaluate
to an empty string. A property value $[section.key:default] refers to the value
held by the property section.key if it exists and default otherwise. No
default has to be specified. Therefore $[section.key] refers to the property
section.key. If the property section.key is not set or empty, the overall
expression will evaluate to an empty string.
Note
Any property $[section.key:default] is evaluated whenever it is queried
and not when the configuration data is initialized. This allows for lazy
evaluation and relaxes initialization order of different sections. The only
exception are recursive property values, e.g., values referring to the very
key they are associated with. Those property values are evaluated at
initialization time to avoid infinite recursion.
Built-in default configuration settings#
During startup any HPX application applies a predefined search pattern to locate one or more configuration files. All found files will be read and merged in the sequence they are found into one single internal data structure holding all configuration properties.
As a first step the internal configuration database is filled with a set of default configuration properties. Those settings are described on a section by section basis below.
Note
You can print the default configuration settings used for an executable
by specifying the command line option --hpx:dump-config.
system configuration section#[system]
pid = <process-id>
prefix = <current prefix path of core HPX library>
executable = <current prefix path of executable>
Property |
Description |
|
This is initialized to store the current OS-process id of the application instance. |
|
This is initialized to the base directory HPX has been loaded from. |
|
This is initialized to the base directory the current executable has been loaded from. |
[hpx]
location = ${HPX_LOCATION:$[system.prefix]}
component_path = $[hpx.location]/lib/hpx:$[system.executable_prefix]/lib/hpx:$[system.executable_prefix]/../lib/hpx
master_ini_path = $[hpx.location]/share/hpx-<version>:$[system.executable_prefix]/share/hpx-<version>:$[system.executable_prefix]/../share/hpx-<version>
ini_path = $[hpx.master_ini_path]/ini
os_threads = 1
cores = all
localities = 1
program_name =
cmd_line =
lock_detection = ${HPX_LOCK_DETECTION:0}
throw_on_held_lock = ${HPX_THROW_ON_HELD_LOCK:1}
minimal_deadlock_detection = <debug>
spinlock_deadlock_detection = <debug>
spinlock_deadlock_detection_limit = ${HPX_SPINLOCK_DEADLOCK_DETECTION_LIMIT:1000000}
max_background_threads = ${HPX_MAX_BACKGROUND_THREADS:$[hpx.os_threads]}
max_idle_loop_count = ${HPX_MAX_IDLE_LOOP_COUNT:<hpx_idle_loop_count_max>}
max_busy_loop_count = ${HPX_MAX_BUSY_LOOP_COUNT:<hpx_busy_loop_count_max>}
max_idle_backoff_time = ${HPX_MAX_IDLE_BACKOFF_TIME:<hpx_idle_backoff_time_max>}
exception_verbosity = ${HPX_EXCEPTION_VERBOSITY:2}
trace_depth = ${HPX_TRACE_DEPTH:20}
handle_signals = ${HPX_HANDLE_SIGNALS:1}
handle_failed_new = ${HPX_HANDLE_FAILED_NEW:1}
[hpx.stacks]
small_size = ${HPX_SMALL_STACK_SIZE:<hpx_small_stack_size>}
medium_size = ${HPX_MEDIUM_STACK_SIZE:<hpx_medium_stack_size>}
large_size = ${HPX_LARGE_STACK_SIZE:<hpx_large_stack_size>}
huge_size = ${HPX_HUGE_STACK_SIZE:<hpx_huge_stack_size>}
use_guard_pages = ${HPX_THREAD_GUARD_PAGE:1}
Property |
Description |
|
This is initialized to the id of the locality this application instance is running on. |
|
Duplicates are discarded.
This property can refer to a list of directories separated by |
|
This is initialized to the list of default paths of the main hpx.ini
configuration files. This property can refer to a list of directories
separated by |
|
This is initialized to the default path where HPX will look for more
ini configuration files. This property can refer to a list of directories
separated by |
|
This setting reflects the number of OS threads used for running HPX threads. Defaults to number of detected cores (not hyperthreads/PUs). |
|
This setting reflects the number of cores used for running HPX threads. Defaults to number of detected cores (not hyperthreads/PUs). |
|
This setting reflects the number of localities the application is running
on. Defaults to |
|
This setting reflects the program name of the application instance.
Initialized from the command line |
|
This setting reflects the actual command line used to launch this application instance. |
|
This setting verifies that no locks are being held while a HPX thread
is suspended. This setting is applicable only if
|
|
This setting causes an exception if during lock detection at least one
lock is being held while a HPX thread is suspended. This setting is
applicable only if |
|
This setting enables support for minimal deadlock detection for
HPX threads. By default this is set to |
|
This setting verifies that spinlocks don’t spin longer than specified
using the |
|
This setting specifies the upper limit of the allowed number of spins that
spinlocks are allowed to perform. This setting is applicable only if
|
|
This setting defines the number of threads in the scheduler, which are used to execute background work. By default this is the same as the number of cores used for the scheduler. |
|
By default this is defined by the preprocessor constant
|
|
This setting defines the maximum value of the busy-loop counter in the
scheduler. By default this is defined by the preprocessor constant
|
|
This setting defines the maximum time (in milliseconds) for the scheduler
to sleep after being idle for |
|
This setting defines the verbosity of exceptions. Valid values are
integers. A setting of |
|
This setting defines the number of stack-levels printed in generated
stack backtraces. This defaults to |
|
This setting defines whether HPX will register signal handlers that will
print the configuration information (stack backtrace, system information,
etc.) whenever a signal is raised. The default is |
|
This setting defines whether HPX will register a handler for failed
allocationsthat will print the configuration information
(stack backtrace, system information, etc.) whenever an allocation fails.
The default is |
|
This is initialized to the small stack size to be used by HPX threads.
Set by default to the value of the compile time preprocessor constant
|
|
This is initialized to the medium stack size to be used by HPX threads.
Set by default to the value of the compile time preprocessor constant
|
|
This is initialized to the large stack size to be used by HPX threads.
Set by default to the value of the compile time preprocessor constant
|
|
This is initialized to the huge stack size to be used by HPX threads.
Set by default to the value of the compile time preprocessor constant
|
|
This entry controls whether the coroutine library will generate stack
guard pages or not. This entry is applicable on Linux only and only if
the |
hpx.threadpools configuration section#[hpx.threadpools]
io_pool_size = ${HPX_NUM_IO_POOL_SIZE:2}
parcel_pool_size = ${HPX_NUM_PARCEL_POOL_SIZE:2}
timer_pool_size = ${HPX_NUM_TIMER_POOL_SIZE:2}
Property |
Description |
|
The value of this property defines the number of OS threads created for the internal I/O thread pool. |
|
The value of this property defines the number of OS threads created for the internal parcel thread pool. |
|
The value of this property defines the number of OS threads created for the internal timer thread pool. |
hpx.thread_queue configuration section#Important
These are the setting control internal values used by the thread scheduling queues in the HPX scheduler. You should not modify these settings unless you know exactly what you are doing.
[hpx.thread_queue]
min_tasks_to_steal_pending = ${HPX_THREAD_QUEUE_MIN_TASKS_TO_STEAL_PENDING:0}
min_tasks_to_steal_staged = ${HPX_THREAD_QUEUE_MIN_TASKS_TO_STEAL_STAGED:0}
min_add_new_count = ${HPX_THREAD_QUEUE_MIN_ADD_NEW_COUNT:10}
max_add_new_count = ${HPX_THREAD_QUEUE_MAX_ADD_NEW_COUNT:10}
max_delete_count = ${HPX_THREAD_QUEUE_MAX_DELETE_COUNT:1000}
Property |
Description |
|
The value of this property defines the number of pending HPX threads that have to be available before neighboring cores are allowed to steal work. The default is to allow stealing always. |
|
The value of this property defines the number of staged HPX tasks that need to be available before neighboring cores are allowed to steal work. The default is to allow stealing always. |
|
The value of this property defines the minimal number of tasks to be converted into HPX threads whenever the thread queues for a core have run empty. |
|
The value of this property defines the maximal number of tasks to be converted into HPX threads whenever the thread queues for a core have run empty. |
|
The value of this property defines the number of terminated HPX threads to discard during each invocation of the corresponding function. |
hpx.components configuration section#[hpx.components]
load_external = ${HPX_LOAD_EXTERNAL_COMPONENTS:1}
Property |
Description |
|
This entry defines whether external components will be loaded on this
locality. This entry is normally set to |
Additionally, the section hpx.components will be populated with the
information gathered from all found components. The information loaded for each
of the components will contain at least the following properties:
[hpx.components.<component_instance_name>]
name = <component_name>
path = <full_path_of_the_component_module>
enabled = $[hpx.components.load_external]
Property |
Description |
|
This is the name of a component, usually the same as the second argument
to the macro used while registering the component with
|
|
This is either the full path file name of the component module or the
directory the component module is located in. In this case, the component
module name will be derived from the property
|
|
This setting explicitly enables or disables the component. This is an optional property. HPX assumes that the component is enabled if it is not defined. |
The value for <component_instance_name> is usually the same as for the
corresponding name property. However, generally it can be defined to any
arbitrary instance name. It is used to distinguish between different ini
sections, one for each component.
hpx.parcel configuration section#[hpx.parcel]
address = ${HPX_PARCEL_SERVER_ADDRESS:<hpx_initial_ip_address>}
port = ${HPX_PARCEL_SERVER_PORT:<hpx_initial_ip_port>}
bootstrap = ${HPX_PARCEL_BOOTSTRAP:<hpx_parcel_bootstrap>}
max_connections = ${HPX_PARCEL_MAX_CONNECTIONS:<hpx_parcel_max_connections>}
max_connections_per_locality = ${HPX_PARCEL_MAX_CONNECTIONS_PER_LOCALITY:<hpx_parcel_max_connections_per_locality>}
max_message_size = ${HPX_PARCEL_MAX_MESSAGE_SIZE:<hpx_parcel_max_message_size>}
max_outbound_message_size = ${HPX_PARCEL_MAX_OUTBOUND_MESSAGE_SIZE:<hpx_parcel_max_outbound_message_size>}
array_optimization = ${HPX_PARCEL_ARRAY_OPTIMIZATION:1}
zero_copy_optimization = ${HPX_PARCEL_ZERO_COPY_OPTIMIZATION:$[hpx.parcel.array_optimization]}
zero_copy_receive_optimization = ${HPX_PARCEL_ZERO_COPY_RECEIVE_OPTIMIZATION:$[hpx.parcel.array_optimization]}
async_serialization = ${HPX_PARCEL_ASYNC_SERIALIZATION:1}
message_handlers = ${HPX_PARCEL_MESSAGE_HANDLERS:0}
Property |
Description |
|
This property defines the default IP address to be used for the parcel
layer to listen to. This IP address will be used as long as no other
values are specified (for instance, using the |
|
This property defines the default IP port to be used for the parcel layer
to listen to. This IP port will be used as long as no other values are
specified (for instance using the |
|
This property defines which parcelport type should be used during
application bootstrap. The default depends on the compile time
preprocessor constant |
|
This property defines how many network connections between different
localities are overall kept alive by each locality. The
default depends on the compile time preprocessor constant
|
|
This property defines the maximum number of network connections that one
locality will open to another locality. The default depends
on the compile time preprocessor constant
|
|
This property defines the maximum allowed message size that will be
transferrable through the parcel layer. The default depends on the
compile time preprocessor constant |
|
This property defines the maximum allowed outbound coalesced message size
that will be transferrable through the parcel layer. The default depends
on the compile time preprocessor constant
|
|
This property defines whether this locality is allowed to utilize
array optimizations during serialization of parcel data. The default is
|
|
This property defines whether this locality is allowed to utilize
zero copy optimizations during serialization of parcel data. The default
is the same value as set for |
|
This property defines whether this locality is allowed to utilize
zero copy optimizations on the receiving end during de-serialization of
parcel data. The default is the same value as set for
|
|
This property defines the threshold value (in bytes) starting at which the
serialization layer will apply zero-copy optimizations for serialized
entities. The default value is defined by the preprocessor constant
|
|
This property defines whether this locality is allowed to spawn a
new thread for serialization (this is both for encoding and decoding
parcels). The default is |
|
This property defines whether message handlers are loaded. The default is
|
|
This property defines how many cores should be used to perform background
operations. The default is |
The following settings relate to the TCP/IP parcelport.
[hpx.parcel.tcp]
enable = ${HPX_HAVE_PARCELPORT_TCP:$[hpx.parcel.enabled]}
array_optimization = ${HPX_PARCEL_TCP_ARRAY_OPTIMIZATION:$[hpx.parcel.array_optimization]}
zero_copy_optimization = ${HPX_PARCEL_TCP_ZERO_COPY_OPTIMIZATION:$[hpx.parcel.zero_copy_optimization]}
zero_copy_receive_optimization = ${HPX_PARCEL_TCP_ZERO_COPY_RECEIVE_OPTIMIZATION:$[hpx.parcel.zero_copy_receive_optimization]}
zero_copy_serialization_threshold = ${HPX_PARCEL_TCP_ZERO_COPY_SERIALIZATION_THRESHOLD:$[hpx.parcel.zero_copy_serialization_threshold]}
async_serialization = ${HPX_PARCEL_TCP_ASYNC_SERIALIZATION:$[hpx.parcel.async_serialization]}
parcel_pool_size = ${HPX_PARCEL_TCP_PARCEL_POOL_SIZE:$[hpx.threadpools.parcel_pool_size]}
max_connections = ${HPX_PARCEL_TCP_MAX_CONNECTIONS:$[hpx.parcel.max_connections]}
max_connections_per_locality = ${HPX_PARCEL_TCP_MAX_CONNECTIONS_PER_LOCALITY:$[hpx.parcel.max_connections_per_locality]}
max_message_size = ${HPX_PARCEL_TCP_MAX_MESSAGE_SIZE:$[hpx.parcel.max_message_size]}
max_outbound_message_size = ${HPX_PARCEL_TCP_MAX_OUTBOUND_MESSAGE_SIZE:$[hpx.parcel.max_outbound_message_size]}
max_background_threads = ${HPX_PARCEL_TCP_MAX_BACKGROUND_THREADS:$[hpx.parcel.max_background_threads]}
Property |
Description |
|
Enables the use of the default TCP parcelport. Note that the initial bootstrap of the overall HPX application will be performed using the default TCP connections. This parcelport is enabled by default. This will be disabled only if MPI is enabled (see below). |
|
This property defines whether this locality is allowed to utilize
array optimizations in the TCP/IP parcelport during serialization of
parcel data. The default is the same value as set for
|
|
This property defines whether this locality is allowed to utilize
zero copy optimizations during serialization of
parcel data. The default is the same value as set for
|
|
This property defines whether this locality is allowed to utilize
zero copy optimizations on the receiving end in the TCP/IP parcelport during
de-serialization of parcel data. The default is the same value as set
for |
|
This property defines the threshold value (in bytes) starting at which the
serialization layer will apply zero-copy optimizations for serialized
entities. The default is the same value as set for
|
|
This property defines whether this locality is allowed to spawn a
new thread for serialization in the TCP/IP parcelport (this is both for
encoding and decoding parcels). The default is the same value as set for
|
|
The value of this property defines the number of OS threads created for
the internal parcel thread pool of the TCP parcel port. The default is
taken from |
|
This property defines how many network connections between different
localities are overall kept alive by each locality. The
default is taken from |
|
This property defines the maximum number of network connections that one
locality will open to another locality. The default is
taken from |
|
This property defines the maximum allowed message size that will be
transferrable through the parcel layer. The default is taken from
|
|
This property defines the maximum allowed outbound coalesced message size
that will be transferrable through the parcel layer. The default is
taken from |
|
This property defines how many cores should be used to perform background
operations. The default is taken from |
The following settings relate to the MPI parcelport. These settings take effect
only if the compile time constant HPX_HAVE_PARCELPORT_MPI is set (the
equivalent CMake variable is HPX_WITH_PARCELPORT_MPI and has to be set to
ON).
[hpx.parcel.mpi]
enable = ${HPX_HAVE_PARCELPORT_MPI:$[hpx.parcel.enabled]}
env = ${HPX_HAVE_PARCELPORT_MPI_ENV:MV2_COMM_WORLD_RANK,PMI_RANK,OMPI_COMM_WORLD_SIZE,ALPS_APP_PE,PALS_NODEID}
multithreaded = ${HPX_HAVE_PARCELPORT_MPI_MULTITHREADED:1}
rank = <MPI_rank>
processor_name = <MPI_processor_name>
array_optimization = ${HPX_HAVE_PARCEL_MPI_ARRAY_OPTIMIZATION:$[hpx.parcel.array_optimization]}
zero_copy_optimization = ${HPX_HAVE_PARCEL_MPI_ZERO_COPY_OPTIMIZATION:$[hpx.parcel.zero_copy_optimization]}
zero_copy_receive_optimization = ${HPX_HAVE_PARCEL_MPI_ZERO_COPY_RECEIVE_OPTIMIZATION:$[hpx.parcel.zero_copy_receive_optimization]}
zero_copy_serialization_threshold = ${HPX_PARCEL_MPI_ZERO_COPY_SERIALIZATION_THRESHOLD:$[hpx.parcel.zero_copy_serialization_threshold]}
use_io_pool = ${HPX_HAVE_PARCEL_MPI_USE_IO_POOL:$1}
async_serialization = ${HPX_HAVE_PARCEL_MPI_ASYNC_SERIALIZATION:$[hpx.parcel.async_serialization]}
parcel_pool_size = ${HPX_HAVE_PARCEL_MPI_PARCEL_POOL_SIZE:$[hpx.threadpools.parcel_pool_size]}
max_connections = ${HPX_HAVE_PARCEL_MPI_MAX_CONNECTIONS:$[hpx.parcel.max_connections]}
max_connections_per_locality = ${HPX_HAVE_PARCEL_MPI_MAX_CONNECTIONS_PER_LOCALITY:$[hpx.parcel.max_connections_per_locality]}
max_message_size = ${HPX_HAVE_PARCEL_MPI_MAX_MESSAGE_SIZE:$[hpx.parcel.max_message_size]}
max_outbound_message_size = ${HPX_HAVE_PARCEL_MPI_MAX_OUTBOUND_MESSAGE_SIZE:$[hpx.parcel.max_outbound_message_size]}
max_background_threads = ${HPX_PARCEL_MPI_MAX_BACKGROUND_THREADS:$[hpx.parcel.max_background_threads]}
Property |
Description |
|
Enables the use of the MPI parcelport. HPX tries to detect if the application was started within a parallel MPI environment. If the detection was successful, the MPI parcelport is enabled by default. To explicitly disable the MPI parcelport, set to 0. Note that the initial bootstrap of the overall HPX application will be performed using MPI as well. |
|
This property influences which environment variables (separated by commas) will be analyzed to find out whether the application was invoked by MPI. |
|
This property is used to determine what threading mode to use when
initializing MPI. If this setting is |
|
This property will be initialized to the MPI rank of the locality. |
|
This property will be initialized to the MPI processor name of the locality. |
|
This property defines whether this locality is allowed to utilize
array optimizations in the MPI parcelport during serialization of
parcel data. The default is the same value as set for
|
|
This property defines whether this locality is allowed to utilize
zero copy optimizations in the MPI parcelport during serialization of
parcel data. The default is the same value as set for
|
|
This property defines whether this locality is allowed to utilize
zero copy optimizations on the receiving end in the MPI parcelport during
de-serialization of parcel data. The default is the same value as
set for |
|
This property defines the threshold value (in bytes) starting at which the
serialization layer will apply zero-copy optimizations for serialized
entities. The default is the same value as set for
|
|
This property can be set to run the progress thread inside of HPX threads
instead of a separate thread pool. The default is |
|
This property defines whether this locality is allowed to spawn a
new thread for serialization in the MPI parcelport (this is both for
encoding and decoding parcels). The default is the same value as set for
|
|
The value of this property defines the number of OS threads created for
the internal parcel thread pool of the MPI parcel port. The default is
taken from |
|
This property defines how many network connections between different
localities are overall kept alive by each locality. The
default is taken from |
|
This property defines the maximum number of network connections that one
locality will open to another locality. The default is
taken from |
|
This property defines the maximum allowed message size that will be
transferrable through the parcel layer. The default is taken from
|
|
This property defines the maximum allowed outbound coalesced message size
that will be transferrable through the parcel layer. The default is
taken from |
|
This property defines how many cores should be used to perform background
operations. The default is taken from |
hpx.agas configuration section#[hpx.agas]
address = ${HPX_AGAS_SERVER_ADDRESS:<hpx_initial_ip_address>}
port = ${HPX_AGAS_SERVER_PORT:<hpx_initial_ip_port>}
service_mode = hosted
dedicated_server = 0
max_pending_refcnt_requests = ${HPX_AGAS_MAX_PENDING_REFCNT_REQUESTS:<hpx_initial_agas_max_pending_refcnt_requests>}
use_caching = ${HPX_AGAS_USE_CACHING:1}
use_range_caching = ${HPX_AGAS_USE_RANGE_CACHING:1}
local_cache_size = ${HPX_AGAS_LOCAL_CACHE_SIZE:<hpx_agas_local_cache_size>}
Property |
Description |
|
This property defines the default IP address to be used for the
AGAS root server. This IP address will be used as long as no
other values are specified (for instance, using the |
|
This property defines the default IP port to be used for the AGAS
root server. This IP port will be used as long as no other values are
specified (for instance, using the |
|
This property specifies what type of AGAS service is running on
this locality. Currently, two modes exist. The locality
that acts as the AGAS server runs in |
|
This property specifies whether the AGAS server is exclusively
running AGAS services and not hosting any application components.
It is a boolean value. Set to |
|
This property defines the number of reference counting requests
(increments or decrements) to buffer. The default depends on the compile
time preprocessor constant
|
|
This property specifies whether a software address translation cache is
used. It is a boolean value. Defaults to |
|
This property specifies whether range-based caching is used by the
software address translation cache. This property is ignored if
hpx.agas.use_caching is false. It is a boolean value. Defaults to |
|
This property defines the size of the software address translation cache
for AGAS services. This property is ignored
if |
hpx.commandline configuration section#The following table lists the definition of all pre-defined command line option shortcuts. For more information about commandline options, see the section HPX Command Line Options.
[hpx.commandline]
aliasing = ${HPX_COMMANDLINE_ALIASING:1}
allow_unknown = ${HPX_COMMANDLINE_ALLOW_UNKNOWN:0}
[hpx.commandline.aliases]
-a = --hpx:agas
-c = --hpx:console
-h = --hpx:help
-I = --hpx:ini
-l = --hpx:localities
-p = --hpx:app-config
-q = --hpx:queuing
-r = --hpx:run-agas-server
-t = --hpx:threads
-v = --hpx:version
-w = --hpx:worker
-x = --hpx:hpx
-0 = --hpx:node=0
-1 = --hpx:node=1
-2 = --hpx:node=2
-3 = --hpx:node=3
-4 = --hpx:node=4
-5 = --hpx:node=5
-6 = --hpx:node=6
-7 = --hpx:node=7
-8 = --hpx:node=8
-9 = --hpx:node=9
Note
The short options listed above are disabled by default if the application
is built using #include <hpx/hpx_main.hpp>. See Re-use the main() function as the main HPX entry point for more
information.
The rationale behind this is that in this case the user’s application may
handle its own command line options, since HPX passes all unknown options
to main(). Short options like -t are prone to create ambiguities regarding
what the application will support.
Hence, the user should instead rely on the corresponding long options like
--hpx:threads in such a case.
Property |
Description |
|
Enable command line aliases as defined in the section
|
|
Allow for unknown command line options to be passed through to
|
|
On the commandline |
|
On the commandline |
|
On the commandline |
|
On the commandline |
|
On the commandline |
|
On the commandline |
|
On the commandline |
|
On the commandline |
|
On the commandline |
|
On the commandline |
|
On the commandline |
|
On the commandline |
|
On the commandline |
|
On the commandline |
|
On the commandline |
|
On the commandline |
|
On the commandline |
|
On the commandline |
|
On the commandline |
|
On the commandline |
|
On the commandline |
|
On the commandline |
|
On the commandline |
|
On the commandline |
Loading INI files#
During startup and after the internal database has been initialized as described in the section Built-in default configuration settings, HPX will try to locate and load additional ini files to be used as a source for configuration properties. This allows for a wide spectrum of additional customization possibilities by the user and system administrators. The sequence of locations where HPX will try loading the ini files is well defined and documented in this section. All ini files found are merged into the internal configuration database. The merge operation itself conforms to the rules as described in the section The HPX ini file format.
Load all component shared libraries found in the directories specified by the property
hpx.component_pathand retrieve their default configuration information (see section Loading components for more details). This property can refer to a list of directories separated by':'(Linux, Android, and MacOS) or by';'(Windows).Load all files named
hpx.iniin the directories referenced by the propertyhpx.master_ini_pathThis property can refer to a list of directories separated by':'(Linux, Android, and MacOS) or by';'(Windows).Load a file named
.hpx.iniin the current working directory, e.g., the directory the application was invoked from.Load a file referenced by the environment variable
HPX_INI. This variable is expected to provide the full path name of the ini configuration file (if any).Load a file named
/etc/hpx.ini. This lookup is done on non-Windows systems only.Load a file named
.hpx.iniin the home directory of the current user, e.g., the directory referenced by the environment variableHOME.Load a file named
.hpx.iniin the directory referenced by the environment variablePWD.Load the file specified on the command line using the option
--hpx:config.Load all properties specified on the command line using the option
--hpx:ini. The properties will be added to the database in the same sequence as they are specified on the command line. The format for those options is, for instance,--hpx:ini=hpx.default_stack_size=0x4000. In addition to the explicit command line options, this will set the following properties as implied from other settings:hpx.parcel.addressandhpx.parcel.portas set by--hpx:hpxhpx.agas.address,hpx.agas.portandhpx.agas.service_modeas set by--hpx:agashpx.program_nameandhpx.cmd_linewill be derived from the actual command linehpx.os_threadsandhpx.localitiesas set by
hpx.runtime_modewill be derived from any explicit--hpx:console,--hpx:worker, or--hpx:connect, or it will be derived from other settings, such as--hpx:node=0, which implies--hpx:console.
Load files based on the pattern
*.iniin all directories listed by the propertyhpx.ini_path. All files found during this search will be merged. The propertyhpx.ini_pathcan hold a list of directories separated by':'(on Linux or Mac) or';'(on Windows).Load the file specified on the command line using the option
--hpx:app-config. Note that this file will be merged as the content for a top level section[application].
Note
Any changes made to the configuration database caused by one of the steps
will influence the loading process for all subsequent steps. For instance, if
one of the ini files loaded changes the property hpx.ini_path, this will
influence the directories searched in step 9 as described above.
Important
The HPX core library will verify that all configuration settings specified
on the command line (using the --hpx:ini option) will be checked
for validity. That means that the library will accept only known
configuration settings. This is to protect the user from unintentional typos
while specifying those settings. This behavior can be overwritten by
appending a '!' to the configuration key, thus forcing the setting to be
entered into the configuration database. For instance: --hpx:ini=hpx.foo! = 1
If any of the environment variables or files listed above are not found, the corresponding loading step will be silently skipped.
Loading components#
HPX relies on loading application specific components during the runtime of an application. Moreover, HPX comes with a set of preinstalled components supporting basic functionalities useful for almost every application. Any component in HPX is loaded from a shared library, where any of the shared libraries can contain more than one component type. During startup, HPX tries to locate all available components (e.g., their corresponding shared libraries) and creates an internal component registry for later use. This section describes the algorithm used by HPX to locate all relevant shared libraries on a system. As described, this algorithm is customizable by the configuration properties loaded from the ini files (see section Loading INI files).
Loading components is a two-stage process. First HPX tries to locate all component shared libraries, loads those, and generates a default configuration section in the internal configuration database for each component found. For each found component the following information is generated:
[hpx.components.<component_instance_name>]
name = <name_of_shared_library>
path = $[component_path]
enabled = $[hpx.components.load_external]
default = 1
The values in this section correspond to the expected configuration information for a component as described in the section Built-in default configuration settings.
In order to locate component shared libraries, HPX will try loading all
shared libraries (files with the platform specific extension of a shared
library, Linux: *.so, Windows: *.dll, MacOS: *.dylib found in the
directory referenced by the ini property hpx.component_path).
This first step corresponds to step 1) during the process of filling the internal configuration database with default information as described in section Loading INI files.
After all of the configuration information has been loaded, HPX performs the
second step in terms of loading components. During this step, HPX scans all
existing configuration sections
[hpx.component.<some_component_instance_name>] and instantiates a special
factory object for each of the successfully located and loaded components.
During the application’s life time, these factory objects are responsible for
creating new and discarding old instances of the component they are associated with.
This step is performed after step 11) of the process of filling the internal
configuration database with default information as described in section
Loading INI files.
Application specific component example#
This section assumes there is a simple application component that exposes
one member function as a component action. The header file app_server.hpp
declares the C++ type to be exposed as a component. This type has a member
function print_greeting(), which is exposed as an action
print_greeting_action. We assume the source files for this example are
located in a directory referenced by $APP_ROOT:
// file: $APP_ROOT/app_server.hpp
#include <hpx/hpx.hpp>
#include <hpx/include/iostreams.hpp>
namespace app
{
// Define a simple component exposing one action 'print_greeting'
class HPX_COMPONENT_EXPORT server
: public hpx::components::component_base<server>
{
void print_greeting ()
{
hpx::cout << "Hey, how are you?\n" << std::flush;
}
// Component actions need to be declared, this also defines the
// type 'print_greeting_action' representing the action.
HPX_DEFINE_COMPONENT_ACTION(server, print_greeting, print_greeting_action);
};
}
// Declare boilerplate code required for each of the component actions.
HPX_REGISTER_ACTION_DECLARATION(app::server::print_greeting_action);
The corresponding source file contains mainly macro invocations that define the boilerplate code needed for HPX to function properly:
// file: $APP_ROOT/app_server.cpp
#include "app_server.hpp"
// Define boilerplate required once per component module.
HPX_REGISTER_COMPONENT_MODULE();
// Define factory object associated with our component of type 'app::server'.
HPX_REGISTER_COMPONENT(app::server, app_server);
// Define boilerplate code required for each of the component actions. Use the
// same argument as used for HPX_REGISTER_ACTION_DECLARATION above.
HPX_REGISTER_ACTION(app::server::print_greeting_action);
The following gives an example of how the component can be used. Here, one
instance of the app::server component is created on the current locality and
the exposed action print_greeting_action is invoked using the global id of the
newly created instance. Note that no special code is required to delete the
component instance after it is not needed anymore. It will be deleted
automatically when its last reference goes out of scope (shown in the example below at
the closing brace of the block surrounding the code):
// file: $APP_ROOT/use_app_server_example.cpp
#include <hpx/hpx_init.hpp>
#include "app_server.hpp"
int hpx_main()
{
{
// Create an instance of the app_server component on the current locality.
hpx::naming:id_type app_server_instance =
hpx::create_component<app::server>(hpx::find_here());
// Create an instance of the action 'print_greeting_action'.
app::server::print_greeting_action print_greeting;
// Invoke the action 'print_greeting' on the newly created component.
print_greeting(app_server_instance);
}
return hpx::finalize();
}
int main(int argc, char* argv[])
{
return hpx::init(argc, argv);
}
In order to make sure that the application will be able to use the component
app::server, special configuration information must be passed to HPX. The
simplest way to allow HPX to ‘find’ the component is to provide special ini
configuration files that add the necessary information to the internal
configuration database. The component should have a special ini file containing
the information specific to the component app_server.
# file: $APP_ROOT/app_server.ini
[hpx.components.app_server]
name = app_server
path = $APP_LOCATION/
Here, $APP_LOCATION is the directory where the (binary) component shared
library is located. HPX will attempt to load the shared library from there.
The section name hpx.components.app_server reflects the instance name of the
component (app_server is an arbitrary, but unique name). The property value
for hpx.components.app_server.name should be the same as used for the second
argument to the macro HPX_REGISTER_COMPONENT above.
Additionally, a file .hpx.ini, which could be located in the current working
directory (see step 3 as described in the section Loading INI files), can
be used to add to the ini search path for components:
# file: $PWD/.hpx.ini
[hpx]
ini_path = $[hpx.ini_path]:$APP_ROOT/
This assumes that the above ini file specific to the component is located in
the directory $APP_ROOT.
Note
It is possible to reference the defined property from inside its value. HPX
will gracefully use the previous value of hpx.ini_path for the reference
on the right hand side and assign the overall (now expanded) value to the
property.
Logging#
HPX uses a sophisticated logging framework, allowing users to follow in detail what operations have been performed inside the HPX library in what sequence. This information proves to be very useful for diagnosing problems or just for improving the understanding of what is happening in HPX as a consequence of invoking HPX API functionality.
Default logging#
Enabling default logging is a simple process. The detailed description in the remainder of this section explains different ways to customize the defaults. Default logging can be enabled by using one of the following:
A command line switch
--hpx:debug-hpx-log, which will enable logging to the console terminal.The command line switch
--hpx:debug-hpx-log=<filename>, which enables logging to a given file<filename>.Setting an environment variable
HPX_LOGLEVEL=<loglevel>while running the HPX application. In this case<loglevel>should be a number between (or equal to)1and5where1means minimal logging and5causes all available messages to be logged. When setting the environment variable, the logs will be written to a file namedhpx.<PID>.loin the current working directory, where<PID>is the process id of the console instance of the application.
Customizing logging#
Generally, logging can be customized either using environment variable settings or using by an ini configuration file. Logging is generated in several categories, each of which can be customized independently. All customizable configuration parameters have reasonable defaults, allowing for the use of logging without any additional configuration effort. The following table lists the available categories.
Category |
Category shortcut |
Information to be generated |
Environment variable |
General |
None |
Logging information generated by different subsystems of HPX, such as thread-manager, parcel layer, LCOs, etc. |
|
|
Logging output generated by the AGAS subsystem |
|
|
Application |
|
Logging generated by applications. |
|
By default, all logging output is redirected to the console instance of an application, where it is collected and written to a file, one file for each logging category.
Each logging category can be customized at two levels. The parameters for each
are stored in the ini configuration sections hpx.logging.CATEGORY and
hpx.logging.console.CATEGORY (where CATEGORY is the category shortcut as
listed in the table above). The former influences logging at the source
locality and the latter modifies the logging behaviour for each of the
categories at the console instance of an application.
Levels#
All HPX logging output has seven different logging levels. These levels can be set explicitly or through environment variables in the main HPX ini file as shown below. The logging levels and their associated integral values are shown in the table below, ordered from most verbose to least verbose. By default, all HPX logs are set to 0, e.g., all logging output is disabled by default.
Logging level |
Integral value |
|---|---|
|
|
|
|
|
|
|
|
|
|
No logging |
|
Tip
The easiest way to enable logging output is to set the environment variable
corresponding to the logging category to an integral value as described in
the table above. For instance, setting HPX_LOGLEVEL=5 will enable full
logging output for the general category. Please note that the syntax and
means of setting environment variables varies between operating systems.
Configuration#
Logs will be saved to destinations as configured by the user. By default,
logging output is saved on the console instance of an application to
hpx.<CATEGORY>.<PID>.lo (where CATEGORY and PID> are placeholders
for the category shortcut and the OS process id). The output for the general
logging category is saved to hpx.<PID>.log. The default settings for the
general logging category are shown here (the syntax is described in the section
The HPX ini file format):
[hpx.logging]
level = ${HPX_LOGLEVEL:0}
destination = ${HPX_LOGDESTINATION:console}
format = ${HPX_LOGFORMAT:(T%locality%/%hpxthread%.%hpxphase%/%hpxcomponent%) P%parentloc%/%hpxparent%.%hpxparentphase% %time%($hh:$mm.$ss.$mili) [%idx%]|\\n}
The logging level is taken from the environment variable HPX_LOGLEVEL and
defaults to zero, e.g., no logging. The default logging destination is read from
the environment variable HPX_LOGDESTINATION On any of the localities it
defaults to console, which redirects all generated logging output to the
console instance of an application. The following table lists the possible
destinations for any logging output. It is possible to specify more than one
destination separated by whitespace.
Logging destination |
Description |
file( |
Directs all output to a file with the given <filename>. |
cout |
Directs all output to the local standard output of the application instance on this locality. |
cerr |
Directs all output to the local standard error output of the application instance on this locality. |
console |
Directs all output to the console instance of the application. The console instance has its logging destinations configured separately. |
android_log |
Directs all output to the (Android) system log (available on Android systems only). |
The logging format is read from the environment variable HPX_LOGFORMAT, and
it defaults to a complex format description. This format consists of several
placeholder fields (for instance %locality%), which will be replaced by
concrete values when the logging output is generated. All other information is
transferred verbatim to the output. The table below describes the available
field placeholders. The separator character | separates the logging message
prefix formatted as shown and the actual log message which will replace the
separator.
Name |
Description |
The id of the locality on which the logging message was generated. |
|
hpxthread |
The id of the HPX thread generating this logging output. |
hpxphase |
The phase 1 of the HPX thread generating this logging output. |
hpxcomponent |
The local virtual address of the component which the current HPX thread is accessing. |
parentloc |
The id of the locality where the HPX thread was running that initiated the current HPX thread. The current HPX thread is generating this logging output. |
hpxparent |
The id of the HPX thread that initiated the current HPX thread. The current HPX thread is generating this logging output. |
hpxparentphase |
The phase of the HPX thread when it initiated the current HPX thread. The current HPX thread is generating this logging output. |
time |
The time stamp for this logging outputline as generated by the source locality. |
idx |
The sequence number of the logging output line as generated on the source locality. |
osthread |
The sequence number of the OS thread that executes the current HPX thread. |
Note
Not all of the field placeholder may be expanded for all generated logging
output. If no value is available for a particular field, it is replaced with a
sequence of '-' characters.
Here is an example line from a logging output generated by one of the HPX examples (please note that this is generated on a single line, without a line break):
(T00000000/0000000002d46f90.01/00000000009ebc10) P--------/0000000002d46f80.02 17:49.37.320 [000000000000004d]
<info> [RT] successfully created component {0000000100ff0001, 0000000000030002} of type: component_barrier[7(3)]
The default settings for the general logging category on the console is shown here:
[hpx.logging.console]
level = ${HPX_LOGLEVEL:$[hpx.logging.level]}
destination = ${HPX_CONSOLE_LOGDESTINATION:file(hpx.$[system.pid].log)}
format = ${HPX_CONSOLE_LOGFORMAT:|}
These settings define how the logging is customized once the logging output is
received by the console instance of an application. The logging level is read
from the environment variable HPX_LOGLEVEL (as set for the console instance
of the application). The level defaults to the same values as the corresponding
settings in the general logging configuration shown before. The destination on
the console instance is set to be a file that’s name is generated based on its
OS process id. Setting the environment variable HPX_CONSOLE_LOGDESTINATION
allows customization of the naming scheme for the output file. The logging
format is set to leave the original logging output unchanged, as received from
one of the localities the application runs on.
HPX Command Line Options#
The predefined command line options for any application using
hpx::init are described in the following subsections.
HPX options (allowed on command line only)#
- --hpx:help#
Print out program usage (default: this message). Possible values:
full(additionally prints options from components).
- --hpx:version#
Print out HPX version and copyright information.
- --hpx:info#
Print out HPX configuration information.
- --hpx:options-file arg#
Specify a file containing command line options (alternatively: @filepath).
HPX options (additionally allowed in an options file)#
- --hpx:worker#
Run this instance in worker mode.
- --hpx:console#
Run this instance in console mode.
- --hpx:connect#
Run this instance in worker mode, but connecting late.
- --hpx:hpx arg#
The IP address the HPX parcelport is listening on, expected format:
address:port(default:127.0.0.1:7910).
- --hpx:agas arg#
The IP address the AGAS root server is running on, expected format:
address:port(default:127.0.0.1:7910).
- --hpx:nodefile arg#
The file name of a node file to use (list of nodes, one node name per line and core).
- --hpx:nodes arg#
The (space separated) list of the nodes to use (usually this is extracted from a node file).
- --hpx:endnodes#
This can be used to end the list of nodes specified using the option
--hpx:nodes.
- --hpx:ifsuffix arg#
Suffix to append to host names in order to resolve them to the proper network interconnect.
- --hpx:ifprefix arg#
Prefix to prepend to host names in order to resolve them to the proper network interconnect.
- --hpx:iftransform arg#
Sed-style search and replace (
s/search/replace/) used to transform host names to the proper network interconnect.
- --hpx:force_ipv4#
Network hostnames will be resolved to ipv4 addresses instead of using the first resolved endpoint. This is especially useful on Windows where the local hostname will resolve to an ipv6 address while remote network hostnames are commonly resolved to ipv4 addresses.
- --hpx:localities arg#
The number of localities to wait for at application startup (default:
1).
- --hpx:ignore-batch-env#
Ignore batch environment variables.
- --hpx:expect-connecting-localities#
This locality expects other localities to dynamically connect (this is implied if the number of initial localities is larger than 1).
- --hpx:pu-offset#
The first processing unit this instance of HPX should be run on (default:
0).
- --hpx:pu-step#
The step between used processing unit numbers for this instance of HPX (default:
1).
- --hpx:threads arg#
The number of operating system threads to spawn for this HPX locality. Possible values are: numeric values
1,2,3and so on,all(which spawns one thread per processing unit, includes hyperthreads), orcores(which spawns one thread per core) (default:cores).
- --hpx:cores arg#
The number of cores to utilize for this HPX locality (default:
all, i.e., the number of cores is based on the number of threads--hpx:threadsassuming--hpx:bind=compact.
- --hpx:affinity arg#
The affinity domain the OS threads will be confined to, possible values:
pu,core,numa,machine(default:pu).
- --hpx:bind arg#
he detailed affinity description for the OS threads, see More details about HPX command line options for a detailed description of possible values. Do not use with
--hpx:pu-step,--hpx:pu-offsetor--hpx:affinityoptions. Implies--hpx:numa-sensitive(--hpx:bind=none) disables defining thread affinities).
- --hpx:use-process-mask#
Use the process mask to restrict available hardware resources (implies
--hpx:ignore-batch-env).
- --hpx:print-bind#
Print to the console the bit masks calculated from the arguments specified to all
--hpx:bindoptions.
- --hpx:queuing arg#
The queue scheduling policy to use. Options are
local,local-priority-fifo,local-priority-lifo,static,static-priority,abp-priority-fifo,local-workrequesting-fifo,local-workrequesting-lifolocal-workrequesting-mc, andabp-priority-lifo(default:local-priority-fifo).
- --hpx:high-priority-threads arg#
The number of operating system threads maintaining a high priority queue (default: number of OS threads), valid for
--hpx:queuing=abp-priority,--hpx:queuingstatic-priorityand--hpx:queuinglocal-priorityonly.
- --hpx:numa-sensitive#
Makes the scheduler NUMA sensitive.
HPX configuration options#
- --hpx:app-config arg#
Load the specified application configuration (ini) file.
- --hpx:config arg#
Load the specified HPX configuration (ini) file.
- --hpx:ini arg#
Add a configuration definition to the default runtime configuration.
- --hpx:exit#
Exit after configuring the runtime.
HPX debugging options#
- --hpx:list-symbolic-names#
List all registered symbolic names after startup.
- --hpx:list-component-types#
List all dynamic component types after startup.
- --hpx:dump-config-initial#
Print the initial runtime configuration.
- --hpx:dump-config#
Print the final runtime configuration.
- --hpx:debug-hpx-log [arg]#
Enable all messages on the HPX log channel and send all HPX logs to the target destination (default:
cout).
- --hpx:debug-agas-log [arg]#
Enable all messages on the AGAS log channel and send all AGAS logs to the target destination (default:
cout).
- --hpx:debug-parcel-log [arg]#
Enable all messages on the parcel transport log channel and send all parcel transport logs to the target destination (default:
cout).
- --hpx:debug-timing-log [arg]#
Enable all messages on the timing log channel and send all timing logs to the target destination (default:
cout).
- --hpx:debug-app-log [arg]#
Enable all messages on the application log channel and send all application logs to the target destination (default:
cout).
- --hpx:debug-clp#
Debug command line processing.
- --hpx:attach-debugger arg#
Wait for a debugger to be attached, possible arg values:
startuporexception(default:startup)
Command line argument shortcuts#
Additionally, the following shortcuts are available from every HPX application.
Shortcut option |
Equivalent long option |
|---|---|
|
|
|
|
|
|
|
|
|
|
|
|
|
|
|
|
|
|
|
|
|
|
|
|
|
|
|
|
|
|
|
|
|
|
|
|
|
|
|
|
|
|
|
Note
The short options listed above are disabled by default if the application
is built using #include <hpx/hpx_main.hpp>. See Re-use the main() function as the main HPX entry point for more
information.
The rationale behind this is that in this case the user’s application may
handle its own command line options, since HPX passes all unknown options
to main(). Short options like -t are prone to create ambiguities regarding
what the application will support.
Hence, the user should instead rely on the corresponding long options like
--hpx:threads in such a case.
It is possible to define your own shortcut options. In fact, all of the shortcuts listed above are pre-defined using the technique described here. Also, it is possible to redefine any of the pre-defined shortcuts to expand differently as well.
Shortcut options are obtained from the internal configuration database. They are
stored as key-value properties in a special properties section named
hpx.commandline. You can define your own shortcuts by adding the
corresponding definitions to one of the ini configuration files as described
in the section Configuring HPX applications. For instance, in order to define a command
line shortcut --p, which should expand to -hpx:print-counter, the
following configuration information needs to be added to one of the ini
configuration files:
[hpx.commandline.aliases]
--pc = --hpx:print-counter
Note
Any arguments for shortcut options passed on the command line are retained and passed as arguments to the corresponding expanded option. For instance, given the definition above, the command line option:
--pc=/threads{locality#0/total}/count/cumulative
would be expanded to:
--hpx:print-counter=/threads{locality#0/total}/count/cumulative
Important
Any shortcut option should either start with a single '-' or with two
'--' characters. Shortcuts starting with a single '-' are interpreted
as short options (i.e., everything after the first character following the
'-' is treated as the argument). Shortcuts starting with '--' are
interpreted as long options. No other shortcut formats are supported.
Specifying options for single localities only#
For runs involving more than one locality, it is sometimes desirable to
supply specific command line options to single localities only. When the HPX
application is launched using a scheduler (like PBS; for more details see
section How to use HPX applications with PBS), specifying dedicated command line options for single
localities may be desirable. For this reason all of the command line options
that have the general format --hpx:<some_key> can be used in a more general
form: --hpx:<N>:<some_key>, where <N> is the number of the locality
this command line option will be applied to; all other localities will simply
ignore the option. For instance, the following PBS script passes the option
--hpx:pu-offset=4 to the locality '1' only.
#!/bin/bash
#
#PBS -l nodes=2:ppn=4
APP_PATH=~/packages/hpx/bin/hello_world_distributed
APP_OPTIONS=
pbsdsh -u $APP_PATH $APP_OPTIONS --hpx:1:pu-offset=4 --hpx:nodes=`cat $PBS_NODEFILE`
Caution
If the first application specific argument (inside $APP_OPTIONS) is a
non-option (i.e., does not start with a - or a --), then it must be
placed before the option --hpx:nodes, which, in this case,
should be the last option on the command line.
Alternatively, use the option --hpx:endnodes to explicitly
mark the end of the list of node names:
$ pbsdsh -u $APP_PATH --hpx:1:pu-offset=4 --hpx:nodes=`cat $PBS_NODEFILE` --hpx:endnodes $APP_OPTIONS
More details about HPX command line options#
This section documents the following list of the command line options in more detail:
--hpx:bind#This command line option allows one to specify the required affinity of the
HPX worker threads to the underlying processing units. As a result the worker
threads will run only on the processing units identified by the corresponding
bind specification. The affinity settings are to be specified using
--hpx:bind=<BINDINGS>, where <BINDINGS> have to be formatted as
described below.
In addition to the syntax described below, one can use --hpx:bind=none to disable all binding of any threads to a particular core. This is
mostly supported for debugging purposes.
The specified affinities refer to specific regions within a machine hardware topology. In order to understand the hardware topology of a particular machine, it may be useful to run the lstopo tool, which is part of Portable Hardware Locality (HWLOC), to see the reported topology tree. Seeing and understanding a topology tree will definitely help in understanding the concepts that are discussed below.
Affinities can be specified using hwloc tuples. Tuples of hwloc objects and
associated indexes can be specified in the form object:index,
object:index-index or object:index,...,index. Hwloc objects
represent types of mapped items in a topology tree. Possible values for
objects are socket, numanode, core and pu (processing unit).
Indexes are non-negative integers that specify a unique physical object in a
topology tree using its logical sequence number.
Chaining multiple tuples together in the more general form
object1:index1[.object2:index2[...]] is permissible. While the first tuple’s
object may appear anywhere in the topology, the Nth tuple’s object must have a
shallower topology depth than the (N+1)th tuple’s object. Put simply: as you
move right in a tuple chain, objects must go deeper in the topology tree.
Indexes specified in chained tuples are relative to the scope of the parent
object. For example, socket:0.core:1 refers to the second core in the first
socket (all indices are zero based).
Multiple affinities can be specified using several --hpx:bind command
line options or by appending several affinities separated by a ';'. By
default, if multiple affinities are specified, they are added.
"all" is a special affinity consisting in the entire current topology.
Note
All “names” in an affinity specification, such as thread, socket,
numanode, pu or all, can be abbreviated. Thus, the affinity
specification threads:0-3=socket:0.core:1.pu:1 is fully equivalent to its
shortened form t:0-3=s:0.c:1.p:1.
Here is a full grammar describing the possible format of mappings:
mappings ::=distribution|mapping(";"mapping)* distribution ::= "compact" | "scatter" | "balanced" | "numa-balanced" mapping ::=thread_spec"="pu_specsthread_spec ::= "thread:"range_specspu_specs ::=pu_spec("."pu_spec)* pu_spec ::=type":"range_specs| "~"pu_specrange_specs ::=range_spec(","range_spec)* range_spec ::= int | int "-" int | "all" type ::= "socket" | "numanode" | "core" | "pu"
The following example assumes a system with at least 4 cores, where each core
has more than 1 processing unit (hardware threads). Running
hello_world_distributed with 4 OS threads (on 4 processing units), where
each of those threads is bound to the first processing unit of each of the
cores, can be achieved by invoking:
$ hello_world_distributed -t4 --hpx:bind=thread:0-3=core:0-3.pu:0
Here, thread:0-3 specifies the OS threads used to define affinity
bindings, and core:0-3.pu: defines that for each of the cores (core:0-3)
only their first processing unit pu:0 should be used.
Note
The command line option --hpx:print-bind can be used to print the
bitmasks generated from the affinity mappings as specified with
--hpx:bind. For instance, on a system with hyperthreading enabled
(i.e. 2 processing units per core), the command line:
$ hello_world_distributed -t4 --hpx:bind=thread:0-3=core:0-3.pu:0 --hpx:print-bind
will cause this output to be printed:
0: PU L#0(P#0), Core L#0, Socket L#0, Node L#0(P#0)
1: PU L#2(P#2), Core L#1, Socket L#0, Node L#0(P#0)
2: PU L#4(P#4), Core L#2, Socket L#0, Node L#0(P#0)
3: PU L#6(P#6), Core L#3, Socket L#0, Node L#0(P#0)
where each bit in the bitmasks corresponds to a processing unit the listed worker thread will be bound to run on.
The difference between the four possible predefined distribution schemes
(compact, scatter, balanced and numa-balanced) is best explained
with an example. Imagine that we have a system with 4 cores and 4 hardware
threads per core on 2 sockets. If we place 8 threads the assignments produced by
the compact, scatter, balanced and numa-balanced types are shown
in the figure below. Notice that compact does not fully utilize all the
cores in the system. For this reason it is recommended that applications are run
using the scatter or balanced/numa-balanced options in most cases.
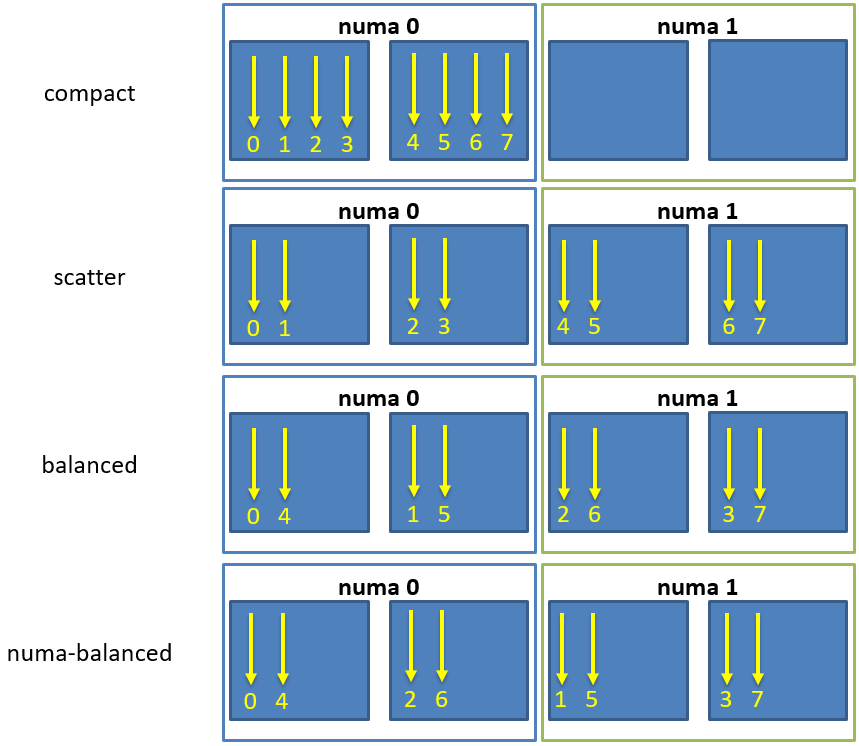
Fig. 7 Schematic of thread affinity type distributions.#
In addition to the predefined distributions it is possible to restrict the
resources used by HPX to the process CPU mask. The CPU mask is typically set
by e.g. MPI and batch environments. Using the command line option
--hpx:use-process-mask makes HPX act as if only the processing units
in the CPU mask are available for use by HPX. The number of threads is
automatically determined from the CPU mask. The number of threads can still be
changed manually using this option, but only to a number less than or equal to
the number of processing units in the CPU mask. The option
--hpx:print-bind is useful in conjunction with
--hpx:use-process-mask to make sure threads are placed as expected.
- 1
The phase of a HPX-thread counts how often this thread has been activated.
Writing single-node applications#
Being a C++ Standard Library for Concurrency and Parallelism, HPX implements all of the corresponding facilities as defined by the C++ Standard but also those which are proposed as part of the ongoing C++ standardization process. This section focuses on the features available in HPX for parallel and concurrent computation on a single node, although many of the features presented here are also implemented to work in the distributed case.
Synchronization objects#
The following objects are providing synchronization for HPX applications:
Barrier#
Barriers are used for synchronizing multiple threads. They provide a synchronization point, where all threads must wait until they have all reached the barrier, before they can continue execution. This allows multiple threads to work together to solve a common task, and ensures that no thread starts working on the next task until all threads have completed the current task. This ensures that all threads are in the same state before performing any further operations, leading to a more consistent and accurate computation.
Unlike latches, barriers are reusable: once the participating threads are released from a barrier’s synchronization point, they can re-use the same barrier. It is thus useful for managing repeated tasks, or phases of a larger task, that are handled by multiple threads. The code below shows how barriers can be used to synchronize two threads:
#include <hpx/barrier.hpp>
#include <hpx/future.hpp>
#include <hpx/init.hpp>
#include <iostream>
int hpx_main()
{
hpx::barrier b(2);
hpx::future<void> f1 = hpx::async([&b]() {
std::cout << "Thread 1 started." << std::endl;
// Do some computation
b.arrive_and_wait();
// Continue with next task
std::cout << "Thread 1 finished." << std::endl;
});
hpx::future<void> f2 = hpx::async([&b]() {
std::cout << "Thread 2 started." << std::endl;
// Do some computation
b.arrive_and_wait();
// Continue with next task
std::cout << "Thread 2 finished." << std::endl;
});
f1.get();
f2.get();
return hpx::local::finalize();
}
int main(int argc, char* argv[])
{
return hpx::local::init(hpx_main, argc, argv);
}
In this example, two hpx::future objects are created, each representing a separate thread of
execution. The wait function of the hpx::barrier object is called by each thread. The
threads will wait at the barrier until both have reached it. Once both threads have reached
the barrier, they can continue with their next task.
Condition variable#
A condition variable is a synchronization primitive
in HPX that allows a thread to wait for a specific condition to be satisfied before continuing
execution. It is typically used in conjunction with a mutex or a lock to protect shared data that is
being modified by multiple threads. Hence, it blocks one or more threads until another thread both
modifies a shared variable (the condition) and notifies the condition_variable. The code below
shows how two threads modifying the shared variable data can be synchronized using the
condition_variable:
#include <hpx/condition_variable.hpp>
#include <hpx/init.hpp>
#include <hpx/mutex.hpp>
#include <hpx/thread.hpp>
#include <iostream>
#include <string>
hpx::condition_variable cv;
hpx::mutex m;
std::string data;
bool ready = false;
bool processed = false;
void worker_thread()
{
// Wait until the main thread signals that data is ready
std::unique_lock<hpx::mutex> lk(m);
cv.wait(lk, [] { return ready; });
// Access the shared resource
std::cout << "Worker thread: Processing data...\n";
data = "Test data after";
// Send data back to the main thread
processed = true;
std::cout << "Worker thread: data processing is complete\n";
// Manual unlocking is done before notifying, to avoid waking up
// the waiting thread only to block again
lk.unlock();
cv.notify_one();
}
int hpx_main()
{
hpx::thread worker(worker_thread);
// Do some work
std::cout << "Main thread: Preparing data...\n";
data = "Test data before";
hpx::this_thread::sleep_for(std::chrono::seconds(1));
std::cout << "Main thread: Data before processing = " << data << '\n';
// Signal that data is ready and send data to worker thread
{
std::lock_guard<hpx::mutex> lk(m);
ready = true;
std::cout << "Main thread: Data is ready...\n";
}
cv.notify_one();
// Wait for the worker thread to finish
{
std::unique_lock<hpx::mutex> lk(m);
cv.wait(lk, [] { return processed; });
}
std::cout << "Main thread: Data after processing = " << data << '\n';
worker.join();
return hpx::local::finalize();
}
int main(int argc, char* argv[])
{
return hpx::local::init(hpx_main, argc, argv);
}
The main thread of the code above starts by creating a worker thread and preparing the shared variable data.
Once the data is ready, the main thread acquires a lock on the mutex m using std::lock_guard<hpx::mutex> lk(m)
and sets the ready flag to true, then signals the worker thread to start processing by calling cv.notify_one().
The cv.wait() call in the main thread then blocks until the worker thread signals that processing is
complete by setting the processed flag.
The worker thread starts by acquiring a lock on the mutex m to ensure exclusive access to the shared data.
The cv.wait() call blocks the thread until the ready flag is set by the main thread. Once this is
true, the worker thread accesses the shared data resource, processes it, and sets the processed flag
to indicate completion. The mutex is then unlocked using lk.unlock() and the cv.notify_one() call
signals the main thread to resume execution. Finally, the new data is printed by the main thread to the
console.
Latch#
A latch is a downward counter which can be used to synchronize threads. The value of the counter is initialized on creation. Threads may block on the latch until the counter is decremented to zero. There is no possibility to increase or reset the counter, which makes the latch a single-use barrier.
In HPX, a latch is implemented as a counting semaphore, which can be initialized with a specific count value and decremented each time a thread reaches the latch. When the count value reaches zero, all waiting threads are unblocked and allowed to continue execution. The code below shows how latch can be used to synchronize 16 threads:
std::ptrdiff_t num_threads = 16;
///////////////////////////////////////////////////////////////////////////////
void wait_for_latch(hpx::latch& l)
{
l.arrive_and_wait();
}
///////////////////////////////////////////////////////////////////////////////
int hpx_main(hpx::program_options::variables_map& vm)
{
num_threads = vm["num-threads"].as<std::ptrdiff_t>();
hpx::latch l(num_threads + 1);
std::vector<hpx::future<void>> results;
for (std::ptrdiff_t i = 0; i != num_threads; ++i)
results.push_back(hpx::async(&wait_for_latch, std::ref(l)));
// Wait for all threads to reach this point.
l.arrive_and_wait();
hpx::wait_all(results);
return hpx::local::finalize();
}
In the above code, the hpx_main function creates a latch object l with a count of num_threads + 1
and num_threads number of threads using hpx::async. These threads call the wait_for_latch
function and pass the reference to the latch object. In the wait_for_latch function, the thread calls the
arrive_and_wait method on the latch, which decrements the count of the latch and causes the thread to wait
until the count reaches zero. Finally, the main thread waits for all the threads to arrive at the latch by
calling the arrive_and_wait method and then waits for all the threads to finish by calling the
hpx::wait_all method.
Mutex#
A mutex (short for “mutual exclusion”) is a synchronization primitive in HPX used to control access to a shared resource, ensuring that only one thread can access it at a time. A mutex is used to protect data structures from race conditions and other synchronization-related issues. When a thread acquires a mutex, other threads that try to access the same resource will be blocked until the mutex is released. The code below shows the basic use of mutexes:
#include <hpx/future.hpp>
#include <hpx/init.hpp>
#include <hpx/mutex.hpp>
#include <iostream>
int hpx_main()
{
hpx::mutex m;
hpx::future<void> f1 = hpx::async([&m]() {
std::scoped_lock sl(m);
std::cout << "Thread 1 acquired the mutex" << std::endl;
});
hpx::future<void> f2 = hpx::async([&m]() {
std::scoped_lock sl(m);
std::cout << "Thread 2 acquired the mutex" << std::endl;
});
hpx::wait_all(f1, f2);
return hpx::local::finalize();
}
int main(int argc, char* argv[])
{
return hpx::local::init(hpx_main, argc, argv);
}
In this example, two HPX threads created using hpx::async are acquiring a hpx::mutex m.
std::scoped_lock sl(m) is used to take ownership of the given mutex m. When control leaves
the scope in which the scoped_lock object was created, the scoped_lock is destructed and
the mutex is released.
Attention
A common way to acquire and release mutexes is by using the function m.lock() before accessing
the shared resource, and m.unlock() called after the access is complete. However, these functions
may lead to deadlocks in case of exception(s). That is, if an exception happens when the mutex is locked
then the code that unlocks the mutex will never be executed, the lock will remain held by the thread
that acquired it, and other threads will be unable to access the shared resource. This can cause a
deadlock if the other threads are also waiting to acquire the same lock. For this reason, we suggest
you use std::scoped_lock, which prevents this issue by releasing the lock when control leaves the
scope in which the scoped_lock object was created.
Semaphore#
Semaphores are a synchronization mechanism used to control concurrent access to a shared resource. The two types of semaphores are:
counting semaphore: it has a counter that is bigger than zero. The counter is initialized in the constructor. Acquiring the semaphore decreases the counter and releasing the semaphore increases the counter. If a thread tries to acquire the semaphore when the counter is zero, the thread will block until another thread increments the counter by releasing the semaphore. Unlike
hpx::mutex, anhpx::counting_semaphoreis not bound to a thread, which means that the acquire and release call of a semaphore can happen on different threads.binary semaphore: it is an alias for a
hpx::counting_semaphore<1>. In this case, the least maximal value is 1.hpx::binary_semaphorecan be used to implement locks.
#include <hpx/init.hpp>
#include <hpx/semaphore.hpp>
#include <hpx/thread.hpp>
#include <iostream>
// initialize the semaphore with a count of 3
hpx::counting_semaphore<> semaphore(3);
void worker()
{
semaphore.acquire(); // decrement the semaphore's count
std::cout << "Entering critical section" << std::endl;
hpx::this_thread::sleep_for(std::chrono::seconds(1));
semaphore.release(); // increment the semaphore's count
std::cout << "Exiting critical section" << std::endl;
}
int hpx_main()
{
hpx::thread t1(worker);
hpx::thread t2(worker);
hpx::thread t3(worker);
hpx::thread t4(worker);
hpx::thread t5(worker);
t1.join();
t2.join();
t3.join();
t4.join();
t5.join();
return hpx::local::finalize();
}
int main(int argc, char* argv[])
{
return hpx::local::init(hpx_main, argc, argv);
}
In this example, the counting semaphore is initialized to the value of 3. This means that up to 3 threads can
access the critical section (the section of code inside the worker() function) at the same time. When a thread
enters the critical section, it acquires the semaphore, which decrements the count, while when it exits the
critical section, it releases the semaphore, incrementing thus the count. The worker() function simulates a
critical section by acquiring the semaphore, sleeping for 1 second and then releasing the semaphore.
In the main function, 5 worker threads are created and started, each trying to enter the critical section. If the count of the semaphore is already 0, a worker will wait until another worker releases the semaphore (increasing its value).
Composable guards#
Composable guards operate in a manner similar to locks, but are applied only to asynchronous functions. The guard (or guards) is automatically locked at the beginning of a specified task and automatically unlocked at the end. Because guards are never added to an existing task’s execution context, the calling of guards is freely composable and can never deadlock.
To call an application with a single guard, simply declare the guard and call
run_guarded() with a function (task):
hpx::lcos::local::guard gu;
run_guarded(gu,task);
If a single method needs to run with multiple guards, use a guard set:
std::shared_ptr<hpx::lcos::local::guard> gu1(new hpx::lcos::local::guard());
std::shared_ptr<hpx::lcos::local::guard> gu2(new hpx::lcos::local::guard());
gs.add(*gu1);
gs.add(*gu2);
run_guarded(gs,task);
Guards use two atomic operations (which are not called repeatedly) to manage what they do, so overhead should be extremely low.
Execution control#
The following objects are providing control of the execution in HPX applications:
Futures#
Futures are a mechanism to represent the result of a potentially asynchronous operation. A future is a type that represents a value that will become available at some point in the future, and it can be used to write asynchronous and parallel code. Futures can be returned from functions that perform time-consuming operations, allowing the calling code to continue executing while the function performs its work. The value of the future is set when the operation completes and can be accessed later. Futures are used in HPX to write asynchronous and parallel code. Below is an example demonstrating different features of futures:
#include <hpx/assert.hpp>
#include <hpx/future.hpp>
#include <hpx/hpx_main.hpp>
#include <hpx/tuple.hpp>
#include <iostream>
#include <utility>
int main()
{
// Asynchronous execution with futures
hpx::future<void> f1 = hpx::async(hpx::launch::async, []() {});
hpx::shared_future<int> f2 =
hpx::async(hpx::launch::async, []() { return 42; });
hpx::future<int> f3 =
f2.then([](hpx::shared_future<int>&& f) { return f.get() * 3; });
hpx::promise<double> p;
auto f4 = p.get_future();
HPX_ASSERT(!f4.is_ready());
p.set_value(123.45);
HPX_ASSERT(f4.is_ready());
hpx::packaged_task<int()> t([]() { return 43; });
hpx::future<int> f5 = t.get_future();
HPX_ASSERT(!f5.is_ready());
t();
HPX_ASSERT(f5.is_ready());
// Fire-and-forget
hpx::post([]() {
std::cout << "This will be printed later\n" << std::flush;
});
// Synchronous execution
hpx::sync([]() {
std::cout << "This will be printed immediately\n" << std::flush;
});
// Combinators
hpx::future<double> f6 = hpx::async([]() { return 3.14; });
hpx::future<double> f7 = hpx::async([]() { return 42.0; });
std::cout
<< hpx::when_all(f6, f7)
.then([](hpx::future<
hpx::tuple<hpx::future<double>, hpx::future<double>>>
f) {
hpx::tuple<hpx::future<double>, hpx::future<double>> t =
f.get();
double pi = hpx::get<0>(t).get();
double r = hpx::get<1>(t).get();
return pi * r * r;
})
.get()
<< std::endl;
// Easier continuations with dataflow; it waits for all future or
// shared_future arguments before executing the continuation, and also
// accepts non-future arguments
hpx::future<double> f8 = hpx::async([]() { return 3.14; });
hpx::future<double> f9 = hpx::make_ready_future(42.0);
hpx::shared_future<double> f10 = hpx::async([]() { return 123.45; });
hpx::future<hpx::tuple<double, double>> f11 = hpx::dataflow(
[](hpx::future<double> a, hpx::future<double> b,
hpx::shared_future<double> c, double d) {
return hpx::make_tuple<>(a.get() + b.get(), c.get() / d);
},
f8, f9, f10, -3.9);
// split_future gives a tuple of futures from a future of tuple
hpx::tuple<hpx::future<double>, hpx::future<double>> f12 =
hpx::split_future(std::move(f11));
std::cout << hpx::get<1>(f12).get() << std::endl;
return 0;
}
The first section of the main function demonstrates how to use futures for asynchronous execution.
The first two lines create two futures, one for void and another for an integer, using the
hpx::async() function. These futures are executed asynchronously in separate threads using
the hpx::launch::async launch policy. The third future is created by chaining the second
future using the then() member function. This future multiplies the result of the second future
by 3.
The next part of the code demonstrates how to use promises and packaged tasks, which are constructs
used for communicating data between threads. The promise class is used to store a value that can be
retrieved later using a future. The packaged_task class represents a task that can be executed
asynchronously, and its result can be obtained using a future. The last three lines create a
packaged task that returns an integer, obtain its future, execute the task, and check whether the
future is ready or not.
The code then demonstrates how to use the hpx::post() and hpx::sync() functions for
fire-and-forget and synchronous execution, respectively. The hpx::post() function executes a
given function asynchronously and returns immediately without waiting for the result. The
hpx::sync() function executes a given function synchronously and waits for the result before
returning.
Next the code demonstrates the use of combinators, which are higher-order functions that combine
two or more futures into a single future. The hpx::when_all() function is used to combine two futures,
which return double values, into a tuple of futures. The then() member function is then used to
compute the area of a circle using the values of the two futures. The get() member function is used to
retrieve the result of the computation.
The last section demonstrates the use of hpx::dataflow(), which is a higher-order function that waits
for all the future or shared_future arguments to be ready before executing the continuation. The
hpx::make_ready_future() function is used to create a future with a given value. The
hpx::split_future() function is used to split a future of a tuple into a tuple of futures. The last
line retrieves the value of the second future in the tuple using hpx::get() and prints it to the console.
Concurrency is about both decomposing and composing the program from the parts that work well individually and together. It is in the composition of connected and multicore components where today’s C++ libraries are still lacking.
The functionality of std::future offers a partial solution. It allows for the separation of the initiation of an operation and the act of waiting for its result; however, the act of waiting is synchronous. In communication-intensive code this act of waiting can be unpredictable, inefficient and simply frustrating. The example below illustrates a possible synchronous wait using futures:
#include <future>
using namespace std;
int main()
{
future<int> f = async([]() { return 123; });
int result = f.get(); // might block
}
For this reason, HPX implements a set of extensions to
std::future (as proposed by N4313). This
proposal introduces the following key asynchronous operations to
hpx::future, hpx::shared_future and hpx::async,
which enhance and enrich these facilities.
Facility |
Description |
In asynchronous programming, it is very common for one asynchronous
operation, on completion, to invoke a second operation and pass data to
it. The current C++ standard does not allow one to register a
continuation to a future. With |
|
unwrapping constructor for |
In some scenarios, you might want to create a future that returns another future, resulting in nested futures. Although it is possible to write code to unwrap the outer future and retrieve the nested future and its result, such code is not easy to write because users must handle exceptions and it may cause a blocking call. Unwrapping can allow users to mitigate this problem by doing an asynchronous call to unwrap the outermost future. |
|
There are often situations where a |
|
Some functions may know the value at the point of construction. In these
cases the value is immediately available, but needs to be returned as a
future. By using |
The standard also omits the ability to compose multiple futures. This is a common pattern that is ubiquitous in other asynchronous frameworks and is absolutely necessary in order to make C++ a powerful asynchronous programming language. Not including these functions is synonymous to Boolean algebra without AND/OR.
In addition to the extensions proposed by N4313, HPX adds functions allowing users to compose several futures in a more flexible way.
Facility |
Description |
Asynchronously wait for at least one of multiple future or shared_future objects to finish. |
|
Synchronously wait for at least one of multiple future or shared_future objects to finish. |
|
Asynchronously wait for all future and shared_future objects to finish. |
|
Synchronously wait for all future and shared_future objects to finish. |
|
Asynchronously wait for multiple future and shared_future objects to finish. |
|
Synchronously wait for multiple future and shared_future objects to finish. |
|
Asynchronously wait for multiple future and shared_future objects to finish and call a function for each of the future objects as soon as it becomes ready. |
|
Synchronously wait for multiple future and shared_future objects to finish and call a function for each of the future objects as soon as it becomes ready. |
Channels#
Channels combine communication (the exchange of a value) with synchronization (guaranteeing that two calculations (tasks) are in a known state). A channel can transport any number of values of a given type from a sender to a receiver:
hpx::lcos::local::channel<int> c;
hpx::future<int> f = c.get();
HPX_ASSERT(!f.is_ready());
c.set(42);
HPX_ASSERT(f.is_ready());
std::cout << f.get() << std::endl;
Channels can be handed to another thread (or in case of channel components, to other localities), thus establishing a communication channel between two independent places in the program:
void do_something(hpx::lcos::local::receive_channel<int> c,
hpx::lcos::local::send_channel<> done)
{
// prints 43
std::cout << c.get(hpx::launch::sync) << std::endl;
// signal back
done.set();
}
void send_receive_channel()
{
hpx::lcos::local::channel<int> c;
hpx::lcos::local::channel<> done;
hpx::post(&do_something, c, done);
// send some value
c.set(43);
// wait for thread to be done
done.get().wait();
}
Note how hpx::lcos::local::channel::get without any arguments
returns a future which is ready when a value has been set on the channel. The
launch policy hpx::launch::sync can be used to make
hpx::lcos::local::channel::get block until a value is set and
return the value directly.
A channel component is created on one locality and can be sent to another locality using an action. This example also demonstrates how a channel can be used as a range of values:
// channel components need to be registered for each used type (not needed
// for hpx::lcos::local::channel)
HPX_REGISTER_CHANNEL(double)
void channel_sender(hpx::lcos::channel<double> c)
{
for (double d : c)
hpx::cout << d << std::endl;
}
HPX_PLAIN_ACTION(channel_sender)
void channel()
{
// create the channel on this locality
hpx::lcos::channel<double> c(hpx::find_here());
// pass the channel to a (possibly remote invoked) action
hpx::post(channel_sender_action(), hpx::find_here(), c);
// send some values to the receiver
std::vector<double> v = {1.2, 3.4, 5.0};
for (double d : v)
c.set(d);
// explicitly close the communication channel (implicit at destruction)
c.close();
}
Task blocks#
Task blocks in HPX provide a way to structure and organize the execution of tasks in a parallel program, making it easier to manage dependencies between tasks. A task block actually is a group of tasks that can be executed in parallel. Tasks in a task block can depend on other tasks in the same task block. The task block allows the runtime to optimize the execution of tasks, by scheduling them in an optimal order based on the dependencies between them.
The define_task_block, run and the wait functions implemented based
on N4755 are based on the task_block concept that is a part of the
common subset of the Microsoft Parallel Patterns Library (PPL) and the Intel Threading Building Blocks (TBB) libraries.
These implementations adopt a simpler syntax than exposed by those libraries— one that is influenced by language-based concepts, such as spawn and sync from Cilk++ and async and finish from X10. They improve on existing practice in the following ways:
The exception handling model is simplified and more consistent with normal C++ exceptions.
Most violations of strict fork-join parallelism can be enforced at compile time (with compiler assistance, in some cases).
The syntax allows scheduling approaches other than child stealing.
Consider an example of a parallel traversal of a tree, where a user-provided function compute is applied to each node of the tree, returning the sum of the results:
template <typename Func>
int traverse(node& n, Func && compute)
{
int left = 0, right = 0;
define_task_block(
[&](task_block<>& tr) {
if (n.left)
tr.run([&] { left = traverse(*n.left, compute); });
if (n.right)
tr.run([&] { right = traverse(*n.right, compute); });
});
return compute(n) + left + right;
}
The example above demonstrates the use of two of the functions,
hpx::experimental::define_task_block and the
hpx::experimental::task_block::run member function of a
hpx::experimental::task_block.
The task_block function delineates a region in a program code potentially
containing invocations of threads spawned by the run member function of the
task_block class. The run function spawns an HPX thread, a unit of
work that is allowed to execute in parallel with respect to the caller. Any
parallel tasks spawned by run within the task block are joined back to a
single thread of execution at the end of the define_task_block. run
takes a user-provided function object f and starts it asynchronously—i.e.,
it may return before the execution of f completes. The HPX scheduler may
choose to run f immediately or delay running f until compute resources
become available.
A task_block can be constructed only by define_task_block because it has
no public constructors. Thus, run can be invoked directly or indirectly
only from a user-provided function passed to define_task_block:
void g();
void f(task_block<>& tr)
{
tr.run(g); // OK, invoked from within task_block in h
}
void h()
{
define_task_block(f);
}
int main()
{
task_block<> tr; // Error: no public constructor
tr.run(g); // No way to call run outside of a define_task_block
return 0;
}
HPX implements some extensions for task_block beyond the actual
standards proposal N4755. The main addition is that a task_block
can be invoked with an execution policy as its first argument, very similar to
the parallel algorithms.
An execution policy is an object that expresses the requirements on the
ordering of functions invoked as a consequence of the invocation of a
task block. Enabling passing an execution policy to define_task_block
gives the user control over the amount of parallelism employed by the
created task_block. In the following example the use of an explicit
par execution policy makes the user’s intent explicit:
template <typename Func>
int traverse(node *n, Func&& compute)
{
int left = 0, right = 0;
define_task_block(
execution::par, // execution::parallel_policy
[&](task_block<>& tb) {
if (n->left)
tb.run([&] { left = traverse(n->left, compute); });
if (n->right)
tb.run([&] { right = traverse(n->right, compute); });
});
return compute(n) + left + right;
}
This also causes the hpx::experimental::task_block object to be a
template in our implementation. The template argument is the type of the
execution policy used to create the task block. The template argument defaults
to hpx::execution::parallel_policy.
HPX still supports calling hpx::experimental::define_task_block
without an explicit execution policy. In this case the task block will run using
the hpx::execution::parallel_policy.
HPX also adds the ability to access the execution policy that was used to
create a given task_block.
Often, users want to be able to not only define an execution policy to use by
default for all spawned tasks inside the task block, but also to
customize the execution context for one of the tasks executed by
task_block::run. Adding an optionally passed executor instance to that
function enables this use case:
template <typename Func>
int traverse(node *n, Func&& compute)
{
int left = 0, right = 0;
define_task_block(
execution::par, // execution::parallel_policy
[&](auto& tb) {
if (n->left)
{
// use explicitly specified executor to run this task
tb.run(my_executor(), [&] { left = traverse(n->left, compute); });
}
if (n->right)
{
// use the executor associated with the par execution policy
tb.run([&] { right = traverse(n->right, compute); });
}
});
return compute(n) + left + right;
}
HPX still supports calling hpx::experimental::task_block::run
without an explicit executor object. In this case the task will be run using the
executor associated with the execution policy that was used to call
hpx::experimental::define_task_block.
Task groups#
A task group in HPX is a synchronization primitive
that allows you to execute a group of tasks concurrently and wait for their completion before
continuing. The tasks in an hpx::experimental::task_group can be added dynamically. This is the HPX
implementation of tbb::task_group of the Intel Threading Building Blocks (TBB) library.
The example below shows that to use a task group, you simply create an hpx::task_group object
and add tasks to it using the run() method. Once all the tasks have been added, you can call
the wait() method to synchronize the tasks and wait for them to complete.
#include <hpx/experimental/task_group.hpp>
#include <hpx/init.hpp>
#include <iostream>
void task1()
{
std::cout << "Task 1 executed." << std::endl;
}
void task2()
{
std::cout << "Task 2 executed." << std::endl;
}
int hpx_main()
{
hpx::experimental::task_group tg;
tg.run(task1);
tg.run(task2);
tg.wait();
std::cout << "All tasks finished!" << std::endl;
return hpx::local::finalize();
}
int main(int argc, char* argv[])
{
return hpx::local::init(hpx_main, argc, argv);
}
Note
task groups and task blocks are both ways to group and synchronize parallel tasks, but task groups are used to group multiple tasks together as a single unit, while task blocks are used to execute a loop in parallel, with each iteration of the loop executing in a separate task. If the difference is not clear yet, continue reading.
A task group is a construct that allows multiple parallel tasks to be grouped together as a single unit. The task group provides a way to synchronize all the tasks in the group before continuing with the rest of the program.
A task block, on the other hand, is a parallel loop construct that allows you to execute a loop in parallel, with each iteration of the loop executing in a separate task. The loop iterations are executed in a block, meaning that the loop body is executed as a single task.
Threads#
A thread in HPX refers to a sequence of instructions that can be executed concurrently with other such sequences in multithreading environments, while sharing a same address space. These threads can communicate with each other through various means, such as futures or shared data structures.
The example below demonstrates how to launch multiple threads and synchronize them using a hpx::latch
object. It also shows how to query the state of threads and wait for futures to complete.
#include <hpx/future.hpp>
#include <hpx/init.hpp>
#include <hpx/thread.hpp>
#include <functional>
#include <iostream>
#include <vector>
int const num_threads = 10;
///////////////////////////////////////////////////////////////////////////////
void wait_for_latch(hpx::latch& l)
{
l.arrive_and_wait();
}
int hpx_main()
{
// Spawn a couple of threads
hpx::latch l(num_threads + 1);
std::vector<hpx::future<void>> results;
results.reserve(num_threads);
for (int i = 0; i != num_threads; ++i)
results.push_back(hpx::async(&wait_for_latch, std::ref(l)));
// Allow spawned threads to reach latch
hpx::this_thread::yield();
// Enumerate all suspended threads
hpx::threads::enumerate_threads(
[](hpx::threads::thread_id_type id) -> bool {
std::cout << "thread " << hpx::thread::id(id) << " is "
<< hpx::threads::get_thread_state_name(
hpx::threads::get_thread_state(id))
<< std::endl;
return true; // always continue enumeration
},
hpx::threads::thread_schedule_state::suspended);
// Wait for all threads to reach this point.
l.arrive_and_wait();
hpx::wait_all(results);
return hpx::local::finalize();
}
int main(int argc, char* argv[])
{
return hpx::local::init(hpx_main, argc, argv);
}
In more detail, the wait_for_latch() function is a simple helper function that waits for a hpx::latch
object to be released. At this point we remind that hpx::latch is a synchronization primitive that
allows multiple threads to wait for a common event to occur.
In the hpx_main() function, an hpx::latch object is created with a count of num_threads + 1,
indicating that num_threads threads need to arrive at the latch before the latch is released. The loop
that follows launches num_threads asynchronous operations, each of which calls the wait_for_latch
function. The resulting futures are added to the vector.
After the threads have been launched, hpx::this_thread::yield() is called to give them a chance to
reach the latch before the program proceeds. Then, the hpx::threads::enumerate_threads function
prints the state of each suspended thread, while the next call of l.arrive_and_wait() waits for all
the threads to reach the latch. Finally, hpx::wait_all is called to wait for all the futures to complete.
Hint
An advantage of using hpx::thread over other threading libraries is that it is optimized for
high-performance parallelism, with support for lightweight threads and task scheduling to minimize
thread overhead and maximize parallelism. Additionally, hpx::thread integrates seamlessly with
other features of HPX such as futures, promises, and task groups, making it a powerful tool for
parallel programming.
Checkout the examples of Shared mutex, Condition variable, Semaphore to see how HPX threads are used in combination with other features.
High level parallel facilities#
In preparation for the upcoming C++ Standards, there are currently several proposals targeting different facilities supporting parallel programming. HPX implements (and extends) some of those proposals. This is well aligned with our strategy to align the APIs exposed from HPX with current and future C++ Standards.
At this point, HPX implements several of the C++ Standardization working papers, most notably N4409 (Working Draft, Technical Specification for C++ Extensions for Parallelism), N4755 (Task Blocks), and N4406 (Parallel Algorithms Need Executors).
Using parallel algorithms#
A parallel algorithm is a function template declared in the namespace
hpx::parallel.
All parallel algorithms are very similar in semantics to their sequential
counterparts (as defined in the namespace std) with an additional formal
template parameter named ExecutionPolicy. The execution policy is generally
passed as the first argument to any of the parallel algorithms and describes the
manner in which the execution of these algorithms may be parallelized and the
manner in which they apply user-provided function objects.
The applications of function objects in parallel algorithms invoked with an
execution policy object of type hpx::execution::sequenced_policy or
hpx::execution::sequenced_task_policy execute in sequential order. For
hpx::execution::sequenced_policy the execution happens in the calling thread.
The applications of function objects in parallel algorithms invoked with an
execution policy object of type hpx::execution::parallel_policy or
hpx::execution::parallel_task_policy are permitted to execute in an unordered
fashion in unspecified threads, and are indeterminately sequenced within each
thread.
Important
It is the caller’s responsibility to ensure correctness, such as making sure that the invocation does not introduce data races or deadlocks.
The example below demonstrates how to perform a sequential and parallel hpx::for_each loop on a vector of integers.
#include <hpx/algorithm.hpp>
#include <hpx/execution.hpp>
#include <hpx/init.hpp>
#include <iostream>
#include <vector>
int hpx_main()
{
std::vector<int> v{1, 2, 3, 4, 5};
auto print = [](int const& n) { std::cout << n << ' '; };
std::cout << "Print sequential: ";
hpx::for_each(v.begin(), v.end(), print);
std::cout << '\n';
std::cout << "Print parallel: ";
hpx::for_each(hpx::execution::par, v.begin(), v.end(), print);
std::cout << '\n';
return hpx::local::finalize();
}
int main(int argc, char* argv[])
{
return hpx::local::init(hpx_main, argc, argv);
}
The above code uses hpx::for_each to print the elements of the vector v{1, 2, 3, 4, 5}.
At first, hpx::for_each() is called without an execution policy, which means that it applies
the lambda function print to each element in the vector sequentially. Hence, the elements are
printed in order.
Next, hpx::for_each() is called with the hpx::execution::par execution policy,
which applies the lambda function print to each element in the vector in parallel. Therefore,
the output order of the elements in the vector is not deterministic and may vary from run to run.
Parallel exceptions#
During the execution of a standard parallel algorithm, if temporary memory
resources are required by any of the algorithms and no memory is available, the
algorithm throws a std::bad_alloc exception.
During the execution of any of the parallel algorithms, if the application of a function object terminates with an uncaught exception, the behavior of the program is determined by the type of execution policy used to invoke the algorithm:
If the execution policy object is of type
hpx::execution::parallel_unsequenced_policy,hpx::terminateshall be called.If the execution policy object is of type
hpx::execution::sequenced_policy,hpx::execution::sequenced_task_policy,hpx::execution::parallel_policy, orhpx::execution::parallel_task_policy, the execution of the algorithm terminates with anhpx::exception_listexception. All uncaught exceptions thrown during the application of user-provided function objects shall be contained in thehpx::exception_list.
For example, the number of invocations of the user-provided function object in
for_each is unspecified. When hpx::for_each is executed sequentially, only one
exception will be contained in the hpx::exception_list object.
These guarantees imply that, unless the algorithm has failed to allocate memory
and terminated with std::bad_alloc, all exceptions thrown during the
execution of the algorithm are communicated to the caller. It is unspecified
whether an algorithm implementation will “forge ahead” after encountering and
capturing a user exception.
The algorithm may terminate with the std::bad_alloc exception even if one or
more user-provided function objects have terminated with an exception. For
example, this can happen when an algorithm fails to allocate memory while
creating or adding elements to the hpx::exception_list object.
Parallel algorithms#
HPX provides implementations of the following parallel algorithms:
Name |
Description |
C++ standard |
Computes the differences between adjacent elements in a range. |
||
Checks if a predicate is |
||
Checks if a predicate is |
||
Returns the number of elements equal to a given value. |
||
Returns the number of elements satisfying a specific criteria. |
||
Determines if two sets of elements are the same. |
||
Finds the first element equal to a given value. |
||
Finds the last sequence of elements in a certain range. |
||
Searches for any one of a set of elements. |
||
Finds the first element satisfying a specific criteria. |
||
Finds the first element not satisfying a specific criteria. |
||
Applies a function to a range of elements. |
||
Applies a function to a number of elements. |
||
Checks if a range of values is lexicographically less than another range of values. |
||
Finds the first position where two ranges differ. |
||
Checks if a predicate is |
||
Searches for a range of elements. |
||
Searches for a number consecutive copies of an element in a range. |
Name |
Description |
C++ standard |
Copies a range of elements to a new location. |
||
Copies a number of elements to a new location. |
||
Copies the elements from a range to a new location for which the given predicate is |
||
Moves a range of elements to a new location. |
||
Assigns a range of elements a certain value. |
||
Assigns a value to a number of elements. |
||
Saves the result of a function in a range. |
||
Saves the result of N applications of a function. |
||
Performs an inclusive scan on consecutive elements with matching keys,
with a reduction to output only the final sum for each key. The key
sequence |
||
Removes the elements from a range that are equal to the given value. |
||
Removes the elements from a range that are equal to the given predicate is |
||
Copies the elements from a range to a new location that are not equal to the given value. |
||
Copies the elements from a range to a new location for which the given predicate is |
||
Replaces all values satisfying specific criteria with another value. |
||
Replaces all values satisfying specific criteria with another value. |
||
Copies a range, replacing elements satisfying specific criteria with another value. |
||
Copies a range, replacing elements satisfying specific criteria with another value. |
||
Reverses the order elements in a range. |
||
Creates a copy of a range that is reversed. |
||
Rotates the order of elements in a range. |
||
Copies and rotates a range of elements. |
||
Shifts the elements in the range left by n positions. |
||
Shifts the elements in the range right by n positions. |
||
Swaps two ranges of elements. |
||
Applies a function to a range of elements. |
||
Eliminates all but the first element from every consecutive group of equivalent elements from a range. |
||
Copies the elements from one range to another in such a way that there are no consecutive equal elements. |
Name |
Description |
C++ standard |
Merges two sorted ranges. |
||
Merges two ordered ranges in-place. |
||
Returns true if one set is a subset of another. |
||
Computes the difference between two sets. |
||
Computes the intersection of two sets. |
||
Computes the symmetric difference between two sets. |
||
Computes the union of two sets. |
Name |
Description |
C++ standard |
Returns |
||
Returns the first element that breaks a max heap. |
||
Constructs a max heap in the range [first, last). |
Name |
Description |
C++ standard |
Returns the largest element in a range. |
||
Returns the smallest element in a range. |
||
Returns the smallest and the largest element in a range. |
Name |
Description |
C++ standard |
Partially sorts the given range making sure that it is partitioned by the given element |
||
Returns |
||
Divides elements into two groups without preserving their relative order. |
||
Copies a range dividing the elements into two groups. |
||
Divides elements into two groups while preserving their relative order. |
Name |
Description |
C++ standard |
Returns |
||
Returns the first unsorted element. |
||
Sorts the elements in a range. |
||
Sorts the elements in a range, maintain sequence of equal elements. |
||
Sorts the first elements in a range. |
||
Sorts the first elements in a range, storing the result in another range. |
||
Sorts one range of data using keys supplied in another range. |
Name |
Description |
C++ standard |
Calculates the difference between each element in an input range and the preceding element. |
||
Does an exclusive parallel scan over a range of elements. |
||
Does an inclusive parallel scan over a range of elements. |
||
Sums up a range of elements. |
||
Does an exclusive parallel scan over a range of elements after applying a function. |
||
Does an inclusive parallel scan over a range of elements after applying a function. |
||
Sums up a range of elements after applying a function. Also, accumulates the inner products of two input ranges. |
Name |
Description |
C++ standard |
Destroys a range of objects. |
||
Destroys a range of objects. |
||
Copies a range of objects to an uninitialized area of memory. |
||
Copies a number of objects to an uninitialized area of memory. |
||
Copies a range of objects to an uninitialized area of memory. |
||
Copies a number of objects to an uninitialized area of memory. |
||
Copies an object to an uninitialized area of memory. |
||
Copies an object to an uninitialized area of memory. |
||
Moves a range of objects to an uninitialized area of memory. |
||
Moves a number of objects to an uninitialized area of memory. |
||
Constructs objects in an uninitialized area of memory. |
||
Constructs objects in an uninitialized area of memory. |
Name |
Description |
Implements loop functionality over a range specified by integral or iterator bounds. |
|
Implements loop functionality over a range specified by integral or iterator bounds. |
|
Implements loop functionality over a range specified by integral or iterator bounds. |
|
Implements loop functionality over a range specified by integral or iterator bounds. |
Executor parameters and executor parameter traits#
HPX introduces the notion of execution parameters and execution parameter traits. At this point, the only parameter that can be customized is the size of the chunks of work executed on a single HPX thread (such as the number of loop iterations combined to run as a single task).
An executor parameter object is responsible for exposing the calculation of the size of the chunks scheduled. It abstracts the (potentially platform-specific) algorithms of determining those chunk sizes.
The way executor parameters are implemented is aligned with the way executors
are implemented. All functionalities of concrete executor parameter types are
exposed and accessible through a corresponding customization point, e.g.
get_chunk_size().
With executor_parameter_traits, clients access all types of executor
parameters uniformly, e.g.:
std::size_t chunk_size =
hpx::execution::experimental::get_chunk_size(my_parameter, my_executor,
num_cores, num_tasks);
This call synchronously retrieves the size of a single chunk of loop iterations
(or similar) to combine for execution on a single HPX thread if the overall
number of cores num_cores and tasks to schedule is given by num_tasks.
The lambda function exposes a means of test-probing the execution of a single
iteration for performance measurement purposes. The execution parameter type
might dynamically determine the execution time of one or more tasks in order
to calculate the chunk size; see
hpx::execution::experimental::auto_chunk_size for an example of
this executor parameter type.
Other functions in the interface exist to discover whether an executor parameter
type should be invoked once (i.e., it returns a static chunk size; see
hpx::execution::experimental::static_chunk_size) or whether it
should be invoked
for each scheduled chunk of work (i.e., it returns a variable chunk size; for an
example, see hpx::execution::experimental::guided_chunk_size).
Although this interface appears to require executor parameter type authors to implement all different basic operations, none are required. In practice, all operations have sensible defaults. However, some executor parameter types will naturally specialize all operations for maximum efficiency.
HPX implements the following executor parameter types:
hpx::execution::experimental::auto_chunk_size: Loop iterations are divided into pieces and then assigned to threads. The number of loop iterations combined is determined based on measurements of how long the execution of 1% of the overall number of iterations takes. This executor parameter type makes sure that as many loop iterations are combined as necessary to run for the amount of time specified.hpx::execution::experimental::static_chunk_size: Loop iterations are divided into pieces of a given size and then assigned to threads. If the size is not specified, the iterations are, if possible, evenly divided contiguously among the threads. This executor parameters type is equivalent to OpenMP’s STATIC scheduling directive.hpx::execution::experimental::dynamic_chunk_size: Loop iterations are divided into pieces of a given size and then dynamically scheduled among the cores; when a core finishes one chunk, it is dynamically assigned another. If the size is not specified, the default chunk size is 1. This executor parameter type is equivalent to OpenMP’s DYNAMIC scheduling directive.hpx::execution::experimental::guided_chunk_size: Iterations are dynamically assigned to cores in blocks as cores request them until no blocks remain to be assigned. This is similar todynamic_chunk_sizeexcept that the block size decreases each time a number of loop iterations is given to a thread. The size of the initial block is proportional tonumber_of_iterations / number_of_cores. Subsequent blocks are proportional tonumber_of_iterations_remaining / number_of_cores. The optional chunk size parameter defines the minimum block size. The default minimal chunk size is 1. This executor parameter type is equivalent to OpenMP’s GUIDED scheduling directive.
Writing distributed applications#
This section focuses on the features of HPX needed to write distributed applications, namely the Active Global Address Space (AGAS), remotely executable functions (i.e., actions), and distributed objects (i.e., components).
Global names#
HPX implements an Active Global Address Space (AGAS) which exposes a single uniform address space spanning all localities an application runs on. AGAS is a fundamental component of the ParalleX execution model. Conceptually, there is no rigid demarcation of local or global memory in AGAS; all available memory is a part of the same address space. AGAS enables named objects to be moved (migrated) across localities without having to change the object’s name; i.e., no references to migrated objects have to be ever updated. This feature has significance for dynamic load balancing and in applications where the workflow is highly dynamic, allowing work to be migrated from heavily loaded nodes to less loaded nodes. In addition, immutability of names ensures that AGAS does not have to keep extra indirections (“bread crumbs”) when objects move, hence, minimizing complexity of code management for system developers as well as minimizing overheads in maintaining and managing aliases.
The AGAS implementation in HPX does not automatically expose every local address to the global address space. It is the responsibility of the programmer to explicitly define which of the objects have to be globally visible and which of the objects are purely local.
In HPX global addresses (global names) are represented using the
hpx::id_type data type. This data type is conceptually very similar to
void* pointers as it does not expose any type information of the object it
is referring to.
The only predefined global addresses are assigned to all localities. The following HPX API functions allow one to retrieve the global addresses of localities:
hpx::find_here: retrieves the global address of the locality this function is called on.hpx::find_all_localities: retrieves the global addresses of all localities available to this application (including the locality the function is being called on).hpx::find_remote_localities: retrieves the global addresses of all remote localities available to this application (not including the locality the function is being called on).hpx::get_num_localities: retrieves the number of localities available to this application.hpx::find_locality: retrieves the global address of any locality supporting the given component type.hpx::get_colocation_id: retrieves the global address of the locality currently hosting the object with the given global address.
Additionally, the global addresses of localities can be used to create new instances of components using the following HPX API function:
hpx::components::new_: Creates a new instance of the givenComponenttype on the specified locality.
Note
HPX does not expose any functionality to delete component instances. All
global addresses (as represented using hpx::id_type) are automatically
garbage collected. When the last (global) reference to a particular component
instance goes out of scope, the corresponding component instance is
automatically deleted.
Posting actions#
Action type definition#
Actions are special types used to describe possibly remote operations. For
every global function and every member function which has to be invoked
distantly, a special type must be defined. For any global function the special
macro HPX_PLAIN_ACTION can be used to define the
action type. Here is an example demonstrating this:
namespace app
{
void some_global_function(double d)
{
cout << d;
}
}
// This will define the action type 'some_global_action' which represents
// the function 'app::some_global_function'.
HPX_PLAIN_ACTION(app::some_global_function, some_global_action);
Important
The macro HPX_PLAIN_ACTION has to be placed in
global namespace, even if the wrapped function is located in some other
namespace. The newly defined action type is placed in the global namespace as
well.
If the action type should be defined somewhere not in global namespace, the
action type definition has to be split into two macro invocations
(HPX_DEFINE_PLAIN_ACTION and HPX_REGISTER_ACTION) as shown
in the next example:
namespace app
{
void some_global_function(double d)
{
cout << d;
}
// On conforming compilers the following macro expands to:
//
// typedef hpx::actions::make_action<
// decltype(&some_global_function), &some_global_function
// >::type some_global_action;
//
// This will define the action type 'some_global_action' which represents
// the function 'some_global_function'.
HPX_DEFINE_PLAIN_ACTION(some_global_function, some_global_action);
}
// The following macro expands to a series of definitions of global objects
// which are needed for proper serialization and initialization support
// enabling the remote invocation of the function``some_global_function``
HPX_REGISTER_ACTION(app::some_global_action, app_some_global_action);
The shown code defines an action type some_global_action inside the namespace
app.
Important
If the action type definition is split between two macros as shown above, the
name of the action type to create has to be the same for both macro
invocations (here some_global_action).
Important
The second argument passed to HPX_REGISTER_ACTION (app_some_global_action) has
to comprise a globally unique C++ identifier representing the action. This is
used for serialization purposes.
For member functions of objects which have been registered with AGAS
(e.g., ‘components’), a different registration macro
HPX_DEFINE_COMPONENT_ACTION has to be utilized. Any component needs
to be declared in a header file and have some special support macros defined in
a source file. Here is an example demonstrating this. The first snippet has to
go into the header file:
namespace app
{
struct some_component
: hpx::components::component_base<some_component>
{
int some_member_function(std::string s)
{
return boost::lexical_cast<int>(s);
}
// This will define the action type 'some_member_action' which
// represents the member function 'some_member_function' of the
// object type 'some_component'.
HPX_DEFINE_COMPONENT_ACTION(some_component, some_member_function,
some_member_action);
};
}
// Note: The second argument to the macro below has to be systemwide-unique
// C++ identifiers
HPX_REGISTER_ACTION_DECLARATION(app::some_component::some_member_action, some_component_some_action);
The next snippet belongs in a source file (e.g., the main application source file) in the simplest case:
typedef hpx::components::component<app::some_component> component_type;
typedef app::some_component some_component;
HPX_REGISTER_COMPONENT(component_type, some_component);
// The parameters for this macro have to be the same as used in the corresponding
// HPX_REGISTER_ACTION_DECLARATION() macro invocation above
typedef some_component::some_member_action some_component_some_action;
HPX_REGISTER_ACTION(some_component_some_action);
While these macro invocations are a bit more complex than those for simple global functions, they should still be manageable.
The most important macro invocation is the HPX_DEFINE_COMPONENT_ACTION in the header file
as this defines the action type we need to invoke the member function. For a
complete example of a simple component action see component_in_executable.cpp.
Action invocation#
The process of invoking a global function (or a member function of an object)
with the help of the associated action is called ‘posting the action’. Actions
can have arguments, which will be supplied while the action is applied. At the
minimum, one parameter is required to post any action - the id of the
locality the associated function should be invoked on (for global
functions), or the id of the component instance (for member functions).
Generally, HPX provides several ways to post an action, all of which are
described in the following sections.
Generally, HPX actions are very similar to ‘normal’ C++ functions except that actions can be invoked remotely. Fig. 8 below shows an overview of the main API exposed by HPX. This shows the function invocation syntax as defined by the C++ language (dark gray), the additional invocation syntax as provided through C++ Standard Library features (medium gray), and the extensions added by HPX (light gray) where:
ffunction to invoke,p..: (optional) arguments,R: return type off,action: action type defined by,HPX_DEFINE_PLAIN_ACTIONorHPX_DEFINE_COMPONENT_ACTIONencapsulatingf,a: an instance of the typeaction,id: the global address the action is applied to.
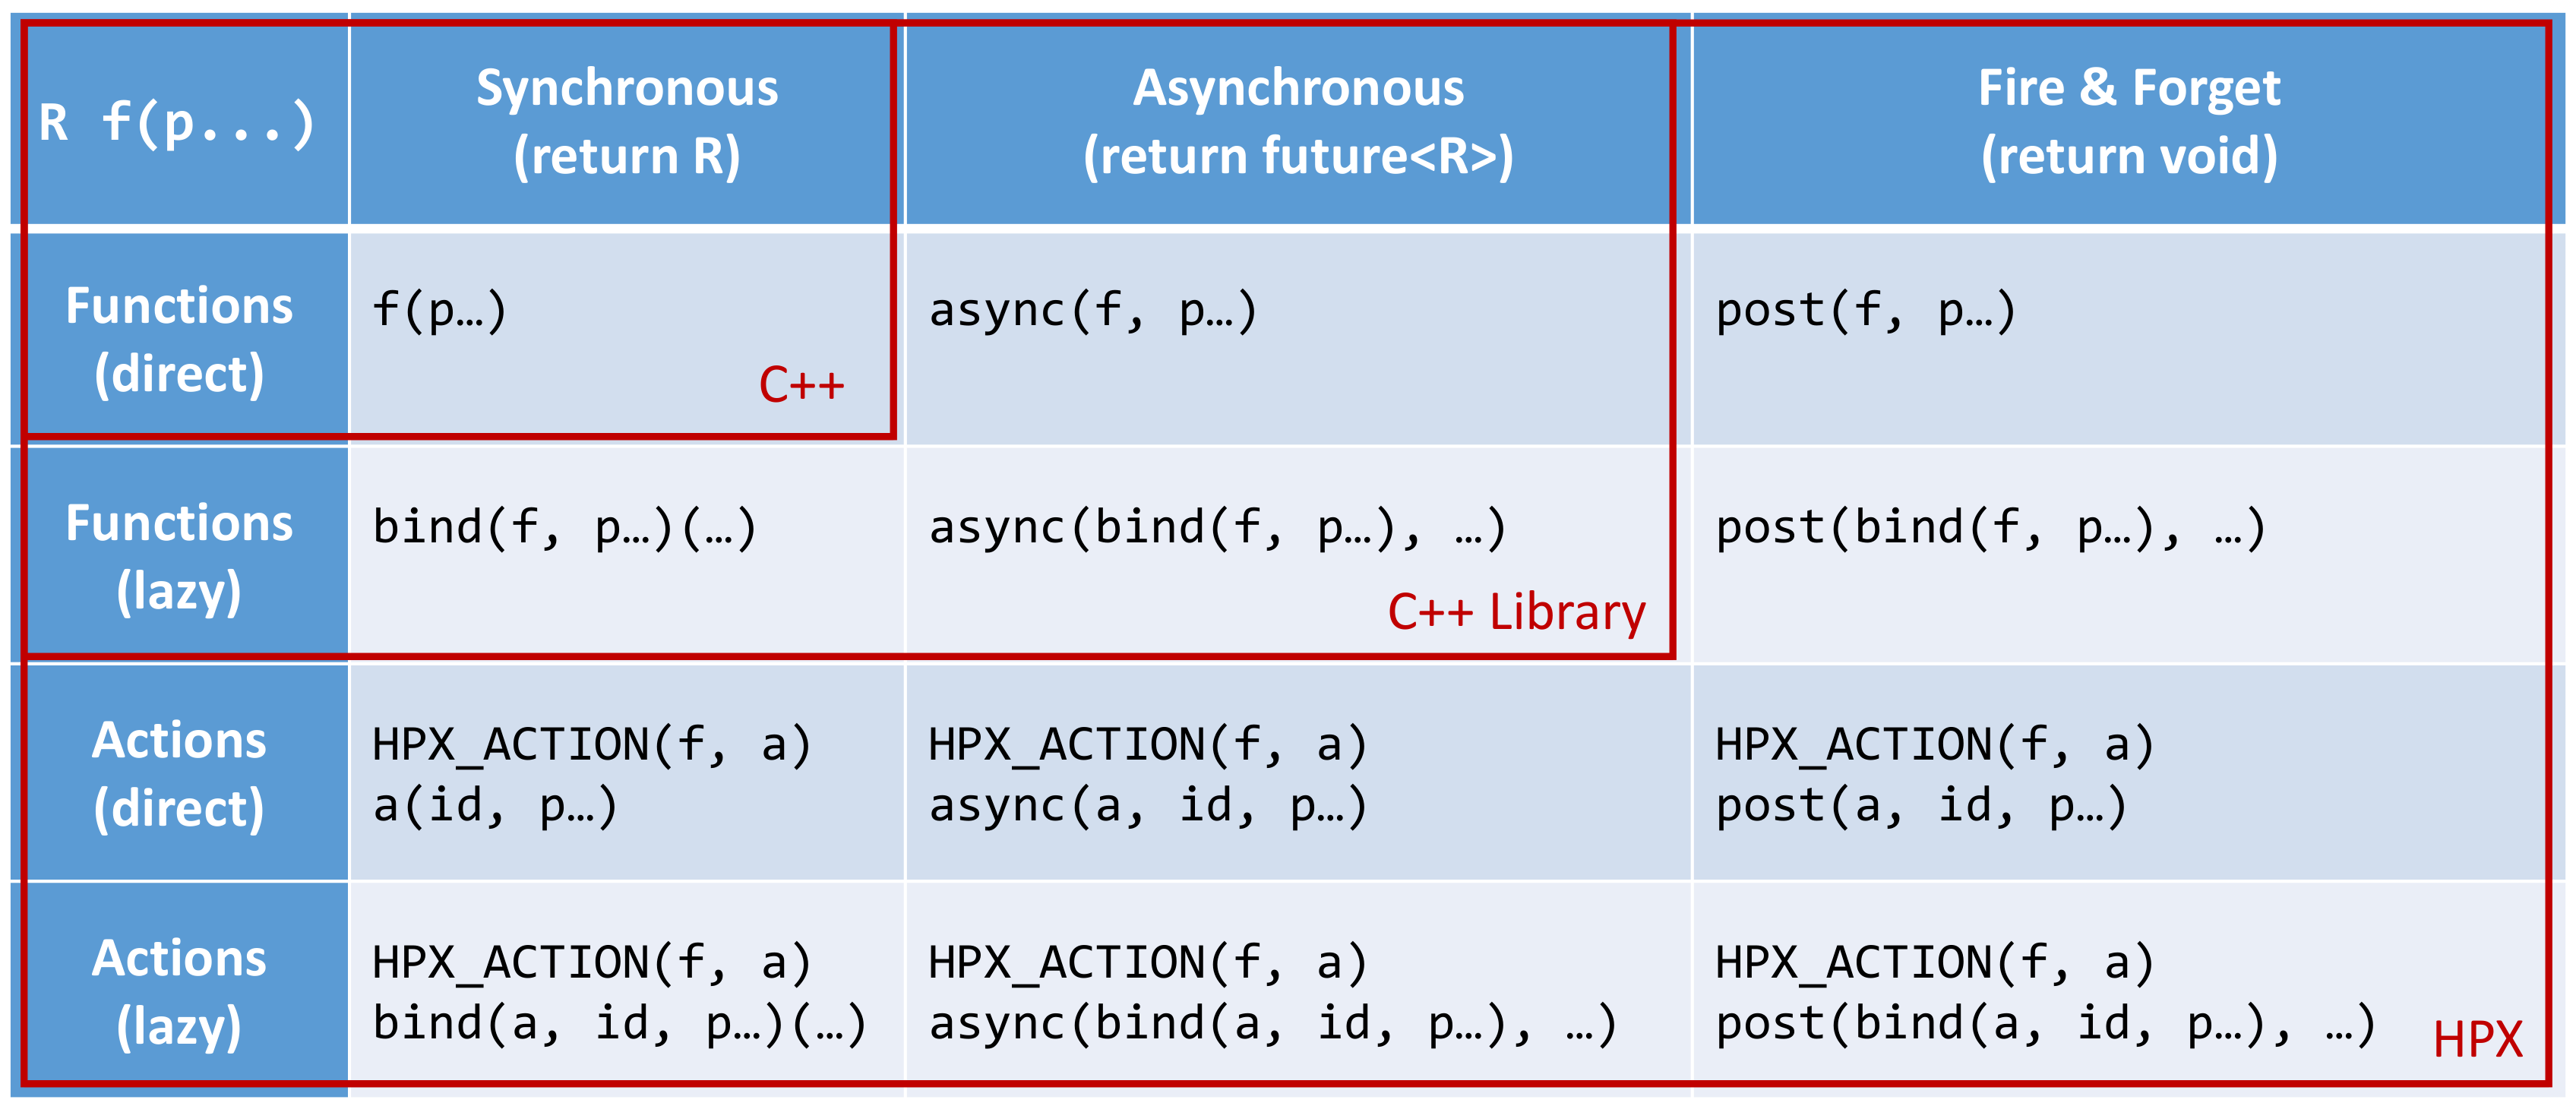
Fig. 8 Overview of the main API exposed by HPX.#
This figure shows that HPX allows the user to post actions with a syntax
similar to the C++ standard. In fact, all action types have an overloaded
function operator allowing to synchronously post the action. Further, HPX
implements hpx::async which semantically works similar to the
way std::async works for plain C++ function.
Note
The similarity of posting an action to conventional function invocations
extends even further. HPX implements hpx::bind and hpx::function
two facilities which are semantically equivalent to the std::bind and
std::function types as defined by the C++11 Standard. While
hpx::async extends beyond the conventional semantics by supporting
actions and conventional C++ functions, the HPX facilities hpx::bind
and hpx::function extend beyond the conventional standard facilities too.
The HPX facilities not only support conventional functions, but can be used
for actions as well.
Additionally, HPX exposes hpx::post and hpx::async_continue both of
which refine and extend the standard C++ facilities.
The different ways to invoke a function in HPX will be explained in more detail in the following sections.
Posting an action asynchronously without any synchronization#
This method (‘fire and forget’) will make sure the function associated with the
action is scheduled to run on the target locality. Posting the action
does not wait for the function to start running, instead it is a fully
asynchronous operation. The following example shows how to post the action as
defined in the previous section on the local
locality (the locality this code runs on):
some_global_action act; // define an instance of some_global_action
hpx::post(act, hpx::find_here(), 2.0);
(the function hpx::find_here() returns the id of the local locality,
i.e. the locality this code executes on).
Any component member function can be invoked using the same syntactic construct.
Given that id is the global address for a component instance created
earlier, this invocation looks like:
some_component_action act; // define an instance of some_component_action
hpx::post(act, id, "42");
In this case any value returned from this action (e.g. in this case the integer
42 is ignored. Please look at Action type definition for the code
defining the component action some_component_action used.
Posting an action asynchronously with synchronization#
This method will make sure the action is scheduled to run on the target
locality. Posting the action itself does not wait for the function to
start running or to complete, instead this is a fully asynchronous operation
similar to using hpx::post as described above. The difference is that this
method will return an instance of a hpx::future<> encapsulating the result
of the (possibly remote) execution. The future can be used to synchronize with
the asynchronous operation. The following example shows how to post the action
from above on the local locality:
some_global_action act; // define an instance of some_global_action
hpx::future<void> f = hpx::async(act, hpx::find_here(), 2.0);
//
// ... other code can be executed here
//
f.get(); // this will possibly wait for the asynchronous operation to 'return'
(as before, the function hpx::find_here() returns the id of the local
locality (the locality this code is executed on).
Note
The use of a hpx::future<void> allows the current thread to synchronize
with any remote operation not returning any value.
Note
Any std::future<> returned from std::async() is required to block in
its destructor if the value has not been set for this future yet. This is not
true for hpx::future<> which will never block in its destructor, even if
the value has not been returned to the future yet. We believe that
consistency in the behavior of futures is more important than standards
conformance in this case.
Any component member function can be invoked using the same syntactic construct.
Given that id is the global address for a component instance created
earlier, this invocation looks like:
some_component_action act; // define an instance of some_component_action
hpx::future<int> f = hpx::async(act, id, "42");
//
// ... other code can be executed here
//
cout << f.get(); // this will possibly wait for the asynchronous operation to 'return' 42
Note
The invocation of f.get() will return the result immediately (without
suspending the calling thread) if the result from the asynchronous operation
has already been returned. Otherwise, the invocation of f.get() will
suspend the execution of the calling thread until the asynchronous operation
returns its result.
Posting an action synchronously#
This method will schedule the function wrapped in the specified action on the target locality. While the invocation appears to be synchronous (as we will see), the calling thread will be suspended while waiting for the function to return. Invoking a plain action (e.g. a global function) synchronously is straightforward:
some_global_action act; // define an instance of some_global_action
act(hpx::find_here(), 2.0);
While this call looks just like a normal synchronous function invocation, the function wrapped by the action will be scheduled to run on a new thread and the calling thread will be suspended. After the new thread has executed the wrapped global function, the waiting thread will resume and return from the synchronous call.
Equivalently, any action wrapping a component member function can be invoked synchronously as follows:
some_component_action act; // define an instance of some_component_action
int result = act(id, "42");
The action invocation will either schedule a new thread locally to execute the
wrapped member function (as before, id is the global address of the
component instance the member function should be invoked on), or it will send a
parcel to the remote locality of the component causing a new thread to
be scheduled there. The calling thread will be suspended until the function
returns its result. This result will be returned from the synchronous action
invocation.
It is very important to understand that this ‘synchronous’ invocation syntax in fact conceals an asynchronous function call. This is beneficial as the calling thread is suspended while waiting for the outcome of a potentially remote operation. The HPX thread scheduler will schedule other work in the meantime, allowing the application to make further progress while the remote result is computed. This helps overlapping computation with communication and hiding communication latencies.
Note
The syntax of posting an action is always the same, regardless whether the target locality is remote to the invocation locality or not. This is a very important feature of HPX as it frees the user from the task of keeping track what actions have to be applied locally and which actions are remote. If the target for posting an action is local, a new thread is automatically created and scheduled. Once this thread is scheduled and run, it will execute the function encapsulated by that action. If the target is remote, HPX will send a parcel to the remote locality which encapsulates the action and its parameters. Once the parcel is received on the remote locality HPX will create and schedule a new thread there. Once this thread runs on the remote locality, it will execute the function encapsulated by the action.
Posting an action with a continuation but without any synchronization#
This method is very similar to the method described in section Posting an action asynchronously without any synchronization. The
difference is that it allows the user to chain a sequence of asynchronous
operations, while handing the (intermediate) results from one step to the next
step in the chain. Where hpx::post invokes a single function using ‘fire
and forget’ semantics, hpx::post_continue asynchronously triggers a chain
of functions without the need for the execution flow ‘to come back’ to the
invocation site. Each of the asynchronous functions can be executed on a
different locality.
Posting an action with a continuation and with synchronization#
This method is very similar to the method described in section Posting an action asynchronously with synchronization. In
addition to what hpx::async can do, the functions hpx::async_continue
takes an additional function argument. This function will be called as the
continuation of the executed action. It is expected to perform additional
operations and to make sure that a result is returned to the original invocation
site. This method chains operations asynchronously by providing a continuation
operation which is automatically executed once the first action has finished
executing.
As an example we chain two actions, where the result of the first action is forwarded to the second action and the result of the second action is sent back to the original invocation site:
// first action
std::int32_t action1(std::int32_t i)
{
return i+1;
}
HPX_PLAIN_ACTION(action1); // defines action1_type
// second action
std::int32_t action2(std::int32_t i)
{
return i*2;
}
HPX_PLAIN_ACTION(action2); // defines action2_type
// this code invokes 'action1' above and passes along a continuation
// function which will forward the result returned from 'action1' to
// 'action2'.
action1_type act1; // define an instance of 'action1_type'
action2_type act2; // define an instance of 'action2_type'
hpx::future<int> f =
hpx::async_continue(act1, hpx::make_continuation(act2),
hpx::find_here(), 42);
hpx::cout << f.get() << "\n"; // will print: 86 ((42 + 1) * 2)
By default, the continuation is executed on the same locality as
hpx::async_continue is invoked from. If you want to specify the
locality where the continuation should be executed, the code above has
to be written as:
// this code invokes 'action1' above and passes along a continuation
// function which will forward the result returned from 'action1' to
// 'action2'.
action1_type act1; // define an instance of 'action1_type'
action2_type act2; // define an instance of 'action2_type'
hpx::future<int> f =
hpx::async_continue(act1, hpx::make_continuation(act2, hpx::find_here()),
hpx::find_here(), 42);
hpx::cout << f.get() << "\n"; // will print: 86 ((42 + 1) * 2)
Similarly, it is possible to chain more than 2 operations:
action1_type act1; // define an instance of 'action1_type'
action2_type act2; // define an instance of 'action2_type'
hpx::future<int> f =
hpx::async_continue(act1,
hpx::make_continuation(act2, hpx::make_continuation(act1)),
hpx::find_here(), 42);
hpx::cout << f.get() << "\n"; // will print: 87 ((42 + 1) * 2 + 1)
The function hpx::make_continuation creates a special function object
which exposes the following prototype:
struct continuation
{
template <typename Result>
void operator()(hpx::id_type id, Result&& result) const
{
...
}
};
where the parameters passed to the overloaded function operator operator()()
are:
the
idis the global id where the final result of the asynchronous chain of operations should be sent to (in most cases this is the id of thehpx::futurereturned from the initial call tohpx::async_continue. Any custom continuation function should make sure thisidis forwarded to the last operation in the chain.the
resultis the result value of the current operation in the asynchronous execution chain. This value needs to be forwarded to the next operation.
Note
All of those operations are implemented by the predefined continuation
function object which is returned from hpx::make_continuation. Any (custom)
function object used as a continuation should conform to the same interface.
Action error handling#
Like in any other asynchronous invocation scheme it is important to be able to handle error conditions occurring while the asynchronous (and possibly remote) operation is executed. In HPX all error handling is based on standard C++ exception handling. Any exception thrown during the execution of an asynchronous operation will be transferred back to the original invocation locality, where it is rethrown during synchronization with the calling thread.
Important
Exceptions thrown during asynchronous execution can be transferred back to
the invoking thread only for the synchronous and the asynchronous case with
synchronization. Like with any other unhandled exception, any exception
thrown during the execution of an asynchronous action without
synchronization will result in calling hpx::terminate causing the running
application to exit immediately.
Note
Even if error handling internally relies on exceptions, most of the API functions exposed by HPX can be used without throwing an exception. Please see Working with exceptions for more information.
As an example, we will assume that the following remote function will be executed:
namespace app
{
void some_function_with_error(int arg)
{
if (arg < 0) {
HPX_THROW_EXCEPTION(hpx::error::bad_parameter,
"some_function_with_error",
"some really bad error happened");
}
// do something else...
}
}
// This will define the action type 'some_error_action' which represents
// the function 'app::some_function_with_error'.
HPX_PLAIN_ACTION(app::some_function_with_error, some_error_action);
The use of HPX_THROW_EXCEPTION to report the error encapsulates the
creation of a hpx::exception which is initialized with the error
code hpx::error::bad_parameter. Additionally it carries the passed strings, the
information about the file name, line number, and call stack of the point the
exception was thrown from.
We invoke this action using the synchronous syntax as described before:
// note: wrapped function will throw hpx::exception
some_error_action act; // define an instance of some_error_action
try {
act(hpx::find_here(), -3); // exception will be rethrown from here
}
catch (hpx::exception const& e) {
// prints: 'some really bad error happened: HPX(bad parameter)'
cout << e.what();
}
If this action is invoked asynchronously with synchronization, the exception is
propagated to the waiting thread as well and is re-thrown from the future’s
function get():
// note: wrapped function will throw hpx::exception
some_error_action act; // define an instance of some_error_action
hpx::future<void> f = hpx::async(act, hpx::find_here(), -3);
try {
f.get(); // exception will be rethrown from here
}
catch (hpx::exception const& e) {
// prints: 'some really bad error happened: HPX(bad parameter)'
cout << e.what();
}
For more information about error handling please refer to the section Working with exceptions. There we also explain how to handle error conditions without having to rely on exception.
Writing components#
A component in HPX is a C++ class which can be created remotely and for which its member functions can be invoked remotely as well. The following sections highlight how components can be defined, created, and used.
Defining components#
In order for a C++ class type to be managed remotely in HPX, the type must be
derived from the hpx::components::component_base template type. We
call such C++ class types ‘components’.
Note that the component type itself is passed as a template argument to the base class:
// header file some_component.hpp
#include <hpx/include/components.hpp>
namespace app
{
// Define a new component type 'some_component'
struct some_component
: hpx::components::component_base<some_component>
{
// This member function is has to be invoked remotely
int some_member_function(std::string const& s)
{
return boost::lexical_cast<int>(s);
}
// This will define the action type 'some_member_action' which
// represents the member function 'some_member_function' of the
// object type 'some_component'.
HPX_DEFINE_COMPONENT_ACTION(some_component, some_member_function, some_member_action);
};
}
// This will generate the necessary boiler-plate code for the action allowing
// it to be invoked remotely. This declaration macro has to be placed in the
// header file defining the component itself.
//
// Note: The second argument to the macro below has to be systemwide-unique
// C++ identifiers
//
HPX_REGISTER_ACTION_DECLARATION(app::some_component::some_member_action, some_component_some_action);
There is more boiler plate code which has to be placed into a source file in order for the component to be usable. Every component type is required to have macros placed into its source file, one for each component type and one macro for each of the actions defined by the component type.
For instance:
// source file some_component.cpp
#include "some_component.hpp"
// The following code generates all necessary boiler plate to enable the
// remote creation of 'app::some_component' instances with 'hpx::new_<>()'
//
using some_component = app::some_component;
using some_component_type = hpx::components::component<some_component>;
// Please note that the second argument to this macro must be a
// (system-wide) unique C++-style identifier (without any namespaces)
//
HPX_REGISTER_COMPONENT(some_component_type, some_component);
// The parameters for this macro have to be the same as used in the corresponding
// HPX_REGISTER_ACTION_DECLARATION() macro invocation in the corresponding
// header file.
//
// Please note that the second argument to this macro must be a
// (system-wide) unique C++-style identifier (without any namespaces)
//
HPX_REGISTER_ACTION(app::some_component::some_member_action, some_component_some_action);
Defining client side representation classes#
Often it is very convenient to define a separate type for a component which can be used on the client side (from where the component is instantiated and used). This step might seem as unnecessary duplicating code, however it significantly increases the type safety of the code.
A possible implementation of such a client side representation for the component described in the previous section could look like:
#include <hpx/include/components.hpp>
namespace app
{
// Define a client side representation type for the component type
// 'some_component' defined in the previous section.
//
struct some_component_client
: hpx::components::client_base<some_component_client, some_component>
{
using base_type = hpx::components::client_base<
some_component_client, some_component>;
some_component_client(hpx::future<hpx::id_type> && id)
: base_type(std::move(id))
{}
hpx::future<int> some_member_function(std::string const& s)
{
some_component::some_member_action act;
return hpx::async(act, get_id(), s);
}
};
}
A client side object stores the global id of the component instance it
represents. This global id is accessible by calling the function
client_base<>::get_id(). The special constructor which is provided in the
example allows to create this client side object directly using the API function
hpx::new_.
Creating component instances#
Instances of defined component types can be created in two different ways. If the component to create has a defined client side representation type, then this can be used, otherwise use the server type.
The following examples assume that some_component_type is the type of the
server side implementation of the component to create. All additional arguments
(see , ... notation below) are passed through to the corresponding
constructor calls of those objects:
// create one instance on the given locality
hpx::id_type here = hpx::find_here();
hpx::future<hpx::id_type> f =
hpx::new_<some_component_type>(here, ...);
// create one instance using the given distribution
// policy (here: hpx::colocating_distribution_policy)
hpx::id_type here = hpx::find_here();
hpx::future<hpx::id_type> f =
hpx::new_<some_component_type>(hpx::colocated(here), ...);
// create multiple instances on the given locality
hpx::id_type here = find_here();
hpx::future<std::vector<hpx::id_type>> f =
hpx::new_<some_component_type[]>(here, num, ...);
// create multiple instances using the given distribution
// policy (here: hpx::binpacking_distribution_policy)
hpx::future<std::vector<hpx::id_type>> f = hpx::new_<some_component_type[]>(
hpx::binpacking(hpx::find_all_localities()), num, ...);
The examples below demonstrate the use of the same API functions for creating
client side representation objects (instead of just plain ids). These examples
assume that client_type is the type of the client side representation of the
component type to create. As above, all additional arguments
(see , ... notation below) are passed through to the corresponding constructor
calls of the server side implementation objects corresponding to the
client_type:
// create one instance on the given locality
hpx::id_type here = hpx::find_here();
client_type c = hpx::new_<client_type>(here, ...);
// create one instance using the given distribution
// policy (here: hpx::colocating_distribution_policy)
hpx::id_type here = hpx::find_here();
client_type c = hpx::new_<client_type>(hpx::colocated(here), ...);
// create multiple instances on the given locality
hpx::id_type here = hpx::find_here();
hpx::future<std::vector<client_type>> f =
hpx::new_<client_type[]>(here, num, ...);
// create multiple instances using the given distribution
// policy (here: hpx::binpacking_distribution_policy)
hpx::future<std::vector<client_type>> f = hpx::new_<client_type[]>(
hpx::binpacking(hpx::find_all_localities()), num, ...);
Using component instances#
After having created the component instances as described above, we can simply use them as indicated below:
#include <hpx/include/components.hpp>
#include <iostream>
#include <vector>
// Define a simple component
struct some_component : hpx::components::component_base<some_component>
{
void print() const
{
std::cout << "Hello from component instance!" << std::endl;
}
HPX_DEFINE_COMPONENT_ACTION(some_component, print, print_action);
};
typedef some_component::print_action print_action;
// Create one instance on the given locality
hpx::id_type here = hpx::find_here();
hpx::future<hpx::id_type> f1 =
hpx::new_<some_component>(here);
// Get the future value
hpx::id_type instance_id = f1.get();
// Invoke action on the instance
hpx::async<print_action>(instance_id).get();
// Create multiple instances on the given locality
int num = 3;
hpx::future<std::vector<hpx::id_type>> f2 =
hpx::new_<some_component[]>(here, num);
// Get the future value
std::vector<hpx::id_type> instance_ids = f2.get();
// Invoke action on each instance
for (const auto& id : instance_ids)
{
hpx::async<print_action>(id).get();
}
We can use the component instances with distribution policies the same way.
Segmented containers#
In parallel programming, there is now a plethora of solutions aimed at implementing “partially contiguous” or segmented data structures, whether on shared memory systems or distributed memory systems. HPX implements such structures by drawing inspiration from Standard C++ containers.
Using segmented containers#
A segmented container is a template class that is described in the namespace
hpx. All segmented containers are very similar semantically to their
sequential counterpart (defined in namespace std but with an additional
template parameter named DistPolicy). The distribution policy is an optional
parameter that is passed last to the segmented container constructor (after the
container size when no default value is given, after the default value if not).
The distribution policy describes the manner in which a container is segmented
and the placement of each segment among the available runtime localities.
However, only a part of the std container member functions were
reimplemented:
(constructor),(destructor),operator=operator[]begin,cbegin,end,cendsize
An example of how to use the partitioned_vector container would be:
#include <hpx/include/partitioned_vector.hpp>
// The following code generates all necessary boiler plate to enable the
// remote creation of 'partitioned_vector' segments
//
HPX_REGISTER_PARTITIONED_VECTOR(double);
// By default, the number of segments is equal to the current number of
// localities
//
hpx::partitioned_vector<double> va(50);
hpx::partitioned_vector<double> vb(50, 0.0);
An example of how to use the partitioned_vector container
with distribution policies would be:
#include <hpx/include/partitioned_vector.hpp>
#include <hpx/runtime_distributed/find_localities.hpp>
// The following code generates all necessary boiler plate to enable the
// remote creation of 'partitioned_vector' segments
//
HPX_REGISTER_PARTITIONED_VECTOR(double);
std::size_t num_segments = 10;
std::vector<hpx::id_type> locs = hpx::find_all_localities();
auto layout =
hpx::container_layout( num_segments, locs );
// The number of segments is 10 and those segments are spread across the
// localities collected in the variable locs in a Round-Robin manner
//
hpx::partitioned_vector<double> va(50, layout);
hpx::partitioned_vector<double> vb(50, 0.0, layout);
By definition, a segmented container must be accessible from any thread although its construction is synchronous only for the thread who has called its constructor. To overcome this problem, it is possible to assign a symbolic name to the segmented container:
#include <hpx/include/partitioned_vector.hpp>
// The following code generates all necessary boiler plate to enable the
// remote creation of 'partitioned_vector' segments
//
HPX_REGISTER_PARTITIONED_VECTOR(double);
hpx::future<void> fserver = hpx::async(
[](){
hpx::partitioned_vector<double> v(50);
// Register the 'partitioned_vector' with the name "some_name"
//
v.register_as("some_name");
/* Do some code */
});
hpx::future<void> fclient =
hpx::async(
[](){
// Naked 'partitioned_vector'
//
hpx::partitioned_vector<double> v;
// Now the variable v points to the same 'partitioned_vector' that has
// been registered with the name "some_name"
//
v.connect_to("some_name");
/* Do some code */
});
HPX provides the following segmented containers:
Name |
Description |
In header |
C++ standard |
|
Dynamic segmented contiguous array. |
|
Name |
Description |
In header |
C++ standard |
|
Segmented collection of key-value pairs, hashed by keys, keys are unique. |
|
Segmented iterators and segmented iterator traits#
The basic iterator used in the STL library is only suitable for one-dimensional
structures. The iterators we use in HPX must adapt to the segmented format of
our containers. Our iterators are then able to know when incrementing themselves
if the next element of type T is in the same data segment or in another
segment. In this second case, the iterator will automatically point to the
beginning of the next segment.
Note
Note that the dereference operation operator * does not directly return a
reference of type T& but an intermediate object wrapping this reference.
When this object is used as an l-value, a remote write operation is
performed; When this object is used as an r-value, implicit conversion to
T type will take care of performing remote read operation.
It is sometimes useful not only to iterate element by element, but also segment
by segment, or simply get a local iterator in order to avoid additional
construction costs at each deferencing operations. To mitigate this need, the
hpx::traits::segmented_iterator_traits are used.
With segmented_iterator_traits users can uniformly get the iterators
which specifically iterates over segments (by providing a segmented iterator
as a parameter), or get the local begin/end iterators of the nearest
local segment (by providing a per-segment iterator as a parameter):
#include <hpx/include/partitioned_vector.hpp>
// The following code generates all necessary boiler plate to enable the
// remote creation of 'partitioned_vector' segments
//
HPX_REGISTER_PARTITIONED_VECTOR(double);
using iterator = hpx::partitioned_vector<T>::iterator;
using traits = hpx::traits::segmented_iterator_traits<iterator>;
hpx::partitioned_vector<T> v;
std::size_t count = 0;
auto seg_begin = traits::segment(v.begin());
auto seg_end = traits::segment(v.end());
// Iterate over segments
for (auto seg_it = seg_begin; seg_it != seg_end; ++seg_it)
{
auto loc_begin = traits::begin(seg_it);
auto loc_end = traits::end(seg_it);
// Iterate over elements inside segments
for (auto lit = loc_begin; lit != loc_end; ++lit, ++count)
{
*lit = count;
}
}
Which is equivalent to:
hpx::partitioned_vector<T> v;
std::size_t count = 0;
auto begin = v.begin();
auto end = v.end();
for (auto it = begin; it != end; ++it, ++count)
{
*it = count;
}
Using views#
The use of multidimensional arrays is quite common in the numerical field
whether to perform dense matrix operations or to process images. It exist many
libraries which implement such object classes overloading their basic operators
(e.g. +, -, *, (), etc.). However, such operation becomes more
delicate when the underlying data layout is segmented or when it is mandatory to
use optimized linear algebra subroutines (i.e. BLAS subroutines).
Our solution is thus to relax the level of abstraction by allowing the user to work not directly on n-dimensionnal data, but on “n-dimensionnal collections of 1-D arrays”. The use of well-accepted techniques on contiguous data is thus preserved at the segment level, and the composability of the segments is made possible thanks to multidimensional array-inspired access mode.
Although HPX refutes by design this programming model, the locality plays a dominant role when it comes to implement vectorized code. To maximize local computations and avoid unneeded data transfers, a parallel section (or Single Programming Multiple Data section) is required. Because the use of global variables is prohibited, this parallel section is created via the RAII idiom.
To define a parallel section, simply write an action taking a spmd_block
variable as a first parameter:
#include <hpx/collectives/spmd_block.hpp>
void bulk_function(hpx::lcos::spmd_block block /* , arg0, arg1, ... */)
{
// Parallel section
/* Do some code */
}
HPX_PLAIN_ACTION(bulk_function, bulk_action);
Note
In the following paragraphs, we will use the term “image” several times. An image is defined as a lightweight process whose entry point is a function provided by the user. It’s an “image of the function”.
The spmd_block class contains the following methods:
Team information:
get_num_images,this_image,images_per_localityControl statements:
sync_all,sync_images
Here is a sample code summarizing the features offered by the spmd_block
class:
#include <hpx/collectives/spmd_block.hpp>
void bulk_function(hpx::lcos::spmd_block block /* , arg0, arg1, ... */)
{
std::size_t num_images = block.get_num_images();
std::size_t this_image = block.this_image();
std::size_t images_per_locality = block.images_per_locality();
/* Do some code */
// Synchronize all images in the team
block.sync_all();
/* Do some code */
// Synchronize image 0 and image 1
block.sync_images(0,1);
/* Do some code */
std::vector<std::size_t> vec_images = {2,3,4};
// Synchronize images 2, 3 and 4
block.sync_images(vec_images);
// Alternative call to synchronize images 2, 3 and 4
block.sync_images(vec_images.begin(), vec_images.end());
/* Do some code */
// Non-blocking version of sync_all()
hpx::future<void> event =
block.sync_all(hpx::launch::async);
// Callback waiting for 'event' to be ready before being scheduled
hpx::future<void> cb =
event.then(
[](hpx::future<void>)
{
/* Do some code */
});
// Finally wait for the execution tree to be finished
cb.get();
}
HPX_PLAIN_ACTION(bulk_test_function, bulk_test_action);
Then, in order to invoke the parallel section, call the function
define_spmd_block specifying an arbitrary symbolic name and indicating the
number of images per locality to create:
void bulk_function(hpx::lcos::spmd_block block, /* , arg0, arg1, ... */)
{
}
HPX_PLAIN_ACTION(bulk_test_function, bulk_test_action);
int main()
{
/* std::size_t arg0, arg1, ...; */
bulk_action act;
std::size_t images_per_locality = 4;
// Instantiate the parallel section
hpx::lcos::define_spmd_block(
"some_name", images_per_locality, std::move(act) /*, arg0, arg1, ... */);
return 0;
}
Note
In principle, the user should never call the spmd_block constructor. The
define_spmd_block function is responsible of instantiating spmd_block
objects and broadcasting them to each created image.
Some classes are defined as “container views” when the purpose is to observe
and/or modify the values of a container using another perspective than the one
that characterizes the container. For example, the values of an std::vector
object can be accessed via the expression [i]. Container views can be used,
for example, when it is desired for those values to be “viewed” as a 2D matrix
that would have been flattened in a std::vector. The values would be
possibly accessible via the expression vv(i,j) which would call internally
the expression v[k].
By default, the partitioned_vector class integrates 1-D views of its segments:
#include <hpx/include/partitioned_vector.hpp>
// The following code generates all necessary boiler plate to enable the
// remote creation of 'partitioned_vector' segments
//
HPX_REGISTER_PARTITIONED_VECTOR(double);
using iterator = hpx::partitioned_vector<double>::iterator;
using traits = hpx::traits::segmented_iterator_traits<iterator>;
hpx::partitioned_vector<double> v;
// Create a 1-D view of the vector of segments
auto vv = traits::segment(v.begin());
// Access segment i
std::vector<double> v = vv[i];
Our views are called “multidimensional” in the sense that they generalize to N
dimensions the purpose of segmented_iterator_traits::segment() in the 1-D
case. Note that in a parallel section, the 2-D expression a(i,j) = b(i,j) is
quite confusing because without convention, each of the images invoked will race
to execute the statement. For this reason, our views are not only
multidimensional but also “spmd-aware”.
Note
SPMD-awareness: The convention is simple. If an assignment statement contains a view subscript as an l-value, it is only and only the image holding the r-value who is evaluating the statement. (In MPI sense, it is called a Put operation).
Here are some examples of using subscripts in the 2-D view case:
#include <hpx/components/containers/partitioned_vector/partitioned_vector_view.hpp>
#include <hpx/include/partitioned_vector.hpp>
// The following code generates all necessary boiler plate to enable the
// remote creation of 'partitioned_vector' segments
//
HPX_REGISTER_PARTITIONED_VECTOR(double);
using Vec = hpx::partitioned_vector<double>;
using View_2D = hpx::partitioned_vector_view<double,2>;
/* Do some code */
Vec v;
// Parallel section (suppose 'block' an spmd_block instance)
{
std::size_t height, width;
// Instantiate the view
View_2D vv(block, v.begin(), v.end(), {height,width});
// The l-value is a view subscript, the image that owns vv(1,0)
// evaluates the assignment.
vv(0,1) = vv(1,0);
// The l-value is a view subscript, the image that owns the r-value
// (result of expression 'std::vector<double>(4,1.0)') evaluates the
// assignment : oops! race between all participating images.
vv(2,3) = std::vector<double>(4,1.0);
}
Here are some examples of using iterators in the 3-D view case:
#include <hpx/components/containers/partitioned_vector/partitioned_vector_view.hpp>
#include <hpx/include/partitioned_vector.hpp>
// The following code generates all necessary boiler plate to enable the
// remote creation of 'partitioned_vector' segments
//
HPX_REGISTER_PARTITIONED_VECTOR(int);
using Vec = hpx::partitioned_vector<int>;
using View_3D = hpx::partitioned_vector_view<int,3>;
/* Do some code */
Vec v1, v2;
// Parallel section (suppose 'block' an spmd_block instance)
{
std::size_t sixe_x, size_y, size_z;
// Instantiate the views
View_3D vv1(block, v1.begin(), v1.end(), {sixe_x,size_y,size_z});
View_3D vv2(block, v2.begin(), v2.end(), {sixe_x,size_y,size_z});
// Save previous segments covered by vv1 into segments covered by vv2
auto vv2_it = vv2.begin();
auto vv1_it = vv1.cbegin();
for(; vv2_it != vv2.end(); vv2_it++, vv1_it++)
{
// It's a Put operation
*vv2_it = *vv1_it;
}
// Ensure that all images have performed their Put operations
block.sync_all();
// Ensure that only one image is putting updated data into the different
// segments covered by vv1
if(block.this_image() == 0)
{
int idx = 0;
// Update all the segments covered by vv1
for(auto i = vv1.begin(); i != vv1.end(); i++)
{
// It's a Put operation
*i = std::vector<float>(elt_size,idx++);
}
}
}
Here is an example that shows how to iterate only over segments owned by the current image:
#include <hpx/components/containers/partitioned_vector/partitioned_vector_view.hpp>
#include <hpx/components/containers/partitioned_vector/partitioned_vector_local_view.hpp>
#include <hpx/include/partitioned_vector.hpp>
// The following code generates all necessary boiler plate to enable the
// remote creation of 'partitioned_vector' segments
//
HPX_REGISTER_PARTITIONED_VECTOR(float);
using Vec = hpx::partitioned_vector<float>;
using View_1D = hpx::partitioned_vector_view<float,1>;
/* Do some code */
Vec v;
// Parallel section (suppose 'block' an spmd_block instance)
{
std::size_t num_segments;
// Instantiate the view
View_1D vv(block, v.begin(), v.end(), {num_segments});
// Instantiate the local view from the view
auto local_vv = hpx::local_view(vv);
for ( auto i = local_vv.begin(); i != local_vv.end(); i++ )
{
std::vector<float> & segment = *i;
/* Do some code */
}
}
It is possible to construct views from other views: we call it sub-views. The constraint nevertheless for the subviews is to retain the dimension and the value type of the input view. Here is an example showing how to create a sub-view:
#include <hpx/components/containers/partitioned_vector/partitioned_vector_view.hpp>
#include <hpx/include/partitioned_vector.hpp>
// The following code generates all necessary boiler plate to enable the
// remote creation of 'partitioned_vector' segments
//
HPX_REGISTER_PARTITIONED_VECTOR(float);
using Vec = hpx::partitioned_vector<float>;
using View_2D = hpx::partitioned_vector_view<float,2>;
/* Do some code */
Vec v;
// Parallel section (suppose 'block' an spmd_block instance)
{
std::size_t N = 20;
std::size_t tilesize = 5;
// Instantiate the view
View_2D vv(block, v.begin(), v.end(), {N,N});
// Instantiate the subview
View_2D svv(
block,&vv(tilesize,0),&vv(2*tilesize-1,tilesize-1),{tilesize,tilesize},{N,N});
if(block.this_image() == 0)
{
// Equivalent to 'vv(tilesize,0) = 2.0f'
svv(0,0) = 2.0f;
// Equivalent to 'vv(2*tilesize-1,tilesize-1) = 3.0f'
svv(tilesize-1,tilesize-1) = 3.0f;
}
}
Note
The last parameter of the subview constructor is the size of the original
view. If one would like to create a subview of the subview and so on, this
parameter should stay unchanged. {N,N} for the above example).
C++ co-arrays#
Fortran has extended its scalar element indexing approach to reference each segment of a distributed array. In this extension, a segment is attributed a ?co-index? and lives in a specific locality. A co-index provides the application with enough information to retrieve the corresponding data reference. In C++, containers present themselves as a ?smarter? alternative of Fortran arrays but there are still no corresponding standardized features similar to the Fortran co-indexing approach. We present here an implementation of such features in HPX.
As mentioned before, a co-array is a distributed array whose segments are accessible through an array-inspired access mode. We have previously seen that it is possible to reproduce such access mode using the concept of views. Nevertheless, the user must pre-create a segmented container to instantiate this view. We illustrate below how a single constructor call can perform those two operations:
#include <hpx/components/containers/coarray/coarray.hpp>
#include <hpx/collectives/spmd_block.hpp>
// The following code generates all necessary boiler plate to enable the
// co-creation of 'coarray'
//
HPX_REGISTER_COARRAY(double);
// Parallel section (suppose 'block' an spmd_block instance)
{
using hpx::container::placeholders::_;
std::size_t height=32, width=4, segment_size=10;
hpx::coarray<double,3> a(block, "a", {height,width,_}, segment_size);
/* Do some code */
}
Unlike segmented containers, a co-array object can only be instantiated within a parallel section. Here is the description of the parameters to provide to the coarray constructor:
Parameter |
Description |
|
Reference to a |
|
Symbolic name of type |
|
Dimensions of the |
|
Size of a co-indexed element (i.e. size of the object referenced by the
expression |
Note that the “last dimension size” cannot be set by the user. It only accepts
the constexpr variable hpx::container::placeholders::_. This size, which is
considered private, is equal to the number of current images (value returned by
block.get_num_images()).
Note
An important constraint to remember about coarray objects is that all segments sharing the same “last dimension index” are located in the same image.
The member functions owned by the coarray objects are exactly the same as
those of spmd multidimensional views. These are:
* Subscript-based operations
* Iterator-based operations
However, one additional functionality is provided. Knowing that the element
a(i,j,k) is in the memory of the kth image, the use of local subscripts
is possible.
Note
For spmd multidimensional views, subscripts are only global as it still involves potential remote data transfers.
Here is an example of using local subscripts:
#include <hpx/components/containers/coarray/coarray.hpp>
#include <hpx/collectives/spmd_block.hpp>
// The following code generates all necessary boiler plate to enable the
// co-creation of 'coarray'
//
HPX_REGISTER_COARRAY(double);
// Parallel section (suppose 'block' an spmd_block instance)
{
using hpx::container::placeholders::_;
std::size_t height=32, width=4, segment_size=10;
hpx::coarray<double,3> a(block, "a", {height,width,_}, segment_size);
double idx = block.this_image()*height*width;
for (std::size_t j = 0; j<width; j++)
for (std::size_t i = 0; i<height; i++)
{
// Local write operation performed via the use of local subscript
a(i,j,_) = std::vector<double>(elt_size,idx);
idx++;
}
block.sync_all();
}
Note
When the “last dimension index” of a subscript is equal to
hpx::container::placeholders::_, local subscript (and not global
subscript) is used. It is equivalent to a global subscript used with a “last
dimension index” equal to the value returned by block.this_image().
Running on batch systems#
This section walks you through launching HPX applications on various batch systems.
How to use HPX applications with PBS#
Most HPX applications are executed on parallel computers. These platforms typically provide integrated job management services that facilitate the allocation of computing resources for each parallel program. HPX includes support for one of the most common job management systems, the Portable Batch System (PBS).
All PBS jobs require a script to specify the resource requirements and other
parameters associated with a parallel job. The PBS script is basically a shell
script with PBS directives placed within commented sections at the beginning of
the file. The remaining (not commented-out) portions of the file executes just
like any other regular shell script. While the description of all available PBS
options is outside the scope of this tutorial (the interested reader may refer
to in-depth documentation for
more information), below is a minimal example to illustrate the approach. The following
test application will use the multithreaded hello_world_distributed
program, explained in the section Remote execution with actions.
#!/bin/bash
#
#PBS -l nodes=2:ppn=4
APP_PATH=~/packages/hpx/bin/hello_world_distributed
APP_OPTIONS=
pbsdsh -u $APP_PATH $APP_OPTIONS --hpx:nodes=`cat $PBS_NODEFILE`
Caution
If the first application specific argument (inside $APP_OPTIONS) is a
non-option (i.e., does not start with a - or a --), then the argument has to
be placed before the option --hpx:nodes, which, in this case, should
be the last option on the command line.
Alternatively, use the option --hpx:endnodes to explicitly mark the
end of the list of node names:
$ pbsdsh -u $APP_PATH --hpx:nodes`cat $PBS_NODEFILE` --hpx:endnodes $APP_OPTIONS
The #PBS -l nodes=2:ppn=4 directive will cause two compute nodes to be
allocated for the application, as specified in the option nodes. Each of the
nodes will dedicate four cores to the program, as per the option ppn, short
for “processors per node” (PBS does not distinguish between processors and
cores). Note that requesting more cores per node than physically available is
pointless and may prevent PBS from accepting the script.
On newer PBS versions the PBS command syntax might be different. For instance, the PBS script above would look like:
#!/bin/bash
#
#PBS -l select=2:ncpus=4
APP_PATH=~/packages/hpx/bin/hello_world_distributed
APP_OPTIONS=
pbsdsh -u $APP_PATH $APP_OPTIONS --hpx:nodes=`cat $PBS_NODEFILE`
APP_PATH and APP_OPTIONS are shell variables that respectively specify
the correct path to the executable (hello_world_distributed in this case)
and the command line options. Since the hello_world_distributed application
doesn’t need any command line options, APP_OPTIONS has been left empty.
Unlike in other execution environments, there is no need to use the
--hpx:threads option to indicate the required number of OS threads per
node; the HPX library will derive this parameter automatically from PBS.
Finally, pbsdsh is a PBS command that starts tasks to the resources allocated to the current job. It is recommended to leave this line as shown and modify only the PBS options and shell variables as needed for a specific application.
Important
A script invoked by pbsdsh starts in a very basic environment: the user’s
$HOME directory is defined and is the current directory, the LANG
variable is set to C and the PATH is set to the basic
/usr/local/bin:/usr/bin:/bin as defined in a system-wide file
pbs_environment. Nothing that would normally be set up by a system shell
profile or user shell profile is defined, unlike the environment for the main
job script.
Another choice is for the pbsdsh command in your main job script to invoke
your program via a shell, like sh or bash, so that it gives an initialized
environment for each instance. Users can create a small script runme.sh, which is used
to invoke the program:
#!/bin/bash
# Small script which invokes the program based on what was passed on its
# command line.
#
# This script is executed by the bash shell which will initialize all
# environment variables as usual.
$@
Now, the script is invoked using the pbsdsh tool:
#!/bin/bash
#
#PBS -l nodes=2:ppn=4
APP_PATH=~/packages/hpx/bin/hello_world_distributed
APP_OPTIONS=
pbsdsh -u runme.sh $APP_PATH $APP_OPTIONS --hpx:nodes=`cat $PBS_NODEFILE`
All that remains now is submitting the job to the queuing system. Assuming that
the contents of the PBS script were saved in the file pbs_hello_world.sh in the
current directory, this is accomplished by typing:
$ qsub ./pbs_hello_world_pbs.sh
If the job is accepted, qsub will print out the assigned job ID, which may look like:
$ 42.supercomputer.some.university.edu
To check the status of your job, issue the following command:
$ qstat 42.supercomputer.some.university.edu
and look for a single-letter job status symbol. The common cases include:
Q - signifies that the job is queued and awaiting its turn to be executed.
R - indicates that the job is currently running.
C - means that the job has completed.
The example qstat output below shows a job waiting for execution resources to become available:
Job id Name User Time Use S Queue
------------------------- ---------------- --------------- -------- - -----
42.supercomputer ...ello_world.sh joe_user 0 Q batch
After the job completes, PBS will place two files, pbs_hello_world.sh.o42 and
pbs_hello_world.sh.e42, in the directory where the job was submitted. The
first contains the standard output and the second contains the standard error
from all the nodes on which the application executed. In our example, the error
output file should be empty and the standard output file should contain something
similar to:
hello world from OS-thread 3 on locality 0
hello world from OS-thread 2 on locality 0
hello world from OS-thread 1 on locality 1
hello world from OS-thread 0 on locality 0
hello world from OS-thread 3 on locality 1
hello world from OS-thread 2 on locality 1
hello world from OS-thread 1 on locality 0
hello world from OS-thread 0 on locality 1
Congratulations! You have just run your first distributed HPX application!
How to use HPX applications with SLURM#
Just like PBS (described in section How to use HPX applications with PBS), SLURM is a job management system which is widely used on large supercomputing systems. Any HPX application can easily be run using SLURM. This section describes how this can be done.
The easiest way to run an HPX application using SLURM is to utilize the command line tool srun, which interacts with the SLURM batch scheduling system:
$ srun -p <partition> -N <number-of-nodes> hpx-application <application-arguments>
Here, <partition> is one of the node partitions existing on the target
machine (consult the machine’s documentation to get a list of existing
partitions) and <number-of-nodes> is the number of compute nodes that should
be used. By default, the HPX application is started with one locality per
node and uses all available cores on a node. You can change the number of
localities started per node (for example, to account for NUMA effects) by
specifying the -n option of srun. The number of cores per locality
can be set by -c. The <application-arguments> are any application
specific arguments that need to be passed on to the application.
Note
There is no need to use any of the HPX command line options related to the number of localities, number of threads, or related to networking ports. All of this information is automatically extracted from the SLURM environment by the HPX startup code.
Important
The srun documentation explicitly states: “If -c is specified without
-n, as many tasks will be allocated per node as possible while satisfying
the -c restriction. For instance on a cluster with 8 CPUs per node, a job
request for 4 nodes and 3 CPUs per task may be allocated 3 or 6 CPUs per node
(1 or 2 tasks per node) depending upon resource consumption by other jobs.”
For this reason, it’s recommended to always specify -n <number-of-instances>,
even if <number-of-instances> is equal to one (1).
Interactive shells#
To get an interactive development shell on one of the nodes, users can issue the following command:
$ srun -p <node-type> -N <number-of-nodes> --pty /bin/bash -l
After the shell has been opened, users can run their HPX application. By default,
it uses all available cores. Note that if you requested one node, you don’t need
to do srun again. However, if you requested more than one node, and want to
run your distributed application, you can use srun again to start up the
distributed HPX application. It will use the resources that have been requested
for the interactive shell.
Scheduling batch jobs#
The above mentioned method of running HPX applications is fine for development
purposes. The disadvantage that comes with srun is that it only returns once
the application is finished. This might not be appropriate for longer-running
applications (for example, benchmarks or larger scale simulations). In order to
cope with that limitation, users can use the sbatch command.
The sbatch command expects a script that it can run once the requested
resources are available. In order to request resources, users need to add
#SBATCH comments in their script or provide the necessary parameters to
sbatch directly. The parameters are the same as with run. The commands
you need to execute are the same you would need to start your application as if
you were in an interactive shell.
Debugging HPX applications#
Using a debugger with HPX applications#
Using a debugger such as gdb with HPX applications is no problem. However,
there are some things to keep in mind to make the experience somewhat more
productive.
Call stacks in HPX can often be quite unwieldy as the library is heavily
templated and the call stacks can be very deep. For this reason it is sometimes
a good idea compile HPX in RelWithDebInfo mode, which applies some
optimizations but keeps debugging symbols. This can often compress call stacks
significantly. On the other hand, stepping through the code can also be more
difficult because of statements being reordered and variables being optimized
away. Also, note that because HPX implements user-space threads and context
switching, call stacks may not always be complete in a debugger.
HPX launches not only worker threads but also a few helper threads. The first thread is the main thread, which typically does no work in an HPX application, except at startup and shutdown. If using the default settings, HPX will spawn six additional threads (used for service thread pools). The first worker thread is usually the eighth thread, and most user codes will be run on these worker threads. The last thread is a helper thread used for HPX shutdown.
Finally, since HPX is a multi-threaded runtime, the following gdb options
can be helpful:
set pagination off
set non-stop on
Non-stop mode allows users to have a single thread stop on a breakpoint without stopping all other threads as well.
Using sanitizers with HPX applications#
Warning
Not all parts of HPX are sanitizer clean. This means that users may end up with false positives from HPX itself when using sanitizers for their applications.
To use sanitizers with HPX, turn on HPX_WITH_SANITIZERS and turn
off HPX_WITH_STACKOVERFLOW_DETECTION during CMake configuration. It’s
recommended to also build Boost with the same sanitizers that will be
used for HPX. The appropriate sanitizers can then be enabled using CMake by
appending -fsanitize=address -fno-omit-frame-pointer to CMAKE_CXX_FLAGS
and -fsanitize=address to CMAKE_EXE_LINKER_FLAGS. Replace address
with the sanitizer that you want to use.
Debugging applications using core files#
For HPX to generate useful core files, HPX has to be compiled without signal
and exception handlers
HPX_WITH_DISABLED_SIGNAL_EXCEPTION_HANDLERS:BOOL. If this option is
not specified, the signal handlers change the application state. For example,
after a segmentation fault the stack trace will show the signal handler.
Similarly, unhandled exceptions are also caught by these handlers and the
stack trace will not point to the location where the unhandled exception was
thrown.
In general, core files are a helpful tool to inspect the state of the application at the moment of the crash (post-mortem debugging), without the need of attaching a debugger beforehand. This approach to debugging is especially useful if the error cannot be reliably reproduced, as only a single crashed application run is required to gain potentially helpful information like a stacktrace.
To debug with core files, the operating system first has to be told to actually write them. On most Unix systems this can be done by calling:
$ ulimit -c unlimited
in the shell. Now the debugger can be started up with:
$ gdb <application> <core file name>
The debugger should now display the last state of the application. The default
file name for core files is core.
Optimizing HPX applications#
Performance counters#
Performance counters in HPX are used to provide information as to how well the runtime system or an application is performing. The counter data can help determine system bottlenecks, and fine-tune system and application performance. The HPX runtime system, its networking, and other layers provide counter data that an application can consume to provide users with information about how well the application is performing.
Applications can also use counter data to determine how much system resources to consume. For example, an application that transfers data over the network could consume counter data from a network switch to determine how much data to transfer without competing for network bandwidth with other network traffic. The application could use the counter data to adjust its transfer rate as the bandwidth usage from other network traffic increases or decreases.
Performance counters are HPX parallel processes that expose a predefined interface. HPX exposes special API functions that allow one to create, manage, and read the counter data, and release instances of performance counters. Performance Counter instances are accessed by name, and these names have a predefined structure which is described in the section Performance counter names. The advantage of this is that any Performance Counter can be accessed remotely (from a different locality) or locally (from the same locality). Moreover, since all counters expose their data using the same API, any code consuming counter data can be utilized to access arbitrary system information with minimal effort.
Counter data may be accessed in real time. More information about how to consume counter data can be found in the section Consuming performance counter data.
All HPX applications provide command line options related to performance counters, such as the ability to list available counter types, or periodically query specific counters to be printed to the screen or save them in a file. For more information, please refer to the section HPX Command Line Options.
Performance counter names#
All Performance Counter instances have a name uniquely identifying each instance. This name can be used to access the counter, retrieve all related meta data, and to query the counter data (as described in the section Consuming performance counter data). Counter names are strings with a predefined structure. The general form of a countername is:
/objectname{full_instancename}/countername@parameters
where full_instancename could be either another (full) counter name or a
string formatted as:
parentinstancename#parentindex/instancename#instanceindex
Each separate part of a countername (e.g., objectname, countername
parentinstancename, instancename, and parameters) should start with
a letter ('a'…'z', 'A'…'Z') or an underscore
character ('_'), optionally followed by letters, digits ('0'…'9'), hyphen ('-'), or underscore characters. Whitespace is not allowed
inside a counter name. The characters '/', '{', '}', '#' and
'@' have a special meaning and are used to delimit the different parts of
the counter name.
The parts parentinstanceindex and instanceindex are integers. If an
index is not specified, HPX will assume a default of -1.
Two counter name examples#
This section gives examples of both simple counter names and aggregate counter names. For more information on simple and aggregate counter names, please see Performance counter instances.
An example of a well-formed (and meaningful) simple counter name would be:
/threads{locality#0/total}/count/cumulative
This counter returns the current cumulative number of executed (retired)
HPX threads for the locality 0. The counter type of this counter
is /threads/count/cumulative and the full instance name is
locality#0/total. This counter type does not require an instanceindex or
parameters to be specified.
In this case, the parentindex (the '0') designates the locality
for which the counter instance is created. The counter will return the number of
HPX threads retired on that particular locality.
Another example for a well formed (aggregate) counter name is:
/statistics{/threads{locality#0/total}/count/cumulative}/average@500
This counter takes the simple counter from the first example, samples its values
every 500 milliseconds, and returns the average of the value samples
whenever it is queried. The counter type of this counter is
/statistics/average and the instance name is the full name of the counter
for which the values have to be averaged. In this case, the parameters (the
'500') specify the sampling interval for the averaging to take place (in
milliseconds).
Performance counter types#
Every performance counter belongs to a specific performance counter type which
classifies the counters into groups of common semantics. The type of a counter
is identified by the objectname and the countername parts of the name.
/objectname/countername
When an application starts HPX will register all available counter types on each of the localities. These counter types are held in a special performance counter registration database, which can be used to retrieve the meta data related to a counter type and to create counter instances based on a given counter instance name.
Performance counter instances#
The full_instancename distinguishes different counter instances of the same
counter type. The formatting of the full_instancename depends on the counter
type. There are two types of counters: simple counters, which usually generate
the counter values based on direct measurements, and aggregate counters, which
take another counter and transform its values before generating their own
counter values. An example for a simple counter is given above:
counting retired HPX threads. An aggregate counter is shown as an example
above as well: calculating the average of the underlying
counter values sampled at constant time intervals.
While simple counters use instance names formatted as
parentinstancename#parentindex/instancename#instanceindex, most aggregate
counters have the full counter name of the embedded counter as their instance
name.
Not all simple counter types require specifying all four elements of a full counter
instance name; some of the parts (parentinstancename, parentindex,
instancename, and instanceindex) are optional for specific counters.
Please refer to the documentation of a particular counter for more information
about the formatting requirements for the name of this counter (see
Existing HPX performance counters).
The parameters are used to pass additional information to a counter at
creation time. They are optional, and they fully depend on the concrete counter.
Even if a specific counter type allows additional parameters to be given, those
usually are not required as sensible defaults will be chosen. Please refer to
the documentation of a particular counter for more information about what
parameters are supported, how to specify them, and what default values are
assumed (see also Existing HPX performance counters).
Every locality of an application exposes its own set of performance counter types and performance counter instances. The set of exposed counters is determined dynamically at application start based on the execution environment of the application. For instance, this set is influenced by the current hardware environment for the locality (such as whether the locality has access to accelerators), and the software environment of the application (such as the number of OS threads used to execute HPX threads).
Using wildcards in performance counter names#
It is possible to use wildcard characters when specifying performance counter names. Performance counter names can contain two types of wildcard characters:
Wildcard characters in the performance counter type
Wildcard characters in the performance counter instance name
A wildcard character has a meaning which is very close to usual file name wildcard matching rules implemented by common shells (like bash).
Wildcard |
Description |
|
This wildcard character matches any number (zero or more) of arbitrary characters. |
|
This wildcard character matches any single arbitrary character. |
|
This wildcard character matches any single character from the list of specified within the square brackets. |
Wildcard |
Description |
|
This wildcard character matches any locality or any thread,
depending on whether it is used for |
Consuming performance counter data#
You can consume performance data using either the command line interface, the HPX application or the HPX API. The command line interface is easier to use, but it is less flexible and does not allow one to adjust the behaviour of your application at runtime. The command line interface provides a convenience abstraction but simplified abstraction for querying and logging performance counter data for a set of performance counters.
Consuming performance counter data from the command line#
HPX provides a set of predefined command line options for every application
that uses hpx::init for its initialization. While there are many more
command line options available (see HPX Command Line Options), the set of options related
to performance counters allows one to list existing counters, and query existing
counters once at application termination or repeatedly after a constant time
interval.
The following table summarizes the available command line options:
Command line option |
Description |
|
Prints the specified performance counter either repeatedly and/or at the
times specified by |
|
Prints the specified performance counter either repeatedly and/or at the
times specified by |
|
Prints the performance counter(s) specified with |
|
Prints the performance counter(s) specified with |
|
Lists the names of all registered performance counters. |
|
Lists the description of all registered performance counters. |
|
Prints the performance counter(s) specified with |
|
Prints the performance counter(s) specified with |
|
Prints the performance counter(s) specified with |
|
Resets all performance counter(s) specified with |
|
Appends counter type description to generated output. |
|
Each locality prints only its own local counters. |
While the options --hpx:list-counters and --hpx:list-counter-infos give
a short list of all available counters, the full documentation for those can
be found in the section Existing HPX performance counters.
A simple example#
All of the commandline options mentioned above can be tested using
the hello_world_distributed example.
Listing all available counters hello_world_distributed --hpx:list-counters
yields:
List of available counter instances (replace * below with the appropriate
sequence number)
-------------------------------------------------------------------------
/agas/count/allocate /agas/count/bind /agas/count/bind_gid
/agas/count/bind_name ... /threads{locality#*/allocator#*}/count/objects
/threads{locality#*/total}/count/stack-recycles
/threads{locality#*/total}/idle-rate
/threads{locality#*/worker-thread#*}/idle-rate
Providing more information about all available counters,
hello_world_distributed --hpx:list-counter-infos yields:
Information about available counter instances (replace * below with the
appropriate sequence number)
------------------------------------------------------------------------------
fullname: /agas/count/allocate helptext: returns the number of invocations of
the AGAS service 'allocate' type: counter_type::raw version: 1.0.0
------------------------------------------------------------------------------
------------------------------------------------------------------------------
fullname: /agas/count/bind helptext: returns the number of invocations of the
AGAS service 'bind' type: counter_type::raw version: 1.0.0
------------------------------------------------------------------------------
------------------------------------------------------------------------------
fullname: /agas/count/bind_gid helptext: returns the number of invocations of
the AGAS service 'bind_gid' type: counter_type::raw version: 1.0.0
------------------------------------------------------------------------------
...
This command will not only list the counter names but also a short description of the data exposed by this counter.
Note
The list of available counters may differ depending on the concrete execution environment (hardware or software) of your application.
Requesting the counter data for one or more performance counters can be achieved
by invoking hello_world_distributed with a list of counter names:
$ hello_world_distributed \
--hpx:print-counter=/threads{locality#0/total}/count/cumulative \
--hpx:print-counter=/agas{locality#0/total}/count/bind
which yields for instance:
hello world from OS-thread 0 on locality 0
/threads{locality#0/total}/count/cumulative,1,0.212527,[s],33
/agas{locality#0/total}/count/bind,1,0.212790,[s],11
The first line is the normal output generated by hello_world_distributed and
has no relation to the counter data listed. The last two lines contain the
counter data as gathered at application shutdown. These lines have six fields, the
counter name, the sequence number of the counter invocation, the time stamp at
which this information has been sampled, the unit of measure for the time stamp,
the actual counter value and an optional unit of measure for the counter value.
Note
The command line option --hpx:print-counter-types will append a seventh
field to the generated output. This field will hold an abbreviated counter
type.
The actual counter value can be represented by a single number (for counters
returning singular values) or a list of numbers separated by ':' (for
counters returning an array of values, like for instance a histogram).
Note
The name of the performance counter will be enclosed in double quotes '"'
if it contains one or more commas ','.
Requesting to query the counter data once after a constant time interval with this command line:
$ hello_world_distributed \
--hpx:print-counter=/threads{locality#0/total}/count/cumulative \
--hpx:print-counter=/agas{locality#0/total}/count/bind \
--hpx:print-counter-interval=20
yields for instance (leaving off the actual console output of the
hello_world_distributed example for brevity):
threads{locality#0/total}/count/cumulative,1,0.002409,[s],22
agas{locality#0/total}/count/bind,1,0.002542,[s],9
threads{locality#0/total}/count/cumulative,2,0.023002,[s],41
agas{locality#0/total}/count/bind,2,0.023557,[s],10
threads{locality#0/total}/count/cumulative,3,0.037514,[s],46
agas{locality#0/total}/count/bind,3,0.038679,[s],10
The command --hpx:print-counter-destination=<file> will redirect all counter
data gathered to the specified file name, which avoids cluttering the console
output of your application.
The command line option --hpx:print-counter supports using a limited set of
wildcards for a (very limited) set of use cases. In particular, all occurrences
of #* as in locality#* and in worker-thread#* will be automatically
expanded to the proper set of performance counter names representing the actual
environment for the executed program. For instance, if your program is utilizing
four worker threads for the execution of HPX threads (see command line option
--hpx:threads) the following command line
$ hello_world_distributed \
--hpx:threads=4 \
--hpx:print-counter=/threads{locality#0/worker-thread#*}/count/cumulative
will print the value of the performance counters monitoring each of the worker threads:
hello world from OS-thread 1 on locality 0
hello world from OS-thread 0 on locality 0
hello world from OS-thread 3 on locality 0
hello world from OS-thread 2 on locality 0
/threads{locality#0/worker-thread#0}/count/cumulative,1,0.0025214,[s],27
/threads{locality#0/worker-thread#1}/count/cumulative,1,0.0025453,[s],33
/threads{locality#0/worker-thread#2}/count/cumulative,1,0.0025683,[s],29
/threads{locality#0/worker-thread#3}/count/cumulative,1,0.0025904,[s],33
The command --hpx:print-counter-format takes values csv and
csv-short to generate CSV formatted counter values with a header.
With format as csv:
$ hello_world_distributed \
--hpx:threads=2 \
--hpx:print-counter-format csv \
--hpx:print-counter /threads{locality#*/total}/count/cumulative \
--hpx:print-counter /threads{locality#*/total}/count/cumulative-phases
will print the values of performance counters in CSV format with the full countername as a header:
hello world from OS-thread 1 on locality 0
hello world from OS-thread 0 on locality 0
/threads{locality#*/total}/count/cumulative,/threads{locality#*/total}/count/cumulative-phases
39,93
With format csv-short:
$ hello_world_distributed \
--hpx:threads 2 \
--hpx:print-counter-format csv-short \
--hpx:print-counter cumulative,/threads{locality#*/total}/count/cumulative \
--hpx:print-counter phases,/threads{locality#*/total}/count/cumulative-phases
will print the values of performance counters in CSV format with the short countername as a header:
hello world from OS-thread 1 on locality 0
hello world from OS-thread 0 on locality 0
cumulative,phases
39,93
With format csv and csv-short when used with --hpx:print-counter-interval:
$ hello_world_distributed \
--hpx:threads 2 \
--hpx:print-counter-format csv-short \
--hpx:print-counter cumulative,/threads{locality#*/total}/count/cumulative \
--hpx:print-counter phases,/threads{locality#*/total}/count/cumulative-phases \
--hpx:print-counter-interval 5
will print the header only once repeating the performance counter value(s) repeatedly:
cum,phases
25,42
hello world from OS-thread 1 on locality 0
hello world from OS-thread 0 on locality 0
44,95
The command --hpx:no-csv-header can be used with
--hpx:print-counter-format to print performance counter values in CSV format
without any header:
$ hello_world_distributed \
--hpx:threads 2 \
--hpx:print-counter-format csv-short \
--hpx:print-counter cumulative,/threads{locality#*/total}/count/cumulative \
--hpx:print-counter phases,/threads{locality#*/total}/count/cumulative-phases \
--hpx:no-csv-header
will print:
hello world from OS-thread 1 on locality 0
hello world from OS-thread 0 on locality 0
37,91
Consuming performance counter data using the HPX API#
HPX provides an API that allows users to discover performance counters and to retrieve the current value of any existing performance counter from any application.
Discover existing performance counters#
Retrieve the current value of any performance counter#
Performance counters are specialized HPX components. In order to retrieve a counter value, the performance counter needs to be instantiated. HPX exposes a client component object for this purpose:
hpx::performance_counters::performance_counter counter(std::string const& name);
Instantiating an instance of this type will create the performance counter
identified by the given name. Only the first invocation for any given counter
name will create a new instance of that counter. All following invocations for a
given counter name will reference the initially created instance. This ensures
that at any point in time there is never more than one active instance of
any of the existing performance counters.
In order to access the counter value (or to invoke any of the other functionality
related to a performance counter, like start, stop or reset) member
functions of the created client component instance should be called:
// print the current number of threads created on locality 0
hpx::performance_counters::performance_counter count(
"/threads{locality#0/total}/count/cumulative");
hpx::cout << count.get_value<int>().get() << std::endl;
For more information about the client component type, see
hpx::performance_counters::performance_counter
Note
In the above example count.get_value() returns a future. In order to print
the result we must append .get() to retrieve the value. You could write the
above example like this for more clarity:
// print the current number of threads created on locality 0
hpx::performance_counters::performance_counter count(
"/threads{locality#0/total}/count/cumulative");
hpx::future<int> result = count.get_value<int>();
hpx::cout << result.get() << std::endl;
Providing performance counter data#
HPX offers several ways by which you may provide your own data as a performance counter. This has the benefit of exposing additional, possibly application-specific information using the existing Performance Counter framework, unifying the process of gathering data about your application.
An application that wants to provide counter data can implement a performance counter to provide the data. When a consumer queries performance data, the HPX runtime system calls the provider to collect the data. The runtime system uses an internal registry to determine which provider to call.
Generally, there are two ways of exposing your own performance counter data: a simple, function-based way and a more complex, but more powerful way of implementing a full performance counter. Both alternatives are described in the following sections.
Exposing performance counter data using a simple function#
The simplest way to expose arbitrary numeric data is to write a function which will then be called whenever a consumer queries this counter. Currently, this type of performance counter can only be used to expose integer values. The expected signature of this function is:
std::int64_t some_performance_data(bool reset);
The argument bool reset (which is supplied by the runtime system when the
function is invoked) specifies whether the counter value should be reset after
evaluating the current value (if applicable).
For instance, here is such a function returning how often it was invoked:
// The atomic variable 'counter' ensures the thread safety of the counter.
boost::atomic<std::int64_t> counter(0);
std::int64_t some_performance_data(bool reset)
{
std::int64_t result = ++counter;
if (reset)
counter = 0;
return result;
}
This example function exposes a linearly-increasing value as our performance data. The value is incremented on each invocation, i.e., each time a consumer requests the counter data of this performance counter.
The next step in exposing this counter to the runtime system is to register the
function as a new raw counter type using the HPX API function
hpx::performance_counters::install_counter_type. A counter type
represents certain common characteristics of counters, like their counter type
name and any associated description information. The following snippet shows an
example of how to register the function some_performance_data, which is shown
above, for a counter type named "/test/data". This registration has to be
executed before any consumer instantiates, and queries an instance of this
counter type:
#include <hpx/include/performance_counters.hpp>
void register_counter_type()
{
// Call the HPX API function to register the counter type.
hpx::performance_counters::install_counter_type(
"/test/data", // counter type name
&some_performance_data, // function providing counter data
"returns a linearly increasing counter value" // description text (optional)
"" // unit of measure (optional)
);
}
Now it is possible to instantiate a new counter instance based on the naming
scheme "/test{locality#*/total}/data" where * is a zero-based integer
index identifying the locality for which the counter instance should be
accessed. The function
hpx::performance_counters::install_counter_type enables users to
instantiate exactly one counter instance for each locality. Repeated
requests to instantiate such a counter will return the same instance, i.e., the
instance created for the first request.
If this counter needs to be accessed using the standard HPX command line
options, the registration has to be performed during application startup, before
hpx_main is executed. The best way to achieve this is to register an HPX
startup function using the API function
hpx::register_startup_function before calling hpx::init to
initialize the runtime system:
int main(int argc, char* argv[])
{
// By registering the counter type we make it available to any consumer
// who creates and queries an instance of the type "/test/data".
//
// This registration should be performed during startup. The
// function 'register_counter_type' should be executed as an HPX thread right
// before hpx_main is executed.
hpx::register_startup_function(®ister_counter_type);
// Initialize and run HPX.
return hpx::init(argc, argv);
}
Please see the code in simplest_performance_counter.cpp
for a full example demonstrating this functionality.
Implementing a full performance counter#
Sometimes, the simple way of exposing a single value as a performance counter is not sufficient. For that reason, HPX provides a means of implementing full performance counters which support:
Retrieving the descriptive information about the performance counter
Retrieving the current counter value
Resetting the performance counter (value)
Starting the performance counter
Stopping the performance counter
Setting the (initial) value of the performance counter
Every full performance counter will implement a predefined interface:
// Copyright (c) 2007-2023 Hartmut Kaiser
//
// SPDX-License-Identifier: BSL-1.0
// Distributed under the Boost Software License, Version 1.0. (See accompanying
// file LICENSE_1_0.txt or copy at http://www.boost.org/LICENSE_1_0.txt)
#pragma once
#include <hpx/config.hpp>
#include <hpx/components/client_base.hpp>
#include <hpx/modules/async_base.hpp>
#include <hpx/modules/execution.hpp>
#include <hpx/modules/functional.hpp>
#include <hpx/modules/futures.hpp>
#include <hpx/performance_counters/counters_fwd.hpp>
#include <hpx/performance_counters/server/base_performance_counter.hpp>
#include <string>
#include <utility>
#include <vector>
#include <hpx/config/warnings_prefix.hpp>
///////////////////////////////////////////////////////////////////////////////
namespace hpx::performance_counters {
///////////////////////////////////////////////////////////////////////////
struct HPX_EXPORT performance_counter
: components::client_base<performance_counter,
server::base_performance_counter>
{
using base_type = components::client_base<performance_counter,
server::base_performance_counter>;
performance_counter() = default;
explicit performance_counter(std::string const& name);
performance_counter(
std::string const& name, hpx::id_type const& locality);
performance_counter(id_type const& id)
: base_type(id)
{
}
performance_counter(future<id_type>&& id)
: base_type(HPX_MOVE(id))
{
}
performance_counter(hpx::future<performance_counter>&& c)
: base_type(HPX_MOVE(c))
{
}
///////////////////////////////////////////////////////////////////////
future<counter_info> get_info() const;
counter_info get_info(
launch::sync_policy, error_code& ec = throws) const;
future<counter_value> get_counter_value(bool reset) const;
counter_value get_counter_value(
launch::sync_policy, bool reset, error_code& ec = throws) const;
future<counter_value> get_counter_value() const;
counter_value get_counter_value(
launch::sync_policy, error_code& ec = throws) const;
future<counter_values_array> get_counter_values_array(bool reset) const;
counter_values_array get_counter_values_array(
launch::sync_policy, bool reset, error_code& ec = throws) const;
future<counter_values_array> get_counter_values_array() const;
counter_values_array get_counter_values_array(
launch::sync_policy, error_code& ec = throws) const;
///////////////////////////////////////////////////////////////////////
future<bool> start() const;
bool start(launch::sync_policy, error_code& ec = throws) const;
future<bool> stop() const;
bool stop(launch::sync_policy, error_code& ec = throws) const;
future<void> reset() const;
void reset(launch::sync_policy, error_code& ec = throws) const;
future<void> reinit(bool reset = true) const;
void reinit(launch::sync_policy, bool reset = true,
error_code& ec = throws) const;
///////////////////////////////////////////////////////////////////////
future<std::string> get_name() const;
std::string get_name(
launch::sync_policy, error_code& ec = throws) const;
private:
template <typename T>
static T extract_value(future<counter_value>&& value)
{
return value.get().get_value<T>();
}
public:
template <typename T>
future<T> get_value(bool reset = false)
{
return get_counter_value(reset).then(hpx::launch::sync,
hpx::bind_front(&performance_counter::extract_value<T>));
}
template <typename T>
T get_value(
launch::sync_policy, bool reset = false, error_code& ec = throws)
{
return get_counter_value(launch::sync, reset).get_value<T>(ec);
}
template <typename T>
future<T> get_value() const
{
return get_counter_value(false).then(hpx::launch::sync,
hpx::bind_front(&performance_counter::extract_value<T>));
}
template <typename T>
T get_value(launch::sync_policy, error_code& ec = throws) const
{
return get_counter_value(launch::sync, false).get_value<T>(ec);
}
};
// Return all counters matching the given name (with optional wild cards).
HPX_EXPORT std::vector<performance_counter> discover_counters(
std::string const& name, error_code& ec = throws);
} // namespace hpx::performance_counters
#include <hpx/config/warnings_suffix.hpp>
In order to implement a full performance counter, you have to create an HPX
component exposing this interface. To simplify this task, HPX provides a
ready-made base class which handles all the boiler plate of creating
a component for you. The remainder of this section will explain the process of creating a full
performance counter based on the Sine example, which you can find in the
directory examples/performance_counters/sine/.
The base class is defined in the header file base_performance_counter.cpp
as:
// Copyright (c) 2007-2025 Hartmut Kaiser
//
// SPDX-License-Identifier: BSL-1.0
// Distributed under the Boost Software License, Version 1.0. (See accompanying
// file LICENSE_1_0.txt or copy at http://www.boost.org/LICENSE_1_0.txt)
#pragma once
#include <hpx/config.hpp>
#include <hpx/actions_base/component_action.hpp>
#include <hpx/components_base/component_type.hpp>
#include <hpx/components_base/server/component_base.hpp>
#include <hpx/modules/runtime_local.hpp>
#include <hpx/performance_counters/counters.hpp>
#include <hpx/performance_counters/server/base_performance_counter.hpp>
///////////////////////////////////////////////////////////////////////////////
//[performance_counter_base_class
namespace hpx::performance_counters {
template <typename Derived>
class base_performance_counter;
} // namespace hpx::performance_counters
//]
///////////////////////////////////////////////////////////////////////////////
namespace hpx::performance_counters {
template <typename Derived>
class base_performance_counter
: public hpx::performance_counters::server::base_performance_counter
, public hpx::components::component_base<Derived>
{
private:
using base_type = hpx::components::component_base<Derived>;
public:
using type_holder = Derived;
using base_type_holder =
hpx::performance_counters::server::base_performance_counter;
// NOLINTBEGIN(bugprone-crtp-constructor-accessibility)
base_performance_counter() = default;
explicit base_performance_counter(
hpx::performance_counters::counter_info const& info)
: base_type_holder(info)
{
}
// NOLINTEND(bugprone-crtp-constructor-accessibility)
// Disambiguate finalize() which is implemented in both base classes
void finalize()
{
base_type_holder::finalize();
base_type::finalize();
}
hpx::naming::address get_current_address() const
{
return hpx::naming::address(
hpx::naming::get_gid_from_locality_id(hpx::get_locality_id()),
hpx::components::get_component_type<Derived>(),
const_cast<Derived*>(static_cast<Derived const*>(this)));
}
};
} // namespace hpx::performance_counters
The single template parameter is expected to receive the type of the derived class implementing the performance counter. In the Sine example this looks like:
// Copyright (c) 2007-2012 Hartmut Kaiser
//
// SPDX-License-Identifier: BSL-1.0
// Distributed under the Boost Software License, Version 1.0. (See accompanying
// file LICENSE_1_0.txt or copy at http://www.boost.org/LICENSE_1_0.txt)
#pragma once
#include <hpx/config.hpp>
#if !defined(HPX_COMPUTE_DEVICE_CODE)
#include <hpx/hpx.hpp>
#include <hpx/include/lcos_local.hpp>
#include <hpx/include/performance_counters.hpp>
#include <hpx/include/util.hpp>
#include <cstdint>
namespace performance_counters { namespace sine { namespace server {
///////////////////////////////////////////////////////////////////////////
//[sine_counter_definition
class sine_counter
: public hpx::performance_counters::base_performance_counter<sine_counter>
//]
{
public:
sine_counter()
: current_value_(0)
, evaluated_at_(0)
{
}
explicit sine_counter(
hpx::performance_counters::counter_info const& info);
/// This function will be called in order to query the current value of
/// this performance counter
hpx::performance_counters::counter_value get_counter_value(bool reset);
/// The functions below will be called to start and stop collecting
/// counter values from this counter.
bool start();
bool stop();
/// finalize() will be called just before the instance gets destructed
void finalize();
protected:
bool evaluate();
private:
typedef hpx::spinlock mutex_type;
mutable mutex_type mtx_;
double current_value_;
std::uint64_t evaluated_at_;
hpx::util::interval_timer timer_;
};
}}} // namespace performance_counters::sine::server
#endif
i.e., the type sine_counter is derived from the base class passing the type
as a template argument (please see simplest_performance_counter.cpp
for the full source code of the counter definition). For more information about this
technique (called Curiously Recurring Template Pattern - CRTP), please see for
instance the corresponding Wikipedia article. This base
class itself is derived from the performance_counter interface described
above.
Additionally, a full performance counter implementation not only exposes the actual value but also provides information about:
The point in time a particular value was retrieved.
A (sequential) invocation count.
The actual counter value.
An optional scaling coefficient.
Information about the counter status.
Existing HPX performance counters#
The HPX runtime system exposes a wide variety of predefined performance counters. These counters expose critical information about different modules of the runtime system. They can help determine system bottlenecks and fine-tune system and application performance.
Counter type |
where primary namespace services: component namespace services: locality namespace services: symbol namespace services: |
Counter instance formatting |
where The value for |
Description |
Returns the total number of invocations of the specified AGAS service since its creation. |
Counter type |
where |
Counter instance formatting |
where |
Description |
Returns the overall total number of invocations of all AGAS services provided by the given AGAS service category since its creation. |
Counter type |
where |
Counter instance formatting |
where |
Description |
Returns the overall total number of invocations of all AGAS services provided by the given AGAS service category since its creation. |
Counter type |
where primary namespace services: component namespace services: locality namespace services: symbol namespace services: |
Counter instance formatting |
where The value for |
Description |
Returns the overall execution time of the specified AGAS service since its creation (in nanoseconds). |
Counter type |
where |
Counter instance formatting |
where |
Description |
Returns the overall execution time of all AGAS services provided by the given AGAS service category since its creation (in nanoseconds). |
Counter type |
|
Counter instance formatting |
where |
Description |
Returns the number of cache entries resident in the AGAS cache of
the specified locality (see |
Counter type |
where |
Counter instance formatting |
where |
Description |
Returns the number of cache events (evictions, hits, inserts, and misses)
in the AGAS cache of the specified locality (see
|
Counter type |
where |
Counter instance formatting |
where |
Description |
Returns the number of invocations of the specified cache API function of the AGAS cache. |
Counter type |
where
|
Counter instance formatting |
where |
Description |
Returns the overall time spent executing of the specified API function of the AGAS cache. |
Counter type |
where:
|
Counter instance formatting |
where |
Description |
Returns the overall number of raw (uncompressed) bytes sent or received
(see The performance counters are available only if the compile time constant
The performance counters for the connection type Please see CMake options for more details. |
Counter type |
where:
|
Counter instance formatting |
where |
Description |
Returns the total time (in nanoseconds) between the start of each
asynchronous transmission operation and the end of the corresponding
operation for the specified The performance counters are available only if the compile time constant
The performance counters for the connection type Please see CMake options for more details. |
Counter type |
where:
|
Counter instance formatting |
where |
Description |
Returns the overall number of bytes transferred (see The performance counters are available only if the compile time constant
The performance counters for the connection type Please see CMake options for more details. |
Description |
If the configure-time option |
Counter type |
where:
|
Counter instance formatting |
where |
Description |
Returns the overall time spent performing outgoing data serialization for
the specified The performance counters are available only if the compile time constant
The performance counters for the connection type Please see CMake options for more details. |
Parameters |
If the configure-time option |
Counter type |
|
Counter instance formatting |
where |
Description |
Returns the overall number of routed (outbound) parcels transferred by the given locality. Routed parcels are those which cannot directly be delivered to its destination as the local AGAS is not able to resolve the destination address. In this case a parcel is sent to the AGAS service component which is responsible for creating the destination GID (and is responsible for resolving the destination address). This AGAS service component will deliver the parcel to its final target. |
Parameters |
If the configure-time option |
Counter type |
where:
|
Counter instance formatting |
where |
Description |
Returns the overall number of parcels transferred using the specified
The performance counters are available only if the compile time constant
The performance counters for the connection type Please see CMake options for more details. |
Counter type |
|
Counter instance formatting |
where |
Description |
Returns the overall number of messages 1 transferred using the
specified The performance counters are available only if the compile time constant
The performance counters for the connection type Please see CMake options for more details. |
Counter type |
where:
|
Counter instance formatting |
where |
Description |
Returns the overall number of zero-copy chunks sent or received
(see The performance counters are available only if the compile time constant
The performance counters for the connection type Please see CMake options for more details. |
Counter type |
where:
|
Counter instance formatting |
where |
Description |
Returns the maximum number of zero-copy chunks sent or received per message
(see The performance counters are available only if the compile time constant
The performance counters for the connection type Please see CMake options for more details. |
Counter type |
where:
|
Counter instance formatting |
where |
Description |
Returns the overall size of zero-copy chunks sent or received
(see The performance counters are available only if the compile time constant
The performance counters for the connection type Please see CMake options for more details. |
Counter type |
where:
|
Counter instance formatting |
where |
Description |
Returns the maximum size of zero-copy chunks sent or received
(see The performance counters are available only if the compile time constant
The performance counters for the connection type Please see CMake options for more details. |
Counter type |
where:
|
Counter instance formatting |
where |
Description |
Returns the overall number cache events (evictions, hits, inserts,
misses, and reclaims) for the connection cache of the given connection
type on the given locality (see The performance counters for the connection type Please see CMake options for more details. |
Counter type |
where |
Counter instance formatting |
where |
Description |
Returns the current number of parcels stored in the parcel queue (see
|
Counter type |
|
Counter instance formatting |
where:
|
Description |
Returns the overall number of executed (retired) HPX-threads on the
given locality since application start. If the instance name is
|
Counter type |
|
Counter instance formatting |
where:
|
Description |
Returns the average time spent executing one HPX-thread on the given
locality since application start. If the instance name is |
Counter type |
|
Counter instance formatting |
where:
|
Description |
Returns the average time spent on overhead while executing one
HPX-thread on the given locality since application start. If
the instance name is |
Counter type |
|
Counter instance formatting |
where:
|
Description |
Returns the overall number of executed HPX-thread phases (invocations)
on the given locality since application start. If the instance
name is |
Counter type |
|
Counter instance formatting |
where:
|
Description |
Returns the average time spent executing one HPX-thread phase
(invocation) on the given locality since application start. If
the instance name is |
Counter type |
|
Counter instance formatting |
where:
|
Description |
Returns the average time spent on overhead executing one HPX-thread
phase (invocation) on the given locality since application start.
If the instance name is |
Counter type |
|
Counter instance formatting |
where:
|
Description |
Returns the overall time spent running the scheduler on the given
locality since application start. If the instance name is |
Counter type |
|
Counter instance formatting |
where:
|
Description |
Returns the overall time spent executing all HPX-threads on the given
locality since application start. If the instance name is |
Counter type |
|
Counter instance formatting |
where:
|
Description |
Returns the overall overhead time incurred executing all HPX-threads on
the given locality since application start. If the instance name
is |
Counter type |
where:
|
Counter instance formatting |
where:
The |
Description |
Returns the current number of HPX-threads having the given thread state
on the given locality. If the instance name is |
Counter type |
where:
|
Counter instance formatting |
where:
The |
Description |
Returns the average wait time of HPX-threads (if the thread state is
These counters are available only if the compile time constant
|
Counter type |
|
Counter instance formatting |
where:
|
Description |
Returns the average idle rate for the given worker thread(s) on the given
locality. The idle rate is defined as the ratio of the time spent
on scheduling and management tasks and the overall time spent executing
work since the application started. This counter is available only if the
configuration time constant |
Counter type |
|
Counter instance formatting |
where:
|
Description |
Returns the average idle rate for the given worker thread(s) on the given
locality which is caused by creating new threads. The creation idle
rate is defined as the ratio of the time spent on creating new threads and
the overall time spent executing work since the application started. This
counter is available only if the configuration time constants
|
Counter type |
|
Counter instance formatting |
where:
|
Description |
Returns the average idle rate for the given worker thread(s) on the given
locality which is caused by cleaning up terminated threads. The
cleanup idle rate is defined as the ratio of the time spent on cleaning up
terminated thread objects and the overall time spent executing work since
the application started. This counter is available only if the
configuration time constants |
Counter type |
|
Counter instance formatting |
where:
|
Description |
Returns the overall length of all queues for the given worker thread(s) on the given locality. |
Counter type |
|
Counter instance formatting |
where:
|
Description |
Returns the total number of HPX-thread unbind (madvise) operations performed for the referenced locality. Note that this counter is not available on Windows based platforms. |
Counter type |
|
Counter instance formatting |
where:
|
Description |
Returns the total number of HPX-thread recycling operations performed. |
Counter type |
|
Counter instance formatting |
|
Description |
Returns the total number of HPX-threads ‘stolen’ from the pending
thread queue by a neighboring thread worker thread (these threads are
executed by a different worker thread than they were initially scheduled
on). This counter is available only if the configuration time constant
|
Counter type |
|
Counter instance formatting |
where:
|
Description |
Returns the total number of times that the referenced worker-thread on
the referenced locality failed to find pending HPX-threads in
its associated queue. This counter is available only if the configuration
time constant |
Counter type |
|
Counter instance formatting |
where:
|
Description |
Returns the total number of times that the referenced worker-thread on
the referenced locality looked for pending HPX-threads in its
associated queue. This counter is available only if the configuration
time constant |
Counter type |
|
Counter instance formatting |
where:
|
Description |
Returns the total number of HPX-threads ‘stolen’ from the staged thread
queue by a neighboring worker thread (these threads are executed by a
different worker thread than they were initially scheduled on). This
counter is available only if the configuration time constant
|
Counter type |
|
Counter instance formatting |
where:
|
Description |
Returns the total number of HPX-threads ‘stolen’ to the pending thread
queue of the worker thread (these threads are executed by a different
worker thread than they were initially scheduled on). This counter is
available only if the configuration time constant
|
Counter type |
|
Counter instance formatting |
where:
|
Description |
Returns the total number of HPX-threads ‘stolen’ to the staged thread
queue of a neighboring worker thread (these threads are executed by a
different worker thread than they were initially scheduled on). This
counter is available only if the configuration time constant
|
Counter type |
|
Counter instance formatting |
where:
|
Description |
Returns the total number of HPX-thread objects created. Note that thread objects are reused to improve system performance, thus this number does not reflect the number of actually executed (retired) HPX-threads. |
Counter type |
|
Counter instance formatting |
where:
|
Description |
|
Parameters |
Percent |
Counter type |
|
Counter instance formatting |
where:
|
Description |
Returns the current (instantaneous) idle-loop count for the given HPX- worker thread or the accumulated value for all worker threads. |
Counter type |
|
Counter instance formatting |
where:
|
Description |
Returns the current (instantaneous) busy-loop count for the given HPX- worker thread or the accumulated value for all worker threads. |
Counter type |
|
Counter instance formatting |
where:
|
Description |
Returns the overall time spent performing background work on the given
locality since application start. If the instance name is |
Counter type |
|
Counter instance formatting |
where:
|
Description |
Returns the background overhead on the given locality since application
start. If the instance name is |
Counter type |
|
Counter instance formatting |
where:
|
Description |
Returns the overall time spent performing background work related to
sending parcels on the given locality since application start. If the
instance name is This counter will currently return meaningful values for the MPI parcelport only. |
Counter type |
|
Counter instance formatting |
where:
|
Description |
Returns the background overhead related to sending parcels on the given
locality since application start. If the instance name is This counter will currently return meaningful values for the MPI parcelport only. |
Counter type |
|
Counter instance formatting |
where:
|
Description |
Returns the overall time spent performing background work related to
receiving parcels on the given locality since application start. If the
instance name is This counter will currently return meaningful values for the MPI parcelport only. |
Counter type |
|
Counter instance formatting |
where:
|
Description |
Returns the background overhead related to receiving parcels on the given
locality since application start. If the instance name is This counter will currently return meaningful values for the MPI parcelport only. |
Counter type |
|
Counter instance formatting |
where:
|
Description |
Returns the overall number of currently active components of the specified type on the given locality. |
Parameters |
The type of the component. This is the string which has been used while
registering the component with HPX, e.g. which has been passed as the
second parameter to the macro |
Counter type |
|
Counter instance formatting |
|
Description |
Returns the overall (local) invocation count of the specified action type on the given locality. |
Parameters |
The action type. This is the string which has been used while registering
the action with HPX, e.g. which has been passed as the second parameter
to the macro |
Counter type |
|
Counter instance formatting |
where:
|
Description |
Returns the overall (remote) invocation count of the specified action type on the given locality. |
Parameters |
The action type. This is the string which has been used while registering
the action with HPX, e.g. which has been passed as the second parameter
to the macro |
Counter type |
|
Counter instance formatting |
where:
|
Description |
Returns the overall time since application start on the given locality in nanoseconds. |
Counter type |
|
Counter instance formatting |
where:
|
Description |
Returns the amount of virtual memory currently allocated by the referenced locality (in bytes). |
Counter type |
|
Counter instance formatting |
where:
|
Description |
Returns the amount of resident memory currently allocated by the referenced locality (in bytes). |
Counter type |
|
Counter instance formatting |
where:
|
Description |
|
Counter type |
|
Counter instance formatting |
where:
|
Description |
Returns the number of bytes read by the process (aggregate of count arguments passed to read() call or its analogues). This performance counter is available only on systems which expose the related data through the /proc file system. |
Counter type |
|
Counter instance formatting |
where:
|
Description |
Returns the number of bytes written by the process (aggregate of count arguments passed to write() call or its analogues). This performance counter is available only on systems which expose the related data through the /proc file system. |
Counter type |
|
Counter instance formatting |
where:
|
Description |
Returns the number of system calls that perform I/O reads. This performance counter is available only on systems which expose the related data through the /proc file system. |
Counter type |
|
Counter instance formatting |
where:
|
Description |
Returns the number of system calls that perform I/O writes. This performance counter is available only on systems which expose the related data through the /proc file system. |
Counter type |
|
Counter instance formatting |
where:
|
Description |
Returns the number of bytes retrieved from storage by I/O operations. This performance counter is available only on systems which expose the related data through the /proc file system. |
Counter type |
|
Counter instance formatting |
where:
|
Description |
Returns the number of bytes retrieved from storage by I/O operations. This performance counter is available only on systems which expose the related data through the /proc file system. |
Counter type |
|
Counter instance formatting |
where:
|
Description |
Returns the number of bytes accounted by write_bytes_transferred that has not been ultimately stored due to truncation or deletion. This performance counter is available only on systems which expose the related data through the /proc file system. |
Counter type |
where:
For a full list of available PAPI events and their (short) description
use the |
Counter instance formatting |
where:
|
Description |
Returns the current count of occurrences of the specified
PAPI event. This counter is available only if the configuration time
constant |
Counter type |
|
Counter instance formatting |
Any full performance counter name. The referenced performance counter is queried at fixed time intervals as specified by the first parameter. |
Description |
Returns the current average (mean) value calculated based on the values queried from the underlying counter (the one specified as the instance name). |
Parameters |
Any parameter will be interpreted as a list of up to two comma separated
(integer) values, where the first is the time interval (in milliseconds)
at which the underlying counter should be queried. If no value is
specified, the counter will assume |
Counter type |
|
Counter instance formatting |
Any full performance counter name. The referenced performance counter is queried at fixed time intervals as specified by the first parameter. |
Description |
Returns the current rolling average (mean) value calculated based on the values queried from the underlying counter (the one specified as the instance name). |
Parameters |
Any parameter will be interpreted as a list of up to three comma
separated (integer) values, where the first is the time interval (in
milliseconds) at which the underlying counter should be queried. If no
value is specified, the counter will assume |
Counter type |
|
Counter instance formatting |
Any full performance counter name. The referenced performance counter is queried at fixed time intervals as specified by the first parameter. |
Description |
Returns the current standard deviation (stddev) value calculated based on the values queried from the underlying counter (the one specified as the instance name). |
Parameters |
Any parameter will be interpreted as a list of up to two comma separated
(integer) values, where the first is the time interval (in milliseconds)
at which the underlying counter should be queried. If no value is
specified, the counter will assume |
Counter type |
|
Counter instance formatting |
Any full performance counter name. The referenced performance counter is queried at fixed time intervals as specified by the first parameter. |
Description |
Returns the current rolling variance (stddev) value calculated based on the values queried from the underlying counter (the one specified as the instance name). |
Parameters |
Any parameter will be interpreted as a list of up to three comma
separated (integer) values, where the first is the time interval (in
milliseconds) at which the underlying counter should be queried. If no
value is specified, the counter will assume |
Counter type |
|
Counter instance formatting |
Any full performance counter name. The referenced performance counter is queried at fixed time intervals as specified by the first parameter. |
Description |
Returns the current (statistically estimated) median value calculated based on the values queried from the underlying counter (the one specified as the instance name). |
Parameters |
Any parameter will be interpreted as a list of up to two comma separated
(integer) values, where the first is the time interval (in milliseconds)
at which the underlying counter should be queried. If no value is
specified, the counter will assume |
Counter type |
|
Counter instance formatting |
Any full performance counter name. The referenced performance counter is queried at fixed time intervals as specified by the first parameter. |
Description |
Returns the current maximum value calculated based on the values queried from the underlying counter (the one specified as the instance name). |
Parameters |
Any parameter will be interpreted as a list of up to two comma separated
(integer) values, where the first is the time interval (in milliseconds)
at which the underlying counter should be queried. If no value is
specified, the counter will assume |
Counter type |
|
Counter instance formatting |
Any full performance counter name. The referenced performance counter is queried at fixed time intervals as specified by the first parameter. |
Description |
Returns the current rolling maximum value calculated based on the values queried from the underlying counter (the one specified as the instance name). |
Parameters |
Any parameter will be interpreted as a list of up to three comma
separated (integer) values, where the first is the time interval (in
milliseconds) at which the underlying counter should be queried. If no
value is specified, the counter will assume |
Counter type |
|
Counter instance formatting |
Any full performance counter name. The referenced performance counter is queried at fixed time intervals as specified by the first parameter. |
Description |
Returns the current minimum value calculated based on the values queried from the underlying counter (the one specified as the instance name). |
Parameters |
Any parameter will be interpreted as a list of up to two comma separated
(integer) values, where the first is the time interval (in milliseconds)
at which the underlying counter should be queried. If no value is
specified, the counter will assume |
Counter type |
|
Counter instance formatting |
Any full performance counter name. The referenced performance counter is queried at fixed time intervals as specified by the first parameter. |
Description |
Returns the current rolling minimum value calculated based on the values queried from the underlying counter (the one specified as the instance name). |
Parameters |
Any parameter will be interpreted as a list of up to three comma
separated (integer) values, where the first is the time interval (in
milliseconds) at which the underlying counter should be queried. If no
value is specified, the counter will assume |
Counter type |
|
Description |
Returns the sum calculated based on the values queried from the underlying counters (the ones specified as the parameters). |
Parameters |
The parameter will be interpreted as a comma separated list of full performance counter names which are queried whenever this counter is accessed. Any wildcards in the counter names will be expanded. |
Counter type |
|
Description |
Returns the difference calculated based on the values queried from the underlying counters (the ones specified as the parameters). |
Parameters |
The parameter will be interpreted as a comma separated list of full performance counter names which are queried whenever this counter is accessed. Any wildcards in the counter names will be expanded. |
Counter type |
|
Description |
Returns the product calculated based on the values queried from the underlying counters (the ones specified as the parameters). |
Parameters |
The parameter will be interpreted as a comma separated list of full performance counter names which are queried whenever this counter is accessed. Any wildcards in the counter names will be expanded. |
Counter type |
|
Description |
Returns the result of division of the values queried from the underlying counters (the ones specified as the parameters). |
Parameters |
The parameter will be interpreted as a comma separated list of full performance counter names which are queried whenever this counter is accessed. Any wildcards in the counter names will be expanded. |
Counter type |
|
Description |
Returns the average value of all values queried from the underlying counters (the ones specified as the parameters). |
Parameters |
The parameter will be interpreted as a comma separated list of full performance counter names which are queried whenever this counter is accessed. Any wildcards in the counter names will be expanded. |
Counter type |
|
Description |
Returns the standard deviation of all values queried from the underlying counters (the ones specified as the parameters). |
Parameters |
The parameter will be interpreted as a comma separated list of full performance counter names which are queried whenever this counter is accessed. Any wildcards in the counter names will be expanded. |
Counter type |
|
Description |
Returns the median value of all values queried from the underlying counters (the ones specified as the parameters). |
Parameters |
The parameter will be interpreted as a comma separated list of full performance counter names which are queried whenever this counter is accessed. Any wildcards in the counter names will be expanded. |
Counter type |
|
Description |
Returns the minimum value of all values queried from the underlying counters (the ones specified as the parameters). |
Parameters |
The parameter will be interpreted as a comma separated list of full performance counter names which are queried whenever this counter is accessed. Any wildcards in the counter names will be expanded. |
Counter type |
|
Description |
Returns the maximum value of all values queried from the underlying counters (the ones specified as the parameters). |
Parameters |
The parameter will be interpreted as a comma separated list of full performance counter names which are queried whenever this counter is accessed. Any wildcards in the counter names will be expanded. |
Counter type |
|
Description |
Returns the count value of all values queried from the underlying counters (the ones specified as the parameters). |
Parameters |
The parameter will be interpreted as a comma separated list of full performance counter names which are queried whenever this counter is accessed. Any wildcards in the counter names will be expanded. |
Note
The /arithmetics counters can consume an arbitrary number of other
counters. For this reason those have to be specified as parameters (a comma
separated list of counters appended after a '@'). For instance:
$ ./bin/hello_world_distributed -t2 \
--hpx:print-counter=/threads{locality#0/worker-thread#*}/count/cumulative \
--hpx:print-counter=/arithmetics/add@/threads{locality#0/worker-thread#*}/count/cumulative
hello world from OS-thread 0 on locality 0
hello world from OS-thread 1 on locality 0
/threads{locality#0/worker-thread#0}/count/cumulative,1,0.515640,[s],25
/threads{locality#0/worker-thread#1}/count/cumulative,1,0.515520,[s],36
/arithmetics/add@/threads{locality#0/worker-thread#*}/count/cumulative,1,0.516445,[s],64
Since all wildcards in the parameters are expanded, this example is fully
equivalent to specifying both counters separately to /arithmetics/add:
$ ./bin/hello_world_distributed -t2 \
--hpx:print-counter=/threads{locality#0/worker-thread#*}/count/cumulative \
--hpx:print-counter=/arithmetics/add@\
/threads{locality#0/worker-thread#0}/count/cumulative,\
/threads{locality#0/worker-thread#1}/count/cumulative
Counter type |
|
Counter instance formatting |
where:
|
Description |
Returns the number of parcels handled by the message handler associated with the action which is given by the counter parameter. |
Parameters |
The action type. This is the string which has been used while registering
the action with HPX, e.g. which has been passed as the second parameter
to the macro |
Counter type |
|
Counter instance formatting |
where:
|
Description |
Returns the number of messages generated by the message handler associated with the action which is given by the counter parameter. |
Parameters |
The action type. This is the string which has been used while registering
the action with HPX, e.g. which has been passed as the second parameter
to the macro |
Counter type |
|
Counter instance formatting |
where:
|
Description |
Returns the average number of parcels sent in a message generated by the message handler associated with the action which is given by the counter parameter. |
Parameters |
The action type. This is the string which has been used while registering
the action with HPX, e.g. which has been passed as the second parameter
to the macro |
Counter type |
|
Counter instance formatting |
where:
|
Description |
Returns the average time between arriving parcels for the action which is given by the counter parameter. |
Parameters |
The action type. This is the string which has been used while registering
the action with HPX, e.g. which has been passed as the second parameter
to the macro |
Counter type |
|
Counter instance formatting |
where:
|
Description |
Returns a histogram representing the times between arriving parcels for the action which is given by the counter parameter. This counter returns an array of values, where the first three values represent the three parameters used for the histogram followed by one value for each of the histogram buckets. The first unit of measure displayed for this counter For each bucket the counter shows a value between |
Parameters |
The action type and optional histogram parameters. The action type is
the string which has been used while registering the action with HPX,
e.g. which has been passed as the second parameter to the macro
The action type may be followed by a comma separated list of up-to three
numbers: the lower and upper boundaries for the collected histogram, and
the number of buckets for the histogram to generate. By default these
three numbers will be assumed to be |
Note
The performance counters related to parcel coalescing are available only if
the configuration time constant HPX_WITH_PARCEL_COALESCING is set to
ON (default: ON). However, even in this case it will be available
only for actions that are enabled for parcel coalescing (see the
macros HPX_ACTION_USES_MESSAGE_COALESCING and
HPX_ACTION_USES_MESSAGE_COALESCING_NOTHROW).
APEX integration#
HPX provides integration with APEX, which is a framework for application
profiling using task timers and various performance counters Huck et al.2.
It can be added as a git submodule by turning on the option HPX_WITH_APEX:BOOL
during CMake configuration. TAU is an optional dependency when using APEX.
To build HPX with APEX, add HPX_WITH_APEX=ON, and,
optionally, Tau_ROOT=$PATH_TO_TAU to your CMake configuration. In
addition, you can override the tag used for APEX with the
HPX_WITH_APEX_TAG option. Please see the APEX HPX documentation for detailed
instructions on using APEX with HPX.
References#
- 2
K. A. Huck, A. Porterfield, N Chaimov, H. Kaiser, A. D. Malony, T. Sterling, and R. Fowler. An autonomic performance environment for exascale. Supercomputing Frontiers and Innovations, 2015.
Using the LCI parcelport#
Basic information#
The Lightweight Communication Interface (LCI) is an ongoing research project aiming to provide efficient support for applications with irregular and asynchronous communication patterns such as graph analysis, sparse linear algebra, and task-based runtime on modern parallel architectures. Its features include (a) support for more communication primitives such as two-sided send/recv and one-sided (dynamic or direct) remote put/get (b) better multi-threaded performance (c) explicit user control of communication resource (d) flexible signaling mechanisms such as synchronizer, completion queue, and active message handler. It is designed to be a low-level communication library used by high-level libraries and frameworks.
The LCI parcelport is an experimental parcelport. It aims to provide the best possible communication performance on high-performance computation platforms. Compared to the MPI parcelport, it uses much fewer messages and memory copies to transfer an HPX parcel over the network. Its message transmission path involves minimum synchronization points and is almost lock-free. It is expected to be much faster than the MPI parcelport.
Build HPX with the LCI parcelport#
While building HPX, you can specify a set of CMake variables to enable and configure the LCI parcelport. Below, there is a set of the most important and frequently used CMake variables.
- HPX_WITH_PARCELPORT_LCI#
Enable the LCI parcelport. This enables the use of LCI for networking operations in the HPX runtime. The default value is
OFFbecause it’s not available on all systems and/or requires another dependency. However, this experimental parcelport may provide better performance than the MPI parcelport. You must set this variable toONin order to use the LCI parcelport. All the following variables only make sense when this variable is set toON.
- HPX_WITH_FETCH_LCI#
Use FetchContent to fetch LCI. The default value is
OFF. If this option is set toOFF. You need to install your own LCI library and HPX will try to find it using CMakefind_package. You can specify the location of the LCI installation by the environmental variableLCI_ROOT. Refer to the LCI README for how to install LCI. If this option is set toON. HPX will fetch and build LCI for you. You can use the following CMake variables to configure this behavior for your platform.
- HPX_WITH_LCI_TAG#
This variable only takes effect when
HPX_WITH_FETCH_LCIis set toONandFETCHCONTENT_SOURCE_DIR_LCIis not set. HPX will fetch LCI from its github repository. This variable controls the branch/tag LCI will be fetched.
- FETCHCONTENT_SOURCE_DIR_LCI#
This variable only takes effect when
HPX_WITH_FETCH_LCIis set toON. When it is defined,HPX_WITH_LCI_TAGwill be ignored. It accepts a path to a local version of LCI source code and HPX will fetch and build LCI from there. The default value is set conservatively for the stability of HPX, but users are welcome to set this variable tomasterfor potentially better performance.
Run HPX with the LCI parcelport#
We use the same mechanisms as MPI to launch LCI, so you can use the same way you run MPI parcelport to run LCI
parcelport. Typically, it would be hpxrun.py, mpirun, or srun.
hpxrun.py serves as a wrapper for mpirun and srun.
If you are using hpxrun.py, pass -p lci to the scripts. You also need to pass either -r mpi or
-r srun to select the correct run wrapper according to the platform.
If you are using mpirun or srun, you can just pass
--hpx:ini=hpx.parcel.lci.priority=1000, --hpx:ini=hpx.parcel.lci.enable=1, and
--hpx:ini=hpx.parcel.bootstrap=lci to the HPX applications.
The hpxrun.py argument -r none (the default option for the run wrapper) and its corresponding HPX arguments
--hpx:hpx and --hpx:agas do not work for the MPI or the LCI parcelport.
Performance tuning of the LCI parcelport#
We encourage users to set the following environmental variables when using the LCI parcelport to get better performance.
$ export LCI_SERVER_MAX_SENDS=1024
$ export LCI_SERVER_MAX_RECVS=4096
$ export LCI_SERVER_NUM_PKTS=65536
$ export LCI_SERVER_MAX_CQES=65536
$ export LCI_PACKET_SIZE=12288
This setting needs roughly 800MB memory per process. The memory consumption mainly comes from the packets, which can be calculated using LCI_SERVER_NUM_PKTS x LCI_PACKET_SIZE.
In addition, users can tune the following command-line options when using the LCI parcelport to get better performance.
- --hpx:ini=hpx.parcel.lci.ndevices=<int>#
The number of LCI devices to use. The default value is 2. An LCI device represents a collection of network resources. More devices lead to lower thread contention, but too many devices may lead to load imbalance or hardware overhead.
- --hpx:ini=hpx.parcel.lci.progress_type=<worker|rp>#
The way to progress the LCI device. The default value is
worker. Theworkeroption uses all worker threads to progress the LCI devices. Therpoption uses dedicated pinned threads to progress the LCI devices. Normally, theworkeroption gives better performance, but therpoption has been observed with better performance on some clusters with prior generation of InfiniBand hardware.
Reference#
Yan, Jiakun, Hartmut Kaiser, and Marc Snir. Understanding the Communication Needs of Asynchronous Many-Task Systems–A Case Study of HPX+ LCI. arXiv preprint, 2025.
Yan, Jiakun, and Marc Snir. LCI: a Lightweight Communication Interface for Efficient Asynchronous Multithreaded Communication. The International Conference for High Performance Computing, Networking, Storage, and Analysis (SC), 2025.
Using the LCW parcelport#
Basic information#
The LCW parcelport is an advanced MPI parcelport that can utilize the MPICH VCI and Continuation extensions. The exact MPI implementation is wrapped in a thin wrapper layer (the Lightweight Communication Wrapper, or LCW). This wrapper provides an active message, send/recv, completion queue, and device abstraction on top of MPI (with/without extensions), GASNet-EX, and LCI. The GASNet-EX backend of LCW cannot be used in HPX for now, as it lacks send/recv support.
Build HPX with the LCW parcelport#
While building HPX, you can specify a set of CMake variables to enable and configure the LCW parcelport. Below, there is a set of the most important and frequently used CMake variables.
- HPX_WITH_PARCELPORT_LCW#
Enable the LCW parcelport. This enables the use of LCW for networking operations in the HPX runtime. The default value is
OFFbecause it’s not available on all systems and/or requires another dependency. You must set this variable toONin order to use the LCW parcelport. All the following variables only make sense when this variable is set toON.
- HPX_WITH_FETCH_LCW#
Use FetchContent to fetch LCW. The default value is
OFF. If this option is set toOFF. You need to install your own LCW library and HPX will try to find it using CMakefind_package. You can specify the location of the LCW installation by the environmental variableLCW_ROOT. Refer to the LCW README for how to install LCW. If this option is set toON. HPX will fetch and build LCW for you. You can use the following CMake variables to configure this behavior for your platform.
- HPX_WITH_LCW_TAG#
This variable only takes effect when
HPX_WITH_FETCH_LCWis set toONandFETCHCONTENT_SOURCE_DIR_LCWis not set. HPX will fetch LCW from its github repository. This variable controls the branch/tag LCW will be fetched.
- FETCHCONTENT_SOURCE_DIR_LCW#
This variable only takes effect when
HPX_WITH_FETCH_LCWis set toON. When it is defined,HPX_WITH_LCW_TAGwill be ignored. It accepts a path to a local version of LCW source code and HPX will fetch and build LCW from there.
Run HPX with the LCW parcelport#
You can configure runtime behavior with the following options.
- --hpx:ini=hpx.parcel.lcw.ndevices=<n>#
The number of LCW devices to use (default: 2). Each LCW device maps to an MPI communicator or an LCI device. When the MPICH VCI extension is enabled, each MPI communicator will be mapped to a dedicated collection of network resources. More devices lead to lower thread contention, but too many devices may lead to load imbalance or hardware overhead.
Reference#
Yan, Jiakun, Marc Snir, and Yanfei Guo. Examining MPI and its Extensions for Asynchronous Multithreaded Communication. In European MPI Users’ Group Meeting, pp. 122-142. Cham: Springer Nature Switzerland, 2025.
HPX runtime and resources#
HPX thread scheduling policies#
The HPX runtime has six thread scheduling policies: local-priority,
static-priority, local, static, local-workrequesting-fifo, and abp-priority.
These policies can be specified from the command line using the command line
option --hpx:queuing. In order to use a particular scheduling policy,
the runtime system must be built with the appropriate scheduler flag turned on
(e.g. cmake -DHPX_THREAD_SCHEDULERS=local, see CMake options for
more information).
Priority local scheduling policy (default policy)#
The priority local scheduling policy maintains one queue per operating system
(OS) thread. The OS thread pulls its work from this queue. By default the number
of high priority queues is equal to the number of OS threads; the number of high
priority queues can be specified on the command line using
--hpx:high-priority-threads. High priority threads are executed by any
of the OS threads before any other work is executed. When a queue is empty, work
will be taken from high priority queues first. There is one low priority queue
from which threads will be scheduled only when there is no other work.
For this scheduling policy there is an option to turn on NUMA sensitivity using
the command line option --hpx:numa-sensitive. When NUMA sensitivity is
turned on, work stealing is done from queues associated with the same NUMA domain
first, only after that work is stolen from other NUMA domains.
This scheduler is enabled at build time by default using the FIFO
(first-in-first-out) queueing policy. This policy can be invoked using
--hpx:queuinglocal-priority-fifo. The scheduler can also be
enabled using the LIFO (last-in-first-out) policy. This is not the default
policy and must be invoked using the command line option
--hpx:queuinglocal-priority-lifo.
Static priority scheduling policy#
invoke using:
--hpx:queuingstatic-priority(or-qs)
The static scheduling policy maintains one queue per OS thread from which each OS thread pulls its tasks (user threads). Threads are distributed in a round robin fashion. There is no thread stealing in this policy.
Local scheduling policy#
invoke using:
--hpx:queuinglocal(or-ql)flag to turn on for build:
HPX_THREAD_SCHEDULERS=allorHPX_THREAD_SCHEDULERS=local
The local scheduling policy maintains one queue per OS thread from which each OS thread pulls its tasks (user threads).
Static scheduling policy#
invoke using:
--hpx:queuingstaticflag to turn on for build:
HPX_THREAD_SCHEDULERS=allorHPX_THREAD_SCHEDULERS=static
The static scheduling policy maintains one queue per OS thread from which each OS thread pulls its tasks (user threads). Threads are distributed in a round robin fashion. There is no thread stealing in this policy.
Priority ABP scheduling policy#
invoke using:
--hpx:queuingabp-priority-fifoflag to turn on for build:
HPX_THREAD_SCHEDULERS=allorHPX_THREAD_SCHEDULERS=abp-priority
Priority ABP policy maintains a double ended lock free queue for each OS thread.
By default the number of high priority queues is equal to the number of OS
threads; the number of high priority queues can be specified on the command line
using --hpx:high-priority-threads. High priority threads are executed
by the first OS threads before any other work is executed. When a queue is empty
work will be taken from high priority queues first. There is one low priority
queue from which threads will be scheduled only when there is no other work. For
this scheduling policy there is an option to turn on NUMA sensitivity using the
command line option --hpx:numa-sensitive. When NUMA sensitivity
is turned on work stealing is done from queues associated with the same NUMA
domain first, only after that work is stolen from other NUMA domains.
This scheduler can be used with two underlying queuing policies (FIFO:
first-in-first-out, and LIFO: last-in-first-out). In order to use the LIFO
policy use the command line option
--hpx:queuingabp-priority-lifo.
Work requesting scheduling policies#
invoke using:
--hpx:queuinglocal-workrequesting-fifo, using--hpx:queuinglocal-workrequesting-lifo, or using--hpx:queuinglocal-workrequesting-mc
The work-requesting policies rely on a different mechanism of balancing work between cores (compared to the other policies listed above). Instead of actively trying to steal work from other cores, requesting work relies on a less disruptive mechanism. If a core runs out of work, instead of actively looking at the queues of neighboring cores, in this case a request is posted to another core. This core now (whenever it is not busy with other work) either responds to the original core by sending back work or passes the request on to the next possible core in the system. In general, this scheme avoids contention on the work queues as those are always accessed by their own cores only.
The HPX resource partitioner#
The HPX resource partitioner lets you take the execution resources available
on a system—processing units, cores, and numa domains—and assign them to
thread pools. By default HPX creates a single thread pool name default.
While this is good for most use cases, the resource partitioner lets you create
multiple thread pools with custom resources and options.
Creating custom thread pools is useful for cases where you have tasks which absolutely need to run without interference from other tasks. An example of this is when using MPI for distribution instead of the built-in mechanisms in HPX (useful in legacy applications). In this case one can create a thread pool containing a single thread for MPI communication. MPI tasks will then always run on the same thread, instead of potentially being stuck in a queue behind other threads.
Note that HPX thread pools are completely independent from each other in the sense that task stealing will never happen between different thread pools. However, tasks running on a particular thread pool can schedule tasks on another thread pool.
Note
It is simpler in some situations to schedule important tasks with high priority instead of using a separate thread pool.
Using the resource partitioner#
The hpx::resource::partitioner is now created during HPX runtime
initialization without explicit action needed from the user. To specify some of
the initialization parameters you can use the hpx::init_params.
The resource partitioner callback is the interface to add thread pools to the
HPX runtime and to assign resources to the thread pools. In order to create
custom thread pools you can specify the resource partitioner callback
hpx::init_params::rp_callback which will be called once the
resource partitioner will be created , see the example below. You can also
specify other parameters, see hpx::init_params.
To add a thread pool use the
hpx::resource::partitioner::create_thread_pool method. If you
simply want to use the default scheduler and scheduler options, it is enough to
call rp.create_thread_pool("my-thread-pool").
Then, to add resources to the thread pool you can use the
hpx::resource::partitioner::add_resource method. The resource
partitioner exposes the hardware topology retrieved using Portable Hardware Locality (HWLOC) and lets you
iterate through the topology to add the wanted processing units to the thread
pool. Below is an example of adding all processing units from the first NUMA
domain to a custom thread pool, unless there is only one NUMA domain in which
case we leave the first processing unit for the default thread pool:
Note
Whatever processing units are not assigned to a thread pool by the time
hpx::init is called will be added to the default thread pool. It
is also possible to explicitly add processing units to the default thread
pool, and to create the default thread pool manually (in order to e.g. set
the scheduler type).
Tip
The command line option --hpx:print-bind is useful for checking
that the thread pools have been set up the way you expect.
Difference between the old and new version#
In the old version, you had to create an instance of the
resource_partitioner with argc and argv.
int main(int argc, char** argv)
{
hpx::resource::partitioner rp(argc, argv);
hpx::init();
}
From HPX 1.5.0 onwards, you just pass argc and argv to hpx::init()
or hpx::start() for the binding options to be parsed by the resource
partitioner.
int main(int argc, char** argv)
{
hpx::init_params init_args;
hpx::init(argc, argv, init_args);
}
In the old version, when creating a custom thread pool, you just called the utilities on the resource partitioner instantiated previously.
int main(int argc, char** argv)
{
hpx::resource::partitioner rp(argc, argv);
rp.create_thread_pool("my-thread-pool");
bool one_numa_domain = rp.numa_domains().size() == 1;
bool skipped_first_pu = false;
hpx::resource::numa_domain const& d = rp.numa_domains()[0];
for (const hpx::resource::core& c : d.cores())
{
for (const hpx::resource::pu& p : c.pus())
{
if (one_numa_domain && !skipped_first_pu)
{
skipped_first_pu = true;
continue;
}
rp.add_resource(p, "my-thread-pool");
}
}
hpx::init();
}
You now specify the resource partitioner callback which will tie the resources to the resource partitioner created during runtime initialization.
void init_resource_partitioner_handler(hpx::resource::partitioner& rp)
{
rp.create_thread_pool("my-thread-pool");
bool one_numa_domain = rp.numa_domains().size() == 1;
bool skipped_first_pu = false;
hpx::resource::numa_domain const& d = rp.numa_domains()[0];
for (const hpx::resource::core& c : d.cores())
{
for (const hpx::resource::pu& p : c.pus())
{
if (one_numa_domain && !skipped_first_pu)
{
skipped_first_pu = true;
continue;
}
rp.add_resource(p, "my-thread-pool");
}
}
}
int main(int argc, char* argv[])
{
hpx::init_params init_args;
init_args.rp_callback = &init_resource_partitioner_handler;
hpx::init(argc, argv, init_args);
}
Advanced usage#
It is possible to customize the built in schedulers by passing scheduler options
to hpx::resource::partitioner::create_thread_pool. It is also possible
to create and use custom schedulers.
Note
It is not recommended to create your own scheduler. The HPX developers use
this to experiment with new scheduler designs before making them available to
users via the standard mechanisms of choosing a scheduler (command line
options). If you would like to experiment with a custom scheduler the
resource partitioner example shared_priority_queue_scheduler.cpp contains
a fully implemented scheduler with logging, etc. to make exploration easier.
To choose a scheduler and custom mode for a thread pool, pass additional options when creating the thread pool like this:
rp.create_thread_pool("my-thread-pool",
hpx::resource::policies::local_priority_lifo,
hpx::policies::scheduler_mode(
hpx::policies::scheduler_mode::default |
hpx::policies::scheduler_mode::enable_elasticity));
The available schedulers are documented here:
hpx::resource::scheduling_policy, and the available scheduler modes
here: hpx::threads::policies::scheduler_mode. Also see the examples
folder for examples of advanced resource partitioner usage:
simple_resource_partitioner.cpp and
oversubscribing_resource_partitioner.cpp.
Executors#
Executors in HPX provide a flexible way to control how, when, and where tasks are executed. Instead of manually creating threads or managing thread pools, you can hand your tasks to an executor, and it takes care of the details of running them.
This page introduces the concept of executors, the main types available in HPX, and how to create custom executors.
What is an executor?#
An executor is an abstraction that separates the what from the how of task execution:
What: the work to be performed (e.g. a function or task).
How: whether the task runs synchronously, asynchronously, or in parallel across multiple cores.
By using executors, you can switch between execution strategies without rewriting your algorithms. HPX provides a rich set of executors with a unified API.
Main Executors in HPX#
HPX provides multiple executors. Below are three of the most commonly used:
Parallel Executor#
Default in HPX.
Creates a new HPX thread for every scheduled task.
Works well for large tasks, but frequent small tasks incur overhead due to thread creation/destruction.
#include <hpx/execution.hpp>
#include <hpx/algorithm.hpp>
#include <vector>
std::vector<int> data(100, 1);
hpx::for_each(
hpx::execution::par,
data.begin(), data.end(),
[](int &x) {
x += 1;
}
);
Fork-Join Executor#
Spawns one thread per CPU core when created.
Threads are reused across tasks, avoiding repeated creation costs.
Efficient for workloads with many sequential parallel regions.
May waste resources if parallel work is limited.
#include <hpx/execution.hpp>
#include <hpx/algorithm.hpp>
#include <vector>
std::vector<int> data(100, 1);
hpx::execution::experimental::fork_join_executor exec;
hpx::for_each(
hpx::execution::par.on(exec),
data.begin(), data.end(),
[](int &x) {
x += 1;
}
);
Sequential Executor#
Executes all tasks synchronously on the calling thread.
Useful for debugging (deterministic execution) or when parallelism brings no benefit.
Maintains the same executor-based API while running tasks sequentially.
#include <hpx/execution.hpp>
#include <hpx/algorithm.hpp>
#include <vector>
std::vector<int> data(100, 1);
hpx::execution::sequenced_executor seq_exec;
hpx::for_each(
hpx::execution::seq.on(seq_exec),
data.begin(), data.end(),
[](int &x) { x += 1; }
);
Executors in real-world applications#
A practical example is the LULESH mini-application (a hydrodynamics benchmark).
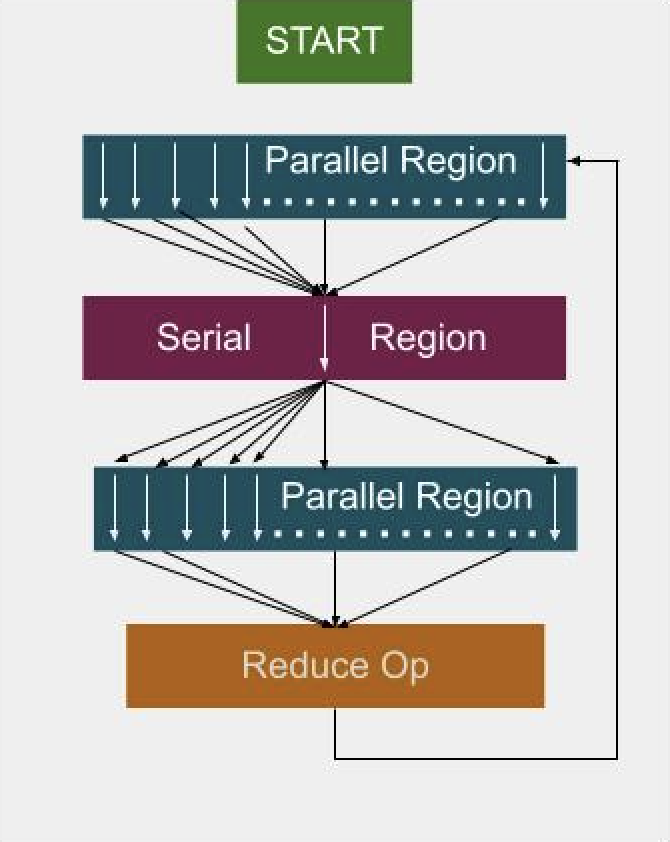
Fig. 9 Parallel executor: creates and destroys threads for each loop.#
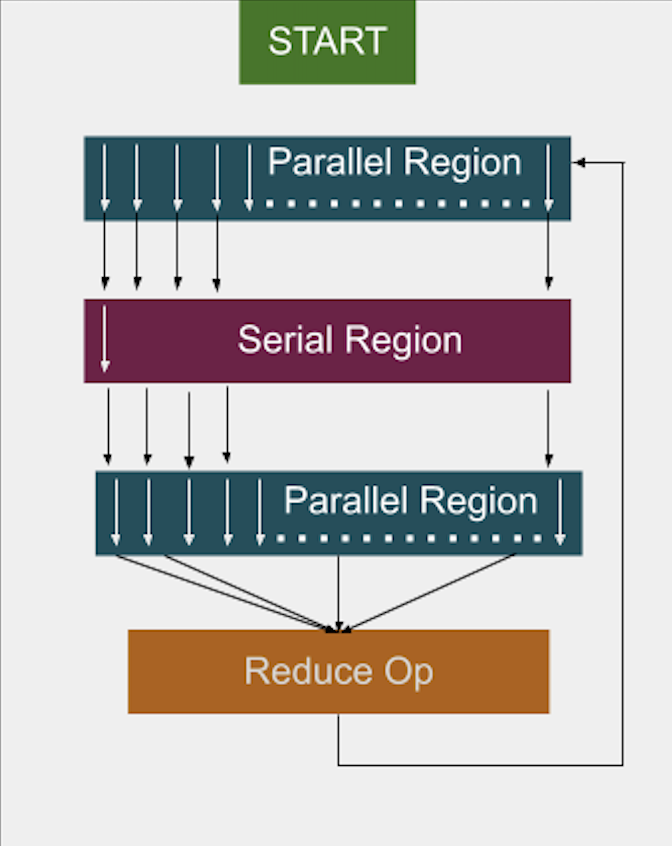
Fig. 10 Fork-join executor: reuses threads across loops.#
With the parallel executor, each parallel loop creates and destroys new threads, introducing overhead.
With the fork-join executor, threads are created once and reused across loops, reducing overhead and improving performance.
In studies, the fork-join executor achieved significant speedups, in some cases more than twice as fast as traditional OpenMP implementations.
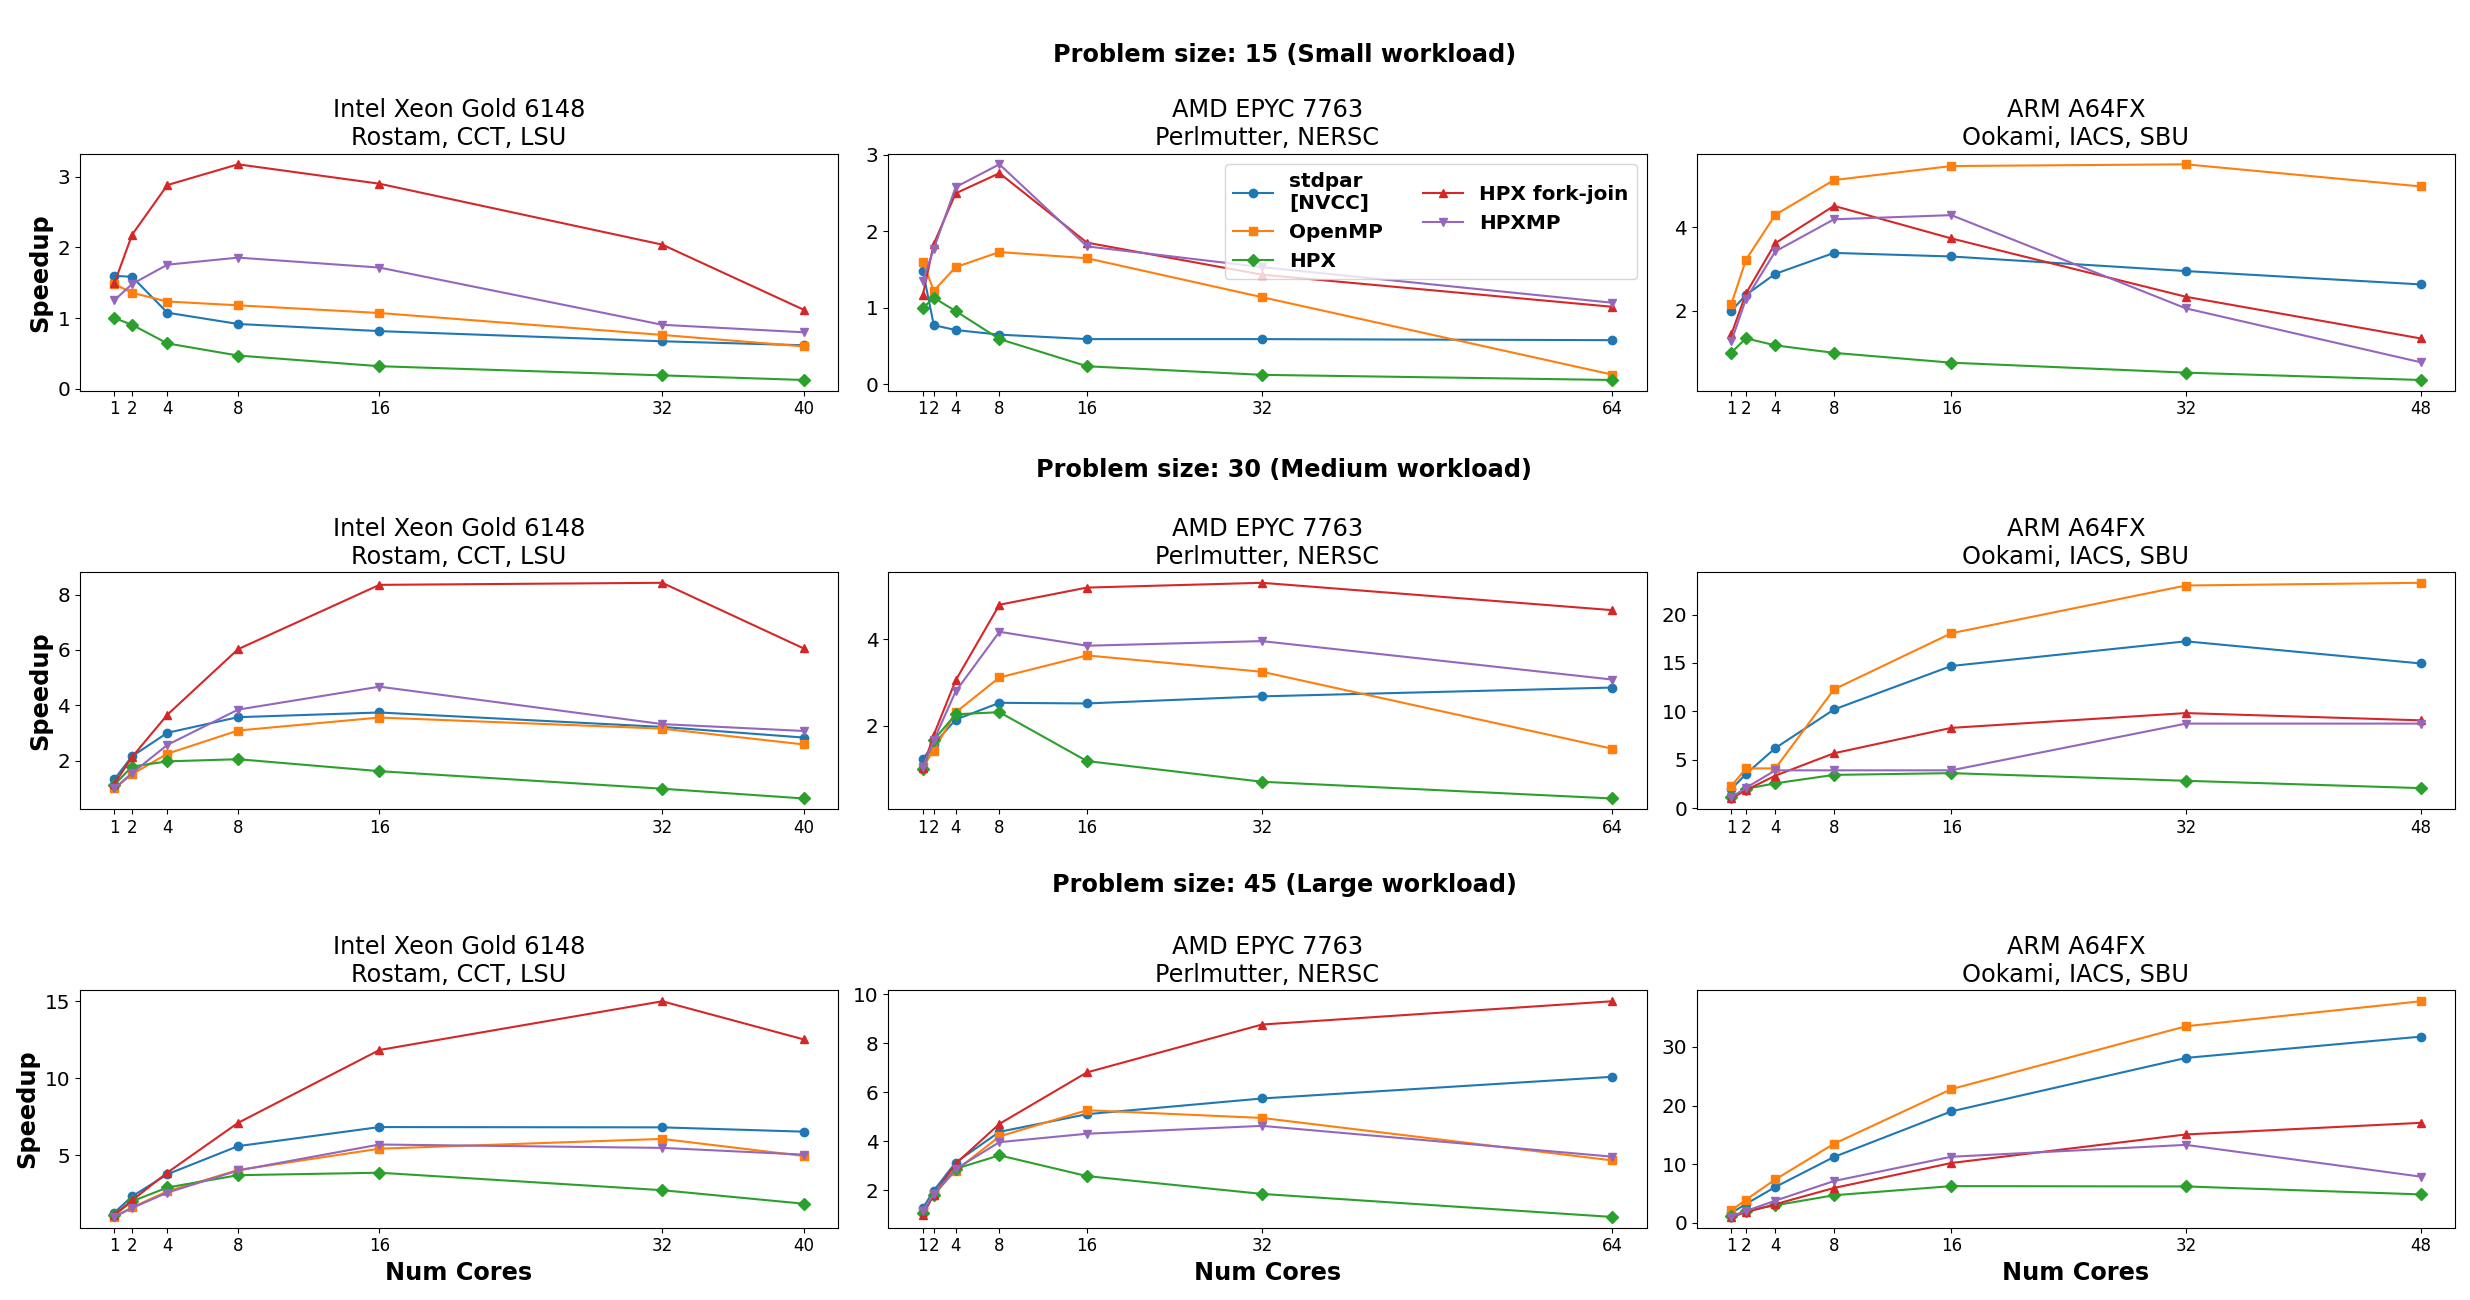
Fig. 11 Performance comparison between executors in the LULESH benchmark.#
Custom executors#
While HPX provides a variety of built-in executors, you may sometimes need to adapt task execution to your own requirements. This is where custom executors come in. By writing a small wrapper around an existing executor, you can extend its behavior?for example, to add logging, profiling information, or special scheduling rules?while still taking advantage of the HPX executor API.
Custom annotating executor#
The following example shows how to implement a simple executor that annotates tasks with a string label for easier debugging and profiling.
Note
Annotations do not affect how tasks run or what results they produce. Their main purpose is to give human-readable names to tasks so that they can be identified in profilers, and debuggers.
#include <hpx/hpx_main.hpp>
#include <hpx/include/parallel_executors.hpp>
#include <hpx/include/async.hpp>
#include <hpx/execution.hpp>
#include <hpx/modules/async_base.hpp>
#include <hpx/modules/threading_base.hpp>
#include <iostream>
#include <string>
#include <utility>
template <typename BaseExecutor>
struct simple_annotating_executor
{
BaseExecutor base_;
const char* annotation_;
simple_annotating_executor(BaseExecutor exec, const char* ann)
: base_(std::move(exec)), annotation_(ann)
{}
// Non-blocking one-way executor
template <typename F, typename... Ts>
friend void tag_invoke(hpx::parallel::execution::post_t,
simple_annotating_executor const& exec,
F&& f, Ts&&... ts)
{
hpx::post(
hpx::annotated_function(std::forward<F>(f), exec.annotation_),
std::forward<Ts>(ts)...);
}
// Synchronous execution
template <typename F, typename... Ts>
friend auto tag_invoke(hpx::parallel::execution::sync_execute_t,
simple_annotating_executor const& exec,
F&& f, Ts&&... ts)
{
return hpx::parallel::execution::sync_execute(
exec.base_,
hpx::annotated_function(std::forward<F>(f), exec.annotation_),
std::forward<Ts>(ts)...);
}
};
// Example functions
int compute_square(int x)
{
std::cout << "[sync_execute] Running task with annotation\n";
return x * x;
}
void say_hello()
{
std::cout << "[post] Running task with annotation\n";
}
int main()
{
simple_annotating_executor exec(hpx::execution::parallel_executor{}, "my_custom_task");
// Synchronous execution
int result = hpx::parallel::execution::sync_execute(exec, &compute_square, 7);
std::cout << "Result from sync_execute: " << result << "\n";
// Post a task
hpx::parallel::execution::post(exec, &say_hello);
return 0;
}
The first lines pull in the necessary HPX headers for executors, asynchronous execution, and annotated functions. The key one here is hpx/threading_base/annotated_function.hpp, which provides the facility to tag tasks with a string label. We then define a simple_annotating_executor that wraps another executor and associates an annotation string with every task:
template <typename BaseExecutor>
struct simple_annotating_executor
{
BaseExecutor base_;
const char* annotation_;
simple_annotating_executor(BaseExecutor exec, const char* ann)
: base_(std::move(exec)), annotation_(ann)
{}
};
The post customization schedules a task to run asynchronously. We wrap the task in hpx::annotated_function so that it carries the annotation. Executors in HPX customize these operations through tag_invoke overloads, which are selected by special tag objects like post_t` and sync_execute_t. This is why the executor interface may look different from a normal member function API.
template <typename F, typename... Ts>
friend void tag_invoke(hpx::parallel::execution::post_t,
simple_annotating_executor const& exec,
F&& f, Ts&&... ts)
{
hpx::post(
hpx::annotated_function(std::forward<F>(f), exec.annotation_),
std::forward<Ts>(ts)...);
}
The sync_execute customization runs a task immediately and returns the result. Again, we wrap the function with an annotation before executing. The key difference is that post schedules a task in a fire-and-forget style (no result is returned), while sync_execute blocks until the task finishes and gives you the result back.
template <typename F, typename... Ts>
friend auto tag_invoke(hpx::parallel::execution::sync_execute_t,
simple_annotating_executor const& exec,
F&& f, Ts&&... ts)
{
return hpx::parallel::execution::sync_execute(
exec.base_,
hpx::annotated_function(std::forward<F>(f), exec.annotation_),
std::forward<Ts>(ts)...);
}
Note how we delegate the actual execution to exec.base_, the underlying executor. This makes the custom executor lightweight: it only adds annotations, while leaving the scheduling strategy to the base executor (here, a parallel_executor).
We define two simple functions to demonstrate both synchronous and asynchronous execution: These functions also print to std::cout, but this output is not the actual annotation. Annotations are stored internally by HPX and become visible when you use debugging or profiling tools.
int compute_square(int x)
{
std::cout << "[sync_execute] Running task with annotation\n";
return x * x;
}
void say_hello()
{
std::cout << "[post] Running task with annotation\n";
}
Finally, in main we create the executor with a base executor and annotation string. We then run one task with sync_execute (blocking, returns result) and one with post (asynchronous, fire-and-forget). You can also create multiple annotating executors with different strings, so each task gets its own label. This is especially useful in larger applications with many different kinds of tasks, where annotations make it much easier to trace what is happening.
int main()
{
simple_annotating_executor exec(hpx::execution::parallel_executor{}, "my_custom_task");
// Synchronous execution
int result = hpx::parallel::execution::sync_execute(exec, &compute_square, 7);
std::cout << "Result from sync_execute: " << result << "\n";
// Post a task
hpx::parallel::execution::post(exec, &say_hello);
return 0;
}
Custom annotating executor with parallel algorithms#
The following example demonstrates how to use a custom annotating executor with HPX parallel algorithms, such as for_each. This allows you to attach annotations to tasks while executing them in parallel.
#include <hpx/execution.hpp>
#include <hpx/hpx_main.hpp>
#include <hpx/include/parallel_algorithm.hpp>
#include <hpx/include/parallel_executors.hpp>
#include <hpx/modules/threading_base.hpp>
#include <iostream>
#include <utility>
#include <vector>
template <typename BaseExecutor>
struct simple_annotating_executor
{
BaseExecutor base_;
char const* annotation_;
using execution_category =
hpx::traits::executor_execution_category_t<BaseExecutor>;
simple_annotating_executor(BaseExecutor exec, char const* ann)
: base_(std::move(exec))
, annotation_(ann)
{
}
// Bulk async_execute (used by parallel algorithms)
template <typename F, typename Shape, typename... Ts>
friend auto tag_invoke(hpx::parallel::execution::bulk_async_execute_t,
simple_annotating_executor const& exec, F&& f, Shape const& shape,
Ts&&... ts)
{
return hpx::parallel::execution::bulk_async_execute(
exec.base_,
hpx::annotated_function(std::forward<F>(f), exec.annotation_),
shape, std::forward<Ts>(ts)...);
}
};
namespace hpx::execution::experimental {
// The annotating executor exposes the same executor categories as its
// underlying (wrapped) executor.
template <typename BaseExecutor>
struct is_two_way_executor<simple_annotating_executor<BaseExecutor>>
: is_two_way_executor<BaseExecutor>
{
};
} // namespace hpx::execution::experimental
int main()
{
using base_executor = hpx::execution::parallel_executor;
simple_annotating_executor exec(base_executor{}, "for_each_task");
std::vector<int> data = {1, 2, 3, 4, 5};
// Use the custom executor with a parallel algorithm
hpx::for_each(hpx::execution::par.on(exec), // attach executor
data.begin(), data.end(), [](int& x) {
std::cout << "Processing " << x << " on thread "
<< hpx::get_worker_thread_num() << "\n";
x *= x;
});
std::cout << "Squared values: ";
for (int v : data)
std::cout << v << " ";
std::cout << "\n";
return 0;
}
Similar as before, the first lines pull in the necessary HPX headers for executors, asynchronous execution, and annotated functions. The key one here is hpx/threading_base/annotated_function.hpp, which provides the facility to tag tasks with a string label. We then define a simple_annotating_executor that wraps another executor and associates an annotation string with every task:
template <typename BaseExecutor>
struct simple_annotating_executor
{
BaseExecutor base_;
const char* annotation_;
using execution_category =
hpx::traits::executor_execution_category_t<BaseExecutor>;
simple_annotating_executor(BaseExecutor exec, const char* ann)
: base_(std::move(exec)), annotation_(ann)
{}
};
Note that we expose the execution category of the custom executor with using execution_category = hpx::traits::executor_execution_category_t<BaseExecutor>. We inherit the execution category from the underlying executor (BaseExecutor`), which ensures that our simple_annotating_executor behaves like the base executor in terms of parallelism and task execution capabilities.
The bulk_async_execute customization schedules a set of tasks to run asynchronously. We wrap each task in hpx::annotated_function so that it carries the annotation. Executors in HPX customize these operations through tag_invoke overloads, which are selected by special tag objects like bulk_async_execute_t. This is why the executor interface may look different from a normal member function API - it uses tag dispatch to integrate seamlessly with the HPX parallel algorithms infrastructure.
template <typename F, typename Shape, typename... Ts>
friend auto tag_invoke(hpx::parallel::execution::bulk_async_execute_t,
simple_annotating_executor const& exec, F&& f, Shape const& shape,
Ts&&... ts)
{
return hpx::parallel::execution::bulk_async_execute(
exec.base_,
hpx::annotated_function(std::forward<F>(f), exec.annotation_),
shape, std::forward<Ts>(ts)...);
}
Note how we delegate the actual execution to exec.base_, the underlying executor. This makes the custom executor lightweight: it only adds annotations, while leaving the scheduling strategy to the base executor (here, a parallel_executor).
The hpx::execution::experimental namespace contains traits that describe executor capabilities, such as whether an executor can run tasks one-way, two-way, or never-blocking. These traits are used internally by HPX to verify that an executor is compatible with a given parallel algorithm or execution policy.
namespace hpx::execution::experimental {
// The annotating executor exposes the same executor categories as its
// underlying (wrapped) executor.
template <typename BaseExecutor>
struct is_never_blocking_one_way_executor<
simple_annotating_executor<BaseExecutor>>
: is_never_blocking_one_way_executor<BaseExecutor>
{
};
template <typename BaseExecutor>
struct is_one_way_executor<simple_annotating_executor<BaseExecutor>>
: is_one_way_executor<BaseExecutor>
{
};
template <typename BaseExecutor>
struct is_two_way_executor<simple_annotating_executor<BaseExecutor>>
: is_two_way_executor<BaseExecutor>
{
};
}
is_never_blocking_one_way_executor indicates whether the executor can schedule tasks in a fire-and-forget style without blocking.
is_one_way_executor indicates support for one-way execution (tasks can be scheduled but no result is returned).
is_two_way_executor indicates support for two-way execution (tasks return a result or a future).
In all cases, the custom executor inherits the capabilities of the base executor, so it integrates seamlessly with HPX algorithms.
This design ensures that simple_annotating_executor can be used anywhere its underlying executor could be used, while still adding the annotation functionality. It keeps the custom executor lightweight and fully compatible with the parallel algorithms infrastructure.
In main, we create the executor with a base executor and an annotation string, and then use it with a parallel algorithm:
int main()
{
using base_executor = hpx::execution::parallel_executor;
simple_annotating_executor exec(base_executor{}, "for_each_task");
std::vector<int> data = {1, 2, 3, 4, 5};
// Use the custom executor with a parallel algorithm
hpx::for_each(hpx::execution::par.on(exec), // attach executor
data.begin(), data.end(), [](int& x) {
std::cout << "Processing " << x << " on thread "
<< hpx::get_worker_thread_num() << "\n";
x *= x;
});
std::cout << "Squared values: ";
for (int v : data)
std::cout << v << " ";
std::cout << "\n";
return 0;
}
First, we create a base executor (parallel_executor) and wrap it in our simple_annotating_executor, providing an annotation string “for_each_task”. This custom executor will attach the annotation to every task it schedules, while delegating actual execution to the base executor.
We then use hpx::for_each with a parallel execution policy and attach our custom executor using par.on(exec): * hpx::execution::par.on(exec) attaches our custom executor to the algorithm. * for_each internally partitions the work across threads and schedules each task using bulk_async_execute. * Each task is annotated with “for_each_task”, visible in debuggers and profilers. * The results of the parallel computation are stored in the data vector, demonstrating that the algorithm
executed successfully in parallel.
This pattern is especially useful in larger applications with many tasks, as annotations make it much easier to trace and debug the execution of parallel algorithms.
Error handling#
Like in any other asynchronous invocation scheme, it is important to be able to handle error conditions occurring while the asynchronous (and possibly remote) operation is executed. In HPX all error handling is based on standard C++ exception handling. Any exception thrown during the execution of an asynchronous operation will be transferred back to the original invocation locality, where it will be rethrown during synchronization with the calling thread.
The source code for this example can be found here:
error_handling.cpp.
Working with exceptions#
For the following description assume that the function raise_exception()
is executed by invoking the plain action raise_exception_type.
void raise_exception()
{
HPX_THROW_EXCEPTION(
hpx::error::no_success, "raise_exception", "simulated error");
}
HPX_PLAIN_ACTION(raise_exception, raise_exception_action)
The exception is thrown using the macro HPX_THROW_EXCEPTION. The type
of the thrown exception is hpx::exception. This associates
additional diagnostic information with the exception, such as file name and line
number, locality id and thread id, and stack backtrace from the point
where the exception was thrown.
Any exception thrown during the execution of an action is transferred back to
the (asynchronous) invocation site. It will be rethrown in this context when the
calling thread tries to wait for the result of the action by invoking either
future<>::get() or the synchronous action invocation wrapper as shown here:
Note
The exception is transferred back to the invocation site even if it is executed on a different locality.
Additionally, this example demonstrates how an exception thrown by an (possibly
remote) action can be handled. It shows the use of
hpx::diagnostic_information, which retrieves all available diagnostic
information from the exception as a formatted string. This includes, for
instance, the name of the source file and line number, the sequence number of
the OS thread and the HPX thread id, the locality id and the stack
backtrace of the point where the original exception was thrown.
Under certain circumstances it is desirable to output only some of the diagnostics, or to output those using different formatting. For this case, HPX exposes a set of lower-level functions as demonstrated in the following code snippet:
Working with error codes#
Most of the API functions exposed by HPX can be invoked in two different
modes. By default those will throw an exception on error as described above.
However, sometimes it is desirable not to throw an exception in case of an error
condition. In this case an object instance of the hpx::error_code
type can be passed as the last argument to the API function. In case of an error,
the error condition will be returned in that hpx::error_code
instance. The following example demonstrates extracting the full diagnostic
information without exception handling:
hpx::cout << "Error reporting using error code\n";
// Create a new error_code instance.
hpx::error_code ec;
// If an instance of an error_code is passed as the last argument while
// invoking the action, the function will not throw in case of an error
// but store the error information in this error_code instance instead.
raise_exception_action do_it;
do_it(hpx::find_here(), ec);
if (ec)
{
// Print just the essential error information.
hpx::cout << "returned error: " << ec.get_message() << "\n";
// Print all of the available diagnostic information as stored with
// the exception.
hpx::cout << "diagnostic information:"
<< hpx::diagnostic_information(ec) << "\n";
}
hpx::cout << std::flush;
Note
The error information is transferred back to the invocation site even if it is executed on a different locality.
This example show how an error can be handled without having to resolve to
exceptions and that the returned hpx::error_code instance can be
used in a very similar way as the hpx::exception type above. Simply
pass it to the hpx::diagnostic_information, which retrieves all
available diagnostic information from the error code instance as a formatted
string.
As for handling exceptions, when working with error codes, under certain circumstances it is desirable to output only some of the diagnostics, or to output those using different formatting. For this case, HPX exposes a set of lower-level functions usable with error codes as demonstrated in the following code snippet:
hpx::cout << "Detailed error reporting using error code\n";
// Create a new error_code instance.
hpx::error_code ec;
// If an instance of an error_code is passed as the last argument while
// invoking the action, the function will not throw in case of an error
// but store the error information in this error_code instance instead.
raise_exception_action do_it;
do_it(hpx::find_here(), ec);
if (ec)
{
// Print the elements of the diagnostic information separately.
hpx::cout << "{what}: " << hpx::get_error_what(ec) << "\n";
hpx::cout << "{locality-id}: " << hpx::get_error_locality_id(ec)
<< "\n";
hpx::cout << "{hostname}: " << hpx::get_error_host_name(ec)
<< "\n";
hpx::cout << "{pid}: " << hpx::get_error_process_id(ec) << "\n";
hpx::cout << "{function}: " << hpx::get_error_function_name(ec)
<< "\n";
hpx::cout << "{file}: " << hpx::get_error_file_name(ec) << "\n";
hpx::cout << "{line}: " << hpx::get_error_line_number(ec)
<< "\n";
hpx::cout << "{os-thread}: " << hpx::get_error_os_thread(ec)
<< "\n";
hpx::cout << "{thread-id}: " << std::hex
<< hpx::get_error_thread_id(ec) << "\n";
hpx::cout << "{thread-description}: "
<< hpx::get_error_thread_description(ec) << "\n\n";
hpx::cout << "{state}: " << std::hex << hpx::get_error_state(ec)
<< "\n";
hpx::cout << "{stack-trace}: " << hpx::get_error_backtrace(ec)
<< "\n";
hpx::cout << "{env}: " << hpx::get_error_env(ec) << "\n";
}
hpx::cout << std::flush;
For more information please refer to the documentation of
hpx::get_error_what, hpx::get_error_locality_id,
hpx::get_error_host_name, hpx::get_error_process_id,
hpx::get_error_function_name, hpx::get_error_file_name,
hpx::get_error_line_number, hpx::get_error_os_thread,
hpx::get_error_thread_id,
hpx::get_error_thread_description,
hpx::get_error_backtrace, hpx::get_error_env, and
hpx::get_error_state.
Lightweight error codes#
Sometimes it is not desirable to collect all the ambient information about the error at the point where it happened as this might impose too much overhead for simple scenarios. In this case, HPX provides a lightweight error code facility that will hold the error code only. The following snippet demonstrates its use:
hpx::cout << "Error reporting using an lightweight error code\n";
// Create a new error_code instance.
hpx::error_code ec(hpx::throwmode::lightweight);
// If an instance of an error_code is passed as the last argument while
// invoking the action, the function will not throw in case of an error
// but store the error information in this error_code instance instead.
raise_exception_action do_it;
do_it(hpx::find_here(), ec);
if (ec)
{
// Print just the essential error information.
hpx::cout << "returned error: " << ec.get_message() << "\n";
// Print all of the available diagnostic information as stored with
// the exception.
hpx::cout << "error code:" << ec.value() << "\n";
}
hpx::cout << std::flush;
All functions that retrieve other diagnostic elements from the
hpx::error_code will fail if called with a lightweight error_code
instance.
The HPX I/O-streams component#
The HPX I/O-streams subsystem extends the standard C++ output streams
std::cout and std::cerr to work in the distributed setting of an HPX
application. All of the output streamed to hpx::cout will be dispatched to
std::cout on the console locality. Likewise, all output generated
from hpx::cerr will be dispatched to std::cerr on the console
locality.
Note
All existing standard manipulators can be used in conjunction with
hpx::cout and hpx::cerr.
In order to use either hpx::cout or hpx::cerr, application codes need to
#include <hpx/include/iostreams.hpp>. For an example, please see the
following ‘Hello world’ program:
// Including 'hpx/hpx_main.hpp' instead of the usual 'hpx/hpx_init.hpp' enables
// to use the plain C-main below as the direct main HPX entry point.
#include <hpx/hpx_main.hpp>
#include <hpx/iostream.hpp>
int main()
{
// Say hello to the world!
hpx::cout << "Hello World!\n" << std::flush;
return 0;
}
Additionally, those applications need to link with the iostreams component. When
using CMake this can be achieved by using the COMPONENT_DEPENDENCIES
parameter; for instance:
include(HPX_AddExecutable)
add_hpx_executable(
hello_world
SOURCES hello_world.cpp
COMPONENT_DEPENDENCIES iostreams
)
Note
The hpx::cout and hpx::cerr streams buffer all output locally until a
std::endl or std::flush is encountered. That means that no output
will appear on the console as long as either of these is explicitly used.
Troubleshooting#
Common issues#
This section contains commonly encountered problems when compiling or using HPX.
See also the closed issues on GitHub to find out how other people resolved a similar problem. If nothing of that works, you can also open a new issue on GitHub or contact us using one the options found in Support for deploying and using HPX.
hpx::iostreams_component" target not found#
You may see a CMake error message that looks a bit like this:
error: `hpx::iostreams_component`` target not found
Simply ensure that HPX is installed with HPX_WITH_DISTRIBUTED_RUNTIME=ON
to prevent encountering such error(s). This is required if you want to use
hpx::cout.
Undefined reference to hpx::cout#
You may see a linker error message that looks a bit like this:
hello_world.cpp:(.text+0x5aa): undefined reference to `hpx::cout'
This usually happens if you are trying to use HPX iostreams functionality such
as hpx::cout but are not linking against it. The iostreams functionality is
not part of the core HPX library, and must be linked to explicitly. Typically
this can be solved by adding COMPONENT_DEPENDENCIES iostreams to a call to
add_hpx_library/add_hpx_executable/hpx_setup_target if using CMake. See
Creating HPX projects for more details.
Build fails with ASIO error#
You may see an error message that looks a bit like this:
Cannot open include file asio/io_context.hpp
This can be resolved by using -DHPX_WITH_FETCH_ASIO=ON to the cmake command line.
See also the corresponding closed Issue #5404 for more information.
Build fails with TCMalloc error#
You may see an error message that looks a bit like this:
Could NOT find TCMalloc (missing: Tcmalloc_LIBRARY Tcmalloc_INCLUDE_DIR)
ERROR: HPX_WITH_MALLOC was set to tcmalloc, but tcmalloc could not be
found. Valid options for HPX_WITH_MALLOC are: system, tcmalloc, jemalloc,
mimalloc, tbbmalloc, and custom
This can be resolved either by defining HPX_WITH_MALLOC=system or by installing TCMalloc.
This error occurs when users don’t specify an option for HPX_WITH_MALLOC; in that case,
HPX will be looking tcmalloc, which is the default value.
Useful suggestions#
Reducing compilation time#
If you want to significantly reduce compilation time, you can just use the local part of HPX for parallelism by disabling the distributed functionality. Moreover, you can avoid compiling examples. These can be done with the following flags:
-DHPX_WITH_NETWORKING=OFF
-DHPX_WITH_DISTRIBUTED_RUNTIME=OFF
-DHPX_WITH_EXAMPLES=OFF
-DHPX_WITH_TESTS=OFF
Linking HPX to your application#
If you want to avoid installing and linking HPX, you can just build HPX and then use the following flag on your HPX application CMake configuration:
-DHPX_DIR=<build_dir>/lib/cmake/HPX
Note
For this to work you need not to specify -DCMAKE_INSTALL_PREFIX when building HPX.
HPX-application build type conformance#
Your application’s build type should align with the HPX build type. For example, if you specified
-DCMAKE_BUILD_TYPE=Debug during the HPX compilation, then your application needs to be compiled
with the same flag. We recommend keeping a separate build folder for different build types and just
point accordingly to the type you want by using -DHPX_DIR=<build_dir>/lib/cmake/HPX.
Terminology#
This section gives definitions for some of the terms used throughout the HPX documentation and source code.
- Locality#
A locality in HPX describes a synchronous domain of execution, or the domain of bounded upper response time. This normally is just a single node in a cluster or a NUMA domain in a SMP machine.
- Active Global Address Space#
- AGAS#
HPX incorporates a global address space. Any executing thread can access any object within the domain of the parallel application with the caveat that it must have appropriate access privileges. The model does not assume that global addresses are cache coherent; all loads and stores will deal directly with the site of the target object. All global addresses within a Synchronous Domain are assumed to be cache coherent for those processor cores that incorporate transparent caches. The Active Global Address Space used by HPX differs from research PGAS models. Partitioned Global Address Space is passive in their means of address translation. Copy semantics, distributed compound operations, and affinity relationships are some of the global functionality supported by AGAS.
- Process#
The concept of the “process” in HPX is extended beyond that of either sequential execution or communicating sequential processes. While the notion of process suggests action (as do “function” or “subroutine”) it has a further responsibility of context, that is, the logical container of program state. It is this aspect of operation that process is employed in HPX. Furthermore, referring to “parallel processes” in HPX designates the presence of parallelism within the context of a given process, as well as the coarse grained parallelism achieved through concurrency of multiple processes of an executing user job. HPX processes provide a hierarchical name space within the framework of the active global address space and support multiple means of internal state access from external sources.
- Parcel#
The Parcel is a component in HPX that communicates data, invokes an action at a distance, and distributes flow-control through the migration of continuations. Parcels bridge the gap of asynchrony between synchronous domains while maintaining symmetry of semantics between local and global execution. Parcels enable message-driven computation and may be seen as a form of “active messages”. Other important forms of message-driven computation predating active messages include dataflow tokens, the J-machine’s support for remote method instantiation, and at the coarse grained variations of Unix remote procedure calls, among others. This enables work to be moved to the data as well as performing the more common action of bringing data to the work. A parcel can cause actions to occur remotely and asynchronously, among which are the creation of threads at different system nodes or synchronous domains.
- Local Control Object#
- Lightweight Control Object#
- LCO#
A local control object (sometimes called a lightweight control object) is a general term for the synchronization mechanisms used in HPX. Any object implementing a certain concept can be seen as an LCO. This concepts encapsulates the ability to be triggered by one or more events which when taking the object into a predefined state will cause a thread to be executed. This could either create a new thread or resume an existing thread.
The LCO is a family of synchronization functions potentially representing many classes of synchronization constructs, each with many possible variations and multiple instances. The LCO is sufficiently general that it can subsume the functionality of conventional synchronization primitives such as spinlocks, mutexes, semaphores, and global barriers. However due to the rich concept an LCO can represent powerful synchronization and control functionality not widely employed, such as dataflow and futures (among others), which open up enormous opportunities for rich diversity of distributed control and operation.
See lcos for more details on how to use LCOs in HPX.
- Action#
An action is a function that can be invoked remotely. In HPX a plain function can be made into an action using a macro. See applying_actions for details on how to use actions in HPX.
- Component#
A component is a C++ object which can be accessed remotely. A component can also contain member functions which can be invoked remotely. These are referred to as component actions. See Writing components for details on how to use components in HPX.
Why HPX?#
Current advances in high performance computing (HPC) continue to suffer from the issues plaguing parallel computation. These issues include, but are not limited to, ease of programming, inability to handle dynamically changing workloads, scalability, and efficient utilization of system resources. Emerging technological trends such as multi-core processors further highlight limitations of existing parallel computation models. To mitigate the aforementioned problems, it is necessary to rethink the approach to parallelization models. ParalleX contains mechanisms such as multi-threading, parcels, global name space support, percolation and local control objects (LCO). By design, ParalleX overcomes limitations of current models of parallelism by alleviating contention, latency, overhead and starvation. With ParalleX, it is further possible to increase performance by at least an order of magnitude on challenging parallel algorithms, e.g., dynamic directed graph algorithms and adaptive mesh refinement methods for astrophysics. An additional benefit of ParalleX is fine-grained control of power usage, enabling reductions in power consumption.
ParalleX—a new execution model for future architectures#
ParalleX is a new parallel execution model that offers an alternative to the conventional computation models, such as message passing. ParalleX distinguishes itself by:
Split-phase transaction model
Message-driven
Distributed shared memory (not cache coherent)
Multi-threaded
Futures synchronization
Synchronization for anonymous producer-consumer scenarios
Percolation (pre-staging of task data)
The ParalleX model is intrinsically latency hiding, delivering an abundance of variable-grained parallelism within a hierarchical namespace environment. The goal of this innovative strategy is to enable future systems delivering very high efficiency, increased scalability and ease of programming. ParalleX can contribute to significant improvements in the design of all levels of computing systems and their usage from application algorithms and their programming languages to system architecture and hardware design together with their supporting compilers and operating system software.
What is HPX?#
High Performance ParalleX (HPX) is the first runtime system implementation of the ParalleX execution model. The HPX runtime software package is a modular, feature-complete, and performance-oriented representation of the ParalleX execution model targeted at conventional parallel computing architectures, such as SMP nodes and commodity clusters. It is academically developed and freely available under an open source license. We provide HPX to the community for experimentation and application to achieve high efficiency and scalability for dynamic adaptive and irregular computational problems. HPX is a C++ library that supports a set of critical mechanisms for dynamic adaptive resource management and lightweight task scheduling within the context of a global address space. It is solidly based on many years of experience in writing highly parallel applications for HPC systems.
The two-decade success of the communicating sequential processes (CSP) execution model and its message passing interface (MPI) programming model have been seriously eroded by challenges of power, processor core complexity, multi-core sockets, and heterogeneous structures of GPUs. Both efficiency and scalability for some current (strong scaled) applications and future Exascale applications demand new techniques to expose new sources of algorithm parallelism and exploit unused resources through adaptive use of runtime information.
The ParalleX execution model replaces CSP to provide a new computing paradigm embodying the governing principles for organizing and conducting highly efficient scalable computations greatly exceeding the capabilities of today’s problems. HPX is the first practical, reliable, and performance-oriented runtime system incorporating the principal concepts of the ParalleX model publicly provided in open source release form.
HPX is designed by the STE||AR Group (Systems Technology, Emergent Parallelism, and Algorithm Research) at Louisiana State University (LSU)’s Center for Computation and Technology (CCT) to enable developers to exploit the full processing power of many-core systems with an unprecedented degree of parallelism. STE||AR is a research group focusing on system software solutions and scientific application development for hybrid and many-core hardware architectures.
What makes our systems slow?#
Estimates say that we currently run our computers at well below 100% efficiency. The theoretical peak performance (usually measured in FLOPS—floating point operations per second) is much higher than any practical peak performance reached by any application. This is particularly true for highly parallel hardware. The more hardware parallelism we provide to an application, the better the application must scale in order to efficiently use all the resources of the machine. Roughly speaking, we distinguish two forms of scalability: strong scaling (see Amdahl’s Law) and weak scaling (see Gustafson’s Law). Strong scaling is defined as how the solution time varies with the number of processors for a fixed total problem size. It gives an estimate of how much faster we can solve a particular problem by throwing more resources at it. Weak scaling is defined as how the solution time varies with the number of processors for a fixed problem size per processor. In other words, it defines how much more data can we process by using more hardware resources.
In order to utilize as much hardware parallelism as possible an application must exhibit excellent strong and weak scaling characteristics, which requires a high percentage of work executed in parallel, i.e., using multiple threads of execution. Optimally, if you execute an application on a hardware resource with N processors it either runs N times faster or it can handle N times more data. Both cases imply 100% of the work is executed on all available processors in parallel. However, this is just a theoretical limit. Unfortunately, there are more things that limit scalability, mostly inherent to the hardware architectures and the programming models we use. We break these limitations into four fundamental factors that make our systems SLOW:
Starvation occurs when there is insufficient concurrent work available to maintain high utilization of all resources.
Latencies are imposed by the time-distance delay intrinsic to accessing remote resources and services.
Overhead is work required for the management of parallel actions and resources on the critical execution path, which is not necessary in a sequential variant.
Waiting for contention resolution is the delay due to the lack of availability of oversubscribed shared resources.
Each of those four factors manifests itself in multiple and different ways; each of the hardware architectures and programming models expose specific forms. However, the interesting part is that all of them are limiting the scalability of applications no matter what part of the hardware jungle we look at. Hand-helds, PCs, supercomputers, or the cloud, all suffer from the reign of the 4 horsemen: Starvation, Latency, Overhead, and Contention. This realization is very important as it allows us to derive the criteria for solutions to the scalability problem from first principles, and it allows us to focus our analysis on very concrete patterns and measurable metrics. Moreover, any derived results will be applicable to a wide variety of targets.
Technology demands new response#
Today’s computer systems are designed based on the initial ideas of John von Neumann, as published back in 1945, and later extended by the Harvard architecture. These ideas form the foundation, the execution model, of computer systems we use currently. However, a new response is required in the light of the demands created by today’s technology.
So, what are the overarching objectives for designing systems allowing for applications to scale as they should? In our opinion, the main objectives are:
Performance: as previously mentioned, scalability and efficiency are the main criteria people are interested in.
Fault tolerance: the low expected mean time between failures (MTBF) of future systems requires embracing faults, not trying to avoid them.
Power: minimizing energy consumption is a must as it is one of the major cost factors today, and will continue to rise in the future.
Generality: any system should be usable for a broad set of use cases.
Programmability: for programmer this is a very important objective, ensuring long term platform stability and portability.
What needs to be done to meet those objectives, to make applications scale better on tomorrow’s architectures? Well, the answer is almost obvious: we need to devise a new execution model—a set of governing principles for the holistic design of future systems—targeted at minimizing the effect of the outlined SLOW factors. Everything we create for future systems, every design decision we make, every criteria we apply, have to be validated against this single, uniform metric. This includes changes in the hardware architecture we prevalently use today, and it certainly involves new ways of writing software, starting from the operating system, runtime system, compilers, and at the application level. However, the key point is that all those layers have to be co-designed; they are interdependent and cannot be seen as separate facets. The systems we have today have been evolving for over 50 years now. All layers function in a certain way, relying on the other layers to do so. But we do not have the time to wait another 50 years for a new coherent system to evolve. The new paradigms are needed now—therefore, co-design is the key.
Governing principles applied while developing HPX#
As it turn out, we do not have to start from scratch. Not everything has to be invented and designed anew. Many of the ideas needed to combat the 4 horsemen already exist, many for more than 30 years. All it takes is to gather them into a coherent approach. We’ll highlight some of the derived principles we think to be crucial for defeating SLOW. Some of those are focused on high-performance computing, others are more general.
Focus on latency hiding instead of latency avoidance#
It is impossible to design a system exposing zero latencies. In an effort to come as close as possible to this goal many optimizations are mainly targeted towards minimizing latencies. Examples for this can be seen everywhere, such as low latency network technologies like InfiniBand, caching memory hierarchies in all modern processors, the constant optimization of existing MPI implementations to reduce related latencies, or the data transfer latencies intrinsic to the way we use GPGPUs today. It is important to note that existing latencies are often tightly related to some resource having to wait for the operation to be completed. At the same time it would be perfectly fine to do some other, unrelated work in the meantime, allowing the system to hide the latencies by filling the idle-time with useful work. Modern systems already employ similar techniques (pipelined instruction execution in the processor cores, asynchronous input/output operations, and many more). What we propose is to go beyond anything we know today and to make latency hiding an intrinsic concept of the operation of the whole system stack.
Embrace fine-grained parallelism instead of heavyweight threads#
If we plan to hide latencies even for very short operations, such as fetching the contents of a memory cell from main memory (if it is not already cached), we need to have very lightweight threads with extremely short context switching times, optimally executable within one cycle. Granted, for mainstream architectures, this is not possible today (even if we already have special machines supporting this mode of operation, such as the Cray XMT). For conventional systems, however, the smaller the overhead of a context switch and the finer the granularity of the threading system, the better will be the overall system utilization and its efficiency. For today’s architectures we already see a flurry of libraries providing exactly this type of functionality: non-pre-emptive, task-queue based parallelization solutions, such as Intel Threading Building Blocks (TBB), Microsoft Parallel Patterns Library (PPL), Cilk++, and many others. The possibility to suspend a current task if some preconditions for its execution are not met (such as waiting for I/O or the result of a different task), seamlessly switching to any other task which can continue, and to reschedule the initial task after the required result has been calculated, which makes the implementation of latency hiding almost trivial.
Rediscover constraint-based synchronization to replace global barriers#
The code we write today is riddled with implicit (and explicit) global barriers. By “global barriers,” we mean the synchronization of the control flow between several (very often all) threads (when using OpenMP) or processes (MPI). For instance, an implicit global barrier is inserted after each loop parallelized using OpenMP as the system synchronizes the threads used to execute the different iterations in parallel. In MPI each of the communication steps imposes an explicit barrier onto the execution flow as (often all) nodes have to be synchronized. Each of those barriers is like the eye of a needle the overall execution is forced to be squeezed through. Even minimal fluctuations in the execution times of the parallel threads (jobs) causes them to wait. Additionally, it is often only one of the executing threads that performs the actual reduce operation, which further impedes parallelism. A closer analysis of a couple of key algorithms used in science applications reveals that these global barriers are not always necessary. In many cases it is sufficient to synchronize a small subset of the threads. Any operation should proceed whenever the preconditions for its execution are met, and only those. Usually there is no need to wait for iterations of a loop to finish before you can continue calculating other things; all you need is to complete the iterations that produce the required results for the next operation. Good bye global barriers, hello constraint based synchronization! People have been trying to build this type of computing (and even computers) since the 1970s. The theory behind what they did is based on ideas around static and dynamic dataflow. There are certain attempts today to get back to those ideas and to incorporate them with modern architectures. For instance, a lot of work is being done in the area of constructing dataflow-oriented execution trees. Our results show that employing dataflow techniques in combination with the other ideas, as outlined herein, considerably improves scalability for many problems.
Adaptive locality control instead of static data distribution#
While this principle seems to be a given for single desktop or laptop computers (the operating system is your friend), it is everything but ubiquitous on modern supercomputers, which are usually built from a large number of separate nodes (i.e., Beowulf clusters), tightly interconnected by a high-bandwidth, low-latency network. Today’s prevalent programming model for those is MPI, which does not directly help with proper data distribution, leaving it to the programmer to decompose the data to all of the nodes the application is running on. There are a couple of specialized languages and programming environments based on PGAS (Partitioned Global Address Space) designed to overcome this limitation, such as Chapel, X10, UPC, or Fortress. However, all systems based on PGAS rely on static data distribution. This works fine as long as this static data distribution does not result in heterogeneous workload distributions or other resource utilization imbalances. In a distributed system these imbalances can be mitigated by migrating part of the application data to different localities (nodes). The only framework supporting (limited) migration today is Charm++. The first attempts towards solving related problem go back decades as well, a good example is the Linda coordination language. Nevertheless, none of the other mentioned systems support data migration today, which forces the users to either rely on static data distribution and live with the related performance hits or to implement everything themselves, which is very tedious and difficult. We believe that the only viable way to flexibly support dynamic and adaptive locality control is to provide a global, uniform address space to the applications, even on distributed systems.
Prefer moving work to the data over moving data to the work#
For the best performance it seems obvious to minimize the amount of bytes transferred from one part of the system to another. This is true on all levels. At the lowest level we try to take advantage of processor memory caches, thus, minimizing memory latencies. Similarly, we try to amortize the data transfer time to and from GPGPUs as much as possible. At high levels we try to minimize data transfer between different nodes of a cluster or between different virtual machines on the cloud. Our experience (well, it’s almost common wisdom) shows that the amount of bytes necessary to encode a certain operation is very often much smaller than the amount of bytes encoding the data the operation is performed upon. Nevertheless, we still often transfer the data to a particular place where we execute the operation just to bring the data back to where it came from afterwards. As an example let’s look at the way we usually write our applications for clusters using MPI. This programming model is all about data transfer between nodes. MPI is the prevalent programming model for clusters, and it is fairly straightforward to understand and to use. Therefore, we often write applications in a way that accommodates this model, centered around data transfer. These applications usually work well for smaller problem sizes and for regular data structures. The larger the amount of data we have to churn and the more irregular the problem domain becomes, the worse the overall machine utilization and the (strong) scaling characteristics become. While it is not impossible to implement more dynamic, data driven, and asynchronous applications using MPI, it is somewhat difficult to do so. At the same time, if we look at applications that prefer to execute the code close to the locality where the data was placed, i.e., utilizing active messages (for instance based on Charm++), we see better asynchrony, simpler application codes, and improved scaling.
Favor message driven computation over message passing#
Today’s prevalently used programming model on parallel (multi-node) systems is MPI. It is based on message passing, as the name implies, which means that the receiver has to be aware of a message about to come in. Both codes, the sender and the receiver, have to synchronize in order to perform the communication step. Even the newer, asynchronous interfaces require explicitly coding the algorithms around the required communication scheme. As a result, everything but the most trivial MPI applications spends a considerable amount of time waiting for incoming messages, thus, causing starvation and latencies to impede full resource utilization. The more complex and more dynamic the data structures and algorithms become, the larger the adverse effects. The community discovered message-driven and data-driven methods of implementing algorithms a long time ago, and systems such as Charm++ have already integrated active messages demonstrating the validity of the concept. Message-driven computation allows for sending messages without requiring the receiver to actively wait for them. Any incoming message is handled asynchronously and triggers the encoded action by passing along arguments and—possibly—continuations. HPX combines this scheme with work-queue based scheduling as described above, which allows the system to almost completely overlap any communication with useful work, thereby minimizing latencies.
Additional material#
2-day workshop held at CSCS in 2016
C++ Lectures <https://www.youtube.com/playlist?list=PL7vEgTL3FalY2eBxud1wsfz8OKvE9sd_z>
Parallel C++ for Scientific Applications Lectures <https://www.youtube.com/watch?v=RdmXiIilArM&list=PL7vEgTL3Falab59uJoOb7AtFQKVuL0MV->
Basic HPX recipes
Overview#
HPX is organized into different sub-libraries and those in turn into modules.
The libraries and modules are independent, with clear dependencies and no
cycles. As an end-user, the use of these libraries is completely transparent. If
you use e.g. add_hpx_executable to create a target in your project you will
automatically get all modules as dependencies. See below for a list of the
available libraries and modules. Currently these are nothing more than an
internal grouping and do not affect usage. They cannot be consumed individually
at the moment.
Note
There is a dependency report that displays useful information about the structure of the code. It is available for each commit at HPX Dependency report.
Core modules#
affinity#
The affinity module contains helper functionality for mapping worker threads to hardware resources.
See the API reference of the module for more details.
algorithms#
The algorithms module exposes the full set of algorithms defined by the C++ standard. There is also partial support for C++ ranges.
See the API reference of the module for more details.
allocator_support#
This module provides utilities for allocators. It contains
hpx::util::internal_allocator which directly forwards allocation
calls to jemalloc. This utility is is mainly useful on Windows.
See the API reference of the module for more details.
asio#
The asio module is a thin wrapper around the Boost.Asio library, providing a few additional helper functions.
See the API reference of the module for more details.
assertion#
The assertion library implements the macros HPX_ASSERT and
HPX_ASSERT_MSG. Those two macros can be used to implement assertions
which are turned of during a release build.
By default, the location and function where the assert has been called from are
displayed when the assertion fires. This behavior can be modified by using
hpx::assertion::set_assertion_handler. When HPX initializes, it uses
this function to specify a more elaborate assertion handler. If your application
needs to customize this, it needs to do so before calling
hpx::init, hpx_main or using the C-main
wrappers.
See the API reference of the module for more details.
async_base#
The async_base module defines the basic functionality for spawning tasks on thread pools. This module does not implement any functionality on its own, but is extended by async_local and async_distributed with implementations for the local and distributed cases.
See the API reference of this module for more details.
async_combinators#
This module contains combinators for futures. The when_* functions allow you
to turn multiple futures into a single future which is ready when all, any,
some, or each of the given futures are ready. The wait_* combinators are
equivalent to the when_* functions except that they do not return a future.
Those wait for all futures to become ready before returning to the user. Note
that the wait_* functions will rethrow one of the exceptions from
exceptional futures.
The wait_*_nothrow combinators are equivalent to the wait_* functions
exception that they do not throw if one of the futures has become exceptional.
The split_future combinator takes a single future of a container (e.g.
tuple) and turns it into a container of futures.
See lcos_local, synchronization, and async_distributed for other synchronization facilities.
See the API reference of this module for more details.
async_cuda#
This library adds a simple API that enables the user to retrieve a future from a CUDA stream. Typically, a user may launch one or more kernels and then get a future from the stream that will become ready when those kernels have completed. It is important to note that multiple kernels may be launched without fetching a future, and multiple futures may be obtained from the helper. Please refer to the unit tests and examples for further examples.
See the API reference of this module for more details.
async_local#
This module extends async_base to provide local implementations of
hpx::async, hpx::post, hpx::sync, and
hpx::dataflow. The async_distributed module extends the
functionality in this module to work with actions.
See the API reference of this module for more details.
async_mpi#
The MPI library is intended to simplify the process of integrating MPI based
codes with the HPX runtime. Any MPI function that is asynchronous and uses an
MPI_Request may be converted into an hpx::future.
The syntax is designed to allow a simple replacement of the MPI call with a futurized
async version that accepts an executor instead of a communicator,
and returns a future instead of assigning a request.
Typically, an MPI call of the form
int MPI_Isend(buf, count, datatype, rank, tag, comm, request);
becomes
hpx::future<int> f = hpx::async(executor, MPI_Isend, buf, count, datatype, rank, tag);
When the MPI operation is complete, the future will become ready. This allows communication to integrated cleanly with the rest of HPX, in particular the continuation style of programming may be used to build up more complex code. Consider the following example, that chains user processing, sends and receives using continuations…
// create an executor for MPI dispatch
hpx::mpi::experimental::executor exec(MPI_COMM_WORLD);
// post an asynchronous receive using MPI_Irecv
hpx::future<int> f_recv = hpx::async(
exec, MPI_Irecv, &data, rank, MPI_INT, rank_from, i);
// attach a continuation to run when the recv completes,
f_recv.then([=, &tokens, &counter](auto&&)
{
// call an application specific function
msg_recv(rank, size, rank_to, rank_from, tokens[i], i);
// send a new message
hpx::future<int> f_send = hpx::async(
exec, MPI_Isend, &tokens[i], 1, MPI_INT, rank_to, i);
// when that send completes
f_send.then([=, &tokens, &counter](auto&&)
{
// call an application specific function
msg_send(rank, size, rank_to, rank_from, tokens[i], i);
});
}
The example above makes use of MPI_Isend and MPI_Irecv, but any MPI function
that uses requests may be futurized in this manner.
The following is a (non exhaustive) list of MPI functions that should be supported,
though not all have been tested at the time of writing
(please report any problems to the issue tracker).
int MPI_Isend(...);
int MPI_Ibsend(...);
int MPI_Issend(...);
int MPI_Irsend(...);
int MPI_Irecv(...);
int MPI_Imrecv(...);
int MPI_Ibarrier(...);
int MPI_Ibcast(...);
int MPI_Igather(...);
int MPI_Igatherv(...);
int MPI_Iscatter(...);
int MPI_Iscatterv(...);
int MPI_Iallgather(...);
int MPI_Iallgatherv(...);
int MPI_Ialltoall(...);
int MPI_Ialltoallv(...);
int MPI_Ialltoallw(...);
int MPI_Ireduce(...);
int MPI_Iallreduce(...);
int MPI_Ireduce_scatter(...);
int MPI_Ireduce_scatter_block(...);
int MPI_Iscan(...);
int MPI_Iexscan(...);
int MPI_Ineighbor_allgather(...);
int MPI_Ineighbor_allgatherv(...);
int MPI_Ineighbor_alltoall(...);
int MPI_Ineighbor_alltoallv(...);
int MPI_Ineighbor_alltoallw(...);
Note that the HPX mpi futurization wrapper should work with any asynchronous
MPI call, as long as the function signature has the last two arguments
MPI_xxx(..., MPI_Comm comm, MPI_Request *request)
- internally these two parameters will be substituted by the executor and future data
parameters that are supplied by template instantiations inside the hpx::mpi code.
See the API reference of this module for more details.
async_sycl#
This module allows creating HPX futures using SYCL events, effectively integrating asynchronous SYCL kernels and memory transfers with HPX. Building on this integration, this module also contains a SYCL executor. This executor encapsulates a SYCL queue. When SYCL queue member functions are launched with this executor, the user can automatically obtain the HPX futures associated with them.
The creation of the HPX futures using SYCL events is based on the same event polling mechanism that the CUDA HPX integration uses. Each registered event gets an associated callback and gets inserted into a callback vector to be polled by the scheduler in between tasks. Once the polling reveals the event is complete, the callback will be called, which in turn sets the future to ready (see sycl_event_callback.cpp). There are multiple adaptions for HipSYCL for this: To keep the runtime alive (avoiding the repeated on-the-fly creation of the runtime during the polling), we keep a default queue. Furthermore, we flush the internal SYCL DAG to ensure that the launched SYCL function is actually being executed.
The SYCL executor offers the usual post and async_execute functions. Additionally, it contains two get_future functions. One expects a pre-existing SYCL event to return a future, the other one does not but will launch an empty SYCL kernel instead, to obtain an event (causing higher overhead for the sake of being more convenient). The post and async_execute implementations here are actually different for HipSYCL and OneAPI, since the sycl::queue in OneAPI uses a different interface (using a code_location parameter) which requires some adaptations here.
To make this module compile, we use the -fno-sycl and -fsycl compiler parameters for the OneAPI use-case (requiring HPX to be compiled with dpcpp). For HipSYCL we use its cmake integration instead (requiring HPX to be compiled with clang++ and including HipSYCL as a library).
To build with OneAPI, use the CMake Variable HPX_WITH_SYCL=ON. To build with HipSYCL, use HPX_WITH_SYCL=ON and HPX_WITH_HIPSYCL=ON (and make sure find_package will find HipSYCL).
Lastly, the module contains three tests/examples. All three implement a simple vector add example. The first one obtains a future using the free method get_future, the second one uses a single SYCL executor and the last one is using multiple executors called from multiple host threads.
To build the tests, use ” make tests.unit.modules.async_sycl ” To run the tests, use “ctest -R sycl”.
NOTE: Theoretically, this module could work with other SYCL implementations, but was only tested using OneAPI and HipSYCL so far.
See the API reference of this module for more details.
batch_environments#
This module allows for the detection of execution as batch jobs, a series of programs executed without user intervention. All data is preselected and will be executed according to preset parameters, such as date or completion of another task. Batch environments are especially useful for executing repetitive tasks.
HPX supports the creation of batch jobs through the Portable Batch System (PBS) and SLURM.
For more information on batch environments, see Running on batch systems and the API reference for the module.
cache#
This module provides two cache data structures:
See the API reference of the module for more details.
checkpoint_base#
The checkpoint_base module contains lower level facilities that wrap simple check-pointing capabilities. This module does not implement special handling for futures or components, but simply serializes all arguments to or from a given container.
This module exposes the hpx::util::save_checkpoint_data,
hpx::util::restore_checkpoint_data, and hpx::util::prepare_checkpoint_data
APIs. These functions encapsulate the basic serialization functionalities
necessary to save/restore a variadic list of arguments to/from a given data
container.
See the API reference of this module for more details.
command_line_handling_local#
TODO: High-level description of the module.
See the API reference of this module for more details.
compute_local#
TODO: High-level description of the module.
See the API reference of this module for more details.
concepts#
This module provides helpers for emulating concepts. It provides the following macros:
HPX_CONCEPT_REQUIRESHPX_HAS_MEMBER_XXX_TRAIT_DEFHPX_HAS_XXX_TRAIT_DEF
See the API reference of the module for more details.
concurrency#
This module provides concurrency primitives useful for multi-threaded programming such as:
hpx::util::cache_line_dataandhpx::util::cache_aligned_data: wrappers for aligning and padding data to cache lines.various lockfree queue data structures
See the API reference of the module for more details.
config#
The config module contains various configuration options, typically hidden behind macros that choose the correct implementation based on the compiler and other available options. It also contains platform independent macros to control inlinining, export sets and more.
See the API reference of the module for more details.
config_registry#
The config_registry module is a low level module providing helper functionality
for registering configuration entries to a global registry from other modules.
The hpx::config_registry::add_module_config function is used to add
configuration options, and hpx::config_registry::get_module_configs
can be used to retrieve configuration entries registered so far.
add_module_config_helper can be used to register configuration
entries through static global options.
See the API reference of this module for more details.
contracts#
The contracts module provides C++ contracts support for HPX with intelligent fallback to assertions when native contracts are not available. This module implements a forward-compatible API that works across different C++ standards and compiler capabilities.
The module provides three primary macros: HPX_PRE,
HPX_POST, and HPX_CONTRACT_ASSERT. These macros
automatically adapt their behavior based on compiler capabilities:
When C++26 native contracts are available (
__cpp_contractsdefined), they map to standard contract syntaxWhen
HPX_WITH_CX26_CONTRACTS=OFF, preconditions and postconditions become no-ops while contract assertions remain available as enhanced assertions
Configuration#
Enable contracts in CMake:
cmake -DHPX_WITH_CXX26_CONTRACTS=ON -DCMAKE_CXX_STANDARD=26
Enable contract-enhanced assertions (optional):
cmake -DHPX_WITH_CXX26_CONTRACTS=ON -DHPX_CONTRACTS_WITH_ASSERTS_AS_CONTRACT_ASSERTS=ON
Contract assertions work even when contracts are disabled:
cmake -DHPX_WITH_CXX26_CONTRACTS=OFF # HPX_CONTRACT_ASSERT still maps to HPX_ASSERT
Advanced Features#
When HPX_CONTRACTS_WITH_ASSERTS_AS_CONTRACT_ASSERTS=ON is enabled, regular
HPX_ASSERT calls are automatically upgraded to use contract
assertions in C++26 mode:
void example_function(int value)
{
HPX_ASSERT(value > 0); // Becomes contract_assert(value > 0) in C++26 mode
// ... rest of function
}
Warning
Enhanced assertions only provide benefits when native C++26 contracts are
supported by the compiler. Without native contract support,
HPX_ASSERT -> HPX_CONTRACT_ASSERT -> HPX_ASSERT (no enhancement).
CMake will issue a warning if you enable this option without native contract support.
This provides enhanced contract semantics throughout your existing codebase
without requiring changes to assertion code. The transformation occurs in the
contracts module (contracts.hpp) where the HPX_ASSERT macro is
overridden to use HPX_CONTRACT_ASSERT when HPX_WITH_ASSERTS_AS_CONTRACT_ASSERTS=ON:
HPX_WITH_CXX26_CONTRACTS=ON- Contracts module is enabledHPX_CONTRACTS_WITH_ASSERTS_AS_CONTRACT_ASSERTS=ON- Assertion enhancement is enabled
The implementation works by redefining HPX_ASSERT in contracts.hpp to
use HPX_CONTRACT_ASSERT, which automatically adapts to the current contract
mode (native C++26 contracts or assertion fallback). This ensures all existing
HPX_ASSERT calls throughout the HPX codebase automatically gain contract
semantics when available.
Usage Examples#
Preconditions and postconditions using declaration syntax (C++26):
int divide(int a, int b) HPX_PRE(b != 0)
{
return a / b;
}
int factorial(int n) HPX_PRE(n >= 0) HPX_POST(r; r > 0)
{
return n <= 1 ? 1 : n * factorial(n - 1);
}
Contract assertions (available in all modes):
void process_array(std::vector<int>& arr, size_t index)
{
HPX_CONTRACT_ASSERT(index < arr.size());
arr[index] *= 2;
}
Design Philosophy#
- HPX_CONTRACT_ASSERT: Enhanced assertion mechanism
Available even when
HPX_WITH_CONTRACTS=OFFbecause it provides value as an enhanced assertion. Maps toHPX_ASSERTin all configurations.- HPX_PRE/HPX_POST: True contract syntax
Represent language-level contract semantics. When contracts are enabled but native C++26 contracts are not available, these become no-ops to maintain forward compatibility. When
HPX_WITH_CONTRACTS=OFF, they are also no-ops. This prepares for C++26 migration where they will be attached to function declarations rather than used in function bodies.
Migration Strategy#
The module is designed for smooth migration to C++26 native contracts:
Current (transition mode):
int func(int x)
{
HPX_PRE(x > 0); // No-op in fallback mode, active in native mode
return x;
}
Target (C++26 native):
int func(int x) HPX_PRE(x > 0)
{
return x;
}
Note: In fallback mode, HPX_PRE and HPX_POST become no-ops to maintain
forward compatibility and avoid performance overhead. Use HPX_CONTRACT_ASSERT
when you need runtime validation in all modes.
Testing#
The module includes comprehensive testing with automatic compiler capability detection. Tests are organized into three categories:
Declaration tests: Test C++26 native contract syntax when
__cpp_contractsis availableFallback tests: Test assertion fallback behavior when contracts are not natively supported
Disabled tests: Test no-op behavior when contracts are disabled
The test suite automatically detects compiler capabilities at configure time and builds only the appropriate tests for the current configuration.
See the API reference of the module for more details.
coroutines#
The coroutines module provides coroutine (user-space thread) implementations for different platforms.
See the API reference of the module for more details.
datastructures#
The datastructures module provides basic data structures (typically provided for compatibility with older C++ standards):
hpx::detail::small_vectorhpx::util::member_packhpx::optionalhpx::variant
See the API reference of the module for more details.
debugging#
This module provides helpers for demangling symbol names.
See the API reference of the module for more details.
errors#
This module provides support for exceptions and error codes:
See the API reference of the module for more details.
execution#
This library implements executors and execution policies for use with parallel algorithms and other facilities related to managing the execution of tasks.
See the API reference of the module for more details.
execution_base#
The basic execution module is the main entry point to implement parallel and concurrent operations. It is modeled after P0443 with some additions and implementations for the described concepts. Most notably, it provides an abstraction for execution resources, execution contexts and execution agents in such a way, that it provides customization points that those aforementioned concepts can be replaced and combined with ease.
For that purpose, three virtual base classes are provided to be able to provide implementations with different properties:
resource_base: This is the abstraction for execution resources, that isfor example CPU cores or an accelerator.
context_base: An execution context uses execution resources and is ableto spawn new execution agents, as new threads of executions on the available resources.
agent_base: The execution agent represents the thread of execution, andcan be used to yield, suspend, resume or abort a thread of execution.
executors#
The executors module exposes executors and execution policies. Most importantly, it exposes the following classes and constants:
hpx::execution::seqhpx::execution::parhpx::execution::par_unseqhpx::execution::task
See the API reference of this module for more details.
filesystem#
This module provides a compatibility layer for the C++17 filesystem library. If
the filesystem library is available this module will simply forward its contents
into the hpx::filesystem namespace. If the library is not available it will
fall back to Boost.Filesystem instead.
See the API reference of the module for more details.
format#
The format module exposes the format and format_to
functions for formatting strings.
See the API reference of the module for more details.
functional#
This module provides function wrappers and helpers for managing functions and their arguments.
hpx::bindhpx::bind_backhpx::bind_fronthpx::util::deferred_callhpx::invokehpx::invoke_rhpx::invoke_fusedhpx::invoke_fused_rhpx::mem_fnhpx::util::one_shothpx::util::protecthpx::util::result_ofhpx::placeholders::_1hpx::placeholders::_2…
hpx::placeholders::_9
See the API reference of the module for more details.
futures#
This module defines the hpx::future and
hpx::shared_future classes corresponding to the C++ standard
library classes std::future and
std::shared_future. Note that the
specializations of hpx::future::then for executors and
execution policies are defined in the execution module.
See the API reference of this module for more details.
hardware#
The hardware module abstracts away hardware specific details of timestamps and CPU features.
See the API reference of the module for more details.
hashing#
The hashing module provides two hashing implementations:
hpx::util::fibhashhpx::util::jenkins_hash
See the API reference of the module for more details.
include_local#
This module provides no functionality in itself. Instead it provides headers that group together other headers that often appear together. This module provides local-only headers.
See the API reference of this module for more details.
ini#
TODO: High-level description of the module.
See the API reference of this module for more details.
init_runtime_local#
TODO: High-level description of the module.
See the API reference of this module for more details.
io_service#
This module provides an abstraction over Boost.ASIO, combining multiple
asio::io_contexts into a single pool.
hpx::util::io_service_pool provides a simple pool of
asio::io_contexts with an API similar to asio::io_context.
hpx::threads::detail::io_service_thread_pool wraps
hpx::util::io_service_pool into an interface derived from
hpx::threads::detail::thread_pool_base.
See the API reference of this module for more details.
iterator_support#
This module provides helpers for iterators. It provides
hpx::util::iterator_facade and
hpx::util::iterator_adaptor for creating new iterators, and the
trait hpx::util::is_iterator along with more specific iterator
traits.
See the API reference of the module for more details.
itt_notify#
This module provides support for profiling with Intel VTune.
See the API reference of this module for more details.
lci_base#
This module provides helper functionality for detecting LCI environments.
See the API reference of this module for more details.
lcos_local#
This module provides the following local LCOs:
hpx::lcos::local::and_gatehpx::lcos::local::channelhpx::lcos::local::one_element_channelhpx::lcos::local::receive_channelhpx::lcos::local::send_channelhpx::lcos::local::guardhpx::lcos::local::guard_sethpx::lcos::local::run_guardedhpx::lcos::local::conditional_triggerhpx::lcos::local::receive_buffer
See lcos_distributed for distributed LCOs. Basic synchronization primitives for use in HPX threads can be found in synchronization. async_combinators contains useful utility functions for combining futures.
See the API reference of this module for more details.
likwid#
TODO: High-level description of the module.
See the API reference of this module for more details.
lock_registration#
This module contains fucntionality for registering locks to detect when they are locked and unlocked on different threads.
See the API reference of this module for more details.
logging#
This module provides useful macros for logging information.
See the API reference of the module for more details.
memory#
Part of this module is a forked version of boost::intrusive_ptr from
Boost.SmartPtr.
See the API reference of the module for more details.
mpi_base#
This module provides helper functionality for detecting MPI environments.
See the API reference of this module for more details.
pack_traversal#
This module exposes the basic functionality for traversing various packs, both
synchronously and asynchronously: hpx::util::traverse_pack and
hpx::util::traverse_pack_async. It also exposes the higher level
functionality of unwrapping nested futures: hpx::util::unwrap and
its function object form hpx::util::functional::unwrap.
See the API reference of this module for more details.
plugin#
This module provides base utilities for creating plugins.
See the API reference of the module for more details.
prefix#
This module provides utilities for handling the prefix of an HPX application, i.e. the paths used for searching components and plugins.
See the API reference of this module for more details.
preprocessor#
This library contains useful preprocessor macros:
HPX_PP_CAT: Concatenate two tokensHPX_PP_EXPAND: Expands a preprocessor tokenHPX_PP_NARGS: Determines the number of arguments passed to a variadic macroHPX_PP_STRINGIZE: Turns a token into a stringHPX_PP_STRIP_PARENS: Strips parenthesis from a token
See the API reference of the module for more details.
program_options#
The module program_options is a direct fork of the Boost.Program_options library
(Boost V1.70.0).
In order to be included as an HPX module, the Boost.Program_options library has
been moved to the namespace hpx::program_options. We have also replaced all
Boost facilities the library depends on with either the equivalent facilities
from the standard library or from HPX. As a result, the HPX program_options module
is fully interface compatible with Boost.Program_options (sans the hpx
namespace and the #include <hpx/modules/program_options.hpp> changes that need to be
applied to all code relying on this library).
All credit goes to Vladimir Prus, the author of the excellent Boost.Program_options library. All bugs have been introduced by us.
See the API reference of the module for more details.
properties#
This module implements the prefer customization point for properties in
terms of P2220. This differs from P1393 in that it relies fully on
tag_invoke overloads and fewer base customization points. Actual properties
are defined in modules. All functionality is experimental and can be accessed
through the hpx::experimental namespace.
See the API reference of this module for more details.
resiliency#
In HPX, a program failure is a manifestation of a failing task. This module exposes several APIs that allow users to manage failing tasks in a convenient way by either replaying a failed task or by replicating a specific task.
Task replay is analogous to the Checkpoint/Restart mechanism found in conventional execution models. The key difference being localized fault detection. When the runtime detects an error, it replays the failing task as opposed to completely rolling back the entire program to the previous checkpoint.
Task replication is designed to provide reliability enhancements by replicating a set of tasks and evaluating their results to determine a consensus among them. This technique is most effective in situations where there are few tasks in the critical path of the DAG which leaves the system underutilized or where hardware or software failures may result in an incorrect result instead of an error. However, the drawback of this method is the additional computational cost incurred by repeating a task multiple times.
The following API functions are exposed:
hpx::resiliency::experimental::async_replay: This version of task replay will catch user-defined exceptions and automatically reschedule the task N times before throwing anhpx::resiliency::experimental::abort_replay_exceptionif no task is able to complete execution without an exception.hpx::resiliency::experimental::async_replay_validate: This version of replay adds an argument to async replay which receives a user-provided validation function to test the result of the task against. If the task’s output is validated, the result is returned. If the output fails the check or an exception is thrown, the task is replayed until no errors are encountered or the number of specified retries has been exceeded.hpx::resiliency::experimental::async_replicate: This is the most basic implementation of the task replication. The API returns the first result that runs without detecting any errors.hpx::resiliency::experimental::async_replicate_validate: This API additionally takes a validation function which evaluates the return values produced by the threads. The first task to compute a valid result is returned.hpx::resiliency::experimental::async_replicate_vote: This API adds a vote function to the basic replicate function. Many hardware or software failures are silent errors which do not interrupt program flow. In order to detect errors of this kind, it is necessary to run the task several times and compare the values returned by every version of the task. In order to determine which return value is “correct”, the API allows the user to provide a custom consensus function to properly form a consensus. This voting function then returns the “correct”” answer.hpx::resiliency::experimental::async_replicate_vote_validate: This combines the features of the previously discussed replicate set. Replicate vote validate allows a user to provide a validation function to filter results. Additionally, as described in replicate vote, the user can provide a “voting function” which returns the consensus formed by the voting logic.hpx::resiliency::experimental::dataflow_replay: This version of dataflow replay will catch user-defined exceptions and automatically reschedules the task N times before throwing anhpx::resiliency::experimental::abort_replay_exceptionif no task is able to complete execution without an exception. Any arguments for the executed task that are futures will cause the task invocation to be delayed until all of those futures have become ready.hpx::resiliency::experimental::dataflow_replay_validate: This version of replay adds an argument to dataflow replay which receives a user-provided validation function to test the result of the task against. If the task’s output is validated, the result is returned. If the output fails the check or an exception is thrown, the task is replayed until no errors are encountered or the number of specified retries have been exceeded. Any arguments for the executed task that are futures will cause the task invocation to be delayed until all of those futures have become ready.hpx::resiliency::experimental::dataflow_replicate: This is the most basic implementation of the task replication. The API returns the first result that runs without detecting any errors. Any arguments for the executed task that are futures will cause the task invocation to be delayed until all of those futures have become ready.hpx::resiliency::experimental::dataflow_replicate_validate: This API additionally takes a validation function which evaluates the return values produced by the threads. The first task to compute a valid result is returned. Any arguments for the executed task that are futures will cause the task invocation to be delayed until all of those futures have become ready.hpx::resiliency::experimental::dataflow_replicate_vote: This API adds a vote function to the basic replicate function. Many hardware or software failures are silent errors which do not interrupt program flow. In order to detect errors of this kind, it is necessary to run the task several times and compare the values returned by every version of the task. In order to determine which return value is “correct”, the API allows the user to provide a custom consensus function to properly form a consensus. This voting function then returns the “correct” answer. Any arguments for the executed task that are futures will cause the task invocation to be delayed until all of those futures have become ready.hpx::resiliency::experimental::dataflow_replicate_vote_validate: This combines the features of the previously discussed replicate set. Replicate vote validate allows a user to provide a validation function to filter results. Additionally, as described in replicate vote, the user can provide a “voting function” which returns the consensus formed by the voting logic. Any arguments for the executed task that are futures will cause the task invocation to be delayed until all of those futures have become ready.
See the API reference of the module for more details.
resource_partitioner#
The resource_partitioner module defines hpx::resource::partitioner,
the class used by the runtime and users to partition available hardware
resources into thread pools. See Using the resource partitioner for more
details on using the resource partitioner in applications.
See the API reference of this module for more details.
runtime_configuration#
This module handles the configuration options required by the runtime.
See the API reference of this module for more details.
runtime_local#
TODO: High-level description of the library.
See the API reference of this module for more details.
schedulers#
This module provides schedulers used by thread pools in the thread_pools module. There are currently three main schedulers:
hpx::threads::policies::local_priority_queue_schedulerhpx::threads::policies::static_priority_queue_schedulerhpx::threads::policies::shared_priority_queue_scheduler
Other schedulers are specializations or variations of the above schedulers. See the examples of the resource_partitioner module for examples of specifying a custom scheduler for a thread pool.
See the API reference of this module for more details.
serialization#
This module provides serialization primitives and support for all built-in types as well as all C++ Standard Library collection and utility types. This list is extended by HPX vocabulary types with proper support for global reference counting. HPX’s mode of serialization is derived from Boost’s serialization model and, as such, is mostly interface compatible with its Boost counterpart.
The purest form of serializing data is to copy the content of the payload bit by bit; however, this method is impractical for generic C++ types, which might be composed of more than just regular built-in types. Instead, HPX’s approach to serialization is derived from the Boost Serialization library, and is geared towards allowing the programmer of a given class explicit control and syntax of what to serialize. It is based on operator overloading of two special archive types that hold a buffer or stream to store the serialized data and is responsible for dispatching the serialization mechanism to the intrusive or non-intrusive version. The serialization process is recursive. Each member that needs to be serialized must be specified explicitly. The advantage of this approach is that the serialization code is written in C++ and leverages all necessary programming techniques. The generic, user-facing interface allows for effective application of the serialization process without obstructing the algorithms that need special code for packing and unpacking. It also allows for optimizations in the implementation of the archives.
See the API reference of the module for more details.
static_reinit#
This module provides a simple wrapper around static variables that can be reinitialized.
See the API reference of this module for more details.
string_util#
This module contains string utilities inspired by the Boost String Algorithms Library.
See the API reference of this module for more details.
synchronization#
This module provides synchronization primitives that should be used rather than the C++ standard ones in HPX threads:
hpx::call_oncehpx::spinlock(std::mutex compatible spinlock)hpx::spinlock_no_backoff(boost::mutex compatible spinlock)hpx::spinlock_poolhpx::in_place_stop_tokenhpx::upgrade_to_unique_lockhpx::upgrade_lock
See lcos_local, async_combinators, and async_distributed for higher level synchronization facilities.
See the API reference of this module for more details.
tag_invoke#
TODO: High-level description of the module.
See the API reference of this module for more details.
testing#
The testing module contains useful macros for testing. The results of tests can
be printed with hpx::util::report_errors. The following macros are
provided:
HPX_TESTHPX_TEST_MSGHPX_TEST_EQHPX_TEST_NEQHPX_TEST_LTHPX_TEST_LTEHPX_TEST_RANGEHPX_TEST_EQ_MSGHPX_TEST_NEQ_MSGHPX_SANITYHPX_SANITY_MSGHPX_SANITY_EQHPX_SANITY_NEQHPX_SANITY_LTHPX_SANITY_LTEHPX_SANITY_RANGEHPX_SANITY_EQ_MSG
See the API reference of the module for more details.
thread_pool_util#
This module contains helper functions for asynchronously suspending and resuming thread pools and their worker threads.
See the API reference of this module for more details.
thread_pools#
This module defines the thread pools and utilities used by the HPX runtime.
The only thread pool implementation provided by this module is
hpx::threads::detail::scheduled_thread_pool, which is derived from
hpx::threads::detail::thread_pool_base defined in the
threading_base module.
See the API reference of this module for more details.
thread_support#
This module provides miscellaneous utilities for threading and concurrency.
See the API reference of the module for more details.
threading#
This module provides the equivalents of std::thread and std::jthread
for lightweight HPX threads:
See the API reference of this module for more details.
threading_base#
This module contains the base class definition required for threads. The base
class hpx::threads::thread_data is inherited by two specializations
for stackful and stackless threads:
hpx::threads::thread_data_stackful and
hpx::threads::thread_data_stackless. In addition, the module
defines the base classes for schedulers and thread pools:
hpx::threads::policies::scheduler_base and
hpx::threads::thread_pool_base.
See the API reference of this module for more details.
thread_manager#
This module defines the hpx::threads::threadmanager class. This is
used by the runtime to manage the creation and destruction of thread pools. The
resource_partitioner module handles the partitioning of resources
into thread pools, but not the creation of thread pools.
See the API reference of this module for more details.
thrust#
The thrust module integrates HPX parallel algorithms with NVIDIA Thrust, enabling GPU acceleration using familiar HPX algorithm syntax.
Execution Policies#
hpx::thrust::thrust_host_policyCPU execution using optimized parallel implementations
hpx::thrust::thrust_device_policySynchronous GPU execution
hpx::thrust::thrust_task_policyAsynchronous GPU execution returning HPX futures
Policy Mappings#
The HPX thrust policies map directly to Thrust execution policies:
// Policy mappings
hpx::thrust::thrust_host_policy -> thrust::host
hpx::thrust::thrust_device_policy -> thrust::device
hpx::thrust::thrust_task_policy -> thrust::par_nosync
Usage#
#include <hpx/modules/thrust.hpp>
#include <thrust/device_vector.h>
hpx::thrust::thrust_device_policy device{};
thrust::device_vector<int> d_vec(1000, 0);
hpx::fill(device, d_vec.begin(), d_vec.end(), 42);
int sum = hpx::reduce(device, d_vec.begin(), d_vec.end(), 0);
#include <hpx/modules/async_cuda.hpp>
#include <hpx/modules/thrust.hpp>
int hpx_main() {
// Required for async operations
hpx::cuda::experimental::enable_user_polling polling_guard("default");
hpx::thrust::thrust_task_policy task{};
thrust::device_vector<int> d_vec(1000, 1);
auto fill_future = hpx::fill(task, d_vec.begin(), d_vec.end(), 42);
fill_future.get(); // Standard HPX future operations
}
Build Requirements#
CUDA Toolkit 12.4.0+
HPX with
HPX_WITH_CUDA=ONEnable with:
cmake -DHPX_WITH_CUDA=ON ...
See Also#
async_cuda - CUDA integration
execution - HPX execution policies
timed_execution#
This module provides extensions to the executor interfaces defined in the execution module that allow timed submission of tasks on thread pools (at or after a specified time).
See the API reference of this module for more details.
timing#
This module provides the timing utilities (clocks and timers).
See the API reference of the module for more details.
topology#
This module provides the class hpx::threads::topology which
represents the hardware resources available on a node. The class is a light
wrapper around the Portable Hardware Locality (HWLOC) library. The hpx::threads::cpu_mask is
a small companion class that represents a set of resources on a node.
See the API reference of the module for more details.
tracy#
This modules enables the integration of HPX applications with the |tracy|_ profiler.
type_support#
This module provides helper facilities related to types.
See the API reference of the module for more details.
util#
The util module provides miscellaneous standalone utilities.
See the API reference of the module for more details.
version#
This module macros and functions for accessing version information about HPX and its dependencies.
See the API reference of this module for more details.
Main HPX modules#
actions#
TODO: High-level description of the library.
See the API reference of this module for more details.
actions_base#
TODO: High-level description of the library.
See the API reference of this module for more details.
agas#
TODO: High-level description of the module.
See the API reference of this module for more details.
agas_base#
This module holds the implementation of the four AGAS services: primary namespace, locality namespace, component namespace, and symbol namespace.
See the API reference of this module for more details.
async_colocated#
TODO: High-level description of the module.
See the API reference of this module for more details.
async_distributed#
This module contains functionality for asynchronously launching work on remote
localities: hpx::async, hpx::post. This module extends
the local-only functions in libs_async_local.
See the API reference of this module for more details.
checkpoint#
A common need of users is to periodically backup an application. This practice
provides resiliency and potential restart points in code. HPX utilizes the
concept of a checkpoint to support this use case.
Found in hpx/util/checkpoint.hpp, checkpoints are defined as objects
that hold a serialized version of an object or set of objects at a particular
moment in time. This representation can be stored in memory for later use or it
can be written to disk for storage and/or recovery at a later point. In order to
create and fill this object with data, users must use a function called
save_checkpoint. In code the function looks like this:
hpx::future<hpx::util::checkpoint> hpx::util::save_checkpoint(a, b, c, ...);
save_checkpoint takes arbitrary data containers, such as int,
double, float, vector, and future, and serializes them into a
newly created checkpoint object. This function returns a future to a
checkpoint containing the data. Here’s an example of a simple use case:
using hpx::util::checkpoint;
using hpx::util::save_checkpoint;
std::vector<int> vec{1,2,3,4,5};
hpx::future<checkpoint> save_checkpoint(vec);
Once the future is ready, the checkpoint object will contain the vector
vec and its five elements.
prepare_checkpoint takes arbitrary data containers (same as for
save_checkpoint), , such as int,
double, float, vector, and future, and calculates the necessary
buffer space for the checkpoint that would be created if save_checkpoint
was called with the same arguments. This function returns a future to a
checkpoint that is appropriately initialized. Here’s an example of a
simple use case:
using hpx::util::checkpoint;
using hpx::util::prepare_checkpoint;
std::vector<int> vec{1,2,3,4,5};
hpx::future<checkpoint> prepare_checkpoint(vec);
Once the future is ready, the checkpoint object will be initialized with an appropriately sized internal buffer.
It is also possible to modify the launch policy used by save_checkpoint.
This is accomplished by passing a launch policy as the first argument. It is
important to note that passing hpx::launch::sync will cause
save_checkpoint to return a checkpoint instead of a future to a
checkpoint. All other policies passed to save_checkpoint will return a
future to a checkpoint.
Sometimes checkpoint s must be declared before they are used.
save_checkpoint allows users to move pre-created checkpoint s into the
function as long as they are the first container passing into the function (In
the case where a launch policy is used, the checkpoint will immediately
follow the launch policy). An example of these features can be found below:
char character = 'd';
int integer = 10;
float flt = 10.01f;
bool boolean = true;
std::string str = "I am a string of characters";
std::vector<char> vec(str.begin(), str.end());
checkpoint archive;
// Test 1
// test basic functionality
hpx::shared_future<checkpoint> f_archive = save_checkpoint(
std::move(archive), character, integer, flt, boolean, str, vec);
Once users can create checkpoints they must now be able to restore the
objects they contain into memory. This is accomplished by the function
restore_checkpoint. This function takes a checkpoint and fills its data
into the containers it is provided. It is important to remember that the
containers must be ordered in the same way they were placed into the
checkpoint. For clarity see the example below:
char character2;
int integer2;
float flt2;
bool boolean2;
std::string str2;
std::vector<char> vec2;
restore_checkpoint(data, character2, integer2, flt2, boolean2, str2, vec2);
The core utility of checkpoint is in its ability to make certain data
persistent. Often, this means that the data needs to be stored in an object,
such as a file, for later use. HPX has two solutions for these issues: stream
operator overloads and access iterators.
HPX contains two stream overloads, operator<< and operator>>, to stream
data out of and into checkpoint. Here is an example of the overloads in
use below:
double a9 = 1.0, b9 = 1.1, c9 = 1.2;
std::ofstream test_file_9("test_file_9.txt");
hpx::future<checkpoint> f_9 = save_checkpoint(a9, b9, c9);
test_file_9 << f_9.get();
test_file_9.close();
double a9_1, b9_1, c9_1;
std::ifstream test_file_9_1("test_file_9.txt");
checkpoint archive9;
test_file_9_1 >> archive9;
restore_checkpoint(archive9, a9_1, b9_1, c9_1);
This is the primary way to move data into and out of a checkpoint. It is
important to note, however, that users should be cautious when using a stream
operator to load data and another function to remove it (or vice versa). Both
operator<< and operator>> rely on a .write() and a .read()
function respectively. In order to know how much data to read from the
std::istream, the operator<< will write the size of the checkpoint
before writing the checkpoint data. Correspondingly, the operator>> will
read the size of the stored data before reading the data into a new instance of
checkpoint. As long as the user employs the operator<< and
operator>> to stream the data, this detail can be ignored.
Important
Be careful when mixing operator<< and operator>> with other
facilities to read and write to a checkpoint. operator<< writes an
extra variable, and operator>> reads this variable back separately. Used
together the user will not encounter any issues and can safely ignore this
detail.
Users may also move the data into and out of a checkpoint using the exposed
.begin() and .end() iterators. An example of this use case is
illustrated below.
std::ofstream test_file_7("checkpoint_test_file.txt");
std::vector<float> vec7{1.02f, 1.03f, 1.04f, 1.05f};
hpx::future<checkpoint> fut_7 = save_checkpoint(vec7);
checkpoint archive7 = fut_7.get();
std::copy(archive7.begin(), // Write data to ofstream
archive7.end(), // ie. the file
std::ostream_iterator<char>(test_file_7));
test_file_7.close();
std::vector<float> vec7_1;
std::vector<char> char_vec;
std::ifstream test_file_7_1("checkpoint_test_file.txt");
if (test_file_7_1)
{
test_file_7_1.seekg(0, test_file_7_1.end);
auto length = test_file_7_1.tellg();
test_file_7_1.seekg(0, test_file_7_1.beg);
char_vec.resize(length);
test_file_7_1.read(char_vec.data(), length);
}
checkpoint archive7_1(std::move(char_vec)); // Write data to checkpoint
restore_checkpoint(archive7_1, vec7_1);
Checkpointing components#
save_checkpoint and restore_checkpoint are also able to store components
inside checkpoints. This can be done in one of two ways. First a client of
the component can be passed to save_checkpoint. When the user wishes to
resurrect the component she can pass a client instance to
restore_checkpoint.
This technique is demonstrated below:
// Try to checkpoint and restore a component with a client
std::vector<int> vec3{10, 10, 10, 10, 10};
// Create a component instance through client constructor
data_client D(hpx::find_here(), std::move(vec3));
hpx::future<checkpoint> f3 = save_checkpoint(D);
// Create a new client
data_client E;
// Restore server inside client instance
restore_checkpoint(f3.get(), E);
The second way a user can save a component is by passing a shared_ptr to the
component to save_checkpoint. This component can be resurrected by creating
a new instance of the component type and passing a shared_ptr to the new
instance to restore_checkpoint.
This technique is demonstrated below:
// test checkpoint a component using a shared_ptr
std::vector<int> vec{1, 2, 3, 4, 5};
data_client A(hpx::find_here(), std::move(vec));
// Checkpoint Server
hpx::id_type old_id = A.get_id();
hpx::future<std::shared_ptr<data_server>> f_a_ptr =
hpx::get_ptr<data_server>(A.get_id());
std::shared_ptr<data_server> a_ptr = f_a_ptr.get();
hpx::future<checkpoint> f = save_checkpoint(a_ptr);
auto&& data = f.get();
// test prepare_checkpoint API
checkpoint c = prepare_checkpoint(hpx::launch::sync, a_ptr);
HPX_TEST(c.size() == data.size());
// Restore Server
// Create a new server instance
std::shared_ptr<data_server> b_server;
restore_checkpoint(data, b_server);
collectives#
The collectives module exposes a set of distributed collective operations. Those can be used to exchange data between participating sites in a coordinated way. At this point the module exposes the following collective primitives:
hpx::collectives::all_gather: receives a set of values from all participating sites.hpx::collectives::all_reduce: performs a reduction on data from each participating site to each participating site.hpx::collectives::all_to_all: each participating site provides its element of the data to collect while all participating sites receive the data from every other site.hpx::collectives::broadcast_toandhpx::collectives::broadcast_from: performs a broadcast operation from a root site to all participating sites.- cpp:func:hpx::collectives::exclusive_scan
performs an exclusive scan operation
on a set of values received from all call sites operating on the given base name.
hpx::collectives::gather_hereandhpx::collectives::gather_there: gathers values from all participating sites.- cpp:func:hpx::collectives::inclusive_scan
performs an inclusive scan operation
on a set of values received from all call sites operating on the given base name.
hpx::collectives::reduce_hereandhpx::collectives::reduce_there: performs a reduction on data from each participating site to a root site.hpx::collectives::scatter_toandhpx::collectives::scatter_from: receives an element of a set of values operating on the given base name.hpx::lcos::broadcast: performs a given action on all given global identifiers.hpx::distributed::barrier: distributed barrier.hpx::lcos::fold: performs a fold with a given action on all given global identifiers.hpx::distributed::latch: distributed latch.hpx::lcos::reduce: performs a reduction on data from each given global identifiers.hpx::lcos::spmd_block: performs the same operation on a local image while providing handles to the other images.
See the API reference of the module for more details.
command_line_handling#
The command_line_handling module defines and handles the command-line options required by the HPX runtime, combining them with configuration options defined by the runtime_configuration module. The actual parsing of command line options is handled by the program_options module.
See the API reference of the module for more details.
components#
TODO: High-level description of the module.
See the API reference of this module for more details.
components_base#
TODO: High-level description of the library.
See the API reference of this module for more details.
compute#
The compute module provides utilities for handling task and memory affinity on host systems.
See the API reference of the module for more details.
distribution_policies#
TODO: High-level description of the module.
See the API reference of this module for more details.
executors_distributed#
This module provides the executor
hpx::parallel::execution::disribution_policy_executor. It allows
one to create work that is implicitly distributed over multiple localities.
See the API reference of this module for more details.
include#
This module provides no functionality in itself. Instead it provides headers that group together other headers that often appear together.
See the API reference of this module for more details.
init_runtime#
TODO: High-level description of the library.
See the API reference of this module for more details.
lcos_distributed#
This module contains distributed LCOs. Currently the only LCO provided is :cpp:class::hpx::lcos::channel, a construct for sending values from one locality to another. See libs_lcos_local for local LCOs.
See the API reference of this module for more details.
naming#
TODO: High-level description of the module.
See the API reference of this module for more details.
naming_base#
This module provides a forward declaration of address_type, component_type and invalid_locality_id.
See the API reference of this module for more details.
parcelport_lci#
TODO: High-level description of the module.
See the API reference of this module for more details.
parcelport_mpi#
TODO: High-level description of the module.
See the API reference of this module for more details.
parcelport_tcp#
TODO: High-level description of the module.
See the API reference of this module for more details.
parcelset#
TODO: High-level description of the module.
See the API reference of this module for more details.
parcelset_base#
TODO: High-level description of the module.
See the API reference of this module for more details.
performance_counters#
This module provides the basic functionality required for defining performance counters. See Performance counters for more information about performance counters.
See the API reference of this module for more details.
plugin_factories#
TODO: High-level description of the module.
See the API reference of this module for more details.
resiliency_distributed#
Software resiliency features of HPX were introduced in the resiliency module. This module extends the APIs to run on distributed-memory systems allowing the user to invoke the failing task on other localities at runtime. This is useful in cases where a node is identified to fail more often (e.g., for certain ALU computes) as the task can now be replayed or replicated among different localities. The API exposed allows for an easy integration with the local only resiliency APIs as well.
Distributed software resilience APIs have a similar function signature
and lives under the same namespace of hpx::resiliency::experimental.
The difference arises in the formal parameters where distributed APIs takes
the localities as the first argument, and an action as opposed to a function or
a function object. The localities signify the order in which the API will either
schedule (in case of Task Replay) tasks in a round robin fashion or replicate
the tasks onto the list of localities.
The list of APIs exposed by distributed resiliency modules is the same as those defined in local resiliency module.
See the API reference of this module for more details.
runtime_components#
TODO: High-level description of the module.
See the API reference of this module for more details.
runtime_distributed#
TODO: High-level description of the module.
See the API reference of this module for more details.
segmented_algorithms#
Segmented algorithms extend the usual parallel algorithms by providing overloads that work with distributed containers, such as partitioned vectors.
See the API reference of the module for more details.
statistics#
This module provide some statistics utilities like rolling min/max and histogram.
See the API reference of the module for more details.
API reference#
HPX follows a versioning scheme with three numbers: major.minor.patch. We
guarantee no breaking changes in the API for patch releases. Minor releases may
remove or break existing APIs, but only after a deprecation period of at least
two minor releases. In rare cases do we outright remove old and unused
functionality without a deprecation period.
We do not provide any ABI compatibility guarantees between any versions, debug and release builds, and builds with different C++ standards.
The public API of HPX is presented below. Clicking on a name brings you to the full documentation for the class or function. Including the header specified in a heading brings in the features listed under that heading.
Note
Names listed here are guaranteed stable with respect to semantic versioning. However, at the moment the list is incomplete and certain unlisted features are intended to be in the public API. While we work on completing the list, if you’re unsure about whether a particular unlisted name is part of the public API you can get into contact with us or open an issue and we’ll clarify the situation.
Public API#
Our API is semantically conforming; hence, the reader is highly encouraged to refer to the
corresponding facility in the C++ Standard if
needed. All names below are also available in the top-level hpx namespace unless
otherwise noted. The names in hpx should be preferred. The names in
sub-namespaces will eventually be removed.
hpx/algorithm.hpp#
The header hpx/algorithm.hpp corresponds to the C++ standard library header algorithm. See Using parallel algorithms for more information about the parallel algorithms.
Classes#
Class |
C++ standard |
|---|---|
|
|
|
Functions#
hpx function |
C++ standard |
|---|---|
hpx::ranges function |
C++ standard |
|---|---|
|
|
|
|
|
|
|
|
|
|
hpx/any.hpp#
The header hpx/any.hpp corresponds to the C++ standard library header any.
hpx::any is compatible with std::any.
Classes#
Class |
C++ standard |
|---|---|
Functions#
Function |
C++ standard |
|---|---|
|
|
|
|
|
|
|
hpx/assert.hpp#
The header hpx/assert.hpp corresponds to the C++ standard library header cassert.
HPX_ASSERT is the HPX equivalent to assert in cassert.
HPX_ASSERT can also be used in CUDA device code.
Macros#
Macro |
|---|
hpx/barrier.hpp#
The header hpx/barrier.hpp corresponds to the
C++ standard library header barrier and contains a distributed barrier implementation. This
functionality is also exposed through the hpx::distributed namespace. The name in
hpx::distributed should be preferred.
Classes#
Class |
C++ standard |
|---|---|
Class |
|---|
hpx/channel.hpp#
The header hpx/channel.hpp contains a local and a
distributed channel implementation. This functionality is also exposed through the hpx::distributed
namespace. The name in hpx::distributed should be preferred.
Classes#
Class |
|---|
|
Class |
|---|
|
hpx/chrono.hpp#
The header hpx/chrono.hpp corresponds to the C++ standard library header chrono. The following replacements and extensions are provided compared to chrono.
Classes#
Class |
C++ standard |
|---|---|
|
hpx/condition_variable.hpp#
The header hpx/condition_variable.hpp corresponds to the C++ standard library header condition_variable.
Classes#
Class |
C++ standard |
|---|---|
hpx/exception.hpp#
The header hpx/exception.hpp corresponds to
the C++ standard library header exception. hpx::exception
extends std::exception and is the base class for all exceptions thrown in HPX.
HPX_THROW_EXCEPTION can be used to throw HPX exceptions with file and line information
attached to the exception.
Macros#
Classes#
Class |
C++ standard |
|---|---|
hpx/execution.hpp#
The header hpx/execution.hpp corresponds to the C++ standard library header execution. See High level parallel facilities, Using parallel algorithms and Executor parameters and executor parameter traits for more information about execution policies and executor parameters.
Note
These names are only available in the hpx::execution namespace, not in
the top-level hpx namespace.
Constants#
Constant |
C++ standard |
|---|---|
|
|
|
|
|
|
|
Classes#
Class |
C++ standard |
|---|---|
hpx/functional.hpp#
The header hpx/functional.hpp corresponds to the
C++ standard library header functional. hpx::function is a more
efficient and serializable replacement for std::function.
Constants#
The following constants correspond to the C++ standard std::placeholders
Constant |
|---|
|
|
… |
|
Classes#
Class |
C++ standard |
|---|---|
Functions#
Function |
C++ standard |
|---|---|
|
|
|
|
|
|
|
|
|
|
|
|
|
|
|
hpx/future.hpp#
The header hpx/future.hpp corresponds to the C++ standard library header future. See Extended facilities for futures for more information about extensions to futures compared to the C++ standard library.
This header file also contains overloads of hpx::async,
hpx::post, hpx::sync, and hpx::dataflow that can be used with
actions. See Action invocation for more information about invoking actions.
Classes#
Class |
C++ standard |
|---|---|
Note
All names except hpx::promise are also available in
the top-level hpx namespace. hpx::promise refers to
hpx::distributed::promise, a distributed variant of
hpx::promise, but will eventually refer to
hpx::promise after a deprecation period.
Class |
|---|
Functions#
Function |
C++ standard |
|---|---|
|
|
|
|
|
|
|
|
|
|
|
|
|
|
hpx/init.hpp#
The header hpx/init.hpp contains functionality for starting, stopping, suspending, and resuming the HPX runtime. This is the main way to explicitly start the HPX runtime. See Starting the HPX runtime for more details on starting the HPX runtime.
Classes#
Class |
|---|
Functions#
Function |
|---|
hpx/latch.hpp#
The header hpx/latch.hpp corresponds to the C++
standard library header latch. It contains a local and a distributed latch
implementation. This functionality is also exposed through the hpx::distributed namespace.
The name in hpx::distributed should be preferred.
Classes#
Class |
C++ standard |
|---|---|
Class |
|---|
hpx/mutex.hpp#
The header hpx/mutex.hpp corresponds to the C++ standard library header mutex.
Classes#
Class |
C++ standard |
|---|---|
Functions#
Class |
C++ standard |
|---|---|
|
hpx/memory.hpp#
The header hpx/memory.hpp corresponds to the C++ standard library header memory. It contains parallel versions of the copy, fill, move, and construct helper functions in memory. See Using parallel algorithms for more information about the parallel algorithms.
Functions#
hpx function |
C++ standard |
|---|---|
hpx::ranges function |
C++ standard |
|---|---|
hpx/numeric.hpp#
The header hpx/numeric.hpp corresponds to the C++ standard library header numeric. See Using parallel algorithms for more information about the parallel algorithms.
Functions#
hpx function |
C++ standard |
|---|---|
hpx::ranges function |
|---|
|
hpx/optional.hpp#
The header hpx/optional.hpp corresponds to the
C++ standard library header optional. hpx::optional is compatible
with std::optional.
Constants#
hpx::nullopt
Classes#
Class |
C++ standard |
|---|---|
|
|
|
|
|
hpx/runtime.hpp#
The header hpx/runtime.hpp contains functions for accessing local and distributed runtime information.
Typedefs#
Typedef |
|---|
Functions#
Function |
|---|
|
|
|
|
|
|
|
|
hpx/experimental/scope.hpp#
The header hpx/experimental/scope.hpp corresponds to the C++ standard library header experimental/scope.
Classes#
Class |
C++ standard |
|---|---|
hpx/semaphore.hpp#
The header hpx/semaphore.hpp corresponds to the C++ standard library header semaphore.
Classes#
Class |
C++ standard |
|---|---|
hpx/source_location.hpp#
The header hpx/source_location.hpp corresponds to the C++ standard library header source_location.
Classes#
Class |
C++ standard |
|---|---|
hpx/stop_token.hpp#
The header hpx/stop_token.hpp corresponds to the C++ standard library header stop_token.
Constants#
Constant |
C++ standard |
|---|---|
|
Classes#
Class |
C++ standard |
|---|---|
hpx/system_error.hpp#
The header hpx/system_error.hpp corresponds to the C++ standard library header system_error.
Classes#
Class |
C++ standard |
|---|---|
hpx/task_block.hpp#
The header hpx/task_block.hpp corresponds to the
task_block feature in N4755. See using_task_block for more details on using task
blocks.
Classes#
Class |
|---|
Functions#
Function |
|---|
|
|
hpx/experimental/task_group.hpp#
The header hpx/experimental/task_group.hpp
corresponds to the task_group feature in oneAPI Threading Building Blocks (oneTBB).
Classes#
Class |
|---|
hpx/thread.hpp#
The header hpx/thread.hpp corresponds to the C++ standard library header thread. The functionality in this header is equivalent to the standard library thread functionality, with the exception that the HPX equivalents are implemented on top of lightweight threads and the HPX runtime.
Classes#
Class |
C++ standard |
|---|---|
Functions#
Function |
C++ standard |
|---|---|
|
|
|
|
|
|
|
hpx/tuple.hpp#
The header hpx/tuple.hpp corresponds to the
C++ standard library header tuple. hpx::tuple can be used in
CUDA device code, unlike std::tuple.
Constants#
Constant |
C++ standard |
|---|---|
Classes#
Class |
C++ standard |
|---|---|
Functions#
Function |
C++ standard |
|---|---|
hpx/type_traits.hpp#
The header hpx/type_traits.hpp corresponds to the C++ standard library header type_traits.
Classes#
Class |
C++ standard |
|---|---|
hpx/unwrap.hpp#
The header hpx/unwrap.hpp contains utilities for unwrapping futures.
Classes#
Class |
|---|
Functions#
Function |
|---|
hpx/version.hpp#
The header hpx/version.hpp provides version information about HPX.
Macros#
Macro |
|---|
|
|
|
|
|
|
|
Functions#
Function |
|---|
|
|
|
|
|
|
|
|
|
hpx/wrap_main.hpp#
The header hpx/wrap_main.hpp does not provide any direct functionality
but is used for implicitly using main as the runtime entry point. See Re-use the main() function as the main HPX entry point for more
details on implicitly starting the HPX runtime.
Public distributed API#
Our Public Distributed API offers a rich set of tools and functions that enable developers to harness the full potential of distributed computing. Here, you’ll find a comprehensive list of header files, classes and functions for various distributed computing features provided by HPX.
hpx/barrier.hpp#
The header hpx/barrier.hpp includes a distributed barrier implementation. For information regarding the C++ standard library header barrier, see Public API.
Classes#
Class |
|---|
Functions#
Function |
|---|
hpx/collectives.hpp#
The header hpx/collectives.hpp contains definitions and implementations related to the collectives operations.
Classes#
Class |
|---|
Functions#
hpx/latch.hpp#
The header hpx/latch.hpp includes a distributed latch implementation. For information regarding the C++ standard library header latch, see Public API.
Classes#
Class |
|---|
Function |
|---|
hpx/async.hpp#
The header hpx/async.hpp
includes distributed implementations of hpx::async,
hpx::post, hpx::sync, and hpx::dataflow.
For information regarding the C++ standard library header, see Public API.
Functions#
Functions |
|---|
hpx/components.hpp#
The header hpx/include/components.hpp includes the components implementation. A component in hpx is a C++ class which can be created remotely and for which its member functions can be invoked remotely as well. More information about how components can be defined, created, and used can be found in Writing components. Components and actions includes examples on the accumulator, template accumulator and template function accumulator.
Macros#
Macro |
|---|
Classes#
Class |
|---|
Functions#
Function |
|---|
Full API#
The full API of HPX is presented below. The listings for the public API above refer to the full documentation below.
Note
Most names listed in the full API reference are implementation details or considered unstable. They are listed mostly for completeness. If there is a particular feature you think deserves being in the public API we may consider promoting it. In general we prioritize making sure features corresponding to C++ standard library features are stable and complete.
algorithms#
See Public API for a list of names and headers that are part of the public HPX API.
hpx::experimental::run_on_all#
Defined in header hpx/task_block.hpp.
See Public API for a list of names and headers that are part of the public HPX API.
-
namespace hpx
-
namespace experimental
Top-level namespace.
Functions
- template<typename ExPolicy, typename T, typename... Ts> HPX_CXX_CORE_EXPORT requires (hpx::is_execution_policy_v< ExPolicy >) decltype(auto) run_on_all(ExPolicy &&policy
Run a function on all available worker threads with reduction support using the given execution policy
- Template Parameters
ExPolicy – The execution policy type
T – The first type in a list of reduction types and the function type to invoke (last argument)
Ts – The list of reduction types and the function type to invoke (last argument)
- Parameters
policy – The execution policy to use
t – The first in a list of reductions and the function to invoke (last argument)
ts – The list of reductions and the function to invoke (last argument)
- template<typename T, typename... Ts> HPX_CXX_CORE_EXPORT requires (!hpx::is_execution_policy_v< T >) decltype(auto) run_on_all(T &&t
Run a function on all available worker threads with reduction support using the hpx::execution::par execution policy
- Template Parameters
T – The first type in a list of reduction types and the function type to invoke (last argument)
Ts – The list of reduction types and the function type to invoke (last argument)
- Parameters
t – The first in a list of reductions and the function to invoke (last argument)
ts – The list of reductions and the function to invoke (last argument)
Variables
- HPX_CXX_CORE_EXPORT T && t
- HPX_CXX_CORE_EXPORT T Ts && ts {return detail::run_on_all(HPX_FORWARD(ExPolicy, policy),hpx::util::make_index_pack_t<sizeof...(Ts)>(), HPX_FORWARD(T, t),HPX_FORWARD(Ts, ts)...)
-
namespace experimental
hpx::experimental::task_canceled_exception, hpx::experimental::task_block, hpx::experimental::define_task_block, hpx::experimental::define_task_block_restore_thread#
Defined in header hpx/task_block.hpp.
See Public API for a list of names and headers that are part of the public HPX API.
-
namespace hpx
-
namespace experimental
Top-level namespace.
Functions
- template<typename ExPolicy, typename F> HPX_CXX_CORE_EXPORT requires (hpx::is_execution_policy_v< std::decay_t< ExPolicy >>) decltype(auto) define_task_block(ExPolicy &&policy
Constructs a task_block, tr, using the given execution policy policy,and invokes the expression f(tr) on the user-provided object, f.
Postcondition: All tasks spawned from f have finished execution. A call to define_task_block may return on a different thread than that on which it was called.
Note
It is expected (but not mandated) that f will (directly or indirectly) call tr.run(callable_object).
- Template Parameters
ExPolicy – The type of the execution policy to use (deduced). It describes the manner in which the execution of the task block may be parallelized.
F – The type of the user defined function to invoke inside the define_task_block (deduced). F shall be MoveConstructible.
- Parameters
policy – The execution policy to use for the scheduling of the iterations.
f – The user defined function to invoke inside the task block. Given an lvalue tr of type task_block, the expression, (void)f(tr), shall be well-formed.
- Throws
exception_list – specified in Exception Handling.
-
template<typename ExPolicy = hpx::execution::parallel_policy>
class task_block# - #include <task_block.hpp>
The class task_block defines an interface for forking and joining parallel tasks. The define_task_block and define_task_block_restore_thread function templates create an object of type task_block and pass a reference to that object to a user-provided callable object.
An object of class task_block cannot be constructed, destroyed, copied, or moved except by the implementation of the task region library. Taking the address of a task_block object via operator& or addressof is ill formed. The result of obtaining its address by any other means is unspecified.
is active if it was created by the nearest enclosing task block, where “task block” refers to an invocation of define_task_block or define_task_block_restore_thread and “nearest
enclosing” means the most recent invocation that has not yet completed. Code designated for execution in another thread by means other than the facilities in this section (e.g., using thread or async) are not enclosed in the task region and a
task_block passed to (or captured by) such code is not active within that code. Performing any operation on a task_block that is not active results in undefined behavior.The task_block that is active before a specific call to the run member function is not active within the asynchronous function that invoked run. (The invoked function should not, therefore, capture the task_block from the surrounding block.)
Example: define_task_block([&](auto& tr) { tr.run([&] { tr.run([] { f(); }); // Error: tr is not active define_task_block([&](auto& tr) { // Nested task block tr.run(f); // OK: inner tr is active /// ... }); }); /// ... });
- Template Parameters
ExPolicy – The execution policy an instance of a task_block was created with. This defaults to parallel_policy.
Public Types
-
using execution_policy = ExPolicy#
Refers to the type of the execution policy used to create the task_block.
Public Functions
-
inline constexpr execution_policy const &get_execution_policy() const noexcept#
Return the execution policy instance used to create this task_block
-
template<typename F, typename ...Ts>
inline void run(F &&f, Ts&&... ts)# Causes the expression f() to be invoked asynchronously. The invocation of f is permitted to run on an unspecified thread in an unordered fashion relative to the sequence of operations following the call to run(f) (the continuation), or indeterminately sequenced within the same thread as the continuation.
The call to run synchronizes with the invocation of f. The completion of f() synchronizes with the next invocation of wait on the same task_block or completion of the nearest enclosing task block (i.e., the define_task_block or define_task_block_restore_thread that created this task block).
Requires: F shall be MoveConstructible. The expression, (void)f(), shall be well-formed.
Precondition: this shall be the active task_block.
Postconditions: A call to run may return on a different thread than that on which it was called.
Note
The call to run is sequenced before the continuation as if run returns on the same thread. The invocation of the user-supplied callable object f may be immediate or may be delayed until compute resources are available. run might or might not return before invocation of f completes.
- Throws
task_canceled_exception – described in Exception Handling.
-
template<typename Executor, typename F, typename ...Ts>
inline void run(Executor &&exec, F &&f, Ts&&... ts)# Causes the expression f() to be invoked asynchronously using the given executor. The invocation of f is permitted to run on an unspecified thread associated with the given executor and in an unordered fashion relative to the sequence of operations following the call to run(exec, f) (the continuation), or indeterminately sequenced within the same thread as the continuation.
The call to run synchronizes with the invocation of f. The completion of f() synchronizes with the next invocation of wait on the same task_block or completion of the nearest enclosing task block (i.e., the define_task_block or define_task_block_restore_thread that created this task block).
Requires: Executor shall be a type modeling the Executor concept. F shall be MoveConstructible. The expression, (void)f(), shall be well-formed.
Precondition: this shall be the active task_block.
Postconditions: A call to run may return on a different thread than that on which it was called.
Note
The call to run is sequenced before the continuation as if run returns on the same thread. The invocation of the user-supplied callable object f may be immediate or may be delayed until compute resources are available. run might or might not return before invocation of f completes.
- Throws
task_canceled_exception – described in Exception Handling. The function will also throw an exception_list holding all exceptions that were caught while executing the tasks.
-
inline void wait()#
Blocks until the tasks spawned using this task_block have finished.
Precondition: this shall be the active task_block.
Postcondition: All tasks spawned by the nearest enclosing task region have finished. A call to wait may return on a different thread than that on which it was called.
Example: define_task_block([&](auto& tr) { tr.run([&]{ process(a, w, x); }); // Process a[w] through a[x] if (y < x) tr.wait(); // Wait if overlap between [w, x) and [y, z) process(a, y, z); // Process a[y] through a[z] });
Note
The call to wait is sequenced before the continuation as if wait returns on the same thread.
- Throws
This – function may throw task_canceled_exception, as described in Exception Handling. The function will also throw a exception_list holding all exceptions that were caught while executing the tasks.
-
inline ExPolicy &policy() noexcept#
Returns a reference to the execution policy used to construct this object.
Precondition: this shall be the active task_block.
-
inline constexpr ExPolicy const &policy() const noexcept#
Returns a reference to the execution policy used to construct this object.
Precondition: this shall be the active task_block.
Private Members
-
hpx::experimental::task_group tasks_#
-
class task_canceled_exception : public exception#
- #include <task_block.hpp>
The class task_canceled_exception defines the type of objects thrown by task_block::run or task_block::wait if they detect that an exception is pending within the current parallel region.
Public Functions
-
inline task_canceled_exception() noexcept#
-
inline task_canceled_exception() noexcept#
-
namespace parallel
Typedefs
-
typedef hpx::experimental::task_canceled_exception instead#
Functions
- template<typename ExPolicy, typename F> requires (hpx::is_async_execution_policy_v< std::decay_t< ExPolicy >>) HPX_DEPRECATED_V(1
- hpx::parallel use hpx::experimental::define_task_block instead hpx::future< void > define_task_block (ExPolicy &&policy, F &&f)
- template<typename ExPolicy, typename F> requires (!hpx::is_async_execution_policy_v< std::decay_t< ExPolicy >>) HPX_DEPRECATED_V(1
- template<typename F> HPX_DEPRECATED_V (1, 9, "hpx::parallel:v2::define_task_block is deprecated, use " "hpx::experimental::define_task_block instead") void define_task_block(F &&f)
- template<typename ExPolicy, typename F> HPX_DEPRECATED_V (1, 9, "hpx::parallel:v2::define_task_block is deprecated, use " "hpx::experimental::define_task_block instead") util
-
typedef hpx::experimental::task_canceled_exception instead#
-
namespace experimental
hpx::experimental::task_group#
Defined in header hpx/experimental/task_group.hpp.
See Public API for a list of names and headers that are part of the public HPX API.
-
namespace hpx
-
namespace execution#
-
namespace experimental#
Typedefs
-
using instead = hpx::experimental::task_group#
-
using instead = hpx::experimental::task_group#
-
namespace experimental#
-
namespace experimental
Top-level namespace.
-
class task_group#
- #include <task_group.hpp>
A
task_grouprepresents concurrent execution of a group of tasks. Tasks can be dynamically added to the group while it is executing.Public Functions
-
task_group()#
-
~task_group()#
-
task_group(task_group const&) = delete#
-
task_group(task_group&&) = delete#
-
task_group &operator=(task_group const&) = delete#
-
task_group &operator=(task_group&&) = delete#
- template<typename Executor, typename F, typename... Ts> requires (hpx::traits::is_executor_any_v< std::decay_t< Executor >>) void run(Executor &&exec
Adds a task to compute
f()and returns immediately.- Template Parameters
Executor – The type of the executor to associate with this execution policy.
F – The type of the user defined function to invoke.
Ts – The type of additional arguments used to invoke
f().
- Parameters
exec – The executor to use for the execution of the parallel algorithm the returned execution policy is used with.
f – The user defined function to invoke inside the task group.
ts – Additional arguments to use to invoke
f().
- hpx::parallel::execution::post (HPX_FORWARD(Executor, exec), [this, on_exit=HPX_MOVE(on_exit), f=HPX_FORWARD(F, f),... ts=HPX_FORWARD(Ts, ts)]() mutable { auto _(HPX_MOVE(on_exit));hpx::detail::try_catch_exception_ptr([&]() { HPX_INVOKE(f, ts...);}, [this](std::exception_ptr e) { add_exception(HPX_MOVE(e));});})
- template<typename F, typename... Ts> requires (!hpx::traits::is_executor_any_v< std::decay_t< F >>) void run(F &&f
Adds a task to compute
f()and returns immediately.- Template Parameters
F – The type of the user defined function to invoke.
Ts – The type of additional arguments used to invoke
f().
- Parameters
f – The user defined function to invoke inside the task group.
ts – Additional arguments to use to invoke
f().
-
void wait()#
Waits for all tasks in the group to complete or be cancelled.
-
void add_exception(std::exception_ptr p)#
Adds an exception to this
task_group.
Public Members
-
F &&f#
- F Ts && ts {if (latch_.reset_if_needed_and_count_up(1, 1)){has_arrived_.store(false, std::memory_order_release);}auto on_exit =hpx::experimental::scope_exit([this] { latch_.count_down(1); })
- Ts && ts {run(execution::parallel_executor{}, HPX_FORWARD(F, f),HPX_FORWARD(Ts, ts)...)
Private Types
Private Functions
-
void serialize(serialization::output_archive&, unsigned const)#
Private Static Functions
-
static inline constexpr void serialize(serialization::input_archive&, unsigned const) noexcept#
Friends
- friend class serialization::access
-
task_group()#
-
class task_group#
-
namespace execution#
hpx::adjacent_difference#
Defined in header hpx/algorithm.hpp.
See Public API for a list of names and headers that are part of the public HPX API.
-
namespace hpx#
Functions
-
template<typename FwdIter1, typename FwdIter2>
FwdIter2 adjacent_difference(FwdIter1 first, FwdIter1 last, FwdIter2 dest)# Assigns each value in the range given by result its corresponding element in the range [first, last] and the one preceding it except *result, which is assigned *first.
Note
Complexity: Exactly (last - first) - 1 application of the binary operator and (last - first) assignments.
- Template Parameters
FwdIter1 – The type of the source iterators used for the input range (deduced). This iterator type must meet the requirements of a forward iterator.
FwdIter2 – The type of the source iterators used for the output range (deduced). This iterator type must meet the requirements of a forward iterator.
- Parameters
first – Refers to the beginning of the sequence of elements of the range the algorithm will be applied to.
last – Refers to the end of the sequence of elements of the range the algorithm will be applied to.
dest – Refers to the beginning of the sequence of elements the results will be assigned to.
- Returns
The adjacent_difference algorithm returns a FwdIter2. The adjacent_difference algorithm returns an iterator to the element past the last element written.
-
template<typename ExPolicy, typename FwdIter1, typename FwdIter2>
hpx::parallel::util::detail::algorithm_result_t<ExPolicy, FwdIter2> adjacent_difference(ExPolicy &&policy, FwdIter1 first, FwdIter1 last, FwdIter2 dest)# Assigns each value in the range given by result its corresponding element in the range [first, last] and the one preceding it except *result, which is assigned *first. Executed according to the policy.
The difference operations in the parallel adjacent_difference invoked with an execution policy object of type sequenced_policy execute in sequential order in the calling thread.
The difference operations in the parallel adjacent_difference invoked with an execution policy object of type parallel_policy or parallel_task_policy are permitted to execute in an unordered fashion in unspecified threads, and indeterminately sequenced within each thread.
Note
Complexity: Exactly (last - first) - 1 application of the binary operator and (last - first) assignments.
- Template Parameters
ExPolicy – The type of the execution policy to use (deduced). It describes the manner in which the execution of the algorithm may be parallelized and the manner in which it executes the assignments.
FwdIter1 – The type of the source iterators used for the input range (deduced). This iterator type must meet the requirements of a forward iterator.
FwdIter2 – The type of the source iterators used for the output range (deduced). This iterator type must meet the requirements of a forward iterator.
- Parameters
policy – The execution policy to use for the scheduling of the iterations.
first – Refers to the beginning of the sequence of elements of the range the algorithm will be applied to.
last – Refers to the end of the sequence of elements of the range the algorithm will be applied to.
dest – Refers to the beginning of the sequence of elements the results will be assigned to.
- Returns
The adjacent_difference algorithm returns a hpx::future<FwdIter2> if the execution policy is of type sequenced_task_policy or parallel_task_policy and returns FwdIter2 otherwise. The adjacent_difference algorithm returns an iterator to the element past the last element written.
-
template<typename FwdIter1, typename FwdIter2, typename Op>
FwdIter2 adjacent_difference(FwdIter1 first, FwdIter1 last, FwdIter2 dest, Op &&op)# Assigns each value in the range given by result its corresponding element in the range [first, last] and the one preceding it except *result, which is assigned *first
Note
Complexity: Exactly (last - first) - 1 application of the binary operator and (last - first) assignments.
- Template Parameters
FwdIter1 – The type of the source iterators used for the input range (deduced). This iterator type must meet the requirements of a forward iterator.
FwdIter2 – The type of the source iterators used for the output range (deduced). This iterator type must meet the requirements of a forward iterator.
Op – The type of the function/function object to use (deduced). Unlike its sequential form, the parallel overload of adjacent_difference requires Op to meet the requirements of CopyConstructible.
- Parameters
first – Refers to the beginning of the sequence of elements of the range the algorithm will be applied to.
last – Refers to the end of the sequence of elements of the range the algorithm will be applied to.
dest – Refers to the beginning of the sequence of elements the results will be assigned to.
op – The binary operator which returns the difference of elements. The signature should be equivalent to the following:
The signature does not need to have const &, but the function must not modify the objects passed to it. The types Type1 must be such that objects of type FwdIter1 can be dereferenced and then implicitly converted to the dereferenced type of dest.bool op(const Type1 &a, const Type1 &b);
- Returns
The adjacent_difference algorithm returns FwdIter2. The adjacent_difference algorithm returns an iterator to the element past the last element written.
-
template<typename ExPolicy, typename FwdIter1, typename FwdIter2, typename Op>
hpx::parallel::util::detail::algorithm_result_t<ExPolicy, FwdIter2> adjacent_difference(ExPolicy &&policy, FwdIter1 first, FwdIter1 last, FwdIter2 dest, Op &&op)# Assigns each value in the range given by result its corresponding element in the range [first, last] and the one preceding it except *result, which is assigned *first
The difference operations in the parallel adjacent_difference invoked with an execution policy object of type sequenced_policy execute in sequential order in the calling thread.
The difference operations in the parallel adjacent_difference invoked with an execution policy object of type parallel_policy or parallel_task_policy are permitted to execute in an unordered fashion in unspecified threads, and indeterminately sequenced within each thread.
Note
Complexity: Exactly (last - first) - 1 application of the binary operator and (last - first) assignments.
- Template Parameters
ExPolicy – The type of the execution policy to use (deduced). It describes the manner in which the execution of the algorithm may be parallelized and the manner in which it executes the assignments.
FwdIter1 – The type of the source iterators used for the input range (deduced). This iterator type must meet the requirements of a forward iterator.
FwdIter2 – The type of the source iterators used for the output range (deduced). This iterator type must meet the requirements of a forward iterator.
Op – The type of the function/function object to use (deduced). Unlike its sequential form, the parallel overload of adjacent_difference requires Op to meet the requirements of CopyConstructible.
- Parameters
policy – The execution policy to use for the scheduling of the iterations.
first – Refers to the beginning of the sequence of elements of the range the algorithm will be applied to.
last – Refers to the end of the sequence of elements of the range the algorithm will be applied to.
dest – Refers to the beginning of the sequence of elements the results will be assigned to.
op – The binary operator which returns the difference of elements. The signature should be equivalent to the following:
The signature does not need to have const &, but the function must not modify the objects passed to it. The types Type1 must be such that objects of type FwdIter1 can be dereferenced and then implicitly converted to the dereferenced type of dest.bool op(const Type1 &a, const Type1 &b);
- Returns
The adjacent_difference algorithm returns a hpx::future<FwdIter2> if the execution policy is of type sequenced_task_policy or parallel_task_policy and returns FwdIter2 otherwise. The adjacent_difference algorithm returns an iterator to the element past the last element written.
-
template<typename FwdIter1, typename FwdIter2>
hpx::adjacent_find#
Defined in header hpx/algorithm.hpp.
See Public API for a list of names and headers that are part of the public HPX API.
-
namespace hpx
Functions
-
template<typename InIter, typename Pred = hpx::parallel::detail::equal_to>
InIter adjacent_find(InIter first, InIter last, Pred &&pred = Pred())# Searches the range [first, last) for two consecutive identical elements.
Note
Complexity: Exactly the smaller of (result - first) + 1 and (last - first) - 1 application of the predicate where result is the value returned
- Template Parameters
InIter – The type of the source iterators used for the range (deduced). This iterator type must meet the requirements of an input iterator.
Pred – The type of an optional function/function object to use.
- Parameters
first – Refers to the beginning of the sequence of elements of the range the algorithm will be applied to.
last – Refers to the end of the sequence of elements of the range the algorithm will be applied to.
pred – The binary predicate which returns true if the elements should be treated as equal. The signature should be equivalent to the following:
The signature does not need to have const &, but the function must not modify the objects passed to it. The types Type1 must be such that objects of type InIter can be dereferenced and then implicitly converted to Type1 .bool pred(const Type1 &a, const Type1 &b);
- Returns
The adjacent_find algorithm returns an iterator to the first of the identical elements. If no such elements are found, last is returned.
-
template<typename ExPolicy, typename FwdIter, typename Pred = hpx::parallel::detail::equal_to>
hpx::parallel::util::detail::algorithm_result_t<ExPolicy, FwdIter> adjacent_find(ExPolicy &&policy, FwdIter first, FwdIter last, Pred &&pred = Pred())# Searches the range [first, last) for two consecutive identical elements. This version uses the given binary predicate pred
The comparison operations in the parallel adjacent_find invoked with an execution policy object of type sequenced_policy execute in sequential order in the calling thread.
The comparison operations in the parallel adjacent_find invoked with an execution policy object of type parallel_policy or parallel_task_policy are permitted to execute in an unordered fashion in unspecified threads, and indeterminately sequenced within each thread.
This overload of adjacent_find is available if the user decides to provide their algorithm their own binary predicate pred.
Note
Complexity: Exactly the smaller of (result - first) + 1 and (last - first) - 1 application of the predicate where result is the value returned
- Template Parameters
ExPolicy – The type of the execution policy to use (deduced). It describes the manner in which the execution of the algorithm may be parallelized and the manner in which it executes the assignments.
FwdIter – The type of the source iterators used for the range (deduced). This iterator type must meet the requirements of a forward iterator.
Pred – The type of an optional function/function object to use. Unlike its sequential form, the parallel overload of adjacent_find requires Pred to meet the requirements of CopyConstructible. This defaults to std::equal_to<>
- Parameters
policy – The execution policy to use for the scheduling of the iterations.
first – Refers to the beginning of the sequence of elements of the range the algorithm will be applied to.
last – Refers to the end of the sequence of elements of the range the algorithm will be applied to.
pred – The binary predicate which returns true if the elements should be treated as equal. The signature should be equivalent to the following:
The signature does not need to have const &, but the function must not modify the objects passed to it. The types Type1 must be such that objects of type FwdIter can be dereferenced and then implicitly converted to Type1 .bool pred(const Type1 &a, const Type1 &b);
- Returns
The adjacent_find algorithm returns a hpx::future<FwdIter> if the execution policy is of type sequenced_task_policy or parallel_task_policy and returns FwdIter otherwise. The adjacent_find algorithm returns an iterator to the first of the identical elements. If no such elements are found, last is returned.
-
template<typename InIter, typename Pred = hpx::parallel::detail::equal_to>
hpx::all_of, hpx::any_of, hpx::none_of#
Defined in header hpx/algorithm.hpp.
See Public API for a list of names and headers that are part of the public HPX API.
-
namespace hpx
Functions
-
template<typename ExPolicy, typename FwdIter, typename F>
util::detail::algorithm_result_t<ExPolicy, bool> none_of(ExPolicy &&policy, FwdIter first, FwdIter last, F &&f)# Checks if unary predicate f returns true for no elements in the range [first, last).
The application of function objects in parallel algorithm invoked with an execution policy object of type sequenced_policy execute in sequential order in the calling thread.
The application of function objects in parallel algorithm invoked with an execution policy object of type parallel_policy or parallel_task_policy are permitted to execute in an unordered fashion in unspecified threads, and indeterminately sequenced within each thread.
Note
Complexity: At most last - first applications of the predicate f
- Template Parameters
ExPolicy – The type of the execution policy to use (deduced). It describes the manner in which the execution of the algorithm may be parallelized and the manner in which it applies user-provided function objects.
FwdIter – The type of the source iterators used (deduced). This iterator type must meet the requirements of an forward iterator.
F – The type of the function/function object to use (deduced). Unlike its sequential form, the parallel overload of none_of requires F to meet the requirements of CopyConstructible.
- Parameters
policy – The execution policy to use for the scheduling of the iterations.
first – Refers to the beginning of the sequence of elements the algorithm will be applied to.
last – Refers to the end of the sequence of elements the algorithm will be applied to.
f – Specifies the function (or function object) which will be invoked for each of the elements in the sequence specified by [first, last). The signature of this predicate should be equivalent to:
The signature does not need to have const&, but the function must not modify the objects passed to it. The type Type must be such that an object of type FwdIter can be dereferenced and then implicitly converted to Type.bool pred(const Type &a);
- Returns
The none_of algorithm returns a hpx::future<bool> if the execution policy is of type sequenced_task_policy or parallel_task_policy and returns bool otherwise. The none_of algorithm returns true if the unary predicate f returns true for no elements in the range, false otherwise. It returns true if the range is empty.
-
template<typename InIter, typename F>
bool none_of(InIter first, InIter last, F &&f)# Checks if unary predicate f returns true for no elements in the range [first, last).
Note
Complexity: At most last - first applications of the predicate f
- Template Parameters
InIter – The type of the source iterators used (deduced). This iterator type must meet the requirements of an input iterator.
F – The type of the function/function object to use (deduced). Unlike its sequential form, the parallel overload of none_of requires F to meet the requirements of CopyConstructible.
- Parameters
first – Refers to the beginning of the sequence of elements the algorithm will be applied to.
last – Refers to the end of the sequence of elements the algorithm will be applied to.
f – Specifies the function (or function object) which will be invoked for each of the elements in the sequence specified by [first, last). The signature of this predicate should be equivalent to:
The signature does not need to have const&, but the function must not modify the objects passed to it. The type Type must be such that an object of type InIter can be dereferenced and then implicitly converted to Type.bool pred(const Type &a);
- Returns
The none_of algorithm returns a bool . The none_of algorithm returns true if the unary predicate f returns true for no elements in the range, false otherwise. It returns true if the range is empty.
-
template<typename ExPolicy, typename FwdIter, typename F>
util::detail::algorithm_result_t<ExPolicy, bool> any_of(ExPolicy &&policy, FwdIter first, FwdIter last, F &&f)# Checks if unary predicate f returns true for at least one element in the range [first, last).
The application of function objects in parallel algorithm invoked with an execution policy object of type sequenced_policy execute in sequential order in the calling thread.
The application of function objects in parallel algorithm invoked with an execution policy object of type parallel_policy or parallel_task_policy are permitted to execute in an unordered fashion in unspecified threads, and indeterminately sequenced within each thread.
Note
Complexity: At most last - first applications of the predicate f
- Template Parameters
ExPolicy – The type of the execution policy to use (deduced). It describes the manner in which the execution of the algorithm may be parallelized and the manner in which it applies user-provided function objects.
FwdIter – The type of the source iterators used (deduced). This iterator type must meet the requirements of an forward iterator.
F – The type of the function/function object to use (deduced). Unlike its sequential form, the parallel overload of any_of requires F to meet the requirements of CopyConstructible.
- Parameters
policy – The execution policy to use for the scheduling of the iterations.
first – Refers to the beginning of the sequence of elements the algorithm will be applied to.
last – Refers to the end of the sequence of elements the algorithm will be applied to.
f – Specifies the function (or function object) which will be invoked for each of the elements in the sequence specified by [first, last). The signature of this predicate should be equivalent to:
The signature does not need to have const&, but the function must not modify the objects passed to it. The type Type must be such that an object of type FwdIter can be dereferenced and then implicitly converted to Type.bool pred(const Type &a);
- Returns
The any_of algorithm returns a hpx::future<bool> if the execution policy is of type sequenced_task_policy or parallel_task_policy and returns bool otherwise. The any_of algorithm returns true if the unary predicate f returns true for at least one element in the range, false otherwise. It returns false if the range is empty.
-
template<typename InIter, typename F>
bool any_of(InIter first, InIter last, F &&f)# Checks if unary predicate f returns true for at least one element in the range [first, last).
Note
Complexity: At most last - first applications of the predicate f
- Template Parameters
InIter – The type of the source iterators used (deduced). This iterator type must meet the requirements of an input iterator.
F – The type of the function/function object to use (deduced). Unlike its sequential form, the parallel overload of any_of requires F to meet the requirements of CopyConstructible.
- Parameters
first – Refers to the beginning of the sequence of elements the algorithm will be applied to.
last – Refers to the end of the sequence of elements the algorithm will be applied to.
f – Specifies the function (or function object) which will be invoked for each of the elements in the sequence specified by [first, last). The signature of this predicate should be equivalent to:
The signature does not need to have const&, but the function must not modify the objects passed to it. The type Type must be such that an object of type InIter can be dereferenced and then implicitly converted to Type.bool pred(const Type &a);
- Returns
The any_of algorithm returns a bool . The any_of algorithm returns true if the unary predicate f returns true for at least one element in the range, false otherwise. It returns false if the range is empty.
-
template<typename ExPolicy, typename FwdIter, typename F>
util::detail::algorithm_result_t<ExPolicy, bool> all_of(ExPolicy &&policy, FwdIter first, FwdIter last, F &&f)# Checks if unary predicate f returns true for all elements in the range [first, last).
The application of function objects in parallel algorithm invoked with an execution policy object of type sequenced_policy execute in sequential order in the calling thread.
The application of function objects in parallel algorithm invoked with an execution policy object of type parallel_policy or parallel_task_policy are permitted to execute in an unordered fashion in unspecified threads, and indeterminately sequenced within each thread.
Note
Complexity: At most last - first applications of the predicate f
- Template Parameters
ExPolicy – The type of the execution policy to use (deduced). It describes the manner in which the execution of the algorithm may be parallelized and the manner in which it applies user-provided function objects.
FwdIter – The type of the source iterators used (deduced). This iterator type must meet the requirements of an forward iterator.
F – The type of the function/function object to use (deduced). Unlike its sequential form, the parallel overload of all_of requires F to meet the requirements of CopyConstructible.
- Parameters
policy – The execution policy to use for the scheduling of the iterations.
first – Refers to the beginning of the sequence of elements the algorithm will be applied to.
last – Refers to the end of the sequence of elements the algorithm will be applied to.
f – Specifies the function (or function object) which will be invoked for each of the elements in the sequence specified by [first, last). The signature of this predicate should be equivalent to:
The signature does not need to have const&, but the function must not modify the objects passed to it. The type Type must be such that an object of type FwdIter can be dereferenced and then implicitly converted to Type.bool pred(const Type &a);
- Returns
The all_of algorithm returns a hpx::future<bool> if the execution policy is of type sequenced_task_policy or parallel_task_policy and returns bool otherwise. The all_of algorithm returns true if the unary predicate f returns true for all elements in the range, false otherwise. It returns true if the range is empty.
-
template<typename ExPolicy, typename InIter, typename F>
bool all_of(InIter first, InIter last, F &&f)# Checks if unary predicate f returns true for all elements in the range [first, last).
Note
Complexity: At most last - first applications of the predicate f
- Template Parameters
InIter – The type of the source iterators used (deduced). This iterator type must meet the requirements of an input iterator.
F – The type of the function/function object to use (deduced). Unlike its sequential form, the parallel overload of all_of requires F to meet the requirements of CopyConstructible.
- Parameters
first – Refers to the beginning of the sequence of elements the algorithm will be applied to.
last – Refers to the end of the sequence of elements the algorithm will be applied to.
f – Specifies the function (or function object) which will be invoked for each of the elements in the sequence specified by [first, last). The signature of this predicate should be equivalent to:
The signature does not need to have const&, but the function must not modify the objects passed to it. The type Type must be such that an object of type InIter can be dereferenced and then implicitly converted to Type.bool pred(const Type &a);
- Returns
The all_of algorithm returns a bool . The all_of algorithm returns true if the unary predicate f returns true for all elements in the range, false otherwise. It returns true if the range is empty.
-
template<typename ExPolicy, typename FwdIter, typename F>
hpx::copy, hpx::copy_n, hpx::copy_if#
Defined in header hpx/algorithm.hpp.
See Public API for a list of names and headers that are part of the public HPX API.
-
namespace hpx
Functions
-
template<typename ExPolicy, typename FwdIter1, typename FwdIter2>
hpx::parallel::util::detail::algorithm_result_t<ExPolicy, FwdIter2> copy(ExPolicy &&policy, FwdIter1 first, FwdIter1 last, FwdIter2 dest)# Copies the elements in the range, defined by [first, last), to another range beginning at dest. Executed according to the policy.
The assignments in the parallel copy algorithm invoked with an execution policy object of type sequenced_policy execute in sequential order in the calling thread.
The assignments in the parallel copy algorithm invoked with an execution policy object of type parallel_policy or parallel_task_policy are permitted to execute in an unordered fashion in unspecified threads, and indeterminately sequenced within each thread.
Note
Complexity: Performs exactly last - first assignments.
- Template Parameters
ExPolicy – The type of the execution policy to use (deduced). It describes the manner in which the execution of the algorithm may be parallelized and the manner in which it executes the assignments.
FwdIter1 – The type of the source iterators used (deduced). This iterator type must meet the requirements of an forward iterator.
FwdIter2 – The type of the iterator representing the destination range (deduced). This iterator type must meet the requirements of an forward iterator.
- Parameters
policy – The execution policy to use for the scheduling of the iterations.
first – Refers to the beginning of the sequence of elements the algorithm will be applied to.
last – Refers to the end of the sequence of elements the algorithm will be applied to.
dest – Refers to the beginning of the destination range.
- Returns
The copy algorithm returns a hpx::future<FwdIter2> > if the execution policy is of type sequenced_task_policy or parallel_task_policy and returns FwdIter2> otherwise. The copy algorithm returns the pair of the input iterator last and the output iterator to the element in the destination range, one past the last element copied.
-
template<typename FwdIter1, typename FwdIter2>
FwdIter2 copy(FwdIter1 first, FwdIter1 last, FwdIter2 dest)# Copies the elements in the range, defined by [first, last), to another range beginning at dest.
Note
Complexity: Performs exactly last - first assignments.
- Template Parameters
FwdIter1 – The type of the source iterators used (deduced). This iterator type must meet the requirements of an forward iterator.
FwdIter2 – The type of the iterator representing the destination range (deduced). This iterator type must meet the requirements of an forward iterator.
- Parameters
first – Refers to the beginning of the sequence of elements the algorithm will be applied to.
last – Refers to the end of the sequence of elements the algorithm will be applied to.
dest – Refers to the beginning of the destination range.
- Returns
The copy algorithm returns a FwdIter2 . The copy algorithm returns the pair of the input iterator last and the output iterator to the element in the destination range, one past the last element copied.
-
template<typename ExPolicy, typename FwdIter1, typename Size, typename FwdIter2>
hpx::parallel::util::detail::algorithm_result_t<ExPolicy, FwdIter2> copy_n(ExPolicy &&policy, FwdIter1 first, Size count, FwdIter2 dest)# Copies the elements in the range [first, first + count), starting from first and proceeding to first + count - 1., to another range beginning at dest. Executed according to the policy.
The assignments in the parallel copy_n algorithm invoked with an execution policy object of type sequenced_policy execute in sequential order in the calling thread.
The assignments in the parallel copy_n algorithm invoked with an execution policy object of type parallel_policy or parallel_task_policy are permitted to execute in an unordered fashion in unspecified threads, and indeterminately sequenced within each thread.
Note
Complexity: Performs exactly count assignments, if count > 0, no assignments otherwise.
- Template Parameters
ExPolicy – The type of the execution policy to use (deduced). It describes the manner in which the execution of the algorithm may be parallelized and the manner in which it executes the assignments.
FwdIter1 – The type of the source iterators used (deduced). This iterator type must meet the requirements of an forward iterator.
Size – The type of the argument specifying the number of elements to apply f to.
FwdIter2 – The type of the iterator representing the destination range (deduced). This iterator type must meet the requirements of an forward iterator.
- Parameters
policy – The execution policy to use for the scheduling of the iterations.
first – Refers to the beginning of the sequence of elements the algorithm will be applied to.
count – Refers to the number of elements starting at first the algorithm will be applied to.
dest – Refers to the beginning of the destination range.
- Returns
The copy_n algorithm returns a hpx::future<FwdIter2> if the execution policy is of type sequenced_task_policy or parallel_task_policy and returns FwdIter2 otherwise. The copy_n algorithm returns Iterator in the destination range, pointing past the last element copied if count>0 or result otherwise.
-
template<typename FwdIter1, typename Size, typename FwdIter2>
FwdIter2 copy_n(FwdIter1 first, Size count, FwdIter2 dest)# Copies the elements in the range [first, first + count), starting from first and proceeding to first + count - 1., to another range beginning at dest.
Note
Complexity: Performs exactly count assignments, if count > 0, no assignments otherwise.
- Template Parameters
FwdIter1 – The type of the source iterators used (deduced). This iterator type must meet the requirements of an forward iterator.
Size – The type of the argument specifying the number of elements to apply f to.
FwdIter2 – The type of the iterator representing the destination range (deduced). This iterator type must meet the requirements of an forward iterator.
- Parameters
first – Refers to the beginning of the sequence of elements the algorithm will be applied to.
count – Refers to the number of elements starting at first the algorithm will be applied to.
dest – Refers to the beginning of the destination range.
- Returns
The copy_n algorithm returns a FwdIter2 . The copy_n algorithm returns Iterator in the destination range, pointing past the last element copied if count>0 or result otherwise.
-
template<typename ExPolicy, typename FwdIter1, typename FwdIter2, typename Pred>
hpx::parallel::util::detail::algorithm_result_t<ExPolicy, FwdIter2> copy_if(ExPolicy &&policy, FwdIter1 first, FwdIter1 last, FwdIter2 dest, Pred &&pred)# Copies the elements in the range, defined by [first, last), to another range beginning at dest. Copies only the elements for which the predicate f returns true. The order of the elements that are not removed is preserved. Executed according to the policy.
The assignments in the parallel copy_if algorithm invoked with an execution policy object of type sequenced_policy execute in sequential order in the calling thread.
The assignments in the parallel copy_if algorithm invoked with an execution policy object of type parallel_policy or parallel_task_policy are permitted to execute in an unordered fashion in unspecified threads, and indeterminately sequenced within each thread.
Note
Complexity: Performs not more than last - first assignments, exactly last - first applications of the predicate f.
- Template Parameters
ExPolicy – The type of the execution policy to use (deduced). It describes the manner in which the execution of the algorithm may be parallelized and the manner in which it executes the assignments.
FwdIter1 – The type of the source iterators used (deduced). This iterator type must meet the requirements of an forward iterator.
FwdIter2 – The type of the iterator representing the destination range (deduced). This iterator type must meet the requirements of an forward iterator.
Pred – The type of the function/function object to use (deduced). Unlike its sequential form, the parallel overload of copy_if requires F to meet the requirements of CopyConstructible.
- Parameters
policy – The execution policy to use for the scheduling of the iterations.
first – Refers to the beginning of the sequence of elements the algorithm will be applied to.
last – Refers to the end of the sequence of elements the algorithm will be applied to.
dest – Refers to the beginning of the destination range.
pred – Specifies the function (or function object) which will be invoked for each of the elements in the sequence specified by [first, last).This is an unary predicate which returns true for the required elements. The signature of this predicate should be equivalent to:
The signature does not need to have const&, but the function must not modify the objects passed to it. The type Type must be such that an object of type FwdIter1 can be dereferenced and then implicitly converted to Type.bool pred(const Type &a);
- Returns
The copy_if algorithm returns a hpx::future<FwdIter2> > if the execution policy is of type sequenced_task_policy or parallel_task_policy and returns FwdIter2 otherwise. The copy_if algorithm returns output iterator to the element in the destination range, one past the last element copied.
-
template<typename FwdIter1, typename FwdIter2, typename Pred>
FwdIter2 copy_if(FwdIter1 first, FwdIter1 last, FwdIter2 dest, Pred &&pred)# Copies the elements in the range, defined by [first, last), to another range beginning at dest. Copies only the elements for which the predicate f returns true. The order of the elements that are not removed is preserved.
Note
Complexity: Performs not more than last - first assignments, exactly last - first applications of the predicate f.
- Template Parameters
FwdIter1 – The type of the source iterators used (deduced). This iterator type must meet the requirements of an forward iterator.
FwdIter2 – The type of the iterator representing the destination range (deduced). This iterator type must meet the requirements of an forward iterator.
Pred – The type of the function/function object to use (deduced). Unlike its sequential form, the parallel overload of copy_if requires F to meet the requirements of CopyConstructible.
- Parameters
first – Refers to the beginning of the sequence of elements the algorithm will be applied to.
last – Refers to the end of the sequence of elements the algorithm will be applied to.
dest – Refers to the beginning of the destination range.
pred – Specifies the function (or function object) which will be invoked for each of the elements in the sequence specified by [first, last).This is an unary predicate which returns true for the required elements. The signature of this predicate should be equivalent to:
The signature does not need to have const&, but the function must not modify the objects passed to it. The type Type must be such that an object of type FwdIter1 can be dereferenced and then implicitly converted to Type.bool pred(const Type &a);
- Returns
The copy_if algorithm returns a FwdIter2 . The copy_if algorithm returns output iterator to the element in the destination range, one past the last element copied.
-
template<typename ExPolicy, typename FwdIter1, typename FwdIter2>
hpx::count, hpx::count_if#
Defined in header hpx/algorithm.hpp.
See Public API for a list of names and headers that are part of the public HPX API.
-
namespace hpx
Functions
-
template<typename ExPolicy, typename FwdIter, typename T>
util::detail::algorithm_result<ExPolicy, typename std::iterator_traits<FwdIter>::difference_type>::type count(ExPolicy &&policy, FwdIter first, FwdIter last, T const &value)# Returns the number of elements in the range [first, last) satisfying a specific criteria. This version counts the elements that are equal to the given value. Executed according to the policy.
The comparisons in the parallel count algorithm invoked with an execution policy object of type sequenced_policy execute in sequential order in the calling thread.
Note
Complexity: Performs exactly last - first comparisons.
Note
The comparisons in the parallel count algorithm invoked with an execution policy object of type parallel_policy or parallel_task_policy are permitted to execute in an unordered fashion in unspecified threads, and indeterminately sequenced within each thread.
- Template Parameters
ExPolicy – The type of the execution policy to use (deduced). It describes the manner in which the execution of the algorithm may be parallelized and the manner in which it executes the comparisons.
FwdIter – The type of the source iterator used (deduced). This iterator type must meet the requirements of an forward iterator.
T – The type of the value to search for (deduced).
- Parameters
policy – The execution policy to use for the scheduling of the iterations.
first – Refers to the beginning of the sequence of elements the algorithm will be applied to.
last – Refers to the end of the sequence of elements the algorithm will be applied to.
value – The value to search for.
- Returns
The count algorithm returns a hpx::future<difference_type> if the execution policy is of type sequenced_task_policy or parallel_task_policy and returns difference_type otherwise (where difference_type is defined by std::iterator_traits<FwdIterB>::difference_type. The count algorithm returns the number of elements satisfying the given criteria.
-
template<typename InIter, typename T>
std::iterator_traits<InIter>::difference_type count(InIter first, InIter last, T const &value)# Returns the number of elements in the range [first, last) satisfying a specific criteria. This version counts the elements that are equal to the given value.
Note
Complexity: Performs exactly last - first comparisons.
- Template Parameters
InIter – The type of the source iterator used (deduced). This iterator type must meet the requirements of an input iterator.
T – The type of the value to search for (deduced).
- Parameters
first – Refers to the beginning of the sequence of elements the algorithm will be applied to.
last – Refers to the end of the sequence of elements the algorithm will be applied to.
value – The value to search for.
- Returns
The count algorithm returns a difference_type (where difference_type is defined by std::iterator_traits<InIter>::difference_type. The count algorithm returns the number of elements satisfying the given criteria.
-
template<typename ExPolicy, typename FwdIter, typename F>
util::detail::algorithm_result<ExPolicy, typename std::iterator_traits<FwdIter>::difference_type>::type count_if(ExPolicy &&policy, FwdIter first, FwdIter last, F &&f)# Returns the number of elements in the range [first, last) satisfying a specific criteria. This version counts elements for which predicate f returns true. Executed according to the policy.
Note
Complexity: Performs exactly last - first applications of the predicate.
Note
The assignments in the parallel count_if algorithm invoked with an execution policy object of type sequenced_policy execute in sequential order in the calling thread.
Note
The assignments in the parallel count_if algorithm invoked with an execution policy object of type parallel_policy or parallel_task_policy are permitted to execute in an unordered fashion in unspecified threads, and indeterminately sequenced within each thread.
- Template Parameters
ExPolicy – The type of the execution policy to use (deduced). It describes the manner in which the execution of the algorithm may be parallelized and the manner in which it executes the comparisons.
FwdIter – The type of the source begin iterator used (deduced). This iterator type must meet the requirements of an forward iterator.
F – The type of the function/function object to use (deduced). Unlike its sequential form, the parallel overload of count_if requires F to meet the requirements of CopyConstructible.
- Parameters
policy – The execution policy to use for the scheduling of the iterations.
first – Refers to the beginning of the sequence of elements the algorithm will be applied to.
last – Refers to the end of the sequence of elements the algorithm will be applied to.
f – Specifies the function (or function object) which will be invoked for each of the elements in the sequence specified by [first, last).This is an unary predicate which returns true for the required elements. The signature of this predicate should be equivalent to:
The signature does not need to have const&, but the function must not modify the objects passed to it. The type Type must be such that an object of type FwdIter can be dereferenced and then implicitly converted to Type.bool pred(const Type &a);
- Returns
The count_if algorithm returns hpx::future<difference_type> if the execution policy is of type sequenced_task_policy or parallel_task_policy and returns difference_type otherwise (where difference_type is defined by std::iterator_traits<FwdIter>::difference_type. The count algorithm returns the number of elements satisfying the given criteria.
-
template<typename InIter, typename F>
std::iterator_traits<InIter>::difference_type count_if(InIter first, InIter last, F &&f)# Returns the number of elements in the range [first, last) satisfying a specific criteria. This version counts elements for which predicate f returns true.
Note
Complexity: Performs exactly last - first applications of the predicate.
- Template Parameters
InIter – The type of the source begin iterator used (deduced). This iterator type must meet the requirements of an input iterator.
F – The type of the function/function object to use (deduced). Unlike its sequential form, the parallel overload of count_if requires F to meet the requirements of CopyConstructible.
- Parameters
first – Refers to the beginning of the sequence of elements the algorithm will be applied to.
last – Refers to the end of the sequence of elements the algorithm will be applied to.
f – Specifies the function (or function object) which will be invoked for each of the elements in the sequence specified by [first, last).This is an unary predicate which returns true for the required elements. The signature of this predicate should be equivalent to:
The signature does not need to have const&, but the function must not modify the objects passed to it. The type Type must be such that an object of type InIter can be dereferenced and then implicitly converted to Type.bool pred(const Type &a);
- Returns
The count_if algorithm returns difference_type (where a difference_type is defined by std::iterator_traits<InIter>::difference_type. The count algorithm returns the number of elements satisfying the given criteria.
-
template<typename ExPolicy, typename FwdIter, typename T>
hpx::destroy, hpx::destroy_n#
Defined in header hpx/algorithm.hpp.
See Public API for a list of names and headers that are part of the public HPX API.
-
namespace hpx
Functions
-
template<typename ExPolicy, typename FwdIter>
util::detail::algorithm_result_t<ExPolicy> destroy(ExPolicy &&policy, FwdIter first, FwdIter last)# Destroys objects of type typename iterator_traits<ForwardIt>::value_type in the range [first, last). Executed according to the policy.
The operations in the parallel destroy algorithm invoked with an execution policy object of type sequenced_policy execute in sequential order in the calling thread.
The operations in the parallel destroy algorithm invoked with an execution policy object of type parallel_policy or parallel_task_policy are permitted to execute in an unordered fashion in unspecified threads, and indeterminately sequenced within each thread.
Note
Complexity: Performs exactly last - first operations.
- Template Parameters
ExPolicy – The type of the execution policy to use (deduced). It describes the manner in which the execution of the algorithm may be parallelized and the manner in which it executes the assignments.
FwdIter – The type of the source iterators used (deduced). This iterator type must meet the requirements of an forward iterator.
- Parameters
policy – The execution policy to use for the scheduling of the iterations.
first – Refers to the beginning of the sequence of elements the algorithm will be applied to.
last – Refers to the end of the sequence of elements the algorithm will be applied to.
- Returns
The destroy algorithm returns a hpx::future<void>, if the execution policy is of type sequenced_task_policy or parallel_task_policy and returns void otherwise.
-
template<typename FwdIter>
void destroy(FwdIter first, FwdIter last)# Destroys objects of type typename iterator_traits<ForwardIt>::value_type in the range [first, last).
Note
Complexity: Performs exactly last - first operations.
- Template Parameters
FwdIter – The type of the source iterators used (deduced). This iterator type must meet the requirements of an forward iterator.
- Parameters
first – Refers to the beginning of the sequence of elements the algorithm will be applied to.
last – Refers to the end of the sequence of elements the algorithm will be applied to.
- Returns
The destroy algorithm returns a void
-
template<typename ExPolicy, typename FwdIter, typename Size>
util::detail::algorithm_result_t<ExPolicy, FwdIter> destroy_n(ExPolicy &&policy, FwdIter first, Size count)# Destroys objects of type typename iterator_traits<ForwardIt>::value_type in the range [first, first + count). Executed according to the policy.
The operations in the parallel destroy_n algorithm invoked with an execution policy object of type sequenced_policy execute in sequential order in the calling thread.
The operations in the parallel destroy_n algorithm invoked with an execution policy object of type parallel_policy or parallel_task_policy are permitted to execute in an unordered fashion in unspecified threads, and indeterminately sequenced within each thread.
Note
Complexity: Performs exactly count operations, if count > 0, no assignments otherwise.
- Template Parameters
ExPolicy – The type of the execution policy to use (deduced). It describes the manner in which the execution of the algorithm may be parallelized and the manner in which it executes the assignments.
FwdIter – The type of the source iterators used (deduced). This iterator type must meet the requirements of an forward iterator.
Size – The type of the argument specifying the number of elements to apply this algorithm to.
- Parameters
policy – The execution policy to use for the scheduling of the iterations.
first – Refers to the beginning of the sequence of elements the algorithm will be applied to.
count – Refers to the number of elements starting at first the algorithm will be applied to.
- Returns
The destroy_n algorithm returns a hpx::future<FwdIter> if the execution policy is of type sequenced_task_policy or parallel_task_policy and returns FwdIter otherwise. The destroy_n algorithm returns the iterator to the element in the source range, one past the last element constructed.
-
template<typename FwdIter, typename Size>
FwdIter destroy_n(FwdIter first, Size count)# Destroys objects of type typename iterator_traits<ForwardIt>::value_type in the range [first, first + count).
Note
Complexity: Performs exactly count operations, if count > 0, no assignments otherwise.
- Template Parameters
FwdIter – The type of the source iterators used (deduced). This iterator type must meet the requirements of an forward iterator.
Size – The type of the argument specifying the number of elements to apply this algorithm to.
- Parameters
first – Refers to the beginning of the sequence of elements the algorithm will be applied to.
count – Refers to the number of elements starting at first the algorithm will be applied to.
- Returns
The destroy_n algorithm returns a FwdIter . The destroy_n algorithm returns the iterator to the element in the source range, one past the last element constructed.
-
template<typename ExPolicy, typename FwdIter>
hpx::ends_with#
Defined in header hpx/algorithm.hpp.
See Public API for a list of names and headers that are part of the public HPX API.
-
namespace hpx
Functions
-
template<typename InIter1, typename InIter2, typename Pred>
bool ends_with(InIter1 first1, InIter1 last1, InIter2 first2, InIter2 last2, Pred &&pred)# Checks whether the second range defined by [first1, last1) matches the suffix of the first range defined by [first2, last2)
The assignments in the parallel ends_with algorithm invoked without an execution policy object execute in sequential order in the calling thread.
Note
Complexity: Linear: at most min(N1, N2) applications of the predicate and both projections.
- Template Parameters
InIter1 – The type of the begin source iterators used (deduced). This iterator type must meet the requirements of an input iterator.
InIter2 – The type of the begin destination iterators used deduced). This iterator type must meet the requirements of a input iterator.
Pred – The binary predicate that compares the projected elements.
- Parameters
first1 – Refers to the beginning of the source range.
last1 – Refers to the end of the source range.
first2 – Refers to the beginning of the destination range.
last2 – Refers to the end of the destination range.
pred – Specifies the binary predicate function (or function object) which will be invoked for comparison of the elements in the in two ranges projected by proj1 and proj2 respectively.
- Returns
The ends_with algorithm returns bool. The ends_with algorithm returns a boolean with the value true if the second range matches the suffix of the first range, false otherwise.
-
template<typename ExPolicy, typename FwdIter1, typename FwdIter2, typename Pred>
hpx::parallel::util::detail::algorithm_result<ExPolicy, bool>::type ends_with(ExPolicy &&policy, FwdIter1 first1, FwdIter1 last1, FwdIter2 first2, FwdIter2 last2, Pred &&pred)# Checks whether the second range defined by [first1, last1) matches the suffix of the first range defined by [first2, last2). Executed according to the policy.
The assignments in the parallel ends_with algorithm invoked with an execution policy object of type sequenced_policy execute in sequential order in the calling thread.
The assignments in the parallel ends_with algorithm invoked with an execution policy object of type parallel_policy or parallel_task_policy are permitted to execute in an unordered fashion in unspecified threads, and indeterminately sequenced within each thread.
Note
Complexity: Linear: at most min(N1, N2) applications of the predicate and both projections.
- Template Parameters
ExPolicy – The type of the execution policy to use (deduced). It describes the manner in which the execution of the algorithm may be parallelized and the manner in which it executes the assignments.
FwdIter1 – The type of the begin source iterators used (deduced). This iterator type must meet the requirements of an forward iterator.
FwdIter2 – The type of the begin destination iterators used deduced). This iterator type must meet the requirements of a forward iterator.
Pred – The binary predicate that compares the projected elements.
- Parameters
policy – The execution policy to use for the scheduling of the iterations.
first1 – Refers to the beginning of the source range.
last1 – Refers to the end of the source range.
first2 – Refers to the beginning of the destination range.
last2 – Refers to the end of the destination range.
pred – Specifies the binary predicate function (or function object) which will be invoked for
- Returns
The ends_with algorithm returns a hpx::future<bool> if the execution policy is of type sequenced_task_policy or parallel_task_policy and returns bool otherwise. The ends_with algorithm returns a boolean with the value true if the second range matches the suffix of the first range, false otherwise.
-
template<typename InIter1, typename InIter2, typename Pred>
hpx::equal#
Defined in header hpx/algorithm.hpp.
See Public API for a list of names and headers that are part of the public HPX API.
-
namespace hpx
Functions
-
template<typename ExPolicy, typename FwdIter1, typename FwdIter2, typename Pred = detail::equal_to>
util::detail::algorithm_result_t<ExPolicy, bool> equal(ExPolicy &&policy, FwdIter1 first1, FwdIter1 last1, FwdIter2 first2, FwdIter2 last2, Pred &&op = Pred())# Returns true if the range [first1, last1) is equal to the range [first2, last2), and false otherwise. Executed according to the policy.
The comparison operations in the parallel equal algorithm invoked with an execution policy object of type sequenced_policy execute in sequential order in the calling thread.
The comparison operations in the parallel equal algorithm invoked with an execution policy object of type parallel_policy or parallel_task_policy are permitted to execute in an unordered fashion in unspecified threads, and indeterminately sequenced within each thread.
Note
Complexity: O(min(last1 - first1, last2 - first2)) applications of the predicate op.
Note
The two ranges are considered equal if, for every iterator i in the range [first1,last1), *i equals *(first2 + (i - first1)). This overload of equal uses operator== to determine if two elements are equal.
- Template Parameters
ExPolicy – The type of the execution policy to use (deduced). It describes the manner in which the execution of the algorithm may be parallelized and the manner in which it executes the assignments.
FwdIter1 – The type of the source iterators used for the first range (deduced). This iterator type must meet the requirements of an forward iterator.
FwdIter2 – The type of the source iterators used for the second range (deduced). This iterator type must meet the requirements of an forward iterator.
Pred – The type of an optional function/function object to use. Unlike its sequential form, the parallel overload of equal requires Pred to meet the requirements of CopyConstructible. This defaults to std::equal_to<>
- Parameters
policy – The execution policy to use for the scheduling of the iterations.
first1 – Refers to the beginning of the sequence of elements of the first range the algorithm will be applied to.
last1 – Refers to the end of the sequence of elements of the first range the algorithm will be applied to.
first2 – Refers to the beginning of the sequence of elements of the second range the algorithm will be applied to.
last2 – Refers to the end of the sequence of elements of the second range the algorithm will be applied to.
op – The binary predicate which returns true if the elements should be treated as equal. The signature of the predicate function should be equivalent to the following:
The signature does not need to have const &, but the function must not modify the objects passed to it. The types Type1 and Type2 must be such that objects of types FwdIter1 and FwdIter2 can be dereferenced and then implicitly converted to Type1 and Type2 respectivelybool pred(const Type1 &a, const Type2 &b);
- Returns
The equal algorithm returns a hpx::future<bool> if the execution policy is of type sequenced_task_policy or parallel_task_policy and returns bool otherwise. The equal algorithm returns true if the elements in the two ranges are equal, otherwise it returns false. If the length of the range [first1, last1) does not equal the length of the range [first2, last2), it returns false.
-
template<typename ExPolicy, typename FwdIter1, typename FwdIter2>
util::detail::algorithm_result_t<ExPolicy, bool> equal(ExPolicy &&policy, FwdIter1 first1, FwdIter1 last1, FwdIter2 first2, FwdIter2 last2)# Returns true if the range [first1, last1) is equal to the range [first2, last2), and false otherwise. Executed according to policy.
The comparison operations in the parallel equal algorithm invoked with an execution policy object of type sequenced_policy execute in sequential order in the calling thread.
The comparison operations in the parallel equal algorithm invoked with an execution policy object of type parallel_policy or parallel_task_policy are permitted to execute in an unordered fashion in unspecified threads, and indeterminately sequenced within each thread.
Note
Complexity: O(min(last1 - first1, last2 - first2)) applications of the predicate std::equal_to.
Note
The two ranges are considered equal if, for every iterator i in the range [first1,last1), *i equals *(first2 + (i - first1)). This overload of equal uses operator== to determine if two elements are equal.
- Template Parameters
ExPolicy – The type of the execution policy to use (deduced). It describes the manner in which the execution of the algorithm may be parallelized and the manner in which it executes the assignments.
FwdIter1 – The type of the source iterators used for the first range (deduced). This iterator type must meet the requirements of an forward iterator.
FwdIter2 – The type of the source iterators used for the second range (deduced). This iterator type must meet the requirements of an forward iterator.
- Parameters
policy – The execution policy to use for the scheduling of the iterations.
first1 – Refers to the beginning of the sequence of elements of the first range the algorithm will be applied to.
last1 – Refers to the end of the sequence of elements of the first range the algorithm will be applied to.
first2 – Refers to the beginning of the sequence of elements of the second range the algorithm will be applied to.
last2 – Refers to the end of the sequence of elements of the second range the algorithm will be applied to.
- Returns
The equal algorithm returns a hpx::future<bool> if the execution policy is of type sequenced_task_policy or parallel_task_policy and returns bool otherwise. The equal algorithm returns true if the elements in the two ranges are equal, otherwise it returns false. If the length of the range [first1, last1) does not equal the length of the range [first2, last2), it returns false.
-
template<typename ExPolicy, typename FwdIter1, typename FwdIter2, typename Pred = detail::equal_to>
util::detail::algorithm_result_t<ExPolicy, bool> equal(ExPolicy &&policy, FwdIter1 first1, FwdIter1 last1, FwdIter2 first2, Pred &&op = Pred())# Returns true if the range [first1, last1) is equal to the range starting at first2, and false otherwise. Executed according to policy.
The comparison operations in the parallel equal algorithm invoked with an execution policy object of type sequenced_policy execute in sequential order in the calling thread.
The comparison operations in the parallel equal algorithm invoked with an execution policy object of type parallel_policy or parallel_task_policy are permitted to execute in an unordered fashion in unspecified threads, and indeterminately sequenced within each thread.
Note
Complexity: O(min(last1 - first1, last2 - first2)) applications of the predicate op.
Note
The two ranges are considered equal if, for every iterator i in the range [first1,last1), *i equals *(first2 + (i - first1)). This overload of equal uses operator== to determine if two elements are equal.
- Template Parameters
ExPolicy – The type of the execution policy to use (deduced). It describes the manner in which the execution of the algorithm may be parallelized and the manner in which it executes the assignments.
FwdIter1 – The type of the source iterators used for the first range (deduced). This iterator type must meet the requirements of an forward iterator.
FwdIter2 – The type of the source iterators used for the second range (deduced). This iterator type must meet the requirements of an forward iterator.
Pred – The type of an optional function/function object to use. Unlike its sequential form, the parallel overload of equal requires Pred to meet the requirements of CopyConstructible. This defaults to std::equal_to<>
- Parameters
policy – The execution policy to use for the scheduling of the iterations.
first1 – Refers to the beginning of the sequence of elements of the first range the algorithm will be applied to.
last1 – Refers to the end of the sequence of elements of the first range the algorithm will be applied to.
first2 – Refers to the beginning of the sequence of elements of the second range the algorithm will be applied to.
op – The binary predicate which returns true if the elements should be treated as equal. The signature of the predicate function should be equivalent to the following:
The signature does not need to have const &, but the function must not modify the objects passed to it. The types Type1 and Type2 must be such that objects of types FwdIter1 and FwdIter2 can be dereferenced and then implicitly converted to Type1 and Type2 respectivelybool pred(const Type1 &a, const Type2 &b);
- Returns
The equal algorithm returns a hpx::future<bool> if the execution policy is of type sequenced_task_policy or parallel_task_policy and returns bool otherwise. The equal algorithm returns true if the elements in the two ranges are equal, otherwise it returns false.
-
template<typename ExPolicy, typename FwdIter1, typename FwdIter2>
util::detail::algorithm_result_t<ExPolicy, bool> equal(ExPolicy &&policy, FwdIter1 first1, FwdIter1 last1, FwdIter2 first2)# Returns true if the range [first1, last1) is equal to the range [first2, last2), and false otherwise. Executed according to policy.
The comparison operations in the parallel equal algorithm invoked with an execution policy object of type sequenced_policy execute in sequential order in the calling thread.
The comparison operations in the parallel equal algorithm invoked with an execution policy object of type parallel_policy or parallel_task_policy are permitted to execute in an unordered fashion in unspecified threads, and indeterminately sequenced within each thread.
Note
Complexity: At most last1 - first1 applications of the predicate op.
Note
The two ranges are considered equal if, for every iterator i in the range [first1,last1), *i equals *(first2 + (i - first1)). This overload of equal uses operator== to determine if two elements are equal.
- Template Parameters
ExPolicy – The type of the execution policy to use (deduced). It describes the manner in which the execution of the algorithm may be parallelized and the manner in which it executes the assignments.
FwdIter1 – The type of the source iterators used for the first range (deduced). This iterator type must meet the requirements of an forward iterator.
FwdIter2 – The type of the source iterators used for the second range (deduced). This iterator type must meet the requirements of an forward iterator.
- Parameters
policy – The execution policy to use for the scheduling of the iterations.
first1 – Refers to the beginning of the sequence of elements of the first range the algorithm will be applied to.
last1 – Refers to the end of the sequence of elements of the first range the algorithm will be applied to.
first2 – Refers to the beginning of the sequence of elements of the second range the algorithm will be applied to.
- Returns
The equal algorithm returns a hpx::future<bool> if the execution policy is of type sequenced_task_policy or parallel_task_policy and returns bool otherwise. The equal algorithm returns true if the elements in the two ranges are equal, otherwise it returns false. If the length of the range [first1, last1) does not equal the length of the range [first2, last2), it returns false.
-
template<typename FwdIter1, typename FwdIter2, typename Pred = detail::equal_to>
bool equal(FwdIter1 first1, FwdIter1 last1, FwdIter2 first2, FwdIter2 last2, Pred &&op = Pred())# Returns true if the range [first1, last1) is equal to the range [first2, last2), and false otherwise.
Note
Complexity: At most min(last1 - first1, last2 - first2) applications of the predicate op.
Note
The two ranges are considered equal if, for every iterator i in the range [first1,last1), *i equals *(first2 + (i - first1)). This overload of equal uses operator== to determine if two elements are equal.
- Template Parameters
FwdIter1 – The type of the source iterators used for the first range (deduced). This iterator type must meet the requirements of an forward iterator.
FwdIter2 – The type of the source iterators used for the second range (deduced). This iterator type must meet the requirements of an forward iterator.
Pred – The type of an optional function/function object to use. Unlike its sequential form, the parallel overload of equal requires Pred to meet the requirements of CopyConstructible. This defaults to std::equal_to<>
- Parameters
first1 – Refers to the beginning of the sequence of elements of the first range the algorithm will be applied to.
last1 – Refers to the end of the sequence of elements of the first range the algorithm will be applied to.
first2 – Refers to the beginning of the sequence of elements of the second range the algorithm will be applied to.
last2 – Refers to the end of the sequence of elements of the second range the algorithm will be applied to.
op – The binary predicate which returns true if the elements should be treated as equal. The signature of the predicate function should be equivalent to the following:
The signature does not need to have const &, but the function must not modify the objects passed to it. The types Type1 and Type2 must be such that objects of types FwdIter1 and FwdIter2 can be dereferenced and then implicitly converted to Type1 and Type2 respectivelybool pred(const Type1 &a, const Type2 &b);
- Returns
The equal algorithm returns a bool . The equal algorithm returns true if the elements in the two ranges are equal, otherwise it returns false. If the length of the range [first1, last1) does not equal the length of the range [first2, last2), it returns false.
-
template<typename FwdIter1, typename FwdIter2>
bool equal(FwdIter1 first1, FwdIter1 last1, FwdIter2 first2, FwdIter2 last2)# Returns true if the range [first1, last1) is equal to the range [first2, last2), and false otherwise.
Note
Complexity: At most min(last1 - first1, last2 - first2) applications of the predicate std::equal_to.
Note
The two ranges are considered equal if, for every iterator i in the range [first1,last1), *i equals *(first2 + (i - first1)). This overload of equal uses operator== to determine if two elements are equal.
- Template Parameters
FwdIter1 – The type of the source iterators used for the first range (deduced). This iterator type must meet the requirements of an forward iterator.
FwdIter2 – The type of the source iterators used for the second range (deduced). This iterator type must meet the requirements of an forward iterator.
- Parameters
first1 – Refers to the beginning of the sequence of elements of the first range the algorithm will be applied to.
last1 – Refers to the end of the sequence of elements of the first range the algorithm will be applied to.
first2 – Refers to the beginning of the sequence of elements of the second range the algorithm will be applied to.
last2 – Refers to the end of the sequence of elements of the second range the algorithm will be applied to.
- Returns
The equal algorithm returns a bool . The equal algorithm returns true if the elements in the two ranges are equal, otherwise it returns false. If the length of the range [first1, last1) does not equal the length of the range [first2, last2), it returns false.
-
template<typename FwdIter1, typename FwdIter2, typename Pred = detail::equal_to>
bool equal(FwdIter1 first1, FwdIter1 last1, FwdIter2 first2, Pred &&op = Pred())# Returns true if the range [first1, last1) is equal to the range [first2, first2 + (last1 - first1)), and false otherwise.
Note
Complexity: At most last1 - first1 applications of the predicate op.
Note
The two ranges are considered equal if, for every iterator i in the range [first1,last1), *i equals *(first2 + (i - first1)). This overload of equal uses operator== to determine if two elements are equal.
- Template Parameters
FwdIter1 – The type of the source iterators used for the first range (deduced). This iterator type must meet the requirements of an forward iterator.
FwdIter2 – The type of the source iterators used for the second range (deduced). This iterator type must meet the requirements of an forward iterator.
Pred – The type of an optional function/function object to use. Unlike its sequential form, the parallel overload of equal requires Pred to meet the requirements of CopyConstructible. This defaults to std::equal_to<>
- Parameters
first1 – Refers to the beginning of the sequence of elements of the first range the algorithm will be applied to.
last1 – Refers to the end of the sequence of elements of the first range the algorithm will be applied to.
first2 – Refers to the beginning of the sequence of elements of the second range the algorithm will be applied to.
op – The binary predicate which returns true if the elements should be treated as equal. The signature of the predicate function should be equivalent to the following:
The signature does not need to have const &, but the function must not modify the objects passed to it. The types Type1 and Type2 must be such that objects of types FwdIter1 and FwdIter2 can be dereferenced and then implicitly converted to Type1 and Type2 respectivelybool pred(const Type1 &a, const Type2 &b);
- Returns
The equal algorithm returns a bool . The equal algorithm returns true if the elements in the two ranges are equal, otherwise it returns false. If the length of the range [first1, last1) does not equal the length of the range [first2, last2), it returns false.
-
template<typename ExPolicy, typename FwdIter1, typename FwdIter2, typename Pred = detail::equal_to>
hpx::exclusive_scan#
Defined in header hpx/algorithm.hpp.
See Public API for a list of names and headers that are part of the public HPX API.
-
namespace hpx
Functions
-
template<typename InIter, typename OutIter, typename T>
OutIter exclusive_scan(InIter first, InIter last, OutIter dest, T init)# Assigns through each iterator i in [result, result + (last - first)) the value of GENERALIZED_NONCOMMUTATIVE_SUM(+, init, *first, …, *(first + (i - result) - 1))
The reduce operations in the parallel exclusive_scan algorithm invoked without an execution policy object will execute in sequential order in the calling thread.
The difference between exclusive_scan and inclusive_scan is that inclusive_scan includes the ith input element in the ith sum.
Note
Complexity: O(last - first) applications of the predicate std::plus<T>.
Note
GENERALIZED_NONCOMMUTATIVE_SUM(+, a1, …, aN) is defined as:
a1 when N is 1
GENERALIZED_NONCOMMUTATIVE_SUM(+, a1, …, aK)
GENERALIZED_NONCOMMUTATIVE_SUM(+, aM, …, aN) where 1 < K+1 = M <= N.
- Template Parameters
InIter – The type of the source iterators used (deduced). This iterator type must meet the requirements of an input iterator.
OutIter – The type of the iterator representing the destination range (deduced). This iterator type must meet the requirements of an output iterator.
T – The type of the value to be used as initial (and intermediate) values (deduced).
- Parameters
first – Refers to the beginning of the sequence of elements the algorithm will be applied to.
last – Refers to the end of the sequence of elements the algorithm will be applied to.
dest – Refers to the beginning of the destination range.
init – The initial value for the generalized sum.
- Returns
The exclusive_scan algorithm returns OutIter. The exclusive_scan algorithm returns the output iterator to the element in the destination range, one past the last element copied.
-
template<typename ExPolicy, typename FwdIter1, typename FwdIter2, typename T>
util::detail::algorithm_result_t<ExPolicy, FwdIter2> exclusive_scan(ExPolicy &&policy, FwdIter1 first, FwdIter1 last, FwdIter2 dest, T init)# Assigns through each iterator i in [result, result + (last - first)) the value of GENERALIZED_NONCOMMUTATIVE_SUM(+, init, *first, …, *(first + (i - result) - 1))
The reduce operations in the parallel exclusive_scan algorithm invoked with an execution policy object of type sequenced_policy execute in sequential order in the calling thread.
The reduce operations in the parallel exclusive_scan algorithm invoked with an execution policy object of type parallel_policy or parallel_task_policy are permitted to execute in an unordered fashion in unspecified threads, and indeterminately sequenced within each thread.
The difference between exclusive_scan and inclusive_scan is that inclusive_scan includes the ith input element in the ith sum.
Note
Complexity: O(last - first) applications of the predicate std::plus<T>.
Note
GENERALIZED_NONCOMMUTATIVE_SUM(+, a1, …, aN) is defined as:
a1 when N is 1
GENERALIZED_NONCOMMUTATIVE_SUM(+, a1, …, aK)
GENERALIZED_NONCOMMUTATIVE_SUM(+, aM, …, aN) where 1 < K+1 = M <= N.
- Template Parameters
ExPolicy – The type of the execution policy to use (deduced). It describes the manner in which the execution of the algorithm may be parallelized and the manner in which it executes the assignments.
FwdIter1 – The type of the source iterators used (deduced). This iterator type must meet the requirements of an forward iterator.
FwdIter2 – The type of the iterator representing the destination range (deduced). This iterator type must meet the requirements of an forward iterator.
T – The type of the value to be used as initial (and intermediate) values (deduced).
- Parameters
policy – The execution policy to use for the scheduling of the iterations.
first – Refers to the beginning of the sequence of elements the algorithm will be applied to.
last – Refers to the end of the sequence of elements the algorithm will be applied to.
dest – Refers to the beginning of the destination range.
init – The initial value for the generalized sum.
- Returns
The exclusive_scan algorithm returns a hpx::future<FwdIter2> if the execution policy is of type sequenced_task_policy or parallel_task_policy and returns FwdIter2 otherwise. The exclusive_scan algorithm returns the output iterator to the element in the destination range, one past the last element copied.
-
template<typename InIter, typename OutIter, typename T, typename Op>
OutIter exclusive_scan(InIter first, InIter last, OutIter dest, T init, Op &&op)# Assigns through each iterator i in [result, result + (last - first)) the value of GENERALIZED_NONCOMMUTATIVE_SUM(binary_op, init, *first, …, *(first + (i - result) - 1)).
The reduce operations in the parallel exclusive_scan algorithm invoked without an execution policy object will execute in sequential order in the calling thread.
The difference between exclusive_scan and inclusive_scan is that inclusive_scan includes the ith input element in the ith sum. If op is not mathematically associative, the behavior of inclusive_scan may be non-deterministic.
Note
Complexity: O(last - first) applications of the predicate op.
Note
GENERALIZED_NONCOMMUTATIVE_SUM(op, a1, …, aN) is defined as:
a1 when N is 1
op(GENERALIZED_NONCOMMUTATIVE_SUM(op, a1, …, aK), GENERALIZED_NONCOMMUTATIVE_SUM(op, aM, …, aN)) where 1 < K+1 = M <= N.
- Template Parameters
InIter – The type of the source iterators used (deduced). This iterator type must meet the requirements of an input iterator.
OutIter – The type of the iterator representing the destination range (deduced). This iterator type must meet the requirements of an output iterator.
T – The type of the value to be used as initial (and intermediate) values (deduced).
Op – The type of the binary function object used for the reduction operation.
- Parameters
first – Refers to the beginning of the sequence of elements the algorithm will be applied to.
last – Refers to the end of the sequence of elements the algorithm will be applied to.
dest – Refers to the beginning of the destination range.
init – The initial value for the generalized sum.
op – Specifies the function (or function object) which will be invoked for each of the values of the input sequence. This is a binary predicate. The signature of this predicate should be equivalent to:
The signature does not need to have const&, but the function must not modify the objects passed to it. The types Type1 and Ret must be such that an object of a type as given by the input sequence can be implicitly converted to any of those types.Ret fun(const Type1 &a, const Type1 &b);
- Returns
The exclusive_scan algorithm returns OutIter. The exclusive_scan algorithm returns the output iterator to the element in the destination range, one past the last element copied.
-
template<typename ExPolicy, typename FwdIter1, typename FwdIter2, typename Op, typename T>
util::detail::algorithm_result_t<ExPolicy, FwdIter2> exclusive_scan(ExPolicy &&policy, FwdIter1 first, FwdIter1 last, FwdIter2 dest, T init, Op &&op)# Assigns through each iterator i in [result, result + (last - first)) the value of GENERALIZED_NONCOMMUTATIVE_SUM(binary_op, init, *first, …, *(first + (i - result) - 1)).
The reduce operations in the parallel exclusive_scan algorithm invoked with an execution policy object of type sequenced_policy execute in sequential order in the calling thread.
The reduce operations in the parallel exclusive_scan algorithm invoked with an execution policy object of type parallel_policy or parallel_task_policy are permitted to execute in an unordered fashion in unspecified threads, and indeterminately sequenced within each thread.
The difference between exclusive_scan and inclusive_scan is that inclusive_scan includes the ith input element in the ith sum. If op is not mathematically associative, the behavior of inclusive_scan may be non-deterministic.
Note
Complexity: O(last - first) applications of the predicate op.
Note
GENERALIZED_NONCOMMUTATIVE_SUM(op, a1, …, aN) is defined as:
a1 when N is 1
op(GENERALIZED_NONCOMMUTATIVE_SUM(op, a1, …, aK), GENERALIZED_NONCOMMUTATIVE_SUM(op, aM, …, aN)) where 1 < K+1 = M <= N.
- Template Parameters
ExPolicy – The type of the execution policy to use (deduced). It describes the manner in which the execution of the algorithm may be parallelized and the manner in which it executes the assignments.
FwdIter1 – The type of the source iterators used (deduced). This iterator type must meet the requirements of an forward iterator.
FwdIter2 – The type of the iterator representing the destination range (deduced). This iterator type must meet the requirements of an forward iterator.
Op – The type of the binary function object used for the reduction operation.
T – The type of the value to be used as initial (and intermediate) values (deduced).
- Parameters
policy – The execution policy to use for the scheduling of the iterations.
first – Refers to the beginning of the sequence of elements the algorithm will be applied to.
last – Refers to the end of the sequence of elements the algorithm will be applied to.
dest – Refers to the beginning of the destination range.
init – The initial value for the generalized sum.
op – Specifies the function (or function object) which will be invoked for each of the values of the input sequence. This is a binary predicate. The signature of this predicate should be equivalent to:
The signature does not need to have const&, but the function must not modify the objects passed to it. The types Type1 and Ret must be such that an object of a type as given by the input sequence can be implicitly converted to any of those types.Ret fun(const Type1 &a, const Type1 &b);
- Returns
The exclusive_scan algorithm returns a hpx::future<OutIter> if the execution policy is of type sequenced_task_policy or parallel_task_policy and returns OutIter otherwise. The exclusive_scan algorithm returns the output iterator to the element in the destination range, one past the last element copied.
-
template<typename InIter, typename OutIter, typename T>
hpx::fill, hpx::fill_n#
Defined in header hpx/algorithm.hpp.
See Public API for a list of names and headers that are part of the public HPX API.
-
namespace hpx
Functions
-
template<typename ExPolicy, typename FwdIter, typename T>
util::detail::algorithm_result_t<ExPolicy> fill(ExPolicy &&policy, FwdIter first, FwdIter last, T value)# Assigns the given value to the elements in the range [first, last). Executed according to the policy.
The comparisons in the parallel fill algorithm invoked with an execution policy object of type sequenced_policy execute in sequential order in the calling thread.
The comparisons in the parallel fill algorithm invoked with an execution policy object of type parallel_policy or parallel_task_policy are permitted to execute in an unordered fashion in unspecified threads, and indeterminately sequenced within each thread.
Note
Complexity: Performs exactly last - first assignments.
- Template Parameters
ExPolicy – The type of the execution policy to use (deduced). It describes the manner in which the execution of the algorithm may be parallelized and the manner in which it executes the assignments.
FwdIter – The type of the source iterators used (deduced). This iterator type must meet the requirements of an forward iterator.
T – The type of the value to be assigned (deduced).
- Parameters
policy – The execution policy to use for the scheduling of the iterations.
first – Refers to the beginning of the sequence of elements the algorithm will be applied to.
last – Refers to the end of the sequence of elements the algorithm will be applied to.
value – The value to be assigned.
- Returns
The fill algorithm returns a hpx::future<void> if the execution policy is of type sequenced_task_policy or parallel_task_policy and returns difference_type otherwise (where difference_type is defined by void.
-
template<typename FwdIter, typename T>
void fill(FwdIter first, FwdIter last, T value)# Assigns the given value to the elements in the range [first, last).
Note
Complexity: Performs exactly last - first assignments.
- Template Parameters
FwdIter – The type of the source iterators used (deduced). This iterator type must meet the requirements of an forward iterator.
T – The type of the value to be assigned (deduced).
- Parameters
first – Refers to the beginning of the sequence of elements the algorithm will be applied to.
last – Refers to the end of the sequence of elements the algorithm will be applied to.
value – The value to be assigned.
- Returns
The fill algorithm returns a void.
-
template<typename ExPolicy, typename FwdIter, typename Size, typename T>
util::detail::algorithm_result_t<ExPolicy, FwdIter> fill_n(ExPolicy &&policy, FwdIter first, Size count, T value)# Assigns the given value value to the first count elements in the range beginning at first if count > 0. Does nothing otherwise. Executed according to the policy.
The comparisons in the parallel fill_n algorithm invoked with an execution policy object of type sequenced_policy execute in sequential order in the calling thread.
The comparisons in the parallel fill_n algorithm invoked with an execution policy object of type parallel_policy or parallel_task_policy are permitted to execute in an unordered fashion in unspecified threads, and indeterminately sequenced within each thread.
Note
Complexity: Performs exactly count assignments, for count > 0.
- Template Parameters
ExPolicy – The type of the execution policy to use (deduced). It describes the manner in which the execution of the algorithm may be parallelized and the manner in which it executes the assignments.
FwdIter – The type of the source iterators used (deduced). This iterator type must meet the requirements of a forward iterator.
Size – The type of the argument specifying the number of elements to apply f to.
T – The type of the value to be assigned (deduced).
- Parameters
policy – The execution policy to use for the scheduling of the iterations.
first – Refers to the beginning of the sequence of elements the algorithm will be applied to.
count – Refers to the number of elements starting at first the algorithm will be applied to.
value – The value to be assigned.
- Returns
The fill_n algorithm returns a hpx::future<void> if the execution policy is of type sequenced_task_policy or parallel_task_policy and returns difference_type otherwise (where difference_type is defined by void.
-
template<typename FwdIter, typename Size, typename T>
FwdIter fill_n(FwdIter first, Size count, T value)# Assigns the given value value to the first count elements in the range beginning at first if count > 0. Does nothing otherwise.
Note
Complexity: Performs exactly count assignments, for count > 0.
- Template Parameters
FwdIter – The type of the source iterators used (deduced). This iterator type must meet the requirements of a forward iterator.
Size – The type of the argument specifying the number of elements to apply f to.
T – The type of the value to be assigned (deduced).
- Parameters
first – Refers to the beginning of the sequence of elements the algorithm will be applied to.
count – Refers to the number of elements starting at first the algorithm will be applied to.
value – The value to be assigned.
- Returns
The fill_n algorithm returns a FwdIter.
-
template<typename ExPolicy, typename FwdIter, typename T>
hpx::find, hpx::find_if, hpx::find_if_not, hpx::find_end, hpx::find_first_of#
Defined in header hpx/algorithm.hpp.
See Public API for a list of names and headers that are part of the public HPX API.
-
namespace hpx
Functions
-
template<typename ExPolicy, typename FwdIter, typename T>
util::detail::algorithm_result_t<ExPolicy, FwdIter> find(ExPolicy &&policy, FwdIter first, FwdIter last, T const &val)# Returns the first element in the range [first, last) that is equal to value. Executed according to the policy.
The comparison operations in the parallel find algorithm invoked with an execution policy object of type sequenced_policy execute in sequential order in the calling thread.
The comparison operations in the parallel find algorithm invoked with an execution policy object of type parallel_policy or parallel_task_policy are permitted to execute in an unordered fashion in unspecified threads, and indeterminately sequenced within each thread.
Note
Complexity: At most last - first applications of the operator==().
- Template Parameters
ExPolicy – The type of the execution policy to use (deduced). It describes the manner in which the execution of the algorithm may be parallelized and the manner in which it executes the assignments.
FwdIter – The type of the source iterators used for the first range (deduced). This iterator type must meet the requirements of an forward iterator.
T – The type of the value to find (deduced).
- Parameters
policy – The execution policy to use for the scheduling of the iterations.
first – Refers to the beginning of the sequence of elements of the first range the algorithm will be applied to.
last – Refers to the end of the sequence of elements of the first range the algorithm will be applied to.
val – the value to compare the elements to
- Returns
The find algorithm returns a hpx::future<FwdIter> if the execution policy is of type sequenced_task_policy or parallel_task_policy and returns FwdIter otherwise. The find algorithm returns the first element in the range [first,last) that is equal to val. If no such element in the range of [first,last) is equal to val, then the algorithm returns last.
-
template<typename InIter, typename T>
InIter find(InIter first, InIter last, T const &val)# Returns the first element in the range [first, last) that is equal to value. Executed according to the policy.
Note
Complexity: At most last - first applications of the operator==().
- Template Parameters
InIter – The type of the source iterators used for the first range (deduced). This iterator type must meet the requirements of an input iterator.
T – The type of the value to find (deduced).
- Parameters
first – Refers to the beginning of the sequence of elements of the first range the algorithm will be applied to.
last – Refers to the end of the sequence of elements of the first range the algorithm will be applied to.
val – the value to compare the elements to
- Returns
The find algorithm returns a InIter. The find algorithm returns the first element in the range [first,last) that is equal to val. If no such element in the range of [first,last) is equal to val, then the algorithm returns last.
-
template<typename ExPolicy, typename FwdIter, typename F>
util::detail::algorithm_result_t<ExPolicy, FwdIter> find_if(ExPolicy &&policy, FwdIter first, FwdIter last, F &&f)# Returns the first element in the range [first, last) for which predicate f returns true. Executed according to the policy.
The comparison operations in the parallel find_if algorithm invoked with an execution policy object of type sequenced_policy execute in sequential order in the calling thread.
The comparison operations in the parallel find_if algorithm invoked with an execution policy object of type parallel_policy or parallel_task_policy are permitted to execute in an unordered fashion in unspecified threads, and indeterminately sequenced within each thread.
Note
Complexity: At most last - first applications of the predicate.
- Template Parameters
ExPolicy – The type of the execution policy to use (deduced). It describes the manner in which the execution of the algorithm may be parallelized and the manner in which it executes the assignments.
FwdIter – The type of the source iterators used for the first range (deduced). This iterator type must meet the requirements of a forward iterator.
F – The type of the function/function object to use (deduced). Unlike its sequential form, the parallel overload of equal requires F to meet the requirements of CopyConstructible.
- Parameters
policy – The execution policy to use for the scheduling of the iterations.
first – Refers to the beginning of the sequence of elements of the first range the algorithm will be applied to.
last – Refers to the end of the sequence of elements of the first range the algorithm will be applied to.
f – The unary predicate which returns true for the required element. The signature of the predicate should be equivalent to:
The signature does not need to have const &, but the function must not modify the objects passed to it. The type Type must be such that objects of type FwdIter can be dereferenced and then implicitly converted to Type.bool pred(const Type &a);
- Returns
The find_if algorithm returns a hpx::future<FwdIter> if the execution policy is of type sequenced_task_policy or parallel_task_policy and returns FwdIter otherwise. The find_if algorithm returns the first element in the range [first,last) that satisfies the predicate f. If no such element exists that satisfies the predicate f, the algorithm returns last.
-
template<typename InIter, typename F>
InIter find_if(InIter first, InIter last, F &&f)# Returns the first element in the range [first, last) for which predicate f returns true.
Note
Complexity: At most last - first applications of the predicate.
- Template Parameters
InIter – The type of the source iterators used for the first range (deduced). This iterator type must meet the requirements of an input iterator.
F – The type of the function/function object to use (deduced). Unlike its sequential form, the parallel overload of equal requires F to meet the requirements of CopyConstructible.
- Parameters
first – Refers to the beginning of the sequence of elements of the first range the algorithm will be applied to.
last – Refers to the end of the sequence of elements of the first range the algorithm will be applied to.
f – The unary predicate which returns true for the required element. The signature of the predicate should be equivalent to:
The signature does not need to have const &, but the function must not modify the objects passed to it. The type Type must be such that objects of type InIter can be dereferenced and then implicitly converted to Type.bool pred(const Type &a);
- Returns
The find_if algorithm returns a InIter. The find_if algorithm returns the first element in the range [first,last) that satisfies the predicate f. If no such element exists that satisfies the predicate f, the algorithm returns last.
-
template<typename ExPolicy, typename FwdIter, typename F>
util::detail::algorithm_result_t<ExPolicy, FwdIter> find_if_not(ExPolicy &&policy, FwdIter first, FwdIter last, F &&f)# Returns the first element in the range [first, last) for which predicate f returns false. Executed according to the policy.
The comparison operations in the parallel find_if_not algorithm invoked with an execution policy object of type sequenced_policy execute in sequential order in the calling thread.
The comparison operations in the parallel find_if_not algorithm invoked with an execution policy object of type parallel_policy or parallel_task_policy are permitted to execute in an unordered fashion in unspecified threads, and indeterminately sequenced within each thread.
Note
Complexity: At most last - first applications of the predicate.
- Template Parameters
ExPolicy – The type of the execution policy to use (deduced). It describes the manner in which the execution of the algorithm may be parallelized and the manner in which it executes the assignments.
FwdIter – The type of the source iterators used for the first range (deduced). This iterator type must meet the requirements of a forward iterator.
F – The type of the function/function object to use (deduced). Unlike its sequential form, the parallel overload of equal requires F to meet the requirements of CopyConstructible.
- Parameters
policy – The execution policy to use for the scheduling of the iterations.
first – Refers to the beginning of the sequence of elements of the first range the algorithm will be applied to.
last – Refers to the end of the sequence of elements of the first range the algorithm will be applied to.
f – The unary predicate which returns false for the required element. The signature of the predicate should be equivalent to:
The signature does not need to have const &, but the function must not modify the objects passed to it. The type Type must be such that objects of type FwdIter can be dereferenced and then implicitly converted to Type.bool pred(const Type &a);
- Returns
The find_if_not algorithm returns a hpx::future<FwdIter> if the execution policy is of type sequenced_task_policy or parallel_task_policy and returns FwdIter otherwise. The find_if_not algorithm returns the first element in the range [first, last) that does not satisfy the predicate f. If no such element exists that does not satisfy the predicate f, the algorithm returns last.
-
template<typename FwdIter, typename F>
FwdIter find_if_not(FwdIter first, FwdIter last, F &&f)# Returns the first element in the range [first, last) for which predicate f returns false.
Note
Complexity: At most last - first applications of the predicate.
- Template Parameters
FwdIter – The type of the source iterators used for the first range (deduced). This iterator type must meet the requirements of a forward iterator.
F – The type of the function/function object to use (deduced). Unlike its sequential form, the parallel overload of equal requires F to meet the requirements of CopyConstructible.
- Parameters
first – Refers to the beginning of the sequence of elements of the first range the algorithm will be applied to.
last – Refers to the end of the sequence of elements of the first range the algorithm will be applied to.
f – The unary predicate which returns false for the required element. The signature of the predicate should be equivalent to:
The signature does not need to have const &, but the function must not modify the objects passed to it. The type Type must be such that objects of type FwdIter can be dereferenced and then implicitly converted to Type.bool pred(const Type &a);
- Returns
The find_if_not algorithm returns a FwdIter. The find_if_not algorithm returns the first element in the range [first, last) that does not satisfy the predicate f. If no such element exists that does not satisfy the predicate f, the algorithm returns last.
-
template<typename ExPolicy, typename FwdIter1, typename FwdIter2, typename Pred = detail::equal_to>
util::detail::algorithm_result_t<ExPolicy, FwdIter1> find_end(ExPolicy &&policy, FwdIter1 first1, FwdIter1 last1, FwdIter2 first2, FwdIter2 last2, Pred &&op = Pred())# Returns the last subsequence of elements [first2, last2) found in the range [first, last) using the given predicate op to compare elements. Executed according to the policy.
The comparison operations in the parallel find_end algorithm invoked with an execution policy object of type sequenced_policy execute in sequential order in the calling thread.
The comparison operations in the parallel find_end algorithm invoked with an execution policy object of type parallel_policy or parallel_task_policy are permitted to execute in an unordered fashion in unspecified threads, and indeterminately sequenced within each thread.
This overload of find_end is available if the user decides to provide the algorithm their own predicate op.
Note
Complexity: at most S*(N-S+1) comparisons where S = distance(first2, last2) and N = distance(first1, last1).
- Template Parameters
ExPolicy – The type of the execution policy to use (deduced). It describes the manner in which the execution of the algorithm may be parallelized and the manner in which it executes the assignments.
FwdIter1 – The type of the source iterators used for the first range (deduced). This iterator type must meet the requirements of an forward iterator.
FwdIter2 – The type of the source iterators used for the second range (deduced). This iterator type must meet the requirements of an forward iterator.
Pred – The type of an optional function/function object to use. Unlike its sequential form, the parallel overload of replace requires Pred to meet the requirements of CopyConstructible. This defaults to std::equal_to<>
- Parameters
policy – The execution policy to use for the scheduling of the iterations.
first1 – Refers to the beginning of the sequence of elements of the first range the algorithm will be applied to.
last1 – Refers to the end of the sequence of elements of the first range the algorithm will be applied to.
first2 – Refers to the beginning of the sequence of elements the algorithm will be searching for.
last2 – Refers to the end of the sequence of elements of the algorithm will be searching for.
op – The binary predicate which returns true if the elements should be treated as equal. The signature should be equivalent to the following:
The signature does not need to have const &, but the function must not modify the objects passed to it. The types Type1 and Type2 must be such that objects of types FwdIter1 and FwdIter2 can be dereferenced and then implicitly converted to Type1 and Type2 respectively.bool pred(const Type1 &a, const Type2 &b);
- Returns
The find_end algorithm returns a hpx::future<FwdIter> if the execution policy is of type sequenced_task_policy or parallel_task_policy and returns FwdIter otherwise. The find_end algorithm returns an iterator to the beginning of the last subsequence [first2, last2) in range [first, last). If the length of the subsequence [first2, last2) is greater than the length of the range [first1, last1), last1 is returned. Additionally if the size of the subsequence is empty or no subsequence is found, last1 is also returned.
-
template<typename ExPolicy, typename FwdIter1, typename FwdIter2>
util::detail::algorithm_result_t<ExPolicy, FwdIter1> find_end(ExPolicy &&policy, FwdIter1 first1, FwdIter1 last1, FwdIter2 first2, FwdIter2 last2)# Returns the last subsequence of elements [first2, last2) found in the range [first, last). Elements are compared using operator==. Executed according to the policy.
The comparison operations in the parallel find_end algorithm invoked with an execution policy object of type sequenced_policy execute in sequential order in the calling thread.
The comparison operations in the parallel find_end algorithm invoked with an execution policy object of type parallel_policy or parallel_task_policy are permitted to execute in an unordered fashion in unspecified threads, and indeterminately sequenced within each thread.
Note
Complexity: at most S*(N-S+1) comparisons where S = distance(first2, last2) and N = distance(first1, last1).
- Template Parameters
ExPolicy – The type of the execution policy to use (deduced). It describes the manner in which the execution of the algorithm may be parallelized and the manner in which it executes the assignments.
FwdIter1 – The type of the source iterators used for the first range (deduced). This iterator type must meet the requirements of an forward iterator.
FwdIter2 – The type of the source iterators used for the second range (deduced). This iterator type must meet the requirements of an forward iterator.
- Parameters
policy – The execution policy to use for the scheduling of the iterations.
first1 – Refers to the beginning of the sequence of elements of the first range the algorithm will be applied to.
last1 – Refers to the end of the sequence of elements of the first range the algorithm will be applied to.
first2 – Refers to the beginning of the sequence of elements the algorithm will be searching for.
last2 – Refers to the end of the sequence of elements of the algorithm will be searching for.
- Returns
The find_end algorithm returns a hpx::future<FwdIter> if the execution policy is of type sequenced_task_policy or parallel_task_policy and returns FwdIter otherwise. The find_end algorithm returns an iterator to the beginning of the last subsequence [first2, last2) in range [first, last). If the length of the subsequence [first2, last2) is greater than the length of the range [first1, last1), last1 is returned. Additionally if the size of the subsequence is empty or no subsequence is found, last1 is also returned.
-
template<typename FwdIter1, typename FwdIter2, typename Pred = detail::equal_to>
FwdIter1 find_end(FwdIter1 first1, FwdIter1 last1, FwdIter2 first2, FwdIter2 last2, Pred &&op = Pred())# Returns the last subsequence of elements [first2, last2) found in the range [first, last) using the given predicate op to compare elements.
This overload of find_end is available if the user decides to provide the algorithm their own predicate op.
Note
Complexity: at most S*(N-S+1) comparisons where S = distance(first2, last2) and N = distance(first1, last1).
- Template Parameters
FwdIter1 – The type of the source iterators used for the first range (deduced). This iterator type must meet the requirements of an forward iterator.
FwdIter2 – The type of the source iterators used for the second range (deduced). This iterator type must meet the requirements of an forward iterator.
Pred – The type of an optional function/function object to use. Unlike its sequential form, the parallel overload of replace requires Pred to meet the requirements of CopyConstructible. This defaults to std::equal_to<>
- Parameters
first1 – Refers to the beginning of the sequence of elements of the first range the algorithm will be applied to.
last1 – Refers to the end of the sequence of elements of the first range the algorithm will be applied to.
first2 – Refers to the beginning of the sequence of elements the algorithm will be searching for.
last2 – Refers to the end of the sequence of elements of the algorithm will be searching for.
op – The binary predicate which returns true if the elements should be treated as equal. The signature should be equivalent to the following:
The signature does not need to have const &, but the function must not modify the objects passed to it. The types Type1 and Type2 must be such that objects of types FwdIter1 and FwdIter2 can be dereferenced and then implicitly converted to Type1 and Type2 respectively.bool pred(const Type1 &a, const Type2 &b);
- Returns
The find_end algorithm returns a FwdIter1. The find_end algorithm returns an iterator to the beginning of the last subsequence [first2, last2) in range [first, last). If the length of the subsequence [first2, last2) is greater than the length of the range [first1, last1), last1 is returned. Additionally if the size of the subsequence is empty or no subsequence is found, last1 is also returned.
-
template<typename FwdIter1, typename FwdIter2>
FwdIter1 find_end(FwdIter1 first1, FwdIter1 last1, FwdIter2 first2, FwdIter2 last2)# Returns the last subsequence of elements [first2, last2) found in the range [first, last). Elements are compared using operator==.
Note
Complexity: at most S*(N-S+1) comparisons where S = distance(first2, last2) and N = distance(first1, last1).
- Template Parameters
FwdIter1 – The type of the source iterators used for the first range (deduced). This iterator type must meet the requirements of an forward iterator.
FwdIter2 – The type of the source iterators used for the second range (deduced). This iterator type must meet the requirements of an forward iterator.
- Parameters
first1 – Refers to the beginning of the sequence of elements of the first range the algorithm will be applied to.
last1 – Refers to the end of the sequence of elements of the first range the algorithm will be applied to.
first2 – Refers to the beginning of the sequence of elements the algorithm will be searching for.
last2 – Refers to the end of the sequence of elements of the algorithm will be searching for.
- Returns
The find_end algorithm returns a FwdIter1. The find_end algorithm returns an iterator to the beginning of the last subsequence [first2, last2) in range [first, last). If the length of the subsequence [first2, last2) is greater than the length of the range [first1, last1), last1 is returned. Additionally if the size of the subsequence is empty or no subsequence is found, last1 is also returned.
-
template<typename ExPolicy, typename FwdIter1, typename FwdIter2, typename Pred = detail::equal_to>
util::detail::algorithm_result_t<ExPolicy, FwdIter1> find_first_of(ExPolicy &&policy, FwdIter1 first, FwdIter1 last, FwdIter2 s_first, FwdIter2 s_last, Pred &&op = Pred())# Searches the range [first, last) for any elements in the range [s_first, s_last). Uses binary predicate op to compare elements. Executed according to the policy.
The comparison operations in the parallel find_first_of algorithm invoked with an execution policy object of type sequenced_policy execute in sequential order in the calling thread.
The comparison operations in the parallel find_first_of algorithm invoked with an execution policy object of type parallel_policy or parallel_task_policy are permitted to execute in an unordered fashion in unspecified threads, and indeterminately sequenced within each thread.
This overload of find_first_of is available if the user decides to provide the algorithm their own predicate op.
Note
Complexity: at most (S*N) comparisons where S = distance(s_first, s_last) and N = distance(first, last).
- Template Parameters
ExPolicy – The type of the execution policy to use (deduced). It describes the manner in which the execution of the algorithm may be parallelized and the manner in which it executes the assignments.
FwdIter1 – The type of the source iterators used for the first range (deduced). This iterator type must meet the requirements of an forward iterator.
FwdIter2 – The type of the source iterators used for the second range (deduced). This iterator type must meet the requirements of an forward iterator.
Pred – The type of an optional function/function object to use. Unlike its sequential form, the parallel overload of equal requires Pred to meet the requirements of CopyConstructible. This defaults to std::equal_to<>
- Parameters
policy – The execution policy to use for the scheduling of the iterations.
first – Refers to the beginning of the sequence of elements of the first range the algorithm will be applied to.
last – Refers to the end of the sequence of elements of the first range the algorithm will be applied to.
s_first – Refers to the beginning of the sequence of elements the algorithm will be searching for.
s_last – Refers to the end of the sequence of elements of the algorithm will be searching for.
op – The binary predicate which returns true if the elements should be treated as equal. The signature should be equivalent to the following:
The signature does not need to have const &, but the function must not modify the objects passed to it. The types Type1 and Type2 must be such that objects of types FwdIter1 and FwdIter2 can be dereferenced and then implicitly converted to Type1 and Type2 respectively.bool pred(const Type1 &a, const Type2 &b);
- Returns
The find_first_of algorithm returns a hpx::future<FwdIter1> if the execution policy is of type sequenced_task_policy or parallel_task_policy and returns FwdIter1 otherwise. The find_first_of algorithm returns an iterator to the first element in the range [first, last) that is equal to an element from the range [s_first, s_last). If the length of the subsequence [s_first, s_last) is greater than the length of the range [first, last), last is returned. Additionally if the size of the subsequence is empty or no subsequence is found, last is also returned.
-
template<typename ExPolicy, typename FwdIter1, typename FwdIter2>
util::detail::algorithm_result_t<ExPolicy, FwdIter1> find_first_of(ExPolicy &&policy, FwdIter1 first, FwdIter1 last, FwdIter2 s_first, FwdIter2 s_last)# Searches the range [first, last) for any elements in the range [s_first, s_last). Elements are compared using operator==. Executed according to the policy.
The comparison operations in the parallel find_first_of algorithm invoked with an execution policy object of type sequenced_policy execute in sequential order in the calling thread.
The comparison operations in the parallel find_first_of algorithm invoked with an execution policy object of type parallel_policy or parallel_task_policy are permitted to execute in an unordered fashion in unspecified threads, and indeterminately sequenced within each thread.
Note
Complexity: at most (S*N) comparisons where S = distance(s_first, s_last) and N = distance(first, last).
- Template Parameters
ExPolicy – The type of the execution policy to use (deduced). It describes the manner in which the execution of the algorithm may be parallelized and the manner in which it executes the assignments.
FwdIter1 – The type of the source iterators used for the first range (deduced). This iterator type must meet the requirements of an forward iterator.
FwdIter2 – The type of the source iterators used for the second range (deduced). This iterator type must meet the requirements of an forward iterator.
- Parameters
policy – The execution policy to use for the scheduling of the iterations.
first – Refers to the beginning of the sequence of elements of the first range the algorithm will be applied to.
last – Refers to the end of the sequence of elements of the first range the algorithm will be applied to.
s_first – Refers to the beginning of the sequence of elements the algorithm will be searching for.
s_last – Refers to the end of the sequence of elements of the algorithm will be searching for.
- Returns
The find_first_of algorithm returns a hpx::future<FwdIter1> if the execution policy is of type sequenced_task_policy or parallel_task_policy and returns FwdIter1 otherwise. The find_first_of algorithm returns an iterator to the first element in the range [first, last) that is equal to an element from the range [s_first, s_last). If the length of the subsequence [s_first, s_last) is greater than the length of the range [first, last), last is returned. Additionally if the size of the subsequence is empty or no subsequence is found, last is also returned.
-
template<typename FwdIter1, typename FwdIter2, typename Pred = detail::equal_to>
FwdIter1 find_first_of(FwdIter1 first, FwdIter1 last, FwdIter2 s_first, FwdIter2 s_last, Pred &&op = Pred())# Searches the range [first, last) for any elements in the range [s_first, s_last). Uses binary predicate op to compare elements.
This overload of find_first_of is available if the user decides to provide the algorithm their own predicate op.
Note
Complexity: at most (S*N) comparisons where S = distance(s_first, s_last) and N = distance(first, last).
- Template Parameters
FwdIter1 – The type of the source iterators used for the first range (deduced). This iterator type must meet the requirements of an forward iterator.
FwdIter2 – The type of the source iterators used for the second range (deduced). This iterator type must meet the requirements of an forward iterator.
Pred – The type of an optional function/function object to use. Unlike its sequential form, the parallel overload of equal requires Pred to meet the requirements of CopyConstructible. This defaults to std::equal_to<>
- Parameters
first – Refers to the beginning of the sequence of elements of the first range the algorithm will be applied to.
last – Refers to the end of the sequence of elements of the first range the algorithm will be applied to.
s_first – Refers to the beginning of the sequence of elements the algorithm will be searching for.
s_last – Refers to the end of the sequence of elements of the algorithm will be searching for.
op – The binary predicate which returns true if the elements should be treated as equal. The signature should be equivalent to the following:
The signature does not need to have const &, but the function must not modify the objects passed to it. The types Type1 and Type2 must be such that objects of types FwdIter1 and FwdIter2 can be dereferenced and then implicitly converted to Type1 and Type2 respectively.bool pred(const Type1 &a, const Type2 &b);
- Returns
The find_first_of algorithm returns a FwdIter1. The find_first_of algorithm returns an iterator to the first element in the range [first, last) that is equal to an element from the range [s_first, s_last). If the length of the subsequence [s_first, s_last) is greater than the length of the range [first, last), last is returned. Additionally if the size of the subsequence is empty or no subsequence is found, last is also returned.
-
template<typename FwdIter1, typename FwdIter2>
FwdIter1 find_first_of(FwdIter1 first, FwdIter1 last, FwdIter2 s_first, FwdIter2 s_last)# Searches the range [first, last) for any elements in the range [s_first, s_last). Elements are compared using operator==.
Note
Complexity: at most (S*N) comparisons where S = distance(s_first, s_last) and N = distance(first, last).
- Template Parameters
FwdIter1 – The type of the source iterators used for the first range (deduced). This iterator type must meet the requirements of an forward iterator.
FwdIter2 – The type of the source iterators used for the second range (deduced). This iterator type must meet the requirements of an forward iterator.
- Parameters
first – Refers to the beginning of the sequence of elements of the first range the algorithm will be applied to.
last – Refers to the end of the sequence of elements of the first range the algorithm will be applied to.
s_first – Refers to the beginning of the sequence of elements the algorithm will be searching for.
s_last – Refers to the end of the sequence of elements of the algorithm will be searching for.
- Returns
The find_first_of algorithm returns a FwdIter1. The find_first_of algorithm returns an iterator to the first element in the range [first, last) that is equal to an element from the range [s_first, s_last). If the length of the subsequence [s_first, s_last) is greater than the length of the range [first, last), last is returned. Additionally if the size of the subsequence is empty or no subsequence is found, last is also returned.
-
template<typename ExPolicy, typename BidiIter, typename T>
util::detail::algorithm_result_t<ExPolicy, BidiIter> find_last(ExPolicy &&policy, BidiIter first, BidiIter last, T const &val)# Returns the last element in the range [first, last) that is equal to val. Executed according to the policy.
The comparison operations in the parallel find_last algorithm invoked with an execution policy object of type sequenced_policy execute in sequential order in the calling thread.
The comparison operations in the parallel find_last algorithm invoked with an execution policy object of type parallel_policy or parallel_task_policy are permitted to execute in an unordered fashion in unspecified threads, and indeterminately sequenced within each thread.
Note
Complexity: At most last - first applications of the operator ==.
- Template Parameters
ExPolicy – The type of the execution policy to use (deduced). It describes the manner in which the execution of the algorithm may be parallelized and the manner in which it executes the assignments.
BidiIter – The type of the source iterators used (deduced). This iterator type must meet the requirements of a bidirectional iterator.
T – The type of the value to find (deduced).
- Parameters
policy – The execution policy to use for the scheduling of the iterations.
first – Refers to the beginning of the sequence of elements the algorithm will be applied to.
last – Refers to the end of the sequence of elements the algorithm will be applied to.
val – The value to find.
- Returns
The find_last algorithm returns a hpx::future<BidiIter> if the execution policy is of type sequenced_task_policy or parallel_task_policy and returns BidiIter otherwise. The find_last algorithm returns an iterator to the last element in the range [first, last) that is equal to val. If no such element is found, the function returns last.
-
template<typename InIter, typename T>
InIter find_last(InIter first, InIter last, T const &val)# Returns the last element in the range [first, last) that is equal to val.
Note
Complexity: At most last - first applications of the operator ==.
- Template Parameters
InIter – The type of the source iterators used (deduced). This iterator type must meet the requirements of an input iterator.
T – The type of the value to find (deduced).
- Parameters
first – Refers to the beginning of the sequence of elements the algorithm will be applied to.
last – Refers to the end of the sequence of elements the algorithm will be applied to.
val – The value to find.
- Returns
The find_last algorithm returns a InIter. The find_last algorithm returns an iterator to the last element in the range [first, last) that is equal to val. If no such element is found, the function returns last.
-
template<typename ExPolicy, typename BidiIter, typename F>
util::detail::algorithm_result_t<ExPolicy, BidiIter> find_last_if(ExPolicy &&policy, BidiIter first, BidiIter last, F &&f)# Returns the last element in the range [first, last) for which predicate f returns true. Executed according to the policy.
The comparison operations in the parallel find_last_if algorithm invoked with an execution policy object of type sequenced_policy execute in sequential order in the calling thread.
The comparison operations in the parallel find_last_if algorithm invoked with an execution policy object of type parallel_policy or parallel_task_policy are permitted to execute in an unordered fashion in unspecified threads, and indeterminately sequenced within each thread.
Note
Complexity: At most last - first applications of the predicate.
- Template Parameters
ExPolicy – The type of the execution policy to use (deduced). It describes the manner in which the execution of the algorithm may be parallelized and the manner in which it executes the assignments.
BidiIter – The type of the source iterators used (deduced). This iterator type must meet the requirements of a bidirectional iterator.
F – The type of the function/predicate to use (deduced). Must be callable with the type of the elements in the range.
- Parameters
policy – The execution policy to use for the scheduling of the iterations.
first – Refers to the beginning of the sequence of elements the algorithm will be applied to.
last – Refers to the end of the sequence of elements the algorithm will be applied to.
f – The predicate to check.
- Returns
The find_last_if algorithm returns a hpx::future<BidiIter> if the execution policy is of type sequenced_task_policy or parallel_task_policy and returns BidiIter otherwise. The find_last_if algorithm returns an iterator to the last element in the range [first, last) for which predicate f returns true. If no such element is found, the function returns last.
-
template<typename InIter, typename F>
InIter find_last_if(InIter first, InIter last, F &&f)# Returns the last element in the range [first, last) for which predicate f returns true.
Note
Complexity: At most last - first applications of the predicate.
- Template Parameters
InIter – The type of the source iterators used (deduced). This iterator type must meet the requirements of an input iterator.
F – The type of the function/predicate to use (deduced).
- Parameters
first – Refers to the beginning of the sequence of elements the algorithm will be applied to.
last – Refers to the end of the sequence of elements the algorithm will be applied to.
f – The predicate to check.
- Returns
The find_last_if algorithm returns a InIter. The find_last_if algorithm returns an iterator to the last element in the range [first, last) for which predicate f returns true. If no such element is found, the function returns last.
-
template<typename ExPolicy, typename BidiIter, typename F>
util::detail::algorithm_result_t<ExPolicy, BidiIter> find_last_if_not(ExPolicy &&policy, BidiIter first, BidiIter last, F &&f)# Returns the last element in the range [first, last) for which predicate f returns false. Executed according to the policy.
The comparison operations in the parallel find_last_if_not algorithm invoked with an execution policy object of type sequenced_policy execute in sequential order in the calling thread.
The comparison operations in the parallel find_last_if_not algorithm invoked with an execution policy object of type parallel_policy or parallel_task_policy are permitted to execute in an unordered fashion in unspecified threads, and indeterminately sequenced within each thread.
Note
Complexity: At most last - first applications of the predicate.
- Template Parameters
ExPolicy – The type of the execution policy to use (deduced). It describes the manner in which the execution of the algorithm may be parallelized and the manner in which it executes the assignments.
BidiIter – The type of the source iterators used (deduced). This iterator type must meet the requirements of a bidirectional iterator.
F – The type of the function/predicate to use (deduced). Must be callable with the type of the elements in the range.
- Parameters
policy – The execution policy to use for the scheduling of the iterations.
first – Refers to the beginning of the sequence of elements the algorithm will be applied to.
last – Refers to the end of the sequence of elements the algorithm will be applied to.
f – The predicate to check.
- Returns
The find_last_if_not algorithm returns a hpx::future<BidiIter> if the execution policy is of type sequenced_task_policy or parallel_task_policy and returns BidiIter otherwise. The find_last_if_not algorithm returns an iterator to the last element in the range [first, last) for which predicate f returns false. If no such element is found, the function returns last.
-
template<typename InIter, typename F>
InIter find_last_if_not(InIter first, InIter last, F &&f)# Returns the last element in the range [first, last) for which predicate f returns false.
Note
Complexity: At most last - first applications of the predicate.
- Template Parameters
InIter – The type of the source iterators used (deduced). This iterator type must meet the requirements of an input iterator.
F – The type of the function/predicate to use (deduced).
- Parameters
first – Refers to the beginning of the sequence of elements the algorithm will be applied to.
last – Refers to the end of the sequence of elements the algorithm will be applied to.
f – The predicate to check.
- Returns
The find_last_if_not algorithm returns a InIter. The find_last_if_not algorithm returns an iterator to the last element in the range [first, last) for which predicate f returns false. If no such element is found, the function returns last.
-
template<typename ExPolicy, typename FwdIter, typename T>
hpx::for_each, hpx::for_each_n#
Defined in header hpx/algorithm.hpp.
See Public API for a list of names and headers that are part of the public HPX API.
-
namespace hpx
Functions
-
template<typename InIter, typename F>
F for_each(InIter first, InIter last, F &&f)# Applies f to the result of dereferencing every iterator in the range [first, last).
If f returns a result, the result is ignored.
If the type of first satisfies the requirements of a mutable iterator, f may apply non-constant functions through the dereferenced iterator.
Note
Complexity: Applies f exactly last - first times.
- Template Parameters
InIter – The type of the source begin and end iterator used (deduced). This iterator type must meet the requirements of an input iterator.
F – The type of the function/function object to use (deduced). F must meet requirements of MoveConstructible.
- Parameters
first – Refers to the beginning of the sequence of elements the algorithm will be applied to.
last – Refers to the end of the sequence of elements the algorithm will be applied to.
f – Specifies the function (or function object) which will be invoked for each of the elements in the sequence specified by [first, last). The signature of this predicate should be equivalent to:
The signature does not need to have const&. The type Type must be such that an object of type InIter can be dereferenced and then implicitly converted to Type.<ignored> pred(const Type &a);
- Returns
f.
-
template<typename ExPolicy, typename FwdIter, typename F>
util::detail::algorithm_result_t<ExPolicy, void> for_each(ExPolicy &&policy, FwdIter first, FwdIter last, F &&f)# Applies f to the result of dereferencing every iterator in the range [first, last). Executed according to the policy.
If f returns a result, the result is ignored.
If the type of first satisfies the requirements of a mutable iterator, f may apply non-constant functions through the dereferenced iterator.
Unlike its sequential form, the parallel overload of for_each does not return a copy of its Function parameter, since parallelization may not permit efficient state accumulation.
The application of function objects in parallel algorithm invoked with an execution policy object of type sequenced_policy execute in sequential order in the calling thread.
The application of function objects in parallel algorithm invoked with an execution policy object of type parallel_policy or parallel_task_policy are permitted to execute in an unordered fashion in unspecified threads, and indeterminately sequenced within each thread.
Note
Complexity: Applies f exactly last - first times.
- Template Parameters
ExPolicy – The type of the execution policy to use (deduced). It describes the manner in which the execution of the algorithm may be parallelized and the manner in which it applies user-provided function objects.
FwdIter – The type of the source begin and end iterator used (deduced). This iterator type must meet the requirements of a forward iterator.
F – The type of the function/function object to use (deduced). Unlike its sequential form, the parallel overload of for_each requires F to meet the requirements of CopyConstructible.
- Parameters
policy – The execution policy to use for the scheduling of the iterations.
first – Refers to the beginning of the sequence of elements the algorithm will be applied to.
last – Refers to the end of the sequence of elements the algorithm will be applied to.
f – Specifies the function (or function object) which will be invoked for each of the elements in the sequence specified by [first, last). The signature of this predicate should be equivalent to:
The signature does not need to have const&. The type Type must be such that an object of type FwdIter can be dereferenced and then implicitly converted to Type.<ignored> pred(const Type &a);
- Returns
The for_each algorithm returns a hpx::future<void> if the execution policy is of type sequenced_task_policy or parallel_task_policy and returns void otherwise.
-
template<typename InIter, typename Size, typename F>
InIter for_each_n(InIter first, Size count, F &&f)# Applies f to the result of dereferencing every iterator in the range [first, first + count), starting from first and proceeding to first + count - 1.
If f returns a result, the result is ignored.
If the type of first satisfies the requirements of a mutable iterator, f may apply non-constant functions through the dereferenced iterator.
Note
Complexity: Applies f exactly count times.
- Template Parameters
InIter – The type of the source begin and end iterator used (deduced). This iterator type must meet the requirements of an input iterator.
Size – The type of the argument specifying the number of elements to apply f to.
F – The type of the function/function object to use (deduced). F must meet requirements of MoveConstructible.
- Parameters
first – Refers to the beginning of the sequence of elements the algorithm will be applied to.
count – Refers to the number of elements starting at first the algorithm will be applied to.
f – Specifies the function (or function object) which will be invoked for each of the elements in the sequence specified by [first, last). The signature of this predicate should be equivalent to:
The signature does not need to have const&. The type Type must be such that an object of type InIter can be dereferenced and then implicitly converted to Type.<ignored> pred(const Type &a);
- Returns
first + count for non-negative values of count and first for negative values.
-
template<typename ExPolicy, typename FwdIter, typename Size, typename F>
util::detail::algorithm_result_t<ExPolicy, FwdIter> for_each_n(ExPolicy &&policy, FwdIter first, Size count, F &&f)# Applies f to the result of dereferencing every iterator in the range [first, first + count), starting from first and proceeding to first + count - 1. Executed according to the policy.
If f returns a result, the result is ignored.
If the type of first satisfies the requirements of a mutable iterator, f may apply non-constant functions through the dereferenced iterator.
Unlike its sequential form, the parallel overload of for_each_n does not return a copy of its Function parameter, since parallelization may not permit efficient state accumulation.
The application of function objects in parallel algorithm invoked with an execution policy object of type sequenced_policy execute in sequential order in the calling thread.
The application of function objects in parallel algorithm invoked with an execution policy object of type parallel_policy or parallel_task_policy are permitted to execute in an unordered fashion in unspecified threads, and indeterminately sequenced within each thread.
Note
Complexity: Applies f exactly count times.
- Template Parameters
ExPolicy – The type of the execution policy to use (deduced). It describes the manner in which the execution of the algorithm may be parallelized and the manner in which it applies user-provided function objects.
FwdIter – The type of the source iterators used (deduced). This iterator type must meet the requirements of an forward iterator.
Size – The type of the argument specifying the number of elements to apply f to.
F – The type of the function/function object to use (deduced). Unlike its sequential form, the parallel overload of for_each_n requires F to meet the requirements of CopyConstructible.
- Parameters
policy – The execution policy to use for the scheduling of the iterations.
first – Refers to the beginning of the sequence of elements the algorithm will be applied to.
count – Refers to the number of elements starting at first the algorithm will be applied to.
f – Specifies the function (or function object) which will be invoked for each of the elements in the sequence specified by [first, last). The signature of this predicate should be equivalent to:
The signature does not need to have const&. The type Type must be such that an object of type FwdIter can be dereferenced and then implicitly converted to Type.<ignored> pred(const Type &a);
- Returns
The for_each_n algorithm returns a hpx::future<FwdIter> if the execution policy is of type sequenced_task_policy or parallel_task_policy and returns FwdIter otherwise. It returns first + count for non-negative values of count and first for negative values.
-
template<typename InIter, typename F>
hpx::experimental::for_loop, hpx::experimental::for_loop_strided, hpx::experimental::for_loop_n, hpx::experimental::for_loop_n_strided#
Defined in header hpx/algorithm.hpp.
See Public API for a list of names and headers that are part of the public HPX API.
-
namespace hpx
-
namespace experimental#
Top-level namespace.
Functions
-
template<typename I, typename ...Args>
void for_loop(std::decay_t<I> first, I last, Args&&... args)# The for_loop implements loop functionality over a range specified by integral or iterator bounds. For the iterator case, these algorithms resemble for_each from the Parallelism TS, but leave to the programmer when and if to dereference the iterator.
The execution of for_loop without specifying an execution policy is equivalent to specifying hpx::execution::seq as the execution policy.
Requires: I shall be an integral type or meet the requirements of an input iterator type. The args parameter pack shall have at least one element, comprising objects returned by invocations of reduction and/or induction function templates followed by exactly one element invocable element-access function, f. f shall meet the requirements of MoveConstructible.
Effects: Applies f to each element in the input sequence, with additional arguments corresponding to the reductions and inductions in the args parameter pack. The length of the input sequence is last - first.
The first element in the input sequence is specified by first. Each subsequent element is generated by incrementing the previous element.
Along with an element from the input sequence, for each member of the args parameter pack excluding f, an additional argument is passed to each application of f as follows:
If the pack member is an object returned by a call to a reduction function listed in section, then the additional argument is a reference to a view of that reduction object. If the pack member is an object returned by a call to induction, then the additional argument is the induction value for that induction object corresponding to the position of the application of f in the input sequence.
Complexity: Applies f exactly once for each element of the input sequence.
Remarks: If f returns a result, the result is ignored.
Note
As described in the C++ standard, arithmetic on non-random-access iterators is performed using advance and distance.
Note
The order of the elements of the input sequence is important for determining ordinal position of an application of f, even though the applications themselves may be unordered.
- Template Parameters
I – The type of the iteration variable. This could be an (forward) iterator type or an integral type.
Args – A parameter pack, it’s last element is a function object to be invoked for each iteration, the others have to be either conforming to the induction or reduction concept.
- Parameters
first – Refers to the beginning of the sequence of elements the algorithm will be applied to.
last – Refers to the end of the sequence of elements the algorithm will be applied to.
args – The last element of this parameter pack is the function (object) to invoke, while the remaining elements of the parameter pack are instances of either induction or reduction objects. The function (or function object) which will be invoked for each of the elements in the sequence specified by [first, last) should expose a signature equivalent to:
The signature does not need to have const&. It will receive the current value of the iteration variable and one argument for each of the induction or reduction objects passed to the algorithms, representing their current values.<ignored> pred(I const& a, ...);
- template<typename ExPolicy, typename I, typename... Args> < unspecified > for_loop (ExPolicy &&policy, std::decay_t< I > first, I last, Args &&... args)
The for_loop implements loop functionality over a range specified by integral or iterator bounds. For the iterator case, these algorithms resemble for_each from the Parallelism TS, but leave to the programmer when and if to dereference the iterator. Executed according to the policy.
Requires: I shall be an integral type or meet the requirements of an input iterator type. The args parameter pack shall have at least one element, comprising objects returned by invocations of reduction and/or induction function templates followed by exactly one element invocable element-access function, f. f shall meet the requirements of MoveConstructible.
Effects: Applies f to each element in the input sequence, with additional arguments corresponding to the reductions and inductions in the args parameter pack. The length of the input sequence is last - first.
The first element in the input sequence is specified by first. Each subsequent element is generated by incrementing the previous element.
Along with an element from the input sequence, for each member of the args parameter pack excluding f, an additional argument is passed to each application of f as follows:
If the pack member is an object returned by a call to a reduction function listed in section, then the additional argument is a reference to a view of that reduction object. If the pack member is an object returned by a call to induction, then the additional argument is the induction value for that induction object corresponding to the position of the application of f in the input sequence.
Complexity: Applies f exactly once for each element of the input sequence.
Remarks: If f returns a result, the result is ignored.
Note
As described in the C++ standard, arithmetic on non-random-access iterators is performed using advance and distance.
Note
The order of the elements of the input sequence is important for determining ordinal position of an application of f, even though the applications themselves may be unordered.
- Template Parameters
ExPolicy – The type of the execution policy to use (deduced). It describes the manner in which the execution of the algorithm may be parallelized and the manner in which it applies user-provided function objects.
I – The type of the iteration variable. This could be an (forward) iterator type or an integral type.
Args – A parameter pack, it’s last element is a function object to be invoked for each iteration, the others have to be either conforming to the induction or reduction concept.
- Parameters
policy – The execution policy to use for the scheduling of the iterations.
first – Refers to the beginning of the sequence of elements the algorithm will be applied to.
last – Refers to the end of the sequence of elements the algorithm will be applied to.
args – The last element of this parameter pack is the function (object) to invoke, while the remaining elements of the parameter pack are instances of either induction or reduction objects. The function (or function object) which will be invoked for each of the elements in the sequence specified by [first, last) should expose a signature equivalent to:
The signature does not need to have const&. It will receive the current value of the iteration variable and one argument for each of the induction or reduction objects passed to the algorithms, representing their current values.<ignored> pred(I const& a, ...);
- Returns
The for_loop algorithm returns a hpx::future<void> if the execution policy is of type hpx::execution::sequenced_task_policy or hpx::execution::parallel_task_policy and returns void otherwise.
-
template<typename I, typename S, typename ...Args>
void for_loop_strided(std::decay_t<I> first, I last, S stride, Args&&... args)# The for_loop_strided implements loop functionality over a range specified by integral or iterator bounds. For the iterator case, these algorithms resemble for_each from the Parallelism TS, but leave to the programmer when and if to dereference the iterator.
The execution of for_loop without specifying an execution policy is equivalent to specifying hpx::execution::seq as the execution policy.
Requires: I shall be an integral type or meet the requirements of an input iterator type. The args parameter pack shall have at least one element, comprising objects returned by invocations of reduction and/or induction function templates followed by exactly one element invocable element-access function, f. f shall meet the requirements of MoveConstructible.
Effects: Applies f to each element in the input sequence, with additional arguments corresponding to the reductions and inductions in the args parameter pack. The length of the input sequence is last - first.
The first element in the input sequence is specified by first. Each subsequent element is generated by incrementing the previous element.
Along with an element from the input sequence, for each member of the args parameter pack excluding f, an additional argument is passed to each application of f as follows:
If the pack member is an object returned by a call to a reduction function listed in section, then the additional argument is a reference to a view of that reduction object. If the pack member is an object returned by a call to induction, then the additional argument is the induction value for that induction object corresponding to the position of the application of f in the input sequence.
Complexity: Applies f exactly once for each element of the input sequence.
Remarks: If f returns a result, the result is ignored.
Note
As described in the C++ standard, arithmetic on non-random-access iterators is performed using advance and distance.
Note
The order of the elements of the input sequence is important for determining ordinal position of an application of f, even though the applications themselves may be unordered.
- Template Parameters
I – The type of the iteration variable. This could be an (forward) iterator type or an integral type.
S – The type of the stride variable. This should be an integral type.
Args – A parameter pack, it’s last element is a function object to be invoked for each iteration, the others have to be either conforming to the induction or reduction concept.
- Parameters
first – Refers to the beginning of the sequence of elements the algorithm will be applied to.
last – Refers to the end of the sequence of elements the algorithm will be applied to.
stride – Refers to the stride of the iteration steps. This shall have non-zero value and shall be negative only if I has integral type or meets the requirements of a bidirectional iterator.
args – The last element of this parameter pack is the function (object) to invoke, while the remaining elements of the parameter pack are instances of either induction or reduction objects. The function (or function object) which will be invoked for each of the elements in the sequence specified by [first, last) should expose a signature equivalent to:
The signature does not need to have const&. It will receive the current value of the iteration variable and one argument for each of the induction or reduction objects passed to the algorithms, representing their current values.<ignored> pred(I const& a, ...);
- template<typename ExPolicy, typename I, typename S, typename... Args> < unspecified > for_loop_strided (ExPolicy &&policy, std::decay_t< I > first, I last, S stride, Args &&... args)
The for_loop_strided implements loop functionality over a range specified by integral or iterator bounds. For the iterator case, these algorithms resemble for_each from the Parallelism TS, but leave to the programmer when and if to dereference the iterator. Executed according to the policy.
Requires: I shall be an integral type or meet the requirements of an input iterator type. The args parameter pack shall have at least one element, comprising objects returned by invocations of reduction and/or induction function templates followed by exactly one element invocable element-access function, f. f shall meet the requirements of MoveConstructible.
Effects: Applies f to each element in the input sequence, with additional arguments corresponding to the reductions and inductions in the args parameter pack. The length of the input sequence is last - first.
The first element in the input sequence is specified by first. Each subsequent element is generated by incrementing the previous element.
Along with an element from the input sequence, for each member of the args parameter pack excluding f, an additional argument is passed to each application of f as follows:
If the pack member is an object returned by a call to a reduction function listed in section, then the additional argument is a reference to a view of that reduction object. If the pack member is an object returned by a call to induction, then the additional argument is the induction value for that induction object corresponding to the position of the application of f in the input sequence.
Complexity: Applies f exactly once for each element of the input sequence.
Remarks: If f returns a result, the result is ignored.
Note
As described in the C++ standard, arithmetic on non-random-access iterators is performed using advance and distance.
Note
The order of the elements of the input sequence is important for determining ordinal position of an application of f, even though the applications themselves may be unordered.
- Template Parameters
ExPolicy – The type of the execution policy to use (deduced). It describes the manner in which the execution of the algorithm may be parallelized and the manner in which it applies user-provided function objects.
I – The type of the iteration variable. This could be an (forward) iterator type or an integral type.
S – The type of the stride variable. This should be an integral type.
Args – A parameter pack, it’s last element is a function object to be invoked for each iteration, the others have to be either conforming to the induction or reduction concept.
- Parameters
policy – The execution policy to use for the scheduling of the iterations.
first – Refers to the beginning of the sequence of elements the algorithm will be applied to.
last – Refers to the end of the sequence of elements the algorithm will be applied to.
stride – Refers to the stride of the iteration steps. This shall have non-zero value and shall be negative only if I has integral type or meets the requirements of a bidirectional iterator.
args – The last element of this parameter pack is the function (object) to invoke, while the remaining elements of the parameter pack are instances of either induction or reduction objects. The function (or function object) which will be invoked for each of the elements in the sequence specified by [first, last) should expose a signature equivalent to:
The signature does not need to have const&. It will receive the current value of the iteration variable and one argument for each of the induction or reduction objects passed to the algorithms, representing their current values.<ignored> pred(I const& a, ...);
- Returns
The for_loop_strided algorithm returns a hpx::future<void> if the execution policy is of type hpx::execution::sequenced_task_policy or hpx::execution::parallel_task_policy and returns void otherwise.
-
template<typename I, typename Size, typename ...Args>
void for_loop_n(I first, Size size, Args&&... args)# The for_loop_n implements loop functionality over a range specified by integral or iterator bounds. For the iterator case, these algorithms resemble for_each from the Parallelism TS, but leave to the programmer when and if to dereference the iterator.
The execution of for_loop_n without specifying an execution policy is equivalent to specifying hpx::execution::seq as the execution policy.
Requires: I shall be an integral type or meet the requirements of an input iterator type. The args parameter pack shall have at least one element, comprising objects returned by invocations of reduction and/or induction function templates followed by exactly one element invocable element-access function, f. f shall meet the requirements of MoveConstructible.
Effects: Applies f to each element in the input sequence, with additional arguments corresponding to the reductions and inductions in the args parameter pack. The length of the input sequence is last - first.
The first element in the input sequence is specified by first. Each subsequent element is generated by incrementing the previous element.
Along with an element from the input sequence, for each member of the args parameter pack excluding f, an additional argument is passed to each application of f as follows:
If the pack member is an object returned by a call to a reduction function listed in section, then the additional argument is a reference to a view of that reduction object. If the pack member is an object returned by a call to induction, then the additional argument is the induction value for that induction object corresponding to the position of the application of f in the input sequence.
Complexity: Applies f exactly once for each element of the input sequence.
Remarks: If f returns a result, the result is ignored.
Note
As described in the C++ standard, arithmetic on non-random-access iterators is performed using advance and distance.
Note
The order of the elements of the input sequence is important for determining ordinal position of an application of f, even though the applications themselves may be unordered.
- Template Parameters
I – The type of the iteration variable. This could be an (forward) iterator type or an integral type.
Size – The type of a non-negative integral value specifying the number of items to iterate over.
Args – A parameter pack, it’s last element is a function object to be invoked for each iteration, the others have to be either conforming to the induction or reduction concept.
- Parameters
first – Refers to the beginning of the sequence of elements the algorithm will be applied to.
size – Refers to the number of items the algorithm will be applied to.
args – The last element of this parameter pack is the function (object) to invoke, while the remaining elements of the parameter pack are instances of either induction or reduction objects. The function (or function object) which will be invoked for each of the elements in the sequence specified by [first, last) should expose a signature equivalent to:
The signature does not need to have const&. It will receive the current value of the iteration variable and one argument for each of the induction or reduction objects passed to the algorithms, representing their current values.<ignored> pred(I const& a, ...);
- template<typename ExPolicy, typename I, typename Size, typename... Args> < unspecified > for_loop_n (ExPolicy &&policy, I first, Size size, Args &&... args)
The for_loop_n implements loop functionality over a range specified by integral or iterator bounds. For the iterator case, these algorithms resemble for_each from the Parallelism TS, but leave to the programmer when and if to dereference the iterator. Executed according to the policy.
Requires: I shall be an integral type or meet the requirements of an input iterator type. The args parameter pack shall have at least one element, comprising objects returned by invocations of reduction and/or induction function templates followed by exactly one element invocable element-access function, f. f shall meet the requirements of MoveConstructible.
Effects: Applies f to each element in the input sequence, with additional arguments corresponding to the reductions and inductions in the args parameter pack. The length of the input sequence is last - first.
The first element in the input sequence is specified by first. Each subsequent element is generated by incrementing the previous element.
Along with an element from the input sequence, for each member of the args parameter pack excluding f, an additional argument is passed to each application of f as follows:
If the pack member is an object returned by a call to a reduction function listed in section, then the additional argument is a reference to a view of that reduction object. If the pack member is an object returned by a call to induction, then the additional argument is the induction value for that induction object corresponding to the position of the application of f in the input sequence.
Complexity: Applies f exactly once for each element of the input sequence.
Remarks: If f returns a result, the result is ignored.
Note
As described in the C++ standard, arithmetic on non-random-access iterators is performed using advance and distance.
Note
The order of the elements of the input sequence is important for determining ordinal position of an application of f, even though the applications themselves may be unordered.
- Template Parameters
ExPolicy – The type of the execution policy to use (deduced). It describes the manner in which the execution of the algorithm may be parallelized and the manner in which it applies user-provided function objects.
I – The type of the iteration variable. This could be an (forward) iterator type or an integral type.
Size – The type of a non-negative integral value specifying the number of items to iterate over.
Args – A parameter pack, it’s last element is a function object to be invoked for each iteration, the others have to be either conforming to the induction or reduction concept.
- Parameters
policy – The execution policy to use for the scheduling of the iterations.
first – Refers to the beginning of the sequence of elements the algorithm will be applied to.
size – Refers to the number of items the algorithm will be applied to.
args – The last element of this parameter pack is the function (object) to invoke, while the remaining elements of the parameter pack are instances of either induction or reduction objects. The function (or function object) which will be invoked for each of the elements in the sequence specified by [first, last) should expose a signature equivalent to:
The signature does not need to have const&. It will receive the current value of the iteration variable and one argument for each of the induction or reduction objects passed to the algorithms, representing their current values.<ignored> pred(I const& a, ...);
- Returns
The for_loop_n algorithm returns a hpx::future<void> if the execution policy is of type hpx::execution::sequenced_task_policy or hpx::execution::parallel_task_policy and returns void otherwise.
-
template<typename I, typename Size, typename S, typename ...Args>
void for_loop_n_strided(I first, Size size, S stride, Args&&... args)# The for_loop_n_strided implements loop functionality over a range specified by integral or iterator bounds. For the iterator case, these algorithms resemble for_each from the Parallelism TS, but leave to the programmer when and if to dereference the iterator.
The execution of for_loop without specifying an execution policy is equivalent to specifying hpx::execution::seq as the execution policy.
Requires: I shall be an integral type or meet the requirements of an input iterator type. The args parameter pack shall have at least one element, comprising objects returned by invocations of reduction and/or induction function templates followed by exactly one element invocable element-access function, f. f shall meet the requirements of MoveConstructible.
Effects: Applies f to each element in the input sequence, with additional arguments corresponding to the reductions and inductions in the args parameter pack. The length of the input sequence is last - first.
The first element in the input sequence is specified by first. Each subsequent element is generated by incrementing the previous element.
Along with an element from the input sequence, for each member of the args parameter pack excluding f, an additional argument is passed to each application of f as follows:
If the pack member is an object returned by a call to a reduction function listed in section, then the additional argument is a reference to a view of that reduction object. If the pack member is an object returned by a call to induction, then the additional argument is the induction value for that induction object corresponding to the position of the application of f in the input sequence.
Complexity: Applies f exactly once for each element of the input sequence.
Remarks: If f returns a result, the result is ignored.
Note
As described in the C++ standard, arithmetic on non-random-access iterators is performed using advance and distance.
Note
The order of the elements of the input sequence is important for determining ordinal position of an application of f, even though the applications themselves may be unordered.
- Template Parameters
I – The type of the iteration variable. This could be an (forward) iterator type or an integral type.
Size – The type of a non-negative integral value specifying the number of items to iterate over.
S – The type of the stride variable. This should be an integral type.
Args – A parameter pack, it’s last element is a function object to be invoked for each iteration, the others have to be either conforming to the induction or reduction concept.
- Parameters
first – Refers to the beginning of the sequence of elements the algorithm will be applied to.
size – Refers to the number of items the algorithm will be applied to.
stride – Refers to the stride of the iteration steps. This shall have non-zero value and shall be negative only if I has integral type or meets the requirements of a bidirectional iterator.
args – The last element of this parameter pack is the function (object) to invoke, while the remaining elements of the parameter pack are instances of either induction or reduction objects. The function (or function object) which will be invoked for each of the elements in the sequence specified by [first, last) should expose a signature equivalent to:
The signature does not need to have const&. It will receive the current value of the iteration variable and one argument for each of the induction or reduction objects passed to the algorithms, representing their current values.<ignored> pred(I const& a, ...);
- template<typename ExPolicy, typename I, typename Size, typename S, typename... Args> < unspecified > for_loop_n_strided (ExPolicy &&policy, I first, Size size, S stride, Args &&... args)
The for_loop_n_strided implements loop functionality over a range specified by integral or iterator bounds. For the iterator case, these algorithms resemble for_each from the Parallelism TS, but leave to the programmer when and if to dereference the iterator. Executed according to the policy.
Requires: I shall be an integral type or meet the requirements of an input iterator type. The args parameter pack shall have at least one element, comprising objects returned by invocations of reduction and/or induction function templates followed by exactly one element invocable element-access function, f. f shall meet the requirements of MoveConstructible.
Effects: Applies f to each element in the input sequence, with additional arguments corresponding to the reductions and inductions in the args parameter pack. The length of the input sequence is last - first.
The first element in the input sequence is specified by first. Each subsequent element is generated by incrementing the previous element.
Along with an element from the input sequence, for each member of the args parameter pack excluding f, an additional argument is passed to each application of f as follows:
If the pack member is an object returned by a call to a reduction function listed in section, then the additional argument is a reference to a view of that reduction object. If the pack member is an object returned by a call to induction, then the additional argument is the induction value for that induction object corresponding to the position of the application of f in the input sequence.
Complexity: Applies f exactly once for each element of the input sequence.
Remarks: If f returns a result, the result is ignored.
Note
As described in the C++ standard, arithmetic on non-random-access iterators is performed using advance and distance.
Note
The order of the elements of the input sequence is important for determining ordinal position of an application of f, even though the applications themselves may be unordered.
- Template Parameters
ExPolicy – The type of the execution policy to use (deduced). It describes the manner in which the execution of the algorithm may be parallelized and the manner in which it applies user-provided function objects.
I – The type of the iteration variable. This could be an (forward) iterator type or an integral type.
Size – The type of a non-negative integral value specifying the number of items to iterate over.
S – The type of the stride variable. This should be an integral type.
Args – A parameter pack, it’s last element is a function object to be invoked for each iteration, the others have to be either conforming to the induction or reduction concept.
- Parameters
policy – The execution policy to use for the scheduling of the iterations.
first – Refers to the beginning of the sequence of elements the algorithm will be applied to.
size – Refers to the number of items the algorithm will be applied to.
stride – Refers to the stride of the iteration steps. This shall have non-zero value and shall be negative only if I has integral type or meets the requirements of a bidirectional iterator.
args – The last element of this parameter pack is the function (object) to invoke, while the remaining elements of the parameter pack are instances of either induction or reduction objects. The function (or function object) which will be invoked for each of the elements in the sequence specified by [first, last) should expose a signature equivalent to:
The signature does not need to have const&. It will receive the current value of the iteration variable and one argument for each of the induction or reduction objects passed to the algorithms, representing their current values.<ignored> pred(I const& a, ...);
- Returns
The for_loop_n_strided algorithm returns a hpx::future<void> if the execution policy is of type hpx::execution::sequenced_task_policy or hpx::execution::parallel_task_policy and returns void otherwise.
-
template<typename I, typename ...Args>
-
namespace experimental#
hpx::experimental::induction#
Defined in header hpx/algorithm.hpp.
See Public API for a list of names and headers that are part of the public HPX API.
-
namespace hpx
-
namespace experimental
Top-level namespace.
Functions
- template<typename T> constexpr HPX_CXX_CORE_EXPORT hpx::parallel::detail::induction_stride_helper< T > induction (T &&value, std::size_t stride)
The function template returns an induction object of unspecified type having a value type and encapsulating an initial value of that type and, optionally, a stride.
For each element in the input range, a looping algorithm over input sequence S computes an induction value from an induction variable and ordinal position p within S by the formula i + p * stride if a stride was specified or i + p otherwise. This induction value is passed to the element access function.
If the value argument to induction is a non-const lvalue, then that lvalue becomes the live-out object for the returned induction object. For each induction object that has a live-out object, the looping algorithm assigns the value of i + n * stride to the live-out object upon return, where n is the number of elements in the input range.
- Template Parameters
T – The value type to be used by the induction object.
- Parameters
value – [in] The initial value to use for the induction object
stride – [in] The (optional) stride to use for the induction object (default: 1)
- Returns
This returns an induction object with value type T, initial value, and (if specified) stride. If T is a lvalue of non-const type, value is used as the live-out object for the induction object; otherwise there is no live-out object.
- template<typename T> constexpr HPX_CXX_CORE_EXPORT hpx::parallel::detail::induction_helper< T > induction (T &&value)
-
namespace experimental
hpx::experimental::reduction#
Defined in header hpx/algorithm.hpp.
See Public API for a list of names and headers that are part of the public HPX API.
-
namespace hpx
-
namespace experimental
Top-level namespace.
Functions
- template<typename T, typename Op> constexpr HPX_CXX_CORE_EXPORT hpx::parallel::detail::reduction_helper< T, std::decay_t< Op > > reduction (T &var, T const &identity, Op &&combiner)
The function template returns a reduction object of unspecified type having a value type and encapsulating an identity value for the reduction, a combiner function object, and a live-out object from which the initial value is obtained and into which the final value is stored.
A parallel algorithm uses reduction objects by allocating an unspecified number of instances, called views, of the reduction’s value type. Each view is initialized with the reduction object’s identity value, except that the live-out object (which was initialized by the caller) comprises one of the views. The algorithm passes a reference to a view to each application of an element-access function, ensuring that no two concurrently-executing invocations share the same view. A view can be shared between two applications that do not execute concurrently, but initialization is performed only once per view.
Modifications to the view by the application of element access functions accumulate as partial results. At some point before the algorithm returns, the partial results are combined, two at a time, using the reduction object’s combiner operation until a single value remains, which is then assigned back to the live-out object.
T shall meet the requirements of CopyConstructible and MoveAssignable. The expression
shall be well-formed.var = combiner(var, var)
Note
In order to produce useful results, modifications to the view should be limited to commutative operations closely related to the combiner operation. For example if the combiner is plus<T>, incrementing the view would be consistent with the combiner but doubling it or assigning to it would not.
- Template Parameters
T – The value type to be used by the induction object.
Op – The type of the binary function (object) used to perform the reduction operation.
- Parameters
var – [in,out] The life-out value to use for the reduction object. This will hold the reduced value after the algorithm is finished executing.
identity – [in] The identity value to use for the reduction operation. This argument is optional and defaults to a copy of var.
combiner – [in] The binary function (object) used to perform a pairwise reduction on the elements.
- Returns
This returns a reduction object of unspecified type having a value type of T. When the return value is used by an algorithm, the reference to var is used as the live-out object, new views are initialized to a copy of identity, and views are combined by invoking the copy of combiner, passing it the two views to be combined.
- template<typename T, typename Op> constexpr HPX_CXX_CORE_EXPORT hpx::parallel::detail::reduction_helper< T, std::decay_t< Op > > reduction (T &var, Op &&combiner)
-
namespace experimental
hpx::experimental::reduction_bit_and#
Defined in header hpx/algorithm.hpp.
See Public API for a list of names and headers that are part of the public HPX API.
-
namespace hpx
-
namespace experimental
Top-level namespace.
Functions
- template<typename T> constexpr HPX_CXX_CORE_EXPORT hpx::parallel::detail::reduction_helper< T, std::bit_and< T > > reduction_bit_and (T &var)
The function template reduction_bit_and returns a reduction object of unspecified type having a value type and encapsulating an identity value for the reduction, it uses std::bit_and{} as its combiner function, and a live-out object from which the initial value is obtained and into which the final value is stored.
A parallel algorithm uses the reduction_bit_and object by allocating an unspecified number of instances, called views, of the reduction’s value type. Each view is initialized with the reduction object’s identity value, except that the live-out object (which was initialized by the caller) comprises one of the views. The algorithm passes a reference to a view to each application of an element-access function, ensuring that no two concurrently-executing invocations share the same view. A view can be shared between two applications that do not execute concurrently, but initialization is performed only once per view.
Modifications to the view by the application of element access functions accumulate as partial results. At some point before the algorithm returns, the partial results are combined, two at a time, using the std::bit_and{} operation until a single value remains, which is then assigned back to the live-out object.
T shall meet the requirements of CopyConstructible and MoveAssignable.
Note
In order to produce useful results, modifications to the view should be limited to commutative operations closely related to the combiner operation.
- Template Parameters
T – The value type to be used by the induction object.
Op – The type of the binary function (object) used to perform the reduction operation.
- Parameters
var – [in,out] The life-out value to use for the reduction object. This will hold the reduced value after the algorithm is finished executing.
identity – [in] The identity value to use for the reduction operation. This argument is optional and defaults to a copy of var.
- Returns
This returns a reduction object of unspecified type having a value type of T. When the return value is used by an algorithm, the reference to var is used as the live-out object, new views are initialized to a copy of identity, and views are combined by invoking the copy of combiner, passing it the two views to be combined.
- template<typename T> constexpr HPX_CXX_CORE_EXPORT hpx::parallel::detail::reduction_helper< T, std::bit_and< T > > reduction_bit_and (T &var, T const &identity)
-
namespace experimental
hpx::experimental::reduction_bit_or#
Defined in header hpx/algorithm.hpp.
See Public API for a list of names and headers that are part of the public HPX API.
-
namespace hpx
-
namespace experimental
Top-level namespace.
Functions
- template<typename T> constexpr HPX_CXX_CORE_EXPORT hpx::parallel::detail::reduction_helper< T, std::bit_or< T > > reduction_bit_or (T &var)
The function template reduction_bit_or returns a reduction object of unspecified type having a value type and encapsulating an identity value for the reduction, it uses std::bit_or{} as its combiner function, and a live-out object from which the initial value is obtained and into which the final value is stored.
A parallel algorithm uses the reduction_bit_or object by allocating an unspecified number of instances, called views, of the reduction’s value type. Each view is initialized with the reduction object’s identity value, except that the live-out object (which was initialized by the caller) comprises one of the views. The algorithm passes a reference to a view to each application of an element-access function, ensuring that no two concurrently-executing invocations share the same view. A view can be shared between two applications that do not execute concurrently, but initialization is performed only once per view.
Modifications to the view by the application of element access functions accumulate as partial results. At some point before the algorithm returns, the partial results are combined, two at a time, using the std::bit_or{} operation until a single value remains, which is then assigned back to the live-out object.
T shall meet the requirements of CopyConstructible and MoveAssignable.
Note
In order to produce useful results, modifications to the view should be limited to commutative operations closely related to the combiner operation.
- Template Parameters
T – The value type to be used by the induction object.
Op – The type of the binary function (object) used to perform the reduction operation.
- Parameters
var – [in,out] The life-out value to use for the reduction object. This will hold the reduced value after the algorithm is finished executing.
identity – [in] The identity value to use for the reduction operation. This argument is optional and defaults to a copy of var.
- Returns
This returns a reduction object of unspecified type having a value type of T. When the return value is used by an algorithm, the reference to var is used as the live-out object, new views are initialized to a copy of identity, and views are combined by invoking the copy of combiner, passing it the two views to be combined.
- template<typename T> constexpr HPX_CXX_CORE_EXPORT hpx::parallel::detail::reduction_helper< T, std::bit_or< T > > reduction_bit_or (T &var, T const &identity)
-
namespace experimental
hpx::experimental::reduction_bit_xor#
Defined in header hpx/algorithm.hpp.
See Public API for a list of names and headers that are part of the public HPX API.
-
namespace hpx
-
namespace experimental
Top-level namespace.
Functions
- template<typename T> constexpr HPX_CXX_CORE_EXPORT hpx::parallel::detail::reduction_helper< T, std::bit_xor< T > > reduction_bit_xor (T &var)
The function template reduction_bit_xor returns a reduction object of unspecified type having a value type and encapsulating an identity value for the reduction, it uses std::bit_xor{} as its combiner function, and a live-out object from which the initial value is obtained and into which the final value is stored.
A parallel algorithm uses the reduction_bit_xor object by allocating an unspecified number of instances, called views, of the reduction’s value type. Each view is initialized with the reduction object’s identity value, except that the live-out object (which was initialized by the caller) comprises one of the views. The algorithm passes a reference to a view to each application of an element-access function, ensuring that no two concurrently-executing invocations share the same view. A view can be shared between two applications that do not execute concurrently, but initialization is performed only once per view.
Modifications to the view by the application of element access functions accumulate as partial results. At some point before the algorithm returns, the partial results are combined, two at a time, using the std::bit_xor{} operation until a single value remains, which is then assigned back to the live-out object.
T shall meet the requirements of CopyConstructible and MoveAssignable.
Note
In order to produce useful results, modifications to the view should be limited to commutative operations closely related to the combiner operation.
- Template Parameters
T – The value type to be used by the induction object.
Op – The type of the binary function (object) used to perform the reduction operation.
- Parameters
var – [in,out] The life-out value to use for the reduction object. This will hold the reduced value after the algorithm is finished executing.
identity – [in] The identity value to use for the reduction operation. This argument is optional and defaults to a copy of var.
- Returns
This returns a reduction object of unspecified type having a value type of T. When the return value is used by an algorithm, the reference to var is used as the live-out object, new views are initialized to a copy of identity, and views are combined by invoking the copy of combiner, passing it the two views to be combined.
- template<typename T> constexpr HPX_CXX_CORE_EXPORT hpx::parallel::detail::reduction_helper< T, std::bit_xor< T > > reduction_bit_xor (T &var, T const &identity)
-
namespace experimental
hpx::experimental::reduction_max#
Defined in header hpx/algorithm.hpp.
See Public API for a list of names and headers that are part of the public HPX API.
-
namespace hpx
-
namespace experimental
Top-level namespace.
Functions
- template<typename T> constexpr HPX_CXX_CORE_EXPORT hpx::parallel::detail::reduction_helper< T, hpx::parallel::detail::max_of< T > > reduction_max (T &var)
The function template reduction_max returns a reduction object of unspecified type having a value type and encapsulating an identity value for the reduction, it uses std::max_of{} as its combiner function, and a live-out object from which the initial value is obtained and into which the final value is stored.
A parallel algorithm uses the reduction_max object by allocating an unspecified number of instances, called views, of the reduction’s value type. Each view is initialized with the reduction object’s identity value, except that the live-out object (which was initialized by the caller) comprises one of the views. The algorithm passes a reference to a view to each application of an element-access function, ensuring that no two concurrently-executing invocations share the same view. A view can be shared between two applications that do not execute concurrently, but initialization is performed only once per view.
Modifications to the view by the application of element access functions accumulate as partial results. At some point before the algorithm returns, the partial results are combined, two at a time, using the std::max_of{} operation until a single value remains, which is then assigned back to the live-out object.
T shall meet the requirements of CopyConstructible and MoveAssignable.
Note
In order to produce useful results, modifications to the view should be limited to commutative operations closely related to the combiner operation.
- Template Parameters
T – The value type to be used by the induction object.
Op – The type of the binary function (object) used to perform the reduction operation.
- Parameters
var – [in,out] The life-out value to use for the reduction object. This will hold the reduced value after the algorithm is finished executing.
identity – [in] The identity value to use for the reduction operation. This argument is optional and defaults to a copy of var.
- Returns
This returns a reduction object of unspecified type having a value type of T. When the return value is used by an algorithm, the reference to var is used as the live-out object, new views are initialized to a copy of identity, and views are combined by invoking the copy of combiner, passing it the two views to be combined.
- template<typename T> constexpr HPX_CXX_CORE_EXPORT hpx::parallel::detail::reduction_helper< T, hpx::parallel::detail::max_of< T > > reduction_max (T &var, T const &identity)
-
namespace experimental
hpx::experimental::reduction_min#
Defined in header hpx/algorithm.hpp.
See Public API for a list of names and headers that are part of the public HPX API.
-
namespace hpx
-
namespace experimental
Top-level namespace.
Functions
- template<typename T> constexpr HPX_CXX_CORE_EXPORT hpx::parallel::detail::reduction_helper< T, hpx::parallel::detail::min_of< T > > reduction_min (T &var)
The function template reduction_min returns a reduction object of unspecified type having a value type and encapsulating an identity value for the reduction, it uses std::min_of{} as its combiner function, and a live-out object from which the initial value is obtained and into which the final value is stored.
A parallel algorithm uses the reduction_min object by allocating an unspecified number of instances, called views, of the reduction’s value type. Each view is initialized with the reduction object’s identity value, except that the live-out object (which was initialized by the caller) comprises one of the views. The algorithm passes a reference to a view to each application of an element-access function, ensuring that no two concurrently-executing invocations share the same view. A view can be shared between two applications that do not execute concurrently, but initialization is performed only once per view.
Modifications to the view by the application of element access functions accumulate as partial results. At some point before the algorithm returns, the partial results are combined, two at a time, using the std::min_of{} operation until a single value remains, which is then assigned back to the live-out object.
T shall meet the requirements of CopyConstructible and MoveAssignable.
Note
In order to produce useful results, modifications to the view should be limited to commutative operations closely related to the combiner operation.
- Template Parameters
T – The value type to be used by the induction object.
Op – The type of the binary function (object) used to perform the reduction operation.
- Parameters
var – [in,out] The life-out value to use for the reduction object. This will hold the reduced value after the algorithm is finished executing.
identity – [in] The identity value to use for the reduction operation. This argument is optional and defaults to a copy of var.
- Returns
This returns a reduction object of unspecified type having a value type of T. When the return value is used by an algorithm, the reference to var is used as the live-out object, new views are initialized to a copy of identity, and views are combined by invoking the copy of combiner, passing it the two views to be combined.
- template<typename T> constexpr HPX_CXX_CORE_EXPORT hpx::parallel::detail::reduction_helper< T, hpx::parallel::detail::min_of< T > > reduction_min (T &var, T const &identity)
-
namespace experimental
hpx::experimental::reduction_multiplies#
Defined in header hpx/algorithm.hpp.
See Public API for a list of names and headers that are part of the public HPX API.
-
namespace hpx
-
namespace experimental
Top-level namespace.
Functions
- template<typename T> constexpr HPX_CXX_CORE_EXPORT hpx::parallel::detail::reduction_helper< T, std::multiplies< T > > reduction_multiplies (T &var)
The function template reduction_multiplies returns a reduction object of unspecified type having a value type and encapsulating an identity value for the reduction, it uses std::multiplies{} as its combiner function, and a live-out object from which the initial value is obtained and into which the final value is stored.
A parallel algorithm uses the reduction_multiplies object by allocating an unspecified number of instances, called views, of the reduction’s value type. Each view is initialized with the reduction object’s identity value, except that the live-out object (which was initialized by the caller) comprises one of the views. The algorithm passes a reference to a view to each application of an element-access function, ensuring that no two concurrently-executing invocations share the same view. A view can be shared between two applications that do not execute concurrently, but initialization is performed only once per view.
Modifications to the view by the application of element access functions accumulate as partial results. At some point before the algorithm returns, the partial results are combined, two at a time, using the std::multiplies{} operation until a single value remains, which is then assigned back to the live-out object.
T shall meet the requirements of CopyConstructible and MoveAssignable.
Note
In order to produce useful results, modifications to the view should be limited to commutative operations closely related to the combiner operation.
- Template Parameters
T – The value type to be used by the induction object.
Op – The type of the binary function (object) used to perform the reduction operation.
- Parameters
var – [in,out] The life-out value to use for the reduction object. This will hold the reduced value after the algorithm is finished executing.
identity – [in] The identity value to use for the reduction operation. This argument is optional and defaults to a copy of var.
- Returns
This returns a reduction object of unspecified type having a value type of T. When the return value is used by an algorithm, the reference to var is used as the live-out object, new views are initialized to a copy of identity, and views are combined by invoking the copy of combiner, passing it the two views to be combined.
- template<typename T> constexpr HPX_CXX_CORE_EXPORT hpx::parallel::detail::reduction_helper< T, std::multiplies< T > > reduction_multiplies (T &var, T const &identity)
-
namespace experimental
hpx::experimental::reduction_plus#
Defined in header hpx/algorithm.hpp.
See Public API for a list of names and headers that are part of the public HPX API.
-
namespace hpx
-
namespace experimental
Top-level namespace.
Functions
- template<typename T> constexpr HPX_CXX_CORE_EXPORT hpx::parallel::detail::reduction_helper< T, std::plus< T > > reduction_plus (T &var)
The function template reduction_plus returns a reduction object of unspecified type having a value type and encapsulating an identity value for the reduction, it uses std::plus{} as its combiner function, and a live-out object from which the initial value is obtained and into which the final value is stored.
A parallel algorithm uses the reduction_plus object by allocating an unspecified number of instances, called views, of the reduction’s value type. Each view is initialized with the reduction object’s identity value, except that the live-out object (which was initialized by the caller) comprises one of the views. The algorithm passes a reference to a view to each application of an element-access function, ensuring that no two concurrently-executing invocations share the same view. A view can be shared between two applications that do not execute concurrently, but initialization is performed only once per view.
Modifications to the view by the application of element access functions accumulate as partial results. At some point before the algorithm returns, the partial results are combined, two at a time, using the std::plus{} operation until a single value remains, which is then assigned back to the live-out object.
T shall meet the requirements of CopyConstructible and MoveAssignable.
Note
In order to produce useful results, modifications to the view should be limited to commutative operations closely related to the combiner operation.
- Template Parameters
T – The value type to be used by the induction object.
Op – The type of the binary function (object) used to perform the reduction operation.
- Parameters
var – [in,out] The life-out value to use for the reduction object. This will hold the reduced value after the algorithm is finished executing.
identity – [in] The identity value to use for the reduction operation. This argument is optional and defaults to a copy of var.
- Returns
This returns a reduction object of unspecified type having a value type of T. When the return value is used by an algorithm, the reference to var is used as the live-out object, new views are initialized to a copy of identity, and views are combined by invoking the copy of combiner, passing it the two views to be combined.
- template<typename T> constexpr HPX_CXX_CORE_EXPORT hpx::parallel::detail::reduction_helper< T, std::plus< T > > reduction_plus (T &var, T const &identity)
-
namespace experimental
hpx::generate, hpx::generate_n#
Defined in header hpx/algorithm.hpp.
See Public API for a list of names and headers that are part of the public HPX API.
-
namespace hpx
Functions
-
template<typename ExPolicy, typename FwdIter, typename F>
hpx::parallel::util::detail::algorithm_result_t<ExPolicy, FwdIter> generate(ExPolicy &&policy, FwdIter first, FwdIter last, F &&f)# Assign each element in range [first, last) a value generated by the given function object f. Executed according to the policy.
The assignments in the parallel generate algorithm invoked with an execution policy object of type sequenced_policy execute in sequential order in the calling thread.
The assignments in the parallel generate algorithm invoked with an execution policy object of type parallel_policy or parallel_task_policy are permitted to execute in an unordered fashion in unspecified threads, and indeterminately sequenced within each thread.
Note
Complexity: Exactly distance(first, last) invocations of f and assignments.
- Template Parameters
ExPolicy – The type of the execution policy to use (deduced). It describes the manner in which the execution of the algorithm may be parallelized and the manner in which it executes the assignments.
FwdIter – The type of the source iterators used (deduced). This iterator type must meet the requirements of a forward iterator.
F – The type of the function/function object to use (deduced). Unlike its sequential form, the parallel overload of equal requires F to meet the requirements of CopyConstructible.
- Parameters
policy – The execution policy to use for the scheduling of the iterations.
first – Refers to the beginning of the sequence of elements the algorithm will be applied to.
last – Refers to the end of the sequence of elements the algorithm will be applied to.
f – generator function that will be called. signature of function should be equivalent to the following:
The type Ret must be such that an object of type FwdIter can be dereferenced and assigned a value of type Ret.Ret fun();
- Returns
The generate algorithm returns a hpx::future<FwdIter> if the execution policy is of type sequenced_task_policy or parallel_task_policy and returns FwdIter otherwise.
-
template<typename FwdIter, typename F>
void generate(FwdIter first, FwdIter last, F &&f)# Assign each element in range [first, last) a value generated by the given function object f.
Note
Complexity: Exactly distance(first, last) invocations of f and assignments.
- Template Parameters
FwdIter – The type of the source iterators used (deduced). This iterator type must meet the requirements of a forward iterator.
F – The type of the function/function object to use (deduced). Unlike its sequential form, the parallel overload of equal requires F to meet the requirements of CopyConstructible.
- Parameters
first – Refers to the beginning of the sequence of elements the algorithm will be applied to.
last – Refers to the end of the sequence of elements the algorithm will be applied to.
f – generator function that will be called. signature of function should be equivalent to the following:
The type Ret must be such that an object of type FwdIter can be dereferenced and assigned a value of type Ret.Ret fun();
- Returns
The generate algorithm returns void.
-
template<typename ExPolicy, typename FwdIter, typename Size, typename F>
hpx::parallel::util::detail::algorithm_result_t<ExPolicy, FwdIter> generate_n(ExPolicy &&policy, FwdIter first, Size count, F &&f)# Assigns each element in range [first, first+) a value generated by the given function object f. Executed according to the policy.
The assignments in the parallel generate_n algorithm invoked with an execution policy object of type sequenced_policy execute in sequential order in the calling thread.
The assignments in the parallel generate_n algorithm invoked with an execution policy object of type parallel_policy or parallel_task_policy are permitted to execute in an unordered fashion in unspecified threads, and indeterminately sequenced within each thread.
Note
Complexity: Exactly count invocations of f and assignments, for count > 0.
- Template Parameters
ExPolicy – The type of the execution policy to use (deduced). It describes the manner in which the execution of the algorithm may be parallelized and the manner in which it executes the assignments.
Size – The type of a non-negative integral value specifying the number of items to iterate over.
FwdIter – The type of the source iterators used (deduced). This iterator type must meet the requirements of an forward iterator.
F – The type of the function/function object to use (deduced). Unlike its sequential form, the parallel overload of equal requires F to meet the requirements of CopyConstructible.
- Parameters
policy – The execution policy to use for the scheduling of the iterations.
first – Refers to the beginning of the sequence of elements the algorithm will be applied to.
count – Refers to the number of elements in the sequence the algorithm will be applied to.
f – Refers to the generator function object that will be called. The signature of the function should be equivalent to
The type Ret must be such that an object of type OutputIt can be dereferenced and assigned a value of type Ret.Ret fun();
- Returns
The generate_n algorithm returns a hpx::future<FwdIter> if the execution policy is of type sequenced_task_policy or parallel_task_policy and returns FwdIter otherwise. generate_n algorithm returns iterator one past the last element assigned if count>0, first otherwise.
-
template<typename FwdIter, typename Size, typename F>
FwdIter generate_n(FwdIter first, Size count, F &&f)# Assigns each element in range [first, first+) a value generated by the given function object f.
Note
Complexity: Exactly count invocations of f and assignments, for count > 0.
- Template Parameters
Size – The type of a non-negative integral value specifying the number of items to iterate over.
FwdIter – The type of the source iterators used (deduced). This iterator type must meet the requirements of an forward iterator.
F – The type of the function/function object to use (deduced). Unlike its sequential form, the parallel overload of equal requires F to meet the requirements of CopyConstructible.
- Parameters
first – Refers to the beginning of the sequence of elements the algorithm will be applied to.
count – Refers to the number of elements in the sequence the algorithm will be applied to.
f – Refers to the generator function object that will be called. The signature of the function should be equivalent to
The type Ret must be such that an object of type OutputIt can be dereferenced and assigned a value of type Ret.Ret fun();
- Returns
The generate_n algorithm returns a FwdIter. generate_n algorithm returns iterator one past the last element assigned if count>0, first otherwise.
-
template<typename ExPolicy, typename FwdIter, typename F>
hpx::includes#
Defined in header hpx/algorithm.hpp.
See Public API for a list of names and headers that are part of the public HPX API.
-
namespace hpx
Functions
-
template<typename ExPolicy, typename FwdIter1, typename FwdIter2, typename Pred = hpx::parallel::detail::less>
hpx::parallel::util::detail::algorithm_result_t<ExPolicy, bool>::type includes(ExPolicy &&policy, FwdIter1 first1, FwdIter1 last1, FwdIter2 first2, FwdIter2 last2, Pred &&op = Pred())# Returns true if every element from the sorted range [first2, last2) is found within the sorted range [first1, last1). Also returns true if [first2, last2) is empty. The version expects both ranges to be sorted with the user supplied binary predicate f. Executed according to the policy.
The comparison operations in the parallel includes algorithm invoked with an execution policy object of type sequenced_policy execute in sequential order in the calling thread.
The comparison operations in the parallel includes algorithm invoked with an execution policy object of type parallel_policy or parallel_task_policy are permitted to execute in an unordered fashion in unspecified threads, and indeterminately sequenced within each thread.
Note
At most 2*(N1+N2-1) comparisons, where N1 = std::distance(first1, last1) and N2 = std::distance(first2, last2).
- Template Parameters
ExPolicy – The type of the execution policy to use (deduced). It describes the manner in which the execution of the algorithm may be parallelized and the manner in which it executes the assignments.
FwdIter1 – The type of the source iterators used for the first range (deduced). This iterator type must meet the requirements of an forward iterator.
FwdIter2 – The type of the source iterators used for the second range (deduced). This iterator type must meet the requirements of an forward iterator.
Pred – The type of an optional function/function object to use. Unlike its sequential form, the parallel overload of includes requires Pred to meet the requirements of CopyConstructible. This defaults to std::less<>
- Parameters
policy – The execution policy to use for the scheduling of the iterations.
first1 – Refers to the beginning of the sequence of elements of the first range the algorithm will be applied to.
last1 – Refers to the end of the sequence of elements of the first range the algorithm will be applied to.
first2 – Refers to the beginning of the sequence of elements of the second range the algorithm will be applied to.
last2 – Refers to the end of the sequence of elements of the second range the algorithm will be applied to.
op – The binary predicate which returns true if the elements should be treated as includes. The signature of the predicate function should be equivalent to the following:
The signature does not need to have const &, but the function must not modify the objects passed to it. The types Type1 and Type2 must be such that objects of types FwdIter1 and FwdIter2 can be dereferenced and then implicitly converted to Type1 and Type2 respectivelybool pred(const Type1 &a, const Type2 &b);
- Returns
The includes algorithm returns a hpx::future<bool> if the execution policy is of type sequenced_task_policy or parallel_task_policy and returns bool otherwise. The includes algorithm returns true every element from the sorted range [first2, last2) is found within the sorted range [first1, last1). Also returns true if [first2, last2) is empty.
-
template<typename FwdIter1, typename FwdIter2, typename Pred = hpx::parallel::detail::less>
bool includes(FwdIter1 first1, FwdIter1 last1, FwdIter2 first2, FwdIter2 last2, Pred &&op = Pred())# Returns true if every element from the sorted range [first2, last2) is found within the sorted range [first1, last1). Also returns true if [first2, last2) is empty. The version expects both ranges to be sorted with the user supplied binary predicate f.
Note
At most 2*(N1+N2-1) comparisons, where N1 = std::distance(first1, last1) and N2 = std::distance(first2, last2).
- Template Parameters
FwdIter1 – The type of the source iterators used for the first range (deduced). This iterator type must meet the requirements of an forward iterator.
FwdIter2 – The type of the source iterators used for the second range (deduced). This iterator type must meet the requirements of an forward iterator.
Pred – The type of an optional function/function object to use. Unlike its sequential form, the parallel overload of includes requires Pred to meet the requirements of CopyConstructible. This defaults to std::less<>
- Parameters
first1 – Refers to the beginning of the sequence of elements of the first range the algorithm will be applied to.
last1 – Refers to the end of the sequence of elements of the first range the algorithm will be applied to.
first2 – Refers to the beginning of the sequence of elements of the second range the algorithm will be applied to.
last2 – Refers to the end of the sequence of elements of the second range the algorithm will be applied to.
op – The binary predicate which returns true if the elements should be treated as includes. The signature of the predicate function should be equivalent to the following:
The signature does not need to have const &, but the function must not modify the objects passed to it. The types Type1 and Type2 must be such that objects of types FwdIter1 and FwdIter2 can be dereferenced and then implicitly converted to Type1 and Type2 respectivelybool pred(const Type1 &a, const Type2 &b);
- Returns
The includes algorithm returns a bool. The includes algorithm returns true every element from the sorted range [first2, last2) is found within the sorted range [first1, last1). Also returns true if [first2, last2) is empty.
-
template<typename ExPolicy, typename FwdIter1, typename FwdIter2, typename Pred = hpx::parallel::detail::less>
hpx::inclusive_scan#
Defined in header hpx/algorithm.hpp.
See Public API for a list of names and headers that are part of the public HPX API.
-
namespace hpx
Functions
-
template<typename InIter, typename OutIter>
OutIter inclusive_scan(InIter first, InIter last, OutIter dest)# Assigns through each iterator i in [result, result + (last - first)) the value of GENERALIZED_NONCOMMUTATIVE_SUM(+, *first, …, *(first + (i - result))).
The reduce operations in the parallel inclusive_scan algorithm invoked without an execution policy object will execute in sequential order in the calling thread.
The difference between exclusive_scan and inclusive_scan is that inclusive_scan includes the ith input element in the ith sum.
Note
Complexity: O(last - first) applications of the predicate op, here std::plus<>().
Note
GENERALIZED_NONCOMMUTATIVE_SUM(+, a1, …, aN) is defined as:
a1 when N is 1
GENERALIZED_NONCOMMUTATIVE_SUM(+, a1, …, aK)
GENERALIZED_NONCOMMUTATIVE_SUM(+, aM, …, aN) where 1 < K+1 = M <= N.
- Template Parameters
InIter – The type of the source iterators used (deduced). This iterator type must meet the requirements of an input iterator.
OutIter – The type of the iterator representing the destination range (deduced). This iterator type must meet the requirements of an output iterator.
- Parameters
first – Refers to the beginning of the sequence of elements the algorithm will be applied to.
last – Refers to the end of the sequence of elements the algorithm will be applied to.
dest – Refers to the beginning of the destination range.
- Returns
The inclusive_scan algorithm returns OutIter. The inclusive_scan algorithm returns the output iterator to the element in the destination range, one past the last element copied.
-
template<typename ExPolicy, typename FwdIter1, typename FwdIter2>
hpx::parallel::util::detail::algorithm_result_t<ExPolicy, FwdIter2> inclusive_scan(ExPolicy &&policy, FwdIter1 first, FwdIter1 last, FwdIter2 dest)# Assigns through each iterator i in [result, result + (last - first)) the value of GENERALIZED_NONCOMMUTATIVE_SUM(+, *first, …, *(first + (i - result))). Executed according to the policy.
The reduce operations in the parallel inclusive_scan algorithm invoked with an execution policy object of type sequenced_policy execute in sequential order in the calling thread.
The reduce operations in the parallel inclusive_scan algorithm invoked with an execution policy object of type parallel_policy or parallel_task_policy are permitted to execute in an unordered fashion in unspecified threads, and indeterminately sequenced within each thread.
The difference between exclusive_scan and inclusive_scan is that inclusive_scan includes the ith input element in the ith sum.
Note
Complexity: O(last - first) applications of the predicate op, here std::plus<>().
Note
GENERALIZED_NONCOMMUTATIVE_SUM(+, a1, …, aN) is defined as:
a1 when N is 1
GENERALIZED_NONCOMMUTATIVE_SUM(+, a1, …, aK)
GENERALIZED_NONCOMMUTATIVE_SUM(+, aM, …, aN) where 1 < K+1 = M <= N.
- Template Parameters
ExPolicy – The type of the execution policy to use (deduced). It describes the manner in which the execution of the algorithm may be parallelized and the manner in which it executes the assignments.
FwdIter1 – The type of the source iterators used (deduced). This iterator type must meet the requirements of an forward iterator.
FwdIter2 – The type of the iterator representing the destination range (deduced). This iterator type must meet the requirements of an forward iterator.
- Parameters
policy – The execution policy to use for the scheduling of the iterations.
first – Refers to the beginning of the sequence of elements the algorithm will be applied to.
last – Refers to the end of the sequence of elements the algorithm will be applied to.
dest – Refers to the beginning of the destination range.
- Returns
The inclusive_scan algorithm returns a hpx::future<FwdIter2> if the execution policy is of type sequenced_task_policy or parallel_task_policy and returns FwdIter2 otherwise. The inclusive_scan algorithm returns the output iterator to the element in the destination range, one past the last element copied.
-
template<typename InIter, typename OutIter, typename Op>
OutIter inclusive_scan(InIter first, InIter last, OutIter dest, Op &&op)# Assigns through each iterator i in [result, result + (last - first)) the value of GENERALIZED_NONCOMMUTATIVE_SUM(op, *first, …, *(first + (i - result))).
The reduce operations in the parallel inclusive_scan algorithm invoked without an execution policy object will execute in sequential order in the calling thread.
The difference between exclusive_scan and inclusive_scan is that inclusive_scan includes the ith input element in the ith sum.
Note
Complexity: O(last - first) applications of the predicate op.
Note
GENERALIZED_NONCOMMUTATIVE_SUM(+, a1, …, aN) is defined as:
a1 when N is 1
GENERALIZED_NONCOMMUTATIVE_SUM(+, a1, …, aK)
GENERALIZED_NONCOMMUTATIVE_SUM(+, aM, …, aN) where 1 < K+1 = M <= N.
- Template Parameters
InIter – The type of the source iterators used (deduced). This iterator type must meet the requirements of an input iterator.
OutIter – The type of the iterator representing the destination range (deduced). This iterator type must meet the requirements of an output iterator.
Op – The type of the binary function object used for the reduction operation.
- Parameters
first – Refers to the beginning of the sequence of elements the algorithm will be applied to.
last – Refers to the end of the sequence of elements the algorithm will be applied to.
dest – Refers to the beginning of the destination range.
op – Specifies the function (or function object) which will be invoked for each of the values of the input sequence. This is a binary predicate. The signature of this predicate should be equivalent to:
The signature does not need to have const&, but the function must not modify the objects passed to it. The types Type1 and Ret must be such that an object of a type as given by the input sequence can be implicitly converted to any of those types.Ret fun(const Type1 &a, const Type1 &b);
- Returns
The inclusive_scan algorithm returns OutIter. The inclusive_scan algorithm returns the output iterator to the element in the destination range, one past the last element copied.
-
template<typename ExPolicy, typename FwdIter1, typename FwdIter2, typename Op>
hpx::parallel::util::detail::algorithm_result_t<ExPolicy, FwdIter2> inclusive_scan(ExPolicy &&policy, FwdIter1 first, FwdIter1 last, FwdIter2 dest, Op &&op)# Assigns through each iterator i in [result, result + (last - first)) the value of GENERALIZED_NONCOMMUTATIVE_SUM(op, *first, …, *(first + (i - result))). Executed according to the policy.
The reduce operations in the parallel inclusive_scan algorithm invoked with an execution policy object of type sequenced_policy execute in sequential order in the calling thread.
The reduce operations in the parallel inclusive_scan algorithm invoked with an execution policy object of type parallel_policy or parallel_task_policy are permitted to execute in an unordered fashion in unspecified threads, and indeterminately sequenced within each thread.
The difference between exclusive_scan and inclusive_scan is that inclusive_scan includes the ith input element in the ith sum.
Note
Complexity: O(last - first) applications of the predicate op.
Note
GENERALIZED_NONCOMMUTATIVE_SUM(+, a1, …, aN) is defined as:
a1 when N is 1
GENERALIZED_NONCOMMUTATIVE_SUM(op, a1, …, aK)
GENERALIZED_NONCOMMUTATIVE_SUM(+, aM, …, aN) where 1 < K+1 = M <= N.
- Template Parameters
ExPolicy – The type of the execution policy to use (deduced). It describes the manner in which the execution of the algorithm may be parallelized and the manner in which it executes the assignments.
FwdIter1 – The type of the source iterators used (deduced). This iterator type must meet the requirements of an forward iterator.
FwdIter2 – The type of the iterator representing the destination range (deduced). This iterator type must meet the requirements of an forward iterator.
Op – The type of the binary function object used for the reduction operation.
- Parameters
policy – The execution policy to use for the scheduling of the iterations.
first – Refers to the beginning of the sequence of elements the algorithm will be applied to.
last – Refers to the end of the sequence of elements the algorithm will be applied to.
dest – Refers to the beginning of the destination range.
op – Specifies the function (or function object) which will be invoked for each of the values of the input sequence. This is a binary predicate. The signature of this predicate should be equivalent to:
The signature does not need to have const&, but the function must not modify the objects passed to it. The types Type1 and Ret must be such that an object of a type as given by the input sequence can be implicitly converted to any of those types.Ret fun(const Type1 &a, const Type1 &b);
- Returns
The inclusive_scan algorithm returns a hpx::future<FwdIter2> if the execution policy is of type sequenced_task_policy or parallel_task_policy and returns FwdIter2 otherwise. The inclusive_scan algorithm returns the output iterator to the element in the destination range, one past the last element copied.
-
template<typename InIter, typename OutIter, typename Op, typename T>
OutIter inclusive_scan(InIter first, InIter last, OutIter dest, Op &&op, T init)# Assigns through each iterator i in [result, result + (last - first)) the value of GENERALIZED_NONCOMMUTATIVE_SUM(op, init, *first, …, *(first + (i - result))).
The reduce operations in the parallel inclusive_scan algorithm invoked without an execution policy object will execute in sequential order in the calling thread.
The difference between exclusive_scan and inclusive_scan is that inclusive_scan includes the ith input element in the ith sum. If op is not mathematically associative, the behavior of inclusive_scan may be non-deterministic.
Note
Complexity: O(last - first) applications of the predicate op.
Note
GENERALIZED_NONCOMMUTATIVE_SUM(op, a1, …, aN) is defined as:
a1 when N is 1
op(GENERALIZED_NONCOMMUTATIVE_SUM(op, a1, …, aK), GENERALIZED_NONCOMMUTATIVE_SUM(op, aM, …, aN)) where 1 < K+1 = M <= N.
- Template Parameters
InIter – The type of the source iterators used (deduced). This iterator type must meet the requirements of an input iterator.
OutIter – The type of the iterator representing the destination range (deduced). This iterator type must meet the requirements of an output iterator.
Op – The type of the binary function object used for the reduction operation.
T – The type of the value to be used as initial (and intermediate) values (deduced).
- Parameters
first – Refers to the beginning of the sequence of elements the algorithm will be applied to.
last – Refers to the end of the sequence of elements the algorithm will be applied to.
dest – Refers to the beginning of the destination range.
op – Specifies the function (or function object) which will be invoked for each of the values of the input sequence. This is a binary predicate. The signature of this predicate should be equivalent to:
The signature does not need to have const&, but the function must not modify the objects passed to it. The types Type1 and Ret must be such that an object of a type as given by the input sequence can be implicitly converted to any of those types.Ret fun(const Type1 &a, const Type1 &b);
init – The initial value for the generalized sum.
- Returns
The inclusive_scan algorithm returns OutIter. The inclusive_scan algorithm returns the output iterator to the element in the destination range, one past the last element copied.
-
template<typename ExPolicy, typename FwdIter1, typename FwdIter2, typename Op, typename T>
hpx::parallel::util::detail::algorithm_result_t<ExPolicy, FwdIter2> inclusive_scan(ExPolicy &&policy, FwdIter1 first, FwdIter1 last, FwdIter2 dest, Op &&op, T init)# Assigns through each iterator i in [result, result + (last - first)) the value of GENERALIZED_NONCOMMUTATIVE_SUM(op, init, *first, …, *(first + (i - result))). Executed according to the policy.
The reduce operations in the parallel inclusive_scan algorithm invoked with an execution policy object of type sequenced_policy execute in sequential order in the calling thread.
The reduce operations in the parallel inclusive_scan algorithm invoked with an execution policy object of type parallel_policy or parallel_task_policy are permitted to execute in an unordered fashion in unspecified threads, and indeterminately sequenced within each thread.
The difference between exclusive_scan and inclusive_scan is that inclusive_scan includes the ith input element in the ith sum. If op is not mathematically associative, the behavior of inclusive_scan may be non-deterministic.
Note
Complexity: O(last - first) applications of the predicate op.
Note
GENERALIZED_NONCOMMUTATIVE_SUM(op, a1, …, aN) is defined as:
a1 when N is 1
op(GENERALIZED_NONCOMMUTATIVE_SUM(op, a1, …, aK), GENERALIZED_NONCOMMUTATIVE_SUM(op, aM, …, aN)) where 1 < K+1 = M <= N.
- Template Parameters
ExPolicy – The type of the execution policy to use (deduced). It describes the manner in which the execution of the algorithm may be parallelized and the manner in which it executes the assignments.
FwdIter1 – The type of the source iterators used (deduced). This iterator type must meet the requirements of an forward iterator.
FwdIter2 – The type of the iterator representing the destination range (deduced). This iterator type must meet the requirements of an forward iterator.
Op – The type of the binary function object used for the reduction operation.
T – The type of the value to be used as initial (and intermediate) values (deduced).
- Parameters
policy – The execution policy to use for the scheduling of the iterations.
first – Refers to the beginning of the sequence of elements the algorithm will be applied to.
last – Refers to the end of the sequence of elements the algorithm will be applied to.
dest – Refers to the beginning of the destination range.
op – Specifies the function (or function object) which will be invoked for each of the values of the input sequence. This is a binary predicate. The signature of this predicate should be equivalent to:
The signature does not need to have const&, but the function must not modify the objects passed to it. The types Type1 and Ret must be such that an object of a type as given by the input sequence can be implicitly converted to any of those types.Ret fun(const Type1 &a, const Type1 &b);
init – The initial value for the generalized sum.
- Returns
The inclusive_scan algorithm returns a hpx::future<FwdIter2> if the execution policy is of type sequenced_task_policy or parallel_task_policy and returns FwdIter2 otherwise. The inclusive_scan algorithm returns the output iterator to the element in the destination range, one past the last element copied.
-
template<typename InIter, typename OutIter>
hpx/parallel/algorithms/iota.hpp#
Defined in header hpx/parallel/algorithms/iota.hpp.
See Public API for a list of names and headers that are part of the public HPX API.
-
namespace hpx
Functions
-
template<typename FwdIter, typename Sent, typename T>
void iota(FwdIter first, Sent last, T value)# Fills the range [first, last) with sequentially increasing values, starting with value and repetitively evaluating
++value.The assignments in the iota algorithm invoked without an execution policy object will execute in sequential order in the calling thread.
Note
Complexity: Exactly std::distance(first, last) assignments and increments.
- Template Parameters
FwdIter – The type of the source iterators used (deduced). This iterator type must meet the requirements of an input or output iterator.
Sent – The type of the source sentinel (deduced). This sentinel type must be a sentinel for FwdIter.
T – The type of the value to be assigned (deduced). This type must be weakly incrementable.
- Parameters
first – Refers to the beginning of the sequence of elements the algorithm will be applied to.
last – Refers to the end of the sequence of elements the algorithm will be applied to.
value – The value to be stored in the first element.
- Returns
The iota algorithm returns void.
-
template<typename ExPolicy, typename FwdIter, typename Sent, typename T>
hpx::parallel::util::detail::algorithm_result_t<ExPolicy> iota(ExPolicy &&policy, FwdIter first, Sent last, T value)# Fills the range [first, last) with sequentially increasing values, starting with value and repetitively evaluating
++value.The assignments in the parallel iota algorithm invoked with an execution policy object of type sequenced_policy execute in sequential order in the calling thread.
The assignments in the parallel iota algorithm invoked with an execution policy object of type parallel_policy or parallel_task_policy are permitted to execute in an unordered fashion in unspecified threads, and indeterminately sequenced within each thread.
Note
Complexity: Exactly std::distance(first, last) assignments and increments.
- Template Parameters
ExPolicy – The type of the execution policy to use (deduced). It describes the manner in which the execution of the algorithm may be parallelized and the manner in which it executes the assignments.
FwdIter – The type of the source iterators used (deduced). This iterator type must meet the requirements of a forward iterator.
Sent – The type of the source sentinel (deduced). This sentinel type must be a sentinel for FwdIter.
T – The type of the value to be assigned (deduced). This type must be weakly incrementable.
- Parameters
policy – The execution policy to use for the scheduling of the iterations.
first – Refers to the beginning of the sequence of elements the algorithm will be applied to.
last – Refers to the end of the sequence of elements the algorithm will be applied to.
value – The value to be stored in the first element.
- Returns
The iota algorithm returns a hpx::future<void> if the execution policy is of type sequenced_task_policy or parallel_task_policy and returns void otherwise.
-
template<typename FwdIter, typename Sent, typename T>
hpx::is_heap, hpx::is_heap_until#
Defined in header hpx/algorithm.hpp.
See Public API for a list of names and headers that are part of the public HPX API.
-
namespace hpx
Functions
-
template<typename ExPolicy, typename RandIter, typename Comp = hpx::parallel::detail::less>
hpx::parallel::util::detail::algorithm_result_t<ExPolicy, bool> is_heap(ExPolicy &&policy, RandIter first, RandIter last, Comp &&comp = Comp())# Returns whether the range is max heap. That is, true if the range is max heap, false otherwise. The function uses the given comparison function object comp (defaults to using operator<()). Executed according to the policy.
comp has to induce a strict weak ordering on the values.
The application of function objects in parallel algorithm invoked with an execution policy object of type sequenced_policy execute in sequential order in the calling thread.
The application of function objects in parallel algorithm invoked with an execution policy object of type parallel_policy or parallel_task_policy are permitted to execute in an unordered fashion in unspecified threads, and indeterminately sequenced within each thread.
Note
Complexity: Linear in the distance between first and last.
- Template Parameters
ExPolicy – The type of the execution policy to use (deduced). It describes the manner in which the execution of the algorithm may be parallelized and the manner in which it executes the assignments.
RandIter – The type of the source iterators used (deduced). This iterator type must meet the requirements of a random access iterator.
Comp – The type of the function/function object to use (deduced).
- Parameters
policy – The execution policy to use for the scheduling of the iterations.
first – Refers to the beginning of the sequence of elements the algorithm will be applied to.
last – Refers to the end of the sequence of elements the algorithm will be applied to.
comp – comp is a callable object. The return value of the INVOKE operation applied to an object of type Comp, when contextually converted to bool, yields true if the first argument of the call is less than the second, and false otherwise. It is assumed that comp will not apply any non-constant function through the dereferenced iterator.
- Returns
The is_heap algorithm returns a hpx::future<bool> if the execution policy is of type sequenced_task_policy or parallel_task_policy and returns bool otherwise. The is_heap algorithm returns whether the range is max heap. That is, true if the range is max heap, false otherwise.
-
template<typename RandIter, typename Comp = hpx::parallel::detail::less>
bool is_heap(RandIter first, RandIter last, Comp &&comp = Comp())# Returns whether the range is max heap. That is, true if the range is max heap, false otherwise. The function uses the given comparison function object comp (defaults to using operator<()).
comp has to induce a strict weak ordering on the values.
Note
Complexity: Linear in the distance between first and last.
- Template Parameters
RandIter – The type of the source iterators used (deduced). This iterator type must meet the requirements of a random access iterator.
Comp – The type of the function/function object to use (deduced).
- Parameters
first – Refers to the beginning of the sequence of elements the algorithm will be applied to.
last – Refers to the end of the sequence of elements the algorithm will be applied to.
comp – comp is a callable object. The return value of the INVOKE operation applied to an object of type Comp, when contextually converted to bool, yields true if the first argument of the call is less than the second, and false otherwise. It is assumed that comp will not apply any non-constant function through the dereferenced iterator.
- Returns
The is_heap a bool. The is_heap algorithm returns whether the range is max heap. That is, true if the range is max heap, false otherwise.
-
template<typename ExPolicy, typename RandIter, typename Comp = hpx::parallel::detail::less>
hpx::parallel::util::detail::algorithm_result_t<ExPolicy, RandIter> is_heap_until(ExPolicy &&policy, RandIter first, RandIter last, Comp &&comp = Comp())# Returns the upper bound of the largest range beginning at first which is a max heap. That is, the last iterator it for which range [first, it) is a max heap. The function uses the given comparison function object comp (defaults to using operator<()). Executed according to the policy.
comp has to induce a strict weak ordering on the values.
The application of function objects in parallel algorithm invoked with an execution policy object of type sequenced_policy execute in sequential order in the calling thread.
The application of function objects in parallel algorithm invoked with an execution policy object of type parallel_policy or parallel_task_policy are permitted to execute in an unordered fashion in unspecified threads, and indeterminately sequenced within each thread.
Note
Complexity: Linear in the distance between first and last.
- Template Parameters
ExPolicy – The type of the execution policy to use (deduced). It describes the manner in which the execution of the algorithm may be parallelized and the manner in which it executes the assignments.
RandIter – The type of the source iterators used (deduced). This iterator type must meet the requirements of a random access iterator.
Comp – The type of the function/function object to use (deduced).
- Parameters
policy – The execution policy to use for the scheduling of the iterations.
first – Refers to the beginning of the sequence of elements the algorithm will be applied to.
last – Refers to the end of the sequence of elements the algorithm will be applied to.
comp – comp is a callable object. The return value of the INVOKE operation applied to an object of type Comp, when contextually converted to bool, yields true if the first argument of the call is less than the second, and false otherwise. It is assumed that comp will not apply any non-constant function through the dereferenced iterator.
- Returns
The is_heap_until algorithm returns a hpx::future<RandIter> if the execution policy is of type sequenced_task_policy or parallel_task_policy and returns RandIter otherwise. The is_heap_until algorithm returns the upper bound of the largest range beginning at first which is a max heap. That is, the last iterator it for which range [first, it) is a max heap.
-
template<typename RandIter, typename Comp = hpx::parallel::detail::less>
RandIter is_heap_until(RandIter first, RandIter last, Comp &&comp = Comp())# Returns the upper bound of the largest range beginning at first which is a max heap. That is, the last iterator it for which range [first, it) is a max heap. The function uses the given comparison function object comp (defaults to using operator<()).
comp has to induce a strict weak ordering on the values.
Note
Complexity: Linear in the distance between first and last.
- Template Parameters
RandIter – The type of the source iterators used (deduced). This iterator type must meet the requirements of a random access iterator.
Comp – The type of the function/function object to use (deduced).
- Parameters
first – Refers to the beginning of the sequence of elements the algorithm will be applied to.
last – Refers to the end of the sequence of elements the algorithm will be applied to.
comp – comp is a callable object. The return value of the INVOKE operation applied to an object of type Comp, when contextually converted to bool, yields true if the first argument of the call is less than the second, and false otherwise. It is assumed that comp will not apply any non-constant function through the dereferenced iterator.
- Returns
The is_heap_until algorithm returns a RandIter. The is_heap_until algorithm returns the upper bound of the largest range beginning at first which is a max heap. That is, the last iterator it for which range [first, it) is a max heap.
-
template<typename ExPolicy, typename RandIter, typename Comp = hpx::parallel::detail::less>
hpx::is_partitioned#
Defined in header hpx/algorithm.hpp.
See Public API for a list of names and headers that are part of the public HPX API.
-
namespace hpx
Functions
-
template<typename FwdIter, typename Pred>
bool is_partitioned(FwdIter first, FwdIter last, Pred &&pred)# Determines if the range [first, last) is partitioned.
Note
Complexity: at most (N) predicate evaluations where N = distance(first, last).
- Template Parameters
FwdIter – The type of the source iterators used for the This iterator type must meet the requirements of a forward iterator.
Pred – The type of the function/function object to use (deduced).
- Parameters
first – Refers to the beginning of the sequence of elements of that the algorithm will be applied to.
last – Refers to the end of the sequence of elements of that the algorithm will be applied to.
pred – Refers to the unary predicate which returns true for elements expected to be found in the beginning of the range. The signature of the function should be equivalent to
The signature does not need to have const &, but the function must not modify the objects passed to it. The type Type must be such that objects of types FwdIter can be dereferenced and then implicitly converted to Type.bool pred(const Type &a);
- Returns
The is_partitioned algorithm returns bool. The is_partitioned algorithm returns true if each element in the sequence for which pred returns true precedes those for which pred returns false. Otherwise is_partitioned returns false. If the range [first, last) contains less than two elements, the function is always true.
-
template<typename ExPolicy, typename FwdIter, typename Pred>
hpx::parallel::util::detail::algorithm_result_t<ExPolicy, bool> is_partitioned(ExPolicy &&policy, FwdIter first, FwdIter last, Pred &&pred)# Determines if the range [first, last) is partitioned. Executed according to the policy.
The predicate operations in the parallel is_partitioned algorithm invoked with an execution policy object of type sequenced_policy executes in sequential order in the calling thread.
The comparison operations in the parallel is_partitioned algorithm invoked with an execution policy object of type parallel_policy or parallel_task_policy are permitted to execute in an unordered fashion in unspecified threads, and indeterminately sequenced within each thread.
Note
Complexity: at most (N) predicate evaluations where N = distance(first, last).
- Template Parameters
ExPolicy – The type of the execution policy to use (deduced). It describes the manner in which the execution of the algorithm may be parallelized and the manner in which it executes the assignments.
FwdIter – The type of the source iterators used for the This iterator type must meet the requirements of a forward iterator.
Pred – The type of the function/function object to use (deduced). Pred must be CopyConstructible when using a parallel policy.
- Parameters
policy – The execution policy to use for the scheduling of the iterations.
first – Refers to the beginning of the sequence of elements of that the algorithm will be applied to.
last – Refers to the end of the sequence of elements of that the algorithm will be applied to.
pred – Refers to the unary predicate which returns true for elements expected to be found in the beginning of the range. The signature of the function should be equivalent to
The signature does not need to have const &, but the function must not modify the objects passed to it. The type Type must be such that objects of types FwdIter can be dereferenced and then implicitly converted to Type.bool pred(const Type &a);
- Returns
The is_partitioned algorithm returns a hpx::future<bool> if the execution policy is of type task_execution_policy and returns bool otherwise. The is_partitioned algorithm returns true if each element in the sequence for which pred returns true precedes those for which pred returns false. Otherwise is_partitioned returns false. If the range [first, last) contains less than two elements, the function is always true.
-
template<typename FwdIter, typename Pred>
hpx::is_sorted, hpx::is_sorted_until#
Defined in header hpx/algorithm.hpp.
See Public API for a list of names and headers that are part of the public HPX API.
-
namespace hpx
Functions
-
template<typename FwdIter, typename Pred = hpx::parallel::detail::less>
bool is_sorted(FwdIter first, FwdIter last, Pred &&pred = Pred())# Determines if the range [first, last) is sorted. Uses pred to compare elements.
The comparison operations in the parallel is_sorted algorithm executes in sequential order in the calling thread.
Note
Complexity: at most (N+S-1) comparisons where N = distance(first, last). S = number of partitions
- Template Parameters
FwdIter – The type of the source iterators used for the This iterator type must meet the requirements of a forward iterator.
Pred – The type of an optional function/function object to use.
- Parameters
first – Refers to the beginning of the sequence of elements of that the algorithm will be applied to.
last – Refers to the end of the sequence of elements of that the algorithm will be applied to.
pred – Refers to the binary predicate which returns true if the first argument should be treated as less than the second argument. The signature of the function should be equivalent to
The signature does not need to have const &, but the function must not modify the objects passed to it. The type Type must be such that objects of types FwdIter can be dereferenced and then implicitly converted to Type.bool pred(const Type &a, const Type &b);
- Returns
The is_sorted algorithm returns a bool. The is_sorted algorithm returns true if each element in the sequence [first, last) satisfies the predicate passed. If the range [first, last) contains less than two elements, the function always returns true.
-
template<typename ExPolicy, typename FwdIter, typename Pred = hpx::parallel::detail::less>
hpx::parallel::util::detail::algorithm_result_t<ExPolicy, bool> is_sorted(ExPolicy &&policy, FwdIter first, FwdIter last, Pred &&pred = Pred())# Determines if the range [first, last) is sorted. Uses pred to compare elements. Executed according to the policy.
The comparison operations in the parallel is_sorted algorithm invoked with an execution policy object of type sequenced_policy executes in sequential order in the calling thread.
The comparison operations in the parallel is_sorted algorithm invoked with an execution policy object of type parallel_policy or parallel_task_policy are permitted to execute in an unordered fashion in unspecified threads, and indeterminately sequenced within each thread.
Note
Complexity: at most (N+S-1) comparisons where N = distance(first, last). S = number of partitions
- Template Parameters
ExPolicy – The type of the execution policy to use (deduced). It describes the manner in which the execution of the algorithm may be parallelized and the manner in which it executes the assignments.
FwdIter – The type of the source iterators used for the This iterator type must meet the requirements of a forward iterator.
Pred – The type of an optional function/function object to use. Unlike its sequential form, the parallel overload of is_sorted requires Pred to meet the requirements of CopyConstructible. This defaults to std::less<>
- Parameters
policy – The execution policy to use for the scheduling of the iterations.
first – Refers to the beginning of the sequence of elements of that the algorithm will be applied to.
last – Refers to the end of the sequence of elements of that the algorithm will be applied to.
pred – Refers to the binary predicate which returns true if the first argument should be treated as less than the second argument. The signature of the function should be equivalent to
The signature does not need to have const &, but the function must not modify the objects passed to it. The type Type must be such that objects of types FwdIter can be dereferenced and then implicitly converted to Type.bool pred(const Type &a, const Type &b);
- Returns
The is_sorted algorithm returns a hpx::future<bool> if the execution policy is of type task_execution_policy and returns bool otherwise. The is_sorted algorithm returns a bool if each element in the sequence [first, last) satisfies the predicate passed. If the range [first, last) contains less than two elements, the function always returns true.
-
template<typename FwdIter, typename Pred = hpx::parallel::detail::less>
FwdIter is_sorted_until(FwdIter first, FwdIter last, Pred &&pred = Pred())# Returns the first element in the range [first, last) that is not sorted. Uses a predicate to compare elements or the less than operator.
The comparison operations in the parallel is_sorted_until algorithm execute in sequential order in the calling thread.
Note
Complexity: at most (N+S-1) comparisons where N = distance(first, last). S = number of partitions
- Template Parameters
FwdIter – The type of the source iterators used for the This iterator type must meet the requirements of a forward iterator.
Pred – The type of an optional function/function object to use.
- Parameters
first – Refers to the beginning of the sequence of elements of that the algorithm will be applied to.
last – Refers to the end of the sequence of elements of that the algorithm will be applied to.
pred – Refers to the binary predicate which returns true if the first argument should be treated as less than the second argument. The signature of the function should be equivalent to
The signature does not need to have const &, but the function must not modify the objects passed to it. The type Type must be such that objects of types FwdIter can be dereferenced and then implicitly converted to Type.bool pred(const Type &a, const Type &b);
- Returns
The is_sorted_until algorithm returns a FwdIter. The is_sorted_until algorithm returns the first unsorted element. If the sequence has less than two elements or the sequence is sorted, last is returned.
-
template<typename ExPolicy, typename FwdIter, typename Pred = hpx::parallel::detail::less>
hpx::parallel::util::detail::algorithm_result<ExPolicy, FwdIter>::type is_sorted_until(ExPolicy &&policy, FwdIter first, FwdIter last, Pred &&pred = Pred())# Returns the first element in the range [first, last) that is not sorted. Uses a predicate to compare elements or the less than operator. Executed according to the policy.
The comparison operations in the parallel is_sorted_until algorithm invoked with an execution policy object of type sequenced_policy executes in sequential order in the calling thread.
The comparison operations in the parallel is_sorted_until algorithm invoked with an execution policy object of type parallel_policy or parallel_task_policy are permitted to execute in an unordered fashion in unspecified threads, and indeterminately sequenced within each thread.
Note
Complexity: at most (N+S-1) comparisons where N = distance(first, last). S = number of partitions
- Template Parameters
ExPolicy – The type of the execution policy to use (deduced). It describes the manner in which the execution of the algorithm may be parallelized and the manner in which it executes the assignments.
FwdIter – The type of the source iterators used for the This iterator type must meet the requirements of a forward iterator.
Pred – The type of an optional function/function object to use. Unlike its sequential form, the parallel overload of is_sorted_until requires Pred to meet the requirements of CopyConstructible. This defaults to std::less<>
- Parameters
policy – The execution policy to use for the scheduling of the iterations.
first – Refers to the beginning of the sequence of elements of that the algorithm will be applied to.
last – Refers to the end of the sequence of elements of that the algorithm will be applied to.
pred – Refers to the binary predicate which returns true if the first argument should be treated as less than the second argument. The signature of the function should be equivalent to
The signature does not need to have const &, but the function must not modify the objects passed to it. The type Type must be such that objects of types FwdIter can be dereferenced and then implicitly converted to Type.bool pred(const Type &a, const Type &b);
- Returns
The is_sorted_until algorithm returns a hpx::future<FwdIter> if the execution policy is of type task_execution_policy and returns FwdIter otherwise. The is_sorted_until algorithm returns the first unsorted element. If the sequence has less than two elements or the sequence is sorted, last is returned.
-
template<typename FwdIter, typename Pred = hpx::parallel::detail::less>
hpx::lexicographical_compare#
Defined in header hpx/algorithm.hpp.
See Public API for a list of names and headers that are part of the public HPX API.
-
namespace hpx
Functions
-
template<typename InIter1, typename InIter2, typename Pred = hpx::parallel::detail::less>
bool lexicographical_compare(InIter1 first1, InIter1 last1, InIter2 first2, InIter2 last2, Pred &&pred)# Checks if the first range [first1, last1) is lexicographically less than the second range [first2, last2). uses a provided predicate to compare elements.
The comparison operations in the parallel lexicographical_compare algorithm invoked without an execution policy object execute in sequential order in the calling thread.
Note
Complexity: At most 2 * min(N1, N2) applications of the comparison operation, where N1 = std::distance(first1, last) and N2 = std::distance(first2, last2).
Note
Lexicographical comparison is an operation with the following properties
Two ranges are compared element by element
The first mismatching element defines which range is lexicographically less or greater than the other
If one range is a prefix of another, the shorter range is lexicographically less than the other
If two ranges have equivalent elements and are of the same length, then the ranges are lexicographically equal
An empty range is lexicographically less than any non-empty range
Two empty ranges are lexicographically equal
- Template Parameters
InIter1 – The type of the source iterators used for the first range (deduced). This iterator type must meet the requirements of an input iterator.
InIter2 – The type of the source iterators used for the second range (deduced). This iterator type must meet the requirements of an input iterator.
Pred – The type of an optional function/function object to use. Unlike its sequential form, the parallel overload of lexicographical_compare requires Pred to meet the requirements of CopyConstructible. This defaults to std::less<>
- Parameters
first1 – Refers to the beginning of the sequence of elements of the first range the algorithm will be applied to.
last1 – Refers to the end of the sequence of elements of the first range the algorithm will be applied to.
first2 – Refers to the beginning of the sequence of elements of the second range the algorithm will be applied to.
last2 – Refers to the end of the sequence of elements of the second range the algorithm will be applied to.
pred – Refers to the comparison function that the first and second ranges will be applied to
- Returns
The lexicographically_compare algorithm returns a returns bool if the execution policy object is not passed in. The lexicographically_compare algorithm returns true if the first range is lexicographically less, otherwise it returns false. range [first2, last2), it returns false.
-
template<typename ExPolicy, typename FwdIter1, typename FwdIter2, typename Pred = hpx::parallel::detail::less>
hpx::parallel::util::detail::algorithm_result_t<ExPolicy, bool> lexicographical_compare(ExPolicy &&policy, FwdIter1 first1, FwdIter1 last1, FwdIter2 first2, FwdIter2 last2, Pred &&pred)# Checks if the first range [first1, last1) is lexicographically less than the second range [first2, last2). uses a provided predicate to compare elements.
The comparison operations in the parallel lexicographical_compare algorithm invoked with an execution policy object of type sequenced_policy execute in sequential order in the calling thread.
The comparison operations in the parallel lexicographical_compare algorithm invoked with an execution policy object of type parallel_policy or parallel_task_policy are permitted to execute in an unordered fashion in unspecified threads, and indeterminately sequenced within each thread.
Note
Complexity: At most 2 * min(N1, N2) applications of the comparison operation, where N1 = std::distance(first1, last) and N2 = std::distance(first2, last2).
Note
Lexicographical comparison is an operation with the following properties
Two ranges are compared element by element
The first mismatching element defines which range is lexicographically less or greater than the other
If one range is a prefix of another, the shorter range is lexicographically less than the other
If two ranges have equivalent elements and are of the same length, then the ranges are lexicographically equal
An empty range is lexicographically less than any non-empty range
Two empty ranges are lexicographically equal
- Template Parameters
ExPolicy – The type of the execution policy to use (deduced). It describes the manner in which the execution of the algorithm may be parallelized and the manner in which it executes the assignments.
FwdIter1 – The type of the source iterators used for the first range (deduced). This iterator type must meet the requirements of an forward iterator.
FwdIter2 – The type of the source iterators used for the second range (deduced). This iterator type must meet the requirements of an forward iterator.
Pred – The type of an optional function/function object to use. Unlike its sequential form, the parallel overload of lexicographical_compare requires Pred to meet the requirements of CopyConstructible. This defaults to std::less<>
- Parameters
policy – The execution policy to use for the scheduling of the iterations.
first1 – Refers to the beginning of the sequence of elements of the first range the algorithm will be applied to.
last1 – Refers to the end of the sequence of elements of the first range the algorithm will be applied to.
first2 – Refers to the beginning of the sequence of elements of the second range the algorithm will be applied to.
last2 – Refers to the end of the sequence of elements of the second range the algorithm will be applied to.
pred – Refers to the comparison function that the first and second ranges will be applied to
- Returns
The lexicographically_compare algorithm returns a hpx::future<bool> if the execution policy is of type sequenced_task_policy or parallel_task_policy and returns bool otherwise. The lexicographically_compare algorithm returns true if the first range is lexicographically less, otherwise it returns false. range [first2, last2), it returns false.
-
template<typename InIter1, typename InIter2, typename Pred = hpx::parallel::detail::less>
hpx::make_heap#
Defined in header hpx/algorithm.hpp.
See Public API for a list of names and headers that are part of the public HPX API.
-
namespace hpx
Functions
-
template<typename ExPolicy, typename RndIter, typename Comp>
hpx::parallel::util::detail::algorithm_result_t<ExPolicy> make_heap(ExPolicy &&policy, RndIter first, RndIter last, Comp &&comp)# Constructs a max heap in the range [first, last). Executed according to the policy.
The predicate operations in the parallel make_heap algorithm invoked with an execution policy object of type sequential_execution_policy executes in sequential order in the calling thread.
The comparison operations in the parallel make_heap algorithm invoked with an execution policy object of type parallel_execution_policy or parallel_task_execution_policy are permitted to execute in an unordered fashion in unspecified threads, and indeterminately sequenced within each thread.
Note
Complexity: at most (3*N) comparisons where N = distance(first, last).
- Template Parameters
ExPolicy – The type of the execution policy to use (deduced). It describes the manner in which the execution of the algorithm may be parallelized and the manner in which it executes the assignments.
RndIter – The type of the source iterators used for algorithm. This iterator must meet the requirements for a random access iterator.
Comp – Comparison function object (i.e. an object that satisfies the requirements of Compare) which returns true if the first argument is less than the second. The signature of the comparison function should be equivalent to the following:
While the signature does not need to have const &, the function must not modify the objects passed to it and must be able to accept all values of type (possibly const) Type1 and Type2 regardless of value category (thus, Type1 & is not allowed, nor is Type1 unless for Type1 a move is equivalent to a copy. The types Type1 and Type2 must be such that an object of type RandomIt can be dereferenced and then implicitly converted to both of them.bool cmp(const Type1 &a, const Type2 &b);
- Parameters
policy – The execution policy to use for the scheduling of the iterations.
first – Refers to the beginning of the sequence of elements of that the algorithm will be applied to.
last – Refers to the end of the sequence of elements of that the algorithm will be applied to.
comp – Refers to the binary predicate which returns true if the first argument should be treated as less than the second. The signature of the function should be equivalent to
The signature does not need to have const &, but the function must not modify the objects passed to it. The type Type must be such that objects of types RndIter can be dereferenced and then implicitly converted to Type.bool comp(const Type &a, const Type &b);
- Returns
The make_heap algorithm returns a hpx::future<void> if the execution policy is of type task_execution_policy and returns void otherwise.
-
template<typename ExPolicy, typename RndIter>
hpx::parallel::util::detail::algorithm_result_t<ExPolicy> make_heap(ExPolicy &&policy, RndIter first, RndIter last)# Constructs a max heap in the range [first, last). Uses the operator < for comparisons. Executed according to the policy.
The predicate operations in the parallel make_heap algorithm invoked with an execution policy object of type sequential_execution_policy executes in sequential order in the calling thread.
The comparison operations in the parallel make_heap algorithm invoked with an execution policy object of type parallel_execution_policy or parallel_task_execution_policy are permitted to execute in an unordered fashion in unspecified threads, and indeterminately sequenced within each thread.
Note
Complexity: at most (3*N) comparisons where N = distance(first, last).
- Template Parameters
ExPolicy – The type of the execution policy to use (deduced). It describes the manner in which the execution of the algorithm may be parallelized and the manner in which it executes the assignments.
RndIter – The type of the source iterators used for algorithm. This iterator must meet the requirements for a random access iterator.
- Parameters
policy – The execution policy to use for the scheduling of the iterations.
first – Refers to the beginning of the sequence of elements of that the algorithm will be applied to.
last – Refers to the end of the sequence of elements of that the algorithm will be applied to.
- Returns
The make_heap algorithm returns a hpx::future<void> if the execution policy is of type task_execution_policy and returns void otherwise.
-
template<typename RndIter, typename Comp>
void make_heap(RndIter first, RndIter last, Comp &&comp)# Constructs a max heap in the range [first, last).
Note
Complexity: at most (3*N) comparisons where N = distance(first, last).
- Template Parameters
RndIter – The type of the source iterators used for algorithm. This iterator must meet the requirements for a random access iterator.
Comp – Comparison function object (i.e. an object that satisfies the requirements of Compare) which returns true if the first argument is less than the second. The signature of the comparison function should be equivalent to the following:
While the signature does not need to have const &, the function must not modify the objects passed to it and must be able to accept all values of type (possibly const) Type1 and Type2 regardless of value category (thus, Type1 & is not allowed, nor is Type1 unless for Type1 a move is equivalent to a copy. The types Type1 and Type2 must be such that an object of type RandomIt can be dereferenced and then implicitly converted to both of them.bool cmp(const Type1 &a, const Type2 &b);
- Parameters
first – Refers to the beginning of the sequence of elements of that the algorithm will be applied to.
last – Refers to the end of the sequence of elements of that the algorithm will be applied to.
comp – Refers to the binary predicate which returns true if the first argument should be treated as less than the second. The signature of the function should be equivalent to
The signature does not need to have const &, but the function must not modify the objects passed to it. The type Type must be such that objects of types RndIter can be dereferenced and then implicitly converted to Type.bool comp(const Type &a, const Type &b);
- Returns
The make_heap algorithm returns a void.
-
template<typename RndIter>
void make_heap(RndIter first, RndIter last)# Constructs a max heap in the range [first, last).
Note
Complexity: at most (3*N) comparisons where N = distance(first, last).
- Template Parameters
RndIter – The type of the source iterators used for algorithm. This iterator must meet the requirements for a random access iterator.
- Parameters
first – Refers to the beginning of the sequence of elements of that the algorithm will be applied to.
last – Refers to the end of the sequence of elements of that the algorithm will be applied to.
- Returns
The make_heap algorithm returns a void.
-
template<typename ExPolicy, typename RndIter, typename Comp>
hpx::merge, hpx::inplace_merge#
Defined in header hpx/algorithm.hpp.
See Public API for a list of names and headers that are part of the public HPX API.
-
namespace hpx
Functions
-
template<typename ExPolicy, typename RandIter1, typename RandIter2, typename RandIter3, typename Comp = hpx::parallel::detail::less>
hpx::parallel::util::detail::algorithm_result_t<ExPolicy, RandIter3> merge(ExPolicy &&policy, RandIter1 first1, RandIter1 last1, RandIter2 first2, RandIter2 last2, RandIter3 dest, Comp &&comp = Comp())# Merges two sorted ranges [first1, last1) and [first2, last2) into one sorted range beginning at dest. The order of equivalent elements in each of the original two ranges is preserved. For equivalent elements in the original two ranges, the elements from the first range precede the elements from the second range. The destination range cannot overlap with either of the input ranges. Executed according to the policy.
The assignments in the parallel merge algorithm invoked with an execution policy object of type sequenced_policy execute in sequential order in the calling thread.
The assignments in the parallel merge algorithm invoked with an execution policy object of type parallel_policy or parallel_task_policy are permitted to execute in an unordered fashion in unspecified threads, and indeterminately sequenced within each thread.
Note
Complexity: Performs O(std::distance(first1, last1) + std::distance(first2, last2)) applications of the comparison comp and each projection.
- Template Parameters
ExPolicy – The type of the execution policy to use (deduced). It describes the manner in which the execution of the algorithm may be parallelized and the manner in which it executes the assignments.
RandIter1 – The type of the source iterators used (deduced) representing the first sorted range. This iterator type must meet the requirements of a random access iterator.
RandIter2 – The type of the source iterators used (deduced) representing the second sorted range. This iterator type must meet the requirements of a random access iterator.
RandIter3 – The type of the iterator representing the destination range (deduced). This iterator type must meet the requirements of a random access iterator.
Comp – The type of the function/function object to use (deduced). Unlike its sequential form, the parallel overload of merge requires Comp to meet the requirements of CopyConstructible. This defaults to std::less<>
- Parameters
policy – The execution policy to use for the scheduling of the iterations.
first1 – Refers to the beginning of the first range of elements the algorithm will be applied to.
last1 – Refers to the end of the first range of elements the algorithm will be applied to.
first2 – Refers to the beginning of the second range of elements the algorithm will be applied to.
last2 – Refers to the end of the second range of elements the algorithm will be applied to.
dest – Refers to the beginning of the destination range.
comp – comp is a callable object which returns true if the first argument is less than the second, and false otherwise. The signature of this comparison should be equivalent to:
The signature does not need to have const&, but the function must not modify the objects passed to it. The types Type1 and Type2 must be such that objects of types RandIter1 and RandIter2 can be dereferenced and then implicitly converted to both Type1 and Type2bool comp(const Type1 &a, const Type2 &b);
- Returns
The merge algorithm returns a hpx::future<RandIter3> > if the execution policy is of type sequenced_task_policy or parallel_task_policy and returns RandIter3 otherwise. The merge algorithm returns the destination iterator to the end of the dest range.
-
template<typename RandIter1, typename RandIter2, typename RandIter3, typename Comp = hpx::parallel::detail::less>
RandIter3 merge(RandIter1 first1, RandIter1 last1, RandIter2 first2, RandIter2 last2, RandIter3 dest, Comp &&comp = Comp())# Merges two sorted ranges [first1, last1) and [first2, last2) into one sorted range beginning at dest. The order of equivalent elements in each of the original two ranges is preserved. For equivalent elements in the original two ranges, the elements from the first range precede the elements from the second range. The destination range cannot overlap with either of the input ranges.
Note
Complexity: Performs O(std::distance(first1, last1) + std::distance(first2, last2)) applications of the comparison comp and each projection.
- Template Parameters
RandIter1 – The type of the source iterators used (deduced) representing the first sorted range. This iterator type must meet the requirements of a random access iterator.
RandIter2 – The type of the source iterators used (deduced) representing the second sorted range. This iterator type must meet the requirements of a random access iterator.
RandIter3 – The type of the iterator representing the destination range (deduced). This iterator type must meet the requirements of a random access iterator.
Comp – The type of the function/function object to use (deduced). Unlike its sequential form, the parallel overload of merge requires Comp to meet the requirements of CopyConstructible. This defaults to std::less<>
- Parameters
first1 – Refers to the beginning of the first range of elements the algorithm will be applied to.
last1 – Refers to the end of the first range of elements the algorithm will be applied to.
first2 – Refers to the beginning of the second range of elements the algorithm will be applied to.
last2 – Refers to the end of the second range of elements the algorithm will be applied to.
dest – Refers to the beginning of the destination range.
comp – comp is a callable object which returns true if the first argument is less than the second, and false otherwise. The signature of this comparison should be equivalent to:
The signature does not need to have const&, but the function must not modify the objects passed to it. The types Type1 and Type2 must be such that objects of types RandIter1 and RandIter2 can be dereferenced and then implicitly converted to both Type1 and Type2bool comp(const Type1 &a, const Type2 &b);
- Returns
The merge algorithm returns a RandIter3. The merge algorithm returns the destination iterator to the end of the dest range.
-
template<typename ExPolicy, typename RandIter, typename Comp = hpx::parallel::detail::less>
hpx::parallel::util::detail::algorithm_result_t<ExPolicy> inplace_merge(ExPolicy &&policy, RandIter first, RandIter middle, RandIter last, Comp &&comp = Comp())# Merges two consecutive sorted ranges [first, middle) and [middle, last) into one sorted range [first, last). The order of equivalent elements in each of the original two ranges is preserved. For equivalent elements in the original two ranges, the elements from the first range precede the elements from the second range. Executed according to the policy.
The assignments in the parallel inplace_merge algorithm invoked with an execution policy object of type sequenced_policy execute in sequential order in the calling thread.
The assignments in the parallel inplace_merge algorithm invoked with an execution policy object of type parallel_policy or parallel_task_policy are permitted to execute in an unordered fashion in unspecified threads, and indeterminately sequenced within each thread.
Note
Complexity: Performs O(std::distance(first, last)) applications of the comparison comp and each projection.
- Template Parameters
ExPolicy – The type of the execution policy to use (deduced). It describes the manner in which the execution of the algorithm may be parallelized and the manner in which it executes the assignments.
RandIter – The type of the source iterators used (deduced). This iterator type must meet the requirements of a random access iterator.
Comp – The type of the function/function object to use (deduced). Unlike its sequential form, the parallel overload of inplace_merge requires Comp to meet the requirements of CopyConstructible. This defaults to std::less<>
- Parameters
policy – The execution policy to use for the scheduling of the iterations.
first – Refers to the beginning of the first sorted range the algorithm will be applied to.
middle – Refers to the end of the first sorted range and the beginning of the second sorted range the algorithm will be applied to.
last – Refers to the end of the second sorted range the algorithm will be applied to.
comp – comp is a callable object which returns true if the first argument is less than the second, and false otherwise. The signature of this comparison should be equivalent to:
The signature does not need to have const&, but the function must not modify the objects passed to it. The types Type1 and Type2 must be such that objects of types RandIter can be dereferenced and then implicitly converted to both Type1 and Type2bool comp(const Type1 &a, const Type2 &b);
- Returns
The inplace_merge algorithm returns a hpx::future<void> if the execution policy is of type sequenced_task_policy or parallel_task_policy and returns void otherwise. The inplace_merge algorithm returns the source iterator last.
-
template<typename RandIter, typename Comp = hpx::parallel::detail::less>
void inplace_merge(RandIter first, RandIter middle, RandIter last, Comp &&comp = Comp())# Merges two consecutive sorted ranges [first, middle) and [middle, last) into one sorted range [first, last). The order of equivalent elements in each of the original two ranges is preserved. For equivalent elements in the original two ranges, the elements from the first range precede the elements from the second range.
Note
Complexity: Performs O(std::distance(first, last)) applications of the comparison comp and each projection.
- Template Parameters
RandIter – The type of the source iterators used (deduced). This iterator type must meet the requirements of a random access iterator.
Comp – The type of the function/function object to use (deduced). Unlike its sequential form, the parallel overload of inplace_merge requires Comp to meet the requirements of CopyConstructible. This defaults to std::less<>
- Parameters
first – Refers to the beginning of the first sorted range the algorithm will be applied to.
middle – Refers to the end of the first sorted range and the beginning of the second sorted range the algorithm will be applied to.
last – Refers to the end of the second sorted range the algorithm will be applied to.
comp – comp is a callable object which returns true if the first argument is less than the second, and false otherwise. The signature of this comparison should be equivalent to:
The signature does not need to have const&, but the function must not modify the objects passed to it. The types Type1 and Type2 must be such that objects of types RandIter can be dereferenced and then implicitly converted to both Type1 and Type2bool comp(const Type1 &a, const Type2 &b);
- Returns
The inplace_merge algorithm returns a void. The inplace_merge algorithm returns the source iterator last.
-
template<typename ExPolicy, typename RandIter1, typename RandIter2, typename RandIter3, typename Comp = hpx::parallel::detail::less>
hpx::min_element, hpx::max_element, hpx::minmax_element#
Defined in header hpx/algorithm.hpp.
See Public API for a list of names and headers that are part of the public HPX API.
-
namespace hpx
Functions
-
template<typename FwdIter, typename F = hpx::parallel::detail::less>
FwdIter min_element(FwdIter first, FwdIter last, F &&f)# Finds the smallest element in the range [first, last) using the given comparison function f.
The comparisons in the parallel min_element algorithm execute in sequential order in the calling thread.
Note
Complexity: Exactly max(N-1, 0) comparisons, where N = std::distance(first, last).
- Template Parameters
FwdIter – The type of the source iterators used (deduced). This iterator type must meet the requirements of a forward iterator.
F – The type of the function/function object to use (deduced).
- Parameters
first – Refers to the beginning of the sequence of elements the algorithm will be applied to.
last – Refers to the end of the sequence of elements the algorithm will be applied to.
f – The binary predicate which returns true if the the left argument is less than the right element. The signature of the predicate function should be equivalent to the following:
The signature does not need to have const &, but the function must not modify the objects passed to it. The type Type1 must be such that objects of type FwdIter can be dereferenced and then implicitly converted to Type1.bool pred(const Type1 &a, const Type1 &b);
- Returns
The min_element algorithm returns FwdIter. The min_element algorithm returns the iterator to the smallest element in the range [first, last). If several elements in the range are equivalent to the smallest element, returns the iterator to the first such element. Returns last if the range is empty.
-
template<typename ExPolicy, typename FwdIter, typename F = hpx::parallel::detail::less>
hpx::parallel::util::detail::algorithm_result_t<ExPolicy, FwdIter> min_element(ExPolicy &&policy, FwdIter first, FwdIter last, F &&f)# Finds the smallest element in the range [first, last) using the given comparison function f. Executed according to the policy.
The comparisons in the parallel min_element algorithm invoked with an execution policy object of type sequenced_policy execute in sequential order in the calling thread.
The comparisons in the parallel min_element algorithm invoked with an execution policy object of type parallel_policy or parallel_task_policy are permitted to execute in an unordered fashion in unspecified threads, and indeterminately sequenced within each thread.
Note
Complexity: Exactly max(N-1, 0) comparisons, where N = std::distance(first, last).
- Template Parameters
ExPolicy – The type of the execution policy to use (deduced). It describes the manner in which the execution of the algorithm may be parallelized and the manner in which it executes the assignments.
FwdIter – The type of the source iterators used (deduced). This iterator type must meet the requirements of a forward iterator.
F – The type of the function/function object to use (deduced). Unlike its sequential form, the parallel overload of min_element requires F to meet the requirements of CopyConstructible.
- Parameters
policy – The execution policy to use for the scheduling of the iterations.
first – Refers to the beginning of the sequence of elements the algorithm will be applied to.
last – Refers to the end of the sequence of elements the algorithm will be applied to.
f – The binary predicate which returns true if the the left argument is less than the right element. The signature of the predicate function should be equivalent to the following:
The signature does not need to have const &, but the function must not modify the objects passed to it. The type Type1 must be such that objects of type FwdIter can be dereferenced and then implicitly converted to Type1.bool pred(const Type1 &a, const Type1 &b);
- Returns
The min_element algorithm returns a hpx::future<FwdIter> if the execution policy is of type sequenced_task_policy or parallel_task_policy and returns FwdIter otherwise. The min_element algorithm returns the iterator to the smallest element in the range [first, last). If several elements in the range are equivalent to the smallest element, returns the iterator to the first such element. Returns last if the range is empty.
-
template<typename FwdIter, typename F = hpx::parallel::detail::less>
FwdIter max_element(FwdIter first, FwdIter last, F &&f)# Finds the largest element in the range [first, last) using the given comparison function f.
The comparisons in the parallel min_element algorithm execute in sequential order in the calling thread.
Note
Complexity: Exactly max(N-1, 0) comparisons, where N = std::distance(first, last).
- Template Parameters
FwdIter – The type of the source iterators used (deduced). This iterator type must meet the requirements of a forward iterator.
F – The type of the function/function object to use (deduced).
- Parameters
first – Refers to the beginning of the sequence of elements the algorithm will be applied to.
last – Refers to the end of the sequence of elements the algorithm will be applied to.
f – The binary predicate which returns true if the This argument is optional and defaults to std::less. the left argument is less than the right element. The signature of the predicate function should be equivalent to the following:
The signature does not need to have const &, but the function must not modify the objects passed to it. The type Type1 must be such that objects of type FwdIter can be dereferenced and then implicitly converted to Type1.bool pred(const Type1 &a, const Type1 &b);
- Returns
The max_element algorithm returns FwdIter. The max_element algorithm returns the iterator to the smallest element in the range [first, last). If several elements in the range are equivalent to the smallest element, returns the iterator to the first such element. Returns last if the range is empty.
-
template<typename ExPolicy, typename FwdIter, typename F = hpx::parallel::detail::less>
hpx::parallel::util::detail::algorithm_result<ExPolicy, FwdIter>::type max_element(ExPolicy &&policy, FwdIter first, FwdIter last, F &&f)# Removes all elements satisfying specific criteria from the range Finds the largest element in the range [first, last) using the given comparison function f. Executed according to the policy.
The comparisons in the parallel max_element algorithm invoked with an execution policy object of type sequenced_policy execute in sequential order in the calling thread.
The comparisons in the parallel max_element algorithm invoked with an execution policy object of type parallel_policy or parallel_task_policy are permitted to execute in an unordered fashion in unspecified threads, and indeterminately sequenced within each thread.
Note
Complexity: Exactly max(N-1, 0) comparisons, where N = std::distance(first, last).
- Template Parameters
ExPolicy – The type of the execution policy to use (deduced). It describes the manner in which the execution of the algorithm may be parallelized and the manner in which it executes the assignments.
FwdIter – The type of the source iterators used (deduced). This iterator type must meet the requirements of a forward iterator.
F – The type of the function/function object to use (deduced). Unlike its sequential form, the parallel overload of max_element requires F to meet the requirements of CopyConstructible.
- Parameters
policy – The execution policy to use for the scheduling of the iterations.
first – Refers to the beginning of the sequence of elements the algorithm will be applied to.
last – Refers to the end of the sequence of elements the algorithm will be applied to.
f – The binary predicate which returns true if the This argument is optional and defaults to std::less. the left argument is less than the right element. The signature of the predicate function should be equivalent to the following:
The signature does not need to have const &, but the function must not modify the objects passed to it. The type Type1 must be such that objects of type FwdIter can be dereferenced and then implicitly converted to Type1.bool pred(const Type1 &a, const Type1 &b);
- Returns
The max_element algorithm returns a hpx::future<FwdIter> if the execution policy is of type sequenced_task_policy or parallel_task_policy and returns FwdIter otherwise. The max_element algorithm returns the iterator to the smallest element in the range [first, last). If several elements in the range are equivalent to the smallest element, returns the iterator to the first such element. Returns last if the range is empty.
-
template<typename FwdIter, typename F = hpx::parallel::detail::less>
minmax_element_result<FwdIter> minmax_element(FwdIter first, FwdIter last, F &&f)# Finds the largest element in the range [first, last) using the given comparison function f.
The comparisons in the parallel minmax_element algorithm execute in sequential order in the calling thread.
Note
Complexity: At most max(floor(3/2*(N-1)), 0) applications of the predicate, where N = std::distance(first, last).
- Template Parameters
FwdIter – The type of the source iterators used (deduced). This iterator type must meet the requirements of a forward iterator.
F – The type of the function/function object to use (deduced).
- Parameters
first – Refers to the beginning of the sequence of elements the algorithm will be applied to.
last – Refers to the end of the sequence of elements the algorithm will be applied to.
f – The binary predicate which returns true if the the left argument is less than the right element. This argument is optional and defaults to std::less. The signature of the predicate function should be equivalent to the following:
The signature does not need to have const &, but the function must not modify the objects passed to it. The type Type1 must be such that objects of type FwdIter can be dereferenced and then implicitly converted to Type1.bool pred(const Type1 &a, const Type1 &b);
- Returns
The minmax_element algorithm returns a minmax_element_result<FwdIter> The minmax_element algorithm returns a pair consisting of an iterator to the smallest element as the min element and an iterator to the largest element as the max element. Returns minmax_element_result<FwdIter>{first,first} if the range is empty. If several elements are equivalent to the smallest element, the iterator to the first such element is returned. If several elements are equivalent to the largest element, the iterator to the last such element is returned.
-
template<typename ExPolicy, typename FwdIter, typename F = hpx::parallel::detail::less>
hpx::parallel::util::detail::algorithm_result_t<ExPolicy, minmax_element_result<FwdIter>> minmax_element(ExPolicy &&policy, FwdIter first, FwdIter last, F &&f)# Finds the largest element in the range [first, last) using the given comparison function f.
The comparisons in the parallel minmax_element algorithm invoked with an execution policy object of type sequenced_policy execute in sequential order in the calling thread.
The comparisons in the parallel minmax_element algorithm invoked with an execution policy object of type parallel_policy or parallel_task_policy are permitted to execute in an unordered fashion in unspecified threads, and indeterminately sequenced within each thread.
Note
Complexity: At most max(floor(3/2*(N-1)), 0) applications of the predicate, where N = std::distance(first, last).
- Template Parameters
ExPolicy – The type of the execution policy to use (deduced). It describes the manner in which the execution of the algorithm may be parallelized and the manner in which it executes the assignments.
FwdIter – The type of the source iterators used (deduced). This iterator type must meet the requirements of a forward iterator.
F – The type of the function/function object to use (deduced). Unlike its sequential form, the parallel overload of minmax_element requires F to meet the requirements of CopyConstructible.
- Parameters
policy – The execution policy to use for the scheduling of the iterations.
first – Refers to the beginning of the sequence of elements the algorithm will be applied to.
last – Refers to the end of the sequence of elements the algorithm will be applied to.
f – The binary predicate which returns true if the the left argument is less than the right element. This argument is optional and defaults to std::less. The signature of the predicate function should be equivalent to the following:
The signature does not need to have const &, but the function must not modify the objects passed to it. The type Type1 must be such that objects of type FwdIter can be dereferenced and then implicitly converted to Type1.bool pred(const Type1 &a, const Type1 &b);
- Returns
The minmax_element algorithm returns a hpx::future<minmax_element_result<FwdIter>> if the execution policy is of type sequenced_task_policy or parallel_task_policy and returns minmax_element_result<FwdIter> otherwise. The minmax_element algorithm returns a pair consisting of an iterator to the smallest element as the min element and an iterator to the largest element as the max element. Returns std::make_pair(first,first) if the range is empty. If several elements are equivalent to the smallest element, the iterator to the first such element is returned. If several elements are equivalent to the largest element, the iterator to the last such element is returned.
-
template<typename FwdIter, typename F = hpx::parallel::detail::less>
hpx::mismatch#
Defined in header hpx/algorithm.hpp.
See Public API for a list of names and headers that are part of the public HPX API.
-
namespace hpx
Functions
-
template<typename ExPolicy, typename FwdIter1, typename FwdIter2, typename Pred>
hpx::parallel::util::detail::algorithm_result_t<ExPolicy, std::pair<FwdIter1, FwdIter2>> mismatch(ExPolicy &&policy, FwdIter1 first1, FwdIter1 last1, FwdIter2 first2, FwdIter2 last2, Pred &&op)# Returns the first mismatching pair of elements from two ranges: one defined by [first1, last1) and another defined by [first2,last2). If last2 is not provided, it denotes first2 + (last1 - first1). Executed according to the policy.
The comparison operations in the parallel mismatch algorithm invoked with an execution policy object of type sequenced_policy execute in sequential order in the calling thread.
The comparison operations in the parallel mismatch algorithm invoked with an execution policy object of type parallel_policy or parallel_task_policy are permitted to execute in an unordered fashion in unspecified threads, and indeterminately sequenced within each thread.
Note
Complexity: At most min(last1 - first1, last2 - first2) applications of the predicate op or operator==. If FwdIter1 and FwdIter2 meet the requirements of RandomAccessIterator and (last1 - first1) != (last2 - first2) then no applications of the predicate op or operator== are made.
Note
The two ranges are considered mismatch if, for every iterator i in the range [first1,last1), *i mismatches *(first2 + (i - first1)). This overload of mismatch uses operator== to determine if two elements are mismatch.
- Template Parameters
ExPolicy – The type of the execution policy to use (deduced). It describes the manner in which the execution of the algorithm may be parallelized and the manner in which it executes the assignments.
FwdIter1 – The type of the source iterators used for the first range (deduced). This iterator type must meet the requirements of an forward iterator.
FwdIter2 – The type of the source iterators used for the second range (deduced). This iterator type must meet the requirements of an forward iterator.
Pred – The type of an optional function/function object to use. Unlike its sequential form, the parallel overload of mismatch requires Pred to meet the requirements of CopyConstructible. This defaults to std::equal_to<>
- Parameters
policy – The execution policy to use for the scheduling of the iterations.
first1 – Refers to the beginning of the sequence of elements of the first range the algorithm will be applied to.
last1 – Refers to the end of the sequence of elements of the first range the algorithm will be applied to.
first2 – Refers to the beginning of the sequence of elements of the second range the algorithm will be applied to.
last2 – Refers to the end of the sequence of elements of the second range the algorithm will be applied to.
op – The binary predicate which returns true if the elements should be treated as mismatch. The signature of the predicate function should be equivalent to the following:
The signature does not need to have const &, but the function must not modify the objects passed to it. The types Type1 and Type2 must be such that objects of types FwdIter1 and FwdIter2 can be dereferenced and then implicitly converted to Type1 and Type2 respectivelybool pred(const Type1 &a, const Type2 &b);
- Returns
The mismatch algorithm returns a hpx::future<std::pair<FwdIter1,FwdIter2>> if the execution policy is of type sequenced_task_policy or parallel_task_policy and returns std::pair<FwdIter1,FwdIter2> otherwise. If no mismatches are found when the comparison reaches last1 or last2, whichever happens first, the pair holds the end iterator and the corresponding iterator from the other range.
-
template<typename ExPolicy, typename FwdIter1, typename FwdIter2>
hpx::parallel::util::detail::algorithm_result_t<ExPolicy, std::pair<FwdIter1, FwdIter2>> mismatch(ExPolicy &&policy, FwdIter1 first1, FwdIter1 last1, FwdIter2 first2, FwdIter2 last2)# Returns the first mismatching pair of elements from two ranges: one defined by [first1, last1) and another defined by [first2,last2). If last2 is not provided, it denotes first2 + (last1 - first1). Executed according to the policy.
The comparison operations in the parallel mismatch algorithm invoked with an execution policy object of type sequenced_policy execute in sequential order in the calling thread.
The comparison operations in the parallel mismatch algorithm invoked with an execution policy object of type parallel_policy or parallel_task_policy are permitted to execute in an unordered fashion in unspecified threads, and indeterminately sequenced within each thread.
Note
Complexity: At most min(last1 - first1, last2 - first2) applications of operator==. If FwdIter1 and FwdIter2 meet the requirements of RandomAccessIterator and (last1 - first1) != (last2 - first2) then no applications of operator== are made.
Note
The two ranges are considered mismatch if, for every iterator i in the range [first1,last1), *i mismatches *(first2 + (i - first1)). This overload of mismatch uses operator== to determine if two elements are mismatch.
- Template Parameters
ExPolicy – The type of the execution policy to use (deduced). It describes the manner in which the execution of the algorithm may be parallelized and the manner in which it executes the assignments.
FwdIter1 – The type of the source iterators used for the first range (deduced). This iterator type must meet the requirements of an forward iterator.
FwdIter2 – The type of the source iterators used for the second range (deduced). This iterator type must meet the requirements of an forward iterator.
- Parameters
policy – The execution policy to use for the scheduling of the iterations.
first1 – Refers to the beginning of the sequence of elements of the first range the algorithm will be applied to.
last1 – Refers to the end of the sequence of elements of the first range the algorithm will be applied to.
first2 – Refers to the beginning of the sequence of elements of the second range the algorithm will be applied to.
last2 – Refers to the end of the sequence of elements of the second range the algorithm will be applied to.
- Returns
The mismatch algorithm returns a hpx::future<std::pair<FwdIter1,FwdIter2>> if the execution policy is of type sequenced_task_policy or parallel_task_policy and returns std::pair<FwdIter1,FwdIter2> otherwise. If no mismatches are found when the comparison reaches last1 or last2, whichever happens first, the pair holds the end iterator and the corresponding iterator from the other range.
-
template<typename ExPolicy, typename FwdIter1, typename FwdIter2, typename Pred>
hpx::parallel::util::detail::algorithm_result_t<ExPolicy, std::pair<FwdIter1, FwdIter2>> mismatch(ExPolicy &&policy, FwdIter1 first1, FwdIter1 last1, FwdIter2 first2, Pred &&op)# Returns the first mismatching pair of elements from two ranges: one defined by [first1, last1) and another defined by [first2,last2). If last2 is not provided, it denotes first2 + (last1 - first1). Executed according to the policy.
The comparison operations in the parallel mismatch algorithm invoked with an execution policy object of type sequenced_policy execute in sequential order in the calling thread.
The comparison operations in the parallel mismatch algorithm invoked with an execution policy object of type parallel_policy or parallel_task_policy are permitted to execute in an unordered fashion in unspecified threads, and indeterminately sequenced within each thread.
Note
Complexity: At most last1 - first1 applications of the predicate op or operator==. If FwdIter1 and FwdIter2 meet the requirements of RandomAccessIterator and (last1 - first1) != (last2 - first2) then no applications of the predicate op or operator== are made.
Note
The two ranges are considered mismatch if, for every iterator i in the range [first1,last1), *i mismatches *(first2 + (i - first1)). This overload of mismatch uses operator== to determine if two elements are mismatch.
- Template Parameters
ExPolicy – The type of the execution policy to use (deduced). It describes the manner in which the execution of the algorithm may be parallelized and the manner in which it executes the assignments.
FwdIter1 – The type of the source iterators used for the first range (deduced). This iterator type must meet the requirements of an forward iterator.
FwdIter2 – The type of the source iterators used for the second range (deduced). This iterator type must meet the requirements of an forward iterator.
Pred – The type of an optional function/function object to use. Unlike its sequential form, the parallel overload of mismatch requires Pred to meet the requirements of CopyConstructible. This defaults to std::equal_to<>
- Parameters
policy – The execution policy to use for the scheduling of the iterations.
first1 – Refers to the beginning of the sequence of elements of the first range the algorithm will be applied to.
last1 – Refers to the end of the sequence of elements of the first range the algorithm will be applied to.
first2 – Refers to the beginning of the sequence of elements of the second range the algorithm will be applied to.
op – The binary predicate which returns true if the elements should be treated as mismatch. The signature of the predicate function should be equivalent to the following:
The signature does not need to have const &, but the function must not modify the objects passed to it. The types Type1 and Type2 must be such that objects of types FwdIter1 and FwdIter2 can be dereferenced and then implicitly converted to Type1 and Type2 respectivelybool pred(const Type1 &a, const Type2 &b);
- Returns
The mismatch algorithm returns a hpx::future<std::pair<FwdIter1,FwdIter2>> if the execution policy is of type sequenced_task_policy or parallel_task_policy and returns std::pair<FwdIter1,FwdIter2> otherwise. If no mismatches are found when the comparison reaches last1 or last2, whichever happens first, the pair holds the end iterator and the corresponding iterator from the other range.
-
template<typename ExPolicy, typename FwdIter1, typename FwdIter2>
hpx::parallel::util::detail::algorithm_result_t<ExPolicy, std::pair<FwdIter1, FwdIter2>> mismatch(ExPolicy &&policy, FwdIter1 first1, FwdIter1 last1, FwdIter2 first2)# Returns the first mismatching pair of elements from two ranges: one defined by [first1, last1) and another defined by [first2,last2). If last2 is not provided, it denotes first2 + (last1 - first1). Executed according to the policy.
The comparison operations in the parallel mismatch algorithm invoked with an execution policy object of type sequenced_policy execute in sequential order in the calling thread.
The comparison operations in the parallel mismatch algorithm invoked with an execution policy object of type parallel_policy or parallel_task_policy are permitted to execute in an unordered fashion in unspecified threads, and indeterminately sequenced within each thread.
Note
Complexity: At most last1 - first1 applications of operator==. If FwdIter1 and FwdIter2 meet the requirements of RandomAccessIterator and (last1 - first1) != (last2 - first2) then no applications of operator== are made.
Note
The two ranges are considered mismatch if, for every iterator i in the range [first1,last1), *i mismatches *(first2 + (i - first1)). This overload of mismatch uses operator== to determine if two elements are mismatch.
- Template Parameters
ExPolicy – The type of the execution policy to use (deduced). It describes the manner in which the execution of the algorithm may be parallelized and the manner in which it executes the assignments.
FwdIter1 – The type of the source iterators used for the first range (deduced). This iterator type must meet the requirements of an forward iterator.
FwdIter2 – The type of the source iterators used for the second range (deduced). This iterator type must meet the requirements of an forward iterator.
Pred – The type of an optional function/function object to use. Unlike its sequential form, the parallel overload of mismatch requires Pred to meet the requirements of CopyConstructible. This defaults to std::equal_to<>
- Parameters
policy – The execution policy to use for the scheduling of the iterations.
first1 – Refers to the beginning of the sequence of elements of the first range the algorithm will be applied to.
last1 – Refers to the end of the sequence of elements of the first range the algorithm will be applied to.
first2 – Refers to the beginning of the sequence of elements of the second range the algorithm will be applied to.
- Returns
The mismatch algorithm returns a hpx::future<std::pair<FwdIter1,FwdIter2>> if the execution policy is of type sequenced_task_policy or parallel_task_policy and returns std::pair<FwdIter1,FwdIter2> otherwise. If no mismatches are found when the comparison reaches last1 or last2, whichever happens first, the pair holds the end iterator and the corresponding iterator from the other range.
-
template<typename FwdIter1, typename FwdIter2, typename Pred>
std::pair<FwdIter1, FwdIter2> mismatch(FwdIter1 first1, FwdIter1 last1, FwdIter2 first2, FwdIter2 last2, Pred &&op)# Returns the first mismatching pair of elements from two ranges: one defined by [first1, last1) and another defined by [first2,last2). If last2 is not provided, it denotes first2 + (last1 - first1).
Note
Complexity: At most min(last1 - first1, last2 - first2) applications of the predicate op or operator==. If FwdIter1 and FwdIter2 meet the requirements of RandomAccessIterator and (last1 - first1) != (last2 - first2) then no applications of the predicate op or operator== are made.
Note
The two ranges are considered mismatch if, for every iterator i in the range [first1,last1), *i mismatches *(first2 + (i - first1)). This overload of mismatch uses operator== to determine if two elements are mismatch.
- Template Parameters
FwdIter1 – The type of the source iterators used for the first range (deduced). This iterator type must meet the requirements of an forward iterator.
FwdIter2 – The type of the source iterators used for the second range (deduced). This iterator type must meet the requirements of an forward iterator.
Pred – The type of an optional function/function object to use. Unlike its sequential form, the parallel overload of mismatch requires Pred to meet the requirements of CopyConstructible. This defaults to std::equal_to<>
- Parameters
first1 – Refers to the beginning of the sequence of elements of the first range the algorithm will be applied to.
last1 – Refers to the end of the sequence of elements of the first range the algorithm will be applied to.
first2 – Refers to the beginning of the sequence of elements of the second range the algorithm will be applied to.
last2 – Refers to the end of the sequence of elements of the second range the algorithm will be applied to.
op – The binary predicate which returns true if the elements should be treated as mismatch. The signature of the predicate function should be equivalent to the following:
The signature does not need to have const &, but the function must not modify the objects passed to it. The types Type1 and Type2 must be such that objects of types FwdIter1 and FwdIter2 can be dereferenced and then implicitly converted to Type1 and Type2 respectivelybool pred(const Type1 &a, const Type2 &b);
- Returns
The mismatch algorithm returns a std::pair<FwdIter1,FwdIter2>. If no mismatches are found when the comparison reaches last1 or last2, whichever happens first, the pair holds the end iterator and the corresponding iterator from the other range.
-
template<typename FwdIter1, typename FwdIter2>
std::pair<FwdIter1, FwdIter2> mismatch(FwdIter1 first1, FwdIter1 last1, FwdIter2 first2, FwdIter2 last2)# Returns the first mismatching pair of elements from two ranges: one defined by [first1, last1) and another defined by [first2,last2). If last2 is not provided, it denotes first2 + (last1 - first1).
Note
Complexity: At most min(last1 - first1, last2 - first2) applications of operator==. If FwdIter1 and FwdIter2 meet the requirements of RandomAccessIterator and (last1 - first1) != (last2 - first2) then no applications of operator== are made.
Note
The two ranges are considered mismatch if, for every iterator i in the range [first1,last1), *i mismatches *(first2 + (i - first1)). This overload of mismatch uses operator== to determine if two elements are mismatch.
- Template Parameters
FwdIter1 – The type of the source iterators used for the first range (deduced). This iterator type must meet the requirements of an forward iterator.
FwdIter2 – The type of the source iterators used for the second range (deduced). This iterator type must meet the requirements of an forward iterator.
- Parameters
first1 – Refers to the beginning of the sequence of elements of the first range the algorithm will be applied to.
last1 – Refers to the end of the sequence of elements of the first range the algorithm will be applied to.
first2 – Refers to the beginning of the sequence of elements of the second range the algorithm will be applied to.
last2 – Refers to the end of the sequence of elements of the second range the algorithm will be applied to.
- Returns
The mismatch algorithm returns a std::pair<FwdIter1,FwdIter2>. If no mismatches are found when the comparison reaches last1 or last2, whichever happens first, the pair holds the end iterator and the corresponding iterator from the other range.
-
template<typename FwdIter1, typename FwdIter2, typename Pred>
std::pair<FwdIter1, FwdIter2> mismatch(FwdIter1 first1, FwdIter1 last1, FwdIter2 first2, Pred &&op)# Returns the first mismatching pair of elements from two ranges: one defined by [first1, last1) and another defined by [first2,last2). If last2 is not provided, it denotes first2 + (last1 - first1).
Note
Complexity: At most last1 - first1 applications of the predicate op or operator==. If FwdIter1 and FwdIter2 meet the requirements of RandomAccessIterator and (last1 - first1) != (last2 - first2) then no applications of the predicate op or operator== are made.
Note
The two ranges are considered mismatch if, for every iterator i in the range [first1,last1), *i mismatches *(first2 + (i - first1)). This overload of mismatch uses operator== to determine if two elements are mismatch.
- Template Parameters
FwdIter1 – The type of the source iterators used for the first range (deduced). This iterator type must meet the requirements of an forward iterator.
FwdIter2 – The type of the source iterators used for the second range (deduced). This iterator type must meet the requirements of an forward iterator.
Pred – The type of an optional function/function object to use. Unlike its sequential form, the parallel overload of mismatch requires Pred to meet the requirements of CopyConstructible. This defaults to std::equal_to<>
- Parameters
first1 – Refers to the beginning of the sequence of elements of the first range the algorithm will be applied to.
last1 – Refers to the end of the sequence of elements of the first range the algorithm will be applied to.
first2 – Refers to the beginning of the sequence of elements of the second range the algorithm will be applied to.
op – The binary predicate which returns true if the elements should be treated as mismatch. The signature of the predicate function should be equivalent to the following:
The signature does not need to have const &, but the function must not modify the objects passed to it. The types Type1 and Type2 must be such that objects of types FwdIter1 and FwdIter2 can be dereferenced and then implicitly converted to Type1 and Type2 respectivelybool pred(const Type1 &a, const Type2 &b);
- Returns
The mismatch algorithm returns a std::pair<FwdIter1,FwdIter2>. If no mismatches are found when the comparison reaches last1 or last2, whichever happens first, the pair holds the end iterator and the corresponding iterator from the other range.
-
template<typename FwdIter1, typename FwdIter2>
std::pair<FwdIter1, FwdIter2> mismatch(FwdIter1 first1, FwdIter1 last1, FwdIter2 first2)# Returns the first mismatching pair of elements from two ranges: one defined by [first1, last1) and another defined by [first2,last2). If last2 is not provided, it denotes first2 + (last1 - first1).
Note
Complexity: At most last1 - first1 applications of operator==. If FwdIter1 and FwdIter2 meet the requirements of RandomAccessIterator and (last1 - first1) != (last2 - first2) then no applications of operator== are made.
Note
The two ranges are considered mismatch if, for every iterator i in the range [first1,last1), *i mismatches *(first2 + (i - first1)). This overload of mismatch uses operator== to determine if two elements are mismatch.
- Template Parameters
FwdIter1 – The type of the source iterators used for the first range (deduced). This iterator type must meet the requirements of an forward iterator.
FwdIter2 – The type of the source iterators used for the second range (deduced). This iterator type must meet the requirements of an forward iterator.
Pred – The type of an optional function/function object to use. Unlike its sequential form, the parallel overload of mismatch requires Pred to meet the requirements of CopyConstructible. This defaults to std::equal_to<>
- Parameters
first1 – Refers to the beginning of the sequence of elements of the first range the algorithm will be applied to.
last1 – Refers to the end of the sequence of elements of the first range the algorithm will be applied to.
first2 – Refers to the beginning of the sequence of elements of the second range the algorithm will be applied to.
- Returns
The mismatch algorithm returns a std::pair<FwdIter1,FwdIter2>. If no mismatches are found when the comparison reaches last1 or last2, whichever happens first, the pair holds the end iterator and the corresponding iterator from the other range.
-
template<typename ExPolicy, typename FwdIter1, typename FwdIter2, typename Pred>
hpx::move#
Defined in header hpx/algorithm.hpp.
See Public API for a list of names and headers that are part of the public HPX API.
-
namespace hpx
Functions
-
template<typename ExPolicy, typename FwdIter1, typename FwdIter2>
hpx::parallel::util::detail::algorithm_result_t<ExPolicy, FwdIter2> move(ExPolicy &&policy, FwdIter1 first, FwdIter1 last, FwdIter2 dest)# Moves the elements in the range [first, last), to another range beginning at dest. After this operation the elements in the moved-from range will still contain valid values of the appropriate type, but not necessarily the same values as before the move. Executed according to the policy.
The move assignments in the parallel move algorithm invoked with an execution policy object of type sequenced_policy execute in sequential order in the calling thread.
The move assignments in the parallel move algorithm invoked with an execution policy object of type parallel_policy or parallel_task_policy are permitted to execute in an unordered fashion in unspecified threads, and indeterminately sequenced within each thread.
Note
Complexity: Performs exactly last - first move assignments.
- Template Parameters
ExPolicy – The type of the execution policy to use (deduced). It describes the manner in which the execution of the algorithm may be parallelized and the manner in which it executes the move assignments.
FwdIter1 – The type of the source iterators used (deduced). This iterator type must meet the requirements of an forward iterator.
FwdIter2 – The type of the iterator representing the destination range (deduced). This iterator type must meet the requirements of an forward iterator.
- Parameters
policy – The execution policy to use for the scheduling of the iterations.
first – Refers to the beginning of the sequence of elements the algorithm will be applied to.
last – Refers to the end of the sequence of elements the algorithm will be applied to.
dest – Refers to the beginning of the destination range.
- Returns
The move algorithm returns a hpx::future<FwdIter2>> if the execution policy is of type sequenced_task_policy or parallel_task_policy and returns FwdIter2 otherwise. The move algorithm returns the output iterator to the element in the destination range, one past the last element moved.
-
template<typename FwdIter1, typename FwdIter2>
FwdIter2 move(FwdIter1 first, FwdIter1 last, FwdIter2 dest)# Moves the elements in the range [first, last), to another range beginning at dest. After this operation the elements in the moved-from range will still contain valid values of the appropriate type, but not necessarily the same values as before the move.
Note
Complexity: Performs exactly last - first move assignments.
- Template Parameters
FwdIter1 – The type of the source iterators used (deduced). This iterator type must meet the requirements of an forward iterator.
FwdIter2 – The type of the iterator representing the destination range (deduced). This iterator type must meet the requirements of an forward iterator.
- Parameters
first – Refers to the beginning of the sequence of elements the algorithm will be applied to.
last – Refers to the end of the sequence of elements the algorithm will be applied to.
dest – Refers to the beginning of the destination range.
- Returns
The move algorithm returns a FwdIter2. The move algorithm returns the output iterator to the element in the destination range, one past the last element moved.
-
template<typename ExPolicy, typename FwdIter1, typename FwdIter2>
hpx::nth_element#
Defined in header hpx/algorithm.hpp.
See Public API for a list of names and headers that are part of the public HPX API.
-
namespace hpx
Functions
-
template<typename RandomIt, typename Pred = hpx::parallel::detail::less>
void nth_element(RandomIt first, RandomIt nth, RandomIt last, Pred &&pred = Pred())# nth_element is a partial sorting algorithm that rearranges elements in [first, last) such that the element pointed at by nth is changed to whatever element would occur in that position if [first, last) were sorted and all of the elements before this new nth element are less than or equal to the elements after the new nth element. Executed according to the policy.
The comparison operations in the parallel nth_element algorithm invoked without an execution policy object execute in sequential order in the calling thread.
Note
Complexity: Linear in std::distance(first, last) on average. O(N) applications of the predicate, and O(N log N) swaps, where N = last - first.
- Template Parameters
RandomIt – The type of the source begin, nth, and end iterators used (deduced). This iterator type must meet the requirements of a random access iterator.
Pred – Comparison function object which returns true if the first argument is less than the second. This defaults to std::less<>.
- Parameters
first – Refers to the beginning of the sequence of elements the algorithm will be applied to.
nth – Refers to the iterator defining the sort partition point
last – Refers to the end of the sequence of elements the algorithm will be applied to.
pred – Specifies the comparison function object which returns true if the first argument is less than (i.e. is ordered before) the second. The signature of this comparison function should be equivalent to:
The signature does not need to have const&, but the function must not modify the objects passed to it. The type must be such that an object of type randomIt can be dereferenced and then implicitly converted to Type. This defaults to std::less<>.bool cmp(const Type1 &a, const Type2 &b);
- Returns
The nth_element algorithms returns nothing.
-
template<typename ExPolicy, typename RandomIt, typename Pred = hpx::parallel::detail::less>
void nth_element(ExPolicy &&policy, RandomIt first, RandomIt nth, RandomIt last, Pred &&pred = Pred())# nth_element is a partial sorting algorithm that rearranges elements in [first, last) such that the element pointed at by nth is changed to whatever element would occur in that position if [first, last) were sorted and all of the elements before this new nth element are less than or equal to the elements after the new nth element.
The comparison operations in the parallel nth_element invoked with an execution policy object of type sequenced_policy execute in sequential order in the calling thread.
The assignments in the parallel nth_element algorithm invoked with an execution policy object of type parallel_policy or parallel_task_policy are permitted to execute in an unordered fashion in unspecified threads, and indeterminately sequenced within each thread.
Note
Complexity: Linear in std::distance(first, last) on average. O(N) applications of the predicate, and O(N log N) swaps, where N = last - first.
- Template Parameters
ExPolicy – The type of the execution policy to use (deduced). It describes the manner in which the execution of the algorithm may be parallelized and the manner in which it executes the assignments.
RandomIt – The type of the source begin, nth, and end iterators used (deduced). This iterator type must meet the requirements of a random access iterator.
Pred – Comparison function object which returns true if the first argument is less than the second. This defaults to std::less<>.
- Parameters
policy – The execution policy to use for the scheduling of the iterations.
first – Refers to the beginning of the sequence of elements the algorithm will be applied to.
nth – Refers to the iterator defining the sort partition point
last – Refers to the end of the sequence of elements the algorithm will be applied to.
pred – Specifies the comparison function object which returns true if the first argument is less than (i.e. is ordered before) the second. The signature of this comparison function should be equivalent to:
The signature does not need to have const&, but the function must not modify the objects passed to it. The type must be such that an object of type randomIt can be dereferenced and then implicitly converted to Type. This defaults to std::less<>.bool cmp(const Type1 &a, const Type2 &b);
- Returns
The nth_element algorithms returns nothing.
-
template<typename RandomIt, typename Pred = hpx::parallel::detail::less>
hpx::partial_sort#
Defined in header hpx/algorithm.hpp.
See Public API for a list of names and headers that are part of the public HPX API.
-
namespace hpx
Functions
-
template<typename RandIter, typename Comp = hpx::parallel::detail::less>
RandIter partial_sort(RandIter first, RandIter middle, RandIter last, Comp &&comp = Comp())# Places the first middle - first elements from the range [first, last) as sorted with respect to comp into the range [first, middle). The rest of the elements in the range [middle, last) are placed in an unspecified order.
Note
Complexity: Approximately (last - first) * log(middle - first) comparisons.
- Template Parameters
RandIter – The type of the source begin, middle, and end iterators used (deduced). This iterator type must meet the requirements of a random access iterator.
Comp – The type of the function/function object to use (deduced). Comp defaults to detail::less.
- Parameters
first – Refers to the beginning of the sequence of elements the algorithm will be applied to.
middle – Refers to the middle of the sequence of elements the algorithm will be applied to.
last – Refers to the end of the sequence of elements the algorithm will be applied to.
comp – comp is a callable object. The return value of the INVOKE operation applied to an object of type Comp, when contextually converted to bool, yields true if the first argument of the call is less than the second, and false otherwise. It is assumed that comp will not apply any non-constant function through the dereferenced iterator. It defaults to detail::less.
- Returns
The partial_sort algorithm returns a RandIter that refers to last.
-
template<typename ExPolicy, typename RandIter, typename Comp = hpx::parallel::detail::less>
parallel::util::detail::algorithm_result_t<ExPolicy, RandIter> partial_sort(ExPolicy &&policy, RandIter first, RandIter middle, RandIter last, Comp &&comp = Comp())# Places the first middle - first elements from the range [first, last) as sorted with respect to comp into the range [first, middle). The rest of the elements in the range [middle, last) are placed in an unspecified order.
Note
Complexity: Approximately (last - first) * log(middle - first) comparisons.
- Template Parameters
ExPolicy – The type of the execution policy to use (deduced). It describes the manner in which the execution of the algorithm may be parallelized and the manner in which it applies user-provided function objects.
RandIter – The type of the source begin, middle, and end iterators used (deduced). This iterator type must meet the requirements of a random access iterator.
Comp – The type of the function/function object to use (deduced). Comp defaults to detail::less.
- Parameters
policy – The execution policy to use for the scheduling of the iterations.
first – Refers to the beginning of the sequence of elements the algorithm will be applied to.
middle – Refers to the middle of the sequence of elements the algorithm will be applied to.
last – Refers to the end of the sequence of elements the algorithm will be applied to.
comp – comp is a callable object. The return value of the INVOKE operation applied to an object of type Comp, when contextually converted to bool, yields true if the first argument of the call is less than the second, and false otherwise. It is assumed that comp will not apply any non-constant function through the dereferenced iterator. It defaults to detail::less.
- Returns
The partial_sort algorithm returns a hpx::future<RandIter> if the execution policy is of type sequenced_task_policy or parallel_task_policy and returns RandIter otherwise. The iterator returned refers to last.
-
template<typename RandIter, typename Comp = hpx::parallel::detail::less>
hpx::partial_sort_copy#
Defined in header hpx/algorithm.hpp.
See Public API for a list of names and headers that are part of the public HPX API.
-
namespace hpx
Functions
-
template<typename InIter, typename RandIter, typename Comp = hpx::parallel::detail::less>
RandIter partial_sort_copy(InIter first, InIter last, RandIter d_first, RandIter d_last, Comp &&comp = Comp())# Sorts some of the elements in the range [first, last) in ascending order, storing the result in the range [d_first, d_last). At most d_last - d_first of the elements are placed sorted to the range [d_first, d_first + n) where n is the number of elements to sort (n = min(last - first, d_last - d_first)).
The application of function objects in parallel algorithm invoked with an execution policy object of type sequenced_policy execute in sequential order in the calling thread.
The application of function objects in parallel algorithm invoked with an execution policy object of type parallel_policy or parallel_task_policy are permitted to execute in an unordered fashion in unspecified threads, and indeterminately sequenced within each thread.
Note
Complexity: O(N log(min(D,N))), where N = std::distance(first, last) and D = std::distance(d_first, d_last) comparisons.
- Template Parameters
InIter – The type of the source iterators used (deduced). This iterator type must meet the requirements of an input iterator.
RandIter – The type of the destination iterators used(deduced) This iterator type must meet the requirements of an random iterator.
Comp – The type of the function/function object to use (deduced). Comp defaults to detail::less.
- Parameters
first – Refers to the beginning of the sequence of elements the algorithm will be applied to.
last – Refers to the end of the sequence of elements the algorithm will be applied to.
d_first – Refers to the beginning of the destination range.
d_last – Refers to the end of the destination range.
comp – comp is a callable object. The return value of the INVOKE operation applied to an object of type Comp, when contextually converted to bool, yields true if the first argument of the call is less than the second, and false otherwise. It is assumed that comp will not apply any non-constant function through the dereferenced iterator. This defaults to detail::less.
- Returns
The partial_sort_copy algorithm returns a RandomIt. The algorithm returns an iterator to the element defining the upper boundary of the sorted range i.e. d_first + min(last - first, d_last - d_first)
-
template<typename ExPolicy, typename FwdIter, typename RandIter, typename Comp = hpx::parallel::detail::less>
parallel::util::detail::algorithm_result_t<ExPolicy, RandIter> partial_sort_copy(ExPolicy &&policy, FwdIter first, FwdIter last, RandIter d_first, RandIter d_last, Comp &&comp = Comp())# Sorts some of the elements in the range [first, last) in ascending order, storing the result in the range [d_first, d_last). At most d_last - d_first of the elements are placed sorted to the range [d_first, d_first + n) where n is the number of elements to sort (n = min(last - first, d_last - d_first)). Executed according to the policy.
The application of function objects in parallel algorithm invoked with an execution policy object of type sequenced_policy execute in sequential order in the calling thread.
The application of function objects in parallel algorithm invoked with an execution policy object of type parallel_policy or parallel_task_policy are permitted to execute in an unordered fashion in unspecified threads, and indeterminately sequenced within each thread.
Note
Complexity: O(N log(min(D,N))), where N = std::distance(first, last) and D = std::distance(d_first, d_last) comparisons.
- Template Parameters
ExPolicy – The type of the execution policy to use (deduced). It describes the manner in which the execution of the algorithm may be parallelized and the manner in which it executes the assignments.
FwdIter – The type of the source iterators used (deduced). This iterator type must meet the requirements of an forward iterator.
RandIter – The type of the destination iterators used(deduced) This iterator type must meet the requirements of an random iterator.
Comp – The type of the function/function object to use (deduced). Comp defaults to detail::less.
- Parameters
policy – The execution policy to use for the scheduling of the iterations.
first – Refers to the beginning of the sequence of elements the algorithm will be applied to.
last – Refers to the end of the sequence of elements the algorithm will be applied to.
d_first – Refers to the beginning of the destination range.
d_last – Refers to the end of the destination range.
comp – comp is a callable object. The return value of the INVOKE operation applied to an object of type Comp, when contextually converted to bool, yields true if the first argument of the call is less than the second, and false otherwise. It is assumed that comp will not apply any non-constant function through the dereferenced iterator. This defaults to detail::less.
- Returns
The partial_sort_copy algorithm returns a hpx::future<RandomIt> if the execution policy is of type sequenced_task_policy or parallel_task_policy and returns RandomIt otherwise. The algorithm returns an iterator to the element defining the upper boundary of the sorted range i.e. d_first + min(last - first, d_last - d_first)
-
template<typename InIter, typename RandIter, typename Comp = hpx::parallel::detail::less>
hpx::partition, hpx::stable_partition, hpx::partition_copy#
Defined in header hpx/algorithm.hpp.
See Public API for a list of names and headers that are part of the public HPX API.
-
namespace hpx
Functions
-
template<typename FwdIter, typename Pred, typename Proj = hpx::identity>
FwdIter partition(FwdIter first, FwdIter last, Pred &&pred, Proj &&proj = Proj())# Reorders the elements in the range [first, last) in such a way that all elements for which the predicate pred returns true precede the elements for which the predicate pred returns false. Relative order of the elements is not preserved.
The assignments in the parallel partition algorithm invoked without an execution policy object execute in sequential order in the calling thread.
Note
Complexity: At most 2 * (last - first) swaps. Exactly last - first applications of the predicate and projection.
- Template Parameters
FwdIter – The type of the source iterators used (deduced). This iterator type must meet the requirements of a forward iterator.
Pred – The type of the function/function object to use (deduced). Unlike its sequential form, the parallel overload of partition requires Pred to meet the requirements of CopyConstructible.
Proj – The type of an optional projection function. This defaults to hpx::identity
- Parameters
first – Refers to the beginning of the sequence of elements the algorithm will be applied to.
last – Refers to the end of the sequence of elements the algorithm will be applied to.
pred – Specifies the function (or function object) which will be invoked for each of the elements in the sequence specified by [first, last). This is an unary predicate for partitioning the source iterators. The signature of this predicate should be equivalent to:
The signature does not need to have const&, but the function must not modify the objects passed to it. The type Type must be such that an object of type FwdIter can be dereferenced and then implicitly converted to Type.bool pred(const Type &a);
proj – Specifies the function (or function object) which will be invoked for each of the elements as a projection operation before the actual predicate is invoked.
- Returns
The partition algorithm returns returns FwdIter. The partition algorithm returns the iterator to the first element of the second group.
-
template<typename ExPolicy, typename FwdIter, typename Pred, typename Proj = hpx::identity>
parallel::util::detail::algorithm_result_t<ExPolicy, FwdIter> partition(ExPolicy &&policy, FwdIter first, FwdIter last, Pred &&pred, Proj &&proj = Proj())# Reorders the elements in the range [first, last) in such a way that all elements for which the predicate pred returns true precede the elements for which the predicate pred returns false. Relative order of the elements is not preserved.
The assignments in the parallel partition algorithm invoked with an execution policy object of type sequenced_policy execute in sequential order in the calling thread.
The assignments in the parallel partition algorithm invoked with an execution policy object of type parallel_policy or parallel_task_policy are permitted to execute in an unordered fashion in unspecified threads, and indeterminately sequenced within each thread.
Note
Complexity: At most 2 * (last - first) swaps. Exactly last - first applications of the predicate and projection.
- Template Parameters
ExPolicy – The type of the execution policy to use (deduced). It describes the manner in which the execution of the algorithm may be parallelized and the manner in which it executes the assignments.
FwdIter – The type of the source iterators used (deduced). This iterator type must meet the requirements of an forward iterator.
Pred – The type of the function/function object to use (deduced). Unlike its sequential form, the parallel overload of partition requires Pred to meet the requirements of CopyConstructible.
Proj – The type of an optional projection function. This defaults to hpx::identity
- Parameters
policy – The execution policy to use for the scheduling of the iterations.
first – Refers to the beginning of the sequence of elements the algorithm will be applied to.
last – Refers to the end of the sequence of elements the algorithm will be applied to.
pred – Specifies the function (or function object) which will be invoked for each of the elements in the sequence specified by [first, last). This is an unary predicate for partitioning the source iterators. The signature of this predicate should be equivalent to:
The signature does not need to have const&, but the function must not modify the objects passed to it. The type Type must be such that an object of type FwdIter can be dereferenced and then implicitly converted to Type.bool pred(const Type &a);
proj – Specifies the function (or function object) which will be invoked for each of the elements as a projection operation before the actual predicate is invoked.
- Returns
The partition algorithm returns a hpx::future<FwdIter> if the execution policy is of type parallel_task_policy and returns FwdIter otherwise. The partition algorithm returns the iterator to the first element of the second group.
-
template<typename BidirIter, typename F, typename Proj = hpx::identity>
BidirIter stable_partition(BidirIter first, BidirIter last, F &&f, Proj &&proj = Proj())# Permutes the elements in the range [first, last) such that there exists an iterator i such that for every iterator j in the range [first, i) INVOKE(f, INVOKE (proj, *j)) != false, and for every iterator k in the range [i, last), INVOKE(f, INVOKE (proj, *k)) == false
The invocations of f in the parallel stable_partition algorithm invoked without an execution policy object executes in sequential order in the calling thread.
Note
Complexity: At most (last - first) * log(last - first) swaps, but only linear number of swaps if there is enough extra memory. Exactly last - first applications of the predicate and projection.
- Template Parameters
BidirIter – The type of the source iterators used (deduced). This iterator type must meet the requirements of a bidirectional iterator.
F – The type of the function/function object to use (deduced). Unlike its sequential form, the parallel overload of transform requires F to meet the requirements of CopyConstructible.
Proj – The type of an optional projection function. This defaults to hpx::identity
- Parameters
first – Refers to the beginning of the sequence of elements the algorithm will be applied to.
last – Refers to the end of the sequence of elements the algorithm will be applied to.
f – Unary predicate which returns true if the element should be ordered before other elements. Specifies the function (or function object) which will be invoked for each of the elements in the sequence specified by [first, last). The signature of this predicate should be equivalent to:
The signature does not need to have const&. The type Type must be such that an object of type BidirIter can be dereferenced and then implicitly converted to Type.bool fun(const Type &a);
proj – Specifies the function (or function object) which will be invoked for each of the elements as a projection operation before the actual predicate f is invoked.
- Returns
The stable_partition algorithm returns an iterator i such that for every iterator j in the range [first, i), f(*j) != false INVOKE(f, INVOKE(proj, *j)) != false, and for every iterator k in the range [i, last), f(*k) == false INVOKE(f, INVOKE (proj, *k)) == false. The relative order of the elements in both groups is preserved.
-
template<typename ExPolicy, typename BidirIter, typename F, typename Proj = hpx::identity>
parallel::util::detail::algorithm_result_t<ExPolicy, BidirIter> stable_partition(ExPolicy &&policy, BidirIter first, BidirIter last, F &&f, Proj &&proj = Proj())# Permutes the elements in the range [first, last) such that there exists an iterator i such that for every iterator j in the range [first, i) INVOKE(f, INVOKE (proj, *j)) != false, and for every iterator k in the range [i, last), INVOKE(f, INVOKE (proj, *k)) == false
The invocations of f in the parallel stable_partition algorithm invoked with an execution policy object of type sequenced_policy executes in sequential order in the calling thread.
The invocations of f in the parallel stable_partition algorithm invoked with an execution policy object of type parallel_policy or parallel_task_policy are permitted to execute in an unordered fashion in unspecified threads, and indeterminately sequenced within each thread.
Note
Complexity: At most (last - first) * log(last - first) swaps, but only linear number of swaps if there is enough extra memory. Exactly last - first applications of the predicate and projection.
- Template Parameters
ExPolicy – The type of the execution policy to use (deduced). It describes the manner in which the execution of the algorithm may be parallelized and the manner in which it executes the invocations of f.
BidirIter – The type of the source iterators used (deduced). This iterator type must meet the requirements of a bidirectional iterator.
F – The type of the function/function object to use (deduced). Unlike its sequential form, the parallel overload of transform requires F to meet the requirements of CopyConstructible.
Proj – The type of an optional projection function. This defaults to hpx::identity
- Parameters
policy – The execution policy to use for the scheduling of the iterations.
first – Refers to the beginning of the sequence of elements the algorithm will be applied to.
last – Refers to the end of the sequence of elements the algorithm will be applied to.
f – Unary predicate which returns true if the element should be ordered before other elements. Specifies the function (or function object) which will be invoked for each of the elements in the sequence specified by [first, last). The signature of this predicate should be equivalent to:
The signature does not need to have const&. The type Type must be such that an object of type BidirIter can be dereferenced and then implicitly converted to Type.bool fun(const Type &a);
proj – Specifies the function (or function object) which will be invoked for each of the elements as a projection operation before the actual predicate f is invoked.
- Returns
The stable_partition algorithm returns an iterator i such that for every iterator j in the range [first, i), f(*j) != false INVOKE(f, INVOKE(proj, *j)) != false, and for every iterator k in the range [i, last), f(*k) == false INVOKE(f, INVOKE (proj, *k)) == false. The relative order of the elements in both groups is preserved. If the execution policy is of type parallel_task_policy the algorithm returns a future<> referring to this iterator.
-
template<typename FwdIter1, typename FwdIter2, typename FwdIter3, typename Pred, typename Proj = hpx::identity>
std::pair<FwdIter2, FwdIter3> partition_copy(FwdIter1 first, FwdIter1 last, FwdIter2 dest_true, FwdIter3 dest_false, Pred &&pred, Proj &&proj = Proj())# Copies the elements in the range, defined by [first, last), to two different ranges depending on the value returned by the predicate pred. The elements, that satisfy the predicate pred are copied to the range beginning at dest_true. The rest of the elements are copied to the range beginning at dest_false. The order of the elements is preserved.
The assignments in the parallel partition_copy algorithm invoked without an execution policy object execute in sequential order in the calling thread.
Note
Complexity: Performs not more than last - first assignments, exactly last - first applications of the predicate pred.
- Template Parameters
FwdIter1 – The type of the source iterators used (deduced). This iterator type must meet the requirements of an forward iterator.
FwdIter2 – The type of the iterator representing the destination range for the elements that satisfy the predicate pred (deduced). This iterator type must meet the requirements of an forward iterator.
FwdIter3 – The type of the iterator representing the destination range for the elements that don’t satisfy the predicate pred (deduced). This iterator type must meet the requirements of an forward iterator.
Pred – The type of the function/function object to use (deduced). Unlike its sequential form, the parallel overload of partition_copy requires Pred to meet the requirements of CopyConstructible.
Proj – The type of an optional projection function. This defaults to hpx::identity
- Parameters
first – Refers to the beginning of the sequence of elements the algorithm will be applied to.
last – Refers to the end of the sequence of elements the algorithm will be applied to.
dest_true – Refers to the beginning of the destination range for the elements that satisfy the predicate pred
dest_false – Refers to the beginning of the destination range for the elements that don’t satisfy the predicate pred.
pred – Specifies the function (or function object) which will be invoked for each of the elements in the sequence specified by [first, last). This is an unary predicate for partitioning the source iterators. The signature of this predicate should be equivalent to:
The signature does not need to have const&, but the function must not modify the objects passed to it. The type Type must be such that an object of type FwdIter1 can be dereferenced and then implicitly converted to Type.bool pred(const Type &a);
proj – Specifies the function (or function object) which will be invoked for each of the elements as a projection operation before the actual predicate is invoked.
- Returns
The partition_copy algorithm returns std::pair<OutIter1, OutIter2>. The partition_copy algorithm returns the pair of the destination iterator to the end of the dest_true range, and the destination iterator to the end of the dest_false range.
-
template<typename ExPolicy, typename FwdIter1, typename FwdIter2, typename FwdIter3, typename Pred, typename Proj = hpx::identity>
parallel::util::detail::algorithm_result_t<ExPolicy, std::pair<FwdIter2, FwdIter3>> partition_copy(ExPolicy &&policy, FwdIter1 first, FwdIter1 last, FwdIter2 dest_true, FwdIter3 dest_false, Pred &&pred, Proj &&proj = Proj())# Copies the elements in the range, defined by [first, last), to two different ranges depending on the value returned by the predicate pred. The elements, that satisfy the predicate pred, are copied to the range beginning at dest_true. The rest of the elements are copied to the range beginning at dest_false. The order of the elements is preserved.
The assignments in the parallel partition_copy algorithm invoked with an execution policy object of type sequenced_policy execute in sequential order in the calling thread.
The assignments in the parallel partition_copy algorithm invoked with an execution policy object of type parallel_policy or parallel_task_policy are permitted to execute in an unordered fashion in unspecified threads, and indeterminately sequenced within each thread.
Note
Complexity: Performs not more than last - first assignments, exactly last - first applications of the predicate pred.
- Template Parameters
ExPolicy – The type of the execution policy to use (deduced). It describes the manner in which the execution of the algorithm may be parallelized and the manner in which it executes the assignments.
FwdIter1 – The type of the source iterators used (deduced). This iterator type must meet the requirements of an forward iterator.
FwdIter2 – The type of the iterator representing the destination range for the elements that satisfy the predicate pred (deduced). This iterator type must meet the requirements of an forward iterator.
FwdIter3 – The type of the iterator representing the destination range for the elements that don’t satisfy the predicate pred (deduced). This iterator type must meet the requirements of an forward iterator.
Pred – The type of the function/function object to use (deduced). Unlike its sequential form, the parallel overload of partition_copy requires Pred to meet the requirements of CopyConstructible.
Proj – The type of an optional projection function. This defaults to hpx::identity
- Parameters
policy – The execution policy to use for the scheduling of the iterations.
first – Refers to the beginning of the sequence of elements the algorithm will be applied to.
last – Refers to the end of the sequence of elements the algorithm will be applied to.
dest_true – Refers to the beginning of the destination range for the elements that satisfy the predicate pred
dest_false – Refers to the beginning of the destination range for the elements that don’t satisfy the predicate pred.
pred – Specifies the function (or function object) which will be invoked for each of the elements in the sequence specified by [first, last). This is an unary predicate for partitioning the source iterators. The signature of this predicate should be equivalent to:
The signature does not need to have const&, but the function must not modify the objects passed to it. The type Type must be such that an object of type FwdIter1 can be dereferenced and then implicitly converted to Type.bool pred(const Type &a);
proj – Specifies the function (or function object) which will be invoked for each of the elements as a projection operation before the actual predicate is invoked.
- Returns
The partition_copy algorithm returns a hpx::future<std::pair<OutIter1, OutIter2>> if the execution policy is of type parallel_task_policy and returns std::pair<OutIter1, OutIter2> otherwise. The partition_copy algorithm returns the pair of the destination iterator to the end of the dest_true range, and the destination iterator to the end of the dest_false range.
-
template<typename FwdIter, typename Pred, typename Proj = hpx::identity>
hpx::reduce#
Defined in header hpx/algorithm.hpp.
See Public API for a list of names and headers that are part of the public HPX API.
-
namespace hpx
Functions
-
template<typename ExPolicy, typename FwdIter, typename F, typename T = typename std::iterator_traits<FwdIter>::value_type>
hpx::parallel::util::detail::algorithm_result_t<ExPolicy, T> reduce(ExPolicy &&policy, FwdIter first, FwdIter last, T init, F &&f)# Returns GENERALIZED_SUM(f, init, *first, …, *(first + (last - first) - 1)). Executed according to the policy.
The reduce operations in the parallel reduce algorithm invoked with an execution policy object of type sequenced_policy execute in sequential order in the calling thread.
The reduce operations in the parallel copy_if algorithm invoked with an execution policy object of type parallel_policy or parallel_task_policy are permitted to execute in an unordered fashion in unspecified threads, and indeterminately sequenced within each thread.
The difference between reduce and accumulate is that the behavior of reduce may be non-deterministic for non-associative or non-commutative binary predicate.
Note
Complexity: O(last - first) applications of the predicate f.
Note
GENERALIZED_SUM(op, a1, …, aN) is defined as follows:
a1 when N is 1
op(GENERALIZED_SUM(op, b1, …, bK), GENERALIZED_SUM(op, bM, …, bN)), where:
b1, …, bN may be any permutation of a1, …, aN and
1 < K+1 = M <= N.
- Template Parameters
ExPolicy – The type of the execution policy to use (deduced). It describes the manner in which the execution of the algorithm may be parallelized and the manner in which it executes the assignments.
FwdIter – The type of the source begin and end iterators used (deduced). This iterator type must meet the requirements of a forward iterator.
F – The type of the function/function object to use (deduced). Unlike its sequential form, the parallel overload of reduce requires F to meet the requirements of CopyConstructible.
T – The type of the value to be used as initial (and intermediate) values (deduced).
- Parameters
policy – The execution policy to use for the scheduling of the iterations.
first – Refers to the beginning of the sequence of elements the algorithm will be applied to.
last – Refers to the end of the sequence of elements the algorithm will be applied to.
init – The initial value for the generalized sum.
f – Specifies the function (or function object) which will be invoked for each of the elements in the sequence specified by [first, last). This is a binary predicate. The signature of this predicate should be equivalent to:
The signature does not need to have const&. The types Type1 Ret must be such that an object of type FwdIter can be dereferenced and then implicitly converted to any of those types.Ret fun(const Type1 &a, const Type1 &b);
- Returns
The reduce algorithm returns a hpx::future<T> if the execution policy is of type sequenced_task_policy or parallel_task_policy and returns T otherwise. The reduce algorithm returns the result of the generalized sum over the elements given by the input range [first, last).
-
template<typename ExPolicy, typename FwdIter, typename T = typename std::iterator_traits<FwdIter>::value_type>
util::detail::algorithm_result_t<ExPolicy, T> reduce(ExPolicy &&policy, FwdIter first, FwdIter last, T init)# Returns GENERALIZED_SUM(+, init, *first, …, *(first + (last - first) - 1)). Executed according to the policy.
The reduce operations in the parallel reduce algorithm invoked with an execution policy object of type sequenced_policy execute in sequential order in the calling thread.
The reduce operations in the parallel copy_if algorithm invoked with an execution policy object of type parallel_policy or parallel_task_policy are permitted to execute in an unordered fashion in unspecified threads, and indeterminately sequenced within each thread.
The difference between reduce and accumulate is that the behavior of reduce may be non-deterministic for non-associative or non-commutative binary predicate.
Note
Complexity: O(last - first) applications of the operator+().
Note
GENERALIZED_SUM(+, a1, …, aN) is defined as follows:
a1 when N is 1
op(GENERALIZED_SUM(+, b1, …, bK), GENERALIZED_SUM(+, bM, …, bN)), where:
b1, …, bN may be any permutation of a1, …, aN and
1 < K+1 = M <= N.
- Template Parameters
ExPolicy – The type of the execution policy to use (deduced). It describes the manner in which the execution of the algorithm may be parallelized and the manner in which it executes the assignments.
FwdIter – The type of the source begin and end iterators used (deduced). This iterator type must meet the requirements of a forward iterator.
T – The type of the value to be used as initial (and intermediate) values (deduced).
- Parameters
policy – The execution policy to use for the scheduling of the iterations.
first – Refers to the beginning of the sequence of elements the algorithm will be applied to.
last – Refers to the end of the sequence of elements the algorithm will be applied to.
init – The initial value for the generalized sum.
- Returns
The reduce algorithm returns a hpx::future<T> if the execution policy is of type sequenced_task_policy or parallel_task_policy and returns T otherwise. The reduce algorithm returns the result of the generalized sum (applying operator+()) over the elements given by the input range [first, last).
-
template<typename ExPolicy, typename FwdIter>
hpx::parallel::util::detail::algorithm_result<ExPolicy, typename std::iterator_traits<FwdIter>::value_type>::type reduce(ExPolicy &&policy, FwdIter first, FwdIter last)# Returns GENERALIZED_SUM(+, T(), *first, …, *(first + (last - first) - 1)). Executed according to the policy.
The reduce operations in the parallel reduce algorithm invoked with an execution policy object of type sequenced_policy execute in sequential order in the calling thread.
The reduce operations in the parallel reduce algorithm invoked with an execution policy object of type parallel_policy or parallel_task_policy are permitted to execute in an unordered fashion in unspecified threads, and indeterminately sequenced within each thread.
The difference between reduce and accumulate is that the behavior of reduce may be non-deterministic for non-associative or non-commutative binary predicate.
Note
Complexity: O(last - first) applications of the operator+().
Note
The type of the initial value (and the result type) T is determined from the value_type of the used FwdIter.
Note
GENERALIZED_SUM(+, a1, …, aN) is defined as follows:
a1 when N is 1
op(GENERALIZED_SUM(+, b1, …, bK), GENERALIZED_SUM(+, bM, …, bN)), where:
b1, …, bN may be any permutation of a1, …, aN and
1 < K+1 = M <= N.
- Template Parameters
ExPolicy – The type of the execution policy to use (deduced). It describes the manner in which the execution of the algorithm may be parallelized and the manner in which it executes the assignments.
FwdIter – The type of the source begin and end iterators used (deduced). This iterator type must meet the requirements of a forward iterator.
- Parameters
policy – The execution policy to use for the scheduling of the iterations.
first – Refers to the beginning of the sequence of elements the algorithm will be applied to.
last – Refers to the end of the sequence of elements the algorithm will be applied to.
- Returns
The reduce algorithm returns a hpx::future<T> if the execution policy is of type sequenced_task_policy or parallel_task_policy and returns T otherwise (where T is the value_type of FwdIter). The reduce algorithm returns the result of the generalized sum (applying operator+()) over the elements given by the input range [first, last).
-
template<typename FwdIter, typename F, typename T = typename std::iterator_traits<FwdIter>::value_type>
T reduce(FwdIter first, FwdIter last, T init, F &&f)# Returns GENERALIZED_SUM(f, init, *first, …, *(first + (last - first) - 1)). Executed according to the policy.
The difference between reduce and accumulate is that the behavior of reduce may be non-deterministic for non-associative or non-commutative binary predicate.
Note
Complexity: O(last - first) applications of the predicate f.
Note
GENERALIZED_SUM(op, a1, …, aN) is defined as follows:
a1 when N is 1
op(GENERALIZED_SUM(op, b1, …, bK), GENERALIZED_SUM(op, bM, …, bN)), where:
b1, …, bN may be any permutation of a1, …, aN and
1 < K+1 = M <= N.
- Template Parameters
FwdIter – The type of the source begin and end iterators used (deduced). This iterator type must meet the requirements of an input iterator.
F – The type of the function/function object to use (deduced). Unlike its sequential form, the parallel overload of reduce requires F to meet the requirements of CopyConstructible.
T – The type of the value to be used as initial (and intermediate) values (deduced).
- Parameters
first – Refers to the beginning of the sequence of elements the algorithm will be applied to.
last – Refers to the end of the sequence of elements the algorithm will be applied to.
init – The initial value for the generalized sum.
f – Specifies the function (or function object) which will be invoked for each of the elements in the sequence specified by [first, last). This is a binary predicate. The signature of this predicate should be equivalent to:
The signature does not need to have const&. The types Type1 Ret must be such that an object of type InIter can be dereferenced and then implicitly converted to any of those types.Ret fun(const Type1 &a, const Type1 &b);
- Returns
The reduce algorithm returns T. The reduce algorithm returns the result of the generalized sum over the elements given by the input range [first, last).
-
template<typename FwdIter, typename T = typename std::iterator_traits<FwdIter>::value_type>
T reduce(FwdIter first, FwdIter last, T init)# Returns GENERALIZED_SUM(+, init, *first, …, *(first + (last - first) - 1)). Executed according to the policy.
The difference between reduce and accumulate is that the behavior of reduce may be non-deterministic for non-associative or non-commutative binary predicate.
Note
Complexity: O(last - first) applications of the operator+().
Note
GENERALIZED_SUM(+, a1, …, aN) is defined as follows:
a1 when N is 1
op(GENERALIZED_SUM(+, b1, …, bK), GENERALIZED_SUM(+, bM, …, bN)), where:
b1, …, bN may be any permutation of a1, …, aN and
1 < K+1 = M <= N.
- Template Parameters
FwdIter – The type of the source begin and end iterators used (deduced). This iterator type must meet the requirements of an input iterator.
T – The type of the value to be used as initial (and intermediate) values (deduced).
- Parameters
first – Refers to the beginning of the sequence of elements the algorithm will be applied to.
last – Refers to the end of the sequence of elements the algorithm will be applied to.
init – The initial value for the generalized sum.
- Returns
The reduce algorithm returns a T. The reduce algorithm returns the result of the generalized sum (applying operator+()) over the elements given by the input range [first, last).
-
template<typename FwdIter>
std::iterator_traits<FwdIter>::value_type reduce(FwdIter first, FwdIter last)# Returns GENERALIZED_SUM(+, T(), *first, …, *(first + (last - first) - 1)). Executed according to the policy.
The difference between reduce and accumulate is that the behavior of reduce may be non-deterministic for non-associative or non-commutative binary predicate.
Note
Complexity: O(last - first) applications of the operator+().
Note
The type of the initial value (and the result type) T is determined from the value_type of the used FwdIter.
Note
GENERALIZED_SUM(+, a1, …, aN) is defined as follows:
a1 when N is 1
op(GENERALIZED_SUM(+, b1, …, bK), GENERALIZED_SUM(+, bM, …, bN)), where:
b1, …, bN may be any permutation of a1, …, aN and
1 < K+1 = M <= N.
- Template Parameters
FwdIter – The type of the source begin and end iterators used (deduced). This iterator type must meet the requirements of an input iterator.
- Parameters
first – Refers to the beginning of the sequence of elements the algorithm will be applied to.
last – Refers to the end of the sequence of elements the algorithm will be applied to.
- Returns
The reduce algorithm returns T (where T is the value_type of FwdIter). The reduce algorithm returns the result of the generalized sum (applying operator+()) over the elements given by the input range [first, last).
-
template<typename ExPolicy, typename FwdIter, typename F, typename T = typename std::iterator_traits<FwdIter>::value_type>
hpx::reduce_by_key#
Defined in header hpx/algorithm.hpp.
See Public API for a list of names and headers that are part of the public HPX API.
-
namespace hpx
-
namespace experimental
Top-level namespace.
Functions
-
template<typename ExPolicy, typename RanIter, typename RanIter2, typename FwdIter1, typename FwdIter2, typename Compare = std::equal_to<typename std::iterator_traits<RanIter>::value_type>, typename Func = std::plus<typename std::iterator_traits<RanIter2>::value_type>>
util::detail::algorithm_result<ExPolicy, util::in_out_result<FwdIter1, FwdIter2>>::type reduce_by_key(ExPolicy &&policy, RanIter key_first, RanIter key_last, RanIter2 values_first, FwdIter1 keys_output, FwdIter2 values_output, Compare &&comp = Compare(), Func &&func = Func())# Reduce by Key performs an inclusive scan reduction operation on elements supplied in key/value pairs. The algorithm produces a single output value for each set of equal consecutive keys in [key_first, key_last). the value being the GENERALIZED_NONCOMMUTATIVE_SUM(op, init, *first, …, *(first + (i - result))). for the run of consecutive matching keys. The number of keys supplied must match the number of values.
comp has to induce a strict weak ordering on the values.
The application of function objects in parallel algorithm invoked with an execution policy object of type sequenced_policy execute in sequential order in the calling thread.
The application of function objects in parallel algorithm invoked with an execution policy object of type parallel_policy or parallel_task_policy are permitted to execute in an unordered fashion in unspecified threads, and indeterminately sequenced within each thread.
Note
Complexity: O(last - first) applications of the predicate op.
- Template Parameters
ExPolicy – The type of the execution policy to use (deduced). It describes the manner in which the execution of the algorithm may be parallelized and the manner in which it applies user-provided function objects.
RanIter – The type of the key iterators used (deduced). This iterator type must meet the requirements of a random access iterator.
RanIter2 – The type of the value iterators used (deduced). This iterator type must meet the requirements of a random access iterator.
FwdIter1 – The type of the iterator representing the destination key range (deduced). This iterator type must meet the requirements of a forward iterator.
FwdIter2 – The type of the iterator representing the destination value range (deduced). This iterator type must meet the requirements of a forward iterator.
Compare – The type of the optional function/function object to use to compare keys (deduced). Assumed to be std::equal_to otherwise.
Func – The type of the function/function object to use (deduced). Unlike its sequential form, the parallel overload of reduce_by_key requires Func to meet the requirements of CopyConstructible.
- Parameters
policy – The execution policy to use for the scheduling of the iterations.
key_first – Refers to the beginning of the sequence of key elements the algorithm will be applied to.
key_last – Refers to the end of the sequence of key elements the algorithm will be applied to.
values_first – Refers to the beginning of the sequence of value elements the algorithm will be applied to.
keys_output – Refers to the start output location for the keys produced by the algorithm.
values_output – Refers to the start output location for the values produced by the algorithm.
comp – comp is a callable object. The return value of the INVOKE operation applied to an object of type Comp, when contextually converted to bool, yields true if the first argument of the call is less than the second, and false otherwise. It is assumed that comp will not apply any non-constant function through the dereferenced iterator.
func – Specifies the function (or function object) which will be invoked for each of the elements in the sequence specified by [first, last). This is a binary predicate. The signature of this predicate should be equivalent to:
The signature does not need to have const&. The types Type1 Ret must be such that an object of type FwdIter can be dereferenced and then implicitly converted to any of those types.Ret fun(const Type1 &a, const Type1 &b);
- Returns
The reduce_by_key algorithm returns a hpx::future<pair<Iter1,Iter2>> if the execution policy is of type sequenced_task_policy or parallel_task_policy and returns pair<Iter1,Iter2> otherwise.
-
template<typename ExPolicy, typename RanIter, typename RanIter2, typename FwdIter1, typename FwdIter2, typename Compare = std::equal_to<typename std::iterator_traits<RanIter>::value_type>, typename Func = std::plus<typename std::iterator_traits<RanIter2>::value_type>>
-
namespace experimental
hpx::reduce_deterministic#
Defined in header hpx/algorithm.hpp.
See Public API for a list of names and headers that are part of the public HPX API.
-
namespace hpx
Functions
-
template<typename ExPolicy, typename FwdIter, typename F, typename T = typename std::iterator_traits<FwdIter>::value_type>
hpx::parallel::util::detail::algorithm_result_t<ExPolicy, T> reduce_deterministic(ExPolicy &&policy, FwdIter first, FwdIter last, T init, F &&f)# Returns GENERALIZED_SUM(f, init, *first, …, *(first + (last - first) - 1)). Executed according to the policy.
The reduce operations in the parallel reduce algorithm invoked with an execution policy object of type sequenced_policy execute in sequential order in the calling thread.
The reduce operations in the parallel copy_if algorithm invoked with an execution policy object of type parallel_policy or parallel_task_policy are permitted to execute in an unordered fashion in unspecified threads, and indeterminately sequenced within each thread.
The difference between reduce and accumulate is that the behavior of reduce may be non-deterministic for non-associative or non-commutative binary predicate.
Note
Complexity: O(last - first) applications of the predicate f.
Note
GENERALIZED_SUM(op, a1, …, aN) is defined as follows:
a1 when N is 1
op(GENERALIZED_SUM(op, b1, …, bK), GENERALIZED_SUM(op, bM, …, bN)), where:
b1, …, bN may be any permutation of a1, …, aN and
1 < K+1 = M <= N.
- Template Parameters
ExPolicy – The type of the execution policy to use (deduced). It describes the manner in which the execution of the algorithm may be parallelized and the manner in which it executes the assignments.
FwdIter – The type of the source begin and end iterators used (deduced). This iterator type must meet the requirements of a forward iterator.
F – The type of the function/function object to use (deduced). Unlike its sequential form, the parallel overload of reduce requires F to meet the requirements of CopyConstructible.
T – The type of the value to be used as initial (and intermediate) values (deduced).
- Parameters
policy – The execution policy to use for the scheduling of the iterations.
first – Refers to the beginning of the sequence of elements the algorithm will be applied to.
last – Refers to the end of the sequence of elements the algorithm will be applied to.
init – The initial value for the generalized sum.
f – Specifies the function (or function object) which will be invoked for each of the elements in the sequence specified by [first, last). This is a binary predicate. The signature of this predicate should be equivalent to:
The signature does not need to have const&. The types Type1 Ret must be such that an object of type FwdIter can be dereferenced and then implicitly converted to any of those types.Ret fun(const Type1 &a, const Type1 &b);
- Returns
The reduce algorithm returns a hpx::future<T> if the execution policy is of type sequenced_task_policy or parallel_task_policy and returns T otherwise. The reduce algorithm returns the result of the generalized sum over the elements given by the input range [first, last).
-
template<typename ExPolicy, typename FwdIter, typename T = typename std::iterator_traits<FwdIter>::value_type>
util::detail::algorithm_result_t<ExPolicy, T> reduce_deterministic(ExPolicy &&policy, FwdIter first, FwdIter last, T init)# Returns GENERALIZED_SUM(+, init, *first, …, *(first + (last - first) - 1)). Executed according to the policy.
The reduce operations in the parallel reduce algorithm invoked with an execution policy object of type sequenced_policy execute in sequential order in the calling thread.
The reduce operations in the parallel copy_if algorithm invoked with an execution policy object of type parallel_policy or parallel_task_policy are permitted to execute in an unordered fashion in unspecified threads, and indeterminately sequenced within each thread.
The difference between reduce and accumulate is that the behavior of reduce may be non-deterministic for non-associative or non-commutative binary predicate.
Note
Complexity: O(last - first) applications of the operator+().
Note
GENERALIZED_SUM(+, a1, …, aN) is defined as follows:
a1 when N is 1
op(GENERALIZED_SUM(+, b1, …, bK), GENERALIZED_SUM(+, bM, …, bN)), where:
b1, …, bN may be any permutation of a1, …, aN and
1 < K+1 = M <= N.
- Template Parameters
ExPolicy – The type of the execution policy to use (deduced). It describes the manner in which the execution of the algorithm may be parallelized and the manner in which it executes the assignments.
FwdIter – The type of the source begin and end iterators used (deduced). This iterator type must meet the requirements of a forward iterator.
T – The type of the value to be used as initial (and intermediate) values (deduced).
- Parameters
policy – The execution policy to use for the scheduling of the iterations.
first – Refers to the beginning of the sequence of elements the algorithm will be applied to.
last – Refers to the end of the sequence of elements the algorithm will be applied to.
init – The initial value for the generalized sum.
- Returns
The reduce algorithm returns a hpx::future<T> if the execution policy is of type sequenced_task_policy or parallel_task_policy and returns T otherwise. The reduce algorithm returns the result of the generalized sum (applying operator+()) over the elements given by the input range [first, last).
-
template<typename ExPolicy, typename FwdIter>
hpx::parallel::util::detail::algorithm_result<ExPolicy, typename std::iterator_traits<FwdIter>::value_type>::type reduce_deterministic(ExPolicy &&policy, FwdIter first, FwdIter last)# Returns GENERALIZED_SUM(+, T(), *first, …, *(first + (last - first) - 1)). Executed according to the policy.
The reduce operations in the parallel reduce algorithm invoked with an execution policy object of type sequenced_policy execute in sequential order in the calling thread.
The reduce operations in the parallel reduce algorithm invoked with an execution policy object of type parallel_policy or parallel_task_policy are permitted to execute in an unordered fashion in unspecified threads, and indeterminately sequenced within each thread.
The difference between reduce and accumulate is that the behavior of reduce may be non-deterministic for non-associative or non-commutative binary predicate.
Note
Complexity: O(last - first) applications of the operator+().
Note
The type of the initial value (and the result type) T is determined from the value_type of the used FwdIter.
Note
GENERALIZED_SUM(+, a1, …, aN) is defined as follows:
a1 when N is 1
op(GENERALIZED_SUM(+, b1, …, bK), GENERALIZED_SUM(+, bM, …, bN)), where:
b1, …, bN may be any permutation of a1, …, aN and
1 < K+1 = M <= N.
- Template Parameters
ExPolicy – The type of the execution policy to use (deduced). It describes the manner in which the execution of the algorithm may be parallelized and the manner in which it executes the assignments.
FwdIter – The type of the source begin and end iterators used (deduced). This iterator type must meet the requirements of a forward iterator.
- Parameters
policy – The execution policy to use for the scheduling of the iterations.
first – Refers to the beginning of the sequence of elements the algorithm will be applied to.
last – Refers to the end of the sequence of elements the algorithm will be applied to.
- Returns
The reduce algorithm returns a hpx::future<T> if the execution policy is of type sequenced_task_policy or parallel_task_policy and returns T otherwise (where T is the value_type of FwdIter). The reduce algorithm returns the result of the generalized sum (applying operator+()) over the elements given by the input range [first, last).
-
template<typename FwdIter, typename F, typename T = typename std::iterator_traits<FwdIter>::value_type>
T reduce_deterministic(FwdIter first, FwdIter last, T init, F &&f)# Returns GENERALIZED_SUM(f, init, *first, …, *(first + (last - first) - 1)). Executed according to the policy.
The difference between reduce and accumulate is that the behavior of reduce may be non-deterministic for non-associative or non-commutative binary predicate.
Note
Complexity: O(last - first) applications of the predicate f.
Note
GENERALIZED_SUM(op, a1, …, aN) is defined as follows:
a1 when N is 1
op(GENERALIZED_SUM(op, b1, …, bK), GENERALIZED_SUM(op, bM, …, bN)), where:
b1, …, bN may be any permutation of a1, …, aN and
1 < K+1 = M <= N.
- Template Parameters
FwdIter – The type of the source begin and end iterators used (deduced). This iterator type must meet the requirements of an input iterator.
F – The type of the function/function object to use (deduced). Unlike its sequential form, the parallel overload of reduce requires F to meet the requirements of CopyConstructible.
T – The type of the value to be used as initial (and intermediate) values (deduced).
- Parameters
first – Refers to the beginning of the sequence of elements the algorithm will be applied to.
last – Refers to the end of the sequence of elements the algorithm will be applied to.
init – The initial value for the generalized sum.
f – Specifies the function (or function object) which will be invoked for each of the elements in the sequence specified by [first, last). This is a binary predicate. The signature of this predicate should be equivalent to:
The signature does not need to have const&. The types Type1 Ret must be such that an object of type InIter can be dereferenced and then implicitly converted to any of those types.Ret fun(const Type1 &a, const Type1 &b);
- Returns
The reduce algorithm returns T. The reduce algorithm returns the result of the generalized sum over the elements given by the input range [first, last).
-
template<typename FwdIter, typename T = typename std::iterator_traits<FwdIter>::value_type>
T reduce_deterministic(FwdIter first, FwdIter last, T init)# Returns GENERALIZED_SUM(+, init, *first, …, *(first + (last - first) - 1)). Executed according to the policy.
The difference between reduce and accumulate is that the behavior of reduce may be non-deterministic for non-associative or non-commutative binary predicate.
Note
Complexity: O(last - first) applications of the operator+().
Note
GENERALIZED_SUM(+, a1, …, aN) is defined as follows:
a1 when N is 1
op(GENERALIZED_SUM(+, b1, …, bK), GENERALIZED_SUM(+, bM, …, bN)), where:
b1, …, bN may be any permutation of a1, …, aN and
1 < K+1 = M <= N.
- Template Parameters
FwdIter – The type of the source begin and end iterators used (deduced). This iterator type must meet the requirements of an input iterator.
T – The type of the value to be used as initial (and intermediate) values (deduced).
- Parameters
first – Refers to the beginning of the sequence of elements the algorithm will be applied to.
last – Refers to the end of the sequence of elements the algorithm will be applied to.
init – The initial value for the generalized sum.
- Returns
The reduce algorithm returns a T. The reduce algorithm returns the result of the generalized sum (applying operator+()) over the elements given by the input range [first, last).
-
template<typename FwdIter>
std::iterator_traits<FwdIter>::value_type reduce_deterministic(FwdIter first, FwdIter last)# Returns GENERALIZED_SUM(+, T(), *first, …, *(first + (last - first) - 1)). Executed according to the policy.
The difference between reduce and accumulate is that the behavior of reduce may be non-deterministic for non-associative or non-commutative binary predicate.
Note
Complexity: O(last - first) applications of the operator+().
Note
The type of the initial value (and the result type) T is determined from the value_type of the used FwdIter.
Note
GENERALIZED_SUM(+, a1, …, aN) is defined as follows:
a1 when N is 1
op(GENERALIZED_SUM(+, b1, …, bK), GENERALIZED_SUM(+, bM, …, bN)), where:
b1, …, bN may be any permutation of a1, …, aN and
1 < K+1 = M <= N.
- Template Parameters
FwdIter – The type of the source begin and end iterators used (deduced). This iterator type must meet the requirements of an input iterator.
- Parameters
first – Refers to the beginning of the sequence of elements the algorithm will be applied to.
last – Refers to the end of the sequence of elements the algorithm will be applied to.
- Returns
The reduce algorithm returns T (where T is the value_type of FwdIter). The reduce algorithm returns the result of the generalized sum (applying operator+()) over the elements given by the input range [first, last).
-
template<typename ExPolicy, typename FwdIter, typename F, typename T = typename std::iterator_traits<FwdIter>::value_type>
hpx::remove, hpx::remove_if#
Defined in header hpx/algorithm.hpp.
See Public API for a list of names and headers that are part of the public HPX API.
-
namespace hpx
Functions
-
template<typename FwdIter, typename T = typename std::iterator_traits<FwdIter>::value_type>
FwdIter remove(FwdIter first, FwdIter last, T const &value)# Removes all elements satisfying specific criteria from the range [first, last) and returns a past-the-end iterator for the new end of the range. This version removes all elements that are equal to value.
The assignments in the parallel remove algorithm execute in sequential order in the calling thread.
Note
Complexity: Performs not more than last - first assignments, exactly last - first applications of the operator==().
- Template Parameters
FwdIter – The type of the source iterators used (deduced). This iterator type must meet the requirements of an forward iterator.
T – The type of the value to remove (deduced). This value type must meet the requirements of CopyConstructible.
- Parameters
first – Refers to the beginning of the sequence of elements the algorithm will be applied to.
last – Refers to the end of the sequence of elements the algorithm will be applied to.
value – Specifies the value of elements to remove.
- Returns
The remove algorithm returns a FwdIter. The remove algorithm returns the iterator to the new end of the range.
-
template<typename ExPolicy, typename FwdIter, typename T = typename std::iterator_traits<FwdIter>::value_type>
hpx::parallel::util::detail::algorithm_result_t<ExPolicy, FwdIter> remove(ExPolicy &&policy, FwdIter first, FwdIter last, T const &value)# Removes all elements satisfying specific criteria from the range [first, last) and returns a past-the-end iterator for the new end of the range. This version removes all elements that are equal to value. Executed according to the policy.
The assignments in the parallel remove algorithm invoked with an execution policy object of type sequenced_policy execute in sequential order in the calling thread.
The assignments in the parallel remove algorithm invoked with an execution policy object of type parallel_policy or parallel_task_policy are permitted to execute in an unordered fashion in unspecified threads, and indeterminately sequenced within each thread.
Note
Complexity: Performs not more than last - first assignments, exactly last - first applications of the operator==().
- Template Parameters
ExPolicy – The type of the execution policy to use (deduced). It describes the manner in which the execution of the algorithm may be parallelized and the manner in which it executes the assignments.
FwdIter – The type of the source iterators used (deduced). This iterator type must meet the requirements of an forward iterator.
T – The type of the value to remove (deduced). This value type must meet the requirements of CopyConstructible.
- Parameters
policy – The execution policy to use for the scheduling of the iterations.
first – Refers to the beginning of the sequence of elements the algorithm will be applied to.
last – Refers to the end of the sequence of elements the algorithm will be applied to.
value – Specifies the value of elements to remove.
- Returns
The remove algorithm returns a hpx::future<FwdIter> if the execution policy is of type sequenced_task_policy or parallel_task_policy and returns FwdIter otherwise. The remove algorithm returns the iterator to the new end of the range.
-
template<typename FwdIter, typename Pred>
FwdIter remove_if(FwdIter first, FwdIter last, Pred &&pred)# Removes all elements satisfying specific criteria from the range [first, last) and returns a past-the-end iterator for the new end of the range. This version removes all elements for which predicate pred returns true.
The assignments in the parallel remove_if algorithm execute in sequential order in the calling thread.
Note
Complexity: Performs not more than last - first assignments, exactly last - first applications of the predicate pred.
- Template Parameters
FwdIter – The type of the source iterators used (deduced). This iterator type must meet the requirements of an forward iterator.
Pred – The type of the function/function object to use (deduced). Unlike its sequential form, the parallel overload of remove_if requires Pred to meet the requirements of CopyConstructible.
- Parameters
first – Refers to the beginning of the sequence of elements the algorithm will be applied to.
last – Refers to the end of the sequence of elements the algorithm will be applied to.
pred – Specifies the function (or function object) which will be invoked for each of the elements in the sequence specified by [first, last).This is an unary predicate which returns true for the required elements. The signature of this predicate should be equivalent to:
The signature does not need to have const&, but the function must not modify the objects passed to it. The type Type must be such that an object of type FwdIter can be dereferenced and then implicitly converted to Type.bool pred(const Type &a);
- Returns
The remove_if algorithm returns a FwdIter. The remove_if algorithm returns the iterator to the new end of the range.
-
template<typename ExPolicy, typename FwdIter, typename Pred>
hpx::parallel::util::detail::algorithm_result_t<ExPolicy, FwdIter> remove_if(ExPolicy &&policy, FwdIter first, FwdIter last, Pred &&pred)# Removes all elements satisfying specific criteria from the range [first, last) and returns a past-the-end iterator for the new end of the range. This version removes all elements for which predicate pred returns true. Executed according to the policy.
The assignments in the parallel remove_if algorithm invoked with an execution policy object of type sequenced_policy execute in sequential order in the calling thread.
The assignments in the parallel remove_if algorithm invoked with an execution policy object of type parallel_policy or parallel_task_policy are permitted to execute in an unordered fashion in unspecified threads, and indeterminately sequenced within each thread.
Note
Complexity: Performs not more than last - first assignments, exactly last - first applications of the predicate pred.
- Template Parameters
ExPolicy – The type of the execution policy to use (deduced). It describes the manner in which the execution of the algorithm may be parallelized and the manner in which it executes the assignments.
FwdIter – The type of the source iterators used (deduced). This iterator type must meet the requirements of an forward iterator.
Pred – The type of the function/function object to use (deduced). Unlike its sequential form, the parallel overload of remove_if requires Pred to meet the requirements of CopyConstructible.
- Parameters
policy – The execution policy to use for the scheduling of the iterations.
first – Refers to the beginning of the sequence of elements the algorithm will be applied to.
last – Refers to the end of the sequence of elements the algorithm will be applied to.
pred – Specifies the function (or function object) which will be invoked for each of the elements in the sequence specified by [first, last).This is an unary predicate which returns true for the required elements. The signature of this predicate should be equivalent to:
The signature does not need to have const&, but the function must not modify the objects passed to it. The type Type must be such that an object of type FwdIter can be dereferenced and then implicitly converted to Type.bool pred(const Type &a);
- Returns
The remove_if algorithm returns a hpx::future<FwdIter> if the execution policy is of type sequenced_task_policy or parallel_task_policy and returns FwdIter otherwise. The remove_if algorithm returns the iterator to the new end of the range.
-
template<typename FwdIter, typename T = typename std::iterator_traits<FwdIter>::value_type>
hpx::remove_copy, hpx::remove_copy_if#
Defined in header hpx/algorithm.hpp.
See Public API for a list of names and headers that are part of the public HPX API.
-
namespace hpx
Functions
-
template<typename InIter, typename OutIter, typename T = typename std::iterator_traits<InIter>::value_type>
OutIter remove_copy(InIter first, InIter last, OutIter dest, T const &value)# Copies the elements in the range, defined by [first, last), to another range beginning at dest. Copies only the elements for which the comparison operator returns false when compare to value. The order of the elements that are not removed is preserved.
Effects: Copies all the elements referred to by the iterator it in the range [first,last) for which the following corresponding conditions do not hold: *it == value
The assignments in the parallel remove_copy algorithm execute in sequential order in the calling thread.
Note
Complexity: Performs not more than last - first assignments, exactly last - first applications of the predicate pred, here comparison operator.
- Template Parameters
InIter – The type of the source iterators used (deduced). This iterator type must meet the requirements of an input iterator.
OutIter – The type of the iterator representing the destination range (deduced). This iterator type must meet the requirements of an output iterator.
T – The type that the result of dereferencing FwdIter1 is compared to.
- Parameters
first – Refers to the beginning of the sequence of elements the algorithm will be applied to.
last – Refers to the end of the sequence of elements the algorithm will be applied to.
dest – Refers to the beginning of the destination range.
value – Value to be removed.
- Returns
The remove_copy algorithm returns an OutIter. The remove_copy algorithm returns the iterator to the element past the last element copied.
-
template<typename ExPolicy, typename FwdIter1, typename FwdIter2, typename T = typename std::iterator_traits<InIter>::value_type>
hpx::parallel::util::detail::algorithm_result_t<ExPolicy, FwdIter2> remove_copy(ExPolicy &&policy, FwdIter1 first, FwdIter1 last, FwdIter2 dest, T const &value)# Copies the elements in the range, defined by [first, last), to another range beginning at dest. Copies only the elements for which the comparison operator returns false when compare to value. The order of the elements that are not removed is preserved. Executed according to the policy.
Effects: Copies all the elements referred to by the iterator it in the range [first,last) for which the following corresponding conditions do not hold: *it == value
The assignments in the parallel remove_copy algorithm invoked with an execution policy object of type sequenced_policy execute in sequential order in the calling thread.
The assignments in the parallel remove_copy algorithm invoked with an execution policy object of type parallel_policy or parallel_task_policy are permitted to execute in an unordered fashion in unspecified threads, and indeterminately sequenced within each thread.
Note
Complexity: Performs not more than last - first assignments, exactly last - first applications of the predicate pred, here comparison operator.
- Template Parameters
ExPolicy – The type of the execution policy to use (deduced). It describes the manner in which the execution of the algorithm may be parallelized and the manner in which it executes the assignments.
FwdIter1 – The type of the source iterators used (deduced). This iterator type must meet the requirements of an forward iterator.
FwdIter2 – The type of the iterator representing the destination range (deduced). This iterator type must meet the requirements of an forward iterator.
T – The type that the result of dereferencing FwdIter1 is compared to.
- Parameters
policy – The execution policy to use for the scheduling of the iterations.
first – Refers to the beginning of the sequence of elements the algorithm will be applied to.
last – Refers to the end of the sequence of elements the algorithm will be applied to.
dest – Refers to the beginning of the destination range.
value – Value to be removed.
- Returns
The remove_copy algorithm returns a hpx::future<FwdIter2> if the execution policy is of type sequenced_task_policy or parallel_task_policy and returns FwdIter2 otherwise. The remove_copy algorithm returns the iterator to the element past the last element copied.
-
template<typename InIter, typename OutIter, typename Pred>
OutIter remove_copy_if(InIter first, InIter last, OutIter dest, Pred &&pred)# Copies the elements in the range, defined by [first, last), to another range beginning at dest. Copies only the elements for which the predicate pred returns false. The order of the elements that are not removed is preserved.
Effects: Copies all the elements referred to by the iterator it in the range [first,last) for which the following corresponding conditions do not hold: INVOKE(pred, *it) != false.
The assignments in the parallel remove_copy_if algorithm execute in sequential order in the calling thread.
Note
Complexity: Performs not more than last - first assignments, exactly last - first applications of the predicate pred.
- Template Parameters
InIter – The type of the source iterators used (deduced). This iterator type must meet the requirements of an input iterator.
OutIter – The type of the iterator representing the destination range (deduced). This iterator type must meet the requirements of an output iterator.
Pred – The type of the function/function object to use (deduced).
- Parameters
first – Refers to the beginning of the sequence of elements the algorithm will be applied to.
last – Refers to the end of the sequence of elements the algorithm will be applied to.
dest – Refers to the beginning of the destination range.
pred – Specifies the function (or function object) which will be invoked for each of the elements in the sequence specified by [first, last).This is an unary predicate which returns true for the elements to be removed. The signature of this predicate should be equivalent to:
The signature does not need to have const&, but the function must not modify the objects passed to it. The type Type must be such that an object of type InIter can be dereferenced and then implicitly converted to Type.bool pred(const Type &a);
- Returns
The remove_copy_if algorithm returns an OutIter The remove_copy_if algorithm returns the iterator to the element past the last element copied.
-
template<typename ExPolicy, typename FwdIter1, typename FwdIter2, typename Pred>
hpx::parallel::util::detail::algorithm_result_t<ExPolicy, FwdIter2> remove_copy_if(ExPolicy &&policy, FwdIter1 first, FwdIter1 last, FwdIter2 dest, Pred &&pred)# Copies the elements in the range, defined by [first, last), to another range beginning at dest. Copies only the elements for which the predicate pred returns false. The order of the elements that are not removed is preserved. Executed according to the policy.
Effects: Copies all the elements referred to by the iterator it in the range [first,last) for which the following corresponding conditions do not hold: INVOKE(pred, *it) != false.
The assignments in the parallel remove_copy_if algorithm invoked with an execution policy object of type sequenced_policy execute in sequential order in the calling thread.
The assignments in the parallel remove_copy_if algorithm invoked with an execution policy object of type parallel_policy or parallel_task_policy are permitted to execute in an unordered fashion in unspecified threads, and indeterminately sequenced within each thread.
Note
Complexity: Performs not more than last - first assignments, exactly last - first applications of the predicate pred.
- Template Parameters
ExPolicy – The type of the execution policy to use (deduced). It describes the manner in which the execution of the algorithm may be parallelized and the manner in which it executes the assignments.
FwdIter1 – The type of the source iterators used (deduced). This iterator type must meet the requirements of an forward iterator.
FwdIter2 – The type of the iterator representing the destination range (deduced). This iterator type must meet the requirements of an forward iterator.
Pred – The type of the function/function object to use (deduced). Unlike its sequential form, the parallel overload of remove_copy_if requires Pred to meet the requirements of CopyConstructible.
- Parameters
policy – The execution policy to use for the scheduling of the iterations.
first – Refers to the beginning of the sequence of elements the algorithm will be applied to.
last – Refers to the end of the sequence of elements the algorithm will be applied to.
dest – Refers to the beginning of the destination range.
pred – Specifies the function (or function object) which will be invoked for each of the elements in the sequence specified by [first, last).This is an unary predicate which returns true for the elements to be removed. The signature of this predicate should be equivalent to:
The signature does not need to have const&, but the function must not modify the objects passed to it. The type Type must be such that an object of type FwdIter1 can be dereferenced and then implicitly converted to Type.bool pred(const Type &a);
- Returns
The remove_copy_if algorithm returns a hpx::future<FwdIter2> if the execution policy is of type sequenced_task_policy or parallel_task_policy and returns FwdIter2 otherwise. The remove_copy_if algorithm returns the iterator to the element past the last element copied.
-
template<typename InIter, typename OutIter, typename T = typename std::iterator_traits<InIter>::value_type>
hpx::replace, hpx::replace_if, hpx::replace_copy, hpx::replace_copy_if#
Defined in header hpx/algorithm.hpp.
See Public API for a list of names and headers that are part of the public HPX API.
-
namespace hpx
Functions
-
template<typename InIter, typename T = typename std::iterator_traits<InIter>::value_type>
void replace(InIter first, InIter last, T const &old_value, T const &new_value)# Replaces all elements satisfying specific criteria with new_value in the range [first, last).
Effects: Substitutes elements referred by the iterator it in the range [first, last) with new_value, when the following corresponding conditions hold: *it == old_value
The assignments in the parallel replace algorithm execute in sequential order in the calling thread.
Note
Complexity: Performs exactly last - first assignments.
- Template Parameters
InIter – The type of the source iterators used (deduced). This iterator type must meet the requirements of an input iterator.
T – The type of the old and new values to replace (deduced).
- Parameters
first – Refers to the beginning of the sequence of elements the algorithm will be applied to.
last – Refers to the end of the sequence of elements the algorithm will be applied to.
old_value – Refers to the old value of the elements to replace.
new_value – Refers to the new value to use as the replacement.
- Returns
The replace algorithm returns a void.
-
template<typename ExPolicy, typename FwdIter, typename T = typename std::iterator_traits<FwdIter>::value_type>
hpx::parallel::util::detail::algorithm_result_t<ExPolicy, void> replace(ExPolicy &&policy, FwdIter first, FwdIter last, T const &old_value, T const &new_value)# Replaces all elements satisfying specific criteria with new_value in the range [first, last). Executed according to the policy.
Effects: Substitutes elements referred by the iterator it in the range [first, last) with new_value, when the following corresponding conditions hold: *it == old_value
The assignments in the parallel replace algorithm invoked with an execution policy object of type sequenced_policy execute in sequential order in the calling thread.
The assignments in the parallel replace algorithm invoked with an execution policy object of type parallel_policy or parallel_task_policy are permitted to execute in an unordered fashion in unspecified threads, and indeterminately sequenced within each thread.
Note
Complexity: Performs exactly last - first assignments.
- Template Parameters
ExPolicy – The type of the execution policy to use (deduced). It describes the manner in which the execution of the algorithm may be parallelized and the manner in which it executes the assignments.
FwdIter – The type of the source iterators used (deduced). This iterator type must meet the requirements of a forward iterator.
T – The type of the old and new values to replace (deduced).
- Parameters
policy – The execution policy to use for the scheduling of the iterations.
first – Refers to the beginning of the sequence of elements the algorithm will be applied to.
last – Refers to the end of the sequence of elements the algorithm will be applied to.
old_value – Refers to the old value of the elements to replace.
new_value – Refers to the new value to use as the replacement.
- Returns
The replace algorithm returns a hpx::future<void> if the execution policy is of type sequenced_task_policy or parallel_task_policy and returns void otherwise.
-
template<typename Iter, typename Pred, typename T = typename std::iterator_traits<Iter>::value_type>
void replace_if(Iter first, Iter last, Pred &&pred, T const &new_value)# Replaces all elements satisfying specific criteria (for which predicate pred returns true) with new_value in the range [first, last).
Effects: Substitutes elements referred by the iterator it in the range [first, last) with new_value, when the following corresponding conditions hold: INVOKE(f, *it) != false
The assignments in the parallel replace_if algorithm execute in sequential order in the calling thread.
Note
Complexity: Performs exactly last - first applications of the predicate.
- Template Parameters
Iter – The type of the source iterators used (deduced). This iterator type must meet the requirements of an input iterator.
Pred – The type of the function/function object to use (deduced). Unlike its sequential form, the parallel overload of equal requires Pred to meet the requirements of CopyConstructible. (deduced).
T – The type of the new values to replace (deduced).
- Parameters
first – Refers to the beginning of the sequence of elements the algorithm will be applied to.
last – Refers to the end of the sequence of elements the algorithm will be applied to.
pred – Specifies the function (or function object) which will be invoked for each of the elements in the sequence specified by [first, last).This is an unary predicate which returns true for the elements which need to replaced. The signature of this predicate should be equivalent to:
The signature does not need to have const&, but the function must not modify the objects passed to it. The type Type must be such that an object of type InIter can be dereferenced and then implicitly converted to Type.bool pred(const Type &a);
new_value – Refers to the new value to use as the replacement.
- Returns
The replace_if algorithm returns void.
-
template<typename ExPolicy, typename FwdIter, typename Pred, typename T = typename std::iterator_traits<FwdIter>::value_type>
hpx::parallel::util::detail::algorithm_result_t<ExPolicy, void> replace_if(ExPolicy &&policy, FwdIter first, FwdIter last, Pred &&pred, T const &new_value)# Replaces all elements satisfying specific criteria (for which predicate f returns true) with new_value in the range [first, last). Executed according to the policy.
Effects: Substitutes elements referred by the iterator it in the range [first, last) with new_value, when the following corresponding conditions hold: INVOKE(f, *it) != false
The assignments in the parallel replace_if algorithm invoked with an execution policy object of type sequenced_policy execute in sequential order in the calling thread.
The assignments in the parallel replace_if algorithm invoked with an execution policy object of type parallel_policy or parallel_task_policy are permitted to execute in an unordered fashion in unspecified threads, and indeterminately sequenced within each thread.
Note
Complexity: Performs exactly last - first applications of the predicate.
- Template Parameters
ExPolicy – The type of the execution policy to use (deduced). It describes the manner in which the execution of the algorithm may be parallelized and the manner in which it executes the assignments.
FwdIter – The type of the source iterators used (deduced). This iterator type must meet the requirements of a forward iterator.
Pred – The type of the function/function object to use (deduced). Unlike its sequential form, the parallel overload of equal requires Pred to meet the requirements of CopyConstructible. (deduced).
T – The type of the new values to replace (deduced).
- Parameters
policy – The execution policy to use for the scheduling of the iterations.
first – Refers to the beginning of the sequence of elements the algorithm will be applied to.
last – Refers to the end of the sequence of elements the algorithm will be applied to.
pred – Specifies the function (or function object) which will be invoked for each of the elements in the sequence specified by [first, last).This is an unary predicate which returns true for the elements which need to replaced. The signature of this predicate should be equivalent to:
The signature does not need to have const&, but the function must not modify the objects passed to it. The type Type must be such that an object of type FwdIter can be dereferenced and then implicitly converted to Type.bool pred(const Type &a);
new_value – Refers to the new value to use as the replacement.
- Returns
The replace_if algorithm returns a hpx::future<void> if the execution policy is of type sequenced_task_policy or parallel_task_policy and returns void otherwise.
-
template<typename InIter, typename OutIter, typename T = typename std::iterator_traits<OutIter>::value_type>
OutIter replace_copy(InIter first, InIter last, OutIter dest, T const &old_value, T const &new_value)# Copies the all elements from the range [first, last) to another range beginning at dest replacing all elements satisfying a specific criteria with new_value.
Effects: Assigns to every iterator it in the range [result, result + (last - first)) either new_value or *(first + (it - result)) depending on whether the following corresponding condition holds: *(first + (i - result)) == old_value
The assignments in the parallel replace_copy algorithm execute in sequential order in the calling thread.
Note
Complexity: Performs exactly last - first applications of the predicate.
- Template Parameters
InIter – The type of the source iterators used (deduced). This iterator type must meet the requirements of an input iterator.
OutIter – The type of the iterator representing the destination range (deduced). This iterator type must meet the requirements of an output iterator.
T – The type of the old and new values (deduced).
- Parameters
first – Refers to the beginning of the sequence of elements the algorithm will be applied to.
last – Refers to the end of the sequence of elements the algorithm will be applied to.
dest – Refers to the beginning of the destination range.
old_value – Refers to the old value of the elements to replace.
new_value – Refers to the new value to use as the replacement.
- Returns
The replace_copy algorithm returns an OutIter The replace_copy algorithm returns the Iterator to the element past the last element copied.
-
template<typename ExPolicy, typename FwdIter1, typename FwdIter2, typename T = typename std::iterator_traits<FwdIter2>::value_type>
hpx::parallel::util::detail::algorithm_result_t<ExPolicy, FwdIter2> replace_copy(ExPolicy &&policy, FwdIter1 first, FwdIter1 last, FwdIter2 dest, T const &old_value, T const &new_value)# Copies the all elements from the range [first, last) to another range beginning at dest replacing all elements satisfying a specific criteria with new_value. Executed according to the policy.
Effects: Assigns to every iterator it in the range [result, result + (last - first)) either new_value or *(first + (it - result)) depending on whether the following corresponding condition holds: *(first + (i - result)) == old_value
The assignments in the parallel replace_copy algorithm invoked with an execution policy object of type sequenced_policy execute in sequential order in the calling thread.
The assignments in the parallel replace_copy algorithm invoked with an execution policy object of type parallel_policy or parallel_task_policy are permitted to execute in an unordered fashion in unspecified threads, and indeterminately sequenced within each thread.
Note
Complexity: Performs exactly last - first applications of the predicate.
- Template Parameters
ExPolicy – The type of the execution policy to use (deduced). It describes the manner in which the execution of the algorithm may be parallelized and the manner in which it executes the assignments.
FwdIter1 – The type of the source iterators used (deduced). This iterator type must meet the requirements of an forward iterator.
FwdIter2 – The type of the iterator representing the destination range (deduced). This iterator type must meet the requirements of an forward iterator.
T – The type of the old and new values (deduced).
- Parameters
policy – The execution policy to use for the scheduling of the iterations.
first – Refers to the beginning of the sequence of elements the algorithm will be applied to.
last – Refers to the end of the sequence of elements the algorithm will be applied to.
dest – Refers to the beginning of the destination range.
old_value – Refers to the old value of the elements to replace.
new_value – Refers to the new value to use as the replacement.
- Returns
The replace_copy algorithm returns a hpx::future<FwdIter2> if the execution policy is of type sequenced_task_policy or parallel_task_policy and returns FwdIter2 otherwise. The replace_copy algorithm returns the Iterator to the element past the last element copied.
-
template<typename InIter, typename OutIter, typename Pred, typename T = typename std::iterator_traits<OutIter>::value_type>
OutIter replace_copy_if(InIter first, InIter last, OutIter dest, Pred &&pred, T const &new_value)# Copies the all elements from the range [first, last) to another range beginning at dest replacing all elements satisfying a specific criteria with new_value.
Effects: Assigns to every iterator it in the range [result, result + (last - first)) either new_value or *(first + (it - result)) depending on whether the following corresponding condition holds: INVOKE(f, *(first + (i - result))) != false
The assignments in the parallel replace_copy_if algorithm execute in sequential order in the calling thread.
Note
Complexity: Performs exactly last - first applications of the predicate.
- Template Parameters
InIter – The type of the source iterators used (deduced). This iterator type must meet the requirements of an input iterator.
OutIter – The type of the iterator representing the destination range (deduced). This iterator type must meet the requirements of an output iterator.
Pred – The type of the function/function object to use (deduced). Unlike its sequential form, the parallel overload of equal requires Pred to meet the requirements of CopyConstructible. (deduced).
T – The type of the new values to replace (deduced).
- Parameters
first – Refers to the beginning of the sequence of elements the algorithm will be applied to.
last – Refers to the end of the sequence of elements the algorithm will be applied to.
dest – Refers to the beginning of the destination range.
pred – Specifies the function (or function object) which will be invoked for each of the elements in the sequence specified by [first, last).This is an unary predicate which returns true for the elements which need to replaced. The signature of this predicate should be equivalent to:
The signature does not need to have const&, but the function must not modify the objects passed to it. The type Type must be such that an object of type InIter can be dereferenced and then implicitly converted to Type.bool pred(const Type &a);
new_value – Refers to the new value to use as the replacement.
- Returns
The replace_copy_if algorithm returns an OutIter. The replace_copy_if algorithm returns the output iterator to the element in the destination range, one past the last element copied.
-
template<typename ExPolicy, typename FwdIter1, typename FwdIter2, typename Pred, typename T = typename std::iterator_traits<FwdIter2>::value_type>
hpx::parallel::util::detail::algorithm_result_t<ExPolicy, FwdIter2> replace_copy_if(ExPolicy &&policy, FwdIter1 first, FwdIter1 last, FwdIter2 dest, Pred &&pred, T const &new_value)# Copies the all elements from the range [first, last) to another range beginning at dest replacing all elements satisfying a specific criteria with new_value.
Effects: Assigns to every iterator it in the range [result, result + (last - first)) either new_value or *(first + (it - result)) depending on whether the following corresponding condition holds: INVOKE(f, *(first + (i - result))) != false
The assignments in the parallel replace_copy_if algorithm invoked with an execution policy object of type sequenced_policy execute in sequential order in the calling thread.
The assignments in the parallel replace_copy_if algorithm invoked with an execution policy object of type parallel_policy or parallel_task_policy are permitted to execute in an unordered fashion in unspecified threads, and indeterminately sequenced within each thread.
Note
Complexity: Performs exactly last - first applications of the predicate.
- Template Parameters
ExPolicy – The type of the execution policy to use (deduced). It describes the manner in which the execution of the algorithm may be parallelized and the manner in which it executes the assignments.
FwdIter1 – The type of the source iterators used (deduced). This iterator type must meet the requirements of a forward iterator.
FwdIter2 – The type of the iterator representing the destination range (deduced). This iterator type must meet the requirements of a forward iterator.
Pred – The type of the function/function object to use (deduced). Unlike its sequential form, the parallel overload of replace_copy_if requires Pred to meet the requirements of CopyConstructible. (deduced).
T – The type of the new values to replace (deduced).
- Parameters
policy – The execution policy to use for the scheduling of the iterations.
first – Refers to the beginning of the sequence of elements the algorithm will be applied to.
last – Refers to the end of the sequence of elements the algorithm will be applied to.
dest – Refers to the beginning of the destination range.
pred – Specifies the function (or function object) which will be invoked for each of the elements in the sequence specified by [first, last).This is an unary predicate which returns true for the elements which need to replaced. The signature of this predicate should be equivalent to:
The signature does not need to have const&, but the function must not modify the objects passed to it. The type Type must be such that an object of type FwdIter1 can be dereferenced and then implicitly converted to Type.bool pred(const Type &a);
new_value – Refers to the new value to use as the replacement.
- Returns
The replace_copy_if algorithm returns a hpx::future<FwdIter2> if the execution policy is of type sequenced_task_policy or parallel_task_policy and returns FwdIter2 otherwise. The replace_copy_if algorithm returns the iterator to the element in the destination range, one past the last element copied.
-
template<typename InIter, typename T = typename std::iterator_traits<InIter>::value_type>
hpx::reverse, hpx::reverse_copy#
Defined in header hpx/algorithm.hpp.
See Public API for a list of names and headers that are part of the public HPX API.
-
namespace hpx
Functions
-
template<typename BidirIter>
void reverse(BidirIter first, BidirIter last)# Reverses the order of the elements in the range [first, last). Behaves as if applying std::iter_swap to every pair of iterators first+i, (last-i) - 1 for each non-negative i < (last-first)/2.
The assignments in the parallel reverse algorithm execute in sequential order in the calling thread.
Note
Complexity: Linear in the distance between first and last.
- Template Parameters
BidirIter – The type of the source iterators used (deduced). This iterator type must meet the requirements of a bidirectional iterator.
- Parameters
first – Refers to the beginning of the sequence of elements the algorithm will be applied to.
last – Refers to the end of the sequence of elements the algorithm will be applied to.
- Returns
The reverse algorithm returns void.
-
template<typename ExPolicy, typename BidirIter>
hpx::parallel::util::detail::algorithm_result_t<ExPolicy, void> reverse(ExPolicy &&policy, BidirIter first, BidirIter last)# Reverses the order of the elements in the range [first, last). Behaves as if applying std::iter_swap to every pair of iterators first+i, (last-i) - 1 for each non-negative i < (last-first)/2. Executed according to the policy.
The assignments in the parallel reverse algorithm invoked with an execution policy object of type sequenced_policy execute in sequential order in the calling thread.
The assignments in the parallel reverse algorithm invoked with an execution policy object of type parallel_policy or parallel_task_policy are permitted to execute in an unordered fashion in unspecified threads, and indeterminately sequenced within each thread.
Note
Complexity: Linear in the distance between first and last.
- Template Parameters
ExPolicy – The type of the execution policy to use (deduced). It describes the manner in which the execution of the algorithm may be parallelized and the manner in which it executes the assignments.
BidirIter – The type of the source iterators used (deduced). This iterator type must meet the requirements of a bidirectional iterator.
- Parameters
policy – The execution policy to use for the scheduling of the iterations.
first – Refers to the beginning of the sequence of elements the algorithm will be applied to.
last – Refers to the end of the sequence of elements the algorithm will be applied to.
- Returns
The reverse algorithm returns a hpx::future<void> if the execution policy is of type sequenced_task_policy or parallel_task_policy and returns void otherwise.
-
template<typename BidirIter, typename OutIter>
OutIter reverse_copy(BidirIter first, BidirIter last, OutIter dest)# Copies the elements from the range [first, last) to another range beginning at dest in such a way that the elements in the new range are in reverse order. Behaves as if by executing the assignment *(dest + (last - first) - 1 - i) = *(first + i) once for each non-negative i < (last - first) If the source and destination ranges (that is, [first, last) and [dest, dest+(last-first)) respectively) overlap, the behavior is undefined.
The assignments in the parallel reverse_copy algorithm execute in sequential order in the calling thread.
Note
Complexity: Performs exactly last - first assignments.
- Template Parameters
BidirIter – The type of the source iterators used (deduced). This iterator type must meet the requirements of a bidirectional iterator.
OutIter – The type of the iterator representing the destination range (deduced). This iterator type must meet the requirements of an output iterator.
- Parameters
first – Refers to the beginning of the sequence of elements the algorithm will be applied to.
last – Refers to the end of the sequence of elements the algorithm will be applied to.
dest – Refers to the begin of the destination range.
- Returns
The reverse_copy algorithm returns an OutIter. The reverse_copy algorithm returns the output iterator to the element in the destination range, one past the last element copied.
-
template<typename ExPolicy, typename BidirIter, typename FwdIter>
hpx::parallel::util::detail::algorithm_result_t<ExPolicy, FwdIter> reverse_copy(ExPolicy &&policy, BidirIter first, BidirIter last, FwdIter dest)# Copies the elements from the range [first, last) to another range beginning at dest in such a way that the elements in the new range are in reverse order. Behaves as if by executing the assignment *(dest + (last - first) - 1 - i) = *(first + i) once for each non-negative i < (last - first) If the source and destination ranges (that is, [first, last) and [dest, dest+(last-first)) respectively) overlap, the behavior is undefined. Executed according to the policy.
The assignments in the parallel reverse_copy algorithm invoked with an execution policy object of type sequenced_policy execute in sequential order in the calling thread.
The assignments in the parallel reverse_copy algorithm invoked with an execution policy object of type parallel_policy or parallel_task_policy are permitted to execute in an unordered fashion in unspecified threads, and indeterminately sequenced within each thread.
Note
Complexity: Performs exactly last - first assignments.
- Template Parameters
ExPolicy – The type of the execution policy to use (deduced). It describes the manner in which the execution of the algorithm may be parallelized and the manner in which it executes the assignments.
BidirIter – The type of the source iterators used (deduced). This iterator type must meet the requirements of a bidirectional iterator.
FwdIter – The type of the iterator representing the destination range (deduced). This iterator type must meet the requirements of a forward iterator.
- Parameters
policy – The execution policy to use for the scheduling of the iterations.
first – Refers to the beginning of the sequence of elements the algorithm will be applied to.
last – Refers to the end of the sequence of elements the algorithm will be applied to.
dest – Refers to the begin of the destination range.
- Returns
The reverse_copy algorithm returns a hpx::future<FwdIter> if the execution policy is of type sequenced_task_policy or parallel_task_policy and returns FwdIter otherwise. The reverse_copy algorithm returns the output iterator to the element in the destination range, one past the last element copied.
-
template<typename BidirIter>
hpx::rotate, hpx::rotate_copy#
Defined in header hpx/algorithm.hpp.
See Public API for a list of names and headers that are part of the public HPX API.
-
namespace hpx
Functions
-
template<typename FwdIter>
FwdIter rotate(FwdIter first, FwdIter new_first, FwdIter last)# Performs a left rotation on a range of elements. Specifically, rotate swaps the elements in the range [first, last) in such a way that the element new_first becomes the first element of the new range and new_first - 1 becomes the last element.
The assignments in the parallel rotate algorithm execute in sequential order in the calling thread.
Note
Complexity: Linear in the distance between first and last.
Note
The type of dereferenced FwdIter must meet the requirements of MoveAssignable and MoveConstructible.
- Template Parameters
FwdIter – The type of the source iterators used (deduced). This iterator type must meet the requirements of a forward iterator.
- Parameters
first – Refers to the beginning of the sequence of elements the algorithm will be applied to.
new_first – Refers to the element that should appear at the beginning of the rotated range.
last – Refers to the end of the sequence of elements the algorithm will be applied to.
- Returns
The rotate algorithm returns a FwdIter. The rotate algorithm returns the iterator to the new location of the element pointed by first,equal to first + (last - new_first).
-
template<typename ExPolicy, typename FwdIter>
hpx::parallel::util::detail::algorithm_result_t<ExPolicy, FwdIter> rotate(ExPolicy &&policy, FwdIter first, FwdIter new_first, FwdIter last)# Performs a left rotation on a range of elements. Specifically, rotate swaps the elements in the range [first, last) in such a way that the element new_first becomes the first element of the new range and new_first - 1 becomes the last element. Executed according to the policy.
The assignments in the parallel rotate algorithm invoked with an execution policy object of type sequenced_policy execute in sequential order in the calling thread.
The assignments in the parallel rotate algorithm invoked with an execution policy object of type parallel_policy or parallel_task_policy are permitted to execute in an unordered fashion in unspecified threads, and indeterminately sequenced within each thread.
Note
Complexity: Linear in the distance between first and last.
Note
The type of dereferenced FwdIter must meet the requirements of MoveAssignable and MoveConstructible.
- Template Parameters
ExPolicy – The type of the execution policy to use (deduced). It describes the manner in which the execution of the algorithm may be parallelized and the manner in which it executes the assignments.
FwdIter – The type of the source iterators used (deduced). This iterator type must meet the requirements of a forward iterator.
- Parameters
policy – The execution policy to use for the scheduling of the iterations.
first – Refers to the beginning of the sequence of elements the algorithm will be applied to.
new_first – Refers to the element that should appear at the beginning of the rotated range.
last – Refers to the end of the sequence of elements the algorithm will be applied to.
- Returns
The rotate algorithm returns a hpx::future<FwdIter> if the execution policy is of type sequenced_task_policy or parallel_task_policy and returns FwdIter otherwise. The rotate algorithm returns the iterator equal to first + (last - new_first).
-
template<typename FwdIter, typename OutIter>
OutIter rotate_copy(FwdIter first, FwdIter new_first, FwdIter last, OutIter dest_first)# Copies the elements from the range [first, last), to another range beginning at dest_first in such a way, that the element new_first becomes the first element of the new range and new_first - 1 becomes the last element.
The assignments in the parallel rotate_copy algorithm execute in sequential order in the calling thread.
Note
Complexity: Performs exactly last - first assignments.
- Template Parameters
FwdIter – The type of the source iterators used (deduced). This iterator type must meet the requirements of a forward iterator.
OutIter – The type of the source iterators used (deduced). This iterator type must meet the requirements of a output iterator.
- Parameters
first – Refers to the beginning of the sequence of elements the algorithm will be applied to.
new_first – Refers to the element that should appear at the beginning of the rotated range.
last – Refers to the end of the sequence of elements the algorithm will be applied to.
dest_first – Refers to the begin of the destination range.
- Returns
The rotate_copy algorithm returns a output iterator, The rotate_copy algorithm returns the output iterator to the element past the last element copied.
-
template<typename ExPolicy, typename FwdIter1, typename FwdIter2>
hpx::parallel::util::detail::algorithm_result_t<ExPolicy, FwdIter2> rotate_copy(ExPolicy &&policy, FwdIter1 first, FwdIter1 new_first, FwdIter1 last, FwdIter2 dest_first)# Copies the elements from the range [first, last), to another range beginning at dest_first in such a way, that the element new_first becomes the first element of the new range and new_first - 1 becomes the last element. Executed according to the policy.
The assignments in the parallel rotate_copy algorithm execute in sequential order in the calling thread.
The assignments in the parallel rotate_copy algorithm execute in an unordered fashion in unspecified threads, and indeterminately sequenced within each thread.
Note
Complexity: Performs exactly last - first assignments.
- Template Parameters
ExPolicy – The type of the execution policy to use (deduced). It describes the manner in which the execution of the algorithm may be parallelized and the manner in which it executes the assignments.
FwdIter1 – The type of the source iterators used (deduced). This iterator type must meet the requirements of a forward iterator.
FwdIter2 – The type of the iterator representing the destination range (deduced). This iterator type must meet the requirements of a forward iterator.
- Parameters
policy – The execution policy to use for the scheduling of the iterations.
first – Refers to the beginning of the sequence of elements the algorithm will be applied to.
new_first – Refers to the element that should appear at the beginning of the rotated range.
last – Refers to the end of the sequence of elements the algorithm will be applied to.
dest_first – Refers to the begin of the destination range.
- Returns
The rotate_copy algorithm returns a hpx::future<FwdIter2> if the execution policy is of type parallel_task_policy and returns FwdIter2 otherwise. The rotate_copy algorithm returns the output iterator to the element past the last element copied.
-
template<typename FwdIter>
hpx::search, hpx::search_n#
Defined in header hpx/algorithm.hpp.
See Public API for a list of names and headers that are part of the public HPX API.
-
namespace hpx
Functions
-
template<typename FwdIter, typename FwdIter2, typename Pred = parallel::detail::equal_to>
FwdIter search(FwdIter first, FwdIter last, FwdIter2 s_first, FwdIter2 s_last, Pred &&op = Pred())# Searches the range [first, last) for any elements in the range [s_first, s_last). Uses a provided predicate to compare elements.
The comparison operations in the parallel search algorithm execute in sequential order in the calling thread.
Note
Complexity: at most (S*N) comparisons where S = distance(s_first, s_last) and N = distance(first, last).
- Template Parameters
FwdIter – The type of the source iterators used for the first range (deduced). This iterator type must meet the requirements of a forward iterator.
FwdIter2 – The type of the source iterators used for the second range (deduced). This iterator type must meet the requirements of a forward iterator.
Pred – The type of an optional function/function object to use. Unlike its sequential form, the parallel overload of search requires Pred to meet the requirements of CopyConstructible. This defaults to std::equal_to<>
- Parameters
first – Refers to the beginning of the sequence of elements of the first range the algorithm will be applied to.
last – Refers to the end of the sequence of elements of the first range the algorithm will be applied to.
s_first – Refers to the beginning of the sequence of elements the algorithm will be searching for.
s_last – Refers to the end of the sequence of elements of the algorithm will be searching for.
op – Refers to the binary predicate which returns true if the elements should be treated as equal. the signature of the function should be equivalent to
The signature does not need to have const &, but the function must not modify the objects passed to it. The types Type1 and Type2 must be such that objects of types FwdIter1 and FwdIter2 can be dereferenced and then implicitly converted to Type1 and Type2 respectivelybool pred(const Type1 &a, const Type2 &b);
- Returns
The search algorithm returns a hpx::future<FwdIter> if the execution policy is of type task_execution_policy and returns FwdIter otherwise. The search algorithm returns an iterator to the beginning of the first subsequence [s_first, s_last) in range [first, last). If the length of the subsequence [s_first, s_last) is greater than the length of the range [first, last), last is returned. Additionally if the size of the subsequence is empty first is returned. If no subsequence is found, last is returned.
-
template<typename ExPolicy, typename FwdIter, typename FwdIter2, typename Pred = parallel::detail::equal_to>
hpx::parallel::util::detail::algorithm_result_t<ExPolicy, FwdIter> search(ExPolicy &&policy, FwdIter first, FwdIter last, FwdIter2 s_first, FwdIter2 s_last, Pred &&op = Pred())# Searches the range [first, last) for any elements in the range [s_first, s_last). Uses a provided predicate to compare elements. Executed according to the policy.
The comparison operations in the parallel search algorithm invoked with an execution policy object of type sequenced_policy execute in sequential order in the calling thread.
The comparison operations in the parallel search algorithm invoked with an execution policy object of type parallel_policy or parallel_task_policy are permitted to execute in an unordered fashion in unspecified threads, and indeterminately sequenced within each thread.
Note
Complexity: at most (S*N) comparisons where S = distance(s_first, s_last) and N = distance(first, last).
- Template Parameters
ExPolicy – The type of the execution policy to use (deduced). It describes the manner in which the execution of the algorithm may be parallelized and the manner in which it executes the assignments.
FwdIter – The type of the source iterators used for the first range (deduced). This iterator type must meet the requirements of a forward iterator.
FwdIter2 – The type of the source iterators used for the second range (deduced). This iterator type must meet the requirements of a forward iterator.
Pred – The type of an optional function/function object to use. Unlike its sequential form, the parallel overload of search requires Pred to meet the requirements of CopyConstructible. This defaults to std::equal_to<>.
- Parameters
policy – The execution policy to use for the scheduling of the iterations.
first – Refers to the beginning of the sequence of elements of the first range the algorithm will be applied to.
last – Refers to the end of the sequence of elements of the first range the algorithm will be applied to.
s_first – Refers to the beginning of the sequence of elements the algorithm will be searching for.
s_last – Refers to the end of the sequence of elements of the algorithm will be searching for.
op – Refers to the binary predicate which returns true if the elements should be treated as equal. the signature of the function should be equivalent to
The signature does not need to have const &, but the function must not modify the objects passed to it. The types Type1 and Type2 must be such that objects of types FwdIter1 and FwdIter2 can be dereferenced and then implicitly converted to Type1 and Type2 respectivelybool pred(const Type1 &a, const Type2 &b);
- Returns
The search algorithm returns a hpx::future<FwdIter> if the execution policy is of type task_execution_policy and returns FwdIter otherwise. The search algorithm returns an iterator to the beginning of the first subsequence [s_first, s_last) in range [first, last). If the length of the subsequence [s_first, s_last) is greater than the length of the range [first, last), last is returned. Additionally if the size of the subsequence is empty first is returned. If no subsequence is found, last is returned.
-
template<typename FwdIter, typename Searcher>
FwdIter search(FwdIter first, FwdIter last, Searcher &&searcher)# Searches the range [first, last) using a searcher object.
- Template Parameters
FwdIter – The type of the source iterators (deduced). This iterator type must meet the requirements of a forward iterator.
Searcher – A callable searcher object meeting the C++ Searcher requirements (e.g. std::boyer_moore_searcher).
- Parameters
first – Refers to the beginning of the sequence to search.
last – Refers to the end of the sequence to search.
searcher – A callable object performing the search.
- Returns
An iterator to the beginning of the found subsequence, or last if no subsequence is found.
-
template<typename ExPolicy, typename FwdIter, typename Searcher>
hpx::parallel::util::detail::algorithm_result_t<ExPolicy, FwdIter> search(ExPolicy &&policy, FwdIter first, FwdIter last, Searcher &&searcher)# Searches the range [first, last) using a searcher object. Executed according to the policy.
- Template Parameters
ExPolicy – The type of the execution policy to use (deduced).
FwdIter – The type of the source iterators (deduced).
Searcher – A callable searcher object meeting the C++ Searcher requirements.
- Parameters
policy – The execution policy to use.
first – Refers to the beginning of the sequence to search.
last – Refers to the end of the sequence to search.
searcher – A callable object performing the search.
- Returns
The algorithm returns a hpx::future<FwdIter> if the execution policy is a task policy, or FwdIter otherwise.
-
template<typename FwdIter, typename FwdIter2, typename Pred = parallel::detail::equal_to>
FwdIter search_n(FwdIter first, std::size_t count, FwdIter2 s_first, FwdIter2 s_last, Pred &&op = Pred())# Searches the range [first, last) for any elements in the range [s_first, s_last). Uses a provided predicate to compare elements.
The comparison operations in the parallel search_n algorithm execute in sequential order in the calling thread.
Note
Complexity: at most (S*N) comparisons where S = distance(s_first, s_last) and N = count.
- Template Parameters
FwdIter – The type of the source iterators used for the first range (deduced). This iterator type must meet the requirements of a forward iterator.
FwdIter2 – The type of the source iterators used for the second range (deduced). This iterator type must meet the requirements of a forward iterator.
Pred – The type of an optional function/function object to use. Unlike its sequential form, the parallel overload of search_n requires Pred to meet the requirements of CopyConstructible. This defaults to std::equal_to<>
- Parameters
first – Refers to the beginning of the sequence of elements of the first range the algorithm will be applied to.
count – Refers to the range of elements of the first range the algorithm will be applied to.
s_first – Refers to the beginning of the sequence of elements the algorithm will be searching for.
s_last – Refers to the end of the sequence of elements of the algorithm will be searching for.
op – Refers to the binary predicate which returns true if the elements should be treated as equal. the signature of the function should be equivalent to
The signature does not need to have const &, but the function must not modify the objects passed to it. The types Type1 and Type2 must be such that objects of types FwdIter1 and FwdIter2 can be dereferenced and then implicitly converted to Type1 and Type2 respectivelybool pred(const Type1 &a, const Type2 &b);
- Returns
The search_n algorithm returns FwdIter. The search_n algorithm returns an iterator to the beginning of the last subsequence [s_first, s_last) in range [first, first+count). If the length of the subsequence [s_first, s_last) is greater than the length of the range [first, first+count), first is returned. Additionally if the size of the subsequence is empty or no subsequence is found, first is also returned.
-
template<typename ExPolicy, typename FwdIter, typename FwdIter2, typename Pred = parallel::detail::equal_to>
hpx::parallel::util::detail::algorithm_result_t<ExPolicy, FwdIter> search_n(ExPolicy &&policy, FwdIter first, std::size_t count, FwdIter2 s_first, FwdIter2 s_last, Pred &&op = Pred())# Searches the range [first, last) for any elements in the range [s_first, s_last). Uses a provided predicate to compare elements. Executed according to the policy.
The comparison operations in the parallel search_n algorithm invoked with an execution policy object of type sequenced_policy execute in sequential order in the calling thread.
The comparison operations in the parallel search_n algorithm invoked with an execution policy object of type parallel_policy or parallel_task_policy are permitted to execute in an unordered fashion in unspecified threads, and indeterminately sequenced within each thread.
Note
Complexity: at most (S*N) comparisons where S = distance(s_first, s_last) and N = count.
- Template Parameters
ExPolicy – The type of the execution policy to use (deduced). It describes the manner in which the execution of the algorithm may be parallelized and the manner in which it executes the assignments.
FwdIter – The type of the source iterators used for the first range (deduced). This iterator type must meet the requirements of a forward iterator.
FwdIter2 – The type of the source iterators used for the second range (deduced). This iterator type must meet the requirements of a forward iterator.
Pred – The type of an optional function/function object to use. Unlike its sequential form, the parallel overload of search_n requires Pred to meet the requirements of CopyConstructible. This defaults to std::equal_to<>
- Parameters
policy – The execution policy to use for the scheduling of the iterations.
first – Refers to the beginning of the sequence of elements of the first range the algorithm will be applied to.
count – Refers to the range of elements of the first range the algorithm will be applied to.
s_first – Refers to the beginning of the sequence of elements the algorithm will be searching for.
s_last – Refers to the end of the sequence of elements of the algorithm will be searching for.
op – Refers to the binary predicate which returns true if the elements should be treated as equal. the signature of the function should be equivalent to
The signature does not need to have const &, but the function must not modify the objects passed to it. The types Type1 and Type2 must be such that objects of types FwdIter1 and FwdIter2 can be dereferenced and then implicitly converted to Type1 and Type2 respectivelybool pred(const Type1 &a, const Type2 &b);
- Returns
The search_n algorithm returns a hpx::future<FwdIter> if the execution policy is of type task_execution_policy and returns FwdIter otherwise. The search_n algorithm returns an iterator to the beginning of the last subsequence [s_first, s_last) in range [first, first+count). If the length of the subsequence [s_first, s_last) is greater than the length of the range [first, first+count), first is returned. Additionally if the size of the subsequence is empty or no subsequence is found, first is also returned.
-
template<typename FwdIter, typename FwdIter2, typename Pred = parallel::detail::equal_to>
hpx::set_difference#
Defined in header hpx/algorithm.hpp.
See Public API for a list of names and headers that are part of the public HPX API.
-
namespace hpx
Functions
-
template<typename ExPolicy, typename FwdIter1, typename FwdIter2, typename FwdIter3, typename Pred = hpx::parallel::detail::less>
hpx::parallel::util::detail::algorithm_result_t<ExPolicy, FwdIter3> set_difference(ExPolicy &&policy, FwdIter1 first1, FwdIter1 last1, FwdIter2 first2, FwdIter2 last2, FwdIter3 dest, Pred &&op = Pred())# Constructs a sorted range beginning at dest consisting of all elements present in the range [first1, last1) and not present in the range [first2, last2). This algorithm expects both input ranges to be sorted with the given binary predicate pred. Executed according to the policy.
Equivalent elements are treated individually, that is, if some element is found m times in [first1, last1) and n times in [first2, last2), it will be copied to dest exactly std::max(m-n, 0) times. The resulting range cannot overlap with either of the input ranges.
The resulting range cannot overlap with either of the input ranges.
The application of function objects in parallel algorithm invoked with a sequential execution policy object execute in sequential order in the calling thread (sequenced_policy) or in a single new thread spawned from the current thread (for sequenced_task_policy).
The application of function objects in parallel algorithm invoked with an execution policy object of type parallel_policy or parallel_task_policy are permitted to execute in an unordered fashion in unspecified threads, and indeterminately sequenced within each thread.
Note
Complexity: At most 2*(N1 + N2 - 1) comparisons, where N1 is the length of the first sequence and N2 is the length of the second sequence.
- Template Parameters
ExPolicy – The type of the execution policy to use (deduced). It describes the manner in which the execution of the algorithm may be parallelized and the manner in which it applies user-provided function objects.
FwdIter1 – The type of the source iterators used (deduced) representing the first sequence. This iterator type must meet the requirements of a forward iterator.
FwdIter2 – The type of the source iterators used (deduced) representing the first sequence. This iterator type must meet the requirements of a forward iterator.
FwdIter3 – The type of the iterator representing the destination range (deduced). This iterator type must meet the requirements of a output iterator.
Pred – The type of an optional function/function object to use. Unlike its sequential form, the parallel overload of set_difference requires Pred to meet the requirements of CopyConstructible. This defaults to std::less<>
- Parameters
policy – The execution policy to use for the scheduling of the iterations.
first1 – Refers to the beginning of the sequence of elements of the first range the algorithm will be applied to.
last1 – Refers to the end of the sequence of elements of the first range the algorithm will be applied to.
first2 – Refers to the beginning of the sequence of elements of the second range the algorithm will be applied to.
last2 – Refers to the end of the sequence of elements of the second range the algorithm will be applied to.
dest – Refers to the beginning of the destination range.
op – The binary predicate which returns true if the elements should be treated as equal. The signature of the predicate function should be equivalent to the following:
The signature does not need to have const &, but the function must not modify the objects passed to it. The type Type1 must be such that objects of type FwdIter can be dereferenced and then implicitly converted to Type1bool pred(const Type1 &a, const Type1 &b);
- Returns
The set_difference algorithm returns a hpx::future<FwdIter3> if the execution policy is of type sequenced_task_policy or parallel_task_policy and returns FwdIter3 otherwise. The set_difference algorithm returns the output iterator to the element in the destination range, one past the last element copied.
-
template<typename FwdIter1, typename FwdIter2, typename FwdIter3, typename Pred = hpx::parallel::detail::less>
FwdIter3 set_difference(FwdIter1 first1, FwdIter1 last1, FwdIter2 first2, FwdIter2 last2, FwdIter3 dest, Pred &&op = Pred())# Constructs a sorted range beginning at dest consisting of all elements present in the range [first1, last1) and not present in the range [first2, last2). This algorithm expects both input ranges to be sorted with the given binary predicate pred.
Equivalent elements are treated individually, that is, if some element is found m times in [first1, last1) and n times in [first2, last2), it will be copied to dest exactly std::max(m-n, 0) times. The resulting range cannot overlap with either of the input ranges.
The resulting range cannot overlap with either of the input ranges.
Note
Complexity: At most 2*(N1 + N2 - 1) comparisons, where N1 is the length of the first sequence and N2 is the length of the second sequence.
- Template Parameters
FwdIter1 – The type of the source iterators used (deduced) representing the first sequence. This iterator type must meet the requirements of a forward iterator.
FwdIter2 – The type of the source iterators used (deduced) representing the first sequence. This iterator type must meet the requirements of a forward iterator.
FwdIter3 – The type of the iterator representing the destination range (deduced). This iterator type must meet the requirements of a output iterator.
Pred – The type of an optional function/function object to use. Unlike its sequential form, the parallel overload of set_difference requires Pred to meet the requirements of CopyConstructible. This defaults to std::less<>
- Parameters
first1 – Refers to the beginning of the sequence of elements of the first range the algorithm will be applied to.
last1 – Refers to the end of the sequence of elements of the first range the algorithm will be applied to.
first2 – Refers to the beginning of the sequence of elements of the second range the algorithm will be applied to.
last2 – Refers to the end of the sequence of elements of the second range the algorithm will be applied to.
dest – Refers to the beginning of the destination range.
op – The binary predicate which returns true if the elements should be treated as equal. The signature of the predicate function should be equivalent to the following:
The signature does not need to have const &, but the function must not modify the objects passed to it. The type Type1 must be such that objects of type FwdIter can be dereferenced and then implicitly converted to Type1bool pred(const Type1 &a, const Type1 &b);
- Returns
The set_difference algorithm returns a FwdIter3. The set_difference algorithm returns the output iterator to the element in the destination range, one past the last element copied.
-
template<typename ExPolicy, typename FwdIter1, typename FwdIter2, typename FwdIter3, typename Pred = hpx::parallel::detail::less>
hpx::set_intersection#
Defined in header hpx/algorithm.hpp.
See Public API for a list of names and headers that are part of the public HPX API.
-
namespace hpx
Functions
-
template<typename ExPolicy, typename FwdIter1, typename FwdIter2, typename FwdIter3, typename Pred = hpx::parallel::detail::less>
hpx::parallel::util::detail::algorithm_result_t<ExPolicy, FwdIter3> set_intersection(ExPolicy &&policy, FwdIter1 first1, FwdIter1 last1, FwdIter2 first2, FwdIter2 last2, FwdIter3 dest, Pred &&op = Pred())# Constructs a sorted range beginning at dest consisting of all elements present in both sorted ranges [first1, last1) and [first2, last2). This algorithm expects both input ranges to be sorted with the given binary predicate pred. Executed according to the policy.
If some element is found m times in [first1, last1) and n times in [first2, last2), the first std::min(m, n) elements will be copied from the first range to the destination range. The order of equivalent elements is preserved. The resulting range cannot overlap with either of the input ranges.
The resulting range cannot overlap with either of the input ranges.
The application of function objects in parallel algorithm invoked with a sequential execution policy object execute in sequential order in the calling thread (sequenced_policy) or in a single new thread spawned from the current thread (for sequenced_task_policy).
The application of function objects in parallel algorithm invoked with an execution policy object of type parallel_policy or parallel_task_policy are permitted to execute in an unordered fashion in unspecified threads, and indeterminately sequenced within each thread.
Note
Complexity: At most 2*(N1 + N2 - 1) comparisons, where N1 is the length of the first sequence and N2 is the length of the second sequence.
- Template Parameters
ExPolicy – The type of the execution policy to use (deduced). It describes the manner in which the execution of the algorithm may be parallelized and the manner in which it applies user-provided function objects.
FwdIter1 – The type of the source iterators used (deduced) representing the first sequence. This iterator type must meet the requirements of a forward iterator.
FwdIter2 – The type of the source iterators used (deduced) representing the first sequence. This iterator type must meet the requirements of a forward iterator.
FwdIter3 – The type of the iterator representing the destination range (deduced). This iterator type must meet the requirements of a forward iterator or output iterator with sequential execution.
Pred – The type of an optional function/function object to use. Unlike its sequential form, the parallel overload of set_intersection requires Pred to meet the requirements of CopyConstructible. This defaults to std::less<>
- Parameters
policy – The execution policy to use for the scheduling of the iterations.
first1 – Refers to the beginning of the sequence of elements of the first range the algorithm will be applied to.
last1 – Refers to the end of the sequence of elements of the first range the algorithm will be applied to.
first2 – Refers to the beginning of the sequence of elements of the second range the algorithm will be applied to.
last2 – Refers to the end of the sequence of elements of the second range the algorithm will be applied to.
dest – Refers to the beginning of the destination range.
op – The binary predicate which returns true if the elements should be treated as equal. The signature of the predicate function should be equivalent to the following:
The signature does not need to have const &, but the function must not modify the objects passed to it. The type Type1 must be such that objects of type FwdIter can be dereferenced and then implicitly converted to Type1bool pred(const Type1 &a, const Type1 &b);
- Returns
The set_intersection algorithm returns a hpx::future<FwdIter3> if the execution policy is of type sequenced_task_policy or parallel_task_policy and returns FwdIter3 otherwise. The set_intersection algorithm returns the output iterator to the element in the destination range, one past the last element copied.
-
template<typename FwdIter1, typename FwdIter2, typename FwdIter3, typename Pred = hpx::parallel::detail::less>
FwdIter3 set_intersection(FwdIter1 first1, FwdIter1 last1, FwdIter2 first2, FwdIter2 last2, FwdIter3 dest, Pred &&op = Pred())# Constructs a sorted range beginning at dest consisting of all elements present in both sorted ranges [first1, last1) and [first2, last2). This algorithm expects both input ranges to be sorted with the given binary predicate pred.
If some element is found m times in [first1, last1) and n times in [first2, last2), the first std::min(m, n) elements will be copied from the first range to the destination range. The order of equivalent elements is preserved. The resulting range cannot overlap with either of the input ranges.
The resulting range cannot overlap with either of the input ranges.
Note
Complexity: At most 2*(N1 + N2 - 1) comparisons, where N1 is the length of the first sequence and N2 is the length of the second sequence.
- Template Parameters
FwdIter1 – The type of the source iterators used (deduced) representing the first sequence. This iterator type must meet the requirements of a forward iterator.
FwdIter2 – The type of the source iterators used (deduced) representing the first sequence. This iterator type must meet the requirements of a forward iterator.
FwdIter3 – The type of the iterator representing the destination range (deduced). This iterator type must meet the requirements of a forward iterator or output iterator with sequential execution.
Pred – The type of an optional function/function object to use. Unlike its sequential form, the parallel overload of set_intersection requires Pred to meet the requirements of CopyConstructible. This defaults to std::less<>
- Parameters
first1 – Refers to the beginning of the sequence of elements of the first range the algorithm will be applied to.
last1 – Refers to the end of the sequence of elements of the first range the algorithm will be applied to.
first2 – Refers to the beginning of the sequence of elements of the second range the algorithm will be applied to.
last2 – Refers to the end of the sequence of elements of the second range the algorithm will be applied to.
dest – Refers to the beginning of the destination range.
op – The binary predicate which returns true if the elements should be treated as equal. The signature of the predicate function should be equivalent to the following:
The signature does not need to have const &, but the function must not modify the objects passed to it. The type Type1 must be such that objects of type FwdIter can be dereferenced and then implicitly converted to Type1bool pred(const Type1 &a, const Type1 &b);
- Returns
The set_intersection algorithm returns a FwdIter3. The set_intersection algorithm returns the output iterator to the element in the destination range, one past the last element copied.
-
template<typename ExPolicy, typename FwdIter1, typename FwdIter2, typename FwdIter3, typename Pred = hpx::parallel::detail::less>
hpx::set_symmetric_difference#
Defined in header hpx/algorithm.hpp.
See Public API for a list of names and headers that are part of the public HPX API.
-
namespace hpx
Functions
-
template<typename ExPolicy, typename FwdIter1, typename FwdIter2, typename FwdIter3, typename Pred = hpx::parallel::detail::less>
hpx::parallel::util::detail::algorithm_result<ExPolicy, FwdIter3>::type set_symmetric_difference(ExPolicy &&policy, FwdIter1 first1, FwdIter1 last1, FwdIter2 first2, FwdIter2 last2, FwdIter3 dest, Pred &&op = Pred())# Constructs a sorted range beginning at dest consisting of all elements present in either of the sorted ranges [first1, last1) and [first2, last2), but not in both of them are copied to the range beginning at dest. The resulting range is also sorted. This algorithm expects both input ranges to be sorted with the given binary predicate pred. Executed according to the policy.
If some element is found m times in [first1, last1) and n times in [first2, last2), it will be copied to dest exactly std::abs(m-n) times. If m>n, then the last m-n of those elements are copied from [first1,last1), otherwise the last n-m elements are copied from [first2,last2). The resulting range cannot overlap with either of the input ranges.
The resulting range cannot overlap with either of the input ranges.
The application of function objects in parallel algorithm invoked with a sequential execution policy object execute in sequential order in the calling thread (sequenced_policy) or in a single new thread spawned from the current thread (for sequenced_task_policy).
The application of function objects in parallel algorithm invoked with an execution policy object of type parallel_policy or parallel_task_policy are permitted to execute in an unordered fashion in unspecified threads, and indeterminately sequenced within each thread.
Note
Complexity: At most 2*(N1 + N2 - 1) comparisons, where N1 is the length of the first sequence and N2 is the length of the second sequence.
- Template Parameters
ExPolicy – The type of the execution policy to use (deduced). It describes the manner in which the execution of the algorithm may be parallelized and the manner in which it applies user-provided function objects.
FwdIter1 – The type of the source iterators used (deduced) representing the first sequence. This iterator type must meet the requirements of a forward iterator.
FwdIter2 – The type of the source iterators used (deduced) representing the first sequence. This iterator type must meet the requirements of a forward iterator.
FwdIter3 – The type of the iterator representing the destination range (deduced). This iterator type must meet the requirements of a forward iterator or output iterator and sequential execution.
Pred – The type of an optional function/function object to use. Unlike its sequential form, the parallel overload of set_symmetric_difference requires Pred to meet the requirements of CopyConstructible. This defaults to std::less<>
- Parameters
policy – The execution policy to use for the scheduling of the iterations.
first1 – Refers to the beginning of the sequence of elements of the first range the algorithm will be applied to.
last1 – Refers to the end of the sequence of elements of the first range the algorithm will be applied to.
first2 – Refers to the beginning of the sequence of elements of the second range the algorithm will be applied to.
last2 – Refers to the end of the sequence of elements of the second range the algorithm will be applied to.
dest – Refers to the beginning of the destination range.
op – The binary predicate which returns true if the elements should be treated as equal. The signature of the predicate function should be equivalent to the following:
The signature does not need to have const &, but the function must not modify the objects passed to it. The type Type1 must be such that objects of type FwdIter can be dereferenced and then implicitly converted to Type1bool pred(const Type1 &a, const Type1 &b);
- Returns
The set_symmetric_difference algorithm returns a hpx::future<FwdIter3> if the execution policy is of type sequenced_task_policy or parallel_task_policy and returns FwdIter3 otherwise. The set_symmetric_difference algorithm returns the output iterator to the element in the destination range, one past the last element copied.
-
template<typename FwdIter1, typename FwdIter2, typename FwdIter3, typename Pred = hpx::parallel::detail::less>
FwdIter3 set_symmetric_difference(FwdIter1 first1, FwdIter1 last1, FwdIter2 first2, FwdIter2 last2, FwdIter3 dest, Pred &&op = Pred())# Constructs a sorted range beginning at dest consisting of all elements present in either of the sorted ranges [first1, last1) and [first2, last2), but not in both of them are copied to the range beginning at dest. The resulting range is also sorted. This algorithm expects both input ranges to be sorted with the given binary predicate pred.
If some element is found m times in [first1, last1) and n times in [first2, last2), it will be copied to dest exactly std::abs(m-n) times. If m>n, then the last m-n of those elements are copied from [first1,last1), otherwise the last n-m elements are copied from [first2,last2). The resulting range cannot overlap with either of the input ranges.
The resulting range cannot overlap with either of the input ranges.
Note
Complexity: At most 2*(N1 + N2 - 1) comparisons, where N1 is the length of the first sequence and N2 is the length of the second sequence.
- Template Parameters
FwdIter1 – The type of the source iterators used (deduced) representing the first sequence. This iterator type must meet the requirements of a forward iterator.
FwdIter2 – The type of the source iterators used (deduced) representing the first sequence. This iterator type must meet the requirements of a forward iterator.
FwdIter3 – The type of the iterator representing the destination range (deduced). This iterator type must meet the requirements of a forward iterator or output iterator and sequential execution.
Pred – The type of an optional function/function object to use. Unlike its sequential form, the parallel overload of set_symmetric_difference requires Pred to meet the requirements of CopyConstructible. This defaults to std::less<>
- Parameters
first1 – Refers to the beginning of the sequence of elements of the first range the algorithm will be applied to.
last1 – Refers to the end of the sequence of elements of the first range the algorithm will be applied to.
first2 – Refers to the beginning of the sequence of elements of the second range the algorithm will be applied to.
last2 – Refers to the end of the sequence of elements of the second range the algorithm will be applied to.
dest – Refers to the beginning of the destination range.
op – The binary predicate which returns true if the elements should be treated as equal. The signature of the predicate function should be equivalent to the following:
The signature does not need to have const &, but the function must not modify the objects passed to it. The type Type1 must be such that objects of type FwdIter can be dereferenced and then implicitly converted to Type1bool pred(const Type1 &a, const Type1 &b);
- Returns
The set_symmetric_difference algorithm returns a FwdIter3. The set_symmetric_difference algorithm returns the output iterator to the element in the destination range, one past the last element copied.
-
template<typename ExPolicy, typename FwdIter1, typename FwdIter2, typename FwdIter3, typename Pred = hpx::parallel::detail::less>
hpx::set_union#
Defined in header hpx/algorithm.hpp.
See Public API for a list of names and headers that are part of the public HPX API.
-
namespace hpx
Functions
-
template<typename ExPolicy, typename FwdIter1, typename FwdIter2, typename FwdIter3, typename Pred = hpx::parallel::detail::less>
hpx::parallel::util::detail::algorithm_result_t<ExPolicy, FwdIter3> set_union(ExPolicy &&policy, FwdIter1 first1, FwdIter1 last1, FwdIter2 first2, FwdIter2 last2, FwdIter3 dest, Pred &&op = Pred())# Constructs a sorted range beginning at dest consisting of all elements present in one or both sorted ranges [first1, last1) and [first2, last2). This algorithm expects both input ranges to be sorted with the given binary predicate pred. Executed according to the policy.
If some element is found m times in [first1, last1) and n times in [first2, last2), then all m elements will be copied from [first1, last1) to dest, preserving order, and then exactly std::max(n-m, 0) elements will be copied from [first2, last2) to dest, also preserving order.
The resulting range cannot overlap with either of the input ranges.
The application of function objects in parallel algorithm invoked with a sequential execution policy object execute in sequential order in the calling thread (sequenced_policy) or in a single new thread spawned from the current thread (for sequenced_task_policy).
The application of function objects in parallel algorithm invoked with an execution policy object of type parallel_policy or parallel_task_policy are permitted to execute in an unordered fashion in unspecified threads, and indeterminately sequenced within each thread.
Note
Complexity: At most 2*(N1 + N2 - 1) comparisons, where N1 is the length of the first sequence and N2 is the length of the second sequence.
- Template Parameters
ExPolicy – The type of the execution policy to use (deduced). It describes the manner in which the execution of the algorithm may be parallelized and the manner in which it applies user-provided function objects.
FwdIter1 – The type of the source iterators used (deduced) representing the first sequence. This iterator type must meet the requirements of a forward iterator.
FwdIter2 – The type of the source iterators used (deduced) representing the first sequence. This iterator type must meet the requirements of a forward iterator.
FwdIter3 – The type of the iterator representing the destination range (deduced). This iterator type must meet the requirements of a forward iterator or output iterator and sequential execution.
Op – The type of an optional function/function object to use. Unlike its sequential form, the parallel overload of set_union requires Pred to meet the requirements of CopyConstructible. This defaults to std::less<>
- Parameters
policy – The execution policy to use for the scheduling of the iterations.
first1 – Refers to the beginning of the sequence of elements of the first range the algorithm will be applied to.
last1 – Refers to the end of the sequence of elements of the first range the algorithm will be applied to.
first2 – Refers to the beginning of the sequence of elements of the second range the algorithm will be applied to.
last2 – Refers to the end of the sequence of elements of the second range the algorithm will be applied to.
dest – Refers to the beginning of the destination range.
op – The binary predicate which returns true if the elements should be treated as equal. The signature of the predicate function should be equivalent to the following:
The signature does not need to have const &, but the function must not modify the objects passed to it. The type Type1 must be such that objects of type FwdIter can be dereferenced and then implicitly converted to Type1bool pred(const Type1 &a, const Type1 &b);
- Returns
The set_union algorithm returns a hpx::future<FwdIter3> if the execution policy is of type sequenced_task_policy or parallel_task_policy and returns FwdIter3 otherwise. The set_union algorithm returns the output iterator to the element in the destination range, one past the last element copied.
-
template<typename FwdIter1, typename FwdIter2, typename FwdIter3, typename Pred = hpx::parallel::detail::less>
FwdIter3 set_union(FwdIter1 first1, FwdIter1 last1, FwdIter2 first2, FwdIter2 last2, FwdIter3 dest, Pred &&op = Pred())# Constructs a sorted range beginning at dest consisting of all elements present in one or both sorted ranges [first1, last1) and [first2, last2). This algorithm expects both input ranges to be sorted with the given binary predicate pred. Executed according to the policy.
If some element is found m times in [first1, last1) and n times in [first2, last2), then all m elements will be copied from [first1, last1) to dest, preserving order, and then exactly std::max(n-m, 0) elements will be copied from [first2, last2) to dest, also preserving order.
The resulting range cannot overlap with either of the input ranges.
Note
Complexity: At most 2*(N1 + N2 - 1) comparisons, where N1 is the length of the first sequence and N2 is the length of the second sequence.
- Template Parameters
FwdIter1 – The type of the source iterators used (deduced) representing the first sequence. This iterator type must meet the requirements of a forward iterator.
FwdIter2 – The type of the source iterators used (deduced) representing the first sequence. This iterator type must meet the requirements of a forward iterator.
FwdIter3 – The type of the iterator representing the destination range (deduced). This iterator type must meet the requirements of a forward iterator or output iterator and sequential execution.
Op – The type of an optional function/function object to use. Unlike its sequential form, the parallel overload of set_union requires Pred to meet the requirements of CopyConstructible. This defaults to std::less<>
- Parameters
first1 – Refers to the beginning of the sequence of elements of the first range the algorithm will be applied to.
last1 – Refers to the end of the sequence of elements of the first range the algorithm will be applied to.
first2 – Refers to the beginning of the sequence of elements of the second range the algorithm will be applied to.
last2 – Refers to the end of the sequence of elements of the second range the algorithm will be applied to.
dest – Refers to the beginning of the destination range.
op – The binary predicate which returns true if the elements should be treated as equal. The signature of the predicate function should be equivalent to the following:
The signature does not need to have const &, but the function must not modify the objects passed to it. The type Type1 must be such that objects of type FwdIter can be dereferenced and then implicitly converted to Type1bool pred(const Type1 &a, const Type1 &b);
- Returns
The set_union algorithm returns a FwdIter3. The set_union algorithm returns the output iterator to the element in the destination range, one past the last element copied.
-
template<typename ExPolicy, typename FwdIter1, typename FwdIter2, typename FwdIter3, typename Pred = hpx::parallel::detail::less>
hpx::shift_left#
Defined in header hpx/algorithm.hpp.
See Public API for a list of names and headers that are part of the public HPX API.
-
namespace hpx
Functions
-
template<typename FwdIter, typename Size>
FwdIter shift_left(FwdIter first, FwdIter last, Size n)# Shifts the elements in the range [first, last) by n positions towards the beginning of the range. For every integer i in [0, last - first
n), moves the element originally at position first + n + i to position first + i.
The assignment operations in the parallel shift_left algorithm invoked without an execution policy object will execute in sequential order in the calling thread.
Note
Complexity: At most (last - first) - n assignments.
Note
The type of dereferenced FwdIter must meet the requirements of MoveAssignable.
- Template Parameters
FwdIter – The type of the source iterators used (deduced). This iterator type must meet the requirements of a forward iterator.
Size – The type of the argument specifying the number of positions to shift by.
- Parameters
first – Refers to the beginning of the sequence of elements the algorithm will be applied to.
last – Refers to the end of the sequence of elements the algorithm will be applied to.
n – Refers to the number of positions to shift.
- Returns
The shift_left algorithm returns FwdIter. The shift_left algorithm returns an iterator to the end of the resulting range.
-
template<typename ExPolicy, typename FwdIter, typename Size>
hpx::parallel::util::detail::algorithm_result<ExPolicy, FwdIter> shift_left(ExPolicy &&policy, FwdIter first, FwdIter last, Size n)# Shifts the elements in the range [first, last) by n positions towards the beginning of the range. For every integer i in [0, last - first
n), moves the element originally at position first + n + i to position first + i. Executed according to the policy.
The assignment operations in the parallel shift_left algorithm invoked with an execution policy object of type sequenced_policy execute in sequential order in the calling thread.
The assignment operations in the parallel shift_left algorithm invoked with an execution policy object of type parallel_policy or parallel_task_policy are permitted to execute in an unordered fashion in unspecified threads, and indeterminately sequenced within each thread.
Note
Complexity: At most (last - first) - n assignments.
Note
The type of dereferenced FwdIter must meet the requirements of MoveAssignable.
- Template Parameters
ExPolicy – The type of the execution policy to use (deduced). It describes the manner in which the execution of the algorithm may be parallelized and the manner in which it executes the assignments.
FwdIter – The type of the source iterators used (deduced). This iterator type must meet the requirements of a forward iterator.
Size – The type of the argument specifying the number of positions to shift by.
- Parameters
policy – The execution policy to use for the scheduling of the iterations.
first – Refers to the beginning of the sequence of elements the algorithm will be applied to.
last – Refers to the end of the sequence of elements the algorithm will be applied to.
n – Refers to the number of positions to shift.
- Returns
The shift_left algorithm returns a hpx::future<FwdIter> if the execution policy is of type sequenced_task_policy or parallel_task_policy and returns FwdIter otherwise. The shift_left algorithm returns an iterator to the end of the resulting range.
-
template<typename FwdIter, typename Size>
hpx::shift_right#
Defined in header hpx/algorithm.hpp.
See Public API for a list of names and headers that are part of the public HPX API.
-
namespace hpx
Functions
-
template<typename FwdIter, typename Size>
FwdIter shift_right(FwdIter first, FwdIter last, Size n)# Shifts the elements in the range [first, last) by n positions towards the end of the range. For every integer i in [0, last - first - n), moves the element originally at position first + i to position first
n + i.
The assignment operations in the parallel shift_right algorithm invoked without an execution policy object will execute in sequential order in the calling thread.
Note
Complexity: At most (last - first) - n assignments.
Note
The type of dereferenced FwdIter must meet the requirements of MoveAssignable.
- Template Parameters
FwdIter – The type of the source iterators used (deduced). This iterator type must meet the requirements of a forward iterator.
Size – The type of the argument specifying the number of positions to shift by.
- Parameters
first – Refers to the beginning of the sequence of elements the algorithm will be applied to.
last – Refers to the end of the sequence of elements the algorithm will be applied to.
n – Refers to the number of positions to shift.
- Returns
The shift_right algorithm returns FwdIter. The shift_right algorithm returns an iterator to the end of the resulting range.
-
template<typename ExPolicy, typename FwdIter, typename Size>
hpx::parallel::util::detail::algorithm_result<ExPolicy, FwdIter> shift_right(ExPolicy &&policy, FwdIter first, FwdIter last, Size n)# Shifts the elements in the range [first, last) by n positions towards the end of the range. For every integer i in [0, last - first - n), moves the element originally at position first + i to position first
n + i. Executed according to the policy.
The assignment operations in the parallel shift_right algorithm invoked with an execution policy object of type sequenced_policy execute in sequential order in the calling thread.
The assignment operations in the parallel shift_right algorithm invoked with an execution policy object of type parallel_policy or parallel_task_policy are permitted to execute in an unordered fashion in unspecified threads, and indeterminately sequenced within each thread.
Note
Complexity: At most (last - first) - n assignments.
Note
The type of dereferenced FwdIter must meet the requirements of MoveAssignable.
- Template Parameters
ExPolicy – The type of the execution policy to use (deduced). It describes the manner in which the execution of the algorithm may be parallelized and the manner in which it executes the assignments.
FwdIter – The type of the source iterators used (deduced). This iterator type must meet the requirements of a forward iterator.
Size – The type of the argument specifying the number of positions to shift by.
- Parameters
policy – The execution policy to use for the scheduling of the iterations.
first – Refers to the beginning of the sequence of elements the algorithm will be applied to.
last – Refers to the end of the sequence of elements the algorithm will be applied to.
n – Refers to the number of positions to shift.
- Returns
The shift_right algorithm returns a hpx::future<FwdIter> if the execution policy is of type sequenced_task_policy or parallel_task_policy and returns FwdIter otherwise. The shift_right algorithm returns an iterator to the end of the resulting range.
-
template<typename FwdIter, typename Size>
hpx::sort#
Defined in header hpx/algorithm.hpp.
See Public API for a list of names and headers that are part of the public HPX API.
-
namespace hpx
Functions
-
template<typename RandomIt, typename Comp = hpx::parallel::detail::less, typename Proj = hpx::identity>
void sort(RandomIt first, RandomIt last, Comp &&comp, Proj &&proj = Proj())# Sorts the elements in the range [first, last) in ascending order. The order of equal elements is not guaranteed to be preserved. The function uses the given comparison function object comp (defaults to using operator<()).
A sequence is sorted with respect to a comparator comp and a projection proj if for every iterator i pointing to the sequence and every non-negative integer n such that i + n is a valid iterator pointing to an element of the sequence, and INVOKE(comp, INVOKE(proj, *(i + n)), INVOKE(proj, *i)) == false.
comp has to induce a strict weak ordering on the values.
The assignments in the parallel sort algorithm invoked without an execution policy object execute in sequential order in the calling thread.
Note
Complexity: O(N log(N)), where N = std::distance(first, last) comparisons.
- Template Parameters
RandomIt – The type of the source iterators used (deduced). This iterator type must meet the requirements of a random access iterator.
Comp – The type of the function/function object to use (deduced).
Proj – The type of an optional projection function. This defaults to hpx::identity.
- Parameters
first – Refers to the beginning of the sequence of elements the algorithm will be applied to.
last – Refers to the end of the sequence of elements the algorithm will be applied to.
comp – comp is a callable object. The return value of the INVOKE operation applied to an object of type Comp, when contextually converted to bool, yields true if the first argument of the call is less than the second, and false otherwise. It is assumed that comp will not apply any non-constant function through the dereferenced iterator.
proj – Specifies the function (or function object) which will be invoked for each pair of elements as a projection operation before the actual predicate comp is invoked.
- Returns
The sort algorithm returns void.
-
template<typename ExPolicy, typename RandomIt, typename Comp = hpx::parallel::detail::less, typename Proj = hpx::identity>
hpx::parallel::util::detail::algorithm_result_t<ExPolicy> sort(ExPolicy &&policy, RandomIt first, RandomIt last, Comp &&comp, Proj &&proj)# Sorts the elements in the range [first, last) in ascending order. The order of equal elements is not guaranteed to be preserved. The function uses the given comparison function object comp (defaults to using operator<()). Executed according to the policy.
A sequence is sorted with respect to a comparator comp and a projection proj if for every iterator i pointing to the sequence and every non-negative integer n such that i + n is a valid iterator pointing to an element of the sequence, and INVOKE(comp, INVOKE(proj, *(i + n)), INVOKE(proj, *i)) == false.
comp has to induce a strict weak ordering on the values.
The application of function objects in parallel algorithm invoked with an execution policy object of type sequenced_policy execute in sequential order in the calling thread.
The application of function objects in parallel algorithm invoked with an execution policy object of type parallel_policy or parallel_task_policy are permitted to execute in an unordered fashion in unspecified threads, and indeterminately sequenced within each thread.
Note
Complexity: O(N log(N)), where N = std::distance(first, last) comparisons.
- Template Parameters
ExPolicy – The type of the execution policy to use (deduced). It describes the manner in which the execution of the algorithm may be parallelized and the manner in which it applies user-provided function objects.
RandomIt – The type of the source iterators used (deduced). This iterator type must meet the requirements of a random access iterator.
Comp – The type of the function/function object to use (deduced).
Proj – The type of an optional projection function. This defaults to hpx::identity.
- Parameters
policy – The execution policy to use for the scheduling of the iterations.
first – Refers to the beginning of the sequence of elements the algorithm will be applied to.
last – Refers to the end of the sequence of elements the algorithm will be applied to.
comp – comp is a callable object. The return value of the INVOKE operation applied to an object of type Comp, when contextually converted to bool, yields true if the first argument of the call is less than the second, and false otherwise. It is assumed that comp will not apply any non-constant function through the dereferenced iterator.
proj – Specifies the function (or function object) which will be invoked for each pair of elements as a projection operation before the actual predicate comp is invoked.
- Returns
The sort algorithm returns a hpx::future<void> if the execution policy is of type sequenced_task_policy or parallel_task_policy and returns void otherwise.
-
template<typename RandomIt, typename Comp = hpx::parallel::detail::less, typename Proj = hpx::identity>
hpx::experimental::sort_by_key#
Defined in header hpx/algorithm.hpp.
See Public API for a list of names and headers that are part of the public HPX API.
-
namespace hpx
-
namespace experimental
Top-level namespace.
Functions
-
template<typename ExPolicy, typename KeyIter, typename ValueIter, typename Compare = detail::less>
util::detail::algorithm_result_t<ExPolicy, sort_by_key_result<KeyIter, ValueIter>> sort_by_key(ExPolicy &&policy, KeyIter key_first, KeyIter key_last, ValueIter value_first, Compare &&comp = Compare())# Sorts one range of data using keys supplied in another range. The key elements in the range [key_first, key_last) are sorted in ascending order with the corresponding elements in the value range moved to follow the sorted order. The algorithm is not stable, the order of equal elements is not guaranteed to be preserved. The function uses the given comparison function object comp (defaults to using operator<()). Executed according to the policy.
A sequence is sorted with respect to a comparator comp if for every iterator i pointing to the sequence and every non-negative integer n such that i + n is a valid iterator pointing to an element of the sequence, and INVOKE(comp, *(i + n), *i) == false.
comp has to induce a strict weak ordering on the values.
The application of function objects in parallel algorithm invoked with an execution policy object of type sequenced_policy execute in sequential order in the calling thread.
The application of function objects in parallel algorithm invoked with an execution policy object of type parallel_policy or parallel_task_policy are permitted to execute in an unordered fashion in unspecified threads, and indeterminately sequenced within each thread.
Note
Complexity: O(N log(N)), where N = std::distance(first, last) comparisons.
- Template Parameters
ExPolicy – The type of the execution policy to use (deduced). It describes the manner in which the execution of the algorithm may be parallelized and the manner in which it applies user-provided function objects.
KeyIter – The type of the key iterators used (deduced). This iterator type must meet the requirements of a random access iterator.
ValueIter – The type of the value iterators used (deduced). This iterator type must meet the requirements of a random access iterator.
Compare – The type of the function/function object to use (deduced).
- Parameters
policy – The execution policy to use for the scheduling of the iterations.
key_first – Refers to the beginning of the sequence of key elements the algorithm will be applied to.
key_last – Refers to the end of the sequence of key elements the algorithm will be applied to.
value_first – Refers to the beginning of the sequence of value elements the algorithm will be applied to, the range of elements must match [key_first, key_last)
comp – comp is a callable object. The return value of the INVOKE operation applied to an object of type Comp, when contextually converted to bool, yields true if the first argument of the call is less than the second, and false otherwise. It is assumed that comp will not apply any non-constant function through the dereferenced iterator.
- Returns
The sort_by_key algorithm returns a hpx::future<sort_by_key_result<KeyIter,ValueIter>> if the execution policy is of type sequenced_task_policy or parallel_task_policy and returns otherwise. The algorithm returns a pair holding an iterator pointing to the first element after the last element in the input key sequence and an iterator pointing to the first element after the last element in the input value sequence.
-
template<typename ExPolicy, typename KeyIter, typename ValueIter, typename Compare = detail::less>
-
namespace experimental
hpx::stable_sort#
Defined in header hpx/algorithm.hpp.
See Public API for a list of names and headers that are part of the public HPX API.
-
namespace hpx
Functions
-
template<typename RandomIt, typename Comp = hpx::parallel::detail::less, typename Proj = hpx::identity>
void stable_sort(RandomIt first, RandomIt last, Comp &&comp = Comp(), Proj &&proj = Proj())# Sorts the elements in the range [first, last) in ascending order. The relative order of equal elements is preserved. The function uses the given comparison function object comp (defaults to using operator<()).
A sequence is sorted with respect to a comparator comp and a projection proj if for every iterator i pointing to the sequence and every non-negative integer n such that i + n is a valid iterator pointing to an element of the sequence, and INVOKE(comp, INVOKE(proj, *(i + n)), INVOKE(proj, *i)) == false.
comp has to induce a strict weak ordering on the values.
The assignments in the parallel stable_sort algorithm invoked without an execution policy object execute in sequential order in the calling thread.
Note
Complexity: O(N log(N)), where N = std::distance(first, last) comparisons.
- Template Parameters
RandomIt – The type of the source iterators used (deduced). This iterator type must meet the requirements of a random access iterator.
Comp – The type of the function/function object to use (deduced).
Proj – The type of an optional projection function. This defaults to hpx::identity.
- Parameters
first – Refers to the beginning of the sequence of elements the algorithm will be applied to.
last – Refers to the end of the sequence of elements the algorithm will be applied to.
comp – comp is a callable object. The return value of the INVOKE operation applied to an object of type Comp, when contextually converted to bool, yields true if the first argument of the call is less than the second, and false otherwise. It is assumed that comp will not apply any non-constant function through the dereferenced iterator.
proj – Specifies the function (or function object) which will be invoked for each pair of elements as a projection operation before the actual predicate comp is invoked.
- Returns
The stable_sort algorithm returns void.
-
template<typename ExPolicy, typename RandomIt, typename Comp = hpx::parallel::detail::less, typename Proj = hpx::identity>
hpx::parallel::util::detail::algorithm_result_t<ExPolicy> stable_sort(ExPolicy &&policy, RandomIt first, RandomIt last, Comp &&comp = Comp(), Proj &&proj = Proj())# Sorts the elements in the range [first, last) in ascending order. The relative order of equal elements is preserved. The function uses the given comparison function object comp (defaults to using operator<()). Executed according to the policy.
A sequence is sorted with respect to a comparator comp and a projection proj if for every iterator i pointing to the sequence and every non-negative integer n such that i + n is a valid iterator pointing to an element of the sequence, and INVOKE(comp, INVOKE(proj, *(i + n)), INVOKE(proj, *i)) == false.
comp has to induce a strict weak ordering on the values.
The application of function objects in parallel algorithm invoked with an execution policy object of type sequenced_policy execute in sequential order in the calling thread.
The application of function objects in parallel algorithm invoked with an execution policy object of type parallel_policy or parallel_task_policy are permitted to execute in an unordered fashion in unspecified threads, and indeterminately sequenced within each thread.
Note
Complexity: O(N log(N)), where N = std::distance(first, last) comparisons.
- Template Parameters
ExPolicy – The type of the execution policy to use (deduced). It describes the manner in which the execution of the algorithm may be parallelized and the manner in which it applies user-provided function objects.
RandomIt – The type of the source iterators used (deduced). This iterator type must meet the requirements of a random access iterator.
Comp – The type of the function/function object to use (deduced).
Proj – The type of an optional projection function. This defaults to hpx::identity.
- Parameters
policy – The execution policy to use for the scheduling of the iterations.
first – Refers to the beginning of the sequence of elements the algorithm will be applied to.
last – Refers to the end of the sequence of elements the algorithm will be applied to.
comp – comp is a callable object. The return value of the INVOKE operation applied to an object of type Comp, when contextually converted to bool, yields true if the first argument of the call is less than the second, and false otherwise. It is assumed that comp will not apply any non-constant function through the dereferenced iterator.
proj – Specifies the function (or function object) which will be invoked for each pair of elements as a projection operation before the actual predicate comp is invoked.
- Returns
The stable_sort algorithm returns a hpx::future<void> if the execution policy is of type sequenced_task_policy or parallel_task_policy and returns void otherwise.
-
template<typename RandomIt, typename Comp = hpx::parallel::detail::less, typename Proj = hpx::identity>
hpx::starts_with#
Defined in header hpx/algorithm.hpp.
See Public API for a list of names and headers that are part of the public HPX API.
-
namespace hpx
Functions
-
template<typename InIter1, typename InIter2, typename Pred = hpx::parallel::detail::equal_to, typename Proj1 = hpx::identity, typename Proj2 = hpx::identity>
bool starts_with(InIter1 first1, InIter1 last1, InIter2 first2, InIter2 last2, Pred &&pred = Pred(), Proj1 &&proj1 = Proj1(), Proj2 &&proj2 = Proj2())# Checks whether the second range defined by [first1, last1) matches the prefix of the first range defined by [first2, last2)
The assignments in the parallel starts_with algorithm invoked without an execution policy object execute in sequential order in the calling thread.
Note
Complexity: Linear: at most min(N1, N2) applications of the predicate and both projections.
- Template Parameters
InIter1 – The type of the source iterators used (deduced). This iterator type must meet the requirements of an input iterator.
InIter2 – The type of the destination iterators used (deduced). This iterator type must meet the requirements of an input iterator.
Pred – The binary predicate that compares the projected elements. This defaults to hpx::parallel::detail::equal_to.
Proj1 – The type of an optional projection function for the source range. This defaults to hpx::identity.
Proj2 – The type of an optional projection function for the destination range. This defaults to hpx::identity.
- Parameters
first1 – Refers to the beginning of the source range.
last1 – Sentinel value referring to the end of the source range.
first2 – Refers to the beginning of the destination range.
last2 – Sentinel value referring to the end of the destination range.
pred – Specifies the binary predicate function (or function object) which will be invoked for comparison of the elements in the in two ranges projected by proj1 and proj2 respectively.
proj1 – Specifies the function (or function object) which will be invoked for each of the elements in the source range as a projection operation before the actual predicate pred is invoked.
proj2 – Specifies the function (or function object) which will be invoked for each of the elements in the destination range as a projection operation before the actual predicate pred is invoked.
- Returns
The starts_with algorithm returns bool. The starts_with algorithm returns a boolean with the value true if the second range matches the prefix of the first range, false otherwise.
-
template<typename ExPolicy, typename InIter1, typename InIter2, typename Pred = hpx::parallel::detail::equal_to, typename Proj1 = hpx::identity, typename Proj2 = hpx::identity>
hpx::parallel::util::detail::algorithm_result_t<ExPolicy, bool> starts_with(ExPolicy &&policy, InIter1 first1, InIter1 last1, InIter2 first2, InIter2 last2, Pred &&pred = Pred(), Proj1 &&proj1 = Proj1(), Proj2 &&proj2 = Proj2())# Checks whether the second range defined by [first1, last1) matches the prefix of the first range defined by [first2, last2). Executed according to the policy.
The assignments in the parallel starts_with algorithm invoked without an execution policy object execute in sequential order in the calling thread.
Note
Complexity: Linear: at most min(N1, N2) applications of the predicate and both projections.
- Template Parameters
ExPolicy – The type of the execution policy to use (deduced). It describes the manner in which the execution of the algorithm may be parallelized and the manner in which it executes the assignments.
InIter1 – The type of the source iterators used (deduced). This iterator type must meet the requirements of an input iterator.
InIter2 – The type of the destination iterators used (deduced). This iterator type must meet the requirements of an input iterator.
Pred – The binary predicate that compares the projected elements. This defaults to hpx::parallel::detail::equal_to.
Proj1 – The type of an optional projection function for the source range. This defaults to hpx::identity.
Proj2 – The type of an optional projection function for the destination range. This defaults to hpx::identity.
- Parameters
policy – The execution policy to use for the scheduling of the iterations.
first1 – Refers to the beginning of the source range.
last1 – Sentinel value referring to the end of the source range.
first2 – Refers to the beginning of the destination range.
last2 – Sentinel value referring to the end of the destination range.
pred – Specifies the binary predicate function (or function object) which will be invoked for comparison of the elements in the in two ranges projected by proj1 and proj2 respectively.
proj1 – Specifies the function (or function object) which will be invoked for each of the elements in the source range as a projection operation before the actual predicate pred is invoked.
proj2 – Specifies the function (or function object) which will be invoked for each of the elements in the destination range as a projection operation before the actual predicate pred is invoked.
- Returns
The starts_with algorithm returns a hpx::future<bool> if the execution policy is of type sequenced_task_policy or parallel_task_policy and returns bool otherwise. The starts_with algorithm returns a boolean with the value true if the second range matches the prefix of the first range, false otherwise.
-
template<typename InIter1, typename InIter2, typename Pred = hpx::parallel::detail::equal_to, typename Proj1 = hpx::identity, typename Proj2 = hpx::identity>
hpx::swap_ranges#
Defined in header hpx/algorithm.hpp.
See Public API for a list of names and headers that are part of the public HPX API.
-
namespace hpx
Functions
-
template<typename FwdIter1, typename FwdIter2>
FwdIter2 swap_ranges(FwdIter1 first1, FwdIter1 last1, FwdIter2 first2)# Exchanges elements between range [first1, last1) and another range starting at first2.
The swap operations in the parallel swap_ranges algorithm invoked without an execution policy object execute in sequential order in the calling thread.
Note
Complexity: Linear in the distance between first1 and last1.
- Template Parameters
FwdIter1 – The type of the first range of iterators to swap (deduced). This iterator type must meet the requirements of a forward iterator.
FwdIter2 – The type of the second range of iterators to swap (deduced). This iterator type must meet the requirements of a forward iterator.
- Parameters
first1 – Refers to the beginning of the first sequence of elements the algorithm will be applied to.
last1 – Refers to the end of the first sequence of elements the algorithm will be applied to.
first2 – Refers to the beginning of the second sequence of elements the algorithm will be applied to.
- Returns
The swap_ranges algorithm returns FwdIter2. The swap_ranges algorithm returns iterator to the element past the last element exchanged in the range beginning with first2.
-
template<typename ExPolicy, typename FwdIter1, typename FwdIter2>
hpx::parallel::util::detail::algorithm_result_t<ExPolicy, FwdIter2> swap_ranges(ExPolicy &&policy, FwdIter1 first1, FwdIter1 last1, FwdIter2 first2)# Exchanges elements between range [first1, last1) and another range starting at first2. Executed according to the policy.
The swap operations in the parallel swap_ranges algorithm invoked with an execution policy object of type sequenced_policy execute in sequential order in the calling thread.
The swap operations in the parallel swap_ranges algorithm invoked with an execution policy object of type parallel_policy or parallel_task_policy are permitted to execute in an unordered fashion in unspecified threads, and indeterminately sequenced within each thread.
Note
Complexity: Linear in the distance between first1 and last1.
- Template Parameters
ExPolicy – The type of the execution policy to use (deduced). It describes the manner in which the execution of the algorithm may be parallelized and the manner in which it executes the swap operations.
FwdIter1 – The type of the first range of iterators to swap (deduced). This iterator type must meet the requirements of a forward iterator.
FwdIter2 – The type of the second range of iterators to swap (deduced). This iterator type must meet the requirements of a forward iterator.
- Parameters
policy – The execution policy to use for the scheduling of the iterations.
first1 – Refers to the beginning of the first sequence of elements the algorithm will be applied to.
last1 – Refers to the end of the first sequence of elements the algorithm will be applied to.
first2 – Refers to the beginning of the second sequence of elements the algorithm will be applied to.
- Returns
The swap_ranges algorithm returns a hpx::future<FwdIter2> if the execution policy is of type parallel_task_policy and returns FwdIter2 otherwise. The swap_ranges algorithm returns iterator to the element past the last element exchanged in the range beginning with first2.
-
template<typename FwdIter1, typename FwdIter2>
hpx::transform#
Defined in header hpx/algorithm.hpp.
See Public API for a list of names and headers that are part of the public HPX API.
-
namespace hpx
Functions
-
template<typename FwdIter1, typename FwdIter2, typename F>
FwdIter2 transform(FwdIter1 first, FwdIter1 last, FwdIter2 dest, F &&f)# Applies the given function f to the range [first, last) and stores the result in another range, beginning at dest.
Note
Complexity: Exactly last - first applications of f
- Template Parameters
FwdIter1 – The type of the source iterators used (deduced). This iterator type must meet the requirements of a forward iterator.
FwdIter2 – The type of the iterator representing the destination range (deduced). This iterator type must meet the requirements of a forward iterator.
F – The type of the function/function object to use (deduced). Unlike its sequential form, the parallel overload of transform requires F to meet the requirements of CopyConstructible.
- Parameters
first – Refers to the beginning of the sequence of elements the algorithm will be applied to.
last – Refers to the end of the sequence of elements the algorithm will be applied to.
dest – Refers to the beginning of the destination range.
f – Specifies the function (or function object) which will be invoked for each of the elements in the sequence specified by [first, last).This is an unary predicate. The signature of this predicate should be equivalent to:
The signature does not need to have const&. The type Type must be such that an object of type FwdIter1 can be dereferenced and then implicitly converted to Type. The type Ret must be such that an object of type FwdIter2 can be dereferenced and assigned a value of type Ret.Ret fun(const Type &a);
- Returns
The transform algorithm returns a FwdIter2. The transform algorithm returns a tuple holding an iterator referring to the first element after the input sequence and the output iterator to the element in the destination range, one past the last element copied.
-
template<typename ExPolicy, typename FwdIter1, typename FwdIter2, typename F>
parallel::util::detail::algorithm_result_t<ExPolicy, FwdIter2> transform(ExPolicy &&policy, FwdIter1 first, FwdIter1 last, FwdIter2 dest, F &&f)# Applies the given function f to the range [first, last) and stores the result in another range, beginning at dest. Executed according to the policy.
The invocations of f in the parallel transform algorithm invoked with an execution policy object of type sequenced_policy execute in sequential order in the calling thread.
The invocations of f in the parallel transform algorithm invoked with an execution policy object of type parallel_policy or parallel_task_policy are permitted to execute in an unordered fashion in unspecified threads, and indeterminately sequenced within each thread.
Note
Complexity: Exactly last - first applications of f
- Template Parameters
ExPolicy – The type of the execution policy to use (deduced). It describes the manner in which the execution of the algorithm may be parallelized and the manner in which it executes the invocations of f.
FwdIter1 – The type of the source iterators used (deduced). This iterator type must meet the requirements of a forward iterator.
FwdIter2 – The type of the iterator representing the destination range (deduced). This iterator type must meet the requirements of a forward iterator.
F – The type of the function/function object to use (deduced). Unlike its sequential form, the parallel overload of transform requires F to meet the requirements of CopyConstructible.
- Parameters
policy – The execution policy to use for the scheduling of the iterations.
first – Refers to the beginning of the sequence of elements the algorithm will be applied to.
last – Refers to the end of the sequence of elements the algorithm will be applied to.
dest – Refers to the beginning of the destination range.
f – Specifies the function (or function object) which will be invoked for each of the elements in the sequence specified by [first, last).This is an unary predicate. The signature of this predicate should be equivalent to:
The signature does not need to have const&. The type Type must be such that an object of type FwdIter1 can be dereferenced and then implicitly converted to Type. The type Ret must be such that an object of type FwdIter2 can be dereferenced and assigned a value of type Ret.Ret fun(const Type &a);
- Returns
The transform algorithm returns a hpx::future<FwdIter2> if the execution policy is of type parallel_task_policy and returns FwdIter2 otherwise. The transform algorithm returns a tuple holding an iterator referring to the first element after the input sequence and the output iterator to the element in the destination range, one past the last element copied.
-
template<typename FwdIter1, typename FwdIter2, typename FwdIter3, typename F>
FwdIter3 transform(FwdIter1 first1, FwdIter1 last1, FwdIter2 first2, FwdIter3 dest, F &&f)# Applies the given function f to pairs of elements from two ranges: one defined by [first1, last1) and the other beginning at first2, and stores the result in another range, beginning at dest.
Note
Complexity: Exactly last - first applications of f
- Template Parameters
FwdIter1 – The type of the source iterators for the first range used (deduced). This iterator type must meet the requirements of a forward iterator.
FwdIter2 – The type of the source iterators for the second range used (deduced). This iterator type must meet the requirements of a forward iterator.
FwdIter3 – The type of the iterator representing the destination range (deduced). This iterator type must meet the requirements of a forward iterator.
F – The type of the function/function object to use (deduced). Unlike its sequential form, the parallel overload of transform requires F to meet the requirements of CopyConstructible.
- Parameters
first1 – Refers to the beginning of the first sequence of elements the algorithm will be applied to.
last1 – Refers to the end of the first sequence of elements the algorithm will be applied to.
first2 – Refers to the beginning of the second sequence of elements the algorithm will be applied to.
dest – Refers to the beginning of the destination range.
f – Specifies the function (or function object) which will be invoked for each of the elements in the sequence specified by [first, last).This is a binary predicate. The signature of this predicate should be equivalent to:
The signature does not need to have const&. The types Type1 and Type2 must be such that objects of types FwdIter1 and FwdIter2 can be dereferenced and then implicitly converted to Type1 and Type2 respectively. The type Ret must be such that an object of type FwdIter3 can be dereferenced and assigned a value of type Ret.Ret fun(const Type1 &a, const Type2 &b);
- Returns
The transform algorithm returns a FwdIter3. The transform algorithm returns a tuple holding an iterator referring to the first element after the first input sequence, an iterator referring to the first element after the second input sequence, and the output iterator referring to the element in the destination range, one past the last element copied.
-
template<typename ExPolicy, typename FwdIter1, typename FwdIter2, typename FwdIter3, typename F>
parallel::util::detail::algorithm_result_t<ExPolicy, FwdIter3> transform(ExPolicy &&policy, FwdIter1 first1, FwdIter1 last1, FwdIter2 first2, FwdIter3 dest, F &&f)# Applies the given function f to pairs of elements from two ranges: one defined by [first1, last1) and the other beginning at first2, and stores the result in another range, beginning at dest. Executed according to the policy.
The invocations of f in the parallel transform algorithm invoked with an execution policy object of type sequenced_policy execute in sequential order in the calling thread.
The invocations of f in the parallel transform algorithm invoked with an execution policy object of type parallel_policy or parallel_task_policy are permitted to execute in an unordered fashion in unspecified threads, and indeterminately sequenced within each thread.
Note
Complexity: Exactly last - first applications of f
- Template Parameters
ExPolicy – The type of the execution policy to use (deduced). It describes the manner in which the execution of the algorithm may be parallelized and the manner in which it executes the invocations of f.
FwdIter1 – The type of the source iterators for the first range used (deduced). This iterator type must meet the requirements of a forward iterator.
FwdIter2 – The type of the source iterators for the second range used (deduced). This iterator type must meet the requirements of a forward iterator.
FwdIter3 – The type of the iterator representing the destination range (deduced). This iterator type must meet the requirements of a forward iterator.
F – The type of the function/function object to use (deduced). Unlike its sequential form, the parallel overload of transform requires F to meet the requirements of CopyConstructible.
- Parameters
policy – The execution policy to use for the scheduling of the iterations.
first1 – Refers to the beginning of the first sequence of elements the algorithm will be applied to.
last1 – Refers to the end of the first sequence of elements the algorithm will be applied to.
first2 – Refers to the beginning of the second sequence of elements the algorithm will be applied to.
dest – Refers to the beginning of the destination range.
f – Specifies the function (or function object) which will be invoked for each of the elements in the sequence specified by [first, last).This is a binary predicate. The signature of this predicate should be equivalent to:
The signature does not need to have const&. The types Type1 and Type2 must be such that objects of types FwdIter1 and FwdIter2 can be dereferenced and then implicitly converted to Type1 and Type2 respectively. The type Ret must be such that an object of type FwdIter3 can be dereferenced and assigned a value of type Ret.Ret fun(const Type1 &a, const Type2 &b);
- Returns
The transform algorithm returns a hpx::future<FwdIter3> if the execution policy is of type parallel_task_policy and returns FwdIter3 otherwise. The transform algorithm returns a tuple holding an iterator referring to the first element after the first input sequence, an iterator referring to the first element after the second input sequence, and the output iterator referring to the element in the destination range, one past the last element copied.
-
template<typename FwdIter1, typename FwdIter2, typename F>
hpx::transform_exclusive_scan#
Defined in header hpx/algorithm.hpp.
See Public API for a list of names and headers that are part of the public HPX API.
-
namespace hpx
Functions
-
template<typename InIter, typename OutIter, typename BinOp, typename UnOp, typename T = typename std::iterator_traits<InIter>::value_type>
OutIter transform_exclusive_scan(InIter first, InIter last, OutIter dest, T init, BinOp &&binary_op, UnOp &&unary_op)# Transforms each element in the range [first, last) with unary_op, then computes an exclusive prefix sum operation using binary_op over the resulting range, with init as the initial value, and writes the results to the range beginning at dest. “exclusive” means that the i-th input element is not included in the i-th sum. Formally, assigns through each iterator i in [dest, d_first + (last - first)) the value of the generalized noncommutative sum of init, unary_op(*j)… for every j in [first, first + (i - d_first)) over binary_op, where generalized noncommutative sum GNSUM(op, a1, …, a N) is defined as follows:
if N=1, a1
if N > 1, op(GNSUM(op, a1, …, aK), GNSUM(op, aM, …, aN)) for any K where 1 < K+1 = M <= N In other words, the summation operations may be performed in arbitrary order, and the behavior is nondeterministic if binary_op is not associative.
The reduce operations in the parallel transform_exclusive_scan algorithm invoked without an execution policy object execute in sequential order in the calling thread.
Neither unary_op nor binary_op shall invalidate iterators or sub-ranges, or modify elements in the ranges [first,last) or [result,result + (last - first)).
The behavior of transform_exclusive_scan may be non-deterministic for a non-associative predicate.
Note
Complexity: O(last - first) applications of each of binary_op and unary_op.
Note
GENERALIZED_NONCOMMUTATIVE_SUM(op, a1, …, aN) is defined as:
a1 when N is 1
op(GENERALIZED_NONCOMMUTATIVE_SUM(op, a1, …, aK), GENERALIZED_NONCOMMUTATIVE_SUM(op, aM, …, aN) where 1 < K+1 = M <= N.
- Template Parameters
InIter – The type of the source iterators used (deduced). This iterator type must meet the requirements of an input iterator.
OutIter – The type of the iterator representing the destination range (deduced). This iterator type must meet the requirements of an output iterator.
BinOp – The type of binary_op.
UnOp – The type of unary_op.
T – The type of the value to be used as initial (and intermediate) values (deduced).
- Parameters
first – Refers to the beginning of the sequence of elements the algorithm will be applied to.
last – Refers to the end of the sequence of elements the algorithm will be applied to.
dest – Refers to the beginning of the destination range.
init – The initial value for the generalized sum.
binary_op – Binary FunctionObject that will be applied to the result of unary_op, the results of other binary_op, and init.
unary_op – Unary FunctionObject that will be applied to each element of the input range. The return type must be acceptable as input to binary_op.
- Returns
The transform_exclusive_scan algorithm returns a returns OutIter. The transform_exclusive_scan algorithm returns the output iterator to the element in the destination range, one past the last element copied.
-
template<typename ExPolicy, typename FwdIter1, typename FwdIter2, typename BinOp, typename UnOp, typename T = typename std::iterator_traits<FwdIter1>::value_type>
parallel::util::detail::algorithm_result<ExPolicy, FwdIter2>::type transform_exclusive_scan(ExPolicy &&policy, FwdIter1 first, FwdIter1 last, FwdIter2 dest, T init, BinOp &&binary_op, UnOp &&unary_op)# Assigns through each iterator i in [result, result + (last - first)) the value of GENERALIZED_NONCOMMUTATIVE_SUM(binary_op, init, conv(*first), …, conv(*(first + (i - result) - 1))). Executed according to the policy.
The reduce operations in the parallel transform_exclusive_scan algorithm invoked with an execution policy object of type sequenced_policy execute in sequential order in the calling thread.
The reduce operations in the parallel transform_exclusive_scan algorithm invoked with an execution policy object of type parallel_policy or parallel_task_policy are permitted to execute in an unordered fashion in unspecified threads, and indeterminately sequenced within each thread.
Neither unary_op nor binary_op shall invalidate iterators or sub-ranges, or modify elements in the ranges [first,last) or [result,result + (last - first)).
The behavior of transform_exclusive_scan may be non-deterministic for a non-associative predicate.
Note
Complexity: O(last - first) applications of each of binary_op and unary_op.
Note
GENERALIZED_NONCOMMUTATIVE_SUM(op, a1, …, aN) is defined as:
a1 when N is 1
op(GENERALIZED_NONCOMMUTATIVE_SUM(op, a1, …, aK), GENERALIZED_NONCOMMUTATIVE_SUM(op, aM, …, aN) where 1 < K+1 = M <= N.
- Template Parameters
ExPolicy – The type of the execution policy to use (deduced). It describes the manner in which the execution of the algorithm may be parallelized and the manner in which it executes the assignments.
FwdIter1 – The type of the source iterators used (deduced). This iterator type must meet the requirements of an forward iterator.
FwdIter2 – The type of the iterator representing the destination range (deduced). This iterator type must meet the requirements of an forward iterator.
BinOp – The type of binary_op.
UnOp – The type of unary_op.
T – The type of the value to be used as initial (and intermediate) values (deduced).
- Parameters
policy – The execution policy to use for the scheduling of the iterations.
first – Refers to the beginning of the sequence of elements the algorithm will be applied to.
last – Refers to the end of the sequence of elements the algorithm will be applied to.
dest – Refers to the beginning of the destination range.
init – The initial value for the generalized sum.
binary_op – Binary FunctionObject that will be applied in to the result of unary_op, the results of other binary_op, and init.
unary_op – Unary FunctionObject that will be applied to each element of the input range. The return type must be acceptable as input to binary_op.
- Returns
The transform_exclusive_scan algorithm returns a hpx::future<FwdIter2> if the execution policy is of type sequenced_task_policy or parallel_task_policy and returns FwdIter2 otherwise. The transform_exclusive_scan algorithm returns the output iterator to the element in the destination range, one past the last element copied.
-
template<typename InIter, typename OutIter, typename BinOp, typename UnOp, typename T = typename std::iterator_traits<InIter>::value_type>
hpx::transform_inclusive_scan#
Defined in header hpx/algorithm.hpp.
See Public API for a list of names and headers that are part of the public HPX API.
-
namespace hpx
Functions
-
template<typename InIter, typename OutIter, typename BinOp, typename UnOp>
OutIter transform_inclusive_scan(InIter first, InIter last, OutIter dest, BinOp &&binary_op, UnOp &&unary_op)# Assigns through each iterator i in [result, result + (last - first)) the value of GENERALIZED_NONCOMMUTATIVE_SUM(op, conv(*first), …, conv(*(first + (i - result)))).
The reduce operations in the parallel transform_inclusive_scan algorithm invoked without an execution policy object execute in sequential order in the calling thread.
Neither binary_op nor unary_op shall invalidate iterators or sub-ranges, or modify elements in the ranges [first,last) or [result,result + (last - first)).
The difference between inclusive_scan and transform_inclusive_scan is that transform_inclusive_scan includes the ith input element in the ith sum.
Note
Complexity: O(last - first) applications of each of binary_op and unary_op.
Note
GENERALIZED_NONCOMMUTATIVE_SUM(op, a1, …, aN) is defined as:
a1 when N is 1
op(GENERALIZED_NONCOMMUTATIVE_SUM(op, a1, …, aK), GENERALIZED_NONCOMMUTATIVE_SUM(op, aM, …, aN)) where 1 < K+1 = M <= N.
- Template Parameters
InIter – The type of the source iterators used (deduced). This iterator type must meet the requirements of an input iterator.
OutIter – The type of the iterator representing the destination range (deduced). This iterator type must meet the requirements of an output iterator.
BinOp – The type of binary_op.
UnOp – The type of unary_op.
- Parameters
first – Refers to the beginning of the sequence of elements the algorithm will be applied to.
last – Refers to the end of the sequence of elements the algorithm will be applied to.
dest – Refers to the beginning of the destination range.
binary_op – Binary FunctionObject that will be applied in to the result of unary_op, the results of other binary_op, and init if provided.
unary_op – Unary FunctionObject that will be applied to each element of the input range. The return type must be acceptable as input to binary_op.
- Returns
The transform_inclusive_scan algorithm returns a returns OutIter. The transform_inclusive_scan algorithm returns the output iterator to the element in the destination range, one past the last element copied.
-
template<typename ExPolicy, typename FwdIter1, typename FwdIter2, typename BinOp, typename UnOp>
parallel::util::detail::algorithm_result<ExPolicy, FwdIter2>::type transform_inclusive_scan(ExPolicy &&policy, FwdIter1 first, FwdIter1 last, FwdIter2 dest, BinOp &&binary_op, UnOp &&unary_op)# Assigns through each iterator i in [result, result + (last - first)) the value of GENERALIZED_NONCOMMUTATIVE_SUM(op, conv(*first), …, conv(*(first + (i - result)))). Executed according to the policy.
The reduce operations in the parallel transform_inclusive_scan algorithm invoked with an execution policy object of type sequenced_policy execute in sequential order in the calling thread.
The reduce operations in the parallel transform_inclusive_scan algorithm invoked with an execution policy object of type parallel_policy or parallel_task_policy are permitted to execute in an unordered fashion in unspecified threads, and indeterminately sequenced within each thread.
Neither binary_op nor unary_op shall invalidate iterators or sub-ranges, or modify elements in the ranges [first,last) or [result,result + (last - first)).
The difference between inclusive_scan and transform_inclusive_scan is that transform_inclusive_scan includes the ith input element in the ith sum.
Note
Complexity: O(last - first) applications of each of binary_op and unary_op.
Note
GENERALIZED_NONCOMMUTATIVE_SUM(op, a1, …, aN) is defined as:
a1 when N is 1
op(GENERALIZED_NONCOMMUTATIVE_SUM(op, a1, …, aK), GENERALIZED_NONCOMMUTATIVE_SUM(op, aM, …, aN)) where 1 < K+1 = M <= N.
- Template Parameters
ExPolicy – The type of the execution policy to use (deduced). It describes the manner in which the execution of the algorithm may be parallelized and the manner in which it executes the assignments.
FwdIter1 – The type of the source iterators used (deduced). This iterator type must meet the requirements of a forward iterator.
FwdIter2 – The type of the iterator representing the destination range (deduced). This iterator type must meet the requirements of a forward iterator.
BinOp – The type of binary_op.
UnOp – The type of unary_op.
- Parameters
policy – The execution policy to use for the scheduling of the iterations.
first – Refers to the beginning of the sequence of elements the algorithm will be applied to.
last – Refers to the end of the sequence of elements the algorithm will be applied to.
dest – Refers to the beginning of the destination range.
binary_op – Binary FunctionObject that will be applied in to the result of unary_op, the results of other binary_op, and init if provided.
unnary_op – Unary FunctionObject that will be applied to each element of the input range. The return type must be acceptable as input to binary_op.
- Returns
The transform_inclusive_scan algorithm returns a hpx::future<FwdIter2> if the execution policy is of type sequenced_task_policy or parallel_task_policy and returns FwdIter2 otherwise. The transform_inclusive_scan algorithm returns the output iterator to the element in the destination range, one past the last element copied.
-
template<typename InIter, typename OutIter, typename BinOp, typename UnOp, typename T = typename std::iterator_traits<InIter>::value_type>
OutIter transform_inclusive_scan(InIter first, InIter last, OutIter dest, BinOp &&binary_op, UnOp &&unary_op, T init)# Assigns through each iterator i in [result, result + (last - first)) the value of GENERALIZED_NONCOMMUTATIVE_SUM(op, init, conv(*first), …, conv(*(first + (i - result)))).
The reduce operations in the parallel transform_inclusive_scan algorithm invoked without an execution policy object execute in sequential order in the calling thread.
Neither binary_op nor unary_op shall invalidate iterators or sub-ranges, or modify elements in the ranges [first,last) or [result,result + (last - first)).
The difference between inclusive_scan and transform_inclusive_scan is that transform_inclusive_scan includes the ith input element in the ith sum. If binary_op is not mathematically associative, the behavior of transform_inclusive_scan may be non-deterministic.
Note
Complexity: O(last - first) applications of each of binary_op and unary_op.
Note
GENERALIZED_NONCOMMUTATIVE_SUM(op, a1, …, aN) is defined as:
a1 when N is 1
op(GENERALIZED_NONCOMMUTATIVE_SUM(op, a1, …, aK), GENERALIZED_NONCOMMUTATIVE_SUM(op, aM, …, aN)) where 1 < K+1 = M <= N.
- Template Parameters
InIter – The type of the source iterators used (deduced). This iterator type must meet the requirements of an input iterator.
OutIter – The type of the iterator representing the destination range (deduced). This iterator type must meet the requirements of an output iterator.
BinOp – The type of binary_op.
UnOp – The type of unary_op.
T – The type of the value to be used as initial (and intermediate) values (deduced).
- Parameters
first – Refers to the beginning of the sequence of elements the algorithm will be applied to.
last – Refers to the end of the sequence of elements the algorithm will be applied to.
dest – Refers to the beginning of the destination range.
binary_op – Binary FunctionObject that will be applied in to the result of unary_op, the results of other binary_op, and init if provided.
unnary_op – Unary FunctionObject that will be applied to each element of the input range. The return type must be acceptable as input to binary_op.
init – The initial value for the generalized sum.
- Returns
The transform_inclusive_scan algorithm returns a returns OutIter. The transform_inclusive_scan algorithm returns the output iterator to the element in the destination range, one past the last element copied.
-
template<typename ExPolicy, typename FwdIter1, typename FwdIter2, typename BinOp, typename UnOp, typename T = typename std::iterator_traits<FwdIter1>::value_type>
parallel::util::detail::algorithm_result<ExPolicy, FwdIter2>::type transform_inclusive_scan(ExPolicy &&policy, FwdIter1 first, FwdIter1 last, FwdIter2 dest, BinOp &&binary_op, UnOp &&unary_op, T init)# Assigns through each iterator i in [result, result + (last - first)) the value of GENERALIZED_NONCOMMUTATIVE_SUM(op, init, conv(*first), …, conv(*(first + (i - result)))). Executed according to the policy.
The reduce operations in the parallel transform_inclusive_scan algorithm invoked with an execution policy object of type sequenced_policy execute in sequential order in the calling thread.
The reduce operations in the parallel transform_inclusive_scan algorithm invoked with an execution policy object of type parallel_policy or parallel_task_policy are permitted to execute in an unordered fashion in unspecified threads, and indeterminately sequenced within each thread.
Neither binary_op nor unary_op shall invalidate iterators or sub-ranges, or modify elements in the ranges [first,last) or [result,result + (last - first)).
The difference between inclusive_scan and transform_inclusive_scan is that transform_inclusive_scan includes the ith input element in the ith sum. If binary_op is not mathematically associative, the behavior of transform_inclusive_scan may be non-deterministic.
Note
Complexity: O(last - first) applications of each of binary_op and unary_op.
Note
GENERALIZED_NONCOMMUTATIVE_SUM(op, a1, …, aN) is defined as:
a1 when N is 1
op(GENERALIZED_NONCOMMUTATIVE_SUM(op, a1, …, aK), GENERALIZED_NONCOMMUTATIVE_SUM(op, aM, …, aN)) where 1 < K+1 = M <= N.
- Template Parameters
ExPolicy – The type of the execution policy to use (deduced). It describes the manner in which the execution of the algorithm may be parallelized and the manner in which it executes the assignments.
FwdIter1 – The type of the source iterators used (deduced). This iterator type must meet the requirements of an forward iterator.
FwdIter2 – The type of the iterator representing the destination range (deduced). This iterator type must meet the requirements of an forward iterator.
BinOp – The type of binary_op.
UnOp – The type of unary_op.
T – The type of the value to be used as initial (and intermediate) values (deduced).
- Parameters
policy – The execution policy to use for the scheduling of the iterations.
first – Refers to the beginning of the sequence of elements the algorithm will be applied to.
last – Refers to the end of the sequence of elements the algorithm will be applied to.
dest – Refers to the beginning of the destination range.
binary_op – Binary FunctionObject that will be applied in to the result of unary_op, the results of other binary_op, and init if provided.
unnary_op – Unary FunctionObject that will be applied to each element of the input range. The return type must be acceptable as input to binary_op.
init – The initial value for the generalized sum.
- Returns
The transform_inclusive_scan algorithm returns a hpx::future<FwdIter2> if the execution policy is of type sequenced_task_policy or parallel_task_policy and returns FwdIter2 otherwise. The transform_inclusive_scan algorithm returns the output iterator to the element in the destination range, one past the last element copied.
-
template<typename InIter, typename OutIter, typename BinOp, typename UnOp>
hpx::transform_reduce#
Defined in header hpx/algorithm.hpp.
See Public API for a list of names and headers that are part of the public HPX API.
-
namespace hpx
Functions
-
template<typename ExPolicy, typename FwdIter, typename T, typename Reduce, typename Convert>
hpx::parallel::util::detail::algorithm_result_t<ExPolicy, T> transform_reduce(ExPolicy &&policy, FwdIter first, FwdIter last, T init, Reduce &&red_op, Convert &&conv_op)# Returns GENERALIZED_SUM(red_op, init, conv_op(*first), …, conv_op(*(first + (last - first) - 1))). Executed according to the policy.
The reduce operations in the parallel transform_reduce algorithm invoked with an execution policy object of type sequenced_policy execute in sequential order in the calling thread.
The reduce operations in the parallel transform_reduce algorithm invoked with an execution policy object of type parallel_policy or parallel_task_policy are permitted to execute in an unordered fashion in unspecified threads, and indeterminately sequenced within each thread.
The difference between transform_reduce and accumulate is that the behavior of transform_reduce may be non-deterministic for non-associative or non-commutative binary predicate.
Note
Complexity: O(last - first) applications of the predicates red_op and conv_op.
Note
GENERALIZED_SUM(op, a1, …, aN) is defined as follows:
a1 when N is 1
op(GENERALIZED_SUM(op, b1, …, bK), GENERALIZED_SUM(op, bM, …, bN)), where:
b1, …, bN may be any permutation of a1, …, aN and
1 < K+1 = M <= N.
- Template Parameters
ExPolicy – The type of the execution policy to use (deduced). It describes the manner in which the execution of the algorithm may be parallelized and the manner in which it executes the assignments.
FwdIter – The type of the source iterators used (deduced). This iterator type must meet the requirements of a forward iterator.
T – The type of the value to be used as initial (and intermediate) values (deduced).
Reduce – The type of the binary function object used for the reduction operation.
Convert – The type of the unary function object used to transform the elements of the input sequence before invoking the reduce function.
- Parameters
policy – The execution policy to use for the scheduling of the iterations.
first – Refers to the beginning of the sequence of elements the algorithm will be applied to.
last – Refers to the end of the sequence of elements the algorithm will be applied to.
init – The initial value for the generalized sum.
red_op – Specifies the function (or function object) which will be invoked for each of the values returned from the invocation of conv_op. This is a binary predicate. The signature of this predicate should be equivalent to:
The signature does not need to have const&, but the function must not modify the objects passed to it. The types Type1, Type2, and Ret must be such that an object of a type as returned from conv_op can be implicitly converted to any of those types.Ret fun(const Type1 &a, const Type2 &b);
conv_op – Specifies the function (or function object) which will be invoked for each of the elements in the sequence specified by [first, last). This is a unary predicate. The signature of this predicate should be equivalent to:
The signature does not need to have const&, but the function must not modify the objects passed to it. The type Type must be such that an object of type FwdIter can be dereferenced and then implicitly converted to Type. The type R must be such that an object of this type can be implicitly converted to T.R fun(const Type &a);
- Returns
The transform_reduce algorithm returns a hpx::future<T> if the execution policy is of type parallel_task_policy and returns T otherwise. The transform_reduce algorithm returns the result of the generalized sum over the values returned from conv_op when applied to the elements given by the input range [first, last).
-
template<typename InIter, typename T, typename Reduce, typename Convert>
T transform_reduce(InIter first, InIter last, T init, Reduce &&red_op, Convert &&conv_op)# Returns GENERALIZED_SUM(red_op, init, conv_op(*first), …, conv_op(*(first + (last - first) - 1))).
The difference between transform_reduce and accumulate is that the behavior of transform_reduce may be non-deterministic for non-associative or non-commutative binary predicate.
Note
Complexity: O(last - first) applications of the predicates red_op and conv_op.
Note
GENERALIZED_SUM(op, a1, …, aN) is defined as follows:
a1 when N is 1
op(GENERALIZED_SUM(op, b1, …, bK), GENERALIZED_SUM(op, bM, …, bN)), where:
b1, …, bN may be any permutation of a1, …, aN and
1 < K+1 = M <= N.
- Template Parameters
InIter – The type of the source iterators used (deduced). This iterator type must meet the requirements of an input iterator.
T – The type of the value to be used as initial (and intermediate) values (deduced).
Reduce – The type of the binary function object used for the reduction operation.
Convert – The type of the unary function object used to transform the elements of the input sequence before invoking the reduce function.
- Parameters
first – Refers to the beginning of the sequence of elements the algorithm will be applied to.
last – Refers to the end of the sequence of elements the algorithm will be applied to.
init – The initial value for the generalized sum.
red_op – Specifies the function (or function object) which will be invoked for each of the values returned from the invocation of conv_op. This is a binary predicate. The signature of this predicate should be equivalent to:
The signature does not need to have const&, but the function must not modify the objects passed to it. The types Type1, Type2, and Ret must be such that an object of a type as returned from conv_op can be implicitly converted to any of those types.Ret fun(const Type1 &a, const Type2 &b);
conv_op – Specifies the function (or function object) which will be invoked for each of the elements in the sequence specified by [first, last). This is a unary predicate. The signature of this predicate should be equivalent to:
The signature does not need to have const&, but the function must not modify the objects passed to it. The type Type must be such that an object of type InIter can be dereferenced and then implicitly converted to Type. The type R must be such that an object of this type can be implicitly converted to T.R fun(const Type &a);
- Returns
The transform_reduce algorithm returns a T. The transform_reduce algorithm returns the result of the generalized sum over the values returned from conv_op when applied to the elements given by the input range [first, last).
-
template<typename ExPolicy, typename FwdIter1, typename FwdIter2, typename T>
hpx::parallel::util::detail::algorithm_result_t<ExPolicy, T> transform_reduce(ExPolicy &&policy, FwdIter1 first1, FwdIter1 last1, FwdIter2 first2, T init)# Returns the result of accumulating init with the inner products of the pairs formed by the elements of two ranges starting at first1 and first2. Executed according to the policy.
The operations in the parallel transform_reduce algorithm invoked with an execution policy object of type sequenced_policy execute in sequential order in the calling thread.
The operations in the parallel transform_reduce algorithm invoked with an execution policy object of type parallel_policy or parallel_task_policy are permitted to execute in an unordered fashion in unspecified threads, and indeterminately sequenced within each thread.
Note
Complexity: O(last - first) applications each of reduce and transform.
- Template Parameters
ExPolicy – The type of the execution policy to use (deduced). It describes the manner in which the execution of the algorithm may be parallelized and the manner in which it executes the assignments.
FwdIter1 – The type of the first source iterators used (deduced). This iterator type must meet the requirements of a forward iterator.
FwdIter2 – The type of the second source iterators used (deduced). This iterator type must meet the requirements of a forward iterator.
T – The type of the value to be used as return) values (deduced).
- Parameters
policy – The execution policy to use for the scheduling of the iterations.
first1 – Refers to the beginning of the first sequence of elements the result will be calculated with.
last1 – Refers to the end of the first sequence of elements the algorithm will be applied to.
first2 – Refers to the beginning of the second sequence of elements the result will be calculated with.
init – The initial value for the sum.
- Returns
The transform_reduce algorithm returns a hpx::future<T> if the execution policy is of type sequenced_task_policy or parallel_task_policy and returns T otherwise.
-
template<typename InIter1, typename InIter2, typename T>
T transform_reduce(InIter1 first1, InIter1 last1, InIter2 first2, T init)# Returns the result of accumulating init with the inner products of the pairs formed by the elements of two ranges starting at first1 and first2.
Note
Complexity: O(last - first) applications each of reduce and transform.
- Template Parameters
InIter1 – The type of the first source iterators used (deduced). This iterator type must meet the requirements of an input iterator.
InIter2 – The type of the second source iterators used (deduced). This iterator type must meet the requirements of an input iterator.
T – The type of the value to be used as return) values (deduced).
- Parameters
first1 – Refers to the beginning of the first sequence of elements the result will be calculated with.
last1 – Refers to the end of the first sequence of elements the algorithm will be applied to.
first2 – Refers to the beginning of the second sequence of elements the result will be calculated with.
init – The initial value for the sum.
- Returns
The transform_reduce algorithm returns a T.
-
template<typename ExPolicy, typename FwdIter1, typename FwdIter2, typename T, typename Reduce, typename Convert>
hpx::parallel::util::detail::algorithm_result_t<ExPolicy, T> transform_reduce(ExPolicy &&policy, FwdIter1 first1, FwdIter1 last1, FwdIter2 first2, T init, Reduce &&red_op, Convert &&conv_op)# Returns the result of accumulating init with the inner products of the pairs formed by the elements of two ranges starting at first1 and first2. Executed according to the policy.
The operations in the parallel transform_reduce algorithm invoked with an execution policy object of type sequenced_policy execute in sequential order in the calling thread.
The operations in the parallel transform_reduce algorithm invoked with an execution policy object of type parallel_policy or parallel_task_policy are permitted to execute in an unordered fashion in unspecified threads, and indeterminately sequenced within each thread.
Note
Complexity: O(last - first) applications each of reduce and transform.
- Template Parameters
ExPolicy – The type of the execution policy to use (deduced). It describes the manner in which the execution of the algorithm may be parallelized and the manner in which it executes the assignments.
FwdIter1 – The type of the first source iterators used (deduced). This iterator type must meet the requirements of a forward iterator.
FwdIter2 – The type of the second source iterators used (deduced). This iterator type must meet the requirements of a forward iterator.
T – The type of the value to be used as return) values (deduced).
Reduce – The type of the binary function object used for the multiplication operation.
Convert – The type of the unary function object used to transform the elements of the input sequence before invoking the reduce function.
- Parameters
policy – The execution policy to use for the scheduling of the iterations.
first1 – Refers to the beginning of the first sequence of elements the result will be calculated with.
last1 – Refers to the end of the first sequence of elements the algorithm will be applied to.
first2 – Refers to the beginning of the second sequence of elements the result will be calculated with.
init – The initial value for the sum.
red_op – Specifies the function (or function object) which will be invoked for the initial value and each of the return values of conv_op. This is a binary predicate. The signature of this predicate should be equivalent to should be equivalent to:
The signature does not need to have const&, but the function must not modify the objects passed to it. The type Ret must be such that it can be implicitly converted to a type of T.Ret fun(const Type1 &a, const Type1 &b);
conv_op – Specifies the function (or function object) which will be invoked for each of the input values of the sequence. This is a binary predicate. The signature of this predicate should be equivalent to
The signature does not need to have const&, but the function must not modify the objects passed to it. The type Ret must be such that it can be implicitly converted to an object for the second argument type of red_op.Ret fun(const Type1 &a, const Type2 &b);
- Returns
The transform_reduce algorithm returns a hpx::future<T> if the execution policy is of type sequenced_task_policy or parallel_task_policy and returns T otherwise.
-
template<typename InIter1, typename InIter2, typename T, typename Reduce, typename Convert>
T transform_reduce(ExPolicy &&policy, InIter1 first1, InIter1 last1, InIter2 first2, T init, Reduce &&red_op, Convert &&conv_op)# Returns the result of accumulating init with the inner products of the pairs formed by the elements of two ranges starting at first1 and first2.
Note
Complexity: O(last - first) applications each of reduce and transform.
- Template Parameters
InIter1 – The type of the first source iterators used (deduced). This iterator type must meet the requirements of an input iterator.
InIter2 – The type of the second source iterators used (deduced). This iterator type must meet the requirements of an input iterator.
T – The type of the value to be used as return) values (deduced).
Reduce – The type of the binary function object used for the multiplication operation.
Convert – The type of the unary function object used to transform the elements of the input sequence before invoking the reduce function.
- Parameters
first1 – Refers to the beginning of the first sequence of elements the result will be calculated with.
last1 – Refers to the end of the first sequence of elements the algorithm will be applied to.
first2 – Refers to the beginning of the second sequence of elements the result will be calculated with.
init – The initial value for the sum.
red_op – Specifies the function (or function object) which will be invoked for the initial value and each of the return values of conv_op. This is a binary predicate. The signature of this predicate should be equivalent to should be equivalent to:
The signature does not need to have const&, but the function must not modify the objects passed to it. The type Ret must be such that it can be implicitly converted to a type of T.Ret fun(const Type1 &a, const Type1 &b);
conv_op – Specifies the function (or function object) which will be invoked for each of the input values of the sequence. This is a binary predicate. The signature of this predicate should be equivalent to
The signature does not need to have const&, but the function must not modify the objects passed to it. The type Ret must be such that it can be implicitly converted to an object for the second argument type of red_op.Ret fun(const Type1 &a, const Type2 &b);
- Returns
The transform_reduce algorithm returns a T.
-
template<typename ExPolicy, typename FwdIter, typename T, typename Reduce, typename Convert>
hpx/parallel/algorithms/transform_reduce_binary.hpp#
Defined in header hpx/parallel/algorithms/transform_reduce_binary.hpp.
See Public API for a list of names and headers that are part of the public HPX API.
hpx::uninitialized_copy, hpx::uninitialized_copy_n#
Defined in header hpx/algorithm.hpp.
See Public API for a list of names and headers that are part of the public HPX API.
-
namespace hpx
Functions
-
template<typename InIter, typename FwdIter>
FwdIter uninitialized_copy(InIter first, InIter last, FwdIter dest)# Copies the elements in the range, defined by [first, last), to an uninitialized memory area beginning at dest. If an exception is thrown during the copy operation, the function has no effects.
The assignments in the parallel uninitialized_copy algorithm invoked without an execution policy object will execute in sequential order in the calling thread.
Note
Complexity: Performs exactly last - first assignments.
- Template Parameters
InIter – The type of the source iterators used (deduced). This iterator type must meet the requirements of an input iterator.
FwdIter – The type of the iterator representing the destination range (deduced). This iterator type must meet the requirements of a forward iterator.
- Parameters
first – Refers to the beginning of the sequence of elements the algorithm will be applied to.
last – Refers to the end of the sequence of elements the algorithm will be applied to.
dest – Refers to the beginning of the destination range.
- Returns
The uninitialized_copy algorithm returns FwdIter. The uninitialized_copy algorithm returns the output iterator to the element in the destination range, one past the last element copied.
-
template<typename ExPolicy, typename FwdIter1, typename FwdIter2>
hpx::parallel::util::detail::algorithm_result_t<ExPolicy, FwdIter2> uninitialized_copy(ExPolicy &&policy, FwdIter1 first, FwdIter1 last, FwdIter2 dest)# Copies the elements in the range, defined by [first, last), to an uninitialized memory area beginning at dest. If an exception is thrown during the copy operation, the function has no effects. Executed according to the policy.
The assignments in the parallel uninitialized_copy algorithm invoked with an execution policy object of type sequenced_policy execute in sequential order in the calling thread.
The assignments in the parallel uninitialized_copy algorithm invoked with an execution policy object of type parallel_policy or parallel_task_policy are permitted to execute in an unordered fashion in unspecified threads, and indeterminately sequenced within each thread.
Note
Complexity: Performs exactly last - first assignments.
- Template Parameters
ExPolicy – The type of the execution policy to use (deduced). It describes the manner in which the execution of the algorithm may be parallelized and the manner in which it executes the assignments.
FwdIter1 – The type of the source iterators used (deduced). This iterator type must meet the requirements of an forward iterator.
FwdIter2 – The type of the iterator representing the destination range (deduced). This iterator type must meet the requirements of a forward iterator.
- Parameters
policy – The execution policy to use for the scheduling of the iterations.
first – Refers to the beginning of the sequence of elements the algorithm will be applied to.
last – Refers to the end of the sequence of elements the algorithm will be applied to.
dest – Refers to the beginning of the destination range.
- Returns
The uninitialized_copy algorithm returns a hpx::future<FwdIter2>, if the execution policy is of type sequenced_task_policy or parallel_task_policy and returns FwdIter2 otherwise. The uninitialized_copy algorithm returns the output iterator to the element in the destination range, one past the last element copied.
-
template<typename InIter, typename Size, typename FwdIter>
FwdIter uninitialized_copy_n(InIter first, Size count, FwdIter dest)# Copies the elements in the range [first, first + count), starting from first and proceeding to first + count - 1., to another range beginning at dest. If an exception is thrown during the copy operation, the function has no effects.
The assignments in the parallel uninitialized_copy_n algorithm invoked without an execution policy object execute in sequential order in the calling thread.
Note
Complexity: Performs exactly count assignments, if count > 0, no assignments otherwise.
- Template Parameters
InIter – The type of the source iterators used (deduced). This iterator type must meet the requirements of an input iterator.
Size – The type of the argument specifying the number of elements to apply f to.
FwdIter – The type of the iterator representing the destination range (deduced). This iterator type must meet the requirements of a forward iterator.
- Parameters
first – Refers to the beginning of the sequence of elements the algorithm will be applied to.
count – Refers to the number of elements starting at first the algorithm will be applied to.
dest – Refers to the beginning of the destination range.
- Returns
The uninitialized_copy_n algorithm returns a returns FwdIter. The uninitialized_copy_n algorithm returns the output iterator to the element in the destination range, one past the last element copied.
-
template<typename ExPolicy, typename FwdIter1, typename Size, typename FwdIter2>
hpx::parallel::util::detail::algorithm_result_t<ExPolicy, FwdIter2> uninitialized_copy_n(ExPolicy &&policy, FwdIter1 first, Size count, FwdIter2 dest)# Copies the elements in the range [first, first + count), starting from first and proceeding to first + count - 1., to another range beginning at dest. If an exception is thrown during the copy operation, the function has no effects.
The assignments in the parallel uninitialized_copy_n algorithm invoked with an execution policy object of type sequenced_policy execute in sequential order in the calling thread.
The assignments in the parallel uninitialized_copy_n algorithm invoked with an execution policy object of type parallel_policy or parallel_task_policy are permitted to execute in an unordered fashion in unspecified threads, and indeterminately sequenced within each thread.
Note
Complexity: Performs exactly count assignments, if count > 0, no assignments otherwise.
- Template Parameters
ExPolicy – The type of the execution policy to use (deduced). It describes the manner in which the execution of the algorithm may be parallelized and the manner in which it executes the assignments.
FwdIter1 – The type of the source iterators used (deduced). This iterator type must meet the requirements of a forward iterator.
Size – The type of the argument specifying the number of elements to apply f to.
FwdIter2 – The type of the iterator representing the destination range (deduced). This iterator type must meet the requirements of a forward iterator.
- Parameters
policy – The execution policy to use for the scheduling of the iterations.
first – Refers to the beginning of the sequence of elements the algorithm will be applied to.
count – Refers to the number of elements starting at first the algorithm will be applied to.
dest – Refers to the beginning of the destination range.
- Returns
The uninitialized_copy_n algorithm returns a hpx::future<FwdIter2> if the execution policy is of type sequenced_task_policy or parallel_task_policy and returns FwdIter2 otherwise. The uninitialized_copy_n algorithm returns the output iterator to the element in the destination range, one past the last element copied.
-
template<typename InIter, typename FwdIter>
hpx::uninitialized_default_construct, hpx::uninitialized_default_construct_n#
Defined in header hpx/algorithm.hpp.
See Public API for a list of names and headers that are part of the public HPX API.
-
namespace hpx
Functions
-
template<typename FwdIter>
void uninitialized_default_construct(FwdIter first, FwdIter last)# Constructs objects of type typename iterator_traits<ForwardIt> ::value_type in the uninitialized storage designated by the range by default-initialization. If an exception is thrown during the initialization, the function has no effects.
The assignments in the parallel uninitialized_default_construct algorithm invoked without an execution policy object will execute in sequential order in the calling thread.
Note
Complexity: Performs exactly last - first assignments.
- Template Parameters
FwdIter – The type of the source iterators used (deduced). This iterator type must meet the requirements of a forward iterator.
- Parameters
first – Refers to the beginning of the sequence of elements the algorithm will be applied to.
last – Refers to the end of the sequence of elements the algorithm will be applied to.
- Returns
The uninitialized_default_construct algorithm returns nothing
-
template<typename ExPolicy, typename FwdIter>
hpx::parallel::util::detail::algorithm_result_t<ExPolicy> uninitialized_default_construct(ExPolicy &&policy, FwdIter first, FwdIter last)# Constructs objects of type typename iterator_traits<ForwardIt> ::value_type in the uninitialized storage designated by the range by default-initialization. If an exception is thrown during the initialization, the function has no effects. Executed according to the policy.
The assignments in the parallel uninitialized_default_construct algorithm invoked with an execution policy object of type sequenced_policy execute in sequential order in the calling thread.
The assignments in the parallel uninitialized_default_construct algorithm invoked with an execution policy object of type parallel_policy or parallel_task_policy are permitted to execute in an unordered fashion in unspecified threads, and indeterminately sequenced within each thread.
Note
Complexity: Performs exactly last - first assignments.
- Template Parameters
ExPolicy – The type of the execution policy to use (deduced). It describes the manner in which the execution of the algorithm may be parallelized and the manner in which it executes the assignments.
FwdIter – The type of the source iterators used (deduced). This iterator type must meet the requirements of a forward iterator.
- Parameters
policy – The execution policy to use for the scheduling of the iterations.
first – Refers to the beginning of the sequence of elements the algorithm will be applied to.
last – Refers to the end of the sequence of elements the algorithm will be applied to.
- Returns
The uninitialized_default_construct algorithm returns a hpx::future<void>, if the execution policy is of type sequenced_task_policy or parallel_task_policy and returns nothing otherwise.
-
template<typename FwdIter, typename Size>
FwdIter uninitialized_default_construct_n(FwdIter first, Size count)# Constructs objects of type typename iterator_traits<ForwardIt> ::value_type in the uninitialized storage designated by the range [first, first + count) by default-initialization. If an exception is thrown during the initialization, the function has no effects.
Note
Complexity: Performs exactly count assignments, if count > 0, no assignments otherwise.
- Template Parameters
FwdIter – The type of the source iterators used (deduced). This iterator type must meet the requirements of a forward iterator.
Size – The type of the argument specifying the number of elements to apply f to.
- Parameters
first – Refers to the beginning of the sequence of elements the algorithm will be applied to.
count – Refers to the number of elements starting at first the algorithm will be applied to.
- Returns
The uninitialized_default_construct_n algorithm returns a returns FwdIter. The uninitialized_default_construct_n algorithm returns the iterator to the element in the source range, one past the last element constructed.
-
template<typename ExPolicy, typename FwdIter, typename Size>
hpx::parallel::util::detail::algorithm_result_t<ExPolicy, FwdIter> uninitialized_default_construct_n(ExPolicy &&policy, FwdIter first, Size count)# Constructs objects of type typename iterator_traits<ForwardIt> ::value_type in the uninitialized storage designated by the range [first, first + count) by default-initialization. If an exception is thrown during the initialization, the function has no effects. Executed according to the policy.
The assignments in the parallel uninitialized_default_construct_n algorithm invoked with an execution policy object of type sequenced_policy execute in sequential order in the calling thread.
The assignments in the parallel uninitialized_default_construct_n algorithm invoked with an execution policy object of type parallel_policy or parallel_task_policy are permitted to execute in an unordered fashion in unspecified threads, and indeterminately sequenced within each thread.
Note
Complexity: Performs exactly count assignments, if count > 0, no assignments otherwise.
- Template Parameters
ExPolicy – The type of the execution policy to use (deduced). It describes the manner in which the execution of the algorithm may be parallelized and the manner in which it executes the assignments.
FwdIter – The type of the source iterators used (deduced). This iterator type must meet the requirements of an forward iterator.
Size – The type of the argument specifying the number of elements to apply f to.
- Parameters
policy – The execution policy to use for the scheduling of the iterations.
first – Refers to the beginning of the sequence of elements the algorithm will be applied to.
count – Refers to the number of elements starting at first the algorithm will be applied to.
- Returns
The uninitialized_default_construct_n algorithm returns a hpx::future<FwdIter> if the execution policy is of type sequenced_task_policy or parallel_task_policy and returns FwdIter otherwise. The uninitialized_default_construct_n algorithm returns the iterator to the element in the source range, one past the last element constructed.
-
template<typename FwdIter>
hpx::uninitialized_fill, hpx::uninitialized_fill_n#
Defined in header hpx/algorithm.hpp.
See Public API for a list of names and headers that are part of the public HPX API.
-
namespace hpx
Functions
-
template<typename FwdIter, typename T>
void uninitialized_fill(FwdIter first, FwdIter last, T const &value)# Copies the given value to an uninitialized memory area, defined by the range [first, last). If an exception is thrown during the initialization, the function has no effects.
Note
Complexity: Linear in the distance between first and last
- Template Parameters
FwdIter – The type of the source iterators used (deduced). This iterator type must meet the requirements of a forward iterator.
T – The type of the value to be assigned (deduced).
- Parameters
first – Refers to the beginning of the sequence of elements the algorithm will be applied to.
last – Refers to the end of the sequence of elements the algorithm will be applied to.
value – The value to be assigned.
- Returns
The uninitialized_fill algorithm returns nothing
-
template<typename ExPolicy, typename FwdIter, typename T>
hpx::parallel::util::detail::algorithm_result_t<ExPolicy> uninitialized_fill(ExPolicy &&policy, FwdIter first, FwdIter last, T const &value)# Copies the given value to an uninitialized memory area, defined by the range [first, last). If an exception is thrown during the initialization, the function has no effects. Executed according to the policy.
The initializations in the parallel uninitialized_fill algorithm invoked with an execution policy object of type sequenced_policy execute in sequential order in the calling thread.
The initializations in the parallel uninitialized_fill algorithm invoked with an execution policy object of type parallel_policy or parallel_task_policy are permitted to execute in an unordered fashion in unspecified threads, and indeterminately sequenced within each thread.
Note
Complexity: Linear in the distance between first and last
- Template Parameters
ExPolicy – The type of the execution policy to use (deduced). It describes the manner in which the execution of the algorithm may be parallelized and the manner in which it executes the assignments.
FwdIter – The type of the source iterators used (deduced). This iterator type must meet the requirements of a forward iterator.
T – The type of the value to be assigned (deduced).
- Parameters
policy – The execution policy to use for the scheduling of the iterations.
first – Refers to the beginning of the sequence of elements the algorithm will be applied to.
last – Refers to the end of the sequence of elements the algorithm will be applied to.
value – The value to be assigned.
- Returns
The uninitialized_fill algorithm returns a hpx::future<void>, if the execution policy is of type sequenced_task_policy or parallel_task_policy and returns nothing otherwise.
-
template<typename FwdIter, typename Size, typename T>
FwdIter uninitialized_fill_n(FwdIter first, Size count, T const &value)# Copies the given value value to the first count elements in an uninitialized memory area beginning at first. If an exception is thrown during the initialization, the function has no effects.
Note
Complexity: Performs exactly count assignments, if count > 0, no assignments otherwise.
- Template Parameters
FwdIter – The type of the source iterators used (deduced). This iterator type must meet the requirements of a forward iterator.
Size – The type of the argument specifying the number of elements to apply f to.
T – The type of the value to be assigned (deduced).
- Parameters
first – Refers to the beginning of the sequence of elements the algorithm will be applied to.
count – Refers to the number of elements starting at first the algorithm will be applied to.
value – The value to be assigned.
- Returns
The uninitialized_fill_n algorithm returns a returns FwdIter. The uninitialized_fill_n algorithm returns the output iterator to the element in the range, one past the last element copied.
-
template<typename ExPolicy, typename FwdIter, typename Size, typename T>
hpx::parallel::util::detail::algorithm_result_t<ExPolicy, FwdIter> uninitialized_fill_n(ExPolicy &&policy, FwdIter first, Size count, T const &value)# Copies the given value value to the first count elements in an uninitialized memory area beginning at first. If an exception is thrown during the initialization, the function has no effects. Executed according to the policy.
The initializations in the parallel uninitialized_fill_n algorithm invoked with an execution policy object of type sequenced_policy execute in sequential order in the calling thread.
The initializations in the parallel uninitialized_fill_n algorithm invoked with an execution policy object of type parallel_policy or parallel_task_policy are permitted to execute in an unordered fashion in unspecified threads, and indeterminately sequenced within each thread.
Note
Complexity: Performs exactly count assignments, if count > 0, no assignments otherwise.
- Template Parameters
ExPolicy – The type of the execution policy to use (deduced). It describes the manner in which the execution of the algorithm may be parallelized and the manner in which it executes the assignments.
FwdIter – The type of the source iterators used (deduced). This iterator type must meet the requirements of a forward iterator.
Size – The type of the argument specifying the number of elements to apply f to.
T – The type of the value to be assigned (deduced).
- Parameters
policy – The execution policy to use for the scheduling of the iterations.
first – Refers to the beginning of the sequence of elements the algorithm will be applied to.
count – Refers to the number of elements starting at first the algorithm will be applied to.
value – The value to be assigned.
- Returns
The uninitialized_fill_n algorithm returns a hpx::future<FwdIter>, if the execution policy is of type sequenced_task_policy or parallel_task_policy and returns FwdIter otherwise. The uninitialized_fill_n algorithm returns the output iterator to the element in the range, one past the last element copied.
-
template<typename FwdIter, typename T>
hpx::uninitialized_move, hpx::uninitialized_move_n#
Defined in header hpx/algorithm.hpp.
See Public API for a list of names and headers that are part of the public HPX API.
-
namespace hpx
Functions
-
template<typename InIter, typename FwdIter>
FwdIter uninitialized_move(InIter first, InIter last, FwdIter dest)# Moves the elements in the range, defined by [first, last), to an uninitialized memory area beginning at dest. If an exception is thrown during the initialization, some objects in [first, last) are left in a valid but unspecified state.
Note
Complexity: Performs exactly last - first assignments.
- Template Parameters
InIter – The type of the source iterators used (deduced). This iterator type must meet the requirements of an input iterator.
FwdIter – The type of the iterator representing the destination range (deduced). This iterator type must meet the requirements of a forward iterator.
- Parameters
first – Refers to the beginning of the sequence of elements the algorithm will be applied to.
last – Refers to the end of the sequence of elements the algorithm will be applied to.
dest – Refers to the beginning of the destination range.
- Returns
The uninitialized_move algorithm returns FwdIter. The uninitialized_move algorithm returns the output iterator to the element in the destination range, one past the last element moved.
-
template<typename ExPolicy, typename FwdIter1, typename FwdIter2>
hpx::parallel::util::detail::algorithm_result_t<ExPolicy, FwdIter2> uninitialized_move(ExPolicy &&policy, FwdIter1 first, FwdIter1 last, FwdIter2 dest)# Moves the elements in the range, defined by [first, last), to an uninitialized memory area beginning at dest. If an exception is thrown during the initialization, some objects in [first, last) are left in a valid but unspecified state. Executed according to the policy.
The assignments in the parallel uninitialized_move algorithm invoked with an execution policy object of type sequenced_policy execute in sequential order in the calling thread.
The assignments in the parallel uninitialized_move algorithm invoked with an execution policy object of type parallel_policy or parallel_task_policy are permitted to execute in an unordered fashion in unspecified threads, and indeterminately sequenced within each thread.
Note
Complexity: Performs exactly last - first assignments.
- Template Parameters
ExPolicy – The type of the execution policy to use (deduced). It describes the manner in which the execution of the algorithm may be parallelized and the manner in which it executes the assignments.
FwdIter1 – The type of the source iterators used (deduced). This iterator type must meet the requirements of a forward iterator.
FwdIter2 – The type of the iterator representing the destination range (deduced). This iterator type must meet the requirements of a forward iterator.
- Parameters
policy – The execution policy to use for the scheduling of the iterations.
first – Refers to the beginning of the sequence of elements the algorithm will be applied to.
last – Refers to the end of the sequence of elements the algorithm will be applied to.
dest – Refers to the beginning of the destination range.
- Returns
The uninitialized_move algorithm returns a hpx::future<FwdIter2>, if the execution policy is of type sequenced_task_policy or parallel_task_policy and returns FwdIter2 otherwise. The uninitialized_move algorithm returns the output iterator to the element in the destination range, one past the last element moved.
-
template<typename InIter, typename Size, typename FwdIter>
std::pair<InIter, FwdIter> uninitialized_move_n(InIter first, Size count, FwdIter dest)# Moves the elements in the range [first, first + count), starting from first and proceeding to first + count - 1., to another range beginning at dest. If an exception is thrown during the initialization, some objects in [first, first + count) are left in a valid but unspecified state.
Note
Complexity: Performs exactly count movements, if count > 0, no move operations otherwise.
- Template Parameters
InIter – The type of the source iterators used (deduced). This iterator type must meet the requirements of an input iterator.
Size – The type of the argument specifying the number of elements to apply f to.
FwdIter – The type of the iterator representing the destination range (deduced). This iterator type must meet the requirements of a forward iterator.
- Parameters
first – Refers to the beginning of the sequence of elements the algorithm will be applied to.
count – Refers to the number of elements starting at first the algorithm will be applied to.
dest – Refers to the beginning of the destination range.
- Returns
The uninitialized_move_n algorithm returns a returns std::pair<InIter,FwdIter>. The uninitialized_move_n algorithm returns A pair whose first element is an iterator to the element past the last element moved in the source range, and whose second element is an iterator to the element past the last element moved in the destination range.
-
template<typename ExPolicy, typename FwdIter1, typename Size, typename FwdIter2>
parallel::util::detail::algorithm_result<ExPolicy, std::pair<FwdIter1, FwdIter2>>::type uninitialized_move_n(ExPolicy &&policy, FwdIter1 first, Size count, FwdIter2 dest)# Moves the elements in the range [first, first + count), starting from first and proceeding to first + count - 1., to another range beginning at dest. If an exception is thrown during the initialization, some objects in [first, first + count) are left in a valid but unspecified state. Executed according to the policy.
The assignments in the parallel uninitialized_move_n algorithm invoked with an execution policy object of type sequenced_policy execute in sequential order in the calling thread.
The assignments in the parallel uninitialized_move_n algorithm invoked with an execution policy object of type parallel_policy or parallel_task_policy are permitted to execute in an unordered fashion in unspecified threads, and indeterminately sequenced within each thread.
Note
Complexity: Performs exactly count movements, if count > 0, no move operations otherwise.
- Template Parameters
ExPolicy – The type of the execution policy to use (deduced). It describes the manner in which the execution of the algorithm may be parallelized and the manner in which it executes the assignments.
FwdIter1 – The type of the source iterators used (deduced). This iterator type must meet the requirements of a forward iterator.
Size – The type of the argument specifying the number of elements to apply f to.
FwdIter2 – The type of the iterator representing the destination range (deduced). This iterator type must meet the requirements of a forward iterator.
- Parameters
policy – The execution policy to use for the scheduling of the iterations.
first – Refers to the beginning of the sequence of elements the algorithm will be applied to.
count – Refers to the number of elements starting at first the algorithm will be applied to.
dest – Refers to the beginning of the destination range.
- Returns
The uninitialized_move_n algorithm returns a hpx::future<std::pair<FwdIter1,FwdIter2>> if the execution policy is of type sequenced_task_policy or parallel_task_policy and returns std::pair<FwdIter1,FwdIter2> otherwise. The uninitialized_move_n algorithm returns A pair whose first element is an iterator to the element past the last element moved in the source range, and whose second element is an iterator to the element past the last element moved in the destination range.
-
template<typename InIter, typename FwdIter>
hpx::uninitialized_relocate, hpx::uninitialized_relocate_n#
Defined in header hpx/algorithm.hpp.
See Public API for a list of names and headers that are part of the public HPX API.
-
namespace hpx
Functions
-
template<typename InIter1, typename InIter2, typename FwdIter>
FwdIter uninitialized_relocate(InIter1 first, InIter2 last, FwdIter dest)# Relocates the elements in the range, defined by [first, last), to an uninitialized memory area beginning at dest. If an exception is thrown during the move-construction of an element, all elements left in the input range, as well as all objects already constructed in the destination range are destroyed. After this algorithm completes, the source range should be freed or reused without destroying the objects.
The assignments in the parallel uninitialized_relocate algorithm invoked without an execution policy object will execute in sequential order in the calling thread.
Note
Complexity: time: O(n), space: O(1) 1) For “trivially relocatable” underlying types (T) and a contiguous iterator range [first, last): std::distance(first, last)*sizeof(T) bytes are copied. 2) For “trivially relocatable” underlying types (T) and a non-contiguous iterator range [first, last): std::distance(first, last) memory copies of sizeof(T) bytes each are performed. 3) For “non-trivially relocatable” underlying types (T): std::distance(first, last) move assignments and destructions are performed.
Note
Declare a type as “trivially relocatable” using the
HPX_DECLARE_TRIVIALLY_RELOCATABLEmacros found in <hpx/type_support/is_trivially_relocatable.hpp>.- Template Parameters
InIter1 – The type of the source iterator first (deduced). This iterator type must meet the requirements of an input iterator.
InIter2 – The type of the source iterator last (deduced). This iterator type must meet the requirements of an input iterator.
FwdIter – The type of the iterator representing the destination range (deduced). This iterator type must meet the requirements of a forward iterator.
- Parameters
first – Refers to the beginning of the sequence of elements the algorithm will be applied to.
last – Refers to the end of the sequence of elements the algorithm will be applied to.
dest – Refers to the beginning of the destination range.
- Returns
The uninitialized_relocate algorithm returns FwdIter. The uninitialized_relocate algorithm returns the output iterator to the element in the destination range, one past the last element relocated.
-
template<typename ExPolicy, typename InIter1, typename InIter2, typename FwdIter>
hpx::parallel::util::detail::algorithm_result_t<ExPolicy, FwdIter> uninitialized_relocate(ExPolicy &&policy, InIter1 first, InIter2 last, FwdIter dest)# Relocates the elements in the range defined by [first, last), to an uninitialized memory area beginning at dest. If an exception is thrown during the move-construction of an element, all elements left in the input range, as well as all objects already constructed in the destination range are destroyed. After this algorithm completes, the source range should be freed or reused without destroying the objects.
The assignments in the parallel uninitialized_relocate algorithm invoked with an execution policy object of type parallel_policy or parallel_task_policy are permitted to execute in an unordered fashion in unspecified threads, and indeterminately sequenced within each thread.
Note
Complexity: time: O(n), space: O(1) 1) For “trivially relocatable” underlying types (T) and a contiguous iterator range [first, last): std::distance(first, last)*sizeof(T) bytes are copied. 2) For “trivially relocatable” underlying types (T) and a non-contiguous iterator range [first, last): std::distance(first, last) memory copies of sizeof(T) bytes each are performed. 3) For “non-trivially relocatable” underlying types (T): std::distance(first, last) move assignments and destructions are performed.
Note
Declare a type as “trivially relocatable” using the
HPX_DECLARE_TRIVIALLY_RELOCATABLEmacros found in <hpx/type_support/is_trivially_relocatable.hpp>.- Template Parameters
ExPolicy – The type of the execution policy to use (deduced). It describes the manner in which the execution of the algorithm may be parallelized and the manner in which it executes the assignments.
InIter1 – The type of the source iterator first (deduced). This iterator type must meet the requirements of an input iterator.
InIter2 – The type of the source iterator last (deduced). This iterator type must meet the requirements of an input iterator.
FwdIter – The type of the iterator representing the destination range (deduced). This iterator type must meet the requirements of a forward iterator.
- Parameters
policy – The execution policy to use for the scheduling of the iterations.
first – Refers to the beginning of the sequence of elements the algorithm will be applied to.
last – Refers to the end of the sequence of elements the algorithm will be applied to.
dest – Refers to the beginning of the destination range. The assignments in the parallel uninitialized_relocate_n algorithm invoked with an execution policy object of type sequenced_policy execute in sequential order in the calling thread.
- Returns
The uninitialized_relocate algorithm returns a hpx::future<FwdIter>, if the execution policy is of type sequenced_task_policy or parallel_task_policy and returns FwdIter otherwise. The uninitialized_relocate algorithm returns the output iterator to the element in the destination range, one past the last element relocated.
-
template<typename BiIter1, typename BiIter2>
BiIter2 uninitialized_relocate_backward(BiIter1 first, BiIter1 last, BiIter2 dest_last)# Relocates the elements in the range, defined by [first, last), to an uninitialized memory area ending at dest_last. The objects are processed in reverse order. If an exception is thrown during the the move-construction of an element, all elements left in the input range, as well as all objects already constructed in the destination range are destroyed. After this algorithm completes, the source range should be freed or reused without destroying the objects.
The assignments in the parallel uninitialized_relocate algorithm invoked without an execution policy object will execute in sequential order in the calling thread.
Note
Complexity: time: O(n), space: O(1) 1) For “trivially relocatable” underlying types (T) and a contiguous iterator range [first, last): std::distance(first, last)*sizeof(T) bytes are copied. 2) For “trivially relocatable” underlying types (T) and a non-contiguous iterator range [first, last): std::distance(first, last) memory copies of sizeof(T) bytes each are performed. 3) For “non-trivially relocatable” underlying types (T): std::distance(first, last) move assignments and destructions are performed.
Note
Declare a type as “trivially relocatable” using the
HPX_DECLARE_TRIVIALLY_RELOCATABLEmacros found in <hpx/type_support/is_trivially_relocatable.hpp>.- Template Parameters
BiIter1 – The type of the source range (deduced). This iterator type must meet the requirements of a Bidirectional iterator.
BiIter2 – The type of the iterator representing the destination range (deduced). This iterator type must meet the requirements of a Bidirectional iterator.
- Parameters
first – Refers to the beginning of the sequence of elements the algorithm will be applied to.
last – Refers to the end of the sequence of elements the algorithm will be applied to.
dest_last – Refers to the beginning of the destination range.
- Returns
The uninitialized_relocate_backward algorithm returns BiIter2. The uninitialized_relocate_backward algorithm returns the bidirectional iterator to the first element in the destination range.
-
template<typename ExPolicy, typename BiIter1, typename BiIter2>
hpx::parallel::util::detail::algorithm_result<ExPolicy, BiIter2> uninitialized_relocate_backward(ExPolicy &&policy, BiIter1 first, BiIter1 last, BiIter2 dest_last)# Relocates the elements in the range, defined by [first, last), to an uninitialized memory area ending at dest_last. The order of the relocation of the objects depends on the execution policy. If an exception is thrown during the the move-construction of an element, all elements left in the input range, as well as all objects already constructed in the destination range are destroyed. After this algorithm completes, the source range should be freed or reused without destroying the objects.
The assignments in the parallel uninitialized_relocate_backward algorithm invoked with an execution policy object of type parallel_policy or parallel_task_policy are permitted to execute in an unordered fashion in unspecified threads, and indeterminately sequenced within each thread.
Note
Using the uninitialized_relocate_backward algorithm with the with a non-sequenced execution policy, will not guarantee the order of the relocation of the objects.
Note
Complexity: time: O(n), space: O(1) 1) For “trivially relocatable” underlying types (T) and a contiguous iterator range [first, last): std::distance(first, last)*sizeof(T) bytes are copied. 2) For “trivially relocatable” underlying types (T) and a non-contiguous iterator range [first, last): std::distance(first, last) memory copies of sizeof(T) bytes each are performed. 3) For “non-trivially relocatable” underlying types (T): std::distance(first, last) move assignments and destructions are performed.
Note
Declare a type as “trivially relocatable” using the
HPX_DECLARE_TRIVIALLY_RELOCATABLEmacros found in <hpx/type_support/is_trivially_relocatable.hpp>.- Template Parameters
ExPolicy – The type of the execution policy to use (deduced). It describes the manner in which the execution of the algorithm may be parallelized and the manner in which it executes the assignments.
BiIter1 – The type of the source range (deduced). This iterator type must meet the requirements of a Bidirectional iterator.
BiIter2 – The type of the iterator representing the destination range (deduced). This iterator type must meet the requirements of a Bidirectional iterator.
- Parameters
policy – The execution policy to use for the scheduling of the iterations.
first – Refers to the beginning of the sequence of elements the algorithm will be applied to.
last – Refers to the end of the sequence of elements the algorithm will be applied to.
dest_last – Refers to the end of the destination range.
- Returns
The uninitialized_relocate_backward algorithm returns a hpx::future<FwdIter>, if the execution policy is of type sequenced_task_policy or parallel_task_policy and returns BiIter2 otherwise. The uninitialized_relocate_backward algorithm returns the bidirectional iterator to the first element in the destination range.
-
template<typename InIter, typename Size, typename FwdIter>
FwdIter uninitialized_relocate_n(InIter first, Size count, FwdIter dest)# Relocates the elements in the range, defined by [first, last), to an uninitialized memory area beginning at dest. If an exception is thrown during the move-construction of an element, all elements left in the input range, as well as all objects already constructed in the destination range are destroyed. After this algorithm completes, the source range should be freed or reused without destroying the objects.
The assignments in the parallel uninitialized_relocate_n algorithm invoked without an execution policy object will execute in sequential order in the calling thread.
Note
Complexity: time: O(n), space: O(1) 1) For “trivially relocatable” underlying types (T) and a contiguous iterator range [first, first+count):
count*sizeof(T)bytes are copied. 2) For “trivially relocatable” underlying types (T) and a non-contiguous iterator range [first, first+count):countmemory copies of sizeof(T) bytes each are performed. 3) For “non-trivially relocatable” underlying types (T):countmove assignments and destructions are performed.Note
Declare a type as “trivially relocatable” using the
HPX_DECLARE_TRIVIALLY_RELOCATABLEmacros found in <hpx/type_support/is_trivially_relocatable.hpp>.- Template Parameters
InIter – The type of the source iterator first (deduced). This iterator type must meet the requirements of an input iterator.
Size – The type of the argument specifying the number of elements to relocate.
FwdIter – The type of the iterator representing the destination range (deduced). This iterator type must meet the requirements of a forward iterator.
- Parameters
first – Refers to the beginning of the sequence of elements the algorithm will be applied to.
count – Refers to the number of elements starting at first the algorithm will be applied to.
dest – Refers to the beginning of the destination range.
- Returns
The uninitialized_relocate_n algorithm returns FwdIter. The uninitialized_relocate_n algorithm returns the output iterator to the element in the destination range, one past the last element relocated.
-
template<typename ExPolicy, typename InIter, typename Size, typename FwdIter>
hpx::parallel::util::detail::algorithm_result_t<ExPolicy, FwdIter> uninitialized_relocate_n(ExPolicy &&policy, InIter first, Size count, FwdIter dest)# Relocates the elements in the range, defined by [first, last), to an uninitialized memory area beginning at dest. If an exception is thrown during the move-construction of an element, all elements left in the input range, as well as all objects already constructed in the destination range are destroyed. After this algorithm completes, the source range should be freed or reused without destroying the objects.
The assignments in the parallel uninitialized_relocate_n algorithm invoked with an execution policy object of type sequenced_policy execute in sequential order in the calling thread.
The assignments in the parallel uninitialized_relocate_n algorithm invoked with an execution policy object of type parallel_policy or parallel_task_policy are permitted to execute in an unordered fashion in unspecified threads, and indeterminately sequenced within each thread.
Note
Complexity: time: O(n), space: O(1) 1) For “trivially relocatable” underlying types (T) and a contiguous iterator range [first, first+count):
count*sizeof(T)bytes are copied. 2) For “trivially relocatable” underlying types (T) and a non-contiguous iterator range [first, first+count):countmemory copies of sizeof(T) bytes each are performed. 3) For “non-trivially relocatable” underlying types (T):countmove assignments and destructions are performed.Note
Declare a type as “trivially relocatable” using the
HPX_DECLARE_TRIVIALLY_RELOCATABLEmacros found in <hpx/type_support/is_trivially_relocatable.hpp>.- Template Parameters
ExPolicy – The type of the execution policy to use (deduced). It describes the manner in which the execution of the algorithm may be parallelized and the manner in which it executes the assignments.
InIter – The type of the source iterator first (deduced). This iterator type must meet the requirements of an input iterator.
Size – The type of the argument specifying the number of elements to relocate.
FwdIter – The type of the iterator representing the destination range (deduced). This iterator type must meet the requirements of a forward iterator.
- Parameters
policy – The execution policy to use for the scheduling of the iterations.
first – Refers to the beginning of the sequence of elements the algorithm will be applied to.
count – Refers to the number of elements starting at first the algorithm will be applied to.
dest – Refers to the beginning of the destination range.
- Returns
The uninitialized_relocate_n algorithm returns a hpx::future<FwdIter> if the execution policy is of type sequenced_task_policy or parallel_task_policy and returns FwdIter otherwise. The uninitialized_relocate_n algorithm returns the output iterator to the element in the destination range, one past the last element relocated.
-
template<typename InIter1, typename InIter2, typename FwdIter>
hpx::uninitialized_value_construct, hpx::uninitialized_value_construct_n#
Defined in header hpx/algorithm.hpp.
See Public API for a list of names and headers that are part of the public HPX API.
-
namespace hpx
Functions
-
template<typename FwdIter>
void uninitialized_value_construct(FwdIter first, FwdIter last)# Constructs objects of type typename iterator_traits<ForwardIt> ::value_type in the uninitialized storage designated by the range by value-initialization. If an exception is thrown during the initialization, the function has no effects.
Note
Complexity: Performs exactly last - first assignments.
- Template Parameters
FwdIter – The type of the source iterators used (deduced). This iterator type must meet the requirements of a forward iterator.
- Parameters
first – Refers to the beginning of the sequence of elements the algorithm will be applied to.
last – Refers to the end of the sequence of elements the algorithm will be applied to.
- Returns
The uninitialized_value_construct algorithm returns nothing
-
template<typename ExPolicy, typename FwdIter>
hpx::parallel::util::detail::algorithm_result_t<ExPolicy> uninitialized_value_construct(ExPolicy &&policy, FwdIter first, FwdIter last)# Constructs objects of type typename iterator_traits<ForwardIt> ::value_type in the uninitialized storage designated by the range by value-initialization. If an exception is thrown during the initialization, the function has no effects. Executed according to the policy.
The assignments in the parallel uninitialized_value_construct algorithm invoked with an execution policy object of type sequenced_policy execute in sequential order in the calling thread.
The assignments in the parallel uninitialized_value_construct algorithm invoked with an execution policy object of type parallel_policy or parallel_task_policy are permitted to execute in an unordered fashion in unspecified threads, and indeterminately sequenced within each thread.
Note
Complexity: Performs exactly last - first assignments.
- Template Parameters
ExPolicy – The type of the execution policy to use (deduced). It describes the manner in which the execution of the algorithm may be parallelized and the manner in which it executes the assignments.
FwdIter – The type of the source iterators used (deduced). This iterator type must meet the requirements of a forward iterator.
- Parameters
policy – The execution policy to use for the scheduling of the iterations.
first – Refers to the beginning of the sequence of elements the algorithm will be applied to.
last – Refers to the end of the sequence of elements the algorithm will be applied to.
- Returns
The uninitialized_value_construct algorithm returns a hpx::future<void>, if the execution policy is of type sequenced_task_policy or parallel_task_policy and returns nothing otherwise.
-
template<typename FwdIter, typename Size>
FwdIter uninitialized_value_construct_n(FwdIter first, Size count)# Constructs objects of type typename iterator_traits<ForwardIt> ::value_type in the uninitialized storage designated by the range [first, first + count) by value-initialization. If an exception is thrown during the initialization, the function has no effects.
Note
Complexity: Performs exactly count assignments, if count > 0, no assignments otherwise.
- Template Parameters
FwdIter – The type of the source iterators used (deduced). This iterator type must meet the requirements of a forward iterator.
Size – The type of the argument specifying the number of elements to apply f to.
- Parameters
first – Refers to the beginning of the sequence of elements the algorithm will be applied to.
count – Refers to the number of elements starting at first the algorithm will be applied to.
- Returns
The uninitialized_value_construct_n algorithm returns a returns FwdIter. The uninitialized_value_construct_n algorithm returns the iterator to the element in the source range, one past the last element constructed.
-
template<typename ExPolicy, typename FwdIter, typename Size>
hpx::parallel::util::detail::algorithm_result_t<ExPolicy, FwdIter> uninitialized_value_construct_n(ExPolicy &&policy, FwdIter first, Size count)# Constructs objects of type typename iterator_traits<ForwardIt> ::value_type in the uninitialized storage designated by the range [first, first + count) by value-initialization. If an exception is thrown during the initialization, the function has no effects.
The assignments in the parallel uninitialized_value_construct_n algorithm invoked with an execution policy object of type sequenced_policy execute in sequential order in the calling thread.
The assignments in the parallel uninitialized_value_construct_n algorithm invoked with an execution policy object of type parallel_policy or parallel_task_policy are permitted to execute in an unordered fashion in unspecified threads, and indeterminately sequenced within each thread.
Note
Complexity: Performs exactly count assignments, if count > 0, no assignments otherwise.
- Template Parameters
ExPolicy – The type of the execution policy to use (deduced). It describes the manner in which the execution of the algorithm may be parallelized and the manner in which it executes the assignments.
FwdIter – The type of the source iterators used (deduced). This iterator type must meet the requirements of a forward iterator.
Size – The type of the argument specifying the number of elements to apply f to.
- Parameters
policy – The execution policy to use for the scheduling of the iterations.
first – Refers to the beginning of the sequence of elements the algorithm will be applied to.
count – Refers to the number of elements starting at first the algorithm will be applied to.
- Returns
The uninitialized_value_construct_n algorithm returns a hpx::future<FwdIter> if the execution policy is of type sequenced_task_policy or parallel_task_policy and returns FwdIter otherwise. The uninitialized_value_construct_n algorithm returns the iterator to the element in the source range, one past the last element constructed.
-
template<typename FwdIter>
hpx::unique, hpx::unique_copy#
Defined in header hpx/algorithm.hpp.
See Public API for a list of names and headers that are part of the public HPX API.
-
namespace hpx
Functions
-
template<typename FwdIter, typename Pred = hpx::parallel::detail::equal_to, typename Proj = hpx::identity>
FwdIter unique(FwdIter first, FwdIter last, Pred &&pred = Pred(), Proj &&proj = Proj())# Eliminates all but the first element from every consecutive group of equivalent elements from the range [first, last) and returns a past-the-end iterator for the new logical end of the range.
Note
Complexity: Performs not more than last - first assignments, exactly last - first - 1 applications of the predicate pred and no more than twice as many applications of the projection proj.
- Template Parameters
FwdIter – The type of the source iterators used (deduced). This iterator type must meet the requirements of a forward iterator.
Pred – The type of the function/function object to use (deduced). Unlike its sequential form, the parallel overload of unique requires Pred to meet the requirements of CopyConstructible. This defaults to std::equal_to<>
Proj – The type of an optional projection function. This defaults to hpx::identity.
- Parameters
first – Refers to the beginning of the sequence of elements the algorithm will be applied to.
last – Refers to the end of the sequence of elements the algorithm will be applied to.
pred – Specifies the function (or function object) which will be invoked for each of the elements in the sequence specified by [first, last). This is an binary predicate which returns true for the required elements. The signature of this predicate should be equivalent to:
The signature does not need to have const&, but the function must not modify the objects passed to it. The types Type1 and Type2 must be such that objects of types FwdIter can be dereferenced and then implicitly converted to both Type1 and Type2bool pred(const Type1 &a, const Type2 &b);
proj – Specifies the function (or function object) which will be invoked for each of the elements as a projection operation before the actual predicate pred is invoked.
- Returns
The unique algorithm returns FwdIter. The unique algorithm returns the iterator to the new end of the range.
-
template<typename ExPolicy, typename FwdIter, typename Pred = hpx::parallel::detail::equal_to, typename Proj = hpx::identity>
parallel::util::detail::algorithm_result<ExPolicy, FwdIter>::type unique(ExPolicy &&policy, FwdIter first, FwdIter last, Pred &&pred = Pred(), Proj &&proj = Proj())# Eliminates all but the first element from every consecutive group of equivalent elements from the range [first, last) and returns a past-the-end iterator for the new logical end of the range. Executed according to the policy.
The assignments in the parallel unique algorithm invoked with an execution policy object of type sequenced_policy execute in sequential order in the calling thread.
The assignments in the parallel unique algorithm invoked with an execution policy object of type parallel_policy or parallel_task_policy are permitted to execute in an unordered fashion in unspecified threads, and indeterminately sequenced within each thread.
Note
Complexity: Performs not more than last - first assignments, exactly last - first - 1 applications of the predicate pred and no more than twice as many applications of the projection proj.
- Template Parameters
ExPolicy – The type of the execution policy to use (deduced). It describes the manner in which the execution of the algorithm may be parallelized and the manner in which it executes the assignments.
FwdIter – The type of the source iterators used (deduced). This iterator type must meet the requirements of a forward iterator.
Pred – The type of the function/function object to use (deduced). Unlike its sequential form, the parallel overload of unique requires Pred to meet the requirements of CopyConstructible. This defaults to std::equal_to<>
Proj – The type of an optional projection function. This defaults to hpx::identity.
- Parameters
policy – The execution policy to use for the scheduling of the iterations.
first – Refers to the beginning of the sequence of elements the algorithm will be applied to.
last – Refers to the end of the sequence of elements the algorithm will be applied to.
pred – Specifies the function (or function object) which will be invoked for each of the elements in the sequence specified by [first, last). This is an binary predicate which returns true for the required elements. The signature of this predicate should be equivalent to:
The signature does not need to have const&, but the function must not modify the objects passed to it. The types Type1 and Type2 must be such that objects of types FwdIter can be dereferenced and then implicitly converted to both Type1 and Type2bool pred(const Type1 &a, const Type2 &b);
proj – Specifies the function (or function object) which will be invoked for each of the elements as a projection operation before the actual predicate pred is invoked.
- Returns
The unique algorithm returns a hpx::future<FwdIter> if the execution policy is of type sequenced_task_policy or parallel_task_policy and returns FwdIter otherwise. The unique algorithm returns the iterator to the new end of the range.
-
template<typename InIter, typename OutIter, typename Pred = hpx::parallel::detail::equal_to, typename Proj = hpx::identity>
OutIter unique_copy(InIter first, InIter last, OutIter dest, Pred &&pred = Pred(), Proj &&proj = Proj())# Copies the elements from the range [first, last), to another range beginning at dest in such a way that there are no consecutive equal elements. Only the first element of each group of equal elements is copied.
Note
Complexity: Performs not more than last - first assignments, exactly last - first - 1 applications of the predicate pred and no more than twice as many applications of the projection proj
- Template Parameters
InIter – The type of the source iterators used (deduced). This iterator type must meet the requirements of an input iterator.
OutIter – The type of the iterator representing the destination range (deduced). This iterator type must meet the requirements of an output iterator.
Pred – The type of the function/function object to use (deduced). Unlike its sequential form, the parallel overload of unique_copy requires Pred to meet the requirements of CopyConstructible. This defaults to std::equal_to<>
Proj – The type of an optional projection function. This defaults to hpx::identity
- Parameters
first – Refers to the beginning of the sequence of elements the algorithm will be applied to.
last – Refers to the end of the sequence of elements the algorithm will be applied to.
dest – Refers to the beginning of the destination range.
pred – Specifies the function (or function object) which will be invoked for each of the elements in the sequence specified by [first, last). This is an binary predicate which returns true for the required elements. The signature of this predicate should be equivalent to:
The signature does not need to have const&, but the function must not modify the objects passed to it. The type Type must be such that an object of type FwdIter can be dereferenced and then implicitly converted to Type.bool pred(const Type &a, const Type &b);
proj – Specifies the function (or function object) which will be invoked for each of the elements as a projection operation before the actual predicate pred is invoked.
- Returns
The unique_copy algorithm returns a returns OutIter. The unique_copy algorithm returns the destination iterator to the end of the dest range.
-
template<typename ExPolicy, typename FwdIter1, typename FwdIter2, typename Pred = hpx::parallel::detail::equal_to, typename Proj = hpx::identity>
parallel::util::detail::algorithm_result<ExPolicy, FwdIter2>::type unique_copy(ExPolicy &&policy, FwdIter1 first, FwdIter1 last, FwdIter2 dest, Pred &&pred = Pred(), Proj &&proj = Proj())# Copies the elements from the range [first, last), to another range beginning at dest in such a way that there are no consecutive equal elements. Only the first element of each group of equal elements is copied. Executed according to the policy.
The assignments in the parallel unique_copy algorithm invoked with an execution policy object of type sequenced_policy execute in sequential order in the calling thread.
The assignments in the parallel unique_copy algorithm invoked with an execution policy object of type parallel_policy or parallel_task_policy are permitted to execute in an unordered fashion in unspecified threads, and indeterminately sequenced within each thread.
Note
Complexity: Performs not more than last - first assignments, exactly last - first - 1 applications of the predicate pred and no more than twice as many applications of the projection proj
- Template Parameters
ExPolicy – The type of the execution policy to use (deduced). It describes the manner in which the execution of the algorithm may be parallelized and the manner in which it executes the assignments.
FwdIter1 – The type of the source iterators used (deduced). This iterator type must meet the requirements of a forward iterator.
FwdIter2 – The type of the iterator representing the destination range (deduced). This iterator type must meet the requirements of a forward iterator.
Pred – The type of the function/function object to use (deduced). Unlike its sequential form, the parallel overload of unique_copy requires Pred to meet the requirements of CopyConstructible. This defaults to std::equal_to<>
Proj – The type of an optional projection function. This defaults to hpx::identity.
- Parameters
policy – The execution policy to use for the scheduling of the iterations.
first – Refers to the beginning of the sequence of elements the algorithm will be applied to.
last – Refers to the end of the sequence of elements the algorithm will be applied to.
dest – Refers to the beginning of the destination range.
pred – Specifies the function (or function object) which will be invoked for each of the elements in the sequence specified by [first, last). This is an binary predicate which returns true for the required elements. The signature of this predicate should be equivalent to:
The signature does not need to have const&, but the function must not modify the objects passed to it. The type Type must be such that an object of type FwdIter1 can be dereferenced and then implicitly converted to Type.bool pred(const Type &a, const Type &b);
proj – Specifies the function (or function object) which will be invoked for each of the elements as a projection operation before the actual predicate pred is invoked.
- Returns
The unique_copy algorithm returns a hpx::future<FwdIter2> if the execution policy is of type sequenced_task_policy or parallel_task_policy and returns FwdIter2 otherwise. The unique_copy algorithm returns the pair of the source iterator to last, and the destination iterator to the end of the dest range.
-
template<typename FwdIter, typename Pred = hpx::parallel::detail::equal_to, typename Proj = hpx::identity>
hpx::ranges::adjacent_difference#
Defined in header hpx/algorithm.hpp.
See Public API for a list of names and headers that are part of the public HPX API.
-
namespace hpx
-
namespace ranges#
Functions
-
template<typename FwdIter1, typename FwdIter2, typename Sent>
FwdIter2 adjacent_difference(FwdIter1 first, Sent last, FwdIter2 dest)# Searches the range [first, last) for two consecutive identical elements.
Note
Complexity: Exactly the smaller of (result - first) + 1 and (last - first) - 1 application of the predicate where result is the value returned
- Template Parameters
FwdIter1 – The type of the source iterators used for the range (deduced). This iterator type must meet the requirements of an forward iterator.
FwdIter2 – The type of the source iterators used for the range (deduced). This iterator type must meet the requirements of an forward iterator.
Sent – The type of the source sentinel (deduced). This sentinel type must be a sentinel for InIter.
- Parameters
first – Refers to the beginning of the sequence of elements of the range the algorithm will be applied to.
last – Refers to the end of the sequence of elements of the range the algorithm will be applied to.
dest – Refers to the beginning of the destination range.
- Returns
The adjacent_difference algorithm returns an iterator to the first of the identical elements. If no such elements are found, last is returned.
-
template<typename Rng, typename FwdIter2>
FwdIter2 adjacent_difference(Rng &&rng, FwdIter2 dest)# Searches the rng for two consecutive identical elements.
Note
Complexity: Exactly the smaller of (result - first) + 1 and (last - first) - 1 application of the predicate where result is the value returned
- Template Parameters
FwdIter2 – The type of the source iterators used for the range (deduced). This iterator type must meet the requirements of an forward iterator.
Rng – The type of the source range used (deduced). The iterators extracted from this range type must meet the requirements of an input iterator.
- Parameters
rng – Refers to the sequence of elements the algorithm will be applied to.
dest – Refers to the beginning of the destination range.
- Returns
The adjacent_difference algorithm returns an iterator to the first of the identical elements.
-
template<typename ExPolicy, typename FwdIter1, typename Sent, typename FwdIter2>
hpx::parallel::util::detail::algorithm_result_t<ExPolicy, FwdIter2> adjacent_difference(ExPolicy &&policy, FwdIter1 first, Sent last, FwdIter2 dest)# Searches the range [first, last) for two consecutive identical elements.
Note
Complexity: Exactly the smaller of (result - first) + 1 and (last - first) - 1 application of the predicate where result is the value returned
- Template Parameters
ExPolicy – The type of the execution policy to use (deduced). It describes the manner in which the execution of the algorithm may be parallelized and the manner in which it executes the assignments.
FwdIter1 – The type of the source iterators used for the range (deduced). This iterator type must meet the requirements of an forward iterator.
FwdIter2 – The type of the source iterators used for the range (deduced). This iterator type must meet the requirements of an forward iterator.
Sent – The type of the source sentinel (deduced). This sentinel type must be a sentinel for InIter.
- Parameters
policy – The execution policy to use for the scheduling of the iterations.
first – Refers to the beginning of the sequence of elements of the range the algorithm will be applied to.
last – Refers to the end of the sequence of elements of the range the algorithm will be applied to.
dest – Refers to the beginning of the destination range.
- Returns
The adjacent_difference algorithm returns an iterator to the first of the identical elements. If no such elements are found, last is returned.
-
template<typename ExPolicy, typename Rng, typename FwdIter2>
hpx::parallel::util::detail::algorithm_result_t<ExPolicy, FwdIter2> adjacent_difference(ExPolicy &&policy, Rng &&rng, FwdIter2 dest)# Searches the rng for two consecutive identical elements.
Note
Complexity: Exactly the smaller of (result - first) + 1 and (last - first) - 1 application of the predicate where result is the value returned
- Template Parameters
ExPolicy – The type of the execution policy to use (deduced). It describes the manner in which the execution of the algorithm may be parallelized and the manner in which it executes the assignments.
FwdIter2 – The type of the source iterators used for the range (deduced). This iterator type must meet the requirements of an forward iterator.
Rng – The type of the source range used (deduced). The iterators extracted from this range type must meet the requirements of an input iterator.
- Parameters
policy – The execution policy to use for the scheduling of the iterations.
rng – Refers to the sequence of elements the algorithm will be applied to.
dest – Refers to the beginning of the destination range.
- Returns
The adjacent_difference algorithm returns an iterator to the first of the identical elements.
-
template<typename FwdIter1, typename Sent, typename FwdIter2, typename Op>
FwdIter2 adjacent_difference(FwdIter1 first, Sent last, FwdIter2 dest, Op &&op)# Searches the range [first, last) for two consecutive identical elements.
Note
Complexity: Exactly the smaller of (result - first) + 1 and (last - first) - 1 application of the predicate where result is the value returned
- Template Parameters
FwdIter1 – The type of the source iterators used for the range (deduced). This iterator type must meet the requirements of an forward iterator.
FwdIter2 – The type of the source iterators used for the range (deduced). This iterator type must meet the requirements of an forward iterator.
Sent – The type of the source sentinel (deduced). This sentinel type must be a sentinel for InIter.
Op – The type of the function/function object to use (deduced). Unlike its sequential form, the parallel overload of adjacent_difference requires Op to meet the requirements of CopyConstructible.
- Parameters
first – Refers to the beginning of the sequence of elements of the range the algorithm will be applied to.
last – Refers to the end of the sequence of elements of the range the algorithm will be applied to.
dest – Refers to the beginning of the destination range.
op – Binary operation function object that will be applied. The signature of the function should be equivalent to the following:
The signature does not need to have const &. The types Type1 and Type2 must be such that an object of type iterator_traits<InputIt>::value_type can be implicitly converted to both of them. The type Ret must be such that an object of type OutputIt can be dereferenced and assigned a value of type Ret.Ret fun(const Type1 &a, const Type2 &b);
- Returns
The adjacent_difference algorithm returns an iterator to the first of the identical elements. If no such elements are found, last is returned.
-
template<typename Rng, typename FwdIter2, typename Op>
FwdIter2 adjacent_difference(Rng &&rng, FwdIter2 dest, Op &&op)# Searches the rng for two consecutive identical elements.
- Template Parameters
FwdIter2 – The type of the source iterators used for the range (deduced). This iterator type must meet the requirements of an forward iterator.
Rng – The type of the source range used (deduced). The iterators extracted from this range type must meet the requirements of an input iterator.
Op – The type of the function/function object to use (deduced). Unlike its sequential form, the parallel overload of adjacent_difference requires Op to meet the requirements of CopyConstructible.
- Parameters
rng – Refers to the sequence of elements the algorithm will be applied to.
dest – Refers to the beginning of the destination range.
op – Binary operation function object that will be applied. The signature of the function should be equivalent to the following:
The signature does not need to have const &. The types Type1 and Type2 must be such that an object of type iterator_traits<InputIt>::value_type can be implicitly converted to both of them. The type Ret must be such that an object of type OutputIt can be dereferenced and assigned a value of type Ret.?Ret fun(const Type1 &a, const Type2 &b);
- Returns
The adjacent_difference algorithm returns an iterator to the first of the identical elements.
-
template<typename ExPolicy, typename FwdIter1, typename Sent, typename FwdIter2, typename Op>
hpx::parallel::util::detail::algorithm_result_t<ExPolicy, FwdIter2> adjacent_difference(ExPolicy &&policy, FwdIter1 first, Sent last, FwdIter2 dest, Op &&op)# Searches the range [first, last) for two consecutive identical elements.
Note
Complexity: Exactly the smaller of (result - first) + 1 and (last - first) - 1 application of the predicate where result is the value returned
- Template Parameters
ExPolicy – The type of the execution policy to use (deduced). It describes the manner in which the execution of the algorithm may be parallelized and the manner in which it executes the assignments.
FwdIter1 – The type of the source iterators used for the range (deduced). This iterator type must meet the requirements of an forward iterator.
FwdIter2 – The type of the source iterators used for the range (deduced). This iterator type must meet the requirements of an forward iterator.
Sent – The type of the source sentinel (deduced). This sentinel type must be a sentinel for InIter.
Op – The type of the function/function object to use (deduced). Unlike its sequential form, the parallel overload of adjacent_difference requires Op to meet the requirements of CopyConstructible.
- Parameters
policy – The execution policy to use for the scheduling of the iterations.
first – Refers to the beginning of the sequence of elements of the range the algorithm will be applied to.
last – Refers to the end of the sequence of elements of the range the algorithm will be applied to.
dest – Refers to the beginning of the destination range.
op – Binary operation function object that will be applied. The signature of the function should be equivalent to the following:
The signature does not need to have const &. The types Type1 and Type2 must be such that an object of type iterator_traits<InputIt>::value_type can be implicitly converted to both of them. The type Ret must be such that an object of type OutputIt can be dereferenced and assigned a value of type Ret.?Ret fun(const Type1 &a, const Type2 &b);
- Returns
The adjacent_difference algorithm returns an iterator to the first of the identical elements. If no such elements are found, last is returned.
-
template<typename ExPolicy, typename Rng, typename FwdIter2, typename Op>
hpx::parallel::util::detail::algorithm_result_t<ExPolicy, FwdIter2> adjacent_difference(ExPolicy &&policy, Rng &&rng, FwdIter2 dest, Op &&op)# Searches the rng for two consecutive identical elements.
Note
Complexity: Exactly the smaller of (result - first) + 1 and (last - first) - 1 application of the predicate where result is the value returned
- Template Parameters
ExPolicy – The type of the execution policy to use (deduced). It describes the manner in which the execution of the algorithm may be parallelized and the manner in which it executes the assignments.
FwdIter2 – The type of the source iterators used for the range (deduced). This iterator type must meet the requirements of an forward iterator.
Rng – The type of the source range used (deduced). The iterators extracted from this range type must meet the requirements of an input iterator.
Op – The type of the function/function object to use (deduced). Unlike its sequential form, the parallel overload of adjacent_difference requires Op to meet the requirements of CopyConstructible.
- Parameters
policy – The execution policy to use for the scheduling of the iterations.
rng – Refers to the sequence of elements the algorithm will be applied to.
dest – Refers to the beginning of the destination range.
op – Binary operation function object that will be applied. The signature of the function should be equivalent to the following:
The signature does not need to have const &. The types Type1 and Type2 must be such that an object of type iterator_traits<InputIt>::value_type can be implicitly converted to both of them. The type Ret must be such that an object of type OutputIt can be dereferenced and assigned a value of type Ret.Ret fun(const Type1 &a, const Type2 &b);
- Returns
The adjacent_difference algorithm returns an iterator to the first of the identical elements.
-
template<typename FwdIter1, typename FwdIter2, typename Sent>
-
namespace ranges#
hpx::ranges::adjacent_find#
Defined in header hpx/algorithm.hpp.
See Public API for a list of names and headers that are part of the public HPX API.
-
namespace hpx
-
namespace ranges
Functions
-
template<typename FwdIter, typename Sent, typename Proj = hpx::identity, typename Pred = detail::equal_to>
FwdIter adjacent_find(FwdIter first, Sent last, Pred &&pred = Pred(), Proj &&proj = Proj())# Searches the range [first, last) for two consecutive identical elements.
Note
Complexity: Exactly the smaller of (result - first) + 1 and (last - first) - 1 application of the predicate where result is the value returned
- Template Parameters
FwdIter – The type of the source iterators used for the range (deduced). This iterator type must meet the requirements of an forward iterator.
Sent – The type of the source sentinel (deduced). This sentinel type must be a sentinel for InIter.
Proj – The type of an optional projection function. This defaults to hpx::identity
Pred – The type of an optional function/function object to use.
- Parameters
first – Refers to the beginning of the sequence of elements of the range the algorithm will be applied to.
last – Refers to the end of the sequence of elements of the range the algorithm will be applied to.
pred – The binary predicate which returns true if the elements should be treated as equal. The signature should be equivalent to the following:
The signature does not need to have const &, but the function must not modify the objects passed to it. The types Type1 must be such that objects of type FwdIter can be dereferenced and then implicitly converted to Type1 .bool pred(const Type1 &a, const Type1 &b);
proj – Specifies the function (or function object) which will be invoked for each of the elements as a projection operation before the actual predicate is invoked.
- Returns
The adjacent_find algorithm returns an iterator to the first of the identical elements. If no such elements are found, last is returned.
-
template<typename ExPolicy, typename FwdIter, typename Sent, typename Proj = hpx::identity, typename Pred = detail::equal_to>
parallel::util::detail::algorithm_result<ExPolicy, FwdIter>::type adjacent_find(ExPolicy &&policy, FwdIter first, Sent last, Pred &&pred = Pred(), Proj &&proj = Proj())# Searches the range [first, last) for two consecutive identical elements. This version uses the given binary predicate pred
The comparison operations in the parallel adjacent_find invoked with an execution policy object of type sequenced_policy execute in sequential order in the calling thread.
The comparison operations in the parallel adjacent_find invoked with an execution policy object of type parallel_policy or parallel_task_policy are permitted to execute in an unordered fashion in unspecified threads, and indeterminately sequenced within each thread.
This overload of adjacent_find is available if the user decides to provide their algorithm their own binary predicate pred.
Note
Complexity: Exactly the smaller of (result - first) + 1 and (last - first) - 1 application of the predicate where result is the value returned
- Template Parameters
ExPolicy – The type of the execution policy to use (deduced). It describes the manner in which the execution of the algorithm may be parallelized and the manner in which it executes the assignments.
FwdIter – The type of the source iterators used for the range (deduced). This iterator type must meet the requirements of an forward iterator.
Sent – The type of the source sentinel (deduced). This sentinel type must be a sentinel for InIter.
Proj – The type of an optional projection function. This defaults to hpx::identity
Pred – The type of an optional function/function object to use. Unlike its sequential form, the parallel overload of adjacent_find requires Pred to meet the requirements of CopyConstructible. This defaults to std::equal_to<>
- Parameters
policy – The execution policy to use for the scheduling of the iterations.
first – Refers to the beginning of the sequence of elements of the range the algorithm will be applied to.
last – Refers to the end of the sequence of elements of the range the algorithm will be applied to.
pred – The binary predicate which returns true if the elements should be treated as equal. The signature should be equivalent to the following:
The signature does not need to have const &, but the function must not modify the objects passed to it. The types Type1 must be such that objects of type FwdIter can be dereferenced and then implicitly converted to Type1 .bool pred(const Type1 &a, const Type1 &b);
proj – Specifies the function (or function object) which will be invoked for each of the elements as a projection operation before the actual predicate is invoked.
- Returns
The adjacent_find algorithm returns a hpx::future<InIter> if the execution policy is of type sequenced_task_policy or parallel_task_policy and returns InIter otherwise. The adjacent_find algorithm returns an iterator to the first of the identical elements. If no such elements are found, last is returned.
-
template<typename Rng, typename Proj = hpx::identity, typename Pred = detail::equal_to>
hpx::traits::range_traits<Rng>::iterator_type adjacent_find(Rng &&rng, Pred &&pred = Pred(), Proj &&proj = Proj())# Searches the range rng for two consecutive identical elements.
Note
Complexity: Exactly the smaller of (result - std::begin(rng)) + 1 and (std::begin(rng) - std::end(rng)) - 1 applications of the predicate where result is the value returned
- Template Parameters
Rng – The type of the source range used (deduced). The iterators extracted from this range type must meet the requirements of an forward iterator.
Proj – The type of an optional projection function. This defaults to hpx::identity
Pred – The type of an optional function/function object to use.
- Parameters
rng – Refers to the sequence of elements the algorithm will be applied to.
pred – The binary predicate which returns true if the elements should be treated as equal. The signature should be equivalent to the following:
The signature does not need to have const &, but the function must not modify the objects passed to it. The types Type1 must be such that objects of type FwdIter can be dereferenced and then implicitly converted to Type1 .bool pred(const Type1 &a, const Type1 &b);
proj – Specifies the function (or function object) which will be invoked for each of the elements as a projection operation before the actual predicate is invoked.
- Returns
The adjacent_find algorithm returns an iterator to the first of the identical elements. If no such elements are found, last is returned.
-
template<typename ExPolicy, typename Rng, typename Proj = hpx::identity, typename Pred = detail::equal_to>
parallel::util::detail::algorithm_result<ExPolicy, typename hpx::traits::range_traits<Rng>::iterator_type>::type adjacent_find(ExPolicy &&policy, Rng &&rng, Pred &&pred = Pred(), Proj &&proj = Proj())# Searches the range rng for two consecutive identical elements.
The comparison operations in the parallel adjacent_find invoked with an execution policy object of type sequenced_policy execute in sequential order in the calling thread.
The comparison operations in the parallel adjacent_find invoked with an execution policy object of type parallel_policy or parallel_task_policy are permitted to execute in an unordered fashion in unspecified threads, and indeterminately sequenced within each thread.
This overload of adjacent_find is available if the user decides to provide their algorithm their own binary predicate pred.
Note
Complexity: Exactly the smaller of (result - std::begin(rng)) + 1 and (std::begin(rng) - std::end(rng)) - 1 applications of the predicate where result is the value returned
- Template Parameters
ExPolicy – The type of the execution policy to use (deduced). It describes the manner in which the execution of the algorithm may be parallelized and the manner in which it executes the assignments.
Rng – The type of the source range used (deduced). The iterators extracted from this range type must meet the requirements of an forward iterator.
Proj – The type of an optional projection function. This defaults to hpx::identity
Pred – The type of an optional function/function object to use. Unlike its sequential form, the parallel overload of adjacent_find requires Pred to meet the requirements of CopyConstructible. This defaults to std::equal_to<>
- Parameters
policy – The execution policy to use for the scheduling of the iterations.
rng – Refers to the sequence of elements the algorithm will be applied to.
pred – The binary predicate which returns true if the elements should be treated as equal. The signature should be equivalent to the following:
The signature does not need to have const &, but the function must not modify the objects passed to it. The types Type1 must be such that objects of type FwdIter can be dereferenced and then implicitly converted to Type1 .bool pred(const Type1 &a, const Type1 &b);
proj – Specifies the function (or function object) which will be invoked for each of the elements as a projection operation before the actual predicate is invoked.
- Returns
The adjacent_find algorithm returns a hpx::future<InIter> if the execution policy is of type sequenced_task_policy or parallel_task_policy and returns InIter otherwise. The adjacent_find algorithm returns an iterator to the first of the identical elements. If no such elements are found, last is returned.
-
template<typename FwdIter, typename Sent, typename Proj = hpx::identity, typename Pred = detail::equal_to>
-
namespace ranges
hpx::ranges::all_of, hpx::ranges::any_of, hpx::ranges::none_of#
Defined in header hpx/algorithm.hpp.
See Public API for a list of names and headers that are part of the public HPX API.
-
namespace hpx
-
namespace ranges
Functions
-
template<typename ExPolicy, typename Rng, typename F, typename Proj = hpx::identity>
hpx::parallel::util::detail::algorithm_result_t<ExPolicy, bool> none_of(ExPolicy &&policy, Rng &&rng, F &&f, Proj &&proj = Proj())# Checks if unary predicate f returns true for no elements in the range rng.
The application of function objects in parallel algorithm invoked with an execution policy object of type sequenced_policy execute in sequential order in the calling thread.
The application of function objects in parallel algorithm invoked with an execution policy object of type parallel_policy or parallel_task_policy are permitted to execute in an unordered fashion in unspecified threads, and indeterminately sequenced within each thread.
Note
Complexity: At most std::distance(begin(rng), end(rng)) applications of the predicate f
- Template Parameters
ExPolicy – The type of the execution policy to use (deduced). It describes the manner in which the execution of the algorithm may be parallelized and the manner in which it applies user-provided function objects.
Rng – The type of the source range used (deduced). The iterators extracted from this range type must meet the requirements of an input iterator.
F – The type of the function/function object to use (deduced). Unlike its sequential form, the parallel overload of none_of requires F to meet the requirements of CopyConstructible.
Proj – The type of an optional projection function. This defaults to hpx::identity
- Parameters
policy – The execution policy to use for the scheduling of the iterations.
rng – Refers to the sequence of elements the algorithm will be applied to.
f – Specifies the function (or function object) which will be invoked for each of the elements in the sequence specified by [first, last). The signature of this predicate should be equivalent to:
The signature does not need to have const&, but the function must not modify the objects passed to it. The type Type must be such that an object of type FwdIter can be dereferenced and then implicitly converted to Type.bool pred(const Type &a);
proj – Specifies the function (or function object) which will be invoked for each of the elements as a projection operation before the actual predicate is invoked.
- Returns
The none_of algorithm returns a hpx::future<bool> if the execution policy is of type sequenced_task_policy or parallel_task_policy and returns bool otherwise. The none_of algorithm returns true if the unary predicate f returns true for no elements in the range, false otherwise. It returns true if the range is empty.
-
template<typename ExPolicy, typename Iter, typename Sent, typename F, typename Proj = hpx::identity>
hpx::parallel::util::detail::algorithm_result_t<ExPolicy, bool> none_of(ExPolicy &&policy, Iter first, Sent last, F &&f, Proj &&proj = Proj())# Checks if unary predicate f returns true for no elements in the range [first, last).
The application of function objects in parallel algorithm invoked with an execution policy object of type sequenced_policy execute in sequential order in the calling thread.
The application of function objects in parallel algorithm invoked with an execution policy object of type parallel_policy or parallel_task_policy are permitted to execute in an unordered fashion in unspecified threads, and indeterminately sequenced within each thread.
Note
Complexity: At most last - first applications of the predicate f
- Template Parameters
ExPolicy – The type of the execution policy to use (deduced). It describes the manner in which the execution of the algorithm may be parallelized and the manner in which it applies user-provided function objects.
Iter – The type of the source iterators used for the range (deduced).
Sent – The type of the source sentinel (deduced). This sentinel type must be a sentinel for InIter.
F – The type of the function/function object to use (deduced). Unlike its sequential form, the parallel overload of none_of requires F to meet the requirements of CopyConstructible.
Proj – The type of an optional projection function. This defaults to hpx::identity
- Parameters
policy – The execution policy to use for the scheduling of the iterations.
first – Refers to the beginning of the sequence of elements of the range the algorithm will be applied to.
last – Refers to the end of the sequence of elements of the range the algorithm will be applied to.
f – Specifies the function (or function object) which will be invoked for each of the elements in the sequence specified by [first, last). The signature of this predicate should be equivalent to:
The signature does not need to have const&, but the function must not modify the objects passed to it. The type Type must be such that an object of type FwdIter can be dereferenced and then implicitly converted to Type.bool pred(const Type &a);
proj – Specifies the function (or function object) which will be invoked for each of the elements as a projection operation before the actual predicate is invoked.
- Returns
The none_of algorithm returns a hpx::future<bool> if the execution policy is of type sequenced_task_policy or parallel_task_policy and returns bool otherwise. The none_of algorithm returns true if the unary predicate f returns true for no elements in the range, false otherwise. It returns true if the range is empty.
-
template<typename Rng, typename F, typename Proj = hpx::identity>
bool none_of(Rng &&rng, F &&f, Proj &&proj = Proj())# Checks if unary predicate f returns true for no elements in the range rng.
Note
Complexity: At most std::distance(begin(rng), end(rng)) applications of the predicate f
- Template Parameters
Rng – The type of the source range used (deduced). The iterators extracted from this range type must meet the requirements of an input iterator.
F – The type of the function/function object to use (deduced). Unlike its sequential form, the parallel overload of none_of requires F to meet the requirements of CopyConstructible.
Proj – The type of an optional projection function. This defaults to hpx::identity
- Parameters
rng – Refers to the sequence of elements the algorithm will be applied to.
f – Specifies the function (or function object) which will be invoked for each of the elements in the sequence specified by [first, last). The signature of this predicate should be equivalent to:
The signature does not need to have const&, but the function must not modify the objects passed to it. The type Type must be such that an object of type FwdIter can be dereferenced and then implicitly converted to Type.bool pred(const Type &a);
proj – Specifies the function (or function object) which will be invoked for each of the elements as a projection operation before the actual predicate is invoked.
- Returns
The none_of algorithm returns true if the unary predicate f returns true for no elements in the range, false otherwise. It returns true if the range is empty.
-
template<typename Iter, typename Sent, typename F, typename Proj = hpx::identity>
bool none_of(Iter first, Sent last, F &&f, Proj &&proj = Proj())# Checks if unary predicate f returns true for no elements in the range [first, last).
Note
Complexity: At most last - first applications of the predicate f
- Template Parameters
Iter – The type of the source iterators used for the range (deduced).
Sent – The type of the source sentinel (deduced). This sentinel type must be a sentinel for InIter.
F – The type of the function/function object to use (deduced). Unlike its sequential form, the parallel overload of none_of requires F to meet the requirements of CopyConstructible.
Proj – The type of an optional projection function. This defaults to hpx::identity
- Parameters
first – Refers to the beginning of the sequence of elements of the range the algorithm will be applied to.
last – Refers to the end of the sequence of elements of the range the algorithm will be applied to.
f – Specifies the function (or function object) which will be invoked for each of the elements in the sequence specified by [first, last). The signature of this predicate should be equivalent to:
The signature does not need to have const&, but the function must not modify the objects passed to it. The type Type must be such that an object of type FwdIter can be dereferenced and then implicitly converted to Type.bool pred(const Type &a);
proj – Specifies the function (or function object) which will be invoked for each of the elements as a projection operation before the actual predicate is invoked.
- Returns
The none_of algorithm returns true if the unary predicate f returns true for no elements in the range, false otherwise. It returns true if the range is empty.
-
template<typename ExPolicy, typename Rng, typename F, typename Proj = hpx::identity>
hpx::parallel::util::detail::algorithm_result_t<ExPolicy, bool> any_of(ExPolicy &&policy, Rng &&rng, F &&f, Proj &&proj = Proj())# Checks if unary predicate f returns true for at least one element in the range rng.
The application of function objects in parallel algorithm invoked with an execution policy object of type sequenced_policy execute in sequential order in the calling thread.
The application of function objects in parallel algorithm invoked with an execution policy object of type parallel_policy or parallel_task_policy are permitted to execute in an unordered fashion in unspecified threads, and indeterminately sequenced within each thread.
Note
Complexity: At most std::distance(begin(rng), end(rng)) applications of the predicate f
- Template Parameters
ExPolicy – The type of the execution policy to use (deduced). It describes the manner in which the execution of the algorithm may be parallelized and the manner in which it applies user-provided function objects.
Rng – The type of the source range used (deduced). The iterators extracted from this range type must meet the requirements of an input iterator.
F – The type of the function/function object to use (deduced). Unlike its sequential form, the parallel overload of none_of requires F to meet the requirements of CopyConstructible.
Proj – The type of an optional projection function. This defaults to hpx::identity
- Parameters
policy – The execution policy to use for the scheduling of the iterations.
rng – Refers to the sequence of elements the algorithm will be applied to.
f – Specifies the function (or function object) which will be invoked for each of the elements in the sequence specified by [first, last). The signature of this predicate should be equivalent to:
The signature does not need to have const&, but the function must not modify the objects passed to it. The type Type must be such that an object of type FwdIter can be dereferenced and then implicitly converted to Type.bool pred(const Type &a);
proj – Specifies the function (or function object) which will be invoked for each of the elements as a projection operation before the actual predicate is invoked.
- Returns
The any_of algorithm returns a hpx::future<bool> if the execution policy is of type sequenced_task_policy or parallel_task_policy and returns bool otherwise. The any_of algorithm returns true if the unary predicate f returns true for at least one element in the range, false otherwise. It returns false if the range is empty.
-
template<typename ExPolicy, typename Iter, typename Sent, typename F, typename Proj = hpx::identity>
hpx::parallel::util::detail::algorithm_result_t<ExPolicy, bool> any_of(ExPolicy &&policy, Iter first, Sent last, F &&f, Proj &&proj = Proj())# Checks if unary predicate f returns true for at least one element in the range rng.
The application of function objects in parallel algorithm invoked with an execution policy object of type sequenced_policy execute in sequential order in the calling thread.
The application of function objects in parallel algorithm invoked with an execution policy object of type parallel_policy or parallel_task_policy are permitted to execute in an unordered fashion in unspecified threads, and indeterminately sequenced within each thread.
Note
Complexity: At most std::distance(begin(rng), end(rng)) applications of the predicate f
- Template Parameters
ExPolicy – The type of the execution policy to use (deduced). It describes the manner in which the execution of the algorithm may be parallelized and the manner in which it applies user-provided function objects.
Iter – The type of the source iterators used for the range (deduced).
Sent – The type of the source sentinel (deduced). This sentinel type must be a sentinel for InIter.
F – The type of the function/function object to use (deduced). Unlike its sequential form, the parallel overload of none_of requires F to meet the requirements of CopyConstructible.
Proj – The type of an optional projection function. This defaults to hpx::identity
- Parameters
policy – The execution policy to use for the scheduling of the iterations.
first – Refers to the beginning of the sequence of elements of the range the algorithm will be applied to.
last – Refers to the end of the sequence of elements of the range the algorithm will be applied to.
f – Specifies the function (or function object) which will be invoked for each of the elements in the sequence specified by [first, last). The signature of this predicate should be equivalent to:
The signature does not need to have const&, but the function must not modify the objects passed to it. The type Type must be such that an object of type FwdIter can be dereferenced and then implicitly converted to Type.bool pred(const Type &a);
proj – Specifies the function (or function object) which will be invoked for each of the elements as a projection operation before the actual predicate is invoked.
- Returns
The any_of algorithm returns a hpx::future<bool> if the execution policy is of type sequenced_task_policy or parallel_task_policy and returns bool otherwise. The any_of algorithm returns true if the unary predicate f returns true for at least one element in the range, false otherwise. It returns false if the range is empty.
-
template<typename Rng, typename F, typename Proj = hpx::identity>
bool any_of(Rng &&rng, F &&f, Proj &&proj = Proj())# Checks if unary predicate f returns true for at least one element in the range rng.
Note
Complexity: At most std::distance(begin(rng), end(rng)) applications of the predicate f
- Template Parameters
Rng – The type of the source range used (deduced). The iterators extracted from this range type must meet the requirements of an input iterator.
F – The type of the function/function object to use (deduced). Unlike its sequential form, the parallel overload of none_of requires F to meet the requirements of CopyConstructible.
Proj – The type of an optional projection function. This defaults to hpx::identity
- Parameters
rng – Refers to the sequence of elements the algorithm will be applied to.
f – Specifies the function (or function object) which will be invoked for each of the elements in the sequence specified by [first, last). The signature of this predicate should be equivalent to:
The signature does not need to have const&, but the function must not modify the objects passed to it. The type Type must be such that an object of type FwdIter can be dereferenced and then implicitly converted to Type.bool pred(const Type &a);
proj – Specifies the function (or function object) which will be invoked for each of the elements as a projection operation before the actual predicate is invoked.
- Returns
The any_of algorithm returns true if the unary predicate f returns true for at least one element in the range, false otherwise. It returns false if the range is empty.
-
template<typename Iter, typename Sent, typename F, typename Proj = hpx::identity>
bool any_of(Iter first, Sent last, F &&f, Proj &&proj = Proj())# Checks if unary predicate f returns true for at least one element in the range rng.
Note
Complexity: At most std::distance(begin(rng), end(rng)) applications of the predicate f
- Template Parameters
Iter – The type of the source iterators used for the range (deduced).
Sent – The type of the source sentinel (deduced). This sentinel type must be a sentinel for InIter.
F – The type of the function/function object to use (deduced). Unlike its sequential form, the parallel overload of none_of requires F to meet the requirements of CopyConstructible.
Proj – The type of an optional projection function. This defaults to hpx::identity
- Parameters
first – Refers to the beginning of the sequence of elements of the range the algorithm will be applied to.
last – Refers to the end of the sequence of elements of the range the algorithm will be applied to.
f – Specifies the function (or function object) which will be invoked for each of the elements in the sequence specified by [first, last). The signature of this predicate should be equivalent to:
The signature does not need to have const&, but the function must not modify the objects passed to it. The type Type must be such that an object of type FwdIter can be dereferenced and then implicitly converted to Type.bool pred(const Type &a);
proj – Specifies the function (or function object) which will be invoked for each of the elements as a projection operation before the actual predicate is invoked.
- Returns
The any_of algorithm returns true if the unary predicate f returns true for at least one element in the range, false otherwise. It returns false if the range is empty.
-
template<typename ExPolicy, typename Rng, typename F, typename Proj = hpx::identity>
hpx::parallel::util::detail::algorithm_result_t<ExPolicy, bool> all_of(ExPolicy &&policy, Rng &&rng, F &&f, Proj &&proj = Proj())# Checks if unary predicate f returns true for all elements in the range rng.
The application of function objects in parallel algorithm invoked with an execution policy object of type sequenced_policy execute in sequential order in the calling thread.
The application of function objects in parallel algorithm invoked with an execution policy object of type parallel_policy or parallel_task_policy are permitted to execute in an unordered fashion in unspecified threads, and indeterminately sequenced within each thread.
Note
Complexity: At most std::distance(begin(rng), end(rng)) applications of the predicate f
- Template Parameters
ExPolicy – The type of the execution policy to use (deduced). It describes the manner in which the execution of the algorithm may be parallelized and the manner in which it applies user-provided function objects.
Rng – The type of the source range used (deduced). The iterators extracted from this range type must meet the requirements of an input iterator.
F – The type of the function/function object to use (deduced). Unlike its sequential form, the parallel overload of none_of requires F to meet the requirements of CopyConstructible.
Proj – The type of an optional projection function. This defaults to hpx::identity
- Parameters
policy – The execution policy to use for the scheduling of the iterations.
rng – Refers to the sequence of elements the algorithm will be applied to.
f – Specifies the function (or function object) which will be invoked for each of the elements in the sequence specified by [first, last). The signature of this predicate should be equivalent to:
The signature does not need to have const&, but the function must not modify the objects passed to it. The type Type must be such that an object of type FwdIter can be dereferenced and then implicitly converted to Type.bool pred(const Type &a);
proj – Specifies the function (or function object) which will be invoked for each of the elements as a projection operation before the actual predicate is invoked.
- Returns
The all_of algorithm returns a hpx::future<bool> if the execution policy is of type sequenced_task_policy or parallel_task_policy and returns bool otherwise. The all_of algorithm returns true if the unary predicate f returns true for all elements in the range, false otherwise. It returns true if the range is empty.
-
template<typename ExPolicy, typename Iter, typename Sent, typename F, typename Proj = hpx::identity>
hpx::parallel::util::detail::algorithm_result_t<ExPolicy, bool> all_of(ExPolicy &&policy, Iter first, Sent last, F &&f, Proj &&proj = Proj())# Checks if unary predicate f returns true for all elements in the range rng.
The application of function objects in parallel algorithm invoked with an execution policy object of type sequenced_policy execute in sequential order in the calling thread.
The application of function objects in parallel algorithm invoked with an execution policy object of type parallel_policy or parallel_task_policy are permitted to execute in an unordered fashion in unspecified threads, and indeterminately sequenced within each thread.
Note
Complexity: At most std::distance(begin(rng), end(rng)) applications of the predicate f
- Template Parameters
ExPolicy – The type of the execution policy to use (deduced). It describes the manner in which the execution of the algorithm may be parallelized and the manner in which it applies user-provided function objects.
Iter – The type of the source iterators used for the range (deduced).
Sent – The type of the source sentinel (deduced). This sentinel type must be a sentinel for InIter.
F – The type of the function/function object to use (deduced). Unlike its sequential form, the parallel overload of none_of requires F to meet the requirements of CopyConstructible.
Proj – The type of an optional projection function. This defaults to hpx::identity
- Parameters
policy – The execution policy to use for the scheduling of the iterations.
first – Refers to the beginning of the sequence of elements of the range the algorithm will be applied to.
last – Refers to the end of the sequence of elements of the range the algorithm will be applied to.
f – Specifies the function (or function object) which will be invoked for each of the elements in the sequence specified by [first, last). The signature of this predicate should be equivalent to:
The signature does not need to have const&, but the function must not modify the objects passed to it. The type Type must be such that an object of type FwdIter can be dereferenced and then implicitly converted to Type.bool pred(const Type &a);
proj – Specifies the function (or function object) which will be invoked for each of the elements as a projection operation before the actual predicate is invoked.
- Returns
The all_of algorithm returns a hpx::future<bool> if the execution policy is of type sequenced_task_policy or parallel_task_policy and returns bool otherwise. The all_of algorithm returns true if the unary predicate f returns true for all elements in the range, false otherwise. It returns true if the range is empty.
-
template<typename Rng, typename F, typename Proj = hpx::identity>
bool all_of(Rng &&rng, F &&f, Proj &&proj = Proj())# Checks if unary predicate f returns true for all elements in the range rng.
Note
Complexity: At most std::distance(begin(rng), end(rng)) applications of the predicate f
- Template Parameters
Rng – The type of the source range used (deduced). The iterators extracted from this range type must meet the requirements of an input iterator.
F – The type of the function/function object to use (deduced). Unlike its sequential form, the parallel overload of none_of requires F to meet the requirements of CopyConstructible.
Proj – The type of an optional projection function. This defaults to hpx::identity
- Parameters
rng – Refers to the sequence of elements the algorithm will be applied to.
f – Specifies the function (or function object) which will be invoked for each of the elements in the sequence specified by [first, last). The signature of this predicate should be equivalent to:
The signature does not need to have const&, but the function must not modify the objects passed to it. The type Type must be such that an object of type FwdIter can be dereferenced and then implicitly converted to Type.bool pred(const Type &a);
proj – Specifies the function (or function object) which will be invoked for each of the elements as a projection operation before the actual predicate is invoked.
- Returns
The all_of algorithm returns true if the unary predicate f returns true for all elements in the range, false otherwise. It returns true if the range is empty.
-
template<typename Iter, typename Sent, typename F, typename Proj = hpx::identity>
bool all_of(Iter first, Sent last, F &&f, Proj &&proj = Proj())# Checks if unary predicate f returns true for all elements in the range rng.
Note
Complexity: At most std::distance(begin(rng), end(rng)) applications of the predicate f
- Template Parameters
Iter – The type of the source iterators used for the range (deduced).
Sent – The type of the source sentinel (deduced). This sentinel type must be a sentinel for InIter.
F – The type of the function/function object to use (deduced). Unlike its sequential form, the parallel overload of none_of requires F to meet the requirements of CopyConstructible.
Proj – The type of an optional projection function. This defaults to hpx::identity
- Parameters
first – Refers to the beginning of the sequence of elements of the range the algorithm will be applied to.
last – Refers to the end of the sequence of elements of the range the algorithm will be applied to.
f – Specifies the function (or function object) which will be invoked for each of the elements in the sequence specified by [first, last). The signature of this predicate should be equivalent to:
The signature does not need to have const&, but the function must not modify the objects passed to it. The type Type must be such that an object of type FwdIter can be dereferenced and then implicitly converted to Type.bool pred(const Type &a);
proj – Specifies the function (or function object) which will be invoked for each of the elements as a projection operation before the actual predicate is invoked.
- Returns
The all_of algorithm returns true if the unary predicate f returns true for all elements in the range, false otherwise. It returns true if the range is empty.
-
template<typename ExPolicy, typename Rng, typename F, typename Proj = hpx::identity>
-
namespace ranges
hpx::ranges::copy, hpx::ranges::copy_n, hpx::ranges::copy_if#
Defined in header hpx/algorithm.hpp.
See Public API for a list of names and headers that are part of the public HPX API.
-
namespace hpx
-
namespace ranges
Functions
-
template<typename ExPolicy, typename FwdIter1, typename Sent1, typename FwdIter>
parallel::util::detail::algorithm_result<ExPolicy, ranges::copy_result<FwdIter1, FwdIter>>::type copy(ExPolicy &&policy, FwdIter1 iter, Sent1 sent, FwdIter dest)# Copies the elements in the range, defined by [first, last), to another range beginning at dest.
The assignments in the parallel copy algorithm invoked with an execution policy object of type sequenced_policy execute in sequential order in the calling thread.
The assignments in the parallel copy algorithm invoked with an execution policy object of type parallel_policy or parallel_task_policy are permitted to execute in an unordered fashion in unspecified threads, and indeterminately sequenced within each thread.
Note
Complexity: Performs exactly last - first assignments.
- Template Parameters
ExPolicy – The type of the execution policy to use (deduced). It describes the manner in which the execution of the algorithm may be parallelized and the manner in which it executes the assignments.
FwdIter1 – The type of the begin source iterators used (deduced). This iterator type must meet the requirements of an forward iterator.
Sent1 – The type of the end source iterators used (deduced). This iterator type must meet the requirements of an sentinel for Iter1.
FwdIter – The type of the iterator representing the destination range (deduced). This iterator type must meet the requirements of an forward iterator.
- Parameters
policy – The execution policy to use for the scheduling of the iterations.
iter – Refers to the beginning of the sequence of elements the algorithm will be applied to.
sent – Refers to the end of the sequence of elements the algorithm will be applied to.
dest – Refers to the beginning of the destination range.
- Returns
The copy algorithm returns a hpx::future<ranges::copy_result<FwdIter1, FwdIter> > if the execution policy is of type sequenced_task_policy or parallel_task_policy and returns ranges::copy_result<FwdIter1, FwdIter> otherwise. The copy algorithm returns the pair of the input iterator last and the output iterator to the element in the destination range, one past the last element copied.
-
template<typename ExPolicy, typename Rng, typename FwdIter>
parallel::util::detail::algorithm_result<ExPolicy, ranges::copy_result<typename hpx::traits::range_traits<Rng>::iterator_type, FwdIter>>::type copy(ExPolicy &&policy, Rng &&rng, FwdIter dest)# Copies the elements in the range rng to another range beginning at dest.
The assignments in the parallel copy algorithm invoked with an execution policy object of type sequenced_policy execute in sequential order in the calling thread.
The assignments in the parallel copy algorithm invoked with an execution policy object of type parallel_policy or parallel_task_policy are permitted to execute in an unordered fashion in unspecified threads, and indeterminately sequenced within each thread.
Note
Complexity: Performs exactly std::distance(begin(rng), end(rng)) assignments.
- Template Parameters
ExPolicy – The type of the execution policy to use (deduced). It describes the manner in which the execution of the algorithm may be parallelized and the manner in which it executes the assignments.
Rng – The type of the source range used (deduced). The iterators extracted from this range type must meet the requirements of an input iterator.
FwdIter – The type of the iterator representing the destination range (deduced). This iterator type must meet the requirements of an forward iterator.
- Parameters
policy – The execution policy to use for the scheduling of the iterations.
rng – Refers to the sequence of elements the algorithm will be applied to.
dest – Refers to the beginning of the destination range.
- Returns
The copy algorithm returns a hpx::future<ranges::copy_result<iterator_t<Rng>, FwdIter2>> if the execution policy is of type sequenced_task_policy or parallel_task_policy and returns ranges::copy_result<iterator_t<Rng>, FwdIter2> otherwise. The copy algorithm returns the pair of the input iterator last and the output iterator to the element in the destination range, one past the last element copied.
-
template<typename FwdIter1, typename Sent1, typename FwdIter>
ranges::copy_result<FwdIter1, FwdIter> copy(FwdIter1 iter, Sent1 sent, FwdIter dest)# Copies the elements in the range, defined by [first, last), to another range beginning at dest.
Note
Complexity: Performs exactly last - first assignments.
- Template Parameters
FwdIter1 – The type of the begin source iterators used (deduced). This iterator type must meet the requirements of an forward iterator.
Sent1 – The type of the end source iterators used (deduced). This iterator type must meet the requirements of an sentinel for Iter1.
FwdIter – The type of the iterator representing the destination range (deduced). This iterator type must meet the requirements of an forward iterator.
- Parameters
iter – Refers to the beginning of the sequence of elements the algorithm will be applied to.
sent – Refers to the end of the sequence of elements the algorithm will be applied to.
dest – Refers to the beginning of the destination range.
- Returns
The copy algorithm returns the pair of the input iterator last and the output iterator to the element in the destination range, one past the last element copied.
-
template<typename Rng, typename FwdIter>
ranges::copy_result<typename hpx::traits::range_traits<Rng>::iterator_type, FwdIter> copy(Rng &&rng, FwdIter dest)# Copies the elements in the range rng to another range beginning at dest.
Note
Complexity: Performs exactly std::distance(begin(rng), end(rng)) assignments.
- Template Parameters
Rng – The type of the source range used (deduced). The iterators extracted from this range type must meet the requirements of an input iterator.
FwdIter – The type of the iterator representing the destination range (deduced). This iterator type must meet the requirements of an forward iterator.
- Parameters
rng – Refers to the sequence of elements the algorithm will be applied to.
dest – Refers to the beginning of the destination range.
- Returns
The copy algorithm returns the pair of the input iterator last and the output iterator to the element in the destination range, one past the last element copied.
-
template<typename ExPolicy, typename FwdIter1, typename Size, typename FwdIter2>
hpx::parallel::util::detail::algorithm_result<ExPolicy, ranges::copy_n_result<FwdIter1, FwdIter2>>::type copy_n(ExPolicy &&policy, FwdIter1 first, Size count, FwdIter2 dest)# Copies the elements in the range [first, first + count), starting from first and proceeding to first + count - 1., to another range beginning at dest.
The assignments in the parallel copy_n algorithm invoked with an execution policy object of type sequenced_policy execute in sequential order in the calling thread.
The assignments in the parallel copy_n algorithm invoked with an execution policy object of type parallel_policy or parallel_task_policy are permitted to execute in an unordered fashion in unspecified threads, and indeterminately sequenced within each thread.
Note
Complexity: Performs exactly count assignments, if count > 0, no assignments otherwise.
- Template Parameters
ExPolicy – The type of the execution policy to use (deduced). It describes the manner in which the execution of the algorithm may be parallelized and the manner in which it executes the assignments.
FwdIter1 – The type of the source iterators used (deduced). This iterator type must meet the requirements of an forward iterator.
Size – The type of the argument specifying the number of elements to apply f to.
FwdIter2 – The type of the iterator representing the destination range (deduced). This iterator type must meet the requirements of an forward iterator.
- Parameters
policy – The execution policy to use for the scheduling of the iterations.
first – Refers to the beginning of the sequence of elements the algorithm will be applied to.
count – Refers to the number of elements starting at first the algorithm will be applied to.
dest – Refers to the beginning of the destination range.
- Returns
The copy_n algorithm returns a hpx::future<ranges::copy_n_result<FwdIter1, FwdIter2> > if the execution policy is of type sequenced_task_policy or parallel_task_policy and returns ranges::copy_n_result<FwdIter1, FwdIter2> otherwise. The copy algorithm returns the pair of the input iterator forwarded to the first element after the last in the input sequence and the output iterator to the element in the destination range, one past the last element copied.
-
template<typename FwdIter1, typename Size, typename FwdIter2>
ranges::copy_n_result<FwdIter1, FwdIter2> copy_n(FwdIter1 first, Size count, FwdIter2 dest)# Copies the elements in the range [first, first + count), starting from first and proceeding to first + count - 1., to another range beginning at dest.
Note
Complexity: Performs exactly count assignments, if count > 0, no assignments otherwise.
- Template Parameters
FwdIter1 – The type of the source iterators used (deduced). This iterator type must meet the requirements of an forward iterator.
Size – The type of the argument specifying the number of elements to apply f to.
FwdIter2 – The type of the iterator representing the destination range (deduced). This iterator type must meet the requirements of an forward iterator.
- Parameters
first – Refers to the beginning of the sequence of elements the algorithm will be applied to.
count – Refers to the number of elements starting at first the algorithm will be applied to.
dest – Refers to the beginning of the destination range.
- Returns
The copy algorithm returns the pair of the input iterator forwarded to the first element after the last in the input sequence and the output iterator to the element in the destination range, one past the last element copied.
-
template<typename ExPolicy, typename FwdIter1, typename Sent1, typename FwdIter, typename Pred, typename Proj = hpx::identity>
hpx::parallel::util::detail::algorithm_result<ExPolicy, ranges::copy_if_result<FwdIter1, FwdIter>>::type copy_if(ExPolicy &&policy, FwdIter1 iter, Sent1 sent, FwdIter dest, Pred &&pred, Proj &&proj = Proj())# Copies the elements in the range, defined by [first, last) to another range beginning at dest. The order of the elements that are not removed is preserved.
The assignments in the parallel copy_if algorithm invoked with an execution policy object of type sequenced_policy execute in sequential order in the calling thread.
The assignments in the parallel copy_if algorithm invoked with an execution policy object of type parallel_policy or parallel_task_policy are permitted to execute in an unordered fashion in unspecified threads, and indeterminately sequenced within each thread.
- Template Parameters
ExPolicy – The type of the execution policy to use (deduced). It describes the manner in which the execution of the algorithm may be parallelized and the manner in which it executes the assignments.
FwdIter1 – The type of the begin source iterators used (deduced). This iterator type must meet the requirements of an forward iterator.
Sent1 – The type of the end source iterators used (deduced). This iterator type must meet the requirements of an sentinel for FwdIter1.
FwdIter – The type of the iterator representing the destination range (deduced). This iterator type must meet the requirements of an output iterator.
Pred – The type of an optional function/function object to use.
Proj – The type of an optional projection function. This defaults to hpx::identity
- Parameters
policy – The execution policy to use for the scheduling of the iterations.
iter – Refers to the beginning of the sequence of elements the algorithm will be applied to.
sent – Refers to the end of the sequence of elements the algorithm will be applied to.
dest – Refers to the beginning of the destination range.
pred – The binary predicate which returns true if the elements should be treated as equal. The signature should be equivalent to the following:
The signature does not need to have const &, but the function must not modify the objects passed to it. The types Type1 must be such that objects of type FwdIter can be dereferenced and then implicitly converted to Type1 .bool pred(const Type1 &a, const Type1 &b);
proj – Specifies the function (or function object) which will be invoked for each of the elements as a projection operation before the actual predicate is invoked.
- Returns
The copy_if algorithm returns a hpx::future<ranges::copy_if_result<iterator_t<Rng>, FwdIter2>> if the execution policy is of type sequenced_task_policy or parallel_task_policy and returns ranges::copy_if_result<iterator_t<Rng>, FwdIter2> otherwise. The copy_if algorithm returns the pair of the input iterator last and the output iterator to the element in the destination range, one past the last element copied.
-
template<typename ExPolicy, typename Rng, typename FwdIter, typename Pred, typename Proj = hpx::identity>
hpx::parallel::util::detail::algorithm_result<ExPolicy, ranges::copy_if_result<typename hpx::traits::range_traits<Rng>::iterator_type, FwdIter>>::type copy_if(ExPolicy &&policy, Rng &&rng, FwdIter dest, Pred &&pred, Proj &&proj = Proj())# Copies the elements in the range, defined by rng to another range beginning at dest. The order of the elements that are not removed is preserved.
The assignments in the parallel copy_if algorithm invoked with an execution policy object of type sequenced_policy execute in sequential order in the calling thread.
The assignments in the parallel copy_if algorithm invoked with an execution policy object of type parallel_policy or parallel_task_policy are permitted to execute in an unordered fashion in unspecified threads, and indeterminately sequenced within each thread.
- Template Parameters
ExPolicy – The type of the execution policy to use (deduced). It describes the manner in which the execution of the algorithm may be parallelized and the manner in which it executes the assignments.
Rng – The type of the source range used (deduced). The iterators extracted from this range type must meet the requirements of an forward iterator.
FwdIter – The type of the iterator representing the destination range (deduced). This iterator type must meet the requirements of an output iterator.
Pred – The type of an optional function/function object to use.
Proj – The type of an optional projection function. This defaults to hpx::identity
- Parameters
policy – The execution policy to use for the scheduling of the iterations.
rng – Refers to the sequence of elements the algorithm will be applied to.
dest – Refers to the beginning of the destination range.
pred – The binary predicate which returns true if the elements should be treated as equal. The signature should be equivalent to the following:
The signature does not need to have const &, but the function must not modify the objects passed to it. The types Type1 must be such that objects of type FwdIter can be dereferenced and then implicitly converted to Type1 .bool pred(const Type1 &a, const Type1 &b);
proj – Specifies the function (or function object) which will be invoked for each of the elements as a projection operation before the actual predicate is invoked.
- Returns
The copy_if algorithm returns a hpx::future<ranges::copy_if_result<iterator_t<Rng>, FwdIter2>> if the execution policy is of type sequenced_task_policy or parallel_task_policy and returns ranges::copy_if_result<iterator_t<Rng>, FwdIter2> otherwise. The copy_if algorithm returns the pair of the input iterator last and the output iterator to the element in the destination range, one past the last element copied.
-
template<typename FwdIter1, typename Sent1, typename FwdIter, typename Pred, typename Proj = hpx::identity>
ranges::copy_if_result<FwdIter1, FwdIter> copy_if(FwdIter1 iter, Sent1 sent, FwdIter dest, Pred &&pred, Proj &&proj = Proj())# Copies the elements in the range, defined by [first, last) to another range beginning at dest. The order of the elements that are not removed is preserved.
- Template Parameters
FwdIter1 – The type of the begin source iterators used (deduced). This iterator type must meet the requirements of an forward iterator.
Sent1 – The type of the end source iterators used (deduced). This iterator type must meet the requirements of an sentinel for FwdIter1.
FwdIter – The type of the iterator representing the destination range (deduced). This iterator type must meet the requirements of an output iterator.
Pred – The type of an optional function/function object to use.
Proj – The type of an optional projection function. This defaults to hpx::identity
- Parameters
iter – Refers to the beginning of the sequence of elements the algorithm will be applied to.
sent – Refers to the end of the sequence of elements the algorithm will be applied to.
dest – Refers to the beginning of the destination range.
pred – The binary predicate which returns true if the elements should be treated as equal. The signature should be equivalent to the following:
The signature does not need to have const &, but the function must not modify the objects passed to it. The types Type1 must be such that objects of type FwdIter can be dereferenced and then implicitly converted to Type1 .bool pred(const Type1 &a, const Type1 &b);
proj – Specifies the function (or function object) which will be invoked for each of the elements as a projection operation before the actual predicate is invoked.
- Returns
The copy_if algorithm returns the pair of the input iterator last and the output iterator to the element in the destination range, one past the last element copied.
-
template<typename Rng, typename FwdIter, typename Pred, typename Proj = hpx::identity>
ranges::copy_if_result<typename hpx::traits::range_traits<Rng>::iterator_type, FwdIter> copy_if(Rng &&rng, FwdIter dest, Pred &&pred, Proj &&proj = Proj())# Copies the elements in the range, defined by rng to another range beginning at dest. The order of the elements that are not removed is preserved.
- Template Parameters
Rng – The type of the source range used (deduced). The iterators extracted from this range type must meet the requirements of an forward iterator.
FwdIter – The type of the iterator representing the destination range (deduced). This iterator type must meet the requirements of an output iterator.
Pred – The type of an optional function/function object to use.
Proj – The type of an optional projection function. This defaults to hpx::identity
- Parameters
rng – Refers to the sequence of elements the algorithm will be applied to.
dest – Refers to the beginning of the destination range.
pred – The binary predicate which returns true if the elements should be treated as equal. The signature should be equivalent to the following:
The signature does not need to have const &, but the function must not modify the objects passed to it. The types Type1 must be such that objects of type FwdIter can be dereferenced and then implicitly converted to Type1 .bool pred(const Type1 &a, const Type1 &b);
proj – Specifies the function (or function object) which will be invoked for each of the elements as a projection operation before the actual predicate is invoked.
- Returns
The copy_if algorithm returns the pair of the input iterator last and the output iterator to the element in the destination range, one past the last element copied.
-
template<typename ExPolicy, typename FwdIter1, typename Sent1, typename FwdIter>
-
namespace ranges
hpx::ranges::count, hpx::ranges::count_if#
Defined in header hpx/algorithm.hpp.
See Public API for a list of names and headers that are part of the public HPX API.
-
namespace hpx
-
namespace ranges
Functions
-
template<typename ExPolicy, typename Rng, typename Proj = hpx::identity, typename T = typename hpx::parallel::traits::projected<std::ranges::iterator_t<Rng>, Proj>::value_type>
hpx::parallel::util::detail::algorithm_result<ExPolicy, typename std::iterator_traits<typename hpx::traits::range_traits<Rng>::iterator_type>::difference_type>::type count(ExPolicy &&policy, Rng &&rng, T const &value, Proj &&proj = Proj())# Returns the number of elements in the range [first, last) satisfying a specific criteria. This version counts the elements that are equal to the given value.
The comparisons in the parallel count algorithm invoked with an execution policy object of type sequenced_policy execute in sequential order in the calling thread.
Note
Complexity: Performs exactly last - first comparisons.
Note
The comparisons in the parallel count algorithm invoked with an execution policy object of type parallel_policy or parallel_task_policy are permitted to execute in an unordered fashion in unspecified threads, and indeterminately sequenced within each thread.
- Template Parameters
ExPolicy – The type of the execution policy to use (deduced). It describes the manner in which the execution of the algorithm may be parallelized and the manner in which it executes the comparisons.
Rng – The type of the source range used (deduced). The iterators extracted from this range type must meet the requirements of an input iterator.
T – The type of the value to search for (deduced).
Proj – The type of an optional projection function. This defaults to hpx::identity
- Parameters
policy – The execution policy to use for the scheduling of the iterations.
rng – Refers to the sequence of elements the algorithm will be applied to.
value – The value to search for.
proj – Specifies the function (or function object) which will be invoked for each of the elements as a projection operation before the actual predicate is invoked.
- Returns
The count algorithm returns a hpx::future<difference_type> if the execution policy is of type sequenced_task_policy or parallel_task_policy and returns difference_type otherwise (where difference_type is defined by std::iterator_traits<FwdIter>::difference_type. The count algorithm returns the number of elements satisfying the given criteria.
-
template<typename ExPolicy, typename Iter, typename Sent, typename Proj = hpx::identity, typename T = typename hpx::parallel::traits::projected<Iter, Proj>::value_type>
hpx::parallel::util::detail::algorithm_result<ExPolicy, typename std::iterator_traits<Iter>::difference_type>::type count(ExPolicy &&policy, Iter first, Sent last, T const &value, Proj &&proj = Proj())# Returns the number of elements in the range [first, last) satisfying a specific criteria. This version counts the elements that are equal to the given value.
The comparisons in the parallel count algorithm invoked with an execution policy object of type sequenced_policy execute in sequential order in the calling thread.
Note
Complexity: Performs exactly last - first comparisons.
Note
The comparisons in the parallel count algorithm invoked with an execution policy object of type parallel_policy or parallel_task_policy are permitted to execute in an unordered fashion in unspecified threads, and indeterminately sequenced within each thread.
- Template Parameters
ExPolicy – The type of the execution policy to use (deduced). It describes the manner in which the execution of the algorithm may be parallelized and the manner in which it executes the comparisons.
Iter – The type of the source iterators used for the range (deduced).
Sent – The type of the source sentinel (deduced). This sentinel type must be a sentinel for InIter.
T – The type of the value to search for (deduced).
Proj – The type of an optional projection function. This defaults to hpx::identity
- Parameters
policy – The execution policy to use for the scheduling of the iterations.
first – Refers to the beginning of the sequence of elements the algorithm will be applied to.
last – Refers to the end of the sequence of elements the algorithm will be applied to.
value – The value to search for.
proj – Specifies the function (or function object) which will be invoked for each of the elements as a projection operation before the actual predicate is invoked.
- Returns
The count algorithm returns a hpx::future<difference_type> if the execution policy is of type sequenced_task_policy or parallel_task_policy and returns difference_type otherwise (where difference_type is defined by std::iterator_traits<FwdIter>::difference_type. The count algorithm returns the number of elements satisfying the given criteria.
-
template<typename Rng, typename Proj = hpx::identity, typename T = typename hpx::parallel::traits::projected<std::ranges::iterator_t<Rng>, Proj>::value_type>
std::iterator_traits<typename hpx::traits::range_traits<Rng>::iterator_type>::difference_type count(Rng &&rng, T const &value, Proj &&proj = Proj())# Returns the number of elements in the range [first, last) satisfying a specific criteria. This version counts the elements that are equal to the given value.
Note
Complexity: Performs exactly last - first comparisons.
- Template Parameters
Rng – The type of the source range used (deduced). The iterators extracted from this range type must meet the requirements of an input iterator.
T – The type of the value to search for (deduced).
Proj – The type of an optional projection function. This defaults to hpx::identity
- Parameters
rng – Refers to the sequence of elements the algorithm will be applied to.
value – The value to search for.
proj – Specifies the function (or function object) which will be invoked for each of the elements as a projection operation before the actual predicate is invoked.
- Returns
The count algorithm returns the number of elements satisfying the given criteria.
-
template<typename Iter, typename Sent, typename Proj = hpx::identity, typename T = typename hpx::parallel::traits::projected<Iter, Proj>::value_type>
std::iterator_traits<Iter>::difference_type count(Iter first, Sent last, T const &value, Proj &&proj = Proj())# Returns the number of elements in the range [first, last) satisfying a specific criteria. This version counts the elements that are equal to the given value.
Note
Complexity: Performs exactly last - first comparisons.
- Template Parameters
Iter – The type of the source iterators used for the range (deduced).
Sent – The type of the source sentinel (deduced). This sentinel type must be a sentinel for InIter.
T – The type of the value to search for (deduced).
Proj – The type of an optional projection function. This defaults to hpx::identity
- Parameters
first – Refers to the beginning of the sequence of elements the algorithm will be applied to.
last – Refers to the end of the sequence of elements the algorithm will be applied to.
value – The value to search for.
proj – Specifies the function (or function object) which will be invoked for each of the elements as a projection operation before the actual predicate is invoked.
- Returns
The count algorithm returns the number of elements satisfying the given criteria.
-
template<typename ExPolicy, typename Rng, typename F, typename Proj = hpx::identity>
hpx::parallel::util::detail::algorithm_result<ExPolicy, typename std::iterator_traits<typename hpx::traits::range_traits<Rng>::iterator_type>::difference_type>::type count_if(ExPolicy &&policy, Rng &&rng, F &&f, Proj &&proj = Proj())# Returns the number of elements in the range [first, last) satisfying a specific criteria. This version counts elements for which predicate f returns true.
Note
Complexity: Performs exactly last - first applications of the predicate.
Note
The assignments in the parallel count_if algorithm invoked with an execution policy object of type sequenced_policy execute in sequential order in the calling thread.
Note
The assignments in the parallel count_if algorithm invoked with an execution policy object of type parallel_policy or parallel_task_policy are permitted to execute in an unordered fashion in unspecified threads, and indeterminately sequenced within each thread.
- Template Parameters
ExPolicy – The type of the execution policy to use (deduced). It describes the manner in which the execution of the algorithm may be parallelized and the manner in which it executes the comparisons.
Rng – The type of the source range used (deduced). The iterators extracted from this range type must meet the requirements of an input iterator.
F – The type of the function/function object to use (deduced). Unlike its sequential form, the parallel overload of count_if requires F to meet the requirements of CopyConstructible.
Proj – The type of an optional projection function. This defaults to hpx::identity
- Parameters
policy – The execution policy to use for the scheduling of the iterations.
rng – Refers to the sequence of elements the algorithm will be applied to.
f – Specifies the function (or function object) which will be invoked for each of the elements in the sequence specified by [first, last).This is an unary predicate which returns true for the required elements. The signature of this predicate should be equivalent to:
The signature does not need to have const&, but the function must not modify the objects passed to it. The type Type must be such that an object of type FwdIter can be dereferenced and then implicitly converted to Type.bool pred(const Type &a);
proj – Specifies the function (or function object) which will be invoked for each of the elements as a projection operation before the actual predicate is invoked.
- Returns
The count_if algorithm returns hpx::future<difference_type> if the execution policy is of type sequenced_task_policy or parallel_task_policy and returns difference_type otherwise (where difference_type is defined by std::iterator_traits<FwdIter>::difference_type. The count algorithm returns the number of elements satisfying the given criteria.
-
template<typename ExPolicy, typename Iter, typename Sent, typename F, typename Proj = hpx::identity>
hpx::parallel::util::detail::algorithm_result<ExPolicy, typename std::iterator_traits<Iter>::difference_type>::type count_if(ExPolicy &&policy, Iter first, Sent last, F &&f, Proj &&proj = Proj())# Returns the number of elements in the range [first, last) satisfying a specific criteria. This version counts elements for which predicate f returns true.
Note
Complexity: Performs exactly last - first applications of the predicate.
Note
The assignments in the parallel count_if algorithm invoked with an execution policy object of type sequenced_policy execute in sequential order in the calling thread.
Note
The assignments in the parallel count_if algorithm invoked with an execution policy object of type parallel_policy or parallel_task_policy are permitted to execute in an unordered fashion in unspecified threads, and indeterminately sequenced within each thread.
- Template Parameters
ExPolicy – The type of the execution policy to use (deduced). It describes the manner in which the execution of the algorithm may be parallelized and the manner in which it executes the comparisons.
Iter – The type of the source iterators used for the range (deduced).
Sent – The type of the source sentinel (deduced). This sentinel type must be a sentinel for InIter.
F – The type of the function/function object to use (deduced). Unlike its sequential form, the parallel overload of count_if requires F to meet the requirements of CopyConstructible.
Proj – The type of an optional projection function. This defaults to hpx::identity
- Parameters
policy – The execution policy to use for the scheduling of the iterations.
first – Refers to the beginning of the sequence of elements the algorithm will be applied to.
last – Refers to the end of the sequence of elements the algorithm will be applied to.
f – Specifies the function (or function object) which will be invoked for each of the elements in the sequence specified by [first, last).This is an unary predicate which returns true for the required elements. The signature of this predicate should be equivalent to:
The signature does not need to have const&, but the function must not modify the objects passed to it. The type Type must be such that an object of type FwdIter can be dereferenced and then implicitly converted to Type.bool pred(const Type &a);
proj – Specifies the function (or function object) which will be invoked for each of the elements as a projection operation before the actual predicate is invoked.
- Returns
The count_if algorithm returns hpx::future<difference_type> if the execution policy is of type sequenced_task_policy or parallel_task_policy and returns difference_type otherwise (where difference_type is defined by std::iterator_traits<FwdIter>::difference_type. The count algorithm returns the number of elements satisfying the given criteria.
-
template<typename Rng, typename F, typename Proj = hpx::identity>
std::iterator_traits<typename hpx::traits::range_traits<Rng>::iterator_type>::difference_type count_if(Rng &&rng, F &&f, Proj &&proj = Proj())# Returns the number of elements in the range [first, last) satisfying a specific criteria. This version counts elements for which predicate f returns true.
Note
Complexity: Performs exactly last - first applications of the predicate.
- Template Parameters
Rng – The type of the source range used (deduced). The iterators extracted from this range type must meet the requirements of an input iterator.
F – The type of the function/function object to use (deduced). Unlike its sequential form, the parallel overload of count_if requires F to meet the requirements of CopyConstructible.
Proj – The type of an optional projection function. This defaults to hpx::identity
- Parameters
rng – Refers to the sequence of elements the algorithm will be applied to.
f – Specifies the function (or function object) which will be invoked for each of the elements in the sequence specified by [first, last).This is an unary predicate which returns true for the required elements. The signature of this predicate should be equivalent to:
The signature does not need to have const&, but the function must not modify the objects passed to it. The type Type must be such that an object of type FwdIter can be dereferenced and then implicitly converted to Type.bool pred(const Type &a);
proj – Specifies the function (or function object) which will be invoked for each of the elements as a projection operation before the actual predicate is invoked.
- Returns
The count algorithm returns the number of elements satisfying the given criteria.
-
template<typename Iter, typename Sent, typename F, typename Proj = hpx::identity>
std::iterator_traits<Iter>::difference_type count_if(Iter first, Sent last, F &&f, Proj &&proj = Proj())# Returns the number of elements in the range [first, last) satisfying a specific criteria. This version counts elements for which predicate f returns true.
Note
Complexity: Performs exactly last - first applications of the predicate.
- Template Parameters
Iter – The type of the source iterators used for the range (deduced).
Sent – The type of the source sentinel (deduced). This sentinel type must be a sentinel for InIter.
F – The type of the function/function object to use (deduced). Unlike its sequential form, the parallel overload of count_if requires F to meet the requirements of CopyConstructible.
Proj – The type of an optional projection function. This defaults to hpx::identity
- Parameters
first – Refers to the beginning of the sequence of elements the algorithm will be applied to.
last – Refers to the end of the sequence of elements the algorithm will be applied to.
f – Specifies the function (or function object) which will be invoked for each of the elements in the sequence specified by [first, last).This is an unary predicate which returns true for the required elements. The signature of this predicate should be equivalent to:
The signature does not need to have const&, but the function must not modify the objects passed to it. The type Type must be such that an object of type FwdIter can be dereferenced and then implicitly converted to Type.bool pred(const Type &a);
proj – Specifies the function (or function object) which will be invoked for each of the elements as a projection operation before the actual predicate is invoked.
- Returns
The count algorithm returns the number of elements satisfying the given criteria.
-
template<typename ExPolicy, typename Rng, typename Proj = hpx::identity, typename T = typename hpx::parallel::traits::projected<std::ranges::iterator_t<Rng>, Proj>::value_type>
-
namespace ranges
hpx::ranges::destroy, hpx::ranges::destroy_n#
Defined in header hpx/algorithm.hpp.
See Public API for a list of names and headers that are part of the public HPX API.
-
namespace hpx
-
namespace ranges
Functions
-
template<typename ExPolicy, typename Rng>
hpx::parallel::util::detail::algorithm_result<ExPolicy, std::ranges::iterator_t<Rng>> destroy(ExPolicy &&policy, Rng &&rng)# Destroys objects of type typename iterator_traits<ForwardIt>::value_type in the range [first, last).
The operations in the parallel destroy algorithm invoked with an execution policy object of type sequenced_policy execute in sequential order in the calling thread.
The operations in the parallel destroy algorithm invoked with an execution policy object of type parallel_policy or parallel_task_policy are permitted to execute in an unordered fashion in unspecified threads, and indeterminately sequenced within each thread.
Note
Complexity: Performs exactly last - first operations.
- Template Parameters
ExPolicy – The type of the execution policy to use (deduced). It describes the manner in which the execution of the algorithm may be parallelized and the manner in which it executes the assignments.
Rng – The type of the source range used (deduced). The iterators extracted from this range type must meet the requirements of an input iterator.
- Parameters
policy – The execution policy to use for the scheduling of the iterations.
rng – Refers to the sequence of elements the algorithm will be applied to.
- Returns
The destroy algorithm returns a hpx::future<void>, if the execution policy is of type sequenced_task_policy or parallel_task_policy and returns void otherwise.
-
template<typename ExPolicy, typename Iter, typename Sent>
hpx::parallel::util::detail::algorithm_result_t<ExPolicy, Iter> destroy(ExPolicy &&policy, Iter first, Sent last)# Destroys objects of type typename iterator_traits<ForwardIt>::value_type in the range [first, last).
The operations in the parallel destroy algorithm invoked with an execution policy object of type sequenced_policy execute in sequential order in the calling thread.
The operations in the parallel destroy algorithm invoked with an execution policy object of type parallel_policy or parallel_task_policy are permitted to execute in an unordered fashion in unspecified threads, and indeterminately sequenced within each thread.
Note
Complexity: Performs exactly last - first operations.
- Template Parameters
ExPolicy – The type of the execution policy to use (deduced). It describes the manner in which the execution of the algorithm may be parallelized and the manner in which it executes the assignments.
Iter – The type of the source iterators used for the range (deduced).
Sent – The type of the source sentinel (deduced). This sentinel type must be a sentinel for InIter.
- Parameters
policy – The execution policy to use for the scheduling of the iterations.
first – Refers to the beginning of the sequence of elements the algorithm will be applied to.
last – Refers to the end of the sequence of elements the algorithm will be applied to.
- Returns
The destroy algorithm returns a hpx::future<void>, if the execution policy is of type sequenced_task_policy or parallel_task_policy and returns void otherwise.
-
template<typename Rng>
hpx::traits::range_iterator<Rng>::type destroy(Rng &&rng)# Destroys objects of type typename iterator_traits<ForwardIt>::value_type in the range [first, last).
Note
Complexity: Performs exactly last - first operations.
- Template Parameters
Rng – The type of the source range used (deduced). The iterators extracted from this range type must meet the requirements of an input iterator.
- Parameters
rng – Refers to the sequence of elements the algorithm will be applied to.
- Returns
The destroy algorithm returns void.
-
template<typename Iter, typename Sent>
Iter destroy(Iter first, Sent last)# Destroys objects of type typename iterator_traits<ForwardIt>::value_type in the range [first, last).
Note
Complexity: Performs exactly last - first operations.
- Template Parameters
Iter – The type of the source iterators used for the range (deduced).
Sent – The type of the source sentinel (deduced). This sentinel type must be a sentinel for InIter.
- Parameters
first – Refers to the beginning of the sequence of elements the algorithm will be applied to.
last – Refers to the end of the sequence of elements the algorithm will be applied to.
- Returns
The destroy algorithm returns void.
-
template<typename ExPolicy, typename FwdIter, typename Size>
hpx::parallel::util::detail::algorithm_result<ExPolicy, FwdIter>::type destroy_n(ExPolicy &&policy, FwdIter first, Size count)# Destroys objects of type typename iterator_traits<ForwardIt>::value_type in the range [first, first + count).
The operations in the parallel destroy_n algorithm invoked with an execution policy object of type sequenced_policy execute in sequential order in the calling thread.
The operations in the parallel destroy_n algorithm invoked with an execution policy object of type parallel_policy or parallel_task_policy are permitted to execute in an unordered fashion in unspecified threads, and indeterminately sequenced within each thread.
Note
Complexity: Performs exactly count operations, if count > 0, no assignments otherwise.
- Template Parameters
ExPolicy – The type of the execution policy to use (deduced). It describes the manner in which the execution of the algorithm may be parallelized and the manner in which it executes the assignments.
FwdIter – The type of the source iterators used (deduced). This iterator type must meet the requirements of an forward iterator.
Size – The type of the argument specifying the number of elements to apply this algorithm to.
- Parameters
policy – The execution policy to use for the scheduling of the iterations.
first – Refers to the beginning of the sequence of elements the algorithm will be applied to.
count – Refers to the number of elements starting at first the algorithm will be applied to.
- Returns
The destroy_n algorithm returns a hpx::future<FwdIter> if the execution policy is of type sequenced_task_policy or parallel_task_policy and returns FwdIter otherwise. The destroy_n algorithm returns the iterator to the element in the source range, one past the last element constructed.
-
template<typename FwdIter, typename Size>
FwdIter destroy_n(FwdIter first, Size count)# Destroys objects of type typename iterator_traits<ForwardIt>::value_type in the range [first, first + count).
Note
Complexity: Performs exactly count operations, if count > 0, no assignments otherwise.
- Template Parameters
FwdIter – The type of the source iterators used (deduced). This iterator type must meet the requirements of an forward iterator.
Size – The type of the argument specifying the number of elements to apply this algorithm to.
- Parameters
first – Refers to the beginning of the sequence of elements the algorithm will be applied to.
count – Refers to the number of elements starting at first the algorithm will be applied to.
- Returns
The destroy_n algorithm returns the iterator to the element in the source range, one past the last element constructed.
-
template<typename ExPolicy, typename Rng>
-
namespace ranges
hpx::ranges::ends_with#
Defined in header hpx/algorithm.hpp.
See Public API for a list of names and headers that are part of the public HPX API.
-
namespace hpx
-
namespace ranges
Functions
-
template<typename Iter1, typename Sent1, typename Iter2, typename Sent2, typename Pred = ranges::equal_to, typename Proj1 = hpx::identity, typename Proj2 = hpx::identity>
bool ends_with(Iter1 first1, Sent1 last1, Iter2 first2, Sent2 last2, Pred &&pred = Pred(), Proj1 &&proj1 = Proj1(), Proj2 &&proj2 = Proj2())# Checks whether the second range defined by [first1, last1) matches the suffix of the first range defined by [first2, last2)
The assignments in the parallel ends_with algorithm invoked without an execution policy object execute in sequential order in the calling thread.
Note
Complexity: Linear: at most min(N1, N2) applications of the predicate and both projections.
- Template Parameters
Iter1 – The type of the begin source iterators used (deduced). This iterator type must meet the requirements of an input iterator.
Sent1 – The type of the end source iterators used(deduced). This iterator type must meet the requirements of an sentinel for Iter1.
Iter2 – The type of the begin destination iterators used deduced). This iterator type must meet the requirements of a input iterator.
Sent2 – The type of the end destination iterators used (deduced). This iterator type must meet the requirements of an sentinel for Iter2.
Pred – The binary predicate that compares the projected elements.
Proj1 – The type of an optional projection function for the source range. This defaults to hpx::identity
Proj2 – The type of an optional projection function for the destination range. This defaults to hpx::identity
- Parameters
first1 – Refers to the beginning of the source range.
last1 – Sentinel value referring to the end of the source range.
first2 – Refers to the beginning of the destination range.
last2 – Sentinel value referring to the end of the destination range.
pred – Specifies the binary predicate function (or function object) which will be invoked for comparison of the elements in the in two ranges projected by proj1 and proj2 respectively.
proj1 – Specifies the function (or function object) which will be invoked for each of the elements in the source range as a projection operation before the actual predicate is invoked.
proj2 – Specifies the function (or function object) which will be invoked for each of the elements in the destination range as a projection operation before the actual predicate is invoked.
- Returns
The ends_with algorithm returns bool. The ends_with algorithm returns a boolean with the value true if the second range matches the suffix of the first range, false otherwise.
-
template<typename ExPolicy, typename FwdIter1, typename Sent1, typename FwdIter2, typename Sent2, typename Pred = ranges::equal_to, typename Proj1 = hpx::identity, typename Proj2 = hpx::identity>
parallel::util::detail::algorithm_result<ExPolicy, bool>::type ends_with(ExPolicy &&policy, FwdIter1 first1, Sent1 last1, FwdIter2 first2, Sent2 last2, Pred &&pred = Pred(), Proj1 &&proj1 = Proj1(), Proj2 &&proj2 = Proj2())# Checks whether the second range defined by [first1, last1) matches the suffix of the first range defined by [first2, last2)
The assignments in the parallel ends_with algorithm invoked with an execution policy object of type sequenced_policy execute in sequential order in the calling thread.
The assignments in the parallel ends_with algorithm invoked with an execution policy object of type parallel_policy or parallel_task_policy are permitted to execute in an unordered fashion in unspecified threads, and indeterminately sequenced within each thread.
Note
Complexity: Linear: at most min(N1, N2) applications of the predicate and both projections.
- Template Parameters
ExPolicy – The type of the execution policy to use (deduced). It describes the manner in which the execution of the algorithm may be parallelized and the manner in which it executes the assignments.
FwdIter1 – The type of the begin source iterators used (deduced). This iterator type must meet the requirements of an forward iterator.
Sent1 – The type of the end source iterators used(deduced). This iterator type must meet the requirements of an sentinel for Iter1.
FwdIter2 – The type of the begin destination iterators used deduced). This iterator type must meet the requirements of a forward iterator.
Sent2 – The type of the end destination iterators used (deduced). This iterator type must meet the requirements of an sentinel for Iter2.
Pred – The binary predicate that compares the projected elements.
Proj1 – The type of an optional projection function for the source range. This defaults to hpx::identity
Proj2 – The type of an optional projection function for the destination range. This defaults to hpx::identity
- Parameters
policy – The execution policy to use for the scheduling of the iterations.
first1 – Refers to the beginning of the source range.
last1 – Sentinel value referring to the end of the source range.
first2 – Refers to the beginning of the destination range.
last2 – Sentinel value referring to the end of the destination range.
pred – Specifies the binary predicate function (or function object) which will be invoked for comparison of the elements in the in two ranges projected by proj1 and proj2 respectively.
proj1 – Specifies the function (or function object) which will be invoked for each of the elements in the source range as a projection operation before the actual predicate is invoked.
proj2 – Specifies the function (or function object) which will be invoked for each of the elements in the destination range as a projection operation before the actual predicate is invoked.
- Returns
The ends_with algorithm returns a hpx::future<bool> if the execution policy is of type sequenced_task_policy or parallel_task_policy and returns bool otherwise. The ends_with algorithm returns a boolean with the value true if the second range matches the suffix of the first range, false otherwise.
-
template<typename Rng1, typename Rng2, typename Pred = ranges::equal_to, typename Proj1 = hpx::identity, typename Proj2 = hpx::identity>
bool ends_with(Rng1 &&rng1, Rng2 &&rng2, Pred &&pred = Pred(), Proj1 &&proj1 = Proj1(), Proj2 &&proj2 = Proj2())# Checks whether the second range rng2 matches the suffix of the first range rng1.
The assignments in the parallel ends_with algorithm invoked without an execution policy object execute in sequential order in the calling thread.
Note
Complexity: Linear: at most min(N1, N2) applications of the predicate and both projections.
- Template Parameters
Rng1 – The type of the source range used (deduced). The iterators extracted from this range type must meet the requirements of an forward iterator.
Rng2 – The type of the destination range used (deduced). The iterators extracted from this range type must meet the requirements of an forward iterator.
Pred – The binary predicate that compares the projected elements.
Proj1 – The type of an optional projection function for the source range. This defaults to hpx::identity
Proj2 – The type of an optional projection function for the destination range. This defaults to hpx::identity
- Parameters
rng1 – Refers to the source range.
rng2 – Refers to the destination range.
pred – Specifies the binary predicate function (or function object) which will be invoked for comparison of the elements in the in two ranges projected by proj1 and proj2 respectively.
proj1 – Specifies the function (or function object) which will be invoked for each of the elements in the source range as a projection operation before the actual predicate is invoked.
proj2 – Specifies the function (or function object) which will be invoked for each of the elements in the destination range as a projection operation before the actual predicate is invoked.
- Returns
The ends_with algorithm returns bool. The ends_with algorithm returns a boolean with the value true if the second range matches the suffix of the first range, false otherwise.
-
template<typename ExPolicy, typename Rng1, typename Rng2, typename Pred = ranges::equal_to, typename Proj1 = hpx::identity, typename Proj2 = hpx::identity>
hpx::parallel::util::detail::algorithm_result<ExPolicy, bool>::type ends_with(ExPolicy &&policy, Rng1 &&rng1, Rng2 &&rng2, Pred &&pred = Pred(), Proj1 &&proj1 = Proj1(), Proj2 &&proj2 = Proj2())# Checks whether the second range rng2 matches the suffix of the first range rng1.
The assignments in the parallel ends_with algorithm invoked with an execution policy object of type sequenced_policy execute in sequential order in the calling thread.
The assignments in the parallel ends_with algorithm invoked with an execution policy object of type parallel_policy or parallel_task_policy are permitted to execute in an unordered fashion in unspecified threads, and indeterminately sequenced within each thread.
Note
Complexity: Linear: at most min(N1, N2) applications of the predicate and both projections.
- Template Parameters
ExPolicy – The type of the execution policy to use (deduced). It describes the manner in which the execution of the algorithm may be parallelized and the manner in which it executes the assignments.
Rng1 – The type of the source range used (deduced). The iterators extracted from this range type must meet the requirements of an forward iterator.
Rng2 – The type of the destination range used (deduced). The iterators extracted from this range type must meet the requirements of an forward iterator.
Pred – The binary predicate that compares the projected elements.
Proj1 – The type of an optional projection function for the source range. This defaults to hpx::identity
Proj2 – The type of an optional projection function for the destination range. This defaults to hpx::identity
- Parameters
policy – The execution policy to use for the scheduling of the iterations.
rng1 – Refers to the source range.
rng2 – Refers to the destination range.
pred – Specifies the binary predicate function (or function object) which will be invoked for comparison of the elements in the in two ranges projected by proj1 and proj2 respectively.
proj1 – Specifies the function (or function object) which will be invoked for each of the elements in the source range as a projection operation before the actual predicate is invoked.
proj2 – Specifies the function (or function object) which will be invoked for each of the elements in the destination range as a projection operation before the actual predicate is invoked.
- Returns
The ends_with algorithm returns a hpx::future<bool> if the execution policy is of type sequenced_task_policy or parallel_task_policy and returns bool otherwise. The ends_with algorithm returns a boolean with the value true if the second range matches the suffix of the first range, false otherwise.
-
template<typename Iter1, typename Sent1, typename Iter2, typename Sent2, typename Pred = ranges::equal_to, typename Proj1 = hpx::identity, typename Proj2 = hpx::identity>
-
namespace ranges
hpx::ranges::equal#
Defined in header hpx/algorithm.hpp.
See Public API for a list of names and headers that are part of the public HPX API.
-
namespace hpx
-
namespace ranges
Functions
-
template<typename ExPolicy, typename Iter1, typename Sent1, typename Iter2, typename Sent2, typename Pred = equal_to, typename Proj1 = hpx::identity, typename Proj2 = hpx::identity>
hpx::parallel::util::detail::algorithm_result_t<ExPolicy, bool> equal(ExPolicy &&policy, Iter1 first1, Sent1 last1, Iter2 first2, Sent2 last2, Pred &&op = Pred(), Proj1 &&proj1 = Proj1(), Proj2 &&proj2 = Proj2())# Returns true if the range [first1, last1) is equal to the range [first2, last2), and false otherwise.
The comparison operations in the parallel equal algorithm invoked with an execution policy object of type sequenced_policy execute in sequential order in the calling thread.
The comparison operations in the parallel equal algorithm invoked with an execution policy object of type parallel_policy or parallel_task_policy are permitted to execute in an unordered fashion in unspecified threads, and indeterminately sequenced within each thread.
Note
Complexity: At most min(last1 - first1, last2 - first2) applications of the predicate f.
Note
The two ranges are considered equal if, for every iterator i in the range [first1,last1), *i equals *(first2 + (i - first1)). This overload of equal uses operator== to determine if two elements are equal.
- Template Parameters
ExPolicy – The type of the execution policy to use (deduced). It describes the manner in which the execution of the algorithm may be parallelized and the manner in which it executes the assignments.
Iter1 – The type of the source iterators used for the first range (deduced). This iterator type must meet the requirements of an forward iterator.
Sent1 – The type of the source iterators used for the end of the first range (deduced).
Iter2 – The type of the source iterators used for the second range (deduced). This iterator type must meet the requirements of an forward iterator.
Sent2 – The type of the source iterators used for the end of the second range (deduced).
Pred – The type of an optional function/function object to use. Unlike its sequential form, the parallel overload of equal requires Pred to meet the requirements of CopyConstructible. This defaults to std::equal_to<>
Proj1 – The type of an optional projection function applied to the first range. This defaults to hpx::identity
Proj2 – The type of an optional projection function applied to the second range. This defaults to hpx::identity
- Parameters
policy – The execution policy to use for the scheduling of the iterations.
first1 – Refers to the beginning of the sequence of elements of the first range the algorithm will be applied to.
last1 – Refers to the end of the sequence of elements of the first range the algorithm will be applied to.
first2 – Refers to the beginning of the sequence of elements of the second range the algorithm will be applied to.
last2 – Refers to the end of the sequence of elements of the second range the algorithm will be applied to.
op – The binary predicate which returns true if the elements should be treated as equal. The signature of the predicate function should be equivalent to the following:
The signature does not need to have const &, but the function must not modify the objects passed to it. The types Type1 and Type2 must be such that objects of types FwdIter1 and FwdIter2 can be dereferenced and then implicitly converted to Type1 and Type2 respectivelybool pred(const Type1 &a, const Type2 &b);
proj1 – Specifies the function (or function object) which will be invoked for each of the elements of the first range as a projection operation before the actual predicate is invoked.
proj2 – Specifies the function (or function object) which will be invoked for each of the elements of the second range as a projection operation before the actual predicate is invoked.
- Returns
The equal algorithm returns a hpx::future<bool> if the execution policy is of type sequenced_task_policy or parallel_task_policy and returns bool otherwise. The equal algorithm returns true if the elements in the two ranges are equal, otherwise it returns false. If the length of the range [first1, last1) does not equal the length of the range [first2, last2), it returns false.
-
template<typename ExPolicy, typename Rng1, typename Rng2, typename Pred = equal_to, typename Proj1 = hpx::identity, typename Proj2 = hpx::identity>
hpx::parallel::util::detail::algorithm_result_t<ExPolicy, bool> equal(ExPolicy &&policy, Rng1 &&rng1, Rng2 &&rng2, Pred &&op = Pred(), Proj1 &&proj1 = Proj1(), Proj2 &&proj2 = Proj2())# Returns true if the range [first1, last1) is equal to the range starting at first2, and false otherwise.
The comparison operations in the parallel equal algorithm invoked with an execution policy object of type sequenced_policy execute in sequential order in the calling thread.
The comparison operations in the parallel equal algorithm invoked with an execution policy object of type parallel_policy or parallel_task_policy are permitted to execute in an unordered fashion in unspecified threads, and indeterminately sequenced within each thread.
Note
Complexity: At most last1 - first1 applications of the predicate f.
Note
The two ranges are considered equal if, for every iterator i in the range [first1,last1), *i equals *(first2 + (i - first1)). This overload of equal uses operator== to determine if two elements are equal.
- Template Parameters
ExPolicy – The type of the execution policy to use (deduced). It describes the manner in which the execution of the algorithm may be parallelized and the manner in which it executes the assignments.
Rng1 – The type of the first source range used (deduced). The iterators extracted from this range type must meet the requirements of an forward iterator.
Rng2 – The type of the second source range used (deduced). The iterators extracted from this range type must meet the requirements of an forward iterator.
Pred – The type of an optional function/function object to use. Unlike its sequential form, the parallel overload of equal requires Pred to meet the requirements of CopyConstructible. This defaults to std::equal_to<>
Proj1 – The type of an optional projection function applied to the first range. This defaults to hpx::identity
Proj2 – The type of an optional projection function applied to the second range. This defaults to hpx::identity
- Parameters
policy – The execution policy to use for the scheduling of the iterations.
rng1 – Refers to the first sequence of elements the algorithm will be applied to.
rng2 – Refers to the second sequence of elements the algorithm will be applied to.
op – The binary predicate which returns true if the elements should be treated as equal. The signature of the predicate function should be equivalent to the following:
The signature does not need to have const &, but the function must not modify the objects passed to it. The types Type1 and Type2 must be such that objects of types FwdIter1 and FwdIter2 can be dereferenced and then implicitly converted to Type1 and Type2 respectivelybool pred(const Type1 &a, const Type2 &b);
proj1 – Specifies the function (or function object) which will be invoked for each of the elements of the first range as a projection operation before the actual predicate is invoked.
proj2 – Specifies the function (or function object) which will be invoked for each of the elements of the second range as a projection operation before the actual predicate is invoked.
- Returns
The equal algorithm returns a hpx::future<bool> if the execution policy is of type sequenced_task_policy or parallel_task_policy and returns bool otherwise. The equal algorithm returns true if the elements in the two ranges are equal, otherwise it returns false.
-
template<typename Iter1, typename Sent1, typename Iter2, typename Sent2, typename Pred = equal_to, typename Proj1 = hpx::identity, typename Proj2 = hpx::identity>
bool equal(Iter1 first1, Sent1 last1, Iter2 first2, Sent2 last2, Pred &&op = Pred(), Proj1 &&proj1 = Proj1(), Proj2 &&proj2 = Proj2())# Returns true if the range [first1, last1) is equal to the range [first2, last2), and false otherwise.
Note
Complexity: At most min(last1 - first1, last2 - first2) applications of the predicate f.
Note
The two ranges are considered equal if, for every iterator i in the range [first1,last1), *i equals *(first2 + (i - first1)). This overload of equal uses operator== to determine if two elements are equal.
- Template Parameters
Iter1 – The type of the source iterators used for the first range (deduced). This iterator type must meet the requirements of an forward iterator.
Sent1 – The type of the source iterators used for the end of the first range (deduced).
Iter2 – The type of the source iterators used for the second range (deduced). This iterator type must meet the requirements of an forward iterator.
Sent2 – The type of the source iterators used for the end of the second range (deduced).
Pred – The type of an optional function/function object to use. Unlike its sequential form, the parallel overload of equal requires Pred to meet the requirements of CopyConstructible. This defaults to std::equal_to<>
Proj1 – The type of an optional projection function applied to the first range. This defaults to hpx::identity
Proj2 – The type of an optional projection function applied to the second range. This defaults to hpx::identity
- Parameters
first1 – Refers to the beginning of the sequence of elements of the first range the algorithm will be applied to.
last1 – Refers to the end of the sequence of elements of the first range the algorithm will be applied to.
first2 – Refers to the beginning of the sequence of elements of the second range the algorithm will be applied to.
last2 – Refers to the end of the sequence of elements of the second range the algorithm will be applied to.
op – The binary predicate which returns true if the elements should be treated as equal. The signature of the predicate function should be equivalent to the following:
The signature does not need to have const &, but the function must not modify the objects passed to it. The types Type1 and Type2 must be such that objects of types FwdIter1 and FwdIter2 can be dereferenced and then implicitly converted to Type1 and Type2 respectivelybool pred(const Type1 &a, const Type2 &b);
proj1 – Specifies the function (or function object) which will be invoked for each of the elements of the first range as a projection operation before the actual predicate is invoked.
proj2 – Specifies the function (or function object) which will be invoked for each of the elements of the second range as a projection operation before the actual predicate is invoked.
- Returns
The equal algorithm returns true if the elements in the two ranges are equal, otherwise it returns false. If the length of the range [first1, last1) does not equal the length of the range [first2, last2), it returns false.
-
template<typename Rng1, typename Rng2, typename Pred = equal_to, typename Proj1 = hpx::identity, typename Proj2 = hpx::identity>
bool equal(Rng1 &&rng1, Rng2 &&rng2, Pred &&op = Pred(), Proj1 &&proj1 = Proj1(), Proj2 &&proj2 = Proj2())# Returns true if the range [first1, last1) is equal to the range starting at first2, and false otherwise.
Note
Complexity: At most last1 - first1 applications of the predicate f.
Note
The two ranges are considered equal if, for every iterator i in the range [first1,last1), *i equals *(first2 + (i - first1)). This overload of equal uses operator== to determine if two elements are equal.
- Template Parameters
Rng1 – The type of the first source range used (deduced). The iterators extracted from this range type must meet the requirements of an forward iterator.
Rng2 – The type of the second source range used (deduced). The iterators extracted from this range type must meet the requirements of an forward iterator.
Pred – The type of an optional function/function object to use. Unlike its sequential form, the parallel overload of equal requires Pred to meet the requirements of CopyConstructible. This defaults to std::equal_to<>
Proj1 – The type of an optional projection function applied to the first range. This defaults to hpx::identity
Proj2 – The type of an optional projection function applied to the second range. This defaults to hpx::identity
- Parameters
rng1 – Refers to the first sequence of elements the algorithm will be applied to.
rng2 – Refers to the second sequence of elements the algorithm will be applied to.
op – The binary predicate which returns true if the elements should be treated as equal. The signature of the predicate function should be equivalent to the following:
The signature does not need to have const &, but the function must not modify the objects passed to it. The types Type1 and Type2 must be such that objects of types FwdIter1 and FwdIter2 can be dereferenced and then implicitly converted to Type1 and Type2 respectivelybool pred(const Type1 &a, const Type2 &b);
proj1 – Specifies the function (or function object) which will be invoked for each of the elements of the first range as a projection operation before the actual predicate is invoked.
proj2 – Specifies the function (or function object) which will be invoked for each of the elements of the second range as a projection operation before the actual predicate is invoked.
- Returns
The equal algorithm returns true if the elements in the two ranges are equal, otherwise it returns false.
-
template<typename ExPolicy, typename Iter1, typename Sent1, typename Iter2, typename Sent2, typename Pred = equal_to, typename Proj1 = hpx::identity, typename Proj2 = hpx::identity>
-
namespace ranges
hpx::ranges::exclusive_scan#
Defined in header hpx/algorithm.hpp.
See Public API for a list of names and headers that are part of the public HPX API.
-
namespace hpx
-
namespace ranges
Functions
-
template<typename InIter, typename Sent, typename OutIter, typename T = typename std::iterator_traits<InIter>::value_type, typename Op = std::plus<T>>
exclusive_scan_result<InIter, OutIter> exclusive_scan(InIter first, Sent last, OutIter dest, T init, Op &&op = Op())# Assigns through each iterator i in [result, result + (last - first)) the value of GENERALIZED_NONCOMMUTATIVE_SUM(binary_op, init, *first, …, *(first + (i - result) - 1)).
The difference between exclusive_scan and inclusive_scan is that inclusive_scan includes the ith input element in the ith sum. If op is not mathematically associative, the behavior of inclusive_scan may be non-deterministic.
Note
Complexity: O(last - first) applications of the predicate op.
Note
GENERALIZED_NONCOMMUTATIVE_SUM(op, a1, …, aN) is defined as:
a1 when N is 1
op(GENERALIZED_NONCOMMUTATIVE_SUM(op, a1, …, aK), GENERALIZED_NONCOMMUTATIVE_SUM(op, aM, …, aN)) where 1 < K+1 = M <= N.
- Template Parameters
FwdIter1 – The type of the source iterators used (deduced). This iterator type must meet the requirements of an forward iterator.
Sent – The type of the source sentinel (deduced). This sentinel type must be a sentinel for FwdIter1.
FwdIter2 – The type of the iterator representing the destination range (deduced). This iterator type must meet the requirements of an forward iterator.
T – The type of the value to be used as initial (and intermediate) values (deduced).
Op – The type of the binary function object used for the reduction operation.
- Parameters
first – Refers to the beginning of the sequence of elements the algorithm will be applied to.
last – Refers to sentinel value denoting the end of the sequence of elements the algorithm will be applied.
dest – Refers to the beginning of the destination range.
init – The initial value for the generalized sum.
op – Specifies the function (or function object) which will be invoked for each of the values of the input sequence. This is a binary predicate. The signature of this predicate should be equivalent to:
The signature does not need to have const&, but the function must not modify the objects passed to it. The types Type1 and Ret must be such that an object of a type as given by the input sequence can be implicitly converted to any of those types.Ret fun(const Type1 &a, const Type1 &b);
- Returns
The exclusive_scan algorithm returns an input iterator to the point denoted by the sentinel and an output iterator to the element in the destination range, one past the last element copied.
-
template<typename ExPolicy, typename FwdIter1, typename Sent, typename FwdIter2, typename T = typename std::iterator_traits<FwdIter1>::value_type, typename Op = std::plus<T>>
parallel::util::detail::algorithm_result<ExPolicy, exclusive_scan_result<FwdIter1, FwdIter2>>::type exclusive_scan(ExPolicy &&policy, FwdIter1 first, Sent last, FwdIter2 dest, T init, Op &&op = Op())# Assigns through each iterator i in [result, result + (last - first)) the value of GENERALIZED_NONCOMMUTATIVE_SUM(binary_op, init, *first, …, *(first + (i - result) - 1)).
The reduce operations in the parallel exclusive_scan algorithm invoked with an execution policy object of type sequenced_policy execute in sequential order in the calling thread.
The reduce operations in the parallel exclusive_scan algorithm invoked with an execution policy object of type parallel_policy or parallel_task_policy are permitted to execute in an unordered fashion in unspecified threads, and indeterminately sequenced within each thread.
The difference between exclusive_scan and inclusive_scan is that inclusive_scan includes the ith input element in the ith sum. If op is not mathematically associative, the behavior of inclusive_scan may be non-deterministic.
Note
Complexity: O(last - first) applications of the predicate op.
Note
GENERALIZED_NONCOMMUTATIVE_SUM(op, a1, …, aN) is defined as:
a1 when N is 1
op(GENERALIZED_NONCOMMUTATIVE_SUM(op, a1, …, aK), GENERALIZED_NONCOMMUTATIVE_SUM(op, aM, …, aN)) where 1 < K+1 = M <= N.
- Template Parameters
ExPolicy – The type of the execution policy to use (deduced). It describes the manner in which the execution of the algorithm may be parallelized and the manner in which it executes the assignments.
FwdIter1 – The type of the source iterators used (deduced). This iterator type must meet the requirements of an forward iterator.
Sent – The type of the source sentinel (deduced). This sentinel type must be a sentinel for FwdIter1.
FwdIter2 – The type of the iterator representing the destination range (deduced). This iterator type must meet the requirements of an forward iterator.
T – The type of the value to be used as initial (and intermediate) values (deduced).
Op – The type of the binary function object used for the reduction operation.
- Parameters
policy – The execution policy to use for the scheduling of the iterations.
first – Refers to the beginning of the sequence of elements the algorithm will be applied to.
last – Refers to sentinel value denoting the end of the sequence of elements the algorithm will be applied.
dest – Refers to the beginning of the destination range.
init – The initial value for the generalized sum.
op – Specifies the function (or function object) which will be invoked for each of the values of the input sequence. This is a binary predicate. The signature of this predicate should be equivalent to:
The signature does not need to have const&, but the function must not modify the objects passed to it. The types Type1 and Ret must be such that an object of a type as given by the input sequence can be implicitly converted to any of those types.Ret fun(const Type1 &a, const Type1 &b);
- Returns
The exclusive_scan algorithm returns a hpx::future<util::in_out_result<FwdIter1, FwdIter2>> if the execution policy is of type sequenced_task_policy or parallel_task_policy and returns util::in_out_result<FwdIter1, FwdIter2> otherwise. The exclusive_scan algorithm returns an input iterator to the point denoted by the sentinel and an output iterator to the element in the destination range, one past the last element copied.
-
template<typename Rng, typename O, typename T = typename std::iterator_traits<std::ranges::iterator_t<Rng>>::value_type, typename Op = std::plus<T>>
exclusive_scan_result<std::ranges::iterator_t<Rng>, O> exclusive_scan(Rng &&rng, O dest, T init, Op &&op = Op())# Assigns through each iterator i in [result, result + (last - first)) the value of GENERALIZED_NONCOMMUTATIVE_SUM(+, init, *first, …, *(first + (i - result) - 1))
The difference between exclusive_scan and inclusive_scan is that inclusive_scan includes the ith input element in the ith sum.
Note
Complexity: O(last - first) applications of the predicate std::plus<T>.
Note
GENERALIZED_NONCOMMUTATIVE_SUM(+, a1, …, aN) is defined as:
a1 when N is 1
GENERALIZED_NONCOMMUTATIVE_SUM(+, a1, …, aK)
GENERALIZED_NONCOMMUTATIVE_SUM(+, aM, …, aN) where 1 < K+1 = M <= N.
- Template Parameters
Rng – The type of the source range used (deduced). The iterators extracted from this range type must meet the requirements of an forward iterator.
O – The type of the iterator representing the destination range (deduced). This iterator type must meet the requirements of an forward iterator.
T – The type of the value to be used as initial (and intermediate) values (deduced).
Op – The type of the binary function object used for the reduction operation.
- Parameters
rng – Refers to the sequence of elements the algorithm will be applied to.
dest – Refers to the beginning of the destination range.
init – The initial value for the generalized sum.
op – Specifies the function (or function object) which will be invoked for each of the values of the input sequence. This is a binary predicate. The signature of this predicate should be equivalent to:
The signature does not need to have const&, but the function must not modify the objects passed to it. The types Type1 and Ret must be such that an object of a type as given by the input sequence can be implicitly converted to any of those types.Ret fun(const Type1 &a, const Type1 &b);
- Returns
The exclusive_scan algorithm returns an input iterator to the point denoted by the sentinel and an output iterator to the element in the destination range, one past the last element copied.
-
template<typename ExPolicy, typename Rng, typename O, typename T = typename std::iterator_traits<std::ranges::iterator_t<Rng>>::value_type, typename Op = std::plus<T>>
parallel::util::detail::algorithm_result<ExPolicy, exclusive_scan_result<std::ranges::iterator_t<Rng>, O>> exclusive_scan(ExPolicy &&policy, Rng &&rng, O dest, T init, Op &&op = Op())# Assigns through each iterator i in [result, result + (last - first)) the value of GENERALIZED_NONCOMMUTATIVE_SUM(+, init, *first, …, *(first + (i - result) - 1))
The reduce operations in the parallel exclusive_scan algorithm invoked with an execution policy object of type sequenced_policy execute in sequential order in the calling thread.
The reduce operations in the parallel exclusive_scan algorithm invoked with an execution policy object of type parallel_policy or parallel_task_policy are permitted to execute in an unordered fashion in unspecified threads, and indeterminately sequenced within each thread.
The difference between exclusive_scan and inclusive_scan is that inclusive_scan includes the ith input element in the ith sum.
Note
Complexity: O(last - first) applications of the predicate std::plus<T>.
Note
GENERALIZED_NONCOMMUTATIVE_SUM(+, a1, …, aN) is defined as:
a1 when N is 1
GENERALIZED_NONCOMMUTATIVE_SUM(+, a1, …, aK)
GENERALIZED_NONCOMMUTATIVE_SUM(+, aM, …, aN) where 1 < K+1 = M <= N.
- Template Parameters
ExPolicy – The type of the execution policy to use (deduced). It describes the manner in which the execution of the algorithm may be parallelized and the manner in which it executes the assignments.
Rng – The type of the source range used (deduced). The iterators extracted from this range type must meet the requirements of an forward iterator.
O – The type of the iterator representing the destination range (deduced). This iterator type must meet the requirements of an forward iterator.
T – The type of the value to be used as initial (and intermediate) values (deduced).
Op – The type of the binary function object used for the reduction operation.
- Parameters
policy – The execution policy to use for the scheduling of the iterations.
rng – Refers to the sequence of elements the algorithm will be applied to.
dest – Refers to the beginning of the destination range.
init – The initial value for the generalized sum.
op – Specifies the function (or function object) which will be invoked for each of the values of the input sequence. This is a binary predicate. The signature of this predicate should be equivalent to:
The signature does not need to have const&, but the function must not modify the objects passed to it. The types Type1 and Ret must be such that an object of a type as given by the input sequence can be implicitly converted to any of those types.Ret fun(const Type1 &a, const Type1 &b);
- Returns
The exclusive_scan algorithm returns a hpx::future<util::in_out_result <std::ranges::iterator_t<Rng>, O>> if the execution policy is of type sequenced_task_policy or parallel_task_policy and returns util::in_out_result <std::ranges::iterator_t<Rng>, O> otherwise. The exclusive_scan algorithm returns an input iterator to the point denoted by the sentinel and an output iterator to the element in the destination range, one past the last element copied.
-
template<typename InIter, typename Sent, typename OutIter, typename T = typename std::iterator_traits<InIter>::value_type, typename Op = std::plus<T>>
-
namespace ranges
hpx::ranges::fill, hpx::ranges::fill_n#
Defined in header hpx/algorithm.hpp.
See Public API for a list of names and headers that are part of the public HPX API.
-
namespace hpx
-
namespace ranges
Functions
-
template<typename ExPolicy, typename Rng, typename T = typename std::iterator_traits<std::ranges::iterator_t<Rng>>::value_type>
hpx::parallel::util::detail::algorithm_result<ExPolicy, typename hpx::traits::range_traits<Rng>::iterator_type>::type fill(ExPolicy &&policy, Rng &&rng, T const &value)# Assigns the given value to the elements in the range [first, last).
The comparisons in the parallel fill algorithm invoked with an execution policy object of type sequenced_policy execute in sequential order in the calling thread.
The comparisons in the parallel fill algorithm invoked with an execution policy object of type parallel_policy or parallel_task_policy are permitted to execute in an unordered fashion in unspecified threads, and indeterminately sequenced within each thread.
Note
Complexity: Performs exactly last - first assignments.
- Template Parameters
ExPolicy – The type of the execution policy to use (deduced). It describes the manner in which the execution of the algorithm may be parallelized and the manner in which it executes the assignments.
Rng – The type of the source range used (deduced). The iterators extracted from this range type must meet the requirements of an input iterator.
T – The type of the value to be assigned (deduced).
- Parameters
policy – The execution policy to use for the scheduling of the iterations.
rng – Refers to the sequence of elements the algorithm will be applied to.
value – The value to be assigned.
- Returns
The fill algorithm returns a hpx::future<void> if the execution policy is of type sequenced_task_policy or parallel_task_policy and returns difference_type otherwise (where difference_type is defined by void.
-
template<typename ExPolicy, typename Iter, typename Sent, typename T = typename std::iterator_traits<Iter>::value_type>
hpx::parallel::util::detail::algorithm_result<ExPolicy, Iter>::type fill(ExPolicy &&policy, Iter first, Sent last, T const &value)# Assigns the given value to the elements in the range [first, last).
The comparisons in the parallel fill algorithm invoked with an execution policy object of type sequenced_policy execute in sequential order in the calling thread.
The comparisons in the parallel fill algorithm invoked with an execution policy object of type parallel_policy or parallel_task_policy are permitted to execute in an unordered fashion in unspecified threads, and indeterminately sequenced within each thread.
Note
Complexity: Performs exactly last - first assignments.
- Template Parameters
ExPolicy – The type of the execution policy to use (deduced). It describes the manner in which the execution of the algorithm may be parallelized and the manner in which it executes the assignments.
Iter – The type of the source iterators used for the range (deduced).
Sent – The type of the source sentinel (deduced). This sentinel type must be a sentinel for InIter.
T – The type of the value to be assigned (deduced).
- Parameters
policy – The execution policy to use for the scheduling of the iterations.
first – Refers to the beginning of the sequence of elements of the range the algorithm will be applied to.
last – Refers to the end of the sequence of elements of the range the algorithm will be applied to.
value – The value to be assigned.
- Returns
The fill algorithm returns a hpx::future<void> if the execution policy is of type sequenced_task_policy or parallel_task_policy and returns difference_type otherwise (where difference_type is defined by void.
-
template<typename Rng, typename T = typename std::iterator_traits<std::ranges::iterator_t<Rng>>::value_type>
std::ranges::iterator_t<Rng> fill(Rng &&rng, T const &value)# Assigns the given value to the elements in the range [first, last).
Note
Complexity: Performs exactly last - first assignments.
- Template Parameters
Rng – The type of the source range used (deduced). The iterators extracted from this range type must meet the requirements of an input iterator.
T – The type of the value to be assigned (deduced).
- Parameters
rng – Refers to the sequence of elements the algorithm will be applied to.
value – The value to be assigned.
- Returns
The fill algorithm returns void.
-
template<typename Iter, typename Sent, typename T = typename std::iterator_traits<Iter>::value_type>
Iter fill(Iter first, Sent last, T const &value)# Assigns the given value to the elements in the range [first, last).
Note
Complexity: Performs exactly last - first assignments.
- Template Parameters
Iter – The type of the source iterators used for the range (deduced).
Sent – The type of the source sentinel (deduced). This sentinel type must be a sentinel for InIter.
T – The type of the value to be assigned (deduced).
- Parameters
first – Refers to the beginning of the sequence of elements of the range the algorithm will be applied to.
last – Refers to the end of the sequence of elements of the range the algorithm will be applied to.
value – The value to be assigned.
- Returns
The fill algorithm returns void.
-
template<typename ExPolicy, typename Rng, typename T = typename std::iterator_traits<std::ranges::iterator_t<Rng>>::value_type>
hpx::parallel::util::detail::algorithm_result_t<ExPolicy, std::ranges::iterator_t<Rng>> fill_n(ExPolicy &&policy, Rng &&rng, T const &value)# Assigns the given value value to the first count elements in the range beginning at first if count > 0. Does nothing otherwise.
The comparisons in the parallel fill_n algorithm invoked with an execution policy object of type sequenced_policy execute in sequential order in the calling thread.
The comparisons in the parallel fill_n algorithm invoked with an execution policy object of type parallel_policy or parallel_task_policy are permitted to execute in an unordered fashion in unspecified threads, and indeterminately sequenced within each thread.
- Template Parameters
ExPolicy – The type of the execution policy to use (deduced). It describes the manner in which the execution of the algorithm may be parallelized and the manner in which it executes the assignments.
Rng – The type of the source range used (deduced). The iterators extracted from this range type must meet the requirements of an input iterator.
T – The type of the value to be assigned (deduced).
- Parameters
policy – The execution policy to use for the scheduling of the iterations.
rng – Refers to the sequence of elements the algorithm will be applied to.
value – The value to be assigned.
- Returns
The fill_n algorithm returns a hpx::future<void> if the execution policy is of type sequenced_task_policy or parallel_task_policy and returns difference_type otherwise (where difference_type is defined by void.
-
template<typename ExPolicy, typename FwdIter, typename Size, typename T = typename std::iterator_traits<FwdIter>::value_type>
hpx::parallel::util::detail::algorithm_result<ExPolicy, FwdIter>::type fill_n(ExPolicy &&policy, FwdIter first, Size count, T const &value)# Assigns the given value value to the first count elements in the range beginning at first if count > 0. Does nothing otherwise.
The comparisons in the parallel fill_n algorithm invoked with an execution policy object of type sequenced_policy execute in sequential order in the calling thread.
The comparisons in the parallel fill_n algorithm invoked with an execution policy object of type parallel_policy or parallel_task_policy are permitted to execute in an unordered fashion in unspecified threads, and indeterminately sequenced within each thread.
Note
Complexity: Performs exactly count assignments, for count > 0.
- Template Parameters
ExPolicy – The type of the execution policy to use (deduced). It describes the manner in which the execution of the algorithm may be parallelized and the manner in which it executes the assignments.
FwdIter – The type of the source iterators used for the range (deduced). This iterator type must meet the requirements of an forward iterator.
Size – The type of the argument specifying the number of elements to apply f to.
T – The type of the value to be assigned (deduced).
- Parameters
policy – The execution policy to use for the scheduling of the iterations.
first – Refers to the beginning of the sequence of elements the algorithm will be applied to.
count – Refers to the number of elements starting at first the algorithm will be applied to.
value – The value to be assigned.
- Returns
The fill_n algorithm returns a hpx::future<void> if the execution policy is of type sequenced_task_policy or parallel_task_policy and returns difference_type otherwise (where difference_type is defined by void.
-
template<typename Rng, typename T = typename std::iterator_traits<std::ranges::iterator_t<Rng>>::value_type>
hpx::traits::range_traits<Rng>::iterator_type fill_n(Rng &&rng, T const &value)# Assigns the given value value to the first count elements in the range beginning at first if count > 0. Does nothing otherwise.
- Template Parameters
Rng – The type of the source range used (deduced). The iterators extracted from this range type must meet the requirements of an input iterator.
T – The type of the value to be assigned (deduced).
- Parameters
rng – Refers to the sequence of elements the algorithm will be applied to.
value – The value to be assigned.
- Returns
The fill_n algorithm returns an output iterator that compares equal to last.
-
template<typename FwdIter, typename Size, typename T = typename std::iterator_traits<FwdIter>::value_type>
FwdIter fill_n(Iterator first, Size count, T const &value)# Assigns the given value value to the first count elements in the range beginning at first if count > 0. Does nothing otherwise.
Note
Complexity: Performs exactly count assignments, for count > 0.
- Template Parameters
Iterator – The type of the source range used (deduced). The iterators extracted from this range type must meet the requirements of an forward iterator.
Size – The type of the argument specifying the number of elements to apply f to.
T – The type of the value to be assigned (deduced).
- Parameters
first – Refers to the beginning of the sequence of elements the algorithm will be applied to.
count – Refers to the number of elements starting at first the algorithm will be applied to.
value – The value to be assigned.
- Returns
The fill_n algorithm returns an output iterator that compares equal to last.
-
template<typename ExPolicy, typename Rng, typename T = typename std::iterator_traits<std::ranges::iterator_t<Rng>>::value_type>
-
namespace ranges
hpx::ranges::find, hpx::ranges::find_if, hpx::ranges::find_if_not, hpx::ranges::find_end, hpx::ranges::find_first_of, hpx::ranges::find_last, hpx::ranges::find_last_if, hpx::ranges::find_last_if_not#
Defined in header hpx/algorithm.hpp.
See Public API for a list of names and headers that are part of the public HPX API.
hpx::ranges::fold_left, hpx::ranges::fold_left_first, hpx::ranges::fold_right, hpx::ranges::fold_right_last, hpx::ranges::fold_left_with_iter, hpx::ranges::fold_left_first_with_iter#
Defined in header hpx/algorithm.hpp.
See Public API for a list of names and headers that are part of the public HPX API.
-
namespace hpx
-
namespace ranges
Functions
-
template<typename InIter, typename Sent, typename T, typename F>
auto fold_left(InIter first, Sent last, T init, F f)# Left-folds a range of elements using a binary operator.
Note
Complexity: Exactly N applications of the binary operator, where N = std::distance(first, last).
- Template Parameters
InIter – The type of the source begin iterator (deduced). This iterator must meet the requirements of an input iterator.
Sent – The type of the source sentinel (deduced). This sentinel type must be a sentinel for InIter.
T – The type of the initial value.
F – The type of the binary function object.
- Parameters
first – Refers to the beginning of the sequence of elements the algorithm will be applied to.
last – Refers to the end of the sequence of elements the algorithm will be applied to.
init – The initial value for the fold operation.
f – Binary function object that will be applied.
- Returns
The result of left-folding the range.
-
template<typename Rng, typename T, typename F>
auto fold_left(Rng &&rng, T init, F f)# Left-folds a range of elements using a binary operator.
Note
Complexity: Exactly N applications of the binary operator, where N = std::distance(begin(rng), end(rng)).
- Template Parameters
Rng – The type of the source range (deduced).
T – The type of the initial value.
F – The type of the binary function object.
- Parameters
rng – Refers to the sequence of elements the algorithm will be applied to.
init – The initial value for the fold operation.
f – Binary function object that will be applied.
- Returns
The result of left-folding the range.
-
template<typename InIter, typename Sent, typename F>
auto fold_left_first(InIter first, Sent last, F f)# Left-folds a range using the first element as the initial value.
Note
Complexity: Exactly N-1 applications of the binary operator, where N = std::distance(first, last).
- Template Parameters
InIter – The type of the source begin iterator (deduced).
Sent – The type of the source sentinel (deduced).
F – The type of the binary function object.
- Parameters
first – Refers to the beginning of the sequence.
last – Refers to the end of the sequence.
f – Binary function object that will be applied.
- Returns
An optional containing the fold result, or std::nullopt if the range is empty.
-
template<typename Rng, typename F>
auto fold_left_first(Rng &&rng, F f)# Left-folds a range using the first element as the initial value.
- Template Parameters
Rng – The type of the source range (deduced).
F – The type of the binary function object.
- Parameters
rng – Refers to the sequence of elements.
f – Binary function object that will be applied.
- Returns
An optional containing the fold result, or std::nullopt if the range is empty.
-
template<typename BidIter, typename Sent, typename T, typename F>
auto fold_right(BidIter first, Sent last, T init, F f)# Right-folds a range of elements using a binary operator.
Note
Complexity: Exactly N applications of the binary operator.
- Template Parameters
BidIter – The type of the source begin iterator (deduced). This iterator must meet the requirements of a bidirectional iterator.
Sent – The type of the source sentinel (deduced).
T – The type of the initial value.
F – The type of the binary function object.
- Parameters
first – Refers to the beginning of the sequence.
last – Refers to the end of the sequence.
init – The initial value for the fold operation.
f – Binary function object that will be applied.
- Returns
The result of right-folding the range.
-
template<typename Rng, typename T, typename F>
auto fold_right(Rng &&rng, T init, F f)# Right-folds a range of elements using a binary operator.
- Template Parameters
Rng – The type of the source range (deduced).
T – The type of the initial value.
F – The type of the binary function object.
- Parameters
rng – Refers to the sequence of elements.
init – The initial value for the fold operation.
f – Binary function object that will be applied.
- Returns
The result of right-folding the range.
-
template<typename BidIter, typename Sent, typename F>
auto fold_right_last(BidIter first, Sent last, F f)# Right-folds a range using the last element as the initial value.
- Template Parameters
BidIter – The type of the source begin iterator (deduced).
Sent – The type of the source sentinel (deduced).
F – The type of the binary function object.
- Parameters
first – Refers to the beginning of the sequence.
last – Refers to the end of the sequence.
f – Binary function object that will be applied.
- Returns
An optional containing the fold result, or std::nullopt if the range is empty.
-
template<typename Rng, typename F>
auto fold_right_last(Rng &&rng, F f)# Right-folds a range using the last element as the initial value.
- Template Parameters
Rng – The type of the source range (deduced).
F – The type of the binary function object.
- Parameters
rng – Refers to the sequence of elements.
f – Binary function object that will be applied.
- Returns
An optional containing the fold result, or std::nullopt if the range is empty.
-
template<typename InIter, typename Sent, typename T, typename F>
auto fold_left_with_iter(InIter first, Sent last, T init, F f) -> fold_left_with_iter_result<InIter, std::decay_t<hpx::util::invoke_result_t<F&, T, hpx::traits::iter_reference_t<InIter>>>># Left-folds a range and returns both the result and the end iterator.
- Template Parameters
InIter – The type of the source begin iterator (deduced).
Sent – The type of the source sentinel (deduced).
T – The type of the initial value.
F – The type of the binary function object.
- Parameters
first – Refers to the beginning of the sequence.
last – Refers to the end of the sequence.
init – The initial value for the fold operation.
f – Binary function object that will be applied.
- Returns
A fold_left_with_iter_result containing the end iterator and the fold result.
-
template<typename Rng, typename T, typename F>
auto fold_left_with_iter(Rng &&rng, T init, F f) -> fold_left_with_iter_result<std::ranges::iterator_t<Rng>, std::decay_t<hpx::util::invoke_result_t<F&, T, hpx::traits::range_reference_t<Rng>>>># Left-folds a range and returns both the result and the end iterator.
- Template Parameters
Rng – The type of the source range (deduced).
T – The type of the initial value.
F – The type of the binary function object.
- Parameters
rng – Refers to the sequence of elements.
init – The initial value for the fold operation.
f – Binary function object that will be applied.
- Returns
A fold_left_with_iter_result containing the end iterator and the fold result.
-
template<typename InIter, typename Sent, typename F>
auto fold_left_first_with_iter(InIter first, Sent last, F f) -> fold_left_first_with_iter_result<InIter, hpx::optional<std::decay_t<hpx::util::invoke_result_t<F&, hpx::traits::iter_reference_t<InIter>, hpx::traits::iter_reference_t<InIter>>>>># Left-folds a range using the first element and returns both an optional result and the end iterator.
- Template Parameters
InIter – The type of the source begin iterator (deduced).
Sent – The type of the source sentinel (deduced).
F – The type of the binary function object.
- Parameters
first – Refers to the beginning of the sequence.
last – Refers to the end of the sequence.
f – Binary function object that will be applied.
- Returns
A fold_left_first_with_iter_result containing the end iterator and an optional with the fold result.
-
template<typename Rng, typename F>
auto fold_left_first_with_iter(Rng &&rng, F f) -> fold_left_first_with_iter_result<std::ranges::iterator_t<Rng>, hpx::optional<std::decay_t<hpx::util::invoke_result_t<F&, hpx::traits::range_reference_t<Rng>, hpx::traits::range_reference_t<Rng>>>>># Left-folds a range using the first element and returns both an optional result and the end iterator.
- Template Parameters
Rng – The type of the source range (deduced).
F – The type of the binary function object.
- Parameters
rng – Refers to the sequence of elements.
f – Binary function object that will be applied.
- Returns
A fold_left_first_with_iter_result containing the end iterator and an optional with the fold result.
-
template<typename InIter, typename Sent, typename T, typename F>
-
namespace ranges
hpx::ranges::for_each, hpx::ranges::for_each_n#
Defined in header hpx/algorithm.hpp.
See Public API for a list of names and headers that are part of the public HPX API.
-
namespace hpx
-
namespace ranges
Functions
-
template<typename InIter, typename Sent, typename F, typename Proj = hpx::identity>
for_each_result<InIter, F> for_each(InIter first, Sent last, F &&f, Proj &&proj = Proj())# Applies f to the result of dereferencing every iterator in the range [first, last).
If f returns a result, the result is ignored.
If the type of first satisfies the requirements of a mutable iterator, f may apply non-constant functions through the dereferenced iterator.
Note
Complexity: Applies f exactly last - first times.
- Template Parameters
InIter – The type of the source begin iterator used (deduced). This iterator type must meet the requirements of an input iterator.
Sent – The type of the source sentinel (deduced). This sentinel type must be a sentinel for InIter.
F – The type of the function/function object to use (deduced). Unlike its sequential form, the parallel overload of for_each requires F to meet the requirements of CopyConstructible.
Proj – The type of an optional projection function. This defaults to hpx::identity
- Parameters
first – Refers to the beginning of the sequence of elements the algorithm will be applied to.
last – Refers to the end of the sequence of elements the algorithm will be applied to.
f – Specifies the function (or function object) which will be invoked for each of the elements in the sequence specified by [first, last). The signature of this predicate should be equivalent to:
The signature does not need to have const&. The type Type must be such that an object of type InIter can be dereferenced and then implicitly converted to Type.<ignored> pred(const Type &a);
proj – Specifies the function (or function object) which will be invoked for each of the elements as a projection operation before the actual predicate is invoked.
- Returns
{last, HPX_MOVE(f)} where last is the iterator corresponding to the input sentinel last.
-
template<typename Rng, typename F, typename Proj = hpx::identity>
for_each_result<std::ranges::iterator_t<Rng>, F> for_each(Rng &&rng, F &&f, Proj &&proj = Proj())# Applies f to the result of dereferencing every iterator in the given range rng.
If f returns a result, the result is ignored.
If the type of first satisfies the requirements of a mutable iterator, f may apply non-constant functions through the dereferenced iterator.
Note
Complexity: Applies f exactly size(rng) times.
- Template Parameters
Rng – The type of the source range used (deduced). The iterators extracted from this range type must meet the requirements of an input iterator.
F – The type of the function/function object to use (deduced). Unlike its sequential form, the parallel overload of for_each requires F to meet the requirements of CopyConstructible.
Proj – The type of an optional projection function. This defaults to hpx::identity
- Parameters
rng – Refers to the sequence of elements the algorithm will be applied to.
f – Specifies the function (or function object) which will be invoked for each of the elements in the sequence specified by [first, last). The signature of this predicate should be equivalent to:
The signature does not need to have const&. The type Type must be such that an object of type InIter can be dereferenced and then implicitly converted to Type.<ignored> pred(const Type &a);
proj – Specifies the function (or function object) which will be invoked for each of the elements as a projection operation before the actual predicate is invoked.
- Returns
{std::end(rng), HPX_MOVE(f)}
-
template<typename ExPolicy, typename FwdIter, typename Sent, typename F, typename Proj = hpx::identity>
hpx::parallel::util::detail::algorithm_result_t<ExPolicy, FwdIter> for_each(ExPolicy &&policy, FwdIter first, Sent last, F &&f, Proj &&proj = Proj())# Applies f to the result of dereferencing every iterator in the range [first, last).
If f returns a result, the result is ignored.
If the type of first satisfies the requirements of a mutable iterator, f may apply non-constant functions through the dereferenced iterator.
Unlike its sequential form, the parallel overload of for_each does not return a copy of its Function parameter, since parallelization may not permit efficient state accumulation.
The application of function objects in parallel algorithm invoked with an execution policy object of type sequenced_policy execute in sequential order in the calling thread.
The application of function objects in parallel algorithm invoked with an execution policy object of type parallel_policy or parallel_task_policy are permitted to execute in an unordered fashion in unspecified threads, and indeterminately sequenced within each thread.
Note
Complexity: Applies f exactly last - first times.
- Template Parameters
ExPolicy – The type of the execution policy to use (deduced). It describes the manner in which the execution of the algorithm may be parallelized and the manner in which it applies user-provided function objects.
FwdIter – The type of the source begin iterator used (deduced). This iterator type must meet the requirements of an forward iterator.
Sent – The type of the source sentinel (deduced). This sentinel type must be a sentinel for InIter.
F – The type of the function/function object to use (deduced). Unlike its sequential form, the parallel overload of for_each requires F to meet the requirements of CopyConstructible.
Proj – The type of an optional projection function. This defaults to hpx::identity
- Parameters
policy – The execution policy to use for the scheduling of the iterations.
first – Refers to the beginning of the sequence of elements the algorithm will be applied to.
last – Refers to the end of the sequence of elements the algorithm will be applied to.
f – Specifies the function (or function object) which will be invoked for each of the elements in the sequence specified by [first, last). The signature of this predicate should be equivalent to:
The signature does not need to have const&. The type Type must be such that an object of type InIter can be dereferenced and then implicitly converted to Type.<ignored> pred(const Type &a);
proj – Specifies the function (or function object) which will be invoked for each of the elements as a projection operation before the actual predicate is invoked.
- Returns
The for_each algorithm returns a hpx::future<FwdIter> if the execution policy is of type sequenced_task_policy or parallel_task_policy and returns FwdIter otherwise. It returns last.
-
template<typename ExPolicy, typename Rng, typename F, typename Proj = hpx::identity>
hpx::parallel::util::detail::algorithm_result<ExPolicy, std::ranges::iterator_t<Rng>> for_each(ExPolicy &&policy, Rng &&rng, F &&f, Proj &&proj = Proj())# Applies f to the result of dereferencing every iterator in the given range rng.
If f returns a result, the result is ignored.
If the type of first satisfies the requirements of a mutable iterator, f may apply non-constant functions through the dereferenced iterator.
Unlike its sequential form, the parallel overload of for_each does not return a copy of its Function parameter, since parallelization may not permit efficient state accumulation.
The application of function objects in parallel algorithm invoked with an execution policy object of type sequenced_policy execute in sequential order in the calling thread.
The application of function objects in parallel algorithm invoked with an execution policy object of type parallel_policy or parallel_task_policy are permitted to execute in an unordered fashion in unspecified threads, and indeterminately sequenced within each thread.
Note
Complexity: Applies f exactly size(rng) times.
- Template Parameters
ExPolicy – The type of the execution policy to use (deduced). It describes the manner in which the execution of the algorithm may be parallelized and the manner in which it applies user-provided function objects.
Rng – The type of the source range used (deduced). The iterators extracted from this range type must meet the requirements of an input iterator.
F – The type of the function/function object to use (deduced). Unlike its sequential form, the parallel overload of for_each requires F to meet the requirements of CopyConstructible.
Proj – The type of an optional projection function. This defaults to hpx::identity
- Parameters
policy – The execution policy to use for the scheduling of the iterations.
rng – Refers to the sequence of elements the algorithm will be applied to.
f – Specifies the function (or function object) which will be invoked for each of the elements in the sequence specified by [first, last). The signature of this predicate should be equivalent to:
The signature does not need to have const&. The type Type must be such that an object of type InIter can be dereferenced and then implicitly converted to Type.<ignored> pred(const Type &a);
proj – Specifies the function (or function object) which will be invoked for each of the elements as a projection operation before the actual predicate is invoked.
- Returns
The for_each algorithm returns a hpx::future<FwdIter> if the execution policy is of type sequenced_task_policy or parallel_task_policy and returns FwdIter otherwise. It returns last.
-
template<typename InIter, typename Size, typename F, typename Proj = hpx::identity>
for_each_n_result<InIter, F> for_each_n(InIter first, Size count, F &&f, Proj &&proj = Proj())# Applies f to the result of dereferencing every iterator in the range [first, first + count), starting from first and proceeding to first + count - 1.
If f returns a result, the result is ignored.
If the type of first satisfies the requirements of a mutable iterator, f may apply non-constant functions through the dereferenced iterator.
Unlike its sequential form, the parallel overload of for_each does not return a copy of its Function parameter, since parallelization may not permit efficient state accumulation.
Note
Complexity: Applies f exactly count times.
- Template Parameters
InIter – The type of the source begin iterator used (deduced). This iterator type must meet the requirements of an input iterator.
Size – The type of the argument specifying the number of elements to apply f to.
F – The type of the function/function object to use (deduced). Unlike its sequential form, the parallel overload of for_each requires F to meet the requirements of CopyConstructible.
Proj – The type of an optional projection function. This defaults to hpx::identity
- Parameters
first – Refers to the beginning of the sequence of elements the algorithm will be applied to.
count – Refers to the number of elements starting at first the algorithm will be applied to.
f – Specifies the function (or function object) which will be invoked for each of the elements in the sequence specified by [first, last). The signature of this predicate should be equivalent to:
The signature does not need to have const&. The type Type must be such that an object of type InIter can be dereferenced and then implicitly converted to Type.<ignored> pred(const Type &a);
proj – Specifies the function (or function object) which will be invoked for each of the elements as a projection operation before the actual predicate is invoked.
- Returns
It returns last.
-
template<typename ExPolicy, typename FwdIter, typename Size, typename F, typename Proj = hpx::identity>
hpx::parallel::util::detail::algorithm_result<ExPolicy, FwdIter>::type for_each_n(ExPolicy &&policy, FwdIter first, Size count, F &&f, Proj &&proj = Proj())# Applies f to the result of dereferencing every iterator in the range [first, first + count), starting from first and proceeding to first + count - 1.
If f returns a result, the result is ignored.
If the type of first satisfies the requirements of a mutable iterator, f may apply non-constant functions through the dereferenced iterator.
Unlike its sequential form, the parallel overload of for_each does not return a copy of its Function parameter, since parallelization may not permit efficient state accumulation.
The application of function objects in parallel algorithm invoked with an execution policy object of type sequenced_policy execute in sequential order in the calling thread.
The application of function objects in parallel algorithm invoked with an execution policy object of type parallel_policy or parallel_task_policy are permitted to execute in an unordered fashion in unspecified threads, and indeterminately sequenced within each thread.
Note
Complexity: Applies f exactly count times.
- Template Parameters
ExPolicy – The type of the execution policy to use (deduced). It describes the manner in which the execution of the algorithm may be parallelized and the manner in which it applies user-provided function objects.
FwdIter – The type of the source begin iterator used (deduced). This iterator type must meet the requirements of an forward iterator.
Size – The type of the argument specifying the number of elements to apply f to.
F – The type of the function/function object to use (deduced). Unlike its sequential form, the parallel overload of for_each requires F to meet the requirements of CopyConstructible.
Proj – The type of an optional projection function. This defaults to hpx::identity
- Parameters
policy – The execution policy to use for the scheduling of the iterations.
first – Refers to the beginning of the sequence of elements the algorithm will be applied to.
count – Refers to the number of elements starting at first the algorithm will be applied to.
f – Specifies the function (or function object) which will be invoked for each of the elements in the sequence specified by [first, last). The signature of this predicate should be equivalent to:
The signature does not need to have const&. The type Type must be such that an object of type InIter can be dereferenced and then implicitly converted to Type.<ignored> pred(const Type &a);
proj – Specifies the function (or function object) which will be invoked for each of the elements as a projection operation before the actual predicate is invoked.
- Returns
The for_each algorithm returns a hpx::future<FwdIter> if the execution policy is of type sequenced_task_policy or parallel_task_policy and returns FwdIter otherwise. It returns last.
-
template<typename InIter, typename Sent, typename F, typename Proj = hpx::identity>
-
namespace ranges
hpx::ranges::experimental::for_loop, hpx::ranges::experimental::for_loop_strided, hpx::ranges::experimental::for_loop_n, hpx::ranges::experimental::for_loop_n_strided#
Defined in header hpx/algorithm.hpp.
See Public API for a list of names and headers that are part of the public HPX API.
-
namespace hpx
-
namespace ranges
-
namespace experimental#
Functions
-
template<typename ExPolicy, typename Iter, typename Sent, typename ...Args>
hpx::parallel::util::detail::algorithm_result<ExPolicy>::type for_loop(ExPolicy &&policy, Iter first, Sent last, Args&&... args)# The for_loop implements loop functionality over a range specified by iterator bounds. These algorithms resemble for_each from the Parallelism TS, but leave to the programmer when and if to dereference the iterator.
Requires: Iter shall meet the requirements of a forward iterator type. The args parameter pack shall have at least one element, comprising objects returned by invocations of reduction and/or induction function templates followed by exactly one element invocable element-access function, f. f shall meet the requirements of MoveConstructible.
Effects: Applies f to each element in the input sequence, with additional arguments corresponding to the reductions and inductions in the args parameter pack. The length of the input sequence is last - first.
The first element in the input sequence is specified by first. Each subsequent element is generated by incrementing the previous element.
Along with an element from the input sequence, for each member of the args parameter pack excluding f, an additional argument is passed to each application of f as follows:
If the pack member is an object returned by a call to a reduction function listed in section, then the additional argument is a reference to a view of that reduction object. If the pack member is an object returned by a call to induction, then the additional argument is the induction value for that induction object corresponding to the position of the application of f in the input sequence.
Complexity: Applies f exactly once for each element of the input sequence.
Remarks: If f returns a result, the result is ignored.
Note
As described in the C++ standard, arithmetic on non-random-access iterators is performed using advance and distance.
Note
The order of the elements of the input sequence is important for determining ordinal position of an application of f, even though the applications themselves may be unordered.
- Template Parameters
ExPolicy – The type of the execution policy to use (deduced). It describes the manner in which the execution of the algorithm may be parallelized and the manner in which it applies user-provided function objects.
Iter – The type of the iteration variable (forward iterator).
Sent – The type of the source sentinel (deduced). This sentinel type must be a sentinel for Iter.
Args – A parameter pack, it’s last element is a function object to be invoked for each iteration, the others have to be either conforming to the induction or reduction concept.
- Parameters
policy – The execution policy to use for the scheduling of the iterations.
first – Refers to the beginning of the sequence of elements the algorithm will be applied to.
last – Refers to the end of the sequence of elements the algorithm will be applied to.
args – The last element of this parameter pack is the function (object) to invoke, while the remaining elements of the parameter pack are instances of either induction or reduction objects. The function (or function object) which will be invoked for each of the elements in the sequence specified by [first, last) should expose a signature equivalent to:
The signature does not need to have const&. It will receive the current value of the iteration variable and one argument for each of the induction or reduction objects passed to the algorithms, representing their current values.<ignored> pred(Iter const& a, ...);
- Returns
The for_loop algorithm returns a hpx::future<void> if the execution policy is of type hpx::execution::sequenced_task_policy or hpx::execution::parallel_task_policy and returns void otherwise.
-
template<typename Iter, typename Sent, typename ...Args>
void for_loop(Iter first, Sent last, Args&&... args)# The for_loop implements loop functionality over a range specified by iterator bounds. These algorithms resemble for_each from the Parallelism TS, but leave to the programmer when and if to dereference the iterator.
The execution of for_loop without specifying an execution policy is equivalent to specifying hpx::execution::seq as the execution policy.
Requires: Iter shall meet the requirements of an input iterator type. The args parameter pack shall have at least one element, comprising objects returned by invocations of reduction and/or induction function templates followed by exactly one element invocable element-access function, f. f shall meet the requirements of MoveConstructible.
Effects: Applies f to each element in the input sequence, with additional arguments corresponding to the reductions and inductions in the args parameter pack. The length of the input sequence is last - first.
The first element in the input sequence is specified by first. Each subsequent element is generated by incrementing the previous element.
Along with an element from the input sequence, for each member of the args parameter pack excluding f, an additional argument is passed to each application of f as follows:
If the pack member is an object returned by a call to a reduction function listed in section, then the additional argument is a reference to a view of that reduction object. If the pack member is an object returned by a call to induction, then the additional argument is the induction value for that induction object corresponding to the position of the application of f in the input sequence.
Complexity: Applies f exactly once for each element of the input sequence.
Remarks: If f returns a result, the result is ignored.
Note
As described in the C++ standard, arithmetic on non-random-access iterators is performed using advance and distance.
Note
The order of the elements of the input sequence is important for determining ordinal position of an application of f, even though the applications themselves may be unordered.
- Template Parameters
Iter – The type of the iteration variable (input iterator).
Sent – The type of the source sentinel (deduced). This sentinel type must be a sentinel for Iter.
Args – A parameter pack, it’s last element is a function object to be invoked for each iteration, the others have to be either conforming to the induction or reduction concept.
- Parameters
first – Refers to the beginning of the sequence of elements the algorithm will be applied to.
last – Refers to the end of the sequence of elements the algorithm will be applied to.
args – The last element of this parameter pack is the function (object) to invoke, while the remaining elements of the parameter pack are instances of either induction or reduction objects. The function (or function object) which will be invoked for each of the elements in the sequence specified by [first, last) should expose a signature equivalent to:
The signature does not need to have const&. It will receive the current value of the iteration variable and one argument for each of the induction or reduction objects passed to the algorithms, representing their current values.<ignored> pred(Iter const& a, ...);
-
template<typename ExPolicy, typename R, typename ...Args>
hpx::parallel::util::detail::algorithm_result<ExPolicy>::type for_loop(ExPolicy &&policy, R &&rng, Args&&... args)# The for_loop implements loop functionality over a range specified by a range. These algorithms resemble for_each from the Parallelism TS, but leave to the programmer when and if to dereference the iterator.
Requires: Rng::iterator shall meet the requirements of a forward iterator type. The args parameter pack shall have at least one element, comprising objects returned by invocations of reduction and/or induction function templates followed by exactly one element invocable element-access function, f. f shall meet the requirements of MoveConstructible.
Effects: Applies f to each element in the input sequence, with additional arguments corresponding to the reductions and inductions in the args parameter pack. The length of the input sequence is last - first.
The first element in the input sequence is specified by first. Each subsequent element is generated by incrementing the previous element.
Along with an element from the input sequence, for each member of the args parameter pack excluding f, an additional argument is passed to each application of f as follows:
If the pack member is an object returned by a call to a reduction function listed in section, then the additional argument is a reference to a view of that reduction object. If the pack member is an object returned by a call to induction, then the additional argument is the induction value for that induction object corresponding to the position of the application of f in the input sequence.
Complexity: Applies f exactly once for each element of the input sequence.
Remarks: If f returns a result, the result is ignored.
Note
As described in the C++ standard, arithmetic on non-random-access iterators is performed using advance and distance.
Note
The order of the elements of the input sequence is important for determining ordinal position of an application of f, even though the applications themselves may be unordered.
- Template Parameters
ExPolicy – The type of the execution policy to use (deduced). It describes the manner in which the execution of the algorithm may be parallelized and the manner in which it applies user-provided function objects.
R – The type of the source range used (deduced). The iterators extracted from this range type must meet the requirements of an input iterator.
Args – A parameter pack, it’s last element is a function object to be invoked for each iteration, the others have to be either conforming to the induction or reduction concept.
- Parameters
policy – The execution policy to use for the scheduling of the iterations.
rng – Refers to theof the sequence of elements the algorithm will be applied to.
args – The last element of this parameter pack is the function (object) to invoke, while the remaining elements of the parameter pack are instances of either induction or reduction objects. The function (or function object) which will be invoked for each of the elements in the sequence specified by [first, last) should expose a signature equivalent to:
The signature does not need to have const&. It will receive the current value of the iteration variable and one argument for each of the induction or reduction objects passed to the algorithms, representing their current values.<ignored> pred(Rng::iterator const& a, ...);
- Returns
The for_loop algorithm returns a hpx::future<void> if the execution policy is of type hpx::execution::sequenced_task_policy or hpx::execution::parallel_task_policy and returns void otherwise.
-
template<typename Rng, typename ...Args>
void for_loop(Rng &&rng, Args&&... args)# The for_loop implements loop functionality over a range specified by a range. These algorithms resemble for_each from the Parallelism TS, but leave to the programmer when and if to dereference the iterator.
The execution of for_loop without specifying an execution policy is equivalent to specifying hpx::execution::seq as the execution policy.
Requires: Rng::iterator shall meet the requirements of an input iterator type. The args parameter pack shall have at least one element, comprising objects returned by invocations of reduction and/or induction function templates followed by exactly one element invocable element-access function, f. f shall meet the requirements of MoveConstructible.
Effects: Applies f to each element in the input sequence, with additional arguments corresponding to the reductions and inductions in the args parameter pack. The length of the input sequence is last - first.
The first element in the input sequence is specified by first. Each subsequent element is generated by incrementing the previous element.
Along with an element from the input sequence, for each member of the args parameter pack excluding f, an additional argument is passed to each application of f as follows:
If the pack member is an object returned by a call to a reduction function listed in section, then the additional argument is a reference to a view of that reduction object. If the pack member is an object returned by a call to induction, then the additional argument is the induction value for that induction object corresponding to the position of the application of f in the input sequence.
Complexity: Applies f exactly once for each element of the input sequence.
Remarks: If f returns a result, the result is ignored.
Note
As described in the C++ standard, arithmetic on non-random-access iterators is performed using advance and distance.
Note
The order of the elements of the input sequence is important for determining ordinal position of an application of f, even though the applications themselves may be unordered.
- Template Parameters
Rng – The type of the source range used (deduced). The iterators extracted from this range type must meet the requirements of an input iterator.
Args – A parameter pack, it’s last element is a function object to be invoked for each iteration, the others have to be either conforming to the induction or reduction concept.
- Parameters
rng – Refers to theof the sequence of elements the algorithm will be applied to.
args – The last element of this parameter pack is the function (object) to invoke, while the remaining elements of the parameter pack are instances of either induction or reduction objects. The function (or function object) which will be invoked for each of the elements in the sequence specified by [first, last) should expose a signature equivalent to:
The signature does not need to have const&. It will receive the current value of the iteration variable and one argument for each of the induction or reduction objects passed to the algorithms, representing their current values.<ignored> pred(Rng::iterator const& a, ...);
-
template<typename ExPolicy, typename Iter, typename Sent, typename S, typename ...Args>
hpx::parallel::util::detail::algorithm_result_t<ExPolicy> for_loop_strided(ExPolicy &&policy, Iter first, Sent last, S stride, Args&&... args)# The for_loop_strided implements loop functionality over a range specified by iterator bounds. These algorithms resemble for_each from the Parallelism TS, but leave to the programmer when and if to dereference the iterator.
Requires: Iter shall meet the requirements of a forward iterator type. The args parameter pack shall have at least one element, comprising objects returned by invocations of reduction and/or induction function templates followed by exactly one element invocable element-access function, f. f shall meet the requirements of MoveConstructible.
Effects: Applies f to each element in the input sequence, with additional arguments corresponding to the reductions and inductions in the args parameter pack. The length of the input sequence is last - first.
The first element in the input sequence is specified by first. Each subsequent element is generated by incrementing the previous element.
Along with an element from the input sequence, for each member of the args parameter pack excluding f, an additional argument is passed to each application of f as follows:
If the pack member is an object returned by a call to a reduction function listed in section, then the additional argument is a reference to a view of that reduction object. If the pack member is an object returned by a call to induction, then the additional argument is the induction value for that induction object corresponding to the position of the application of f in the input sequence.
Complexity: Applies f exactly once for each element of the input sequence.
Remarks: If f returns a result, the result is ignored.
Note
As described in the C++ standard, arithmetic on non-random-access iterators is performed using advance and distance.
Note
The order of the elements of the input sequence is important for determining ordinal position of an application of f, even though the applications themselves may be unordered.
- Template Parameters
ExPolicy – The type of the execution policy to use (deduced). It describes the manner in which the execution of the algorithm may be parallelized and the manner in which it applies user-provided function objects.
Iter – The type of the iteration variable (forward iterator).
Sent – The type of the source sentinel (deduced). This sentinel type must be a sentinel for Iter.
S – The type of the stride variable. This should be an integral type.
Args – A parameter pack, it’s last element is a function object to be invoked for each iteration, the others have to be either conforming to the induction or reduction concept.
- Parameters
policy – The execution policy to use for the scheduling of the iterations.
first – Refers to the beginning of the sequence of elements the algorithm will be applied to.
last – Refers to the end of the sequence of elements the algorithm will be applied to.
stride – Refers to the stride of the iteration steps. This shall have non-zero value and shall be negative only if Iter meets the requirements a bidirectional iterator.
args – The last element of this parameter pack is the function (object) to invoke, while the remaining elements of the parameter pack are instances of either induction or reduction objects. The function (or function object) which will be invoked for each of the elements in the sequence specified by [first, last) should expose a signature equivalent to:
The signature does not need to have const&. It will receive the current value of the iteration variable and one argument for each of the induction or reduction objects passed to the algorithms, representing their current values.<ignored> pred(Iter const& a, ...);
- Returns
The for_loop_strided algorithm returns a hpx::future<void> if the execution policy is of type hpx::execution::sequenced_task_policy or hpx::execution::parallel_task_policy and returns void otherwise.
-
template<typename Iter, typename Sent, typename S, typename ...Args>
void for_loop_strided(Iter first, Sent last, S stride, Args&&... args)# The for_loop_strided implements loop functionality over a range specified by iterator bounds. These algorithms resemble for_each from the Parallelism TS, but leave to the programmer when and if to dereference the iterator.
The execution of for_loop_strided without specifying an execution policy is equivalent to specifying hpx::execution::seq as the execution policy.
Requires: Iter shall meet the requirements of an input iterator type. The args parameter pack shall have at least one element, comprising objects returned by invocations of reduction and/or induction function templates followed by exactly one element invocable element-access function, f. f shall meet the requirements of MoveConstructible.
Effects: Applies f to each element in the input sequence, with additional arguments corresponding to the reductions and inductions in the args parameter pack. The length of the input sequence is last - first.
The first element in the input sequence is specified by first. Each subsequent element is generated by incrementing the previous element.
Along with an element from the input sequence, for each member of the args parameter pack excluding f, an additional argument is passed to each application of f as follows:
If the pack member is an object returned by a call to a reduction function listed in section, then the additional argument is a reference to a view of that reduction object. If the pack member is an object returned by a call to induction, then the additional argument is the induction value for that induction object corresponding to the position of the application of f in the input sequence.
Complexity: Applies f exactly once for each element of the input sequence.
Remarks: If f returns a result, the result is ignored.
Note
As described in the C++ standard, arithmetic on non-random-access iterators is performed using advance and distance.
Note
The order of the elements of the input sequence is important for determining ordinal position of an application of f, even though the applications themselves may be unordered.
- Template Parameters
Iter – The type of the iteration variable (input iterator).
Sent – The type of the source sentinel (deduced). This sentinel type must be a sentinel for Iter.
S – The type of the stride variable. This should be an integral type.
Args – A parameter pack, it’s last element is a function object to be invoked for each iteration, the others have to be either conforming to the induction or reduction concept.
- Parameters
first – Refers to the beginning of the sequence of elements the algorithm will be applied to.
last – Refers to the end of the sequence of elements the algorithm will be applied to.
stride – Refers to the stride of the iteration steps. This shall have non-zero value and shall be negative only if Iter meets the requirements a bidirectional iterator.
args – The last element of this parameter pack is the function (object) to invoke, while the remaining elements of the parameter pack are instances of either induction or reduction objects. The function (or function object) which will be invoked for each of the elements in the sequence specified by [first, last) should expose a signature equivalent to:
The signature does not need to have const&. It will receive the current value of the iteration variable and one argument for each of the induction or reduction objects passed to the algorithms, representing their current values.<ignored> pred(Iter const& a, ...);
-
template<typename ExPolicy, typename Rng, typename S, typename ...Args>
hpx::parallel::util::detail::algorithm_result_t<ExPolicy> for_loop_strided(ExPolicy &&policy, Rng &&rng, S stride, Args&&... args)# The for_loop_strided implements loop functionality over a range specified by a range. These algorithms resemble for_each from the Parallelism TS, but leave to the programmer when and if to dereference the iterator.
Requires: Rng::iterator shall meet the requirements of a forward iterator type. The args parameter pack shall have at least one element, comprising objects returned by invocations of reduction and/or induction function templates followed by exactly one element invocable element-access function, f. f shall meet the requirements of MoveConstructible.
Effects: Applies f to each element in the input sequence, with additional arguments corresponding to the reductions and inductions in the args parameter pack. The length of the input sequence is last - first.
The first element in the input sequence is specified by first. Each subsequent element is generated by incrementing the previous element.
Along with an element from the input sequence, for each member of the args parameter pack excluding f, an additional argument is passed to each application of f as follows:
If the pack member is an object returned by a call to a reduction function listed in section, then the additional argument is a reference to a view of that reduction object. If the pack member is an object returned by a call to induction, then the additional argument is the induction value for that induction object corresponding to the position of the application of f in the input sequence.
Complexity: Applies f exactly once for each element of the input sequence.
Remarks: If f returns a result, the result is ignored.
Note
As described in the C++ standard, arithmetic on non-random-access iterators is performed using advance and distance.
Note
The order of the elements of the input sequence is important for determining ordinal position of an application of f, even though the applications themselves may be unordered.
- Template Parameters
ExPolicy – The type of the execution policy to use (deduced). It describes the manner in which the execution of the algorithm may be parallelized and the manner in which it applies user-provided function objects.
Rng – The type of the source range used (deduced). The iterators extracted from this range type must meet the requirements of an input iterator.
S – The type of the stride variable. This should be an integral type.
Args – A parameter pack, it’s last element is a function object to be invoked for each iteration, the others have to be either conforming to the induction or reduction concept.
- Parameters
policy – The execution policy to use for the scheduling of the iterations.
rng – Refers to theof the sequence of elements the algorithm will be applied to.
stride – Refers to the stride of the iteration steps. This shall have non-zero value and shall be negative only if Rng::iterator meets the requirements a bidirectional iterator.
args – The last element of this parameter pack is the function (object) to invoke, while the remaining elements of the parameter pack are instances of either induction or reduction objects. The function (or function object) which will be invoked for each of the elements in the sequence specified by [first, last) should expose a signature equivalent to:
The signature does not need to have const&. It will receive the current value of the iteration variable and one argument for each of the induction or reduction objects passed to the algorithms, representing their current values.<ignored> pred(Rng::iterator const& a, ...);
- Returns
The for_loop_strided algorithm returns a hpx::future<void> if the execution policy is of type hpx::execution::sequenced_task_policy or hpx::execution::parallel_task_policy and returns void otherwise.
-
template<typename Rng, typename S, typename ...Args>
void for_loop_strided(Rng &&rng, S stride, Args&&... args)# The for_loop_strided implements loop functionality over a range specified by a range. These algorithms resemble for_each from the Parallelism TS, but leave to the programmer when and if to dereference the iterator.
The execution of for_loop_strided without specifying an execution policy is equivalent to specifying hpx::execution::seq as the execution policy.
Requires: Rng::iterator shall meet the requirements of an input iterator type. The args parameter pack shall have at least one element, comprising objects returned by invocations of reduction and/or induction function templates followed by exactly one element invocable element-access function, f. f shall meet the requirements of MoveConstructible.
Effects: Applies f to each element in the input sequence, with additional arguments corresponding to the reductions and inductions in the args parameter pack. The length of the input sequence is last - first.
The first element in the input sequence is specified by first. Each subsequent element is generated by incrementing the previous element.
Along with an element from the input sequence, for each member of the args parameter pack excluding f, an additional argument is passed to each application of f as follows:
If the pack member is an object returned by a call to a reduction function listed in section, then the additional argument is a reference to a view of that reduction object. If the pack member is an object returned by a call to induction, then the additional argument is the induction value for that induction object corresponding to the position of the application of f in the input sequence.
Complexity: Applies f exactly once for each element of the input sequence.
Remarks: If f returns a result, the result is ignored.
Note
As described in the C++ standard, arithmetic on non-random-access iterators is performed using advance and distance.
Note
The order of the elements of the input sequence is important for determining ordinal position of an application of f, even though the applications themselves may be unordered.
- Template Parameters
Rng – The type of the source range used (deduced). The iterators extracted from this range type must meet the requirements of an input iterator.
S – The type of the stride variable. This should be an integral type.
Args – A parameter pack, it’s last element is a function object to be invoked for each iteration, the others have to be either conforming to the induction or reduction concept.
- Parameters
rng – Refers to theof the sequence of elements the algorithm will be applied to.
stride – Refers to the stride of the iteration steps. This shall have non-zero value and shall be negative only if Rng::iterator meets the requirements a bidirectional iterator.
args – The last element of this parameter pack is the function (object) to invoke, while the remaining elements of the parameter pack are instances of either induction or reduction objects. The function (or function object) which will be invoked for each of the elements in the sequence specified by [first, last) should expose a signature equivalent to:
The signature does not need to have const&. It will receive the current value of the iteration variable and one argument for each of the induction or reduction objects passed to the algorithms, representing their current values.<ignored> pred(Rng::iterator const& a, ...);
-
template<typename ExPolicy, typename Iter, typename Sent, typename ...Args>
-
namespace experimental#
-
namespace ranges
hpx::ranges::generate, hpx::ranges::generate_n#
Defined in header hpx/algorithm.hpp.
See Public API for a list of names and headers that are part of the public HPX API.
-
namespace hpx
-
namespace ranges
Functions
-
template<typename ExPolicy, typename Rng, typename F>
hpx::parallel::util::detail::algorithm_result<ExPolicy, std::ranges::iterator_t<Rng>> generate(ExPolicy &&policy, Rng &&rng, F &&f)# Assign each element in range [first, last) a value generated by the given function object f
The assignments in the parallel generate algorithm invoked with an execution policy object of type sequenced_policy execute in sequential order in the calling thread.
The assignments in the parallel generate algorithm invoked with an execution policy object of type parallel_policy or parallel_task_policy are permitted to execute in an unordered fashion in unspecified threads, and indeterminately sequenced within each thread.
Note
Complexity: Exactly distance(first, last) invocations of f and assignments.
- Template Parameters
ExPolicy – The type of the execution policy to use (deduced). It describes the manner in which the execution of the algorithm may be parallelized and the manner in which it executes the assignments.
Rng – The type of the source range used (deduced). The iterators extracted from this range type must meet the requirements of an forward iterator.
F – The type of the function/function object to use (deduced). Unlike its sequential form, the parallel overload of equal requires F to meet the requirements of CopyConstructible.
- Parameters
policy – The execution policy to use for the scheduling of the iterations.
rng – Refers to the sequence of elements the algorithm will be applied to.
f – generator function that will be called. signature of function should be equivalent to the following:
The type Ret must be such that an object of type FwdIter can be dereferenced and assigned a value of type Ret.Ret fun();
- Returns
The replace_if algorithm returns a hpx::future<FwdIter> if the execution policy is of type sequenced_task_policy or parallel_task_policy and returns FwdIter otherwise. It returns last.
-
template<typename ExPolicy, typename Iter, typename Sent, typename F>
hpx::parallel::util::detail::algorithm_result_t<ExPolicy, Iter> generate(ExPolicy &&policy, Iter first, Sent last, F &&f)# Assign each element in range [first, last) a value generated by the given function object f
The assignments in the parallel generate algorithm invoked with an execution policy object of type sequenced_policy execute in sequential order in the calling thread.
The assignments in the parallel generate algorithm invoked with an execution policy object of type parallel_policy or parallel_task_policy are permitted to execute in an unordered fashion in unspecified threads, and indeterminately sequenced within each thread.
Note
Complexity: Exactly distance(first, last) invocations of f and assignments.
- Template Parameters
ExPolicy – The type of the execution policy to use (deduced). It describes the manner in which the execution of the algorithm may be parallelized and the manner in which it executes the assignments.
Iter – The type of the source begin iterator used (deduced). This iterator type must meet the requirements of an forward iterator.
Sent – The type of the source end iterator used (deduced). This iterator type must meet the requirements of an forward iterator.
F – The type of the function/function object to use (deduced). Unlike its sequential form, the parallel overload of equal requires F to meet the requirements of CopyConstructible.
- Parameters
policy – The execution policy to use for the scheduling of the iterations.
first – Refers to the beginning of the sequence of elements the algorithm will be applied to.
last – Refers to the end of the sequence of elements the algorithm will be applied to.
f – generator function that will be called. signature of function should be equivalent to the following:
The type Ret must be such that an object of type FwdIter can be dereferenced and assigned a value of type Ret.Ret fun();
- Returns
The replace_if algorithm returns a hpx::future<FwdIter> if the execution policy is of type sequenced_task_policy or parallel_task_policy and returns FwdIter otherwise. It returns last.
-
template<typename Rng, typename F>
std::ranges::iterator_t<Rng> generate(Rng &&rng, F &&f)# Assign each element in range [first, last) a value generated by the given function object f
Note
Complexity: Exactly distance(first, last) invocations of f and assignments.
- Template Parameters
Rng – The type of the source range used (deduced). The iterators extracted from this range type must meet the requirements of an forward iterator.
F – The type of the function/function object to use (deduced). Unlike its sequential form, the parallel overload of equal requires F to meet the requirements of CopyConstructible.
- Parameters
rng – Refers to the sequence of elements the algorithm will be applied to.
f – generator function that will be called. signature of function should be equivalent to the following:
The type Ret must be such that an object of type FwdIter can be dereferenced and assigned a value of type Ret.Ret fun();
- Returns
The replace_if algorithm returns last.
-
template<typename Iter, typename Sent, typename F>
Iter generate(Iter first, Sent last, F &&f)# Assign each element in range [first, last) a value generated by the given function object f
Note
Complexity: Exactly distance(first, last) invocations of f and assignments.
- Template Parameters
Iter – The type of the source begin iterator used (deduced). This iterator type must meet the requirements of an forward iterator.
Sent – The type of the source end iterator used (deduced). This iterator type must meet the requirements of an forward iterator.
F – The type of the function/function object to use (deduced). Unlike its sequential form, the parallel overload of equal requires F to meet the requirements of CopyConstructible.
- Parameters
first – Refers to the beginning of the sequence of elements the algorithm will be applied to.
last – Refers to the end of the sequence of elements the algorithm will be applied to.
f – generator function that will be called. signature of function should be equivalent to the following:
The type Ret must be such that an object of type FwdIter can be dereferenced and assigned a value of type Ret.Ret fun();
- Returns
The replace_if algorithm returns last.
-
template<typename ExPolicy, typename FwdIter, typename Size, typename F>
hpx::parallel::util::detail::algorithm_result_t<ExPolicy, FwdIter> generate_n(ExPolicy &&policy, FwdIter first, Size count, F &&f)# Assigns each element in range [first, first+count) a value generated by the given function object g.
The assignments in the parallel generate_n algorithm invoked with an execution policy object of type sequenced_policy execute in sequential order in the calling thread.
The assignments in the parallel generate_n algorithm invoked with an execution policy object of type parallel_policy or parallel_task_policy are permitted to execute in an unordered fashion in unspecified threads, and indeterminately sequenced within each thread.
Note
Complexity: Exactly count invocations of f and assignments, for count > 0.
- Template Parameters
ExPolicy – The type of the execution policy to use (deduced). It describes the manner in which the execution of the algorithm may be parallelized and the manner in which it executes the assignments.
FwdIter – The type of the source iterators used (deduced). This iterator type must meet the requirements of an forward iterator.
Size – The type of the argument specifying the number of elements to apply f to.
F – The type of the function/function object to use (deduced). Unlike its sequential form, the parallel overload of equal requires F to meet the requirements of CopyConstructible.
- Parameters
policy – The execution policy to use for the scheduling of the iterations.
first – Refers to the beginning of the sequence of elements the algorithm will be applied to.
count – Refers to the number of elements in the sequence the algorithm will be applied to.
f – Refers to the generator function object that will be called. The signature of the function should be equivalent to
The type Ret must be such that an object of type OutputIt can be dereferenced and assigned a value of type Ret.Ret fun();
- Returns
The replace_if algorithm returns a hpx::future<FwdIter> if the execution policy is of type sequenced_task_policy or parallel_task_policy and returns FwdIter otherwise. It returns last.
-
template<typename FwdIter, typename Size, typename F>
FwdIter generate_n(FwdIter first, Size count, F &&f)# Assigns each element in range [first, first+count) a value generated by the given function object g.
Note
Complexity: Exactly count invocations of f and assignments, for count > 0.
- Template Parameters
FwdIter – The type of the source iterators used (deduced). This iterator type must meet the requirements of an forward iterator.
Size – The type of the argument specifying the number of elements to apply f to.
F – The type of the function/function object to use (deduced). Unlike its sequential form, the parallel overload of equal requires F to meet the requirements of CopyConstructible.
- Parameters
first – Refers to the beginning of the sequence of elements the algorithm will be applied to.
count – Refers to the number of elements in the sequence the algorithm will be applied to.
f – Refers to the generator function object that will be called. The signature of the function should be equivalent to
The type Ret must be such that an object of type OutputIt can be dereferenced and assigned a value of type Ret.Ret fun();
- Returns
The replace_if algorithm returns last.
-
template<typename ExPolicy, typename Rng, typename F>
-
namespace ranges
hpx::ranges::includes#
Defined in header hpx/algorithm.hpp.
See Public API for a list of names and headers that are part of the public HPX API.
-
namespace hpx
-
namespace ranges
Functions
-
template<typename ExPolicy, typename Iter1, typename Sent1, typename Iter2, typename Sent2, typename Pred = hpx::parallel::detail::less, typename Proj1 = hpx::identity, typename Proj2 = hpx::identity>
hpx::parallel::util::detail::algorithm_result_t<ExPolicy, bool> includes(ExPolicy &&policy, Iter1 first1, Sent1 last1, Iter2 first2, Sent2 last2, Pred &&op = Pred(), Proj1 &&proj1 = Proj1(), Proj2 &&proj2 = Proj2())# Returns true if every element from the sorted range [first2, last2) is found within the sorted range [first1, last1). Also returns true if [first2, last2) is empty. The version expects both ranges to be sorted with the user supplied binary predicate f.
The comparison operations in the parallel includes algorithm invoked with an execution policy object of type sequenced_policy execute in sequential order in the calling thread.
The comparison operations in the parallel includes algorithm invoked with an execution policy object of type parallel_policy or parallel_task_policy are permitted to execute in an unordered fashion in unspecified threads, and indeterminately sequenced within each thread.
Note
At most 2*(N1+N2-1) comparisons, where N1 = std::distance(first1, last1) and N2 = std::distance(first2, last2).
- Template Parameters
ExPolicy – The type of the execution policy to use (deduced). It describes the manner in which the execution of the algorithm may be parallelized and the manner in which it executes the assignments.
Iter1 – The type of the source iterators used (deduced) representing the first sequence. This iterator type must meet the requirements of an forward iterator.
Sent1 – The type of the end source iterators used (deduced). This iterator type must meet the requirements of an sentinel for Iter1.
Iter2 – The type of the source iterators used (deduced) representing the second sequence. This iterator type must meet the requirements of an forward iterator.
Sent2 – The type of the end source iterators used (deduced) representing the second sequence. This iterator type must meet the requirements of an sentinel for Iter2.
Pred – The type of an optional function/function object to use. Unlike its sequential form, the parallel overload of includes requires Pred to meet the requirements of CopyConstructible. This defaults to std::less<>
Proj1 – The type of an optional projection function applied to the first sequence. This defaults to hpx::identity
Proj2 – The type of an optional projection function applied to the second sequence. This defaults to hpx::identity
- Parameters
policy – The execution policy to use for the scheduling of the iterations.
first1 – Refers to the beginning of the sequence of elements of the first range the algorithm will be applied to.
last1 – Refers to the end of the sequence of elements of the first range the algorithm will be applied to.
first2 – Refers to the beginning of the sequence of elements of the second range the algorithm will be applied to.
last2 – Refers to the end of the sequence of elements of the second range the algorithm will be applied to.
op – The binary predicate which returns true if the elements should be treated as includes. The signature of the predicate function should be equivalent to the following:
The signature does not need to have const &, but the function must not modify the objects passed to it. The types Type1 and Type2 must be such that objects of types FwdIter1 and FwdIter2 can be dereferenced and then implicitly converted to Type1 and Type2 respectivelybool pred(const Type1 &a, const Type2 &b);
proj1 – Specifies the function (or function object) which will be invoked for each of the elements of the first sequence as a projection operation before the actual predicate op is invoked.
proj2 – Specifies the function (or function object) which will be invoked for each of the elements of the second sequence as a projection operation before the actual predicate op is invoked.
- Returns
The includes algorithm returns a hpx::future<bool> if the execution policy is of type sequenced_task_policy or parallel_task_policy and returns bool otherwise. The includes algorithm returns true every element from the sorted range [first2, last2) is found within the sorted range [first1, last1). Also returns true if [first2, last2) is empty.
-
template<typename Iter1, typename Sent1, typename Iter2, typename Sent2, typename Pred = hpx::parallel::detail::less, typename Proj1 = hpx::identity, typename Proj2 = hpx::identity>
bool includes(Iter1 first1, Sent1 last1, Iter2 first2, Sent2 last2, Pred &&op = Pred(), Proj1 &&proj1 = Proj1(), Proj2 &&proj2 = Proj2())# Returns true if every element from the sorted range [first2, last2) is found within the sorted range [first1, last1). Also returns true if [first2, last2) is empty. The version expects both ranges to be sorted with the user supplied binary predicate f.
Note
At most 2*(N1+N2-1) comparisons, where N1 = std::distance(first1, last1) and N2 = std::distance(first2, last2).
- Template Parameters
Iter1 – The type of the source iterators used (deduced) representing the first sequence. This iterator type must meet the requirements of an forward iterator.
Sent1 – The type of the end source iterators used (deduced). This iterator type must meet the requirements of an sentinel for Iter1.
Iter2 – The type of the source iterators used (deduced) representing the second sequence. This iterator type must meet the requirements of an forward iterator.
Sent2 – The type of the end source iterators used (deduced) representing the second sequence. This iterator type must meet the requirements of an sentinel for Iter2.
Pred – The type of an optional function/function object to use. Unlike its sequential form, the parallel overload of includes requires Pred to meet the requirements of CopyConstructible. This defaults to std::less<>
Proj1 – The type of an optional projection function applied to the first sequence. This defaults to hpx::identity
Proj2 – The type of an optional projection function applied to the second sequence. This defaults to hpx::identity
- Parameters
first1 – Refers to the beginning of the sequence of elements of the first range the algorithm will be applied to.
last1 – Refers to the end of the sequence of elements of the first range the algorithm will be applied to.
first2 – Refers to the beginning of the sequence of elements of the second range the algorithm will be applied to.
last2 – Refers to the end of the sequence of elements of the second range the algorithm will be applied to.
op – The binary predicate which returns true if the elements should be treated as includes. The signature of the predicate function should be equivalent to the following:
The signature does not need to have const &, but the function must not modify the objects passed to it. The types Type1 and Type2 must be such that objects of types FwdIter1 and FwdIter2 can be dereferenced and then implicitly converted to Type1 and Type2 respectivelybool pred(const Type1 &a, const Type2 &b);
proj1 – Specifies the function (or function object) which will be invoked for each of the elements of the first sequence as a projection operation before the actual predicate op is invoked.
proj2 – Specifies the function (or function object) which will be invoked for each of the elements of the second sequence as a projection operation before the actual predicate op is invoked.
- Returns
The includes algorithm returns true every element from the sorted range [first2, last2) is found within the sorted range [first1, last1). Also returns true if [first2, last2) is empty.
-
template<typename ExPolicy, typename Rng1, typename Rng2, typename Pred = hpx::parallel::detail::less, typename Proj1 = hpx::identity, typename Proj2 = hpx::identity>
hpx::parallel::util::detail::algorithm_result_t<ExPolicy, bool> includes(ExPolicy &&policy, Rng1 &&rng1, Rng2 &&rng2, Pred &&op = Pred(), Proj1 &&proj1 = Proj1(), Proj2 &&proj2 = Proj2())# Returns true if every element from the sorted range [first2, last2) is found within the sorted range [first1, last1). Also returns true if [first2, last2) is empty. The version expects both ranges to be sorted with the user supplied binary predicate f.
The comparison operations in the parallel includes algorithm invoked with an execution policy object of type sequenced_policy execute in sequential order in the calling thread.
The comparison operations in the parallel includes algorithm invoked with an execution policy object of type parallel_policy or parallel_task_policy are permitted to execute in an unordered fashion in unspecified threads, and indeterminately sequenced within each thread.
Note
At most 2*(N1+N2-1) comparisons, where N1 = std::distance(first1, last1) and N2 = std::distance(first2, last2).
- Template Parameters
ExPolicy – The type of the execution policy to use (deduced). It describes the manner in which the execution of the algorithm may be parallelized and the manner in which it executes the assignments.
Rng1 – The type of the source range used (deduced). The iterators extracted from this range type must meet the requirements of an input iterator.
Rng2 – The type of the source range used (deduced). The iterators extracted from this range type must meet the requirements of an input iterator.
Pred – The type of an optional function/function object to use. Unlike its sequential form, the parallel overload of includes requires Pred to meet the requirements of CopyConstructible. This defaults to std::less<>
Proj1 – The type of an optional projection function applied to the first sequence. This defaults to hpx::identity
Proj2 – The type of an optional projection function applied to the second sequence. This defaults to hpx::identity
- Parameters
policy – The execution policy to use for the scheduling of the iterations.
rng1 – Refers to the first sequence of elements the algorithm will be applied to.
rng2 – Refers to the second sequence of elements the algorithm will be applied to.
op – The binary predicate which returns true if the elements should be treated as includes. The signature of the predicate function should be equivalent to the following:
The signature does not need to have const &, but the function must not modify the objects passed to it. The types Type1 and Type2 must be such that objects of types FwdIter1 and FwdIter2 can be dereferenced and then implicitly converted to Type1 and Type2 respectivelybool pred(const Type1 &a, const Type2 &b);
proj1 – Specifies the function (or function object) which will be invoked for each of the elements of the first sequence as a projection operation before the actual predicate op is invoked.
proj2 – Specifies the function (or function object) which will be invoked for each of the elements of the second sequence as a projection operation before the actual predicate op is invoked.
- Returns
The includes algorithm returns a hpx::future<bool> if the execution policy is of type sequenced_task_policy or parallel_task_policy and returns bool otherwise. The includes algorithm returns true every element from the sorted range [first2, last2) is found within the sorted range [first1, last1). Also returns true if [first2, last2) is empty.
-
template<typename Rng1, typename Rng2, typename Pred = hpx::parallel::detail::less, typename Proj1 = hpx::identity, typename Proj2 = hpx::identity>
bool includes(Rng1 &&rng1, Rng2 &&rng2, Pred &&op = Pred(), Proj1 &&proj1 = Proj1(), Proj2 &&proj2 = Proj2())# Returns true if every element from the sorted range [first2, last2) is found within the sorted range [first1, last1). Also returns true if [first2, last2) is empty. The version expects both ranges to be sorted with the user supplied binary predicate f.
Note
At most 2*(N1+N2-1) comparisons, where N1 = std::distance(first1, last1) and N2 = std::distance(first2, last2).
- Template Parameters
Rng1 – The type of the source range used (deduced). The iterators extracted from this range type must meet the requirements of an input iterator.
Rng2 – The type of the source range used (deduced). The iterators extracted from this range type must meet the requirements of an input iterator.
Pred – The type of an optional function/function object to use. Unlike its sequential form, the parallel overload of includes requires Pred to meet the requirements of CopyConstructible. This defaults to std::less<>
Proj1 – The type of an optional projection function applied to the first sequence. This defaults to hpx::identity
Proj2 – The type of an optional projection function applied to the second sequence. This defaults to hpx::identity
- Parameters
rng1 – Refers to the first sequence of elements the algorithm will be applied to.
rng2 – Refers to the second sequence of elements the algorithm will be applied to.
op – The binary predicate which returns true if the elements should be treated as includes. The signature of the predicate function should be equivalent to the following:
The signature does not need to have const &, but the function must not modify the objects passed to it. The types Type1 and Type2 must be such that objects of types FwdIter1 and FwdIter2 can be dereferenced and then implicitly converted to Type1 and Type2 respectivelybool pred(const Type1 &a, const Type2 &b);
proj1 – Specifies the function (or function object) which will be invoked for each of the elements of the first sequence as a projection operation before the actual predicate op is invoked.
proj2 – Specifies the function (or function object) which will be invoked for each of the elements of the second sequence as a projection operation before the actual predicate op is invoked.
- Returns
The includes algorithm returns true every element from the sorted range [first2, last2) is found within the sorted range [first1, last1). Also returns true if [first2, last2) is empty.
-
template<typename ExPolicy, typename Iter1, typename Sent1, typename Iter2, typename Sent2, typename Pred = hpx::parallel::detail::less, typename Proj1 = hpx::identity, typename Proj2 = hpx::identity>
-
namespace ranges
hpx::ranges::inclusive_scan#
Defined in header hpx/algorithm.hpp.
See Public API for a list of names and headers that are part of the public HPX API.
-
namespace hpx
-
namespace ranges
Functions
-
template<typename InIter, typename Sent, typename OutIter, typename Op = std::plus<typename std::iterator_traits<InIter>::value_type>>
inclusive_scan_result<InIter, OutIter> inclusive_scan(InIter first, Sent last, OutIter dest, Op &&op)# Assigns through each iterator i in [result, result + (last - first)) the value of GENERALIZED_NONCOMMUTATIVE_SUM(op, *first, …, *(first + (i - result))).
The reduce operations in the parallel inclusive_scan algorithm invoked without an execution policy object will execute in sequential order in the calling thread.
The difference between exclusive_scan and inclusive_scan is that inclusive_scan includes the ith input element in the ith sum.
Note
Complexity: O(last - first) applications of the predicate op.
Note
GENERALIZED_NONCOMMUTATIVE_SUM(+, a1, …, aN) is defined as:
a1 when N is 1
GENERALIZED_NONCOMMUTATIVE_SUM(+, a1, …, aK)
GENERALIZED_NONCOMMUTATIVE_SUM(+, aM, …, aN) where 1 < K+1 = M <= N.
- Template Parameters
InIter – The type of the source iterators used (deduced). This iterator type must meet the requirements of an input iterator.
Sent – The type of the source sentinel (deduced). This sentinel type must be a sentinel for InIter.
OutIter – The type of the iterator representing the destination range (deduced). This iterator type must meet the requirements of an output iterator.
Op – The type of the binary function object used for the reduction operation.
- Parameters
first – Refers to the beginning of the sequence of elements the algorithm will be applied to.
last – Refers to sentinel value denoting the end of the sequence of elements the algorithm will be applied.
dest – Refers to the beginning of the destination range.
op – Specifies the function (or function object) which will be invoked for each of the values of the input sequence. This is a binary predicate. The signature of this predicate should be equivalent to:
The signature does not need to have const&, but the function must not modify the objects passed to it. The types Type1 and Ret must be such that an object of a type as given by the input sequence can be implicitly converted to any of those types.Ret fun(const Type1 &a, const Type1 &b);
- Returns
The inclusive_scan algorithm returns util::in_out_result<InIter, OutIter>. The inclusive_scan algorithm returns an input iterator to the point denoted by the sentinel and an output iterator to the element in the destination range, one past the last element copied.
-
template<typename ExPolicy, typename FwdIter1, typename Sent, typename FwdIter2, typename Op = std::plus<typename std::iterator_traits<FwdIter1>::value_type>>
parallel::util::detail::algorithm_result<ExPolicy, inclusive_scan_result<FwdIter1, FwdIter2>>::type inclusive_scan(ExPolicy &&policy, FwdIter1 first, Sent last, FwdIter2 dest, Op &&op)# Assigns through each iterator i in [result, result + (last - first)) the value of GENERALIZED_NONCOMMUTATIVE_SUM(op, *first, …, *(first + (i - result))).
The reduce operations in the parallel inclusive_scan algorithm invoked with an execution policy object of type sequenced_policy execute in sequential order in the calling thread.
The reduce operations in the parallel inclusive_scan algorithm invoked with an execution policy object of type parallel_policy or parallel_task_policy are permitted to execute in an unordered fashion in unspecified threads, and indeterminately sequenced within each thread.
The difference between exclusive_scan and inclusive_scan is that inclusive_scan includes the ith input element in the ith sum.
Note
Complexity: O(last - first) applications of the predicate op.
Note
GENERALIZED_NONCOMMUTATIVE_SUM(+, a1, …, aN) is defined as:
a1 when N is 1
GENERALIZED_NONCOMMUTATIVE_SUM(op, a1, …, aK)
GENERALIZED_NONCOMMUTATIVE_SUM(+, aM, …, aN) where 1 < K+1 = M <= N.
- Template Parameters
ExPolicy – The type of the execution policy to use (deduced). It describes the manner in which the execution of the algorithm may be parallelized and the manner in which it executes the assignments.
FwdIter1 – The type of the source iterators used (deduced). This iterator type must meet the requirements of an forward iterator.
Sent – The type of the source sentinel (deduced). This sentinel type must be a sentinel for InIter.
FwdIter2 – The type of the iterator representing the destination range (deduced). This iterator type must meet the requirements of an forward iterator.
Op – The type of the binary function object used for the reduction operation.
- Parameters
policy – The execution policy to use for the scheduling of the iterations.
first – Refers to the beginning of the sequence of elements the algorithm will be applied to.
last – Refers to sentinel value denoting the end of the sequence of elements the algorithm will be applied.
dest – Refers to the beginning of the destination range.
op – Specifies the function (or function object) which will be invoked for each of the values of the input sequence. This is a binary predicate. The signature of this predicate should be equivalent to:
The signature does not need to have const&, but the function must not modify the objects passed to it. The types Type1 and Ret must be such that an object of a type as given by the input sequence can be implicitly converted to any of those types.Ret fun(const Type1 &a, const Type1 &b);
- Returns
The inclusive_scan algorithm returns a hpx::future<util::in_out_result<FwdIter1, FwdIter2>> if the execution policy is of type sequenced_task_policy or parallel_task_policy and returns util::in_out_result<FwdIter1, FwdIter2> otherwise. The inclusive_scan algorithm returns an input iterator to the point denoted by the sentinel and an output iterator to the element in the destination range, one past the last element copied.
-
template<typename Rng, typename O, typename Op = std::plus<typename hpx::traits::range_traits<Rng>::value_type>>
inclusive_scan_result<std::ranges::iterator_t<Rng>, O> inclusive_scan(Rng &&rng, O dest, Op &&op)# Assigns through each iterator i in [result, result + (last - first)) the value of GENERALIZED_NONCOMMUTATIVE_SUM(op, *first, …, *(first + (i - result))).
The reduce operations in the parallel inclusive_scan algorithm invoked without an execution policy object will execute in sequential order in the calling thread.
The difference between exclusive_scan and inclusive_scan is that inclusive_scan includes the ith input element in the ith sum.
Note
Complexity: O(last - first) applications of the predicate op.
Note
GENERALIZED_NONCOMMUTATIVE_SUM(+, a1, …, aN) is defined as:
a1 when N is 1
GENERALIZED_NONCOMMUTATIVE_SUM(+, a1, …, aK)
GENERALIZED_NONCOMMUTATIVE_SUM(+, aM, …, aN) where 1 < K+1 = M <= N.
- Template Parameters
Rng – The type of the source range used (deduced). The iterators extracted from this range type must meet the requirements of an input iterator.
O – The type of the iterator representing the destination range (deduced). This iterator type must meet the requirements of an output iterator.
Op – The type of the binary function object used for the reduction operation.
- Parameters
rng – Refers to the sequence of elements the algorithm will be applied to.
dest – Refers to the beginning of the destination range.
op – Specifies the function (or function object) which will be invoked for each of the values of the input sequence. This is a binary predicate. The signature of this predicate should be equivalent to:
The signature does not need to have const&, but the function must not modify the objects passed to it. The types Type1 and Ret must be such that an object of a type as given by the input sequence can be implicitly converted to any of those types.Ret fun(const Type1 &a, const Type1 &b);
- Returns
The inclusive_scan algorithm returns util::in_out_result<std::ranges::iterator_t<Rng>, O> The inclusive_scan algorithm returns an input iterator to the point denoted by the sentinel and an output iterator to the element in the destination range, one past the last element copied.
-
template<typename ExPolicy, typename Rng, typename O, typename Op = std::plus<typename hpx::traits::range_traits<Rng>::value_type>>
parallel::util::detail::algorithm_result<ExPolicy, inclusive_scan_result<std::ranges::iterator_t<Rng>, O>> inclusive_scan(ExPolicy &&policy, Rng &&rng, O dest, Op &&op)# Assigns through each iterator i in [result, result + (last - first)) the value of GENERALIZED_NONCOMMUTATIVE_SUM(op, *first, …, *(first + (i - result))).
The reduce operations in the parallel inclusive_scan algorithm invoked with an execution policy object of type sequenced_policy execute in sequential order in the calling thread.
The reduce operations in the parallel inclusive_scan algorithm invoked with an execution policy object of type parallel_policy or parallel_task_policy are permitted to execute in an unordered fashion in unspecified threads, and indeterminately sequenced within each thread.
The difference between exclusive_scan and inclusive_scan is that inclusive_scan includes the ith input element in the ith sum.
Note
Complexity: O(last - first) applications of the predicate op.
Note
GENERALIZED_NONCOMMUTATIVE_SUM(+, a1, …, aN) is defined as:
a1 when N is 1
GENERALIZED_NONCOMMUTATIVE_SUM(op, a1, …, aK)
GENERALIZED_NONCOMMUTATIVE_SUM(+, aM, …, aN) where 1 < K+1 = M <= N.
- Template Parameters
ExPolicy – The type of the execution policy to use (deduced). It describes the manner in which the execution of the algorithm may be parallelized and the manner in which it executes the assignments.
Rng – The type of the source range used (deduced). The iterators extracted from this range type must meet the requirements of an forward iterator.
O – The type of the iterator representing the destination range (deduced). This iterator type must meet the requirements of an forward iterator.
Op – The type of the binary function object used for the reduction operation.
- Parameters
policy – The execution policy to use for the scheduling of the iterations.
rng – Refers to the sequence of elements the algorithm will be applied to.
dest – Refers to the beginning of the destination range.
op – Specifies the function (or function object) which will be invoked for each of the values of the input sequence. This is a binary predicate. The signature of this predicate should be equivalent to:
The signature does not need to have const&, but the function must not modify the objects passed to it. The types Type1 and Ret must be such that an object of a type as given by the input sequence can be implicitly converted to any of those types.Ret fun(const Type1 &a, const Type1 &b);
- Returns
The inclusive_scan algorithm returns a hpx::future<util::in_out_result <std::ranges::iterator_t<Rng>, O>> if the execution policy is of type sequenced_task_policy or parallel_task_policy and returns util::in_out_result <std::ranges::iterator_t<Rng>, O> otherwise. The inclusive_scan algorithm returns an input iterator to the point denoted by the sentinel and an output iterator to the element in the destination range, one past the last element copied
-
template<typename InIter, typename Sent, typename OutIter, typename Op, typename T = typename std::iterator_traits<InIter>::value_type>
inclusive_scan_result<InIter, OutIter> inclusive_scan(InIter first, Sent last, OutIter dest, Op &&op, T init)# Assigns through each iterator i in [result, result + (last - first)) the value of GENERALIZED_NONCOMMUTATIVE_SUM(op, init, *first, …, *(first + (i - result))).
The reduce operations in the parallel inclusive_scan algorithm invoked without an execution policy object will execute in sequential order in the calling thread.
The difference between exclusive_scan and inclusive_scan is that inclusive_scan includes the ith input element in the ith sum. If op is not mathematically associative, the behavior of inclusive_scan may be non-deterministic.
Note
Complexity: O(last - first) applications of the predicate op.
Note
GENERALIZED_NONCOMMUTATIVE_SUM(op, a1, …, aN) is defined as:
a1 when N is 1
op(GENERALIZED_NONCOMMUTATIVE_SUM(op, a1, …, aK), GENERALIZED_NONCOMMUTATIVE_SUM(op, aM, …, aN)) where 1 < K+1 = M <= N.
- Template Parameters
InIter – The type of the source iterators used (deduced). This iterator type must meet the requirements of an input iterator.
Sent – The type of the source sentinel (deduced). This sentinel type must be a sentinel for InIter.
OutIter – The type of the iterator representing the destination range (deduced). This iterator type must meet the requirements of an output iterator.
Op – The type of the binary function object used for the reduction operation.
T – The type of the value to be used as initial (and intermediate) values (deduced).
- Parameters
first – Refers to the beginning of the sequence of elements the algorithm will be applied to.
last – Refers to sentinel value denoting the end of the sequence of elements the algorithm will be applied.
dest – Refers to the beginning of the destination range.
op – Specifies the function (or function object) which will be invoked for each of the values of the input sequence. This is a binary predicate. The signature of this predicate should be equivalent to:
The signature does not need to have const&, but the function must not modify the objects passed to it. The types Type1 and Ret must be such that an object of a type as given by the input sequence can be implicitly converted to any of those types.Ret fun(const Type1 &a, const Type1 &b);
init – The initial value for the generalized sum.
- Returns
The inclusive_scan algorithm returns util::in_out_result<InIter, OutIter>. The inclusive_scan algorithm returns an input iterator to the point denoted by the sentinel and an output iterator to the element in the destination range, one past the last element copied.
-
template<typename ExPolicy, typename FwdIter1, typename Sent, typename FwdIter2, typename Op, typename T = typename std::iterator_traits<FwdIter1>::value_type>
parallel::util::detail::algorithm_result<ExPolicy, inclusive_scan_result<FwdIter1, FwdIter2>>::type inclusive_scan(ExPolicy &&policy, InIter first, Sent last, OutIter dest, Op &&op, T init)# Assigns through each iterator i in [result, result + (last - first)) the value of GENERALIZED_NONCOMMUTATIVE_SUM(op, init, *first, …, *(first + (i - result))).
The reduce operations in the parallel inclusive_scan algorithm invoked with an execution policy object of type sequenced_policy execute in sequential order in the calling thread.
The reduce operations in the parallel inclusive_scan algorithm invoked with an execution policy object of type parallel_policy or parallel_task_policy are permitted to execute in an unordered fashion in unspecified threads, and indeterminately sequenced within each thread.
The difference between exclusive_scan and inclusive_scan is that inclusive_scan includes the ith input element in the ith sum. If op is not mathematically associative, the behavior of inclusive_scan may be non-deterministic.
Note
Complexity: O(last - first) applications of the predicate op.
Note
GENERALIZED_NONCOMMUTATIVE_SUM(op, a1, …, aN) is defined as:
a1 when N is 1
op(GENERALIZED_NONCOMMUTATIVE_SUM(op, a1, …, aK), GENERALIZED_NONCOMMUTATIVE_SUM(op, aM, …, aN)) where 1 < K+1 = M <= N.
- Template Parameters
ExPolicy – The type of the execution policy to use (deduced). It describes the manner in which the execution of the algorithm may be parallelized and the manner in which it executes the assignments.
InIter – The type of the source iterators used (deduced). This iterator type must meet the requirements of an input iterator.
Sent – The type of the source sentinel (deduced). This sentinel type must be a sentinel for InIter.
OutIter – The type of the iterator representing the destination range (deduced). This iterator type must meet the requirements of an output iterator.
Op – The type of the binary function object used for the reduction operation.
T – The type of the value to be used as initial (and intermediate) values (deduced).
- Parameters
policy – The execution policy to use for the scheduling of the iterations.
first – Refers to the beginning of the sequence of elements the algorithm will be applied to.
last – Refers to sentinel value denoting the end of the sequence of elements the algorithm will be applied.
dest – Refers to the beginning of the destination range.
op – Specifies the function (or function object) which will be invoked for each of the values of the input sequence. This is a binary predicate. The signature of this predicate should be equivalent to:
The signature does not need to have const&, but the function must not modify the objects passed to it. The types Type1 and Ret must be such that an object of a type as given by the input sequence can be implicitly converted to any of those types.Ret fun(const Type1 &a, const Type1 &b);
init – The initial value for the generalized sum.
- Returns
The inclusive_scan algorithm returns a hpx::future<util::in_out_result<InIter, OutIter>> if the execution policy is of type sequenced_task_policy or parallel_task_policy and returns util::in_out_result<InIter, OutIter> otherwise. The inclusive_scan algorithm returns an input iterator to the point denoted by the sentinel and an output iterator to the element in the destination range, one past the last element copied.
-
template<typename Rng, typename O, typename Op, typename T = typename std::iterator_traits<std::ranges::iterator_t<Rng>>::value_type>
inclusive_scan_result<std::ranges::iterator_t<Rng>, O> inclusive_scan(Rng &&rng, O dest, Op &&op, T init)# Assigns through each iterator i in [result, result + (last - first)) the value of GENERALIZED_NONCOMMUTATIVE_SUM(op, init, *first, …, *(first + (i - result))).
The reduce operations in the parallel inclusive_scan algorithm invoked without an execution policy object will execute in sequential order in the calling thread.
The difference between exclusive_scan and inclusive_scan is that inclusive_scan includes the ith input element in the ith sum. If op is not mathematically associative, the behavior of inclusive_scan may be non-deterministic.
Note
Complexity: O(last - first) applications of the predicate op.
Note
GENERALIZED_NONCOMMUTATIVE_SUM(op, a1, …, aN) is defined as:
a1 when N is 1
op(GENERALIZED_NONCOMMUTATIVE_SUM(op, a1, …, aK), GENERALIZED_NONCOMMUTATIVE_SUM(op, aM, …, aN)) where 1 < K+1 = M <= N.
- Template Parameters
Rng – The type of the source range used (deduced). The iterators extracted from this range type must meet the requirements of an input iterator.
O – The type of the iterator representing the destination range (deduced). This iterator type must meet the requirements of an output iterator.
Op – The type of the binary function object used for the reduction operation.
T – The type of the value to be used as initial (and intermediate) values (deduced).
- Parameters
rng – Refers to the sequence of elements the algorithm will be applied to.
dest – Refers to the beginning of the destination range.
op – Specifies the function (or function object) which will be invoked for each of the values of the input sequence. This is a binary predicate. The signature of this predicate should be equivalent to:
The signature does not need to have const&, but the function must not modify the objects passed to it. The types Type1 and Ret must be such that an object of a type as given by the input sequence can be implicitly converted to any of those types.Ret fun(const Type1 &a, const Type1 &b);
init – The initial value for the generalized sum.
- Returns
The inclusive_scan algorithm returns util::in_out_result<std::ranges::iterator_t<Rng>, O> The inclusive_scan algorithm returns an input iterator to the point denoted by the sentinel and an output iterator to the element in the destination range, one past the last element copied.
-
template<typename ExPolicy, typename Rng, typename O, typename Op, typename T = typename std::iterator_traits<std::ranges::iterator_t<Rng>>::value_type>
parallel::util::detail::algorithm_result<ExPolicy, inclusive_scan_result<std::ranges::iterator_t<Rng>, O>> inclusive_scan(ExPolicy &&policy, Rng &&rng, O dest, Op &&op, T init)# Assigns through each iterator i in [result, result + (last - first)) the value of GENERALIZED_NONCOMMUTATIVE_SUM(op, init, *first, …, *(first + (i - result))).
The reduce operations in the parallel inclusive_scan algorithm invoked with an execution policy object of type sequenced_policy execute in sequential order in the calling thread.
The reduce operations in the parallel inclusive_scan algorithm invoked with an execution policy object of type parallel_policy or parallel_task_policy are permitted to execute in an unordered fashion in unspecified threads, and indeterminately sequenced within each thread.
The difference between exclusive_scan and inclusive_scan is that inclusive_scan includes the ith input element in the ith sum. If op is not mathematically associative, the behavior of inclusive_scan may be non-deterministic.
Note
Complexity: O(last - first) applications of the predicate op.
Note
GENERALIZED_NONCOMMUTATIVE_SUM(op, a1, …, aN) is defined as:
a1 when N is 1
op(GENERALIZED_NONCOMMUTATIVE_SUM(op, a1, …, aK), GENERALIZED_NONCOMMUTATIVE_SUM(op, aM, …, aN)) where 1 < K+1 = M <= N.
- Template Parameters
ExPolicy – The type of the execution policy to use (deduced). It describes the manner in which the execution of the algorithm may be parallelized and the manner in which it executes the assignments.
Rng – The type of the source range used (deduced). The iterators extracted from this range type must meet the requirements of an forward iterator.
O – The type of the iterator representing the destination range (deduced). This iterator type must meet the requirements of an forward iterator.
Op – The type of the binary function object used for the reduction operation.
T – The type of the value to be used as initial (and intermediate) values (deduced).
- Parameters
policy – The execution policy to use for the scheduling of the iterations.
rng – Refers to the sequence of elements the algorithm will be applied to.
dest – Refers to the beginning of the destination range.
op – Specifies the function (or function object) which will be invoked for each of the values of the input sequence. This is a binary predicate. The signature of this predicate should be equivalent to:
The signature does not need to have const&, but the function must not modify the objects passed to it. The types Type1 and Ret must be such that an object of a type as given by the input sequence can be implicitly converted to any of those types.Ret fun(const Type1 &a, const Type1 &b);
init – The initial value for the generalized sum.
- Returns
The inclusive_scan algorithm returns a hpx::future<util::in_out_result <std::ranges::iterator_t<Rng>, O>> if the execution policy is of type sequenced_task_policy or parallel_task_policy and returns util::in_out_result <std::ranges::iterator_t<Rng>, O> otherwise. The inclusive_scan algorithm returns an input iterator to the point denoted by the sentinel and an output iterator to the element in the destination range, one past the last element copied
-
template<typename InIter, typename Sent, typename OutIter, typename Op = std::plus<typename std::iterator_traits<InIter>::value_type>>
-
namespace ranges
hpx/parallel/container_algorithms/iota.hpp#
Defined in header hpx/parallel/container_algorithms/iota.hpp.
See Public API for a list of names and headers that are part of the public HPX API.
-
namespace hpx
-
namespace ranges
Functions
-
template<typename FwdIter, typename Sent, typename T>
iota_result<FwdIter, T> iota(FwdIter first, Sent last, T value)# Fills the range [first, last) with sequentially increasing values, starting with value and repetitively evaluating
++value.The assignments in the iota algorithm invoked without an execution policy object will execute in sequential order in the calling thread.
Note
Complexity: Exactly std::distance(first, last) assignments and increments.
- Template Parameters
FwdIter – The type of the source iterators used (deduced). This iterator type must meet the requirements of an input or output iterator.
Sent – The type of the source sentinel (deduced). This sentinel type must be a sentinel for FwdIter.
T – The type of the target value. This type must meet the requirements of weakly incrementable.
- Parameters
first – Refers to the beginning of the sequence of elements the algorithm will be applied to.
last – Refers to the end of the sequence of elements the algorithm will be applied to.
value – The value to be stored in the first element.
- Returns
The iota algorithm returns a hpx::ranges::iota_result containing the final iterator and the final value.
-
template<typename ExPolicy, typename FwdIter, typename Sent, typename T>
hpx::parallel::util::detail::algorithm_result_t<ExPolicy, iota_result<FwdIter, T>> iota(ExPolicy &&policy, FwdIter first, Sent last, T value)# Fills the range [first, last) with sequentially increasing values, starting with value and repetitively evaluating
++value.The assignments in the parallel iota algorithm invoked with an execution policy object of type sequenced_policy execute in sequential order in the calling thread.
The assignments in the parallel iota algorithm invoked with an execution policy object of type parallel_policy or parallel_task_policy are permitted to execute in an unordered fashion in unspecified threads, and indeterminately sequenced within each thread.
Note
Complexity: Exactly std::distance(first, last) assignments and increments.
- Template Parameters
ExPolicy – The type of the execution policy to use (deduced). It describes the manner in which the execution of the algorithm may be parallelized and the manner in which it executes the assignments.
FwdIter – The type of the source iterators used (deduced). This iterator type must meet the requirements of a forward iterator.
Sent – The type of the source sentinel (deduced). This sentinel type must be a sentinel for FwdIter.
T – The type of the target value. This type must meet the requirements of weakly incrementable.
- Parameters
policy – The execution policy to use for the scheduling of the iterations.
first – Refers to the beginning of the sequence of elements the algorithm will be applied to.
last – Refers to the end of the sequence of elements the algorithm will be applied to.
value – The value to be stored in the first element.
- Returns
The iota algorithm returns a hpx::future<iota_result> if the execution policy is of type sequenced_task_policy or parallel_task_policy and returns iota_result otherwise.
-
template<typename Range, typename T>
iota_result<typename hpx::traits::range_traits<Range>::iterator_type, T> iota(Range &&r, T value)# Fills the range r with sequentially increasing values, starting with value and repetitively evaluating
++value.The assignments in the iota algorithm invoked without an execution policy object will execute in sequential order in the calling thread.
Note
Complexity: Exactly std::ranges::distance(r) assignments and increments.
- Template Parameters
Range – The type of the source range used (deduced). The iterators extracted from this range type must meet the requirements of an input or output iterator
T – The type of the target value. This type must meet the requirements of weakly incrementable.
- Parameters
r – Refers to the sequence of elements the algorithm will be applied to.
value – The value to be stored in the first element.
- Returns
The iota algorithm returns a hpx::ranges::iota_result containing the final iterator and the final value.
-
template<typename ExPolicy, typename Range, typename T>
hpx::parallel::util::detail::algorithm_result_t<ExPolicy, iota_result<typename hpx::traits::range_traits<Range>::iterator_type, T>> iota(ExPolicy &&policy, Range &&r, T value)# Fills the range r with sequentially increasing values, starting with value and repetitively evaluating
++value.The assignments in the parallel iota algorithm invoked with an execution policy object of type sequenced_policy execute in sequential order in the calling thread.
The assignments in the parallel iota algorithm invoked with an execution policy object of type parallel_policy or parallel_task_policy are permitted to execute in an unordered fashion in unspecified threads, and indeterminately sequenced within each thread.
Note
Complexity: Exactly std::ranges::distance(r) assignments and increments.
- Template Parameters
ExPolicy – The type of the execution policy to use (deduced). It describes the manner in which the execution of the algorithm may be parallelized and the manner in which it executes the assignments.
Range – The type of the source range used (deduced). The iterators extracted from this range type must meet the requirements of a forward iterator.
T – The type of the target value. This type must meet the requirements of weakly incrementable.
- Parameters
policy – The execution policy to use for the scheduling of the iterations.
r – Refers to the sequence of elements the algorithm will be applied to.
value – The value to be stored in the first element.
- Returns
The iota algorithm returns a hpx::future<iota_result> if the execution policy is of type sequenced_task_policy or parallel_task_policy and returns iota_result otherwise.
-
template<typename FwdIter, typename Sent, typename T>
-
namespace ranges
hpx::ranges::is_heap, hpx::ranges::is_heap_until#
Defined in header hpx/algorithm.hpp.
See Public API for a list of names and headers that are part of the public HPX API.
-
namespace hpx
-
namespace ranges
Functions
-
template<typename ExPolicy, typename Rng, typename Comp = hpx::parallel::detail::less, typename Proj = hpx::identity>
hpx::parallel::util::detail::algorithm_result_t<ExPolicy, bool> is_heap(ExPolicy &&policy, Rng &&rng, Comp &&comp = Comp(), Proj &&proj = Proj())# Returns whether the range is max heap. That is, true if the range is max heap, false otherwise. The function uses the given comparison function object comp (defaults to using operator<()).
comp has to induce a strict weak ordering on the values.
The application of function objects in parallel algorithm invoked with an execution policy object of type sequenced_policy execute in sequential order in the calling thread.
The application of function objects in parallel algorithm invoked with an execution policy object of type parallel_policy or parallel_task_policy are permitted to execute in an unordered fashion in unspecified threads, and indeterminately sequenced within each thread.
Note
Complexity: Performs at most N applications of the comparison comp, at most 2 * N applications of the projection proj, where N = last - first.
- Template Parameters
ExPolicy – The type of the execution policy to use (deduced). It describes the manner in which the execution of the algorithm may be parallelized and the manner in which it executes the assignments.
Rng – The type of the source range used (deduced). The iterators extracted from this range type must meet the requirements of an random access iterator.
Comp – The type of the function/function object to use (deduced).
Proj – The type of an optional projection function. This defaults to hpx::identity
- Parameters
policy – The execution policy to use for the scheduling of the iterations.
rng – Refers to the sequence of elements the algorithm will be applied to.
comp – comp is a callable object. The return value of the INVOKE operation applied to an object of type Comp, when contextually converted to bool, yields true if the first argument of the call is less than the second, and false otherwise. It is assumed that comp will not apply any non-constant function through the dereferenced iterator.
proj – Specifies the function (or function object) which will be invoked for each of the elements as a projection operation before the actual predicate is invoked.
- Returns
The is_heap algorithm returns a hpx::future<bool> if the execution policy is of type sequenced_task_policy or parallel_task_policy and returns bool otherwise. The is_heap algorithm returns whether the range is max heap. That is, true if the range is max heap, false otherwise.
-
template<typename ExPolicy, typename Iter, typename Sent, typename Comp = hpx::parallel::detail::less, typename Proj = hpx::identity>
hpx::parallel::util::detail::algorithm_result_t<ExPolicy, bool> is_heap(ExPolicy &&policy, Iter first, Sent last, Comp &&comp = Comp(), Proj &&proj = Proj())# Returns whether the range is max heap. That is, true if the range is max heap, false otherwise. The function uses the given comparison function object comp (defaults to using operator<()).
comp has to induce a strict weak ordering on the values.
The application of function objects in parallel algorithm invoked with an execution policy object of type sequenced_policy execute in sequential order in the calling thread.
The application of function objects in parallel algorithm invoked with an execution policy object of type parallel_policy or parallel_task_policy are permitted to execute in an unordered fashion in unspecified threads, and indeterminately sequenced within each thread.
Note
Complexity: Performs at most N applications of the comparison comp, at most 2 * N applications of the projection proj, where N = last - first.
- Template Parameters
ExPolicy – The type of the execution policy to use (deduced). It describes the manner in which the execution of the algorithm may be parallelized and the manner in which it executes the assignments.
Iter – The type of the begin source iterators used (deduced). This iterator type must meet the requirements of an forward iterator.
Sent – The type of the end source iterators used (deduced). This iterator type must meet the requirements of an sentinel for Iter1.
Comp – The type of the function/function object to use (deduced).
Proj – The type of an optional projection function. This defaults to hpx::identity
- Parameters
policy – The execution policy to use for the scheduling of the iterations.
first – Refers to the beginning of the sequence of elements the algorithm will be applied to.
last – Refers to the end of the sequence of elements the algorithm will be applied to.
comp – comp is a callable object. The return value of the INVOKE operation applied to an object of type Comp, when contextually converted to bool, yields true if the first argument of the call is less than the second, and false otherwise. It is assumed that comp will not apply any non-constant function through the dereferenced iterator.
proj – Specifies the function (or function object) which will be invoked for each of the elements as a projection operation before the actual predicate is invoked.
- Returns
The is_heap algorithm returns a hpx::future<bool> if the execution policy is of type sequenced_task_policy or parallel_task_policy and returns bool otherwise. The is_heap algorithm returns whether the range is max heap. That is, true if the range is max heap, false otherwise.
-
template<typename Rng, typename Comp = hpx::parallel::detail::less, typename Proj = hpx::identity>
bool is_heap(Rng &&rng, Comp &&comp = Comp(), Proj &&proj = Proj())# Returns whether the range is max heap. That is, true if the range is max heap, false otherwise. The function uses the given comparison function object comp (defaults to using operator<()).
comp has to induce a strict weak ordering on the values.
Note
Complexity: Performs at most N applications of the comparison comp, at most 2 * N applications of the projection proj, where N = last - first.
- Template Parameters
Rng – The type of the source range used (deduced). The iterators extracted from this range type must meet the requirements of an random access iterator.
Comp – The type of the function/function object to use (deduced).
Proj – The type of an optional projection function. This defaults to hpx::identity
- Parameters
rng – Refers to the sequence of elements the algorithm will be applied to.
comp – comp is a callable object. The return value of the INVOKE operation applied to an object of type Comp, when contextually converted to bool, yields true if the first argument of the call is less than the second, and false otherwise. It is assumed that comp will not apply any non-constant function through the dereferenced iterator.
proj – Specifies the function (or function object) which will be invoked for each of the elements as a projection operation before the actual predicate is invoked.
- Returns
The is_heap algorithm returns bool. The is_heap algorithm returns whether the range is max heap. That is, true if the range is max heap, false otherwise.
-
template<typename Iter, typename Sent, typename Comp = hpx::parallel::detail::less, typename Proj = hpx::identity>
bool is_heap(Iter first, Sent last, Comp &&comp = Comp(), Proj &&proj = Proj())# Returns whether the range is max heap. That is, true if the range is max heap, false otherwise. The function uses the given comparison function object comp (defaults to using operator<()).
comp has to induce a strict weak ordering on the values.
Note
Complexity: Performs at most N applications of the comparison comp, at most 2 * N applications of the projection proj, where N = last - first.
- Template Parameters
Iter – The type of the begin source iterators used (deduced). This iterator type must meet the requirements of an forward iterator.
Sent – The type of the end source iterators used (deduced). This iterator type must meet the requirements of an sentinel for Iter1.
Comp – The type of the function/function object to use (deduced).
Proj – The type of an optional projection function. This defaults to hpx::identity
- Parameters
first – Refers to the beginning of the sequence of elements the algorithm will be applied to.
last – Refers to the end of the sequence of elements the algorithm will be applied to.
comp – comp is a callable object. The return value of the INVOKE operation applied to an object of type Comp, when contextually converted to bool, yields true if the first argument of the call is less than the second, and false otherwise. It is assumed that comp will not apply any non-constant function through the dereferenced iterator.
proj – Specifies the function (or function object) which will be invoked for each of the elements as a projection operation before the actual predicate is invoked.
- Returns
The is_heap algorithm returns bool. The is_heap algorithm returns whether the range is max heap. That is, true if the range is max heap, false otherwise.
-
template<typename ExPolicy, typename Rng, typename Comp = hpx::parallel::detail::less, typename Proj = hpx::identity>
hpx::parallel::util::detail::algorithm_result<ExPolicy, std::ranges::iterator_t<Rng>> is_heap_until(ExPolicy &&policy, Rng &&rng, Comp &&comp = Comp(), Proj &&proj = Proj())# Returns the upper bound of the largest range beginning at first which is a max heap. That is, the last iterator it for which range [first, it) is a max heap. The function uses the given comparison function object comp (defaults to using operator<()).
comp has to induce a strict weak ordering on the values.
The application of function objects in parallel algorithm invoked with an execution policy object of type sequenced_policy execute in sequential order in the calling thread.
The application of function objects in parallel algorithm invoked with an execution policy object of type parallel_policy or parallel_task_policy are permitted to execute in an unordered fashion in unspecified threads, and indeterminately sequenced within each thread.
Note
Complexity: Performs at most N applications of the comparison comp, at most 2 * N applications of the projection proj, where N = last - first.
- Template Parameters
ExPolicy – The type of the execution policy to use (deduced). It describes the manner in which the execution of the algorithm may be parallelized and the manner in which it executes the assignments.
Rng – The type of the source range used (deduced). The iterators extracted from this range type must meet the requirements of an random access iterator.
Comp – The type of the function/function object to use (deduced).
Proj – The type of an optional projection function. This defaults to hpx::identity
- Parameters
policy – The execution policy to use for the scheduling of the iterations.
rng – Refers to the sequence of elements the algorithm will be applied to.
comp – comp is a callable object. The return value of the INVOKE operation applied to an object of type Comp, when contextually converted to bool, yields true if the first argument of the call is less than the second, and false otherwise. It is assumed that comp will not apply any non-constant function through the dereferenced iterator.
proj – Specifies the function (or function object) which will be invoked for each of the elements as a projection operation before the actual predicate is invoked.
- Returns
The is_heap_until algorithm returns a hpx::future<RandIter> if the execution policy is of type sequenced_task_policy or parallel_task_policy and returns RandIter otherwise. The is_heap_until algorithm returns the upper bound of the largest range beginning at first which is a max heap. That is, the last iterator it for which range [first, it) is a max heap.
-
template<typename ExPolicy, typename Iter, typename Sent, typename Comp = hpx::parallel::detail::less, typename Proj = hpx::identity>
hpx::parallel::util::detail::algorithm_result_t<ExPolicy, Iter> is_heap_until(ExPolicy &&policy, Iter first, Sent last, Comp &&comp = Comp(), Proj &&proj = Proj())# Returns the upper bound of the largest range beginning at first which is a max heap. That is, the last iterator it for which range [first, it) is a max heap. The function uses the given comparison function object comp (defaults to using operator<()).
comp has to induce a strict weak ordering on the values.
The application of function objects in parallel algorithm invoked with an execution policy object of type sequenced_policy execute in sequential order in the calling thread.
The application of function objects in parallel algorithm invoked with an execution policy object of type parallel_policy or parallel_task_policy are permitted to execute in an unordered fashion in unspecified threads, and indeterminately sequenced within each thread.
Note
Complexity: Performs at most N applications of the comparison comp, at most 2 * N applications of the projection proj, where N = last - first.
- Template Parameters
ExPolicy – The type of the execution policy to use (deduced). It describes the manner in which the execution of the algorithm may be parallelized and the manner in which it executes the assignments.
Iter – The type of the begin source iterators used (deduced). This iterator type must meet the requirements of an forward iterator.
Sent – The type of the end source iterators used (deduced). This iterator type must meet the requirements of an sentinel for Iter1.
Comp – The type of the function/function object to use (deduced).
Proj – The type of an optional projection function. This defaults to hpx::identity
- Parameters
policy – The execution policy to use for the scheduling of the iterations.
first – Refers to the beginning of the sequence of elements the algorithm will be applied to.
last – Refers to the end of the sequence of elements the algorithm will be applied to.
comp – comp is a callable object. The return value of the INVOKE operation applied to an object of type Comp, when contextually converted to bool, yields true if the first argument of the call is less than the second, and false otherwise. It is assumed that comp will not apply any non-constant function through the dereferenced iterator.
proj – Specifies the function (or function object) which will be invoked for each of the elements as a projection operation before the actual predicate is invoked.
- Returns
The is_heap_until algorithm returns a hpx::future<RandIter> if the execution policy is of type sequenced_task_policy or parallel_task_policy and returns RandIter otherwise. The is_heap_until algorithm returns the upper bound of the largest range beginning at first which is a max heap. That is, the last iterator it for which range [first, it) is a max heap.
-
template<typename Rng, typename Comp = hpx::parallel::detail::less, typename Proj = hpx::identity>
std::ranges::iterator_t<Rng> is_heap_until(Rng &&rng, Comp &&comp = Comp(), Proj &&proj = Proj())# Returns the upper bound of the largest range beginning at first which is a max heap. That is, the last iterator it for which range [first, it) is a max heap. The function uses the given comparison function object comp (defaults to using operator<()).
comp has to induce a strict weak ordering on the values.
Note
Complexity: Performs at most N applications of the comparison comp, at most 2 * N applications of the projection proj, where N = last - first.
- Template Parameters
Rng – The type of the source range used (deduced). The iterators extracted from this range type must meet the requirements of an random access iterator.
Comp – The type of the function/function object to use (deduced).
Proj – The type of an optional projection function. This defaults to hpx::identity
- Parameters
rng – Refers to the sequence of elements the algorithm will be applied to.
comp – comp is a callable object. The return value of the INVOKE operation applied to an object of type Comp, when contextually converted to bool, yields true if the first argument of the call is less than the second, and false otherwise. It is assumed that comp will not apply any non-constant function through the dereferenced iterator.
proj – Specifies the function (or function object) which will be invoked for each of the elements as a projection operation before the actual predicate is invoked.
- Returns
The is_heap_until algorithm returns RandIter. The is_heap_until algorithm returns the upper bound of the largest range beginning at first which is a max heap. That is, the last iterator it for which range [first, it) is a max heap.
-
template<typename Iter, typename Sent, typename Comp = hpx::parallel::detail::less, typename Proj = hpx::identity>
Iter is_heap_until(Iter first, Sent last, Comp &&comp = Comp(), Proj &&proj = Proj())# Returns the upper bound of the largest range beginning at first which is a max heap. That is, the last iterator it for which range [first, it) is a max heap. The function uses the given comparison function object comp (defaults to using operator<()).
comp has to induce a strict weak ordering on the values.
Note
Complexity: Performs at most N applications of the comparison comp, at most 2 * N applications of the projection proj, where N = last - first.
- Template Parameters
Iter – The type of the begin source iterators used (deduced). This iterator type must meet the requirements of an forward iterator.
Sent – The type of the end source iterators used (deduced). This iterator type must meet the requirements of an sentinel for Iter1.
Comp – The type of the function/function object to use (deduced).
Proj – The type of an optional projection function. This defaults to hpx::identity
- Parameters
first – Refers to the beginning of the sequence of elements the algorithm will be applied to.
last – Refers to the end of the sequence of elements the algorithm will be applied to.
comp – comp is a callable object. The return value of the INVOKE operation applied to an object of type Comp, when contextually converted to bool, yields true if the first argument of the call is less than the second, and false otherwise. It is assumed that comp will not apply any non-constant function through the dereferenced iterator.
proj – Specifies the function (or function object) which will be invoked for each of the elements as a projection operation before the actual predicate is invoked.
- Returns
The is_heap_until algorithm returns RandIter. The is_heap_until algorithm returns the upper bound of the largest range beginning at first which is a max heap. That is, the last iterator it for which range [first, it) is a max heap.
-
template<typename ExPolicy, typename Rng, typename Comp = hpx::parallel::detail::less, typename Proj = hpx::identity>
-
namespace ranges
hpx::ranges::is_partitioned#
Defined in header hpx/algorithm.hpp.
See Public API for a list of names and headers that are part of the public HPX API.
-
namespace hpx
-
namespace ranges
Functions
-
template<typename FwdIter, typename Sent, typename Pred, typename Proj = hpx::identity>
bool is_partitioned(FwdIter first, Sent last, Pred &&pred, Proj &&proj = Proj())# Determines if the range [first, last) is partitioned.
Note
Complexity: at most (N) predicate evaluations where N = distance(first, last).
- Template Parameters
FwdIter – The type of the source iterators used for the This iterator type must meet the requirements of a forward iterator.
Sent – The type of the source sentinel (deduced). This sentinel type must be a sentinel for FwdIter.
Pred – The type of the function/function object to use (deduced).
Proj – The type of an optional projection function. This defaults to hpx::identity.
- Parameters
first – Refers to the beginning of the sequence of elements of that the algorithm will be applied to.
last – Refers to the end of the sequence of elements of that the algorithm will be applied to.
pred – Refers to the unary predicate which returns true for elements expected to be found in the beginning of the range. The signature of the function should be equivalent to
The signature does not need to have const &, but the function must not modify the objects passed to it. The type Type must be such that objects of types FwdIter can be dereferenced and then implicitly converted to Type.bool pred(const Type &a);
proj – Specifies the function (or function object) which will be invoked for each of the elements as a projection operation before the actual predicate is invoked.
- Returns
The is_partitioned algorithm returns bool. The is_partitioned algorithm returns true if each element in the sequence for which pred returns true precedes those for which pred returns false. Otherwise is_partitioned returns false. If the range [first, last) contains less than two elements, the function is always true.
-
template<typename ExPolicy, typename FwdIter, typename Sent, typename Pred, typename Proj = hpx::identity>
hpx::parallel::util::detail::algorithm_result_t<ExPolicy, bool> is_partitioned(ExPolicy &&policy, FwdIter first, Sent last, Pred &&pred, Proj &&proj = Proj())# Determines if the range [first, last) is partitioned.
The predicate operations in the parallel is_partitioned algorithm invoked with an execution policy object of type sequenced_policy executes in sequential order in the calling thread.
The comparison operations in the parallel is_partitioned algorithm invoked with an execution policy object of type parallel_policy or parallel_task_policy are permitted to execute in an unordered fashion in unspecified threads, and indeterminately sequenced within each thread.
Note
Complexity: at most (N) predicate evaluations where N = distance(first, last).
- Template Parameters
ExPolicy – The type of the execution policy to use (deduced). It describes the manner in which the execution of the algorithm may be parallelized and the manner in which it executes the assignments.
FwdIter – The type of the source iterators used for the This iterator type must meet the requirements of a forward iterator.
Sent – The type of the source sentinel (deduced). This sentinel type must be a sentinel for FwdIter.
Pred – The type of the function/function object to use (deduced). Pred must be CopyConstructible when using a parallel policy.
Proj – The type of an optional projection function. This defaults to hpx::identity.
- Parameters
policy – The execution policy to use for the scheduling of the iterations.
first – Refers to the beginning of the sequence of elements of that the algorithm will be applied to.
last – Refers to the end of the sequence of elements of that the algorithm will be applied to.
pred – Refers to the unary predicate which returns true for elements expected to be found in the beginning of the range. The signature of the function should be equivalent to
The signature does not need to have const &, but the function must not modify the objects passed to it. The type Type must be such that objects of types FwdIter can be dereferenced and then implicitly converted to Type.bool pred(const Type &a);
proj – Specifies the function (or function object) which will be invoked for each of the elements as a projection operation before the actual predicate is invoked.
- Returns
The is_partitioned algorithm returns a hpx::future<bool> if the execution policy is of type task_execution_policy and returns bool otherwise. The is_partitioned algorithm returns true if each element in the sequence for which pred returns true precedes those for which pred returns false. Otherwise is_partitioned returns false. If the range [first, last) contains less than two elements, the function is always true.
-
template<typename Rng, typename Pred, typename Proj = hpx::identity>
bool is_partitioned(Rng &&rng, Pred &&pred, Proj &&proj = Proj())# Determines if the range rng is partitioned.
Note
Complexity: at most (N) predicate evaluations where N = std::size(rng).
- Template Parameters
Rng – The type of the source range used (deduced). The iterators extracted from this range type must meet the requirements of an forward iterator.
Pred – The type of the function/function object to use (deduced).
Proj – The type of an optional projection function. This defaults to hpx::identity.
- Parameters
rng – Refers to the sequence of elements the algorithm will be applied to.
pred – Refers to the unary predicate which returns true for elements expected to be found in the beginning of the range. The signature of the function should be equivalent to
The signature does not need to have const &, but the function must not modify the objects passed to it. The type Type must be such that objects of types FwdIter can be dereferenced and then implicitly converted to Type.bool pred(const Type &a);
proj – Specifies the function (or function object) which will be invoked for each of the elements as a projection operation before the actual predicate is invoked.
- Returns
The is_partitioned algorithm returns bool. The is_partitioned algorithm returns true if each element in the sequence for which pred returns true precedes those for which pred returns false. Otherwise is_partitioned returns false. If the range rng contains less than two elements, the function is always true.
-
template<typename ExPolicy, typename Rng, typename Pred, typename Proj = hpx::identity>
hpx::parallel::util::detail::algorithm_result_t<ExPolicy, bool> is_partitioned(ExPolicy &&policy, Rng &&rng, Pred &&pred, Proj &&proj = Proj())# Determines if the range [first, last) is partitioned.
The predicate operations in the parallel is_partitioned algorithm invoked with an execution policy object of type sequenced_policy executes in sequential order in the calling thread.
The comparison operations in the parallel is_partitioned algorithm invoked with an execution policy object of type parallel_policy or parallel_task_policy are permitted to execute in an unordered fashion in unspecified threads, and indeterminately sequenced within each thread.
Note
Complexity: at most (N) predicate evaluations where N = std::size(rng).
- Template Parameters
ExPolicy – The type of the execution policy to use (deduced). It describes the manner in which the execution of the algorithm may be parallelized and the manner in which it executes the assignments.
Rng – The type of the source range used (deduced). The iterators extracted from this range type must meet the requirements of an forward iterator.
Pred – The type of the function/function object to use (deduced). Pred must be CopyConstructible when using a parallel policy.
Proj – The type of an optional projection function. This defaults to hpx::identity.
- Parameters
policy – The execution policy to use for the scheduling of the iterations.
rng – Refers to the sequence of elements the algorithm will be applied to.
pred – Refers to the unary predicate which returns true for elements expected to be found in the beginning of the range. The signature of the function should be equivalent to
The signature does not need to have const &, but the function must not modify the objects passed to it. The type Type must be such that objects of types FwdIter can be dereferenced and then implicitly converted to Type.bool pred(const Type &a);
proj – Specifies the function (or function object) which will be invoked for each of the elements as a projection operation before the actual predicate is invoked.
- Returns
The is_partitioned algorithm returns a hpx::future<bool> if the execution policy is of type task_execution_policy and returns bool otherwise. The is_partitioned algorithm returns true if each element in the sequence for which pred returns true precedes those for which pred returns false. Otherwise is_partitioned returns false. If the range rng contains less than two elements, the function is always true.
-
template<typename FwdIter, typename Sent, typename Pred, typename Proj = hpx::identity>
-
namespace ranges
hpx::ranges::is_sorted, hpx::ranges::is_sorted_until#
Defined in header hpx/algorithm.hpp.
See Public API for a list of names and headers that are part of the public HPX API.
-
namespace hpx
-
namespace ranges
Functions
-
template<typename FwdIter, typename Sent, typename Pred = hpx::parallel::detail::less, typename Proj = hpx::identity>
bool is_sorted(FwdIter first, Sent last, Pred &&pred = Pred(), Proj &&proj = Proj())# Determines if the range [first, last) is sorted. Uses pred to compare elements.
The comparison operations in the parallel is_sorted algorithm executes in sequential order in the calling thread.
Note
Complexity: at most (N+S-1) comparisons where N = distance(first, last). S = number of partitions
- Template Parameters
FwdIter – The type of the source iterators used for the This iterator type must meet the requirements of a forward iterator.
Sent – The type of the source sentinel (deduced). This sentinel type must be a sentinel for FwdIter.
Pred – The type of an optional function/function object to use.
Proj – The type of an optional projection function. This defaults to hpx::identity
- Parameters
first – Refers to the beginning of the sequence of elements of that the algorithm will be applied to.
last – Refers to the end of the sequence of elements of that the algorithm will be applied to.
pred – Refers to the binary predicate which returns true if the first argument should be treated as less than the second argument. The signature of the function should be equivalent to
The signature does not need to have const &, but the function must not modify the objects passed to it. The type Type must be such that objects of types FwdIter can be dereferenced and then implicitly converted to Type.bool pred(const Type &a, const Type &b);
proj – Specifies the function (or function object) which will be invoked for each of the elements as a projection operation before the actual predicate is invoked.
- Returns
The is_sorted algorithm returns a bool. The is_sorted algorithm returns true if each element in the sequence [first, last) satisfies the predicate passed. If the range [first, last) contains less than two elements, the function always returns true.
-
template<typename ExPolicy, typename FwdIter, typename Sent, typename Pred = hpx::parallel::detail::less, typename Proj = hpx::identity>
hpx::parallel::util::detail::algorithm_result_t<ExPolicy, bool> is_sorted(ExPolicy &&policy, FwdIter first, Sent last, Pred &&pred = Pred(), Proj &&proj = Proj())# Determines if the range [first, last) is sorted. Uses pred to compare elements.
The comparison operations in the parallel is_sorted algorithm invoked with an execution policy object of type sequenced_policy executes in sequential order in the calling thread.
The comparison operations in the parallel is_sorted algorithm invoked with an execution policy object of type parallel_policy or parallel_task_policy are permitted to execute in an unordered fashion in unspecified threads, and indeterminately sequenced within each thread.
Note
Complexity: at most (N+S-1) comparisons where N = distance(first, last). S = number of partitions
- Template Parameters
ExPolicy – The type of the execution policy to use (deduced). It describes the manner in which the execution of the algorithm may be parallelized and the manner in which it executes the assignments.
FwdIter – The type of the source iterators used for the This iterator type must meet the requirements of a forward iterator.
Sent – The type of the source sentinel (deduced). This sentinel type must be a sentinel for FwdIter.
Pred – The type of an optional function/function object to use. Unlike its sequential form, the parallel overload of is_sorted requires Pred to meet the requirements of CopyConstructible. This defaults to std::less<>
Proj – The type of an optional projection function. This defaults to hpx::identity
- Parameters
policy – The execution policy to use for the scheduling of the iterations.
first – Refers to the beginning of the sequence of elements of that the algorithm will be applied to.
last – Refers to the end of the sequence of elements of that the algorithm will be applied to.
pred – Refers to the binary predicate which returns true if the first argument should be treated as less than the second argument. The signature of the function should be equivalent to
The signature does not need to have const &, but the function must not modify the objects passed to it. The type Type must be such that objects of types FwdIter can be dereferenced and then implicitly converted to Type.bool pred(const Type &a, const Type &b);
proj – Specifies the function (or function object) which will be invoked for each of the elements as a projection operation before the actual predicate is invoked.
- Returns
The is_sorted algorithm returns a hpx::future<bool> if the execution policy is of type task_execution_policy and returns bool otherwise. The is_sorted algorithm returns a bool if each element in the sequence [first, last) satisfies the predicate passed. If the range [first, last) contains less than two elements, the function always returns true.
-
template<typename Rng, typename Pred = hpx::parallel::detail::less, typename Proj = hpx::identity>
bool is_sorted(Rng &&rng, Pred &&pred = Pred(), Proj &&proj = Proj())# Determines if the range rng is sorted. Uses pred to compare elements.
The comparison operations in the parallel is_sorted algorithm executes in sequential order in the calling thread.
Note
Complexity: at most (N+S-1) comparisons where N = size(rng). S = number of partitions
- Template Parameters
Rng – The type of the source range used (deduced). The iterators extracted from this range type must meet the requirements of an forward iterator.
Pred – The type of an optional function/function object to use.
Proj – The type of an optional projection function. This defaults to hpx::identity
- Parameters
rng – Refers to the sequence of elements the algorithm will be applied to.
pred – Refers to the binary predicate which returns true if the first argument should be treated as less than the second argument. The signature of the function should be equivalent to
The signature does not need to have const &, but the function must not modify the objects passed to it. The type Type must be such that objects of types FwdIter can be dereferenced and then implicitly converted to Type.bool pred(const Type &a, const Type &b);
proj – Specifies the function (or function object) which will be invoked for each of the elements as a projection operation before the actual predicate is invoked.
- Returns
The is_sorted algorithm returns a bool. The is_sorted algorithm returns true if each element in the rng satisfies the predicate passed. If the range rng contains less than two elements, the function always returns true.
-
template<typename ExPolicy, typename Rng, typename Pred = hpx::parallel::detail::less, typename Proj = hpx::identity>
hpx::parallel::util::detail::algorithm_result_t<ExPolicy, bool> is_sorted(ExPolicy &&policy, Rng &&rng, Pred &&pred = Pred(), Proj &&proj = Proj())# Determines if the range rng is sorted. Uses pred to compare elements.
The comparison operations in the parallel is_sorted algorithm invoked with an execution policy object of type sequenced_policy executes in sequential order in the calling thread.
The comparison operations in the parallel is_sorted algorithm invoked with an execution policy object of type parallel_policy or parallel_task_policy are permitted to execute in an unordered fashion in unspecified threads, and indeterminately sequenced within each thread.
Note
Complexity: at most (N+S-1) comparisons where N = size(rng). S = number of partitions
- Template Parameters
ExPolicy – The type of the execution policy to use (deduced). It describes the manner in which the execution of the algorithm may be parallelized and the manner in which it executes the assignments.
Rng – The type of the source range used (deduced). The iterators extracted from this range type must meet the requirements of an forward iterator.
Pred – The type of an optional function/function object to use. Unlike its sequential form, the parallel overload of is_sorted requires Pred to meet the requirements of CopyConstructible. This defaults to std::less<>
Proj – The type of an optional projection function. This defaults to hpx::identity
- Parameters
policy – The execution policy to use for the scheduling of the iterations.
rng – Refers to the sequence of elements the algorithm will be applied to.
pred – Refers to the binary predicate which returns true if the first argument should be treated as less than the second argument. The signature of the function should be equivalent to
The signature does not need to have const &, but the function must not modify the objects passed to it. The type Type must be such that objects of types FwdIter can be dereferenced and then implicitly converted to Type.bool pred(const Type &a, const Type &b);
proj – Specifies the function (or function object) which will be invoked for each of the elements as a projection operation before the actual predicate is invoked.
- Returns
The is_sorted algorithm returns a hpx::future<bool> if the execution policy is of type task_execution_policy and returns bool otherwise. The is_sorted algorithm returns a bool if each element in the range rng satisfies the predicate passed. If the range rng contains less than two elements, the function always returns true.
-
template<typename FwdIter, typename Sent, typename Pred = hpx::parallel::detail::less, typename Proj = hpx::identity>
FwdIter is_sorted_until(FwdIter first, Sent last, Pred &&pred = Pred(), Proj &&proj = Proj())# Returns the first element in the range [first, last) that is not sorted. Uses a predicate to compare elements or the less than operator.
The comparison operations in the parallel is_sorted_until algorithm execute in sequential order in the calling thread.
Note
Complexity: at most (N+S-1) comparisons where N = distance(first, last). S = number of partitions
- Template Parameters
FwdIter – The type of the source iterators used for the This iterator type must meet the requirements of a forward iterator.
Sent – The type of the source sentinel (deduced). This sentinel type must be a sentinel for FwdIter.
Pred – The type of an optional function/function object to use.
Proj – The type of an optional projection function. This defaults to hpx::identity
- Parameters
first – Refers to the beginning of the sequence of elements of that the algorithm will be applied to.
last – Refers to the end of the sequence of elements of that the algorithm will be applied to.
pred – Refers to the binary predicate which returns true if the first argument should be treated as less than the second argument. The signature of the function should be equivalent to
The signature does not need to have const &, but the function must not modify the objects passed to it. The type Type must be such that objects of types FwdIter can be dereferenced and then implicitly converted to Type.bool pred(const Type &a, const Type &b);
proj – Specifies the function (or function object) which will be invoked for each of the elements as a projection operation before the actual predicate is invoked.
- Returns
The is_sorted_until algorithm returns a FwdIter. The is_sorted_until algorithm returns the first unsorted element. If the sequence has less than two elements or the sequence is sorted, last is returned.
-
template<typename ExPolicy, typename FwdIter, typename Sent, typename Pred = hpx::parallel::detail::less, typename Proj = hpx::identity>
hpx::parallel::util::detail::algorithm_result<ExPolicy, FwdIter>::type is_sorted_until(ExPolicy &&policy, FwdIter first, Sent last, Pred &&pred = Pred(), Proj &&proj = Proj())# Returns the first element in the range [first, last) that is not sorted. Uses a predicate to compare elements or the less than operator.
The comparison operations in the parallel is_sorted_until algorithm invoked with an execution policy object of type sequenced_policy executes in sequential order in the calling thread.
The comparison operations in the parallel is_sorted_until algorithm invoked with an execution policy object of type parallel_policy or parallel_task_policy are permitted to execute in an unordered fashion in unspecified threads, and indeterminately sequenced within each thread.
Note
Complexity: at most (N+S-1) comparisons where N = distance(first, last). S = number of partitions
- Template Parameters
ExPolicy – The type of the execution policy to use (deduced). It describes the manner in which the execution of the algorithm may be parallelized and the manner in which it executes the assignments.
FwdIter – The type of the source iterators used for the This iterator type must meet the requirements of a forward iterator.
Sent – The type of the source sentinel (deduced). This sentinel type must be a sentinel for FwdIter.
Pred – The type of an optional function/function object to use. Unlike its sequential form, the parallel overload of is_sorted_until requires Pred to meet the requirements of CopyConstructible. This defaults to std::less<>
Proj – The type of an optional projection function. This defaults to hpx::identity
- Parameters
policy – The execution policy to use for the scheduling of the iterations.
first – Refers to the beginning of the sequence of elements of that the algorithm will be applied to.
last – Refers to the end of the sequence of elements of that the algorithm will be applied to.
pred – Refers to the binary predicate which returns true if the first argument should be treated as less than the second argument. The signature of the function should be equivalent to
The signature does not need to have const &, but the function must not modify the objects passed to it. The type Type must be such that objects of types FwdIter can be dereferenced and then implicitly converted to Type.bool pred(const Type &a, const Type &b);
proj – Specifies the function (or function object) which will be invoked for each of the elements as a projection operation before the actual predicate is invoked.
- Returns
The is_sorted_until algorithm returns a hpx::future<FwdIter> if the execution policy is of type task_execution_policy and returns FwdIter otherwise. The is_sorted_until algorithm returns the first unsorted element. If the sequence has less than two elements or the sequence is sorted, last is returned.
-
template<typename Rng, typename Pred = hpx::parallel::detail::less, typename Proj = hpx::identity>
std::ranges::iterator_t<Rng> is_sorted_until(Rng &&rng, Pred &&pred = Pred(), Proj &&proj = Proj())# Returns the first element in the range rng that is not sorted. Uses a predicate to compare elements or the less than operator.
Note
Complexity: at most (N+S-1) comparisons where N = size(rng). S = number of partitions
- Template Parameters
Rng – The type of the source range used (deduced). The iterators extracted from this range type must meet the requirements of an forward iterator.
Pred – The type of an optional function/function object to use. Unlike its sequential form, the parallel overload of is_sorted_until requires Pred to meet the requirements of CopyConstructible. This defaults to std::less<>
Proj – The type of an optional projection function. This defaults to hpx::identity
- Parameters
rng – Refers to the sequence of elements the algorithm will be applied to.
pred – Refers to the binary predicate which returns true if the first argument should be treated as less than the second argument. The signature of the function should be equivalent to
The signature does not need to have const &, but the function must not modify the objects passed to it. The type Type must be such that objects of types FwdIter can be dereferenced and then implicitly converted to Type.bool pred(const Type &a, const Type &b);
proj – Specifies the function (or function object) which will be invoked for each of the elements as a projection operation before the actual predicate is invoked.
- Returns
The is_sorted_until returns FwdIter. The is_sorted_until algorithm returns the first unsorted element. If the sequence has less than two elements or the sequence is sorted, last is returned.
-
template<typename ExPolicy, typename Rng, typename Pred = hpx::parallel::detail::less, typename Proj = hpx::identity>
hpx::parallel::util::detail::algorithm_result<ExPolicy, std::ranges::iterator_t<Rng>> is_sorted_until(ExPolicy &&policy, Rng &&rng, Pred &&pred = Pred(), Proj &&proj = Proj())# Returns the first element in the range rng that is not sorted. Uses a predicate to compare elements or the less than operator.
The comparison operations in the parallel is_sorted_until algorithm invoked with an execution policy object of type sequenced_policy executes in sequential order in the calling thread.
The comparison operations in the parallel is_sorted_until algorithm invoked with an execution policy object of type parallel_policy or parallel_task_policy are permitted to execute in an unordered fashion in unspecified threads, and indeterminately sequenced within each thread.
Note
Complexity: at most (N+S-1) comparisons where N = size(rng). S = number of partitions
- Template Parameters
ExPolicy – The type of the execution policy to use (deduced). It describes the manner in which the execution of the algorithm may be parallelized and the manner in which it executes the assignments.
Rng – The type of the source range used (deduced). The iterators extracted from this range type must meet the requirements of an forward iterator.
Pred – The type of an optional function/function object to use. Unlike its sequential form, the parallel overload of is_sorted_until requires Pred to meet the requirements of CopyConstructible. This defaults to std::less<>
Proj – The type of an optional projection function. This defaults to hpx::identity
- Parameters
policy – The execution policy to use for the scheduling of the iterations.
rng – Refers to the sequence of elements the algorithm will be applied to.
pred – Refers to the binary predicate which returns true if the first argument should be treated as less than the second argument. The signature of the function should be equivalent to
The signature does not need to have const &, but the function must not modify the objects passed to it. The type Type must be such that objects of types FwdIter can be dereferenced and then implicitly converted to Type.bool pred(const Type &a, const Type &b);
proj – Specifies the function (or function object) which will be invoked for each of the elements as a projection operation before the actual predicate is invoked.
- Returns
The is_sorted_until algorithm returns a hpx::future<FwdIter> if the execution policy is of type task_execution_policy and returns FwdIter otherwise. The is_sorted_until algorithm returns the first unsorted element. If the sequence has less than two elements or the sequence is sorted, last is returned.
-
template<typename FwdIter, typename Sent, typename Pred = hpx::parallel::detail::less, typename Proj = hpx::identity>
-
namespace ranges
hpx::ranges::lexicographical_compare#
Defined in header hpx/algorithm.hpp.
See Public API for a list of names and headers that are part of the public HPX API.
-
namespace hpx
-
namespace ranges
Functions
-
template<typename InIter1, typename Sent1, typename InIter2, typename Sent2, typename Proj1 = hpx::identity, typename Proj2 = hpx::identity, typename Pred = hpx::parallel::detail::less>
bool lexicographical_compare(InIter1 first1, Sent1 last1, InIter2 first2, Sent2 last2, Pred &&pred = Pred(), Proj1 &&proj1 = Proj1(), Proj2 &&proj2 = Proj2())# Checks if the first range [first1, last1) is lexicographically less than the second range [first2, last2). uses a provided predicate to compare elements.
The comparison operations in the parallel lexicographical_compare algorithm invoked without an execution policy object execute in sequential order in the calling thread.
Note
Complexity: At most 2 * min(N1, N2) applications of the comparison operation, where N1 = std::distance(first1, last) and N2 = std::distance(first2, last2).
Note
Lexicographical comparison is an operation with the following properties
Two ranges are compared element by element
The first mismatching element defines which range is lexicographically less or greater than the other
If one range is a prefix of another, the shorter range is lexicographically less than the other
If two ranges have equivalent elements and are of the same length, then the ranges are lexicographically equal
An empty range is lexicographically less than any non-empty range
Two empty ranges are lexicographically equal
- Template Parameters
InIter1 – The type of the source iterators used for the first range (deduced). This iterator type must meet the requirements of an input iterator.
Sent1 – The type of the source sentinel (deduced). This sentinel type must be a sentinel for InIter1.
InIter2 – The type of the source iterators used for the second range (deduced). This iterator type must meet the requirements of an input iterator.
Sent2 – The type of the source sentinel (deduced). This sentinel type must be a sentinel for InIter2.
Pred – The type of an optional function/function object to use. Unlike its sequential form, the parallel overload of lexicographical_compare requires Pred to meet the requirements of CopyConstructible. This defaults to std::less<>
Proj1 – The type of an optional projection function for FwdIter1. This defaults to hpx::identity
Proj2 – The type of an optional projection function for FwdIter2. This defaults to hpx::identity
- Parameters
first1 – Refers to the beginning of the sequence of elements of the first range the algorithm will be applied to.
last1 – Refers to the end of the sequence of elements of the first range the algorithm will be applied to.
first2 – Refers to the beginning of the sequence of elements of the second range the algorithm will be applied to.
last2 – Refers to the end of the sequence of elements of the second range the algorithm will be applied to.
pred – Refers to the comparison function that the first and second ranges will be applied to
proj1 – Specifies the function (or function object) which will be invoked for each of the elements of the first range as a projection operation before the actual predicate is invoked.
proj2 – Specifies the function (or function object) which will be invoked for each of the elements of the second range as a projection operation before the actual predicate is invoked.
- Returns
The lexicographically_compare algorithm returns bool. The lexicographically_compare algorithm returns true if the first range is lexicographically less, otherwise it returns false. range [first2, last2), it returns false.
-
template<typename ExPolicy, typename FwdIter1, typename Sent1, typename FwdIter2, typename Sent2, typename Proj1 = hpx::identity, typename Proj2 = hpx::identity, typename Pred = hpx::parallel::detail::less>
hpx::parallel::util::detail::algorithm_result_t<ExPolicy, bool> lexicographical_compare(ExPolicy &&policy, FwdIter1 first1, Sent1 last1, FwdIter2 first2, Sent2 last2, Pred &&pred = Pred(), Proj1 &&proj1 = Proj1(), Proj2 &&proj2 = Proj2())# Checks if the first range [first1, last1) is lexicographically less than the second range [first2, last2). uses a provided predicate to compare elements.
The comparison operations in the parallel lexicographical_compare algorithm invoked with an execution policy object of type sequenced_policy execute in sequential order in the calling thread.
The comparison operations in the parallel lexicographical_compare algorithm invoked with an execution policy object of type parallel_policy or parallel_task_policy are permitted to execute in an unordered fashion in unspecified threads, and indeterminately sequenced within each thread.
Note
Complexity: At most 2 * min(N1, N2) applications of the comparison operation, where N1 = std::distance(first1, last) and N2 = std::distance(first2, last2).
Note
Lexicographical comparison is an operation with the following properties
Two ranges are compared element by element
The first mismatching element defines which range is lexicographically less or greater than the other
If one range is a prefix of another, the shorter range is lexicographically less than the other
If two ranges have equivalent elements and are of the same length, then the ranges are lexicographically equal
An empty range is lexicographically less than any non-empty range
Two empty ranges are lexicographically equal
- Template Parameters
ExPolicy – The type of the execution policy to use (deduced). It describes the manner in which the execution of the algorithm may be parallelized and the manner in which it executes the assignments.
FwdIter1 – The type of the source iterators used for the first range (deduced). This iterator type must meet the requirements of an forward iterator.
Sent1 – The type of the source sentinel (deduced). This sentinel type must be a sentinel for FwdIter1.
FwdIter2 – The type of the source iterators used for the second range (deduced). This iterator type must meet the requirements of an forward iterator.
Sent2 – The type of the source sentinel (deduced). This sentinel type must be a sentinel for FwdIter2.
Pred – The type of an optional function/function object to use. Unlike its sequential form, the parallel overload of lexicographical_compare requires Pred to meet the requirements of CopyConstructible. This defaults to std::less<>
Proj1 – The type of an optional projection function for FwdIter1. This defaults to hpx::identity
Proj2 – The type of an optional projection function for FwdIter2. This defaults to hpx::identity
- Parameters
policy – The execution policy to use for the scheduling of the iterations.
first1 – Refers to the beginning of the sequence of elements of the first range the algorithm will be applied to.
last1 – Refers to the end of the sequence of elements of the first range the algorithm will be applied to.
first2 – Refers to the beginning of the sequence of elements of the second range the algorithm will be applied to.
last2 – Refers to the end of the sequence of elements of the second range the algorithm will be applied to.
pred – Refers to the comparison function that the first and second ranges will be applied to
proj1 – Specifies the function (or function object) which will be invoked for each of the elements of the first range as a projection operation before the actual predicate is invoked.
proj2 – Specifies the function (or function object) which will be invoked for each of the elements of the second range as a projection operation before the actual predicate is invoked.
- Returns
The lexicographically_compare algorithm returns a hpx::future<bool> if the execution policy is of type sequenced_task_policy or parallel_task_policy and returns bool otherwise. The lexicographically_compare algorithm returns true if the first range is lexicographically less, otherwise it returns false. range [first2, last2), it returns false.
-
template<typename Rng1, typename Rng2, typename Proj1 = hpx::identity, typename Proj2 = hpx::identity, typename Pred = hpx::parallel::detail::less>
bool lexicographical_compare(Rng1 &&rng1, Rng2 &&rng2, Pred &&pred = Pred(), Proj1 &&proj1 = Proj1(), Proj2 &&proj2 = Proj2())# Checks if the first range rng1 is lexicographically less than the second range rng2. uses a provided predicate to compare elements.
The comparison operations in the parallel lexicographical_compare algorithm invoked without an execution policy object execute in sequential order in the calling thread.
Note
Complexity: At most 2 * min(N1, N2) applications of the comparison operation, where N1 = std::distance(std::begin(rng1), std::end(rng1)) and N2 = std::distance(std::begin(rng2), std::end(rng2)).
Note
Lexicographical comparison is an operation with the following properties
Two ranges are compared element by element
The first mismatching element defines which range is lexicographically less or greater than the other
If one range is a prefix of another, the shorter range is lexicographically less than the other
If two ranges have equivalent elements and are of the same length, then the ranges are lexicographically equal
An empty range is lexicographically less than any non-empty range
Two empty ranges are lexicographically equal
- Template Parameters
Rng1 – The type of the source range used (deduced). The iterators extracted from this range type must meet the requirements of an input iterator.
Rng2 – The type of the source range used (deduced). The iterators extracted from this range type must meet the requirements of an input iterator.
Pred – The type of an optional function/function object to use. Unlike its sequential form, the parallel overload of lexicographical_compare requires Pred to meet the requirements of CopyConstructible. This defaults to std::less<>
Proj1 – The type of an optional projection function for elements of the first range. This defaults to hpx::identity
Proj2 – The type of an optional projection function for elements of the second range. This defaults to hpx::identity
- Parameters
rng1 – Refers to the sequence of elements the algorithm will be applied to.
rng2 – Refers to the sequence of elements the algorithm will be applied to.
pred – Refers to the comparison function that the first and second ranges will be applied to
proj1 – Specifies the function (or function object) which will be invoked for each of the elements of the first range as a projection operation before the actual predicate is invoked.
proj2 – Specifies the function (or function object) which will be invoked for each of the elements of the second range as a projection operation before the actual predicate is invoked.
- Returns
The lexicographically_compare algorithm returns bool. The lexicographically_compare algorithm returns true if the first range is lexicographically less, otherwise it returns false. range [first2, last2), it returns false.
-
template<typename ExPolicy, typename Rng1, typename Rng2, typename Proj1 = hpx::identity, typename Proj2 = hpx::identity, typename Pred = hpx::parallel::detail::less>
hpx::parallel::util::detail::algorithm_result_t<ExPolicy, bool> lexicographical_compare(ExPolicy &&policy, Rng1 &&rng1, Rng2 &&rng2, Pred &&pred = Pred(), Proj1 &&proj1 = Proj1(), Proj2 &&proj2 = Proj2())# Checks if the first range rng1 is lexicographically less than the second range rng2. uses a provided predicate to compare elements.
The comparison operations in the parallel lexicographical_compare algorithm invoked with an execution policy object of type sequenced_policy execute in sequential order in the calling thread.
The comparison operations in the parallel lexicographical_compare algorithm invoked with an execution policy object of type parallel_policy or parallel_task_policy are permitted to execute in an unordered fashion in unspecified threads, and indeterminately sequenced within each thread.
Note
Complexity: At most 2 * min(N1, N2) applications of the comparison operation, where N1 = std::distance(std::begin(rng1), std::end(rng1)) and N2 = std::distance(std::begin(rng2), std::end(rng2)).
Note
Lexicographical comparison is an operation with the following properties
Two ranges are compared element by element
The first mismatching element defines which range is lexicographically less or greater than the other
If one range is a prefix of another, the shorter range is lexicographically less than the other
If two ranges have equivalent elements and are of the same length, then the ranges are lexicographically equal
An empty range is lexicographically less than any non-empty range
Two empty ranges are lexicographically equal
- Template Parameters
ExPolicy – The type of the execution policy to use (deduced). It describes the manner in which the execution of the algorithm may be parallelized and the manner in which it executes the assignments.
Rng1 – The type of the source range used (deduced). The iterators extracted from this range type must meet the requirements of an input iterator.
Rng2 – The type of the source range used (deduced). The iterators extracted from this range type must meet the requirements of an input iterator.
Pred – The type of an optional function/function object to use. Unlike its sequential form, the parallel overload of lexicographical_compare requires Pred to meet the requirements of CopyConstructible. This defaults to std::less<>
Proj1 – The type of an optional projection function for elements of the first range. This defaults to hpx::identity
Proj2 – The type of an optional projection function for elements of the second range. This defaults to hpx::identity
- Parameters
policy – The execution policy to use for the scheduling of the iterations.
rng1 – Refers to the sequence of elements the algorithm will be applied to.
rng2 – Refers to the sequence of elements the algorithm will be applied to.
pred – Refers to the comparison function that the first and second ranges will be applied to
proj1 – Specifies the function (or function object) which will be invoked for each of the elements of the first range as a projection operation before the actual predicate is invoked.
proj2 – Specifies the function (or function object) which will be invoked for each of the elements of the second range as a projection operation before the actual predicate is invoked.
- Returns
The lexicographically_compare algorithm returns a hpx::future<bool> if the execution policy is of type sequenced_task_policy or parallel_task_policy and returns bool otherwise. The lexicographically_compare algorithm returns true if the first range is lexicographically less, otherwise it returns false. range [first2, last2), it returns false.
-
template<typename InIter1, typename Sent1, typename InIter2, typename Sent2, typename Proj1 = hpx::identity, typename Proj2 = hpx::identity, typename Pred = hpx::parallel::detail::less>
-
namespace ranges
hpx::ranges::make_heap#
Defined in header hpx/algorithm.hpp.
See Public API for a list of names and headers that are part of the public HPX API.
-
namespace hpx
-
namespace ranges
Functions
-
template<typename ExPolicy, typename Iter, typename Sent, typename Comp, typename Proj = hpx::identity>
hpx::parallel::util::detail::algorithm_result_t<ExPolicy, Iter> make_heap(ExPolicy &&policy, Iter first, Sent last, Comp &&comp, Proj &&proj = Proj{})# Constructs a max heap in the range [first, last).
The predicate operations in the parallel make_heap algorithm invoked with an execution policy object of type sequential_execution_policy executes in sequential order in the calling thread.
The comparison operations in the parallel make_heap algorithm invoked with an execution policy object of type parallel_execution_policy or parallel_task_execution_policy are permitted to execute in an unordered fashion in unspecified threads, and indeterminately sequenced within each thread.
Note
Complexity: at most (3*N) comparisons where N = distance(first, last).
- Template Parameters
ExPolicy – The type of the execution policy to use (deduced). It describes the manner in which the execution of the algorithm may be parallelized and the manner in which it executes the assignments.
Iter – The type of the begin source iterators used (deduced). This iterator type must meet the requirements of an forward iterator.
Sent – The type of the end source iterators used (deduced). This iterator type must meet the requirements of an sentinel for Iter1.
Comp – The type of the function/function object to use (deduced).
Proj – The type of an optional projection function. This defaults to hpx::identity
- Parameters
policy – The execution policy to use for the scheduling of the iterations.
first – Refers to the beginning of the sequence of elements the algorithm will be applied to.
last – Refers to the end of the sequence of elements the algorithm will be applied to.
comp – Refers to the binary predicate which returns true if the first argument should be treated as less than the second. The signature of the function should be equivalent to
The signature does not need to have const &, but the function must not modify the objects passed to it. The type Type must be such that objects of types RndIter can be dereferenced and then implicitly converted to Type.bool comp(const Type &a, const Type &b);
proj – Specifies the function (or function object) which will be invoked for each pair of elements as a projection operation before the actual predicate comp is invoked.
- Returns
The make_heap algorithm returns a hpx::future<Iter> if the execution policy is of type sequenced_task_policy or parallel_task_policy and returns Iter otherwise. It returns last.
-
template<typename ExPolicy, typename Rng, typename Comp, typename Proj = hpx::identity>
hpx::parallel::util::detail::algorithm_result<ExPolicy, std::ranges::iterator_t<Rng>> make_heap(ExPolicy &&policy, Rng &&rng, Comp &&comp, Proj &&proj = Proj{})# Constructs a max heap in the range [first, last).
The predicate operations in the parallel make_heap algorithm invoked with an execution policy object of type sequential_execution_policy executes in sequential order in the calling thread.
The comparison operations in the parallel make_heap algorithm invoked with an execution policy object of type parallel_execution_policy or parallel_task_execution_policy are permitted to execute in an unordered fashion in unspecified threads, and indeterminately sequenced within each thread.
Note
Complexity: at most (3*N) comparisons where N = distance(first, last).
- Template Parameters
ExPolicy – The type of the execution policy to use (deduced). It describes the manner in which the execution of the algorithm may be parallelized and the manner in which it executes the assignments.
Rng – The type of the source range used (deduced). The iterators extracted from this range type must meet the requirements of an input iterator.
Comp – The type of the function/function object to use (deduced).
Proj – The type of an optional projection function. This defaults to hpx::identity
- Parameters
policy – The execution policy to use for the scheduling of the iterations.
rng – Refers to the sequence of elements the algorithm will be applied to.
comp – Refers to the binary predicate which returns true if the first argument should be treated as less than the second. The signature of the function should be equivalent to
The signature does not need to have const &, but the function must not modify the objects passed to it. The type Type must be such that objects of types RndIter can be dereferenced and then implicitly converted to Type.bool comp(const Type &a, const Type &b);
proj – Specifies the function (or function object) which will be invoked for each pair of elements as a projection operation before the actual predicate comp is invoked.
- Returns
The make_heap algorithm returns a hpx::future<Iter> if the execution policy is of type sequenced_task_policy or parallel_task_policy and returns Iter otherwise. It returns last.
-
template<typename ExPolicy, typename Iter, typename Sent, typename Proj = hpx::identity>
hpx::parallel::util::detail::algorithm_result_t<ExPolicy, Iter> make_heap(ExPolicy &&policy, Iter first, Sent last, Proj &&proj = Proj{})# Constructs a max heap in the range [first, last).
The predicate operations in the parallel make_heap algorithm invoked with an execution policy object of type sequential_execution_policy executes in sequential order in the calling thread.
The comparison operations in the parallel make_heap algorithm invoked with an execution policy object of type parallel_execution_policy or parallel_task_execution_policy are permitted to execute in an unordered fashion in unspecified threads, and indeterminately sequenced within each thread.
Note
Complexity: at most (3*N) comparisons where N = distance(first, last).
- Template Parameters
ExPolicy – The type of the execution policy to use (deduced). It describes the manner in which the execution of the algorithm may be parallelized and the manner in which it executes the assignments.
Iter – The type of the begin source iterators used (deduced). This iterator type must meet the requirements of an forward iterator.
Sent – The type of the end source iterators used (deduced). This iterator type must meet the requirements of an sentinel for Iter1.
Proj – The type of an optional projection function. This defaults to hpx::identity
- Parameters
policy – The execution policy to use for the scheduling of the iterations.
first – Refers to the beginning of the sequence of elements the algorithm will be applied to.
last – Refers to the end of the sequence of elements the algorithm will be applied to.
proj – Specifies the function (or function object) which will be invoked for each pair of elements as a projection operation before the actual predicate comp is invoked.
- Returns
The make_heap algorithm returns a hpx::future<Iter> if the execution policy is of type sequenced_task_policy or parallel_task_policy and returns Iter otherwise. It returns last.
-
template<typename ExPolicy, typename Rng, typename Proj = hpx::identity>
hpx::parallel::util::detail::algorithm_result<ExPolicy, std::ranges::iterator_t<Rng>> make_heap(ExPolicy &&policy, Rng &&rng, Proj &&proj = Proj{})# Constructs a max heap in the range [first, last).
The predicate operations in the parallel make_heap algorithm invoked with an execution policy object of type sequential_execution_policy executes in sequential order in the calling thread.
The comparison operations in the parallel make_heap algorithm invoked with an execution policy object of type parallel_execution_policy or parallel_task_execution_policy are permitted to execute in an unordered fashion in unspecified threads, and indeterminately sequenced within each thread.
Note
Complexity: at most (3*N) comparisons where N = distance(first, last).
- Template Parameters
ExPolicy – The type of the execution policy to use (deduced). It describes the manner in which the execution of the algorithm may be parallelized and the manner in which it executes the assignments.
Rng – The type of the source range used (deduced). The iterators extracted from this range type must meet the requirements of an input iterator.
Proj – The type of an optional projection function. This defaults to hpx::identity
- Parameters
policy – The execution policy to use for the scheduling of the iterations.
rng – Refers to the sequence of elements the algorithm will be applied to.
proj – Specifies the function (or function object) which will be invoked for each pair of elements as a projection operation before the actual predicate comp is invoked.
- Returns
The make_heap algorithm returns a hpx::future<Iter> if the execution policy is of type sequenced_task_policy or parallel_task_policy and returns Iter otherwise. It returns last.
-
template<typename Iter, typename Sent, typename Comp, typename Proj = hpx::identity>
Iter make_heap(Iter first, Sent last, Comp &&comp, Proj &&proj = Proj{})# Constructs a max heap in the range [first, last).
Note
Complexity: at most (3*N) comparisons where N = distance(first, last).
- Template Parameters
Iter – The type of the begin source iterators used (deduced). This iterator type must meet the requirements of an forward iterator.
Sent – The type of the end source iterators used (deduced). This iterator type must meet the requirements of an sentinel for Iter1.
Comp – The type of the function/function object to use (deduced).
Proj – The type of an optional projection function. This defaults to hpx::identity
- Parameters
first – Refers to the beginning of the sequence of elements the algorithm will be applied to.
last – Refers to the end of the sequence of elements the algorithm will be applied to.
comp – Refers to the binary predicate which returns true if the first argument should be treated as less than the second. The signature of the function should be equivalent to
The signature does not need to have const &, but the function must not modify the objects passed to it. The type Type must be such that objects of types RndIter can be dereferenced and then implicitly converted to Type.bool comp(const Type &a, const Type &b);
proj – Specifies the function (or function object) which will be invoked for each pair of elements as a projection operation before the actual predicate comp is invoked.
- Returns
The make_heap algorithm returns Iter. It returns last.
-
template<typename Rng, typename Comp, typename Proj = hpx::identity>
std::ranges::iterator_t<Rng> make_heap(Rng &&rng, Comp &&comp, Proj &&proj = Proj{})# Constructs a max heap in the range [first, last).
Note
Complexity: at most (3*N) comparisons where N = distance(first, last).
- Template Parameters
Rng – The type of the source range used (deduced). The iterators extracted from this range type must meet the requirements of an input iterator.
Comp – The type of the function/function object to use (deduced).
Proj – The type of an optional projection function. This defaults to hpx::identity
- Parameters
rng – Refers to the sequence of elements the algorithm will be applied to.
comp – Refers to the binary predicate which returns true if the first argument should be treated as less than the second. The signature of the function should be equivalent to
The signature does not need to have const &, but the function must not modify the objects passed to it. The type Type must be such that objects of types RndIter can be dereferenced and then implicitly converted to Type.bool comp(const Type &a, const Type &b);
proj – Specifies the function (or function object) which will be invoked for each pair of elements as a projection operation before the actual predicate comp is invoked.
- Returns
The make_heap algorithm returns Iter. It returns last.
-
template<typename Iter, typename Sent, typename Proj = hpx::identity>
Iter make_heap(Iter first, Sent last, Proj &&proj = Proj{})# Constructs a max heap in the range [first, last).
Note
Complexity: at most (3*N) comparisons where N = distance(first, last).
- Template Parameters
Iter – The type of the begin source iterators used (deduced). This iterator type must meet the requirements of an forward iterator.
Sent – The type of the end source iterators used (deduced). This iterator type must meet the requirements of an sentinel for Iter1.
Proj – The type of an optional projection function. This defaults to hpx::identity
- Parameters
first – Refers to the beginning of the sequence of elements the algorithm will be applied to.
last – Refers to the end of the sequence of elements the algorithm will be applied to.
proj – Specifies the function (or function object) which will be invoked for each pair of elements as a projection operation before the actual predicate comp is invoked.
- Returns
The make_heap algorithm returns Iter. It returns last.
-
template<typename Rng, typename Proj = hpx::identity>
std::ranges::iterator_t<Rng> make_heap(Rng &&rng, Proj &&proj = Proj{})# Constructs a max heap in the range [first, last).
Note
Complexity: at most (3*N) comparisons where N = distance(first, last).
- Template Parameters
Rng – The type of the source range used (deduced). The iterators extracted from this range type must meet the requirements of an input iterator.
Proj – The type of an optional projection function. This defaults to hpx::identity
- Parameters
rng – Refers to the sequence of elements the algorithm will be applied to.
proj – Specifies the function (or function object) which will be invoked for each pair of elements as a projection operation before the actual predicate comp is invoked.
- Returns
The make_heap algorithm returns Iter. It returns last.
-
template<typename ExPolicy, typename Iter, typename Sent, typename Comp, typename Proj = hpx::identity>
-
namespace ranges
hpx::ranges::merge, hpx::ranges::inplace_merge#
Defined in header hpx/algorithm.hpp.
See Public API for a list of names and headers that are part of the public HPX API.
-
namespace hpx
-
namespace ranges
Functions
-
template<typename ExPolicy, typename Rng1, typename Rng2, typename Iter3, typename Comp = hpx::ranges::less, typename Proj1 = hpx::identity, typename Proj2 = hpx::identity>
hpx::parallel::util::detail::algorithm_result<ExPolicy, hpx::ranges::merge_result<std::ranges::iterator_t<Rng1>, std::ranges::iterator_t<Rng2>, Iter3>> merge(ExPolicy &&policy, Rng1 &&rng1, Rng2 &&rng2, Iter3 dest, Comp &&comp = Comp(), Proj1 &&proj1 = Proj1(), Proj2 &&proj2 = Proj2())# Merges two sorted ranges [first1, last1) and [first2, last2) into one sorted range beginning at dest. The order of equivalent elements in the each of original two ranges is preserved. For equivalent elements in the original two ranges, the elements from the first range precede the elements from the second range. The destination range cannot overlap with either of the input ranges.
The assignments in the parallel merge algorithm invoked with an execution policy object of type sequenced_policy execute in sequential order in the calling thread.
The assignments in the parallel merge algorithm invoked with an execution policy object of type parallel_policy or parallel_task_policy are permitted to execute in an unordered fashion in unspecified threads, and indeterminately sequenced within each thread.
Note
Complexity: Performs O(std::distance(first1, last1) + std::distance(first2, last2)) applications of the comparison comp and the each projection.
- Template Parameters
ExPolicy – The type of the execution policy to use (deduced). It describes the manner in which the execution of the algorithm may be parallelized and the manner in which it executes the assignments.
Rng1 – The type of the first source range used (deduced). The iterators extracted from this range type must meet the requirements of an random access iterator.
Rng2 – The type of the second source range used (deduced). The iterators extracted from this range type must meet the requirements of an random access iterator.
Iter3 – The type of the iterator representing the destination range (deduced). This iterator type must meet the requirements of an random access iterator.
Comp – The type of the function/function object to use (deduced). Unlike its sequential form, the parallel overload of merge requires Comp to meet the requirements of CopyConstructible. This defaults to std::less<>
Proj1 – The type of an optional projection function to be used for elements of the first range. This defaults to hpx::identity
Proj2 – The type of an optional projection function to be used for elements of the second range. This defaults to hpx::identity
- Parameters
policy – The execution policy to use for the scheduling of the iterations.
rng1 – Refers to the first range of elements the algorithm will be applied to.
rng2 – Refers to the second range of elements the algorithm will be applied to.
dest – Refers to the beginning of the destination range.
comp – comp is a callable object which returns true if the first argument is less than the second, and false otherwise. The signature of this comparison should be equivalent to:
The signature does not need to have const&, but the function must not modify the objects passed to it. The types Type1 and Type2 must be such that objects of types Iter1 and Iter2 can be dereferenced and then implicitly converted to both Type1 and Type2bool comp(const Type1 &a, const Type2 &b);
proj1 – Specifies the function (or function object) which will be invoked for each of the elements of the first range as a projection operation before the actual comparison comp is invoked.
proj2 – Specifies the function (or function object) which will be invoked for each of the elements of the second range as a projection operation before the actual comparison comp is invoked.
- Returns
The merge algorithm returns a hpx::future<merge_result<Iter1, Iter2, Iter3>> if the execution policy is of type sequenced_task_policy or parallel_task_policy and returns merge_result<Iter1, Iter2, Iter3> otherwise. The merge algorithm returns the tuple of the source iterator last1, the source iterator last2, the destination iterator to the end of the dest range.
-
template<typename ExPolicy, typename Iter1, typename Sent1, typename Iter2, typename Sent2, typename Iter3, typename Comp = hpx::ranges::less, typename Proj1 = hpx::identity, typename Proj2 = hpx::identity>
hpx::parallel::util::detail::algorithm_result<ExPolicy, hpx::ranges::merge_result<Iter1, Iter2, Iter3>>::type merge(ExPolicy &&policy, Iter1 first1, Sent1 last1, Iter2 first2, Sent2 last2, Iter3 dest, Comp &&comp = Comp(), Proj1 &&proj1 = Proj1(), Proj2 &&proj2 = Proj2())# Merges two sorted ranges [first1, last1) and [first2, last2) into one sorted range beginning at dest. The order of equivalent elements in the each of original two ranges is preserved. For equivalent elements in the original two ranges, the elements from the first range precede the elements from the second range. The destination range cannot overlap with either of the input ranges.
The assignments in the parallel merge algorithm invoked with an execution policy object of type sequenced_policy execute in sequential order in the calling thread.
The assignments in the parallel merge algorithm invoked with an execution policy object of type parallel_policy or parallel_task_policy are permitted to execute in an unordered fashion in unspecified threads, and indeterminately sequenced within each thread.
Note
Complexity: Performs O(std::distance(first1, last1) + std::distance(first2, last2)) applications of the comparison comp and the each projection.
- Template Parameters
ExPolicy – The type of the execution policy to use (deduced). It describes the manner in which the execution of the algorithm may be parallelized and the manner in which it executes the assignments.
Iter1 – The type of the source iterators used (deduced) representing the first sequence. This iterator type must meet the requirements of an random access iterator.
Sent1 – The type of the end source iterators used (deduced). This iterator type must meet the requirements of an sentinel for Iter1.
Iter2 – The type of the source iterators used (deduced) representing the second sequence. This iterator type must meet the requirements of an random access iterator.
Sent2 – The type of the end source iterators used (deduced) representing the second sequence. This iterator type must meet the requirements of an sentinel for Iter2.
Iter3 – The type of the iterator representing the destination range (deduced). This iterator type must meet the requirements of an random access iterator.
Comp – The type of the function/function object to use (deduced). Unlike its sequential form, the parallel overload of merge requires Comp to meet the requirements of CopyConstructible. This defaults to std::less<>
Proj1 – The type of an optional projection function to be used for elements of the first range. This defaults to hpx::identity
Proj2 – The type of an optional projection function to be used for elements of the second range. This defaults to hpx::identity
- Parameters
policy – The execution policy to use for the scheduling of the iterations.
first1 – Refers to the beginning of the sequence of elements of the first range the algorithm will be applied to.
last1 – Refers to the end of the sequence of elements of the first range the algorithm will be applied to.
first2 – Refers to the beginning of the sequence of elements of the second range the algorithm will be applied to.
last2 – Refers to the end of the sequence of elements of the second range the algorithm will be applied to.
dest – Refers to the beginning of the destination range.
comp – comp is a callable object which returns true if the first argument is less than the second, and false otherwise. The signature of this comparison should be equivalent to:
The signature does not need to have const&, but the function must not modify the objects passed to it. The types Type1 and Type2 must be such that objects of types Iter1 and Iter2 can be dereferenced and then implicitly converted to both Type1 and Type2bool comp(const Type1 &a, const Type2 &b);
proj1 – Specifies the function (or function object) which will be invoked for each of the elements of the first range as a projection operation before the actual comparison comp is invoked.
proj2 – Specifies the function (or function object) which will be invoked for each of the elements of the second range as a projection operation before the actual comparison comp is invoked.
- Returns
The merge algorithm returns a hpx::future<merge_result<Iter1, Iter2, Iter3>> if the execution policy is of type sequenced_task_policy or parallel_task_policy and returns merge_result<Iter1, Iter2, Iter3> otherwise. The merge algorithm returns the tuple of the source iterator last1, the source iterator last2, the destination iterator to the end of the dest range.
-
template<typename Rng1, typename Rng2, typename Iter3, typename Comp = hpx::ranges::less, typename Proj1 = hpx::identity, typename Proj2 = hpx::identity>
hpx::ranges::merge_result<std::ranges::iterator_t<Rng1>, std::ranges::iterator_t<Rng2>, Iter3> merge(Rng1 &&rng1, Rng2 &&rng2, Iter3 dest, Comp &&comp = Comp(), Proj1 &&proj1 = Proj1(), Proj2 &&proj2 = Proj2())# Merges two sorted ranges [first1, last1) and [first2, last2) into one sorted range beginning at dest. The order of equivalent elements in the each of original two ranges is preserved. For equivalent elements in the original two ranges, the elements from the first range precede the elements from the second range. The destination range cannot overlap with either of the input ranges.
Note
Complexity: Performs O(std::distance(first1, last1) + std::distance(first2, last2)) applications of the comparison comp and the each projection.
- Template Parameters
Rng1 – The type of the first source range used (deduced). The iterators extracted from this range type must meet the requirements of an random access iterator.
Rng2 – The type of the second source range used (deduced). The iterators extracted from this range type must meet the requirements of an random access iterator.
Iter3 – The type of the iterator representing the destination range (deduced). This iterator type must meet the requirements of an random access iterator.
Comp – The type of the function/function object to use (deduced). Unlike its sequential form, the parallel overload of merge requires Comp to meet the requirements of CopyConstructible. This defaults to std::less<>
Proj1 – The type of an optional projection function to be used for elements of the first range. This defaults to hpx::identity
Proj2 – The type of an optional projection function to be used for elements of the second range. This defaults to hpx::identity
- Parameters
rng1 – Refers to the first range of elements the algorithm will be applied to.
rng2 – Refers to the second range of elements the algorithm will be applied to.
dest – Refers to the beginning of the destination range.
comp – comp is a callable object which returns true if the first argument is less than the second, and false otherwise. The signature of this comparison should be equivalent to:
The signature does not need to have const&, but the function must not modify the objects passed to it. The types Type1 and Type2 must be such that objects of types Iter1 and Iter2 can be dereferenced and then implicitly converted to both Type1 and Type2bool comp(const Type1 &a, const Type2 &b);
proj1 – Specifies the function (or function object) which will be invoked for each of the elements of the first range as a projection operation before the actual comparison comp is invoked.
proj2 – Specifies the function (or function object) which will be invoked for each of the elements of the second range as a projection operation before the actual comparison comp is invoked.
- Returns
The merge algorithm returns merge_result<Iter1, Iter2, Iter3>. The merge algorithm returns the tuple of the source iterator last1, the source iterator last2, the destination iterator to the end of the dest range.
-
template<typename Iter1, typename Sent1, typename Iter2, typename Sent2, typename Iter3, typename Comp = hpx::ranges::less, typename Proj1 = hpx::identity, typename Proj2 = hpx::identity>
hpx::ranges::merge_result<Iter1, Iter2, Iter3> merge(Iter1 first1, Sent1 last1, Iter2 first2, Sent2 last2, Iter3 dest, Comp &&comp = Comp(), Proj1 &&proj1 = Proj1(), Proj2 &&proj2 = Proj2())# Merges two sorted ranges [first1, last1) and [first2, last2) into one sorted range beginning at dest. The order of equivalent elements in the each of original two ranges is preserved. For equivalent elements in the original two ranges, the elements from the first range precede the elements from the second range. The destination range cannot overlap with either of the input ranges.
Note
Complexity: Performs O(std::distance(first1, last1) + std::distance(first2, last2)) applications of the comparison comp and the each projection.
- Template Parameters
Iter1 – The type of the source iterators used (deduced) representing the first sequence. This iterator type must meet the requirements of an random access iterator.
Sent1 – The type of the end source iterators used (deduced). This iterator type must meet the requirements of an sentinel for Iter1.
Iter2 – The type of the source iterators used (deduced) representing the second sequence. This iterator type must meet the requirements of an random access iterator.
Sent2 – The type of the end source iterators used (deduced) representing the second sequence. This iterator type must meet the requirements of an sentinel for Iter2.
Iter3 – The type of the iterator representing the destination range (deduced). This iterator type must meet the requirements of an random access iterator.
Comp – The type of the function/function object to use (deduced). Unlike its sequential form, the parallel overload of merge requires Comp to meet the requirements of CopyConstructible. This defaults to std::less<>
Proj1 – The type of an optional projection function to be used for elements of the first range. This defaults to hpx::identity
Proj2 – The type of an optional projection function to be used for elements of the second range. This defaults to hpx::identity
- Parameters
first1 – Refers to the beginning of the sequence of elements of the first range the algorithm will be applied to.
last1 – Refers to the end of the sequence of elements of the first range the algorithm will be applied to.
first2 – Refers to the beginning of the sequence of elements of the second range the algorithm will be applied to.
last2 – Refers to the end of the sequence of elements of the second range the algorithm will be applied to.
dest – Refers to the beginning of the destination range.
comp – comp is a callable object which returns true if the first argument is less than the second, and false otherwise. The signature of this comparison should be equivalent to:
The signature does not need to have const&, but the function must not modify the objects passed to it. The types Type1 and Type2 must be such that objects of types Iter1 and Iter2 can be dereferenced and then implicitly converted to both Type1 and Type2bool comp(const Type1 &a, const Type2 &b);
proj1 – Specifies the function (or function object) which will be invoked for each of the elements of the first range as a projection operation before the actual comparison comp is invoked.
proj2 – Specifies the function (or function object) which will be invoked for each of the elements of the second range as a projection operation before the actual comparison comp is invoked.
- Returns
The merge algorithm returns merge_result<Iter1, Iter2, Iter3>. The merge algorithm returns the tuple of the source iterator last1, the source iterator last2, the destination iterator to the end of the dest range.
-
template<typename ExPolicy, typename Rng, typename Iter, typename Comp = hpx::ranges::less, typename Proj = hpx::identity>
hpx::parallel::util::detail::algorithm_result_t<ExPolicy, Iter> inplace_merge(ExPolicy &&policy, Rng &&rng, Iter middle, Comp &&comp = Comp(), Proj &&proj = Proj())# Merges two consecutive sorted ranges [first, middle) and [middle, last) into one sorted range [first, last). The order of equivalent elements in the each of original two ranges is preserved. For equivalent elements in the original two ranges, the elements from the first range precede the elements from the second range.
The assignments in the parallel inplace_merge algorithm invoked with an execution policy object of type sequenced_policy execute in sequential order in the calling thread.
The assignments in the parallel inplace_merge algorithm invoked with an execution policy object of type parallel_policy or parallel_task_policy are permitted to execute in an unordered fashion in unspecified threads, and indeterminately sequenced within each thread.
Note
Complexity: Performs O(std::distance(first, last)) applications of the comparison comp and the each projection.
- Template Parameters
ExPolicy – The type of the execution policy to use (deduced). It describes the manner in which the execution of the algorithm may be parallelized and the manner in which it executes the assignments.
Rng – The type of the source range used (deduced). The iterators extracted from this range type must meet the requirements of an random access iterator.
Iter – The type of the source iterators used (deduced). This iterator type must meet the requirements of an random access iterator.
Comp – The type of the function/function object to use (deduced). Unlike its sequential form, the parallel overload of inplace_merge requires Comp to meet the requirements of CopyConstructible. This defaults to std::less<>
Proj – The type of an optional projection function. This defaults to hpx::identity
- Parameters
policy – The execution policy to use for the scheduling of the iterations.
rng – Refers to the range of elements the algorithm will be applied to.
middle – Refers to the end of the first sorted range and the beginning of the second sorted range the algorithm will be applied to.
comp – comp is a callable object which returns true if the first argument is less than the second, and false otherwise. The signature of this comparison should be equivalent to:
The signature does not need to have const&, but the function must not modify the objects passed to it. The types Type1 and Type2 must be such that objects of types Iter can be dereferenced and then implicitly converted to both Type1 and Type2bool comp(const Type1 &a, const Type2 &b);
proj – Specifies the function (or function object) which will be invoked for each of the elements as a projection operation before the actual predicate is invoked.
- Returns
The inplace_merge algorithm returns a hpx::future<Iter> if the execution policy is of type sequenced_task_policy or parallel_task_policy and returns Iter otherwise. The inplace_merge algorithm returns the source iterator last
-
template<typename ExPolicy, typename Iter, typename Sent, typename Comp = hpx::ranges::less, typename Proj = hpx::identity>
hpx::parallel::util::detail::algorithm_result_t<ExPolicy, Iter> inplace_merge(ExPolicy &&policy, Iter first, Iter middle, Sent last, Comp &&comp = Comp(), Proj &&proj = Proj())# Merges two consecutive sorted ranges [first, middle) and [middle, last) into one sorted range [first, last). The order of equivalent elements in the each of original two ranges is preserved. For equivalent elements in the original two ranges, the elements from the first range precede the elements from the second range.
The assignments in the parallel inplace_merge algorithm invoked with an execution policy object of type sequenced_policy execute in sequential order in the calling thread.
The assignments in the parallel inplace_merge algorithm invoked with an execution policy object of type parallel_policy or parallel_task_policy are permitted to execute in an unordered fashion in unspecified threads, and indeterminately sequenced within each thread.
Note
Complexity: Performs O(std::distance(first, last)) applications of the comparison comp and the each projection.
- Template Parameters
ExPolicy – The type of the execution policy to use (deduced). It describes the manner in which the execution of the algorithm may be parallelized and the manner in which it executes the assignments.
Iter – The type of the source iterators used (deduced). This iterator type must meet the requirements of an random access iterator.
Sent – The type of the end source iterators used (deduced). This iterator type must meet the requirements of an sentinel for Iter1.
Comp – The type of the function/function object to use (deduced). Unlike its sequential form, the parallel overload of inplace_merge requires Comp to meet the requirements of CopyConstructible. This defaults to std::less<>
Proj – The type of an optional projection function. This defaults to hpx::identity
- Parameters
policy – The execution policy to use for the scheduling of the iterations.
first – Refers to the beginning of the first sorted range the algorithm will be applied to.
middle – Refers to the end of the first sorted range and the beginning of the second sorted range the algorithm will be applied to.
last – Refers to the end of the second sorted range the algorithm will be applied to.
comp – comp is a callable object which returns true if the first argument is less than the second, and false otherwise. The signature of this comparison should be equivalent to:
The signature does not need to have const&, but the function must not modify the objects passed to it. The types Type1 and Type2 must be such that objects of types Iter can be dereferenced and then implicitly converted to both Type1 and Type2bool comp(const Type1 &a, const Type2 &b);
proj – Specifies the function (or function object) which will be invoked for each of the elements as a projection operation before the actual predicate is invoked.
- Returns
The inplace_merge algorithm returns a hpx::future<Iter> if the execution policy is of type sequenced_task_policy or parallel_task_policy and returns Iter otherwise. The inplace_merge algorithm returns the source iterator last
-
template<typename Rng, typename Iter, typename Comp = hpx::ranges::less, typename Proj = hpx::identity>
Iter inplace_merge(Rng &&rng, Iter middle, Comp &&comp = Comp(), Proj &&proj = Proj())# Merges two consecutive sorted ranges [first, middle) and [middle, last) into one sorted range [first, last). The order of equivalent elements in the each of original two ranges is preserved. For equivalent elements in the original two ranges, the elements from the first range precede the elements from the second range.
Note
Complexity: Performs O(std::distance(first, last)) applications of the comparison comp and the each projection.
- Template Parameters
Rng – The type of the source range used (deduced). The iterators extracted from this range type must meet the requirements of an random access iterator.
Iter – The type of the source iterators used (deduced). This iterator type must meet the requirements of an random access iterator.
Comp – The type of the function/function object to use (deduced). Unlike its sequential form, the parallel overload of inplace_merge requires Comp to meet the requirements of CopyConstructible. This defaults to std::less<>
Proj – The type of an optional projection function. This defaults to hpx::identity
- Parameters
rng – Refers to the range of elements the algorithm will be applied to.
middle – Refers to the end of the first sorted range and the beginning of the second sorted range the algorithm will be applied to.
comp – comp is a callable object which returns true if the first argument is less than the second, and false otherwise. The signature of this comparison should be equivalent to:
The signature does not need to have const&, but the function must not modify the objects passed to it. The types Type1 and Type2 must be such that objects of types Iter can be dereferenced and then implicitly converted to both Type1 and Type2bool comp(const Type1 &a, const Type2 &b);
proj – Specifies the function (or function object) which will be invoked for each of the elements as a projection operation before the actual predicate is invoked.
- Returns
The inplace_merge algorithm returns Iter. The inplace_merge algorithm returns the source iterator last
-
template<typename Iter, typename Sent, typename Comp = hpx::ranges::less, typename Proj = hpx::identity>
Iter inplace_merge(Iter first, Iter middle, Sent last, Comp &&comp = Comp(), Proj &&proj = Proj())# Merges two consecutive sorted ranges [first, middle) and [middle, last) into one sorted range [first, last). The order of equivalent elements in the each of original two ranges is preserved. For equivalent elements in the original two ranges, the elements from the first range precede the elements from the second range.
Note
Complexity: Performs O(std::distance(first, last)) applications of the comparison comp and the each projection.
- Template Parameters
Iter – The type of the source iterators used (deduced). This iterator type must meet the requirements of an random access iterator.
Sent – The type of the end source iterators used (deduced). This iterator type must meet the requirements of an sentinel for Iter1.
Comp – The type of the function/function object to use (deduced). Unlike its sequential form, the parallel overload of inplace_merge requires Comp to meet the requirements of CopyConstructible. This defaults to std::less<>
Proj – The type of an optional projection function. This defaults to hpx::identity
- Parameters
first – Refers to the beginning of the first sorted range the algorithm will be applied to.
middle – Refers to the end of the first sorted range and the beginning of the second sorted range the algorithm will be applied to.
last – Refers to the end of the second sorted range the algorithm will be applied to.
comp – comp is a callable object which returns true if the first argument is less than the second, and false otherwise. The signature of this comparison should be equivalent to:
The signature does not need to have const&, but the function must not modify the objects passed to it. The types Type1 and Type2 must be such that objects of types Iter can be dereferenced and then implicitly converted to both Type1 and Type2bool comp(const Type1 &a, const Type2 &b);
proj – Specifies the function (or function object) which will be invoked for each of the elements as a projection operation before the actual predicate is invoked.
- Returns
The inplace_merge algorithm Iter. The inplace_merge algorithm returns the source iterator last
-
template<typename ExPolicy, typename Rng1, typename Rng2, typename Iter3, typename Comp = hpx::ranges::less, typename Proj1 = hpx::identity, typename Proj2 = hpx::identity>
-
namespace ranges
hpx::ranges::min_element, hpx::ranges::max_element, hpx::ranges::minmax_element#
Defined in header hpx/algorithm.hpp.
See Public API for a list of names and headers that are part of the public HPX API.
-
namespace hpx
-
namespace ranges
Functions
-
template<typename FwdIter, typename Sent, typename F = hpx::parallel::detail::less, typename Proj = hpx::identity>
FwdIter min_element(FwdIter first, Sent last, F &&f = F(), Proj &&proj = Proj())# Finds the smallest element in the range [first, last) using the given comparison function f.
The comparisons in the parallel min_element algorithm execute in sequential order in the calling thread.
Note
Complexity: Exactly max(N-1, 0) comparisons, where N = std::distance(first, last).
- Template Parameters
FwdIter – The type of the source iterator used (deduced). The iterator type must meet the requirements of an forward iterator.
Sent – The type of the end iterators used (deduced). This sentinel type must be a sentinel for FwdIter.
F – The type of the function/function object to use (deduced).
Proj – The type of an optional projection function. This defaults to hpx::identity
- Parameters
first – Refers to the beginning of the sequence of elements the algorithm will be applied to.
last – Refers to the end of the sequence of elements the algorithm will be applied to.
f – The binary predicate which returns true if the the left argument is less than the right element. The signature of the predicate function should be equivalent to the following:
The signature does not need to have const &, but the function must not modify the objects passed to it. The type Type1 must be such that objects of type FwdIter can be dereferenced and then implicitly converted to Type1.bool pred(const Type1 &a, const Type1 &b);
proj – Specifies the function (or function object) which will be invoked for each of the elements as a projection operation before the actual predicate is invoked.
- Returns
The min_element algorithm returns FwdIter. The min_element algorithm returns the iterator to the smallest element in the range [first, last). If several elements in the range are equivalent to the smallest element, returns the iterator to the first such element. Returns last if the range is empty.
-
template<typename Rng, typename F = hpx::parallel::detail::less, typename Proj = hpx::identity>
std::ranges::iterator_t<Rng> min_element(Rng &&rng, F &&f = F(), Proj &&proj = Proj())# Finds the smallest element in the range [first, last) using the given comparison function f.
The comparisons in the parallel min_element algorithm execute in sequential order in the calling thread.
Note
Complexity: Exactly max(N-1, 0) comparisons, where N = std::distance(first, last).
- Template Parameters
Rng – The type of the source range used (deduced). The iterators extracted from this range type must meet the requirements of an forward iterator.
F – The type of the function/function object to use (deduced).
Proj – The type of an optional projection function. This defaults to hpx::identity
- Parameters
rng – Refers to the sequence of elements the algorithm will be applied to.
f – The binary predicate which returns true if the the left argument is less than the right element. The signature of the predicate function should be equivalent to the following:
The signature does not need to have const &, but the function must not modify the objects passed to it. The type Type1 must be such that objects of type FwdIter can be dereferenced and then implicitly converted to Type1.bool pred(const Type1 &a, const Type1 &b);
proj – Specifies the function (or function object) which will be invoked for each of the elements as a projection operation before the actual predicate is invoked.
- Returns
The min_element algorithm returns a hpx::traits::range_iterator<Rng>::type otherwise. The min_element algorithm returns the iterator to the smallest element in the range [first, last). If several elements in the range are equivalent to the smallest element, returns the iterator to the first such element. Returns last if the range is empty.
-
template<typename ExPolicy, typename FwdIter, typename Sent, typename F = hpx::parallel::detail::less, typename Proj = hpx::identity>
hpx::parallel::util::detail::algorithm_result_t<ExPolicy, FwdIter> min_element(ExPolicy &&policy, FwdIter first, Sent last, F &&f = F(), Proj &&proj = Proj())# Finds the smallest element in the range [first, last) using the given comparison function f.
The comparisons in the parallel min_element algorithm invoked with an execution policy object of type sequenced_policy execute in sequential order in the calling thread.
The comparisons in the parallel min_element algorithm invoked with an execution policy object of type parallel_policy or parallel_task_policy are permitted to execute in an unordered fashion in unspecified threads, and indeterminately sequenced within each thread.
Note
Complexity: Exactly max(N-1, 0) comparisons, where N = std::distance(first, last).
- Template Parameters
ExPolicy – The type of the execution policy to use (deduced). It describes the manner in which the execution of the algorithm may be parallelized and the manner in which it executes the assignments.
FwdIter – The type of the source iterator used (deduced). The iterator type must meet the requirements of an forward iterator.
Sent – The type of the end iterators used (deduced). This sentinel type must be a sentinel for FwdIter.
F – The type of the function/function object to use (deduced). Unlike its sequential form, the parallel overload of min_element requires F to meet the requirements of CopyConstructible.
Proj – The type of an optional projection function. This defaults to hpx::identity
- Parameters
policy – The execution policy to use for the scheduling of the iterations.
first – Refers to the beginning of the sequence of elements the algorithm will be applied to.
last – Refers to the end of the sequence of elements the algorithm will be applied to.
f – The binary predicate which returns true if the the left argument is less than the right element. The signature of the predicate function should be equivalent to the following:
The signature does not need to have const &, but the function must not modify the objects passed to it. The type Type1 must be such that objects of type FwdIter can be dereferenced and then implicitly converted to Type1.bool pred(const Type1 &a, const Type1 &b);
proj – Specifies the function (or function object) which will be invoked for each of the elements as a projection operation before the actual predicate is invoked.
- Returns
The min_element algorithm returns a hpx::future<FwdIter> if the execution policy is of type sequenced_task_policy or parallel_task_policy and returns FwdIter otherwise. The min_element algorithm returns the iterator to the smallest element in the range [first, last). If several elements in the range are equivalent to the smallest element, returns the iterator to the first such element. Returns last if the range is empty.
-
template<typename ExPolicy, typename Rng, typename F = hpx::parallel::detail::less, typename Proj = hpx::identity>
hpx::parallel::util::detail::algorithm_result_t<ExPolicy, std::ranges::iterator_t<Rng>> min_element(ExPolicy &&policy, Rng &&rng, F &&f = F(), Proj &&proj = Proj())# Finds the smallest element in the range [first, last) using the given comparison function f.
The comparisons in the parallel min_element algorithm invoked with an execution policy object of type sequenced_policy execute in sequential order in the calling thread.
The comparisons in the parallel min_element algorithm invoked with an execution policy object of type parallel_policy or parallel_task_policy are permitted to execute in an unordered fashion in unspecified threads, and indeterminately sequenced within each thread.
Note
Complexity: Exactly max(N-1, 0) comparisons, where N = std::distance(first, last).
- Template Parameters
ExPolicy – The type of the execution policy to use (deduced). It describes the manner in which the execution of the algorithm may be parallelized and the manner in which it executes the assignments.
Rng – The type of the source range used (deduced). The iterators extracted from this range type must meet the requirements of an forward iterator.
F – The type of the function/function object to use (deduced). Unlike its sequential form, the parallel overload of min_element requires F to meet the requirements of CopyConstructible.
Proj – The type of an optional projection function. This defaults to hpx::identity
- Parameters
policy – The execution policy to use for the scheduling of the iterations.
rng – Refers to the sequence of elements the algorithm will be applied to.
f – The binary predicate which returns true if the the left argument is less than the right element. The signature of the predicate function should be equivalent to the following:
The signature does not need to have const &, but the function must not modify the objects passed to it. The type Type1 must be such that objects of type FwdIter can be dereferenced and then implicitly converted to Type1.bool pred(const Type1 &a, const Type1 &b);
proj – Specifies the function (or function object) which will be invoked for each of the elements as a projection operation before the actual predicate is invoked.
- Returns
The min_element algorithm returns a hpx::future<hpx::traits::range_iterator<Rng>::type> if the execution policy is of type sequenced_task_policy or parallel_task_policy and returns FwdIter otherwise. The min_element algorithm returns the iterator to the smallest element in the range [first, last). If several elements in the range are equivalent to the smallest element, returns the iterator to the first such element. Returns last if the range is empty.
-
template<typename FwdIter, typename Sent, typename F = hpx::parallel::detail::less, typename Proj = hpx::identity>
FwdIter max_element(FwdIter first, Sent last, F &&f = F(), Proj &&proj = Proj())# Finds the greatest element in the range [first, last) using the given comparison function f.
The comparisons in the parallel max_element algorithm execute in sequential order in the calling thread.
Note
Complexity: Exactly max(N-1, 0) comparisons, where N = std::distance(first, last).
- Template Parameters
FwdIter – The type of the source iterator used (deduced). The iterator type must meet the requirements of an forward iterator.
Sent – The type of the end iterators used (deduced). This sentinel type must be a sentinel for FwdIter.
F – The type of the function/function object to use (deduced).
Proj – The type of an optional projection function. This defaults to hpx::identity
- Parameters
first – Refers to the beginning of the sequence of elements the algorithm will be applied to.
last – Refers to the end of the sequence of elements the algorithm will be applied to.
f – The binary predicate which returns true if the This argument is optional and defaults to std::less. the left argument is less than the right element. The signature of the predicate function should be equivalent to the following:
The signature does not need to have const &, but the function must not modify the objects passed to it. The type Type1 must be such that objects of type FwdIter can be dereferenced and then implicitly converted to Type1.bool pred(const Type1 &a, const Type1 &b);
proj – Specifies the function (or function object) which will be invoked for each of the elements as a projection operation before the actual predicate is invoked.
- Returns
The max_element algorithm returns a FwdIter. The max_element algorithm returns the iterator to the smallest element in the range [first, last). If several elements in the range are equivalent to the smallest element, returns the iterator to the first such element. Returns last if the range is empty.
-
template<typename Rng, typename F = hpx::parallel::detail::less, typename Proj = hpx::identity>
std::ranges::iterator_t<Rng> max_element(Rng &&rng, F &&f = F(), Proj &&proj = Proj())# Finds the greatest element in the range [first, last) using the given comparison function f.
The comparisons in the parallel max_element algorithm execute in sequential order in the calling thread.
Note
Complexity: Exactly max(N-1, 0) comparisons, where N = std::distance(first, last).
- Template Parameters
Rng – The type of the source range used (deduced). The iterators extracted from this range type must meet the requirements of an forward iterator.
F – The type of the function/function object to use (deduced).
Proj – The type of an optional projection function. This defaults to hpx::identity
- Parameters
rng – Refers to the sequence of elements the algorithm will be applied to.
f – The binary predicate which returns true if the This argument is optional and defaults to std::less. the left argument is less than the right element. The signature of the predicate function should be equivalent to the following:
The signature does not need to have const &, but the function must not modify the objects passed to it. The type Type1 must be such that objects of type FwdIter can be dereferenced and then implicitly converted to Type1.bool pred(const Type1 &a, const Type1 &b);
proj – Specifies the function (or function object) which will be invoked for each of the elements as a projection operation before the actual predicate is invoked.
- Returns
The max_element algorithm returns a hpx::traits::range_iterator<Rng>::type otherwise. The max_element algorithm returns the iterator to the smallest element in the range [first, last). If several elements in the range are equivalent to the smallest element, returns the iterator to the first such element. Returns last if the range is empty.
-
template<typename ExPolicy, typename FwdIter, typename Sent, typename F = hpx::parallel::detail::less, typename Proj = hpx::identity>
hpx::parallel::util::detail::algorithm_result_t<ExPolicy, FwdIter> max_element(ExPolicy &&policy, FwdIter first, Sent last, F &&f = F(), Proj &&proj = Proj())# Finds the greatest element in the range [first, last) using the given comparison function f.
The comparisons in the parallel max_element algorithm invoked with an execution policy object of type sequenced_policy execute in sequential order in the calling thread.
The comparisons in the parallel max_element algorithm invoked with an execution policy object of type parallel_policy or parallel_task_policy are permitted to execute in an unordered fashion in unspecified threads, and indeterminately sequenced within each thread.
Note
Complexity: Exactly max(N-1, 0) comparisons, where N = std::distance(first, last).
- Template Parameters
ExPolicy – The type of the execution policy to use (deduced). It describes the manner in which the execution of the algorithm may be parallelized and the manner in which it executes the assignments.
FwdIter – The type of the source iterator used (deduced). The iterator type must meet the requirements of an forward iterator.
Sent – The type of the end iterators used (deduced). This sentinel type must be a sentinel for FwdIter.
F – The type of the function/function object to use (deduced). Unlike its sequential form, the parallel overload of max_element requires F to meet the requirements of CopyConstructible.
Proj – The type of an optional projection function. This defaults to hpx::identity
- Parameters
policy – The execution policy to use for the scheduling of the iterations.
first – Refers to the beginning of the sequence of elements the algorithm will be applied to.
last – Refers to the end of the sequence of elements the algorithm will be applied to.
f – The binary predicate which returns true if the This argument is optional and defaults to std::less. the left argument is less than the right element. The signature of the predicate function should be equivalent to the following:
The signature does not need to have const &, but the function must not modify the objects passed to it. The type Type1 must be such that objects of type FwdIter can be dereferenced and then implicitly converted to Type1.bool pred(const Type1 &a, const Type1 &b);
proj – Specifies the function (or function object) which will be invoked for each of the elements as a projection operation before the actual predicate is invoked.
- Returns
The max_element algorithm returns a hpx::future<FwdIter> if the execution policy is of type sequenced_task_policy or parallel_task_policy and returns FwdIter otherwise. The max_element algorithm returns the iterator to the smallest element in the range [first, last). If several elements in the range are equivalent to the smallest element, returns the iterator to the first such element. Returns last if the range is empty.
-
template<typename ExPolicy, typename Rng, typename F = hpx::parallel::detail::less, typename Proj = hpx::identity>
hpx::parallel::util::detail::algorithm_result_t<ExPolicy, std::ranges::iterator_t<Rng>> max_element(ExPolicy &&policy, Rng &&rng, F &&f = F(), Proj &&proj = Proj())# Finds the greatest element in the range [first, last) using the given comparison function f.
The comparisons in the parallel max_element algorithm invoked with an execution policy object of type sequenced_policy execute in sequential order in the calling thread.
The comparisons in the parallel max_element algorithm invoked with an execution policy object of type parallel_policy or parallel_task_policy are permitted to execute in an unordered fashion in unspecified threads, and indeterminately sequenced within each thread.
Note
Complexity: Exactly max(N-1, 0) comparisons, where N = std::distance(first, last).
- Template Parameters
ExPolicy – The type of the execution policy to use (deduced). It describes the manner in which the execution of the algorithm may be parallelized and the manner in which it executes the assignments.
Rng – The type of the source range used (deduced). The iterators extracted from this range type must meet the requirements of an forward iterator.
F – The type of the function/function object to use (deduced). Unlike its sequential form, the parallel overload of max_element requires F to meet the requirements of CopyConstructible.
Proj – The type of an optional projection function. This defaults to hpx::identity
- Parameters
policy – The execution policy to use for the scheduling of the iterations.
rng – Refers to the sequence of elements the algorithm will be applied to.
f – The binary predicate which returns true if the This argument is optional and defaults to std::less. the left argument is less than the right element. The signature of the predicate function should be equivalent to the following:
The signature does not need to have const &, but the function must not modify the objects passed to it. The type Type1 must be such that objects of type FwdIter can be dereferenced and then implicitly converted to Type1.bool pred(const Type1 &a, const Type1 &b);
proj – Specifies the function (or function object) which will be invoked for each of the elements as a projection operation before the actual predicate is invoked.
- Returns
The max_element algorithm returns a hpx::future<hpx::traits::range_iterator<Rng>::type> if the execution policy is of type sequenced_task_policy or parallel_task_policy and returns FwdIter otherwise. The max_element algorithm returns the iterator to the smallest element in the range [first, last). If several elements in the range are equivalent to the smallest element, returns the iterator to the first such element. Returns last if the range is empty.
-
template<typename FwdIter, typename Sent, typename F = hpx::parallel::detail::less, typename Proj = hpx::identity>
minmax_element_result<FwdIter> minmax_element(FwdIter first, Sent last, F &&f = F(), Proj &&proj = Proj())# Finds the greatest element in the range [first, last) using the given comparison function f.
The assignments in the parallel minmax_element algorithm execute in sequential order in the calling thread.
Note
Complexity: At most max(floor(3/2*(N-1)), 0) applications of the predicate, where N = std::distance(first, last).
- Template Parameters
FwdIter – The type of the source iterator used (deduced). The iterator type must meet the requirements of an forward iterator.
Sent – The type of the end iterators used (deduced). This sentinel type must be a sentinel for FwdIter.
F – The type of the function/function object to use (deduced).
Proj – The type of an optional projection function. This defaults to hpx::identity
- Parameters
first – Refers to the beginning of the sequence of elements the algorithm will be applied to.
last – Refers to the end of the sequence of elements the algorithm will be applied to.
f – The binary predicate which returns true if the the left argument is less than the right element. This argument is optional and defaults to std::less. The signature of the predicate function should be equivalent to the following:
The signature does not need to have const &, but the function must not modify the objects passed to it. The type Type1 must be such that objects of type FwdIter can be dereferenced and then implicitly converted to Type1.bool pred(const Type1 &a, const Type1 &b);
proj – Specifies the function (or function object) which will be invoked for each of the elements as a projection operation before the actual predicate is invoked.
- Returns
The minmax_element algorithm returns a minmax_element_result<FwdIter, FwdIter> The minmax_element algorithm returns a min_max_result consisting of an iterator to the smallest element as the min element and an iterator to the greatest element as the max element. Returns minmax_element_result{first, first} if the range is empty. If several elements are equivalent to the smallest element, the iterator to the first such element is returned. If several elements are equivalent to the largest element, the iterator to the last such element is returned.
-
template<typename Rng, typename F = hpx::parallel::detail::less, typename Proj = hpx::identity>
minmax_element_result<std::ranges::iterator_t<Rng>> minmax_element(Rng &&rng, F &&f = F(), Proj &&proj = Proj())# Finds the greatest element in the range [first, last) using the given comparison function f.
The assignments in the parallel minmax_element algorithm execute in sequential order in the calling thread.
Note
Complexity: At most max(floor(3/2*(N-1)), 0) applications of the predicate, where N = std::distance(first, last).
- Template Parameters
Rng – The type of the source range used (deduced). The iterators extracted from this range type must meet the requirements of an forward iterator.
F – The type of the function/function object to use (deduced).
Proj – The type of an optional projection function. This defaults to hpx::identity
- Parameters
rng – Refers to the sequence of elements the algorithm will be applied to.
f – The binary predicate which returns true if the the left argument is less than the right element. This argument is optional and defaults to std::less. The signature of the predicate function should be equivalent to the following:
The signature does not need to have const &, but the function must not modify the objects passed to it. The type Type1 must be such that objects of type FwdIter can be dereferenced and then implicitly converted to Type1.bool pred(const Type1 &a, const Type1 &b);
proj – Specifies the function (or function object) which will be invoked for each of the elements as a projection operation before the actual predicate is invoked.
- Returns
The minmax_element algorithm returns a minmax_element_result<hpx::traits::range_iterator<Rng>::type , hpx::traits::range_iterator<Rng>::type> The minmax_element algorithm returns a min_max_result consisting of an range iterator to the smallest element as the min element and an range iterator to the greatest element as the max element. If several elements are equivalent to the smallest element, the iterator to the first such element is returned. If several elements are equivalent to the largest element, the iterator to the last such element is returned.
-
template<typename ExPolicy, typename FwdIter, typename Sent, typename F = hpx::parallel::detail::less, typename Proj = hpx::identity>
hpx::parallel::util::detail::algorithm_result_t<ExPolicy, minmax_element_result<FwdIter>> minmax_element(ExPolicy &&policy, FwdIter first, Sent last, F &&f = F(), Proj &&proj = Proj())# Finds the greatest element in the range [first, last) using the given comparison function f.
The comparisons in the parallel minmax_element algorithm invoked with an execution policy object of type sequenced_policy execute in sequential order in the calling thread.
The comparisons in the parallel minmax_element algorithm invoked with an execution policy object of type parallel_policy or parallel_task_policy are permitted to execute in an unordered fashion in unspecified threads, and indeterminately sequenced within each thread.
Note
Complexity: At most max(floor(3/2*(N-1)), 0) applications of the predicate, where N = std::distance(first, last).
- Template Parameters
ExPolicy – The type of the execution policy to use (deduced). It describes the manner in which the execution of the algorithm may be parallelized and the manner in which it executes the assignments.
FwdIter – The type of the source iterator used (deduced). The iterator type must meet the requirements of an forward iterator.
Sent – The type of the end iterators used (deduced). This sentinel type must be a sentinel for FwdIter.
F – The type of the function/function object to use (deduced). Unlike its sequential form, the parallel overload of minmax_element requires F to meet the requirements of CopyConstructible.
Proj – The type of an optional projection function. This defaults to hpx::identity
- Parameters
policy – The execution policy to use for the scheduling of the iterations.
first – Refers to the beginning of the sequence of elements the algorithm will be applied to.
last – Refers to the end of the sequence of elements the algorithm will be applied to.
f – The binary predicate which returns true if the the left argument is less than the right element. This argument is optional and defaults to std::less. The signature of the predicate function should be equivalent to the following:
The signature does not need to have const &, but the function must not modify the objects passed to it. The type Type1 must be such that objects of type FwdIter can be dereferenced and then implicitly converted to Type1.bool pred(const Type1 &a, const Type1 &b);
proj – Specifies the function (or function object) which will be invoked for each of the elements as a projection operation before the actual predicate is invoked.
- Returns
The minmax_element algorithm returns a minmax_element_result<FwdIter, FwdIter> The minmax_element algorithm returns a min_max_result consisting of an iterator to the smallest element as the min element and an iterator to the greatest element as the max element. Returns minmax_element_result{first, first} if the range is empty. If several elements are equivalent to the smallest element, the iterator to the first such element is returned. If several elements are equivalent to the largest element, the iterator to the last such element is returned.
-
template<typename ExPolicy, typename Rng, typename F = hpx::parallel::detail::less, typename Proj = hpx::identity>
hpx::parallel::util::detail::algorithm_result_t<ExPolicy, minmax_element_result<std::ranges::iterator_t<Rng>>> minmax_element(ExPolicy &&policy, Rng &&rng, F &&f = F(), Proj &&proj = Proj())# Finds the greatest element in the range [first, last) using the given comparison function f.
The comparisons in the parallel minmax_element algorithm invoked with an execution policy object of type sequenced_policy execute in sequential order in the calling thread.
The comparisons in the parallel minmax_element algorithm invoked with an execution policy object of type parallel_policy or parallel_task_policy are permitted to execute in an unordered fashion in unspecified threads, and indeterminately sequenced within each thread.
Note
Complexity: At most max(floor(3/2*(N-1)), 0) applications of the predicate, where N = std::distance(first, last).
- Template Parameters
ExPolicy – The type of the execution policy to use (deduced). It describes the manner in which the execution of the algorithm may be parallelized and the manner in which it executes the assignments.
Rng – The type of the source range used (deduced). The iterators extracted from this range type must meet the requirements of an forward iterator.
F – The type of the function/function object to use (deduced). Unlike its sequential form, the parallel overload of minmax_element requires F to meet the requirements of CopyConstructible.
Proj – The type of an optional projection function. This defaults to hpx::identity
- Parameters
policy – The execution policy to use for the scheduling of the iterations.
rng – Refers to the sequence of elements the algorithm will be applied to.
f – The binary predicate which returns true if the the left argument is less than the right element. This argument is optional and defaults to std::less. The signature of the predicate function should be equivalent to the following:
The signature does not need to have const &, but the function must not modify the objects passed to it. The type Type1 must be such that objects of type FwdIter can be dereferenced and then implicitly converted to Type1.bool pred(const Type1 &a, const Type1 &b);
proj – Specifies the function (or function object) which will be invoked for each of the elements as a projection operation before the actual predicate is invoked.
- Returns
The minmax_element algorithm returns a minmax_element_result<hpx::traits::range_iterator<Rng>::type, hpx::traits::range_iterator<Rng>::type> The minmax_element algorithm returns a min_max_result consisting of an range iterator to the smallest element as the min element and an range iterator to the greatest element as the max element. If several elements are equivalent to the smallest element, the iterator to the first such element is returned. If several elements are equivalent to the largest element, the iterator to the last such element is returned.
-
template<typename FwdIter, typename Sent, typename F = hpx::parallel::detail::less, typename Proj = hpx::identity>
-
namespace ranges
hpx::ranges::mismatch#
Defined in header hpx/algorithm.hpp.
See Public API for a list of names and headers that are part of the public HPX API.
-
namespace hpx
-
namespace ranges
Functions
-
template<typename ExPolicy, typename Iter1, typename Sent1, typename Iter2, typename Sent2, typename Pred = equal_to, typename Proj1 = hpx::identity, typename Proj2 = hpx::identity>
hpx::parallel::util::detail::algorithm_result<ExPolicy, mismatch_result<Iter1, Iter2>>::type mismatch(ExPolicy &&policy, Iter1 first1, Sent1 last1, Iter2 first2, Sent2 last2, Pred &&op = Pred(), Proj1 &&proj1 = Proj1(), Proj2 &&proj2 = Proj2())# Returns true if the range [first1, last1) is mismatch to the range [first2, last2), and false otherwise.
The comparison operations in the parallel mismatch algorithm invoked with an execution policy object of type sequenced_policy execute in sequential order in the calling thread.
The comparison operations in the parallel mismatch algorithm invoked with an execution policy object of type parallel_policy or parallel_task_policy are permitted to execute in an unordered fashion in unspecified threads, and indeterminately sequenced within each thread.
Note
Complexity: At most min(last1 - first1, last2 - first2) applications of the predicate f. If FwdIter1 and FwdIter2 meet the requirements of RandomAccessIterator and (last1 - first1) != (last2 - first2) then no applications of the predicate f are made.
Note
The two ranges are considered mismatch if, for every iterator i in the range [first1,last1), *i mismatchs *(first2 + (i - first1)). This overload of mismatch uses operator== to determine if two elements are mismatch.
- Template Parameters
ExPolicy – The type of the execution policy to use (deduced). It describes the manner in which the execution of the algorithm may be parallelized and the manner in which it executes the assignments.
Iter1 – The type of the source iterators used for the first range (deduced). This iterator type must meet the requirements of an forward iterator.
Sent1 – The type of the source iterators used for the end of the first range (deduced).
Iter2 – The type of the source iterators used for the second range (deduced). This iterator type must meet the requirements of an forward iterator.
Sent2 – The type of the source iterators used for the end of the second range (deduced).
Pred – The type of an optional function/function object to use. Unlike its sequential form, the parallel overload of mismatch requires Pred to meet the requirements of CopyConstructible. This defaults to std::equal_to<>
Proj1 – The type of an optional projection function applied to the first range. This defaults to hpx::identity
Proj2 – The type of an optional projection function applied to the second range. This defaults to hpx::identity
- Parameters
policy – The execution policy to use for the scheduling of the iterations.
first1 – Refers to the beginning of the sequence of elements of the first range the algorithm will be applied to.
last1 – Refers to the end of the sequence of elements of the first range the algorithm will be applied to.
first2 – Refers to the beginning of the sequence of elements of the second range the algorithm will be applied to.
last2 – Refers to the end of the sequence of elements of the second range the algorithm will be applied to.
op – The binary predicate which returns true if the elements should be treated as mismatch. The signature of the predicate function should be equivalent to the following:
The signature does not need to have const &, but the function must not modify the objects passed to it. The types Type1 and Type2 must be such that objects of types FwdIter1 and FwdIter2 can be dereferenced and then implicitly converted to Type1 and Type2 respectivelybool pred(const Type1 &a, const Type2 &b);
proj1 – Specifies the function (or function object) which will be invoked for each of the elements of the first range as a projection operation before the actual predicate is invoked.
proj2 – Specifies the function (or function object) which will be invoked for each of the elements of the second range as a projection operation before the actual predicate is invoked.
- Returns
The mismatch algorithm returns a hpx::future<bool> if the execution policy is of type sequenced_task_policy or parallel_task_policy and returns bool otherwise. The mismatch algorithm returns true if the elements in the two ranges are mismatch, otherwise it returns false. If the length of the range [first1, last1) does not mismatch the length of the range [first2, last2), it returns false.
-
template<typename ExPolicy, typename Rng1, typename Rng2, typename Pred = equal_to, typename Proj1 = hpx::identity, typename Proj2 = hpx::identity>
hpx::parallel::util::detail::algorithm_result<ExPolicy, mismatch_result<typename hpx::traits::range_traits<Rng1>::iterator_type, typename hpx::traits::range_traits<Rng2>::iterator_type>>::type mismatch(ExPolicy &&policy, Rng1 &&rng1, Rng2 &&rng2, Pred &&op = Pred(), Proj1 &&proj1 = Proj1(), Proj2 &&proj2 = Proj2())# Returns std::pair with iterators to the first two non-equivalent elements.
The comparison operations in the parallel mismatch algorithm invoked with an execution policy object of type sequenced_policy execute in sequential order in the calling thread.
The comparison operations in the parallel mismatch algorithm invoked with an execution policy object of type parallel_policy or parallel_task_policy are permitted to execute in an unordered fashion in unspecified threads, and indeterminately sequenced within each thread.
Note
Complexity: At most last1 - first1 applications of the predicate f.
- Template Parameters
ExPolicy – The type of the execution policy to use (deduced). It describes the manner in which the execution of the algorithm may be parallelized and the manner in which it executes the assignments.
Rng1 – The type of the first source range used (deduced). The iterators extracted from this range type must meet the requirements of an forward iterator.
Rng2 – The type of the second source range used (deduced). The iterators extracted from this range type must meet the requirements of an forward iterator.
Pred – The type of an optional function/function object to use. Unlike its sequential form, the parallel overload of mismatch requires Pred to meet the requirements of CopyConstructible. This defaults to std::equal_to<>
Proj1 – The type of an optional projection function applied to the first range. This defaults to hpx::identity
Proj2 – The type of an optional projection function applied to the second range. This defaults to hpx::identity
- Parameters
policy – The execution policy to use for the scheduling of the iterations.
rng1 – Refers to the first sequence of elements the algorithm will be applied to.
rng2 – Refers to the second sequence of elements the algorithm will be applied to.
op – The binary predicate which returns true if the elements should be treated as mismatch. The signature of the predicate function should be equivalent to the following:
The signature does not need to have const &, but the function must not modify the objects passed to it. The types Type1 and Type2 must be such that objects of types FwdIter1 and FwdIter2 can be dereferenced and then implicitly converted to Type1 and Type2 respectivelybool pred(const Type1 &a, const Type2 &b);
proj1 – Specifies the function (or function object) which will be invoked for each of the elements of the first range as a projection operation before the actual predicate is invoked.
proj2 – Specifies the function (or function object) which will be invoked for each of the elements of the second range as a projection operation before the actual predicate is invoked.
- Returns
The mismatch algorithm returns a hpx::future<std::pair<FwdIter1, FwdIter2> > if the execution policy is of type sequenced_task_policy or parallel_task_policy and returns std::pair<FwdIter1, FwdIter2> otherwise. The mismatch algorithm returns the first mismatching pair of elements from two ranges: one defined by [first1, last1) and another defined by [first2, last2).
-
template<typename Iter1, typename Sent1, typename Iter2, typename Sent2, typename Pred = equal_to, typename Proj1 = hpx::identity, typename Proj2 = hpx::identity>
mismatch_result<Iter1, Iter2> mismatch(Iter1 first1, Sent1 last1, Iter2 first2, Sent2 last2, Pred &&op = Pred(), Proj1 &&proj1 = Proj1(), Proj2 &&proj2 = Proj2())# Returns true if the range [first1, last1) is mismatch to the range [first2, last2), and false otherwise.
Note
Complexity: At most min(last1 - first1, last2 - first2) applications of the predicate f. If FwdIter1 and FwdIter2 meet the requirements of RandomAccessIterator and (last1 - first1) != (last2 - first2) then no applications of the predicate f are made.
Note
The two ranges are considered mismatch if, for every iterator i in the range [first1,last1), *i mismatchs *(first2 + (i - first1)). This overload of mismatch uses operator== to determine if two elements are mismatch.
- Template Parameters
Iter1 – The type of the source iterators used for the first range (deduced). This iterator type must meet the requirements of an forward iterator.
Sent1 – The type of the source iterators used for the end of the first range (deduced).
Iter2 – The type of the source iterators used for the second range (deduced). This iterator type must meet the requirements of an forward iterator.
Sent2 – The type of the source iterators used for the end of the second range (deduced).
Pred – The type of an optional function/function object to use. Unlike its sequential form, the parallel overload of mismatch requires Pred to meet the requirements of CopyConstructible. This defaults to std::equal_to<>
Proj1 – The type of an optional projection function applied to the first range. This defaults to hpx::identity
Proj2 – The type of an optional projection function applied to the second range. This defaults to hpx::identity
- Parameters
first1 – Refers to the beginning of the sequence of elements of the first range the algorithm will be applied to.
last1 – Refers to the end of the sequence of elements of the first range the algorithm will be applied to.
first2 – Refers to the beginning of the sequence of elements of the second range the algorithm will be applied to.
last2 – Refers to the end of the sequence of elements of the second range the algorithm will be applied to.
op – The binary predicate which returns true if the elements should be treated as mismatch. The signature of the predicate function should be equivalent to the following:
The signature does not need to have const &, but the function must not modify the objects passed to it. The types Type1 and Type2 must be such that objects of types FwdIter1 and FwdIter2 can be dereferenced and then implicitly converted to Type1 and Type2 respectivelybool pred(const Type1 &a, const Type2 &b);
proj1 – Specifies the function (or function object) which will be invoked for each of the elements of the first range as a projection operation before the actual predicate is invoked.
proj2 – Specifies the function (or function object) which will be invoked for each of the elements of the second range as a projection operation before the actual predicate is invoked.
- Returns
The mismatch algorithm returns bool. The mismatch algorithm returns true if the elements in the two ranges are mismatch, otherwise it returns false. If the length of the range [first1, last1) does not mismatch the length of the range [first2, last2), it returns false.
-
template<typename Rng1, typename Rng2, typename Pred = equal_to, typename Proj1 = hpx::identity, typename Proj2 = hpx::identity>
mismatch_result<typename hpx::traits::range_traits<Rng1>::iterator_type, typename hpx::traits::range_traits<Rng2>::iterator_type> mismatch(Rng1 &&rng1, Rng2 &&rng2, Pred &&op = Pred(), Proj1 &&proj1 = Proj1(), Proj2 &&proj2 = Proj2())# Returns std::pair with iterators to the first two non-equivalent elements.
Note
Complexity: At most last1 - first1 applications of the predicate f.
- Template Parameters
Rng1 – The type of the first source range used (deduced). The iterators extracted from this range type must meet the requirements of an forward iterator.
Rng2 – The type of the second source range used (deduced). The iterators extracted from this range type must meet the requirements of an forward iterator.
Pred – The type of an optional function/function object to use. Unlike its sequential form, the parallel overload of mismatch requires Pred to meet the requirements of CopyConstructible. This defaults to std::equal_to<>
Proj1 – The type of an optional projection function applied to the first range. This defaults to hpx::identity
Proj2 – The type of an optional projection function applied to the second range. This defaults to hpx::identity
- Parameters
rng1 – Refers to the first sequence of elements the algorithm will be applied to.
rng2 – Refers to the second sequence of elements the algorithm will be applied to.
op – The binary predicate which returns true if the elements should be treated as mismatch. The signature of the predicate function should be equivalent to the following:
The signature does not need to have const &, but the function must not modify the objects passed to it. The types Type1 and Type2 must be such that objects of types FwdIter1 and FwdIter2 can be dereferenced and then implicitly converted to Type1 and Type2 respectivelybool pred(const Type1 &a, const Type2 &b);
proj1 – Specifies the function (or function object) which will be invoked for each of the elements of the first range as a projection operation before the actual predicate is invoked.
proj2 – Specifies the function (or function object) which will be invoked for each of the elements of the second range as a projection operation before the actual predicate is invoked.
- Returns
The mismatch algorithm returns std::pair<FwdIter1, FwdIter2>. The mismatch algorithm returns the first mismatching pair of elements from two ranges: one defined by [first1, last1) and another defined by [first2, last2).
-
template<typename ExPolicy, typename Iter1, typename Sent1, typename Iter2, typename Sent2, typename Pred = equal_to, typename Proj1 = hpx::identity, typename Proj2 = hpx::identity>
-
namespace ranges
hpx::ranges::move#
Defined in header hpx/algorithm.hpp.
See Public API for a list of names and headers that are part of the public HPX API.
-
namespace hpx
-
namespace ranges
Functions
-
template<typename ExPolicy, typename Iter1, typename Sent1, typename Iter2>
hpx::parallel::util::detail::algorithm_result<ExPolicy, move_result<Iter1, Iter2>>::type move(ExPolicy &&policy, Iter1 first, Sent1 last, Iter2 dest)# Moves the elements in the range rng to another range beginning at dest. After this operation the elements in the moved-from range will still contain valid values of the appropriate type, but not necessarily the same values as before the move.
The assignments in the parallel copy algorithm invoked with an execution policy object of type sequenced_policy execute in sequential order in the calling thread.
The assignments in the parallel copy algorithm invoked with an execution policy object of type parallel_policy or parallel_task_policy are permitted to execute in an unordered fashion in unspecified threads, and indeterminately sequenced within each thread.
Note
Complexity: Performs exactly std::distance(begin(rng), end(rng)) assignments.
- Template Parameters
ExPolicy – The type of the execution policy to use (deduced). It describes the manner in which the execution of the algorithm may be parallelized and the manner in which it executes the assignments.
Iter1 – The type of the source iterators used for the first range (deduced). This iterator type must meet the requirements of an forward iterator.
Sent1 – The type of the source iterators used for the end of the first range (deduced).
Iter2 – The type of the source iterators used for the second range (deduced). This iterator type must meet the requirements of an forward iterator.
- Parameters
policy – The execution policy to use for the scheduling of the iterations.
first – Refers to the beginning of the sequence of elements the algorithm will be applied to.
last – Refers to the end of the sequence of elements the algorithm will be applied to.
dest – Refers to the beginning of the destination range.
- Returns
The move algorithm returns a hpx::future<ranges::move_result<iterator_t<Rng>, FwdIter2>> if the execution policy is of type sequenced_task_policy or parallel_task_policy and returns ranges::move_result<iterator_t<Rng>, FwdIter2> otherwise. The move algorithm returns the pair of the input iterator last and the output iterator to the element in the destination range, one past the last element moved.
-
template<typename ExPolicy, typename Rng, typename Iter2>
hpx::parallel::util::detail::algorithm_result<ExPolicy, move_result<std::ranges::iterator_t<Rng>, Iter2>>::type move(ExPolicy &&policy, Rng &&rng, Iter2 dest)# Moves the elements in the range rng to another range beginning at dest. After this operation the elements in the moved-from range will still contain valid values of the appropriate type, but not necessarily the same values as before the move.
The assignments in the parallel copy algorithm invoked with an execution policy object of type sequenced_policy execute in sequential order in the calling thread.
The assignments in the parallel copy algorithm invoked with an execution policy object of type parallel_policy or parallel_task_policy are permitted to execute in an unordered fashion in unspecified threads, and indeterminately sequenced within each thread.
Note
Complexity: Performs exactly std::distance(begin(rng), end(rng)) assignments.
- Template Parameters
ExPolicy – The type of the execution policy to use (deduced). It describes the manner in which the execution of the algorithm may be parallelized and the manner in which it executes the assignments.
Rng – The type of the source range used (deduced). The iterators extracted from this range type must meet the requirements of an input iterator.
Iter2 – The type of the source iterators used for the second range (deduced). This iterator type must meet the requirements of an forward iterator.
- Parameters
policy – The execution policy to use for the scheduling of the iterations.
rng – Refers to the sequence of elements the algorithm will be applied to.
dest – Refers to the beginning of the destination range.
- Returns
The move algorithm returns a hpx::future<ranges::move_result<iterator_t<Rng>, FwdIter2>> if the execution policy is of type sequenced_task_policy or parallel_task_policy and returns ranges::move_result<iterator_t<Rng>, FwdIter2> otherwise. The move algorithm returns the pair of the input iterator last and the output iterator to the element in the destination range, one past the last element moved.
-
template<typename Iter1, typename Sent1, typename Iter2>
move_result<Iter1, Iter2> move(Iter1 first, Sent1 last, Iter2 dest)# Moves the elements in the range rng to another range beginning at dest. After this operation the elements in the moved-from range will still contain valid values of the appropriate type, but not necessarily the same values as before the move.
Note
Complexity: Performs exactly std::distance(begin(rng), end(rng)) assignments.
- Template Parameters
Iter1 – The type of the source iterators used for the first range (deduced). This iterator type must meet the requirements of an forward iterator.
Sent1 – The type of the source iterators used for the end of the first range (deduced).
Iter2 – The type of the source iterators used for the second range (deduced). This iterator type must meet the requirements of an forward iterator.
- Parameters
first – Refers to the beginning of the sequence of elements the algorithm will be applied to.
last – Refers to the end of the sequence of elements the algorithm will be applied to.
dest – Refers to the beginning of the destination range.
- Returns
The move algorithm returns ranges::move_result<iterator_t<Rng>, FwdIter2>. The move algorithm returns the pair of the input iterator last and the output iterator to the element in the destination range, one past the last element moved.
-
template<typename Rng, typename Iter2>
move_result<std::ranges::iterator_t<Rng>, Iter2> move(Rng &&rng, Iter2 dest)# Moves the elements in the range rng to another range beginning at dest. After this operation the elements in the moved-from range will still contain valid values of the appropriate type, but not necessarily the same values as before the move.
Note
Complexity: Performs exactly std::distance(begin(rng), end(rng)) assignments.
- Template Parameters
Rng – The type of the source range used (deduced). The iterators extracted from this range type must meet the requirements of an input iterator.
Iter2 – The type of the source iterators used for the second range (deduced). This iterator type must meet the requirements of an forward iterator.
- Parameters
rng – Refers to the sequence of elements the algorithm will be applied to.
dest – Refers to the beginning of the destination range.
- Returns
The move algorithm returns a ranges::move_result<iterator_t<Rng>, FwdIter2>. The move algorithm returns the pair of the input iterator last and the output iterator to the element in the destination range, one past the last element moved.
-
template<typename ExPolicy, typename Iter1, typename Sent1, typename Iter2>
-
namespace ranges
hpx::ranges::nth_element#
Defined in header hpx/algorithm.hpp.
See Public API for a list of names and headers that are part of the public HPX API.
-
namespace hpx
-
namespace ranges
Functions
-
template<typename RandomIt, typename Sent, typename Pred = hpx::parallel::detail::less, typename Proj = hpx::identity>
RandomIt nth_element(RandomIt first, RandomIt nth, Sent last, Pred &&pred = Pred(), Proj &&proj = Proj())# nth_element is a partial sorting algorithm that rearranges elements in [first, last) such that the element pointed at by nth is changed to whatever element would occur in that position if [first, last) were sorted and all of the elements before this new nth element are less than or equal to the elements after the new nth element.
The comparison operations in the parallel nth_element algorithm invoked without an execution policy object execute in sequential order in the calling thread.
Note
Complexity: Linear in std::distance(first, last) on average. O(N) applications of the predicate, and O(N log N) swaps, where N = last - first.
- Template Parameters
RandomIt – The type of the source begin, nth, and end iterators used (deduced). This iterator type must meet the requirements of a random access iterator.
Sent – The type of the source sentinel (deduced). This sentinel type must be a sentinel for RandomIt.
Pred – Comparison function object which returns true if the first argument is less than the second.
Proj – The type of an optional projection function. This defaults to hpx::identity
- Parameters
first – Refers to the beginning of the sequence of elements the algorithm will be applied to.
nth – Refers to the iterator defining the sort partition point
last – Refers to sentinel value denoting the end of the sequence of elements the algorithm will be applied.
pred – Specifies the comparison function object which returns true if the first argument is less than (i.e. is ordered before) the second. The signature of this comparison function should be equivalent to:
The signature does not need to have const&, but the function must not modify the objects passed to it. The type must be such that an object of type randomIt can be dereferenced and then implicitly converted to Type. This defaults to std::less<>.bool cmp(const Type1 &a, const Type2 &b);
proj – Specifies the function (or function object) which will be invoked for each of the elements as a projection operation before the actual predicate is invoked. This defaults to hpx::identity.
- Returns
The nth_element algorithm returns returns RandomIt. The nth_element algorithm returns an iterator equal to last.
-
template<typename ExPolicy, typename RandomIt, typename Sent, typename Pred = hpx::parallel::detail::less, typename Proj = hpx::identity>
parallel::util::detail::algorithm_result_t<ExPolicy, RandomIt> nth_element(ExPolicy &&policy, RandomIt first, RandomIt nth, Sent last, Pred &&pred = Pred(), Proj &&proj = Proj())# nth_element is a partial sorting algorithm that rearranges elements in [first, last) such that the element pointed at by nth is changed to whatever element would occur in that position if [first, last) were sorted and all of the elements before this new nth element are less than or equal to the elements after the new nth element.
The comparison operations in the parallel nth_element invoked with an execution policy object of type sequenced_policy execute in sequential order in the calling thread.
The assignments in the parallel nth_element algorithm invoked with an execution policy object of type parallel_policy or parallel_task_policy are permitted to execute in an unordered fashion in unspecified threads, and indeterminately sequenced within each thread.
Note
Complexity: Linear in std::distance(first, last) on average. O(N) applications of the predicate, and O(N log N) swaps, where N = last - first.
- Template Parameters
ExPolicy – The type of the execution policy to use (deduced). It describes the manner in which the execution of the algorithm may be parallelized and the manner in which it executes the assignments.
RandomIt – The type of the source begin, nth, and end iterators used (deduced). This iterator type must meet the requirements of a random access iterator.
Sent – The type of the source sentinel (deduced). This sentinel type must be a sentinel for RandomIt.
Pred – Comparison function object which returns true if the first argument is less than the second.
Proj – The type of an optional projection function. This defaults to hpx::identity
- Parameters
policy – The execution policy to use for the scheduling of the iterations.
first – Refers to the beginning of the sequence of elements the algorithm will be applied to.
nth – Refers to the iterator defining the sort partition point
last – Refers to sentinel value denoting the end of the sequence of elements the algorithm will be applied.
pred – Specifies the comparison function object which returns true if the first argument is less than (i.e. is ordered before) the second. The signature of this comparison function should be equivalent to:
The signature does not need to have const&, but the function must not modify the objects passed to it. The type must be such that an object of type randomIt can be dereferenced and then implicitly converted to Type. This defaults to std::less<>.bool cmp(const Type1 &a, const Type2 &b);
proj – Specifies the function (or function object) which will be invoked for each of the elements as a projection operation before the actual predicate is invoked. This defaults to hpx::identity.
- Returns
The partition algorithm returns a hpx::future<RandomIt> if the execution policy is of type parallel_task_policy and returns RandomIt otherwise. The nth_element algorithm returns an iterator equal to last.
-
template<typename Rng, typename Pred = hpx::parallel::detail::less, typename Proj = hpx::identity>
std::ranges::iterator_t<Rng> nth_element(Rng &&rng, std::ranges::iterator_t<Rng> nth, Pred &&pred = Pred(), Proj &&proj = Proj())# nth_element is a partial sorting algorithm that rearranges elements in [first, last) such that the element pointed at by nth is changed to whatever element would occur in that position if [first, last) were sorted and all of the elements before this new nth element are less than or equal to the elements after the new nth element.
The comparison operations in the parallel nth_element algorithm invoked without an execution policy object execute in sequential order in the calling thread.
Note
Complexity: Linear in std::distance(first, last) on average. O(N) applications of the predicate, and O(N log N) swaps, where N = last - first.
- Template Parameters
Rng – The type of the source range used (deduced). The iterators extracted from this range type must meet the requirements of an random access iterator.
Pred – Comparison function object which returns true if the first argument is less than the second.
Proj – The type of an optional projection function. This defaults to hpx::identity
- Parameters
rng – Refers to the sequence of elements the algorithm will be applied to.
nth – Refers to the iterator defining the sort partition point
pred – Specifies the comparison function object which returns true if the first argument is less than (i.e. is ordered before) the second. The signature of this comparison function should be equivalent to:
The signature does not need to have const&, but the function must not modify the objects passed to it. The type must be such that an object of type randomIt can be dereferenced and then implicitly converted to Type. This defaults to std::less<>.bool cmp(const Type1 &a, const Type2 &b);
proj – Specifies the function (or function object) which will be invoked for each of the elements as a projection operation before the actual predicate is invoked. This defaults to hpx::identity.
- Returns
The nth_element algorithm returns returns std::ranges::iterator_t<Rng>. The nth_element algorithm returns an iterator equal to last.
-
template<typename ExPolicy, typename Rng, typename Pred = hpx::parallel::detail::less, typename Proj = hpx::identity>
parallel::util::detail::algorithm_result_t<ExPolicy, std::ranges::iterator_t<Rng>> nth_element(ExPolicy &&policy, Rng &&rng, std::ranges::iterator_t<Rng> nth, Pred &&pred = Pred(), Proj &&proj = Proj())# nth_element is a partial sorting algorithm that rearranges elements in [first, last) such that the element pointed at by nth is changed to whatever element would occur in that position if [first, last) were sorted and all of the elements before this new nth element are less than or equal to the elements after the new nth element.
The comparison operations in the parallel nth_element invoked with an execution policy object of type sequenced_policy execute in sequential order in the calling thread.
The assignments in the parallel nth_element algorithm invoked with an execution policy object of type parallel_policy or parallel_task_policy are permitted to execute in an unordered fashion in unspecified threads, and indeterminately sequenced within each thread.
Note
Complexity: Linear in std::distance(first, last) on average. O(N) applications of the predicate, and O(N log N) swaps, where N = last - first.
- Template Parameters
ExPolicy – The type of the execution policy to use (deduced). It describes the manner in which the execution of the algorithm may be parallelized and the manner in which it executes the assignments.
Rng – The type of the source range used (deduced). The iterators extracted from this range type must meet the requirements of an random access iterator.
Pred – Comparison function object which returns true if the first argument is less than the second.
Proj – The type of an optional projection function. This defaults to hpx::identity
- Parameters
policy – The execution policy to use for the scheduling of the iterations.
rng – Refers to the sequence of elements the algorithm will be applied to.
nth – Refers to the iterator defining the sort partition point
pred – Specifies the comparison function object which returns true if the first argument is less than (i.e. is ordered before) the second. The signature of this comparison function should be equivalent to:
The signature does not need to have const&, but the function must not modify the objects passed to it. The type must be such that an object of type randomIt can be dereferenced and then implicitly converted to Type. This defaults to std::less<>.bool cmp(const Type1 &a, const Type2 &b);
proj – Specifies the function (or function object) which will be invoked for each of the elements as a projection operation before the actual predicate is invoked. This defaults to hpx::identity.
- Returns
The partition algorithm returns a hpx::future<std::ranges::iterator_t<Rng>> if the execution policy is of type parallel_task_policy and returns std::ranges::iterator_t<Rng> otherwise. The nth_element algorithm returns an iterator equal to last.
-
template<typename RandomIt, typename Sent, typename Pred = hpx::parallel::detail::less, typename Proj = hpx::identity>
-
namespace ranges
hpx::ranges::partial_sort#
Defined in header hpx/algorithm.hpp.
See Public API for a list of names and headers that are part of the public HPX API.
-
namespace hpx
-
namespace ranges
Functions
-
template<typename RandomIt, typename Sent, typename Comp = ranges::less, typename Proj = hpx::identity>
RandomIt partial_sort(RandomIt first, RandomIt middle, Sent last, Comp &&comp = Comp(), Proj &&proj = Proj())# Places the first middle - first elements from the range [first, last) as sorted with respect to comp into the range [first, middle). The rest of the elements in the range [middle, last) are placed in an unspecified order.
The assignments in the parallel partial_sort algorithm invoked without an execution policy object execute in sequential order in the calling thread.
Note
Complexity: Approximately (last - first) * log(middle - first) comparisons.
- Template Parameters
RandomIt – The type of the source iterators used (deduced). This iterator type must meet the requirements of an random iterator.
Sent – The type of the source sentinel (deduced). This sentinel type must be a sentinel for RandomIt.
Comp – The type of the function/function object to use (deduced). Comp defaults to detail::less.
Proj – The type of an optional projection function. This defaults to hpx::identity
- Parameters
first – Refers to the beginning of the sequence of elements the algorithm will be applied to.
middle – Refers to the middle of the sequence of elements the algorithm will be applied to.
last – Refers to sentinel value denoting the end of the sequence of elements the algorithm will be applied.
comp – comp is a callable object. The return value of the INVOKE operation applied to an object of type Comp, when contextually converted to bool, yields true if the first argument of the call is less than the second, and false otherwise. It is assumed that comp will not apply any non-constant function through the dereferenced iterator. Comp defaults to detail::less.
proj – Specifies the function (or function object) which will be invoked for each pair of elements as a projection operation before the actual predicate comp is invoked.
- Returns
The partial_sort algorithm returns RandomIt. The algorithm returns an iterator pointing to the first element after the last element in the input sequence.
-
template<typename ExPolicy, typename RandomIt, typename Sent, typename Comp = ranges::less, typename Proj = hpx::identity>
parallel::util::detail::algorithm_result<ExPolicy, RandomIt>::type partial_sort(ExPolicy &&policy, RandomIt first, RandomIt middle, Sent last, Comp &&comp = Comp(), Proj &&proj = Proj())# Places the first middle - first elements from the range [first, last) as sorted with respect to comp into the range [first, middle). The rest of the elements in the range [middle, last) are placed in an unspecified order.
The application of function objects in parallel algorithm invoked with an execution policy object of type sequenced_policy execute in sequential order in the calling thread.
The application of function objects in parallel algorithm invoked with an execution policy object of type parallel_policy or parallel_task_policy are permitted to execute in an unordered fashion in unspecified threads, and indeterminately sequenced within each thread.
Note
Complexity: Approximately (last - first) * log(middle - first) comparisons.
- Template Parameters
ExPolicy – The type of the execution policy to use (deduced). It describes the manner in which the execution of the algorithm may be parallelized and the manner in which it executes the assignments.
RandomIt – The type of the source iterators used (deduced). This iterator type must meet the requirements of an random iterator.
Sent – The type of the source sentinel (deduced). This sentinel type must be a sentinel for RandomIt.
Comp – The type of the function/function object to use (deduced). Comp defaults to detail::less.
Proj – The type of an optional projection function. This defaults to hpx::identity
- Parameters
policy – The execution policy to use for the scheduling of the iterations.
first – Refers to the beginning of the sequence of elements the algorithm will be applied to.
middle – Refers to the middle of the sequence of elements the algorithm will be applied to.
last – Refers to sentinel value denoting the end of the sequence of elements the algorithm will be applied.
comp – comp is a callable object. The return value of the INVOKE operation applied to an object of type Comp, when contextually converted to bool, yields true if the first argument of the call is less than the second, and false otherwise. It is assumed that comp will not apply any non-constant function through the dereferenced iterator. Comp defaults to detail::less.
proj – Specifies the function (or function object) which will be invoked for each pair of elements as a projection operation before the actual predicate comp is invoked.
- Returns
The partial_sort algorithm returns a hpx::future<RandomIt> if the execution policy is of type sequenced_task_policy or parallel_task_policy and returns RandomIt otherwise. The algorithm returns an iterator pointing to the first element after the last element in the input sequence.
-
template<typename Rng, typename Comp = ranges::less, typename Proj = hpx::identity>
std::ranges::iterator_t<Rng> partial_sort(Rng &&rng, std::ranges::iterator_t<Rng> middle, Comp &&comp = Comp(), Proj &&proj = Proj())# Places the first middle - first elements from the range [first, last) as sorted with respect to comp into the range [first, middle). The rest of the elements in the range [middle, last) are placed in an unspecified order.
The assignments in the parallel partial_sort algorithm invoked without an execution policy object execute in sequential order in the calling thread.
Note
Complexity: Approximately (last - first) * log(middle - first) comparisons.
- Template Parameters
Rng – The type of the source range used (deduced). The iterators extracted from this range type must meet the requirements of an input iterator.
Comp – The type of the function/function object to use (deduced). Comp defaults to detail::less.
Proj – The type of an optional projection function. This defaults to hpx::identity
- Parameters
rng – Refers to the sequence of elements the algorithm will be applied to.
middle – Refers to the middle of the sequence of elements the algorithm will be applied to.
comp – comp is a callable object. The return value of the INVOKE operation applied to an object of type Comp, when contextually converted to bool, yields true if the first argument of the call is less than the second, and false otherwise. It is assumed that comp will not apply any non-constant function through the dereferenced iterator. Comp defaults to detail::less.
proj – Specifies the function (or function object) which will be invoked for each pair of elements as a projection operation before the actual predicate comp is invoked.
- Returns
The partial_sort algorithm returns std::ranges::iterator_t<Rng>. It returns last.
-
template<typename ExPolicy, typename Rng, typename Comp = ranges::less, typename Proj = hpx::identity>
parallel::util::detail::algorithm_result_t<ExPolicy, std::ranges::iterator_t<Rng>> partial_sort(ExPolicy &&policy, Rng &&rng, std::ranges::iterator_t<Rng> middle, Comp &&comp = Comp(), Proj &&proj = Proj())# Sorts the elements in the range [first, last) in ascending order. The relative order of equal elements is preserved. The function uses the given comparison function object comp (defaults to using operator<()).
A sequence is sorted with respect to a comparator comp and a projection proj if for every iterator i pointing to the sequence and every non-negative integer n such that i + n is a valid iterator pointing to an element of the sequence, and INVOKE(comp, INVOKE(proj, *(i + n)), INVOKE(proj, *i)) == false.
The application of function objects in parallel algorithm invoked with an execution policy object of type sequenced_policy execute in sequential order in the calling thread.
The application of function objects in parallel algorithm invoked with an execution policy object of type parallel_policy or parallel_task_policy are permitted to execute in an unordered fashion in unspecified threads, and indeterminately sequenced within each thread.
Note
Complexity: O(N log(N)), where N = std::distance(first, last) comparisons.
- Template Parameters
ExPolicy – The type of the execution policy to use (deduced). It describes the manner in which the execution of the algorithm may be parallelized and the manner in which it applies user-provided function objects.
Rng – The type of the source range used (deduced). The iterators extracted from this range type must meet the requirements of an input iterator.
Comp – The type of the function/function object to use (deduced). Comp defaults to detail::less;
Proj – The type of an optional projection function. This defaults to hpx::identity
- Parameters
policy – The execution policy to use for the scheduling of the iterations.
rng – Refers to the sequence of elements the algorithm will be applied to.
middle – Refers to the middle of the sequence of elements the algorithm will be applied to.
comp – comp is a callable object. The return value of the INVOKE operation applied to an object of type Comp, when contextually converted to bool, yields true if the first argument of the call is less than the second, and false otherwise. It is assumed that comp will not apply any non-constant function through the dereferenced iterator. Comp defaults to detail::less.
proj – Specifies the function (or function object) which will be invoked for each pair of elements as a projection operation before the actual predicate comp is invoked.
- Returns
The partial_sort algorithm returns a hpx::future<std::ranges::iterator_t<Rng> if the execution policy is of type sequenced_task_policy or parallel_task_policy and returns std::ranges::iterator_t<Rng> otherwise. It returns last.
-
template<typename RandomIt, typename Sent, typename Comp = ranges::less, typename Proj = hpx::identity>
-
namespace ranges
hpx::ranges::partial_sort_copy#
Defined in header hpx/algorithm.hpp.
See Public API for a list of names and headers that are part of the public HPX API.
-
namespace hpx
-
namespace ranges
Functions
-
template<typename InIter, typename Sent1, typename RandIter, typename Sent2, typename Comp = ranges::less, typename Proj1 = hpx::identity, typename Proj2 = hpx::identity>
partial_sort_copy_result<InIter, RandIter> partial_sort_copy(InIter first, Sent1 last, RandIter r_first, Sent2 r_last, Comp &&comp = Comp(), Proj1 &&proj1 = Proj1(), Proj2 &&proj2 = Proj2())# Sorts some of the elements in the range [first, last) in ascending order, storing the result in the range [r_first, r_last). At most r_last - r_first of the elements are placed sorted to the range [r_first, r_first + n) where n is the number of elements to sort (n = min(last - first, r_last - r_first)).
The assignments in the parallel partial_sort_copy algorithm invoked without an execution policy object execute in sequential order in the calling thread.
Note
Complexity: O(N log(min(D,N))), where N = std::distance(first, last) and D = std::distance(r_first, r_last) comparisons.
- Template Parameters
InIter – The type of the source iterators used (deduced). This iterator type must meet the requirements of an input iterator.
Sent1 – The type of the source sentinel (deduced).This sentinel type must be a sentinel for InIter.
RandIter – The type of the destination iterators used(deduced) This iterator type must meet the requirements of an random iterator.
Sent2 – The type of the destination sentinel (deduced).This sentinel type must be a sentinel for RandIter.
Comp – The type of the function/function object to use (deduced). Comp defaults to detail::less.
Proj1 – The type of an optional projection function for the input range. This defaults to hpx::identity.
Proj1 – The type of an optional projection function for the output range. This defaults to hpx::identity.
- Parameters
first – Refers to the beginning of the sequence of elements the algorithm will be applied to.
last – Refers to the sentinel value denoting the end of the sequence of elements the algorithm will be applied to.
r_first – Refers to the beginning of the destination range.
r_last – Refers to the sentinel denoting the end of the destination range.
comp – comp is a callable object. The return value of the INVOKE operation applied to an object of type Comp, when contextually converted to bool, yields true if the first argument of the call is less than the second, and false otherwise. It is assumed that comp will not apply any non-constant function through the dereferenced iterator. This defaults to detail::less.
proj1 – Specifies the function (or function object) which will be invoked for each pair of elements as a projection operation before the actual predicate comp is invoked.
proj2 – Specifies the function (or function object) which will be invoked for each pair of elements as a projection operation after the actual predicate comp is invoked.
- Returns
The partial_sort_copy algorithm returns a returns partial_sort_copy_result<InIter, RandIter>. The algorithm returns {last, result_first + N}.
-
template<typename ExPolicy, typename FwdIter, typename Sent1, typename RandIter, typename Sent2, typename Comp = ranges::less, typename Proj1 = hpx::identity, typename Proj2 = hpx::identity>
parallel::util::detail::algorithm_result_t<ExPolicy, partial_sort_copy_result<FwdIter, RandIter>> partial_sort_copy(ExPolicy &&policy, FwdIter first, Sent1 last, RandIter r_first, Sent2 r_last, Comp &&comp = Comp(), Proj1 &&proj1 = Proj1(), Proj2 &&proj2 = Proj2())# Sorts some of the elements in the range [first, last) in ascending order, storing the result in the range [r_first, r_last). At most r_last - r_first of the elements are placed sorted to the range [r_first, r_first + n) where n is the number of elements to sort (n = min(last - first, r_last - r_first)).
The application of function objects in parallel algorithm invoked with an execution policy object of type sequenced_policy execute in sequential order in the calling thread.
The application of function objects in parallel algorithm invoked with an execution policy object of type parallel_policy or parallel_task_policy are permitted to execute in an unordered fashion in unspecified threads, and indeterminately sequenced within each thread.
Note
Complexity: O(N log(min(D,N))), where N = std::distance(first, last) and D = std::distance(r_first, r_last) comparisons.
- Template Parameters
ExPolicy – The type of the execution policy to use (deduced). It describes the manner in which the execution of the algorithm may be parallelized and the manner in which it executes the assignments.
FwdIter – The type of the source iterators used (deduced). This iterator type must meet the requirements of an forward iterator.
Sent1 – The type of the source sentinel (deduced).This sentinel type must be a sentinel for FwdIter.
RandIter – The type of the destination iterators used(deduced) This iterator type must meet the requirements of an random iterator.
Sent2 – The type of the destination sentinel (deduced).This sentinel type must be a sentinel for RandIter.
Comp – The type of the function/function object to use (deduced). Comp defaults to detail::less.
Proj1 – The type of an optional projection function for the input range. This defaults to hpx::identity.
Proj1 – The type of an optional projection function for the output range. This defaults to hpx::identity.
- Parameters
policy – The execution policy to use for the scheduling of the iterations.
first – Refers to the beginning of the sequence of elements the algorithm will be applied to.
last – Refers to the sentinel value denoting the end of the sequence of elements the algorithm will be applied to.
r_first – Refers to the beginning of the destination range.
r_last – Refers to the sentinel denoting the end of the destination range.
comp – comp is a callable object. The return value of the INVOKE operation applied to an object of type Comp, when contextually converted to bool, yields true if the first argument of the call is less than the second, and false otherwise. It is assumed that comp will not apply any non-constant function through the dereferenced iterator. This defaults to detail::less.
proj1 – Specifies the function (or function object) which will be invoked for each pair of elements as a projection operation before the actual predicate comp is invoked.
proj2 – Specifies the function (or function object) which will be invoked for each pair of elements as a projection operation after the actual predicate comp is invoked.
- Returns
The partial_sort_copy algorithm returns a hpx::future<partial_sort_copy_result<FwdIter, RandIter>> if the execution policy is of type sequenced_task_policy or parallel_task_policy and returns partial_sort_copy_result<FwdIter, RandIter> otherwise. The algorithm returns {last, result_first + N}.
-
template<typename Rng1, typename Rng2, typename Comp = ranges::less, typename Proj1 = hpx::identity, typename Proj2 = hpx::identity>
partial_sort_copy_result<std::ranges::iterator_t<Rng1>, std::ranges::iterator_t<Rng2>> partial_sort_copy(Rng1 &&rng1, Rng2 &&rng2, Comp &&comp = Comp(), Proj1 &&proj1 = Proj1(), Proj2 &&proj2 = Proj2())# Sorts some of the elements in the range [first, last) in ascending order, storing the result in the range [r_first, r_last). At most r_last - r_first of the elements are placed sorted to the range [r_first, r_first + n) where n is the number of elements to sort (n = min(last - first, r_last - r_first)).
The assignments in the parallel partial_sort_copy algorithm invoked without an execution policy object execute in sequential order in the calling thread.
Note
Complexity: O(N log(min(D,N))), where N = std::distance(first, last) and D = std::distance(r_first, r_last) comparisons.
- Template Parameters
Rng1 – The type of the source range used (deduced). The iterators extracted from this range type must meet the requirements of a input iterator.
Rng2 – The type of the destination range used (deduced). The iterators extracted from this range type must meet the requirements of a random iterator.
Comp – The type of the function/function object to use (deduced). Comp defaults to detail::less.
Proj1 – The type of an optional projection function for the input range. This defaults to hpx::identity.
Proj2 – The type of an optional projection function for the output range. This defaults to hpx::identity.
- Parameters
rng1 – Refers to the source range.
rng2 – Refers to the destination range.
comp – comp is a callable object. The return value of the INVOKE operation applied to an object of type Comp, when contextually converted to bool, yields true if the first argument of the call is less than the second, and false otherwise. It is assumed that comp will not apply any non-constant function through the dereferenced iterator. This defaults to detail::less.
proj1 – Specifies the function (or function object) which will be invoked for each pair of elements as a projection operation before the actual predicate comp is invoked.
proj2 – Specifies the function (or function object) which will be invoked for each pair of elements as a projection operation after the actual predicate comp is invoked.
- Returns
The partial_sort_copy algorithm returns partial_sort_copy_result<range_iterator_t<Rng1>, range_iterator_t<Rng2>>. The algorithm returns {last, result_first + N}.
-
template<typename ExPolicy, typename Rng1, typename Rng2, typename Comp = ranges::less, typename Proj1 = hpx::identity, typename Proj2 = hpx::identity>
parallel::util::detail::algorithm_result_t<ExPolicy, partial_sort_copy_result<std::ranges::iterator_t<Rng1>, std::ranges::iterator_t<Rng2>>> partial_sort_copy(ExPolicy &&policy, Rng1 &&rng1, Rng2 &&rng2, Comp &&comp = Comp(), Proj1 &&proj1 = Proj1(), Proj2 &&proj2 = Proj2())# Sorts some of the elements in the range [first, last) in ascending order, storing the result in the range [r_first, r_last). At most r_last - r_first of the elements are placed sorted to the range [r_first, r_first + n) where n is the number of elements to sort (n = min(last - first, r_last - r_first)).
The application of function objects in parallel algorithm invoked with an execution policy object of type sequenced_policy execute in sequential order in the calling thread.
The application of function objects in parallel algorithm invoked with an execution policy object of type parallel_policy or parallel_task_policy are permitted to execute in an unordered fashion in unspecified threads, and indeterminately sequenced within each thread.
Note
Complexity: O(N log(min(D,N))), where N = std::distance(first, last) and D = std::distance(r_first, r_last) comparisons.
- Template Parameters
ExPolicy – The type of the execution policy to use (deduced). It describes the manner in which the execution of the algorithm may be parallelized and the manner in which it executes the assignments.
Rng1 – The type of the source range used (deduced). The iterators extracted from this range type must meet the requirements of a forward iterator.
Rng2 – The type of the destination range used (deduced). The iterators extracted from this range type must meet the requirements of a random iterator.
Comp – The type of the function/function object to use (deduced). Comp defaults to detail::less.
Proj1 – The type of an optional projection function for the input range. This defaults to hpx::identity.
Proj2 – The type of an optional projection function for the output range. This defaults to hpx::identity.
- Parameters
policy – The execution policy to use for the scheduling of the iterations.
rng1 – Refers to the source range.
rng2 – Refers to the destination range.
comp – comp is a callable object. The return value of the INVOKE operation applied to an object of type Comp, when contextually converted to bool, yields true if the first argument of the call is less than the second, and false otherwise. It is assumed that comp will not apply any non-constant function through the dereferenced iterator. This defaults to detail::less.
proj1 – Specifies the function (or function object) which will be invoked for each pair of elements as a projection operation before the actual predicate comp is invoked.
proj2 – Specifies the function (or function object) which will be invoked for each pair of elements as a projection operation after the actual predicate comp is invoked.
- Returns
The partial_sort_copy algorithm returns a hpx::future<partial_sort_copy_result< range_iterator_t<Rng1>, range_iterator_t<Rng2>>> if the execution policy is of type sequenced_task_policy or parallel_task_policy and returns partial_sort_copy_result<range_iterator_t<Rng1>, range_iterator_t<Rng2>> otherwise. The algorithm returns {last, result_first + N}.
-
template<typename InIter, typename Sent1, typename RandIter, typename Sent2, typename Comp = ranges::less, typename Proj1 = hpx::identity, typename Proj2 = hpx::identity>
-
namespace ranges
hpx::ranges::partition, hpx::ranges::stable_partition, hpx::ranges::partition_copy#
Defined in header hpx/algorithm.hpp.
See Public API for a list of names and headers that are part of the public HPX API.
-
namespace hpx
-
namespace ranges
Functions
-
template<typename Rng, typename Pred, typename Proj = hpx::identity>
subrange_t<std::ranges::iterator_t<Rng>> partition(Rng &&rng, Pred &&pred, Proj &&proj = Proj())# Reorders the elements in the range rng in such a way that all elements for which the predicate pred returns true precede the elements for which the predicate pred returns false. Relative order of the elements is not preserved.
The assignments in the parallel partition algorithm invoked without an execution policy object execute in sequential order in the calling thread.
Note
Complexity: Performs at most 2 * N swaps, exactly N applications of the predicate and projection, where N = std::distance(begin(rng), end(rng)).
- Template Parameters
Rng – The type of the source range used (deduced). The iterators extracted from this range type must meet the requirements of an forward iterator.
Pred – The type of the function/function object to use (deduced). Unlike its sequential form, the parallel overload of partition requires Pred to meet the requirements of CopyConstructible.
Proj – The type of an optional projection function. This defaults to hpx::identity
- Parameters
rng – Refers to the sequence of elements the algorithm will be applied to.
pred – Specifies the function (or function object) which will be invoked for each of the elements in the sequence specified by the range rng. This is an unary predicate for partitioning the source iterators. The signature of this predicate should be equivalent to:
The signature does not need to have const&, but the function must not modify the objects passed to it. The type Type must be such that an object of type FwdIter can be dereferenced and then implicitly converted to Type.bool pred(const Type &a);
proj – Specifies the function (or function object) which will be invoked for each of the elements as a projection operation before the actual predicate is invoked.
- Returns
The partition algorithm returns subrange_t<std::ranges::iterator_t<Rng>> The partition algorithm returns a subrange starting with an iterator to the first element of the second group and finishing with an iterator equal to last.
-
template<typename ExPolicy, typename Rng, typename Pred, typename Proj = hpx::identity>
parallel::util::detail::algorithm_result<ExPolicy, subrange_t<std::ranges::iterator_t<Rng>>> partition(ExPolicy &&policy, Rng &&rng, Pred &&pred, Proj &&proj = Proj())# Reorders the elements in the range rng in such a way that all elements for which the predicate pred returns true precede the elements for which the predicate pred returns false. Relative order of the elements is not preserved.
The assignments in the parallel partition algorithm invoked with an execution policy object of type sequenced_policy execute in sequential order in the calling thread.
The assignments in the parallel partition algorithm invoked with an execution policy object of type parallel_policy or parallel_task_policy are permitted to execute in an unordered fashion in unspecified threads, and indeterminately sequenced within each thread.
Note
Complexity: Performs at most 2 * N swaps, exactly N applications of the predicate and projection, where N = std::distance(begin(rng), end(rng)).
- Template Parameters
ExPolicy – The type of the execution policy to use (deduced). It describes the manner in which the execution of the algorithm may be parallelized and the manner in which it executes the assignments.
Rng – The type of the source range used (deduced). The iterators extracted from this range type must meet the requirements of an forward iterator.
Pred – The type of the function/function object to use (deduced). Unlike its sequential form, the parallel overload of partition requires Pred to meet the requirements of CopyConstructible.
Proj – The type of an optional projection function. This defaults to hpx::identity
- Parameters
policy – The execution policy to use for the scheduling of the iterations.
rng – Refers to the sequence of elements the algorithm will be applied to.
pred – Specifies the function (or function object) which will be invoked for each of the elements in the sequence specified by the range rng. This is an unary predicate for partitioning the source iterators. The signature of this predicate should be equivalent to:
The signature does not need to have const&, but the function must not modify the objects passed to it. The type Type must be such that an object of type FwdIter can be dereferenced and then implicitly converted to Type.bool pred(const Type &a);
proj – Specifies the function (or function object) which will be invoked for each of the elements as a projection operation before the actual predicate is invoked.
- Returns
The partition algorithm returns a hpx::future<subrange_t<std::ranges::iterator_t<Rng>>> if the execution policy is of type parallel_task_policy and returns subrange_t<std::ranges::iterator_t<Rng>> The partition algorithm returns a subrange starting with an iterator to the first element of the second group and finishing with an iterator equal to last.
-
template<typename FwdIter, typename Sent, typename Pred, typename Proj = hpx::identity>
subrange_t<FwdIter> partition(FwdIter first, Sent last, Pred &&pred, Proj &&proj = Proj())# Reorders the elements in the range [first, last) in such a way that all elements for which the predicate pred returns true precede the elements for which the predicate pred returns false. Relative order of the elements is not preserved.
The assignments in the parallel partition algorithm invoked without an execution policy object execute in sequential order in the calling thread.
Note
Complexity: At most 2 * (last - first) swaps. Exactly last - first applications of the predicate and projection.
- Template Parameters
FwdIter – The type of the source iterators used (deduced). This iterator type must meet the requirements of an forward iterator.
Sent – The type of the source sentinel (deduced). This sentinel type must be a sentinel for FwdIter.
Pred – The type of the function/function object to use (deduced). Unlike its sequential form, the parallel overload of partition requires Pred to meet the requirements of CopyConstructible.
Proj – The type of an optional projection function. This defaults to hpx::identity
- Parameters
first – Refers to the beginning of the sequence of elements the algorithm will be applied to.
last – Refers to sentinel value denoting the end of the sequence of elements the algorithm will be applied.
pred – Specifies the function (or function object) which will be invoked for each of the elements in the sequence specified by [first, last). This is an unary predicate for partitioning the source iterators. The signature of this predicate should be equivalent to:
The signature does not need to have const&, but the function must not modify the objects passed to it. The type Type must be such that an object of type InIter can be dereferenced and then implicitly converted to Type.bool pred(const Type &a);
proj – Specifies the function (or function object) which will be invoked for each of the elements as a projection operation before the actual predicate is invoked.
- Returns
The partition algorithm returns returns subrange_t<FwdIter>. The partition algorithm returns a subrange starting with an iterator to the first element of the second group and finishing with an iterator equal to last.
-
template<typename ExPolicy, typename FwdIter, typename Sent, typename Pred, typename Proj = hpx::identity>
parallel::util::detail::algorithm_result<ExPolicy, subrange_t<FwdIter>>::type partition(ExPolicy &&policy, FwdIter first, Sent last, Pred &&pred, Proj &&proj = Proj())# Reorders the elements in the range [first, last) in such a way that all elements for which the predicate pred returns true precede the elements for which the predicate pred returns false. Relative order of the elements is not preserved.
The assignments in the parallel partition algorithm invoked with an execution policy object of type sequenced_policy execute in sequential order in the calling thread.
The assignments in the parallel partition algorithm invoked with an execution policy object of type parallel_policy or parallel_task_policy are permitted to execute in an unordered fashion in unspecified threads, and indeterminately sequenced within each thread.
Note
Complexity: At most 2 * (last - first) swaps. Exactly last - first applications of the predicate and projection.
- Template Parameters
ExPolicy – The type of the execution policy to use (deduced). It describes the manner in which the execution of the algorithm may be parallelized and the manner in which it executes the assignments.
FwdIter – The type of the source iterators used (deduced). This iterator type must meet the requirements of an forward iterator.
Sent – The type of the source sentinel (deduced). This sentinel type must be a sentinel for FwdIter.
Pred – The type of the function/function object to use (deduced). Unlike its sequential form, the parallel overload of partition requires Pred to meet the requirements of CopyConstructible.
Proj – The type of an optional projection function. This defaults to hpx::identity
- Parameters
policy – The execution policy to use for the scheduling of the iterations.
first – Refers to the beginning of the sequence of elements the algorithm will be applied to.
last – Refers to sentinel value denoting the end of the sequence of elements the algorithm will be applied.
pred – Specifies the function (or function object) which will be invoked for each of the elements in the sequence specified by [first, last). This is an unary predicate for partitioning the source iterators. The signature of this predicate should be equivalent to:
The signature does not need to have const&, but the function must not modify the objects passed to it. The type Type must be such that an object of type InIter can be dereferenced and then implicitly converted to Type.bool pred(const Type &a);
proj – Specifies the function (or function object) which will be invoked for each of the elements as a projection operation before the actual predicate is invoked.
- Returns
The partition algorithm returns a hpx::future<subrange_t<FwdIter>> if the execution policy is of type parallel_task_policy and returns subrange_t<FwdIter> otherwise. The partition algorithm returns a subrange starting with an iterator to the first element of the second group and finishing with an iterator equal to last.
-
template<typename Rng, typename Pred, typename Proj = hpx::identity>
subrange_t<std::ranges::iterator_t<Rng>> stable_partition(Rng &&rng, Pred &&pred, Proj &&proj = Proj())# Permutes the elements in the range [first, last) such that there exists an iterator i such that for every iterator j in the range [first, i) INVOKE(f, INVOKE (proj, *j)) != false, and for every iterator k in the range [i, last), INVOKE(f, INVOKE (proj, *k)) == false
The invocations of f in the parallel stable_partition algorithm invoked without an execution policy object executes in sequential order in the calling thread.
Note
Complexity: At most (last - first) * log(last - first) swaps, but only linear number of swaps if there is enough extra memory Exactly last - first applications of the predicate and projection.
- Template Parameters
Rng – The type of the source range used (deduced). The iterators extracted from this range type must meet the requirements of an birdirectional iterator
Pred – The type of the function/function object to use (deduced). Unlike its sequential form, the parallel overload of partition requires Pred to meet the requirements of CopyConstructible.
Proj – The type of an optional projection function. This defaults to hpx::identity
- Parameters
rng – Refers to the sequence of elements the algorithm will be applied to.
pred – Unary predicate which returns true if the element should be ordered before other elements. Specifies the function (or function object) which will be invoked for each of the elements in the sequence specified by [first, last). The signature of this predicate should be equivalent to:
The signature does not need to have const&. The type Type must be such that an object of type BidirIter can be dereferenced and then implicitly converted to Type.bool fun(const Type &a);
proj – Specifies the function (or function object) which will be invoked for each of the elements as a projection operation before the actual predicate f is invoked.
- Returns
The stable_partition algorithm returns an iterator i such that for every iterator j in the range [first, i), f(*j) != false INVOKE(f, INVOKE(proj, *j)) != false, and for every iterator k in the range [i, last), f(*k) == false INVOKE(f, INVOKE (proj, *k)) == false. The relative order of the elements in both groups is preserved.
-
template<typename ExPolicy, typename Rng, typename Pred, typename Proj = hpx::identity>
parallel::util::detail::algorithm_result<ExPolicy, subrange_t<std::ranges::iterator_t<Rng>>> stable_partition(ExPolicy &&policy, Rng &&rng, Pred &&pred, Proj &&proj = Proj())# Permutes the elements in the range [first, last) such that there exists an iterator i such that for every iterator j in the range [first, i) INVOKE(f, INVOKE (proj, *j)) != false, and for every iterator k in the range [i, last), INVOKE(f, INVOKE (proj, *k)) == false
The invocations of f in the parallel stable_partition algorithm invoked with an execution policy object of type sequenced_policy executes in sequential order in the calling thread.
The invocations of f in the parallel stable_partition algorithm invoked with an execution policy object of type parallel_policy or parallel_task_policy are permitted to execute in an unordered fashion in unspecified threads, and indeterminately sequenced within each thread.
Note
Complexity: At most (last - first) * log(last - first) swaps, but only linear number of swaps if there is enough extra memory. Exactly last - first applications of the predicate and projection.
- Template Parameters
ExPolicy – The type of the execution policy to use (deduced). It describes the manner in which the execution of the algorithm may be parallelized and the manner in which it executes the invocations of f.
Rng – The type of the source range used (deduced). The iterators extracted from this range type must meet the requirements of an birdirectional iterator
Pred – The type of the function/function object to use (deduced). Unlike its sequential form, the parallel overload of partition requires Pred to meet the requirements of CopyConstructible.
Proj – The type of an optional projection function. This defaults to hpx::identity
- Parameters
policy – The execution policy to use for the scheduling of the iterations.
rng – Refers to the sequence of elements the algorithm will be applied to.
pred – Unary predicate which returns true if the element should be ordered before other elements. Specifies the function (or function object) which will be invoked for each of the elements in the sequence specified by [first, last). The signature of this predicate should be equivalent to:
The signature does not need to have const&. The type Type must be such that an object of type BidirIter can be dereferenced and then implicitly converted to Type.bool fun(const Type &a);
proj – Specifies the function (or function object) which will be invoked for each of the elements as a projection operation before the actual predicate f is invoked.
- Returns
The stable_partition algorithm returns an iterator i such that for every iterator j in the range [first, i), f(*j) != false INVOKE(f, INVOKE(proj, *j)) != false, and for every iterator k in the range [i, last), f(*k) == false INVOKE(f, INVOKE (proj, *k)) == false. The relative order of the elements in both groups is preserved. If the execution policy is of type parallel_task_policy the algorithm returns a future<> referring to this iterator.
-
template<typename BidirIter, typename Sent, typename Pred, typename Proj = hpx::identity>
subrange_t<BidirIter> stable_partition(BidirIter first, Sent last, Pred &&pred, Proj &&proj = Proj())# Permutes the elements in the range [first, last) such that there exists an iterator i such that for every iterator j in the range [first, i) INVOKE(f, INVOKE (proj, *j)) != false, and for every iterator k in the range [i, last), INVOKE(f, INVOKE (proj, *k)) == false
The invocations of f in the parallel stable_partition algorithm invoked without an execution policy object executes in sequential order in the calling thread.
Note
Complexity: At most (last - first) * log(last - first) swaps, but only linear number of swaps if there is enough extra memory Exactly last - first applications of the predicate and projection.
- Template Parameters
BidirIter – The type of the source iterators used (deduced). This iterator type must meet the requirements of an input iterator.
Sent – The type of the source sentinel (deduced). This sentinel type must be a sentinel for BidirIter.
Pred – The type of the function/function object to use (deduced). Unlike its sequential form, the parallel overload of partition requires Pred to meet the requirements of CopyConstructible.
Proj – The type of an optional projection function. This defaults to hpx::identity
- Parameters
first – Refers to the beginning of the sequence of elements the algorithm will be applied to.
last – Refers to sentinel value denoting the end of the sequence of elements the algorithm will be applied.
pred – Unary predicate which returns true if the element should be ordered before other elements. Specifies the function (or function object) which will be invoked for each of the elements in the sequence specified by [first, last). The signature of this predicate should be equivalent to:
The signature does not need to have const&. The type Type must be such that an object of type BidirIter can be dereferenced and then implicitly converted to Type.bool fun(const Type &a);
proj – Specifies the function (or function object) which will be invoked for each of the elements as a projection operation before the actual predicate f is invoked.
- Returns
The stable_partition algorithm returns an iterator i such that for every iterator j in the range [first, i), f(*j) != false INVOKE(f, INVOKE(proj, *j)) != false, and for every iterator k in the range [i, last), f(*k) == false INVOKE(f, INVOKE (proj, *k)) == false. The relative order of the elements in both groups is preserved.
-
template<typename ExPolicy, typename BidirIter, typename Sent, typename Pred, typename Proj = hpx::identity>
parallel::util::detail::algorithm_result<ExPolicy, subrange_t<BidirIter>>::type stable_partition(ExPolicy &&policy, BidirIter first, Sent last, Pred &&pred, Proj &&proj = Proj())# Permutes the elements in the range [first, last) such that there exists an iterator i such that for every iterator j in the range [first, i) INVOKE(f, INVOKE (proj, *j)) != false, and for every iterator k in the range [i, last), INVOKE(f, INVOKE (proj, *k)) == false
The invocations of f in the parallel stable_partition algorithm invoked with an execution policy object of type sequenced_policy executes in sequential order in the calling thread.
The invocations of f in the parallel stable_partition algorithm invoked with an execution policy object of type parallel_policy or parallel_task_policy are permitted to execute in an unordered fashion in unspecified threads, and indeterminately sequenced within each thread.
Note
Complexity: At most (last - first) * log(last - first) swaps, but only linear number of swaps if there is enough extra memory Exactly last - first applications of the predicate and projection.
- Template Parameters
ExPolicy – The type of the execution policy to use (deduced). It describes the manner in which the execution of the algorithm may be parallelized and the manner in which it executes the invocations of f.
BidirIter – The type of the source iterators used (deduced). This iterator type must meet the requirements of an input iterator.
Sent – The type of the source sentinel (deduced). This sentinel type must be a sentinel for BidirIter.
Pred – The type of the function/function object to use (deduced). Unlike its sequential form, the parallel overload of partition requires Pred to meet the requirements of CopyConstructible.
Proj – The type of an optional projection function. This defaults to hpx::identity
- Parameters
policy – The execution policy to use for the scheduling of the iterations.
first – Refers to the beginning of the sequence of elements the algorithm will be applied to.
last – Refers to sentinel value denoting the end of the sequence of elements the algorithm will be applied.
pred – Unary predicate which returns true if the element should be ordered before other elements. Specifies the function (or function object) which will be invoked for each of the elements in the sequence specified by [first, last). The signature of this predicate should be equivalent to:
The signature does not need to have const&. The type Type must be such that an object of type BidirIter can be dereferenced and then implicitly converted to Type.bool fun(const Type &a);
proj – Specifies the function (or function object) which will be invoked for each of the elements as a projection operation before the actual predicate f is invoked.
- Returns
The stable_partition algorithm returns an iterator i such that for every iterator j in the range [first, i), f(*j) != false INVOKE(f, INVOKE(proj, *j)) != false, and for every iterator k in the range [i, last), f(*k) == false INVOKE(f, INVOKE (proj, *k)) == false. The relative order of the elements in both groups is preserved. If the execution policy is of type parallel_task_policy the algorithm returns a future<> referring to this iterator.
-
template<typename Rng, typename OutIter2, typename OutIter3, typename Pred, typename Proj = hpx::identity>
partition_copy_result<std::ranges::iterator_t<Rng>, OutIter2, OutIter3> partition_copy(Rng &&rng, OutIter2 dest_true, OutIter3 dest_false, Pred &&pred, Proj &&proj = Proj())# Copies the elements in the range rng, to two different ranges depending on the value returned by the predicate pred. The elements, that satisfy the predicate pred are copied to the range beginning at dest_true. The rest of the elements are copied to the range beginning at dest_false. The order of the elements is preserved.
The assignments in the parallel partition_copy algorithm invoked without an execution policy object execute in sequential order in the calling thread.
Note
Complexity: Performs not more than N assignments, exactly N applications of the predicate pred, where N = std::distance(begin(rng), end(rng)).
- Template Parameters
Rng – The type of the source range used (deduced). The iterators extracted from this range type must meet the requirements of an forward iterator.
OutIter2 – The type of the iterator representing the destination range for the elements that satisfy the predicate pred (deduced). This iterator type must meet the requirements of an forward iterator.
OutIter3 – The type of the iterator representing the destination range for the elements that don’t satisfy the predicate pred (deduced). This iterator type must meet the requirements of an forward iterator.
Pred – The type of the function/function object to use (deduced). Unlike its sequential form, the parallel overload of partition_copy requires Pred to meet the requirements of CopyConstructible.
Proj – The type of an optional projection function. This defaults to hpx::identity
- Parameters
rng – Refers to the sequence of elements the algorithm will be applied to.
dest_true – Refers to the beginning of the destination range for the elements that satisfy the predicate pred
dest_false – Refers to the beginning of the destination range for the elements that don’t satisfy the predicate pred.
pred – Specifies the function (or function object) which will be invoked for each of the elements in the sequence specified by [first, last). This is an unary predicate for partitioning the source iterators. The signature of this predicate should be equivalent to:
The signature does not need to have const&, but the function must not modify the objects passed to it. The type Type must be such that an object of type FwdIter1 can be dereferenced and then implicitly converted to Type.bool pred(const Type &a);
proj – Specifies the function (or function object) which will be invoked for each of the elements as a projection operation before the actual predicate is invoked.
- Returns
The partition_copy algorithm returns a partition_copy_result<std::ranges::iterator_t<Rng>, FwdIter2, FwdIter3>>. The partition_copy algorithm returns the tuple of the source iterator last, the destination iterator to the end of the dest_true range, and the destination iterator to the end of the dest_false range.
-
template<typename ExPolicy, typename Rng, typename FwdIter2, typename FwdIter3, typename Pred, typename Proj = hpx::identity>
parallel::util::detail::algorithm_result<ExPolicy, partition_copy_result<std::ranges::iterator_t<Rng>, FwdIter2, FwdIter3>>::type partition_copy(ExPolicy &&policy, Rng &&rng, FwdIter2 dest_true, FwdIter3 dest_false, Pred &&pred, Proj &&proj = Proj())# Copies the elements in the range rng, to two different ranges depending on the value returned by the predicate pred. The elements, that satisfy the predicate pred are copied to the range beginning at dest_true. The rest of the elements are copied to the range beginning at dest_false. The order of the elements is preserved.
The assignments in the parallel partition_copy algorithm invoked with an execution policy object of type sequenced_policy execute in sequential order in the calling thread.
The assignments in the parallel partition_copy algorithm invoked with an execution policy object of type parallel_policy or parallel_task_policy are permitted to execute in an unordered fashion in unspecified threads, and indeterminately sequenced within each thread.
Note
Complexity: Performs not more than N assignments, exactly N applications of the predicate pred, where N = std::distance(begin(rng), end(rng)).
- Template Parameters
ExPolicy – The type of the execution policy to use (deduced). It describes the manner in which the execution of the algorithm may be parallelized and the manner in which it executes the assignments.
Rng – The type of the source range used (deduced). The iterators extracted from this range type must meet the requirements of an forward iterator.
FwdIter2 – The type of the iterator representing the destination range for the elements that satisfy the predicate pred (deduced). This iterator type must meet the requirements of an forward iterator.
FwdIter3 – The type of the iterator representing the destination range for the elements that don’t satisfy the predicate pred (deduced). This iterator type must meet the requirements of an forward iterator.
Pred – The type of the function/function object to use (deduced). Unlike its sequential form, the parallel overload of partition_copy requires Pred to meet the requirements of CopyConstructible.
Proj – The type of an optional projection function. This defaults to hpx::identity
- Parameters
policy – The execution policy to use for the scheduling of the iterations.
rng – Refers to the sequence of elements the algorithm will be applied to.
dest_true – Refers to the beginning of the destination range for the elements that satisfy the predicate pred
dest_false – Refers to the beginning of the destination range for the elements that don’t satisfy the predicate pred.
pred – Specifies the function (or function object) which will be invoked for each of the elements in the sequence specified by [first, last). This is an unary predicate for partitioning the source iterators. The signature of this predicate should be equivalent to:
The signature does not need to have const&, but the function must not modify the objects passed to it. The type Type must be such that an object of type FwdIter1 can be dereferenced and then implicitly converted to Type.bool pred(const Type &a);
proj – Specifies the function (or function object) which will be invoked for each of the elements as a projection operation before the actual predicate is invoked.
- Returns
The partition_copy algorithm returns a hpx::future<partition_copy_result <std::ranges::iterator_t<Rng>, FwdIter2, FwdIter3>> if the execution policy is of type parallel_task_policy and returns partition_copy_result<std::ranges::iterator_t<Rng>, FwdIter2, FwdIter3> otherwise. The partition_copy algorithm returns the tuple of the source iterator last, the destination iterator to the end of the dest_true range, and the destination iterator to the end of the dest_false range.
-
template<typename InIter, typename Sent, typename OutIter2, typename OutIter3, typename Pred, typename Proj = hpx::identity>
partition_copy_result<InIter, OutIter2, OutIter3> partition_copy(InIter first, Sent last, OutIter2 dest_true, OutIter3 dest_false, Pred &&pred, Proj &&proj = Proj())# Copies the elements in the range, defined by [first, last), to two different ranges depending on the value returned by the predicate pred. The elements, that satisfy the predicate pred are copied to the range beginning at dest_true. The rest of the elements are copied to the range beginning at dest_false. The order of the elements is preserved.
The assignments in the parallel partition_copy algorithm invoked without an execution policy object execute in sequential order in the calling thread.
Note
Complexity: Performs not more than last - first assignments, exactly last - first applications of the predicate f.
- Template Parameters
InIter – The type of the source iterators used (deduced). This iterator type must meet the requirements of an forward iterator.
Sent – The type of the source sentinel (deduced). This sentinel type must be a sentinel for FwdIter.
OutIter2 – The type of the iterator representing the destination range for the elements that satisfy the predicate pred (deduced). This iterator type must meet the requirements of an forward iterator.
OutIter3 – The type of the iterator representing the destination range for the elements that don’t satisfy the predicate pred (deduced). This iterator type must meet the requirements of an forward iterator.
Pred – The type of the function/function object to use (deduced). Unlike its sequential form, the parallel overload of partition_copy requires Pred to meet the requirements of CopyConstructible.
Proj – The type of an optional projection function. This defaults to hpx::identity
- Parameters
first – Refers to the beginning of the sequence of elements the algorithm will be applied to.
last – Refers to sentinel value denoting the end of the sequence of elements the algorithm will be applied.
dest_true – Refers to the beginning of the destination range for the elements that satisfy the predicate pred
dest_false – Refers to the beginning of the destination range for the elements that don’t satisfy the predicate pred.
pred – Specifies the function (or function object) which will be invoked for each of the elements in the sequence specified by [first, last). This is an unary predicate for partitioning the source iterators. The signature of this predicate should be equivalent to:
The signature does not need to have const&, but the function must not modify the objects passed to it. The type Type must be such that an object of type FwdIter1 can be dereferenced and then implicitly converted to Type.bool pred(const Type &a);
proj – Specifies the function (or function object) which will be invoked for each of the elements as a projection operation before the actual predicate is invoked.
- Returns
The partition_copy algorithm returns a partition_copy_result<FwdIter, OutIter2, OutIter3>. The partition_copy algorithm returns the tuple of the source iterator last, the destination iterator to the end of the dest_true range, and the destination iterator to the end of the dest_false range.
-
template<typename ExPolicy, typename FwdIter, typename Sent, typename OutIter2, typename OutIter3, typename Pred, typename Proj = hpx::identity>
parallel::util::detail::algorithm_result<ExPolicy, partition_copy_result<FwdIter, OutIter2, OutIter3>>::type partition_copy(ExPolicy &&policy, FwdIter first, Sent last, OutIter2 dest_true, OutIter3 dest_false, Pred &&pred, Proj &&proj = Proj())# Copies the elements in the range, defined by [first, last), to two different ranges depending on the value returned by the predicate pred. The elements, that satisfy the predicate pred are copied to the range beginning at dest_true. The rest of the elements are copied to the range beginning at dest_false. The order of the elements is preserved.
The assignments in the parallel partition_copy algorithm invoked with an execution policy object of type sequenced_policy execute in sequential order in the calling thread.
The assignments in the parallel partition_copy algorithm invoked with an execution policy object of type parallel_policy or parallel_task_policy are permitted to execute in an unordered fashion in unspecified threads, and indeterminately sequenced within each thread.
Note
Complexity: Performs not more than last - first assignments, exactly last - first applications of the predicate f.
- Template Parameters
ExPolicy – The type of the execution policy to use (deduced). It describes the manner in which the execution of the algorithm may be parallelized and the manner in which it executes the assignments.
FwdIter – The type of the source iterators used (deduced). This iterator type must meet the requirements of an forward iterator.
Sent – The type of the source sentinel (deduced). This sentinel type must be a sentinel for FwdIter.
OutIter2 – The type of the iterator representing the destination range for the elements that satisfy the predicate pred (deduced). This iterator type must meet the requirements of an forward iterator.
OutIter3 – The type of the iterator representing the destination range for the elements that don’t satisfy the predicate pred (deduced). This iterator type must meet the requirements of an forward iterator.
Pred – The type of the function/function object to use (deduced). Unlike its sequential form, the parallel overload of partition_copy requires Pred to meet the requirements of CopyConstructible.
Proj – The type of an optional projection function. This defaults to hpx::identity
- Parameters
policy – The execution policy to use for the scheduling of the iterations.
first – Refers to the beginning of the sequence of elements the algorithm will be applied to.
last – Refers to sentinel value denoting the end of the sequence of elements the algorithm will be applied.
dest_true – Refers to the beginning of the destination range for the elements that satisfy the predicate pred
dest_false – Refers to the beginning of the destination range for the elements that don’t satisfy the predicate pred.
pred – Specifies the function (or function object) which will be invoked for each of the elements in the sequence specified by [first, last). This is an unary predicate for partitioning the source iterators. The signature of this predicate should be equivalent to:
The signature does not need to have const&, but the function must not modify the objects passed to it. The type Type must be such that an object of type FwdIter1 can be dereferenced and then implicitly converted to Type.bool pred(const Type &a);
proj – Specifies the function (or function object) which will be invoked for each of the elements as a projection operation before the actual predicate is invoked.
- Returns
The partition_copy algorithm returns a hpx::future<partition_copy_result<FwdIter, OutIter2, OutIter3>> if the execution policy is of type parallel_task_policy and returns partition_copy_result<FwdIter, OutIter2, OutIter3> otherwise. The partition_copy algorithm returns the tuple of the source iterator last, the destination iterator to the end of the dest_true range, and the destination iterator to the end of the dest_false range.
-
template<typename Rng, typename Pred, typename Proj = hpx::identity>
-
namespace ranges
hpx::ranges::reduce#
Defined in header hpx/algorithm.hpp.
See Public API for a list of names and headers that are part of the public HPX API.
-
namespace hpx
-
namespace ranges
Functions
-
template<typename ExPolicy, typename FwdIter, typename Sent, typename F, typename T = typename std::iterator_traits<FwdIter>::value_type>
hpx::parallel::util::detail::algorithm_result_t<ExPolicy, T> reduce(ExPolicy &&policy, FwdIter first, Sent last, T init, F &&f)# Returns GENERALIZED_SUM(f, init, *first, …, *(first + (last - first) - 1)).
The reduce operations in the parallel reduce algorithm invoked with an execution policy object of type sequenced_policy execute in sequential order in the calling thread.
The reduce operations in the parallel copy_if algorithm invoked with an execution policy object of type parallel_policy or parallel_task_policy are permitted to execute in an unordered fashion in unspecified threads, and indeterminately sequenced within each thread.
The difference between reduce and accumulate is that the behavior of reduce may be non-deterministic for non-associative or non-commutative binary predicate.
Note
Complexity: O(last - first) applications of the predicate f.
Note
GENERALIZED_SUM(op, a1, …, aN) is defined as follows:
a1 when N is 1
op(GENERALIZED_SUM(op, b1, …, bK), GENERALIZED_SUM(op, bM, …, bN)), where:
b1, …, bN may be any permutation of a1, …, aN and
1 < K+1 = M <= N.
- Template Parameters
ExPolicy – The type of the execution policy to use (deduced). It describes the manner in which the execution of the algorithm may be parallelized and the manner in which it executes the assignments.
FwdIter – The type of the source begin iterator used (deduced). This iterator type must meet the requirements of an forward iterator.
Sent – The type of the source sentinel used (deduced). This iterator type must meet the requirements of an forward iterator.
F – The type of the function/function object to use (deduced). Unlike its sequential form, the parallel overload of copy_if requires F to meet the requirements of CopyConstructible.
T – The type of the value to be used as initial (and intermediate) values (deduced).
- Parameters
policy – The execution policy to use for the scheduling of the iterations.
first – Refers to the beginning of the sequence of elements the algorithm will be applied to.
last – Refers to the end of the sequence of elements the algorithm will be applied to.
f – Specifies the function (or function object) which will be invoked for each of the elements in the sequence specified by [first, last). This is a binary predicate. The signature of this predicate should be equivalent to:
The signature does not need to have const&. The types Type1 Ret must be such that an object of type FwdIterB can be dereferenced and then implicitly converted to any of those types.Ret fun(const Type1 &a, const Type1 &b);
init – The initial value for the generalized sum.
- Returns
The reduce algorithm returns a hpx::future<T> if the execution policy is of type sequenced_task_policy or parallel_task_policy and returns T otherwise. The reduce algorithm returns the result of the generalized sum over the elements given by the input range [first, last).
-
template<typename ExPolicy, typename Rng, typename F, typename T = typename std::iterator_traits<std::ranges::iterator_t<Rng>>::value_type>
hpx::parallel::util::detail::algorithm_result_t<ExPolicy, T> reduce(ExPolicy &&policy, Rng &&rng, T init, F &&f)# Returns GENERALIZED_SUM(f, init, *first, …, *(first + (last - first) - 1)).
The reduce operations in the parallel reduce algorithm invoked with an execution policy object of type sequenced_policy execute in sequential order in the calling thread.
The reduce operations in the parallel copy_if algorithm invoked with an execution policy object of type parallel_policy or parallel_task_policy are permitted to execute in an unordered fashion in unspecified threads, and indeterminately sequenced within each thread.
The difference between reduce and accumulate is that the behavior of reduce may be non-deterministic for non-associative or non-commutative binary predicate.
Note
Complexity: O(last - first) applications of the predicate f.
Note
GENERALIZED_SUM(op, a1, …, aN) is defined as follows:
a1 when N is 1
op(GENERALIZED_SUM(op, b1, …, bK), GENERALIZED_SUM(op, bM, …, bN)), where:
b1, …, bN may be any permutation of a1, …, aN and
1 < K+1 = M <= N.
- Template Parameters
ExPolicy – The type of the execution policy to use (deduced). It describes the manner in which the execution of the algorithm may be parallelized and the manner in which it executes the assignments.
Rng – The type of the source range used (deduced). The iterators extracted from this range type must meet the requirements of an input iterator.
F – The type of the function/function object to use (deduced). Unlike its sequential form, the parallel overload of copy_if requires F to meet the requirements of CopyConstructible.
T – The type of the value to be used as initial (and intermediate) values (deduced).
- Parameters
policy – The execution policy to use for the scheduling of the iterations.
rng – Refers to the sequence of elements the algorithm will be applied to.
f – Specifies the function (or function object) which will be invoked for each of the elements in the sequence specified by [first, last). This is a binary predicate. The signature of this predicate should be equivalent to:
The signature does not need to have const&. The types Type1 Ret must be such that an object of type FwdIterB can be dereferenced and then implicitly converted to any of those types.Ret fun(const Type1 &a, const Type1 &b);
init – The initial value for the generalized sum.
- Returns
The reduce algorithm returns a hpx::future<T> if the execution policy is of type sequenced_task_policy or parallel_task_policy and returns T otherwise. The reduce algorithm returns the result of the generalized sum over the elements given by the input range [first, last).
-
template<typename ExPolicy, typename FwdIter, typename Sent, typename T = typename std::iterator_traits<FwdIter>::value_type>
hpx::parallel::util::detail::algorithm_result_t<ExPolicy, T> reduce(ExPolicy &&policy, FwdIter first, Sent last, T init)# Returns GENERALIZED_SUM(+, init, *first, …, *(first + (last - first) - 1)).
The reduce operations in the parallel reduce algorithm invoked with an execution policy object of type sequenced_policy execute in sequential order in the calling thread.
The reduce operations in the parallel copy_if algorithm invoked with an execution policy object of type parallel_policy or parallel_task_policy are permitted to execute in an unordered fashion in unspecified threads, and indeterminately sequenced within each thread.
The difference between reduce and accumulate is that the behavior of reduce may be non-deterministic for non-associative or non-commutative binary predicate.
Note
Complexity: O(last - first) applications of the operator+().
Note
GENERALIZED_SUM(+, a1, …, aN) is defined as follows:
a1 when N is 1
op(GENERALIZED_SUM(+, b1, …, bK), GENERALIZED_SUM(+, bM, …, bN)), where:
b1, …, bN may be any permutation of a1, …, aN and
1 < K+1 = M <= N.
- Template Parameters
ExPolicy – The type of the execution policy to use (deduced). It describes the manner in which the execution of the algorithm may be parallelized and the manner in which it executes the assignments.
FwdIter – The type of the source begin iterator used (deduced). This iterator type must meet the requirements of an forward iterator.
Sent – The type of the source sentinel used (deduced). This iterator type must meet the requirements of an forward iterator.
T – The type of the value to be used as initial (and intermediate) values (deduced).
- Parameters
policy – The execution policy to use for the scheduling of the iterations.
first – Refers to the beginning of the sequence of elements the algorithm will be applied to.
last – Refers to the end of the sequence of elements the algorithm will be applied to.
init – The initial value for the generalized sum.
- Returns
The reduce algorithm returns a hpx::future<T> if the execution policy is of type sequenced_task_policy or parallel_task_policy and returns T otherwise. The reduce algorithm returns the result of the generalized sum (applying operator+()) over the elements given by the input range [first, last).
-
template<typename ExPolicy, typename Rng, typename T = typename std::iterator_traits<std::ranges::iterator_t<Rng>>::value_type>
hpx::parallel::util::detail::algorithm_result_t<ExPolicy, T> reduce(ExPolicy &&policy, Rng &&rng, T init)# Returns GENERALIZED_SUM(+, init, *first, …, *(first + (last - first) - 1)).
The reduce operations in the parallel reduce algorithm invoked with an execution policy object of type sequenced_policy execute in sequential order in the calling thread.
The reduce operations in the parallel copy_if algorithm invoked with an execution policy object of type parallel_policy or parallel_task_policy are permitted to execute in an unordered fashion in unspecified threads, and indeterminately sequenced within each thread.
The difference between reduce and accumulate is that the behavior of reduce may be non-deterministic for non-associative or non-commutative binary predicate.
Note
Complexity: O(last - first) applications of the operator+().
Note
GENERALIZED_SUM(+, a1, …, aN) is defined as follows:
a1 when N is 1
op(GENERALIZED_SUM(+, b1, …, bK), GENERALIZED_SUM(+, bM, …, bN)), where:
b1, …, bN may be any permutation of a1, …, aN and
1 < K+1 = M <= N.
- Template Parameters
ExPolicy – The type of the execution policy to use (deduced). It describes the manner in which the execution of the algorithm may be parallelized and the manner in which it executes the assignments.
Rng – The type of the source range used (deduced). The iterators extracted from this range type must meet the requirements of an input iterator.
T – The type of the value to be used as initial (and intermediate) values (deduced).
- Parameters
policy – The execution policy to use for the scheduling of the iterations.
rng – Refers to the sequence of elements the algorithm will be applied to.
init – The initial value for the generalized sum.
- Returns
The reduce algorithm returns a hpx::future<T> if the execution policy is of type sequenced_task_policy or parallel_task_policy and returns T otherwise. The reduce algorithm returns the result of the generalized sum (applying operator+()) over the elements given by the input range [first, last).
-
template<typename ExPolicy, typename FwdIter, typename Sent>
hpx::parallel::util::detail::algorithm_result<ExPolicy, typename std::iterator_traits<FwdIter>::value_type>::type reduce(ExPolicy &&policy, FwdIter first, Sent last)# Returns GENERALIZED_SUM(+, T(), *first, …, *(first + (last - first) - 1)).
The reduce operations in the parallel reduce algorithm invoked with an execution policy object of type sequenced_policy execute in sequential order in the calling thread.
The reduce operations in the parallel copy_if algorithm invoked with an execution policy object of type parallel_policy or parallel_task_policy are permitted to execute in an unordered fashion in unspecified threads, and indeterminately sequenced within each thread.
The difference between reduce and accumulate is that the behavior of reduce may be non-deterministic for non-associative or non-commutative binary predicate.
Note
Complexity: O(last - first) applications of the operator+().
Note
The type of the initial value (and the result type) T is determined from the value_type of the used FwdIterB.
Note
GENERALIZED_SUM(+, a1, …, aN) is defined as follows:
a1 when N is 1
op(GENERALIZED_SUM(+, b1, …, bK), GENERALIZED_SUM(+, bM, …, bN)), where:
b1, …, bN may be any permutation of a1, …, aN and
1 < K+1 = M <= N.
- Template Parameters
ExPolicy – The type of the execution policy to use (deduced). It describes the manner in which the execution of the algorithm may be parallelized and the manner in which it executes the assignments.
FwdIter – The type of the source begin iterator used (deduced). This iterator type must meet the requirements of an forward iterator.
Sent – The type of the source sentinel used (deduced). This iterator type must meet the requirements of an forward iterator.
- Parameters
policy – The execution policy to use for the scheduling of the iterations.
first – Refers to the beginning of the sequence of elements the algorithm will be applied to.
last – Refers to the end of the sequence of elements the algorithm will be applied to.
- Returns
The reduce algorithm returns a hpx::future<T> if the execution policy is of type sequenced_task_policy or parallel_task_policy and returns T otherwise (where T is the value_type of FwdIterB). The reduce algorithm returns the result of the generalized sum (applying operator+()) over the elements given by the input range [first, last).
-
template<typename ExPolicy, typename Rng>
hpx::parallel::util::detail::algorithm_result<ExPolicy, typename std::iterator_traits<typename hpx::traits::range_traits<Rng>::iterator_type>::value_type>::type reduce(ExPolicy &&policy, Rng &&rng)# Returns GENERALIZED_SUM(+, T(), *first, …, *(first + (last - first) - 1)).
The reduce operations in the parallel reduce algorithm invoked with an execution policy object of type sequenced_policy execute in sequential order in the calling thread.
The reduce operations in the parallel copy_if algorithm invoked with an execution policy object of type parallel_policy or parallel_task_policy are permitted to execute in an unordered fashion in unspecified threads, and indeterminately sequenced within each thread.
The difference between reduce and accumulate is that the behavior of reduce may be non-deterministic for non-associative or non-commutative binary predicate.
Note
Complexity: O(last - first) applications of the operator+().
Note
The type of the initial value (and the result type) T is determined from the value_type of the used FwdIterB.
Note
GENERALIZED_SUM(+, a1, …, aN) is defined as follows:
a1 when N is 1
op(GENERALIZED_SUM(+, b1, …, bK), GENERALIZED_SUM(+, bM, …, bN)), where:
b1, …, bN may be any permutation of a1, …, aN and
1 < K+1 = M <= N.
- Template Parameters
ExPolicy – The type of the execution policy to use (deduced). It describes the manner in which the execution of the algorithm may be parallelized and the manner in which it executes the assignments.
Rng – The type of the source range used (deduced). The iterators extracted from this range type must meet the requirements of an input iterator.
- Parameters
policy – The execution policy to use for the scheduling of the iterations.
rng – Refers to the sequence of elements the algorithm will be applied to.
- Returns
The reduce algorithm returns a hpx::future<T> if the execution policy is of type sequenced_task_policy or parallel_task_policy and returns T otherwise (where T is the value_type of FwdIterB). The reduce algorithm returns the result of the generalized sum (applying operator+()) over the elements given by the input range [first, last).
-
template<typename FwdIter, typename Sent, typename F, typename T = typename std::iterator_traits<FwdIter>::value_type>
T reduce(FwdIter first, Sent last, T init, F &&f)# Returns GENERALIZED_SUM(f, init, *first, …, *(first + (last - first) - 1)).
The difference between reduce and accumulate is that the behavior of reduce may be non-deterministic for non-associative or non-commutative binary predicate.
Note
Complexity: O(last - first) applications of the predicate f.
Note
GENERALIZED_SUM(op, a1, …, aN) is defined as follows:
a1 when N is 1
op(GENERALIZED_SUM(op, b1, …, bK), GENERALIZED_SUM(op, bM, …, bN)), where:
b1, …, bN may be any permutation of a1, …, aN and
1 < K+1 = M <= N.
- Template Parameters
FwdIter – The type of the source begin iterator used (deduced). This iterator type must meet the requirements of an forward iterator.
Sent – The type of the source sentinel used (deduced). This iterator type must meet the requirements of an forward iterator.
F – The type of the function/function object to use (deduced). Unlike its sequential form, the parallel overload of copy_if requires F to meet the requirements of CopyConstructible.
T – The type of the value to be used as initial (and intermediate) values (deduced).
- Parameters
first – Refers to the beginning of the sequence of elements the algorithm will be applied to.
last – Refers to the end of the sequence of elements the algorithm will be applied to.
f – Specifies the function (or function object) which will be invoked for each of the elements in the sequence specified by [first, last). This is a binary predicate. The signature of this predicate should be equivalent to:
The signature does not need to have const&. The types Type1 Ret must be such that an object of type FwdIterB can be dereferenced and then implicitly converted to any of those types.Ret fun(const Type1 &a, const Type1 &b);
init – The initial value for the generalized sum.
- Returns
The reduce algorithm returns T. The reduce algorithm returns the result of the generalized sum over the elements given by the input range [first, last).
-
template<typename Rng, typename F, typename T = typename std::iterator_traits<std::ranges::iterator_t<Rng>>::value_type>
T reduce(Rng &&rng, T init, F &&f)# Returns GENERALIZED_SUM(f, init, *first, …, *(first + (last - first) - 1)).
The difference between reduce and accumulate is that the behavior of reduce may be non-deterministic for non-associative or non-commutative binary predicate.
Note
Complexity: O(last - first) applications of the predicate f.
Note
GENERALIZED_SUM(op, a1, …, aN) is defined as follows:
a1 when N is 1
op(GENERALIZED_SUM(op, b1, …, bK), GENERALIZED_SUM(op, bM, …, bN)), where:
b1, …, bN may be any permutation of a1, …, aN and
1 < K+1 = M <= N.
- Template Parameters
Rng – The type of the source range used (deduced). The iterators extracted from this range type must meet the requirements of an input iterator.
F – The type of the function/function object to use (deduced). Unlike its sequential form, the parallel overload of copy_if requires F to meet the requirements of CopyConstructible.
T – The type of the value to be used as initial (and intermediate) values (deduced).
- Parameters
rng – Refers to the sequence of elements the algorithm will be applied to.
f – Specifies the function (or function object) which will be invoked for each of the elements in the sequence specified by [first, last). This is a binary predicate. The signature of this predicate should be equivalent to:
The signature does not need to have const&. The types Type1 Ret must be such that an object of type FwdIterB can be dereferenced and then implicitly converted to any of those types.Ret fun(const Type1 &a, const Type1 &b);
init – The initial value for the generalized sum.
- Returns
The reduce algorithm returns T. The reduce algorithm returns the result of the generalized sum over the elements given by the input range [first, last).
-
template<typename FwdIter, typename Sent, typename T = typename std::iterator_traits<FwdIter>::value_type>
T reduce(FwdIter first, Sent last, T init)# Returns GENERALIZED_SUM(+, init, *first, …, *(first + (last - first) - 1)).
The difference between reduce and accumulate is that the behavior of reduce may be non-deterministic for non-associative or non-commutative binary predicate.
Note
Complexity: O(last - first) applications of the operator+().
Note
GENERALIZED_SUM(+, a1, …, aN) is defined as follows:
a1 when N is 1
op(GENERALIZED_SUM(+, b1, …, bK), GENERALIZED_SUM(+, bM, …, bN)), where:
b1, …, bN may be any permutation of a1, …, aN and
1 < K+1 = M <= N.
- Template Parameters
FwdIter – The type of the source begin iterator used (deduced). This iterator type must meet the requirements of an forward iterator.
Sent – The type of the source sentinel used (deduced). This iterator type must meet the requirements of an forward iterator.
T – The type of the value to be used as initial (and intermediate) values (deduced).
- Parameters
first – Refers to the beginning of the sequence of elements the algorithm will be applied to.
last – Refers to the end of the sequence of elements the algorithm will be applied to.
init – The initial value for the generalized sum.
- Returns
The reduce algorithm returns T. The reduce algorithm returns the result of the generalized sum (applying operator+()) over the elements given by the input range [first, last).
-
template<typename Rng, typename T = typename std::iterator_traits<std::ranges::iterator_t<Rng>>::value_type>
T reduce(Rng &&rng, T init)# Returns GENERALIZED_SUM(+, init, *first, …, *(first + (last - first) - 1)).
The difference between
reduce and accumulate is that the behavior of reduce may be non-deterministic for non-associative or non-commutative binary predicate.Note
Complexity: O(last - first) applications of the operator+().
Note
GENERALIZED_SUM(+, a1, …, aN) is defined as follows:
a1 when N is 1
op(GENERALIZED_SUM(+, b1, …, bK), GENERALIZED_SUM(+, bM, …, bN)), where:
b1, …, bN may be any permutation of a1, …, aN and
1 < K+1 = M <= N.
- Template Parameters
Rng – The type of the source range used (deduced). The iterators extracted from this range type must meet the requirements of an input iterator.
T – The type of the value to be used as initial (and intermediate) values (deduced).
- Parameters
rng – Refers to the sequence of elements the algorithm will be applied to.
init – The initial value for the generalized sum.
- Returns
The reduce algorithm returns T. The reduce algorithm returns the result of the generalized sum (applying operator+()) over the elements given by the input range [first, last).
-
template<typename FwdIter, typename Sent>
std::iterator_traits<FwdIter>::value_type reduce(FwdIter first, Sent last)# Returns GENERALIZED_SUM(+, T(), *first, …, *(first + (last - first) - 1)).
The difference between reduce and accumulate is that the behavior of reduce may be non-deterministic for non-associative or non-commutative binary predicate.
Note
Complexity: O(last - first) applications of the operator+().
Note
The type of the initial value (and the result type) T is determined from the value_type of the used FwdIterB.
Note
GENERALIZED_SUM(+, a1, …, aN) is defined as follows:
a1 when N is 1
op(GENERALIZED_SUM(+, b1, …, bK), GENERALIZED_SUM(+, bM, …, bN)), where:
b1, …, bN may be any permutation of a1, …, aN and
1 < K+1 = M <= N.
- Template Parameters
FwdIter – The type of the source begin iterator used (deduced). This iterator type must meet the requirements of an forward iterator.
Sent – The type of the source sentinel used (deduced). This iterator type must meet the requirements of an forward iterator.
- Parameters
first – Refers to the beginning of the sequence of elements the algorithm will be applied to.
last – Refers to the end of the sequence of elements the algorithm will be applied to.
- Returns
The reduce algorithm returns T (where T is the value_type of FwdIterB). The reduce algorithm returns the result of the generalized sum (applying operator+()) over the elements given by the input range [first, last).
-
template<typename Rng>
std::iterator_traits<typename hpx::traits::range_traits<Rng>::iterator_type>::value_type reduce(Rng &&rng)# Returns GENERALIZED_SUM(+, T(), *first, …, *(first + (last - first) - 1)).
The difference between reduce and accumulate is that the behavior of reduce may be non-deterministic for non-associative or non-commutative binary predicate.
Note
Complexity: O(last - first) applications of the operator+().
Note
The type of the initial value (and the result type) T is determined from the value_type of the used FwdIterB.
Note
GENERALIZED_SUM(+, a1, …, aN) is defined as follows:
a1 when N is 1
op(GENERALIZED_SUM(+, b1, …, bK), GENERALIZED_SUM(+, bM, …, bN)), where:
b1, …, bN may be any permutation of a1, …, aN and
1 < K+1 = M <= N.
- Template Parameters
Rng – The type of the source range used (deduced). The iterators extracted from this range type must meet the requirements of an input iterator.
- Parameters
rng – Refers to the sequence of elements the algorithm will be applied to.
- Returns
The reduce algorithm returns T (where T is the value_type of FwdIterB). The reduce algorithm returns the result of the generalized sum (applying operator+()) over the elements given by the input range [first, last).
-
template<typename ExPolicy, typename FwdIter, typename Sent, typename F, typename T = typename std::iterator_traits<FwdIter>::value_type>
-
namespace ranges
hpx::ranges::remove, hpx::ranges::remove_if#
Defined in header hpx/algorithm.hpp.
See Public API for a list of names and headers that are part of the public HPX API.
-
namespace hpx
-
namespace ranges
Functions
-
template<typename Iter, typename Sent, typename Pred, typename Proj = hpx::identity>
subrange_t<Iter, Sent> remove_if(Iter first, Sent sent, Pred &&pred, Proj &&proj = Proj())# Removes all elements for which predicate pred returns true from the range [first, last) and returns a subrange [ret, last), where ret is a past-the-end iterator for the new end of the range.
The assignments in the parallel remove_if algorithm execute in sequential order in the calling thread.
Note
Complexity: Performs not more than last - first assignments, exactly last - first applications of the predicate pred and the projection proj.
- Template Parameters
Iter – The type of the source iterators used for the This iterator type must meet the requirements of a forward iterator.
Sent – The type of the end iterators used (deduced). This sentinel type must be a sentinel for FwdIter.
Pred – The type of the function/function object to use (deduced). Unlike its sequential form, the parallel overload of remove_if requires Pred to meet the requirements of CopyConstructible..
Proj – The type of an optional projection function. This defaults to hpx::identity
- Parameters
first – Refers to the beginning of the sequence of elements the algorithm will be applied to.
sent – Refers to the end of the sequence of elements the algorithm will be applied to.
pred – Specifies the function (or function object) which will be invoked for each of the elements in the sequence specified by [first, last).This is an unary predicate which returns true for the required elements. The signature of this predicate should be equivalent to:
The signature does not need to have const&, but the function must not modify the objects passed to it. The type Type must be such that an object of type FwdIter can be dereferenced and then implicitly converted to Type.bool pred(const Type &a);
proj – Specifies the function (or function object) which will be invoked for each of the elements as a projection operation before the actual predicate is invoked.
- Returns
The remove_if algorithm returns a subrange_t<FwdIter, Sent>. The remove_if algorithm returns an object {ret, last}, where ret is a past-the-end iterator for a new subrange of the values all in valid but unspecified state.
-
template<typename Rng, typename Pred, typename Proj = hpx::identity>
subrange_t<std::ranges::iterator_t<Rng>> remove_if(Rng &&rng, Pred &&pred, Proj &&proj = Proj())# Removes all elements that are equal to value from the range rng and and returns a subrange [ret, util::end(rng)), where ret is a past-the-end iterator for the new end of the range.
The assignments in the parallel remove_if algorithm execute in sequential order in the calling thread.
Note
Complexity: Performs not more than util::end(rng)
util::begin(rng) assignments, exactly util::end(rng) - util::begin(rng) applications of the operator==() and the projection proj.
- Template Parameters
Rng – The type of the source range used (deduced). The iterators extracted from this range type must meet the requirements of an forward iterator.
Pred – The type of the function/function object to use (deduced). Unlike its sequential form, the parallel overload of remove_if requires Pred to meet the requirements of CopyConstructible.
Proj – The type of an optional projection function. This defaults to hpx::identity
- Parameters
rng – Refers to the sequence of elements the algorithm will be applied to.
pred – Specifies the function (or function object) which will be invoked for each of the elements in the sequence specified by [first, last).This is an unary predicate which returns true for the required elements. The signature of this predicate should be equivalent to:
The signature does not need to have const&, but the function must not modify the objects passed to it. The type Type must be such that an object of type FwdIter can be dereferenced and then implicitly converted to Type.bool pred(const Type &a);
proj – Specifies the function (or function object) which will be invoked for each of the elements as a projection operation before the actual predicate is invoked.
- Returns
The remove_if algorithm returns a subrange_t<std::ranges::iterator_t<Rng>>. The remove_if algorithm returns an object {ret, last}, where ret is a past-the-end iterator for a new subrange of the values all in valid but unspecified state.
-
template<typename ExPolicy, typename FwdIter, typename Sent, typename Pred, typename Proj = hpx::identity>
parallel::util::detail::algorithm_result<ExPolicy, subrange_t<FwdIter, Sent>>::type remove_if(ExPolicy &&policy, FwdIter first, Sent sent, Pred &&pred, Proj &&proj = Proj())# Removes all elements for which predicate pred returns true from the range [first, last) and returns a subrange [ret, last), where ret is a past-the-end iterator for the new end of the range.
The assignments in the parallel remove_if algorithm invoked with an execution policy object of type sequenced_policy execute in sequential order in the calling thread.
The assignments in the parallel remove_if algorithm invoked with an execution policy object of type parallel_policy or parallel_task_policy are permitted to execute in an unordered fashion in unspecified threads, and indeterminately sequenced within each thread.
Note
Complexity: Performs not more than last - first assignments, exactly last - first applications of the predicate pred and the projection proj.
- Template Parameters
ExPolicy – The type of the execution policy to use (deduced). It describes the manner in which the execution of the algorithm may be parallelized and the manner in which it executes the assignments.
FwdIter – The type of the source iterators used for the This iterator type must meet the requirements of a forward iterator.
Sent – The type of the end iterators used (deduced). This sentinel type must be a sentinel for FwdIter.
Pred – The type of the function/function object to use (deduced). Unlike its sequential form, the parallel overload of remove_if requires Pred to meet the requirements of CopyConstructible.
Proj – The type of an optional projection function. This defaults to hpx::identity
- Parameters
policy – The execution policy to use for the scheduling of the iterations.
first – Refers to the beginning of the sequence of elements the algorithm will be applied to.
sent – Refers to the end of the sequence of elements the algorithm will be applied to.
pred – Specifies the function (or function object) which will be invoked for each of the elements in the sequence specified by [first, last).This is an unary predicate which returns true for the required elements. The signature of this predicate should be equivalent to:
The signature does not need to have const&, but the function must not modify the objects passed to it. The type Type must be such that an object of type FwdIter can be dereferenced and then implicitly converted to Type.bool pred(const Type &a);
proj – Specifies the function (or function object) which will be invoked for each of the elements as a projection operation before the actual predicate is invoked.
- Returns
The remove_if algorithm returns a hpx::future<subrange_t<FwdIter, Sent>>. The remove_if algorithm returns an object {ret, last}, where ret is a past-the-end iterator for a new subrange of the values all in valid but unspecified state.
-
template<typename ExPolicy, typename Rng, typename Pred, typename Proj = hpx::identity>
parallel::util::detail::algorithm_result<ExPolicy, subrange_t<std::ranges::iterator_t<Rng>>> remove_if(ExPolicy &&policy, Rng &&rng, Pred &&pred, Proj &&proj = Proj())# Removes all elements that are equal to value from the range rng and and returns a subrange [ret, util::end(rng)), where ret is a past-the-end iterator for the new end of the range.
The assignments in the parallel remove_if algorithm invoked with an execution policy object of type sequenced_policy execute in sequential order in the calling thread.
The assignments in the parallel remove_if algorithm invoked with an execution policy object of type parallel_policy or parallel_task_policy are permitted to execute in an unordered fashion in unspecified threads, and indeterminately sequenced within each thread.
Note
Complexity: Performs not more than util::end(rng)
util::begin(rng) assignments, exactly util::end(rng) - util::begin(rng) applications of the operator==() and the projection proj.
- Template Parameters
ExPolicy – The type of the execution policy to use (deduced). It describes the manner in which the execution of the algorithm may be parallelized and the manner in which it executes the assignments.
Rng – The type of the source range used (deduced). The iterators extracted from this range type must meet the requirements of an forward iterator.
Pred – The type of the function/function object to use (deduced). Unlike its sequential form, the parallel overload of remove_if requires Pred to meet the requirements of CopyConstructible.
Proj – The type of an optional projection function. This defaults to hpx::identity
- Parameters
policy – The execution policy to use for the scheduling of the iterations.
rng – Refers to the sequence of elements the algorithm will be applied to.
pred – Specifies the function (or function object) which will be invoked for each of the elements in the sequence specified by [first, last).This is an unary predicate which returns true for the required elements. The signature of this predicate should be equivalent to:
The signature does not need to have const&, but the function must not modify the objects passed to it. The type Type must be such that an object of type FwdIter can be dereferenced and then implicitly converted to Type.bool pred(const Type &a);
proj – Specifies the function (or function object) which will be invoked for each of the elements as a projection operation before the actual predicate is invoked.
- Returns
The remove_if algorithm returns a hpx::future<subrange_t< std::ranges::iterator_t<Rng>>> if the execution policy is of type sequenced_task_policy or parallel_task_policy and returns FwdIter otherwise. The remove_if algorithm returns an object {ret, last}, where ret is a past-the-end iterator for a new subrange of the values all in valid but unspecified state.
-
template<typename Iter, typename Sent, typename Proj = hpx::identity, typename T = typename hpx::parallel::traits::projected<Iter, Proj>::value_type>
subrange_t<Iter, Sent> remove(Iter first, Sent last, T const &value, Proj &&proj = Proj())# Removes all elements that are equal to value from the range [first, last) and and returns a subrange [ret, last), where ret is a past-the-end iterator for the new end of the range.
The assignments in the parallel remove algorithm execute in sequential order in the calling thread.
Note
Complexity: Performs not more than last - first assignments, exactly last - first applications of the operator==() and the projection proj.
- Template Parameters
Iter – The type of the source iterators used for the This iterator type must meet the requirements of a forward iterator.
Sent – The type of the end iterators used (deduced). This sentinel type must be a sentinel for FwdIter.
T – The type of the value to remove (deduced). This value type must meet the requirements of CopyConstructible.
Proj – The type of an optional projection function. This defaults to hpx::identity
- Parameters
first – Refers to the beginning of the sequence of elements the algorithm will be applied to.
last – Refers to the end of the sequence of elements the algorithm will be applied to.
value – Specifies the value of elements to remove.
proj – Specifies the function (or function object) which will be invoked for each of the elements as a projection operation before the actual predicate is invoked.
- Returns
The remove algorithm returns a subrange_t<FwdIter, Sent>. The remove algorithm returns an object {ret, last}, where ret is a past-the-end iterator for a new subrange of the values all in valid but unspecified state.
-
template<typename Rng, typename Proj = hpx::identity, typename T = typename hpx::parallel::traits::projected<std::ranges::iterator_t<Rng>, Proj>::value_type>
subrange_t<std::ranges::iterator_t<Rng>> remove(Rng &&rng, T const &value, Proj &&proj = Proj())# Removes all elements that are equal to value from the range rng and and returns a subrange [ret, util::end(rng)), where ret is a past-the-end iterator for the new end of the range.
The assignments in the parallel remove algorithm execute in sequential order in the calling thread.
Note
Complexity: Performs not more than util::end(rng)
util::begin(rng) assignments, exactly util::end(rng) - util::begin(rng) applications of the operator==() and the projection proj.
- Template Parameters
Rng – The type of the source range used (deduced). The iterators extracted from this range type must meet the requirements of an forward iterator.
T – The type of the value to remove (deduced). This value type must meet the requirements of CopyConstructible.
Proj – The type of an optional projection function. This defaults to hpx::identity
- Parameters
rng – Refers to the sequence of elements the algorithm will be applied to.
value – Specifies the value of elements to remove.
proj – Specifies the function (or function object) which will be invoked for each of the elements as a projection operation before the actual predicate is invoked.
- Returns
The remove algorithm returns a subrange_t<std::ranges::iterator_t<Rng>>. The remove algorithm returns an object {ret, last}, where ret is a past-the-end iterator for a new subrange of the values all in valid but unspecified state.
-
template<typename ExPolicy, typename FwdIter, typename Sent, typename Proj = hpx::identity, typename T = typename hpx::parallel::traits::projected<FwdIter, Proj>::value_type>
parallel::util::detail::algorithm_result<ExPolicy, subrange_t<FwdIter, Sent>>::type remove(ExPolicy &&policy, FwdIter first, Sent last, T const &value, Proj &&proj = Proj())# Removes all elements that are equal to value from the range [first, last) and and returns a subrange [ret, last), where ret is a past-the-end iterator for the new end of the range.
The assignments in the parallel remove algorithm invoked with an execution policy object of type sequenced_policy execute in sequential order in the calling thread.
The assignments in the parallel remove algorithm invoked with an execution policy object of type parallel_policy or parallel_task_policy are permitted to execute in an unordered fashion in unspecified threads, and indeterminately sequenced within each thread.
Note
Complexity: Performs not more than last - first assignments, exactly last - first applications of the operator==() and the projection proj.
- Template Parameters
ExPolicy – The type of the execution policy to use (deduced). It describes the manner in which the execution of the algorithm may be parallelized and the manner in which it executes the assignments.
FwdIter – The type of the source iterators used for the This iterator type must meet the requirements of a forward iterator.
Sent – The type of the end iterators used (deduced). This sentinel type must be a sentinel for FwdIter.
T – The type of the value to remove (deduced). This value type must meet the requirements of CopyConstructible.
Proj – The type of an optional projection function. This defaults to hpx::identity
- Parameters
policy – The execution policy to use for the scheduling of the iterations.
first – Refers to the beginning of the sequence of elements the algorithm will be applied to.
last – Refers to the end of the sequence of elements the algorithm will be applied to.
value – Specifies the value of elements to remove.
proj – Specifies the function (or function object) which will be invoked for each of the elements as a projection operation before the actual predicate is invoked.
- Returns
The remove algorithm returns a hpx::future<subrange_t<FwdIter, Sent>>. The remove algorithm returns an object {ret, last}, where ret is a past-the-end iterator for a new subrange of the values all in valid but unspecified state.
-
template<typename ExPolicy, typename Rng, typename Proj = hpx::identity, typename T = typename hpx::parallel::traits::projected<std::ranges::iterator_t<Rng>, Proj>::value_type>
parallel::util::detail::algorithm_result<ExPolicy, subrange_t<std::ranges::iterator_t<Rng>>> remove(ExPolicy &&policy, Rng &&rng, T const &value, Proj &&proj = Proj())# Removes all elements that are equal to value from the range rng and and returns a subrange [ret, util::end(rng)), where ret is a past-the-end iterator for the new end of the range.
The assignments in the parallel remove algorithm invoked with an execution policy object of type sequenced_policy execute in sequential order in the calling thread.
The assignments in the parallel remove algorithm invoked with an execution policy object of type parallel_policy or parallel_task_policy are permitted to execute in an unordered fashion in unspecified threads, and indeterminately sequenced within each thread.
Note
Complexity: Performs not more than util::end(rng)
util::begin(rng) assignments, exactly util::end(rng) - util::begin(rng) applications of the operator==() and the projection proj.
- Template Parameters
ExPolicy – The type of the execution policy to use (deduced). It describes the manner in which the execution of the algorithm may be parallelized and the manner in which it executes the assignments.
Rng – The type of the source range used (deduced). The iterators extracted from this range type must meet the requirements of an forward iterator.
T – The type of the value to remove (deduced). This value type must meet the requirements of CopyConstructible.
Proj – The type of an optional projection function. This defaults to hpx::identity
- Parameters
policy – The execution policy to use for the scheduling of the iterations.
rng – Refers to the sequence of elements the algorithm will be applied to.
value – Specifies the value of elements to remove.
proj – Specifies the function (or function object) which will be invoked for each of the elements as a projection operation before the actual predicate is invoked.
- Returns
The remove algorithm returns a hpx::future< subrange_t<std::ranges::iterator_t<Rng>>> if the execution policy is of type sequenced_task_policy or parallel_task_policy and returns FwdIter otherwise. The remove algorithm returns the iterator to the new end of the range.
-
template<typename Iter, typename Sent, typename Pred, typename Proj = hpx::identity>
-
namespace ranges
hpx::ranges::remove_copy, hpx::ranges::remove_copy_if#
Defined in header hpx/algorithm.hpp.
See Public API for a list of names and headers that are part of the public HPX API.
-
namespace hpx
-
namespace ranges
-
namespace ranges
hpx::ranges::replace, hpx::ranges::replace_if, hpx::ranges::replace_copy, hpx::ranges::replace_copy_if#
Defined in header hpx/algorithm.hpp.
See Public API for a list of names and headers that are part of the public HPX API.
-
namespace hpx
-
namespace ranges
Functions
-
template<typename Iter, typename Sent, typename Pred, typename Proj = hpx::identity, typename T = typename hpx::parallel::traits::projected<Iter, Proj>::value_type>
Iter replace_if(Iter first, Sent sent, Pred &&pred, T const &new_value, Proj &&proj = Proj())# Replaces all elements satisfying specific criteria (for which predicate f returns true) with new_value in the range [first, sent).
Effects: Substitutes elements referred by the iterator it in the range [first, sent) with new_value, when the following corresponding conditions hold: INVOKE(f, INVOKE(proj, *it)) != false
The assignments in the parallel replace_if algorithm execute in sequential order in the calling thread.
Note
Complexity: Performs exactly sent - first applications of the predicate.
- Template Parameters
Iter – The type of the source iterator used (deduced). The iterator type must meet the requirements of a forward iterator.
Sent – The type of the end iterators used (deduced). This sentinel type must be a sentinel for Iter.
Pred – The type of the function/function object to use (deduced). Unlike its sequential form, the parallel overload of equal requires F to meet the requirements of CopyConstructible. (deduced).
T – The type of the new values to replace (deduced).
Proj – The type of an optional projection function. This defaults to hpx::identity
- Parameters
first – Refers to the beginning of the sequence of elements the algorithm will be applied to.
sent – Refers to the end of the sequence of elements the algorithm will be applied to.
pred – Specifies the function (or function object) which will be invoked for each of the elements in the sequence specified by [first, last).This is an unary predicate which returns true for the elements which need to replaced. The signature of this predicate should be equivalent to:
The signature does not need to have const&, but the function must not modify the objects passed to it. The type Type must be such that an object of type Iter can be dereferenced and then implicitly converted to Type.bool pred(const Type &a);
new_value – Refers to the new value to use as the replacement.
proj – Specifies the function (or function object) which will be invoked for each of the elements as a projection operation before the actual predicate is invoked.
- Returns
The replace_if algorithm returns Iter. It returns last.
-
template<typename Rng, typename Pred, typename Proj = hpx::identity, typename T = typename hpx::parallel::traits::projected<std::ranges::iterator_t<Rng>, Proj>::value_type>
std::ranges::iterator_t<Rng> replace_if(Rng &&rng, Pred &&pred, T const &new_value, Proj &&proj = Proj())# Replaces all elements satisfying specific criteria (for which predicate pred returns true) with new_value in the range rng.
Effects: Substitutes elements referred by the iterator it in the range rng with new_value, when the following corresponding conditions hold: INVOKE(f, INVOKE(proj, *it)) != false
Note
Complexity: Performs exactly util::end(rng) - util::begin(rng) applications of the predicate.
- Template Parameters
Rng – The type of the source range used (deduced). The iterators extracted from this range type must meet the requirements of a forward iterator.
Pred – The type of the function/function object to use (deduced). Unlike its sequential form, the parallel overload of equal requires F to meet the requirements of CopyConstructible. (deduced).
T – The type of the new values to replace (deduced).
Proj – The type of an optional projection function. This defaults to hpx::identity
- Parameters
rng – Refers to the sequence of elements the algorithm will be applied to.
pred – Specifies the function (or function object) which will be invoked for each of the elements in the sequence specified by rng.This is an unary predicate which returns true for the elements which need to replaced. The signature of this predicate should be equivalent to:
The signature does not need to have const&, but the function must not modify the objects passed to it. The type Type must be such that an object of type FwdIter can be dereferenced and then implicitly converted to Type.bool pred(const Type &a);
new_value – Refers to the new value to use as the replacement.
proj – Specifies the function (or function object) which will be invoked for each of the elements as a projection operation before the actual predicate is invoked.
- Returns
The replace_if algorithm returns an hpx::traits::range_iterator<Rng>::type. It returns last.
-
template<typename ExPolicy, typename Iter, typename Sent, typename Pred, typename Proj = hpx::identity, typename T = typename hpx::parallel::traits::projected<Iter, Proj>::value_type>
hpx::parallel::util::detail::algorithm_result_t<ExPolicy, Iter> replace_if(ExPolicy &&policy, Iter first, Sent sent, Pred &&pred, T const &new_value, Proj &&proj = Proj())# Replaces all elements satisfying specific criteria (for which predicate pred returns true) with new_value in the range rng.
Effects: Substitutes elements referred by the iterator it in the range rng with new_value, when the following corresponding conditions hold: INVOKE(f, INVOKE(proj, *it)) != false
The assignments in the parallel replace_if algorithm invoked with an execution policy object of type sequenced_policy execute in sequential order in the calling thread.
The assignments in the parallel replace_if algorithm invoked with an execution policy object of type parallel_policy or parallel_task_policy are permitted to execute in an unordered fashion in unspecified threads, and indeterminately sequenced within each thread.
Note
Complexity: Performs exactly util::end(rng) - util::begin(rng) applications of the predicate.
- Template Parameters
ExPolicy – The type of the execution policy to use (deduced). It describes the manner in which the execution of the algorithm may be parallelized and the manner in which it executes the assignments.
Iter – The type of the source iterator used (deduced). The iterator type must meet the requirements of a forward iterator.
Sent – The type of the end iterators used (deduced). This sentinel type must be a sentinel for Iter.
Pred – The type of the function/function object to use (deduced). Unlike its sequential form, the parallel overload of equal requires Pred to meet the requirements of CopyConstructible. (deduced).
T – The type of the new values to replace (deduced).
Proj – The type of an optional projection function. This defaults to hpx::identity
- Parameters
policy – The execution policy to use for the scheduling of the iterations.
first – Refers to the beginning of the sequence of elements the algorithm will be applied to.
sent – Refers to the end of the sequence of elements the algorithm will be applied to.
pred – Specifies the function (or function object) which will be invoked for each of the elements in the sequence specified by [first, last).This is an unary predicate which returns true for the elements which need to replaced. The signature of this predicate should be equivalent to:
The signature does not need to have const&, but the function must not modify the objects passed to it. The type Type must be such that an object of type FwdIter can be dereferenced and then implicitly converted to Type.bool pred(const Type &a);
new_value – Refers to the new value to use as the replacement.
proj – Specifies the function (or function object) which will be invoked for each of the elements as a projection operation before the actual predicate is invoked.
- Returns
The replace_if algorithm returns a hpx::future<Iter> if the execution policy is of type sequenced_task_policy or parallel_task_policy. It returns last.
-
template<typename ExPolicy, typename Rng, typename Pred, typename Proj = hpx::identity, typename T = typename hpx::parallel::traits::projected<std::ranges::iterator_t<Rng>, Proj>::value_type>
parallel::util::detail::algorithm_result<ExPolicy, std::ranges::iterator_t<Rng>> replace_if(ExPolicy &&policy, Rng &&rng, Pred &&pred, T const &new_value, Proj &&proj = Proj())# Replaces all elements satisfying specific criteria (for which predicate pred returns true) with new_value in the range rng.
Effects: Substitutes elements referred by the iterator it in the range rng with new_value, when the following corresponding conditions hold: INVOKE(f, INVOKE(proj, *it)) != false
The assignments in the parallel replace algorithm invoked with an execution policy object of type sequenced_policy execute in sequential order in the calling thread.
The assignments in the parallel replace algorithm invoked with an execution policy object of type parallel_policy or parallel_task_policy are permitted to execute in an unordered fashion in unspecified threads, and indeterminately sequenced within each thread.
Note
Complexity: Performs exactly util::end(rng) - util::begin(rng) applications of the predicate.
- Template Parameters
ExPolicy – The type of the execution policy to use (deduced). It describes the manner in which the execution of the algorithm may be parallelized and the manner in which it executes the assignments.
Rng – The type of the source range used (deduced). The iterators extracted from this range type must meet the requirements of a forward iterator.
Pred – The type of the function/function object to use (deduced). Unlike its sequential form, the parallel overload of equal requires F to meet the requirements of CopyConstructible. (deduced).
T – The type of the new values to replace (deduced).
Proj – The type of an optional projection function. This defaults to hpx::identity
- Parameters
policy – The execution policy to use for the scheduling of the iterations.
rng – Refers to the sequence of elements the algorithm will be applied to.
pred – Specifies the function (or function object) which will be invoked for each of the elements in the sequence specified by rng.This is an unary predicate which returns true for the elements which need to replaced. The signature of this predicate should be equivalent to:
The signature does not need to have const&, but the function must not modify the objects passed to it. The type Type must be such that an object of type FwdIter can be dereferenced and then implicitly converted to Type.bool pred(const Type &a);
new_value – Refers to the new value to use as the replacement.
proj – Specifies the function (or function object) which will be invoked for each of the elements as a projection operation before the actual predicate is invoked.
- Returns
The replace_if algorithm returns a hpx::future<std::ranges::iterator_t<Rng>> if the execution policy is of type sequenced_task_policy or parallel_task_policy. It returns last.
-
template<typename Iter, typename Sent, typename Proj = hpx::identity, typename T1 = typename hpx::parallel::traits::projected<Iter, Proj>::value_type, typename T2 = T1>
Iter replace(Iter first, Sent sent, T1 const &old_value, T2 const &new_value, Proj &&proj = Proj())# Replaces all elements satisfying specific criteria with new_value in the range [first, last).
Effects: Substitutes elements referred by the iterator it in the range [first,last) with new_value, when the following corresponding conditions hold: INVOKE(proj, *i) == old_value
The assignments in the parallel replace algorithm execute in sequential order in the calling thread.
Note
Complexity: Performs exactly last - first assignments.
- Template Parameters
Iter – The type of the source iterator used (deduced). The iterator type must meet the requirements of an input iterator.
Sent – The type of the end iterators used (deduced). This sentinel type must be a sentinel for Iter.
T1 – The type of the old value to replace (deduced).
T2 – The type of the new values to replace (deduced).
Proj – The type of an optional projection function. This defaults to hpx::identity
- Parameters
first – Refers to the beginning of the sequence of elements the algorithm will be applied to.
sent – Refers to the end of the sequence of elements the algorithm will be applied to.
old_value – Refers to the old value of the elements to replace.
new_value – Refers to the new value to use as the replacement.
proj – Specifies the function (or function object) which will be invoked for each of the elements as a projection operation before the actual predicate is invoked.
- Returns
The replace algorithm returns an Iter.
-
template<typename Rng, typename Proj = hpx::identity, typename T1 = typename hpx::parallel::traits::projected<std::ranges::iterator_t<Rng>, Proj>::value_type, typename T2 = T1>
std::ranges::iterator_t<Rng> replace(Rng &&rng, T1 const &old_value, T2 const &new_value, Proj &&proj = Proj())# Replaces all elements satisfying specific criteria with new_value in the range rng.
Effects: Substitutes elements referred by the iterator it in the range rng with new_value, when the following corresponding conditions hold: INVOKE(proj, *i) == old_value
The assignments in the parallel replace algorithm execute in sequential order in the calling thread.
Note
Complexity: Performs exactly util::end(rng) - util::begin(rng) assignments.
- Template Parameters
Rng – The type of the source range used (deduced). The iterators extracted from this range type must meet the requirements of a forward iterator.
T1 – The type of the old value to replace (deduced).
T2 – The type of the new values to replace (deduced).
Proj – The type of an optional projection function. This defaults to hpx::identity
- Parameters
rng – Refers to the sequence of elements the algorithm will be applied to.
old_value – Refers to the old value of the elements to replace.
new_value – Refers to the new value to use as the replacement.
proj – Specifies the function (or function object) which will be invoked for each of the elements as a projection operation before the actual predicate is invoked.
- Returns
The replace algorithm returns an hpx::traits::range_iterator<Rng>::type.
-
template<typename ExPolicy, typename Iter, typename Sent, typename Proj = hpx::identity, typename T1 = typename hpx::parallel::traits::projected<Iter, Proj>::value_type, typename T2 = T1>
hpx::parallel::util::detail::algorithm_result_t<ExPolicy, Iter> replace(ExPolicy &&policy, Iter first, Sent sent, T1 const &old_value, T2 const &new_value, Proj &&proj = Proj())# Replaces all elements satisfying specific criteria with new_value in the range [first, last).
Effects: Substitutes elements referred by the iterator it in the range [first,last) with new_value, when the following corresponding conditions hold: INVOKE(proj, *i) == old_value
The assignments in the parallel replace algorithm invoked with an execution policy object of type sequenced_policy execute in sequential order in the calling thread.
The assignments in the parallel replace algorithm invoked with an execution policy object of type parallel_policy or parallel_task_policy are permitted to execute in an unordered fashion in unspecified threads, and indeterminately sequenced within each thread.
Note
Complexity: Performs exactly last - first assignments.
- Template Parameters
ExPolicy – The type of the execution policy to use (deduced). It describes the manner in which the execution of the algorithm may be parallelized and the manner in which it executes the assignments.
Iter – The type of the source iterator used (deduced). The iterator type must meet the requirements of a forward iterator.
Sent – The type of the end iterators used (deduced). This sentinel type must be a sentinel for Iter.
T1 – The type of the old value to replace (deduced).
T2 – The type of the new values to replace (deduced).
Proj – The type of an optional projection function. This defaults to hpx::identity
- Parameters
policy – The execution policy to use for the scheduling of the iterations.
first – Refers to the beginning of the sequence of elements the algorithm will be applied to.
sent – Refers to the end of the sequence of elements the algorithm will be applied to.
old_value – Refers to the old value of the elements to replace.
new_value – Refers to the new value to use as the replacement.
proj – Specifies the function (or function object) which will be invoked for each of the elements as a projection operation before the actual predicate is invoked.
- Returns
The replace algorithm returns a hpx::future<Iter> if the execution policy is of type sequenced_task_policy or parallel_task_policy and returns Iter otherwise.
-
template<typename ExPolicy, typename Rng, typename Proj = hpx::identity, typename T1 = typename hpx::parallel::traits::projected<std::ranges::iterator_t<Rng>, Proj>::value_type, typename T2 = T1>
parallel::util::detail::algorithm_result<ExPolicy, std::ranges::iterator_t<Rng>> replace(ExPolicy &&policy, Rng &&rng, T1 const &old_value, T2 const &new_value, Proj &&proj = Proj())# Replaces all elements satisfying specific criteria with new_value in the range rng.
Effects: Substitutes elements referred by the iterator it in the range rng with new_value, when the following corresponding conditions hold: INVOKE(proj, *i) == old_value
The assignments in the parallel replace algorithm invoked with an execution policy object of type parallel_policy or parallel_task_policy are permitted to execute in an unordered fashion in unspecified threads, and indeterminately sequenced within each thread.
Note
Complexity: Performs exactly util::end(rng) - util::begin(rng) assignments.
- Template Parameters
ExPolicy – The type of the execution policy to use (deduced). It describes the manner in which the execution of the algorithm may be parallelized and the manner in which it executes the assignments.
Rng – The type of the source range used (deduced). The iterators extracted from this range type must meet the requirements of a forward iterator.
T1 – The type of the old value to replace (deduced).
T2 – The type of the new values to replace (deduced).
Proj – The type of an optional projection function. This defaults to hpx::identity
- Parameters
policy – The execution policy to use for the scheduling of the iterations.
rng – Refers to the sequence of elements the algorithm will be applied to.
old_value – Refers to the old value of the elements to replace.
new_value – Refers to the new value to use as the replacement.
proj – Specifies the function (or function object) which will be invoked for each of the elements as a projection operation before the actual predicate is invoked. The assignments in the parallel replace algorithm invoked with an execution policy object of type sequenced_policy execute in sequential order in the calling thread.
- Returns
The replace algorithm returns an hpx::future<hpx::traits::range_iterator<Rng>::type> if the execution policy is of type sequenced_task_policy or parallel_task_policy and returns hpx::traits::range_iterator<Rng>::type otherwise.
-
template<typename InIter, typename Sent, typename OutIter, typename Pred, typename T = typename std::iterator_traits<OutIter>::value_type, typename Proj = hpx::identity>
replace_copy_if_result<InIter, OutIter> replace_copy_if(InIter first, Sent sent, OutIter dest, Pred &&pred, T const &new_value, Proj &&proj = Proj())# Copies the all elements from the range [first, sent) to another range beginning at dest replacing all elements satisfying a specific criteria with new_value.
Effects: Assigns to every iterator it in the range [result, result + (sent - first)) either new_value or *(first + (it - result)) depending on whether the following corresponding condition holds: INVOKE(f, INVOKE(proj, *(first + (i - result)))) != false
The assignments in the parallel replace_copy_if algorithm execute in sequential order in the calling thread.
Note
Complexity: Performs exactly sent - first applications of the predicate.
- Template Parameters
InIter – The type of the source iterator used (deduced). The iterator type must meet the requirements of an input iterator.
Sent – The type of the end iterators used (deduced). This sentinel type must be a sentinel for InIter.
OutIter – The type of the iterator representing the destination range (deduced). This iterator type must meet the requirements of an output iterator.
Pred – The type of the function/function object to use (deduced). Unlike its sequential form, the parallel overload of equal requires Pred to meet the requirements of CopyConstructible. (deduced).
T – The type of the new values to replace (deduced).
Proj – The type of an optional projection function. This defaults to hpx::identity
- Parameters
first – Refers to the beginning of the sequence of elements the algorithm will be applied to.
sent – Refers to the end of the sequence of elements the algorithm will be applied to.
dest – Refers to the beginning of the destination range.
pred – Specifies the function (or function object) which will be invoked for each of the elements in the sequence specified by [first, last).This is an unary predicate which returns true for the elements which need to replaced. The signature of this predicate should be equivalent to:
The signature does not need to have const&, but the function must not modify the objects passed to it. The type Type must be such that an object of type FwdIter can be dereferenced and then implicitly converted to Type.bool pred(const Type &a);
new_value – Refers to the new value to use as the replacement.
proj – Specifies the function (or function object) which will be invoked for each of the elements as a projection operation before the actual predicate is invoked.
- Returns
The replace_copy_if algorithm returns a in_out_result<InIter, OutIter>. The replace_copy_if algorithm returns the input iterator last and the output iterator to the element in the destination range, one past the last element copied.
-
template<typename Rng, typename OutIter, typename Pred, typename T = typename std::iterator_traits<OutIter>::value_type, typename Proj = hpx::identity>
replace_copy_if_result<std::ranges::iterator_t<Rng>, OutIter> replace_copy_if(Rng &&rng, OutIter dest, Pred &&pred, T const &new_value, Proj &&proj = Proj())# Copies the all elements from the range rng to another range beginning at dest replacing all elements satisfying a specific criteria with new_value.
Effects: Assigns to every iterator it in the range [result, result + (util::end(rng) - util::begin(rng))) either new_value or *(first + (it - result)) depending on whether the following corresponding condition holds: INVOKE(f, INVOKE(proj, *(first + (i - result)))) != false
The assignments in the parallel replace_copy_if algorithm execute in sequential order in the calling thread.
Note
Complexity: Performs exactly util::end(rng) - util::begin(rng) applications of the predicate.
- Template Parameters
Rng – The type of the source range used (deduced). The iterators extracted from this range type must meet the requirements of an input iterator.
OutIter – The type of the iterator representing the destination range (deduced). This iterator type must meet the requirements of an output iterator.
Pred – The type of the function/function object to use (deduced). Unlike its sequential form, the parallel overload of equal requires Pred to meet the requirements of CopyConstructible. (deduced).
T – The type of the new values to replace (deduced).
Proj – The type of an optional projection function. This defaults to hpx::identity
- Parameters
rng – Refers to the sequence of elements the algorithm will be applied to.
dest – Refers to the beginning of the destination range.
pred – Specifies the function (or function object) which will be invoked for each of the elements in the sequence specified by [first, last).This is an unary predicate which returns true for the elements which need to replaced. The signature of this predicate should be equivalent to:
The signature does not need to have const&, but the function must not modify the objects passed to it. The type Type must be such that an object of type FwdIter can be dereferenced and then implicitly converted to Type.bool pred(const Type &a);
new_value – Refers to the new value to use as the replacement.
proj – Specifies the function (or function object) which will be invoked for each of the elements as a projection operation before the actual predicate is invoked.
- Returns
The replace_copy_if algorithm returns an in_out_result<std::ranges::iterator_t<Rng>, OutIter>. The replace_copy_if algorithm returns the input iterator last and the output iterator to the element in the destination range, one past the last element copied.
-
template<typename ExPolicy, typename FwdIter1, typename Sent, typename FwdIter2, typename Pred, typename T = typename std::iterator_traits<FwdIter2>::value_type, typename Proj = hpx::identity>
parallel::util::detail::algorithm_result<ExPolicy, replace_copy_if_result<FwdIter1, FwdIter2>>::type replace_copy_if(ExPolicy &&policy, FwdIter1 first, Sent sent, FwdIter2 dest, Pred &&pred, T const &new_value, Proj &&proj = Proj())# Copies the all elements from the range [first, sent) to another range beginning at dest replacing all elements satisfying a specific criteria with new_value.
Effects: Assigns to every iterator it in the range [result, result + (sent - first)) either new_value or *(first + (it - result)) depending on whether the following corresponding condition holds: INVOKE(f, INVOKE(proj, *(first + (i - result)))) != false
The assignments in the parallel replace_copy_if algorithm invoked with an execution policy object of type sequenced_policy execute in sequential order in the calling thread.
The assignments in the parallel replace_copy_if algorithm invoked with an execution policy object of type parallel_policy or parallel_task_policy are permitted to execute in an unordered fashion in unspecified threads, and indeterminately sequenced within each thread.
Note
Complexity: Performs exactly sent - first applications of the predicate.
- Template Parameters
ExPolicy – The type of the execution policy to use (deduced). It describes the manner in which the execution of the algorithm may be parallelized and the manner in which it executes the assignments.
FwdIter1 – The type of the source iterator used (deduced). The iterator type must meet the requirements of a forward iterator.
Sent – The type of the end iterators used (deduced). This sentinel type must be a sentinel for InIter.
FwdIter2 – The type of the iterator representing the destination range (deduced). This iterator type must meet the requirements of an forward iterator.
Pred – The type of the function/function object to use (deduced). Unlike its sequential form, the parallel overload of equal requires Pred to meet the requirements of CopyConstructible. (deduced).
T – The type of the new values to replace (deduced).
Proj – The type of an optional projection function. This defaults to hpx::identity
- Parameters
policy – The execution policy to use for the scheduling of the iterations.
first – Refers to the beginning of the sequence of elements the algorithm will be applied to.
sent – Refers to the end of the sequence of elements the algorithm will be applied to.
dest – Refers to the beginning of the destination range.
pred – Specifies the function (or function object) which will be invoked for each of the elements in the sequence specified by [first, last).This is an unary predicate which returns true for the elements which need to replaced. The signature of this predicate should be equivalent to:
The signature does not need to have const&, but the function must not modify the objects passed to it. The type Type must be such that an object of type FwdIter can be dereferenced and then implicitly converted to Type.bool pred(const Type &a);
new_value – Refers to the new value to use as the replacement.
proj – Specifies the function (or function object) which will be invoked for each of the elements as a projection operation before the actual predicate is invoked.
- Returns
The replace_copy_if algorithm returns an hpx::future<FwdIter1, FwdIter2>. The replace_copy_if algorithm returns the input iterator last and the output iterator to the element in the destination range, one past the last element copied.
-
template<typename ExPolicy, typename Rng, typename FwdIter, typename Pred, typename T = typename std::iterator_traits<FwdIter>::value_type, typename Proj = hpx::identity>
parallel::util::detail::algorithm_result<ExPolicy, replace_copy_if_result<std::ranges::iterator_t<Rng>, FwdIter>>::type replace_copy_if(ExPolicy &&policy, Rng &&rng, FwdIter dest, Pred &&pred, T const &new_value, Proj &&proj = Proj())# Copies the all elements from the range rng to another range beginning at dest replacing all elements satisfying a specific criteria with new_value.
Effects: Assigns to every iterator it in the range [result, result + (util::end(rng) - util::begin(rng))) either new_value or *(first + (it - result)) depending on whether the following corresponding condition holds: INVOKE(f, INVOKE(proj, *(first + (i - result)))) != false
The assignments in the parallel replace_copy_if algorithm invoked with an execution policy object of type sequenced_policy execute in sequential order in the calling thread.
The assignments in the parallel replace_copy_if algorithm invoked with an execution policy object of type parallel_policy or parallel_task_policy are permitted to execute in an unordered fashion in unspecified threads, and indeterminately sequenced within each thread.
Note
Complexity: Performs exactly util::end(rng) - util::begin(rng) applications of the predicate.
- Template Parameters
ExPolicy – The type of the execution policy to use (deduced). It describes the manner in which the execution of the algorithm may be parallelized and the manner in which it executes the assignments.
Rng – The type of the source range used (deduced). The iterators extracted from this range type must meet the requirements of an input iterator.
FwdIter – The type of the iterator representing the destination range (deduced). This iterator type must meet the requirements of an forward iterator.
Pred – The type of the function/function object to use (deduced). Unlike its sequential form, the parallel overload of equal requires Pred to meet the requirements of CopyConstructible. (deduced).
T – The type of the new values to replace (deduced).
Proj – The type of an optional projection function. This defaults to hpx::identity
- Parameters
policy – The execution policy to use for the scheduling of the iterations.
rng – Refers to the sequence of elements the algorithm will be applied to.
dest – Refers to the beginning of the destination range.
pred – Specifies the function (or function object) which will be invoked for each of the elements in the sequence specified by [first, last).This is an unary predicate which returns true for the elements which need to replaced. The signature of this predicate should be equivalent to:
The signature does not need to have const&, but the function must not modify the objects passed to it. The type Type must be such that an object of type FwdIter can be dereferenced and then implicitly converted to Type.bool pred(const Type &a);
new_value – Refers to the new value to use as the replacement.
proj – Specifies the function (or function object) which will be invoked for each of the elements as a projection operation before the actual predicate is invoked.
- Returns
The replace_copy_if algorithm returns an hpx::future<in_out_result<std::ranges::iterator_t<Rng>, OutIter>>. The replace_copy_if algorithm returns the input iterator last and the output iterator to the element in the destination range, one past the last element copied.
-
template<typename InIter, typename Sent, typename OutIter, typename Proj = hpx::identity, typename T1 = typename hpx::parallel::traits::projected<InIter, Proj>::value_type, typename T2 = T1>
replace_copy_result<InIter, OutIter> replace_copy(InIter first, Sent sent, OutIter dest, T1 const &old_value, T2 const &new_value, Proj &&proj = Proj())# Copies the all elements from the range [first, sent) to another range beginning at dest replacing all elements satisfying a specific criteria with new_value.
Effects: Assigns to every iterator it in the range [result, result + (sent - first)) either new_value or *(first + (it - result)) depending on whether the following corresponding condition holds: INVOKE(proj, *(first + (i - result))) == old_value
The assignments in the parallel replace_copy algorithm execute in sequential order in the calling thread.
Note
Complexity: Performs exactly sent - first applications of the predicate.
- Template Parameters
InIter – The type of the source iterator used (deduced). The iterator type must meet the requirements of an input iterator.
Sent – The type of the end iterators used (deduced). This sentinel type must be a sentinel for Iter.
OutIter – The type of the iterator representing the destination range (deduced). This iterator type must meet the requirements of an output iterator.
T1 – The type of the old value to replace (deduced).
T2 – The type of the new values to replace (deduced).
Proj – The type of an optional projection function. This defaults to hpx::identity
- Parameters
first – Refers to the beginning of the sequence of elements the algorithm will be applied to.
sent – Refers to the end of the sequence of elements the algorithm will be applied to.
dest – Refers to the beginning of the destination range.
old_value – Refers to the old value of the elements to replace.
new_value – Refers to the new value to use as the replacement.
proj – Specifies the function (or function object) which will be invoked for each of the elements as a projection operation before the actual predicate is invoked.
- Returns
The replace_copy algorithm returns an in_out_result<InIter, OutIter>. The copy algorithm returns the pair of the input iterator last and the output iterator to the element in the destination range, one past the last element copied.
-
template<typename Rng, typename OutIter, typename Proj = hpx::identity, typename T1 = typename hpx::parallel::traits::projected<std::ranges::iterator_t<Rng>, Proj>::value_type, typename T2 = T1>
replace_copy_result<std::ranges::iterator_t<Rng>, OutIter> replace_copy(Rng &&rng, OutIter dest, T1 const &old_value, T2 const &new_value, Proj &&proj = Proj())# Copies the all elements from the range rbg to another range beginning at dest replacing all elements satisfying a specific criteria with new_value.
Effects: Assigns to every iterator it in the range [result, result + (util::end(rng) - util::begin(rng))) either new_value or *(first + (it - result)) depending on whether the following corresponding condition holds: INVOKE(proj, *(first + (i - result))) == old_value
The assignments in the parallel replace_copy algorithm execute in sequential order in the calling thread.
Note
Complexity: Performs exactly util::end(rng) - util::begin(rng) applications of the predicate.
- Template Parameters
Rng – The type of the source range used (deduced). The iterators extracted from this range type must meet the requirements of an input iterator.
OutIter – The type of the iterator representing the destination range (deduced). This iterator type must meet the requirements of an output iterator.
T1 – The type of the old value to replace (deduced).
T2 – The type of the new values to replace (deduced).
Proj – The type of an optional projection function. This defaults to hpx::identity
- Parameters
rng – Refers to the sequence of elements the algorithm will be applied to.
dest – Refers to the beginning of the destination range.
old_value – Refers to the old value of the elements to replace.
new_value – Refers to the new value to use as the replacement.
proj – Specifies the function (or function object) which will be invoked for each of the elements as a projection operation before the actual predicate is invoked.
- Returns
The replace_copy algorithm returns an in_out_result<std::ranges::iterator_t<Rng>, OutIter>. The copy algorithm returns the pair of the input iterator last and the output iterator to the element in the destination range, one past the last element copied.
-
template<typename ExPolicy, typename FwdIter1, typename Sent, typename FwdIter2, typename Proj = hpx::identity, typename T1 = typename hpx::parallel::traits::projected<FwdIter1, Proj>::value_type, typename T2 = T1>
parallel::util::detail::algorithm_result<ExPolicy, replace_copy_result<FwdIter1, FwdIter2>>::type replace_copy(ExPolicy &&policy, FwdIter1 first, Sent sent, FwdIter2 dest, T1 const &old_value, T2 const &new_value, Proj &&proj = Proj())# Copies the all elements from the range [first, sent) to another range beginning at dest replacing all elements satisfying a specific criteria with new_value.
Effects: Assigns to every iterator it in the range [result, result + (sent - first)) either new_value or *(first + (it - result)) depending on whether the following corresponding condition holds: INVOKE(proj, *(first + (i - result))) == old_value
The assignments in the parallel replace_copy algorithm invoked with an execution policy object of type sequenced_policy execute in sequential order in the calling thread.
The assignments in the parallel replace_copy algorithm invoked with an execution policy object of type parallel_policy or parallel_task_policy are permitted to execute in an unordered fashion in unspecified threads, and indeterminately sequenced within each thread.
Note
Complexity: Performs exactly sent - first applications of the predicate.
- Template Parameters
ExPolicy – The type of the execution policy to use (deduced). It describes the manner in which the execution of the algorithm may be parallelized and the manner in which it executes the assignments.
FwdIter1 – The type of the source iterator used (deduced). The iterator type must meet the requirements of an forward iterator.
Sent – The type of the end iterators used (deduced). This sentinel type must be a sentinel for Iter.
FwdIter2 – The type of the iterator representing the destination range (deduced). This iterator type must meet the requirements of an forward iterator.
T1 – The type of the old value to replace (deduced).
T2 – The type of the new values to replace (deduced).
Proj – The type of an optional projection function. This defaults to hpx::identity
- Parameters
policy – The execution policy to use for the scheduling of the iterations.
first – Refers to the beginning of the sequence of elements the algorithm will be applied to.
sent – Refers to the end of the sequence of elements the algorithm will be applied to.
dest – Refers to the beginning of the destination range.
old_value – Refers to the old value of the elements to replace.
new_value – Refers to the new value to use as the replacement.
proj – Specifies the function (or function object) which will be invoked for each of the elements as a projection operation before the actual predicate is invoked.
- Returns
The replace_copy algorithm returns a hpx::future<in_out_result<FwdIter1, FwdIter2>> if the execution policy is of type sequenced_task_policy or parallel_task_policy and returns in_out_result<FwdIter1, FwdIter2> otherwise. The copy algorithm returns the pair of the forward iterator last and the output iterator to the element in the destination range, one past the last element copied.
-
template<typename ExPolicy, typename Rng, typename FwdIter, typename Proj = hpx::identity, typename T1 = typename hpx::parallel::traits::projected<std::ranges::iterator_t<Rng>, Proj>::value_type, typename T2 = T1>
parallel::util::detail::algorithm_result<ExPolicy, replace_copy_result<std::ranges::iterator_t<Rng>, FwdIter>>::type replace_copy(ExPolicy &&policy, Rng &&rng, FwdIter dest, T1 const &old_value, T2 const &new_value, Proj &&proj = Proj())# Copies the all elements from the range rbg to another range beginning at dest replacing all elements satisfying a specific criteria with new_value.
Effects: Assigns to every iterator it in the range [result, result + (util::end(rng) - util::begin(rng))) either new_value or *(first + (it - result)) depending on whether the following corresponding condition holds: INVOKE(proj, *(first + (i - result))) == old_value
The assignments in the parallel replace_copy algorithm invoked with an execution policy object of type sequenced_policy execute in sequential order in the calling thread.
The assignments in the parallel replace_copy algorithm invoked with an execution policy object of type parallel_policy or parallel_task_policy are permitted to execute in an unordered fashion in unspecified threads, and indeterminately sequenced within each thread.
Note
Complexity: Performs exactly util::end(rng) - util::begin(rng) applications of the predicate.
- Template Parameters
ExPolicy – The type of the execution policy to use (deduced). It describes the manner in which the execution of the algorithm may be parallelized and the manner in which it executes the assignments.
Rng – The type of the source range used (deduced). The iterators extracted from this range type must meet the requirements of an input iterator.
FwdIter – The type of the iterator representing the destination range (deduced). This iterator type must meet the requirements of an forward iterator.
T1 – The type of the old value to replace (deduced).
T2 – The type of the new values to replace (deduced).
Proj – The type of an optional projection function. This defaults to hpx::identity
- Parameters
policy – The execution policy to use for the scheduling of the iterations.
rng – Refers to the sequence of elements the algorithm will be applied to.
dest – Refers to the beginning of the destination range.
old_value – Refers to the old value of the elements to replace.
new_value – Refers to the new value to use as the replacement.
proj – Specifies the function (or function object) which will be invoked for each of the elements as a projection operation before the actual predicate is invoked.
- Returns
The replace_copy algorithm returns a hpx::future<in_out_result< std::ranges::iterator_t<Rng>, FwdIter>> if the execution policy is of type sequenced_task_policy or parallel_task_policy and returns in_out_result< std::ranges::iterator_t<Rng>, FwdIter>> The copy algorithm returns the pair of the input iterator last and the forward iterator to the element in the destination range, one past the last element copied.
-
template<typename Iter, typename Sent, typename Pred, typename Proj = hpx::identity, typename T = typename hpx::parallel::traits::projected<Iter, Proj>::value_type>
-
namespace ranges
hpx::ranges::reverse, hpx::ranges::reverse_copy#
Defined in header hpx/algorithm.hpp.
See Public API for a list of names and headers that are part of the public HPX API.
-
namespace hpx
-
namespace ranges
Functions
-
template<typename Iter, typename Sent>
Iter reverse(Iter first, Sent sent)# Reverses the order of the elements in the range [first, last). Behaves as if applying std::iter_swap to every pair of iterators first+i, (last-i) - 1 for each non-negative i < (last-first)/2.
The assignments in the parallel reverse algorithm execute in sequential order in the calling thread.
Note
Complexity: Linear in the distance between first and last.
- Template Parameters
Iter – The type of the source iterator used (deduced). The iterator type must meet the requirements of an input iterator.
Sent – The type of the end iterators used (deduced). This sentinel type must be a sentinel for Iter.
- Parameters
first – Refers to the beginning of the sequence of elements the algorithm will be applied to.
sent – Refers to the end of the sequence of elements the algorithm will be applied to.
- Returns
The reverse algorithm returns a Iter. It returns last.
-
template<typename Rng>
std::ranges::iterator_t<Rng> reverse(Rng &&rng)# Uses rng as the source range, as if using util::begin(rng) as first and ranges::end(rng) as last. Reverses the order of the elements in the range [first, last). Behaves as if applying std::iter_swap to every pair of iterators first+i, (last-i) - 1 for each non-negative i < (last-first)/2.
The assignments in the parallel reverse algorithm execute in sequential order in the calling thread.
Note
Complexity: Linear in the distance between first and last.
- Template Parameters
Rng – The type of the source range used (deduced). The iterators extracted from this range type must meet the requirements of a bidirectional iterator.
- Parameters
rng – Refers to the sequence of elements the algorithm will be applied to.
- Returns
The reverse algorithm returns a hpx::traits::range_iterator<Rng>::type. It returns last.
-
template<typename ExPolicy, typename Iter, typename Sent>
hpx::parallel::util::detail::algorithm_result_t<ExPolicy, Iter> reverse(ExPolicy &&policy, Iter first, Sent sent)# Reverses the order of the elements in the range [first, last). Behaves as if applying std::iter_swap to every pair of iterators first+i, (last-i) - 1 for each non-negative i < (last-first)/2.
The assignments in the parallel reverse algorithm invoked with an execution policy object of type sequenced_policy execute in sequential order in the calling thread.
The assignments in the parallel reverse algorithm invoked with an execution policy object of type parallel_policy or parallel_task_policy are permitted to execute in an unordered fashion in unspecified threads, and indeterminately sequenced within each thread.
Note
Complexity: Linear in the distance between first and last.
- Template Parameters
ExPolicy – The type of the execution policy to use (deduced). It describes the manner in which the execution of the algorithm may be parallelized and the manner in which it executes the assignments.
Iter – The type of the source iterator used (deduced). The iterator type must meet the requirements of an input iterator.
Sent – The type of the end iterators used (deduced). This sentinel type must be a sentinel for Iter.
- Parameters
policy – The execution policy to use for the scheduling of the iterations.
first – Refers to the beginning of the sequence of elements the algorithm will be applied to.
sent – Refers to the end of the sequence of elements the algorithm will be applied to.
- Returns
The reverse algorithm returns a hpx::future<Iter> if the execution policy is of type sequenced_task_policy or parallel_task_policy and returns Iter otherwise. It returns last.
-
template<typename ExPolicy, typename Rng>
parallel::util::detail::algorithm_result<ExPolicy, std::ranges::iterator_t<Rng>> reverse(ExPolicy &&policy, Rng &&rng)# Uses rng as the source range, as if using util::begin(rng) as first and ranges::end(rng) as last. Reverses the order of the elements in the range [first, last). Behaves as if applying std::iter_swap to every pair of iterators first+i, (last-i) - 1 for each non-negative i < (last-first)/2.
The assignments in the parallel reverse algorithm invoked with an execution policy object of type sequenced_policy execute in sequential order in the calling thread.
The assignments in the parallel reverse algorithm invoked with an execution policy object of type parallel_policy or parallel_task_policy are permitted to execute in an unordered fashion in unspecified threads, and indeterminately sequenced within each thread.
Note
Complexity: Linear in the distance between first and last.
- Template Parameters
ExPolicy – The type of the execution policy to use (deduced). It describes the manner in which the execution of the algorithm may be parallelized and the manner in which it executes the assignments.
Rng – The type of the source range used (deduced). The iterators extracted from this range type must meet the requirements of a bidirectional iterator.
- Parameters
policy – The execution policy to use for the scheduling of the iterations.
rng – Refers to the sequence of elements the algorithm will be applied to.
- Returns
The reverse algorithm returns a hpx::future<std::ranges::iterator_t<Rng>> if the execution policy is of type sequenced_task_policy or parallel_task_policy and returns hpx::future< std::ranges::iterator_t<Rng>> otherwise. It returns last.
-
template<typename Iter, typename Sent, typename OutIter>
reverse_copy_result<Iter, OutIter> reverse_copy(Iter first, Sent last, OutIter result)# Copies the elements from the range [first, last) to another range beginning at result in such a way that the elements in the new range are in reverse order. Behaves as if by executing the assignment *(result + (last - first) - 1 - i) = *(first + i) once for each non-negative i < (last - first) If the source and destination ranges (that is, [first, last) and [result, result+(last-first)) respectively) overlap, the behavior is undefined.
The assignments in the parallel reverse_copy algorithm execute in sequential order in the calling thread.
Note
Complexity: Performs exactly last - first assignments.
- Template Parameters
Iter – The type of the source iterator used (deduced). The iterator type must meet the requirements of an input iterator.
Sent – The type of the end iterators used (deduced). This sentinel type must be a sentinel for Iter.
OutIter – The type of the iterator representing the destination range (deduced). This iterator type must meet the requirements of an output iterator.
- Parameters
first – Refers to the beginning of the sequence of elements the algorithm will be applied to.
last – Refers to the end of the sequence of elements the algorithm will be applied to.
result – Refers to the begin of the destination range.
- Returns
The reverse_copy algorithm returns a reverse_copy_result<Iter, OutIter>. The reverse_copy algorithm returns the pair of the input iterator forwarded to the first element after the last in the input sequence and the output iterator to the element in the destination range, one past the last element copied.
-
template<typename Rng, typename OutIter>
reverse_copy_result<std::ranges::iterator_t<Rng>, OutIter> reverse_copy(Rng &&rng, OutIter result)# Uses rng as the source range, as if using util::begin(rng) as first and ranges::end(rng) as last. Copies the elements from the range [first, last) to another range beginning at result in such a way that the elements in the new range are in reverse order. Behaves as if by executing the assignment *(result + (last - first) - 1 - i) = *(first + i) once for each non-negative i < (last - first) If the source and destination ranges (that is, [first, last) and [result, result+(last-first)) respectively) overlap, the behavior is undefined.
The assignments in the parallel reverse_copy algorithm execute in sequential order in the calling thread.
Note
Complexity: Performs exactly last - first assignments.
- Template Parameters
Rng – The type of the source range used (deduced). The iterators extracted from this range type must meet the requirements of a bidirectional iterator.
OutIter – The type of the iterator representing the destination range (deduced). This iterator type must meet the requirements of an output iterator.
- Parameters
rng – Refers to the sequence of elements the algorithm will be applied to.
result – Refers to the begin of the destination range.
- Returns
The reverse_copy algorithm returns a ranges::reverse_copy_result< std::ranges::iterator_t<Rng>, OutIter>. The reverse_copy algorithm returns an object equal to {last, result + N} where N = last - first
-
template<typename ExPolicy, typename Iter, typename Sent, typename FwdIter>
parallel::util::detail::algorithm_result<ExPolicy, reverse_copy_result<Iter, FwdIter>>::type reverse_copy(ExPolicy &&policy, Iter first, Sent last, FwdIter result)# Copies the elements from the range [first, last) to another range beginning at result in such a way that the elements in the new range are in reverse order. Behaves as if by executing the assignment *(result + (last - first) - 1 - i) = *(first + i) once for each non-negative i < (last - first) If the source and destination ranges (that is, [first, last) and [result, result+(last-first)) respectively) overlap, the behavior is undefined.
The assignments in the parallel reverse_copy algorithm invoked with an execution policy object of type sequenced_policy execute in sequential order in the calling thread.
The assignments in the parallel reverse_copy algorithm invoked with an execution policy object of type parallel_policy or parallel_task_policy are permitted to execute in an unordered fashion in unspecified threads, and indeterminately sequenced within each thread.
Note
Complexity: Performs exactly last - first assignments.
- Template Parameters
ExPolicy – The type of the execution policy to use (deduced). It describes the manner in which the execution of the algorithm may be parallelized and the manner in which it executes the assignments.
Iter – The type of the source iterator used (deduced). The iterator type must meet the requirements of an input iterator.
Sent – The type of the end iterators used (deduced). This sentinel type must be a sentinel for Iter.
FwdIter – The type of the iterator representing the destination range (deduced). This iterator type must meet the requirements of an forward iterator.
- Parameters
policy – The execution policy to use for the scheduling of the iterations.
first – Refers to the beginning of the sequence of elements the algorithm will be applied to.
last – Refers to the end of the sequence of elements the algorithm will be applied to.
result – Refers to the begin of the destination range.
- Returns
The reverse_copy algorithm returns a hpx::future<reverse_copy_result<Iter, FwdIter> > if the execution policy is of type sequenced_task_policy or parallel_task_policy and returns reverse_copy_result<Iter, FwdIter> otherwise. The reverse_copy algorithm returns the pair of the input iterator forwarded to the first element after the last in the input sequence and the output iterator to the element in the destination range, one past the last element copied.
-
template<typename ExPolicy, typename Rng, typename OutIter>
parallel::util::detail::algorithm_result<ExPolicy, reverse_copy_result<std::ranges::iterator_t<Rng>, OutIter>>::type reverse_copy(ExPolicy &&policy, Rng &&rng, OutIter result)# Uses rng as the source range, as if using util::begin(rng) as first and ranges::end(rng) as last. Copies the elements from the range [first, last) to another range beginning at result in such a way that the elements in the new range are in reverse order. Behaves as if by executing the assignment *(result + (last - first) - 1 - i) = *(first + i) once for each non-negative i < (last - first) If the source and destination ranges (that is, [first, last) and [result, result+(last-first)) respectively) overlap, the behavior is undefined.
The assignments in the parallel reverse_copy algorithm invoked with an execution policy object of type sequenced_policy execute in sequential order in the calling thread.
The assignments in the parallel reverse_copy algorithm invoked with an execution policy object of type parallel_policy or parallel_task_policy are permitted to execute in an unordered fashion in unspecified threads, and indeterminately sequenced within each thread.
Note
Complexity: Performs exactly last - first assignments.
- Template Parameters
ExPolicy – The type of the execution policy to use (deduced). It describes the manner in which the execution of the algorithm may be parallelized and the manner in which it executes the assignments.
Rng – The type of the source range used (deduced). The iterators extracted from this range type must meet the requirements of a bidirectional iterator.
OutIter – The type of the iterator representing the destination range (deduced). This iterator type must meet the requirements of an output iterator.
- Parameters
policy – The execution policy to use for the scheduling of the iterations.
rng – Refers to the sequence of elements the algorithm will be applied to.
result – Refers to the begin of the destination range.
- Returns
The reverse_copy algorithm returns a hpx::future<ranges::reverse_copy_result< std::ranges::iterator_t<Rng>, OutIter>> if the execution policy is of type sequenced_task_policy or parallel_task_policy and returns ranges::reverse_copy_result< std::ranges::iterator_t<Rng>, OutIter> otherwise. The reverse_copy algorithm returns an object equal to {last, result + N} where N = last - first
-
template<typename Iter, typename Sent>
-
namespace ranges
hpx::ranges::rotate, hpx::ranges::rotate_copy#
Defined in header hpx/algorithm.hpp.
See Public API for a list of names and headers that are part of the public HPX API.
-
namespace hpx
-
namespace ranges
Functions
-
template<typename FwdIter, typename Sent>
subrange_t<FwdIter, Sent> rotate(FwdIter first, FwdIter middle, Sent last)# Performs a left rotation on a range of elements. Specifically, rotate swaps the elements in the range [first, last) in such a way that the element middle becomes the first element of the new range and middle - 1 becomes the last element.
The assignments in the parallel rotate algorithm execute in sequential order in the calling thread.
Note
Complexity: Linear in the distance between first and last.
Note
The type of dereferenced FwdIter must meet the requirements of MoveAssignable and MoveConstructible.
- Template Parameters
FwdIter – The type of the source iterators used (deduced). This iterator type must meet the requirements of an forward iterator.
Sent – The type of the end iterators used (deduced). This sentinel type must be a sentinel for FwdIter.
- Parameters
first – Refers to the beginning of the sequence of elements the algorithm will be applied to.
middle – Refers to the element that should appear at the beginning of the rotated range.
last – Refers to the end of the sequence of elements the algorithm will be applied to.
- Returns
The rotate algorithm returns a subrange_t<FwdIter, Sent>. The rotate algorithm returns the iterator equal to pair(first + (last - middle), last).
-
template<typename ExPolicy, typename FwdIter, typename Sent>
parallel::util::detail::algorithm_result<ExPolicy, subrange_t<FwdIter, Sent>>::type rotate(ExPolicy &&policy, FwdIter first, FwdIter middle, Sent last)# Performs a left rotation on a range of elements. Specifically, rotate swaps the elements in the range [first, last) in such a way that the element middle becomes the first element of the new range and middle - 1 becomes the last element.
The assignments in the parallel rotate algorithm invoked with an execution policy object of type sequenced_policy execute in sequential order in the calling thread.
The assignments in the parallel rotate algorithm invoked with an execution policy object of type parallel_policy or parallel_task_policy are permitted to execute in an unordered fashion in unspecified threads, and indeterminately sequenced within each thread.
Note
Complexity: Linear in the distance between first and last.
Note
The type of dereferenced FwdIter must meet the requirements of MoveAssignable and MoveConstructible.
- Template Parameters
ExPolicy – The type of the execution policy to use (deduced). It describes the manner in which the execution of the algorithm may be parallelized and the manner in which it executes the assignments.
FwdIter – The type of the source iterators used (deduced). This iterator type must meet the requirements of an forward iterator.
Sent – The type of the end iterators used (deduced). This sentinel type must be a sentinel for FwdIter.
- Parameters
policy – The execution policy to use for the scheduling of the iterations.
first – Refers to the beginning of the sequence of elements the algorithm will be applied to.
middle – Refers to the element that should appear at the beginning of the rotated range.
last – Refers to the end of the sequence of elements the algorithm will be applied to.
- Returns
The rotate algorithm returns a hpx::future<subrange_t<FwdIter, Sent>> if the execution policy is of type parallel_task_policy and returns a subrange_t<FwdIter, Sent> otherwise. The rotate algorithm returns the iterator equal to pair(first + (last - middle), last).
-
template<typename Rng>
subrange_t<std::ranges::iterator_t<Rng>, std::ranges::iterator_t<Rng>> rotate(Rng &&rng, std::ranges::iterator_t<Rng> middle)# Uses rng as the source range, as if using util::begin(rng) as first and ranges::end(rng) as last. Performs a left rotation on a range of elements. Specifically, rotate swaps the elements in the range [first, last) in such a way that the element middle becomes the first element of the new range and middle - 1 becomes the last element.
The assignments in the parallel rotate algorithm execute in sequential order in the calling thread.
Note
Complexity: Linear in the distance between first and last.
Note
The type of dereferenced FwdIter must meet the requirements of MoveAssignable and MoveConstructible.
- Template Parameters
Rng – The type of the source range used (deduced). The iterators extracted from this range type must meet the requirements of a forward iterator.
- Parameters
rng – Refers to the sequence of elements the algorithm will be applied to.
middle – Refers to the element that should appear at the beginning of the rotated range.
- Returns
The rotate algorithm returns a subrange_t<std::ranges::iterator_t<Rng>, std::ranges::iterator_t<Rng>>. The rotate algorithm returns the iterator equal to pair(first + (last - middle), last).
-
template<typename ExPolicy, typename Rng>
parallel::util::detail::algorithm_result<ExPolicy, subrange_t<std::ranges::iterator_t<Rng>, std::ranges::iterator_t<Rng>>> rotate(ExPolicy &&policy, Rng &&rng, std::ranges::iterator_t<Rng> middle)# Uses rng as the source range, as if using util::begin(rng) as first and ranges::end(rng) as last. Performs a left rotation on a range of elements. Specifically, rotate swaps the elements in the range [first, last) in such a way that the element middle becomes the first element of the new range and middle - 1 becomes the last element.
The assignments in the parallel rotate algorithm invoked with an execution policy object of type sequenced_policy execute in sequential order in the calling thread.
The assignments in the parallel rotate algorithm invoked with an execution policy object of type parallel_policy or parallel_task_policy are permitted to execute in an unordered fashion in unspecified threads, and indeterminately sequenced within each thread.
Note
Complexity: Linear in the distance between first and last.
Note
The type of dereferenced FwdIter must meet the requirements of MoveAssignable and MoveConstructible.
- Template Parameters
ExPolicy – The type of the execution policy to use (deduced). It describes the manner in which the execution of the algorithm may be parallelized and the manner in which it executes the assignments.
Rng – The type of the source range used (deduced). The iterators extracted from this range type must meet the requirements of a forward iterator.
- Parameters
policy – The execution policy to use for the scheduling of the iterations.
rng – Refers to the sequence of elements the algorithm will be applied to.
middle – Refers to the element that should appear at the beginning of the rotated range.
- Returns
The rotate algorithm returns a hpx::future <subrange_t<std::ranges::iterator_t<Rng>, std::ranges::iterator_t<Rng>>> if the execution policy is of type sequenced_task_policy or parallel_task_policy and returns subrange_t<std::ranges::iterator_t<Rng>, std::ranges::iterator_t<Rng>>. otherwise. The rotate algorithm returns the iterator equal to pair(first + (last - middle), last).
-
template<typename FwdIter, typename Sent, typename OutIter>
rotate_copy_result<FwdIter, OutIter> rotate_copy(FwdIter first, FwdIter middle, Sent last, OutIter dest_first)# Copies the elements from the range [first, last), to another range beginning at dest_first in such a way, that the element middle becomes the first element of the new range and middle - 1 becomes the last element.
The assignments in the parallel rotate_copy algorithm execute in sequential order in the calling thread.
Note
Complexity: Performs exactly last - first assignments.
- Template Parameters
FwdIter – The type of the source iterators used (deduced). This iterator type must meet the requirements of an forward iterator.
Sent – The type of the end iterators used (deduced). This sentinel type must be a sentinel for FwdIter.
OutIter – The type of the iterator representing the destination range (deduced). This iterator type must meet the requirements of an output iterator.
- Parameters
first – Refers to the beginning of the sequence of elements the algorithm will be applied to.
middle – Refers to the element that should appear at the beginning of the rotated range.
last – Refers to the end of the sequence of elements the algorithm will be applied to.
dest_first – Output iterator to the initial position of the range where the reversed range is stored. The pointed type shall support being assigned the value of an element in the range [first,last).
- Returns
The rotate_copy algorithm returns a rotate_copy_result<FwdIter, OutIter>. The rotate_copy algorithm returns the output iterator to the element past the last element copied.
-
template<typename ExPolicy, typename FwdIter1, typename Sent, typename FwdIter2>
parallel::util::detail::algorithm_result<ExPolicy, rotate_copy_result<FwdIter1, FwdIter2>>::type rotate_copy(ExPolicy &&policy, FwdIter1 first, FwdIter1 middle, Sent last, FwdIter2 dest_first)# Copies the elements from the range [first, last), to another range beginning at dest_first in such a way, that the element middle becomes the first element of the new range and middle - 1 becomes the last element.
The assignments in the parallel rotate_copy algorithm invoked with an execution policy object of type sequenced_policy execute in sequential order in the calling thread.
The assignments in the parallel rotate_copy algorithm invoked with an execution policy object of type parallel_policy or parallel_task_policy are permitted to execute in an unordered fashion in unspecified threads, and indeterminately sequenced within each thread.
Note
Complexity: Performs exactly last - first assignments.
- Template Parameters
ExPolicy – The type of the execution policy to use (deduced). It describes the manner in which the execution of the algorithm may be parallelized and the manner in which it executes the assignments.
FwdIter1 – The type of the source iterators used (deduced). This iterator type must meet the requirements of an forward iterator.
Sent – The type of the end iterators used (deduced). This sentinel type must be a sentinel for FwdIter.
FwdIter2 – The type of the iterator representing the destination range (deduced). This iterator type must meet the requirements of an forward iterator.
- Parameters
policy – The execution policy to use for the scheduling of the iterations.
first – Refers to the beginning of the sequence of elements the algorithm will be applied to.
middle – Refers to the element that should appear at the beginning of the rotated range.
last – Refers to the end of the sequence of elements the algorithm will be applied to.
dest_first – Output iterator to the initial position of the range where the reversed range is stored. The pointed type shall support being assigned the value of an element in the range [first,last).
- Returns
The rotate_copy algorithm returns areturns hpx::future< rotate_copy_result<FwdIter1, FwdIter2>> if the execution policy is of type sequenced_task_policy or parallel_task_policy and returns rotate_copy_result<FwdIter1, FwdIter2> otherwise. The rotate_copy algorithm returns the output iterator to the element past the last element copied.
-
template<typename Rng, typename OutIter>
rotate_copy_result<std::ranges::iterator_t<Rng>, OutIter> rotate_copy(Rng &&rng, std::ranges::iterator_t<Rng> middle, OutIter dest_first)# Uses rng as the source range, as if using util::begin(rng) as first and ranges::end(rng) as last. Copies the elements from the range [first, last), to another range beginning at dest_first in such a way, that the element middle becomes the first element of the new range and middle - 1 becomes the last element.
The assignments in the parallel rotate_copy algorithm execute in sequential order in the calling thread.
Note
Complexity: Performs exactly last - first assignments.
- Template Parameters
Rng – The type of the source range used (deduced). The iterators extracted from this range type must meet the requirements of a forward iterator.
OutIter – The type of the iterator representing the destination range (deduced). This iterator type must meet the requirements of an forward iterator.
- Parameters
rng – Refers to the sequence of elements the algorithm will be applied to.
middle – Refers to the element that should appear at the beginning of the rotated range.
dest_first – Output iterator to the initial position of the range where the reversed range is stored. The pointed type shall support being assigned the value of an element in the range [first,last).
- Returns
The rotate algorithm returns a rotate_copy_result<std::ranges::iterator_t<Rng>, OutIter>. The rotate_copy algorithm returns the output iterator to the element past the last element copied.
-
template<typename ExPolicy, typename Rng, typename OutIter>
parallel::util::detail::algorithm_result<ExPolicy, rotate_copy_result<std::ranges::iterator_t<Rng>, OutIter>> rotate_copy(ExPolicy &&policy, Rng &&rng, std::ranges::iterator_t<Rng> middle, OutIter dest_first)# Uses rng as the source range, as if using util::begin(rng) as first and ranges::end(rng) as last. Copies the elements from the range [first, last), to another range beginning at dest_first in such a way, that the element new_first becomes the first element of the new range and new_first - 1 becomes the last element.
The assignments in the parallel rotate_copy algorithm invoked with an execution policy object of type sequenced_policy execute in sequential order in the calling thread.
The assignments in the parallel rotate_copy algorithm invoked with an execution policy object of type parallel_policy or parallel_task_policy are permitted to execute in an unordered fashion in unspecified threads, and indeterminately sequenced within each thread.
Note
Complexity: Performs exactly last - first assignments.
- Template Parameters
ExPolicy – The type of the execution policy to use (deduced). It describes the manner in which the execution of the algorithm may be parallelized and the manner in which it executes the assignments.
Rng – The type of the source range used (deduced). The iterators extracted from this range type must meet the requirements of a forward iterator.
OutIter – The type of the iterator representing the destination range (deduced). This iterator type must meet the requirements of an output iterator.
- Parameters
policy – The execution policy to use for the scheduling of the iterations.
rng – Refers to the sequence of elements the algorithm will be applied to.
middle – Refers to the element that should appear at the beginning of the rotated range.
dest_first – Output iterator to the initial position of the range where the reversed range is stored. The pointed type shall support being assigned the value of an element in the range [first,last).
- Returns
The rotate_copy algorithm returns a hpx::future<otate_copy_result< std::ranges::iterator_t<Rng>, OutIter>> if the execution policy is of type parallel_task_policy and returns rotate_copy_result< std::ranges::iterator_t<Rng>, OutIter> otherwise. The rotate_copy algorithm returns the output iterator to the element past the last element copied.
-
template<typename FwdIter, typename Sent>
-
namespace ranges
hpx::ranges::search, hpx::ranges::search_n#
Defined in header hpx/algorithm.hpp.
See Public API for a list of names and headers that are part of the public HPX API.
-
namespace hpx
-
namespace ranges
Functions
-
template<typename FwdIter, typename Sent, typename FwdIter2, typename Sent2, typename Pred = hpx::ranges::equal_to, typename Proj1 = hpx::identity, typename Proj2 = hpx::identity>
FwdIter search(FwdIter first, Sent last, FwdIter2 s_first, Sent2 s_last, Pred &&op = Pred(), Proj1 &&proj1 = Proj1(), Proj2 &&proj2 = Proj2())# Searches the range [first, last) for any elements in the range [s_first, s_last). Uses a provided predicate to compare elements.
The comparison operations in the parallel search algorithm execute in sequential order in the calling thread.
Note
Complexity: at most (S*N) comparisons where S = distance(s_first, s_last) and N = distance(first, last).
- Template Parameters
FwdIter – The type of the source iterators used for the first range (deduced). This iterator type must meet the requirements of an forward iterator.
Sent – The type of the source sentinel used for the first range (deduced). This iterator type must meet the requirements of an sentinel.
FwdIter2 – The type of the source iterators used for the second range (deduced). This iterator type must meet the requirements of an forward iterator.
Sent2 – The type of the source sentinel used for the second range (deduced). This iterator type must meet the requirements of an sentinel.
Pred – The type of an optional function/function object to use. Unlike its sequential form, the parallel overload of adjacent_find requires Pred to meet the requirements of CopyConstructible. This defaults to std::equal_to<>
Proj1 – The type of an optional projection function. This defaults to hpx::identity and is applied to the elements of type dereferenced FwdIter.
Proj2 – The type of an optional projection function. This defaults to hpx::identity and is applied to the elements of type dereferenced FwdIter2.
- Parameters
first – Refers to the beginning of the sequence of elements of the first range the algorithm will be applied to.
last – Refers to the end of the sequence of elements of the first range the algorithm will be applied to.
s_first – Refers to the beginning of the sequence of elements the algorithm will be searching for.
s_last – Refers to the end of the sequence of elements of the algorithm will be searching for.
op – Refers to the binary predicate which returns true if the elements should be treated as equal. the signature of the function should be equivalent to
The signature does not need to have const &, but the function must not modify the objects passed to it. The types Type1 and Type2 must be such that objects of types FwdIter1 and FwdIter2 can be dereferenced and then implicitly converted to Type1 and Type2 respectivelybool pred(const Type1 &a, const Type2 &b);
proj1 – Specifies the function (or function object) which will be invoked for each of the elements of type dereferenced FwdIter1 as a projection operation before the actual predicate is invoked.
proj2 – Specifies the function (or function object) which will be invoked for each of the elements of type dereferenced FwdIter2 as a projection operation before the actual predicate is invoked.
- Returns
The search algorithm returns a hpx::future<FwdIter> if the execution policy is of type task_execution_policy and returns FwdIter otherwise. The search algorithm returns an iterator to the beginning of the first subsequence [s_first, s_last) in range [first, last). If the length of the subsequence [s_first, s_last) is greater than the length of the range [first, last), last is returned. Additionally if the size of the subsequence is empty first is returned. If no subsequence is found, last is returned.
-
template<typename ExPolicy, typename FwdIter, typename Sent, typename FwdIter2, typename Sent2, typename Pred = hpx::ranges::equal_to, typename Proj1 = hpx::identity, typename Proj2 = hpx::identity>
parallel::util::detail::algorithm_result<ExPolicy, FwdIter>::type search(ExPolicy &&policy, FwdIter first, Sent last, FwdIter2 s_first, Sent2 s_last, Pred &&op = Pred(), Proj1 &&proj1 = Proj1(), Proj2 &&proj2 = Proj2())# Searches the range [first, last) for any elements in the range [s_first, s_last). Uses a provided predicate to compare elements.
The comparison operations in the parallel search algorithm invoked with an execution policy object of type sequenced_policy execute in sequential order in the calling thread.
The comparison operations in the parallel search algorithm invoked with an execution policy object of type parallel_policy or parallel_task_policy are permitted to execute in an unordered fashion in unspecified threads, and indeterminately sequenced within each thread.
Note
Complexity: at most (S*N) comparisons where S = distance(s_first, s_last) and N = distance(first, last).
- Template Parameters
ExPolicy – The type of the execution policy to use (deduced). It describes the manner in which the execution of the algorithm may be parallelized and the manner in which it executes the assignments.
FwdIter – The type of the source iterators used for the first range (deduced). This iterator type must meet the requirements of an forward iterator.
Sent – The type of the source sentinel used for the first range (deduced). This iterator type must meet the requirements of an sentinel.
FwdIter2 – The type of the source iterators used for the second range (deduced). This iterator type must meet the requirements of an forward iterator.
Sent2 – The type of the source sentinel used for the second range (deduced). This iterator type must meet the requirements of an sentinel.
Pred – The type of an optional function/function object to use. Unlike its sequential form, the parallel overload of adjacent_find requires Pred to meet the requirements of CopyConstructible. This defaults to std::equal_to<>
Proj1 – The type of an optional projection function. This defaults to hpx::identity and is applied to the elements of type dereferenced FwdIter.
Proj2 – The type of an optional projection function. This defaults to hpx::identity and is applied to the elements of type dereferenced FwdIter2.
- Parameters
policy – The execution policy to use for the scheduling of the iterations.
first – Refers to the beginning of the sequence of elements of the first range the algorithm will be applied to.
last – Refers to the end of the sequence of elements of the first range the algorithm will be applied to.
s_first – Refers to the beginning of the sequence of elements the algorithm will be searching for.
s_last – Refers to the end of the sequence of elements of the algorithm will be searching for.
op – Refers to the binary predicate which returns true if the elements should be treated as equal. the signature of the function should be equivalent to
The signature does not need to have const &, but the function must not modify the objects passed to it. The types Type1 and Type2 must be such that objects of types FwdIter1 and FwdIter2 can be dereferenced and then implicitly converted to Type1 and Type2 respectivelybool pred(const Type1 &a, const Type2 &b);
proj1 – Specifies the function (or function object) which will be invoked for each of the elements of type dereferenced FwdIter1 as a projection operation before the actual predicate is invoked.
proj2 – Specifies the function (or function object) which will be invoked for each of the elements of type dereferenced FwdIter2 as a projection operation before the actual predicate is invoked.
- Returns
The search algorithm returns a hpx::future<FwdIter> if the execution policy is of type task_execution_policy and returns FwdIter otherwise. The search algorithm returns an iterator to the beginning of the first subsequence [s_first, s_last) in range [first, last). If the length of the subsequence [s_first, s_last) is greater than the length of the range [first, last), last is returned. Additionally if the size of the subsequence is empty first is returned. If no subsequence is found, last is returned.
-
template<typename Rng1, typename Rng2, typename Pred = hpx::ranges::equal_to, typename Proj1 = hpx::identity, typename Proj2 = hpx::identity>
std::ranges::iterator_t<Rng1> search(Rng1 &&rng1, Rng2 &&rng2, Pred &&op = Pred(), Proj1 &&proj1 = Proj1(), Proj2 &&proj2 = Proj2())# Searches the range [first, last) for any elements in the range [s_first, s_last). Uses a provided predicate to compare elements.
The comparison operations in the parallel search algorithm execute in sequential order in the calling thread.
Note
Complexity: at most (S*N) comparisons where S = distance(s_first, s_last) and N = distance(first, last).
- Template Parameters
Rng1 – The type of the examine range used (deduced). The iterators extracted from this range type must meet the requirements of an input iterator.
Rng2 – The type of the search range used (deduced). The iterators extracted from this range type must meet the requirements of an input iterator.
Pred – The type of an optional function/function object to use. Unlike its sequential form, the parallel overload of adjacent_find requires Pred to meet the requirements of CopyConstructible. This defaults to std::equal_to<>
Proj1 – The type of an optional projection function. This defaults to hpx::identity and is applied to the elements of Rng1.
Proj2 – The type of an optional projection function. This defaults to hpx::identity and is applied to the elements of Rng2.
- Parameters
rng1 – Refers to the sequence of elements the algorithm will be examining.
rng2 – Refers to the sequence of elements the algorithm will be searching for.
op – Refers to the binary predicate which returns true if the elements should be treated as equal. the signature of the function should be equivalent to
The signature does not need to have const &, but the function must not modify the objects passed to it. The types Type1 and Type2 must be such that objects of types FwdIter1 and FwdIter2 can be dereferenced and then implicitly converted to Type1 and Type2 respectivelybool pred(const Type1 &a, const Type2 &b);
proj1 – Specifies the function (or function object) which will be invoked for each of the elements of rng1 as a projection operation before the actual predicate is invoked.
proj2 – Specifies the function (or function object) which will be invoked for each of the elements of rng2 as a projection operation before the actual predicate is invoked.
- Returns
The search algorithm returns a hpx::future<FwdIter> if the execution policy is of type task_execution_policy and returns FwdIter otherwise. The search algorithm returns an iterator to the beginning of the first subsequence [s_first, s_last) in range [first, last). If the length of the subsequence [s_first, s_last) is greater than the length of the range [first, last), last is returned. Additionally if the size of the subsequence is empty first is returned. If no subsequence is found, last is returned.
-
template<typename ExPolicy, typename Rng1, typename Rng2, typename Pred = hpx::ranges::equal_to, typename Proj1 = hpx::identity, typename Proj2 = hpx::identity>
hpx::parallel::util::detail::algorithm_result<ExPolicy, std::ranges::iterator_t<Rng1>> search(ExPolicy &&policy, Rng1 &&rng1, Rng2 &&rng2, Pred &&op = Pred(), Proj1 &&proj1 = Proj1(), Proj2 &&proj2 = Proj2())# Searches the range [first, last) for any elements in the range [s_first, s_last). Uses a provided predicate to compare elements.
The comparison operations in the parallel search algorithm invoked with an execution policy object of type sequenced_policy execute in sequential order in the calling thread.
The comparison operations in the parallel search algorithm invoked with an execution policy object of type parallel_policy or parallel_task_policy are permitted to execute in an unordered fashion in unspecified threads, and indeterminately sequenced within each thread.
Note
Complexity: at most (S*N) comparisons where S = distance(s_first, s_last) and N = distance(first, last).
- Template Parameters
ExPolicy – The type of the execution policy to use (deduced). It describes the manner in which the execution of the algorithm may be parallelized and the manner in which it executes the assignments.
Rng1 – The type of the examine range used (deduced). The iterators extracted from this range type must meet the requirements of an input iterator.
Rng2 – The type of the search range used (deduced). The iterators extracted from this range type must meet the requirements of an input iterator.
Pred – The type of an optional function/function object to use. Unlike its sequential form, the parallel overload of adjacent_find requires Pred to meet the requirements of CopyConstructible. This defaults to std::equal_to<>
Proj1 – The type of an optional projection function. This defaults to hpx::identity and is applied to the elements of Rng1.
Proj2 – The type of an optional projection function. This defaults to hpx::identity and is applied to the elements of Rng2.
- Parameters
policy – The execution policy to use for the scheduling of the iterations.
rng1 – Refers to the sequence of elements the algorithm will be examining.
rng2 – Refers to the sequence of elements the algorithm will be searching for.
op – Refers to the binary predicate which returns true if the elements should be treated as equal. the signature of the function should be equivalent to
The signature does not need to have const &, but the function must not modify the objects passed to it. The types Type1 and Type2 must be such that objects of types FwdIter1 and FwdIter2 can be dereferenced and then implicitly converted to Type1 and Type2 respectivelybool pred(const Type1 &a, const Type2 &b);
proj1 – Specifies the function (or function object) which will be invoked for each of the elements of rng1 as a projection operation before the actual predicate is invoked.
proj2 – Specifies the function (or function object) which will be invoked for each of the elements of rng2 as a projection operation before the actual predicate is invoked.
- Returns
The search algorithm returns a hpx::future<FwdIter> if the execution policy is of type task_execution_policy and returns FwdIter otherwise. The search algorithm returns an iterator to the beginning of the first subsequence [s_first, s_last) in range [first, last). If the length of the subsequence [s_first, s_last) is greater than the length of the range [first, last), last is returned. Additionally if the size of the subsequence is empty first is returned. If no subsequence is found, last is returned.
-
template<typename FwdIter, typename FwdIter2, typename Sent2, typename Pred = hpx::ranges::equal_to, typename Proj1 = hpx::identity, typename Proj2 = hpx::identity>
FwdIter search_n(FwdIter first, std::size_t count, FwdIter2 s_first, Sent s_last, Pred &&op = Pred(), Proj1 &&proj1 = Proj1(), Proj2 &&proj2 = Proj2())# Searches the range [first, last) for any elements in the range [s_first, s_last). Uses a provided predicate to compare elements.
The comparison operations in the parallel search_n algorithm execute in sequential order in the calling thread.
Note
Complexity: at most (S*N) comparisons where S = distance(s_first, s_last) and N = count.
- Template Parameters
FwdIter – The type of the source iterators used for the first range (deduced). This iterator type must meet the requirements of an forward iterator.
FwdIter2 – The type of the source iterators used for the second range (deduced). This iterator type must meet the requirements of an forward iterator.
Sent2 – The type of the source sentinel used for the second range (deduced). This iterator type must meet the requirements of an sentinel.
Pred – The type of an optional function/function object to use. Unlike its sequential form, the parallel overload of adjacent_find requires Pred to meet the requirements of CopyConstructible. This defaults to std::equal_to<>
Proj1 – The type of an optional projection function. This defaults to hpx::identity and is applied to the elements of type dereferenced FwdIter.
Proj2 – The type of an optional projection function. This defaults to hpx::identity and is applied to the elements of type dereferenced FwdIter2.
- Parameters
first – Refers to the beginning of the sequence of elements of the first range the algorithm will be applied to.
count – Refers to the range of elements of the first range the algorithm will be applied to.
s_first – Refers to the beginning of the sequence of elements the algorithm will be searching for.
s_last – Refers to the end of the sequence of elements of the algorithm will be searching for.
op – Refers to the binary predicate which returns true if the elements should be treated as equal. the signature of the function should be equivalent to
The signature does not need to have const &, but the function must not modify the objects passed to it. The types Type1 and Type2 must be such that objects of types FwdIter1 and FwdIter2 can be dereferenced and then implicitly converted to Type1 and Type2 respectivelybool pred(const Type1 &a, const Type2 &b);
proj1 – Specifies the function (or function object) which will be invoked for each of the elements of type dereferenced FwdIter1 as a projection operation before the actual predicate is invoked.
proj2 – Specifies the function (or function object) which will be invoked for each of the elements of type dereferenced FwdIter2 as a projection operation before the actual predicate is invoked.
- Returns
The search_n algorithm returns FwdIter. The search_n algorithm returns an iterator to the beginning of the last subsequence [s_first, s_last) in range [first, first+count). If the length of the subsequence [s_first, s_last) is greater than the length of the range [first, first+count), first is returned. Additionally, if the size of the subsequence is empty or no subsequence is found, first is also returned.
-
template<typename ExPolicy, typename FwdIter, typename FwdIter2, typename Sent2, typename Pred = hpx::ranges::equal_to, typename Proj1 = hpx::identity, typename Proj2 = hpx::identity>
hpx::parallel::util::detail::algorithm_result<ExPolicy, FwdIter>::type search_n(ExPolicy &&policy, FwdIter first, std::size_t count, FwdIter2 s_first, Sent2 s_last, Pred &&op = Pred(), Proj1 &&proj1 = Proj1(), Proj2 &&proj2 = Proj2())# Searches the range [first, last) for any elements in the range [s_first, s_last). Uses a provided predicate to compare elements.
The comparison operations in the parallel search_n algorithm invoked with an execution policy object of type sequenced_policy execute in sequential order in the calling thread.
The comparison operations in the parallel search_n algorithm invoked with an execution policy object of type parallel_policy or parallel_task_policy are permitted to execute in an unordered fashion in unspecified threads, and indeterminately sequenced within each thread.
Note
Complexity: at most (S*N) comparisons where S = distance(s_first, s_last) and N = count.
- Template Parameters
ExPolicy – The type of the execution policy to use (deduced). It describes the manner in which the execution of the algorithm may be parallelized and the manner in which it executes the assignments.
FwdIter – The type of the source iterators used for the first range (deduced). This iterator type must meet the requirements of an forward iterator.
FwdIter2 – The type of the source iterators used for the second range (deduced). This iterator type must meet the requirements of an forward iterator.
Sent2 – The type of the source sentinel used for the second range (deduced). This iterator type must meet the requirements of an sentinel.
Pred – The type of an optional function/function object to use. Unlike its sequential form, the parallel overload of adjacent_find requires Pred to meet the requirements of CopyConstructible. This defaults to std::equal_to<>
Proj1 – The type of an optional projection function. This defaults to hpx::identity and is applied to the elements of type dereferenced FwdIter.
Proj2 – The type of an optional projection function. This defaults to hpx::identity and is applied to the elements of type dereferenced FwdIter2.
- Parameters
policy – The execution policy to use for the scheduling of the iterations.
first – Refers to the beginning of the sequence of elements of the first range the algorithm will be applied to.
count – Refers to the range of elements of the first range the algorithm will be applied to.
s_first – Refers to the beginning of the sequence of elements the algorithm will be searching for.
s_last – Refers to the end of the sequence of elements of the algorithm will be searching for.
op – Refers to the binary predicate which returns true if the elements should be treated as equal. the signature of the function should be equivalent to
The signature does not need to have const &, but the function must not modify the objects passed to it. The types Type1 and Type2 must be such that objects of types FwdIter1 and FwdIter2 can be dereferenced and then implicitly converted to Type1 and Type2 respectivelybool pred(const Type1 &a, const Type2 &b);
proj1 – Specifies the function (or function object) which will be invoked for each of the elements of type dereferenced FwdIter1 as a projection operation before the actual predicate is invoked.
proj2 – Specifies the function (or function object) which will be invoked for each of the elements of type dereferenced FwdIter2 as a projection operation before the actual predicate is invoked.
- Returns
The search_n algorithm returns a hpx::future<FwdIter> if the execution policy is of type task_execution_policy and returns FwdIter otherwise. The search_n algorithm returns an iterator to the beginning of the last subsequence [s_first, s_last) in range [first, first+count). If the length of the subsequence [s_first, s_last) is greater than the length of the range [first, first+count), first is returned. Additionally if the size of the subsequence is empty or no subsequence is found, first is also returned.
-
template<typename Rng1, typename Rng2, typename Pred = hpx::ranges::equal_to, typename Proj1 = hpx::identity, typename Proj2 = hpx::identity>
std::ranges::iterator_t<Rng1> search_n(Rng1 &&rng1, std::size_t count, Rng2 &&rng2, Pred &&op = Pred(), Proj1 &&proj1 = Proj1(), Proj2 &&proj2 = Proj2())# Searches the range [first, last) for any elements in the range [s_first, s_last). Uses a provided predicate to compare elements.
The comparison operations in the parallel search algorithm execute in sequential order in the calling thread.
Note
Complexity: at most (S*N) comparisons where S = distance(s_first, s_last) and N = distance(first, last).
- Template Parameters
Rng1 – The type of the examine range used (deduced). The iterators extracted from this range type must meet the requirements of an input iterator.
Rng2 – The type of the search range used (deduced). The iterators extracted from this range type must meet the requirements of an input iterator.
Pred – The type of an optional function/function object to use. Unlike its sequential form, the parallel overload of adjacent_find requires Pred to meet the requirements of CopyConstructible. This defaults to std::equal_to<>
Proj1 – The type of an optional projection function. This defaults to hpx::identity and is applied to the elements of Rng1.
Proj2 – The type of an optional projection function. This defaults to hpx::identity and is applied to the elements of Rng2.
- Parameters
rng1 – Refers to the sequence of elements the algorithm will be examining.
count – The number of elements to apply the algorithm on.
rng2 – Refers to the sequence of elements the algorithm will be searching for.
op – Refers to the binary predicate which returns true if the elements should be treated as equal. the signature of the function should be equivalent to
The signature does not need to have const &, but the function must not modify the objects passed to it. The types Type1 and Type2 must be such that objects of types FwdIter1 and FwdIter2 can be dereferenced and then implicitly converted to Type1 and Type2 respectivelybool pred(const Type1 &a, const Type2 &b);
proj1 – Specifies the function (or function object) which will be invoked for each of the elements of rng1 as a projection operation before the actual predicate is invoked.
proj2 – Specifies the function (or function object) which will be invoked for each of the elements of rng2 as a projection operation before the actual predicate is invoked.
- Returns
The search algorithm returns a hpx::future<FwdIter> if the execution policy is of type task_execution_policy and returns FwdIter otherwise. The search algorithm returns an iterator to the beginning of the first subsequence [s_first, s_last) in range [first, last). If the length of the subsequence [s_first, s_last) is greater than the length of the range [first, last), last is returned. Additionally if the size of the subsequence is empty first is returned. If no subsequence is found, last is returned.
-
template<typename ExPolicy, typename Rng1, typename Rng2, typename Pred = hpx::ranges::equal_to, typename Proj1 = hpx::identity, typename Proj2 = hpx::identity>
hpx::parallel::util::detail::algorithm_result<ExPolicy, std::ranges::iterator_t<Rng1>> search_n(ExPolicy &&policy, Rng1 &&rng1, std::size_t count, Rng2 &&rng2, Pred &&op = Pred(), Proj1 &&proj1 = Proj1(), Proj2 &&proj2 = Proj2())# Searches the range [first, last) for any elements in the range [s_first, s_last). Uses a provided predicate to compare elements.
The comparison operations in the parallel search algorithm invoked with an execution policy object of type sequenced_policy execute in sequential order in the calling thread.
The comparison operations in the parallel search algorithm invoked with an execution policy object of type parallel_policy or parallel_task_policy are permitted to execute in an unordered fashion in unspecified threads, and indeterminately sequenced within each thread.
Note
Complexity: at most (S*N) comparisons where S = distance(s_first, s_last) and N = distance(first, last).
- Template Parameters
ExPolicy – The type of the execution policy to use (deduced). It describes the manner in which the execution of the algorithm may be parallelized and the manner in which it executes the assignments.
Rng1 – The type of the examine range used (deduced). The iterators extracted from this range type must meet the requirements of an input iterator.
Rng2 – The type of the search range used (deduced). The iterators extracted from this range type must meet the requirements of an input iterator.
Pred – The type of an optional function/function object to use. Unlike its sequential form, the parallel overload of adjacent_find requires Pred to meet the requirements of CopyConstructible. This defaults to std::equal_to<>
Proj1 – The type of an optional projection function. This defaults to hpx::identity and is applied to the elements of Rng1.
Proj2 – The type of an optional projection function. This defaults to hpx::identity and is applied to the elements of Rng2.
- Parameters
policy – The execution policy to use for the scheduling of the iterations.
rng1 – Refers to the sequence of elements the algorithm will be examining.
count – The number of elements to apply the algorithm on.
rng2 – Refers to the sequence of elements the algorithm will be searching for.
op – Refers to the binary predicate which returns true if the elements should be treated as equal. the signature of the function should be equivalent to
The signature does not need to have const &, but the function must not modify the objects passed to it. The types Type1 and Type2 must be such that objects of types FwdIter1 and FwdIter2 can be dereferenced and then implicitly converted to Type1 and Type2 respectivelybool pred(const Type1 &a, const Type2 &b);
proj1 – Specifies the function (or function object) which will be invoked for each of the elements of rng1 as a projection operation before the actual predicate is invoked.
proj2 – Specifies the function (or function object) which will be invoked for each of the elements of rng2 as a projection operation before the actual predicate is invoked.
- Returns
The search algorithm returns a hpx::future<FwdIter> if the execution policy is of type task_execution_policy and returns FwdIter otherwise. The search algorithm returns an iterator to the beginning of the first subsequence [s_first, s_last) in range [first, last). If the length of the subsequence [s_first, s_last) is greater than the length of the range [first, last), last is returned. Additionally if the size of the subsequence is empty first is returned. If no subsequence is found, last is returned.
-
template<typename FwdIter, typename Sent, typename FwdIter2, typename Sent2, typename Pred = hpx::ranges::equal_to, typename Proj1 = hpx::identity, typename Proj2 = hpx::identity>
-
namespace ranges
hpx::ranges::set_difference#
Defined in header hpx/algorithm.hpp.
See Public API for a list of names and headers that are part of the public HPX API.
-
namespace hpx
-
namespace ranges
Functions
-
template<typename ExPolicy, typename Iter1, typename Sent1, typename Iter2, typename Sent2, typename Iter3, typename Pred = hpx::parallel::detail::less, typename Proj1 = hpx::identity, typename Proj2 = hpx::identity>
hpx::parallel::util::detail::algorithm_result<ExPolicy, set_difference_result<Iter1, Iter3>>::type set_difference(ExPolicy &&policy, Iter1 first1, Sent1 last1, Iter2 first2, Sent2 last2, Iter3 dest, Pred &&op = Pred(), Proj1 &&proj1 = Proj1(), Proj2 &&proj2 = Proj2())# Constructs a sorted range beginning at dest consisting of all elements present in the range [first1, last1) and not present in the range [first2, last2). This algorithm expects both input ranges to be sorted with the given binary predicate f.
Equivalent elements are treated individually, that is, if some element is found m times in [first1, last1) and n times in [first2, last2), it will be copied to dest exactly std::max(m-n, 0) times. The resulting range cannot overlap with either of the input ranges.
The resulting range cannot overlap with either of the input ranges.
The application of function objects in parallel algorithm invoked with a sequential execution policy object execute in sequential order in the calling thread (sequenced_policy) or in a single new thread spawned from the current thread (for sequenced_task_policy).
The application of function objects in parallel algorithm invoked with an execution policy object of type parallel_policy or parallel_task_policy are permitted to execute in an unordered fashion in unspecified threads, and indeterminately sequenced within each thread.
Note
Complexity: At most 2*(N1 + N2 - 1) comparisons, where N1 is the length of the first sequence and N2 is the length of the second sequence.
- Template Parameters
ExPolicy – The type of the execution policy to use (deduced). It describes the manner in which the execution of the algorithm may be parallelized and the manner in which it applies user-provided function objects.
Iter1 – The type of the source iterators used (deduced) representing the first sequence. This iterator type must meet the requirements of an forward iterator.
Sent1 – The type of the end source iterators used (deduced). This iterator type must meet the requirements of an sentinel for Iter1.
Iter2 – The type of the source iterators used (deduced) representing the second sequence. This iterator type must meet the requirements of an forward iterator.
Sent2 – The type of the end source iterators used (deduced) representing the second sequence. This iterator type must meet the requirements of an sentinel for Iter2.
Iter3 – The type of the iterator representing the destination range (deduced). This iterator type must meet the requirements of an output iterator.
Pred – The type of an optional function/function object to use. Unlike its sequential form, the parallel overload of set_difference requires Pred to meet the requirements of CopyConstructible. This defaults to std::less<>
Proj1 – The type of an optional projection function applied to the first sequence. This defaults to hpx::identity
Proj2 – The type of an optional projection function applied to the second sequence. This defaults to hpx::identity
- Parameters
policy – The execution policy to use for the scheduling of the iterations.
first1 – Refers to the beginning of the sequence of elements of the first range the algorithm will be applied to.
last1 – Refers to the end of the sequence of elements of the first range the algorithm will be applied to.
first2 – Refers to the beginning of the sequence of elements of the second range the algorithm will be applied to.
last2 – Refers to the end of the sequence of elements of the second range the algorithm will be applied to.
dest – Refers to the beginning of the destination range.
op – The binary predicate which returns true if the elements should be treated as equal. The signature of the predicate function should be equivalent to the following:
The signature does not need to have const &, but the function must not modify the objects passed to it. The type Type1 must be such that objects of type InIter can be dereferenced and then implicitly converted to Type1bool pred(const Type1 &a, const Type1 &b);
proj1 – Specifies the function (or function object) which will be invoked for each of the elements of the first sequence as a projection operation before the actual predicate op is invoked.
proj2 – Specifies the function (or function object) which will be invoked for each of the elements of the second sequence as a projection operation before the actual predicate op is invoked.
- Returns
The set_difference algorithm returns a hpx::future<ranges::set_difference_result<Iter1, Iter3>> if the execution policy is of type sequenced_task_policy or parallel_task_policy and returns ranges::set_difference_result<Iter1, Iter3> otherwise. The set_difference algorithm returns the output iterator to the element in the destination range, one past the last element copied.
-
template<typename ExPolicy, typename Rng1, typename Rng2, typename Iter3, typename Pred = hpx::parallel::detail::less, typename Proj1 = hpx::identity, typename Proj2 = hpx::identity>
hpx::parallel::util::detail::algorithm_result<ExPolicy, set_difference_result<std::ranges::iterator_t<Rng1>, Iter3>> set_difference(ExPolicy &&policy, Rng1 &&rng1, Rng2 &&rng2, Iter3 dest, Pred &&op = Pred(), Proj1 &&proj1 = Proj1(), Proj2 &&proj2 = Proj2())# Constructs a sorted range beginning at dest consisting of all elements present in the range [first1, last1) and not present in the range [first2, last2). This algorithm expects both input ranges to be sorted with the given binary predicate f.
Equivalent elements are treated individually, that is, if some element is found m times in [first1, last1) and n times in [first2, last2), it will be copied to dest exactly std::max(m-n, 0) times. The resulting range cannot overlap with either of the input ranges.
The resulting range cannot overlap with either of the input ranges.
The application of function objects in parallel algorithm invoked with a sequential execution policy object execute in sequential order in the calling thread (sequenced_policy) or in a single new thread spawned from the current thread (for sequenced_task_policy).
The application of function objects in parallel algorithm invoked with an execution policy object of type parallel_policy or parallel_task_policy are permitted to execute in an unordered fashion in unspecified threads, and indeterminately sequenced within each thread.
Note
Complexity: At most 2*(N1 + N2 - 1) comparisons, where N1 is the length of the first sequence and N2 is the length of the second sequence.
- Template Parameters
ExPolicy – The type of the execution policy to use (deduced). It describes the manner in which the execution of the algorithm may be parallelized and the manner in which it applies user-provided function objects.
Rng1 – The type of the source range used (deduced). The iterators extracted from this range type must meet the requirements of an input iterator.
Rng2 – The type of the source range used (deduced). The iterators extracted from this range type must meet the requirements of an input iterator.
Iter3 – The type of the iterator representing the destination range (deduced). This iterator type must meet the requirements of an output iterator.
Pred – The type of an optional function/function object to use. Unlike its sequential form, the parallel overload of set_difference requires Pred to meet the requirements of CopyConstructible. This defaults to std::less<>
Proj1 – The type of an optional projection function applied to the first sequence. This defaults to hpx::identity
Proj2 – The type of an optional projection function applied to the second sequence. This defaults to hpx::identity
- Parameters
policy – The execution policy to use for the scheduling of the iterations.
rng1 – Refers to the first sequence of elements the algorithm will be applied to.
rng2 – Refers to the second sequence of elements the algorithm will be applied to.
dest – Refers to the beginning of the destination range.
op – The binary predicate which returns true if the elements should be treated as equal. The signature of the predicate function should be equivalent to the following:
The signature does not need to have const &, but the function must not modify the objects passed to it. The type Type1 must be such that objects of type InIter can be dereferenced and then implicitly converted to Type1bool pred(const Type1 &a, const Type1 &b);
proj1 – Specifies the function (or function object) which will be invoked for each of the elements of the first sequence as a projection operation before the actual predicate op is invoked.
proj2 – Specifies the function (or function object) which will be invoked for each of the elements of the second sequence as a projection operation before the actual predicate op is invoked.
- Returns
The set_difference algorithm returns a hpx::future<ranges::set_difference_result<Iter1, Iter3>> if the execution policy is of type sequenced_task_policy or parallel_task_policy and returns ranges::set_difference_result<Iter1, Iter3> otherwise. where Iter1 is range_iterator_t<Rng1> and Iter2 is range_iterator_t<Rng2> The set_difference algorithm returns the output iterator to the element in the destination range, one past the last element copied.
-
template<typename Iter1, typename Sent1, typename Iter2, typename Sent2, typename Iter3, typename Pred = hpx::parallel::detail::less, typename Proj1 = hpx::identity, typename Proj2 = hpx::identity>
set_difference_result<Iter1, Iter3> set_difference(Iter1 first1, Sent1 last1, Iter2 first2, Sent2 last2, Iter3 dest, Pred &&op = Pred(), Proj1 &&proj1 = Proj1(), Proj2 &&proj2 = Proj2())# Constructs a sorted range beginning at dest consisting of all elements present in the range [first1, last1) and not present in the range [first2, last2). This algorithm expects both input ranges to be sorted with the given binary predicate f.
Equivalent elements are treated individually, that is, if some element is found m times in [first1, last1) and n times in [first2, last2), it will be copied to dest exactly std::max(m-n, 0) times. The resulting range cannot overlap with either of the input ranges.
The resulting range cannot overlap with either of the input ranges.
Note
Complexity: At most 2*(N1 + N2 - 1) comparisons, where N1 is the length of the first sequence and N2 is the length of the second sequence.
- Template Parameters
Iter1 – The type of the source iterators used (deduced) representing the first sequence. This iterator type must meet the requirements of an forward iterator.
Sent1 – The type of the end source iterators used (deduced). This iterator type must meet the requirements of an sentinel for Iter1.
Iter2 – The type of the source iterators used (deduced) representing the second sequence. This iterator type must meet the requirements of an forward iterator.
Sent2 – The type of the end source iterators used (deduced) representing the second sequence. This iterator type must meet the requirements of an sentinel for Iter2.
Iter3 – The type of the iterator representing the destination range (deduced). This iterator type must meet the requirements of an output iterator.
Pred – The type of an optional function/function object to use. Unlike its sequential form, the parallel overload of set_difference requires Pred to meet the requirements of CopyConstructible. This defaults to std::less<>
Proj1 – The type of an optional projection function applied to the first sequence. This defaults to hpx::identity
Proj2 – The type of an optional projection function applied to the second sequence. This defaults to hpx::identity
- Parameters
first1 – Refers to the beginning of the sequence of elements of the first range the algorithm will be applied to.
last1 – Refers to the end of the sequence of elements of the first range the algorithm will be applied to.
first2 – Refers to the beginning of the sequence of elements of the second range the algorithm will be applied to.
last2 – Refers to the end of the sequence of elements of the second range the algorithm will be applied to.
dest – Refers to the beginning of the destination range.
op – The binary predicate which returns true if the elements should be treated as equal. The signature of the predicate function should be equivalent to the following:
The signature does not need to have const &, but the function must not modify the objects passed to it. The type Type1 must be such that objects of type InIter can be dereferenced and then implicitly converted to Type1bool pred(const Type1 &a, const Type1 &b);
proj1 – Specifies the function (or function object) which will be invoked for each of the elements of the first sequence as a projection operation before the actual predicate op is invoked.
proj2 – Specifies the function (or function object) which will be invoked for each of the elements of the second sequence as a projection operation before the actual predicate op is invoked.
- Returns
The set_difference algorithm returns ranges::set_difference_result<Iter1, Iter3>. The set_difference algorithm returns the output iterator to the element in the destination range, one past the last element copied.
-
template<typename Rng1, typename Rng2, typename Iter3, typename Pred = hpx::parallel::detail::less, typename Proj1 = hpx::identity, typename Proj2 = hpx::identity>
set_difference_result<std::ranges::iterator_t<Rng1>, Iter3> set_difference(Rng1 &&rng1, Rng2 &&rng2, Iter3 dest, Pred &&op = Pred(), Proj1 &&proj1 = Proj1(), Proj2 &&proj2 = Proj2())# Constructs a sorted range beginning at dest consisting of all elements present in the range [first1, last1) and not present in the range [first2, last2). This algorithm expects both input ranges to be sorted with the given binary predicate f.
Equivalent elements are treated individually, that is, if some element is found m times in [first1, last1) and n times in [first2, last2), it will be copied to dest exactly std::max(m-n, 0) times. The resulting range cannot overlap with either of the input ranges.
The resulting range cannot overlap with either of the input ranges.
Note
Complexity: At most 2*(N1 + N2 - 1) comparisons, where N1 is the length of the first sequence and N2 is the length of the second sequence.
- Template Parameters
Rng1 – The type of the source range used (deduced). The iterators extracted from this range type must meet the requirements of an input iterator.
Rng2 – The type of the source range used (deduced). The iterators extracted from this range type must meet the requirements of an input iterator.
Iter3 – The type of the iterator representing the destination range (deduced). This iterator type must meet the requirements of an output iterator.
Pred – The type of an optional function/function object to use. Unlike its sequential form, the parallel overload of set_difference requires Pred to meet the requirements of CopyConstructible. This defaults to std::less<>
Proj1 – The type of an optional projection function applied to the first sequence. This defaults to hpx::identity
Proj2 – The type of an optional projection function applied to the second sequence. This defaults to hpx::identity
- Parameters
rng1 – Refers to the first sequence of elements the algorithm will be applied to.
rng2 – Refers to the second sequence of elements the algorithm will be applied to.
dest – Refers to the beginning of the destination range.
op – The binary predicate which returns true if the elements should be treated as equal. The signature of the predicate function should be equivalent to the following:
The signature does not need to have const &, but the function must not modify the objects passed to it. The type Type1 must be such that objects of type InIter can be dereferenced and then implicitly converted to Type1bool pred(const Type1 &a, const Type1 &b);
proj1 – Specifies the function (or function object) which will be invoked for each of the elements of the first sequence as a projection operation before the actual predicate op is invoked.
proj2 – Specifies the function (or function object) which will be invoked for each of the elements of the second sequence as a projection operation before the actual predicate op is invoked.
- Returns
The set_difference algorithm returns ranges::set_difference_result<Iter1, Iter3>. where Iter1 is range_iterator_t<Rng1> and Iter2 is range_iterator_t<Rng2> The set_difference algorithm returns the output iterator to the element in the destination range, one past the last element copied.
-
template<typename ExPolicy, typename Iter1, typename Sent1, typename Iter2, typename Sent2, typename Iter3, typename Pred = hpx::parallel::detail::less, typename Proj1 = hpx::identity, typename Proj2 = hpx::identity>
-
namespace ranges
hpx::ranges::set_intersection#
Defined in header hpx/algorithm.hpp.
See Public API for a list of names and headers that are part of the public HPX API.
-
namespace hpx
-
namespace ranges
Functions
-
template<typename ExPolicy, typename Iter1, typename Sent1, typename Iter2, typename Sent2, typename Iter3, typename Pred = hpx::parallel::detail::less, typename Proj1 = hpx::identity, typename Proj2 = hpx::identity>
hpx::parallel::util::detail::algorithm_result<ExPolicy, set_intersection_result<Iter1, Iter2, Iter3>>::type set_intersection(ExPolicy &&policy, Iter1 first1, Sent1 last1, Iter2 first2, Sent2 last2, Iter3 dest, Pred &&op = Pred(), Proj1 &&proj1 = Proj1(), Proj2 &&proj2 = Proj2())# Constructs a sorted range beginning at dest consisting of all elements present in both sorted ranges [first1, last1) and [first2, last2). This algorithm expects both input ranges to be sorted with the given binary predicate f.
If some element is found m times in [first1, last1) and n times in [first2, last2), the first std::min(m, n) elements will be copied from the first range to the destination range. The order of equivalent elements is preserved. The resulting range cannot overlap with either of the input ranges.
The resulting range cannot overlap with either of the input ranges.
The application of function objects in parallel algorithm invoked with a sequential execution policy object execute in sequential order in the calling thread (sequenced_policy) or in a single new thread spawned from the current thread (for sequenced_task_policy).
The application of function objects in parallel algorithm invoked with an execution policy object of type parallel_policy or parallel_task_policy are permitted to execute in an unordered fashion in unspecified threads, and indeterminately sequenced within each thread.
Note
Complexity: At most 2*(N1 + N2 - 1) comparisons, where N1 is the length of the first sequence and N2 is the length of the second sequence.
- Template Parameters
ExPolicy – The type of the execution policy to use (deduced). It describes the manner in which the execution of the algorithm may be parallelized and the manner in which it applies user-provided function objects.
Iter1 – The type of the source iterators used (deduced) representing the first sequence. This iterator type must meet the requirements of an forward iterator.
Sent1 – The type of the end source iterators used (deduced). This iterator type must meet the requirements of an sentinel for Iter1.
Iter2 – The type of the source iterators used (deduced) representing the second sequence. This iterator type must meet the requirements of an forward iterator.
Sent2 – The type of the end source iterators used (deduced) representing the second sequence. This iterator type must meet the requirements of an sentinel for Iter2.
Iter3 – The type of the iterator representing the destination range (deduced). This iterator type must meet the requirements of an output iterator.
Pred – The type of an optional function/function object to use. Unlike its sequential form, the parallel overload of set_intersection requires Pred to meet the requirements of CopyConstructible. This defaults to std::less<>
Proj1 – The type of an optional projection function applied to the first sequence. This defaults to hpx::identity
Proj2 – The type of an optional projection function applied to the second sequence. This defaults to hpx::identity
- Parameters
policy – The execution policy to use for the scheduling of the iterations.
first1 – Refers to the beginning of the sequence of elements of the first range the algorithm will be applied to.
last1 – Refers to the end of the sequence of elements of the first range the algorithm will be applied to.
first2 – Refers to the beginning of the sequence of elements of the second range the algorithm will be applied to.
last2 – Refers to the end of the sequence of elements of the second range the algorithm will be applied to.
dest – Refers to the beginning of the destination range.
op – The binary predicate which returns true if the elements should be treated as equal. The signature of the predicate function should be equivalent to the following:
The signature does not need to have const &, but the function must not modify the objects passed to it. The type Type1 must be such that objects of type InIter can be dereferenced and then implicitly converted to Type1bool pred(const Type1 &a, const Type1 &b);
proj1 – Specifies the function (or function object) which will be invoked for each of the elements of the first sequence as a projection operation before the actual predicate op is invoked.
proj2 – Specifies the function (or function object) which will be invoked for each of the elements of the second sequence as a projection operation before the actual predicate op is invoked.
- Returns
The set_intersection algorithm returns a hpx::future<ranges::set_intersection_result<Iter1, Iter2, Iter3>> if the execution policy is of type sequenced_task_policy or parallel_task_policy and returns ranges::set_intersection_result<Iter1, Iter2, Iter3> otherwise. The set_intersection algorithm returns the output iterator to the element in the destination range, one past the last element copied.
-
template<typename ExPolicy, typename Rng1, typename Rng2, typename Iter3, typename Pred = hpx::parallel::detail::less, typename Proj1 = hpx::identity, typename Proj2 = hpx::identity>
hpx::parallel::util::detail::algorithm_result<ExPolicy, set_intersection_result<std::ranges::iterator_t<Rng1>, std::ranges::iterator_t<Rng2>, Iter3>> set_intersection(ExPolicy &&policy, Rng1 &&rng1, Rng2 &&rng2, Iter3 dest, Pred &&op = Pred(), Proj1 &&proj1 = Proj1(), Proj2 &&proj2 = Proj2())# Constructs a sorted range beginning at dest consisting of all elements present in both sorted ranges [first1, last1) and [first2, last2). This algorithm expects both input ranges to be sorted with the given binary predicate f.
If some element is found m times in [first1, last1) and n times in [first2, last2), the first std::min(m, n) elements will be copied from the first range to the destination range. The order of equivalent elements is preserved. The resulting range cannot overlap with either of the input ranges.
The resulting range cannot overlap with either of the input ranges.
The application of function objects in parallel algorithm invoked with a sequential execution policy object execute in sequential order in the calling thread (sequenced_policy) or in a single new thread spawned from the current thread (for sequenced_task_policy).
The application of function objects in parallel algorithm invoked with an execution policy object of type parallel_policy or parallel_task_policy are permitted to execute in an unordered fashion in unspecified threads, and indeterminately sequenced within each thread.
Note
Complexity: At most 2*(N1 + N2 - 1) comparisons, where N1 is the length of the first sequence and N2 is the length of the second sequence.
- Template Parameters
ExPolicy – The type of the execution policy to use (deduced). It describes the manner in which the execution of the algorithm may be parallelized and the manner in which it applies user-provided function objects.
Rng1 – The type of the source range used (deduced). The iterators extracted from this range type must meet the requirements of an input iterator.
Rng2 – The type of the source range used (deduced). The iterators extracted from this range type must meet the requirements of an input iterator.
Iter3 – The type of the iterator representing the destination range (deduced). This iterator type must meet the requirements of an output iterator.
Pred – The type of an optional function/function object to use. Unlike its sequential form, the parallel overload of set_intersection requires Pred to meet the requirements of CopyConstructible. This defaults to std::less<>
Proj1 – The type of an optional projection function applied to the first sequence. This defaults to hpx::identity
Proj2 – The type of an optional projection function applied to the second sequence. This defaults to hpx::identity
- Parameters
policy – The execution policy to use for the scheduling of the iterations.
rng1 – Refers to the first sequence of elements the algorithm will be applied to.
rng2 – Refers to the second sequence of elements the algorithm will be applied to.
dest – Refers to the beginning of the destination range.
op – The binary predicate which returns true if the elements should be treated as equal. The signature of the predicate function should be equivalent to the following:
The signature does not need to have const &, but the function must not modify the objects passed to it. The type Type1 must be such that objects of type InIter can be dereferenced and then implicitly converted to Type1bool pred(const Type1 &a, const Type1 &b);
proj1 – Specifies the function (or function object) which will be invoked for each of the elements of the first sequence as a projection operation before the actual predicate op is invoked.
proj2 – Specifies the function (or function object) which will be invoked for each of the elements of the second sequence as a projection operation before the actual predicate op is invoked.
- Returns
The set_intersection algorithm returns a hpx::future<ranges::set_intersection_result<Iter1, Iter2, Iter3>> if the execution policy is of type sequenced_task_policy or parallel_task_policy and returns ranges::set_intersection_result<Iter1, Iter2, Iter3> otherwise. where Iter1 is range_iterator_t<Rng1> and Iter2 is range_iterator_t<Rng2> The set_intersection algorithm returns the output iterator to the element in the destination range, one past the last element copied.
-
template<typename Iter1, typename Sent1, typename Iter2, typename Sent2, typename Iter3, typename Pred = hpx::parallel::detail::less, typename Proj1 = hpx::identity, typename Proj2 = hpx::identity>
set_intersection_result<Iter1, Iter2, Iter3> set_intersection(Iter1 first1, Sent1 last1, Iter2 first2, Sent2 last2, Iter3 dest, Pred &&op = Pred(), Proj1 &&proj1 = Proj1(), Proj2 &&proj2 = Proj2())# Constructs a sorted range beginning at dest consisting of all elements present in both sorted ranges [first1, last1) and [first2, last2). This algorithm expects both input ranges to be sorted with the given binary predicate f.
If some element is found m times in [first1, last1) and n times in [first2, last2), the first std::min(m, n) elements will be copied from the first range to the destination range. The order of equivalent elements is preserved. The resulting range cannot overlap with either of the input ranges.
The resulting range cannot overlap with either of the input ranges.
Note
Complexity: At most 2*(N1 + N2 - 1) comparisons, where N1 is the length of the first sequence and N2 is the length of the second sequence.
- Template Parameters
Iter1 – The type of the source iterators used (deduced) representing the first sequence. This iterator type must meet the requirements of an forward iterator.
Sent1 – The type of the end source iterators used (deduced). This iterator type must meet the requirements of an sentinel for Iter1.
Iter2 – The type of the source iterators used (deduced) representing the second sequence. This iterator type must meet the requirements of an forward iterator.
Sent2 – The type of the end source iterators used (deduced) representing the second sequence. This iterator type must meet the requirements of an sentinel for Iter2.
Iter3 – The type of the iterator representing the destination range (deduced). This iterator type must meet the requirements of an output iterator.
Pred – The type of an optional function/function object to use. Unlike its sequential form, the parallel overload of set_intersection requires Pred to meet the requirements of CopyConstructible. This defaults to std::less<>
Proj1 – The type of an optional projection function applied to the first sequence. This defaults to hpx::identity
Proj2 – The type of an optional projection function applied to the second sequence. This defaults to hpx::identity
- Parameters
first1 – Refers to the beginning of the sequence of elements of the first range the algorithm will be applied to.
last1 – Refers to the end of the sequence of elements of the first range the algorithm will be applied to.
first2 – Refers to the beginning of the sequence of elements of the second range the algorithm will be applied to.
last2 – Refers to the end of the sequence of elements of the second range the algorithm will be applied to.
dest – Refers to the beginning of the destination range.
op – The binary predicate which returns true if the elements should be treated as equal. The signature of the predicate function should be equivalent to the following:
The signature does not need to have const &, but the function must not modify the objects passed to it. The type Type1 must be such that objects of type InIter can be dereferenced and then implicitly converted to Type1bool pred(const Type1 &a, const Type1 &b);
proj1 – Specifies the function (or function object) which will be invoked for each of the elements of the first sequence as a projection operation before the actual predicate op is invoked.
proj2 – Specifies the function (or function object) which will be invoked for each of the elements of the second sequence as a projection operation before the actual predicate op is invoked.
- Returns
The set_intersection algorithm returns ranges::set_intersection_result<Iter1, Iter2, Iter3>. The set_intersection algorithm returns the output iterator to the element in the destination range, one past the last element copied.
-
template<typename Rng1, typename Rng2, typename Iter3, typename Pred = hpx::parallel::detail::less, typename Proj1 = hpx::identity, typename Proj2 = hpx::identity>
set_intersection_result<std::ranges::iterator_t<Rng1>, std::ranges::iterator_t<Rng2>, Iter3> set_intersection(Rng1 &&rng1, Rng2 &&rng2, Iter3 dest, Pred &&op = Pred(), Proj1 &&proj1 = Proj1(), Proj2 &&proj2 = Proj2())# Constructs a sorted range beginning at dest consisting of all elements present in both sorted ranges [first1, last1) and [first2, last2). This algorithm expects both input ranges to be sorted with the given binary predicate f.
If some element is found m times in [first1, last1) and n times in [first2, last2), the first std::min(m, n) elements will be copied from the first range to the destination range. The order of equivalent elements is preserved. The resulting range cannot overlap with either of the input ranges.
The resulting range cannot overlap with either of the input ranges.
Note
Complexity: At most 2*(N1 + N2 - 1) comparisons, where N1 is the length of the first sequence and N2 is the length of the second sequence.
- Template Parameters
Rng1 – The type of the source range used (deduced). The iterators extracted from this range type must meet the requirements of an input iterator.
Rng2 – The type of the source range used (deduced). The iterators extracted from this range type must meet the requirements of an input iterator.
Iter3 – The type of the iterator representing the destination range (deduced). This iterator type must meet the requirements of an output iterator.
Pred – The type of an optional function/function object to use. Unlike its sequential form, the parallel overload of set_intersection requires Pred to meet the requirements of CopyConstructible. This defaults to std::less<>
Proj1 – The type of an optional projection function applied to the first sequence. This defaults to hpx::identity
Proj2 – The type of an optional projection function applied to the second sequence. This defaults to hpx::identity
- Parameters
rng1 – Refers to the first sequence of elements the algorithm will be applied to.
rng2 – Refers to the second sequence of elements the algorithm will be applied to.
dest – Refers to the beginning of the destination range.
op – The binary predicate which returns true if the elements should be treated as equal. The signature of the predicate function should be equivalent to the following:
The signature does not need to have const &, but the function must not modify the objects passed to it. The type Type1 must be such that objects of type InIter can be dereferenced and then implicitly converted to Type1bool pred(const Type1 &a, const Type1 &b);
proj1 – Specifies the function (or function object) which will be invoked for each of the elements of the first sequence as a projection operation before the actual predicate op is invoked.
proj2 – Specifies the function (or function object) which will be invoked for each of the elements of the second sequence as a projection operation before the actual predicate op is invoked.
- Returns
The set_intersection algorithm returns ranges::set_intersection_result<Iter1, Iter2, Iter3>. where Iter1 is range_iterator_t<Rng1> and Iter2 is range_iterator_t<Rng2> The set_intersection algorithm returns the output iterator to the element in the destination range, one past the last element copied.
-
template<typename ExPolicy, typename Iter1, typename Sent1, typename Iter2, typename Sent2, typename Iter3, typename Pred = hpx::parallel::detail::less, typename Proj1 = hpx::identity, typename Proj2 = hpx::identity>
-
namespace ranges
hpx::ranges::set_symmetric_difference#
Defined in header hpx/algorithm.hpp.
See Public API for a list of names and headers that are part of the public HPX API.
-
namespace hpx
-
namespace ranges
Functions
-
template<typename ExPolicy, typename Iter1, typename Sent1, typename Iter2, typename Sent2, typename Iter3, typename Pred = hpx::parallel::detail::less, typename Proj1 = hpx::identity, typename Proj2 = hpx::identity>
hpx::parallel::util::detail::algorithm_result<ExPolicy, set_symmetric_difference_result<Iter1, Iter2, Iter3>>::type set_symmetric_difference(ExPolicy &&policy, Iter1 first1, Sent1 last1, Iter2 first2, Sent2 last2, Iter3 dest, Pred &&op = Pred(), Proj1 &&proj1 = Proj1(), Proj2 &&proj2 = Proj2())# Constructs a sorted range beginning at dest consisting of all elements present in either of the sorted ranges [first1, last1) and [first2, last2), but not in both of them are copied to the range beginning at dest. The resulting range is also sorted. This algorithm expects both input ranges to be sorted with the given binary predicate f.
If some element is found m times in [first1, last1) and n times in [first2, last2), it will be copied to dest exactly std::abs(m-n) times. If m>n, then the last m-n of those elements are copied from [first1,last1), otherwise the last n-m elements are copied from [first2,last2). The resulting range cannot overlap with either of the input ranges.
The resulting range cannot overlap with either of the input ranges.
The application of function objects in parallel algorithm invoked with a sequential execution policy object execute in sequential order in the calling thread (sequenced_policy) or in a single new thread spawned from the current thread (for sequenced_task_policy).
The application of function objects in parallel algorithm invoked with an execution policy object of type parallel_policy or parallel_task_policy are permitted to execute in an unordered fashion in unspecified threads, and indeterminately sequenced within each thread.
Note
Complexity: At most 2*(N1 + N2 - 1) comparisons, where N1 is the length of the first sequence and N2 is the length of the second sequence.
- Template Parameters
ExPolicy – The type of the execution policy to use (deduced). It describes the manner in which the execution of the algorithm may be parallelized and the manner in which it applies user-provided function objects.
Iter1 – The type of the source iterators used (deduced) representing the first sequence. This iterator type must meet the requirements of an forward iterator.
Sent1 – The type of the end source iterators used (deduced). This iterator type must meet the requirements of an sentinel for Iter1.
Iter2 – The type of the source iterators used (deduced) representing the second sequence. This iterator type must meet the requirements of an forward iterator.
Sent2 – The type of the end source iterators used (deduced) representing the second sequence. This iterator type must meet the requirements of an sentinel for Iter2.
Iter3 – The type of the iterator representing the destination range (deduced). This iterator type must meet the requirements of an output iterator.
Pred – The type of an optional function/function object to use. Unlike its sequential form, the parallel overload of set_symmetric_difference requires Pred to meet the requirements of CopyConstructible. This defaults to std::less<>
Proj1 – The type of an optional projection function applied to the first sequence. This defaults to hpx::identity
Proj2 – The type of an optional projection function applied to the second sequence. This defaults to hpx::identity
- Parameters
policy – The execution policy to use for the scheduling of the iterations.
first1 – Refers to the beginning of the sequence of elements of the first range the algorithm will be applied to.
last1 – Refers to the end of the sequence of elements of the first range the algorithm will be applied to.
first2 – Refers to the beginning of the sequence of elements of the second range the algorithm will be applied to.
last2 – Refers to the end of the sequence of elements of the second range the algorithm will be applied to.
dest – Refers to the beginning of the destination range.
op – The binary predicate which returns true if the elements should be treated as equal. The signature of the predicate function should be equivalent to the following:
The signature does not need to have const &, but the function must not modify the objects passed to it. The type Type1 must be such that objects of type InIter can be dereferenced and then implicitly converted to Type1bool pred(const Type1 &a, const Type1 &b);
proj1 – Specifies the function (or function object) which will be invoked for each of the elements of the first sequence as a projection operation before the actual predicate op is invoked.
proj2 – Specifies the function (or function object) which will be invoked for each of the elements of the second sequence as a projection operation before the actual predicate op is invoked.
- Returns
The set_symmetric_difference algorithm returns a hpx::future<ranges::set_symmetric_difference_result<Iter1, Iter2, Iter3>> if the execution policy is of type sequenced_task_policy or parallel_task_policy and returns ranges::set_symmetric_difference_result<Iter1, Iter2, Iter3> otherwise. The set_symmetric_difference algorithm returns the output iterator to the element in the destination range, one past the last element copied.
-
template<typename ExPolicy, typename Rng1, typename Rng2, typename Iter3, typename Pred = hpx::parallel::detail::less, typename Proj1 = hpx::identity, typename Proj2 = hpx::identity>
hpx::parallel::util::detail::algorithm_result<ExPolicy, set_symmetric_difference_result<std::ranges::iterator_t<Rng1>, std::ranges::iterator_t<Rng2>, Iter3>> set_symmetric_difference(ExPolicy &&policy, Rng1 &&rng1, Rng2 &&rng2, Iter3 dest, Pred &&op = Pred(), Proj1 &&proj1 = Proj1(), Proj2 &&proj2 = Proj2())# Constructs a sorted range beginning at dest consisting of all elements present in either of the sorted ranges [first1, last1) and [first2, last2), but not in both of them are copied to the range beginning at dest. The resulting range is also sorted. This algorithm expects both input ranges to be sorted with the given binary predicate f.
If some element is found m times in [first1, last1) and n times in [first2, last2), it will be copied to dest exactly std::abs(m-n) times. If m>n, then the last m-n of those elements are copied from [first1,last1), otherwise the last n-m elements are copied from [first2,last2). The resulting range cannot overlap with either of the input ranges.
The resulting range cannot overlap with either of the input ranges.
The application of function objects in parallel algorithm invoked with a sequential execution policy object execute in sequential order in the calling thread (sequenced_policy) or in a single new thread spawned from the current thread (for sequenced_task_policy).
The application of function objects in parallel algorithm invoked with an execution policy object of type parallel_policy or parallel_task_policy are permitted to execute in an unordered fashion in unspecified threads, and indeterminately sequenced within each thread.
Note
Complexity: At most 2*(N1 + N2 - 1) comparisons, where N1 is the length of the first sequence and N2 is the length of the second sequence.
- Template Parameters
ExPolicy – The type of the execution policy to use (deduced). It describes the manner in which the execution of the algorithm may be parallelized and the manner in which it applies user-provided function objects.
Rng1 – The type of the source range used (deduced). The iterators extracted from this range type must meet the requirements of an input iterator.
Rng2 – The type of the source range used (deduced). The iterators extracted from this range type must meet the requirements of an input iterator.
Iter3 – The type of the iterator representing the destination range (deduced). This iterator type must meet the requirements of an output iterator.
Pred – The type of an optional function/function object to use. Unlike its sequential form, the parallel overload of set_symmetric_difference requires Pred to meet the requirements of CopyConstructible. This defaults to std::less<>
Proj1 – The type of an optional projection function applied to the first sequence. This defaults to hpx::identity
Proj2 – The type of an optional projection function applied to the second sequence. This defaults to hpx::identity
- Parameters
policy – The execution policy to use for the scheduling of the iterations.
rng1 – Refers to the first sequence of elements the algorithm will be applied to.
rng2 – Refers to the second sequence of elements the algorithm will be applied to.
dest – Refers to the beginning of the destination range.
op – The binary predicate which returns true if the elements should be treated as equal. The signature of the predicate function should be equivalent to the following:
The signature does not need to have const &, but the function must not modify the objects passed to it. The type Type1 must be such that objects of type InIter can be dereferenced and then implicitly converted to Type1bool pred(const Type1 &a, const Type1 &b);
proj1 – Specifies the function (or function object) which will be invoked for each of the elements of the first sequence as a projection operation before the actual predicate op is invoked.
proj2 – Specifies the function (or function object) which will be invoked for each of the elements of the second sequence as a projection operation before the actual predicate op is invoked.
- Returns
The set_symmetric_difference algorithm returns a hpx::future<ranges::set_symmetric_difference_result<Iter1, Iter2, Iter3>> if the execution policy is of type sequenced_task_policy or parallel_task_policy and returns ranges::set_symmetric_difference_result<Iter1, Iter2, Iter3> otherwise. where Iter1 is range_iterator_t<Rng1> and Iter2 is range_iterator_t<Rng2> The set_symmetric_difference algorithm returns the output iterator to the element in the destination range, one past the last element copied.
-
template<typename Iter1, typename Sent1, typename Iter2, typename Sent2, typename Iter3, typename Pred = hpx::parallel::detail::less, typename Proj1 = hpx::identity, typename Proj2 = hpx::identity>
set_symmetric_difference_result<Iter1, Iter2, Iter3> set_symmetric_difference(Iter1 first1, Sent1 last1, Iter2 first2, Sent2 last2, Iter3 dest, Pred &&op = Pred(), Proj1 &&proj1 = Proj1(), Proj2 &&proj2 = Proj2())# Constructs a sorted range beginning at dest consisting of all elements present in either of the sorted ranges [first1, last1) and [first2, last2), but not in both of them are copied to the range beginning at dest. The resulting range is also sorted. This algorithm expects both input ranges to be sorted with the given binary predicate f.
If some element is found m times in [first1, last1) and n times in [first2, last2), it will be copied to dest exactly std::abs(m-n) times. If m>n, then the last m-n of those elements are copied from [first1,last1), otherwise the last n-m elements are copied from [first2,last2). The resulting range cannot overlap with either of the input ranges.
The resulting range cannot overlap with either of the input ranges.
Note
Complexity: At most 2*(N1 + N2 - 1) comparisons, where N1 is the length of the first sequence and N2 is the length of the second sequence.
- Template Parameters
Iter1 – The type of the source iterators used (deduced) representing the first sequence. This iterator type must meet the requirements of an forward iterator.
Sent1 – The type of the end source iterators used (deduced). This iterator type must meet the requirements of an sentinel for Iter1.
Iter2 – The type of the source iterators used (deduced) representing the second sequence. This iterator type must meet the requirements of an forward iterator.
Sent2 – The type of the end source iterators used (deduced) representing the second sequence. This iterator type must meet the requirements of an sentinel for Iter2.
Iter3 – The type of the iterator representing the destination range (deduced). This iterator type must meet the requirements of an output iterator.
Pred – The type of an optional function/function object to use. Unlike its sequential form, the parallel overload of set_symmetric_difference requires Pred to meet the requirements of CopyConstructible. This defaults to std::less<>
Proj1 – The type of an optional projection function applied to the first sequence. This defaults to hpx::identity
Proj2 – The type of an optional projection function applied to the second sequence. This defaults to hpx::identity
- Parameters
first1 – Refers to the beginning of the sequence of elements of the first range the algorithm will be applied to.
last1 – Refers to the end of the sequence of elements of the first range the algorithm will be applied to.
first2 – Refers to the beginning of the sequence of elements of the second range the algorithm will be applied to.
last2 – Refers to the end of the sequence of elements of the second range the algorithm will be applied to.
dest – Refers to the beginning of the destination range.
op – The binary predicate which returns true if the elements should be treated as equal. The signature of the predicate function should be equivalent to the following:
The signature does not need to have const &, but the function must not modify the objects passed to it. The type Type1 must be such that objects of type InIter can be dereferenced and then implicitly converted to Type1bool pred(const Type1 &a, const Type1 &b);
proj1 – Specifies the function (or function object) which will be invoked for each of the elements of the first sequence as a projection operation before the actual predicate op is invoked.
proj2 – Specifies the function (or function object) which will be invoked for each of the elements of the second sequence as a projection operation before the actual predicate op is invoked.
- Returns
The set_symmetric_difference algorithm returns ranges::set_symmetric_difference_result<Iter1, Iter2, Iter3>. The set_symmetric_difference algorithm returns the output iterator to the element in the destination range, one past the last element copied.
-
template<typename Rng1, typename Rng2, typename Iter3, typename Pred = hpx::parallel::detail::less, typename Proj1 = hpx::identity, typename Proj2 = hpx::identity>
set_symmetric_difference_result<std::ranges::iterator_t<Rng1>, std::ranges::iterator_t<Rng2>, Iter3> set_symmetric_difference(Rng1 &&rng1, Rng2 &&rng2, Iter3 dest, Pred &&op = Pred(), Proj1 &&proj1 = Proj1(), Proj2 &&proj2 = Proj2())# Constructs a sorted range beginning at dest consisting of all elements present in either of the sorted ranges [first1, last1) and [first2, last2), but not in both of them are copied to the range beginning at dest. The resulting range is also sorted. This algorithm expects both input ranges to be sorted with the given binary predicate f.
If some element is found m times in [first1, last1) and n times in [first2, last2), it will be copied to dest exactly std::abs(m-n) times. If m>n, then the last m-n of those elements are copied from [first1,last1), otherwise the last n-m elements are copied from [first2,last2). The resulting range cannot overlap with either of the input ranges.
The resulting range cannot overlap with either of the input ranges.
Note
Complexity: At most 2*(N1 + N2 - 1) comparisons, where N1 is the length of the first sequence and N2 is the length of the second sequence.
- Template Parameters
Rng1 – The type of the source range used (deduced). The iterators extracted from this range type must meet the requirements of an input iterator.
Rng2 – The type of the source range used (deduced). The iterators extracted from this range type must meet the requirements of an input iterator.
Iter3 – The type of the iterator representing the destination range (deduced). This iterator type must meet the requirements of an output iterator.
Pred – The type of an optional function/function object to use. Unlike its sequential form, the parallel overload of set_symmetric_difference requires Pred to meet the requirements of CopyConstructible. This defaults to std::less<>
Proj1 – The type of an optional projection function applied to the first sequence. This defaults to hpx::identity
Proj2 – The type of an optional projection function applied to the second sequence. This defaults to hpx::identity
- Parameters
rng1 – Refers to the first sequence of elements the algorithm will be applied to.
rng2 – Refers to the second sequence of elements the algorithm will be applied to.
dest – Refers to the beginning of the destination range.
op – The binary predicate which returns true if the elements should be treated as equal. The signature of the predicate function should be equivalent to the following:
The signature does not need to have const &, but the function must not modify the objects passed to it. The type Type1 must be such that objects of type InIter can be dereferenced and then implicitly converted to Type1bool pred(const Type1 &a, const Type1 &b);
proj1 – Specifies the function (or function object) which will be invoked for each of the elements of the first sequence as a projection operation before the actual predicate op is invoked.
proj2 – Specifies the function (or function object) which will be invoked for each of the elements of the second sequence as a projection operation before the actual predicate op is invoked.
- Returns
The set_symmetric_difference algorithm returns ranges::set_symmetric_difference_result<Iter1, Iter2, Iter3>. where Iter1 is range_iterator_t<Rng1> and Iter2 is range_iterator_t<Rng2> The set_symmetric_difference algorithm returns the output iterator to the element in the destination range, one past the last element copied.
-
template<typename ExPolicy, typename Iter1, typename Sent1, typename Iter2, typename Sent2, typename Iter3, typename Pred = hpx::parallel::detail::less, typename Proj1 = hpx::identity, typename Proj2 = hpx::identity>
-
namespace ranges
hpx::ranges::set_union#
Defined in header hpx/algorithm.hpp.
See Public API for a list of names and headers that are part of the public HPX API.
-
namespace hpx
-
namespace ranges
Functions
-
template<typename ExPolicy, typename Iter1, typename Sent1, typename Iter2, typename Sent2, typename Iter3, typename Pred = hpx::parallel::detail::less, typename Proj1 = hpx::identity, typename Proj2 = hpx::identity>
hpx::parallel::util::detail::algorithm_result<ExPolicy, set_union_result<Iter1, Iter2, Iter3>>::type set_union(ExPolicy &&policy, Iter1 first1, Sent1 last1, Iter2 first2, Sent2 last2, Iter3 dest, Pred &&op = Pred(), Proj1 &&proj1 = Proj1(), Proj2 &&proj2 = Proj2())# Constructs a sorted range beginning at dest consisting of all elements present in one or both sorted ranges [first1, last1) and [first2, last2). This algorithm expects both input ranges to be sorted with the given binary predicate f.
If some element is found m times in [first1, last1) and n times in [first2, last2), then all m elements will be copied from [first1, last1) to dest, preserving order, and then exactly std::max(n-m, 0) elements will be copied from [first2, last2) to dest, also preserving order.
The resulting range cannot overlap with either of the input ranges.
The application of function objects in parallel algorithm invoked with a sequential execution policy object execute in sequential order in the calling thread (sequenced_policy) or in a single new thread spawned from the current thread (for sequenced_task_policy).
The application of function objects in parallel algorithm invoked with an execution policy object of type parallel_policy or parallel_task_policy are permitted to execute in an unordered fashion in unspecified threads, and indeterminately sequenced within each thread.
Note
Complexity: At most 2*(N1 + N2 - 1) comparisons, where N1 is the length of the first sequence and N2 is the length of the second sequence.
- Template Parameters
ExPolicy – The type of the execution policy to use (deduced). It describes the manner in which the execution of the algorithm may be parallelized and the manner in which it applies user-provided function objects.
Iter1 – The type of the source iterators used (deduced) representing the first sequence. This iterator type must meet the requirements of an forward iterator.
Sent1 – The type of the end source iterators used (deduced). This iterator type must meet the requirements of an sentinel for Iter1.
Iter2 – The type of the source iterators used (deduced) representing the second sequence. This iterator type must meet the requirements of an forward iterator.
Sent2 – The type of the end source iterators used (deduced) representing the second sequence. This iterator type must meet the requirements of an sentinel for Iter2.
Iter3 – The type of the iterator representing the destination range (deduced). This iterator type must meet the requirements of an output iterator.
Pred – The type of an optional function/function object to use. Unlike its sequential form, the parallel overload of set_union requires Pred to meet the requirements of CopyConstructible. This defaults to std::less<>
Proj1 – The type of an optional projection function applied to the first sequence. This defaults to hpx::identity
Proj2 – The type of an optional projection function applied to the second sequence. This defaults to hpx::identity
- Parameters
policy – The execution policy to use for the scheduling of the iterations.
first1 – Refers to the beginning of the sequence of elements of the first range the algorithm will be applied to.
last1 – Refers to the end of the sequence of elements of the first range the algorithm will be applied to.
first2 – Refers to the beginning of the sequence of elements of the second range the algorithm will be applied to.
last2 – Refers to the end of the sequence of elements of the second range the algorithm will be applied to.
dest – Refers to the beginning of the destination range.
op – The binary predicate which returns true if the elements should be treated as equal. The signature of the predicate function should be equivalent to the following:
The signature does not need to have const &, but the function must not modify the objects passed to it. The type Type1 must be such that objects of type InIter can be dereferenced and then implicitly converted to Type1bool pred(const Type1 &a, const Type1 &b);
proj1 – Specifies the function (or function object) which will be invoked for each of the elements of the first sequence as a projection operation before the actual predicate op is invoked.
proj2 – Specifies the function (or function object) which will be invoked for each of the elements of the second sequence as a projection operation before the actual predicate op is invoked.
- Returns
The set_union algorithm returns a hpx::future<ranges::set_union_result<Iter1, Iter2, Iter3>> if the execution policy is of type sequenced_task_policy or parallel_task_policy and returns ranges::set_union_result<Iter1, Iter2, Iter3> otherwise. The set_union algorithm returns the output iterator to the element in the destination range, one past the last element copied.
-
template<typename ExPolicy, typename Rng1, typename Rng2, typename Iter3, typename Pred = hpx::parallel::detail::less, typename Proj1 = hpx::identity, typename Proj2 = hpx::identity>
hpx::parallel::util::detail::algorithm_result<ExPolicy, set_union_result<std::ranges::iterator_t<Rng1>, std::ranges::iterator_t<Rng2>, Iter3>> set_union(ExPolicy &&policy, Rng1 &&rng1, Rng2 &&rng2, Iter3 dest, Pred &&op = Pred(), Proj1 &&proj1 = Proj1(), Proj2 &&proj2 = Proj2())# Constructs a sorted range beginning at dest consisting of all elements present in one or both sorted ranges [first1, last1) and [first2, last2). This algorithm expects both input ranges to be sorted with the given binary predicate f.
If some element is found m times in [first1, last1) and n times in [first2, last2), then all m elements will be copied from [first1, last1) to dest, preserving order, and then exactly std::max(n-m, 0) elements will be copied from [first2, last2) to dest, also preserving order.
The resulting range cannot overlap with either of the input ranges.
The application of function objects in parallel algorithm invoked with a sequential execution policy object execute in sequential order in the calling thread (sequenced_policy) or in a single new thread spawned from the current thread (for sequenced_task_policy).
The application of function objects in parallel algorithm invoked with an execution policy object of type parallel_policy or parallel_task_policy are permitted to execute in an unordered fashion in unspecified threads, and indeterminately sequenced within each thread.
Note
Complexity: At most 2*(N1 + N2 - 1) comparisons, where N1 is the length of the first sequence and N2 is the length of the second sequence.
- Template Parameters
ExPolicy – The type of the execution policy to use (deduced). It describes the manner in which the execution of the algorithm may be parallelized and the manner in which it applies user-provided function objects.
Rng1 – The type of the source range used (deduced). The iterators extracted from this range type must meet the requirements of an input iterator.
Rng2 – The type of the source range used (deduced). The iterators extracted from this range type must meet the requirements of an input iterator.
Iter3 – The type of the iterator representing the destination range (deduced). This iterator type must meet the requirements of an output iterator.
Pred – The type of an optional function/function object to use. Unlike its sequential form, the parallel overload of set_union requires Pred to meet the requirements of CopyConstructible. This defaults to std::less<>
Proj1 – The type of an optional projection function applied to the first sequence. This defaults to hpx::identity
Proj2 – The type of an optional projection function applied to the second sequence. This defaults to hpx::identity
- Parameters
policy – The execution policy to use for the scheduling of the iterations.
rng1 – Refers to the first sequence of elements the algorithm will be applied to.
rng2 – Refers to the second sequence of elements the algorithm will be applied to.
dest – Refers to the beginning of the destination range.
op – The binary predicate which returns true if the elements should be treated as equal. The signature of the predicate function should be equivalent to the following:
The signature does not need to have const &, but the function must not modify the objects passed to it. The type Type1 must be such that objects of type InIter can be dereferenced and then implicitly converted to Type1bool pred(const Type1 &a, const Type1 &b);
proj1 – Specifies the function (or function object) which will be invoked for each of the elements of the first sequence as a projection operation before the actual predicate op is invoked.
proj2 – Specifies the function (or function object) which will be invoked for each of the elements of the second sequence as a projection operation before the actual predicate op is invoked.
- Returns
The set_union algorithm returns a hpx::future<ranges::set_union_result<Iter1, Iter2, Iter3>> if the execution policy is of type sequenced_task_policy or parallel_task_policy and returns ranges::set_union_result<Iter1, Iter2, Iter3> otherwise. where Iter1 is range_iterator_t<Rng1> and Iter2 is range_iterator_t<Rng2> The set_union algorithm returns the output iterator to the element in the destination range, one past the last element copied.
-
template<typename Iter1, typename Sent1, typename Iter2, typename Sent2, typename Iter3, typename Pred = hpx::parallel::detail::less, typename Proj1 = hpx::identity, typename Proj2 = hpx::identity>
set_union_result<Iter1, Iter2, Iter3> tag_fallback_invoke(set_union_t, Iter1 first1, Sent1 last1, Iter2 first2, Sent2 last2, Iter3 dest, Pred &&op = Pred(), Proj1 &&proj1 = Proj1(), Proj2 &&proj2 = Proj2())# Constructs a sorted range beginning at dest consisting of all elements present in one or both sorted ranges [first1, last1) and [first2, last2). This algorithm expects both input ranges to be sorted with the given binary predicate f.
If some element is found m times in [first1, last1) and n times in [first2, last2), then all m elements will be copied from [first1, last1) to dest, preserving order, and then exactly std::max(n-m, 0) elements will be copied from [first2, last2) to dest, also preserving order.
The resulting range cannot overlap with either of the input ranges.
Note
Complexity: At most 2*(N1 + N2 - 1) comparisons, where N1 is the length of the first sequence and N2 is the length of the second sequence.
- Template Parameters
Iter1 – The type of the source iterators used (deduced) representing the first sequence. This iterator type must meet the requirements of an forward iterator.
Sent1 – The type of the end source iterators used (deduced). This iterator type must meet the requirements of an sentinel for Iter1.
Iter2 – The type of the source iterators used (deduced) representing the second sequence. This iterator type must meet the requirements of an forward iterator.
Sent2 – The type of the end source iterators used (deduced) representing the second sequence. This iterator type must meet the requirements of an sentinel for Iter2.
Iter3 – The type of the iterator representing the destination range (deduced). This iterator type must meet the requirements of an output iterator.
Pred – The type of an optional function/function object to use. Unlike its sequential form, the parallel overload of set_union requires Pred to meet the requirements of CopyConstructible. This defaults to std::less<>
Proj1 – The type of an optional projection function applied to the first sequence. This defaults to hpx::identity
Proj2 – The type of an optional projection function applied to the second sequence. This defaults to hpx::identity
- Parameters
first1 – Refers to the beginning of the sequence of elements of the first range the algorithm will be applied to.
last1 – Refers to the end of the sequence of elements of the first range the algorithm will be applied to.
first2 – Refers to the beginning of the sequence of elements of the second range the algorithm will be applied to.
last2 – Refers to the end of the sequence of elements of the second range the algorithm will be applied to.
dest – Refers to the beginning of the destination range.
op – The binary predicate which returns true if the elements should be treated as equal. The signature of the predicate function should be equivalent to the following:
The signature does not need to have const &, but the function must not modify the objects passed to it. The type Type1 must be such that objects of type InIter can be dereferenced and then implicitly converted to Type1bool pred(const Type1 &a, const Type1 &b);
proj1 – Specifies the function (or function object) which will be invoked for each of the elements of the first sequence as a projection operation before the actual predicate op is invoked.
proj2 – Specifies the function (or function object) which will be invoked for each of the elements of the second sequence as a projection operation before the actual predicate op is invoked.
- Returns
The set_union algorithm returns ranges::set_union_result<Iter1, Iter2, Iter3>. The set_union algorithm returns the output iterator to the element in the destination range, one past the last element copied.
-
template<typename Rng1, typename Rng2, typename Iter3, typename Pred = hpx::parallel::detail::less, typename Proj1 = hpx::identity, typename Proj2 = hpx::identity>
set_union_result<std::ranges::iterator_t<Rng1>, std::ranges::iterator_t<Rng2>, Iter3> set_union(Rng1 &&rng1, Rng2 &&rng2, Iter3 dest, Pred &&op = Pred(), Proj1 &&proj1 = Proj1(), Proj2 &&proj2 = Proj2())# Constructs a sorted range beginning at dest consisting of all elements present in one or both sorted ranges [first1, last1) and [first2, last2). This algorithm expects both input ranges to be sorted with the given binary predicate f.
If some element is found m times in [first1, last1) and n times in [first2, last2), then all m elements will be copied from [first1, last1) to dest, preserving order, and then exactly std::max(n-m, 0) elements will be copied from [first2, last2) to dest, also preserving order.
The resulting range cannot overlap with either of the input ranges.
Note
Complexity: At most 2*(N1 + N2 - 1) comparisons, where N1 is the length of the first sequence and N2 is the length of the second sequence.
- Template Parameters
Rng1 – The type of the source range used (deduced). The iterators extracted from this range type must meet the requirements of an input iterator.
Rng2 – The type of the source range used (deduced). The iterators extracted from this range type must meet the requirements of an input iterator.
Iter3 – The type of the iterator representing the destination range (deduced). This iterator type must meet the requirements of an output iterator.
Pred – The type of an optional function/function object to use. Unlike its sequential form, the parallel overload of set_union requires Pred to meet the requirements of CopyConstructible. This defaults to std::less<>
Proj1 – The type of an optional projection function applied to the first sequence. This defaults to hpx::identity
Proj2 – The type of an optional projection function applied to the second sequence. This defaults to hpx::identity
- Parameters
rng1 – Refers to the first sequence of elements the algorithm will be applied to.
rng2 – Refers to the second sequence of elements the algorithm will be applied to.
dest – Refers to the beginning of the destination range.
op – The binary predicate which returns true if the elements should be treated as equal. The signature of the predicate function should be equivalent to the following:
The signature does not need to have const &, but the function must not modify the objects passed to it. The type Type1 must be such that objects of type InIter can be dereferenced and then implicitly converted to Type1bool pred(const Type1 &a, const Type1 &b);
proj1 – Specifies the function (or function object) which will be invoked for each of the elements of the first sequence as a projection operation before the actual predicate op is invoked.
proj2 – Specifies the function (or function object) which will be invoked for each of the elements of the second sequence as a projection operation before the actual predicate op is invoked.
- Returns
The set_union algorithm returns ranges::set_union_result<Iter1, Iter2, Iter3>. where Iter1 is range_iterator_t<Rng1> and Iter2 is range_iterator_t<Rng2> The set_union algorithm returns the output iterator to the element in the destination range, one past the last element copied.
-
template<typename ExPolicy, typename Iter1, typename Sent1, typename Iter2, typename Sent2, typename Iter3, typename Pred = hpx::parallel::detail::less, typename Proj1 = hpx::identity, typename Proj2 = hpx::identity>
-
namespace ranges
hpx::ranges::shift_left#
Defined in header hpx/algorithm.hpp.
See Public API for a list of names and headers that are part of the public HPX API.
-
namespace hpx
-
namespace ranges
Functions
-
template<typename FwdIter, typename Sent, typename Size>
FwdIter shift_left(FwdIter first, Sent last, Size n)# Shifts the elements in the range [first, last) by n positions towards the beginning of the range. For every integer i in [0, last - first
n), moves the element originally at position first + n + i to position first + i.
The assignment operations in the parallel shift_left algorithm invoked without an execution policy object will execute in sequential order in the calling thread.
Note
Complexity: At most (last - first) - n assignments.
Note
The type of dereferenced FwdIter must meet the requirements of MoveAssignable.
- Template Parameters
FwdIter – The type of the source iterators used (deduced). This iterator type must meet the requirements of an forward iterator.
Sent – The type of the source sentinel (deduced). This sentinel type must be a sentinel for FwdIter.
Size – The type of the argument specifying the number of positions to shift by.
- Parameters
first – Refers to the beginning of the sequence of elements the algorithm will be applied to.
last – Refers to sentinel value denoting the end of the sequence of elements the algorithm will be applied.
n – Refers to the number of positions to shift.
- Returns
The shift_left algorithm returns FwdIter. The shift_left algorithm returns an iterator to the end of the resulting range.
-
template<typename ExPolicy, typename FwdIter, typename Sent, typename Size>
hpx::parallel::util::detail::algorithm_result_t<ExPolicy, FwdIter> shift_left(ExPolicy &&policy, FwdIter first, Sent last, Size n)# Shifts the elements in the range [first, last) by n positions towards the beginning of the range. For every integer i in [0, last - first
n), moves the element originally at position first + n + i to position first + i.
The assignment operations in the parallel shift_left algorithm invoked with an execution policy object of type sequenced_policy execute in sequential order in the calling thread.
The assignment operations in the parallel shift_left algorithm invoked with an execution policy object of type parallel_policy or parallel_task_policy are permitted to execute in an unordered fashion in unspecified threads, and indeterminately sequenced within each thread.
Note
Complexity: At most (last - first) - n assignments.
Note
The type of dereferenced FwdIter must meet the requirements of MoveAssignable.
- Template Parameters
ExPolicy – The type of the execution policy to use (deduced). It describes the manner in which the execution of the algorithm may be parallelized and the manner in which it executes the assignments.
FwdIter – The type of the source iterators used (deduced). This iterator type must meet the requirements of an forward iterator.
Sent – The type of the source sentinel (deduced). This sentinel type must be a sentinel for FwdIter.
Size – The type of the argument specifying the number of positions to shift by.
- Parameters
policy – The execution policy to use for the scheduling of the iterations.
first – Refers to the beginning of the sequence of elements the algorithm will be applied to.
last – Refers to sentinel value denoting the end of the sequence of elements the algorithm will be applied.
n – Refers to the number of positions to shift.
- Returns
The shift_left algorithm returns a hpx::future<FwdIter> if the execution policy is of type sequenced_task_policy or parallel_task_policy and returns FwdIter otherwise. The shift_left algorithm returns an iterator to the end of the resulting range.
-
template<typename Rng, typename Size>
std::ranges::iterator_t<Rng> shift_left(Rng &&rng, Size n)# Shifts the elements in the range [first, last) by n positions towards the beginning of the range. For every integer i in [0, last - first
n), moves the element originally at position first + n + i to position first + i.
The assignment operations in the parallel shift_left algorithm invoked without an execution policy object will execute in sequential order in the calling thread.
Note
Complexity: At most (last - first) - n assignments.
Note
The type of dereferenced std::ranges::iterator_t<Rng> must meet the requirements of MoveAssignable.
- Template Parameters
Rng – The type of the range used (deduced). The iterators extracted from this range type must meet the requirements of an forward iterator.
Size – The type of the argument specifying the number of positions to shift by.
- Parameters
rng – Refers to the range in which the elements will be shifted.
n – Refers to the number of positions to shift.
- Returns
The shift_left algorithm returns std::ranges::iterator_t<Rng>. The shift_left algorithm returns an iterator to the end of the resulting range.
-
template<typename ExPolicy, typename Rng, typename Size>
parallel::util::detail::algorithm_result<ExPolicy, std::ranges::iterator_t<Rng>> shift_left(ExPolicy &&policy, Rng &&rng, Size n)# Shifts the elements in the range [first, last) by n positions towards the beginning of the range. For every integer i in [0, last - first
n), moves the element originally at position first + n + i to position first + i.
The assignment operations in the parallel shift_left algorithm invoked with an execution policy object of type sequenced_policy execute in sequential order in the calling thread.
The assignment operations in the parallel shift_left algorithm invoked with an execution policy object of type parallel_policy or parallel_task_policy are permitted to execute in an unordered fashion in unspecified threads, and indeterminately sequenced within each thread.
Note
Complexity: At most (last - first) - n assignments.
Note
The type of dereferenced std::ranges::iterator_t<Rng> must meet the requirements of MoveAssignable.
- Template Parameters
ExPolicy – The type of the execution policy to use (deduced). It describes the manner in which the execution of the algorithm may be parallelized and the manner in which it executes the assignments.
Rng – The type of the range used (deduced). The iterators extracted from this range type must meet the requirements of an forward iterator.
Size – The type of the argument specifying the number of positions to shift by.
- Parameters
policy – The execution policy to use for the scheduling of the iterations.
rng – Refers to the range in which the elements will be shifted.
n – Refers to the number of positions to shift.
- Returns
The shift_left algorithm returns a hpx::future<std::ranges::iterator_t<Rng>> if the execution policy is of type sequenced_task_policy or parallel_task_policy and returns std::ranges::iterator_t<Rng> otherwise. The shift_left algorithm returns an iterator to the end of the resulting range.
-
template<typename FwdIter, typename Sent, typename Size>
-
namespace ranges
hpx::ranges::shift_right#
Defined in header hpx/algorithm.hpp.
See Public API for a list of names and headers that are part of the public HPX API.
-
namespace hpx
-
namespace ranges
Functions
-
template<typename FwdIter, typename Sent, typename Size>
FwdIter shift_right(FwdIter first, Sent last, Size n)# Shifts the elements in the range [first, last) by n positions towards the end of the range. For every integer i in [0, last - first - n), moves the element originally at position first + i to position first
n + i.
The assignment operations in the parallel shift_right algorithm invoked without an execution policy object will execute in sequential order in the calling thread.
Note
Complexity: At most (last - first) - n assignments.
Note
The type of dereferenced FwdIter must meet the requirements of MoveAssignable.
- Template Parameters
FwdIter – The type of the source iterators used (deduced). This iterator type must meet the requirements of an forward iterator.
Sent – The type of the source sentinel (deduced). This sentinel type must be a sentinel for FwdIter.
Size – The type of the argument specifying the number of positions to shift by.
- Parameters
first – Refers to the beginning of the sequence of elements the algorithm will be applied to.
last – Refers to sentinel value denoting the end of the sequence of elements the algorithm will be applied.
n – Refers to the number of positions to shift.
- Returns
The shift_right algorithm returns FwdIter. The shift_right algorithm returns an iterator to the end of the resulting range.
-
template<typename ExPolicy, typename FwdIter, typename Sent, typename Size>
hpx::parallel::util::detail::algorithm_result_t<ExPolicy, FwdIter> shift_right(ExPolicy &&policy, FwdIter first, Sent last, Size n)# Shifts the elements in the range [first, last) by n positions towards the end of the range. For every integer i in [0, last - first - n), moves the element originally at position first + i to position first
n + i.
The assignment operations in the parallel shift_right algorithm invoked with an execution policy object of type sequenced_policy execute in sequential order in the calling thread.
The assignment operations in the parallel shift_right algorithm invoked with an execution policy object of type parallel_policy or parallel_task_policy are permitted to execute in an unordered fashion in unspecified threads, and indeterminately sequenced within each thread.
Note
Complexity: At most (last - first) - n assignments.
Note
The type of dereferenced FwdIter must meet the requirements of MoveAssignable.
- Template Parameters
ExPolicy – The type of the execution policy to use (deduced). It describes the manner in which the execution of the algorithm may be parallelized and the manner in which it executes the assignments.
FwdIter – The type of the source iterators used (deduced). This iterator type must meet the requirements of an forward iterator.
Sent – The type of the source sentinel (deduced). This sentinel type must be a sentinel for FwdIter.
Size – The type of the argument specifying the number of positions to shift by.
- Parameters
policy – The execution policy to use for the scheduling of the iterations.
first – Refers to the beginning of the sequence of elements the algorithm will be applied to.
last – Refers to sentinel value denoting the end of the sequence of elements the algorithm will be applied.
n – Refers to the number of positions to shift.
- Returns
The shift_right algorithm returns a hpx::future<FwdIter> if the execution policy is of type sequenced_task_policy or parallel_task_policy and returns FwdIter otherwise. The shift_right algorithm returns an iterator to the end of the resulting range.
-
template<typename Rng, typename Size>
std::ranges::iterator_t<Rng> shift_right(Rng &&rng, Size n)# Shifts the elements in the range [first, last) by n positions towards the end of the range. For every integer i in [0, last - first - n), moves the element originally at position first + i to position first
n + i.
The assignment operations in the parallel shift_right algorithm invoked without an execution policy object will execute in sequential order in the calling thread.
Note
Complexity: At most (last - first) - n assignments.
Note
The type of dereferenced std::ranges::iterator_t<Rng> must meet the requirements of MoveAssignable.
- Template Parameters
Rng – The type of the range used (deduced). The iterators extracted from this range type must meet the requirements of an forward iterator.
Size – The type of the argument specifying the number of positions to shift by.
- Parameters
rng – Refers to the range in which the elements will be shifted.
n – Refers to the number of positions to shift.
- Returns
The shift_right algorithm returns std::ranges::iterator_t<Rng>. The shift_right algorithm returns an iterator to the end of the resulting range.
-
template<typename ExPolicy, typename Rng, typename Size>
parallel::util::detail::algorithm_result<ExPolicy, std::ranges::iterator_t<Rng>> shift_right(ExPolicy &&policy, Rng &&rng, Size n)# Shifts the elements in the range [first, last) by n positions towards the end of the range. For every integer i in [0, last - first - n), moves the element originally at position first + i to position first
n + i.
The assignment operations in the parallel shift_right algorithm invoked with an execution policy object of type sequenced_policy execute in sequential order in the calling thread.
The assignment operations in the parallel shift_right algorithm invoked with an execution policy object of type parallel_policy or parallel_task_policy are permitted to execute in an unordered fashion in unspecified threads, and indeterminately sequenced within each thread.
Note
Complexity: At most (last - first) - n assignments.
Note
The type of dereferenced std::ranges::iterator_t<Rng> must meet the requirements of MoveAssignable.
- Template Parameters
ExPolicy – The type of the execution policy to use (deduced). It describes the manner in which the execution of the algorithm may be parallelized and the manner in which it executes the assignments.
Rng – The type of the range used (deduced). The iterators extracted from this range type must meet the requirements of an forward iterator.
Size – The type of the argument specifying the number of positions to shift by.
- Parameters
policy – The execution policy to use for the scheduling of the iterations.
rng – Refers to the range in which the elements will be shifted.
n – Refers to the number of positions to shift.
- Returns
The shift_right algorithm returns a hpx::future<std::ranges::iterator_t<Rng>> if the execution policy is of type sequenced_task_policy or parallel_task_policy and returns std::ranges::iterator_t<Rng> otherwise. The shift_right algorithm returns an iterator to the end of the resulting range.
-
template<typename FwdIter, typename Sent, typename Size>
-
namespace ranges
hpx::ranges::sort#
Defined in header hpx/algorithm.hpp.
See Public API for a list of names and headers that are part of the public HPX API.
-
namespace hpx
-
namespace ranges
Functions
-
template<typename RandomIt, typename Sent, typename Comp = ranges::less, typename Proj = hpx::identity>
RandomIt sort(RandomIt first, Sent last, Comp &&comp = Comp(), Proj &&proj = Proj())# Sorts the elements in the range [first, last) in ascending order. The order of equal elements is not guaranteed to be preserved. The function uses the given comparison function object comp (defaults to using operator<()).
A sequence is sorted with respect to a comparator comp and a projection proj if for every iterator i pointing to the sequence and every non-negative integer n such that i + n is a valid iterator pointing to an element of the sequence, and INVOKE(comp, INVOKE(proj, *(i + n)), INVOKE(proj, *i)) == false.
comp has to induce a strict weak ordering on the values.
The assignments in the parallel sort algorithm invoked without an execution policy object execute in sequential order in the calling thread.
Note
Complexity: O(N log(N)), where N = detail::distance(first, last) comparisons.
- Template Parameters
RandomIt – The type of the source iterators used (deduced). This iterator type must meet the requirements of an random iterator.
Sent – The type of the source sentinel (deduced). This sentinel type must be a sentinel for RandomIt.
Comp – The type of the function/function object to use (deduced).
Proj – The type of an optional projection function. This defaults to hpx::identity
- Parameters
first – Refers to the beginning of the sequence of elements the algorithm will be applied to.
last – Refers to sentinel value denoting the end of the sequence of elements the algorithm will be applied.
comp – comp is a callable object. The return value of the INVOKE operation applied to an object of type Comp, when contextually converted to bool, yields true if the first argument of the call is less than the second, and false otherwise. It is assumed that comp will not apply any non-constant function through the dereferenced iterator.
proj – Specifies the function (or function object) which will be invoked for each pair of elements as a projection operation before the actual predicate comp is invoked.
- Returns
The sort algorithm returns RandomIt. The algorithm returns an iterator pointing to the first element after the last element in the input sequence.
-
template<typename ExPolicy, typename RandomIt, typename Sent, typename Comp = ranges::less, typename Proj = hpx::identity>
parallel::util::detail::algorithm_result<ExPolicy, RandomIt>::type sort(ExPolicy &&policy, RandomIt first, Sent last, Comp &&comp = Comp(), Proj &&proj = Proj())# Sorts the elements in the range [first, last) in ascending order. The order of equal elements is not guaranteed to be preserved. The function uses the given comparison function object comp (defaults to using operator<()).
A sequence is sorted with respect to a comparator comp and a projection proj if for every iterator i pointing to the sequence and every non-negative integer n such that i + n is a valid iterator pointing to an element of the sequence, and INVOKE(comp, INVOKE(proj, *(i + n)), INVOKE(proj, *i)) == false.
comp has to induce a strict weak ordering on the values.
The application of function objects in parallel algorithm invoked with an execution policy object of type sequenced_policy execute in sequential order in the calling thread.
The application of function objects in parallel algorithm invoked with an execution policy object of type parallel_policy or parallel_task_policy are permitted to execute in an unordered fashion in unspecified threads, and indeterminately sequenced within each thread.
Note
Complexity: O(N log(N)), where N = detail::distance(first, last) comparisons.
- Template Parameters
ExPolicy – The type of the execution policy to use (deduced). It describes the manner in which the execution of the algorithm may be parallelized and the manner in which it executes the assignments.
RandomIt – The type of the source iterators used (deduced). This iterator type must meet the requirements of an random iterator.
Sent – The type of the source sentinel (deduced). This sentinel type must be a sentinel for RandomIt.
Comp – The type of the function/function object to use (deduced).
Proj – The type of an optional projection function. This defaults to hpx::identity
- Parameters
policy – The execution policy to use for the scheduling of the iterations.
first – Refers to the beginning of the sequence of elements the algorithm will be applied to.
last – Refers to sentinel value denoting the end of the sequence of elements the algorithm will be applied.
comp – comp is a callable object. The return value of the INVOKE operation applied to an object of type Comp, when contextually converted to bool, yields true if the first argument of the call is less than the second, and false otherwise. It is assumed that comp will not apply any non-constant function through the dereferenced iterator.
proj – Specifies the function (or function object) which will be invoked for each pair of elements as a projection operation before the actual predicate comp is invoked.
- Returns
The sort algorithm returns a hpx::future<RandomIt> if the execution policy is of type sequenced_task_policy or parallel_task_policy and returns RandomIt otherwise. The algorithm returns an iterator pointing to the first element after the last element in the input sequence.
-
template<typename Rng, typename Comp, typename Proj>
std::ranges::iterator_t<Rng> sort(Rng &&rng, Comp &&comp = Comp(), Proj &&proj = Proj())# Sorts the elements in the range rng in ascending order. The order of equal elements is not guaranteed to be preserved. The function uses the given comparison function object comp (defaults to using operator<()).
A sequence is sorted with respect to a comparator comp and a projection proj if for every iterator i pointing to the sequence and every non-negative integer n such that i + n is a valid iterator pointing to an element of the sequence, and INVOKE(comp, INVOKE(proj, *(i + n)), INVOKE(proj, *i)) == false.
comp has to induce a strict weak ordering on the values.
The assignments in the parallel sort algorithm invoked without an execution policy object execute in sequential order in the calling thread.
Note
Complexity: O(N log(N)), where N = std::distance(begin(rng), end(rng)) comparisons.
- Template Parameters
Rng – The type of the source range used (deduced). The iterators extracted from this range type must meet the requirements of an input iterator.
Comp – The type of the function/function object to use (deduced).
Proj – The type of an optional projection function. This defaults to hpx::identity
- Parameters
rng – Refers to the sequence of elements the algorithm will be applied to.
comp – comp is a callable object. The return value of the INVOKE operation applied to an object of type Comp, when contextually converted to bool, yields true if the first argument of the call is less than the second, and false otherwise. It is assumed that comp will not apply any non-constant function through the dereferenced iterator.
proj – Specifies the function (or function object) which will be invoked for each pair of elements as a projection operation before the actual predicate comp is invoked.
- Returns
The sort algorithm returns std::ranges::iterator_t<Rng>. It returns last.
-
template<typename ExPolicy, typename Rng, typename Comp = ranges::less, typename Proj = hpx::identity>
parallel::util::detail::algorithm_result<ExPolicy, std::ranges::iterator_t<Rng>> sort(ExPolicy &&policy, Rng &&rng, Comp &&comp = Comp(), Proj &&proj = Proj())# Sorts the elements in the range rng in ascending order. The order of equal elements is not guaranteed to be preserved. The function uses the given comparison function object comp (defaults to using operator<()).
A sequence is sorted with respect to a comparator comp and a projection proj if for every iterator i pointing to the sequence and every non-negative integer n such that i + n is a valid iterator pointing to an element of the sequence, and INVOKE(comp, INVOKE(proj, *(i + n)), INVOKE(proj, *i)) == false.
comp has to induce a strict weak ordering on the values.
The application of function objects in parallel algorithm invoked with an execution policy object of type sequenced_policy execute in sequential order in the calling thread.
The application of function objects in parallel algorithm invoked with an execution policy object of type parallel_policy or parallel_task_policy are permitted to execute in an unordered fashion in unspecified threads, and indeterminately sequenced within each thread.
Note
Complexity: O(N log(N)), where N = std::distance(begin(rng), end(rng)) comparisons.
- Template Parameters
ExPolicy – The type of the execution policy to use (deduced). It describes the manner in which the execution of the algorithm may be parallelized and the manner in which it applies user-provided function objects.
Rng – The type of the source range used (deduced). The iterators extracted from this range type must meet the requirements of an input iterator.
Comp – The type of the function/function object to use (deduced).
Proj – The type of an optional projection function. This defaults to hpx::identity
- Parameters
policy – The execution policy to use for the scheduling of the iterations.
rng – Refers to the sequence of elements the algorithm will be applied to.
comp – comp is a callable object. The return value of the INVOKE operation applied to an object of type Comp, when contextually converted to bool, yields true if the first argument of the call is less than the second, and false otherwise. It is assumed that comp will not apply any non-constant function through the dereferenced iterator.
proj – Specifies the function (or function object) which will be invoked for each pair of elements as a projection operation before the actual predicate comp is invoked.
- Returns
The sort algorithm returns a hpx::future<std::ranges::iterator_t<Rng> if the execution policy is of type sequenced_task_policy or parallel_task_policy and returns std::ranges::iterator_t<Rng> otherwise. It returns last.
-
template<typename RandomIt, typename Sent, typename Comp = ranges::less, typename Proj = hpx::identity>
-
namespace ranges
hpx::ranges::stable_sort#
Defined in header hpx/algorithm.hpp.
See Public API for a list of names and headers that are part of the public HPX API.
-
namespace hpx
-
namespace ranges
Functions
-
template<typename RandomIt, typename Sent, typename Comp = ranges::less, typename Proj = hpx::identity>
RandomIt stable_sort(RandomIt first, Sent last, Comp &&comp = Comp(), Proj &&proj = Proj())# Sorts the elements in the range [first, last) in ascending order. The relative order of equal elements is preserved. The function uses the given comparison function object comp (defaults to using operator<()).
A sequence is sorted with respect to a comparator comp and a projection proj if for every iterator i pointing to the sequence and every non-negative integer n such that i + n is a valid iterator pointing to an element of the sequence, and INVOKE(comp, INVOKE(proj, *(i + n)), INVOKE(proj, *i)) == false.
comp has to induce a strict weak ordering on the values.
The assignments in the parallel stable_sort algorithm invoked without an execution policy object execute in sequential order in the calling thread.
Note
Complexity: O(N log(N)), where N = std::distance(first, last) comparisons.
- Template Parameters
RandomIt – The type of the source iterators used (deduced). This iterator type must meet the requirements of an random iterator.
Sent – The type of the source sentinel (deduced). This sentinel type must be a sentinel for RandomIt.
Comp – The type of the function/function object to use (deduced).
Proj – The type of an optional projection function. This defaults to hpx::identity
- Parameters
first – Refers to the beginning of the sequence of elements the algorithm will be applied to.
last – Refers to sentinel value denoting the end of the sequence of elements the algorithm will be applied.
comp – comp is a callable object. The return value of the INVOKE operation applied to an object of type Comp, when contextually converted to bool, yields true if the first argument of the call is less than the second, and false otherwise. It is assumed that comp will not apply any non-constant function through the dereferenced iterator.
proj – Specifies the function (or function object) which will be invoked for each pair of elements as a projection operation before the actual predicate comp is invoked.
- Returns
The stable_sort algorithm returns RandomIt. The algorithm returns an iterator pointing to the first element after the last element in the input sequence.
-
template<typename ExPolicy, typename RandomIt, typename Sent, typename Comp = ranges::less, typename Proj = hpx::identity>
parallel::util::detail::algorithm_result<ExPolicy, RandomIt>::type stable_sort(ExPolicy &&policy, RandomIt first, Sent last, Comp &&comp = Comp(), Proj &&proj = Proj())# Sorts the elements in the range [first, last) in ascending order. The relative order of equal elements is preserved. The function uses the given comparison function object comp (defaults to using operator<()).
A sequence is sorted with respect to a comparator comp and a projection proj if for every iterator i pointing to the sequence and every non-negative integer n such that i + n is a valid iterator pointing to an element of the sequence, and INVOKE(comp, INVOKE(proj, *(i + n)), INVOKE(proj, *i)) == false.
comp has to induce a strict weak ordering on the values.
The application of function objects in parallel algorithm invoked with an execution policy object of type sequenced_policy execute in sequential order in the calling thread.
The application of function objects in parallel algorithm invoked with an execution policy object of type parallel_policy or parallel_task_policy are permitted to execute in an unordered fashion in unspecified threads, and indeterminately sequenced within each thread.
Note
Complexity: O(N log(N)), where N = std::distance(first, last) comparisons.
- Template Parameters
ExPolicy – The type of the execution policy to use (deduced). It describes the manner in which the execution of the algorithm may be parallelized and the manner in which it executes the assignments.
RandomIt – The type of the source iterators used (deduced). This iterator type must meet the requirements of an random iterator.
Sent – The type of the source sentinel (deduced). This sentinel type must be a sentinel for RandomIt.
Comp – The type of the function/function object to use (deduced).
Proj – The type of an optional projection function. This defaults to hpx::identity
- Parameters
policy – The execution policy to use for the scheduling of the iterations.
first – Refers to the beginning of the sequence of elements the algorithm will be applied to.
last – Refers to sentinel value denoting the end of the sequence of elements the algorithm will be applied.
comp – comp is a callable object. The return value of the INVOKE operation applied to an object of type Comp, when contextually converted to bool, yields true if the first argument of the call is less than the second, and false otherwise. It is assumed that comp will not apply any non-constant function through the dereferenced iterator.
proj – Specifies the function (or function object) which will be invoked for each pair of elements as a projection operation before the actual predicate comp is invoked.
- Returns
The stable_sort algorithm returns a hpx::future<RandomIt> if the execution policy is of type sequenced_task_policy or parallel_task_policy and returns RandomIt otherwise. The algorithm returns an iterator pointing to the first element after the last element in the input sequence.
-
template<typename Rng, typename Comp = ranges::less, typename Proj = hpx::identity>
std::ranges::iterator_t<Rng> stable_sort(Rng &&rng, Comp &&comp = Comp(), Proj &&proj = Proj())# Sorts the elements in the range [first, last) in ascending order. The relative order of equal elements is preserved. The function uses the given comparison function object comp (defaults to using operator<()).
A sequence is sorted with respect to a comparator comp and a projection proj if for every iterator i pointing to the sequence and every non-negative integer n such that i + n is a valid iterator pointing to an element of the sequence, and INVOKE(comp, INVOKE(proj, *(i + n)), INVOKE(proj, *i)) == false.
comp has to induce a strict weak ordering on the values.
The assignments in the parallel stable_sort algorithm invoked without an execution policy object execute in sequential order in the calling thread.
Note
Complexity: O(N log(N)), where N = std::distance(first, last) comparisons.
- Template Parameters
Rng – The type of the source range used (deduced). The iterators extracted from this range type must meet the requirements of an input iterator.
Comp – The type of the function/function object to use (deduced).
Proj – The type of an optional projection function. This defaults to hpx::identity
- Parameters
rng – Refers to the sequence of elements the algorithm will be applied to.
comp – comp is a callable object. The return value of the INVOKE operation applied to an object of type Comp, when contextually converted to bool, yields true if the first argument of the call is less than the second, and false otherwise. It is assumed that comp will not apply any non-constant function through the dereferenced iterator.
proj – Specifies the function (or function object) which will be invoked for each pair of elements as a projection operation before the actual predicate comp is invoked.
- Returns
The stable_sort algorithm returns std::ranges::iterator_t<Rng>. It returns last.
-
template<typename ExPolicy, typename Rng, typename Comp = ranges::less, typename Proj = hpx::identity>
parallel::util::detail::algorithm_result<ExPolicy, std::ranges::iterator_t<Rng>> stable_sort(ExPolicy &&policy, Rng &&rng, Comp &&comp = Comp(), Proj &&proj = Proj())# Sorts the elements in the range [first, last) in ascending order. The relative order of equal elements is preserved. The function uses the given comparison function object comp (defaults to using operator<()).
A sequence is sorted with respect to a comparator comp and a projection proj if for every iterator i pointing to the sequence and every non-negative integer n such that i + n is a valid iterator pointing to an element of the sequence, and INVOKE(comp, INVOKE(proj, *(i + n)), INVOKE(proj, *i)) == false.
comp has to induce a strict weak ordering on the values.
The application of function objects in parallel algorithm invoked with an execution policy object of type sequenced_policy execute in sequential order in the calling thread.
The application of function objects in parallel algorithm invoked with an execution policy object of type parallel_policy or parallel_task_policy are permitted to execute in an unordered fashion in unspecified threads, and indeterminately sequenced within each thread.
Note
Complexity: O(N log(N)), where N = std::distance(first, last) comparisons.
- Template Parameters
ExPolicy – The type of the execution policy to use (deduced). It describes the manner in which the execution of the algorithm may be parallelized and the manner in which it applies user-provided function objects.
Rng – The type of the source range used (deduced). The iterators extracted from this range type must meet the requirements of an input iterator.
Comp – The type of the function/function object to use (deduced).
Proj – The type of an optional projection function. This defaults to hpx::identity
- Parameters
policy – The execution policy to use for the scheduling of the iterations.
rng – Refers to the sequence of elements the algorithm will be applied to.
comp – comp is a callable object. The return value of the INVOKE operation applied to an object of type Comp, when contextually converted to bool, yields true if the first argument of the call is less than the second, and false otherwise. It is assumed that comp will not apply any non-constant function through the dereferenced iterator.
proj – Specifies the function (or function object) which will be invoked for each pair of elements as a projection operation before the actual predicate comp is invoked.
- Returns
The stable_sort algorithm returns a hpx::future<std::ranges::iterator_t<Rng> if the execution policy is of type sequenced_task_policy or parallel_task_policy and returns std::ranges::iterator_t<Rng> otherwise. It returns last.
-
template<typename RandomIt, typename Sent, typename Comp = ranges::less, typename Proj = hpx::identity>
-
namespace ranges
hpx::ranges::starts_with#
Defined in header hpx/algorithm.hpp.
See Public API for a list of names and headers that are part of the public HPX API.
-
namespace hpx
-
namespace ranges
Functions
-
template<typename Iter1, typename Sent1, typename Iter2, typename Sent2, typename Pred = ranges::equal_to, typename Proj1 = hpx::identity, typename Proj2 = hpx::identity>
bool starts_with(Iter1 first1, Sent1 last1, Iter2 first2, Sent2 last2, Pred &&pred = Pred(), Proj1 &&proj1 = Proj1(), Proj2 &&proj2 = Proj2())# Checks whether the second range defined by [first1, last1) matches the prefix of the first range defined by [first2, last2)
The assignments in the parallel starts_with algorithm invoked without an execution policy object execute in sequential order in the calling thread.
Note
Complexity: Linear: at most min(N1, N2) applications of the predicate and both projections.
- Template Parameters
Iter1 – The type of the begin source iterators used (deduced). This iterator type must meet the requirements of an input iterator.
Sent1 – The type of the end source iterators used(deduced). This iterator type must meet the requirements of an sentinel for Iter1.
Iter2 – The type of the begin destination iterators used deduced). This iterator type must meet the requirements of a input iterator.
Sent2 – The type of the end destination iterators used (deduced). This iterator type must meet the requirements of an sentinel for Iter2.
Pred – The binary predicate that compares the projected elements.
Proj1 – The type of an optional projection function for the source range. This defaults to hpx::identity
Proj2 – The type of an optional projection function for the destination range. This defaults to hpx::identity
- Parameters
first1 – Refers to the beginning of the source range.
last1 – Sentinel value referring to the end of the source range.
first2 – Refers to the beginning of the destination range.
last2 – Sentinel value referring to the end of the destination range.
pred – Specifies the binary predicate function (or function object) which will be invoked for comparison of the elements in the in two ranges projected by proj1 and proj2 respectively.
proj1 – Specifies the function (or function object) which will be invoked for each of the elements in the source range as a projection operation before the actual predicate is invoked.
proj2 – Specifies the function (or function object) which will be invoked for each of the elements in the destination range as a projection operation before the actual predicate is invoked.
- Returns
The starts_with algorithm returns bool. The starts_with algorithm returns a boolean with the value true if the second range matches the prefix of the first range, false otherwise.
-
template<typename ExPolicy, typename FwdIter1, typename Sent1, typename FwdIter2, typename Sent2, typename Pred = ranges::equal_to, typename Proj1 = hpx::identity, typename Proj2 = hpx::identity>
hpx::parallel::util::detail::algorithm_result_t<ExPolicy, bool> starts_with(ExPolicy &&policy, FwdIter1 first1, Sent1 last1, FwdIter2 first2, Sent2 last2, Pred &&pred = Pred(), Proj1 &&proj1 = Proj1(), Proj2 &&proj2 = Proj2())# Checks whether the second range defined by [first1, last1) matches the prefix of the first range defined by [first2, last2)
The assignments in the parallel starts_with algorithm invoked with an execution policy object of type sequenced_policy execute in sequential order in the calling thread.
The assignments in the parallel starts_with algorithm invoked with an execution policy object of type parallel_policy or parallel_task_policy are permitted to execute in an unordered fashion in unspecified threads, and indeterminately sequenced within each thread.
Note
Complexity: Linear: at most min(N1, N2) applications of the predicate and both projections.
- Template Parameters
ExPolicy – The type of the execution policy to use (deduced). It describes the manner in which the execution of the algorithm may be parallelized and the manner in which it executes the assignments.
FwdIter1 – The type of the begin source iterators used (deduced). This iterator type must meet the requirements of an forward iterator.
Sent1 – The type of the end source iterators used(deduced). This iterator type must meet the requirements of an sentinel for Iter1.
FwdIter2 – The type of the begin destination iterators used deduced). This iterator type must meet the requirements of a forward iterator.
Sent2 – The type of the end destination iterators used (deduced). This iterator type must meet the requirements of an sentinel for Iter2.
Pred – The binary predicate that compares the projected elements.
Proj1 – The type of an optional projection function for the source range. This defaults to hpx::identity
Proj2 – The type of an optional projection function for the destination range. This defaults to hpx::identity
- Parameters
policy – The execution policy to use for the scheduling of the iterations.
first1 – Refers to the beginning of the source range.
last1 – Sentinel value referring to the end of the source range.
first2 – Refers to the beginning of the destination range.
last2 – Sentinel value referring to the end of the destination range.
pred – Specifies the binary predicate function (or function object) which will be invoked for comparison of the elements in the in two ranges projected by proj1 and proj2 respectively.
proj1 – Specifies the function (or function object) which will be invoked for each of the elements in the source range as a projection operation before the actual predicate is invoked.
proj2 – Specifies the function (or function object) which will be invoked for each of the elements in the destination range as a projection operation before the actual predicate is invoked.
- Returns
The starts_with algorithm returns a hpx::future<bool> if the execution policy is of type sequenced_task_policy or parallel_task_policy and returns bool otherwise. The starts_with algorithm returns a boolean with the value true if the second range matches the prefix of the first range, false otherwise.
-
template<typename Rng1, typename Rng2, typename Pred = ranges::equal_to, typename Proj1 = hpx::identity, typename Proj2 = hpx::identity>
bool starts_with(Rng1 &&rng1, Rng2 &&rng2, Pred &&pred = Pred(), Proj1 &&proj1 = Proj1(), Proj2 &&proj2 = Proj2())# Checks whether the second range rng2 matches the prefix of the first range rng1.
The assignments in the parallel starts_with algorithm invoked without an execution policy object execute in sequential order in the calling thread.
Note
Complexity: Linear: at most min(N1, N2) applications of the predicate and both projections.
- Template Parameters
Rng1 – The type of the source range used (deduced). The iterators extracted from this range type must meet the requirements of an forward iterator.
Rng2 – The type of the destination range used (deduced). The iterators extracted from this range type must meet the requirements of an forward iterator.
Pred – The binary predicate that compares the projected elements.
Proj1 – The type of an optional projection function for the source range. This defaults to hpx::identity
Proj2 – The type of an optional projection function for the destination range. This defaults to hpx::identity
- Parameters
rng1 – Refers to the source range.
rng2 – Refers to the destination range.
pred – Specifies the binary predicate function (or function object) which will be invoked for comparison of the elements in the in two ranges projected by proj1 and proj2 respectively.
proj1 – Specifies the function (or function object) which will be invoked for each of the elements in the source range as a projection operation before the actual predicate is invoked.
proj2 – Specifies the function (or function object) which will be invoked for each of the elements in the destination range as a projection operation before the actual predicate is invoked.
- Returns
The starts_with algorithm returns bool. The starts_with algorithm returns a boolean with the value true if the second range matches the prefix of the first range, false otherwise.
-
template<typename ExPolicy, typename Rng1, typename Rng2, typename Pred = ranges::equal_to, typename Proj1 = hpx::identity, typename Proj2 = hpx::identity>
hpx::parallel::util::detail::algorithm_result<ExPolicy, bool>::type starts_with(ExPolicy &&policy, Rng1 &&rng1, Rng2 &&rng2, Pred &&pred = Pred(), Proj1 &&proj1 = Proj1(), Proj2 &&proj2 = Proj2())# Checks whether the second range rng2 matches the prefix of the first range rng1.
The assignments in the parallel starts_with algorithm invoked with an execution policy object of type sequenced_policy execute in sequential order in the calling thread.
The assignments in the parallel starts_with algorithm invoked with an execution policy object of type parallel_policy or parallel_task_policy are permitted to execute in an unordered fashion in unspecified threads, and indeterminately sequenced within each thread.
Note
Complexity: Linear: at most min(N1, N2) applications of the predicate and both projections.
- Template Parameters
ExPolicy – The type of the execution policy to use (deduced). It describes the manner in which the execution of the algorithm may be parallelized and the manner in which it executes the assignments.
Rng1 – The type of the source range used (deduced). The iterators extracted from this range type must meet the requirements of an forward iterator.
Rng2 – The type of the destination range used (deduced). The iterators extracted from this range type must meet the requirements of an forward iterator.
Pred – The binary predicate that compares the projected elements.
Proj1 – The type of an optional projection function for the source range. This defaults to hpx::identity
Proj2 – The type of an optional projection function for the destination range. This defaults to hpx::identity
- Parameters
policy – The execution policy to use for the scheduling of the iterations.
rng1 – Refers to the source range.
rng2 – Refers to the destination range.
pred – Specifies the binary predicate function (or function object) which will be invoked for comparison of the elements in the in two ranges projected by proj1 and proj2 respectively.
proj1 – Specifies the function (or function object) which will be invoked for each of the elements in the source range as a projection operation before the actual predicate is invoked.
proj2 – Specifies the function (or function object) which will be invoked for each of the elements in the destination range as a projection operation before the actual predicate is invoked.
- Returns
The starts_with algorithm returns a hpx::future<bool> if the execution policy is of type sequenced_task_policy or parallel_task_policy and returns bool otherwise. The starts_with algorithm returns a boolean with the value true if the second range matches the prefix of the first range, false otherwise.
-
template<typename Iter1, typename Sent1, typename Iter2, typename Sent2, typename Pred = ranges::equal_to, typename Proj1 = hpx::identity, typename Proj2 = hpx::identity>
-
namespace ranges
hpx::ranges::swap_ranges#
Defined in header hpx/algorithm.hpp.
See Public API for a list of names and headers that are part of the public HPX API.
-
namespace hpx
-
namespace ranges
Functions
-
template<typename InIter1, typename Sent1, typename InIter2, typename Sent2>
swap_ranges_result<InIter1, InIter2> swap_ranges(InIter1 first1, Sent1 last1, InIter2 first2, Sent2 last2)# Exchanges elements between range [first1, last1) and another range starting at first2.
The swap operations in the parallel swap_ranges algorithm invoked without an execution policy object execute in sequential order in the calling thread.
Note
Complexity: Linear in the distance between first1 and last1
- Template Parameters
InIter1 – The type of the first range of iterators to swap (deduced).
Sent1 – The type of the first sentinel (deduced). This sentinel type must be a sentinel for InIter1.
InIter2 – The type of the second range of iterators to swap (deduced).
Sent2 – The type of the second sentinel (deduced). This sentinel type must be a sentinel for InIter2.
- Parameters
first1 – Refers to the beginning of the sequence of elements for the first range.
last1 – Refers to sentinel value denoting the end of the sequence of elements for the first range.
first2 – Refers to the beginning of the sequence of elements for the second range.
last2 – Refers to sentinel value denoting the end of the sequence of elements for the second range.
- Returns
The swap_ranges algorithm returns swap_ranges_result<InIter1, InIter2>. The swap_ranges algorithm returns in_in_result with the first element as the iterator to the element past the last element exchanged in range beginning with first1 and the second element as the iterator to the element past the last element exchanged in the range beginning with first2.
-
template<typename ExPolicy, typename FwdIter1, typename Sent1, typename FwdIter2, typename Sent2>
parallel::util::detail::algorithm_result<ExPolicy, swap_ranges_result<FwdIter1, FwdIter2>>::type swap_ranges(ExPolicy &&policy, FwdIter1 first1, Sent1 last1, FwdIter2 first2, Sent2 last2)# Exchanges elements between range [first1, last1) and another range starting at first2.
The swap operations in the parallel swap_ranges algorithm invoked with an execution policy object of type sequenced_policy execute in sequential order in the calling thread.
The swap operations in the parallel swap_ranges algorithm invoked with an execution policy object of type parallel_policy or parallel_task_policy are permitted to execute in an unordered fashion in unspecified threads, and indeterminately sequenced within each thread.
Note
Complexity: Linear in the distance between first1 and last1
- Template Parameters
ExPolicy – The type of the execution policy to use (deduced). It describes the manner in which the execution of the algorithm may be parallelized and the manner in which it executes the assignments.
FwdIter1 – The type of the first range of iterators to swap (deduced).
Sent1 – The type of the first sentinel (deduced). This sentinel type must be a sentinel for FwdIter1.
FwdIter2 – The type of the second range of iterators to swap (deduced).
Sent2 – The type of the second sentinel (deduced). This sentinel type must be a sentinel for FwdIter2.
- Parameters
policy – The execution policy to use for the scheduling of the iterations.
first1 – Refers to the beginning of the sequence of elements for the first range.
last1 – Refers to sentinel value denoting the end of the sequence of elements for the first range.
first2 – Refers to the beginning of the sequence of elements for the second range.
last2 – Refers to sentinel value denoting the end of the sequence of elements for the second range.
- Returns
The swap_ranges algorithm returns a hpx::future<swap_ranges_result<FwdIter1, FwdIter2>> if the execution policy is of type parallel_task_policy and returns FwdIter2 otherwise. The swap_ranges algorithm returns in_in_result with the first element as the iterator to the element past the last element exchanged in range beginning with first1 and the second element as the iterator to the element past the last element exchanged in the range beginning with first2.
-
template<typename Rng1, typename Rng2>
swap_ranges_result<std::ranges::iterator_t<Rng1>, std::ranges::iterator_t<Rng2>> swap_ranges(Rng1 &&rng1, Rng2 &&rng2)# Exchanges elements between range [first1, last1) and another range starting at first2.
The swap operations in the parallel swap_ranges algorithm invoked without an execution policy object execute in sequential order in the calling thread.
Note
Complexity: Linear in the distance between first1 and last1
- Template Parameters
Rng1 – The type of the source range used (deduced). The iterators extracted from this range type must meet the requirements of an input iterator.
Rng2 – The type of the destination range used (deduced). The iterators extracted from this range type must meet the requirements of an input iterator.
- Parameters
rng1 – Refers to the sequence of elements of the first range.
rng2 – Refers to the sequence of elements of the second range.
- Returns
The swap_ranges algorithm returns swap_ranges_result< std::ranges::iterator_t<Rng1>, std::ranges::iterator_t<Rng1>>. The swap_ranges algorithm returns in_in_result with the first element as the iterator to the element past the last element exchanged in range beginning with first1 and the second element as the iterator to the element past the last element exchanged in the range beginning with first2.
-
template<typename ExPolicy, typename Rng1, typename Rng2>
parallel::util::detail::algorithm_result<ExPolicy, swap_ranges_result<std::ranges::iterator_t<Rng1>, std::ranges::iterator_t<Rng2>>> swap_ranges(ExPolicy &&policy, Rng1 &&rng1, Rng2 &&rng2)# Exchanges elements between range [first1, last1) and another range starting at first2.
The swap operations in the parallel swap_ranges algorithm invoked with an execution policy object of type sequenced_policy execute in sequential order in the calling thread.
The swap operations in the parallel swap_ranges algorithm invoked with an execution policy object of type parallel_policy or parallel_task_policy are permitted to execute in an unordered fashion in unspecified threads, and indeterminately sequenced within each thread.
Note
Complexity: Linear in the distance between first1 and last1
- Template Parameters
ExPolicy – The type of the execution policy to use (deduced). It describes the manner in which the execution of the algorithm may be parallelized and the manner in which it executes the assignments.
Rng1 – The type of the source range used (deduced). The iterators extracted from this range type must meet the requirements of an input iterator.
Rng2 – The type of the destination range used (deduced). The iterators extracted from this range type must meet the requirements of an input iterator.
- Parameters
policy – The execution policy to use for the scheduling of the iterations.
rng1 – Refers to the sequence of elements of the first range.
rng2 – Refers to the sequence of elements of the second range.
- Returns
The swap_ranges algorithm returns a hpx::future<swap_ranges_result< std::ranges::iterator_t<Rng1>, std::ranges::iterator_t<Rng1>>> if the execution policy is of type parallel_task_policy and returns swap_ranges_result< std::ranges::iterator_t<Rng1>, std::ranges::iterator_t<Rng1>>. otherwise. The swap_ranges algorithm returns in_in_result with the first element as the iterator to the element past the last element exchanged in range beginning with first1 and the second element as the iterator to the element past the last element exchanged in the range beginning with first2.
-
template<typename InIter1, typename Sent1, typename InIter2, typename Sent2>
-
namespace ranges
hpx::ranges::transform#
Defined in header hpx/algorithm.hpp.
See Public API for a list of names and headers that are part of the public HPX API.
-
namespace hpx
-
namespace ranges
Functions
-
template<typename ExPolicy, typename FwdIter1, typename Sent1, typename FwdIter2, typename F, typename Proj = hpx::identity>
parallel::util::detail::algorithm_result<ExPolicy, ranges::unary_transform_result<FwdIter1, FwdIter2>>::type transform(ExPolicy &&policy, FwdIter1 first, Sent1 last, FwdIter2 dest, F &&f, Proj &&proj = Proj())# Applies the given function f to the given range rng and stores the result in another range, beginning at dest.
The invocations of f in the parallel transform algorithm invoked with an execution policy object of type sequenced_policy execute in sequential order in the calling thread.
The invocations of f in the parallel transform algorithm invoked with an execution policy object of type parallel_policy or parallel_task_policy are permitted to execute in an unordered fashion in unspecified threads, and indeterminately sequenced within each thread.
Note
Complexity: Exactly size(rng) applications of f
- Template Parameters
ExPolicy – The type of the execution policy to use (deduced). It describes the manner in which the execution of the algorithm may be parallelized and the manner in which it executes the invocations of f.
FwdIter1 – The type of the source iterators for the first range used (deduced). This iterator type must meet the requirements of a forward iterator.
Sent1 – The type of the end source iterators used (deduced). This iterator type must meet the requirements of a sentinel for FwdIter1.
FwdIter2 – The type of the source iterators for the first range used (deduced). This iterator type must meet the requirements of a forward iterator.
F – The type of the function/function object to use (deduced). Unlike its sequential form, the parallel overload of transform requires F to meet the requirements of CopyConstructible.
Proj – The type of an optional projection function. This defaults to hpx::identity
- Parameters
policy – The execution policy to use for the scheduling of the iterations.
first – Refers to the beginning of the first sequence of elements the algorithm will be applied to.
last – Refers to the end of the sequence of elements the algorithm will be applied to.
dest – Refers to the beginning of the destination range.
f – Specifies the function (or function object) which will be invoked for each of the elements in the sequence specified by [first, last).This is an unary predicate. The signature of this predicate should be equivalent to:
The signature does not need to have const&. The type Type must be such that an object of type FwdIter1 can be dereferenced and then implicitly converted to Type. The type Ret must be such that an object of type FwdIter2 can be dereferenced and assigned a value of type Ret.Ret fun(const Type &a);
proj – Specifies the function (or function object) which will be invoked for each of the elements as a projection operation before the actual predicate f is invoked.
- Returns
The transform algorithm returns a hpx::future<ranges::unary_transform_result<FwdIter1, FwdIter2> > if the execution policy is of type parallel_task_policy and returns ranges::unary_transform_result<FwdIter1, FwdIter2> otherwise. The transform algorithm returns a tuple holding an iterator referring to the first element after the input sequence and the output iterator to the element in the destination range, one past the last element copied.
-
template<typename ExPolicy, typename Rng, typename FwdIter, typename F, typename Proj = hpx::identity>
parallel::util::detail::algorithm_result<ExPolicy, ranges::unary_transform_result<std::ranges::iterator_t<Rng>, FwdIter>> transform(ExPolicy &&policy, Rng &&rng, FwdIter dest, F &&f, Proj &&proj = Proj())# Applies the given function f to the given range rng and stores the result in another range, beginning at dest.
The invocations of f in the parallel transform algorithm invoked with an execution policy object of type sequenced_policy execute in sequential order in the calling thread.
The invocations of f in the parallel transform algorithm invoked with an execution policy object of type parallel_policy or parallel_task_policy are permitted to execute in an unordered fashion in unspecified threads, and indeterminately sequenced within each thread.
Note
Complexity: Exactly size(rng) applications of f
- Template Parameters
ExPolicy – The type of the execution policy to use (deduced). It describes the manner in which the execution of the algorithm may be parallelized and the manner in which it executes the invocations of f.
Rng – The type of the source range used (deduced). The iterators extracted from this range type must meet the requirements of an input iterator.
FwdIter – The type of the iterator representing the destination range (deduced). This iterator type must meet the requirements of a forward iterator.
F – The type of the function/function object to use (deduced). Unlike its sequential form, the parallel overload of transform requires F to meet the requirements of CopyConstructible.
Proj – The type of an optional projection function. This defaults to hpx::identity
- Parameters
policy – The execution policy to use for the scheduling of the iterations.
rng – Refers to the sequence of elements the algorithm will be applied to.
dest – Refers to the beginning of the destination range.
f – Specifies the function (or function object) which will be invoked for each of the elements in the sequence specified by [first, last).This is an unary predicate. The signature of this predicate should be equivalent to:
The signature does not need to have const&. The type Type must be such that an object of type range_iterator<Rng>::type can be dereferenced and then implicitly converted to Type. The type Ret must be such that an object of type OutIter can be dereferenced and assigned a value of type Ret.Ret fun(const Type &a);
proj – Specifies the function (or function object) which will be invoked for each of the elements as a projection operation before the actual predicate f is invoked.
- Returns
The transform algorithm returns a hpx::future<ranges::unary_transform_result<range_iterator<Rng>::type, FwdIter>> if the execution policy is of type parallel_task_policy and returns ranges::unary_transform_result<range_iterator<Rng>::type, FwdIter> otherwise. The transform algorithm returns a tuple holding an iterator referring to the first element after the input sequence and the output iterator to the element in the destination range, one past the last element copied.
-
template<typename ExPolicy, typename FwdIter1, typename Sent1, typename FwdIter2, typename Sent2, typename FwdIter3, typename F, typename Proj1 = hpx::identity, typename Proj2 = hpx::identity>
parallel::util::detail::algorithm_result<ExPolicy, ranges::binary_transform_result<FwdIter1, FwdIter2, FwdIter3>>::type transform(ExPolicy &&policy, FwdIter1 first1, Sent1 last1, FwdIter2 first2, Sent2 last2, FwdIter3 dest, F &&f, Proj1 &&proj1 = Proj1(), Proj2 &&proj2 = Proj2())# Applies the given function f to pairs of elements from two ranges: one defined by rng and the other beginning at first2, and stores the result in another range, beginning at dest.
The invocations of f in the parallel transform algorithm invoked with an execution policy object of type sequenced_policy execute in sequential order in the calling thread.
The invocations of f in the parallel transform algorithm invoked with an execution policy object of type parallel_policy or parallel_task_policy are permitted to execute in an unordered fashion in unspecified threads, and indeterminately sequenced within each thread.
Note
Complexity: Exactly size(rng) applications of f
- Template Parameters
ExPolicy – The type of the execution policy to use (deduced). It describes the manner in which the execution of the algorithm may be parallelized and the manner in which it executes the invocations of f.
FwdIter1 – The type of the source iterators for the first range used (deduced). This iterator type must meet the requirements of a forward iterator.
Sent1 – The type of the end source iterators used (deduced). This iterator type must meet the requirements of a sentinel for FwdIter1.
FwdIter2 – The type of the source iterators for the first range used (deduced). This iterator type must meet the requirements of a forward iterator.
Sent2 – The type of the end source iterators used (deduced). This iterator type must meet the requirements of a sentinel for FwdIter2.
FwdIter3 – The type of the source iterators for the first range used (deduced). This iterator type must meet the requirements of a forward iterator.
F – The type of the function/function object to use (deduced). Unlike its sequential form, the parallel overload of transform requires F to meet the requirements of CopyConstructible.
Proj1 – The type of an optional projection function to be used for elements of the first sequence. This defaults to hpx::identity
Proj2 – The type of an optional projection function to be used for elements of the second sequence. This defaults to hpx::identity
- Parameters
policy – The execution policy to use for the scheduling of the iterations.
first1 – Refers to the beginning of the first sequence of elements the algorithm will be applied to.
last1 – Refers to the end of the first sequence of elements the algorithm will be applied to.
first2 – Refers to the beginning of the second sequence of elements the algorithm will be applied to.
last2 – Refers to the end of the second sequence of elements the algorithm will be applied to.
dest – Refers to the beginning of the destination range.
f – Specifies the function (or function object) which will be invoked for each of the elements in the sequence specified by [first, last).This is a binary predicate. The signature of this predicate should be equivalent to:
The signature does not need to have const&. The types Type1 and Type2 must be such that objects of types FwdIter1 and FwdIter2 can be dereferenced and then implicitly converted to Type1 and Type2 respectively. The type Ret must be such that an object of type FwdIter3 can be dereferenced and assigned a value of type Ret.Ret fun(const Type1 &a, const Type2 &b);
proj1 – Specifies the function (or function object) which will be invoked for each of the elements of the first sequence as a projection operation before the actual predicate f is invoked.
proj2 – Specifies the function (or function object) which will be invoked for each of the elements of the second sequence as a projection operation before the actual predicate f is invoked.
- Returns
The transform algorithm returns A hpx::future<ranges::binary_transform_result<FwdIter1, FwdIter2, FwdIter3>> if the execution policy is of type parallel_task_policy and returns ranges::binary_transform_result<FwdIter1, FwdIter2, FwdIter3> otherwise. The transform algorithm returns a tuple holding an iterator referring to the first element after the first input sequence, an iterator referring to the first element after the second input sequence, and the output iterator referring to the element in the destination range, one past the last element copied.
-
template<typename ExPolicy, typename Rng1, typename Rng2, typename FwdIter, typename F, typename Proj1 = hpx::identity, typename Proj2 = hpx::identity>
parallel::util::detail::algorithm_result<ExPolicy, ranges::binary_transform_result<std::ranges::iterator_t<Rng1>, std::ranges::iterator_t<Rng2>, FwdIter>> transform_t(ExPolicy &&policy, Rng1 &&rng1, Rng2 &&rng2, FwdIter dest, F &&f, Proj1 &&proj1 = Proj1(), Proj2 &&proj2 = Proj2())# Applies the given function f to pairs of elements from two ranges: one defined by [first1, last1) and the other beginning at first2, and stores the result in another range, beginning at dest.
The invocations of f in the parallel transform algorithm invoked with an execution policy object of type sequenced_policy execute in sequential order in the calling thread.
The invocations of f in the parallel transform algorithm invoked with an execution policy object of type parallel_policy or parallel_task_policy are permitted to execute in an unordered fashion in unspecified threads, and indeterminately sequenced within each thread.
Note
Complexity: Exactly min(last2-first2, last1-first1) applications of f
Note
The algorithm will invoke the binary predicate until it reaches the end of the shorter of the two given input sequences
- Template Parameters
ExPolicy – The type of the execution policy to use (deduced). It describes the manner in which the execution of the algorithm may be parallelized and the manner in which it executes the invocations of f.
Rng1 – The type of the first source range used (deduced). The iterators extracted from this range type must meet the requirements of an input iterator.
Rng2 – The type of the second source range used (deduced). The iterators extracted from this range type must meet the requirements of an input iterator.
FwdIter – The type of the iterator representing the destination range (deduced). This iterator type must meet the requirements of an output iterator.
F – The type of the function/function object to use (deduced). Unlike its sequential form, the parallel overload of transform requires F to meet the requirements of CopyConstructible.
Proj1 – The type of an optional projection function to be used for elements of the first sequence. This defaults to hpx::identity
Proj2 – The type of an optional projection function to be used for elements of the second sequence. This defaults to hpx::identity
- Parameters
policy – The execution policy to use for the scheduling of the iterations.
rng1 – Refers to the first sequence of elements the algorithm will be applied to.
rng2 – Refers to the second sequence of elements the algorithm will be applied to.
dest – Refers to the beginning of the destination range.
f – Specifies the function (or function object) which will be invoked for each of the elements in the sequence specified by [first, last).This is a binary predicate. The signature of this predicate should be equivalent to:
The signature does not need to have const&. The types Type1 and Type2 must be such that objects of types range_iterator<Rng1>::type and range_iterator<Rng2>::type can be dereferenced and then implicitly converted to Type1 and Type2 respectively. The type Ret must be such that an object of type FwdIter can be dereferenced and assigned a value of type Ret.Ret fun(const Type1 &a, const Type2 &b);
proj1 – Specifies the function (or function object) which will be invoked for each of the elements of the first sequence as a projection operation before the actual predicate f is invoked.
proj2 – Specifies the function (or function object) which will be invoked for each of the elements of the second sequence as a projection operation before the actual predicate f is invoked.
- Returns
The transform algorithm returns a hpx::future<ranges::binary_transform_result< std::ranges::iterator_t<Rng1>, std::ranges::iterator_t<Rng2>, FwdIter> > if the execution policy is of type parallel_task_policy and returns ranges::binary_transform_result< std::ranges::iterator_t<Rng1>, std::ranges::iterator_t<Rng2>, FwdIter> otherwise. The transform algorithm returns a tuple holding an iterator referring to the first element after the first input sequence, an iterator referring to the first element after the second input sequence, and the output iterator referring to the element in the destination range, one past the last element copied.
-
template<typename FwdIter1, typename Sent1, typename FwdIter2, typename F, typename Proj = hpx::identity>
ranges::unary_transform_result<FwdIter1, FwdIter2> transform(FwdIter1 first, Sent1 last, FwdIter2 dest, F &&f, Proj &&proj = Proj())# Applies the given function f to the given range rng and stores the result in another range, beginning at dest.
Note
Complexity: Exactly size(rng) applications of f
- Template Parameters
FwdIter1 – The type of the source iterators for the first range used (deduced). This iterator type must meet the requirements of a forward iterator.
Sent1 – The type of the end source iterators used (deduced). This iterator type must meet the requirements of a sentinel for FwdIter1.
FwdIter2 – The type of the source iterators for the first range used (deduced). This iterator type must meet the requirements of a forward iterator.
F – The type of the function/function object to use (deduced). Unlike its sequential form, the parallel overload of transform requires F to meet the requirements of CopyConstructible.
Proj – The type of an optional projection function. This defaults to hpx::identity
- Parameters
first – Refers to the beginning of the first sequence of elements the algorithm will be applied to.
last – Refers to the end of the sequence of elements the algorithm will be applied to.
dest – Refers to the beginning of the destination range.
f – Specifies the function (or function object) which will be invoked for each of the elements in the sequence specified by [first, last).This is an unary predicate. The signature of this predicate should be equivalent to:
The signature does not need to have const&. The type Type must be such that an object of type FwdIter1 can be dereferenced and then implicitly converted to Type. The type Ret must be such that an object of type FwdIter2 can be dereferenced and assigned a value of type Ret.Ret fun(const Type &a);
proj – Specifies the function (or function object) which will be invoked for each of the elements as a projection operation before the actual predicate f is invoked.
- Returns
The transform algorithm returns ranges::unary_transform_result<FwdIter1, FwdIter2>. The transform algorithm returns a tuple holding an iterator referring to the first element after the input sequence and the output iterator to the element in the destination range, one past the last element copied.
-
template<typename Rng, typename FwdIter, typename F, typename Proj = hpx::identity>
ranges::unary_transform_result<std::ranges::iterator_t<Rng>, FwdIter> transform(Rng &&rng, FwdIter dest, F &&f, Proj &&proj = Proj())# Applies the given function f to the given range rng and stores the result in another range, beginning at dest.
Note
Complexity: Exactly size(rng) applications of f
- Template Parameters
Rng – The type of the source range used (deduced). The iterators extracted from this range type must meet the requirements of an input iterator.
FwdIter – The type of the iterator representing the destination range (deduced). This iterator type must meet the requirements of a forward iterator.
F – The type of the function/function object to use (deduced). Unlike its sequential form, the parallel overload of transform requires F to meet the requirements of CopyConstructible.
Proj – The type of an optional projection function. This defaults to hpx::identity
- Parameters
rng – Refers to the sequence of elements the algorithm will be applied to.
dest – Refers to the beginning of the destination range.
f – Specifies the function (or function object) which will be invoked for each of the elements in the sequence specified by [first, last).This is an unary predicate. The signature of this predicate should be equivalent to:
The signature does not need to have const&. The type Type must be such that an object of type range_iterator<Rng>::type can be dereferenced and then implicitly converted to Type. The type Ret must be such that an object of type OutIter can be dereferenced and assigned a value of type Ret.Ret fun(const Type &a);
proj – Specifies the function (or function object) which will be invoked for each of the elements as a projection operation before the actual predicate f is invoked.
- Returns
The transform algorithm returns ranges::unary_transform_result<range_iterator<Rng>::type, FwdIter>. The transform algorithm returns a tuple holding an iterator referring to the first element after the input sequence and the output iterator to the element in the destination range, one past the last element copied.
-
template<typename FwdIter1, typename Sent1, typename FwdIter2, typename Sent2, typename FwdIter3, typename F, typename Proj1 = hpx::identity, typename Proj2 = hpx::identity>
ranges::binary_transform_result<FwdIter1, FwdIter2, FwdIter3> transform(FwdIter1 first1, Sent1 last1, FwdIter2 first2, Sent2 last2, FwdIter3 dest, F &&f, Proj1 &&proj1 = Proj1(), Proj2 &&proj2 = Proj2())# Applies the given function f to pairs of elements from two ranges: one defined by rng and the other beginning at first2, and stores the result in another range, beginning at dest.
Note
Complexity: Exactly size(rng) applications of f
- Template Parameters
FwdIter1 – The type of the source iterators for the first range used (deduced). This iterator type must meet the requirements of a forward iterator.
Sent1 – The type of the end source iterators used (deduced). This iterator type must meet the requirements of a sentinel for FwdIter1.
FwdIter2 – The type of the source iterators for the first range used (deduced). This iterator type must meet the requirements of a forward iterator.
Sent2 – The type of the end source iterators used (deduced). This iterator type must meet the requirements of a sentinel for FwdIter2.
FwdIter3 – The type of the source iterators for the first range used (deduced). This iterator type must meet the requirements of a forward iterator.
F – The type of the function/function object to use (deduced). Unlike its sequential form, the parallel overload of transform requires F to meet the requirements of CopyConstructible.
Proj1 – The type of an optional projection function to be used for elements of the first sequence. This defaults to hpx::identity
Proj2 – The type of an optional projection function to be used for elements of the second sequence. This defaults to hpx::identity
- Parameters
first1 – Refers to the beginning of the first sequence of elements the algorithm will be applied to.
last1 – Refers to the end of the first sequence of elements the algorithm will be applied to.
first2 – Refers to the beginning of the second sequence of elements the algorithm will be applied to.
last2 – Refers to the end of the second sequence of elements the algorithm will be applied to.
dest – Refers to the beginning of the destination range.
f – Specifies the function (or function object) which will be invoked for each of the elements in the sequence specified by [first, last).This is a binary predicate. The signature of this predicate should be equivalent to:
The signature does not need to have const&. The types Type1 and Type2 must be such that objects of types FwdIter1 and FwdIter2 can be dereferenced and then implicitly converted to Type1 and Type2 respectively. The type Ret must be such that an object of type FwdIter3 can be dereferenced and assigned a value of type Ret.Ret fun(const Type1 &a, const Type2 &b);
proj1 – Specifies the function (or function object) which will be invoked for each of the elements of the first sequence as a projection operation before the actual predicate f is invoked.
proj2 – Specifies the function (or function object) which will be invoked for each of the elements of the second sequence as a projection operation before the actual predicate f is invoked.
- Returns
The transform algorithm returns ranges::binary_transform_result<FwdIter1, FwdIter2, FwdIter3>. The transform algorithm returns a tuple holding an iterator referring to the first element after the first input sequence, an iterator referring to the first element after the second input sequence, and the output iterator referring to the element in the destination range, one past the last element copied.
-
template<typename Rng1, typename Rng2, typename FwdIter, typename F, typename Proj1 = hpx::identity, typename Proj2 = hpx::identity>
ranges::binary_transform_result<std::ranges::iterator_t<Rng1>, std::ranges::iterator_t<Rng2>, FwdIter> transform(Rng1 &&rng1, Rng2 &&rng2, FwdIter dest, F &&f, Proj1 &&proj1 = Proj1(), Proj2 &&proj2 = Proj2())# Applies the given function f to pairs of elements from two ranges: one defined by [first1, last1) and the other beginning at first2, and stores the result in another range, beginning at dest.
Note
Complexity: Exactly min(last2-first2, last1-first1) applications of f
Note
The algorithm will invoke the binary predicate until it reaches the end of the shorter of the two given input sequences
- Template Parameters
Rng1 – The type of the first source range used (deduced). The iterators extracted from this range type must meet the requirements of an input iterator.
Rng2 – The type of the second source range used (deduced). The iterators extracted from this range type must meet the requirements of an input iterator.
FwdIter – The type of the iterator representing the destination range (deduced). This iterator type must meet the requirements of an output iterator.
F – The type of the function/function object to use (deduced). Unlike its sequential form, the parallel overload of transform requires F to meet the requirements of CopyConstructible.
Proj1 – The type of an optional projection function to be used for elements of the first sequence. This defaults to hpx::identity
Proj2 – The type of an optional projection function to be used for elements of the second sequence. This defaults to hpx::identity
- Parameters
rng1 – Refers to the first sequence of elements the algorithm will be applied to.
rng2 – Refers to the second sequence of elements the algorithm will be applied to.
dest – Refers to the beginning of the destination range.
f – Specifies the function (or function object) which will be invoked for each of the elements in the sequence specified by [first, last).This is a binary predicate. The signature of this predicate should be equivalent to:
The signature does not need to have const&. The types Type1 and Type2 must be such that objects of types range_iterator<Rng1>::type and range_iterator<Rng2>::type can be dereferenced and then implicitly converted to Type1 and Type2 respectively. The type Ret must be such that an object of type FwdIter can be dereferenced and assigned a value of type Ret.Ret fun(const Type1 &a, const Type2 &b);
proj1 – Specifies the function (or function object) which will be invoked for each of the elements of the first sequence as a projection operation before the actual predicate f is invoked.
proj2 – Specifies the function (or function object) which will be invoked for each of the elements of the second sequence as a projection operation before the actual predicate f is invoked.
- Returns
The transform algorithm returns ranges::binary_transform_result< std::ranges::iterator_t<Rng1>, std::ranges::iterator_t<Rng2>, FwdIter>. The transform algorithm returns a tuple holding an iterator referring to the first element after the first input sequence, an iterator referring to the first element after the second input sequence, and the output iterator referring to the element in the destination range, one past the last element copied.
-
template<typename ExPolicy, typename FwdIter1, typename Sent1, typename FwdIter2, typename F, typename Proj = hpx::identity>
-
namespace ranges
hpx::ranges::transform_exclusive_scan#
Defined in header hpx/algorithm.hpp.
See Public API for a list of names and headers that are part of the public HPX API.
-
namespace hpx
-
namespace ranges
Functions
-
template<typename InIter, typename Sent, typename OutIter, typename BinOp, typename UnOp, typename T = typename std::iterator_traits<InIter>::value_type>
transform_exclusive_scan_result<InIter, OutIter> transform_exclusive_scan(InIter first, Sent last, OutIter dest, T init, BinOp &&binary_op, UnOp &&unary_op)# Assigns through each iterator i in [result, result + (last - first)) the value of GENERALIZED_NONCOMMUTATIVE_SUM(binary_op, init, conv(*first), …, conv(*(first + (i - result) - 1))).
The reduce operations in the parallel transform_exclusive_scan algorithm invoked without an execution policy object execute in sequential order in the calling thread.
Neither conv nor op shall invalidate iterators or sub-ranges, or modify elements in the ranges [first,last) or [result,result + (last - first)).
The behavior of transform_exclusive_scan may be non-deterministic for a non-associative predicate.
Note
Complexity: O(last - first) applications of the predicates op and conv.
Note
GENERALIZED_NONCOMMUTATIVE_SUM(op, a1, …, aN) is defined as:
a1 when N is 1
op(GENERALIZED_NONCOMMUTATIVE_SUM(op, a1, …, aK), GENERALIZED_NONCOMMUTATIVE_SUM(op, aM, …, aN) where 1 < K+1 = M <= N.
- Template Parameters
InIter – The type of the source iterators used (deduced). This iterator type must meet the requirements of an input iterator.
Sent – The type of the source sentinel (deduced). This sentinel type must be a sentinel for InIter.
OutIter – The type of the iterator representing the destination range (deduced). This iterator type must meet the requirements of an output iterator.
T – The type of the value to be used as initial (and intermediate) values (deduced).
BinOp – The type of the binary function object used for the reduction operation.
UnOp – The type of the unary function object used for the conversion operation.
- Parameters
first – Refers to the beginning of the sequence of elements the algorithm will be applied to.
last – Refers to sentinel value denoting the end of the sequence of elements the algorithm will be applied.
dest – Refers to the beginning of the destination range.
init – The initial value for the generalized sum.
binary_op – Specifies the function (or function object) which will be invoked for each of the values of the input sequence. This is a binary predicate. The signature of this predicate should be equivalent to:
The signature does not need to have const&, but the function must not modify the objects passed to it. The types Type1 and Ret must be such that an object of a type as given by the input sequence can be implicitly converted to any of those types.Ret fun(const Type1 &a, const Type1 &b);
unary_op – Specifies the function (or function object) which will be invoked for each of the elements in the sequence specified by [first, last). This is a unary predicate. The signature of this predicate should be equivalent to:
The signature does not need to have const&, but the function must not modify the objects passed to it. The type Type must be such that an object of type FwdIter1 can be dereferenced and then implicitly converted to Type. The type R must be such that an object of this type can be implicitly converted to T.R fun(const Type &a);
- Returns
The transform_exclusive_scan algorithm returns transform_exclusive_scan_result<InIter, OutIter>. The transform_exclusive_scan algorithm returns an input iterator to the point denoted by the sentinel and an output iterator to the element in the destination range, one past the last element copied.
-
template<typename ExPolicy, typename FwdIter1, typename Sent, typename FwdIter2, typename BinOp, typename UnOp, typename T = typename std::iterator_traits<FwdIter1>::value_type>
parallel::util::detail::algorithm_result<ExPolicy, transform_exclusive_result<FwdIter1, FwdIter2>>::type transform_exclusive_scan(ExPolicy &&policy, FwdIter1 first, Sent last, FwdIter2 dest, T init, BinOp &&binary_op, UnOp &&unary_op)# Assigns through each iterator i in [result, result + (last - first)) the value of GENERALIZED_NONCOMMUTATIVE_SUM(binary_op, init, conv(*first), …, conv(*(first + (i - result) - 1))).
The reduce operations in the parallel transform_exclusive_scan algorithm invoked with an execution policy object of type sequenced_policy execute in sequential order in the calling thread.
The reduce operations in the parallel transform_exclusive_scan algorithm invoked with an execution policy object of type parallel_policy or parallel_task_policy are permitted to execute in an unordered fashion in unspecified threads, and indeterminately sequenced within each thread.
Neither conv nor op shall invalidate iterators or sub-ranges, or modify elements in the ranges [first,last) or [result,result + (last - first)).
The behavior of transform_exclusive_scan may be non-deterministic for a non-associative predicate.
Note
Complexity: O(last - first) applications of the predicates op and conv.
Note
GENERALIZED_NONCOMMUTATIVE_SUM(op, a1, …, aN) is defined as:
a1 when N is 1
op(GENERALIZED_NONCOMMUTATIVE_SUM(op, a1, …, aK), GENERALIZED_NONCOMMUTATIVE_SUM(op, aM, …, aN) where 1 < K+1 = M <= N.
- Template Parameters
ExPolicy – The type of the execution policy to use (deduced). It describes the manner in which the execution of the algorithm may be parallelized and the manner in which it executes the assignments.
FwdIter1 – The type of the source iterators used (deduced). This iterator type must meet the requirements of an forward iterator.
Sent – The type of the source sentinel (deduced). This sentinel type must be a sentinel for FwdIter.
FwdIter2 – The type of the iterator representing the destination range (deduced). This iterator type must meet the requirements of an forward iterator.
T – The type of the value to be used as initial (and intermediate) values (deduced).
BinOp – The type of the binary function object used for the reduction operation.
UnOp – The type of the unary function object used for the conversion operation.
- Parameters
policy – The execution policy to use for the scheduling of the iterations.
first – Refers to the beginning of the sequence of elements the algorithm will be applied to.
last – Refers to sentinel value denoting the end of the sequence of elements the algorithm will be applied.
dest – Refers to the beginning of the destination range.
init – The initial value for the generalized sum.
binary_op – Specifies the function (or function object) which will be invoked for each of the values of the input sequence. This is a binary predicate. The signature of this predicate should be equivalent to:
The signature does not need to have const&, but the function must not modify the objects passed to it. The types Type1 and Ret must be such that an object of a type as given by the input sequence can be implicitly converted to any of those types.Ret fun(const Type1 &a, const Type1 &b);
unary_op – Specifies the function (or function object) which will be invoked for each of the elements in the sequence specified by [first, last). This is a unary predicate. The signature of this predicate should be equivalent to:
The signature does not need to have const&, but the function must not modify the objects passed to it. The type Type must be such that an object of type FwdIter1 can be dereferenced and then implicitly converted to Type. The type R must be such that an object of this type can be implicitly converted to T.R fun(const Type &a);
- Returns
The transform_exclusive_scan algorithm returns a hpx::future<transform_exclusive_result<FwdIter1, FwdIter2>> if the execution policy is of type sequenced_task_policy or parallel_task_policy and returns transform_exclusive_result<FwdIter1, FwdIter2> otherwise. The transform_exclusive_scan algorithm returns an input iterator to the point denoted by the sentinel and an output iterator to the element in the destination range, one past the last element copied.
-
template<typename Rng, typename O, typename BinOp, typename UnOp, typename T = typename std::iterator_traits<std::ranges::iterator_t<Rng>>::value_type>
transform_exclusive_scan_result<std::ranges::iterator_t<Rng>, O> transform_exclusive_scan(Rng &&rng, O dest, T init, BinOp &&binary_op, UnOp &&unary_op)# Assigns through each iterator i in [result, result + (last - first)) the value of GENERALIZED_NONCOMMUTATIVE_SUM(binary_op, init, conv(*first), …, conv(*(first + (i - result) - 1))).
The reduce operations in the parallel transform_exclusive_scan algorithm invoked without an execution policy object execute in sequential order in the calling thread.
Neither conv nor op shall invalidate iterators or sub-ranges, or modify elements in the ranges [first,last) or [result,result + (last - first)).
The behavior of transform_exclusive_scan may be non-deterministic for a non-associative predicate.
Note
Complexity: O(last - first) applications of the predicates op and conv.
Note
GENERALIZED_NONCOMMUTATIVE_SUM(op, a1, …, aN) is defined as:
a1 when N is 1
op(GENERALIZED_NONCOMMUTATIVE_SUM(op, a1, …, aK), GENERALIZED_NONCOMMUTATIVE_SUM(op, aM, …, aN) where 1 < K+1 = M <= N.
- Template Parameters
Rng – The type of the source range used (deduced). The iterators extracted from this range type must meet the requirements of an input iterator.
O – The type of the iterator representing the destination range (deduced).
T – The type of the value to be used as initial (and intermediate) values (deduced).
BinOp – The type of the binary function object used for the reduction operation.
UnOp – The type of the unary function object used for the conversion operation.
- Parameters
rng – Refers to the sequence of elements the algorithm will be applied to.
dest – Refers to the beginning of the destination range.
init – The initial value for the generalized sum.
binary_op – Specifies the function (or function object) which will be invoked for each of the values of the input sequence. This is a binary predicate. The signature of this predicate should be equivalent to:
The signature does not need to have const&, but the function must not modify the objects passed to it. The types Type1 and Ret must be such that an object of a type as given by the input sequence can be implicitly converted to any of those types.Ret fun(const Type1 &a, const Type1 &b);
unary_op – Specifies the function (or function object) which will be invoked for each of the elements in the sequence specified by [first, last). This is a unary predicate. The signature of this predicate should be equivalent to:
The signature does not need to have const&, but the function must not modify the objects passed to it. The type Type must be such that an object of type FwdIter1 can be dereferenced and then implicitly converted to Type. The type R must be such that an object of this type can be implicitly converted to T.R fun(const Type &a);
- Returns
The transform_exclusive_scan algorithm returns a returns transform_exclusive_scan_result< std::ranges::iterator_t<Rng>, O>. The transform_exclusive_scan algorithm returns an input iterator to one past the end of the range and an output iterator to the element in the destination range, one past the last element copied.
-
template<typename ExPolicy, typename Rng, typename O, typename BinOp, typename UnOp, typename T = typename std::iterator_traits<std::ranges::iterator_t<Rng>>::value_type>
parallel::util::detail::algorithm_result<ExPolicy, transform_exclusive_scan_result<std::ranges::iterator_t<Rng>, O>>::type transform_exclusive_scan(ExPolicy &&policy, Rng &&rng, O dest, T init, BinOp &&binary_op, UnOp &&unary_op)# Assigns through each iterator i in [result, result + (last - first)) the value of GENERALIZED_NONCOMMUTATIVE_SUM(binary_op, init, conv(*first), …, conv(*(first + (i - result) - 1))).
The reduce operations in the parallel transform_exclusive_scan algorithm invoked with an execution policy object of type sequenced_policy execute in sequential order in the calling thread.
The reduce operations in the parallel transform_exclusive_scan algorithm invoked with an execution policy object of type parallel_policy or parallel_task_policy are permitted to execute in an unordered fashion in unspecified threads, and indeterminately sequenced within each thread.
Neither conv nor op shall invalidate iterators or sub-ranges, or modify elements in the ranges [first,last) or [result,result + (last - first)).
The behavior of transform_exclusive_scan may be non-deterministic for a non-associative predicate.
Note
Complexity: O(last - first) applications of the predicates op and conv.
Note
GENERALIZED_NONCOMMUTATIVE_SUM(op, a1, …, aN) is defined as:
a1 when N is 1
op(GENERALIZED_NONCOMMUTATIVE_SUM(op, a1, …, aK), GENERALIZED_NONCOMMUTATIVE_SUM(op, aM, …, aN) where 1 < K+1 = M <= N.
- Template Parameters
ExPolicy – The type of the execution policy to use (deduced). It describes the manner in which the execution of the algorithm may be parallelized and the manner in which it executes the assignments.
Rng – The type of the source range used (deduced). The iterators extracted from this range type must meet the requirements of an forward iterator.
O – The type of the iterator representing the destination range (deduced). This iterator type must meet the requirements of an forward iterator. This iterator type must meet the requirements of an forward iterator.
T – The type of the value to be used as initial (and intermediate) values (deduced).
BinOp – The type of the binary function object used for the reduction operation.
UnOp – The type of the unary function object used for the conversion operation.
- Parameters
policy – The execution policy to use for the scheduling of the iterations.
rng – Refers to the sequence of elements the algorithm will be applied to.
dest – Refers to the beginning of the destination range.
init – The initial value for the generalized sum.
binary_op – Specifies the function (or function object) which will be invoked for each of the values of the input sequence. This is a binary predicate. The signature of this predicate should be equivalent to:
The signature does not need to have const&, but the function must not modify the objects passed to it. The types Type1 and Ret must be such that an object of a type as given by the input sequence can be implicitly converted to any of those types.Ret fun(const Type1 &a, const Type1 &b);
unary_op – Specifies the function (or function object) which will be invoked for each of the elements in the sequence specified by [first, last). This is a unary predicate. The signature of this predicate should be equivalent to:
The signature does not need to have const&, but the function must not modify the objects passed to it. The type Type must be such that an object of type FwdIter1 can be dereferenced and then implicitly converted to Type. The type R must be such that an object of this type can be implicitly converted to T.R fun(const Type &a);
- Returns
The transform_exclusive_scan algorithm returns a hpx::future<transform_exclusive_scan_result< std::ranges::iterator_t<Rng>, O>> if the execution policy is of type sequenced_task_policy or parallel_task_policy and returns transform_exclusive_scan_result< std::ranges::iterator_t<Rng>, O> otherwise. The transform_exclusive_scan algorithm returns an input iterator to one past the end of the range and an output iterator to the element in the destination range, one past the last element copied.
-
template<typename InIter, typename Sent, typename OutIter, typename BinOp, typename UnOp, typename T = typename std::iterator_traits<InIter>::value_type>
-
namespace ranges
hpx::ranges::transform_inclusive_scan#
Defined in header hpx/algorithm.hpp.
See Public API for a list of names and headers that are part of the public HPX API.
-
namespace hpx
-
namespace ranges
Functions
-
template<typename InIter, typename Sent, typename OutIter, typename BinOp, typename UnOp>
transform_inclusive_scan_result<InIter, OutIter> transform_inclusive_scan(InIter first, Sent last, OutIter dest, BinOp &&binary_op, UnOp &&unary_op)# Assigns through each iterator i in [result, result + (last - first)) the value of GENERALIZED_NONCOMMUTATIVE_SUM(op, conv(*first), …, conv(*(first + (i - result)))).
The reduce operations in the parallel transform_inclusive_scan algorithm invoked without an execution policy object execute in sequential order in the calling thread.
Neither conv nor op shall invalidate iterators or sub-ranges, or modify elements in the ranges [first,last) or [result,result + (last - first)).
The behavior of transform_inclusive_scan may be non-deterministic for a non-associative predicate.
Note
Complexity: O(last - first) applications of the predicates op and conv.
Note
GENERALIZED_NONCOMMUTATIVE_SUM(op, a1, …, aN) is defined as:
a1 when N is 1
op(GENERALIZED_NONCOMMUTATIVE_SUM(op, a1, …, aK), GENERALIZED_NONCOMMUTATIVE_SUM(op, aM, …, aN) where 1 < K+1 = M <= N.
- Template Parameters
InIter – The type of the source iterators used (deduced). This iterator type must meet the requirements of an input iterator.
Sent – The type of the source sentinel (deduced). This sentinel type must be a sentinel for InIter.
OutIter – The type of the iterator representing the destination range (deduced). This iterator type must meet the requirements of an output iterator.
BinOp – The type of the binary function object used for the reduction operation.
UnOp – The type of the unary function object used for the conversion operation.
- Parameters
first – Refers to the beginning of the sequence of elements the algorithm will be applied to.
last – Refers to sentinel value denoting the end of the sequence of elements the algorithm will be applied.
dest – Refers to the beginning of the destination range.
binary_op – Specifies the function (or function object) which will be invoked for each of the values of the input sequence. This is a binary predicate. The signature of this predicate should be equivalent to:
The signature does not need to have const&, but the function must not modify the objects passed to it. The types Type1 and Ret must be such that an object of a type as given by the input sequence can be implicitly converted to any of those types.Ret fun(const Type1 &a, const Type1 &b);
unary_op – Specifies the function (or function object) which will be invoked for each of the elements in the sequence specified by [first, last). This is a unary predicate. The signature of this predicate should be equivalent to:
The signature does not need to have const&, but the function must not modify the objects passed to it. The type Type must be such that an object of type FwdIter1 can be dereferenced and then implicitly converted to Type. The type R must be such that an object of this type can be implicitly converted to T.R fun(const Type &a);
- Returns
The transform_inclusive_scan algorithm returns transform_inclusive_scan_result<InIter, OutIter>. The transform_inclusive_scan algorithm returns an input iterator to the point denoted by the sentinel and an output iterator to the element in the destination range, one past the last element copied.
-
template<typename ExPolicy, typename FwdIter1, typename Sent, typename FwdIter2, typename BinOp, typename UnOp>
parallel::util::detail::algorithm_result<ExPolicy, transform_inclusive_result<FwdIter1, FwdIter2>>::type transform_inclusive_scan(ExPolicy &&policy, FwdIter1 first, Sent last, FwdIter2 dest, BinOp &&binary_op, UnOp &&unary_op)# Assigns through each iterator i in [result, result + (last - first)) the value of GENERALIZED_NONCOMMUTATIVE_SUM(op, conv(*first), …, conv(*(first + (i - result)))).
The reduce operations in the parallel transform_inclusive_scan algorithm invoked with an execution policy object of type sequenced_policy execute in sequential order in the calling thread.
The reduce operations in the parallel transform_inclusive_scan algorithm invoked with an execution policy object of type parallel_policy or parallel_task_policy are permitted to execute in an unordered fashion in unspecified threads, and indeterminately sequenced within each thread.
Neither conv nor op shall invalidate iterators or sub-ranges, or modify elements in the ranges [first,last) or [result,result + (last - first)).
The behavior of transform_inclusive_scan may be non-deterministic for a non-associative predicate.
Note
Complexity: O(last - first) applications of the predicates op and conv.
Note
GENERALIZED_NONCOMMUTATIVE_SUM(op, a1, …, aN) is defined as:
a1 when N is 1
op(GENERALIZED_NONCOMMUTATIVE_SUM(op, a1, …, aK), GENERALIZED_NONCOMMUTATIVE_SUM(op, aM, …, aN) where 1 < K+1 = M <= N.
- Template Parameters
ExPolicy – The type of the execution policy to use (deduced). It describes the manner in which the execution of the algorithm may be parallelized and the manner in which it executes the assignments.
FwdIter1 – The type of the source iterators used (deduced). This iterator type must meet the requirements of an forward iterator.
Sent – The type of the source sentinel (deduced). This sentinel type must be a sentinel for FwdIter.
FwdIter2 – The type of the iterator representing the destination range (deduced). This iterator type must meet the requirements of an forward iterator.
BinOp – The type of the binary function object used for the reduction operation.
UnOp – The type of the unary function object used for the conversion operation.
- Parameters
policy – The execution policy to use for the scheduling of the iterations.
first – Refers to the beginning of the sequence of elements the algorithm will be applied to.
last – Refers to sentinel value denoting the end of the sequence of elements the algorithm will be applied.
dest – Refers to the beginning of the destination range.
binary_op – Specifies the function (or function object) which will be invoked for each of the values of the input sequence. This is a binary predicate. The signature of this predicate should be equivalent to:
The signature does not need to have const&, but the function must not modify the objects passed to it. The types Type1 and Ret must be such that an object of a type as given by the input sequence can be implicitly converted to any of those types.Ret fun(const Type1 &a, const Type1 &b);
unary_op – Specifies the function (or function object) which will be invoked for each of the elements in the sequence specified by [first, last). This is a unary predicate. The signature of this predicate should be equivalent to:
The signature does not need to have const&, but the function must not modify the objects passed to it. The type Type must be such that an object of type FwdIter1 can be dereferenced and then implicitly converted to Type. The type R must be such that an object of this type can be implicitly converted to T.R fun(const Type &a);
- Returns
The transform_inclusive_scan algorithm returns a hpx::future<transform_inclusive_result<FwdIter1, FwdIter2>> if the execution policy is of type sequenced_task_policy or parallel_task_policy and returns transform_inclusive_result<FwdIter1, FwdIter2> otherwise. The transform_inclusive_scan algorithm returns an input iterator to the point denoted by the sentinel and an output iterator to the element in the destination range, one past the last element copied.
-
template<typename Rng, typename O, typename BinOp, typename UnOp>
transform_inclusive_scan_result<std::ranges::iterator_t<Rng>, O> transform_inclusive_scan(Rng &&rng, O dest, BinOp &&binary_op, UnOp &&unary_op)# Assigns through each iterator i in [result, result + (last - first)) the value of GENERALIZED_NONCOMMUTATIVE_SUM(op, conv(*first), …, conv(*(first + (i - result)))).
The reduce operations in the parallel transform_inclusive_scan algorithm invoked without an execution policy object execute in sequential order in the calling thread.
Neither conv nor op shall invalidate iterators or sub-ranges, or modify elements in the ranges [first,last) or [result,result + (last - first)).
The behavior of transform_inclusive_scan may be non-deterministic for a non-associative predicate.
Note
Complexity: O(last - first) applications of the predicates op and conv.
Note
GENERALIZED_NONCOMMUTATIVE_SUM(op, a1, …, aN) is defined as:
a1 when N is 1
op(GENERALIZED_NONCOMMUTATIVE_SUM(op, a1, …, aK), GENERALIZED_NONCOMMUTATIVE_SUM(op, aM, …, aN) where 1 < K+1 = M <= N.
- Template Parameters
Rng – The type of the source range used (deduced). The iterators extracted from this range type must meet the requirements of an input iterator.
O – The type of the iterator representing the destination range (deduced).
BinOp – The type of the binary function object used for the reduction operation.
UnOp – The type of the unary function object used for the conversion operation.
- Parameters
rng – Refers to the sequence of elements the algorithm will be applied to.
dest – Refers to the beginning of the destination range.
binary_op – Specifies the function (or function object) which will be invoked for each of the values of the input sequence. This is a binary predicate. The signature of this predicate should be equivalent to:
The signature does not need to have const&, but the function must not modify the objects passed to it. The types Type1 and Ret must be such that an object of a type as given by the input sequence can be implicitly converted to any of those types.Ret fun(const Type1 &a, const Type1 &b);
unary_op – Specifies the function (or function object) which will be invoked for each of the elements in the sequence specified by [first, last). This is a unary predicate. The signature of this predicate should be equivalent to:
The signature does not need to have const&, but the function must not modify the objects passed to it. The type Type must be such that an object of type FwdIter1 can be dereferenced and then implicitly converted to Type. The type R must be such that an object of this type can be implicitly converted to T.R fun(const Type &a);
- Returns
The transform_inclusive_scan algorithm returns a returns transform_inclusive_scan_result< std::ranges::iterator_t<Rng>, O>. The transform_inclusive_scan algorithm returns an input iterator to one past the end of the range and an output iterator to the element in the destination range, one past the last element copied.
-
template<typename ExPolicy, typename Rng, typename O, typename BinOp, typename UnOp>
parallel::util::detail::algorithm_result<ExPolicy, transform_inclusive_scan_result<std::ranges::iterator_t<Rng>, O>>::type transform_inclusive_scan(ExPolicy &&policy, Rng &&rng, O dest, BinOp &&binary_op, UnOp &&unary_op)# Assigns through each iterator i in [result, result + (last - first)) the value of GENERALIZED_NONCOMMUTATIVE_SUM(op, conv(*first), …, conv(*(first + (i - result)))).
The reduce operations in the parallel transform_inclusive_scan algorithm invoked with an execution policy object of type sequenced_policy execute in sequential order in the calling thread.
The reduce operations in the parallel transform_inclusive_scan algorithm invoked with an execution policy object of type parallel_policy or parallel_task_policy are permitted to execute in an unordered fashion in unspecified threads, and indeterminately sequenced within each thread.
Neither conv nor op shall invalidate iterators or sub-ranges, or modify elements in the ranges [first,last) or [result,result + (last - first)).
The behavior of transform_inclusive_scan may be non-deterministic for a non-associative predicate.
Note
Complexity: O(last - first) applications of the predicates op and conv.
Note
GENERALIZED_NONCOMMUTATIVE_SUM(op, a1, …, aN) is defined as:
a1 when N is 1
op(GENERALIZED_NONCOMMUTATIVE_SUM(op, a1, …, aK), GENERALIZED_NONCOMMUTATIVE_SUM(op, aM, …, aN) where 1 < K+1 = M <= N.
- Template Parameters
ExPolicy – The type of the execution policy to use (deduced). It describes the manner in which the execution of the algorithm may be parallelized and the manner in which it executes the assignments.
Rng – The type of the source range used (deduced). The iterators extracted from this range type must meet the requirements of an forward iterator.
O – The type of the iterator representing the destination range (deduced). This iterator type must meet the requirements of an forward iterator. This iterator type must meet the requirements of an forward iterator.
BinOp – The type of the binary function object used for the reduction operation.
UnOp – The type of the unary function object used for the conversion operation.
- Parameters
policy – The execution policy to use for the scheduling of the iterations.
rng – Refers to the sequence of elements the algorithm will be applied to.
dest – Refers to the beginning of the destination range.
binary_op – Specifies the function (or function object) which will be invoked for each of the values of the input sequence. This is a binary predicate. The signature of this predicate should be equivalent to:
The signature does not need to have const&, but the function must not modify the objects passed to it. The types Type1 and Ret must be such that an object of a type as given by the input sequence can be implicitly converted to any of those types.Ret fun(const Type1 &a, const Type1 &b);
unary_op – Specifies the function (or function object) which will be invoked for each of the elements in the sequence specified by [first, last). This is a unary predicate. The signature of this predicate should be equivalent to:
The signature does not need to have const&, but the function must not modify the objects passed to it. The type Type must be such that an object of type FwdIter1 can be dereferenced and then implicitly converted to Type. The type R must be such that an object of this type can be implicitly converted to T.R fun(const Type &a);
- Returns
The transform_inclusive_scan algorithm returns a hpx::future<transform_inclusive_scan_result< std::ranges::iterator_t<Rng>, O>> if the execution policy is of type sequenced_task_policy or parallel_task_policy and returns transform_inclusive_scan_result< std::ranges::iterator_t<Rng>, O> otherwise. The transform_inclusive_scan algorithm returns an input iterator to one past the end of the range and an output iterator to the element in the destination range, one past the last element copied.
-
template<typename InIter, typename Sent, typename OutIter, typename BinOp, typename UnOp, typename T = typename std::iterator_traits<InIter>::value_type>
transform_inclusive_scan_result<InIter, OutIter> transform_inclusive_scan(InIter first, Sent last, OutIter dest, BinOp &&binary_op, UnOp &&unary_op, T init)# Assigns through each iterator i in [result, result + (last - first)) the value of GENERALIZED_NONCOMMUTATIVE_SUM(binary_op, init, conv(*first), …, conv(*(first + (i - result)))).
The reduce operations in the parallel transform_inclusive_scan algorithm invoked without an execution policy object execute in sequential order in the calling thread.
Neither conv nor op shall invalidate iterators or sub-ranges, or modify elements in the ranges [first,last) or [result,result + (last - first)).
The behavior of transform_inclusive_scan may be non-deterministic for a non-associative predicate.
Note
Complexity: O(last - first) applications of the predicates op and conv.
Note
GENERALIZED_NONCOMMUTATIVE_SUM(op, a1, …, aN) is defined as:
a1 when N is 1
op(GENERALIZED_NONCOMMUTATIVE_SUM(op, a1, …, aK), GENERALIZED_NONCOMMUTATIVE_SUM(op, aM, …, aN) where 1 < K+1 = M <= N.
- Template Parameters
InIter – The type of the source iterators used (deduced). This iterator type must meet the requirements of an input iterator.
Sent – The type of the source sentinel (deduced). This sentinel type must be a sentinel for InIter.
OutIter – The type of the iterator representing the destination range (deduced). This iterator type must meet the requirements of an output iterator.
BinOp – The type of the binary function object used for the reduction operation.
UnOp – The type of the unary function object used for the conversion operation.
T – The type of the value to be used as initial (and intermediate) values (deduced).
- Parameters
first – Refers to the beginning of the sequence of elements the algorithm will be applied to.
last – Refers to sentinel value denoting the end of the sequence of elements the algorithm will be applied.
dest – Refers to the beginning of the destination range.
binary_op – Specifies the function (or function object) which will be invoked for each of the values of the input sequence. This is a binary predicate. The signature of this predicate should be equivalent to:
The signature does not need to have const&, but the function must not modify the objects passed to it. The types Type1 and Ret must be such that an object of a type as given by the input sequence can be implicitly converted to any of those types.Ret fun(const Type1 &a, const Type1 &b);
unary_op – Specifies the function (or function object) which will be invoked for each of the elements in the sequence specified by [first, last). This is a unary predicate. The signature of this predicate should be equivalent to:
The signature does not need to have const&, but the function must not modify the objects passed to it. The type Type must be such that an object of type FwdIter1 can be dereferenced and then implicitly converted to Type. The type R must be such that an object of this type can be implicitly converted to T.R fun(const Type &a);
init – The initial value for the generalized sum.
- Returns
The transform_inclusive_scan algorithm returns transform_inclusive_scan_result<InIter, OutIter>. The transform_inclusive_scan algorithm returns an input iterator to the point denoted by the sentinel and an output iterator to the element in the destination range, one past the last element copied.
-
template<typename ExPolicy, typename FwdIter1, typename Sent, typename FwdIter2, typename BinOp, typename UnOp, typename T = typename std::iterator_traits<FwdIter1>::value_type>
parallel::util::detail::algorithm_result<ExPolicy, transform_inclusive_result<FwdIter1, FwdIter2>>::type transform_inclusive_scan(ExPolicy &&policy, FwdIter1 first, Sent last, FwdIter2 dest, BinOp &&binary_op, UnOp &&unary_op, T init)# Assigns through each iterator i in [result, result + (last - first)) the value of GENERALIZED_NONCOMMUTATIVE_SUM(binary_op, init, conv(*first), …, conv(*(first + (i - result)))).
The reduce operations in the parallel transform_inclusive_scan algorithm invoked with an execution policy object of type sequenced_policy execute in sequential order in the calling thread.
The reduce operations in the parallel transform_inclusive_scan algorithm invoked with an execution policy object of type parallel_policy or parallel_task_policy are permitted to execute in an unordered fashion in unspecified threads, and indeterminately sequenced within each thread.
Neither conv nor op shall invalidate iterators or sub-ranges, or modify elements in the ranges [first,last) or [result,result + (last - first)).
The behavior of transform_inclusive_scan may be non-deterministic for a non-associative predicate.
Note
Complexity: O(last - first) applications of the predicates op and conv.
Note
GENERALIZED_NONCOMMUTATIVE_SUM(op, a1, …, aN) is defined as:
a1 when N is 1
op(GENERALIZED_NONCOMMUTATIVE_SUM(op, a1, …, aK), GENERALIZED_NONCOMMUTATIVE_SUM(op, aM, …, aN) where 1 < K+1 = M <= N.
- Template Parameters
ExPolicy – The type of the execution policy to use (deduced). It describes the manner in which the execution of the algorithm may be parallelized and the manner in which it executes the assignments.
FwdIter1 – The type of the source iterators used (deduced). This iterator type must meet the requirements of an forward iterator.
Sent – The type of the source sentinel (deduced). This sentinel type must be a sentinel for FwdIter.
FwdIter2 – The type of the iterator representing the destination range (deduced). This iterator type must meet the requirements of an forward iterator.
BinOp – The type of the binary function object used for the reduction operation.
UnOp – The type of the unary function object used for the conversion operation.
T – The type of the value to be used as initial (and intermediate) values (deduced).
- Parameters
policy – The execution policy to use for the scheduling of the iterations.
first – Refers to the beginning of the sequence of elements the algorithm will be applied to.
last – Refers to sentinel value denoting the end of the sequence of elements the algorithm will be applied.
dest – Refers to the beginning of the destination range.
binary_op – Specifies the function (or function object) which will be invoked for each of the values of the input sequence. This is a binary predicate. The signature of this predicate should be equivalent to:
The signature does not need to have const&, but the function must not modify the objects passed to it. The types Type1 and Ret must be such that an object of a type as given by the input sequence can be implicitly converted to any of those types.Ret fun(const Type1 &a, const Type1 &b);
unary_op – Specifies the function (or function object) which will be invoked for each of the elements in the sequence specified by [first, last). This is a unary predicate. The signature of this predicate should be equivalent to:
The signature does not need to have const&, but the function must not modify the objects passed to it. The type Type must be such that an object of type FwdIter1 can be dereferenced and then implicitly converted to Type. The type R must be such that an object of this type can be implicitly converted to T.R fun(const Type &a);
init – The initial value for the generalized sum.
- Returns
The transform_inclusive_scan algorithm returns a hpx::future<transform_inclusive_result<FwdIter1, FwdIter2>> if the execution policy is of type sequenced_task_policy or parallel_task_policy and returns transform_inclusive_result<FwdIter1, FwdIter2> otherwise. The transform_inclusive_scan algorithm returns an input iterator to the point denoted by the sentinel and an output iterator to the element in the destination range, one past the last element copied.
-
template<typename Rng, typename O, typename BinOp, typename UnOp, typename T = typename std::iterator_traits<std::ranges::iterator_t<Rng>>::value_type>
transform_inclusive_scan_result<std::ranges::iterator_t<Rng>, O> transform_inclusive_scan(Rng &&rng, O dest, BinOp &&binary_op, UnOp &&unary_op, T init)# Assigns through each iterator i in [result, result + (last - first)) the value of GENERALIZED_NONCOMMUTATIVE_SUM(binary_op, init, conv(*first), …, conv(*(first + (i - result)))).
The reduce operations in the parallel transform_inclusive_scan algorithm invoked without an execution policy object execute in sequential order in the calling thread.
Neither conv nor op shall invalidate iterators or sub-ranges, or modify elements in the ranges [first,last) or [result,result + (last - first)).
The behavior of transform_inclusive_scan may be non-deterministic for a non-associative predicate.
Note
Complexity: O(last - first) applications of the predicates op and conv.
Note
GENERALIZED_NONCOMMUTATIVE_SUM(op, a1, …, aN) is defined as:
a1 when N is 1
op(GENERALIZED_NONCOMMUTATIVE_SUM(op, a1, …, aK), GENERALIZED_NONCOMMUTATIVE_SUM(op, aM, …, aN) where 1 < K+1 = M <= N.
- Template Parameters
Rng – The type of the source range used (deduced). The iterators extracted from this range type must meet the requirements of an input iterator.
O – The type of the iterator representing the destination range (deduced).
BinOp – The type of the binary function object used for the reduction operation.
UnOp – The type of the unary function object used for the conversion operation.
T – The type of the value to be used as initial (and intermediate) values (deduced).
- Parameters
rng – Refers to the sequence of elements the algorithm will be applied to.
dest – Refers to the beginning of the destination range.
binary_op – Specifies the function (or function object) which will be invoked for each of the values of the input sequence. This is a binary predicate. The signature of this predicate should be equivalent to:
The signature does not need to have const&, but the function must not modify the objects passed to it. The types Type1 and Ret must be such that an object of a type as given by the input sequence can be implicitly converted to any of those types.Ret fun(const Type1 &a, const Type1 &b);
unary_op – Specifies the function (or function object) which will be invoked for each of the elements in the sequence specified by [first, last). This is a unary predicate. The signature of this predicate should be equivalent to:
The signature does not need to have const&, but the function must not modify the objects passed to it. The type Type must be such that an object of type FwdIter1 can be dereferenced and then implicitly converted to Type. The type R must be such that an object of this type can be implicitly converted to T.R fun(const Type &a);
init – The initial value for the generalized sum.
- Returns
The transform_inclusive_scan algorithm returns a returns transform_inclusive_scan_result< std::ranges::iterator_t<Rng>, O>. The transform_inclusive_scan algorithm returns an input iterator to one past the end of the range and an output iterator to the element in the destination range, one past the last element copied.
-
template<typename ExPolicy, typename Rng, typename O, typename BinOp, typename UnOp, typename T = typename std::iterator_traits<std::ranges::iterator_t<Rng>>::value_type>
parallel::util::detail::algorithm_result<ExPolicy, transform_inclusive_scan_result<std::ranges::iterator_t<Rng>, O>>::type transform_inclusive_scan(ExPolicy &&policy, Rng &&rng, O dest, BinOp &&binary_op, UnOp &&unary_op, T init)# Assigns through each iterator i in [result, result + (last - first)) the value of GENERALIZED_NONCOMMUTATIVE_SUM(binary_op, init, conv(*first), …, conv(*(first + (i - result)))).
The reduce operations in the parallel transform_inclusive_scan algorithm invoked with an execution policy object of type sequenced_policy execute in sequential order in the calling thread.
The reduce operations in the parallel transform_inclusive_scan algorithm invoked with an execution policy object of type parallel_policy or parallel_task_policy are permitted to execute in an unordered fashion in unspecified threads, and indeterminately sequenced within each thread.
Neither conv nor op shall invalidate iterators or sub-ranges, or modify elements in the ranges [first,last) or [result,result + (last - first)).
The behavior of transform_inclusive_scan may be non-deterministic for a non-associative predicate.
Note
Complexity: O(last - first) applications of the predicates op and conv.
Note
GENERALIZED_NONCOMMUTATIVE_SUM(op, a1, …, aN) is defined as:
a1 when N is 1
op(GENERALIZED_NONCOMMUTATIVE_SUM(op, a1, …, aK), GENERALIZED_NONCOMMUTATIVE_SUM(op, aM, …, aN) where 1 < K+1 = M <= N.
- Template Parameters
ExPolicy – The type of the execution policy to use (deduced). It describes the manner in which the execution of the algorithm may be parallelized and the manner in which it executes the assignments.
Rng – The type of the source range used (deduced). The iterators extracted from this range type must meet the requirements of an forward iterator.
O – The type of the iterator representing the destination range (deduced). This iterator type must meet the requirements of an forward iterator. This iterator type must meet the requirements of an forward iterator.
BinOp – The type of the binary function object used for the reduction operation.
UnOp – The type of the unary function object used for the conversion operation.
T – The type of the value to be used as initial (and intermediate) values (deduced).
- Parameters
policy – The execution policy to use for the scheduling of the iterations.
rng – Refers to the sequence of elements the algorithm will be applied to.
dest – Refers to the beginning of the destination range.
binary_op – Specifies the function (or function object) which will be invoked for each of the values of the input sequence. This is a binary predicate. The signature of this predicate should be equivalent to:
The signature does not need to have const&, but the function must not modify the objects passed to it. The types Type1 and Ret must be such that an object of a type as given by the input sequence can be implicitly converted to any of those types.Ret fun(const Type1 &a, const Type1 &b);
unary_op – Specifies the function (or function object) which will be invoked for each of the elements in the sequence specified by [first, last). This is a unary predicate. The signature of this predicate should be equivalent to:
The signature does not need to have const&, but the function must not modify the objects passed to it. The type Type must be such that an object of type FwdIter1 can be dereferenced and then implicitly converted to Type. The type R must be such that an object of this type can be implicitly converted to T.R fun(const Type &a);
init – The initial value for the generalized sum.
- Returns
The transform_inclusive_scan algorithm returns a hpx::future<transform_inclusive_scan_result< std::ranges::iterator_t<Rng>, O>> if the execution policy is of type sequenced_task_policy or parallel_task_policy and returns transform_inclusive_scan_result< std::ranges::iterator_t<Rng>, O> otherwise. The transform_inclusive_scan algorithm returns an input iterator to one past the end of the range and an output iterator to the element in the destination range, one past the last element copied.
-
template<typename InIter, typename Sent, typename OutIter, typename BinOp, typename UnOp>
-
namespace ranges
hpx::ranges::transform_reduce#
Defined in header hpx/algorithm.hpp.
See Public API for a list of names and headers that are part of the public HPX API.
-
namespace hpx
Functions
-
template<typename ExPolicy, typename Iter, typename Sent, typename T, typename Reduce, typename Convert>
hpx::parallel::util::detail::algorithm_result_t<ExPolicy, T> transform_reduce(ExPolicy &&policy, Iter first, Sent last, T init, Reduce &&red_op, Convert &&conv_op)# Returns GENERALIZED_SUM(red_op, init, conv_op(*first), …, conv_op(*(first + (last - first) - 1))).
The reduce operations in the parallel transform_reduce algorithm invoked with an execution policy object of type sequenced_policy execute in sequential order in the calling thread.
The reduce operations in the parallel transform_reduce algorithm invoked with an execution policy object of type parallel_policy or parallel_task_policy are permitted to execute in an unordered fashion in unspecified threads, and indeterminately sequenced within each thread.
The difference between transform_reduce and accumulate is that the behavior of transform_reduce may be non-deterministic for non-associative or non-commutative binary predicate.
Note
Complexity: O(last - first) applications of the predicates red_op and conv_op.
Note
GENERALIZED_SUM(op, a1, …, aN) is defined as follows:
a1 when N is 1
op(GENERALIZED_SUM(op, b1, …, bK), GENERALIZED_SUM(op, bM, …, bN)), where:
b1, …, bN may be any permutation of a1, …, aN and
1 < K+1 = M <= N.
- Template Parameters
ExPolicy – The type of the execution policy to use (deduced). It describes the manner in which the execution of the algorithm may be parallelized and the manner in which it executes the assignments.
Iter – The type of the source iterators used (deduced). This iterator type must meet the requirements of an random access iterator.
Sent – The type of the end source iterators used (deduced). This iterator type must meet the requirements of an sentinel for Iter.
T – The type of the value to be used as initial (and intermediate) values (deduced).
Reduce – The type of the binary function object used for the reduction operation.
Convert – The type of the unary function object used to transform the elements of the input sequence before invoking the reduce function.
- Parameters
policy – The execution policy to use for the scheduling of the iterations.
first – Refers to the beginning of the first sorted range the algorithm will be applied to.
last – Refers to the end of the second sorted range the algorithm will be applied to.
init – The initial value for the generalized sum.
red_op – Specifies the function (or function object) which will be invoked for each of the values returned from the invocation of conv_op. This is a binary predicate. The signature of this predicate should be equivalent to:
The signature does not need to have const&, but the function must not modify the objects passed to it. The types Type1, Type2, and Ret must be such that an object of a type as returned from conv_op can be implicitly converted to any of those types.Ret fun(const Type1 &a, const Type2 &b);
conv_op – Specifies the function (or function object) which will be invoked for each of the elements in the sequence specified by [first, last). This is a unary predicate. The signature of this predicate should be equivalent to:
The signature does not need to have const&, but the function must not modify the objects passed to it. The type Type must be such that an object of type Iter can be dereferenced and then implicitly converted to Type. The type R must be such that an object of this type can be implicitly converted to T.R fun(const Type &a);
- Returns
The transform_reduce algorithm returns a hpx::future<T> if the execution policy is of type parallel_task_policy and returns T otherwise. The transform_reduce algorithm returns the result of the generalized sum over the values returned from conv_op when applied to the elements given by the input range [first, last).
-
template<typename Iter, typename Sent, typename T, typename Reduce, typename Convert>
T transform_reduce(Iter first, Sent last, T init, Reduce &&red_op, Convert &&conv_op)# Returns GENERALIZED_SUM(red_op, init, conv_op(*first), …, conv_op(*(first + (last - first) - 1))).
The difference between transform_reduce and accumulate is that the behavior of transform_reduce may be non-deterministic for non-associative or non-commutative binary predicate.
Note
Complexity: O(last - first) applications of the predicates red_op and conv_op.
Note
GENERALIZED_SUM(op, a1, …, aN) is defined as follows:
a1 when N is 1
op(GENERALIZED_SUM(op, b1, …, bK), GENERALIZED_SUM(op, bM, …, bN)), where:
b1, …, bN may be any permutation of a1, …, aN and
1 < K+1 = M <= N.
- Template Parameters
Iter – The type of the source iterators used (deduced). This iterator type must meet the requirements of an random access iterator.
Sent – The type of the end source iterators used (deduced). This iterator type must meet the requirements of an sentinel for Iter.
T – The type of the value to be used as initial (and intermediate) values (deduced).
Reduce – The type of the binary function object used for the reduction operation.
Convert – The type of the unary function object used to transform the elements of the input sequence before invoking the reduce function.
- Parameters
first – Refers to the beginning of the first sorted range the algorithm will be applied to.
last – Refers to the end of the second sorted range the algorithm will be applied to.
init – The initial value for the generalized sum.
red_op – Specifies the function (or function object) which will be invoked for each of the values returned from the invocation of conv_op. This is a binary predicate. The signature of this predicate should be equivalent to:
The signature does not need to have const&, but the function must not modify the objects passed to it. The types Type1, Type2, and Ret must be such that an object of a type as returned from conv_op can be implicitly converted to any of those types.Ret fun(const Type1 &a, const Type2 &b);
conv_op – Specifies the function (or function object) which will be invoked for each of the elements in the sequence specified by [first, last). This is a unary predicate. The signature of this predicate should be equivalent to:
The signature does not need to have const&, but the function must not modify the objects passed to it. The type Type must be such that an object of type Iter can be dereferenced and then implicitly converted to Type. The type R must be such that an object of this type can be implicitly converted to T.R fun(const Type &a);
- Returns
The transform_reduce algorithm returns T. The transform_reduce algorithm returns the result of the generalized sum over the values returned from conv_op when applied to the elements given by the input range [first, last).
-
template<typename ExPolicy, typename Iter, typename Sent, typename Iter2, typename T>
hpx::parallel::util::detail::algorithm_result_t<ExPolicy, T> transform_reduce(ExPolicy &&policy, Iter first, Sent last, Iter2 first2, T init)# Returns GENERALIZED_SUM(red_op, init, conv_op(*first), …, conv_op(*(first + (last - first) - 1))).
The reduce operations in the parallel transform_reduce algorithm invoked with an execution policy object of type sequenced_policy execute in sequential order in the calling thread.
The reduce operations in the parallel transform_reduce algorithm invoked with an execution policy object of type parallel_policy or parallel_task_policy are permitted to execute in an unordered fashion in unspecified threads, and indeterminately sequenced within each thread.
The difference between transform_reduce and accumulate is that the behavior of transform_reduce may be non-deterministic for non-associative or non-commutative binary predicate.
Note
Complexity: O(last - first) applications of the predicates red_op and conv_op.
Note
GENERALIZED_SUM(op, a1, …, aN) is defined as follows:
a1 when N is 1
op(GENERALIZED_SUM(op, b1, …, bK), GENERALIZED_SUM(op, bM, …, bN)), where:
b1, …, bN may be any permutation of a1, …, aN and
1 < K+1 = M <= N.
- Template Parameters
ExPolicy – The type of the execution policy to use (deduced). It describes the manner in which the execution of the algorithm may be parallelized and the manner in which it executes the assignments.
Iter – The type of the source iterators used (deduced). This iterator type must meet the requirements of an random access iterator.
Sent – The type of the end source iterators used (deduced). This iterator type must meet the requirements of an sentinel for Iter.
Iter2 – The type of the source iterators used (deduced) representing the second sequence. This iterator type must meet the requirements of an random access iterator.
T – The type of the value to be used as initial (and intermediate) values (deduced).
- Parameters
policy – The execution policy to use for the scheduling of the iterations.
first – Refers to the beginning of the first sorted range the algorithm will be applied to.
last – Refers to the end of the second sorted range the algorithm will be applied to.
first2 – Refers to the beginning of the sequence of elements of the second range the algorithm will be applied to.
init – The initial value for the generalized sum.
- Returns
The transform_reduce algorithm returns a hpx::future<T> if the execution policy is of type parallel_task_policy and returns T otherwise. The transform_reduce algorithm returns the result of the generalized sum over the values returned from conv_op when applied to the elements given by the input range [first, last).
-
template<typename Iter, typename Sent, typename Iter2, typename T>
T transform_reduce(Iter first, Sent last, Iter2 first2, T init)# Returns GENERALIZED_SUM(red_op, init, conv_op(*first), …, conv_op(*(first + (last - first) - 1))).
The difference between transform_reduce and accumulate is that the behavior of transform_reduce may be non-deterministic for non-associative or non-commutative binary predicate.
Note
Complexity: O(last - first) applications of the predicates red_op and conv_op.
Note
GENERALIZED_SUM(op, a1, …, aN) is defined as follows:
a1 when N is 1
op(GENERALIZED_SUM(op, b1, …, bK), GENERALIZED_SUM(op, bM, …, bN)), where:
b1, …, bN may be any permutation of a1, …, aN and
1 < K+1 = M <= N.
- Template Parameters
Iter – The type of the source iterators used (deduced). This iterator type must meet the requirements of an random access iterator.
Sent – The type of the end source iterators used (deduced). This iterator type must meet the requirements of an sentinel for Iter.
Iter2 – The type of the source iterators used (deduced) representing the second sequence. This iterator type must meet the requirements of an random access iterator.
T – The type of the value to be used as initial (and intermediate) values (deduced).
- Parameters
first – Refers to the beginning of the first sorted range the algorithm will be applied to.
last – Refers to the end of the second sorted range the algorithm will be applied to.
first2 – Refers to the beginning of the sequence of elements of the second range the algorithm will be applied to.
init – The initial value for the generalized sum.
- Returns
The transform_reduce algorithm returns T. The transform_reduce algorithm returns the result of the generalized sum over the values returned from conv_op when applied to the elements given by the input range [first, last).
-
template<typename ExPolicy, typename Iter, typename Sent, typename Iter2, typename T, typename Reduce, typename Convert>
hpx::parallel::util::detail::algorithm_result_t<ExPolicy, T> transform_reduce(ExPolicy &&policy, Iter first, Sent last, Iter2 first2, T init, Reduce &&red_op, Convert &&conv_op)# Returns GENERALIZED_SUM(red_op, init, conv_op(*first), …, conv_op(*(first + (last - first) - 1))).
The reduce operations in the parallel transform_reduce algorithm invoked with an execution policy object of type sequenced_policy execute in sequential order in the calling thread.
The reduce operations in the parallel transform_reduce algorithm invoked with an execution policy object of type parallel_policy or parallel_task_policy are permitted to execute in an unordered fashion in unspecified threads, and indeterminately sequenced within each thread.
The difference between transform_reduce and accumulate is that the behavior of transform_reduce may be non-deterministic for non-associative or non-commutative binary predicate.
Note
Complexity: O(last - first) applications of the predicates red_op and conv_op.
Note
GENERALIZED_SUM(op, a1, …, aN) is defined as follows:
a1 when N is 1
op(GENERALIZED_SUM(op, b1, …, bK), GENERALIZED_SUM(op, bM, …, bN)), where:
b1, …, bN may be any permutation of a1, …, aN and
1 < K+1 = M <= N.
- Template Parameters
ExPolicy – The type of the execution policy to use (deduced). It describes the manner in which the execution of the algorithm may be parallelized and the manner in which it executes the assignments.
Iter – The type of the source iterators used (deduced). This iterator type must meet the requirements of an random access iterator.
Sent – The type of the end source iterators used (deduced). This iterator type must meet the requirements of an sentinel for Iter.
Iter2 – The type of the source iterators used (deduced) representing the second sequence. This iterator type must meet the requirements of an random access iterator.
T – The type of the value to be used as initial (and intermediate) values (deduced).
Reduce – The type of the binary function object used for the reduction operation.
Convert – The type of the unary function object used to transform the elements of the input sequence before invoking the reduce function.
- Parameters
policy – The execution policy to use for the scheduling of the iterations.
first – Refers to the beginning of the first sorted range the algorithm will be applied to.
last – Refers to the end of the second sorted range the algorithm will be applied to.
first2 – Refers to the beginning of the sequence of elements of the second range the algorithm will be applied to.
init – The initial value for the generalized sum.
red_op – Specifies the function (or function object) which will be invoked for each of the values returned from the invocation of conv_op. This is a binary predicate. The signature of this predicate should be equivalent to:
The signature does not need to have const&, but the function must not modify the objects passed to it. The types Type1, Type2, and Ret must be such that an object of a type as returned from conv_op can be implicitly converted to any of those types.Ret fun(const Type1 &a, const Type2 &b);
conv_op – Specifies the function (or function object) which will be invoked for each of the elements in the sequence specified by [first, last). This is a unary predicate. The signature of this predicate should be equivalent to:
The signature does not need to have const&, but the function must not modify the objects passed to it. The type Type must be such that an object of type Iter can be dereferenced and then implicitly converted to Type. The type R must be such that an object of this type can be implicitly converted to T.R fun(const Type &a);
- Returns
The transform_reduce algorithm returns a hpx::future<T> if the execution policy is of type parallel_task_policy and returns T otherwise. The transform_reduce algorithm returns the result of the generalized sum over the values returned from conv_op when applied to the elements given by the input range [first, last).
-
template<typename Iter, typename Sent, typename Iter2, typename T, typename Reduce, typename Convert>
T transform_reduce(Iter first, Sent last, Iter2 first2, T init, Reduce &&red_op, Convert &&conv_op)# Returns GENERALIZED_SUM(red_op, init, conv_op(*first), …, conv_op(*(first + (last - first) - 1))).
The difference between transform_reduce and accumulate is that the behavior of transform_reduce may be non-deterministic for non-associative or non-commutative binary predicate.
Note
Complexity: O(last - first) applications of the predicates red_op and conv_op.
Note
GENERALIZED_SUM(op, a1, …, aN) is defined as follows:
a1 when N is 1
op(GENERALIZED_SUM(op, b1, …, bK), GENERALIZED_SUM(op, bM, …, bN)), where:
b1, …, bN may be any permutation of a1, …, aN and
1 < K+1 = M <= N.
- Template Parameters
Iter – The type of the source iterators used (deduced). This iterator type must meet the requirements of an random access iterator.
Sent – The type of the end source iterators used (deduced). This iterator type must meet the requirements of an sentinel for Iter.
Iter2 – The type of the source iterators used (deduced) representing the second sequence. This iterator type must meet the requirements of an random access iterator.
T – The type of the value to be used as initial (and intermediate) values (deduced).
Reduce – The type of the binary function object used for the reduction operation.
Convert – The type of the unary function object used to transform the elements of the input sequence before invoking the reduce function.
- Parameters
first – Refers to the beginning of the first sorted range the algorithm will be applied to.
last – Refers to the end of the second sorted range the algorithm will be applied to.
first2 – Refers to the beginning of the sequence of elements of the second range the algorithm will be applied to.
init – The initial value for the generalized sum.
red_op – Specifies the function (or function object) which will be invoked for each of the values returned from the invocation of conv_op. This is a binary predicate. The signature of this predicate should be equivalent to:
The signature does not need to have const&, but the function must not modify the objects passed to it. The types Type1, Type2, and Ret must be such that an object of a type as returned from conv_op can be implicitly converted to any of those types.Ret fun(const Type1 &a, const Type2 &b);
conv_op – Specifies the function (or function object) which will be invoked for each of the elements in the sequence specified by [first, last). This is a unary predicate. The signature of this predicate should be equivalent to:
The signature does not need to have const&, but the function must not modify the objects passed to it. The type Type must be such that an object of type Iter can be dereferenced and then implicitly converted to Type. The type R must be such that an object of this type can be implicitly converted to T.R fun(const Type &a);
- Returns
The transform_reduce algorithm returns T. The transform_reduce algorithm returns the result of the generalized sum over the values returned from conv_op when applied to the elements given by the input range [first, last).
-
template<typename ExPolicy, typename Rng, typename T, typename Reduce, typename Convert>
hpx::parallel::util::detail::algorithm_result_t<ExPolicy, T> transform_reduce(ExPolicy &&policy, Rng &&rng, T init, Reduce &&red_op, Convert &&conv_op)# Returns GENERALIZED_SUM(red_op, init, conv_op(*first), …, conv_op(*(first + (last - first) - 1))).
The reduce operations in the parallel transform_reduce algorithm invoked with an execution policy object of type sequenced_policy execute in sequential order in the calling thread.
The reduce operations in the parallel transform_reduce algorithm invoked with an execution policy object of type parallel_policy or parallel_task_policy are permitted to execute in an unordered fashion in unspecified threads, and indeterminately sequenced within each thread.
The difference between transform_reduce and accumulate is that the behavior of transform_reduce may be non-deterministic for non-associative or non-commutative binary predicate.
Note
Complexity: O(last - first) applications of the predicates red_op and conv_op.
Note
GENERALIZED_SUM(op, a1, …, aN) is defined as follows:
a1 when N is 1
op(GENERALIZED_SUM(op, b1, …, bK), GENERALIZED_SUM(op, bM, …, bN)), where:
b1, …, bN may be any permutation of a1, …, aN and
1 < K+1 = M <= N.
- Template Parameters
ExPolicy – The type of the execution policy to use (deduced). It describes the manner in which the execution of the algorithm may be parallelized and the manner in which it executes the assignments.
Rng – The type of the source range used (deduced). The iterators extracted from this range type must meet the requirements of an input iterator.
T – The type of the value to be used as initial (and intermediate) values (deduced).
Reduce – The type of the binary function object used for the reduction operation.
Convert – The type of the unary function object used to transform the elements of the input sequence before invoking the reduce function.
- Parameters
policy – The execution policy to use for the scheduling of the iterations.
rng – Refers to the sequence of elements the algorithm will be applied to.
init – The initial value for the generalized sum.
red_op – Specifies the function (or function object) which will be invoked for each of the values returned from the invocation of conv_op. This is a binary predicate. The signature of this predicate should be equivalent to:
The signature does not need to have const&, but the function must not modify the objects passed to it. The types Type1, Type2, and Ret must be such that an object of a type as returned from conv_op can be implicitly converted to any of those types.Ret fun(const Type1 &a, const Type2 &b);
conv_op – Specifies the function (or function object) which will be invoked for each of the elements in the sequence specified by [first, last). This is a unary predicate. The signature of this predicate should be equivalent to:
The signature does not need to have const&, but the function must not modify the objects passed to it. The type Type must be such that an object of type Iter can be dereferenced and then implicitly converted to Type. The type R must be such that an object of this type can be implicitly converted to T.R fun(const Type &a);
- Returns
The transform_reduce algorithm returns a hpx::future<T> if the execution policy is of type parallel_task_policy and returns T otherwise. The transform_reduce algorithm returns the result of the generalized sum over the values returned from conv_op when applied to the elements given by the input range [first, last).
-
template<typename Rng, typename T, typename Reduce, typename Convert>
T transform_reduce(Rng &&rng, T init, Reduce &&red_op, Convert &&conv_op)# Returns GENERALIZED_SUM(red_op, init, conv_op(*first), …, conv_op(*(first + (last - first) - 1))).
The difference between transform_reduce and accumulate is that the behavior of transform_reduce may be non-deterministic for non-associative or non-commutative binary predicate.
Note
Complexity: O(last - first) applications of the predicates red_op and conv_op.
Note
GENERALIZED_SUM(op, a1, …, aN) is defined as follows:
a1 when N is 1
op(GENERALIZED_SUM(op, b1, …, bK), GENERALIZED_SUM(op, bM, …, bN)), where:
b1, …, bN may be any permutation of a1, …, aN and
1 < K+1 = M <= N.
- Template Parameters
Rng – The type of the source range used (deduced). The iterators extracted from this range type must meet the requirements of an input iterator.
T – The type of the value to be used as initial (and intermediate) values (deduced).
Reduce – The type of the binary function object used for the reduction operation.
Convert – The type of the unary function object used to transform the elements of the input sequence before invoking the reduce function.
- Parameters
rng – Refers to the sequence of elements the algorithm will be applied to.
init – The initial value for the generalized sum.
red_op – Specifies the function (or function object) which will be invoked for each of the values returned from the invocation of conv_op. This is a binary predicate. The signature of this predicate should be equivalent to:
The signature does not need to have const&, but the function must not modify the objects passed to it. The types Type1, Type2, and Ret must be such that an object of a type as returned from conv_op can be implicitly converted to any of those types.Ret fun(const Type1 &a, const Type2 &b);
conv_op – Specifies the function (or function object) which will be invoked for each of the elements in the sequence specified by [first, last). This is a unary predicate. The signature of this predicate should be equivalent to:
The signature does not need to have const&, but the function must not modify the objects passed to it. The type Type must be such that an object of type Iter can be dereferenced and then implicitly converted to Type. The type R must be such that an object of this type can be implicitly converted to T.R fun(const Type &a);
- Returns
The transform_reduce algorithm returns T. The transform_reduce algorithm returns the result of the generalized sum over the values returned from conv_op when applied to the elements given by the input range [first, last).
-
template<typename ExPolicy, typename Rng, typename Iter2, typename T>
hpx::parallel::util::detail::algorithm_result_t<ExPolicy, T> transform_reduce(ExPolicy &&policy, Rng &&rng, Iter2 first2, T init)# Returns the result of accumulating init with the inner products of the pairs formed by the elements of two ranges starting at first1 and first2.
The operations in the parallel transform_reduce algorithm invoked with an execution policy object of type sequenced_policy execute in sequential order in the calling thread.
The operations in the parallel transform_reduce algorithm invoked with an execution policy object of type parallel_policy or parallel_task_policy are permitted to execute in an unordered fashion in unspecified threads, and indeterminately sequenced within each thread.
Note
Complexity: O(last - first) applications of the predicate op2.
- Template Parameters
ExPolicy – The type of the execution policy to use (deduced). It describes the manner in which the execution of the algorithm may be parallelized and the manner in which it executes the assignments.
Rng – The type of the source range used (deduced). The iterators extracted from this range type must meet the requirements of an input iterator.
Iter2 – The type of the second source iterators used (deduced). This iterator type must meet the requirements of an forward iterator.
T – The type of the value to be used as return) values (deduced).
- Parameters
policy – The execution policy to use for the scheduling of the iterations.
rng – Refers to the sequence of elements the algorithm will be applied to.
first2 – Refers to the beginning of the second sequence of elements the result will be calculated with.
init – The initial value for the sum.
- Returns
The transform_reduce algorithm returns a hpx::future<T> if the execution policy is of type sequenced_task_policy or parallel_task_policy and returns T otherwise.
-
template<typename Rng, typename Iter2, typename T>
T transform_reduce(Rng &&rng, Iter2 first2, T init)# Returns the result of accumulating init with the inner products of the pairs formed by the elements of two ranges starting at first1 and first2.
Note
Complexity: O(last - first) applications of the predicate op2.
- Template Parameters
Rng – The type of the source range used (deduced). The iterators extracted from this range type must meet the requirements of an input iterator.
Iter2 – The type of the second source iterators used (deduced). This iterator type must meet the requirements of an forward iterator.
T – The type of the value to be used as return) values (deduced).
- Parameters
rng – Refers to the sequence of elements the algorithm will be applied to.
first2 – Refers to the beginning of the second sequence of elements the result will be calculated with.
init – The initial value for the sum.
- Returns
The transform_reduce algorithm returns T.
-
template<typename ExPolicy, typename Rng, typename Iter2, typename T, typename Reduce, typename Convert>
hpx::parallel::util::detail::algorithm_result_t<ExPolicy, T> transform_reduce(ExPolicy &&policy, Rng &&rng, Iter2 first2, T init, Reduce &&red_op, Convert &&conv_op)# Returns the result of accumulating init with the inner products of the pairs formed by the elements of two ranges starting at first1 and first2.
The operations in the parallel transform_reduce algorithm invoked with an execution policy object of type sequenced_policy execute in sequential order in the calling thread.
The operations in the parallel transform_reduce algorithm invoked with an execution policy object of type parallel_policy or parallel_task_policy are permitted to execute in an unordered fashion in unspecified threads, and indeterminately sequenced within each thread.
Note
Complexity: O(last - first) applications of the predicate op2.
- Template Parameters
ExPolicy – The type of the execution policy to use (deduced). It describes the manner in which the execution of the algorithm may be parallelized and the manner in which it executes the assignments.
Rng – The type of the source range used (deduced). The iterators extracted from this range type must meet the requirements of an input iterator.
Iter2 – The type of the second source iterators used (deduced). This iterator type must meet the requirements of an forward iterator.
T – The type of the value to be used as return) values (deduced).
Reduce – The type of the binary function object used for the multiplication operation.
Convert – The type of the unary function object used to transform the elements of the input sequence before invoking the reduce function.
- Parameters
policy – The execution policy to use for the scheduling of the iterations.
rng – Refers to the sequence of elements the algorithm will be applied to.
first2 – Refers to the beginning of the second sequence of elements the result will be calculated with.
init – The initial value for the sum.
red_op – Specifies the function (or function object) which will be invoked for the initial value and each of the return values of op2. This is a binary predicate. The signature of this predicate should be equivalent to should be equivalent to:
The signature does not need to have const&, but the function must not modify the objects passed to it. The type Ret must be such that it can be implicitly converted to a type of T.Ret fun(const Type1 &a, const Type1 &b);
conv_op – Specifies the function (or function object) which will be invoked for each of the input values of the sequence. This is a binary predicate. The signature of this predicate should be equivalent to
The signature does not need to have const&, but the function must not modify the objects passed to it. The type Ret must be such that it can be implicitly converted to an object for the second argument type of op1.Ret fun(const Type1 &a, const Type2 &b);
- Returns
The transform_reduce algorithm returns a hpx::future<T> if the execution policy is of type sequenced_task_policy or parallel_task_policy and returns T otherwise.
-
template<typename Rng, typename Iter2, typename T, typename Reduce, typename Convert>
T transform_reduce(Rng &&rng, Iter2 first2, T init, Reduce &&red_op, Convert &&conv_op)# Returns the result of accumulating init with the inner products of the pairs formed by the elements of two ranges starting at first1 and first2.
Note
Complexity: O(last - first) applications of the predicate op2.
- Template Parameters
Rng – The type of the source range used (deduced). The iterators extracted from this range type must meet the requirements of an input iterator.
Iter2 – The type of the second source iterators used (deduced). This iterator type must meet the requirements of an forward iterator.
T – The type of the value to be used as return) values (deduced).
Reduce – The type of the binary function object used for the multiplication operation.
Convert – The type of the unary function object used to transform the elements of the input sequence before invoking the reduce function.
- Parameters
rng – Refers to the sequence of elements the algorithm will be applied to.
first2 – Refers to the beginning of the second sequence of elements the result will be calculated with.
init – The initial value for the sum.
red_op – Specifies the function (or function object) which will be invoked for the initial value and each of the return values of op2. This is a binary predicate. The signature of this predicate should be equivalent to should be equivalent to:
The signature does not need to have const&, but the function must not modify the objects passed to it. The type Ret must be such that it can be implicitly converted to a type of T.Ret fun(const Type1 &a, const Type1 &b);
conv_op – Specifies the function (or function object) which will be invoked for each of the input values of the sequence. This is a binary predicate. The signature of this predicate should be equivalent to
The signature does not need to have const&, but the function must not modify the objects passed to it. The type Ret must be such that it can be implicitly converted to an object for the second argument type of op1.Ret fun(const Type1 &a, const Type2 &b);
- Returns
The transform_reduce algorithm returns T.
-
template<typename ExPolicy, typename Iter, typename Sent, typename T, typename Reduce, typename Convert>
hpx::ranges::uninitialized_copy, hpx::ranges::uninitialized_copy_n#
Defined in header hpx/algorithm.hpp.
See Public API for a list of names and headers that are part of the public HPX API.
-
namespace hpx
-
namespace ranges
Functions
-
template<typename InIter, typename Sent1, typename FwdIter, typename Sent2>
hpx::parallel::util::in_out_result<InIter, FwdIter> uninitialized_copy(InIter first1, Sent1 last1, FwdIter first2, Sent2 last2)# Copies the elements in the range, defined by [first, last), to an uninitialized memory area beginning at dest. If an exception is thrown during the copy operation, the function has no effects.
The assignments in the parallel uninitialized_copy algorithm invoked without an execution policy object will execute in sequential order in the calling thread.
Note
Complexity: Performs exactly last - first assignments.
- Template Parameters
InIter – The type of the source iterators used (deduced). This iterator type must meet the requirements of an input iterator.
Sent1 – The type of the source sentinel (deduced). This sentinel type must be a sentinel for InIter.
FwdIter – The type of the iterator representing the destination range (deduced). This iterator type must meet the requirements of a forward iterator.
Sent2 – The type of the source sentinel (deduced). This sentinel type must be a sentinel for InIter2.
- Parameters
first1 – Refers to the beginning of the sequence of elements that will be copied from
last1 – Refers to sentinel value denoting the end of the sequence of elements the algorithm will be applied
first2 – Refers to the beginning of the destination range.
last2 – Refers to sentinel value denoting the end of the second range the algorithm will be applied to.
- Returns
The uninitialized_copy algorithm returns an in_out_result<InIter, FwdIter>. The uninitialized_copy algorithm returns an input iterator to one past the last element copied from and the output iterator to the element in the destination range, one past the last element copied.
-
template<typename ExPolicy, typename FwdIter1, typename Sent1, typename FwdIter2, typename Sent2>
parallel::util::detail::algorithm_result<ExPolicy, parallel::util::in_out_result<FwdIter1, FwdIter2>>::type uninitialized_copy(ExPolicy &&policy, FwdIter1 first1, Sent1 last1, FwdIter2 first2, Sent2 last2)# Copies the elements in the range, defined by [first, last), to an uninitialized memory area beginning at dest. If an exception is thrown during the copy operation, the function has no effects.
The assignments in the parallel uninitialized_copy algorithm invoked with an execution policy object of type sequenced_policy execute in sequential order in the calling thread.
The assignments in the parallel uninitialized_copy algorithm invoked with an execution policy object of type parallel_policy or parallel_task_policy are permitted to execute in an unordered fashion in unspecified threads, and indeterminately sequenced within each thread.
Note
Complexity: Performs exactly last - first assignments.
- Template Parameters
ExPolicy – The type of the execution policy to use (deduced). It describes the manner in which the execution of the algorithm may be parallelized and the manner in which it executes the assignments.
FwdIter1 – The type of the source iterators used (deduced). This iterator type must meet the requirements of an input iterator.
Sent1 – The type of the source sentinel (deduced). This sentinel type must be a sentinel for InIter.
FwdIter2 – The type of the iterator representing the destination range (deduced). This iterator type must meet the requirements of a forward iterator.
Sent2 – The type of the source sentinel (deduced). This sentinel type must be a sentinel for InIter2.
- Parameters
policy – The execution policy to use for the scheduling of the iterations.
first1 – Refers to the beginning of the sequence of elements that will be copied from
last1 – Refers to sentinel value denoting the end of the sequence of elements the algorithm will be applied.
first2 – Refers to the beginning of the destination range.
last2 – Refers to sentinel value denoting the end of the second range the algorithm will be applied to.
- Returns
The uninitialized_copy algorithm returns a hpx::future<in_out_result<InIter, FwdIter>>, if the execution policy is of type sequenced_task_policy or parallel_task_policy and returns in_out_result<InIter, FwdIter> otherwise. The uninitialized_copy algorithm returns an input iterator to one past the last element copied from and the output iterator to the element in the destination range, one past the last element copied.
-
template<typename Rng1, typename Rng2>
hpx::parallel::util::in_out_result<typename hpx::traits::range_traits<Rng1>::iterator_type, typename hpx::traits::range_traits<Rng2>::iterator_type> uninitialized_copy(Rng1 &&rng1, Rng2 &&rng2)# Copies the elements in the range, defined by [first, last), to an uninitialized memory area beginning at dest. If an exception is thrown during the copy operation, the function has no effects.
The assignments in the parallel uninitialized_copy algorithm invoked without an execution policy object will execute in sequential order in the calling thread.
Note
Complexity: Performs exactly last - first assignments.
- Template Parameters
Rng1 – The type of the source range used (deduced). The iterators extracted from this range type must meet the requirements of an input iterator.
Rng2 – The type of the destination range used (deduced). The iterators extracted from this range type must meet the requirements of an forward iterator.
- Parameters
rng1 – Refers to the range from which the elements will be copied from
rng2 – Refers to the range to which the elements will be copied to
- Returns
The uninitialized_copy algorithm returns an in_out_result<typename hpx::traits::range_traits<Rng1>::iterator_type, typename hpx::traits::range_traits<Rng2>::iterator_type>. The uninitialized_copy algorithm returns an input iterator to one past the last element copied from and the output iterator to the element in the destination range, one past the last element copied.
-
template<typename ExPolicy, typename Rng1, typename Rng2>
parallel::util::detail::algorithm_result<ExPolicy, hpx::parallel::util::in_out_result<typename hpx::traits::range_traits<Rng1>::iterator_type, typename hpx::traits::range_traits<Rng2>::iterator_type>>::type uninitialized_copy(ExPolicy &&policy, Rng1 &&rng1, Rng2 &&rng2)# Copies the elements in the range, defined by [first, last), to an uninitialized memory area beginning at dest. If an exception is thrown during the copy operation, the function has no effects.
The assignments in the parallel uninitialized_copy algorithm invoked with an execution policy object of type sequenced_policy execute in sequential order in the calling thread.
The assignments in the parallel uninitialized_copy algorithm invoked with an execution policy object of type parallel_policy or parallel_task_policy are permitted to execute in an unordered fashion in unspecified threads, and indeterminately sequenced within each thread.
Note
Complexity: Performs exactly last - first assignments.
- Template Parameters
ExPolicy – The type of the execution policy to use (deduced). It describes the manner in which the execution of the algorithm may be parallelized and the manner in which it executes the assignments.
Rng1 – The type of the source range used (deduced). The iterators extracted from this range type must meet the requirements of an input iterator.
Rng2 – The type of the destination range used (deduced). The iterators extracted from this range type must meet the requirements of an forward iterator.
- Parameters
policy – The execution policy to use for the scheduling of the iterations.
rng1 – Refers to the range from which the elements will be copied from
rng2 – Refers to the range to which the elements will be copied to
- Returns
The uninitialized_copy algorithm returns a hpx::future<in_out_result<InIter, FwdIter>>, if the execution policy is of type sequenced_task_policy or parallel_task_policy and returns in_out_result< typename hpx::traits::range_traits<Rng1>::iterator_type , typename hpx::traits::range_traits<Rng2>::iterator_type> otherwise. The uninitialized_copy algorithm returns the input iterator to one past the last element copied from and the output iterator to the element in the destination range, one past the last element copied.
-
template<typename InIter, typename Size, typename FwdIter, typename Sent2>
hpx::parallel::util::in_out_result<InIter, FwdIter> uninitialized_copy_n(InIter first1, Size count, FwdIter first2, Sent2 last2)# Copies the elements in the range [first, first + count), starting from first and proceeding to first + count - 1., to another range beginning at dest. If an exception is thrown during the copy operation, the function has no effects.
The assignments in the parallel uninitialized_copy_n algorithm invoked with an execution policy object of type sequenced_policy execute in sequential order in the calling thread.
Note
Complexity: Performs exactly last - first assignments.
- Template Parameters
InIter – The type of the source iterators used (deduced). This iterator type must meet the requirements of an input iterator.
Size – The type of the argument specifying the number of elements to apply f to.
FwdIter – The type of the iterator representing the destination range (deduced). This iterator type must meet the requirements of a forward iterator.
Sent2 – The type of the source sentinel (deduced). This sentinel type must be a sentinel for FwdIter.
- Parameters
first1 – Refers to the beginning of the sequence of elements that will be copied from
count – Refers to the number of elements starting at first the algorithm will be applied to.
first2 – Refers to the beginning of the destination range.
last2 – Refers to sentinel value denoting the end of the second range the algorithm will be applied to.
- Returns
The uninitialized_copy_n algorithm returns in_out_result<InIter, FwdIter>. The uninitialized_copy_n algorithm returns the output iterator to the element in the destination range, one past the last element copied.
-
template<typename ExPolicy, typename FwdIter1, typename Size, typename FwdIter2, typename Sent2>
parallel::util::detail::algorithm_result<ExPolicy, parallel::util::in_out_result<FwdIter1, FwdIter2>>::type uninitialized_copy_n(ExPolicy &&policy, FwdIter1 first1, Size count, FwdIter2 first2, Sent2 last2)# Copies the elements in the range [first, first + count), starting from first and proceeding to first + count - 1., to another range beginning at dest. If an exception is thrown during the copy operation, the function has no effects.
The assignments in the parallel uninitialized_copy_n algorithm invoked with an execution policy object of type sequenced_policy execute in sequential order in the calling thread.
The assignments in the parallel uninitialized_copy_n algorithm invoked with an execution policy object of type parallel_policy or parallel_task_policy are permitted to execute in an unordered fashion in unspecified threads, and indeterminately sequenced within each thread.
Note
Complexity: Performs exactly last - first assignments.
- Template Parameters
ExPolicy – The type of the execution policy to use (deduced). It describes the manner in which the execution of the algorithm may be parallelized and the manner in which it executes the assignments.
FwdIter1 – The type of the source iterators used (deduced). This iterator type must meet the requirements of an input iterator.
Size – The type of the argument specifying the number of elements to apply f to.
FwdIter2 – The type of the iterator representing the destination range (deduced). This iterator type must meet the requirements of a forward iterator.
Sent2 – The type of the source sentinel (deduced). This sentinel type must be a sentinel for InIter2.
- Parameters
policy – The execution policy to use for the scheduling of the iterations.
first1 – Refers to the beginning of the sequence of elements that will be copied from
count – Refers to the number of elements starting at first the algorithm will be applied to.
first2 – Refers to the beginning of the destination range.
last2 – Refers to sentinel value denoting the end of the second range the algorithm will be applied to.
- Returns
The uninitialized_copy_n algorithm returns a hpx::future<in_out_result<FwdIter1, FwdIter2>> if the execution policy is of type sequenced_task_policy or parallel_task_policy and returns FwdIter2 otherwise. The uninitialized_copy_n algorithm returns the output iterator to the element in the destination range, one past the last element copied.
-
template<typename InIter, typename Sent1, typename FwdIter, typename Sent2>
-
namespace ranges
hpx::ranges::uninitialized_default_construct, hpx::ranges::uninitialized_default_construct_n#
Defined in header hpx/algorithm.hpp.
See Public API for a list of names and headers that are part of the public HPX API.
-
namespace hpx
-
namespace ranges
Functions
-
template<typename FwdIter, typename Sent>
FwdIter uninitialized_default_construct(FwdIter first, Sent last)# Constructs objects of type typename iterator_traits<ForwardIt>::value_type in the uninitialized storage designated by the range by default-initialization. If an exception is thrown during the initialization, the function has no effects.
The assignments in the parallel uninitialized_default_construct algorithm invoked without an execution policy object will execute in sequential order in the calling thread.
Note
Complexity: Performs exactly last - first assignments.
- Template Parameters
FwdIter – The type of the source iterators used (deduced). This iterator type must meet the requirements of a forward iterator.
Sent – The type of the source sentinel (deduced). This sentinel type must be a sentinel for FwdIter.
- Parameters
first – Refers to the beginning of the sequence of elements the algorithm will be applied to.
last – Refers to sentinel value denoting the end of the sequence of elements the algorithm will be applied.
- Returns
The uninitialized_default_construct algorithm returns a returns FwdIter. The uninitialized_default_construct algorithm returns the output iterator to the element in the range, one past the last element constructed.
-
template<typename ExPolicy, typename FwdIter, typename Sent>
hpx::parallel::util::detail::algorithm_result_t<ExPolicy, FwdIter> uninitialized_default_construct(ExPolicy &&policy, FwdIter first, Sent last)# Constructs objects of type typename iterator_traits<ForwardIt>::value_type in the uninitialized storage designated by the range by default-initialization. If an exception is thrown during the initialization, the function has no effects.
The assignments in the parallel uninitialized_default_construct algorithm invoked with an execution policy object of type sequenced_policy execute in sequential order in the calling thread.
The assignments in the parallel uninitialized_default_construct algorithm invoked with an execution policy object of type parallel_policy or parallel_task_policy are permitted to execute in an unordered fashion in unspecified threads, and indeterminately sequenced within each thread.
Note
Complexity: Performs exactly last - first assignments.
- Template Parameters
ExPolicy – The type of the execution policy to use (deduced). It describes the manner in which the execution of the algorithm may be parallelized and the manner in which it executes the assignments.
FwdIter – The type of the source iterators used (deduced). This iterator type must meet the requirements of a forward iterator.
Sent – The type of the source sentinel (deduced). This sentinel type must be a sentinel for FwdIter.
- Parameters
policy – The execution policy to use for the scheduling of the iterations.
first – Refers to the beginning of the sequence of elements the algorithm will be applied to.
last – Refers to sentinel value denoting the end of the sequence of elements the algorithm will be applied.
- Returns
The uninitialized_default_construct algorithm returns a hpx::future<FwdIter> if the execution policy is of type sequenced_task_policy or parallel_task_policy and returns FwdIter otherwise. The uninitialized_default_construct algorithm returns the iterator to the element in the source range, one past the last element constructed.
-
template<typename Rng>
hpx::traits::range_traits<Rng>::iterator_type uninitialized_default_construct(Rng &&rng)# Constructs objects of type typename iterator_traits<ForwardIt>::value_type in the uninitialized storage designated by the range by default-initialization. If an exception is thrown during the initialization, the function has no effects.
The assignments in the parallel uninitialized_default_construct algorithm invoked without an execution policy object will execute in sequential order in the calling thread.
Note
Complexity: Performs exactly last - first assignments.
- Template Parameters
Rng – The type of the source range used (deduced). The iterators extracted from this range type must meet the requirements of an input iterator.
- Parameters
rng – Refers to the range to which will be default constructed.
- Returns
The uninitialized_default_construct algorithm returns a returns hpx::traits::range_traits<Rng>::iterator_type. The uninitialized_default_construct algorithm returns the output iterator to the element in the range, one past the last element constructed.
-
template<typename ExPolicy, typename Rng>
parallel::util::detail::algorithm_result<ExPolicy, typename hpx::traits::range_traits<Rng>::iterator_type>::type uninitialized_default_construct(ExPolicy &&policy, Rng &&rng)# Constructs objects of type typename iterator_traits<ForwardIt>::value_type in the uninitialized storage designated by the range by default-initialization. If an exception is thrown during the initialization, the function has no effects.
The assignments in the parallel uninitialized_default_construct algorithm invoked with an execution policy object of type sequenced_policy execute in sequential order in the calling thread.
The assignments in the parallel uninitialized_default_construct algorithm invoked with an execution policy object of type parallel_policy or parallel_task_policy are permitted to execute in an unordered fashion in unspecified threads, and indeterminately sequenced within each thread.
Note
Complexity: Performs exactly last - first assignments.
- Template Parameters
ExPolicy – The type of the execution policy to use (deduced). It describes the manner in which the execution of the algorithm may be parallelized and the manner in which it executes the assignments.
Rng – The type of the source range used (deduced). The iterators extracted from this range type must meet the requirements of an input iterator.
- Parameters
policy – The execution policy to use for the scheduling of the iterations.
rng – Refers to the range to which the value will be default constructed
- Returns
The uninitialized_default_construct algorithm returns a hpx::future<typename hpx::traits::range_traits<Rng>::iterator_type>, if the execution policy is of type sequenced_task_policy or parallel_task_policy and returns typename hpx::traits::range_traits<Rng>::iterator_type otherwise. The uninitialized_default_construct algorithm returns the output iterator to the element in the range, one past the last element constructed.
-
template<typename FwdIter, typename Size>
FwdIter uninitialized_default_construct_n(FwdIter first, Size count)# Constructs objects of type typename iterator_traits<ForwardIt>::value_type in the uninitialized storage designated by the range [first, first + count) by default-initialization. If an exception is thrown during the initialization, the function has no effects.
The assignments in the parallel uninitialized_default_construct_n algorithm invoked without an execution policy object execute in sequential order in the calling thread.
Note
Complexity: Performs exactly count assignments, if count > 0, no assignments otherwise.
- Template Parameters
FwdIter – The type of the source iterators used (deduced). This iterator type must meet the requirements of a forward iterator.
Size – The type of the argument specifying the number of elements to apply f to.
- Parameters
first – Refers to the beginning of the sequence of elements the algorithm will be applied to.
count – Refers to the number of elements starting at first the algorithm will be applied to.
- Returns
The uninitialized_default_construct_n algorithm returns a returns FwdIter. The uninitialized_default_construct_n algorithm returns the iterator to the element in the source range, one past the last element constructed.
-
template<typename ExPolicy, typename FwdIter, typename Size>
parallel::util::detail::algorithm_result<ExPolicy, FwdIter>::type uninitialized_default_construct_n(ExPolicy &&policy, FwdIter first, Size count)# Constructs objects of type typename iterator_traits<ForwardIt>::value_type in the uninitialized storage designated by the range [first, first + count) by default-initialization. If an exception is thrown during the initialization, the function has no effects.
The assignments in the parallel uninitialized_default_construct_n algorithm invoked with an execution policy object of type sequenced_policy execute in sequential order in the calling thread.
The assignments in the parallel uninitialized_default_construct_n algorithm invoked with an execution policy object of type parallel_policy or parallel_task_policy are permitted to execute in an unordered fashion in unspecified threads, and indeterminately sequenced within each thread.
Note
Complexity: Performs exactly count assignments, if count > 0, no assignments otherwise.
- Template Parameters
ExPolicy – The type of the execution policy to use (deduced). It describes the manner in which the execution of the algorithm may be parallelized and the manner in which it executes the assignments.
FwdIter – The type of the source iterators used (deduced). This iterator type must meet the requirements of a forward iterator.
Size – The type of the argument specifying the number of elements to apply f to.
- Parameters
policy – The execution policy to use for the scheduling of the iterations.
first – Refers to the beginning of the sequence of elements the algorithm will be applied to.
count – Refers to the number of elements starting at first the algorithm will be applied to.
- Returns
The uninitialized_default_construct_n algorithm returns a hpx::future<FwdIter> if the execution policy is of type sequenced_task_policy or parallel_task_policy and returns FwdIter otherwise. The uninitialized_default_construct_n algorithm returns the iterator to the element in the source range, one past the last element constructed.
-
template<typename FwdIter, typename Sent>
-
namespace ranges
hpx::ranges::uninitialized_fill, hpx::ranges::uninitialized_fill_n#
Defined in header hpx/algorithm.hpp.
See Public API for a list of names and headers that are part of the public HPX API.
-
namespace hpx
-
namespace ranges
Functions
-
template<typename FwdIter, typename Sent, typename T>
FwdIter uninitialized_fill(FwdIter first, Sent last, T const &value)# Copies the given value to an uninitialized memory area, defined by the range [first, last). If an exception is thrown during the initialization, the function has no effects.
The assignments in the ranges uninitialized_fill algorithm invoked without an execution policy object will execute in sequential order in the calling thread.
Note
Complexity: Linear in the distance between first and last
- Template Parameters
FwdIter – The type of the source iterators used (deduced). This iterator type must meet the requirements of a forward iterator.
Sent – The type of the source sentinel (deduced). This sentinel type must be a sentinel for FwdIter.
T – The type of the value to be assigned (deduced).
- Parameters
first – Refers to the beginning of the sequence of elements the algorithm will be applied to.
last – Refers to sentinel value denoting the end of the sequence of elements the algorithm will be applied.
value – The value to be assigned.
- Returns
The uninitialized_fill algorithm returns a returns FwdIter. The uninitialized_fill algorithm returns the output iterator to the element in the range, one past the last element copied.
-
template<typename ExPolicy, typename FwdIter, typename Sent, typename T>
hpx::parallel::util::detail::algorithm_result_t<ExPolicy, FwdIter> uninitialized_fill(ExPolicy &&policy, FwdIter first, Sent last, T const &value)# Copies the given value to an uninitialized memory area, defined by the range [first, last). If an exception is thrown during the initialization, the function has no effects.
The assignments in the parallel uninitialized_fill algorithm invoked with an execution policy object of type sequenced_policy execute in sequential order in the calling thread.
The assignments in the parallel uninitialized_fill algorithm invoked with an execution policy object of type parallel_policy or parallel_task_policy are permitted to execute in an unordered fashion in unspecified threads, and indeterminately sequenced within each thread.
Note
Complexity: Linear in the distance between first and last
- Template Parameters
ExPolicy – The type of the execution policy to use (deduced). It describes the manner in which the execution of the algorithm may be parallelized and the manner in which it executes the assignments.
FwdIter – The type of the source iterators used (deduced). This iterator type must meet the requirements of a forward iterator.
Sent – The type of the source sentinel (deduced). This sentinel type must be a sentinel for FwdIter.
T – The type of the value to be assigned (deduced).
- Parameters
policy – The execution policy to use for the scheduling of the iterations.
first – Refers to the beginning of the sequence of elements the algorithm will be applied to.
last – Refers to sentinel value denoting the end of the sequence of elements the algorithm will be applied.
value – The value to be assigned.
- Returns
The uninitialized_fill algorithm returns a returns FwdIter. The uninitialized_fill algorithm returns the output iterator to the element in the range, one past the last element copied.
-
template<typename Rng, typename T>
hpx::traits::range_traits<Rng>::iterator_type uninitialized_fill(Rng &&rng, T const &value)# Copies the given value to an uninitialized memory area, defined by the range [first, last). If an exception is thrown during the initialization, the function has no effects.
The assignments in the parallel uninitialized_fill algorithm invoked without an execution policy object will execute in sequential order in the calling thread.
Note
Complexity: Linear in the distance between first and last
- Template Parameters
Rng – The type of the source range used (deduced). The iterators extracted from this range type must meet the requirements of an input iterator.
T – The type of the value to be assigned (deduced).
- Parameters
rng – Refers to the range to which the value will be filled
value – The value to be assigned.
- Returns
The uninitialized_fill algorithm returns a returns hpx::traits::range_traits<Rng>::iterator_type. The uninitialized_fill algorithm returns the output iterator to the element in the range, one past the last element copied.
-
template<typename ExPolicy, typename Rng, typename T>
parallel::util::detail::algorithm_result<ExPolicy, typename hpx::traits::range_traits<Rng1>::iterator_type>::type uninitialized_fill(ExPolicy &&policy, Rng &&rng, T const &value)# Copies the given value to an uninitialized memory area, defined by the range [first, last). If an exception is thrown during the initialization, the function has no effects.
The assignments in the parallel uninitialized_fill algorithm invoked with an execution policy object of type sequenced_policy execute in sequential order in the calling thread.
The assignments in the parallel uninitialized_fill algorithm invoked with an execution policy object of type parallel_policy or parallel_task_policy are permitted to execute in an unordered fashion in unspecified threads, and indeterminately sequenced within each thread.
Note
Complexity: Linear in the distance between first and last
- Template Parameters
ExPolicy – The type of the execution policy to use (deduced). It describes the manner in which the execution of the algorithm may be parallelized and the manner in which it executes the assignments.
Rng – The type of the source range used (deduced). The iterators extracted from this range type must meet the requirements of an input iterator.
T – The type of the value to be assigned (deduced).
- Parameters
policy – The execution policy to use for the scheduling of the iterations.
rng – Refers to the range to which the value will be filled
value – The value to be assigned.
- Returns
The uninitialized_fill algorithm returns a hpx::future<typename hpx::traits::range_traits<Rng>::iterator_type>, if the execution policy is of type sequenced_task_policy or parallel_task_policy and returns typename hpx::traits::range_traits<Rng>::iterator_type otherwise. The uninitialized_fill algorithm returns the iterator to one past the last element filled in the range.
-
template<typename FwdIter, typename Size, typename T>
FwdIter uninitialized_fill_n(FwdIter first, Size count, T const &value)# Copies the given value value to the first count elements in an uninitialized memory area beginning at first. If an exception is thrown during the initialization, the function has no effects.
The assignments in the parallel uninitialized_fill_n algorithm invoked with an execution policy object of type sequenced_policy execute in sequential order in the calling thread.
Note
Complexity: Performs exactly count assignments, if count > 0, no assignments otherwise.
- Template Parameters
FwdIter – The type of the source iterators used (deduced). This iterator type must meet the requirements of a forward iterator.
Size – The type of the argument specifying the number of elements to apply f to.
T – The type of the value to be assigned (deduced).
- Parameters
first – Refers to the beginning of the sequence of elements the algorithm will be applied to.
count – Refers to the number of elements starting at first the algorithm will be applied to.
value – The value to be assigned.
- Returns
The uninitialized_fill_n algorithm returns a returns FwdIter. The uninitialized_fill_n algorithm returns the output iterator to the element in the range, one past the last element copied.
-
template<typename ExPolicy, typename FwdIter, typename Size, typename T>
hpx::parallel::util::detail::algorithm_result_t<ExPolicy, FwdIter> uninitialized_fill_n(ExPolicy &&policy, FwdIter first, Size count, T const &value)# Copies the given value value to the first count elements in an uninitialized memory area beginning at first. If an exception is thrown during the initialization, the function has no effects.
The assignments in the parallel uninitialized_fill_n algorithm invoked with an execution policy object of type sequenced_policy execute in sequential order in the calling thread.
The assignments in the parallel uninitialized_fill_n algorithm invoked with an execution policy object of type parallel_policy or parallel_task_policy are permitted to execute in an unordered fashion in unspecified threads, and indeterminately sequenced within each thread.
Note
Complexity: Performs exactly count assignments, if count > 0, no assignments otherwise.
- Template Parameters
ExPolicy – The type of the execution policy to use (deduced). It describes the manner in which the execution of the algorithm may be parallelized and the manner in which it executes the assignments.
FwdIter – The type of the source iterators used (deduced). This iterator type must meet the requirements of a forward iterator.
Size – The type of the argument specifying the number of elements to apply f to.
T – The type of the value to be assigned (deduced).
- Parameters
policy – The execution policy to use for the scheduling of the iterations.
first – Refers to the beginning of the sequence of elements the algorithm will be applied to.
count – Refers to the number of elements starting at first the algorithm will be applied to.
value – The value to be assigned.
- Returns
The uninitialized_fill_n algorithm returns a hpx::future<FwdIter>, if the execution policy is of type sequenced_task_policy or parallel_task_policy and returns FwdIter otherwise. The uninitialized_fill_n algorithm returns the output iterator to the element in the range, one past the last element copied.
-
template<typename FwdIter, typename Sent, typename T>
-
namespace ranges
hpx::ranges::uninitialized_move, hpx::ranges::uninitialized_move_n#
Defined in header hpx/algorithm.hpp.
See Public API for a list of names and headers that are part of the public HPX API.
-
namespace hpx
-
namespace ranges
Functions
-
template<typename InIter, typename Sent1, typename FwdIter, typename Sent2>
hpx::parallel::util::in_out_result<InIter, FwdIter> uninitialized_move(InIter first1, Sent1 last1, FwdIter first2, Sent2 last2)# Moves the elements in the range, defined by [first, last), to an uninitialized memory area beginning at dest. If an exception is thrown during the initialization, some objects in [first, last) are left in a valid but unspecified state.
The assignments in the parallel uninitialized_move algorithm invoked without an execution policy object will execute in sequential order in the calling thread.
Note
Complexity: Performs exactly last - first assignments.
- Template Parameters
InIter – The type of the source iterators used (deduced). This iterator type must meet the requirements of an input iterator.
Sent1 – The type of the source sentinel (deduced). This sentinel type must be a sentinel for InIter.
FwdIter – The type of the iterator representing the destination range (deduced). This iterator type must meet the requirements of a forward iterator.
Sent2 – The type of the source sentinel (deduced). This sentinel type must be a sentinel for InIter2.
- Parameters
first1 – Refers to the beginning of the sequence of elements that will be moved from
last1 – Refers to sentinel value denoting the end of the sequence of elements the algorithm will be applied
first2 – Refers to the beginning of the destination range.
last2 – Refers to sentinel value denoting the end of the second range the algorithm will be applied to.
- Returns
The uninitialized_move algorithm returns an in_out_result<InIter, FwdIter>. The uninitialized_move algorithm returns an input iterator to one past the last element moved from and the output iterator to the element in the destination range, one past the last element moved.
-
template<typename ExPolicy, typename FwdIter1, typename Sent1, typename FwdIter2, typename Sent2>
parallel::util::detail::algorithm_result<ExPolicy, parallel::util::in_out_result<FwdIter1, FwdIter2>>::type uninitialized_move(ExPolicy &&policy, FwdIter1 first1, Sent1 last1, FwdIter2 first2, Sent2 last2)# Moves the elements in the range, defined by [first, last), to an uninitialized memory area beginning at dest. If an exception is thrown during the initialization, some objects in [first, last) are left in a valid but unspecified state.
The assignments in the parallel uninitialized_move algorithm invoked with an execution policy object of type sequenced_policy execute in sequential order in the calling thread.
The assignments in the parallel uninitialized_move algorithm invoked with an execution policy object of type parallel_policy or parallel_task_policy are permitted to execute in an unordered fashion in unspecified threads, and indeterminately sequenced within each thread.
Note
Complexity: Performs exactly last - first assignments.
- Template Parameters
ExPolicy – The type of the execution policy to use (deduced). It describes the manner in which the execution of the algorithm may be parallelized and the manner in which it executes the assignments.
FwdIter1 – The type of the source iterators used (deduced). This iterator type must meet the requirements of an input iterator.
Sent1 – The type of the source sentinel (deduced). This sentinel type must be a sentinel for InIter.
FwdIter2 – The type of the iterator representing the destination range (deduced). This iterator type must meet the requirements of a forward iterator.
Sent2 – The type of the source sentinel (deduced). This sentinel type must be a sentinel for InIter2.
- Parameters
policy – The execution policy to use for the scheduling of the iterations.
first1 – Refers to the beginning of the sequence of elements that will be moved from
last1 – Refers to sentinel value denoting the end of the sequence of elements the algorithm will be applied.
first2 – Refers to the beginning of the destination range.
last2 – Refers to sentinel value denoting the end of the second range the algorithm will be applied to.
- Returns
The uninitialized_move algorithm returns a hpx::future<in_out_result<InIter, FwdIter>>, if the execution policy is of type sequenced_task_policy or parallel_task_policy and returns in_out_result<InIter, FwdIter> otherwise. The uninitialized_move algorithm returns an input iterator to one past the last element moved from and the output iterator to the element in the destination range, one past the last element moved.
-
template<typename Rng1, typename Rng2>
hpx::parallel::util::in_out_result<typename hpx::traits::range_traits<Rng1>::iterator_type, typename hpx::traits::range_traits<Rng2>::iterator_type> uninitialized_move(Rng1 &&rng1, Rng2 &&rng2)# Moves the elements in the range, defined by [first, last), to an uninitialized memory area beginning at dest. If an exception is thrown during the initialization, some objects in [first, last) are left in a valid but unspecified state.
The assignments in the parallel uninitialized_move algorithm invoked without an execution policy object will execute in sequential order in the calling thread.
Note
Complexity: Performs exactly last - first assignments.
- Template Parameters
Rng1 – The type of the source range used (deduced). The iterators extracted from this range type must meet the requirements of an input iterator.
Rng2 – The type of the destination range used (deduced). The iterators extracted from this range type must meet the requirements of an forward iterator.
- Parameters
rng1 – Refers to the range from which the elements will be moved from
rng2 – Refers to the range to which the elements will be moved to
- Returns
The uninitialized_move algorithm returns an in_out_result<typename hpx::traits::range_traits<Rng1>::iterator_type, typename hpx::traits::range_traits<Rng2>::iterator_type>. The uninitialized_move algorithm returns an input iterator to one past the last element moved from and the output iterator to the element in the destination range, one past the last element moved.
-
template<typename ExPolicy, typename Rng1, typename Rng2>
parallel::util::detail::algorithm_result<ExPolicy, hpx::parallel::util::in_out_result<typename hpx::traits::range_traits<Rng1>::iterator_type, typename hpx::traits::range_traits<Rng2>::iterator_type>>::type uninitialized_move(ExPolicy &&policy, Rng1 &&rng1, Rng2 &&rng2)# Moves the elements in the range, defined by [first, last), to an uninitialized memory area beginning at dest. If an exception is thrown during the initialization, some objects in [first, last) are left in a valid but unspecified state.
The assignments in the parallel uninitialized_move algorithm invoked with an execution policy object of type sequenced_policy execute in sequential order in the calling thread.
The assignments in the parallel uninitialized_move algorithm invoked with an execution policy object of type parallel_policy or parallel_task_policy are permitted to execute in an unordered fashion in unspecified threads, and indeterminately sequenced within each thread.
Note
Complexity: Performs exactly last - first assignments.
- Template Parameters
ExPolicy – The type of the execution policy to use (deduced). It describes the manner in which the execution of the algorithm may be parallelized and the manner in which it executes the assignments.
Rng1 – The type of the source range used (deduced). The iterators extracted from this range type must meet the requirements of an input iterator.
Rng2 – The type of the destination range used (deduced). The iterators extracted from this range type must meet the requirements of an forward iterator.
- Parameters
policy – The execution policy to use for the scheduling of the iterations.
rng1 – Refers to the range from which the elements will be moved from
rng2 – Refers to the range to which the elements will be moved to
- Returns
The uninitialized_move algorithm returns a hpx::future<in_out_result<InIter, FwdIter>>, if the execution policy is of type sequenced_task_policy or parallel_task_policy and returns in_out_result< typename hpx::traits::range_traits<Rng1>::iterator_type , typename hpx::traits::range_traits<Rng2>::iterator_type> otherwise. The uninitialized_move algorithm returns the input iterator to one past the last element moved from and the output iterator to the element in the destination range, one past the last element moved.
-
template<typename InIter, typename Size, typename FwdIter, typename Sent2>
hpx::parallel::util::in_out_result<InIter, FwdIter> uninitialized_move_n(InIter first1, Size count, FwdIter first2, Sent2 last2)# Moves the elements in the range [first, first + count), starting from first and proceeding to first + count - 1., to another range beginning at dest. If an exception is thrown during the initialization, some objects in [first, first + count) are left in a valid but unspecified state.
The assignments in the parallel uninitialized_move_n algorithm invoked with an execution policy object of type sequenced_policy execute in sequential order in the calling thread.
Note
Complexity: Performs exactly count movements, if count > 0, no move operations otherwise.
- Template Parameters
InIter – The type of the source iterators used (deduced). This iterator type must meet the requirements of an input iterator.
Size – The type of the argument specifying the number of elements to apply f to.
FwdIter – The type of the iterator representing the destination range (deduced). This iterator type must meet the requirements of a forward iterator.
Sent2 – The type of the source sentinel (deduced). This sentinel type must be a sentinel for FwdIter.
- Parameters
first1 – Refers to the beginning of the sequence of elements that will be moved from
count – Refers to the number of elements starting at first the algorithm will be applied to.
first2 – Refers to the beginning of the destination range.
last2 – Refers to sentinel value denoting the end of the second range the algorithm will be applied to.
- Returns
The uninitialized_move_n algorithm returns in_out_result<InIter, FwdIter>. The uninitialized_move_n algorithm returns the output iterator to the element in the destination range, one past the last element moved.
-
template<typename ExPolicy, typename FwdIter1, typename Size, typename FwdIter2, typename Sent2>
parallel::util::detail::algorithm_result<ExPolicy, parallel::util::in_out_result<FwdIter1, FwdIter2>>::type uninitialized_move_n(ExPolicy &&policy, FwdIter1 first1, Size count, FwdIter2 first2, Sent2 last2)# Moves the elements in the range [first, first + count), starting from first and proceeding to first + count - 1., to another range beginning at dest. If an exception is thrown during the initialization, some objects in [first, first + count) are left in a valid but unspecified state.
The assignments in the parallel uninitialized_move_n algorithm invoked with an execution policy object of type sequenced_policy execute in sequential order in the calling thread.
The assignments in the parallel uninitialized_move_n algorithm invoked with an execution policy object of type parallel_policy or parallel_task_policy are permitted to execute in an unordered fashion in unspecified threads, and indeterminately sequenced within each thread.
Note
Complexity: Performs exactly count movements, if count > 0, no move operations otherwise.
- Template Parameters
ExPolicy – The type of the execution policy to use (deduced). It describes the manner in which the execution of the algorithm may be parallelized and the manner in which it executes the assignments.
FwdIter1 – The type of the source iterators used (deduced). This iterator type must meet the requirements of an input iterator.
Size – The type of the argument specifying the number of elements to apply f to.
FwdIter2 – The type of the iterator representing the destination range (deduced). This iterator type must meet the requirements of a forward iterator.
Sent2 – The type of the source sentinel (deduced). This sentinel type must be a sentinel for InIter2.
- Parameters
policy – The execution policy to use for the scheduling of the iterations.
first1 – Refers to the beginning of the sequence of elements that will be moved from
count – Refers to the number of elements starting at first the algorithm will be applied to.
first2 – Refers to the beginning of the destination range.
last2 – Refers to sentinel value denoting the end of the second range the algorithm will be applied to.
- Returns
The uninitialized_move_n algorithm returns a hpx::future<in_out_result<FwdIter1, FwdIter2>> if the execution policy is of type sequenced_task_policy or parallel_task_policy and returns FwdIter2 otherwise. The uninitialized_move_n algorithm returns the output iterator to the element in the destination range, one past the last element moved.
-
template<typename InIter, typename Sent1, typename FwdIter, typename Sent2>
-
namespace ranges
hpx::ranges::uninitialized_value_construct, hpx::ranges::uninitialized_value_construct_n#
Defined in header hpx/algorithm.hpp.
See Public API for a list of names and headers that are part of the public HPX API.
-
namespace hpx
-
namespace ranges
Functions
-
template<typename FwdIter, typename Sent>
FwdIter uninitialized_value_construct(FwdIter first, Sent last)# Constructs objects of type typename iterator_traits<ForwardIt>::value_type in the uninitialized storage designated by the range by value-initialization. If an exception is thrown during the initialization, the function has no effects.
The assignments in the parallel uninitialized_value_construct algorithm invoked without an execution policy object will execute in sequential order in the calling thread.
Note
Complexity: Performs exactly last - first assignments.
- Template Parameters
FwdIter – The type of the source iterators used (deduced). This iterator type must meet the requirements of a forward iterator.
Sent – The type of the source sentinel (deduced). This sentinel type must be a sentinel for FwdIter.
- Parameters
first – Refers to the beginning of the sequence of elements the algorithm will be applied to.
last – Refers to sentinel value denoting the end of the sequence of elements the algorithm will be applied.
- Returns
The uninitialized_value_construct algorithm returns a returns FwdIter. The uninitialized_value_construct algorithm returns the output iterator to the element in the range, one past the last element constructed.
-
template<typename ExPolicy, typename FwdIter, typename Sent>
hpx::parallel::util::detail::algorithm_result_t<ExPolicy, FwdIter> uninitialized_value_construct(ExPolicy &&policy, FwdIter first, Sent last)# Constructs objects of type typename iterator_traits<ForwardIt>::value_type in the uninitialized storage designated by the range by value-initialization. If an exception is thrown during the initialization, the function has no effects.
The assignments in the parallel uninitialized_value_construct algorithm invoked with an execution policy object of type sequenced_policy execute in sequential order in the calling thread.
The assignments in the parallel uninitialized_value_construct algorithm invoked with an execution policy object of type parallel_policy or parallel_task_policy are permitted to execute in an unordered fashion in unspecified threads, and indeterminately sequenced within each thread.
Note
Complexity: Performs exactly last - first assignments.
- Template Parameters
ExPolicy – The type of the execution policy to use (deduced). It describes the manner in which the execution of the algorithm may be parallelized and the manner in which it executes the assignments.
FwdIter – The type of the source iterators used (deduced). This iterator type must meet the requirements of a forward iterator.
Sent – The type of the source sentinel (deduced). This sentinel type must be a sentinel for FwdIter.
- Parameters
policy – The execution policy to use for the scheduling of the iterations.
first – Refers to the beginning of the sequence of elements the algorithm will be applied to.
last – Refers to sentinel value denoting the end of the sequence of elements the algorithm will be applied.
- Returns
The uninitialized_value_construct algorithm returns a hpx::future<FwdIter> if the execution policy is of type sequenced_task_policy or parallel_task_policy and returns FwdIter otherwise. The uninitialized_value_construct algorithm returns the iterator to the element in the source range, one past the last element constructed.
-
template<typename Rng>
hpx::traits::range_traits<Rng>::iterator_type uninitialized_value_construct(Rng &&rng)# Constructs objects of type typename iterator_traits<ForwardIt>::value_type in the uninitialized storage designated by the range by value-initialization. If an exception is thrown during the initialization, the function has no effects.
The assignments in the parallel uninitialized_value_construct algorithm invoked without an execution policy object will execute in sequential order in the calling thread.
Note
Complexity: Performs exactly last - first assignments.
- Template Parameters
Rng – The type of the source range used (deduced). The iterators extracted from this range type must meet the requirements of an input iterator.
- Parameters
rng – Refers to the range to which will be value constructed.
- Returns
The uninitialized_value_construct algorithm returns a returns hpx::traits::range_traits<Rng>::iterator_type. The uninitialized_value_construct algorithm returns the output iterator to the element in the range, one past the last element constructed.
-
template<typename ExPolicy, typename Rng>
parallel::util::detail::algorithm_result<ExPolicy, typename hpx::traits::range_traits<Rng>::iterator_type>::type uninitialized_value_construct(ExPolicy &&policy, Rng &&rng)# Constructs objects of type typename iterator_traits<ForwardIt>::value_type in the uninitialized storage designated by the range by value-initialization. If an exception is thrown during the initialization, the function has no effects.
The assignments in the parallel uninitialized_value_construct algorithm invoked with an execution policy object of type sequenced_policy execute in sequential order in the calling thread.
The assignments in the parallel uninitialized_value_construct algorithm invoked with an execution policy object of type parallel_policy or parallel_task_policy are permitted to execute in an unordered fashion in unspecified threads, and indeterminately sequenced within each thread.
Note
Complexity: Performs exactly last - first assignments.
- Template Parameters
ExPolicy – The type of the execution policy to use (deduced). It describes the manner in which the execution of the algorithm may be parallelized and the manner in which it executes the assignments.
Rng – The type of the source range used (deduced). The iterators extracted from this range type must meet the requirements of an input iterator.
- Parameters
policy – The execution policy to use for the scheduling of the iterations.
rng – Refers to the range to which the value will be value consutrcted
- Returns
The uninitialized_value_construct algorithm returns a hpx::future<typename hpx::traits::range_traits<Rng>::iterator_type>, if the execution policy is of type sequenced_task_policy or parallel_task_policy and returns typename hpx::traits::range_traits<Rng>::iterator_type otherwise. The uninitialized_value_construct algorithm returns the output iterator to the element in the range, one past the last element constructed.
-
template<typename FwdIter, typename Size>
FwdIter uninitialized_value_construct_n(FwdIter first, Size count)# Constructs objects of type typename iterator_traits<ForwardIt>::value_type in the uninitialized storage designated by the range [first, first + count) by value-initialization. If an exception is thrown during the initialization, the function has no effects.
The assignments in the parallel uninitialized_value_construct_n algorithm invoked without an execution policy object execute in sequential order in the calling thread.
Note
Complexity: Performs exactly count assignments, if count > 0, no assignments otherwise.
- Template Parameters
FwdIter – The type of the source iterators used (deduced). This iterator type must meet the requirements of a forward iterator.
Size – The type of the argument specifying the number of elements to apply f to.
- Parameters
first – Refers to the beginning of the sequence of elements the algorithm will be applied to.
count – Refers to the number of elements starting at first the algorithm will be applied to.
- Returns
The uninitialized_value_construct_n algorithm returns a returns FwdIter. The uninitialized_value_construct_n algorithm returns the iterator to the element in the source range, one past the last element constructed.
-
template<typename ExPolicy, typename FwdIter, typename Size>
hpx::parallel::util::detail::algorithm_result_t<ExPolicy, FwdIter> uninitialized_value_construct_n(ExPolicy &&policy, FwdIter first, Size count)# Constructs objects of type typename iterator_traits<ForwardIt>::value_type in the uninitialized storage designated by the range [first, first + count) by value-initialization. If an exception is thrown during the initialization, the function has no effects.
The assignments in the parallel uninitialized_value_construct_n algorithm invoked with an execution policy object of type sequenced_policy execute in sequential order in the calling thread.
The assignments in the parallel uninitialized_value_construct_n algorithm invoked with an execution policy object of type parallel_policy or parallel_task_policy are permitted to execute in an unordered fashion in unspecified threads, and indeterminately sequenced within each thread.
Note
Complexity: Performs exactly count assignments, if count > 0, no assignments otherwise.
- Template Parameters
ExPolicy – The type of the execution policy to use (deduced). It describes the manner in which the execution of the algorithm may be parallelized and the manner in which it executes the assignments.
FwdIter – The type of the source iterators used (deduced). This iterator type must meet the requirements of a forward iterator.
Size – The type of the argument specifying the number of elements to apply f to.
- Parameters
policy – The execution policy to use for the scheduling of the iterations.
first – Refers to the beginning of the sequence of elements the algorithm will be applied to.
count – Refers to the number of elements starting at first the algorithm will be applied to.
- Returns
The uninitialized_value_construct_n algorithm returns a hpx::future<FwdIter> if the execution policy is of type sequenced_task_policy or parallel_task_policy and returns FwdIter otherwise. The uninitialized_value_construct_n algorithm returns the iterator to the element in the source range, one past the last element constructed.
-
template<typename FwdIter, typename Sent>
-
namespace ranges
hpx::ranges::unique, hpx::ranges::unique_copy#
Defined in header hpx/algorithm.hpp.
See Public API for a list of names and headers that are part of the public HPX API.
-
namespace hpx
-
namespace ranges
Functions
-
template<typename FwdIter, typename Sent, typename Pred = ranges::equal_to, typename Proj = hpx::identity>
subrange_t<FwdIter, Sent> unique(FwdIter first, Sent last, Pred &&pred = Pred(), Proj &&proj = Proj())# Eliminates all but the first element from every consecutive group of equivalent elements from the range [first, last) and returns a past-the-end iterator for the new logical end of the range.
The assignments in the parallel unique algorithm invoked without an execution policy object execute in sequential order in the calling thread.
Note
Complexity: Performs not more than last - first assignments, exactly last - first - 1 applications of the predicate pred and no more than twice as many applications of the projection proj.
- Template Parameters
FwdIter – The type of the source iterators used (deduced). This iterator type must meet the requirements of a forward iterator.
Sent – The type of the source sentinel (deduced). This sentinel type must be a sentinel for FwdIter.
Pred – The type of the function/function object to use (deduced). Unlike its sequential form, the parallel overload of unique requires Pred to meet the requirements of CopyConstructible. This defaults to std::equal_to<>
Proj – The type of an optional projection function. This defaults to hpx::identity
- Parameters
first – Refers to the beginning of the sequence of elements the algorithm will be applied to.
last – Refers to sentinel value denoting the end of the sequence of elements the algorithm will be applied.
pred – Specifies the function (or function object) which will be invoked for each of the elements in the sequence specified by [first, last). This is an binary predicate which returns true for the required elements. The signature of this predicate should be equivalent to:
The signature does not need to have const&, but the function must not modify the objects passed to it. The types Type1 and Type2 must be such that objects of types FwdIter can be dereferenced and then implicitly converted to both Type1 and Type2bool pred(const Type1 &a, const Type2 &b);
proj – Specifies the function (or function object) which will be invoked for each of the elements as a projection operation before the actual predicate is invoked.
- Returns
The unique algorithm returns subrange_t<FwdIter, Sent>. The unique algorithm returns an object {ret, last}, where ret is a past-the-end iterator for a new subrange.
-
template<typename ExPolicy, typename FwdIter, typename Sent, typename Pred = ranges::equal_to, typename Proj = hpx::identity>
parallel::util::detail::algorithm_result<ExPolicy, subrange_t<FwdIter, Sent>>::type unique(ExPolicy &&policy, FwdIter first, Sent last, Pred &&pred = Pred(), Proj &&proj = Proj())# Eliminates all but the first element from every consecutive group of equivalent elements from the range [first, last) and returns a past-the-end iterator for the new logical end of the range.
The assignments in the parallel unique algorithm invoked with an execution policy object of type sequenced_policy execute in sequential order in the calling thread.
The assignments in the parallel unique algorithm invoked with an execution policy object of type parallel_policy or parallel_task_policy are permitted to execute in an unordered fashion in unspecified threads, and indeterminately sequenced within each thread.
Note
Complexity: Performs not more than last - first assignments, exactly last - first - 1 applications of the predicate pred and no more than twice as many applications of the projection proj.
- Template Parameters
ExPolicy – The type of the execution policy to use (deduced). It describes the manner in which the execution of the algorithm may be parallelized and the manner in which it executes the assignments.
FwdIter – The type of the source iterators used (deduced). This iterator type must meet the requirements of a forward iterator.
Sent – The type of the source sentinel (deduced). This sentinel type must be a sentinel for FwdIter.
Pred – The type of the function/function object to use (deduced). Unlike its sequential form, the parallel overload of unique requires Pred to meet the requirements of CopyConstructible. This defaults to std::equal_to<>
Proj – The type of an optional projection function. This defaults to hpx::identity
- Parameters
policy – The execution policy to use for the scheduling of the iterations.
first – Refers to the beginning of the sequence of elements the algorithm will be applied to.
last – Refers to sentinel value denoting the end of the sequence of elements the algorithm will be applied.
pred – Specifies the function (or function object) which will be invoked for each of the elements in the sequence specified by [first, last). This is an binary predicate which returns true for the required elements. The signature of this predicate should be equivalent to:
The signature does not need to have const&, but the function must not modify the objects passed to it. The types Type1 and Type2 must be such that objects of types FwdIter can be dereferenced and then implicitly converted to both Type1 and Type2bool pred(const Type1 &a, const Type2 &b);
proj – Specifies the function (or function object) which will be invoked for each of the elements as a projection operation before the actual predicate is invoked.
- Returns
The unique algorithm returns subrange_t<FwdIter, Sent>. The unique algorithm returns an object {ret, last}, where ret is a past-the-end iterator for a new subrange.
-
template<typename Rng, typename Pred = ranges::equal_to, typename Proj = hpx::identity>
subrange_t<std::ranges::iterator_t<Rng>, std::ranges::iterator_t<Rng>> unique(Rng &&rng, Pred &&pred = Pred(), Proj &&proj = Proj())# Eliminates all but the first element from every consecutive group of equivalent elements from the range rng and returns a past-the-end iterator for the new logical end of the range.
The assignments in the parallel unique algorithm invoked without an execution policy object execute in sequential order in the calling thread.
Note
Complexity: Performs not more than N assignments, exactly N - 1 applications of the predicate pred and no more than twice as many applications of the projection proj, where N = std::distance(begin(rng), end(rng)).
- Template Parameters
Rng – The type of the source range used (deduced). The iterators extracted from this range type must meet the requirements of an forward iterator.
Pred – The type of the function/function object to use (deduced). Unlike its sequential form, the parallel overload of unique requires Pred to meet the requirements of CopyConstructible. This defaults to std::equal_to<>
Proj – The type of an optional projection function. This defaults to hpx::identity
- Parameters
rng – Refers to the sequence of elements the algorithm will be applied to.
pred – Specifies the function (or function object) which will be invoked for each of the elements in the sequence specified by [first, last). This is an binary predicate which returns true for the required elements. The signature of this predicate should be equivalent to:
The signature does not need to have const&, but the function must not modify the objects passed to it. The type Type must be such that an object of type FwdIter1 can be dereferenced and then implicitly converted to Type.bool pred(const Type &a, const Type &b);
proj – Specifies the function (or function object) which will be invoked for each of the elements as a projection operation before the actual predicate is invoked.
- Returns
The unique algorithm returns subrange_t<std::ranges::iterator_t<Rng>, std::ranges::iterator_t<Rng>>. The unique algorithm returns an object {ret, last}, where ret is a past-the-end iterator for a new subrange.
-
template<typename ExPolicy, typename Rng, typename Pred = ranges::equal_to, typename Proj = hpx::identity>
parallel::util::detail::algorithm_result<ExPolicy, subrange_t<std::ranges::iterator_t<Rng>, std::ranges::iterator_t<Rng>>> unique(ExPolicy &&policy, Rng &&rng, Pred &&pred = Pred(), Proj &&proj = Proj())# Eliminates all but the first element from every consecutive group of equivalent elements from the range rng and returns a past-the-end iterator for the new logical end of the range.
The assignments in the parallel unique algorithm invoked with an execution policy object of type sequenced_policy execute in sequential order in the calling thread.
The assignments in the parallel unique algorithm invoked with an execution policy object of type parallel_policy or parallel_task_policy are permitted to execute in an unordered fashion in unspecified threads, and indeterminately sequenced within each thread.
Note
Complexity: Performs not more than N assignments, exactly N - 1 applications of the predicate pred and no more than twice as many applications of the projection proj, where N = std::distance(begin(rng), end(rng)).
- Template Parameters
ExPolicy – The type of the execution policy to use (deduced). It describes the manner in which the execution of the algorithm may be parallelized and the manner in which it executes the assignments.
Rng – The type of the source range used (deduced). The iterators extracted from this range type must meet the requirements of an forward iterator.
Pred – The type of the function/function object to use (deduced). Unlike its sequential form, the parallel overload of unique requires Pred to meet the requirements of CopyConstructible. This defaults to std::equal_to<>
Proj – The type of an optional projection function. This defaults to hpx::identity
- Parameters
policy – The execution policy to use for the scheduling of the iterations.
rng – Refers to the sequence of elements the algorithm will be applied to.
pred – Specifies the function (or function object) which will be invoked for each of the elements in the sequence specified by [first, last). This is an binary predicate which returns true for the required elements. The signature of this predicate should be equivalent to:
The signature does not need to have const&, but the function must not modify the objects passed to it. The type Type must be such that an object of type FwdIter1 can be dereferenced and then implicitly converted to Type.bool pred(const Type &a, const Type &b);
proj – Specifies the function (or function object) which will be invoked for each of the elements as a projection operation before the actual predicate is invoked.
- Returns
The unique algorithm returns a hpx::future <subrange_t<std::ranges::iterator_t<Rng>, std::ranges::iterator_t<Rng>>> if the execution policy is of type sequenced_task_policy or parallel_task_policy and returns subrange_t<std::ranges::iterator_t<Rng>, std::ranges::iterator_t<Rng>> otherwise. The unique algorithm returns an object {ret, last}, where ret is a past-the-end iterator for a new subrange.
-
template<typename InIter, typename Sent, typename O, typename Pred = ranges::equal_to, typename Proj = hpx::identity>
unique_copy_result<InIter, O> unique_copy(InIter first, Sent last, O dest, Pred &&pred = Pred(), Proj &&proj = Proj())# Copies the elements from the range [first, last), to another range beginning at dest in such a way that there are no consecutive equal elements. Only the first element of each group of equal elements is copied.
The assignments in the parallel unique_copy algorithm invoked without an execution policy object will execute in sequential order in the calling thread.
Note
Complexity: Performs not more than last - first assignments, exactly last - first - 1 applications of the predicate pred and no more than twice as many applications of the projection proj
- Template Parameters
InIter – The type of the source iterators used (deduced). This iterator type must meet the requirements of an input iterator.
Sent – The type of the source sentinel (deduced). This sentinel type must be a sentinel for InIter.
O – The type of the iterator representing the destination range (deduced).
Pred – The type of the function/function object to use (deduced). Unlike its sequential form, the parallel overload of unique_copy requires Pred to meet the requirements of CopyConstructible. This defaults to std::equal_to<>
Proj – The type of an optional projection function. This defaults to hpx::identity
- Parameters
first – Refers to the beginning of the sequence of elements the algorithm will be applied to.
last – Refers to sentinel value denoting the end of the sequence of elements the algorithm will be applied.
dest – Refers to the beginning of the destination range.
pred – Specifies the function (or function object) which will be invoked for each of the elements in the sequence specified by [first, last). This is an binary predicate which returns true for the required elements. The signature of this predicate should be equivalent to:
The signature does not need to have const&, but the function must not modify the objects passed to it. The type Type must be such that an object of type InIter1 can be dereferenced and then implicitly converted to Type.bool pred(const Type &a, const Type &b);
proj – Specifies the function (or function object) which will be invoked for each of the elements as a projection operation before the actual predicate is invoked.
- Returns
The unique_copy algorithm returns a returns unique_copy_result<InIter, O>. The unique_copy algorithm returns an in_out_result with the source iterator to one past the last element and out containing the destination iterator to the end of the dest range.
-
template<typename ExPolicy, typename FwdIter, typename Sent, typename O, typename Pred = ranges::equal_to, typename Proj = hpx::identity>
parallel::util::detail::algorithm_result<ExPolicy, unique_copy_result<FwdIter, O>>::type unique_copy(ExPolicy &&policy, FwdIter first, Sent last, O dest, Pred &&pred = Pred(), Proj &&proj = Proj())# Copies the elements from the range [first, last), to another range beginning at dest in such a way that there are no consecutive equal elements. Only the first element of each group of equal elements is copied.
The assignments in the parallel unique_copy algorithm invoked with an execution policy object of type sequenced_policy execute in sequential order in the calling thread.
The assignments in the parallel unique_copy algorithm invoked with an execution policy object of type parallel_policy or parallel_task_policy are permitted to execute in an unordered fashion in unspecified threads, and indeterminately sequenced within each thread.
Note
Complexity: Performs not more than last - first assignments, exactly last - first - 1 applications of the predicate pred and no more than twice as many applications of the projection proj
- Template Parameters
ExPolicy – The type of the execution policy to use (deduced). It describes the manner in which the execution of the algorithm may be parallelized and the manner in which it executes the assignments.
FwdIter – The type of the source iterators used (deduced). This iterator type must meet the requirements of a forward iterator.
Sent – The type of the source sentinel (deduced). This sentinel type must be a sentinel for FwdIter1.
O – The type of the iterator representing the destination range (deduced).
Pred – The type of the function/function object to use (deduced). Unlike its sequential form, the parallel overload of unique_copy requires Pred to meet the requirements of CopyConstructible. This defaults to std::equal_to<>
Proj – The type of an optional projection function. This defaults to hpx::identity
- Parameters
policy – The execution policy to use for the scheduling of the iterations.
first – Refers to the beginning of the sequence of elements the algorithm will be applied to.
last – Refers to sentinel value denoting the end of the sequence of elements the algorithm will be applied.
dest – Refers to the beginning of the destination range.
pred – Specifies the function (or function object) which will be invoked for each of the elements in the sequence specified by [first, last). This is an binary predicate which returns true for the required elements. The signature of this predicate should be equivalent to:
The signature does not need to have const&, but the function must not modify the objects passed to it. The type Type must be such that an object of type FwdIter can be dereferenced and then implicitly converted to Type.bool pred(const Type &a, const Type &b);
proj – Specifies the function (or function object) which will be invoked for each of the elements as a projection operation before the actual predicate is invoked.
- Returns
The unique_copy algorithm returns returns a hpx::future< unique_copy_result<FwdIter, O>> if the execution policy is of type sequenced_task_policy or parallel_task_policy and returns unique_copy_result<FwdIter, O> otherwise. The unique_copy algorithm returns an in_out_result with the source iterator to one past the last element and out containing the destination iterator to the end of the dest range.
-
template<typename Rng, typename O, typename Pred = ranges::equal_to, typename Proj = hpx::identity>
unique_copy_result<std::ranges::iterator_t<Rng>, O> unique_copy(Rng &&rng, O dest, Pred &&pred = Pred(), Proj &&proj = Proj())# Copies the elements from the range rng, to another range beginning at dest in such a way that there are no consecutive equal elements. Only the first element of each group of equal elements is copied.
The assignments in the parallel unique_copy algorithm invoked without an execution policy object will execute in sequential order in the calling thread.
Note
Complexity: Performs not more than N assignments, exactly N - 1 applications of the predicate pred, where N = std::distance(begin(rng), end(rng)).
- Template Parameters
Rng – The type of the source range used (deduced). The iterators extracted from this range type must meet the requirements of an forward iterator.
O – The type of the iterator representing the destination range (deduced). This iterator type must meet the requirements of a forward iterator.
Pred – The type of the function/function object to use (deduced). Unlike its sequential form, the parallel overload of unique_copy requires Pred to meet the requirements of CopyConstructible. This defaults to std::equal_to<>
Proj – The type of an optional projection function. This defaults to hpx::identity
- Parameters
rng – Refers to the sequence of elements the algorithm will be applied to.
dest – Refers to the beginning of the destination range.
pred – Specifies the function (or function object) which will be invoked for each of the elements in the sequence specified by the range rng. This is an binary predicate which returns true for the required elements. The signature of this predicate should be equivalent to:
The signature does not need to have const&, but the function must not modify the objects passed to it. The type Type must be such that an object of type FwdIter1 can be dereferenced and then implicitly converted to Type.bool pred(const Type &a, const Type &b);
proj – Specifies the function (or function object) which will be invoked for each of the elements as a projection operation before the actual predicate is invoked.
- Returns
The unique_copy algorithm returns unique_copy_result< std::ranges::iterator_t<Rng>, O>. The unique_copy algorithm returns the pair of the source iterator to last, and the destination iterator to the end of the dest range.
-
template<typename ExPolicy, typename Rng, typename O, typename Pred = ranges::equal_to, typename Proj = hpx::identity>
parallel::util::detail::algorithm_result<ExPolicy, unique_copy_result<std::ranges::iterator_t<Rng>, O>> unique_copy(ExPolicy &&policy, Rng &&rng, O dest, Pred &&pred = Pred(), Proj &&proj = Proj())# Copies the elements from the range rng, to another range beginning at dest in such a way that there are no consecutive equal elements. Only the first element of each group of equal elements is copied.
The assignments in the parallel unique_copy algorithm invoked with an execution policy object of type sequenced_policy execute in sequential order in the calling thread.
The assignments in the parallel unique_copy algorithm invoked with an execution policy object of type parallel_policy or parallel_task_policy are permitted to execute in an unordered fashion in unspecified threads, and indeterminately sequenced within each thread.
Note
Complexity: Performs not more than N assignments, exactly N - 1 applications of the predicate pred, where N = std::distance(begin(rng), end(rng)).
- Template Parameters
ExPolicy – The type of the execution policy to use (deduced). It describes the manner in which the execution of the algorithm may be parallelized and the manner in which it executes the assignments.
Rng – The type of the source range used (deduced). The iterators extracted from this range type must meet the requirements of an forward iterator.
O – The type of the iterator representing the destination range (deduced). This iterator type must meet the requirements of a forward iterator.
Pred – The type of the function/function object to use (deduced). Unlike its sequential form, the parallel overload of unique_copy requires Pred to meet the requirements of CopyConstructible. This defaults to std::equal_to<>
Proj – The type of an optional projection function. This defaults to hpx::identity
- Parameters
policy – The execution policy to use for the scheduling of the iterations.
rng – Refers to the sequence of elements the algorithm will be applied to.
dest – Refers to the beginning of the destination range.
pred – Specifies the function (or function object) which will be invoked for each of the elements in the sequence specified by the range rng. This is an binary predicate which returns true for the required elements. The signature of this predicate should be equivalent to:
The signature does not need to have const&, but the function must not modify the objects passed to it. The type Type must be such that an object of type FwdIter1 can be dereferenced and then implicitly converted to Type.bool pred(const Type &a, const Type &b);
proj – Specifies the function (or function object) which will be invoked for each of the elements as a projection operation before the actual predicate is invoked.
- Returns
The unique_copy algorithm returns a hpx::future<unique_copy_result< std::ranges::iterator_t<Rng>, O>> if the execution policy is of type sequenced_task_policy or parallel_task_policy and returns unique_copy_result< std::ranges::iterator_t<Rng>, O> otherwise. The unique_copy algorithm returns the pair of the source iterator to last, and the destination iterator to the end of the dest range.
-
template<typename FwdIter, typename Sent, typename Pred = ranges::equal_to, typename Proj = hpx::identity>
-
namespace ranges
hpx/parallel/util/range.hpp#
Defined in header hpx/parallel/util/range.hpp.
See Public API for a list of names and headers that are part of the public HPX API.
-
namespace hpx
-
namespace parallel#
-
namespace util#
Typedefs
Functions
- template<typename Iter, typename Sent> HPX_CXX_CORE_EXPORT range< Iter, Sent > concat (range< Iter, Sent > const &it1, range< Iter, Sent > const &it2)
- template<typename Iter1, typename Sent1, typename Iter2, typename Sent2> HPX_CXX_CORE_EXPORT range< Iter2, Iter2 > init_move (range< Iter2, Sent2 > const &dest, range< Iter1, Sent1 > const &src)
Move objects from the range src to dest.
- Parameters
dest – [in] : range where move the objects
src – [in] : range from where move the objects
- Returns
range with the objects moved and the size adjusted
- template<typename Iter1, typename Sent1, typename Iter2, typename Sent2> HPX_CXX_CORE_EXPORT range< Iter2, Sent2 > uninit_move (range< Iter2, Sent2 > const &dest, range< Iter1, Sent1 > const &src)
Move objects from the range src creating them in dest.
- Parameters
dest – [in] : range where move and create the objects
src – [in] : range from where move the objects
- Returns
range with the objects moved and the size adjusted
- template<typename Iter, typename Sent> HPX_CXX_CORE_EXPORT void destroy_range (range< Iter, Sent > r)
destroy a range of objects
- Parameters
r – [in] : range to destroy
- template<typename Iter, typename Sent> HPX_CXX_CORE_EXPORT range< Iter, Sent > init (range< Iter, Sent > const &r, typename std::iterator_traits< Iter >::value_type &val)
initialize a range of objects with the object val moving across them
- Parameters
r – [in] : range of elements not initialized
val – [in] : object used for the initialization
- Returns
range initialized
- template<typename Iter1, typename Sent1, typename Iter2, typename Sent2, typename Compare> HPX_CXX_CORE_EXPORT bool is_mergeable (range< Iter1, Sent1 > const &src1, range< Iter2, Sent2 > const &src2, Compare comp)
: indicate if two ranges have a possible merge
Remark
- Parameters
src1 – [in] : first range
src2 – [in] : second range
comp – [in] : object for to compare elements
- Returns
true : they can be merged false : they can’t be merged
- template<typename Iter1, typename Sent1, typename Iter2, typename Sent2, typename Iter3, typename Sent3, typename Compare> HPX_CXX_CORE_EXPORT range< Iter3, Sent3 > full_merge (range< Iter3, Sent3 > const &dest, range< Iter1, Sent1 > const &src1, range< Iter2, Sent2 > const &src2, Compare comp)
Merge two contiguous ranges src1 and src2 , and put the result in the range dest, returning the range merged.
- Parameters
dest – [in] : range where locate the elements merged. the size of dest must be greater or equal than the sum of the sizes of src1 and src2
src1 – [in] : first range to merge
src2 – [in] : second range to merge
comp – [in] : comparison object
- Returns
range with the elements merged and the size adjusted
- template<typename Iter1, typename Sent1, typename Iter2, typename Sent2, typename Value, typename Compare> HPX_CXX_CORE_EXPORT range< Value * > uninit_full_merge (range< Value * > const &dest, range< Iter1, Sent1 > const &src1, range< Iter2, Sent2 > const &src2, Compare comp)
Merge two contiguous ranges src1 and src2 , and create and move the result in the uninitialized range dest, returning the range merged.
- Parameters
dest – [in] : range where locate the elements merged. the size of dest must be greater or equal than the sum of the sizes of src1 and src2. Initially is un-initialize memory
src1 – [in] : first range to merge
src2 – [in] : second range to merge
comp – [in] : comparison object
- Returns
range with the elements merged and the size adjusted
- template<typename Iter1, typename Sent1, typename Iter2, typename Sent2, typename Compare> HPX_CXX_CORE_EXPORT range< Iter2, Sent2 > half_merge (range< Iter2, Sent2 > const &dest, range< Iter1, Sent1 > const &src1, range< Iter2, Sent2 > const &src2, Compare comp)
: Merge two buffers. The first buffer is in a separate memory
- Parameters
dest – [in] : range where finish the two buffers merged
src1 – [in] : first range to merge in a separate memory
src2 – [in] : second range to merge, in the final part of the range where deposit the final results
comp – [in] : object for compare two elements of the type pointed by the Iter1 and Iter2
- Returns
: range with the two buffers merged
- template<typename Iter1, typename Sent1, typename Iter2, typename Sent2, typename Iter3, typename Sent3, typename Compare> HPX_CXX_CORE_EXPORT bool in_place_merge_uncontiguous (range< Iter1, Sent1 > const &src1, range< Iter2, Sent2 > const &src2, range< Iter3, Sent3 > &aux, Compare comp)
: merge two non contiguous buffers src1 , src2, using the range aux as auxiliary memory
Remark
- Parameters
src1 – [in] : first range to merge
src2 – [in] : second range to merge
aux – [in] : auxiliary range used in the merge
comp – [in] : object for to compare elements
- Returns
true : not changes done false : changes in the buffers
- template<typename Iter1, typename Sent1, typename Iter2, typename Sent2, typename Compare> HPX_CXX_CORE_EXPORT range< Iter1, Sent1 > in_place_merge (range< Iter1, Sent1 > const &src1, range< Iter1, Sent1 > const &src2, range< Iter2, Sent2 > &buf, Compare comp)
: merge two contiguous buffers ( src1, src2) using buf as auxiliary memory
Remark
- Parameters
src1 – [in] : first range to merge
src2 – [in] : second range to merge
buf – [in] : auxiliary memory used in the merge
comp – [in] : object for to compare elements
- Returns
true : not changes done false : changes in the buffers
- template<typename Iter1, typename Sent1, typename Iter2, typename Sent2, typename Compare> HPX_CXX_CORE_EXPORT void merge_flow (range< Iter1, Sent1 > rng1, range< Iter2, Sent2 > rbuf, range< Iter1, Sent1 > rng2, Compare cmp)
-
namespace util#
-
namespace parallel#
asio#
See Public API for a list of names and headers that are part of the public HPX API.
hpx/asio/asio_util.hpp#
Defined in header hpx/asio/asio_util.hpp.
See Public API for a list of names and headers that are part of the public HPX API.
-
namespace hpx
-
namespace util#
Functions
- HPX_CXX_CORE_EXPORT bool get_endpoint (std::string const &addr, std::uint16_t port, ::asio::ip::tcp::endpoint &ep, bool force_ipv4=false)
- HPX_CXX_CORE_EXPORT std::string get_endpoint_name (::asio::ip::tcp::endpoint const &ep)
-
HPX_CXX_CORE_EXPORT::asio::ip::tcp::endpoint resolve_hostname(std::string const &hostname, std::uint16_t port, ::asio::io_context &io_service, bool force_ipv4 = false)#
- HPX_CXX_CORE_EXPORT std::string resolve_public_ip_address ()
- HPX_CXX_CORE_EXPORT std::string cleanup_ip_address (std::string const &addr)
- HPX_CXX_CORE_EXPORT detail::endpoint_iterator_type connect_begin (std::string const &address, std::uint16_t port, ::asio::io_context &io_service)
- template<typename Locality> HPX_CXX_CORE_EXPORT detail::endpoint_iterator_type connect_begin (Locality const &loc, ::asio::io_context &io_service)
Returns an iterator which when dereferenced will give an endpoint suitable for a call to connect() related to this locality.
- inline HPX_CXX_CORE_EXPORT detail::endpoint_iterator_type connect_end ()
- HPX_CXX_CORE_EXPORT detail::endpoint_iterator_type accept_begin (std::string const &address, std::uint16_t port, ::asio::io_context &io_service)
- template<typename Locality> HPX_CXX_CORE_EXPORT detail::endpoint_iterator_type accept_begin (Locality const &loc, ::asio::io_context &io_service)
Returns an iterator which when dereferenced will give an endpoint suitable for a call to accept() related to this locality.
- inline HPX_CXX_CORE_EXPORT detail::endpoint_iterator_type accept_end ()
- HPX_CXX_CORE_EXPORT bool split_ip_address (std::string const &v, std::string &host, std::uint16_t &port)
-
namespace util#
assertion#
See Public API for a list of names and headers that are part of the public HPX API.
hpx/assertion/api.hpp#
Defined in header hpx/assertion/api.hpp.
See Public API for a list of names and headers that are part of the public HPX API.
-
namespace hpx
-
namespace assertion#
Typedefs
-
using assertion_handler = void (*)(hpx::source_location const &loc, char const *expr, std::string const &msg)#
The signature for an assertion handler.
Functions
- HPX_CXX_CORE_EXPORT void set_assertion_handler (assertion_handler handler)
Set the assertion handler to be used within a program. If the handler has been set already once, the call to this function will be ignored.
Note
This function is not thread safe
-
using assertion_handler = void (*)(hpx::source_location const &loc, char const *expr, std::string const &msg)#
-
namespace assertion#
hpx/assertion/evaluate_assert.hpp#
Defined in header hpx/assertion/evaluate_assert.hpp.
See Public API for a list of names and headers that are part of the public HPX API.
-
namespace hpx
-
namespace assertion
-
namespace assertion
HPX_ASSERT, HPX_ASSERT_MSG#
Defined in header hpx/assert.hpp.
See Public API for a list of names and headers that are part of the public HPX API.
Defines
-
HPX_ASSERT(expr)#
This macro asserts that expr evaluates to true.
If
exprevaluates to false, The source location andmsgis being printed along with the expression and additional. Afterward, the program is being aborted. The assertion handler can be customized by calling hpx::assertion::set_assertion_handler().Asserts are enabled if HPX_DEBUG is set. This is the default for
CMAKE_BUILD_TYPE=Debug- Parameters
expr – The expression to assert on. This can either be an expression that’s convertible to bool or a callable which returns bool
msg – The optional message that is used to give further information if the assert fails. This should be convertible to a std::string
-
HPX_ASSERT_MSG(expr, msg)#
See also
HPX_ASSERT
HPX_CURRENT_SOURCE_LOCATION, hpx::source_location#
Defined in header hpx/source_location.hpp.
See Public API for a list of names and headers that are part of the public HPX API.
-
namespace hpx
Functions
- HPX_CXX_CORE_EXPORT std::ostream & operator<< (std::ostream &os, source_location const &loc)
-
struct source_location#
- #include <source_location.hpp>
This contains the location information where HPX_ASSERT has been called The source_location class represents certain information about the source code, such as file names, line numbers, and function names. Previously, functions that desire to obtain this information about the call site (for logging, testing, or debugging purposes) must use macros so that predefined macros like and are expanded in the context of the caller. The source_location class provides a better alternative. source_location meets the DefaultConstructible, CopyConstructible, CopyAssignable and Destructible requirements. Lvalue of source_location meets the Swappable requirement. Additionally, the following conditions are true:
std::is_nothrow_move_constructible_v<std::source_location>
std::is_nothrow_move_assignable_v<std::source_location>
- It is intended that source_location has a small size and can be copied efficiently. It is unspecified whether the copy/move constructors and the copy/move assignment operators of source_location are trivial and/or constexpr.
std::is_nothrow_swappable_v<std::source_location>
Public Functions
-
inline constexpr std::uint_least32_t line() const noexcept#
return the line number represented by this object
-
inline constexpr char const *file_name() const noexcept#
return the file name represented by this object
-
inline constexpr char const *function_name() const noexcept#
return the name of the function represented by this object, if any
async_base#
See Public API for a list of names and headers that are part of the public HPX API.
hpx::async#
Defined in header hpx/future.hpp.
See Public API for a list of names and headers that are part of the public HPX API.
-
namespace hpx
Functions
- template<typename F, typename... Ts> decltype(auto) HPX_CXX_CORE_EXPORT async (F &&f, Ts &&... ts)
The function template async runs the function f asynchronously (potentially in a separate thread which might be a part of a thread pool) and returns a hpx::future that will eventually hold the result of that function call. If no policy is defined, async behaves as if it is called with policy being hpx::launch::async | hpx::launch::deferred. Otherwise, it calls a function f with arguments ts according to a specific launch policy.
If the async flag is set (i.e. (policy & hpx::launch::async) != 0), then async executes the callable object f on a new thread of execution (with all thread-locals initialized) as if spawned by hpx::thread(std::forward<F>(f), std::forward<Ts>(ts)…), except that if the function f returns a value or throws an exception, it is stored in the shared state accessible through the hpx::future that async returns to the caller.
If the deferred flag is set (i.e. (policy & hpx::launch::deferred) != 0), then async converts f and ts… the same way as by hpx::thread constructor, but does not spawn a new thread of execution. Instead, lazy evaluation is performed: the first call to a non-timed wait function on the hpx::future that async returned to the caller will cause the copy of f to be invoked (as a rvalue) with the copies of ts… (also passed as rvalues) in the current thread (which does not have to be the thread that originally called hpx::async). The result or exception is placed in the shared state associated with the future and only then it is made ready. All further accesses to the same hpx::future will return the result immediately.
If neither hpx::launch::async nor hpx::launch::deferred, nor any implementation-defined policy flag is set in policy, the behavior is undefined.
If more than one flag is set, it is implementation-defined which policy is selected. For the default (both the hpx::launch::async and hpx::launch::deferred flags are set in policy), standard recommends (but doesn’t require) utilizing available concurrency, and deferring any additional tasks.
In any case, the call to hpx::async synchronizes-with (as defined in std::memory_order) the call to f, and the completion of f is sequenced-before making the shared state ready. If the async policy is chosen, the associated thread completion synchronizes-with the successful return from the first function that is waiting on the shared state, or with the return of the last function that releases the shared state, whichever comes first. If std::decay<Function>::type or each type in std::decay<Ts>::type is not constructible from its corresponding argument, the program is ill-formed.
- Parameters
f – Callable object to call
ts – parameters to pass to f
- Returns
hpx::future referring to the shared state created by this call to hpx::async.
hpx::dataflow#
Defined in header hpx/future.hpp.
See Public API for a list of names and headers that are part of the public HPX API.
-
namespace hpx
Functions
-
template<typename F, typename ...Ts>
decltype(auto) dataflow(F &&f, Ts&&... ts)# The function template dataflow runs the function f asynchronously (potentially in a separate thread which might be a part of a thread pool) and returns a
hpx::futurethat will eventually hold the result of that function call. Its behavior is similar tohpx::asyncwith the exception that if one of the arguments is a future, thenhpx::dataflowwill wait for the future to be ready to launch the thread. Hence, the operation is delayed until all the arguments are ready.
-
template<typename F, typename ...Ts>
hpx::launch#
Defined in header hpx/future.hpp.
See Public API for a list of names and headers that are part of the public HPX API.
-
namespace hpx
Enums
-
struct launch : public detail::policy_holder<>#
- #include <launch_policy.hpp>
Launch policies for hpx::async etc.
Public Functions
-
inline constexpr launch() noexcept#
Default constructor. This creates a launch policy representing all possible launch modes
-
inline constexpr launch(detail::async_policy const p) noexcept#
Create a launch policy representing asynchronous execution.
-
inline constexpr launch(detail::fork_policy const p) noexcept#
Create a launch policy representing asynchronous execution. The new thread is executed in a preferred way
-
inline constexpr launch(detail::sync_policy const p) noexcept#
Create a launch policy representing synchronous execution.
-
inline constexpr launch(detail::deferred_policy const p) noexcept#
Create a launch policy representing deferred execution.
-
inline constexpr launch(detail::apply_policy const p) noexcept#
Create a launch policy representing fire and forget execution.
-
template<typename F>
inline constexpr launch(detail::select_policy<F> const &p) noexcept# Create a launch policy representing fire and forget execution.
-
template<typename Launch, typename Enable = std::enable_if_t<hpx::traits::is_launch_policy_v<Launch>>>
inline constexpr launch(Launch l, threads::thread_priority const priority, threads::thread_stacksize const stacksize, threads::thread_schedule_hint const hint) noexcept#
Public Static Attributes
-
static const detail::async_policy async#
Predefined launch policy representing asynchronous execution.
-
static const detail::fork_policy fork#
Predefined launch policy representing asynchronous execution.The new thread is executed in a preferred way
-
static const detail::sync_policy sync#
Predefined launch policy representing synchronous execution.
-
static const detail::deferred_policy deferred#
Predefined launch policy representing deferred execution.
-
static const detail::apply_policy apply#
Predefined launch policy representing fire and forget execution.
-
static const detail::select_policy_generator select#
Predefined launch policy representing delayed policy selection.
Friends
-
inline friend launch tag_invoke(hpx::execution::experimental::with_priority_t, launch const &policy, threads::thread_priority const priority) noexcept#
- inline friend constexpr friend hpx::threads::thread_priority tag_invoke (hpx::execution::experimental::get_priority_t, launch const &policy) noexcept
-
inline friend launch tag_invoke(hpx::execution::experimental::with_stacksize_t, launch const &policy, threads::thread_stacksize const stacksize) noexcept#
- inline friend constexpr friend hpx::threads::thread_stacksize tag_invoke (hpx::execution::experimental::get_stacksize_t, launch const &policy) noexcept
-
inline friend launch tag_invoke(hpx::execution::experimental::with_hint_t, launch const &policy, threads::thread_schedule_hint const hint) noexcept#
- inline friend constexpr friend hpx::threads::thread_schedule_hint tag_invoke (hpx::execution::experimental::get_hint_t, launch const &policy) noexcept
-
inline constexpr launch() noexcept#
-
struct launch : public detail::policy_holder<>#
hpx::post#
Defined in header hpx/future.hpp.
See Public API for a list of names and headers that are part of the public HPX API.
-
namespace hpx
Functions
-
template<typename F, typename ...Ts>
bool post(F &&f, Ts&&... ts)# Runs the function
fasynchronously (potentially in a separate thread which might be a part of a thread pool). This is done in a fire-and-forget manner, meaning there is no return value or way to synchronize with the function execution (it does not return anhpx::futurethat would hold the result of that function call).hpx::postis particularly useful when synchronization mechanisms as heavyweight as futures are not desired, and instead, more lightweight mechanisms like latches or atomic variables are preferred. Essentially, the post function enables the launch of a new thread without the overhead of creating a future.Note
hpx::postis similar tohpx::asyncbut does not return a future. This is why there is no way of finding out the result/failure of the execution of this function.
-
template<typename F, typename ...Ts>
hpx::sync#
Defined in header hpx/future.hpp.
See Public API for a list of names and headers that are part of the public HPX API.
-
namespace hpx
Functions
- template<typename F, typename... Ts> decltype(auto) HPX_CXX_CORE_EXPORT sync (F &&f, Ts &&... ts)
The function template sync runs the function f synchronously and returns a hpx::future that will eventually hold the result of that function call.
async_combinators#
See Public API for a list of names and headers that are part of the public HPX API.
hpx/async_combinators/split_future.hpp#
Defined in header hpx/async_combinators/split_future.hpp.
See Public API for a list of names and headers that are part of the public HPX API.
-
namespace hpx
Top level HPX namespace.
Functions
-
template<typename ...Ts>
inline tuple<future<Ts>...> split_future(future<tuple<Ts...>> &&f)# The function split_future is an operator allowing to split a given future of a sequence of values (any tuple, std::pair, or std::array) into an equivalent container of futures where each future represents one of the values from the original future. In some sense this function provides the inverse operation of when_all.
Note
The following cases are special:
here the returned futures are directly representing the futures which were passed to the function.tuple<future<void> > split_future(future<tuple<> > && f); array<future<void>, 1> split_future(future<array<T, 0> > && f);
- Parameters
f – [in] A future holding an arbitrary sequence of values stored in a tuple-like container. This facility supports hpx::tuple<>, std::pair<T1, T2>, and std::array<T, N>
- Returns
Returns an equivalent container (same container type as passed as the argument) of futures, where each future refers to the corresponding value in the input parameter. All the returned futures become ready once the input future has become ready. If the input future is exceptional, all output futures will be exceptional as well.
-
template<typename T>
inline std::vector<future<T>> split_future(future<std::vector<T>> &&f, std::size_t size)# The function split_future is an operator allowing to split a given future of a sequence of values (any std::vector) into a std::vector of futures where each future represents one of the values from the original std::vector. In some sense this function provides the inverse operation of when_all.
- Parameters
f – [in] A future holding an arbitrary sequence of values stored in a std::vector.
size – [in] The number of elements the vector will hold once the input future has become ready
- Returns
Returns a std::vector of futures, where each future refers to the corresponding value in the input parameter. All the returned futures become ready once the input future has become ready. If the input future is exceptional, all output futures will be exceptional as well.
-
template<typename ...Ts>
hpx::wait_all#
Defined in header hpx/future.hpp.
See Public API for a list of names and headers that are part of the public HPX API.
-
namespace hpx
Top level HPX namespace.
Functions
-
template<typename InputIter>
void wait_all(InputIter first, InputIter last)# The function wait_all is an operator allowing to join on the result of all given futures. It AND-composes all future objects given and returns after they finished executing.
Note
The function wait_all returns after all futures have become ready. All input futures are still valid after wait_all returns.
Note
The function wait_all will rethrow any exceptions captured by the futures while becoming ready. If this behavior is undesirable, use wait_all_nothrow instead.
- Parameters
first – The iterator pointing to the first element of a sequence of future or shared_future objects for which wait_all should wait.
last – The iterator pointing to the last element of a sequence of future or shared_future objects for which wait_all should wait.
-
template<typename R>
void wait_all(std::vector<future<R>> &&futures)# The function wait_all is an operator allowing to join on the result of all given futures. It AND-composes all future objects given and returns after they finished executing.
Note
The function wait_all returns after all futures have become ready. All input futures are still valid after wait_all returns.
Note
The function wait_all will rethrow any exceptions captured by the futures while becoming ready. If this behavior is undesirable, use wait_all_nothrow instead.
- Parameters
futures – A vector or array holding an arbitrary amount of future or shared_future objects for which wait_all should wait.
-
template<typename R, std::size_t N>
void wait_all(std::array<future<R>, N> &&futures)# The function wait_all is an operator allowing to join on the result of all given futures. It AND-composes all future objects given and returns after they finished executing.
Note
The function wait_all returns after all futures have become ready. All input futures are still valid after wait_all returns.
Note
The function wait_all will rethrow any exceptions captured by the futures while becoming ready. If this behavior is undesirable, use wait_all_nothrow instead.
- Parameters
futures – A vector or array holding an arbitrary amount of future or shared_future objects for which wait_all should wait.
-
template<typename T>
void wait_all(hpx::future<T> const &f)# The function wait_all is an operator allowing to join on the result of all given futures. It AND-composes all future objects given and returns after they finished executing.
Note
The function wait_all returns after the future has become ready. The input future is still valid after wait_all returns.
Note
The function wait_all will rethrow any exceptions captured by the future while becoming ready. If this behavior is undesirable, use wait_all_nothrow instead.
- Parameters
f – A future or shared_future for which wait_all should wait.
-
template<typename ...T>
void wait_all(T&&... futures)# The function wait_all is an operator allowing to join on the result of all given futures. It AND-composes all future objects given and returns after they finished executing.
Note
The function wait_all returns after all futures have become ready. All input futures are still valid after wait_all returns.
Note
The function wait_all will rethrow any exceptions captured by the futures while becoming ready. If this behavior is undesirable, use wait_all_nothrow instead.
- Parameters
futures – An arbitrary number of future or shared_future objects, possibly holding different types for which wait_all should wait.
-
template<typename InputIter>
void wait_all_n(InputIter begin, std::size_t count)# The function wait_all_n is an operator allowing to join on the result of all given futures. It AND-composes all future objects given and returns after they finished executing.
Note
The function wait_all_n returns after all futures have become ready. All input futures are still valid after wait_all_n returns.
Note
The function wait_all_n will rethrow any exceptions captured by the futures while becoming ready. If this behavior is undesirable, use wait_all_n_nothrow instead.
- Parameters
begin – The iterator pointing to the first element of a sequence of future or shared_future objects for which wait_all_n should wait.
count – The number of elements in the sequence starting at first.
- Returns
The function wait_all_n will return an iterator referring to the first element in the input sequence after the last processed element.
-
template<typename InputIter>
hpx::wait_any#
Defined in header hpx/future.hpp.
See Public API for a list of names and headers that are part of the public HPX API.
-
namespace hpx
Top level HPX namespace.
Functions
-
template<typename InputIter>
void wait_any(InputIter first, InputIter last)# The function wait_any is a non-deterministic choice operator. It OR-composes all future objects given and returns after one future of that list finishes execution.
Note
The function wait_any returns after at least one future has become ready. All input futures are still valid after wait_any returns.
Note
The function wait_any will rethrow any exceptions captured by the futures while becoming ready. If this behavior is undesirable, use wait_any_nothrow instead.
- Parameters
first – [in] The iterator pointing to the first element of a sequence of future or shared_future objects for which wait_any should wait.
last – [in] The iterator pointing to the last element of a sequence of future or shared_future objects for which wait_any should wait.
-
template<typename R>
void wait_any(std::vector<future<R>> &futures)# The function wait_any is a non-deterministic choice operator. It OR-composes all future objects given and returns after one future of that list finishes execution.
Note
The function wait_any returns after at least one future has become ready. All input futures are still valid after wait_any returns.
Note
The function wait_any will rethrow any exceptions captured by the futures while becoming ready. If this behavior is undesirable, use wait_any_nothrow instead.
- Parameters
futures – [in] A vector holding an arbitrary amount of future or shared_future objects for which wait_any should wait.
-
template<typename R, std::size_t N>
void wait_any(std::array<future<R>, N> &futures)# The function wait_any is a non-deterministic choice operator. It OR-composes all future objects given and returns after one future of that list finishes execution.
Note
The function wait_any returns after at least one future has become ready. All input futures are still valid after wait_any returns.
Note
The function wait_any will rethrow any exceptions captured by the futures while becoming ready. If this behavior is undesirable, use wait_any_nothrow instead.
- Parameters
futures – [in] Amn array holding an arbitrary amount of future or shared_future objects for which wait_any should wait.
-
template<typename ...T>
void wait_any(T&&... futures)# The function wait_any is a non-deterministic choice operator. It OR-composes all future objects given and returns after one future of that list finishes execution.
Note
The function wait_any returns after at least one future has become ready. All input futures are still valid after wait_any returns.
Note
The function wait_any will rethrow any exceptions captured by the futures while becoming ready. If this behavior is undesirable, use wait_any_nothrow instead.
- Parameters
futures – [in] An arbitrary number of future or shared_future objects, possibly holding different types for which wait_any should wait.
-
template<typename InputIter>
void wait_any_n(InputIter first, std::size_t count)# The function wait_any_n is a non-deterministic choice operator. It OR-composes all future objects given and returns after one future of that list finishes execution.
Note
The function wait_any_n returns after at least one future has become ready. All input futures are still valid after wait_any_n returns.
Note
The function wait_any_n will rethrow any exceptions captured by the futures while becoming ready. If this behavior is undesirable, use wait_any_n_nothrow instead.
- Parameters
first – [in] The iterator pointing to the first element of a sequence of future or shared_future objects for which wait_any_n should wait.
count – [in] The number of elements in the sequence starting at first.
-
template<typename InputIter>
hpx::wait_each#
Defined in header hpx/future.hpp.
See Public API for a list of names and headers that are part of the public HPX API.
-
namespace hpx
Top level HPX namespace.
Functions
-
template<typename F, typename Future>
void wait_each(F &&f, std::vector<Future> &&futures)# The function wait_each is an operator allowing to join on the results of all given futures. It AND-composes all future objects given and returns after they finished executing. Additionally, the supplied function is called for each of the passed futures as soon as the future has become ready. wait_each returns after all futures have been become ready.
Note
This function consumes the futures as they are passed on to the supplied function. The callback should take one or two parameters, namely either a future to be processed or a type that std::size_t is implicitly convertible to as the first parameter and the future as the second parameter. The first parameter will correspond to the index of the current future in the collection.
- Parameters
f – The function which will be called for each of the input futures once the future has become ready.
futures – A vector holding an arbitrary amount of future or shared_future objects for which wait_each should wait.
-
template<typename F, typename Iterator>
void wait_each(F &&f, Iterator begin, Iterator end)# The function wait_each is an operator allowing to join on the results of all given futures. It AND-composes all future objects given and returns after they finished executing. Additionally, the supplied function is called for each of the passed futures as soon as the future has become ready. wait_each returns after all futures have been become ready.
Note
This function consumes the futures as they are passed on to the supplied function. The callback should take one or two parameters, namely either a future to be processed or a type that std::size_t is implicitly convertible to as the first parameter and the future as the second parameter. The first parameter will correspond to the index of the current future in the collection.
- Parameters
f – The function which will be called for each of the input futures once the future has become ready.
begin – The iterator pointing to the first element of a sequence of future or shared_future objects for which wait_each should wait.
end – The iterator pointing to the last element of a sequence of future or shared_future objects for which wait_each should wait.
-
template<typename F, typename ...T>
void wait_each(F &&f, T&&... futures)# The function wait_each is an operator allowing to join on the results of all given futures. It AND-composes all future objects given and returns after they finished executing. Additionally, the supplied function is called for each of the passed futures as soon as the future has become ready. wait_each returns after all futures have been become ready.
Note
This function consumes the futures as they are passed on to the supplied function. The callback should take one or two parameters, namely either a future to be processed or a type that std::size_t is implicitly convertible to as the first parameter and the future as the second parameter. The first parameter will correspond to the index of the current future in the collection.
- Parameters
f – The function which will be called for each of the input futures once the future has become ready.
futures – An arbitrary number of future or shared_future objects, possibly holding different types for which wait_each should wait.
-
template<typename F, typename Iterator>
void wait_each_n(F &&f, Iterator begin, std::size_t count)# The function wait_each is an operator allowing to join on the result of all given futures. It AND-composes all future objects given and returns after they finished executing. Additionally, the supplied function is called for each of the passed futures as soon as the future has become ready.
Note
This function consumes the futures as they are passed on to the supplied function. The callback should take one or two parameters, namely either a future to be processed or a type that std::size_t is implicitly convertible to as the first parameter and the future as the second parameter. The first parameter will correspond to the index of the current future in the collection.
- Parameters
f – The function which will be called for each of the input futures once the future has become ready.
begin – The iterator pointing to the first element of a sequence of future or shared_future objects for which wait_each_n should wait.
count – The number of elements in the sequence starting at first.
-
template<typename F, typename Future>
hpx::wait_some#
Defined in header hpx/future.hpp.
See Public API for a list of names and headers that are part of the public HPX API.
-
namespace hpx
Top level HPX namespace.
Functions
-
template<typename InputIter>
void wait_some(std::size_t n, InputIter first, InputIter last)# The function wait_some is an operator allowing to join on the result of all given futures. It AND-composes all future objects given and returns a new future object representing the same list of futures after n of them finished executing.
Note
The function wait_some returns after n futures have become ready. All input futures are still valid after wait_some returns.
Note
The function wait_some will rethrow any exceptions captured by the futures while becoming ready. If this behavior is undesirable, use wait_some_nothrow instead.
- Parameters
n – [in] The number of futures out of the arguments which have to become ready in order for the function to return.
first – [in] The iterator pointing to the first element of a sequence of future or shared_future objects for which when_all should wait.
last – [in] The iterator pointing to the last element of a sequence of future or shared_future objects for which when_all should wait.
-
template<typename R>
void wait_some(std::size_t n, std::vector<future<R>> &&futures)# The function wait_some is an operator allowing to join on the result of all given futures. It AND-composes all future objects given and returns a new future object representing the same list of futures after n of them finished executing.
Note
The function wait_some returns after n futures have become ready. All input futures are still valid after wait_some returns.
Note
The function wait_some will rethrow any exceptions captured by the futures while becoming ready. If this behavior is undesirable, use wait_some_nothrow instead.
- Parameters
n – [in] The number of futures out of the arguments which have to become ready in order for the returned future to get ready.
futures – [in] A vector holding an arbitrary amount of future or shared_future objects for which wait_some should wait.
-
template<typename R, std::size_t N>
void wait_some(std::size_t n, std::array<future<R>, N> &&futures)# The function wait_some is an operator allowing to join on the result of all given futures. It AND-composes all future objects given and returns a new future object representing the same list of futures after n of them finished executing.
Note
The function wait_some returns after n futures have become ready. All input futures are still valid after wait_some returns.
Note
The function wait_some will rethrow any exceptions captured by the futures while becoming ready. If this behavior is undesirable, use wait_some_nothrow instead.
- Parameters
n – [in] The number of futures out of the arguments which have to become ready in order for the returned future to get ready.
futures – [in] An array holding an arbitrary amount of future or shared_future objects for which wait_some should wait.
-
template<typename ...T>
void wait_some(std::size_t n, T&&... futures)# The function wait_some is an operator allowing to join on the result of all given futures. It AND-composes all future objects given and returns a new future object representing the same list of futures after n of them finished executing.
Note
The function wait_all returns after n futures have become ready. All input futures are still valid after wait_some returns.
Note
The function wait_some will rethrow any exceptions captured by the futures while becoming ready. If this behavior is undesirable, use wait_some_nothrow instead.
- Parameters
n – [in] The number of futures out of the arguments which have to become ready in order for the returned future to get ready.
futures – [in] An arbitrary number of future or shared_future objects, possibly holding different types for which wait_some should wait.
ec – [in,out] this represents the error status on exit, if this is pre-initialized to hpx::throws the function will throw on error instead.
-
template<typename InputIter>
void wait_some_n(std::size_t n, InputIter first, std::size_t count)# The function wait_some_n is an operator allowing to join on the result of all given futures. It AND-composes all future objects given and returns a new future object representing the same list of futures after n of them finished executing.
Note
The function wait_some_n returns after n futures have become ready. All input futures are still valid after wait_some_n returns.
Note
The function wait_some_n will rethrow any exceptions captured by the futures while becoming ready. If this behavior is undesirable, use wait_some_n_nothrow instead.
- Parameters
n – [in] The number of futures out of the arguments which have to become ready in order for the returned future to get ready.
first – [in] The iterator pointing to the first element of a sequence of future or shared_future objects for which when_all should wait.
count – [in] The number of elements in the sequence starting at first.
-
template<typename InputIter>
hpx::when_all#
Defined in header hpx/future.hpp.
See Public API for a list of names and headers that are part of the public HPX API.
-
namespace hpx
Top level HPX namespace.
Functions
-
template<typename InputIter, typename Container = vector<future<typename std::iterator_traits<InputIter>::value_type>>>
hpx::future<Container> when_all(InputIter first, InputIter last)# function when_all creates a future object that becomes ready when all elements in a set of future and shared_future objects become ready. It is an operator allowing to join on the result of all given futures. It AND-composes all given future objects and returns a new future object representing the same list of futures after they finished executing.
Note
Calling this version of when_all where first == last, returns a future with an empty container that is immediately ready. Each future and shared_future is waited upon and then copied into the collection of the output (returned) future, maintaining the order of the futures in the input collection. The future returned by when_all will not throw an exception, but the futures held in the output collection may.
- Parameters
first – [in] The iterator pointing to the first element of a sequence of future or shared_future objects for which when_all should wait.
last – [in] The iterator pointing to the last element of a sequence of future or shared_future objects for which when_all should wait.
- Returns
Returns a future holding the same list of futures as has been passed to when_all.
future<Container<future<R>>>: If the input cardinality is unknown at compile time and the futures are all have the same type. The order of the futures in the output container will be the same as given by the input iterator.
-
template<typename Range>
hpx::future<Range> when_all(Range &&values)# function when_all creates a future object that becomes ready when all elements in a set of future and shared_future objects become ready. It is an operator allowing to join on the result of all given futures. It AND-composes all given future objects and returns a new future object representing the same list of futures after they finished executing.
Note
Calling this version of when_all where the input container is empty, returns a future with an empty container that is immediately ready. Each future and shared_future is waited upon and then copied into the collection of the output (returned) future, maintaining the order of the futures in the input collection. The future returned by when_all will not throw an exception, but the futures held in the output collection may.
- Parameters
values – [in] A range holding an arbitrary amount of future or shared_future objects for which when_all should wait.
- Returns
Returns a future holding the same list of futures as has been passed to when_all.
future<Container<future<R>>>: If the input cardinality is unknown at compile time and the futures are all have the same type.
-
template<typename ...T>
hpx::future<hpx::tuple<hpx::future<T>...>> when_all(T&&... futures)# function when_all creates a future object that becomes ready when all elements in a set of future and shared_future objects become ready. It is an operator allowing to join on the result of all given futures. It AND-composes all given future objects and returns a new future object representing the same list of futures after they finished executing.
Note
Each future and shared_future is waited upon and then copied into the collection of the output (returned) future, maintaining the order of the futures in the input collection. The future returned by when_all will not throw an exception, but the futures held in the output collection may.
- Parameters
futures – [in] An arbitrary number of future or shared_future objects, possibly holding different types for which when_all should wait.
- Returns
Returns a future holding the same list of futures as has been passed to when_all.
future<tuple<future<T0>, future<T1>, future<T2>…>>: If inputs are fixed in number and are of heterogeneous types. The inputs can be any arbitrary number of future objects.
future<tuple<>> if when_all is called with zero arguments. The returned future will be initially ready.
-
template<typename InputIter, typename Container = vector<future<typename std::iterator_traits<InputIter>::value_type>>>
hpx::future<Container> when_all_n(InputIter begin, std::size_t count)# function when_all creates a future object that becomes ready when all elements in a set of future and shared_future objects become ready. It is an operator allowing to join on the result of all given futures. It AND-composes all given future objects and returns a new future object representing the same list of futures after they finished executing.
Note
As long as ec is not pre-initialized to hpx::throws this function doesn’t throw but returns the result code using the parameter ec. Otherwise, it throws an instance of hpx::exception.
Note
None of the futures in the input sequence are invalidated.
- Parameters
begin – [in] The iterator pointing to the first element of a sequence of future or shared_future objects for which wait_all_n should wait.
count – [in] The number of elements in the sequence starting at first.
- Throws
This – function will throw errors which are encountered while setting up the requested operation only. Errors encountered while executing the operations delivering the results to be stored in the futures are reported through the futures themselves.
- Returns
Returns a future holding the same list of futures as has been passed to when_all_n.
future<Container<future<R>>>: If the input cardinality is unknown at compile time and the futures are all have the same type. The order of the futures in the output vector will be the same as given by the input iterator.
-
template<typename InputIter, typename Container = vector<future<typename std::iterator_traits<InputIter>::value_type>>>
hpx::when_any#
Defined in header hpx/future.hpp.
See Public API for a list of names and headers that are part of the public HPX API.
-
namespace hpx
Top level HPX namespace.
Functions
-
template<typename InputIter, typename Container = vector<future<typename std::iterator_traits<InputIter>::value_type>>>
future<when_any_result<Container>> when_any(InputIter first, InputIter last)# function when_any creates a future object that becomes when at least one element in a set of future and shared_future objects becomes ready. It is a non-deterministic choice operator. It OR-composes all given future objects and returns a new future object representing the same list of futures after one future of that list finishes execution.
- Parameters
first – [in] The iterator pointing to the first element of a sequence of future or shared_future objects for which when_any should wait.
last – [in] The iterator pointing to the last element of a sequence of future or shared_future objects for which when_any should wait.
- Returns
Returns a when_any_result holding the same list of futures as has been passed to when_any and an index pointing to a ready future.
future<when_any_result<Container<future<R>>>>: If the input cardinality is unknown at compile time and the futures are all have the same type. The order of the futures in the output container will be the same as given by the input iterator.
-
template<typename Range>
future<when_any_result<Range>> when_any(Range &values)# function when_any creates a future object that becomes when at least one element in a set of future and shared_future objects becomes ready. It is a non-deterministic choice operator. It OR-composes all given future objects and returns a new future object representing the same list of futures after one future of that list finishes execution.
- Parameters
values – [in] A range holding an arbitrary amount of futures or shared_future objects for which when_any should wait.
- Returns
Returns a when_any_result holding the same list of futures as has been passed to when_any and an index pointing to a ready future.
future<when_any_result<Container<future<R>>>>: If the input cardinality is unknown at compile time and the futures are all have the same type. The order of the futures in the output container will be the same as given by the input iterator.
-
template<typename ...T>
future<when_any_result<tuple<future<T>...>>> when_any(T&&... futures)# function when_any creates a future object that becomes when at least one element in a set of future and shared_future objects becomes ready. It is a non-deterministic choice operator. It OR-composes all given future objects and returns a new future object representing the same list of futures after one future of that list finishes execution.
- Parameters
futures – [in] An arbitrary number of future or shared_future objects, possibly holding different types for which when_any should wait.
- Returns
Returns a when_any_result holding the same list of futures as has been passed to when_any and an index pointing to a ready future.
future<when_any_result<tuple<future<T0>, future<T1>…>>>: If inputs are fixed in number and are of heterogeneous types. The inputs can be any arbitrary number of future objects.
future<when_any_result<tuple<>>> if when_any is called with zero arguments. The returned future will be initially ready.
-
template<typename InputIter, typename Container = vector<future<typename std::iterator_traits<InputIter>::value_type>>>
future<when_any_result<Container>> when_any_n(InputIter first, std::size_t count)# function when_any_n creates a future object that becomes when at least one element in a set of future and shared_future objects becomes ready. It is a non-deterministic choice operator. It OR-composes all given future objects and returns a new future object representing the same list of futures after one future of that list finishes execution.
Note
None of the futures in the input sequence are invalidated.
- Parameters
first – [in] The iterator pointing to the first element of a sequence of future or shared_future objects for which when_any_n should wait.
count – [in] The number of elements in the sequence starting at first.
- Returns
Returns a when_any_result holding the same list of futures as has been passed to when_any and an index pointing to a ready future.
future<when_any_result<Container<future<R>>>>: If the input cardinality is unknown at compile time and the futures are all have the same type. The order of the futures in the output container will be the same as given by the input iterator.
-
template<typename Sequence>
struct when_any_result# - #include <when_any.hpp>
Result type for when_any, contains a sequence of futures and an index pointing to a ready future.
Public Members
-
Sequence futures#
The sequence of futures as passed to hpx::when_any
-
Sequence futures#
-
template<typename InputIter, typename Container = vector<future<typename std::iterator_traits<InputIter>::value_type>>>
hpx::when_each#
Defined in header hpx/future.hpp.
See Public API for a list of names and headers that are part of the public HPX API.
-
namespace hpx
Top level HPX namespace.
Functions
-
template<typename F, typename Future>
future<void> when_each(F &&f, std::vector<Future> &&futures)# The function when_each is an operator allowing to join on the results of all given futures. It AND-composes all future objects given and returns a new future object representing the event of all those futures having finished executing. It also calls the supplied callback for each of the futures which becomes ready.
Note
This function consumes the futures as they are passed on to the supplied function. The callback should take one or two parameters, namely either a future to be processed or a type that std::size_t is implicitly convertible to as the first parameter and the future as the second parameter. The first parameter will correspond to the index of the current future in the collection.
- Parameters
f – The function which will be called for each of the input futures once the future has become ready.
futures – A vector holding an arbitrary amount of future or shared_future objects for which wait_each should wait.
- Returns
Returns a future representing the event of all input futures being ready.
-
template<typename F, typename Iterator>
future<Iterator> when_each(F &&f, Iterator begin, Iterator end)# The function when_each is an operator allowing to join on the results of all given futures. It AND-composes all future objects given and returns a new future object representing the event of all those futures having finished executing. It also calls the supplied callback for each of the futures which becomes ready.
Note
This function consumes the futures as they are passed on to the supplied function. The callback should take one or two parameters, namely either a future to be processed or a type that std::size_t is implicitly convertible to as the first parameter and the future as the second parameter. The first parameter will correspond to the index of the current future in the collection.
- Parameters
f – The function which will be called for each of the input futures once the future has become ready.
begin – The iterator pointing to the first element of a sequence of future or shared_future objects for which wait_each should wait.
end – The iterator pointing to the last element of a sequence of future or shared_future objects for which wait_each should wait.
- Returns
Returns a future representing the event of all input futures being ready.
-
template<typename F, typename ...Ts>
future<void> when_each(F &&f, Ts&&... futures)# The function when_each is an operator allowing to join on the results of all given futures. It AND-composes all future objects given and returns a new future object representing the event of all those futures having finished executing. It also calls the supplied callback for each of the futures which becomes ready.
Note
This function consumes the futures as they are passed on to the supplied function. The callback should take one or two parameters, namely either a future to be processed or a type that std::size_t is implicitly convertible to as the first parameter and the future as the second parameter. The first parameter will correspond to the index of the current future in the collection.
- Parameters
f – The function which will be called for each of the input futures once the future has become ready.
futures – An arbitrary number of future or shared_future objects, possibly holding different types for which wait_each should wait.
- Returns
Returns a future representing the event of all input futures being ready.
-
template<typename F, typename Iterator>
future<Iterator> when_each_n(F &&f, Iterator begin, std::size_t count)# The function when_each is an operator allowing to join on the results of all given futures. It AND-composes all future objects given and returns a new future object representing the event of all those futures having finished executing. It also calls the supplied callback for each of the futures which becomes ready.
Note
This function consumes the futures as they are passed on to the supplied function. The callback should take one or two parameters, namely either a future to be processed or a type that std::size_t is implicitly convertible to as the first parameter and the future as the second parameter. The first parameter will correspond to the index of the current future in the collection.
- Parameters
f – The function which will be called for each of the input futures once the future has become ready.
begin – The iterator pointing to the first element of a sequence of future or shared_future objects for which wait_each_n should wait.
count – The number of elements in the sequence starting at first.
- Returns
Returns a future holding the iterator pointing to the first element after the last one.
-
template<typename F, typename Future>
hpx::when_some#
Defined in header hpx/future.hpp.
See Public API for a list of names and headers that are part of the public HPX API.
-
namespace hpx
Top level HPX namespace.
Functions
-
template<typename InputIter, typename Container = vector<future<typename std::iterator_traits<InputIter>::value_type>>>
future<when_some_result<Container>> when_some(std::size_t n, Iterator first, Iterator last)# The function when_some is an operator allowing to join on the result of all given futures. It AND-composes all future objects given and returns a new future object representing the same list of futures after n of them finished executing.
Note
The future returned by the function when_some becomes ready when at least n argument futures have become ready.
Note
Calling this version of when_some where first == last, returns a future with an empty container that is immediately ready. Each future and shared_future is waited upon and then copied into the collection of the output (returned) future, maintaining the order of the futures in the input collection. The future returned by when_some will not throw an exception, but the futures held in the output collection may.
- Parameters
n – [in] The number of futures out of the arguments which have to become ready in order for the returned future to get ready.
first – [in] The iterator pointing to the first element of a sequence of future or shared_future objects for which when_all should wait.
last – [in] The iterator pointing to the last element of a sequence of future or shared_future objects for which when_all should wait.
- Returns
Returns a when_some_result holding the same list of futures as has been passed to when_some and indices pointing to ready futures.
future<when_some_result<Container<future<R>>>>: If the input cardinality is unknown at compile time and the futures are all of the same type. The order of the futures in the output container will be the same as given by the input iterator.
-
template<typename Range>
future<when_some_result<Range>> when_some(std::size_t n, Range &&futures)# The function when_some is an operator allowing to join on the result of all given futures. It AND-composes all future objects given and returns a new future object representing the same list of futures after n of them finished executing.
Note
The future returned by the function when_some becomes ready when at least n argument futures have become ready.
Note
Each future and shared_future is waited upon and then copied into the collection of the output (returned) future, maintaining the order of the futures in the input collection. The future returned by when_some will not throw an exception, but the futures held in the output collection may.
- Parameters
n – [in] The number of futures out of the arguments which have to become ready in order for the returned future to get ready.
futures – [in] A container holding an arbitrary amount of future or shared_future objects for which when_some should wait.
- Returns
Returns a when_some_result holding the same list of futures as has been passed to when_some and indices pointing to ready futures.
future<when_some_result<Container<future<R>>>>: If the input cardinality is unknown at compile time and the futures are all of the same type. The order of the futures in the output container will be the same as given by the input iterator.
-
template<typename ...Ts>
future<when_some_result<tuple<future<T>...>>> when_some(std::size_t n, Ts&&... futures)# The function when_some is an operator allowing to join on the result of all given futures. It AND-composes all future objects given and returns a new future object representing the same list of futures after n of them finished executing.
Note
The future returned by the function when_some becomes ready when at least n argument futures have become ready.
Note
Each future and shared_future is waited upon and then copied into the collection of the output (returned) future, maintaining the order of the futures in the input collection. The future returned by when_some will not throw an exception, but the futures held in the output collection may.
- Parameters
n – [in] The number of futures out of the arguments which have to become ready in order for the returned future to get ready.
futures – [in] An arbitrary number of future or shared_future objects, possibly holding different types for which when_some should wait.
- Returns
Returns a when_some_result holding the same list of futures as has been passed to when_some and an index pointing to a ready future..
future<when_some_result<tuple<future<T0>, future<T1>…>>>: If inputs are fixed in number and are of heterogeneous types. The inputs can be any arbitrary number of future objects.
future<when_some_result<tuple<>>> if when_some is called with zero arguments. The returned future will be initially ready.
-
template<typename InputIter, typename Container = vector<future<typename std::iterator_traits<InputIter>::value_type>>>
future<when_some_result<Container>> when_some_n(std::size_t n, Iterator first, std::size_t count)# The function when_some_n is an operator allowing to join on the result of all given futures. It AND-composes all future objects given and returns a new future object representing the same list of futures after n of them finished executing.
Note
The future returned by the function when_some_n becomes ready when at least n argument futures have become ready.
Note
Calling this version of when_some_n where count == 0, returns a future with the same elements as the arguments that is immediately ready. Possibly none of the futures in that container are ready. Each future and shared_future is waited upon and then copied into the collection of the output (returned) future, maintaining the order of the futures in the input collection. The future returned by when_some_n will not throw an exception, but the futures held in the output collection may.
- Parameters
n – [in] The number of futures out of the arguments which have to become ready in order for the returned future to get ready.
first – [in] The iterator pointing to the first element of a sequence of future or shared_future objects for which when_all should wait.
count – [in] The number of elements in the sequence starting at first.
- Returns
Returns a when_some_result holding the same list of futures as has been passed to when_some and indices pointing to ready futures.
future<when_some_result<Container<future<R>>>>: If the input cardinality is unknown at compile time and the futures are all of the same type. The order of the futures in the output container will be the same as given by the input iterator.
-
template<typename Sequence>
struct when_some_result# - #include <when_some.hpp>
Result type for when_some, contains a sequence of futures and indices pointing to ready futures.
-
template<typename InputIter, typename Container = vector<future<typename std::iterator_traits<InputIter>::value_type>>>
async_cuda#
See Public API for a list of names and headers that are part of the public HPX API.
hpx/async_cuda/cublas_executor.hpp#
Defined in header hpx/async_cuda/cublas_executor.hpp.
See Public API for a list of names and headers that are part of the public HPX API.
hpx/async_cuda/cuda_executor.hpp#
Defined in header hpx/async_cuda/cuda_executor.hpp.
See Public API for a list of names and headers that are part of the public HPX API.
-
namespace hpx
-
namespace cuda#
-
namespace experimental#
-
struct cuda_executor : public hpx::cuda::experimental::cuda_executor_base#
Public Functions
-
inline ~cuda_executor()#
-
template<typename F, typename ...Ts>
inline decltype(auto) friend tag_invoke(hpx::parallel::execution::post_t, cuda_executor const &exec, F &&f, Ts&&... ts)#
-
template<typename F, typename ...Ts>
inline decltype(auto) friend tag_invoke(hpx::parallel::execution::async_execute_t, cuda_executor const &exec, F &&f, Ts&&... ts)#
-
inline ~cuda_executor()#
-
struct cuda_executor_base#
Subclassed by hpx::cuda::experimental::cuda_executor
Public Functions
-
inline future_type get_future() const#
-
inline future_type get_future() const#
-
struct cuda_executor : public hpx::cuda::experimental::cuda_executor_base#
-
namespace experimental#
-
namespace execution
-
namespace experimental
-
namespace experimental
-
namespace cuda#
async_mpi#
See Public API for a list of names and headers that are part of the public HPX API.
hpx/async_mpi/mpi_executor.hpp#
Defined in header hpx/async_mpi/mpi_executor.hpp.
See Public API for a list of names and headers that are part of the public HPX API.
-
namespace hpx
-
namespace mpi#
-
namespace experimental#
-
struct executor#
Public Types
-
using execution_category = hpx::execution::parallel_execution_tag#
-
using executor_parameters_type = hpx::execution::experimental::default_parameters#
Public Functions
-
inline explicit constexpr executor(MPI_Comm communicator = MPI_COMM_WORLD)#
Private Members
-
MPI_Comm communicator_#
-
using execution_category = hpx::execution::parallel_execution_tag#
-
struct executor#
-
namespace experimental#
-
namespace mpi#
hpx/async_mpi/transform_mpi.hpp#
Defined in header hpx/async_mpi/transform_mpi.hpp.
See Public API for a list of names and headers that are part of the public HPX API.
-
namespace hpx
-
namespace mpi
-
namespace experimental
Variables
-
hpx::mpi::experimental::transform_mpi_t transform_mpi#
-
struct transform_mpi_t : public hpx::functional::detail::tag_fallback<transform_mpi_t>#
Private Functions
- template<typename Sender, typename F> requires (hpx::execution::experimental::is_sender_v< Sender >) friend const expr auto tag_fallback_invoke(transform_mpi_t
Private Members
-
Sender &&s#
- Sender F && f {return detail::transform_mpi_sender<Sender, F>{HPX_FORWARD(Sender, s), HPX_FORWARD(F, f)}
Friends
- template<typename F> inline friend constexpr friend auto tag_fallback_invoke (transform_mpi_t, F &&f)
-
hpx::mpi::experimental::transform_mpi_t transform_mpi#
-
namespace experimental
-
namespace mpi
cache#
See Public API for a list of names and headers that are part of the public HPX API.
hpx/cache/local_cache.hpp#
Defined in header hpx/cache/local_cache.hpp.
See Public API for a list of names and headers that are part of the public HPX API.
-
namespace hpx
-
namespace util
-
namespace cache
-
template<typename Key, typename Entry, typename UpdatePolicy = std::less<Entry>, typename InsertPolicy = policies::always<Entry>, typename CacheStorage = std::map<Key, Entry>, typename Statistics = statistics::no_statistics>
class local_cache# - #include <hpx/cache/local_cache.hpp>
The local_cache implements the basic functionality needed for a local (non-distributed) cache.
- Template Parameters
Key – The type of the keys to use to identify the entries stored in the cache
Entry – The type of the items to be held in the cache, must model the CacheEntry concept
UpdatePolicy – A (optional) type specifying a (binary) function object used to sort the cache entries based on their ‘age’. The ‘oldest’ entries (according to this sorting criteria) will be discarded first if the maximum capacity of the cache is reached. The default is std::less<Entry>. The function object will be invoked using 2 entry instances of the type Entry. This type must model the UpdatePolicy model.
InsertPolicy – A (optional) type specifying a (unary) function object used to allow global decisions whether a particular entry should be added to the cache or not. The default is policies::always, imposing no global insert related criteria on the cache. The function object will be invoked using the entry instance to be inserted into the cache. This type must model the InsertPolicy model.
CacheStorage – A (optional) container type used to store the cache items. The container must be an associative and STL compatible container.The default is a std::map<Key, Entry>.
Statistics – A (optional) type allowing to collect some basic statistics about the operation of the cache instance. The type must conform to the CacheStatistics concept. The default value is the type statistics::no_statistics which does not collect any numbers, but provides empty stubs allowing the code to compile.
Public Types
-
using update_policy_type = UpdatePolicy#
-
using insert_policy_type = InsertPolicy#
-
using storage_type = CacheStorage#
-
using statistics_type = Statistics#
-
using value_type = typename entry_type::value_type#
-
using size_type = typename storage_type::size_type#
-
using storage_value_type = typename storage_type::value_type#
Public Functions
-
inline explicit local_cache(size_type max_size = 0, update_policy_type const &up = update_policy_type(), insert_policy_type const &ip = insert_policy_type())#
Construct an instance of a local_cache.
- Parameters
max_size – [in] The maximal size this cache is allowed to reach any time. The default is zero (no size limitation). The unit of this value is usually determined by the unit of the values returned by the entry’s get_size function.
up – [in] An instance of the UpdatePolicy to use for this cache. The default is to use a default constructed instance of the type as defined by the UpdatePolicy template parameter.
ip – [in] An instance of the InsertPolicy to use for this cache. The default is to use a default constructed instance of the type as defined by the InsertPolicy template parameter.
-
local_cache(local_cache const &other) = default#
-
local_cache(local_cache &&other) = default#
-
local_cache &operator=(local_cache const &other) = default#
-
local_cache &operator=(local_cache &&other) = default#
-
~local_cache() = default#
-
inline constexpr size_type size() const noexcept#
Return current size of the cache.
- Returns
The current size of this cache instance.
-
inline constexpr size_type capacity() const noexcept#
Access the maximum size the cache is allowed to grow to.
Note
The unit of this value is usually determined by the unit of the return values of the entry’s function entry::get_size.
- Returns
The maximum size this cache instance is currently allowed to reach. If this number is zero the cache has no limitation with regard to a maximum size.
-
inline bool reserve(size_type max_size)#
Change the maximum size this cache can grow to.
- Parameters
max_size – [in] The new maximum size this cache will be allowed to grow to.
- Returns
This function returns true if successful. It returns false if the new max_size is smaller than the current limit and the cache could not be shrunk to the new maximum size.
-
inline bool holds_key(key_type const &k) const#
Check whether the cache currently holds an entry identified by the given key.
Note
This function does not call the entry’s function entry::touch. It just checks if the cache contains an entry corresponding to the given key.
- Parameters
k – [in] The key for the entry which should be looked up in the cache.
- Returns
This function returns true if the cache holds the referenced entry, otherwise it returns false.
-
inline bool get_entry(key_type const &k, key_type &realkey, entry_type &val)#
Get a specific entry identified by the given key.
Note
The function will call the entry’s entry::touch function if the value corresponding to the provided key is found in the cache.
- Parameters
k – [in] The key for the entry which should be retrieved from the cache.
realkey[out] – Return the full real key found in the cache
val – [out] If the entry indexed by the key is found in the cache this value on successful return will be a copy of the corresponding entry.
- Returns
This function returns true if the cache holds the referenced entry, otherwise it returns false.
-
inline bool get_entry(key_type const &k, entry_type &val)#
Get a specific entry identified by the given key.
Note
The function will call the entry’s entry::touch function if the value corresponding to the provided key is found in the cache.
- Parameters
k – [in] The key for the entry which should be retrieved from the cache.
val – [out] If the entry indexed by the key is found in the cache this value on successful return will be a copy of the corresponding entry.
- Returns
This function returns true if the cache holds the referenced entry, otherwise it returns false.
-
inline bool get_entry(key_type const &k, value_type &val)#
Get a specific entry identified by the given key.
Note
The function will call the entry’s entry::touch function if the value corresponding to the provided is found in the cache.
- Parameters
k – [in] The key for the entry which should be retrieved from the cache
val – [out] If the entry indexed by the key is found in the cache this value on successful return will be a copy of the corresponding value.
- Returns
This function returns true if the cache holds the referenced entry, otherwise it returns false.
-
inline bool insert(key_type const &k, value_type const &val)#
Insert a new element into this cache.
Note
This function invokes both, the insert policy as provided to the constructor and the function entry::insert of the newly constructed entry instance. If either of these functions returns false the key/value pair doesn’t get inserted into the cache and the insert function will return false. Other reasons for this function to fail (return false) are a) the key/value pair is already held in the cache or b) inserting the new value into the cache maxed out its capacity and it was not possible to free any of the existing entries.
- Parameters
k – [in] The key for the entry which should be added to the cache.
val – [in] The value which should be added to the cache.
- Returns
This function returns true if the entry has been successfully added to the cache, otherwise it returns false.
-
inline bool insert(key_type const &k, value_type &&val)#
-
template<typename Entry_, std::enable_if_t<std::is_convertible_v<std::decay_t<Entry_>, entry_type>, int> = 0>
inline bool insert(key_type const &k, Entry_ &&e)# Insert a new entry into this cache.
Note
This function invokes both, the insert policy as provided to the constructor and the function entry::insert of the provided entry instance. If either of these functions returns false the key/value pair doesn’t get inserted into the cache and the insert function will return false. Other reasons for this function to fail (return false) are a) the key/value pair is already held in the cache or b) inserting the new value into the cache maxed out its capacity and it was not possible to free any of the existing entries.
- Parameters
k – [in] The key for the entry which should be added to the cache.
e – [in] The entry which should be added to the cache.
- Returns
This function returns true if the entry has been successfully added to the cache, otherwise it returns false.
-
template<typename Value, std::enable_if_t<std::is_convertible_v<std::decay_t<Value>, value_type>, int> = 0>
inline bool update(key_type const &k, Value &&val)# Update an existing element in this cache.
Note
The function will call the entry’s entry::touch function if the indexed value is found in the cache.
Note
The difference to the other overload of the insert function is that this overload replaces the cached value only, while the other overload replaces the whole cache entry, updating the cache entry properties.
- Parameters
k – [in] The key for the value which should be updated in the cache.
val – [in] The value which should be used as a replacement for the existing value in the cache. Any existing cache entry is not changed except for its value.
- Returns
This function returns true if the entry has been successfully updated, otherwise it returns false. If the entry currently is not held by the cache it is added and the return value reflects the outcome of the corresponding insert operation.
-
template<typename F, typename Value, typename = std::enable_if_t<std::is_convertible_v<std::decay_t<Value>, value_type>>>
inline bool update_if(key_type const &k, Value &&val, F &&f)# Update an existing element in this cache.
Note
The function will call the entry’s entry::touch function if the indexed value is found in the cache.
Note
The difference to the other overload of the insert function is that this overload replaces the cached value only, while the other overload replaces the whole cache entry, updating the cache entry properties.
- Parameters
k – [in] The key for the value which should be updated in the cache.
val – [in] The value which should be used as a replacement for the existing value in the cache. Any existing cache entry is not changed except for its value.
f – [in] A callable taking two arguments, k and the key found in the cache (in that order). If f returns true, then the update will continue. If f returns false, then the update will not succeed.
- Returns
This function returns true if the entry has been successfully updated, otherwise it returns false. If the entry currently is not held by the cache it is added and the return value reflects the outcome of the corresponding insert operation.
-
template<typename Entry_, std::enable_if_t<std::is_convertible_v<std::decay_t<Entry_>, entry_type>, int> = 0>
inline bool update(key_type const &k, Entry_ &&e)# Update an existing entry in this cache.
Note
The function will call the entry’s entry::touch function if the indexed value is found in the cache.
Note
The difference to the other overload of the insert function is that this overload replaces the whole cache entry, while the other overload replaces the cached value only, leaving the cache entry properties untouched.
- Parameters
k – [in] The key for the entry which should be updated in the cache.
e – [in] The entry which should be used as a replacement for the existing entry in the cache. Any existing entry is first removed and then this entry is added.
- Returns
This function returns true if the entry has been successfully updated, otherwise it returns false. If the entry currently is not held by the cache it is added and the return value reflects the outcome of the corresponding insert operation.
-
template<typename Func = policies::always<storage_value_type>>
inline size_type erase(Func &&ep = Func())# Remove stored entries from the cache for which the supplied function object returns true.
- Parameters
ep – [in] This parameter has to be a (unary) function object. It is invoked for each of the entries currently held in the cache. An entry is considered for removal from the cache whenever the value returned from this invocation is true. Even then the entry might not be removed from the cache as its entry::remove function might return false.
- Returns
This function returns the overall size of the removed entries (which is the sum of the values returned by the entry::get_size functions of the removed entries).
-
inline size_type erase()#
Remove all stored entries from the cache.
Note
All entries are considered for removal, but in the end an entry might not be removed from the cache as its entry::remove function might return false. This function is very useful for instance in conjunction with an entry’s entry::remove function enforcing additional criteria like entry expiration, etc.
- Returns
This function returns the overall size of the removed entries (which is the sum of the values returned by the entry::get_size functions of the removed entries).
-
inline void clear()#
Clear the cache.
Unconditionally removes all stored entries from the cache.
-
inline constexpr statistics_type const &get_statistics() const noexcept#
Allow to access the embedded statistics instance.
- Returns
This function returns a reference to the statistics instance embedded inside this cache
-
inline statistics_type &get_statistics() noexcept#
Protected Functions
-
inline bool free_space(long num_free)#
Private Types
-
using iterator = typename storage_type::iterator#
-
using const_iterator = typename storage_type::const_iterator#
-
using adapted_update_policy_type = adapt<UpdatePolicy, iterator>#
-
using update_on_exit = typename statistics_type::update_on_exit#
Private Members
-
storage_type store_#
-
adapted_update_policy_type update_policy_#
-
insert_policy_type insert_policy_#
-
statistics_type statistics_#
-
template<typename Key, typename Entry, typename UpdatePolicy = std::less<Entry>, typename InsertPolicy = policies::always<Entry>, typename CacheStorage = std::map<Key, Entry>, typename Statistics = statistics::no_statistics>
-
namespace cache
-
namespace util
hpx/cache/lru_cache.hpp#
Defined in header hpx/cache/lru_cache.hpp.
See Public API for a list of names and headers that are part of the public HPX API.
-
namespace hpx
-
namespace util
-
namespace cache
-
template<typename Key, typename Entry, typename Statistics = statistics::no_statistics>
class lru_cache# - #include <hpx/cache/lru_cache.hpp>
The lru_cache implements the basic functionality needed for a local (non-distributed) LRU cache.
- Template Parameters
Key – The type of the keys to use to identify the entries stored in the cache
Entry – The type of the items to be held in the cache.
Statistics – A (optional) type allowing to collect some basic statistics about the operation of the cache instance. The type must conform to the CacheStatistics concept. The default value is the type statistics::no_statistics which does not collect any numbers, but provides empty stubs allowing the code to compile.
Public Types
-
using statistics_type = Statistics#
-
using entry_pair = std::pair<key_type, entry_type>#
-
using storage_type = std::list<entry_pair>#
-
using map_type = std::map<Key, typename storage_type::iterator>#
Public Functions
-
inline explicit lru_cache(size_type max_size = 0)#
Construct an instance of a lru_cache.
- Parameters
max_size – [in] The maximal size this cache is allowed to reach any time. The default is zero (no size limitation). The unit of this value is usually determined by the unit of the values returned by the entry’s get_size function.
-
~lru_cache() = default#
-
inline constexpr size_type size() const noexcept#
Return current size of the cache.
- Returns
The current size of this cache instance.
-
inline constexpr size_type capacity() const noexcept#
Access the maximum size the cache is allowed to grow to.
Note
The unit of this value is usually determined by the unit of the return values of the entry’s function entry::get_size.
- Returns
The maximum size this cache instance is currently allowed to reach. If this number is zero the cache has no limitation with regard to a maximum size.
-
inline void reserve(size_type max_size)#
Change the maximum size this cache can grow to.
- Parameters
max_size – [in] The new maximum size this cache will be allowed to grow to.
-
inline bool holds_key(key_type const &key) const#
Check whether the cache currently holds an entry identified by the given key.
Note
This function does not call the entry’s function entry::touch. It just checks if the cache contains an entry corresponding to the given key.
- Parameters
key – [in] The key for the entry which should be looked up in the cache.
- Returns
This function returns true if the cache holds the referenced entry, otherwise it returns false.
-
inline bool get_entry(key_type const &key, key_type &realkey, entry_type &entry)#
Get a specific entry identified by the given key.
Note
The function will “touch” the entry and mark it as recently used if the key was found in the cache.
- Parameters
key – [in] The key for the entry which should be retrieved from the cache.
realkey[out] – Return the full real key found in the cache
entry – [out] If the entry indexed by the key is found in the cache this value on successful return will be a copy of the corresponding entry.
- Returns
This function returns true if the cache holds the referenced entry, otherwise it returns false.
-
inline bool get_entry(key_type const &key, entry_type const &entry)#
Get a specific entry identified by the given key.
Note
The function will “touch” the entry and mark it as recently used if the key was found in the cache.
- Parameters
key – [in] The key for the entry which should be retrieved from the cache.
entry – [out] If the entry indexed by the key is found in the cache this value on successful return will be a copy of the corresponding entry.
- Returns
This function returns true if the cache holds the referenced entry, otherwise it returns false.
-
template<typename Entry_, typename = std::enable_if_t<std::is_convertible_v<std::decay_t<Entry_>, entry_type>>>
inline bool insert(key_type const &key, Entry_ &&entry)# Insert a new entry into this cache.
Note
This function assumes that the entry is not in the cache already. Inserting an already existing entry is considered undefined behavior
- Parameters
key – [in] The key for the entry which should be added to the cache.
entry – [in] The entry which should be added to the cache.
-
template<typename Entry_, typename = std::enable_if_t<std::is_convertible_v<std::decay_t<Entry_>, entry_type>>>
inline void update(key_type const &key, Entry_ &&entry)# Update an existing element in this cache.
Note
The function will “touch” the entry and mark it as recently used if the key was found in the cache.
Note
The difference to the other overload of the insert function is that this overload replaces the cached value only, while the other overload replaces the whole cache entry, updating the cache entry properties.
- Parameters
key – [in] The key for the value which should be updated in the cache.
entry – [in] The entry which should be used as a replacement for the existing value in the cache. Any existing cache entry is not changed except for its value.
-
template<typename F, typename Entry_, std::enable_if_t<std::is_convertible_v<std::decay_t<Entry_>, entry_type>, int> = 0>
inline bool update_if(key_type const &key, Entry_ &&entry, F &&f)# Update an existing element in this cache.
Note
The function will “touch” the entry and mark it as recently used if the key was found in the cache.
Note
The difference to the other overload of the insert function is that this overload replaces the cached value only, while the other overload replaces the whole cache entry, updating the cache entry properties.
- Parameters
key – [in] The key for the value which should be updated in the cache.
entry – [in] The value which should be used as a replacement for the existing value in the cache. Any existing cache entry is not changed except for its value.
f – [in] A callable taking two arguments, k and the key found in the cache (in that order). If f returns true, then the update will continue. If f returns false, then the update will not succeed.
- Returns
This function returns true if the entry has been successfully updated, otherwise it returns false. If the entry currently is not held by the cache it is added and the return value reflects the outcome of the corresponding insert operation.
-
template<typename Func>
inline size_type erase(Func const &ep)# Remove stored entries from the cache for which the supplied function object returns true.
- Parameters
ep – [in] This parameter has to be a (unary) function object. It is invoked for each of the entries currently held in the cache. An entry is considered for removal from the cache whenever the value returned from this invocation is true.
- Returns
This function returns the overall size of the removed entries (which is the sum of the values returned by the entry::get_size functions of the removed entries).
-
inline size_type erase()#
Remove all stored entries from the cache.
- Returns
This function returns the overall size of the removed entries (which is the sum of the values returned by the entry::get_size functions of the removed entries).
-
inline size_type clear()#
Clear the cache.
Unconditionally removes all stored entries from the cache.
-
inline constexpr statistics_type const &get_statistics() const noexcept#
Allow to access the embedded statistics instance.
- Returns
This function returns a reference to the statistics instance embedded inside this cache
-
inline statistics_type &get_statistics() noexcept#
Private Types
-
using update_on_exit = typename statistics_type::update_on_exit#
Private Functions
-
template<typename Entry_, typename = std::enable_if_t<std::is_convertible_v<std::decay_t<Entry_>, entry_type>>>
inline void insert_nonexist(key_type const &key, Entry_ &&entry)#
-
inline void touch(typename storage_type::iterator it)#
-
inline void evict()#
-
template<typename Key, typename Entry, typename Statistics = statistics::no_statistics>
-
namespace cache
-
namespace util
hpx/cache/entries/entry.hpp#
Defined in header hpx/cache/entries/entry.hpp.
See Public API for a list of names and headers that are part of the public HPX API.
-
namespace hpx
-
namespace util
-
namespace cache#
-
namespace entries#
-
template<typename Value>
class entry# - #include <hpx/cache/entries/entry.hpp>
- Template Parameters
Value – The data type to be stored in a cache. It has to be default constructible, copy constructible and less_than_comparable.
Subclassed by hpx::util::cache::entries::fifo_entry< Value >, hpx::util::cache::entries::lfu_entry< Value >, hpx::util::cache::entries::lru_entry< Value >, hpx::util::cache::entries::size_entry< Value >
Public Functions
-
entry() = default#
Any cache entry has to be default constructible.
-
inline explicit entry(value_type const &val) noexcept(std::is_nothrow_copy_constructible_v<value_type>)#
Construct a new instance of a cache entry holding the given value.
-
inline explicit entry(value_type &&val) noexcept#
Construct a new instance of a cache entry holding the given value.
-
inline value_type &get() noexcept#
Get a reference to the stored data value.
Note
This function is part of the CacheEntry concept
-
inline constexpr value_type const &get() const noexcept#
Public Static Functions
-
static inline constexpr bool touch() noexcept#
The function touch is called by a cache holding this instance whenever it has been requested (touched).
Note
It is possible to change the entry in a way influencing the sort criteria mandated by the UpdatePolicy. In this case the function should return true to indicate this to the cache, forcing to reorder the cache entries.
Note
This function is part of the CacheEntry concept
- Returns
This function should return true if the cache needs to update its internal heap. Usually this is needed if the entry has been changed by touch() in a way influencing the sort order as mandated by the cache’s UpdatePolicy
-
static inline constexpr bool insert() noexcept#
The function insert is called by a cache whenever it is about to be inserted into the cache.
Note
This function is part of the CacheEntry concept
- Returns
This function should return true if the entry should be added to the cache, otherwise it should return false.
-
static inline constexpr bool remove() noexcept#
The function remove is called by a cache holding this instance whenever it is about to be removed from the cache.
Note
This function is part of the CacheEntry concept
- Returns
The return value can be used to avoid removing this instance from the cache. If the value is true it is ok to remove the entry, otherwise it will stay in the cache.
Private Members
-
value_type value_#
Friends
- friend auto operator (entry const &, entry const &)=default
Forwarding operator<=> allowing to compare entries instead of the values.
-
template<typename Value>
-
namespace entries#
-
namespace cache#
-
namespace util
hpx/cache/entries/fifo_entry.hpp#
Defined in header hpx/cache/entries/fifo_entry.hpp.
See Public API for a list of names and headers that are part of the public HPX API.
-
namespace hpx
-
namespace util
-
namespace cache
-
namespace entries
-
template<typename Value>
class fifo_entry : public hpx::util::cache::entries::entry<Value># - #include <hpx/cache/entries/fifo_entry.hpp>
The fifo_entry type can be used to store arbitrary values in a cache. Using this type as the cache’s entry type makes sure that the least recently inserted entries are discarded from the cache first.
Note
The fifo_entry conforms to the CacheEntry concept.
Note
This type can be used to model a ‘last in first out’ cache policy if it is used with a std::greater as the caches’ UpdatePolicy (instead of the default std::less).
- Template Parameters
Value – The data type to be stored in a cache. It has to be default constructible, copy constructible and less_than_comparable.
Public Functions
-
fifo_entry() = default#
Any cache entry has to be default constructible.
-
inline explicit fifo_entry(Value const &val) noexcept(std::is_nothrow_constructible_v<base_type, Value const&>)#
Construct a new instance of a cache entry holding the given value.
-
inline explicit fifo_entry(Value &&val) noexcept#
Construct a new instance of a cache entry holding the given value.
-
inline constexpr bool insert()#
The function insert is called by a cache whenever it is about to be inserted into the cache.
Note
This function is part of the CacheEntry concept
- Returns
This function should return true if the entry should be added to the cache, otherwise it should return false.
-
inline constexpr time_point const &get_creation_time() const noexcept#
Private Types
Private Members
-
time_point insertion_time_#
Friends
-
inline friend auto operator<(fifo_entry const &lhs, fifo_entry const &rhs)#
Compare the ‘age’ of two entries. An entry is ‘older’ than another entry if it has been created earlier (FIFO).
-
inline friend auto operator>(fifo_entry const &lhs, fifo_entry const &rhs)#
-
inline friend auto operator<=(fifo_entry const &lhs, fifo_entry const &rhs)#
-
inline friend auto operator>=(fifo_entry const &lhs, fifo_entry const &rhs)#
-
inline friend auto operator==(fifo_entry const &lhs, fifo_entry const &rhs)#
-
inline friend auto operator!=(fifo_entry const &lhs, fifo_entry const &rhs)#
-
template<typename Value>
-
namespace entries
-
namespace cache
-
namespace util
hpx/cache/entries/lfu_entry.hpp#
Defined in header hpx/cache/entries/lfu_entry.hpp.
See Public API for a list of names and headers that are part of the public HPX API.
-
namespace hpx
-
namespace util
-
namespace cache
-
namespace entries
-
template<typename Value>
class lfu_entry : public hpx::util::cache::entries::entry<Value># - #include <hpx/cache/entries/lfu_entry.hpp>
The lfu_entry type can be used to store arbitrary values in a cache. Using this type as the cache’s entry type makes sure that the least frequently used entries are discarded from the cache first.
Note
The lfu_entry conforms to the CacheEntry concept.
Note
This type can be used to model a ‘most frequently used’ cache policy if it is used with a std::greater as the caches’ UpdatePolicy (instead of the default std::less).
- Template Parameters
Value – The data type to be stored in a cache. It has to be default constructible, copy constructible and less_than_comparable.
Public Functions
-
lfu_entry() = default#
Any cache entry has to be default constructible.
-
inline explicit lfu_entry(Value const &val) noexcept(std::is_nothrow_constructible_v<base_type, Value const&>)#
Construct a new instance of a cache entry holding the given value.
-
inline explicit lfu_entry(Value &&val) noexcept#
Construct a new instance of a cache entry holding the given value.
-
inline bool touch() noexcept#
The function touch is called by a cache holding this instance whenever it has been requested (touched).
In the case of the LFU entry we store the reference count tracking the number of times this entry has been requested. This which will be used to compare the age of an entry during the invocation of the operator<().
- Returns
This function should return true if the cache needs to update its internal heap. Usually this is needed if the entry has been changed by touch() in a way influencing the sort order as mandated by the cache’s UpdatePolicy
-
inline constexpr unsigned long const &get_access_count() const noexcept#
Private Members
-
unsigned long ref_count_ = 0#
-
template<typename Value>
-
namespace entries
-
namespace cache
-
namespace util
hpx/cache/entries/lru_entry.hpp#
Defined in header hpx/cache/entries/lru_entry.hpp.
See Public API for a list of names and headers that are part of the public HPX API.
-
namespace hpx
-
namespace util
-
namespace cache
-
namespace entries
-
template<typename Value>
class lru_entry : public hpx::util::cache::entries::entry<Value># - #include <hpx/cache/entries/lru_entry.hpp>
The lru_entry type can be used to store arbitrary values in a cache. Using this type as the cache’s entry type makes sure that the least recently used entries are discarded from the cache first.
Note
The lru_entry conforms to the CacheEntry concept.
Note
This type can be used to model a ‘most recently used’ cache policy if it is used with a std::greater as the caches’ UpdatePolicy (instead of the default std::less).
- Template Parameters
Value – The data type to be stored in a cache. It has to be default constructible, copy constructible and less_than_comparable.
Public Functions
-
inline lru_entry()#
Any cache entry has to be default constructible.
-
inline explicit lru_entry(Value const &val) noexcept(std::is_nothrow_constructible_v<base_type, Value const&>)#
Construct a new instance of a cache entry holding the given value.
-
inline explicit lru_entry(Value &&val) noexcept#
Construct a new instance of a cache entry holding the given value.
-
inline bool touch()#
The function touch is called by a cache holding this instance whenever it has been requested (touched).
In the case of the LRU entry we store the time of the last access which will be used to compare the age of an entry during the invocation of the operator<().
- Returns
This function should return true if the cache needs to update its internal heap. Usually this is needed if the entry has been changed by touch() in a way influencing the sort order as mandated by the cache’s UpdatePolicy
-
inline constexpr time_point const &get_access_time() const noexcept#
Returns the last access time of the entry.
Private Types
Private Members
-
time_point access_time_#
-
template<typename Value>
-
namespace entries
-
namespace cache
-
namespace util
hpx/cache/entries/size_entry.hpp#
Defined in header hpx/cache/entries/size_entry.hpp.
See Public API for a list of names and headers that are part of the public HPX API.
-
namespace hpx
-
namespace util
-
namespace cache
-
namespace entries
-
template<typename Value>
class size_entry : public hpx::util::cache::entries::entry<Value># - #include <hpx/cache/entries/size_entry.hpp>
The size_entry type can be used to store values in a cache which have a size associated (such as files, etc.). Using this type as the cache’s entry type makes sure that the entries with the biggest size are discarded from the cache first.
Note
The size_entry conforms to the CacheEntry concept.
Note
This type can be used to model a ‘discard smallest first’ cache policy if it is used with a std::greater as the caches’ UpdatePolicy (instead of the default std::less).
- Template Parameters
Value – The data type to be stored in a cache. It has to be default constructible, copy constructible and less_than_comparable.
Public Functions
-
size_entry() = default#
Any cache entry has to be default constructible.
-
inline explicit size_entry(Value const &val, std::size_t size = 0) noexcept(std::is_nothrow_constructible_v<base_type, Value const&>)#
Construct a new instance of a cache entry holding the given value.
Friends
-
inline friend auto operator<(size_entry const &lhs, size_entry const &rhs) noexcept#
Compare the ‘age’ of two entries. An entry is ‘older’ than another entry if it has a bigger size.
-
inline friend auto operator>(size_entry const &lhs, size_entry const &rhs) noexcept#
-
inline friend auto operator<=(size_entry const &lhs, size_entry const &rhs) noexcept#
-
inline friend auto operator>=(size_entry const &lhs, size_entry const &rhs) noexcept#
-
inline friend auto operator==(size_entry const &lhs, size_entry const &rhs) noexcept#
-
inline friend auto operator!=(size_entry const &lhs, size_entry const &rhs) noexcept#
-
template<typename Value>
-
namespace entries
-
namespace cache
-
namespace util
hpx/cache/statistics/local_statistics.hpp#
Defined in header hpx/cache/statistics/local_statistics.hpp.
See Public API for a list of names and headers that are part of the public HPX API.
-
namespace hpx
-
namespace util
-
namespace cache
-
namespace statistics#
-
class local_statistics : public hpx::util::cache::statistics::no_statistics#
Public Functions
-
local_statistics() = default#
-
inline void got_hit() noexcept#
The function got_hit will be called by a cache instance whenever an entry got touched.
-
inline void got_miss() noexcept#
The function got_miss will be called by a cache instance whenever a requested entry has not been found in the cache.
-
inline void got_insertion() noexcept#
The function got_insertion will be called by a cache instance whenever a new entry has been inserted.
-
inline void got_eviction() noexcept#
The function got_eviction will be called by a cache instance whenever an entry has been removed from the cache because a new inserted entry let the cache grow beyond its capacity.
-
inline void clear() noexcept#
Reset all statistics.
Private Members
-
local_statistics() = default#
-
class local_statistics : public hpx::util::cache::statistics::no_statistics#
-
namespace statistics#
-
namespace cache
-
namespace util
hpx/cache/statistics/no_statistics.hpp#
Defined in header hpx/cache/statistics/no_statistics.hpp.
See Public API for a list of names and headers that are part of the public HPX API.
-
namespace hpx
-
namespace util
-
namespace cache
-
namespace statistics
Enums
-
class no_statistics#
Subclassed by hpx::util::cache::statistics::local_statistics
Public Static Functions
-
static inline constexpr void got_hit() noexcept#
The function got_hit will be called by a cache instance whenever an entry got touched.
-
static inline constexpr void got_miss() noexcept#
The function got_miss will be called by a cache instance whenever a requested entry has not been found in the cache.
-
static inline constexpr void got_insertion() noexcept#
The function got_insertion will be called by a cache instance whenever a new entry has been inserted.
-
static inline constexpr void got_eviction() noexcept#
The function got_eviction will be called by a cache instance whenever an entry has been removed from the cache because a new inserted entry let the cache grow beyond its capacity.
-
static inline constexpr void clear() noexcept#
Reset all statistics.
-
static inline constexpr std::int64_t get_get_entry_count(bool) noexcept#
The function get_get_entry_count returns the number of invocations of the get_entry() API function of the cache.
-
static inline constexpr std::int64_t get_insert_entry_count(bool) noexcept#
The function get_insert_entry_count returns the number of invocations of the insert_entry() API function of the cache.
-
static inline constexpr std::int64_t get_update_entry_count(bool) noexcept#
The function get_update_entry_count returns the number of invocations of the update_entry() API function of the cache.
-
static inline constexpr std::int64_t get_erase_entry_count(bool) noexcept#
The function get_erase_entry_count returns the number of invocations of the erase() API function of the cache.
-
static inline constexpr std::int64_t get_get_entry_time(bool) noexcept#
The function get_get_entry_time returns the overall time spent executing of the get_entry() API function of the cache.
-
static inline constexpr std::int64_t get_insert_entry_time(bool) noexcept#
The function get_insert_entry_time returns the overall time spent executing of the insert_entry() API function of the cache.
-
struct update_on_exit#
- #include <no_statistics.hpp>
Helper class to update timings and counts on function exit.
Public Functions
-
inline constexpr update_on_exit(no_statistics const&, method) noexcept#
-
~update_on_exit() = default#
-
update_on_exit(update_on_exit const&) = delete#
-
update_on_exit(update_on_exit&&) = delete#
-
update_on_exit &operator=(update_on_exit const&) = delete#
-
update_on_exit &operator=(update_on_exit&&) = delete#
-
inline constexpr update_on_exit(no_statistics const&, method) noexcept#
-
static inline constexpr void got_hit() noexcept#
-
class no_statistics#
-
namespace statistics
-
namespace cache
-
namespace util
checkpoint_base#
See Public API for a list of names and headers that are part of the public HPX API.
hpx/checkpoint_base/checkpoint_data.hpp#
Defined in header hpx/checkpoint_base/checkpoint_data.hpp.
See Public API for a list of names and headers that are part of the public HPX API.
-
namespace hpx
-
namespace util
Functions
- template<typename Container, typename... Ts> HPX_CXX_CORE_EXPORT void save_checkpoint_data (Container &data, Ts &&... ts)
save_checkpoint_data
Save_checkpoint_data takes any number of objects which a user may wish to store in the given container.
- Template Parameters
Container – Container used to store the check-pointed data.
Ts – Types of variables to checkpoint
- Parameters
data – Container instance used to store the checkpoint data
ts – Variable instances to be inserted into the checkpoint.
- template<typename... Ts> HPX_CXX_CORE_EXPORT std::size_t prepare_checkpoint_data (Ts const &... ts)
prepare_checkpoint_data
prepare_checkpoint_data takes any number of objects which a user may wish to store in a subsequent save_checkpoint_data operation. The function will return the number of bytes necessary to store the data that will be produced.
- Template Parameters
Ts – Types of variables to checkpoint
- Parameters
ts – Variable instances to be inserted into the checkpoint.
- template<typename Container, typename... Ts> HPX_CXX_CORE_EXPORT void restore_checkpoint_data (Container const &cont, Ts &... ts)
restore_checkpoint_data
restore_checkpoint_data takes any number of objects which a user may wish to restore from the given container. The sequence of objects has to correspond to the sequence of objects for the corresponding call to save_checkpoint_data that had used the given container instance.
- Template Parameters
Container – Container used to restore the check-pointed data.
Ts – Types of variables to restore
- Parameters
cont – Container instance used to restore the checkpoint data
ts – Variable instances to be restored from the container
-
struct checkpointing_tag#
-
template<>
struct extra_data_helper<checkpointing_tag># Public Static Functions
-
static extra_data_id_type id() noexcept#
-
static inline constexpr void reset(checkpointing_tag*) noexcept#
-
static extra_data_id_type id() noexcept#
-
namespace util
compute_local#
See Public API for a list of names and headers that are part of the public HPX API.
hpx/compute_local/vector.hpp#
Defined in header hpx/compute_local/vector.hpp.
See Public API for a list of names and headers that are part of the public HPX API.
-
namespace hpx
-
namespace compute
Functions
- template<typename T, typename Allocator> HPX_CXX_CORE_EXPORT void swap (vector< T, Allocator > &x, vector< T, Allocator > &y) noexcept
Effects: x.swap(y);.
-
template<typename T, typename Allocator = std::allocator<T>>
class vector# Public Types
-
using access_target = typename alloc_traits::access_target#
-
using reference = typename alloc_traits::reference#
-
using const_reference = typename alloc_traits::const_reference#
-
using pointer = typename alloc_traits::pointer#
-
using const_pointer = typename alloc_traits::const_pointer#
Public Functions
-
template<typename InIter, typename Enable = typename std::enable_if<std::input_iterator<InIter>>::type>
inline vector(InIter first, InIter last, Allocator const &alloc)#
-
inline ~vector()#
-
inline allocator_type get_allocator() const noexcept#
Returns the allocator associated with the container.
-
inline const_reference operator[](size_type pos) const#
-
inline reference front()#
Returns a reference to the first element in the container. Calling front on an empty container is undefined.
-
inline const_reference front() const#
Returns a reference to the first element in the container. Calling front on an empty container is undefined.
-
inline reference back()#
Returns a reference to the last element in the container. Calling back on an empty container is undefined.
-
inline const_reference back() const#
Returns a reference to the last element in the container. Calling back on an empty container is undefined.
-
inline pointer data() noexcept#
Returns pointer to the underlying array serving as element storage. The pointer is such that range [data(); data() + size()) is always a valid range, even if the container is empty (data() is not dereference-able in that case).
-
inline const_pointer data() const noexcept#
Returns pointer to the underlying array serving as element storage. The pointer is such that range [data(); data() + size()) is always a valid range, even if the container is empty (data() is not dereference-able in that case).
-
inline T *device_data() const noexcept#
Returns a raw pointer corresponding to the address of the data allocated on the device.
-
inline bool empty() const noexcept#
Returns: size() == 0.
-
inline void resize(size_type, T const&)#
Effects: If size <= size(), equivalent to calling pop_back() size() - size times. If size() < size, appends size - size() copies of val to the sequence.
Requires: T shall be CopyInsertable into *this.
Remarks: If an exception is thrown there are no effects.
-
inline const_iterator cbegin() const noexcept#
-
inline const_iterator cend() const noexcept#
-
inline const_iterator begin() const noexcept#
-
inline const_iterator end() const noexcept#
-
inline void swap(vector &other) noexcept#
Effects: Exchanges the contents and capacity() of *this with that of x.
Complexity: Constant time.
-
inline void clear() noexcept#
Effects: Erases all elements in the range [begin(),end()). Destroys all elements in ‘a’. Invalidates all references, pointers, and iterators referring to the elements of a and may invalidate the past-the-end iterator.
Post: a.empty() returns true.
Complexity: Linear.
Public Static Functions
-
static inline void resize(size_type)#
Effects: If size <= size(), equivalent to calling pop_back() size()
size times. If size() < size, appends size - size() default-inserted elements to the sequence.
Requires: T shall be MoveInsertable and DefaultInsertable into *this.
Remarks: If an exception is thrown other than by the move constructor of a non-CopyInsertable T there are no effects.
-
using access_target = typename alloc_traits::access_target#
-
namespace compute
hpx/compute_local/host/block_executor.hpp#
Defined in header hpx/compute_local/host/block_executor.hpp.
See Public API for a list of names and headers that are part of the public HPX API.
-
template<typename Executor>
struct executor_execution_category<compute::host::block_executor<Executor>># Public Types
-
using type = hpx::execution::parallel_execution_tag#
-
using type = hpx::execution::parallel_execution_tag#
-
template<typename Executor>
struct is_never_blocking_one_way_executor<compute::host::block_executor<Executor>> : public is_never_blocking_one_way_executor<Executor>#
-
template<typename Executor>
struct is_one_way_executor<compute::host::block_executor<Executor>> : public is_one_way_executor<Executor>#
-
template<typename Executor>
struct is_two_way_executor<compute::host::block_executor<Executor>> : public is_two_way_executor<Executor>#
-
template<typename Executor>
struct is_bulk_one_way_executor<compute::host::block_executor<Executor>> : public is_bulk_one_way_executor<Executor>#
-
template<typename Executor>
struct is_bulk_two_way_executor<compute::host::block_executor<Executor>> : public is_bulk_two_way_executor<Executor>#
-
namespace hpx
-
namespace compute#
-
namespace host#
-
template<typename Executor = hpx::execution::experimental::restricted_thread_pool_executor>
struct block_executor# - #include <block_executor.hpp>
The block executor can be used to build NUMA aware programs. It will distribute work evenly across the passed targets
- Template Parameters
Executor – The underlying executor to use
Public Types
-
using executor_parameters_type = hpx::execution::experimental::default_parameters#
Public Functions
-
inline explicit block_executor(std::vector<host::target> const &targets, threads::thread_priority priority = threads::thread_priority::high, threads::thread_stacksize stacksize = threads::thread_stacksize::default_, threads::thread_schedule_hint schedulehint = {})#
-
inline block_executor(block_executor const &other)#
-
inline block_executor(block_executor &&other) noexcept#
-
inline block_executor &operator=(block_executor const &other)#
-
inline block_executor &operator=(block_executor &&other) noexcept#
Private Functions
-
inline auto get_next_executor() const#
-
template<typename F, typename ...Ts>
inline decltype(auto) friend tag_invoke(hpx::parallel::execution::post_t, block_executor const &exec, F &&f, Ts&&... ts)#
-
template<typename F, typename ...Ts>
inline decltype(auto) friend tag_invoke(hpx::parallel::execution::async_execute_t, block_executor const &exec, F &&f, Ts&&... ts)#
-
template<typename F, typename ...Ts>
inline decltype(auto) friend tag_invoke(hpx::parallel::execution::sync_execute_t, block_executor const &exec, F &&f, Ts&&... ts)#
-
template<typename F, typename Shape, typename ...Ts>
inline decltype(auto) bulk_async_execute_impl(F &&f, Shape const &shape, Ts&&... ts) const#
-
template<typename F, typename Shape, typename ...Ts>
inline decltype(auto) friend tag_invoke(hpx::parallel::execution::bulk_async_execute_t, block_executor const &exec, F &&f, Shape const &shape, Ts&&... ts)#
-
template<typename F, typename Shape, typename ...Ts>
inline decltype(auto) bulk_sync_execute_impl(F &&f, Shape const &shape, Ts&&... ts) const#
-
template<typename F, typename Shape, typename ...Ts>
inline decltype(auto) friend tag_invoke(hpx::parallel::execution::bulk_sync_execute_t, block_executor const &exec, F &&f, Shape const &shape, Ts&&... ts)#
-
inline void init_executors()#
Private Members
-
threads::thread_priority priority_ = threads::thread_priority::high#
-
threads::thread_stacksize stacksize_ = threads::thread_stacksize::default_#
-
threads::thread_schedule_hint schedulehint_ = {}#
-
template<typename Executor = hpx::execution::experimental::restricted_thread_pool_executor>
-
namespace host#
-
namespace execution
-
namespace experimental
- template<typename Executor> block_executor< Executor > >
Public Types
-
using type = hpx::execution::parallel_execution_tag#
-
using type = hpx::execution::parallel_execution_tag#
- template<typename Executor> block_executor< Executor > > : public is_bulk_one_way_executor< Executor >
- template<typename Executor> block_executor< Executor > > : public is_bulk_two_way_executor< Executor >
- template<typename Executor> block_executor< Executor > > : public is_never_blocking_one_way_executor< Executor >
- template<typename Executor> block_executor< Executor > > : public is_one_way_executor< Executor >
- template<typename Executor> block_executor< Executor > > : public is_two_way_executor< Executor >
-
namespace experimental
-
namespace compute#
hpx/compute_local/host/block_fork_join_executor.hpp#
Defined in header hpx/compute_local/host/block_fork_join_executor.hpp.
See Public API for a list of names and headers that are part of the public HPX API.
-
namespace hpx
-
namespace execution
-
namespace experimental
-
class block_fork_join_executor#
- #include <block_fork_join_executor.hpp>
An executor with fork-join (blocking) semantics.
The block_fork_join_executor creates on construction a set of worker threads that are kept alive for the duration of the executor. Copying the executor has reference semantics, i.e. copies of a fork_join_executor hold a reference to the worker threads of the original instance. Scheduling work through the executor concurrently from different threads is undefined behaviour.
The executor keeps a set of worker threads alive for the lifetime of the executor, meaning other work will not be executed while the executor is busy or waiting for work. The executor has a customizable delay after which it will yield to other work. Since starting and resuming the worker threads is a slow operation the executor should be reused whenever possible for multiple adjacent parallel algorithms or invocations of bulk_(a)sync_execute.
This behaviour is similar to the plain fork_join_executor except that the block_fork_join_executor creates a hierarchy of fork_join_executors, one for each target used to initialize it.
Public Functions
-
inline explicit block_fork_join_executor(threads::thread_priority const priority = threads::thread_priority::bound, threads::thread_stacksize const stacksize = threads::thread_stacksize::small_, fork_join_executor::loop_schedule const schedule = fork_join_executor::loop_schedule::static_, std::chrono::nanoseconds const yield_delay = std::chrono::milliseconds(1))#
Construct a block_fork_join_executor.
Note
This constructor will create one fork_join_executor for each numa domain
- Parameters
priority – The priority of the worker threads.
stacksize – The stacksize of the worker threads. Must not be nostack.
schedule – The loop schedule of the parallel regions.
yield_delay – The time after which the executor yields to other work if it has not received any new work for execution.
-
inline explicit block_fork_join_executor(std::vector<compute::host::target> const &targets, threads::thread_priority const priority = threads::thread_priority::bound, threads::thread_stacksize const stacksize = threads::thread_stacksize::small_, fork_join_executor::loop_schedule const schedule = fork_join_executor::loop_schedule::static_, std::chrono::nanoseconds const yield_delay = std::chrono::milliseconds(1))#
Construct a block_fork_join_executor.
Note
This constructor will create one fork_join_executor for each given target
- Parameters
targets – The list of targets to use for thread placement
priority – The priority of the worker threads.
stacksize – The stacksize of the worker threads. Must not be nostack.
schedule – The loop schedule of the parallel regions.
yield_delay – The time after which the executor yields to other work if it has not received any new work for execution.
-
template<typename F, typename S, typename ...Ts>
inline void bulk_sync_execute_helper(F &&f, S const &shape, Ts&&... ts)#
- template<typename F, typename S, typename... Ts> inline requires (!std::is_integral_v< S >) friend void tag_invoke(hpx
- template<typename F, typename S, typename... Ts> inline requires (!std::is_integral_v< S >) friend decltype(auto) tag_invoke(hpx
- template<typename F, typename... Fs> inline requires (std::is_invocable_v< F > &&(std::is_invocable_v< Fs > &&...)) friend decltype(auto) tag_invoke(hpx
- template<typename F, typename... Fs> inline requires (std::is_invocable_v< F > &&(std::is_invocable_v< Fs > &&...)) friend decltype(auto) tag_invoke(hpx
- template<typename Tag, typename Property> requires (hpx::execution::experimental::is_scheduling_property_v< Tag > &&hpx::functional::is_tag_invocable_v< Tag, fork_join_executor, Property >) friend block_fork_join_executor tag_invoke(Tag tag
- template<typename Tag> requires (hpx::execution::experimental::is_scheduling_property_v< Tag > &&hpx::functional::is_tag_invocable_v< Tag, fork_join_executor >) friend decltype(auto) tag_invoke(Tag tag
Public Members
-
block_fork_join_executor const &exec#
- block_fork_join_executor const Property &&prop noexcept {auto exec_with_prop = exec
-
exec_with_prop exec_ = hpx::functional::tag_invoke(tag, exec.exec_, HPX_FORWARD(Property, prop))#
- return exec_with_prop
- block_fork_join_executor const &exec noexcept {return hpx::functional::tag_invoke(tag, exec.exec_)
-
inline explicit block_fork_join_executor(threads::thread_priority const priority = threads::thread_priority::bound, threads::thread_stacksize const stacksize = threads::thread_stacksize::small_, fork_join_executor::loop_schedule const schedule = fork_join_executor::loop_schedule::static_, std::chrono::nanoseconds const yield_delay = std::chrono::milliseconds(1))#
-
class block_fork_join_executor#
-
namespace experimental
-
namespace execution
config#
See Public API for a list of names and headers that are part of the public HPX API.
hpx/config/endian.hpp#
Defined in header hpx/config/endian.hpp.
See Public API for a list of names and headers that are part of the public HPX API.
contracts#
See Public API for a list of names and headers that are part of the public HPX API.
HPX_PRE, HPX_POST, HPX_CONTRACT_ASSERT#
Defined in header hpx/contracts.hpp.
See Public API for a list of names and headers that are part of the public HPX API.
coroutines#
See Public API for a list of names and headers that are part of the public HPX API.
hpx/coroutines/thread_enums.hpp#
Defined in header hpx/coroutines/thread_enums.hpp.
See Public API for a list of names and headers that are part of the public HPX API.
-
namespace hpx
-
namespace threads#
Enums
-
enum class thread_schedule_state : std::int8_t#
The thread_schedule_state enumerator encodes the current state of a thread instance
Values:
-
enumerator unknown#
-
enumerator active#
thread is currently active (running, has resources)
-
enumerator pending#
thread is pending (ready to run, but no hardware resource available)
-
enumerator suspended#
thread has been suspended (waiting for synchronization event, but still known and under control of the thread-manager)
-
enumerator depleted#
thread has been depleted (deeply suspended, it is not known to the thread-manager)
-
enumerator terminated#
thread has been stopped and may be garbage collected
-
enumerator staged#
this is not a real thread state, but allows to reference staged task descriptions, which eventually will be converted into thread objects
-
enumerator pending_do_not_schedule#
this is not a real thread state, but allows to create a thread in pending state without scheduling it (internal, do not use)
-
enumerator pending_boost#
this is not a real thread state, but allows to suspend a thread in pending state without high priority rescheduling
-
enumerator deleted#
thread has been stopped and was deleted
-
enumerator unknown#
-
enum class thread_priority : std::int8_t#
This enumeration lists all possible thread-priorities for HPX threads.
Values:
-
enumerator unknown#
-
enumerator default_#
Will assign the priority of the task to the default (normal) priority.
-
enumerator low#
Task goes onto a special low priority queue and will not be executed until all high/normal priority tasks are done, even if they are added after the low priority task.
-
enumerator normal#
Task will be executed when it is taken from the normal priority queue, this is usually a first in-first-out ordering of tasks (depending on scheduler choice). This is the default priority.
-
enumerator high_recursive#
The task is a high priority task and any child tasks spawned by this task will be made high priority as well - unless they are specifically flagged as non default priority.
-
enumerator boost#
Same as thread_priority_high except that the thread will fall back to thread_priority_normal if resumed after being suspended.
-
enumerator high#
Task goes onto a special high priority queue and will be executed before normal/low priority tasks are taken (some schedulers modify the behavior slightly and the documentation for those should be consulted).
-
enumerator bound#
Task goes onto a special high priority queue and will never be stolen by another thread after initial assignment. This should be used for thread placement tasks such as OpenMP type for loops.
-
enumerator initially_bound#
Task initially goes onto a special high priority queue and will never be stolen by another thread after initial assignment. If the thread is rescheduled later, it will use normal priority.
-
enumerator unknown#
-
enum class thread_restart_state : std::int8_t#
The thread_restart_state enumerator encodes the reason why a thread is being restarted
Values:
-
enumerator unknown#
-
enumerator signaled#
The thread has been signaled.
-
enumerator timeout#
The thread has been reactivated after a timeout.
-
enumerator terminate#
The thread needs to be terminated.
-
enumerator abort#
The thread needs to be aborted.
-
enumerator unknown#
-
enum class thread_stacksize : std::int8_t#
A thread_stacksize references any of the possible stack-sizes for HPX threads.
Values:
-
enumerator unknown#
-
enumerator small_#
use small stack size (the underscore is to work around ‘small’ being defined to char on Windows)
-
enumerator medium#
use medium sized stack size
-
enumerator large#
use large stack size
-
enumerator huge#
use very large stack size
-
enumerator nostack#
this thread does not suspend (does not need a stack)
-
enumerator current#
use size of current thread’s stack
-
enumerator default_#
use default stack size
-
enumerator minimal#
use minimally stack size
-
enumerator maximal#
use maximally stack size
-
enumerator unknown#
-
enum class thread_schedule_hint_mode : std::int8_t#
The type of hint given when creating new tasks.
Values:
-
enumerator none#
A hint that leaves the choice of scheduling entirely up to the scheduler.
-
enumerator thread#
A hint that tells the scheduler to prefer scheduling a task on the local thread number associated with this hint. Local thread numbers are indexed from zero. It is up to the scheduler to decide how to interpret thread numbers that are larger than the number of threads available to the scheduler. Typically, thread numbers will wrap around when too large.
-
enumerator numa#
A hint that tells the scheduler to prefer scheduling a task on the NUMA domain associated with this hint. NUMA domains are indexed from zero. It is up to the scheduler to decide how to interpret NUMA domain indices that are larger than the number of available NUMA domains to the scheduler. Typically, indices will wrap around when too large.
-
enumerator none#
-
enum class thread_placement_hint : std::int8_t#
The type of hint given to the scheduler related to thread placement
The type of hint given to the scheduler related running a thread as a child directly in the context of the parent thread
Values:
-
enumerator none#
No hint is specified. The implementation is free to chose what placement methods to use.
-
enumerator depth_first#
A hint that tells the scheduler to prefer spreading thread placement on a depth-first basis (i.e. consecutively scheduled threads are placed on the same core).
-
enumerator breadth_first#
A hint that tells the scheduler to prefer spreading thread placement on a breadth-first basis (i.e. consecutively scheduled threads are placed on the neighboring cores).
-
enumerator depth_first_reverse#
A hint that tells the scheduler to prefer spreading thread placement on a depth-first basis (i.e. consecutively scheduled threads are placed on the same core). Threads are being scheduled in reverse order.
-
enumerator breadth_first_reverse#
A hint that tells the scheduler to prefer spreading thread placement on a breadth-first basis (i.e. consecutively scheduled threads are placed on the neighboring cores). Threads are being scheduled in reverse order.
-
enumerator none#
-
enum class thread_sharing_hint : std::int8_t#
The type of hint given to the scheduler related to whether it is ok to share the invoked function object between threads
Values:
-
enumerator none#
No hint is specified. The implementation is free to chose what sharing methods to use.
A hint that tells the scheduler to avoid sharing the given function (object) between threads.
-
enumerator do_not_combine_tasks#
A hint that tells the scheduler to avoid combining tasks on the same thread. This is important for tasks that may synchronize between each other, which could lead to deadlocks if those tasks are combined running by the same thread.
-
enumerator none#
Functions
- HPX_CXX_CORE_EXPORT std::ostream & operator<< (std::ostream &os, thread_schedule_state t)
- HPX_CXX_CORE_EXPORT char const * get_thread_state_name (thread_schedule_state state) noexcept
Returns the name of the given state.
Get the readable string representing the name of the given thread_state constant.
- Parameters
state – this represents the thread state.
- HPX_CXX_CORE_EXPORT std::ostream & operator<< (std::ostream &os, thread_priority t)
- HPX_CXX_CORE_EXPORT char const * get_thread_priority_name (thread_priority priority) noexcept
Return the thread priority name.
Get the readable string representing the name of the given thread_priority constant.
- Parameters
priority – this represents the thread priority.
- HPX_CXX_CORE_EXPORT std::ostream & operator<< (std::ostream &os, thread_restart_state t)
- HPX_CXX_CORE_EXPORT char const * get_thread_state_ex_name (thread_restart_state state) noexcept
Get the readable string representing the name of the given thread_restart_state constant.
- HPX_CXX_CORE_EXPORT char const * get_thread_state_name (thread_state state) noexcept
Get the readable string representing the name of the given thread_state constant.
- HPX_CXX_CORE_EXPORT std::ostream & operator<< (std::ostream &os, thread_stacksize t)
- HPX_CXX_CORE_EXPORT char const * get_stack_size_enum_name (thread_stacksize size) noexcept
Returns the stack size name.
Get the readable string representing the given stack size constant.
- Parameters
size – this represents the stack size
- constexpr HPX_CXX_CORE_EXPORT bool do_not_share_function (thread_sharing_hint hint) noexcept
- constexpr HPX_CXX_CORE_EXPORT bool do_not_combine_tasks (thread_sharing_hint hint) noexcept
- constexpr HPX_CXX_CORE_EXPORT thread_sharing_hint operator| (thread_sharing_hint lhs, thread_sharing_hint rhs) noexcept
- constexpr HPX_CXX_CORE_EXPORT bool run_as_child (thread_execution_hint hint) noexcept
Variables
- constexpr HPX_CXX_CORE_EXPORT thread_execution_hint default_runs_as_child_hint = thread_execution_hint::none
Default value to use for runs-as-child mode (if true, then futures will attempt to execute associated threads directly if they have not started running).
-
struct thread_schedule_hint#
- #include <thread_enums.hpp>
A hint given to a scheduler to guide where a task should be scheduled.
A scheduler is free to ignore the hint, or modify the hint to suit the resources available to the scheduler.
Public Functions
-
inline constexpr thread_schedule_hint() noexcept#
Construct a default hint with mode thread_schedule_hint_mode::none.
-
inline explicit constexpr thread_schedule_hint(std::int16_t const thread_hint, thread_placement_hint placement = thread_placement_hint::none, thread_execution_hint runs_as_child = default_runs_as_child_hint, thread_sharing_hint sharing = thread_sharing_hint::none) noexcept#
Construct a hint with mode thread_schedule_hint_mode::thread and the given hint as the local thread number.
-
inline constexpr thread_schedule_hint(thread_schedule_hint_mode const mode, std::int16_t const hint, thread_placement_hint placement = thread_placement_hint::none, thread_execution_hint runs_as_child = default_runs_as_child_hint, thread_sharing_hint sharing = thread_sharing_hint::none) noexcept#
Construct a hint with the given mode and hint. The numerical hint is unused when the mode is thread_schedule_hint_mode::none.
-
inline explicit constexpr thread_schedule_hint(thread_placement_hint placement) noexcept#
Construct a hint with the given placement hint.
-
inline explicit constexpr thread_schedule_hint(thread_execution_hint runs_as_child) noexcept#
Construct a hint with the given execution hint.
-
inline explicit constexpr thread_schedule_hint(thread_sharing_hint sharing) noexcept#
Construct a hint with the given sharing hint.
-
inline constexpr thread_placement_hint placement_mode() const noexcept#
-
inline void placement_mode(thread_placement_hint bits) noexcept#
-
inline constexpr thread_sharing_hint sharing_mode() const noexcept#
-
inline void sharing_mode(thread_sharing_hint bits) noexcept#
-
inline constexpr thread_execution_hint runs_as_child_mode() const noexcept#
-
inline void runs_as_child_mode(thread_execution_hint bits) noexcept#
Public Members
-
std::int16_t hint = -1#
The hint associated with the mode. The interpretation of this hint depends on the given mode.
-
thread_schedule_hint_mode mode = thread_schedule_hint_mode::none#
The mode of the scheduling hint.
-
inline constexpr thread_schedule_hint() noexcept#
-
enum class thread_schedule_state : std::int8_t#
-
namespace threads#
hpx/coroutines/thread_id_type.hpp#
Defined in header hpx/coroutines/thread_id_type.hpp.
See Public API for a list of names and headers that are part of the public HPX API.
-
template<>
struct hash<::hpx::threads::thread_id_ref># Public Functions
-
inline std::size_t operator()(::hpx::threads::thread_id_ref const &v) const noexcept#
-
inline std::size_t operator()(::hpx::threads::thread_id_ref const &v) const noexcept#
-
namespace hpx
-
namespace threads
-
Variables
- constexpr HPX_CXX_CORE_EXPORT const thread_id invalid_thread_id
-
struct thread_id#
Public Functions
-
constexpr thread_id() noexcept = default#
-
~thread_id() = default#
-
inline explicit constexpr thread_id(thread_id_repr thrd) noexcept#
-
inline constexpr thread_id &operator=(thread_id_repr rhs) noexcept#
-
inline explicit constexpr operator bool() const noexcept#
-
inline constexpr thread_id_repr get() const noexcept#
-
inline constexpr void reset() noexcept#
Private Types
-
using thread_id_repr = void*#
Private Members
-
thread_id_repr thrd_ = nullptr#
Friends
- inline friend constexpr friend bool operator== (std::nullptr_t, thread_id const &rhs) noexcept
- inline friend constexpr friend bool operator!= (std::nullptr_t, thread_id const &rhs) noexcept
- inline friend constexpr friend bool operator== (thread_id const &lhs, std::nullptr_t) noexcept
- inline friend constexpr friend bool operator!= (thread_id const &lhs, std::nullptr_t) noexcept
- inline friend constexpr friend bool operator== (thread_id const &lhs, thread_id const &rhs) noexcept
- inline friend constexpr friend bool operator!= (thread_id const &lhs, thread_id const &rhs) noexcept
- inline friend constexpr friend bool operator< (thread_id const &lhs, thread_id const &rhs) noexcept
- inline friend constexpr friend bool operator> (thread_id const &lhs, thread_id const &rhs) noexcept
- inline friend constexpr friend bool operator<= (thread_id const &lhs, thread_id const &rhs) noexcept
- inline friend constexpr friend bool operator>= (thread_id const &lhs, thread_id const &rhs) noexcept
-
constexpr thread_id() noexcept = default#
-
struct thread_id_ref#
Public Types
-
using thread_repr = detail::thread_data_reference_counting#
Public Functions
-
thread_id_ref() noexcept = default#
-
thread_id_ref(thread_id_ref const&) = default#
-
thread_id_ref &operator=(thread_id_ref const&) = default#
-
thread_id_ref(thread_id_ref &&rhs) noexcept = default#
-
thread_id_ref &operator=(thread_id_ref &&rhs) noexcept = default#
-
~thread_id_ref() = default#
-
inline explicit thread_id_ref(thread_id_repr const &thrd) noexcept#
-
inline explicit thread_id_ref(thread_id_repr &&thrd) noexcept#
-
inline thread_id_ref &operator=(thread_id_repr const &rhs) noexcept#
-
inline thread_id_ref &operator=(thread_id_repr &&rhs) noexcept#
-
inline explicit thread_id_ref(thread_repr *thrd, thread_id_addref addref = thread_id_addref::yes) noexcept#
-
inline thread_id_ref &operator=(thread_repr *rhs) noexcept#
-
inline thread_id_ref &operator=(thread_id const &noref)#
-
inline thread_id_ref &operator=(thread_id &&noref) noexcept#
-
inline explicit constexpr operator bool() const noexcept#
-
inline constexpr thread_id_repr &get() & noexcept#
-
inline thread_id_repr &&get() && noexcept#
-
inline constexpr thread_id_repr const &get() const & noexcept#
-
inline void reset() noexcept#
-
inline void reset(thread_repr *thrd, bool add_ref = true) noexcept#
-
inline constexpr thread_repr *detach() noexcept#
Private Members
-
thread_id_repr thrd_#
Friends
- inline friend constexpr friend bool operator== (std::nullptr_t, thread_id_ref const &rhs) noexcept
- inline friend constexpr friend bool operator!= (std::nullptr_t, thread_id_ref const &rhs) noexcept
- inline friend constexpr friend bool operator== (thread_id_ref const &lhs, std::nullptr_t) noexcept
- inline friend constexpr friend bool operator!= (thread_id_ref const &lhs, std::nullptr_t) noexcept
- inline friend constexpr friend bool operator== (thread_id_ref const &lhs, thread_id_ref const &rhs) noexcept
- inline friend constexpr friend bool operator!= (thread_id_ref const &lhs, thread_id_ref const &rhs) noexcept
- inline friend constexpr friend bool operator< (thread_id_ref const &lhs, thread_id_ref const &rhs) noexcept
- inline friend constexpr friend bool operator> (thread_id_ref const &lhs, thread_id_ref const &rhs) noexcept
- inline friend constexpr friend bool operator<= (thread_id_ref const &lhs, thread_id_ref const &rhs) noexcept
- inline friend constexpr friend bool operator>= (thread_id_ref const &lhs, thread_id_ref const &rhs) noexcept
-
friend std::ostream &operator<<(std::ostream &os, thread_id_ref const &id)#
-
friend void format_value(std::ostream &os, std::string_view spec, thread_id_ref const &id)#
-
using thread_repr = detail::thread_data_reference_counting#
-
namespace threads
datastructures#
See Public API for a list of names and headers that are part of the public HPX API.
hpx::any_nonser. hpx::bad_any_cast, hpx::unique_any_nonser, hpx::any_cast, hpx::make_any_nonser, hpx::make_unique_any_nonser#
Defined in header hpx/any.hpp.
See Public API for a list of names and headers that are part of the public HPX API.
-
template<>
class basic_any<void, void, void, std::true_type># Public Functions
-
inline constexpr basic_any() noexcept#
- template<typename T> requires (!std::is_same_v< basic_any, std::decay_t< T >>) explicit basic_any(T &&x
- inline std::enable_if_t< std::is_copy_constructible_v< std::decay_t< T > > > typename Ts requires (std::is_constructible_v< std::decay_t< T >, Ts... > &&std::is_copy_constructible_v< std::decay_t< T >>) explicit basic_any(std
- template<typename T, typename U, typename... Ts> inline requires (std::is_constructible_v< std::decay_t< T >, Ts... > &&std::is_copy_constructible_v< std::decay_t< T >>) explicit basic_any(std
-
inline ~basic_any()#
- template<typename T> requires (!std::is_same_v< basic_any, std::decay_t< T >> &&std::is_copy_constructible_v< std::decay_t< T >>) basic_any &operator
-
inline constexpr basic_any() noexcept#
-
template<typename Char>
class basic_any<void, void, Char, std::true_type># Public Functions
-
inline constexpr basic_any() noexcept#
- template<typename T> requires (!std::is_same_v< basic_any, std::decay_t< T >>) explicit basic_any(T &&x
- inline std::enable_if_t< std::is_copy_constructible_v< std::decay_t< T > > > typename Ts requires (std::is_constructible_v< std::decay_t< T >, Ts... > &&std::is_copy_constructible_v< std::decay_t< T >>) explicit basic_any(std
- template<typename T, typename U, typename... Ts> inline requires (std::is_constructible_v< std::decay_t< T >, Ts... > &&std::is_copy_constructible_v< std::decay_t< T >>) explicit basic_any(std
-
inline ~basic_any()#
- template<typename T> requires (!std::is_same_v< basic_any, std::decay_t< T >> &&std::is_copy_constructible_v< std::decay_t< T >>) basic_any &operator
-
inline constexpr basic_any() noexcept#
-
template<>
class basic_any<void, void, void, std::false_type># Public Functions
-
inline constexpr basic_any() noexcept#
- template<typename T> requires (!std::is_same_v< basic_any, std::decay_t< T >>) explicit basic_any(T &&x
- inline std::enable_if_t< std::is_move_constructible_v< std::decay_t< T > > > typename Ts requires (std::is_constructible_v< std::decay_t< T >, Ts... > &&std::is_copy_constructible_v< std::decay_t< T >>) explicit basic_any(std
- template<typename T, typename U, typename... Ts> inline requires (std::is_constructible_v< std::decay_t< T >, Ts... > &&std::is_copy_constructible_v< std::decay_t< T >>) explicit basic_any(std
-
inline ~basic_any()#
- template<typename T> requires (!std::is_same_v< basic_any, std::decay_t< T >> &&std::is_move_constructible_v< std::decay_t< T >>) basic_any &operator
-
inline constexpr basic_any() noexcept#
-
template<typename Char>
class basic_any<void, void, Char, std::false_type># Public Functions
-
inline constexpr basic_any() noexcept#
- template<typename T> requires (!std::is_same_v< basic_any, std::decay_t< T >>) explicit basic_any(T &&x
- inline std::enable_if_t< std::is_move_constructible_v< std::decay_t< T > > > typename Ts requires (std::is_constructible_v< std::decay_t< T >, Ts... > &&std::is_copy_constructible_v< std::decay_t< T >>) explicit basic_any(std
- template<typename T, typename U, typename... Ts> inline requires (std::is_constructible_v< std::decay_t< T >, Ts... > &&std::is_copy_constructible_v< std::decay_t< T >>) explicit basic_any(std
-
inline ~basic_any()#
- template<typename T> requires (!std::is_same_v< basic_any, std::decay_t< T >> &&std::is_move_constructible_v< std::decay_t< T >>) basic_any &operator
-
inline constexpr basic_any() noexcept#
-
namespace hpx
Top level HPX namespace.
Typedefs
Functions
- template<typename T, typename... Ts> HPX_CXX_CORE_EXPORT util::basic_any< void, void, void, std::true_type > make_any_nonser (Ts &&... ts)
- template<typename T, typename U, typename... Ts> HPX_CXX_CORE_EXPORT util::basic_any< void, void, void, std::true_type > make_any_nonser (std::initializer_list< U > il, Ts &&... ts)
- template<typename T, typename... Ts> HPX_CXX_CORE_EXPORT util::basic_any< void, void, void, std::false_type > make_unique_any_nonser (Ts &&... ts)
- template<typename T, typename U, typename... Ts> HPX_CXX_CORE_EXPORT util::basic_any< void, void, void, std::false_type > make_unique_any_nonser (std::initializer_list< U > il, Ts &&... ts)
- template<typename T> HPX_CXX_CORE_EXPORT util::basic_any< void, void, void, std::true_type > make_any_nonser (T &&t)
- template<typename T> HPX_CXX_CORE_EXPORT util::basic_any< void, void, void, std::false_type > make_unique_any_nonser (T &&t)
- template<typename T, typename IArch, typename OArch, typename Char, typename Copyable> HPX_CXX_CORE_EXPORT T * any_cast (util::basic_any< IArch, OArch, Char, Copyable > *operand) noexcept
Performs type-safe access to the contained object.
- Parameters
operand – target any object
- Returns
If operand is not a null pointer, and the typeid of the requested T matches that of the contents of operand, a pointer to the value contained by operand, otherwise a null pointer.
- template<typename T, typename IArch, typename OArch, typename Char, typename Copyable> HPX_CXX_CORE_EXPORT T const * any_cast (util::basic_any< IArch, OArch, Char, Copyable > const *operand) noexcept
Performs type-safe access to the contained object.
- Parameters
operand – target any object
- Returns
If operand is not a null pointer, and the typeid of the requested T matches that of the contents of operand, a pointer to the value contained by operand, otherwise a null pointer.
- template<typename T, typename IArch, typename OArch, typename Char, typename Copyable> HPX_CXX_CORE_EXPORT T any_cast (util::basic_any< IArch, OArch, Char, Copyable > &operand)
Performs type-safe access to the contained object. Let U be std::remove_cv_t<std::remove_reference_t<T>> The program is ill-formed if std::is_constructible_v<T, U&> is false.
- Parameters
operand – target any object
- Returns
static_cast<T>(*std::any_cast<U>(&operand))
- template<typename T, typename IArch, typename OArch, typename Char, typename Copyable> HPX_CXX_CORE_EXPORT T const & any_cast (util::basic_any< IArch, OArch, Char, Copyable > const &operand)
Performs type-safe access to the contained object. Let U be std::remove_cv_t<std::remove_reference_t<T>> The program is ill-formed if std::is_constructible_v<T, const U&> is false.
- Parameters
operand – target any object
- Returns
static_cast<T>(*std::any_cast<U>(&operand))
-
struct bad_any_cast : public bad_cast#
- #include <any.hpp>
Defines a type of object to be thrown by the value-returning forms of hpx::any_cast on failure.
Public Functions
-
inline bad_any_cast(std::type_info const &src, std::type_info const &dest)#
Constructs a new bad_any_cast object with an implementation-defined null-terminated byte string which is accessible through what().
-
inline char const *what() const noexcept override#
Returns the explanatory string.
Note
Implementations are allowed but not required to override what().
- Returns
Pointer to a null-terminated string with explanatory information. The string is suitable for conversion and display as a std::wstring. The pointer is guaranteed to be valid at least until the exception object from which it is obtained is destroyed, or until a non-const member function (e.g. copy assignment operator) on the exception object is called.
-
inline bad_any_cast(std::type_info const &src, std::type_info const &dest)#
-
namespace util
Typedefs
Functions
- template<typename IArch, typename OArch, typename Char, typename Copyable, typename Enable = std::enable_if_t<!std::is_void_v<Char>>> HPX_CXX_CORE_EXPORT std::basic_istream< Char > & operator>> (std::basic_istream< Char > &i, basic_any< IArch, OArch, Char, Copyable > &obj)
- template<typename IArch, typename OArch, typename Char, typename Copyable, typename Enable = std::enable_if_t<!std::is_void_v<Char>>> HPX_CXX_CORE_EXPORT std::basic_ostream< Char > & operator<< (std::basic_ostream< Char > &o, basic_any< IArch, OArch, Char, Copyable > const &obj)
- template<typename IArch, typename OArch, typename Char, typename Copyable> HPX_CXX_CORE_EXPORT void swap (basic_any< IArch, OArch, Char, Copyable > &lhs, basic_any< IArch, OArch, Char, Copyable > &rhs) noexcept
- template<typename T, typename Char, typename... Ts> HPX_CXX_CORE_EXPORT basic_any< void, void, Char, std::true_type > make_streamable_any_nonser (Ts &&... ts)
- template<typename T, typename Char, typename U, typename... Ts> HPX_CXX_CORE_EXPORT basic_any< void, void, Char, std::true_type > make_streamable_any_nonser (std::initializer_list< U > il, Ts &&... ts)
- template<typename T, typename Char, typename... Ts> HPX_CXX_CORE_EXPORT basic_any< void, void, Char, std::false_type > make_streamable_unique_any_nonser (Ts &&... ts)
- template<typename T, typename Char, typename U, typename... Ts> HPX_CXX_CORE_EXPORT basic_any< void, void, Char, std::false_type > make_streamable_unique_any_nonser (std::initializer_list< U > il, Ts &&... ts)
- template<typename T, typename Char> HPX_CXX_CORE_EXPORT basic_any< void, void, Char, std::true_type > make_streamable_any_nonser (T &&t)
- template<typename T, typename Char> HPX_CXX_CORE_EXPORT basic_any< void, void, Char, std::false_type > make_streamable_unique_any_nonser (T &&t)
-
template<typename IArch, typename OArch, typename Char = char, typename Copyable = std::true_type>
class basic_any#
- template<typename Char> false_type >
Public Functions
-
inline constexpr basic_any() noexcept#
- template<typename T> requires (!std::is_same_v< basic_any, std::decay_t< T >>) explicit basic_any(T &&x
- inline std::enable_if_t< std::is_move_constructible_v< std::decay_t< T > > > typename Ts requires (std::is_constructible_v< std::decay_t< T >, Ts... > &&std::is_copy_constructible_v< std::decay_t< T >>) explicit basic_any(std
- template<typename T, typename U, typename... Ts> inline requires (std::is_constructible_v< std::decay_t< T >, Ts... > &&std::is_copy_constructible_v< std::decay_t< T >>) explicit basic_any(std
-
inline ~basic_any()#
- template<typename T> requires (!std::is_same_v< basic_any, std::decay_t< T >> &&std::is_move_constructible_v< std::decay_t< T >>) basic_any &operator
-
inline constexpr basic_any() noexcept#
- template<typename Char> true_type >
Public Functions
-
inline constexpr basic_any() noexcept
-
inline basic_any(basic_any const &x)
-
inline basic_any(basic_any &&x) noexcept
- template<typename T> requires (!std::is_same_v< basic_any, std::decay_t< T >>) explicit basic_any(T &&x
- inline std::enable_if_t< std::is_copy_constructible_v< std::decay_t< T > > > typename Ts requires (std::is_constructible_v< std::decay_t< T >, Ts... > &&std::is_copy_constructible_v< std::decay_t< T >>) explicit basic_any(std
- template<typename T, typename U, typename... Ts> inline requires (std::is_constructible_v< std::decay_t< T >, Ts... > &&std::is_copy_constructible_v< std::decay_t< T >>) explicit basic_any(std
-
inline ~basic_any()
- template<typename T> requires (!std::is_same_v< basic_any, std::decay_t< T >> &&std::is_copy_constructible_v< std::decay_t< T >>) basic_any &operator
-
inline constexpr basic_any() noexcept
- template<> false_type >
Public Functions
-
inline constexpr basic_any() noexcept
-
inline basic_any(basic_any &&x) noexcept
- template<typename T> requires (!std::is_same_v< basic_any, std::decay_t< T >>) explicit basic_any(T &&x
- inline std::enable_if_t< std::is_move_constructible_v< std::decay_t< T > > > typename Ts requires (std::is_constructible_v< std::decay_t< T >, Ts... > &&std::is_copy_constructible_v< std::decay_t< T >>) explicit basic_any(std
- template<typename T, typename U, typename... Ts> inline requires (std::is_constructible_v< std::decay_t< T >, Ts... > &&std::is_copy_constructible_v< std::decay_t< T >>) explicit basic_any(std
-
basic_any(basic_any const &x) = delete
-
inline ~basic_any()
- template<typename T> requires (!std::is_same_v< basic_any, std::decay_t< T >> &&std::is_move_constructible_v< std::decay_t< T >>) basic_any &operator
-
inline constexpr basic_any() noexcept
- template<> true_type >
Public Functions
-
inline constexpr basic_any() noexcept
-
inline basic_any(basic_any const &x)
-
inline basic_any(basic_any &&x) noexcept
- template<typename T> requires (!std::is_same_v< basic_any, std::decay_t< T >>) explicit basic_any(T &&x
- inline std::enable_if_t< std::is_copy_constructible_v< std::decay_t< T > > > typename Ts requires (std::is_constructible_v< std::decay_t< T >, Ts... > &&std::is_copy_constructible_v< std::decay_t< T >>) explicit basic_any(std
- template<typename T, typename U, typename... Ts> inline requires (std::is_constructible_v< std::decay_t< T >, Ts... > &&std::is_copy_constructible_v< std::decay_t< T >>) explicit basic_any(std
-
inline ~basic_any()
- template<typename T> requires (!std::is_same_v< basic_any, std::decay_t< T >> &&std::is_copy_constructible_v< std::decay_t< T >>) basic_any &operator
-
inline constexpr basic_any() noexcept
hpx::ignore, hpx::tuple, hpx::tuple_size, hpx::tuple_element, hpx::make_tuple, hpx::tie, hpx::forward_as_tuple, hpx::tuple_cat, hpx::get#
Defined in header hpx/tuple.hpp.
See Public API for a list of names and headers that are part of the public HPX API.
-
namespace hpx
Top level HPX namespace.
Functions
-
template<typename ...Ts>
constexpr tuple<util::decay_unwrap_t<Ts>...> make_tuple(Ts&&... ts)# Provides compile-time indexed access to the types of the elements of the tuple.
-
template<typename ...Ts>
constexpr tuple<Ts&&...> forward_as_tuple(Ts&&... ts)# Constructs a tuple of references to the arguments in args suitable for forwarding as an argument to a function. The tuple has rvalue reference data members when rvalues are used as arguments, and otherwise has lvalue reference data members.
- Parameters
ts – zero or more arguments to construct the tuple from
- Returns
hpx::tuple object created as if by
hpx::tuple<Ts&&...>(HPX_FORWARD(Ts, ts)...)
-
template<typename ...Ts>
constexpr tuple<Ts&...> tie(Ts&... ts)# Creates a tuple of lvalue references to its arguments or instances of hpx::ignore.
- Parameters
ts – zero or more lvalue arguments to construct the tuple from.
- Returns
hpx::tuple object containing lvalue references.
-
template<typename ...Tuples>
constexpr auto tuple_cat(Tuples&&... tuples)# Constructs a tuple that is a concatenation of all tuples in
tuples. The behavior is undefined if any type instd::decay_t<Tuples>… is not a specialization ofhpx::tuple. However, an implementation may choose to support types (such asstd::arrayandstd::pair) that follow the tuple-like protocol.- Parameters
tuples – - zero or more tuples to concatenate
- Returns
hpx::tuple object composed of all elements of all argument tuples constructed from
hpx::get<Is>(HPX_FORWARD(UTuple,t) for each individual element.
Variables
-
constexpr hpx::detail::ignore_type ignore = {}#
An object of unspecified type such that any value can be assigned to it with no effect. Intended for use with hpx::tie when unpacking a hpx::tuple, as a placeholder for the arguments that are not used. While the behavior of hpx::ignore outside of hpx::tie is not formally specified, some code guides recommend using hpx::ignore to avoid warnings from unused return values of [[nodiscard]] functions.
-
template<typename ...Ts>
class tuple# - #include <tuple.hpp>
Class template hpx::tuple is a fixed-size collection of heterogeneous values. It is a generalization of hpx::pair. If std::is_trivially_destructible<Ti>::value is true for every Ti in Ts, the destructor of tuple is trivial.
- Param Ts…
the types of the elements that the tuple stores.
-
template<std::size_t I, typename T, typename Enable = void>
struct tuple_element# - #include <tuple.hpp>
Provides compile-time indexed access to the types of the elements of a tuple-like type.
The primary template is not defined. An explicit (full) or partial specialization is required to make a type tuple-like.
-
template<typename T>
struct tuple_size# - #include <tuple.hpp>
Provides access to the number of elements in a tuple-like type as a compile-time constant expression.
The primary template is not defined. An explicit (full) or partial specialization is required to make a type tuple-like.
-
template<typename ...Ts>
hpx::any, hpx::make_any#
Defined in header hpx/any.hpp.
See Public API for a list of names and headers that are part of the public HPX API.
-
template<typename IArch, typename OArch, typename Char>
class basic_any<IArch, OArch, Char, std::true_type># Public Functions
-
inline constexpr basic_any() noexcept#
- template<typename T> requires (!std::is_same_v< basic_any, std::decay_t< T >>) basic_any(T &&x
- inline std::enable_if_t< std::is_copy_constructible_v< std::decay_t< T > > > typename Ts requires (std::is_constructible_v< std::decay_t< T >, Ts... > &&std::is_copy_constructible_v< std::decay_t< T >>) explicit basic_any(std
- template<typename T, typename U, typename... Ts> inline requires (std::is_constructible_v< std::decay_t< T >, Ts... > &&std::is_copy_constructible_v< std::decay_t< T >>) explicit basic_any(std
-
inline ~basic_any()#
- template<typename T> requires (!std::is_same_v< basic_any, std::decay_t< T >> &&std::is_copy_constructible_v< std::decay_t< T >>) basic_any &operator
Private Members
-
void *object#
-
inline constexpr basic_any() noexcept#
-
namespace hpx
Top level HPX namespace.
Typedefs
-
using any = util::basic_any<serialization::input_archive, serialization::output_archive, char, std::true_type>#
Functions
- template<typename T, typename Char> HPX_CXX_CORE_EXPORT util::basic_any< serialization::input_archive, serialization::output_archive, Char > make_any (T &&t)
Constructs an any object containing an object of type T, passing the provided arguments to T’s constructor. Equivalent to:
return std::any(std::in_place_type<T>, std::forward<Args>(args)...);
-
namespace util
Typedefs
-
using wany = basic_any<serialization::input_archive, serialization::output_archive, wchar_t, std::true_type>#
Functions
- template<typename T, typename Char, typename... Ts> HPX_CXX_CORE_EXPORT basic_any< serialization::input_archive, serialization::output_archive, Char > make_any (Ts &&... ts)
- template<typename T, typename Char, typename U, typename... Ts> HPX_CXX_CORE_EXPORT basic_any< serialization::input_archive, serialization::output_archive, Char > make_any (std::initializer_list< U > il, Ts &&... ts)
- template<typename IArch, typename OArch, typename Char> true_type >
Public Functions
-
inline constexpr basic_any() noexcept
-
inline basic_any(basic_any const &x)
-
inline basic_any(basic_any &&x) noexcept
- template<typename T> requires (!std::is_same_v< basic_any, std::decay_t< T >>) basic_any(T &&x
- inline std::enable_if_t< std::is_copy_constructible_v< std::decay_t< T > > > typename Ts requires (std::is_constructible_v< std::decay_t< T >, Ts... > &&std::is_copy_constructible_v< std::decay_t< T >>) explicit basic_any(std
- template<typename T, typename U, typename... Ts> inline requires (std::is_constructible_v< std::decay_t< T >, Ts... > &&std::is_copy_constructible_v< std::decay_t< T >>) explicit basic_any(std
-
inline ~basic_any()
- template<typename T> requires (!std::is_same_v< basic_any, std::decay_t< T >> &&std::is_copy_constructible_v< std::decay_t< T >>) basic_any &operator
-
inline void load(IArch &ar, unsigned const version)#
-
inline void save(OArch &ar, unsigned const version) const#
-
inline constexpr basic_any() noexcept
-
struct hash_any#
Public Functions
-
template<typename Char>
std::size_t operator()(basic_any<serialization::input_archive, serialization::output_archive, Char, std::true_type> const &elem) const#
-
template<typename Char>
-
using wany = basic_any<serialization::input_archive, serialization::output_archive, wchar_t, std::true_type>#
-
using any = util::basic_any<serialization::input_archive, serialization::output_archive, char, std::true_type>#
debugging#
See Public API for a list of names and headers that are part of the public HPX API.
hpx/debugging/print.hpp#
Defined in header hpx/debugging/print.hpp.
See Public API for a list of names and headers that are part of the public HPX API.
errors#
See Public API for a list of names and headers that are part of the public HPX API.
hpx/errors/define_error_info.hpp#
Defined in header hpx/errors/define_error_info.hpp.
See Public API for a list of names and headers that are part of the public HPX API.
hpx/errors/error.hpp#
Defined in header hpx/errors/error.hpp.
See Public API for a list of names and headers that are part of the public HPX API.
Defines
-
HPX_ERROR_UNSCOPED_ENUM_DEPRECATION_MSG#
-
namespace hpx
Enums
-
enum class error : std::int16_t#
Possible error conditions.
This enumeration lists all possible error conditions which can be reported from any of the API functions.
Values:
-
enumerator success#
The operation was successful.
-
enumerator no_success#
The operation did failed, but not in an unexpected manner.
-
enumerator not_implemented#
The operation is not implemented.
-
enumerator out_of_memory#
The operation caused an out of memory condition.
-
enumerator bad_action_code#
-
enumerator bad_component_type#
The specified component type is not known or otherwise invalid.
-
enumerator network_error#
A generic network error occurred.
-
enumerator version_too_new#
The version of the network representation for this object is too new.
-
enumerator version_too_old#
The version of the network representation for this object is too old.
-
enumerator version_unknown#
The version of the network representation for this object is unknown.
-
enumerator unknown_component_address#
-
enumerator duplicate_component_address#
The given global id has already been registered.
-
enumerator invalid_status#
The operation was executed in an invalid status.
-
enumerator bad_parameter#
One of the supplied parameters is invalid.
-
enumerator internal_server_error#
-
enumerator bad_request#
-
enumerator repeated_request#
-
enumerator lock_error#
-
enumerator duplicate_console#
There is more than one console locality.
-
enumerator no_registered_console#
There is no registered console locality available.
-
enumerator startup_timed_out#
-
enumerator uninitialized_value#
-
enumerator bad_response_type#
-
enumerator deadlock#
-
enumerator assertion_failure#
-
enumerator null_thread_id#
Attempt to invoke an API function from a non-HPX thread.
-
enumerator invalid_data#
-
enumerator yield_aborted#
The yield operation was aborted.
-
enumerator dynamic_link_failure#
-
enumerator commandline_option_error#
One of the options given on the command line is erroneous.
-
enumerator serialization_error#
There was an error during serialization of this object.
-
enumerator unhandled_exception#
An unhandled exception has been caught.
-
enumerator kernel_error#
The OS kernel reported an error.
-
enumerator broken_task#
The task associated with this future object is not available anymore.
-
enumerator task_moved#
The task associated with this future object has been moved.
-
enumerator task_already_started#
The task associated with this future object has already been started.
-
enumerator future_already_retrieved#
The future object has already been retrieved.
-
enumerator promise_already_satisfied#
The value for this future object has already been set.
-
enumerator future_does_not_support_cancellation#
The future object does not support cancellation.
-
enumerator future_can_not_be_cancelled#
The future can’t be canceled at this time.
-
enumerator no_state#
The future object has no valid shared state.
-
enumerator broken_promise#
The promise has been deleted.
-
enumerator thread_resource_error#
-
enumerator future_cancelled#
-
enumerator thread_cancelled#
-
enumerator thread_not_interruptable#
-
enumerator duplicate_component_id#
The component type has already been registered.
-
enumerator unknown_error#
An unknown error occurred.
-
enumerator bad_plugin_type#
The specified plugin type is not known or otherwise invalid.
-
enumerator filesystem_error#
The specified file does not exist or other filesystem related error.
-
enumerator bad_function_call#
equivalent of std::bad_function_call
-
enumerator task_canceled_exception#
parallel::task_canceled_exception
-
enumerator task_block_not_active#
task_region is not active
-
enumerator out_of_range#
Equivalent to std::out_of_range.
-
enumerator length_error#
Equivalent to std::length_error.
-
enumerator migration_needs_retry#
migration failed because of global race, retry
-
enumerator success#
Functions
- constexpr HPX_CXX_CORE_EXPORT bool operator== (int lhs, error rhs) noexcept
- constexpr HPX_CXX_CORE_EXPORT bool operator== (error lhs, int rhs) noexcept
- constexpr HPX_CXX_CORE_EXPORT bool operator!= (int lhs, error rhs) noexcept
- constexpr HPX_CXX_CORE_EXPORT bool operator!= (error lhs, int rhs) noexcept
- constexpr HPX_CXX_CORE_EXPORT bool operator< (int lhs, error rhs) noexcept
- constexpr HPX_CXX_CORE_EXPORT bool operator>= (int lhs, error rhs) noexcept
- constexpr HPX_CXX_CORE_EXPORT int operator& (error lhs, error rhs) noexcept
- constexpr HPX_CXX_CORE_EXPORT int operator& (int lhs, error rhs) noexcept
- constexpr HPX_CXX_CORE_EXPORT int operator|= (int &lhs, error rhs) noexcept
- HPX_CXX_CORE_EXPORT char const * get_error_name (error e) noexcept
Variables
-
constexpr error no_success = error::no_success#
-
constexpr error not_implemented = error::not_implemented#
-
constexpr error out_of_memory = error::out_of_memory#
-
constexpr error bad_action_code = error::bad_action_code#
-
constexpr error bad_component_type = error::bad_component_type#
-
constexpr error network_error = error::network_error#
-
constexpr error version_too_new = error::version_too_new#
-
constexpr error version_too_old = error::version_too_old#
-
constexpr error version_unknown = error::version_unknown#
-
constexpr error unknown_component_address = error::unknown_component_address#
-
constexpr error duplicate_component_address = error::duplicate_component_address#
-
constexpr error invalid_status = error::invalid_status#
-
constexpr error bad_parameter = error::bad_parameter#
-
constexpr error internal_server_error = error::internal_server_error#
-
constexpr error bad_request = error::bad_request#
-
constexpr error repeated_request = error::repeated_request#
-
constexpr error lock_error = error::lock_error#
-
constexpr error duplicate_console = error::duplicate_console#
-
constexpr error no_registered_console = error::no_registered_console#
-
constexpr error startup_timed_out = error::startup_timed_out#
-
constexpr error uninitialized_value = error::uninitialized_value#
-
constexpr error bad_response_type = error::bad_response_type#
-
constexpr error assertion_failure = error::assertion_failure#
-
constexpr error null_thread_id = error::null_thread_id#
-
constexpr error invalid_data = error::invalid_data#
-
constexpr error yield_aborted = error::yield_aborted#
-
constexpr error dynamic_link_failure = error::dynamic_link_failure#
-
constexpr error commandline_option_error = error::commandline_option_error#
-
constexpr error serialization_error = error::serialization_error#
-
constexpr error unhandled_exception = error::unhandled_exception#
-
constexpr error kernel_error = error::kernel_error#
-
constexpr error broken_task = error::broken_task#
-
constexpr error task_moved = error::task_moved#
-
constexpr error task_already_started = error::task_already_started#
-
constexpr error future_already_retrieved = error::future_already_retrieved#
-
constexpr error promise_already_satisfied = error::promise_already_satisfied#
-
constexpr error future_does_not_support_cancellation = error::future_does_not_support_cancellation#
-
constexpr error future_can_not_be_cancelled = error::future_can_not_be_cancelled#
-
constexpr error broken_promise = error::broken_promise#
-
constexpr error thread_resource_error = error::thread_resource_error#
-
constexpr error future_cancelled = error::future_cancelled#
-
constexpr error thread_cancelled = error::thread_cancelled#
-
constexpr error thread_not_interruptable = error::thread_not_interruptable#
-
constexpr error duplicate_component_id = error::duplicate_component_id#
-
constexpr error unknown_error = error::unknown_error#
-
constexpr error bad_plugin_type = error::bad_plugin_type#
-
constexpr error filesystem_error = error::filesystem_error#
-
constexpr error bad_function_call = error::bad_function_call#
-
constexpr error task_canceled_exception = error::task_canceled_exception#
-
constexpr error task_block_not_active = error::task_block_not_active#
-
constexpr error out_of_range = error::out_of_range#
-
constexpr error length_error = error::length_error#
-
constexpr error migration_needs_retry = error::migration_needs_retry#
-
enum class error : std::int16_t#
hpx::error_code#
Defined in header hpx/system_error.hpp.
See Public API for a list of names and headers that are part of the public HPX API.
-
namespace hpx
Unnamed Group
- inline HPX_CXX_CORE_EXPORT error_code make_error_code (std::exception_ptr const &e)
- inline HPX_CXX_CORE_EXPORT error_code make_error_code (error e, throwmode mode=throwmode::plain)
Returns a new error_code constructed from the given parameters.
- inline HPX_CXX_CORE_EXPORT error_code make_error_code (error e, char const *func, char const *file, long line, throwmode mode=throwmode::plain)
- inline HPX_CXX_CORE_EXPORT error_code make_error_code (error e, char const *msg, throwmode mode=throwmode::plain)
Returns error_code(e, msg, mode).
- inline HPX_CXX_CORE_EXPORT error_code make_error_code (error e, char const *msg, char const *func, char const *file, long line, throwmode mode=throwmode::plain)
- inline HPX_CXX_CORE_EXPORT error_code make_error_code (error e, std::string const &msg, throwmode mode=throwmode::plain)
Returns error_code(e, msg, mode).
- inline HPX_CXX_CORE_EXPORT error_code make_error_code (error e, std::string const &msg, char const *func, char const *file, long line, throwmode mode=throwmode::plain)
Functions
- HPX_CXX_CORE_EXPORT std::error_category const & get_hpx_category () noexcept
Returns generic HPX error category used for new errors.
- HPX_CXX_CORE_EXPORT std::error_category const & get_hpx_rethrow_category () noexcept
Returns generic HPX error category used for errors re-thrown after the exception has been de-serialized.
- inline HPX_CXX_CORE_EXPORT error_code make_success_code (throwmode mode=throwmode::plain)
Returns error_code(hpx::error::success, “success”, mode).
-
class error_code : public error_code#
- #include <error_code.hpp>
A hpx::error_code represents an arbitrary error condition.
The class hpx::error_code describes an object used to hold error code values, such as those originating from the operating system or other low-level application program interfaces.
Note
Class hpx::error_code is an adjunct to error reporting by exception
Public Functions
-
inline explicit error_code(throwmode mode = throwmode::plain)#
Construct an object of type error_code.
- Parameters
mode – The parameter
modespecifies whether the constructed hpx::error_code belongs to the error category hpx_category (if mode is plain, this is the default) or to the category hpx_category_rethrow (if mode is rethrow).- Throws
nothing –
-
explicit error_code(error e, throwmode mode = throwmode::plain)#
Construct an object of type error_code.
- Parameters
e – The parameter
eholds the hpx::error code the new exception should encapsulate.mode – The parameter
modespecifies whether the constructed hpx::error_code belongs to the error category hpx_category (if mode is plain, this is the default) or to the category hpx_category_rethrow (if mode is rethrow).
- Throws
nothing –
-
error_code(error e, char const *func, char const *file, long line, throwmode mode = throwmode::plain)#
Construct an object of type error_code.
- Parameters
e – The parameter
eholds the hpx::error code the new exception should encapsulate.func – The name of the function where the error was raised.
file – The file name of the code where the error was raised.
line – The line number of the code line where the error was raised.
mode – The parameter
modespecifies whether the constructed hpx::error_code belongs to the error category hpx_category (if mode is plain, this is the default) or to the category hpx_category_rethrow (if mode is rethrow).
- Throws
nothing –
-
error_code(error e, char const *msg, throwmode mode = throwmode::plain)#
Construct an object of type error_code.
- Parameters
e – The parameter
eholds the hpx::error code the new exception should encapsulate.msg – The parameter
msgholds the error message the new exception should encapsulate.mode – The parameter
modespecifies whether the constructed hpx::error_code belongs to the error category hpx_category (if mode is plain, this is the default) or to the category hpx_category_rethrow (if mode is rethrow).
- Throws
std::bad_alloc – (if allocation of a copy of the passed string fails).
-
error_code(error e, char const *msg, char const *func, char const *file, long line, throwmode mode = throwmode::plain)#
Construct an object of type error_code.
- Parameters
e – The parameter
eholds the hpx::error code the new exception should encapsulate.msg – The parameter
msgholds the error message the new exception should encapsulate.func – The name of the function where the error was raised.
file – The file name of the code where the error was raised.
line – The line number of the code line where the error was raised.
mode – The parameter
modespecifies whether the constructed hpx::error_code belongs to the error category hpx_category (if mode is plain, this is the default) or to the category hpx_category_rethrow (if mode is rethrow).
- Throws
std::bad_alloc – (if allocation of a copy of the passed string fails).
-
error_code(error e, std::string const &msg, throwmode mode = throwmode::plain)#
Construct an object of type error_code.
- Parameters
e – The parameter
eholds the hpx::error code the new exception should encapsulate.msg – The parameter
msgholds the error message the new exception should encapsulate.mode – The parameter
modespecifies whether the constructed hpx::error_code belongs to the error category hpx_category (if mode is plain, this is the default) or to the category hpx_category_rethrow (if mode is rethrow).
- Throws
std::bad_alloc – (if allocation of a copy of the passed string fails).
-
error_code(error e, std::string const &msg, char const *func, char const *file, long line, throwmode mode = throwmode::plain)#
Construct an object of type error_code.
- Parameters
e – The parameter
eholds the hpx::error code the new exception should encapsulate.msg – The parameter
msgholds the error message the new exception should encapsulate.func – The name of the function where the error was raised.
file – The file name of the code where the error was raised.
line – The line number of the code line where the error was raised.
mode – The parameter
modespecifies whether the constructed hpx::error_code belongs to the error category hpx_category (if mode is plain, this is the default) or to the category hpx_category_rethrow (if mode is rethrow).
- Throws
std::bad_alloc – (if allocation of a copy of the passed string fails).
-
error_code(error_code&&) = default#
-
error_code &operator=(error_code&&) = default#
-
~error_code() = default#
-
std::string get_message() const#
Return a reference to the error message stored in the hpx::error_code.
- Throws
nothing –
-
inline void clear()#
Clear this error_code object. The postconditions of invoking this method are.
value() == hpx::error::success and category() == hpx::get_hpx_category()
-
error_code(error_code const &rhs)#
Copy constructor for error_code
Note
This function maintains the error category of the left hand side if the right hand side is a success code.
-
error_code &operator=(error_code const &rhs)#
Assignment operator for error_code
Note
This function maintains the error category of the left hand side if the right hand side is a success code.
Private Functions
-
inline explicit error_code(throwmode mode = throwmode::plain)#
hpx::exception#
Defined in header hpx/exception.hpp.
See Public API for a list of names and headers that are part of the public HPX API.
-
namespace hpx
Typedefs
Functions
- HPX_CXX_CORE_EXPORT void set_custom_exception_info_handler (custom_exception_info_handler_type f)
- HPX_CXX_CORE_EXPORT void set_pre_exception_handler (pre_exception_handler_type f)
- HPX_CXX_CORE_EXPORT std::string get_error_what (exception_info const &xi)
Return the error message of the thrown exception.
The function hpx::get_error_what can be used to extract the diagnostic information element representing the error message as stored in the given exception instance.
See also
hpx::diagnostic_information(), hpx::get_error_host_name(), hpx::get_error_process_id(), hpx::get_error_function_name(), hpx::get_error_file_name(), hpx::get_error_line_number(), hpx::get_error_os_thread(), hpx::get_error_thread_id(), hpx::get_error_thread_description(), hpx::get_error() hpx::get_error_backtrace(), hpx::get_error_env(), hpx::get_error_config(), hpx::get_error_state()
- Parameters
xi – The parameter
ewill be inspected for the requested diagnostic information elements which have been stored at the point where the exception was thrown. This parameter can be one of the following types: hpx::exception_info, hpx::error_code, std::exception, or std::exception_ptr.- Throws
std::bad_alloc – (if one of the required allocations fails)
- Returns
The error message stored in the exception If the exception instance does not hold this information, the function will return an empty string.
- HPX_CXX_CORE_EXPORT error get_error (hpx::exception const &e)
Return the error code value of the exception thrown.
The function hpx::get_error can be used to extract the diagnostic information element representing the error value code as stored in the given exception instance.
See also
hpx::diagnostic_information(), hpx::get_error_host_name(), hpx::get_error_process_id(), hpx::get_error_function_name(), hpx::get_error_file_name(), hpx::get_error_line_number(), hpx::get_error_os_thread(), hpx::get_error_thread_id(), hpx::get_error_thread_description(), hpx::get_error_backtrace(), hpx::get_error_env(), hpx::get_error_what(), hpx::get_error_config(), hpx::get_error_state()
- Parameters
e – The parameter
ewill be inspected for the requested diagnostic information elements which have been stored at the point where the exception was thrown. This parameter can be one of the following types: hpx::exception, hpx::error_code, or std::exception_ptr.- Throws
nothing –
- Returns
The error value code of the locality where the exception was thrown. If the exception instance does not hold this information, the function will return hpx::naming::invalid_locality_id.
- HPX_CXX_CORE_EXPORT error get_error (hpx::error_code const &e)
- HPX_CXX_CORE_EXPORT std::string get_error_function_name (hpx::exception_info const &xi)
Return the function name from which the exception was thrown.
The function hpx::get_error_function_name can be used to extract the diagnostic information element representing the name of the function as stored in the given exception instance.
See also
hpx::diagnostic_information(), hpx::get_error_host_name(), hpx::get_error_process_id() hpx::get_error_file_name(), hpx::get_error_line_number(), hpx::get_error_os_thread(), hpx::get_error_thread_id(), hpx::get_error_thread_description(), hpx::get_error(), hpx::get_error_backtrace(), hpx::get_error_env(), hpx::get_error_what(), hpx::get_error_config(), hpx::get_error_state()
- Parameters
xi – The parameter
ewill be inspected for the requested diagnostic information elements which have been stored at the point where the exception was thrown. This parameter can be one of the following types: hpx::exception_info, hpx::error_code, std::exception, or std::exception_ptr.- Throws
std::bad_alloc – (if one of the required allocations fails)
- Returns
The name of the function from which the exception was thrown. If the exception instance does not hold this information, the function will return an empty string.
- HPX_CXX_CORE_EXPORT std::string get_error_file_name (hpx::exception_info const &xi)
Return the (source code) file name of the function from which the exception was thrown.
The function hpx::get_error_file_name can be used to extract the diagnostic information element representing the name of the source file as stored in the given exception instance.
See also
hpx::diagnostic_information(), hpx::get_error_host_name(), hpx::get_error_process_id(), hpx::get_error_function_name(), hpx::get_error_line_number(), hpx::get_error_os_thread(), hpx::get_error_thread_id(), hpx::get_error_thread_description(), hpx::get_error(), hpx::get_error_backtrace(), hpx::get_error_env(), hpx::get_error_what(), hpx::get_error_config(), hpx::get_error_state()
- Parameters
xi – The parameter
ewill be inspected for the requested diagnostic information elements which have been stored at the point where the exception was thrown. This parameter can be one of the following types: hpx::exception_info, hpx::error_code, std::exception, or std::exception_ptr.- Throws
std::bad_alloc – (if one of the required allocations fails)
- Returns
The name of the source file of the function from which the exception was thrown. If the exception instance does not hold this information, the function will return an empty string.
- HPX_CXX_CORE_EXPORT long get_error_line_number (hpx::exception_info const &xi)
Return the line number in the (source code) file of the function from which the exception was thrown.
The function hpx::get_error_line_number can be used to extract the diagnostic information element representing the line number as stored in the given exception instance.
See also
hpx::diagnostic_information(), hpx::get_error_host_name(), hpx::get_error_process_id(), hpx::get_error_function_name(), hpx::get_error_file_name() hpx::get_error_os_thread(), hpx::get_error_thread_id(), hpx::get_error_thread_description(), hpx::get_error(), hpx::get_error_backtrace(), hpx::get_error_env(), hpx::get_error_what(), hpx::get_error_config(), hpx::get_error_state()
- Parameters
xi – The parameter
ewill be inspected for the requested diagnostic information elements which have been stored at the point where the exception was thrown. This parameter can be one of the following types: hpx::exception_info, hpx::error_code, std::exception, or std::exception_ptr.- Throws
nothing –
- Returns
The line number of the place where the exception was thrown. If the exception instance does not hold this information, the function will return -1.
-
class bad_alloc_exception : public hpx::exception, public bad_alloc#
Public Functions
-
bad_alloc_exception()#
Construct a hpx::bad_alloc_exception.
-
error_code get_error_code(throwmode mode = throwmode::plain) const noexcept#
The function get_error_code() returns a hpx::error_code which represents the same error condition as this hpx::exception instance.
- Parameters
mode – The parameter
modespecifies whether the returned hpx::error_code belongs to the error category hpx_category (if mode is throwmode::plain, this is the default) or to the category hpx_category_rethrow (if mode is rethrow).
Public Static Functions
-
static inline constexpr error get_error() noexcept#
The function get_error() returns hpx::error::out_of_memory
- Throws
nothing –
-
bad_alloc_exception()#
-
class exception : public system_error#
- #include <exception.hpp>
A hpx::exception is the main exception type used by HPX to report errors.
The hpx::exception type is the main exception type used by HPX to report errors. Any exceptions thrown by functions in the HPX library are either of this type or of a type derived from it. This implies that it is always safe to use this type only in catch statements guarding HPX library calls.
Subclassed by hpx::bad_alloc_exception, hpx::exception_list
Public Functions
-
explicit exception(error e = hpx::error::success)#
Construct a hpx::exception from a hpx::error.
- Parameters
e – The parameter
eholds the hpx::error code the new exception should encapsulate.
-
explicit exception(std::system_error const &e)#
Construct a hpx::exception from a boost::system_error.
-
explicit exception(std::error_code const &e)#
Construct a hpx::exception from a boost::system::error_code (this is new for Boost V1.69). This constructor is required to compensate for the changes introduced as a resolution to LWG3162 (https://cplusplus.github.io/LWG/issue3162).
-
exception(error e, char const *msg, throwmode mode = throwmode::plain)#
Construct a hpx::exception from a hpx::error and an error message.
- Parameters
e – The parameter
eholds the hpx::error code the new exception should encapsulate.msg – The parameter
msgholds the error message the new exception should encapsulate.mode – The parameter
modespecifies whether the returned hpx::error_code belongs to the error category hpx_category (if mode is plain, this is the default) or to the category hpx_category_rethrow (if mode is rethrow).
-
exception(error e, std::string const &msg, throwmode mode = throwmode::plain)#
Construct a hpx::exception from a hpx::error and an error message.
- Parameters
e – The parameter
eholds the hpx::error code the new exception should encapsulate.msg – The parameter
msgholds the error message the new exception should encapsulate.mode – The parameter
modespecifies whether the returned hpx::error_code belongs to the error category hpx_category (if mode is plain, this is the default) or to the category hpx_category_rethrow (if mode is rethrow).
-
~exception() override#
Destruct a hpx::exception
- Throws
nothing –
-
error get_error() const noexcept#
The function get_error() returns the hpx::error code stored in the referenced instance of a hpx::exception. It returns the hpx::error code this exception instance was constructed from.
- Throws
nothing –
-
error_code get_error_code(throwmode mode = throwmode::plain) const noexcept#
The function get_error_code() returns a hpx::error_code which represents the same error condition as this hpx::exception instance.
- Parameters
mode – The parameter
modespecifies whether the returned hpx::error_code belongs to the error category hpx_category (if mode is throwmode::plain, this is the default) or to the category hpx_category_rethrow (if mode is rethrow).
-
explicit exception(error e = hpx::error::success)#
-
struct thread_interrupted : public exception#
- #include <exception.hpp>
A hpx::thread_interrupted is the exception type used by HPX to interrupt a running HPX thread.
The hpx::thread_interrupted type is the exception type used by HPX to interrupt a running thread.
A running thread can be interrupted by invoking the interrupt() member function of the corresponding hpx::thread object. When the interrupted thread next executes one of the specified interruption points (or if it is currently blocked whilst executing one) with interruption enabled, then a hpx::thread_interrupted exception will be thrown in the interrupted thread. If not caught, this will cause the execution of the interrupted thread to terminate. As with any other exception, the stack will be unwound, and destructors for objects of automatic storage duration will be executed.
If a thread wishes to avoid being interrupted, it can create an instance of hpx::this_thread::disable_interruption. Objects of this class disable interruption for the thread that created them on construction, and restore the interruption state to whatever it was before on destruction.
void f() { // interruption enabled here { hpx::this_thread::disable_interruption di; // interruption disabled { hpx::this_thread::disable_interruption di2; // interruption still disabled } // di2 destroyed, interruption state restored // interruption still disabled } // di destroyed, interruption state restored // interruption now enabled }
The effects of an instance of hpx::this_thread::disable_interruption can be temporarily reversed by constructing an instance of hpx::this_thread::restore_interruption, passing in the hpx::this_thread::disable_interruption object in question. This will restore the interruption state to what it was when the hpx::this_thread::disable_interruption object was constructed, and then disable interruption again when the hpx::this_thread::restore_interruption object is destroyed.
void g() { // interruption enabled here { hpx::this_thread::disable_interruption di; // interruption disabled { hpx::this_thread::restore_interruption ri(di); // interruption now enabled } // ri destroyed, interruption disable again } // di destroyed, interruption state restored // interruption now enabled }
At any point, the interruption state for the current thread can be queried by calling hpx::this_thread::interruption_enabled().
hpx/errors/exception_fwd.hpp#
Defined in header hpx/errors/exception_fwd.hpp.
See Public API for a list of names and headers that are part of the public HPX API.
-
namespace hpx
Enums
Functions
- constexpr HPX_CXX_CORE_EXPORT bool operator& (throwmode lhs, throwmode rhs) noexcept
Variables
- HPX_CXX_CORE_EXPORT error_code throws
Predefined error_code object used as “throw on error” tag.
The predefined hpx::error_code object hpx::throws is supplied for use as a “throw on error” tag.
Functions that specify an argument in the form ‘error_code& ec=throws’ (with appropriate namespace qualifiers), have the following error handling semantics:
If &ec != &throws and an error occurred: ec.value() returns the implementation specific error number for the particular error that occurred and ec.category() returns the error_category for ec.value().
If &ec != &throws and an error did not occur, ec.clear().
If an error occurs and &ec == &throws, the function throws an exception of type hpx::exception or of a type derived from it. The exception’s get_errorcode() member function returns a reference to a hpx::error_code object with the behavior as specified above.
hpx/errors/exception_list.hpp#
Defined in header hpx/errors/exception_list.hpp.
See Public API for a list of names and headers that are part of the public HPX API.
-
namespace hpx
-
class exception_list : public hpx::exception#
- #include <exception_list.hpp>
The class exception_list is a container of exception_ptr objects parallel algorithms may use to communicate uncaught exceptions encountered during parallel execution to the caller of the algorithm
The type exception_list::const_iterator fulfills the requirements of a forward iterator.
Public Types
-
using iterator = exception_list_type::const_iterator#
bidirectional iterator
Public Functions
-
inline std::size_t size() const noexcept#
The number of exception_ptr objects contained within the exception_list.
Note
Complexity: Constant time.
-
inline exception_list_type::const_iterator begin() const noexcept#
An iterator referring to the first exception_ptr object contained within the exception_list.
-
inline exception_list_type::const_iterator end() const noexcept#
An iterator which is the past-the-end value for the exception_list.
-
using iterator = exception_list_type::const_iterator#
-
class exception_list : public hpx::exception#
hpx/errors/macros.hpp#
Defined in header hpx/errors/macros.hpp.
See Public API for a list of names and headers that are part of the public HPX API.
Defines
-
HPX_THROW_EXCEPTION(errcode, f, ...)#
Throw a hpx::exception initialized from the given parameters.
The macro HPX_THROW_EXCEPTION can be used to throw a hpx::exception. The purpose of this macro is to prepend the source file name and line number of the position where the exception is thrown to the error message. Moreover, this associates additional diagnostic information with the exception, such as file name and line number, locality id and thread id, and stack backtrace from the point where the exception was thrown.
The parameter
errcodeholds the hpx::error code the new exception should encapsulate. The parameterfis expected to hold the name of the function exception is thrown from and the parametermsgholds the error message the new exception should encapsulate.void raise_exception() { // Throw a hpx::exception initialized from the given parameters. // Additionally associate with this exception some detailed // diagnostic information about the throw-site. HPX_THROW_EXCEPTION(hpx::error::no_success, "raise_exception", "simulated error"); }
- Example:
-
HPX_THROW_BAD_ALLOC(f)#
Throw a hpx::bad_alloc_exception initialized from the given parameters.
The macro HPX_THROW_BAD_ALLOC can be used to throw a hpx::exception. The purpose of this macro is to prepend the source file name and line number of the position where the exception is thrown to the error message. Moreover, this associates additional diagnostic information with the exception, such as file name and line number, locality id and thread id, and stack backtrace from the point where the exception was thrown.
The parameter
errcodeholds the hpx::error code the new exception should encapsulate. The parameterfis expected to hold the name of the function exception is thrown from and the parametermsgholds the error message the new exception should encapsulate.void raise_exception() { // Throw a hpx::exception initialized from the given parameters. // Additionally associate with this exception some detailed // diagnostic information about the throw-site. HPX_THROW_BAD_ALLOC("raise_exception", "simulated error"); }
- Example:
-
HPX_THROWS_IF(ec, errcode, f, ...)#
Either throw a hpx::exception or initialize hpx::error_code from the given parameters.
The macro HPX_THROWS_IF can be used to either throw a hpx::exception or to initialize a hpx::error_code from the given parameters. If &ec == &hpx::throws, the semantics of this macro are equivalent to HPX_THROW_EXCEPTION. If &ec != &hpx::throws, the hpx::error_code instance
ecis initialized instead.The parameter
errcodeholds the hpx::error code from which the new exception should be initialized. The parameterfis expected to hold the name of the function exception is thrown from and the parametermsgholds the error message the new exception should encapsulate.
-
HPX_THROWS_BAD_ALLOC_IF(ec, f)#
Either throw a hpx::bad_alloc_exception or hpx::error_code to out_of_memory.
The macro HPX_THROWS_BAD_ALLOC_IF can be used to either throw a hpx::bad_alloc_exception or to initialize a hpx::error_code to hpx::error::out_of_memory. If &ec == &hpx::throws, the semantics of this macro are equivalent to HPX_THROW_BAD_ALLOC. If &ec != &hpx::throws, the hpx::error_code instance
ecis initialized instead.
-
HPX_DEFINE_ERROR_INFO(NAME, TYPE)#
HPX_THROW_EXCEPTION, HPX_THROW_BAD_ALLOC, HPX_THROWS_IF#
Defined in header hpx/exception.hpp.
See Public API for a list of names and headers that are part of the public HPX API.
-
namespace hpx
execution#
See Public API for a list of names and headers that are part of the public HPX API.
hpx/execution/executors/adaptive_static_chunk_size.hpp#
Defined in header hpx/execution/executors/adaptive_static_chunk_size.hpp.
See Public API for a list of names and headers that are part of the public HPX API.
-
namespace hpx
-
namespace execution
Typedefs
-
typedef hpx::execution::experimental::adaptive_static_chunk_size instead#
-
namespace experimental
-
struct adaptive_static_chunk_size#
- #include <adaptive_static_chunk_size.hpp>
Loop iterations are divided into pieces of size chunk_size and then assigned to threads. If chunk_size is not specified, the iterations are evenly (if possible) divided contiguously among the threads.
Note
This executor parameters type is equivalent to OpenMP’s STATIC scheduling directive.
Public Functions
-
adaptive_static_chunk_size() = default#
Construct a adaptive_static_chunk_size executor parameters object
Note
By default the number of loop iterations is determined from the number of available cores and the overall number of loop iterations to schedule.
-
inline explicit constexpr adaptive_static_chunk_size(std::size_t const chunk_size) noexcept#
Construct a adaptive_static_chunk_size executor parameters object
- Parameters
chunk_size – [in] The optional chunk size to use as the number of loop iterations to run on a single thread.
-
adaptive_static_chunk_size() = default#
-
struct adaptive_static_chunk_size#
-
typedef hpx::execution::experimental::adaptive_static_chunk_size instead#
-
namespace execution
hpx::execution::experimental::auto_chunk_size#
Defined in header hpx/execution.hpp.
See Public API for a list of names and headers that are part of the public HPX API.
-
namespace hpx
-
namespace execution
-
namespace experimental
-
struct auto_chunk_size#
- #include <auto_chunk_size.hpp>
Loop iterations are divided into pieces and then assigned to threads. The number of loop iterations combined is determined based on measurements of how long the execution of 1% of the overall number of iterations takes. This executor parameters type makes sure that as many loop iterations are combined as necessary to run for the amount of time specified.
Public Functions
-
inline explicit constexpr auto_chunk_size(std::uint64_t const num_iters_for_timing = 0) noexcept#
Construct an auto_chunk_size executor parameters object
Note
Default constructed auto_chunk_size executor parameter types will use 80 microseconds as the minimal time for which any of the scheduled chunks should run.
-
inline explicit auto_chunk_size(hpx::chrono::steady_duration const &rel_time, std::uint64_t const num_iters_for_timing = 0) noexcept#
Construct an auto_chunk_size executor parameters object
- Parameters
rel_time – [in] The time duration to use as the minimum to decide how many loop iterations should be combined.
num_iters_for_timing – [in] The number of iterations to use for the timing operation
-
inline explicit constexpr auto_chunk_size(std::uint64_t const num_iters_for_timing = 0) noexcept#
-
struct auto_chunk_size#
-
namespace experimental
-
namespace execution
hpx::execution::experimental::collect_chunking_parameters#
Defined in header hpx/execution.hpp.
See Public API for a list of names and headers that are part of the public HPX API.
-
namespace hpx
-
namespace execution
-
namespace experimental
-
struct chunking_parameters#
- #include <collect_chunking_parameters.hpp>
Collected execution parameters.
-
struct collect_chunking_parameters#
- #include <collect_chunking_parameters.hpp>
Collect various parameters used for running a parallel algorithm.
Public Functions
-
inline explicit constexpr collect_chunking_parameters(chunking_parameters &exec_params) noexcept#
-
inline explicit constexpr collect_chunking_parameters(chunking_parameters &exec_params) noexcept#
-
struct chunking_parameters#
-
namespace experimental
-
namespace execution
hpx/execution/executors/default_parameters.hpp#
Defined in header hpx/execution/executors/default_parameters.hpp.
See Public API for a list of names and headers that are part of the public HPX API.
-
namespace hpx
-
namespace execution
-
namespace experimental
-
struct default_parameters#
- #include <default_parameters.hpp>
Loop iterations are divided into pieces of size chunk_size and then assigned to threads. If chunk_size is not specified, the iterations are evenly (if possible) divided contiguously among the threads.
Note
This executor parameters type is equivalent to OpenMP’s STATIC scheduling directive.
Public Functions
-
default_parameters() = default#
Construct a default_parameters executor parameters object
Note
By default, the number of loop iterations is determined from the number of available cores and the overall number of loop iterations to schedule.
-
default_parameters() = default#
-
struct default_parameters#
-
namespace experimental
-
namespace execution
hpx::execution::experimental::dynamic_chunk_size#
Defined in header hpx/execution.hpp.
See Public API for a list of names and headers that are part of the public HPX API.
-
namespace hpx
-
namespace execution
-
namespace experimental
-
struct dynamic_chunk_size#
- #include <dynamic_chunk_size.hpp>
Loop iterations are divided into pieces of size chunk_size and then dynamically scheduled among the threads; when a thread finishes one chunk, it is dynamically assigned another If chunk_size is not specified, the default chunk size is 1.
Note
This executor parameters type is equivalent to OpenMP’s DYNAMIC scheduling directive.
Public Functions
-
dynamic_chunk_size() = default#
Construct an dynamic_chunk_size executor parameters object
Note
Default constructed dynamic_chunk_size executor parameter types will use a chunk size of ‘1’.
-
inline explicit constexpr dynamic_chunk_size(std::size_t chunk_size) noexcept#
Construct a dynamic_chunk_size executor parameters object
- Parameters
chunk_size – [in] The optional chunk size to use as the number of loop iterations to schedule together. The default chunk size is 1.
-
dynamic_chunk_size() = default#
-
struct dynamic_chunk_size#
-
namespace experimental
-
namespace execution
hpx/execution/executors/execution.hpp#
Defined in header hpx/execution/executors/execution.hpp.
See Public API for a list of names and headers that are part of the public HPX API.
-
namespace hpx
-
namespace parallel
-
namespace execution#
-
namespace execution#
-
namespace parallel
hpx/execution/executors/execution_information.hpp#
Defined in header hpx/execution/executors/execution_information.hpp.
See Public API for a list of names and headers that are part of the public HPX API.
-
namespace hpx
-
namespace execution
-
namespace experimental
Variables
-
hpx::execution::experimental::has_pending_closures_t has_pending_closures#
-
hpx::execution::experimental::get_pu_mask_t get_pu_mask#
-
hpx::execution::experimental::set_scheduler_mode_t set_scheduler_mode#
-
struct get_pu_mask_t : public hpx::functional::detail::tag_fallback<get_pu_mask_t>#
- #include <execution_information.hpp>
Retrieve the bitmask describing the processing units the given thread is allowed to run on
All threads::executors invoke sched.get_pu_mask().
Note
If the executor does not support this operation, this call will always invoke hpx::threads::get_pu_mask()
- Param exec
[in] The executor object to use for querying the number of pending tasks.
- Param topo
[in] The topology object to use to extract the requested information.
- Param thream_num
[in] The sequence number of the thread to retrieve information for.
Private Functions
- template<typename Executor> requires (hpx::traits::is_executor_any_v< Executor >) friend decltype(auto) tag_fallback_invoke(get_pu_mask_t
- template<typename Executor> requires (hpx::traits::is_executor_any_v< Executor > &&detail::has_get_pu_mask_v< Executor >) friend decltype(auto) tag_invoke(get_pu_mask_t
Private Members
- Executor threads::topology & topo
- Executor threads::topology std::size_t thread_num {return hpx::parallel::execution::detail::get_pu_mask(topo, thread_num)
-
Executor &&exec#
-
struct has_pending_closures_t : public hpx::functional::detail::tag_fallback<has_pending_closures_t>#
- #include <execution_information.hpp>
Retrieve whether this executor has operations pending or not.
Note
If the executor does not expose this information, this call will always return false
- Param exec
[in] The executor object to use to extract the requested information for.
Private Functions
- template<typename Executor> requires (hpx::traits::is_executor_any_v< Executor >) friend decltype(auto) tag_fallback_invoke(has_pending_closures_t
- template<typename Executor> Executor && requires (hpx::traits::is_executor_any_v< Executor > &&detail::has_has_pending_closures_v< Executor >) friend decltype(auto) tag_invoke(has_pending_closures_t
Private Members
- Executor Executor && exec {return HPX_FORWARD(Executor, exec).has_pending_closures()
-
struct set_scheduler_mode_t : public hpx::functional::detail::tag_fallback<set_scheduler_mode_t>#
- #include <execution_information.hpp>
Set various modes of operation on the scheduler underneath the given executor.
Note
This calls exec.set_scheduler_mode(mode) if it exists; otherwise it does nothing.
- Param exec
[in] The executor object to use.
- Param mode
[in] The new mode for the scheduler to pick up
Private Functions
- template<typename Executor, typename Mode> requires (hpx::traits::is_executor_any_v< Executor >) friend void tag_fallback_invoke(set_scheduler_mode_t
-
hpx::execution::experimental::has_pending_closures_t has_pending_closures#
-
namespace experimental
-
namespace execution
hpx/execution/executors/execution_parameters.hpp#
Defined in header hpx/execution/executors/execution_parameters.hpp.
See Public API for a list of names and headers that are part of the public HPX API.
-
namespace hpx
-
namespace execution
-
namespace experimental
Functions
- template<typename... Params> constexpr HPX_CXX_CORE_EXPORT executor_parameters_join< Params... >::type join_executor_parameters (Params &&... params)
- template<typename Param> constexpr HPX_CXX_CORE_EXPORT Param && join_executor_parameters (Param &¶m) noexcept
-
template<typename ...Params>
struct executor_parameters_join#
-
namespace experimental
-
namespace execution
hpx/execution/executors/execution_parameters_fwd.hpp#
Defined in header hpx/execution/executors/execution_parameters_fwd.hpp.
See Public API for a list of names and headers that are part of the public HPX API.
-
namespace hpx
-
namespace execution
-
namespace experimental
Variables
- constexpr HPX_CXX_CORE_EXPORT struct hpx::execution::experimental::null_parameters_t null_parameters
-
hpx::execution::experimental::get_chunk_size_t get_chunk_size#
-
hpx::execution::experimental::measure_iteration_t measure_iteration#
-
hpx::execution::experimental::maximal_number_of_chunks_t maximal_number_of_chunks#
-
hpx::execution::experimental::reset_thread_distribution_t reset_thread_distribution#
-
hpx::execution::experimental::processing_units_count_t processing_units_count#
-
hpx::execution::experimental::with_processing_units_count_t with_processing_units_count#
-
hpx::execution::experimental::mark_begin_execution_t mark_begin_execution#
-
hpx::execution::experimental::mark_end_of_scheduling_t mark_end_of_scheduling#
-
hpx::execution::experimental::mark_end_execution_t mark_end_execution#
-
hpx::execution::experimental::collect_execution_parameters_t collect_execution_parameters#
-
struct collect_execution_parameters_t : public hpx::functional::detail::tag_priority<collect_execution_parameters_t>#
- #include <execution_parameters_fwd.hpp>
Collect various parameters of the chunking for this parallel algorithm execution
Note
This calls params.mark_begin_execution(exec) if it exists; otherwise it does nothing.
- Param params
[in] The executor parameters object to use as a fallback if the executor does not expose
- Param exec
[in] The executor object which will be used for scheduling of the loop iterations.
- Param num_elements
[in] The overall number of elements for the algorithm.
- Param num_cores
[in] The overall number of cores to utilize for the algorithm.
- Param num_chunks
[in] The overall number of chunks for the algorithm.
- Param chunk_size
[in] The size of the chunks created for the algorithm.
Private Functions
- template<typename Parameters, typename Executor> requires (hpx::executor_parameters< Parameters > &&hpx::executor_any< Executor >) friend decltype(auto) tag_fallback_invoke(collect_execution_parameters_t
Private Members
-
Parameters &¶ms#
- Parameters Executor && exec
- Parameters Executor std::size_t num_elements
- Parameters Executor std::size_t std::size_t num_cores
- Parameters Executor std::size_t std::size_t std::size_t num_chunks
- Parameters Executor std::size_t std::size_t std::size_t std::size_t chunk_size {return detail::collect_execution_parameters_fn_helper<hpx::util::decay_unwrap_t<Parameters>,std::decay_t<Executor>>::call(HPX_FORWARD(Parameters, params),HPX_FORWARD(Executor, exec), num_elements,num_cores,num_chunks, chunk_size)
-
struct get_chunk_size_t : public hpx::functional::detail::tag_priority<get_chunk_size_t>#
- #include <execution_parameters_fwd.hpp>
Return the number of invocations of the given function f which should be combined into a single task
- Param params
[in] The executor parameters object to use for determining the chunk size for the given number of tasks num_tasks.
- Param exec
[in] The executor object which will be used for scheduling of the loop iterations.
- Param iteration_duration
[in] The time one of the tasks require to be executed.
- Param cores
[in] The number of cores the number of chunks should be determined for.
- Param num_tasks
[in] The number of tasks the chunk size should be determined for
- Return
The size of the chunks (number of iterations per chunk) that should be used for parallel execution.
Private Functions
- template<typename Parameters, typename Executor> requires (hpx::executor_parameters< Parameters > &&hpx::executor_any< Executor >) friend decltype(auto) tag_fallback_invoke(get_chunk_size_t
- template<typename Parameters, typename Executor> requires (hpx::executor_parameters< Parameters > &&hpx::executor_any< Executor >) friend decltype(auto) tag_fallback_invoke(get_chunk_size_t tag
Private Members
-
Parameters &¶ms#
- Parameters Executor && exec
- Parameters Executor hpx::chrono::steady_duration const & iteration_duration
- Parameters Executor hpx::chrono::steady_duration const std::size_t cores
- Parameters Executor hpx::chrono::steady_duration const std::size_t std::size_t num_tasks {return detail::get_chunk_size_fn_helper<hpx::util::decay_unwrap_t<Parameters>,std::decay_t<Executor>>::call(HPX_FORWARD(Parameters, params),HPX_FORWARD(Executor, exec), iteration_duration, cores,num_tasks)
- Parameters Executor std::size_t cores
- Parameters Executor std::size_t std::size_t num_tasks {return tag(HPX_FORWARD(Parameters, params),HPX_FORWARD(Executor, exec), hpx::chrono::null_duration, cores,num_tasks)
-
template<>
struct is_scheduling_property<with_processing_units_count_t> : public true_type#
-
struct mark_begin_execution_t : public hpx::functional::detail::tag_priority<mark_begin_execution_t>#
- #include <execution_parameters_fwd.hpp>
Mark the begin of a parallel algorithm execution
Note
This calls params.mark_begin_execution(exec) if it exists; otherwise it does nothing.
- Param params
[in] The executor parameters object to use as a fallback if the executor does not expose
- Param exec
[in] The executor object which will be used for scheduling of the loop iterations.
Private Functions
- template<typename Parameters, typename Executor> requires (hpx::executor_parameters< Parameters > &&hpx::executor_any< Executor >) friend decltype(auto) tag_fallback_invoke(mark_begin_execution_t
Private Members
-
Parameters &¶ms#
- Parameters Executor && exec {return detail::mark_begin_execution_fn_helper<hpx::util::decay_unwrap_t<Parameters>,std::decay_t<Executor>>::call(HPX_FORWARD(Parameters, params),HPX_FORWARD(Executor, exec))
-
struct mark_end_execution_t : public hpx::functional::detail::tag_priority<mark_end_execution_t>#
- #include <execution_parameters_fwd.hpp>
Mark the end of a parallel algorithm execution
Note
This calls params.mark_end_execution(exec) if it exists; otherwise it does nothing.
- Param params
[in] The executor parameters object to use as a fallback if the executor does not expose
- Param exec
[in] The executor object which will be used for scheduling of the loop iterations.
Private Functions
- template<typename Parameters, typename Executor> requires (hpx::executor_parameters< Parameters > &&hpx::executor_any< Executor >) friend decltype(auto) tag_fallback_invoke(mark_end_execution_t
Private Members
-
Parameters &¶ms#
- Parameters Executor && exec {return detail::mark_end_execution_fn_helper<hpx::util::decay_unwrap_t<Parameters>,std::decay_t<Executor>>::call(HPX_FORWARD(Parameters, params),HPX_FORWARD(Executor, exec))
-
struct mark_end_of_scheduling_t : public hpx::functional::detail::tag_priority<mark_end_of_scheduling_t>#
- #include <execution_parameters_fwd.hpp>
Mark the end of scheduling tasks during parallel algorithm execution
Note
This calls params.mark_begin_execution(exec) if it exists; otherwise it does nothing.
- Param params
[in] The executor parameters object to use as a fallback if the executor does not expose
- Param exec
[in] The executor object which will be used for scheduling of the loop iterations.
Private Functions
- template<typename Parameters, typename Executor> requires (hpx::executor_parameters< Parameters > &&hpx::executor_any< Executor >) friend decltype(auto) tag_fallback_invoke(mark_end_of_scheduling_t
Private Members
-
Parameters &¶ms#
- Parameters Executor && exec {return detail::mark_end_of_scheduling_fn_helper<hpx::util::decay_unwrap_t<Parameters>,std::decay_t<Executor>>::call(HPX_FORWARD(Parameters, params),HPX_FORWARD(Executor, exec))
-
struct maximal_number_of_chunks_t : public hpx::functional::detail::tag_priority<maximal_number_of_chunks_t>#
- #include <execution_parameters_fwd.hpp>
Return the largest reasonable number of chunks to create for a single algorithm invocation.
- Param params
[in] The executor parameters object to use for determining the number of chunks for the given number of cores.
- Param exec
[in] The executor object which will be used for scheduling of the loop iterations.
- Param cores
[in] The number of cores the number of chunks should be determined for.
- Param num_tasks
[in] The number of tasks the chunk size should be determined for
Private Functions
- template<typename Parameters, typename Executor> requires (hpx::executor_parameters< Parameters > &&hpx::executor_any< Executor >) friend decltype(auto) tag_fallback_invoke(maximal_number_of_chunks_t
Private Members
-
Parameters &¶ms#
- Parameters Executor && exec
- Parameters Executor std::size_t cores
- Parameters Executor std::size_t std::size_t num_tasks {return detail::maximal_number_of_chunks_fn_helper<hpx::util::decay_unwrap_t<Parameters>,std::decay_t<Executor>>::call(HPX_FORWARD(Parameters, params),HPX_FORWARD(Executor, exec), cores, num_tasks)
-
struct measure_iteration_t : public hpx::functional::detail::tag_priority<measure_iteration_t>#
- #include <execution_parameters_fwd.hpp>
Return the measured execution time for one iteration based on running the given function.
Note
The parameter f is expected to be a nullary function returning a
std::size_trepresenting the number of iteration the function has already executed (i.e. which don’t have to be scheduled anymore).- Param params
[in] The executor parameters object to use for determining the chunk size for the given number of tasks num_tasks.
- Param exec
[in] The executor object which will be used for scheduling of the loop iterations.
- Param f
[in] The function which will be optionally scheduled using the given executor.
- Param num_tasks
[in] The number of tasks the chunk size should be determined for
- Return
The execution time for one of the tasks.
Private Functions
- template<typename Parameters, typename Executor, typename F> requires (hpx::executor_parameters< Parameters > &&hpx::executor_any< Executor >) friend decltype(auto) tag_fallback_invoke(measure_iteration_t
Private Members
-
Parameters &¶ms#
- Parameters Executor && exec
- Parameters Executor F && f
- Parameters Executor F std::size_t num_tasks {return detail::measure_iteration_fn_helper<hpx::util::decay_unwrap_t<Parameters>,std::decay_t<Executor>>::call(HPX_FORWARD(Parameters, params),HPX_FORWARD(Executor, exec), HPX_FORWARD(F, f), num_tasks)
-
struct null_parameters_t#
-
struct processing_units_count_t : public hpx::functional::detail::tag_priority<processing_units_count_t>#
- #include <execution_parameters_fwd.hpp>
Retrieve the number of (kernel-)threads used by the associated executor.
Note
This calls params.processing_units_count(Executor&&) if it exists; otherwise it forwards the request to the executor parameters object.
- Param params
[in] The executor parameters object to use as a fallback if the executor does not expose
- Param exec
[in] The executor object which will be used for scheduling of the loop iterations.
- Param iteration_duration
[in] The time one of the tasks require to be executed.
- Param num_tasks
[in] The number of tasks the number of cores should be determined for
- Return
The number of cores to use
Private Functions
- template<typename Parameters, typename Executor> requires (hpx::executor_parameters< Parameters > &&hpx::executor_any< Executor >) friend decltype(auto) tag_fallback_invoke(processing_units_count_t
- template<typename Parameters, typename Executor> requires (hpx::executor_parameters< Parameters > &&hpx::executor_any< Executor >) friend decltype(auto) tag_fallback_invoke(processing_units_count_t tag
Private Members
-
Parameters &¶ms#
- Parameters Executor && exec
- Parameters Executor hpx::chrono::steady_duration const & iteration_duration
- Parameters Executor hpx::chrono::steady_duration const std::size_t num_tasks {return detail::processing_units_count_fn_helper<hpx::util::decay_unwrap_t<Parameters>,std::decay_t<Executor>>::call(HPX_FORWARD(Parameters, params),HPX_FORWARD(Executor, exec), iteration_duration, num_tasks)
-
struct reset_thread_distribution_t : public hpx::functional::detail::tag_priority<reset_thread_distribution_t>#
- #include <execution_parameters_fwd.hpp>
Reset the internal round robin thread distribution scheme for the given executor.
Note
This calls params.reset_thread_distribution(exec) if it exists; otherwise it does nothing.
- Param params
[in] The executor parameters object to use for resetting the thread distribution scheme.
- Param exec
[in] The executor object to use.
Private Functions
- template<typename Parameters, typename Executor> requires (hpx::executor_parameters< Parameters > &&hpx::executor_any< Executor >) friend decltype(auto) tag_fallback_invoke(reset_thread_distribution_t
Private Members
-
Parameters &¶ms#
- Parameters Executor && exec {return detail::reset_thread_distribution_fn_helper<hpx::util::decay_unwrap_t<Parameters>,std::decay_t<Executor>>::call(HPX_FORWARD(Parameters, params),HPX_FORWARD(Executor, exec))
-
struct with_processing_units_count_t : public hpx::functional::detail::tag_priority<with_processing_units_count_t>#
- #include <execution_parameters_fwd.hpp>
Generate a policy that supports setting the number of cores for execution.
-
namespace experimental
-
namespace execution
hpx::execution::experimental::guided_chunk_size#
Defined in header hpx/execution.hpp.
See Public API for a list of names and headers that are part of the public HPX API.
-
namespace hpx
-
namespace execution
-
namespace experimental
-
struct guided_chunk_size#
- #include <guided_chunk_size.hpp>
Iterations are dynamically assigned to threads in blocks as threads request those until no blocks remain to be assigned. Similar to dynamic_chunk_size except that the block size decreases each time a number of loop iterations is given to a thread. The size of the initial block is proportional to number_of_iterations / number_of_cores. Subsequent blocks are proportional to number_of_iterations_remaining / number_of_cores. The optional chunk size parameter defines the minimum block size. The default chunk size is 1.
Note
This executor parameters type is equivalent to OpenMP’s GUIDED scheduling directive.
Public Functions
-
guided_chunk_size() = default#
Construct an dynamic_chunk_size executor parameters object
Note
Default constructed dynamic_chunk_size executor parameter types will use a chunk size of ‘1’.
-
inline explicit constexpr guided_chunk_size(std::size_t const min_chunk_size) noexcept#
Construct a guided_chunk_size executor parameters object
- Parameters
min_chunk_size – [in] The optional minimal chunk size to use as the minimal number of loop iterations to schedule together. The default minimal chunk size is 1.
-
guided_chunk_size() = default#
-
struct guided_chunk_size#
-
namespace experimental
-
namespace execution
hpx::execution::experimental::max_num_chunks#
Defined in header hpx/execution.hpp.
See Public API for a list of names and headers that are part of the public HPX API.
-
namespace hpx
-
namespace execution
-
namespace experimental
-
struct max_num_chunks#
- #include <max_num_chunks.hpp>
Loop iterations are divided into not more than num_chunks partitions that are assigned to threads. If num_chunks is not specified, the number of chunks is determined based on the number of available cores.
Public Functions
-
max_num_chunks() = default#
Construct a max_num_chunks executor parameters object
Note
By default, the number of chunks is determined from the number of available cores.
-
inline explicit constexpr max_num_chunks(std::size_t const num_chunks) noexcept#
Construct a max_num_chunks executor parameters object
- Parameters
num_chunks – [in] The optional number of chunks to use to run on a single thread.
-
max_num_chunks() = default#
-
struct max_num_chunks#
-
namespace experimental
-
namespace execution
hpx::execution::experimental::num_cores#
Defined in header hpx/execution.hpp.
See Public API for a list of names and headers that are part of the public HPX API.
-
namespace hpx
-
namespace execution
-
namespace experimental
-
struct num_cores#
- #include <num_cores.hpp>
Control number of cores in executors which need a functionality for setting the number of cores to be used by an algorithm directly
-
struct num_cores#
-
namespace experimental
-
namespace execution
hpx::execution::experimental::persistent_auto_chunk_size#
Defined in header hpx/execution.hpp.
See Public API for a list of names and headers that are part of the public HPX API.
-
namespace hpx
-
namespace execution
-
namespace experimental
-
struct persistent_auto_chunk_size#
- #include <persistent_auto_chunk_size.hpp>
Loop iterations are divided into pieces and then assigned to threads. The number of loop iterations combined is determined based on measurements of how long the execution of 1% of the overall number of iterations takes. This executor parameters type makes sure that as many loop iterations are combined as necessary to run for the amount of time specified.
Public Functions
-
inline explicit constexpr persistent_auto_chunk_size(std::uint64_t const num_iters_for_timing = 0) noexcept#
Construct an persistent_auto_chunk_size executor parameters object
Note
Default constructed persistent_auto_chunk_size executor parameter types will use 0 microseconds as the execution time for each chunk and 80 microseconds as the minimal time for which any of the scheduled chunks should run.
-
inline explicit persistent_auto_chunk_size(hpx::chrono::steady_duration const &time_cs, std::uint64_t const num_iters_for_timing = 0) noexcept#
Construct an persistent_auto_chunk_size executor parameters object
- Parameters
time_cs – The execution time for each chunk.
num_iters_for_timing – [in] The number of iterations to use for measuring the execution time of one iteration
-
inline persistent_auto_chunk_size(hpx::chrono::steady_duration const &time_cs, hpx::chrono::steady_duration const &rel_time, std::uint64_t const num_iters_for_timing = 0) noexcept#
Construct an persistent_auto_chunk_size executor parameters object
- Parameters
rel_time – [in] The time duration to use as the minimum to decide how many loop iterations should be combined.
time_cs – The execution time for each chunk.
num_iters_for_timing – [in] The number of iterations to use for measuring the execution time of one iteration
-
inline explicit constexpr persistent_auto_chunk_size(std::uint64_t const num_iters_for_timing = 0) noexcept#
-
struct persistent_auto_chunk_size#
-
namespace experimental
-
namespace execution
hpx/execution/executors/polymorphic_executor.hpp#
Defined in header hpx/execution/executors/polymorphic_executor.hpp.
See Public API for a list of names and headers that are part of the public HPX API.
-
namespace hpx
-
namespace execution
-
namespace experimental
-
namespace experimental
-
namespace parallel
-
namespace execution
-
template<typename Sig>
class polymorphic_executor#
-
template<typename R, typename ...Ts>
class polymorphic_executor<R(Ts...)> : private hpx::parallel::execution::detail::polymorphic_executor_base# -
Public Functions
-
inline constexpr polymorphic_executor() noexcept#
-
inline polymorphic_executor(polymorphic_executor const &other)#
-
inline polymorphic_executor(polymorphic_executor &&other) noexcept#
-
inline polymorphic_executor &operator=(polymorphic_executor const &other)#
-
inline polymorphic_executor &operator=(polymorphic_executor &&other) noexcept#
-
template<typename Exec, typename PE = std::decay_t<Exec>, typename Enable = std::enable_if_t<!std::is_same_v<PE, polymorphic_executor>>>
inline polymorphic_executor(Exec &&exec)#
-
template<typename Exec, typename PE = std::decay_t<Exec>, typename Enable = std::enable_if_t<!std::is_same_v<PE, polymorphic_executor>>>
inline polymorphic_executor &operator=(Exec &&exec)#
-
inline void reset() noexcept#
Private Types
-
using base_type = detail::polymorphic_executor_base#
Private Functions
- template<typename F, typename Shape> inline requires (!std::is_integral_v< Shape >) friend std
- template<typename F, typename Shape> inline requires (!std::is_integral_v< Shape >) friend std
- template<typename F, typename Shape> inline requires (!std::is_integral_v< Shape >) friend hpx
Private Static Functions
Friends
-
template<typename F>
inline friend void tag_invoke(hpx::parallel::execution::post_t, polymorphic_executor const &exec, F &&f, Ts... ts)#
-
template<typename F>
inline friend R tag_invoke(hpx::parallel::execution::sync_execute_t, polymorphic_executor const &exec, F &&f, Ts... ts)#
-
inline constexpr polymorphic_executor() noexcept#
-
template<typename Sig>
-
namespace execution
-
namespace execution
hpx/execution/executors/rebind_executor.hpp#
Defined in header hpx/execution/executors/rebind_executor.hpp.
See Public API for a list of names and headers that are part of the public HPX API.
-
namespace hpx
-
namespace execution
-
namespace experimental
Typedefs
-
template<typename ExPolicy, typename Executor, typename Parameters>
using rebind_executor_t = typename rebind_executor<ExPolicy, Executor, Parameters>::type#
Variables
- constexpr HPX_CXX_CORE_EXPORT struct hpx::execution::experimental::create_rebound_policy_t create_rebound_policy
-
struct create_rebound_policy_t#
Public Types
-
using rebound_type = rebind_executor_t<ExPolicy, Executor, parameters_type>#
-
using rebound_type = rebind_executor_t<ExPolicy, executor_type, Parameters>
Public Functions
- template<typename ExPolicy, typename Executor, typename Parameters> requires (hpx::executor_any< Executor > &&hpx::executor_parameters< Parameters >) const expr decltype(auto) operator()(ExPolicy &&
- return rebound_type (HPX_FORWARD(Executor, exec), HPX_FORWARD(Parameters, parameters))
- template<typename ExPolicy, typename Executor> requires (hpx::executor_any< Executor >) const expr decltype(auto) operator()(ExPolicy &&policy
- return rebound_type (HPX_FORWARD(Executor, exec), policy.parameters())
- template<typename ExPolicy, typename Parameters> requires (hpx::executor_parameters< Parameters >) const expr decltype(auto) operator()(ExPolicy &&policy
- return rebound_type (policy.executor(), HPX_FORWARD(Parameters, parameters))
Public Members
-
Executor &&exec#
- Executor Parameters &&const parameters {using rebound_type =rebind_executor_t<ExPolicy, Executor, Parameters>
- Executor &&const exec {using parameters_type = std::decay_t<ExPolicy>::parameters_type
- Parameters &&const parameters {using executor_type = std::decay_t<ExPolicy>::executor_type
-
using rebound_type = rebind_executor_t<ExPolicy, Executor, parameters_type>#
-
template<typename ExPolicy, typename Executor, typename Parameters>
struct rebind_executor# - #include <rebind_executor.hpp>
Rebind the type of executor used by an execution policy. The execution category of Executor shall not be weaker than that of ExecutionPolicy.
Public Types
-
using type = typename policy_type::template rebind<executor_type, parameters_type>::type#
The type of the rebound execution policy.
-
using type = typename policy_type::template rebind<executor_type, parameters_type>::type#
-
template<typename ExPolicy, typename Executor, typename Parameters>
-
namespace experimental
-
namespace execution
hpx::execution::experimental::static_chunk_size#
Defined in header hpx/execution.hpp.
See Public API for a list of names and headers that are part of the public HPX API.
-
namespace hpx
-
namespace execution
-
namespace experimental
-
struct static_chunk_size#
- #include <static_chunk_size.hpp>
Loop iterations are divided into pieces of size chunk_size and then assigned to threads. If chunk_size is not specified, the iterations are evenly (if possible) divided contiguously among the threads.
Note
This executor parameters type is equivalent to OpenMP’s STATIC scheduling directive.
Public Functions
-
static_chunk_size() = default#
Construct a static_chunk_size executor parameters object
Note
By default, the number of loop iterations is determined from the number of available cores and the overall number of loop iterations to schedule.
-
inline explicit constexpr static_chunk_size(std::size_t const chunk_size) noexcept#
Construct a static_chunk_size executor parameters object
- Parameters
chunk_size – [in] The optional chunk size to use as the number of loop iterations to run on a single thread.
-
static_chunk_size() = default#
-
struct static_chunk_size#
-
namespace experimental
-
namespace execution
hpx/execution/traits/is_execution_policy.hpp#
Defined in header hpx/execution/traits/is_execution_policy.hpp.
See Public API for a list of names and headers that are part of the public HPX API.
-
namespace hpx
Variables
- template<typename T> constexpr HPX_CXX_CORE_EXPORT bool is_execution_policy_v = is_execution_policy<T>::value
- template<typename T> HPX_CXX_CORE_EXPORT concept execution_policy = is_execution_policy<T>::value
- template<typename T> constexpr HPX_CXX_CORE_EXPORT bool is_parallel_execution_policy_v = is_parallel_execution_policy<T>::value
- template<typename T> constexpr HPX_CXX_CORE_EXPORT bool is_sequenced_execution_policy_v = is_sequenced_execution_policy<T>::value
- template<typename T> constexpr HPX_CXX_CORE_EXPORT bool is_async_execution_policy_v = is_async_execution_policy<T>::value
-
template<typename T>
struct is_async_execution_policy : public hpx::detail::is_async_execution_policy<std::decay_t<T>># - #include <is_execution_policy.hpp>
Extension: Detect whether given execution policy makes algorithms asynchronous
The type is_async_execution_policy can be used to detect asynchronous execution policies for the purpose of excluding function signatures from otherwise ambiguous overload resolution participation.
If T is the type of the standard or implementation-defined execution policy, is_async_execution_policy<T> shall be publicly derived from integral_constant<bool, true>, otherwise from integral_constant<bool, false>.
The behavior of a program that adds specializations for is_async_execution_policy is undefined.
-
template<typename T>
struct is_execution_policy : public hpx::detail::is_execution_policy<std::decay_t<T>># - #include <is_execution_policy.hpp>
The type is_execution_policy can be used to detect execution policies for the purpose of excluding function signatures from otherwise ambiguous overload resolution participation.
If T is the type of the standard or implementation-defined execution policy, is_execution_policy<T> shall be publicly derived from integral_constant<bool, true>, otherwise from integral_constant<bool, false>.
The behavior of a program that adds specializations for is_execution_policy is undefined.
-
template<typename T>
struct is_parallel_execution_policy : public hpx::detail::is_parallel_execution_policy<std::decay_t<T>># - #include <is_execution_policy.hpp>
Extension: Detect whether given execution policy enables parallelization
The type is_parallel_execution_policy can be used to detect parallel execution policies for the purpose of excluding function signatures from otherwise ambiguous overload resolution participation.
If T is the type of the standard or implementation-defined execution policy, is_parallel_execution_policy<T> shall be publicly derived from integral_constant<bool, true>, otherwise from integral_constant<bool, false>.
The behavior of a program that adds specializations for is_parallel_execution_policy is undefined.
-
template<typename T>
struct is_sequenced_execution_policy : public hpx::detail::is_sequenced_execution_policy<std::decay_t<T>># - #include <is_execution_policy.hpp>
Extension: Detect whether given execution policy does not enable parallelization
The type is_sequenced_execution_policy can be used to detect non-parallel execution policies for the purpose of excluding function signatures from otherwise ambiguous overload resolution participation.
If T is the type of the standard or implementation-defined execution policy, is_sequenced_execution_policy<T> shall be publicly derived from integral_constant<bool, true>, otherwise from integral_constant<bool, false>.
The behavior of a program that adds specializations for is_sequenced_execution_policy is undefined.
execution_base#
See Public API for a list of names and headers that are part of the public HPX API.
hpx/execution_base/execution.hpp#
Defined in header hpx/execution_base/execution.hpp.
See Public API for a list of names and headers that are part of the public HPX API.
-
namespace hpx
-
namespace execution
-
struct parallel_execution_tag#
- #include <execution.hpp>
Function invocations executed by a group of parallel execution agents execute in unordered fashion. Any such invocations executing in the same thread are indeterminately sequenced with respect to each other.
Note
parallel_execution_tag is weaker than sequenced_execution_tag.
-
struct sequenced_execution_tag#
- #include <execution.hpp>
Function invocations executed by a group of sequential execution agents execute in sequential order.
-
struct unsequenced_execution_tag#
- #include <execution.hpp>
Function invocations executed by a group of vector execution agents are permitted to execute in unordered fashion when executed in different threads, and un-sequenced with respect to one another when executed in the same thread.
Note
unsequenced_execution_tag is weaker than parallel_execution_tag.
-
struct parallel_execution_tag#
-
namespace parallel
-
namespace execution
Variables
-
hpx::parallel::execution::sync_execute_t sync_execute#
-
hpx::parallel::execution::async_execute_t async_execute#
-
hpx::parallel::execution::then_execute_t then_execute#
-
hpx::parallel::execution::bulk_sync_execute_t bulk_sync_execute#
-
hpx::parallel::execution::bulk_async_execute_t bulk_async_execute#
-
hpx::parallel::execution::bulk_then_execute_t bulk_then_execute#
-
hpx::parallel::execution::async_invoke_t async_invoke#
-
hpx::parallel::execution::sync_invoke_t sync_invoke#
-
struct async_execute_t : public hpx::functional::detail::tag_fallback<async_execute_t>#
- #include <execution.hpp>
Customization point for asynchronous execution agent creation.
This asynchronously creates a single function invocation f() using the associated executor.
Note
Executors have to implement only
async_execute(). All other functions will be emulated by this or other customization points in terms of this single basic primitive. However, some executors will naturally specialize all operations for maximum efficiency.Note
This is valid for one way executors (calls make_ready_future(exec.sync_execute(f, ts…) if it exists) and for two-way executors (calls exec.async_execute(f, ts…) if it exists).
- Param exec
[in] The executor object to use for scheduling of the function f.
- Param f
[in] The function which will be scheduled using the given executor.
- Param ts
[in] Additional arguments to use to invoke f.
- Return
f(ts…)’s result through a future
Private Functions
- template<executor_any Executor, typename F, typename... Ts> requires (std::invocable< F &&, Ts &&... >) friend decltype(auto) tag_fallback_invoke(async_execute_t
Private Members
-
Executor &&exec#
- Executor F && f
- Executor F Ts && ts {return detail::async_execute_fn_helper<std::decay_t<Executor>>::call(HPX_FORWARD(Executor, exec),HPX_FORWARD(F, f), HPX_FORWARD(Ts, ts)...)
-
struct async_invoke_t : public hpx::functional::detail::tag_fallback<async_invoke_t>#
- #include <execution.hpp>
Asynchronously invoke the given set of nullary functions, each on its own execution agent
This creates a group of function invocations whose ordering is given by the execution_category associated with the executor.
All exceptions thrown by invocations of the functions are reported in a manner consistent with parallel algorithm execution through the returned future.
Note
This calls exec.async_invoke(fs…) if it exists; otherwise it executes async_execute(fs) for each fs.
- Param exec
[in] The executor object to use for scheduling of the functions fs.
- Param fs
[in] The functions which will be scheduled using the given executor.
- Return
The return type of executor_type::async_invoke if defined by executor_type. Otherwise, a future<void> representing finishing the execution of all functions fs.
Private Functions
- template<executor_any Executor, typename F, typename... Fs> requires (std::invocable< F > &&(std::invocable< Fs > &&...)) friend decltype(auto) tag_fallback_invoke(async_invoke_t
Private Members
-
Executor &&exec#
- Executor F && f
- Executor F Fs && fs {return detail::async_invoke_fn_helper<std::decay_t<Executor>>::call(HPX_FORWARD(Executor, exec), HPX_FORWARD(F, f),HPX_FORWARD(Fs, fs)...)
-
struct bulk_async_execute_t : public hpx::functional::detail::tag_fallback<bulk_async_execute_t>#
- #include <execution.hpp>
Bulk form of asynchronous execution agent creation.
This asynchronously creates a group of function invocations f(i) whose ordering is given by the execution_category associated with the executor.
Here i takes on all values in the index space implied by shape. All exceptions thrown by invocations of f(i) are reported in a manner consistent with parallel algorithm execution through the returned future.
Note
This is deliberately different from the bulk_async_execute customization points specified in P0443.The bulk_async_execute customization point defined here is more generic and is used as the workhorse for implementing the specified APIs.
Note
This calls exec.bulk_async_execute(f, shape, ts…) if it exists; otherwise it executes async_execute(f, shape, ts…) as often as needed.
- Param exec
[in] The executor object to use for scheduling of the function f.
- Param f
[in] The function which will be scheduled using the given executor.
- Param shape
[in] The shape objects which defines the iteration boundaries for the arguments to be passed to f.
- Param ts
[in] Additional arguments to use to invoke f.
- Return
The return type of executor_type::bulk_async_execute if defined by executor_type. Otherwise, a vector of futures holding the returned values of each invocation of f.
Private Functions
- template<executor_any Executor, typename F, typename Shape, typename... Ts> requires (!std::integral< Shape >) friend decltype(auto) tag_fallback_invoke(bulk_async_execute_t
- template<executor_any Executor, typename F, typename Shape, typename... Ts> requires (std::integral< Shape >) friend decltype(auto) tag_fallback_invoke(bulk_async_execute_t tag
Private Members
-
Executor &&exec#
- Executor F && f
- Executor F Shape const & shape
- Executor F Shape const Ts && ts {return detail::bulk_async_execute_fn_helper<std::decay_t<Executor>>::call(HPX_FORWARD(Executor, exec),HPX_FORWARD(F, f), shape, HPX_FORWARD(Ts, ts)...)
-
struct bulk_sync_execute_t : public hpx::functional::detail::tag_fallback<bulk_sync_execute_t>#
- #include <execution.hpp>
Bulk form of synchronous execution agent creation.
This synchronously creates a group of function invocations f(i) whose ordering is given by the execution_category associated with the executor. The function synchronizes the execution of all scheduled functions with the caller.
Here i takes on all values in the index space implied by shape. All exceptions thrown by invocations of f(i) are reported in a manner consistent with parallel algorithm execution through the returned future.
Note
This is deliberately different from the bulk_sync_execute customization points specified in P0443.The bulk_sync_execute customization point defined here is more generic and is used as the workhorse for implementing the specified APIs.
Note
This calls exec.bulk_sync_execute(f, shape, ts…) if it exists; otherwise it executes sync_execute(f, shape, ts…) as often as needed.
- Param exec
[in] The executor object to use for scheduling of the function f.
- Param f
[in] The function which will be scheduled using the given executor.
- Param shape
[in] The shape objects which defines the iteration boundaries for the arguments to be passed to f.
- Param ts
[in] Additional arguments to use to invoke f.
- Return
The return type of executor_type::bulk_sync_execute if defined by executor_type. Otherwise, a vector holding the returned values of each invocation of f except when f returns void, which case void is returned.
Private Functions
- template<executor_any Executor, typename F, typename Shape, typename... Ts> requires (!std::integral< Shape >) friend decltype(auto) tag_fallback_invoke(bulk_sync_execute_t
- template<executor_any Executor, typename F, typename Shape, typename... Ts> requires (std::integral< Shape >) friend decltype(auto) tag_fallback_invoke(bulk_sync_execute_t tag
Private Members
-
Executor &&exec#
- Executor F && f
- Executor F Shape const & shape
- Executor F Shape const Ts && ts {return detail::bulk_sync_execute_fn_helper<std::decay_t<Executor>>::call(HPX_FORWARD(Executor, exec),HPX_FORWARD(F, f), shape, HPX_FORWARD(Ts, ts)...)
-
struct bulk_then_execute_t : public hpx::functional::detail::tag_fallback<bulk_then_execute_t>#
- #include <execution.hpp>
Bulk form of execution agent creation depending on a given future.
This creates a group of function invocations f(i) whose ordering is given by the execution_category associated with the executor.
Here i takes on all values in the index space implied by shape. All exceptions thrown by invocations of f(i) are reported in a manner consistent with parallel algorithm execution through the returned future.
Note
This is deliberately different from the then_sync_execute customization points specified in P0443.The bulk_then_execute customization point defined here is more generic and is used as the workhorse for implementing the specified APIs.
Note
This calls exec.bulk_then_execute(f, shape, pred, ts…) if it exists; otherwise it executes sync_execute(f, shape, pred.share(), ts…) (if this executor is also an OneWayExecutor), or async_execute(f, shape, pred.share(), ts…) (if this executor is also a TwoWayExecutor) - as often as needed.
- Param exec
[in] The executor object to use for scheduling of the function f.
- Param f
[in] The function which will be scheduled using the given executor.
- Param shape
[in] The shape objects which defines the iteration boundaries for the arguments to be passed to f.
- Param predecessor
[in] The future object the execution of the given function depends on.
- Param ts
[in] Additional arguments to use to invoke f.
- Return
The return type of executor_type::bulk_then_execute if defined by executor_type. Otherwise, a vector holding the returned values of each invocation of f.
Private Functions
- template<executor_any Executor, typename F, typename Shape, typename Future, typename... Ts> requires (!std::integral< Shape >) friend decltype(auto) tag_fallback_invoke(bulk_then_execute_t
- template<executor_any Executor, typename F, typename Shape, typename Future, typename... Ts> requires (std::integral< Shape >) friend decltype(auto) tag_fallback_invoke(bulk_then_execute_t tag
Private Members
-
Executor &&exec#
- Executor F && f
- Executor F Shape const & shape
- Executor F Shape const Future && predecessor
- Executor F Shape const Future Ts && ts {return detail::bulk_then_execute_fn_helper<std::decay_t<Executor>>::call(HPX_FORWARD(Executor, exec),HPX_FORWARD(F, f), shape, HPX_FORWARD(Future, predecessor),HPX_FORWARD(Ts, ts)...)
-
struct post_t : public hpx::functional::detail::tag_fallback<post_t>#
- #include <execution.hpp>
Customization point for asynchronous fire & forget execution agent creation.
This asynchronously (fire & forget) creates a single function invocation f() using the associated executor.
Note
This is valid for two-way executors (calls exec.post(f, ts…), if available, otherwise it calls exec.async_execute(f, ts…) while discarding the returned future), and for non-blocking two-way executors (calls exec.post(f, ts…) if it exists).
- Param exec
[in] The executor object to use for scheduling of the function f.
- Param f
[in] The function which will be scheduled using the given executor.
- Param ts
[in] Additional arguments to use to invoke f.
Private Functions
- template<executor_any Executor, typename F, typename... Ts> requires (std::invocable< F &&, Ts &&... >) friend decltype(auto) tag_fallback_invoke(post_t
Private Members
-
Executor &&exec#
- Executor F && f
- Executor F Ts && ts {return detail::post_fn_helper<std::decay_t<Executor>>::call(HPX_FORWARD(Executor, exec), HPX_FORWARD(F, f),HPX_FORWARD(Ts, ts)...)
-
struct sync_execute_t : public hpx::functional::detail::tag_fallback<sync_execute_t>#
- #include <execution.hpp>
Customization point for synchronous execution agent creation.
This synchronously creates a single function invocation f() using the associated executor. The execution of the supplied function synchronizes with the caller
Note
It will call tag_invoke(sync_execute_t, exec, f, ts…) if it exists. For two-way executors it will invoke async_execute_t and wait for the task’s completion before returning.
- Param exec
[in] The executor object to use for scheduling of the function f.
- Param f
[in] The function which will be scheduled using the given executor.
- Param ts
[in] Additional arguments to use to invoke f.
- Return
f(ts…)’s result
Private Functions
- template<executor_any Executor, typename F, typename... Ts> requires (std::invocable< F &&, Ts &&... >) friend decltype(auto) tag_fallback_invoke(sync_execute_t
Private Members
-
Executor &&exec#
- Executor F && f
- Executor F Ts && ts {return detail::sync_execute_fn_helper<std::decay_t<Executor>>::call(HPX_FORWARD(Executor, exec), HPX_FORWARD(F, f),HPX_FORWARD(Ts, ts)...)
-
struct sync_invoke_t : public hpx::functional::detail::tag_fallback<sync_invoke_t>#
- #include <execution.hpp>
Synchronously invoke the given set of nullary functions, each on its own execution agent
This creates a group of function invocations whose ordering is given by the execution_category associated with the executor.
All exceptions thrown by invocations of the functions are reported in a manner consistent with parallel algorithm execution through the returned future.
Note
This calls exec.sync_invoke(fs…) if it exists; otherwise it executes sync_execute(fs) for each fs.
- Param exec
[in] The executor object to use for scheduling of the functions fs.
- Param fs
[in] The functions which will be scheduled using the given executor.
- Return
The return type of executor_type::async_invoke if defined by executor_type.
Private Functions
- template<executor_any Executor, typename F, typename... Fs> requires (std::invocable< F > &&(std::invocable< Fs > &&...)) friend decltype(auto) tag_fallback_invoke(sync_invoke_t
Private Members
-
Executor &&exec#
- Executor F && f
- Executor F Fs && fs {return detail::sync_invoke_fn_helper<std::decay_t<Executor>>::call(HPX_FORWARD(Executor, exec), HPX_FORWARD(F, f),HPX_FORWARD(Fs, fs)...)
-
struct then_execute_t : public hpx::functional::detail::tag_fallback<then_execute_t>#
- #include <execution.hpp>
Customization point for execution agent creation depending on a given future.
This creates a single function invocation f() using the associated executor after the given future object has become ready.
Note
This is valid for two-way executors (calls exec.then_execute(f, predecessor, ts…) if it exists) and for one way executors (calls predecessor.then(bind(f, ts…))).
- Param exec
[in] The executor object to use for scheduling of the function f.
- Param f
[in] The function which will be scheduled using the given executor.
- Param predecessor
[in] The future object the execution of the given function depends on.
- Param ts
[in] Additional arguments to use to invoke f.
- Return
f(ts…)’s result through a future
Private Functions
- template<executor_any Executor, typename F, typename Future, typename... Ts> requires (std::invocable< F &&, Future &&, Ts &&... >) friend decltype(auto) tag_fallback_invoke(then_execute_t
Private Members
-
Executor &&exec#
- Executor F && f
- Executor F Future && predecessor
- Executor F Future Ts && ts {return detail::then_execute_fn_helper<std::decay_t<Executor>>::call(HPX_FORWARD(Executor, exec), HPX_FORWARD(F, f),HPX_FORWARD(Future, predecessor), HPX_FORWARD(Ts, ts)...)
-
hpx::parallel::execution::sync_execute_t sync_execute#
-
namespace execution
-
namespace execution
hpx/execution_base/receiver.hpp#
Defined in header hpx/execution_base/receiver.hpp.
See Public API for a list of names and headers that are part of the public HPX API.
-
namespace hpx
-
namespace execution
-
namespace experimental
Functions
-
template<typename R, typename ...As>
void set_value(R &&r, As&&... as)# set_value is a customization point object. The expression
hpx::execution::set_value(r, as...)is equivalent to:r.set_value(as...), if that expression is valid. If the function selected does not send the value(s)as...to the Receiverr’s value channel, the program is ill-formed (no diagnostic required).Otherwise, `set_value(r, as…), if that expression is valid, with overload resolution performed in a context that include the declaration
void set_value();Otherwise, the expression is ill-formed.
The customization is implemented in terms of
hpx::functional::tag_invoke.
-
template<typename R>
void set_stopped(R &&r)# set_stopped is a customization point object. The expression
hpx::execution::set_stopped(r)is equivalent to:r.set_stopped(), if that expression is valid. If the function selected does not signal the Receiverr’s done channel, the program is ill-formed (no diagnostic required).Otherwise, `set_stopped(r), if that expression is valid, with overload resolution performed in a context that include the declaration
void set_stopped();Otherwise, the expression is ill-formed.
The customization is implemented in terms of
hpx::functional::tag_invoke.
-
template<typename R, typename E>
void set_error(R &&r, E &&e)# set_error is a customization point object. The expression
hpx::execution::set_error(r, e)is equivalent to:r.set_stopped(e), if that expression is valid. If the function selected does not send the errorethe Receiverr’s error channel, the program is ill-formed (no diagnostic required).Otherwise, `set_error(r, e), if that expression is valid, with overload resolution performed in a context that include the declaration
void set_error();Otherwise, the expression is ill-formed.
The customization is implemented in terms of
hpx::functional::tag_invoke.
Variables
-
hpx::execution::experimental::set_value_t set_value#
-
hpx::execution::experimental::set_error_t set_error#
-
hpx::execution::experimental::set_stopped_t set_stopped#
- template<typename T, typename E = std::exception_ptr> constexpr HPX_CXX_CORE_EXPORT bool is_receiver_v = is_receiver<T, E>::value
- template<typename T, typename CS> constexpr HPX_CXX_CORE_EXPORT bool is_receiver_of_v = is_receiver_of<T, CS>::value
- template<typename T, typename CS> constexpr HPX_CXX_CORE_EXPORT bool is_nothrow_receiver_of_v = is_nothrow_receiver_of<T, CS>::value
-
template<typename T, typename CS>
struct is_nothrow_receiver_of : public hpx::execution::experimental::detail::is_nothrow_receiver_of_impl<is_receiver_v<T> && is_receiver_of_v<T, CS>, T, CS>#
-
template<typename T, typename E>
struct is_receiver# - #include <receiver.hpp>
Receiving values from asynchronous computations is handled by the
Receiverconcept. AReceiverneeds to be able to receive an error or be marked as being canceled. As such, the Receiver concept is defined by having the following two customization points defined, which form the completion-signal operations:hpx::execution::experimental::set_stopped*hpx::execution::experimental::set_error
Those two functions denote the completion-signal operations. The Receiver contract is as follows:
None of a Receiver’s completion-signal operation shall be invoked before
hpx::execution::experimental::starthas been called on the operation state object that was returned by connecting a Receiver to a senderhpx::execution::experimental::connect.Once
hpx::execution::starthas been called on the operation state object, exactly one of the Receiver’s completion-signal operation shall complete without an exception before the Receiver is destroyed
Once one of the Receiver’s completion-signal operation has been completed without throwing an exception, the Receiver contract has been satisfied. In other words: The asynchronous operation has been completed.
-
template<typename T, typename CS>
struct is_receiver_of# - #include <receiver.hpp>
The
receiver_ofconcept is a refinement of theReceiverconcept by requiring one additional completion-signal operation:hpx::execution::set_value
The
receiver_ofconcept takes a receiver and an instance of thecompletion_signatures<>class template. Thereceiver_ofconcept, rather than accepting a receiver and some value types, is changed to take a receiver and an instance of thecompletion_signatures<>class template. A sender usescompletion_signatures<>to describe the signals with which it completes. Thereceiver_ofconcept ensures that a particular receiver is capable of receiving those signals.This completion-signal operation adds the following to the Receiver’s contract:
If
hpx::execution::set_valueexits with an exception, it is still valid to callhpx::execution::set_errororhpx::execution::set_stopped
See also
hpx::execution::traits::is_receiver
-
struct set_error_t : public hpx::functional::tag_noexcept<set_error_t>#
-
struct set_stopped_t : public hpx::functional::tag_noexcept<set_stopped_t>#
-
struct set_value_t : public hpx::functional::tag<set_value_t>#
-
template<typename R, typename ...As>
-
namespace experimental
-
namespace execution
hpx/execution_base/traits/is_executor_parameters.hpp#
Defined in header hpx/execution_base/traits/is_executor_parameters.hpp.
See Public API for a list of names and headers that are part of the public HPX API.
-
template<typename Executor>
struct extract_executor_parameters<Executor, std::void_t<typename Executor::executor_parameters_type>>#
-
template<typename Parameters>
struct extract_has_variable_chunk_size<Parameters, std::void_t<typename Parameters::has_variable_chunk_size>> : public true_type#
-
template<typename Parameters>
struct extract_has_variable_chunk_size<::std::reference_wrapper<Parameters>> : public hpx::execution::experimental::extract_has_variable_chunk_size<Parameters>#
-
template<typename Parameters>
struct extract_invokes_testing_function<::std::reference_wrapper<Parameters>> : public hpx::execution::experimental::extract_invokes_testing_function<Parameters>#
-
namespace hpx
Variables
- template<typename Parameters> HPX_CXX_CORE_EXPORT concept executor_parameters =hpx::traits::is_executor_parameters_v<Parameters>
-
namespace execution
-
namespace experimental
Typedefs
-
template<typename Executor>
using extract_executor_parameters_t = typename extract_executor_parameters<Executor>::type#
Variables
- template<typename Parameters> constexpr HPX_CXX_CORE_EXPORT bool extract_has_variable_chunk_size_v = extract_has_variable_chunk_size<Parameters>::value
- template<typename Parameters> constexpr HPX_CXX_CORE_EXPORT bool extract_invokes_testing_function_v = extract_invokes_testing_function<Parameters>::value
- template<typename T> constexpr HPX_CXX_CORE_EXPORT bool is_executor_parameters_v = is_executor_parameters<T>::value
-
template<typename Executor, typename Enable = void>
struct extract_executor_parameters# Public Types
-
using type = sequential_executor_parameters#
-
using type = sequential_executor_parameters#
- template<typename Executor> executor_parameters_type > >
Public Types
-
using type = typename Executor::executor_parameters_type
-
using type = typename Executor::executor_parameters_type
-
template<typename Parameters, typename Enable = void>
struct extract_has_variable_chunk_size : public false_type#
- template<typename Parameters> has_variable_chunk_size > > : public true_type
- template<typename Parameters> reference_wrapper< Parameters > > : public hpx::execution::experimental::extract_has_variable_chunk_size< Parameters >
-
template<typename Parameters, typename Enable = void>
struct extract_invokes_testing_function : public false_type#
- template<typename Parameters> reference_wrapper< Parameters > > : public hpx::execution::experimental::extract_invokes_testing_function< Parameters >
-
template<typename T>
struct is_executor_parameters : public detail::is_executor_parameters<std::decay_t<T>>#
-
struct sequential_executor_parameters#
-
template<typename Executor>
-
namespace experimental
executors#
See Public API for a list of names and headers that are part of the public HPX API.
hpx/executors/annotating_executor.hpp#
Defined in header hpx/executors/annotating_executor.hpp.
See Public API for a list of names and headers that are part of the public HPX API.
-
namespace hpx
-
namespace execution
-
namespace experimental
Functions
- template<typename Tag, executor_any BaseExecutor, typename Property> HPX_CXX_CORE_EXPORT requires (hpx::execution::experimental::is_scheduling_property_v< Tag >) auto tag_invoke(Tag tag
- template<typename Tag, typename BaseExecutor> HPX_CXX_CORE_EXPORT requires (hpx::execution::experimental::is_scheduling_property_v< Tag >) auto tag_invoke(Tag tag
Variables
- HPX_CXX_CORE_EXPORT annotating_executor< BaseExecutor > const & exec {return tag(exec.get_executor())
- HPX_CXX_CORE_EXPORT annotating_executor< BaseExecutor > const Property &&decltype(annotating_executor< BaseExecutor >(std::declval< Tag >()(std::declval< BaseExecutor >(), std::declval< Property >()))) prop {returnannotating_executor<BaseExecutor>(tag(exec.get_executor(), HPX_FORWARD(Property, prop)))
-
template<executor_any BaseExecutor>
struct annotating_executor# - #include <annotating_executor.hpp>
An annotating_executor wraps any other executor and adds the capability to add annotations to the launched threads.
Public Functions
- template<executor_any Executor> requires (!std::same_as< std::decay_t< Executor >, annotating_executor >) const expr explicit annotating_executor(Executor &&exec
-
namespace experimental
-
namespace execution
hpx/executors/current_executor.hpp#
Defined in header hpx/executors/current_executor.hpp.
See Public API for a list of names and headers that are part of the public HPX API.
-
namespace hpx
-
namespace parallel
-
namespace execution
Typedefs
-
typedef hpx::execution::parallel_executor instead#
-
typedef hpx::execution::parallel_executor instead#
-
namespace execution
-
namespace this_thread#
Functions
- HPX_CXX_CORE_EXPORT hpx::execution::parallel_executor get_executor (error_code &ec=throws)
Returns a reference to the executor that was used to create the current thread.
- Throws
If –
&ec != &throws, never throws, but will set ec to an appropriate value when an error occurs. Otherwise, this function will throw an hpx::exception with an error code of hpx::error::yield_aborted if it is signaled with wait_aborted. If called outside a HPX-thread, this function will throw a hpx::exception with an error code of hpx::error::null_thread_id. If this function is called while the thread-manager is not running, it will throw an hpx::exception with an error code of hpx::error::invalid_status.
-
namespace threads
Functions
- HPX_CXX_CORE_EXPORT hpx::execution::parallel_executor get_executor (thread_id_type const &id, error_code &ec=throws)
Returns a reference to the executor that was used to create the given thread.
- Throws
If –
&ec != &throws, never throws, but will set ec to an appropriate value when an error occurs. Otherwise, this function will throw an hpx::exception with an error code of hpx::error::yield_aborted if it is signaled with wait_aborted. If called outside a HPX-thread, this function will throw a hpx::exception with an error code of hpx::error::null_thread_id. If this function is called while the thread-manager is not running, it will throw an hpx::exception with an error code of hpx::error::invalid_status.
-
namespace parallel
hpx/executors/exception_list.hpp#
Defined in header hpx/executors/exception_list.hpp.
See Public API for a list of names and headers that are part of the public HPX API.
-
namespace hpx
-
namespace parallel
-
namespace parallel
hpx::execution::seq, hpx::execution::par, hpx::execution::par_unseq, hpx::execution::task, hpx::execution::sequenced_policy, hpx::execution::parallel_policy, hpx::execution::parallel_unsequenced_policy, hpx::execution::sequenced_task_policy, hpx::execution::parallel_task_policy#
Defined in header hpx/execution.hpp.
See Public API for a list of names and headers that are part of the public HPX API.
-
namespace hpx
-
namespace execution
Typedefs
-
using sequenced_task_policy = detail::sequenced_task_policy_shim<sequenced_executor, hpx::traits::executor_parameters_type_t<sequenced_executor>>#
Extension: The class sequenced_task_policy is an execution policy type used as a unique type to disambiguate parallel algorithm overloading and indicate that a parallel algorithm’s execution may not be parallelized (has to run sequentially).
The algorithm returns a future representing the result of the corresponding algorithm when invoked with the sequenced_policy.
-
using sequenced_policy = detail::sequenced_policy_shim<sequenced_executor, hpx::traits::executor_parameters_type_t<sequenced_executor>>#
The class sequenced_policy is an execution policy type used as a unique type to disambiguate parallel algorithm overloading and require that a parallel algorithm’s execution may not be parallelized.
-
using parallel_task_policy = detail::parallel_task_policy_shim<parallel_executor, hpx::traits::executor_parameters_type_t<parallel_executor>>#
Extension: The class parallel_task_policy is an execution policy type used as a unique type to disambiguate parallel algorithm overloading and indicate that a parallel algorithm’s execution may be parallelized.
The algorithm returns a future representing the result of the corresponding algorithm when invoked with the parallel_policy.
-
using parallel_policy = detail::parallel_policy_shim<parallel_executor, hpx::traits::executor_parameters_type_t<parallel_executor>>#
The class parallel_policy is an execution policy type used as a unique type to disambiguate parallel algorithm overloading and indicate that a parallel algorithm’s execution may be parallelized.
-
using parallel_unsequenced_task_policy = detail::parallel_unsequenced_task_policy_shim<parallel_executor, hpx::traits::executor_parameters_type_t<parallel_executor>>#
The class parallel_unsequenced_task_policy is an execution policy type used as a unique type to disambiguate parallel algorithm overloading and indicate that a parallel algorithm’s execution may be parallelized and vectorized.
-
using parallel_unsequenced_policy = detail::parallel_unsequenced_policy_shim<parallel_executor, hpx::traits::executor_parameters_type_t<parallel_executor>>#
The class parallel_unsequenced_policy is an execution policy type used as a unique type to disambiguate parallel algorithm overloading and indicate that a parallel algorithm’s execution may be parallelized and vectorized.
-
using unsequenced_task_policy = detail::unsequenced_task_policy_shim<sequenced_executor, hpx::traits::executor_parameters_type_t<sequenced_executor>>#
The class unsequenced_task_policy is an execution policy type used as a unique type to disambiguate parallel algorithm overloading and indicate that a parallel algorithm’s execution may be vectorized.
-
using unsequenced_policy = detail::unsequenced_policy_shim<sequenced_executor, hpx::traits::executor_parameters_type_t<sequenced_executor>>#
The class unsequenced_policy is an execution policy type used as a unique type to disambiguate parallel algorithm overloading and indicate that a parallel algorithm’s execution may be vectorized.
Variables
- constexpr HPX_CXX_CORE_EXPORT task_policy_tag task = {}
- constexpr HPX_CXX_CORE_EXPORT non_task_policy_tag non_task = {}
- constexpr HPX_CXX_CORE_EXPORT sequenced_policy seq = {}
Default sequential execution policy object.
- constexpr HPX_CXX_CORE_EXPORT parallel_policy par = {}
Default parallel execution policy object.
- constexpr HPX_CXX_CORE_EXPORT parallel_unsequenced_policy par_unseq = {}
Default vector execution policy object.
- constexpr HPX_CXX_CORE_EXPORT unsequenced_policy unseq = {}
Default vector execution policy object.
-
struct non_task_policy_tag : public hpx::execution::experimental::to_non_task_t#
-
struct task_policy_tag : public hpx::execution::experimental::to_task_t#
-
namespace experimental
-
template<>
struct is_execution_policy_mapping<non_task_policy_tag> : public true_type#
-
template<>
struct is_execution_policy_mapping<task_policy_tag> : public true_type#
-
template<>
-
using sequenced_task_policy = detail::sequenced_task_policy_shim<sequenced_executor, hpx::traits::executor_parameters_type_t<sequenced_executor>>#
-
namespace execution
hpx/executors/execution_policy_annotation.hpp#
Defined in header hpx/executors/execution_policy_annotation.hpp.
See Public API for a list of names and headers that are part of the public HPX API.
-
namespace hpx
-
namespace execution
-
namespace experimental
Functions
- template<execution_policy ExPolicy> requires (std::invocable< hpx::execution::experimental::with_annotation_t, typename std::decay_t< ExPolicy >::executor_type, char const * >) const expr decltype(auto) tag_invoke(hpx
- template<execution_policy ExPolicy> requires (std::invocable< hpx::execution::experimental::with_annotation_t, typename std::decay_t< ExPolicy >::executor_type, std::string >) decltype(auto) tag_invoke(hpx
- template<execution_policy ExPolicy> requires (std::invocable< hpx::execution::experimental::get_annotation_t, typename std::decay_t< ExPolicy >::executor_type >) const expr decltype(auto) tag_invoke(hpx
-
namespace experimental
-
namespace execution
hpx/executors/execution_policy_mappings.hpp#
Defined in header hpx/executors/execution_policy_mappings.hpp.
See Public API for a list of names and headers that are part of the public HPX API.
-
namespace hpx
-
namespace execution
-
namespace experimental
Variables
- template<typename Tag> constexpr HPX_CXX_CORE_EXPORT bool is_execution_policy_mapping_v = is_execution_policy_mapping<Tag>::value
-
hpx::execution::experimental::to_non_par_t to_non_par#
-
hpx::execution::experimental::to_par_t to_par#
-
hpx::execution::experimental::to_non_task_t to_non_task#
-
hpx::execution::experimental::to_task_t to_task#
-
hpx::execution::experimental::to_non_unseq_t to_non_unseq#
-
hpx::execution::experimental::to_unseq_t to_unseq#
-
template<typename Tag>
struct is_execution_policy_mapping : public false_type#
-
template<>
struct is_execution_policy_mapping<to_non_par_t> : public true_type#
-
template<>
struct is_execution_policy_mapping<to_non_task_t> : public true_type#
-
template<>
struct is_execution_policy_mapping<to_non_unseq_t> : public true_type#
-
template<>
struct is_execution_policy_mapping<to_unseq_t> : public true_type#
-
struct to_non_par_t : public hpx::functional::detail::tag_fallback<to_non_par_t>#
Private Functions
-
template<execution_policy ExPolicy>
inline constexpr decltype(auto) friend tag_fallback_invoke(to_non_par_t, ExPolicy &&policy) noexcept#
-
template<execution_policy ExPolicy>
-
struct to_non_task_t : public hpx::functional::detail::tag_fallback<to_non_task_t>#
Subclassed by hpx::execution::non_task_policy_tag
Private Functions
-
template<execution_policy ExPolicy>
inline constexpr decltype(auto) friend tag_fallback_invoke(to_non_task_t, ExPolicy &&policy) noexcept#
-
template<execution_policy ExPolicy>
-
struct to_non_unseq_t : public hpx::functional::detail::tag_fallback<to_non_unseq_t>#
Private Functions
-
template<execution_policy ExPolicy>
inline constexpr decltype(auto) friend tag_fallback_invoke(to_non_unseq_t, ExPolicy &&policy) noexcept#
-
template<execution_policy ExPolicy>
-
struct to_par_t : public hpx::functional::detail::tag_fallback<to_par_t>#
-
struct to_task_t : public hpx::functional::detail::tag_fallback<to_task_t>#
Subclassed by hpx::execution::task_policy_tag
-
struct to_unseq_t : public hpx::functional::detail::tag_fallback<to_unseq_t>#
Private Functions
-
template<execution_policy ExPolicy>
inline constexpr decltype(auto) friend tag_fallback_invoke(to_unseq_t, ExPolicy &&policy) noexcept#
-
template<execution_policy ExPolicy>
-
namespace experimental
-
namespace execution
hpx/executors/execution_policy_parameters.hpp#
Defined in header hpx/executors/execution_policy_parameters.hpp.
See Public API for a list of names and headers that are part of the public HPX API.
-
namespace hpx
-
namespace execution
-
namespace experimental
Functions
- template<execution_policy ExPolicy> HPX_CXX_CORE_EXPORT requires (std::invocable< with_processing_units_count_t, typename std::decay_t< ExPolicy >::executor_type, std::size_t >) const expr decltype(auto) tag_invoke(with_processing_units_count_t
- return create_rebound_policy (policy, HPX_MOVE(exec), policy.parameters())
- template<execution_policy ExPolicy, executor_parameters Params> HPX_CXX_CORE_EXPORT requires (std::invocable< with_processing_units_count_t, typename std::decay_t< ExPolicy >::executor_type, std::size_t > &&std::invocable< processing_units_count_t, std::decay_t< Params >, typename std::decay_t< ExPolicy >::executor_type, hpx::chrono::steady_duration const &, std::size_t >) const expr decltype(auto) tag_invoke(with_processing_units_count_t
- template<typename ParametersProperty, execution_policy ExPolicy, executor_parameters Params> constexpr decltype(auto) HPX_CXX_CORE_EXPORT tag_fallback_invoke (ParametersProperty, ExPolicy &&policy, Params &¶ms)
-
template<typename ParametersProperty, typename ExPolicy, typename ...Ts>
constexpr HPX_CXX_CORE_EXPORT auto tag_fallback_invoke(ParametersProperty prop, ExPolicy &&policy, Ts&&... ts) -> decltype(std::declval<ParametersProperty>()(std::declval<typename std::decay_t<ExPolicy>::executor_type>(), std::declval<Ts>()...))#
Variables
- HPX_CXX_CORE_EXPORT ExPolicy && policy {return tag(policy.executor())
- HPX_CXX_CORE_EXPORT ExPolicy std::size_t num_cores {auto exec = with_processing_units_count(policy.executor(), num_cores)
- HPX_CXX_CORE_EXPORT ExPolicy Params && params {auto exec = with_processing_units_count(policy.executor(),processing_units_count(params, policy.executor(), hpx::chrono::null_duration, 0))
-
namespace experimental
-
namespace execution
hpx/executors/execution_policy_scheduling_property.hpp#
Defined in header hpx/executors/execution_policy_scheduling_property.hpp.
See Public API for a list of names and headers that are part of the public HPX API.
-
namespace hpx
-
namespace execution
-
namespace experimental
Functions
- template<scheduling_property Tag, execution_policy ExPolicy, typename Property> HPX_CXX_CORE_EXPORT requires (hpx::functional::is_tag_invocable_v< Tag, typename std::decay_t< ExPolicy >::executor_type, Property >) const expr decltype(auto) tag_invoke(Tag tag
- template<scheduling_property Tag, execution_policy ExPolicy> HPX_CXX_CORE_EXPORT requires (hpx::functional::is_tag_invocable_v< Tag, typename std::decay_t< ExPolicy >::executor_type >) const expr decltype(auto) tag_invoke(Tag tag
-
namespace experimental
-
namespace execution
hpx/executors/explicit_scheduler_executor.hpp#
Defined in header hpx/executors/explicit_scheduler_executor.hpp.
See Public API for a list of names and headers that are part of the public HPX API.
-
namespace hpx
-
namespace execution
-
namespace experimental
Functions
-
template<typename BaseScheduler>
explicit HPX_CXX_CORE_EXPORT explicit_scheduler_executor(BaseScheduler &&sched) -> explicit_scheduler_executor<std::decay_t<BaseScheduler>>#
-
template<typename Tag, typename BaseScheduler, typename Property>
HPX_CXX_CORE_EXPORT auto tag_invoke(Tag tag, explicit_scheduler_executor<BaseScheduler> const &exec, Property &&prop) -> decltype(explicit_scheduler_executor<BaseScheduler>(std::declval<Tag>()(std::declval<BaseScheduler>(), std::declval<Property>())))#
-
template<typename Tag, typename BaseScheduler>
HPX_CXX_CORE_EXPORT auto tag_invoke(Tag tag, explicit_scheduler_executor<BaseScheduler> const &exec) -> decltype(std::declval<Tag>()(std::declval<BaseScheduler>()))#
-
template<typename BaseScheduler>
struct explicit_scheduler_executor
-
template<typename BaseScheduler>
-
namespace experimental
-
namespace execution
hpx/executors/fork_join_executor.hpp#
Defined in header hpx/executors/fork_join_executor.hpp.
See Public API for a list of names and headers that are part of the public HPX API.
hpx/executors/parallel_executor.hpp#
Defined in header hpx/executors/parallel_executor.hpp.
See Public API for a list of names and headers that are part of the public HPX API.
Defines
-
HPX_MASK_TYPE_IS_CONSTEXPR_CONSTRUCTIBLE#
-
namespace hpx
-
namespace execution
Typedefs
-
using parallel_executor = parallel_policy_executor<hpx::launch>#
Functions
-
template<typename Tag, typename Policy, typename Property>
HPX_CXX_CORE_EXPORT auto tag_invoke(Tag tag, parallel_policy_executor<Policy> const &exec, Property &&prop) -> decltype(std::declval<parallel_policy_executor<Policy>>().policy(std::declval<Tag>()(std::declval<Policy>(), std::declval<Property>())), parallel_policy_executor<Policy>())#
-
template<typename Policy>
struct parallel_policy_executor# - #include <parallel_executor.hpp>
A parallel_executor creates groups of parallel execution agents which execute in threads implicitly created by the executor. This executor prefers continuing with the creating thread first before executing newly created threads.
This executor conforms to the concepts of a TwoWayExecutor, and a BulkTwoWayExecutor
Public Types
-
using execution_category = std::conditional_t<std::is_same_v<Policy, launch::sync_policy>, sequenced_execution_tag, parallel_execution_tag>#
Associate the parallel_execution_tag executor tag type as a default with this executor, except if the given launch policy is sync.
-
using executor_parameters_type = experimental::default_parameters#
Associate the default_parameters executor parameters type as a default with this executor.
Public Functions
-
inline explicit constexpr parallel_policy_executor(threads::thread_priority priority, threads::thread_stacksize stacksize = threads::thread_stacksize::default_, threads::thread_schedule_hint schedulehint = {}, Policy l = parallel::execution::detail::get_default_policy<Policy>::call(), std::size_t hierarchical_threshold = hierarchical_threshold_default_)#
Create a new parallel executor.
-
inline explicit constexpr parallel_policy_executor(threads::thread_stacksize stacksize, threads::thread_schedule_hint schedulehint = {}, Policy l = parallel::execution::detail::get_default_policy<Policy>::call())#
-
inline explicit constexpr parallel_policy_executor(threads::thread_schedule_hint schedulehint, Policy l = parallel::execution::detail::get_default_policy<Policy>::call())#
-
inline constexpr parallel_policy_executor()#
-
inline explicit constexpr parallel_policy_executor(threads::thread_pool_base *pool, Policy l, std::size_t hierarchical_threshold = hierarchical_threshold_default_)#
-
inline explicit constexpr parallel_policy_executor(threads::thread_pool_base *pool, threads::thread_priority priority = threads::thread_priority::default_, threads::thread_stacksize stacksize = threads::thread_stacksize::default_, threads::thread_schedule_hint schedulehint = {}, Policy l = parallel::execution::detail::get_default_policy<Policy>::call(), std::size_t hierarchical_threshold = hierarchical_threshold_default_)#
Private Functions
- template<typename Executor_> inline requires (std::is_convertible_v< Executor_, parallel_policy_executor >) friend auto tag_invoke(hpx
- template<typename Parameters> inline requires (hpx::traits::is_executor_parameters_v< Parameters >) friend const expr std
- template<typename Executor_> inline requires (std::is_convertible_v< Executor_, parallel_policy_executor >) friend const expr auto tag_invoke(hpx
Friends
-
inline friend auto tag_invoke(hpx::execution::experimental::get_cores_mask_t, parallel_policy_executor const &exec)#
-
using execution_category = std::conditional_t<std::is_same_v<Policy, launch::sync_policy>, sequenced_execution_tag, parallel_execution_tag>#
-
namespace experimental
-
using parallel_executor = parallel_policy_executor<hpx::launch>#
-
namespace parallel
-
namespace execution
-
namespace execution
-
namespace execution
hpx/executors/parallel_executor_aggregated.hpp#
Defined in header hpx/executors/parallel_executor_aggregated.hpp.
See Public API for a list of names and headers that are part of the public HPX API.
-
namespace hpx
-
namespace parallel
-
namespace execution
-
namespace execution
-
namespace parallel
hpx/executors/restricted_thread_pool_executor.hpp#
Defined in header hpx/executors/restricted_thread_pool_executor.hpp.
See Public API for a list of names and headers that are part of the public HPX API.
-
namespace hpx
-
namespace execution
-
namespace experimental
Typedefs
-
using restricted_thread_pool_executor = restricted_policy_executor<hpx::launch>#
-
template<typename Policy>
class restricted_policy_executor# Public Types
-
using execution_category = typename embedded_executor::execution_category#
Associate the parallel_execution_tag executor tag type as a default with this executor.
-
using executor_parameters_type = typename embedded_executor::executor_parameters_type#
Public Functions
-
inline explicit restricted_policy_executor(std::size_t first_thread = 0, std::size_t num_threads = 1, threads::thread_priority priority = threads::thread_priority::default_, threads::thread_stacksize stacksize = threads::thread_stacksize::default_, threads::thread_schedule_hint schedulehint = {}, std::size_t hierarchical_threshold = hierarchical_threshold_default_)#
Create a new parallel executor.
-
inline restricted_policy_executor(restricted_policy_executor const &other)#
-
inline restricted_policy_executor &operator=(restricted_policy_executor const &rhs)#
Private Types
-
using embedded_executor = hpx::execution::parallel_policy_executor<Policy>#
Private Members
-
embedded_executor exec_#
-
using execution_category = typename embedded_executor::execution_category#
-
using restricted_thread_pool_executor = restricted_policy_executor<hpx::launch>#
-
namespace experimental
-
namespace execution
hpx/executors/scheduler_executor.hpp#
Defined in header hpx/executors/scheduler_executor.hpp.
See Public API for a list of names and headers that are part of the public HPX API.
-
namespace hpx
-
namespace execution
-
namespace experimental
Functions
-
template<typename BaseScheduler>
explicit HPX_CXX_CORE_EXPORT scheduler_executor(BaseScheduler &&sched) -> scheduler_executor<std::decay_t<BaseScheduler>>#
-
template<typename Tag, typename BaseScheduler, typename Property>
HPX_CXX_CORE_EXPORT auto tag_invoke(Tag tag, scheduler_executor<BaseScheduler> const &exec, Property &&prop) -> decltype(scheduler_executor<BaseScheduler>(std::declval<Tag>()(std::declval<BaseScheduler>(), std::declval<Property>())))#
-
template<typename BaseScheduler>
struct scheduler_executor
-
template<typename BaseScheduler>
-
namespace experimental
-
namespace execution
hpx/executors/sequenced_executor.hpp#
Defined in header hpx/executors/sequenced_executor.hpp.
See Public API for a list of names and headers that are part of the public HPX API.
-
namespace hpx
-
namespace execution
-
struct sequenced_executor#
- #include <sequenced_executor.hpp>
A sequential_executor creates groups of sequential execution agents which execute in the calling thread. The sequential order is given by the lexicographical order of indices in the index space.
-
namespace experimental
-
struct sequenced_executor#
-
namespace execution
hpx/executors/service_executors.hpp#
Defined in header hpx/executors/service_executors.hpp.
See Public API for a list of names and headers that are part of the public HPX API.
-
namespace hpx
-
namespace parallel
-
namespace execution
-
namespace execution
-
namespace parallel
hpx/executors/std_execution_policy.hpp#
Defined in header hpx/executors/std_execution_policy.hpp.
See Public API for a list of names and headers that are part of the public HPX API.
hpx/executors/thread_pool_scheduler.hpp#
Defined in header hpx/executors/thread_pool_scheduler.hpp.
See Public API for a list of names and headers that are part of the public HPX API.
-
namespace hpx
-
namespace execution
-
namespace experimental
Typedefs
-
using thread_pool_scheduler = thread_pool_policy_scheduler<hpx::launch>#
Functions
-
template<typename Tag, typename Policy, typename Property>
HPX_CXX_CORE_EXPORT auto tag_invoke(Tag tag, thread_pool_policy_scheduler<Policy> const &scheduler, Property &&prop) -> decltype(std::declval<thread_pool_policy_scheduler<Policy>>().policy(std::declval<Tag>()(std::declval<Policy>(), std::declval<Property>())), thread_pool_policy_scheduler<Policy>())#
-
template<typename Policy>
struct thread_pool_policy_scheduler# Public Types
-
using execution_category = std::conditional_t<std::is_same_v<Policy, launch::sync_policy>, sequenced_execution_tag, parallel_execution_tag>#
Public Functions
-
inline explicit constexpr thread_pool_policy_scheduler(Policy l = experimental::detail::get_default_scheduler_policy<Policy>::call())#
-
inline explicit thread_pool_policy_scheduler(hpx::threads::thread_pool_base *pool, Policy l = experimental::detail::get_default_scheduler_policy<Policy>::call()) noexcept#
-
using execution_category = std::conditional_t<std::is_same_v<Policy, launch::sync_policy>, sequenced_execution_tag, parallel_execution_tag>#
-
using thread_pool_scheduler = thread_pool_policy_scheduler<hpx::launch>#
-
namespace experimental
-
namespace execution
hpx/executors/datapar/execution_policy.hpp#
Defined in header hpx/executors/datapar/execution_policy.hpp.
See Public API for a list of names and headers that are part of the public HPX API.
hpx/executors/datapar/execution_policy_mappings.hpp#
Defined in header hpx/executors/datapar/execution_policy_mappings.hpp.
See Public API for a list of names and headers that are part of the public HPX API.
filesystem#
See Public API for a list of names and headers that are part of the public HPX API.
hpx/filesystem/api.hpp#
Defined in header hpx/filesystem/api.hpp.
See Public API for a list of names and headers that are part of the public HPX API.
This file provides a compatibility layer using Boost.Filesystem for the C++17 filesystem library. It is not intended to be a complete compatibility layer. It only contains functions required by the HPX codebase. It also provides some functions only available in Boost.Filesystem when using C++17 filesystem.
-
namespace hpx
-
namespace filesystem#
Functions
- inline HPX_CXX_CORE_EXPORT path initial_path ()
- inline HPX_CXX_CORE_EXPORT std::string basename (path const &p)
- inline HPX_CXX_CORE_EXPORT path canonical (path const &p, path const &base)
- inline HPX_CXX_CORE_EXPORT path canonical (path const &p, path const &base, std::error_code &ec)
-
namespace filesystem#
-
namespace filesystem#
functional#
See Public API for a list of names and headers that are part of the public HPX API.
hpx::bind, hpx::placeholders::_1, hpx::placeholders::_2, …, hpx::placeholders::_9#
Defined in header hpx/functional.hpp.
See Public API for a list of names and headers that are part of the public HPX API.
-
namespace hpx
Top level namespace.
Functions
- template<typename F, typename... Ts> HPX_CXX_CORE_EXPORT requires (!traits::is_action_v< std::decay_t< F >>) const expr detail
The function template bind generates a forwarding call wrapper for f. Calling this wrapper is equivalent to invoking f with some of its arguments bound to vs.
- Parameters
f – Callable object (function object, pointer to function, reference to function, pointer to member function, or pointer to data member) that will be bound to some arguments
vs – list of arguments to bind, with the unbound arguments replaced by the placeholders _1, _2, _3… of namespace hpx::placeholders
- Returns
A function object of unspecified type T, for which
hpx::is_bind_expression<T>::value == true.
-
namespace placeholders#
The hpx::placeholders namespace contains the placeholder objects [_1, …, _N] where N is an implementation defined maximum number.
When used as an argument in a hpx::bind expression, the placeholder objects are stored in the generated function object, and when that function object is invoked with unbound arguments, each placeholder _N is replaced by the corresponding Nth unbound argument.
The types of the placeholder objects are DefaultConstructible and CopyConstructible, their default copy/move constructors do not throw exceptions, and for any placeholder _N, the type hpx::is_placeholder<decltype(_N)> is defined, where hpx::is_placeholder<decltype(_N)> is derived from std::integral_constant<int, N>.
Variables
- constexpr HPX_CXX_CORE_EXPORT detail::placeholder< 1 > _1 = {}
- constexpr HPX_CXX_CORE_EXPORT detail::placeholder< 2 > _2 = {}
- constexpr HPX_CXX_CORE_EXPORT detail::placeholder< 3 > _3 = {}
- constexpr HPX_CXX_CORE_EXPORT detail::placeholder< 4 > _4 = {}
- constexpr HPX_CXX_CORE_EXPORT detail::placeholder< 5 > _5 = {}
- constexpr HPX_CXX_CORE_EXPORT detail::placeholder< 6 > _6 = {}
- constexpr HPX_CXX_CORE_EXPORT detail::placeholder< 7 > _7 = {}
- constexpr HPX_CXX_CORE_EXPORT detail::placeholder< 8 > _8 = {}
- constexpr HPX_CXX_CORE_EXPORT detail::placeholder< 9 > _9 = {}
-
namespace serialization#
Functions
- template<typename Archive, typename F, typename... Ts> HPX_CXX_CORE_EXPORT void serialize (Archive &ar, ::hpx::detail::bound< F, Ts... > &bound, unsigned int const version=0)
- template<typename Archive, std::size_t I> constexpr HPX_CXX_CORE_EXPORT void serialize (Archive &, ::hpx::detail::placeholder< I > &, unsigned int const =0) noexcept
hpx::bind_back#
Defined in header hpx/functional.hpp.
See Public API for a list of names and headers that are part of the public HPX API.
-
namespace hpx
Top level namespace.
Functions
- template<typename F, typename... Ts> constexpr HPX_CXX_CORE_EXPORT hpx::detail::bound_back< std::decay_t< F >, util::make_index_pack_t< sizeof...(Ts)>, util::decay_unwrap_t< Ts >... > bind_back (F &&f, Ts &&... vs)
Function templates
bind_backgenerate a forwarding call wrapper forf. Calling this wrapper is equivalent to invokingfwith its lastsizeof…(Ts) parameters bound tovs.- Parameters
f – Callable object (function object, pointer to function, reference to function, pointer to member function, or pointer to data member) that will be bound to some arguments
vs – list of the arguments to bind to the last
sizeof…(Ts) parameters off
- Returns
A function object of type
Tthat is unspecified, except that the types of objects returned by two calls tohpx::bind_backwith the same arguments are the same.
- template<typename F> constexpr HPX_CXX_CORE_EXPORT std::decay_t< F > bind_back (F &&f)
-
namespace serialization
Functions
- template<typename Archive, typename F, typename... Ts> HPX_CXX_CORE_EXPORT void serialize (Archive &ar, ::hpx::detail::bound_back< F, Ts... > &bound, unsigned int const version=0)
hpx::bind_front#
Defined in header hpx/functional.hpp.
See Public API for a list of names and headers that are part of the public HPX API.
-
namespace hpx
Top level namespace.
Functions
- template<typename F, typename... Ts> constexpr HPX_CXX_CORE_EXPORT detail::bound_front< std::decay_t< F >, util::make_index_pack_t< sizeof...(Ts)>, util::decay_unwrap_t< Ts >... > bind_front (F &&f, Ts &&... vs)
Function template
bind_frontgenerates a forwarding call wrapper forf. Calling this wrapper is equivalent to invokingfwith its firstsizeof…(Ts) parameters bound tovs.- Parameters
f – Callable object (function object, pointer to function, reference to function, pointer to member function, or pointer to data member) that will be bound to some arguments
vs – list of the arguments to bind to the first or
sizeof…(Ts) parameters off
- Returns
A function object of type
Tthat is unspecified, except that the types of objects returned by two calls tohpx::bind_frontwith the same arguments are the same.
- template<typename F> constexpr HPX_CXX_CORE_EXPORT std::decay_t< F > bind_front (F &&f)
-
namespace serialization
Functions
- template<typename Archive, typename F, typename... Ts> HPX_CXX_CORE_EXPORT void serialize (Archive &ar, ::hpx::detail::bound_front< F, Ts... > &bound, unsigned int const version=0)
hpx::function#
Defined in header hpx/functional.hpp.
See Public API for a list of names and headers that are part of the public HPX API.
-
namespace hpx
Top level namespace.
-
template<typename Sig, bool Serializable = false>
class function# - #include <function.hpp>
Class template hpx::function is a general-purpose polymorphic function wrapper. Instances of hpx::function can store, copy, and invoke any CopyConstructible Callable target — functions, lambda expressions, bind expressions, or other function objects, as well as pointers to member functions and pointers to data members. The stored callable object is called the target of hpx::function. If an hpx::function contains no target, it is called empty. Invoking the target of an empty hpx::function results in hpx::error::bad_function_call exception being thrown. hpx::function satisfies the requirements of CopyConstructible and CopyAssignable.
-
template<typename R, typename ...Ts, bool Serializable>
class function<R(Ts...), Serializable> : public util::detail::basic_function<R(Ts...), true, Serializable># -
Public Functions
-
~function() = default#
Private Types
-
using base_type = util::detail::basic_function<R(Ts...), true, Serializable>#
-
~function() = default#
-
namespace distributed#
-
template<typename Sig, bool Serializable = false>
hpx::function_ref#
Defined in header hpx/functional.hpp.
See Public API for a list of names and headers that are part of the public HPX API.
-
namespace hpx
Top level namespace.
-
template<typename Sig>
class function_ref# - #include <function_ref.hpp>
function_refclass is a vocabulary type with reference semantics for passing entities to call.An example use case that benefits from higher-order functions is
retry(n,f)which attempts to callfup tontimes synchronously until success. This example might model the real-world scenario of repeatedly querying a flaky web service.The passed-in action should be a callable entity that takes no arguments and returns a payload. This can be done with function pointers,using payload = std::optional< /* ... */ >; // Repeatedly invokes `action` up to `times` repetitions. // Immediately returns if `action` returns a valid `payload`. // Returns `std::nullopt` otherwise. payload retry(size_t times, /* ????? */ action);
hpx::functionor a template but it is much simpler withfunction_refas seen below:payload retry(size_t times, function_ref<payload()> action);
-
template<typename R, typename ...Ts>
class function_ref<R(Ts...)># Public Functions
-
template<typename F, typename FD = std::decay_t<F>, typename Enable = std::enable_if_t<!std::is_same_v<FD, function_ref> && is_invocable_r_v<R, F&, Ts...>>>
inline function_ref(F &&f)#
-
inline function_ref(function_ref const &other) noexcept#
-
template<typename F, typename FD = std::decay_t<F>, typename Enable = std::enable_if_t<!std::is_same_v<FD, function_ref> && is_invocable_r_v<R, F&, Ts...>>>
inline function_ref &operator=(F &&f)#
-
inline function_ref &operator=(function_ref const &other) noexcept#
-
template<typename F, typename T = std::remove_reference_t<F>, typename Enable = std::enable_if_t<!std::is_pointer_v<T>>>
inline void assign(F &&f)#
-
inline void swap(function_ref &f) noexcept#
-
inline char const *get_function_annotation() const#
-
template<typename F, typename FD = std::decay_t<F>, typename Enable = std::enable_if_t<!std::is_same_v<FD, function_ref> && is_invocable_r_v<R, F&, Ts...>>>
-
namespace util
-
template<typename Sig>
hpx::invoke_fused, hpx::invoke_fused_r#
Defined in header hpx/functional.hpp.
See Public API for a list of names and headers that are part of the public HPX API.
-
namespace hpx
Top level namespace.
Functions
- template<typename F, typename Tuple> constexpr HPX_CXX_CORE_EXPORT detail::invoke_fused_result_t< F, Tuple > invoke_fused (F &&f, Tuple &&t) noexcept(noexcept(detail::invoke_fused_impl(detail::fused_index_pack_t< Tuple >{}, HPX_FORWARD(F, f), HPX_FORWARD(Tuple, t))))
Invokes the given callable object f with the content of the sequenced type t (tuples, pairs).
Note
This function is similar to
std::apply(C++17). The difference betweenhpx::invokeandhpx::invoke_fusedis that the later unpacks the tuples while the former cannot. Turning a tuple into a parameter pack is not a trivial operation which makeshpx::invoke_fusedrather useful.- Parameters
f – Must be a callable object. If f is a member function pointer, the first argument in the sequenced type will be treated as the callee (this object).
t – A type whose contents are accessible through a call to hpx::get.
- Throws
std::exception – like objects thrown by call to object f with the arguments contained in the sequenceable type t.
- Returns
The result of the callable object when it’s called with the content of the given sequenced type.
- template<typename R, typename F, typename Tuple> constexpr HPX_CXX_CORE_EXPORT R invoke_fused_r (F &&f, Tuple &&t) noexcept(noexcept(detail::invoke_fused_impl(detail::fused_index_pack_t< Tuple >{}, HPX_FORWARD(F, f), HPX_FORWARD(Tuple, t))))
Invokes the given callable object f with the content of the sequenced type t (tuples, pairs).
Note
This function is similar to
std::apply(C++17). The difference betweenhpx::invokeandhpx::invoke_fusedis that the later unpacks the tuples while the former cannot. Turning a tuple into a parameter pack is not a trivial operation which makeshpx::invoke_fusedrather useful.Note
The difference between
hpx::invoke_fusedandhpx::invoke_fused_ris that the later allows to specify the return type as well.- Parameters
f – Must be a callable object. If f is a member function pointer, the first argument in the sequenced type will be treated as the callee (this object).
t – A type whose contents are accessible through a call to hpx::get.
- Throws
std::exception – like objects thrown by call to object f with the arguments contained in the sequenceable type t.
- Template Parameters
R – The result type of the function when it’s called with the content of the given sequenced type.
- Returns
The result of the callable object when it’s called with the content of the given sequenced type.
hpx::mem_fn#
Defined in header hpx/functional.hpp.
See Public API for a list of names and headers that are part of the public HPX API.
-
namespace hpx
Top level namespace.
Functions
- template<typename M, typename C> constexpr HPX_CXX_CORE_EXPORT detail::mem_fn< M C::* > mem_fn (M C::*pm) noexcept
Function template
hpx::mem_fngenerates wrapper objects for pointers to members, which can store, copy, and invoke a pointer to member. Both references and pointers (including smart pointers) to an object can be used when invoking ahpx::mem_fn.- Parameters
pm – pointer to member that will be wrapped
- Returns
a call wrapper of unspecified type with the following member:
Lettemplate <typename... Ts> constexpr typename util::invoke_result<MemberPointer, Ts...>::type operator()(Ts&&... vs) noexcept;
fnbe the call wrapper returned by a call tohpx::mem_fnwith a pointer to memberpm. Then the expressionfn(t,a2,...,aN)is equivalent toHPX_INVOKE(pm,t,a2,...,aN). Thus, the return type of operator() isstd::result_of<decltype(pm)(Ts&&...)>::typeor equivalentlystd::invoke_result_t<decltype(pm),Ts&&...>, and the value innoexceptspecifier is equal tostd::is_nothrow_invocable_v<decltype(pm),Ts&&...>) . Each argument invsis perfectly forwarded, as if bystd::forward<Ts>(vs)… .
- template<typename R, typename C, typename... Ps> constexpr HPX_CXX_CORE_EXPORT detail::mem_fn< R(C::*)(Ps...)> mem_fn (R(C::*pm)(Ps...)) noexcept
Function template
hpx::mem_fngenerates wrapper objects for pointers to members, which can store, copy, and invoke a pointer to member. Both references and pointers (including smart pointers) to an object can be used when invoking ahpx::mem_fn.- Parameters
pm – pointer to member that will be wrapped
- Returns
a call wrapper of unspecified type with the following member:
Lettemplate <typename... Ts> constexpr typename util::invoke_result<MemberPointer, Ts...>::type operator()(Ts&&... vs) noexcept;
fnbe the call wrapper returned by a call tohpx::mem_fnwith a pointer to memberpm. Then the expressionfn(t,a2,...,aN)is equivalent toHPX_INVOKE(pm,t,a2,...,aN). Thus, the return type of operator() isstd::result_of<decltype(pm)(Ts&&...)>::typeor equivalentlystd::invoke_result_t<decltype(pm),Ts&&...>, and the value innoexceptspecifier is equal tostd::is_nothrow_invocable_v<decltype(pm),Ts&&...>) . Each argument invsis perfectly forwarded, as if bystd::forward<Ts>(vs)… .
- template<typename R, typename C, typename... Ps> constexpr HPX_CXX_CORE_EXPORT detail::mem_fn< R(C::*)(Ps...) const > mem_fn (R(C::*pm)(Ps...) const) noexcept
Function template
hpx::mem_fngenerates wrapper objects for pointers to members, which can store, copy, and invoke a pointer to member. Both references and pointers (including smart pointers) to an object can be used when invoking ahpx::mem_fn.- Parameters
pm – pointer to member that will be wrapped
- Returns
a call wrapper of unspecified type with the following member:
Lettemplate <typename... Ts> constexpr typename util::invoke_result<MemberPointer, Ts...>::type operator()(Ts&&... vs) noexcept;
fnbe the call wrapper returned by a call tohpx::mem_fnwith a pointer to memberpm. Then the expressionfn(t,a2,...,aN)is equivalent toHPX_INVOKE(pm,t,a2,...,aN). Thus, the return type of operator() isstd::result_of<decltype(pm)(Ts&&...)>::typeor equivalentlystd::invoke_result_t<decltype(pm),Ts&&...>, and the value innoexceptspecifier is equal tostd::is_nothrow_invocable_v<decltype(pm),Ts&&...>) . Each argument invsis perfectly forwarded, as if bystd::forward<Ts>(vs)… .
hpx::move_only_function#
Defined in header hpx/functional.hpp.
See Public API for a list of names and headers that are part of the public HPX API.
-
namespace hpx
Top level namespace.
-
template<typename Sig, bool Serializable = false>
class move_only_function# - #include <move_only_function.hpp>
Class template hpx::move_only_function is a general-purpose polymorphic function wrapper. hpx::move_only_function objects can store and invoke any constructible (not required to be move constructible) Callable target — functions, lambda expressions, bind expressions, or other function objects, as well as pointers to member functions and pointers to member objects.
The stored callable object is called the target of hpx::move_only_function. If an hpx::move_only_function contains no target, it is called empty. Unlike hpx::function, invoking an empty hpx::move_only_function results in undefined behavior.
hpx::move_only_functions supports every possible combination of cv-qualifiers, ref-qualifiers, and noexcept-specifiers not including volatile provided in its template parameter. These qualifiers and specifier (if any) are added to its operator(). hpx::move_only_function satisfies the requirements of MoveConstructible and MoveAssignable, but does not satisfy CopyConstructible or CopyAssignable.
-
template<typename R, typename ...Ts, bool Serializable>
class move_only_function<R(Ts...), Serializable> : public util::detail::basic_function<R(Ts...), false, Serializable># -
Public Functions
-
move_only_function(move_only_function const&) = delete#
-
move_only_function(move_only_function&&) noexcept = default#
-
move_only_function &operator=(move_only_function const&) = delete#
-
move_only_function &operator=(move_only_function&&) noexcept = default#
-
~move_only_function() = default#
Private Types
-
using base_type = util::detail::basic_function<R(Ts...), false, Serializable>#
-
move_only_function(move_only_function const&) = delete#
-
namespace distributed
Typedefs
-
template<typename Sig>
using move_only_function = hpx::move_only_function<Sig, true>#
-
template<typename Sig>
-
template<typename Sig, bool Serializable = false>
hpx::reference_wrapper, hpx::ref, hpx::cref#
Defined in header hpx/functional.hpp.
See Public API for a list of names and headers that are part of the public HPX API.
-
template<typename T>
struct reference_wrapper<T, std::enable_if_t<traits::needs_reference_semantics_v<T>>># -
Public Functions
-
reference_wrapper() = default#
-
template<typename U, typename Enable = std::enable_if_t<!std::is_same_v<std::decay_t<U>, reference_wrapper>>>
inline reference_wrapper(U &&val)#
-
inline reference_wrapper(reference_wrapper const &rhs)#
-
reference_wrapper(reference_wrapper &&rhs) = default#
-
inline reference_wrapper &operator=(reference_wrapper const &rhs)#
-
reference_wrapper &operator=(reference_wrapper &&rhs) = default#
-
reference_wrapper() = default#
-
template<typename T>
struct unwrap_reference<::hpx::reference_wrapper<T>>#
-
template<typename T>
struct unwrap_reference<::hpx::reference_wrapper<T> const>#
-
namespace hpx
Top level namespace.
Functions
-
template<typename T>
HPX_CXX_CORE_EXPORT reference_wrapper(T&) -> reference_wrapper<T>#
- template<typename T> constexpr HPX_CXX_CORE_EXPORT reference_wrapper< T > ref (T &val) noexcept
- template<typename T> HPX_CXX_CORE_EXPORT void ref (T const &&)=delete
- template<typename T> constexpr HPX_CXX_CORE_EXPORT reference_wrapper< T > ref (reference_wrapper< T > val) noexcept
- template<typename T> constexpr HPX_CXX_CORE_EXPORT reference_wrapper< T const > cref (T const &val) noexcept
- template<typename T> HPX_CXX_CORE_EXPORT void cref (T const &&)=delete
- template<typename T> constexpr HPX_CXX_CORE_EXPORT reference_wrapper< T const > cref (reference_wrapper< T > val) noexcept
- template<typename T> HPX_CXX_CORE_EXPORT requires (traits::needs_reference_semantics_v< T >) reference_wrapper< T > ref(T &&val) noexcept
-
template<typename T, typename Enable = void>
struct reference_wrapper : public std::reference_wrapper<T># Public Functions
-
reference_wrapper() = delete#
-
reference_wrapper() = delete#
- template<typename T> needs_reference_semantics_v< T > > >
Public Types
-
using type = T#
Public Functions
-
reference_wrapper() = default#
-
template<typename U, typename Enable = std::enable_if_t<!std::is_same_v<std::decay_t<U>, reference_wrapper>>>
inline reference_wrapper(U &&val)#
-
inline reference_wrapper(reference_wrapper const &rhs)#
-
reference_wrapper(reference_wrapper &&rhs) = default#
-
inline reference_wrapper &operator=(reference_wrapper const &rhs)#
-
reference_wrapper &operator=(reference_wrapper &&rhs) = default#
Private Members
-
T ptr = {}#
-
using type = T#
-
namespace traits
Variables
- template<typename T> constexpr HPX_CXX_CORE_EXPORT bool needs_reference_semantics_v = needs_reference_semantics<T>::value
-
template<typename T>
struct needs_reference_semantics : public false_type# Subclassed by hpx::traits::needs_reference_semantics< T const >
-
namespace util
- template<typename T> reference_wrapper< T > >
Public Types
-
using type = T#
-
using type = T#
- template<typename T> reference_wrapper< T > const >
Public Types
-
using type = T
-
using type = T
-
template<typename T>
hpx::experimental::scope_exit#
Defined in header hpx/experimental/scope.hpp.
See Public API for a list of names and headers that are part of the public HPX API.
-
namespace hpx
Top level namespace.
-
namespace experimental
-
namespace experimental
hpx::experimental::scope_fail#
Defined in header hpx/experimental/scope.hpp.
See Public API for a list of names and headers that are part of the public HPX API.
-
namespace hpx
Top level namespace.
-
namespace experimental
Functions
-
namespace experimental
hpx::experimental::scope_success#
Defined in header hpx/experimental/scope.hpp.
See Public API for a list of names and headers that are part of the public HPX API.
-
namespace hpx
Top level namespace.
-
namespace experimental
-
namespace experimental
hpx::is_bind_expression#
Defined in header hpx/functional.hpp.
See Public API for a list of names and headers that are part of the public HPX API.
-
namespace hpx
Top level namespace.
Variables
- template<typename T> constexpr HPX_CXX_CORE_EXPORT bool is_bind_expression_v = is_bind_expression<T>::value
-
template<typename T>
struct is_bind_expression : public std::is_bind_expression<T># - #include <is_bind_expression.hpp>
If
Tis the type produced by a call tohpx::bind, this template is derived fromstd::true_type. For any other type, this template is derived fromstd::false_type.This template may be specialized for a user-defined type
Tto implement UnaryTypeTrait with base characteristic ofstd::true_typeto indicate thatTshould be treated byhpx::bindas if it were the type of a bind subexpression: when a bind-generated function object is invoked, a bound argument of this type will be invoked as a function object and will be given all the unbound arguments passed to the bind-generated object.Subclassed by hpx::is_bind_expression< T const >
-
template<typename T>
struct is_bind_expression<T const> : public hpx::is_bind_expression<T>#
hpx::is_placeholder#
Defined in header hpx/functional.hpp.
See Public API for a list of names and headers that are part of the public HPX API.
-
namespace hpx
Top level namespace.
-
template<typename T>
struct is_placeholder# - #include <is_placeholder.hpp>
If
Tis a standard, Boost, or HPX placeholder (_1, _2, _3, …) then this template is derived fromstd::integral_constant<int,1>,std::integral_constant<int,2>,std::integral_constant<int,3>, respectively. Otherwise, it is derived fromstd::integral_constant<int,0>.The template may be specialized for any user-defined
Ttype: the specialization must satisfy UnaryTypeTrait with base characteristic ofstd::integral_constant<int,N>with N>0 to indicate thatTshould be treated as N’th placeholder type.hpx::binduseshpx::is_placeholderto detect placeholders for unbound arguments.
-
template<typename T>
futures#
See Public API for a list of names and headers that are part of the public HPX API.
hpx/futures/future_fwd.hpp#
Defined in header hpx/futures/future_fwd.hpp.
See Public API for a list of names and headers that are part of the public HPX API.
-
namespace hpx
Top level HPX namespace.
-
template<typename R>
class future : public hpx::lcos::detail::future_base<future<R>, R> - #include <future_fwd.hpp>
-
template<typename R>
class promise# - #include <promise.hpp>
The class template hpx::promise provides a facility to store a value or an exception that is later acquired asynchronously via a hpx::future object created by the hpx::promise object. Note that the hpx::promise object is meant to be used only once. Each promise is associated with a shared state, which contains some state information and a result which may be not yet evaluated, evaluated to a value (possibly void) or evaluated to an exception. A promise may do three things with the shared state:
make ready: the promise stores the result or the exception in the shared state. Marks the state ready and unblocks any thread waiting on a future associated with the shared state.
release: the promise gives up its reference to the shared state. If this was the last such reference, the shared state is destroyed. Unless this was a shared state created by hpx::async which is not yet ready, this operation does not block.
abandon: the promise stores the exception of type hpx::future_error with error code hpx::error::broken_promise, makes the shared state ready, and then releases it. The promise is the “push” end of the promise-future communication channel: the operation that stores a value in the shared state synchronizes-with (as defined in hpx::memory_order) the successful return from any function that is waiting on the shared state (such as hpx::future::get). Concurrent access to the same shared state may conflict otherwise: for example multiple callers of hpx::shared_future::get must either all be read-only or provide external synchronization.
- #include <future_fwd.hpp>
-
namespace lcos
-
template<typename R>
-
namespace lcos#
hpx::packaged_task#
Defined in header hpx/future.hpp.
See Public API for a list of names and headers that are part of the public HPX API.
-
template<typename Sig, typename Allocator>
struct uses_allocator<hpx::packaged_task<Sig>, Allocator> : public true_type#
-
namespace hpx
Top level HPX namespace.
-
template<typename Sig>
class packaged_task# - #include <packaged_task.hpp>
The class template hpx::packaged_task wraps any Callable` target (function, lambda expression, bind expression, or another function object) so that it can be invoked asynchronously. Its return value or exception thrown is stored in a shared state which can be accessed through hpx::future objects. Just like hpx::function, hpx::packaged_task is a polymorphic, allocator-aware container: the stored callable target may be allocated on heap or with a provided allocator.
-
template<typename R, typename ...Ts>
class packaged_task<R(Ts...)># Public Functions
-
packaged_task() = default#
-
template<typename F, typename FD = std::decay_t<F>, typename Enable = std::enable_if_t<!std::is_same_v<FD, packaged_task> && is_invocable_r_v<R, FD&, Ts...>>>
inline explicit packaged_task(F &&f)#
-
template<typename Allocator, typename F, typename FD = std::decay_t<F>, typename Enable = std::enable_if_t<!std::is_same_v<FD, packaged_task> && is_invocable_r_v<R, FD&, Ts...>>>
inline explicit packaged_task(std::allocator_arg_t, Allocator const &a, F &&f)#
-
packaged_task(packaged_task const &rhs) noexcept = delete#
-
packaged_task(packaged_task &&rhs) noexcept = default#
-
packaged_task &operator=(packaged_task const &rhs) noexcept = delete#
-
packaged_task &operator=(packaged_task &&rhs) noexcept = default#
-
inline void swap(packaged_task &rhs) noexcept#
-
inline hpx::future<R> get_future(error_code &ec = throws)#
-
inline bool valid() const noexcept#
-
inline void reset(error_code &ec = throws)#
Private Types
-
using function_type = hpx::move_only_function<R(Ts...)>#
-
packaged_task() = default#
-
template<typename Sig>
-
namespace std
Functions
- template<typename Sig> HPX_CXX_CORE_EXPORT void swap (hpx::packaged_task< Sig > &lhs, hpx::packaged_task< Sig > &rhs) noexcept
- template<typename Sig, typename Allocator> packaged_task< Sig >, Allocator > : public true_type
hpx::promise#
Defined in header hpx/future.hpp.
See Public API for a list of names and headers that are part of the public HPX API.
-
template<typename R, typename Allocator>
struct uses_allocator<hpx::promise<R>, Allocator> : public true_type#
-
namespace hpx
Top level HPX namespace.
-
template<typename R>
class promise - #include <promise.hpp>
-
template<typename R>
-
namespace std
Functions
- template<typename R> HPX_CXX_CORE_EXPORT void swap (hpx::promise< R > &x, hpx::promise< R > &y) noexcept
- template<typename R, typename Allocator> promise< R >, Allocator > : public true_type
io_service#
See Public API for a list of names and headers that are part of the public HPX API.
hpx/io_service/io_service_pool.hpp#
Defined in header hpx/io_service/io_service_pool.hpp.
See Public API for a list of names and headers that are part of the public HPX API.
-
namespace hpx
-
namespace util
-
class io_service_pool#
- #include <io_service_pool.hpp>
A pool of io_service objects.
Public Functions
-
explicit io_service_pool(std::size_t pool_size = 2, threads::policies::callback_notifier const ¬ifier = threads::policies::callback_notifier(), char const *pool_name = "", char const *name_postfix = "")#
Construct the io_service pool.
- Parameters
pool_size – [in] The number of threads to run to serve incoming requests
notifier – [in]
pool_name – [in]
name_postfix – [in]
-
explicit io_service_pool(threads::policies::callback_notifier const ¬ifier, char const *pool_name = "", char const *name_postfix = "")#
Construct the io_service pool.
- Parameters
notifier – [in]
pool_name – [in]
name_postfix – [in]
-
io_service_pool(io_service_pool const&) = delete#
-
io_service_pool(io_service_pool&&) = delete#
-
io_service_pool &operator=(io_service_pool const&) = delete#
-
io_service_pool &operator=(io_service_pool&&) = delete#
-
~io_service_pool()#
-
bool run(bool join_threads = true, barrier *startup = nullptr)#
Run all io_service objects in the pool. If join_threads is true this will also wait for all threads to complete
-
bool run(std::size_t num_threads, bool join_threads = true, barrier *startup = nullptr)#
Run all io_service objects in the pool. If join_threads is true this will also wait for all threads to complete
-
void stop()#
Stop all io_service objects in the pool.
-
void join()#
Join all io_service threads in the pool.
-
void clear()#
Clear all internal data structures.
-
void wait()#
Wait for all work to be done.
-
bool stopped()#
-
::asio::io_context &get_io_service(int index = -1)#
Get an io_service to use.
-
inline constexpr std::size_t size() const noexcept#
Get number of threads associated with this I/O service.
-
void thread_run(std::size_t index, barrier *startup = nullptr) const#
Activate the thread index for this thread pool.
-
inline constexpr char const *get_name() const noexcept#
Return name of this pool.
Protected Functions
-
void stop_locked()#
-
void join_locked()#
-
void clear_locked()#
-
void wait_locked()#
Private Types
-
using raw_work_type = ::asio::executor_work_guard<::asio::io_context::executor_type>#
-
using work_type = std::unique_ptr<raw_work_type>#
-
explicit io_service_pool(std::size_t pool_size = 2, threads::policies::callback_notifier const ¬ifier = threads::policies::callback_notifier(), char const *pool_name = "", char const *name_postfix = "")#
-
class io_service_pool#
-
namespace util
lcos_local#
See Public API for a list of names and headers that are part of the public HPX API.
hpx/lcos_local/trigger.hpp#
Defined in header hpx/lcos_local/trigger.hpp.
See Public API for a list of names and headers that are part of the public HPX API.
-
namespace hpx
-
namespace lcos
-
namespace local#
-
template<typename Mutex = hpx::spinlock>
struct base_trigger# Public Functions
-
inline base_trigger() noexcept#
-
inline base_trigger(base_trigger &&rhs) noexcept#
-
inline base_trigger &operator=(base_trigger &&rhs) noexcept#
-
inline hpx::future<void> get_future(std::size_t *generation_value = nullptr, error_code &ec = hpx::throws)#
get a future allowing to wait for the trigger to fire
-
inline bool set(error_code &ec = throws)#
Trigger this object.
-
inline void synchronize(std::size_t generation_value, char const *function_name = "trigger::synchronize", error_code &ec = throws)#
Wait for the generational counter to reach the requested stage.
Protected Functions
-
inline bool trigger_conditions(error_code &ec = throws)#
-
template<typename Lock>
inline void synchronize(std::size_t generation_value, Lock &l, char const *function_name = "trigger::synchronize", error_code &ec = throws)#
Private Types
-
using condition_list_type = hpx::detail::intrusive_list<condition_list_entry>#
-
struct condition_list_entry : public conditional_trigger#
Public Functions
-
condition_list_entry() = default#
-
condition_list_entry() = default#
-
struct manage_condition#
Public Functions
-
inline manage_condition(base_trigger &gate, condition_list_entry &cond) noexcept#
-
inline ~manage_condition()#
-
inline manage_condition(base_trigger &gate, condition_list_entry &cond) noexcept#
-
inline base_trigger() noexcept#
-
struct trigger : public hpx::lcos::local::base_trigger<hpx::no_mutex>#
Public Functions
-
trigger() = default#
-
template<typename Lock>
inline void synchronize(std::size_t generation_value, Lock &l, char const *function_name = "trigger::synchronize", error_code &ec = throws)#
Private Types
-
using base_type = base_trigger<hpx::no_mutex>#
-
trigger() = default#
-
template<typename Mutex = hpx::spinlock>
-
namespace local#
-
namespace lcos
pack_traversal#
See Public API for a list of names and headers that are part of the public HPX API.
hpx/pack_traversal/pack_traversal.hpp#
Defined in header hpx/pack_traversal/pack_traversal.hpp.
See Public API for a list of names and headers that are part of the public HPX API.
-
namespace hpx
-
namespace util
Functions
- template<typename Mapper, typename... T> < unspecified > map_pack (Mapper &&mapper, T &&... pack)
Maps the pack with the given mapper.
This function tries to visit all plain elements which may be wrapped in:
homogeneous containers (
std::vector,std::list)heterogeneous containers
(hpx::tuple,std::pair,std::array) and re-assembles the pack with the result of the mapper. Mapping from one type to a different one is supported.
Elements that aren’t accepted by the mapper are routed through and preserved through the hierarchy.
// Maps all integers to floats map_pack([](int value) { return float(value); }, 1, hpx::make_tuple(2, std::vector<int>{3, 4}), 5);
- Throws
std::exception – like objects which are thrown by an invocation to the mapper.
- Parameters
mapper – A callable object, which accept an arbitrary type and maps it to another type or the same one.
pack – An arbitrary variadic pack which may contain any type.
- Returns
The mapped element or in case the pack contains multiple elements, the pack is wrapped into a
hpx::tuple.
-
namespace util
hpx/pack_traversal/pack_traversal_async.hpp#
Defined in header hpx/pack_traversal/pack_traversal_async.hpp.
See Public API for a list of names and headers that are part of the public HPX API.
-
namespace hpx
-
namespace util
Functions
-
template<typename Visitor, typename ...T>
HPX_CXX_CORE_EXPORT auto traverse_pack_async(Visitor &&visitor, T&&... pack) -> decltype(detail::apply_pack_transform_async(HPX_FORWARD(Visitor, visitor), HPX_FORWARD(T, pack)...))# Traverses the pack with the given visitor in an asynchronous way.
This function works in the same way as
traverse_pack, however, we are able to suspend and continue the traversal at later time. Thus, we require a visitor callable object which provides threeoperator()overloads as depicted by the code sample below:// The synchronous overload is called for each object, // it may return false to suspend the current control. // In that case the overload below is called. template <typename T> bool operator()(async_traverse_visit_tag, T&& element) { return true; } // The asynchronous overload this is called when the // synchronous overload returned false. // In addition to the current visited element the overload is // called with a continuation callable object which resumes the // traversal when it's called later. // The continuation next may be stored and called later or // dropped completely to abort the traversal early. template <typename T, typename N> void operator()(async_traverse_detach_tag, T&& element, N&& next) { } // The overload is called when the traversal was finished. // As argument the whole pack is passed over which we // traversed asynchronously. template <typename T> void operator()(async_traverse_complete_tag, T&& pack) { } };See
traverse_packfor a detailed description about the traversal behavior and capabilities.- Parameters
visitor – A visitor object which provides the three
operator()overloads that were described above. Additionally, the visitor must be compatible for referencing it from ahpx::intrusive_ptr. The visitor should have a virtual destructor!pack – The arbitrary parameter pack which is traversed asynchronously. Nested objects inside containers and tuple like types are traversed recursively.
- Returns
A hpx::intrusive_ptr that references an instance of the given visitor object.
-
template<typename Visitor, typename ...T>
-
namespace util
hpx::functional::unwrap, hpx::functional::unwrap_n, hpx::functional::unwrap_all, hpx::unwrap, hpx::unwrap_n, hpx::unwrap_all, hpx::unwrapping, hpx::unwrapping_n, hpx::unwrapping_all#
Defined in header hpx/unwrap.hpp.
See Public API for a list of names and headers that are part of the public HPX API.
-
namespace hpx
Functions
-
template<typename ...Args>
HPX_CXX_CORE_EXPORT auto unwrap(Args&&... args) -> decltype(util::detail::unwrap_depth_impl<1U>(HPX_FORWARD(Args, args)...))# A helper function for retrieving the actual result of any hpx::future like type which is wrapped in an arbitrary way.
Unwraps the given pack of arguments, so that any hpx::future object is replaced by its future result type in the argument pack:
hpx::future<int>->inthpx::future<std::vector<float>>->std::vector<float>std::vector<future<float>>->std::vector<float>
The function is capable of unwrapping hpx::future like objects that are wrapped inside any container or tuple like type, see hpx::util::map_pack() for a detailed description about which surrounding types are supported. Non hpx::future like types are permitted as arguments and passed through.
hpx:unwrap(hpx::make_ready_future(0)); // Multiple arguments hpx::tuple<int, int> i2 = hpx:unwrap(hpx::make_ready_future(1), hpx::make_ready_future(2));
Note
This function unwraps the given arguments until the first traversed nested hpx::future which corresponds to an unwrapping depth of one. See hpx::unwrap_n() for a function which unwraps the given arguments to a particular depth or hpx::unwrap_all() that unwraps all future like objects recursively which are contained in the arguments.
- Parameters
args – the arguments that are unwrapped which may contain any arbitrary future or non-future type.
- Throws
std::exception – like objects in case any of the given wrapped hpx::future objects were resolved through an exception. See hpx::future::get() for details.
- Returns
Depending on the count of arguments this function returns a hpx::tuple containing the unwrapped arguments if multiple arguments are given. In case the function is called with a single argument, the argument is unwrapped and returned.
-
template<std::size_t Depth, typename ...Args>
HPX_CXX_CORE_EXPORT auto unwrap_n(Args&&... args) -> decltype(util::detail::unwrap_depth_impl<Depth>(HPX_FORWARD(Args, args)...))# An alternative version of hpx::unwrap(), which unwraps the given arguments to a certain depth of hpx::future like objects.
See unwrap for a detailed description.
- Template Parameters
Depth – The count of hpx::future like objects which are unwrapped maximally.
-
template<typename ...Args>
HPX_CXX_CORE_EXPORT auto unwrap_all(Args&&... args) -> decltype(util::detail::unwrap_depth_impl<0U>(HPX_FORWARD(Args, args)...))# An alternative version of hpx::unwrap(), which unwraps the given arguments recursively so that all contained hpx::future like objects are replaced by their actual value.
See hpx::unwrap() for a detailed description.
-
template<typename T>
HPX_CXX_CORE_EXPORT auto unwrapping(T &&callable) -> decltype(util::detail::functional_unwrap_depth_impl<1U>(HPX_FORWARD(T, callable)))# Returns a callable object which unwraps its arguments upon invocation using the hpx::unwrap() function and then passes the result to the given callable object.
return left + right; }); int i1 = callable(hpx::make_ready_future(1), hpx::make_ready_future(2));
See hpx::unwrap() for a detailed description.
- Parameters
callable – the callable object which is called with the result of the corresponding unwrap function.
-
template<std::size_t Depth, typename T>
HPX_CXX_CORE_EXPORT auto unwrapping_n(T &&callable) -> decltype(util::detail::functional_unwrap_depth_impl<Depth>(HPX_FORWARD(T, callable)))# Returns a callable object which unwraps its arguments upon invocation using the hpx::unwrap_n() function and then passes the result to the given callable object.
See hpx::unwrapping() for a detailed description.
-
template<typename T>
HPX_CXX_CORE_EXPORT auto unwrapping_all(T &&callable) -> decltype(util::detail::functional_unwrap_depth_impl<0U>(HPX_FORWARD(T, callable)))# Returns a callable object which unwraps its arguments upon invocation using the hpx::unwrap_all() function and then passes the result to the given callable object.
See hpx::unwrapping() for a detailed description.
-
namespace functional#
-
struct unwrap#
- #include <unwrap.hpp>
A helper function object for functionally invoking
hpx::unwrap. For more information please refer to its documentation.
-
struct unwrap_all#
- #include <unwrap.hpp>
A helper function object for functionally invoking
hpx::unwrap_all. For more information please refer to its documentation.
-
struct unwrap#
-
template<typename ...Args>
preprocessor#
See Public API for a list of names and headers that are part of the public HPX API.
hpx/preprocessor/cat.hpp#
Defined in header hpx/preprocessor/cat.hpp.
See Public API for a list of names and headers that are part of the public HPX API.
Defines
-
HPX_PP_CAT(A, B)#
Concatenates the tokens
AandBinto a single token. Evaluates toAB- Parameters
A – First token
B – Second token
hpx/preprocessor/expand.hpp#
Defined in header hpx/preprocessor/expand.hpp.
See Public API for a list of names and headers that are part of the public HPX API.
Defines
-
HPX_PP_EXPAND(X)#
The HPX_PP_EXPAND macro performs a double macro-expansion on its argument.
This macro can be used to produce a delayed preprocessor expansion.
Example:
#define MACRO(a, b, c) (a)(b)(c) #define ARGS() (1, 2, 3) HPX_PP_EXPAND(MACRO ARGS()) // expands to (1)(2)(3)
- Parameters
X – Token to be expanded twice
hpx/preprocessor/nargs.hpp#
Defined in header hpx/preprocessor/nargs.hpp.
See Public API for a list of names and headers that are part of the public HPX API.
Defines
-
HPX_PP_NARGS(...)#
Expands to the number of arguments passed in
Example Usage:
HPX_PP_NARGS(hpx, pp, nargs) HPX_PP_NARGS(hpx, pp) HPX_PP_NARGS(hpx)
Expands to:
3 2 1
- Parameters
... – The variadic number of arguments
hpx/preprocessor/stringize.hpp#
Defined in header hpx/preprocessor/stringize.hpp.
See Public API for a list of names and headers that are part of the public HPX API.
Defines
-
HPX_PP_STRINGIZE(X)#
The HPX_PP_STRINGIZE macro stringizes its argument after it has been expanded.
The passed argument
Xwill expand to"X". Note that the stringizing operator (#) prevents arguments from expanding. This macro circumvents this shortcoming.- Parameters
X – The text to be converted to a string literal
hpx/preprocessor/strip_parens.hpp#
Defined in header hpx/preprocessor/strip_parens.hpp.
See Public API for a list of names and headers that are part of the public HPX API.
Defines
-
HPX_PP_STRIP_PARENS(X)#
For any symbol
X, this macro returns the same symbol from which potential outer parens have been removed. If no outer parens are found, this macros evaluates toXitself without error.The original implementation of this macro is from Steven Watanbe as shown in http://boost.2283326.n4.nabble.com/preprocessor-removing-parentheses-td2591973.html#a2591976
HPX_PP_STRIP_PARENS(no_parens) HPX_PP_STRIP_PARENS((with_parens))
- Example Usage:
This produces the following output
no_parens with_parens
- Parameters
X – Symbol to strip parens from
resiliency#
See Public API for a list of names and headers that are part of the public HPX API.
hpx/resiliency/replay_executor.hpp#
Defined in header hpx/resiliency/replay_executor.hpp.
See Public API for a list of names and headers that are part of the public HPX API.
-
template<typename BaseExecutor, typename Validator>
struct is_two_way_executor<hpx::resiliency::experimental::replay_executor<BaseExecutor, Validator>> : public true_type#
-
template<typename BaseExecutor, typename Validator>
struct is_bulk_two_way_executor<hpx::resiliency::experimental::replay_executor<BaseExecutor, Validator>> : public true_type#
-
namespace hpx
-
namespace execution
-
namespace experimental
- template<typename BaseExecutor, typename Validator> replay_executor< BaseExecutor, Validator > > : public true_type
- template<typename BaseExecutor, typename Validator> replay_executor< BaseExecutor, Validator > > : public true_type
-
namespace experimental
-
namespace resiliency#
-
namespace experimental#
Functions
-
template<typename Tag, typename BaseExecutor, typename Validate, typename Property>
HPX_CXX_CORE_EXPORT auto tag_invoke(Tag tag, replay_executor<BaseExecutor, Validate> const &exec, Property &&prop) -> decltype(replay_executor<BaseExecutor, Validate>(std::declval<Tag>()(std::declval<BaseExecutor>(), std::declval<Property>()), std::declval<std::size_t>(), std::declval<Validate>()))#
-
template<typename Tag, typename BaseExecutor, typename Validate>
HPX_CXX_CORE_EXPORT auto tag_invoke(Tag tag, replay_executor<BaseExecutor, Validate> const &exec) -> decltype(std::declval<Tag>()(std::declval<BaseExecutor>()))#
- template<executor_any BaseExecutor, typename Validate> HPX_CXX_CORE_EXPORT replay_executor< BaseExecutor, std::decay_t< Validate > > make_replay_executor (BaseExecutor &exec, std::size_t n, Validate &&validate)
- template<executor_any BaseExecutor> HPX_CXX_CORE_EXPORT replay_executor< BaseExecutor, detail::replay_validator > make_replay_executor (BaseExecutor &exec, std::size_t n)
-
template<typename BaseExecutor, typename Validate>
class replay_executor# Public Types
-
using execution_category = hpx::traits::executor_execution_category_t<BaseExecutor>#
-
using executor_parameters_type = hpx::traits::executor_parameters_type_t<BaseExecutor>#
-
template<typename Result>
using future_type = hpx::traits::executor_future_t<BaseExecutor, Result>#
Public Functions
-
template<typename BaseExecutor_, typename F>
inline explicit replay_executor(BaseExecutor_ &&exec, std::size_t n, F &&f)#
-
inline bool operator==(replay_executor const &rhs) const noexcept#
-
inline bool operator!=(replay_executor const &rhs) const noexcept#
-
inline constexpr replay_executor const &context() const noexcept#
-
inline BaseExecutor const &get_executor() const#
Private Functions
-
template<typename F, typename ...Ts>
inline decltype(auto) friend tag_invoke(hpx::parallel::execution::async_execute_t, replay_executor const &exec, F &&f, Ts&&... ts)#
-
template<typename F, typename S, typename ...Ts>
inline decltype(auto) friend tag_invoke(hpx::parallel::execution::bulk_async_execute_t, replay_executor const &exec, F &&f, S const &shape, Ts&&... ts)#
-
using execution_category = hpx::traits::executor_execution_category_t<BaseExecutor>#
-
template<typename Tag, typename BaseExecutor, typename Validate, typename Property>
-
namespace experimental#
-
namespace execution
hpx/resiliency/replicate_executor.hpp#
Defined in header hpx/resiliency/replicate_executor.hpp.
See Public API for a list of names and headers that are part of the public HPX API.
-
template<typename BaseExecutor, typename Voter, typename Validator>
struct is_two_way_executor<hpx::resiliency::experimental::replicate_executor<BaseExecutor, Voter, Validator>> : public true_type#
-
template<typename BaseExecutor, typename Voter, typename Validator>
struct is_bulk_two_way_executor<hpx::resiliency::experimental::replicate_executor<BaseExecutor, Voter, Validator>> : public true_type#
-
namespace hpx
-
namespace execution
-
namespace experimental
- template<typename BaseExecutor, typename Voter, typename Validator> replicate_executor< BaseExecutor, Voter, Validator > > : public true_type
- template<typename BaseExecutor, typename Voter, typename Validator> replicate_executor< BaseExecutor, Voter, Validator > > : public true_type
-
namespace experimental
-
namespace resiliency
-
namespace experimental
Functions
-
template<typename Tag, typename BaseExecutor, typename Vote, typename Validate, typename Property>
HPX_CXX_CORE_EXPORT auto tag_invoke(Tag tag, replicate_executor<BaseExecutor, Vote, Validate> const &exec, Property &&prop) -> decltype(replicate_executor<BaseExecutor, Vote, Validate>(std::declval<Tag>()(std::declval<BaseExecutor>(), std::declval<Property>()), std::declval<std::size_t>(), std::declval<Vote>(), std::declval<Validate>()))#
-
template<typename Tag, typename BaseExecutor, typename Vote, typename Validate>
HPX_CXX_CORE_EXPORT auto tag_invoke(Tag tag, replicate_executor<BaseExecutor, Vote, Validate> const &exec) -> decltype(std::declval<Tag>()(std::declval<BaseExecutor>()))#
- template<executor_any BaseExecutor, typename Voter, typename Validate> HPX_CXX_CORE_EXPORT replicate_executor< BaseExecutor, std::decay_t< Voter >, std::decay_t< Validate > > make_replicate_executor (BaseExecutor &exec, std::size_t n, Voter &&voter, Validate &&validate)
- template<executor_any BaseExecutor, typename Validate> HPX_CXX_CORE_EXPORT replicate_executor< BaseExecutor, detail::replicate_voter, std::decay_t< Validate > > make_replicate_executor (BaseExecutor &exec, std::size_t n, Validate &&validate)
- template<executor_any BaseExecutor> HPX_CXX_CORE_EXPORT replicate_executor< BaseExecutor, detail::replicate_voter, detail::replicate_validator > make_replicate_executor (BaseExecutor &exec, std::size_t n)
-
template<typename BaseExecutor, typename Vote, typename Validate>
class replicate_executor# Public Types
-
using execution_category = hpx::traits::executor_execution_category_t<BaseExecutor>#
-
using executor_parameters_type = hpx::traits::executor_parameters_type_t<BaseExecutor>#
-
template<typename Result>
using future_type = hpx::traits::executor_future_t<BaseExecutor, Result>#
Public Functions
-
template<typename BaseExecutor_, typename V, typename F>
inline explicit replicate_executor(BaseExecutor_ &&exec, std::size_t n, V &&v, F &&f)#
-
inline bool operator==(replicate_executor const &rhs) const noexcept#
-
inline bool operator!=(replicate_executor const &rhs) const noexcept#
-
inline constexpr replicate_executor const &context() const noexcept#
-
inline BaseExecutor const &get_executor() const#
Private Functions
-
template<typename F, typename ...Ts>
inline decltype(auto) friend tag_invoke(hpx::parallel::execution::async_execute_t, replicate_executor const &exec, F &&f, Ts&&... ts)#
-
template<typename F, typename S, typename ...Ts>
inline decltype(auto) friend tag_invoke(hpx::parallel::execution::bulk_async_execute_t, replicate_executor const &exec, F &&f, S const &shape, Ts&&... ts)#
-
using execution_category = hpx::traits::executor_execution_category_t<BaseExecutor>#
-
template<typename Tag, typename BaseExecutor, typename Vote, typename Validate, typename Property>
-
namespace experimental
-
namespace execution
runtime_configuration#
See Public API for a list of names and headers that are part of the public HPX API.
hpx::components::component_commandline_base#
Defined in header hpx/components.hpp.
See Public API for a list of names and headers that are part of the public HPX API.
-
namespace hpx
-
namespace components#
-
struct component_commandline_base#
- #include <component_commandline_base.hpp>
The component_commandline_base has to be used as a base class for all component command-line line handling registries.
Public Functions
-
virtual ~component_commandline_base() = default#
-
virtual hpx::program_options::options_description add_commandline_options() = 0#
Return any additional command line options valid for this component.
Note
This function will be executed by the runtime system during system startup.
- Returns
The module is expected to fill a options_description object with any additional command line options this component will handle.
-
virtual ~component_commandline_base() = default#
-
struct component_commandline_base#
-
namespace components#
hpx/runtime_configuration/component_registry_base.hpp#
Defined in header hpx/runtime_configuration/component_registry_base.hpp.
See Public API for a list of names and headers that are part of the public HPX API.
-
namespace hpx
-
namespace components
-
struct component_registry_base#
- #include <component_registry_base.hpp>
The component_registry_base has to be used as a base class for all component registries.
Public Functions
-
virtual ~component_registry_base() = default#
-
virtual bool get_component_info(std::vector<std::string> &fillini, std::string const &filepath, bool is_static = false) = 0#
Return the ini-information for all contained components.
- Parameters
fillini – [in, out] The module is expected to fill this vector with the ini-information (one line per vector element) for all components implemented in this module.
filepath – [in]
is_static – [in]
- Returns
Returns true if the parameter fillini has been successfully initialized with the registry data of all implemented in this module.
-
virtual void register_component_type() = 0#
Register the component type represented by this component.
-
virtual ~component_registry_base() = default#
-
struct component_registry_base#
-
namespace components
HPX_REGISTER_COMPONENT_MODULE#
Defined in header hpx/components.hpp.
See Public API for a list of names and headers that are part of the public HPX API.
Defines
-
HPX_REGISTER_COMMANDLINE_REGISTRY(RegistryType, componentname)#
The macro HPX_REGISTER_COMMANDLINE_REGISTRY is used to register the given component factory with Hpx.Plugin. This macro has to be used for each of the components.
-
HPX_REGISTER_COMMANDLINE_REGISTRY_DYNAMIC(RegistryType, componentname)#
-
HPX_REGISTER_COMMANDLINE_OPTIONS()#
The macro HPX_REGISTER_COMMANDLINE_OPTIONS is used to define the required Hpx.Plugin entry point for the command line option registry. This macro has to be used in not more than one compilation unit of a component module.
-
HPX_REGISTER_COMMANDLINE_OPTIONS_DYNAMIC()#
-
HPX_REGISTER_COMPONENT_FACTORY(componentname)#
This macro is used to register the given component factory with Hpx.Plugin. This macro has to be used for each of the component factories.
-
HPX_REGISTER_COMPONENT_MODULE()#
This macro is used to define the required Hpx.Plugin entry points. This macro has to be used in exactly one compilation unit of a component module.
-
HPX_REGISTER_COMPONENT_MODULE_DYNAMIC()#
-
HPX_REGISTER_COMPONENT_REGISTRY(RegistryType, componentname)#
This macro is used to register the given component factory with Hpx.Plugin. This macro has to be used for each of the components.
-
HPX_REGISTER_COMPONENT_REGISTRY_DYNAMIC(RegistryType, componentname)#
-
HPX_REGISTER_REGISTRY_MODULE()#
This macro is used to define the required Hpx.Plugin entry points. This macro has to be used in exactly one compilation unit of a component module.
-
HPX_REGISTER_REGISTRY_MODULE_DYNAMIC()#
-
HPX_REGISTER_PLUGIN_BASE_REGISTRY(PluginType, name)#
This macro is used to register the given component factory with Hpx.Plugin. This macro has to be used for each of the components.
-
HPX_REGISTER_PLUGIN_REGISTRY_MODULE()#
This macro is used to define the required Hpx.Plugin entry points. This macro has to be used in exactly one compilation unit of a component module.
-
HPX_REGISTER_PLUGIN_REGISTRY_MODULE_DYNAMIC()#
-
HPX_DECLARE_FACTORY_STATIC(name, base)#
-
HPX_DEFINE_FACTORY_STATIC(module, name, base)#
-
HPX_INIT_REGISTRY_MODULE_STATIC(name, base)#
-
HPX_INIT_REGISTRY_FACTORY_STATIC(name, componentname, base)#
-
HPX_INIT_REGISTRY_COMMANDLINE_STATIC(name, base)#
-
HPX_INIT_REGISTRY_STARTUP_SHUTDOWN_STATIC(name, base)#
hpx/runtime_configuration/plugin_registry_base.hpp#
Defined in header hpx/runtime_configuration/plugin_registry_base.hpp.
See Public API for a list of names and headers that are part of the public HPX API.
-
namespace hpx
-
namespace plugins#
-
struct plugin_registry_base#
- #include <plugin_registry_base.hpp>
The plugin_registry_base has to be used as a base class for all plugin registries.
Public Functions
-
virtual ~plugin_registry_base() = default#
-
virtual bool get_plugin_info(std::vector<std::string> &fillini) = 0#
Return the configuration information for any plugin implemented by this module
- Parameters
fillini – [in, out] The module is expected to fill this vector with the ini-information (one line per vector element) for all plugins implemented in this module.
- Returns
Returns true if the parameter fillini has been successfully initialized with the registry data of all implemented in this module.
-
virtual ~plugin_registry_base() = default#
-
struct plugin_registry_base#
-
namespace plugins#
hpx::runtime_mode#
Defined in header hpx/init.hpp.
See Public API for a list of names and headers that are part of the public HPX API.
-
namespace hpx
Enums
-
enum class runtime_mode : std::int8_t#
A HPX runtime can be executed in two different modes: console mode and worker mode.
Values:
-
enumerator invalid#
-
enumerator console#
The runtime is the console locality.
-
enumerator worker#
The runtime is a worker locality.
-
enumerator connect#
The runtime is a worker locality connecting late
-
enumerator local#
The runtime is fully local.
-
enumerator default_#
The runtime mode will be determined based on the command line arguments
-
enumerator last#
-
enumerator invalid#
Functions
- HPX_CXX_CORE_EXPORT char const * get_runtime_mode_name (runtime_mode state) noexcept
Get the readable string representing the name of the given runtime_mode constant.
- HPX_CXX_CORE_EXPORT runtime_mode get_runtime_mode_from_name (std::string const &mode)
Returns the internal representation (runtime_mode constant) from the readable string representing the name.
This represents the internal representation from the readable string representing the name.
- Parameters
mode – this represents the runtime mode
-
enum class runtime_mode : std::int8_t#
runtime_local#
See Public API for a list of names and headers that are part of the public HPX API.
hpx/runtime_local/component_startup_shutdown_base.hpp#
Defined in header hpx/runtime_local/component_startup_shutdown_base.hpp.
See Public API for a list of names and headers that are part of the public HPX API.
-
namespace hpx
-
namespace components
-
struct component_startup_shutdown_base#
- #include <component_startup_shutdown_base.hpp>
The component_startup_shutdown_base has to be used as a base class for all component startup/shutdown registries.
Public Functions
-
virtual ~component_startup_shutdown_base() = default#
-
virtual bool get_startup_function(startup_function_type &startup, bool &pre_startup) = 0#
Return any startup function for this component.
- Parameters
startup – [in, out] The module is expected to fill this function object with a reference to a startup function. This function will be executed by the runtime system during system startup.
pre_startup – [in, out] Will be set to true if the returned startup function is executed during the first round of calls.
- Returns
Returns true if the parameter startup has been successfully initialized with the startup function.
-
virtual bool get_shutdown_function(shutdown_function_type &shutdown, bool &pre_shutdown) = 0#
Return any startup function for this component.
- Parameters
shutdown – [in, out] The module is expected to fill this function object with a reference to a startup function. This function will be executed by the runtime system during system startup.
pre_shutdown – [in, out] Will be set to true if the returned shutdown function is executed during the first round of calls.
- Returns
Returns true if the parameter shutdown has been successfully initialized with the shutdown function.
-
virtual ~component_startup_shutdown_base() = default#
-
struct component_startup_shutdown_base#
-
namespace components
hpx/runtime_local/custom_exception_info.hpp#
Defined in header hpx/runtime_local/custom_exception_info.hpp.
See Public API for a list of names and headers that are part of the public HPX API.
-
namespace hpx
Functions
- HPX_CXX_CORE_EXPORT std::string diagnostic_information (exception_info const &xi)
Extract the diagnostic information embedded in the given exception and return a string holding a formatted message.
The function hpx::diagnostic_information can be used to extract all diagnostic information stored in the given exception instance as a formatted string. This simplifies debug output as it composes the diagnostics into one, easy to use function call. This includes the name of the source file and line number, the sequence number of the OS-thread and the HPX-thread id, the locality id and the stack backtrace of the point where the original exception was thrown.
See also
hpx::get_error_locality_id(), hpx::get_error_host_name(), hpx::get_error_process_id(), hpx::get_error_function_name(), hpx::get_error_file_name(), hpx::get_error_line_number(), hpx::get_error_os_thread(), hpx::get_error_thread_id(), hpx::get_error_thread_description(), hpx::get_error(), hpx::get_error_backtrace(), hpx::get_error_env(), hpx::get_error_what(), hpx::get_error_config(), hpx::get_error_state()
- Parameters
xi – The parameter
ewill be inspected for all diagnostic information elements which have been stored at the point where the exception was thrown. This parameter can be one of the following types: hpx::exception_info, hpx::error_code, std::exception, or std::exception_ptr.- Throws
std::bad_alloc – (if any of the required allocation operations fail)
- Returns
The formatted string holding all the available diagnostic information stored in the given exception instance.
- HPX_CXX_CORE_EXPORT std::string default_diagnostic_information (std::exception_ptr const &e)
- HPX_CXX_CORE_EXPORT std::uint32_t get_error_locality_id (hpx::exception_info const &xi) noexcept
Return the locality id where the exception was thrown.
The function hpx::get_error_locality_id can be used to extract the diagnostic information element representing the locality id as stored in the given exception instance.
See also
hpx::diagnostic_information(), hpx::get_error_host_name(), hpx::get_error_process_id(), hpx::get_error_function_name(), hpx::get_error_file_name(), hpx::get_error_line_number(), hpx::get_error_os_thread(), hpx::get_error_thread_id(), hpx::get_error_thread_description(), hpx::get_error(), hpx::get_error_backtrace(), hpx::get_error_env(), hpx::get_error_what(), hpx::get_error_config(), hpx::get_error_state()
- Parameters
xi – The parameter
ewill be inspected for the requested diagnostic information elements which have been stored at the point where the exception was thrown. This parameter can be one of the following types: hpx::exception_info, hpx::error_code, std::exception, or std::exception_ptr.- Throws
nothing –
- Returns
The locality id of the locality where the exception was thrown. If the exception instance does not hold this information, the function will return hpx::naming::invalid_locality_id.
- HPX_CXX_CORE_EXPORT std::string get_error_host_name (hpx::exception_info const &xi)
Return the hostname of the locality where the exception was thrown.
The function hpx::get_error_host_name can be used to extract the diagnostic information element representing the host name as stored in the given exception instance.
See also
hpx::diagnostic_information() hpx::get_error_process_id(), hpx::get_error_function_name(), hpx::get_error_file_name(), hpx::get_error_line_number(), hpx::get_error_os_thread(), hpx::get_error_thread_id(), hpx::get_error_thread_description(), hpx::get_error() hpx::get_error_backtrace(), hpx::get_error_env(), hpx::get_error_what(), hpx::get_error_config(), hpx::get_error_state()
- Parameters
xi – The parameter
ewill be inspected for the requested diagnostic information elements which have been stored at the point where the exception was thrown. This parameter can be one of the following types: hpx::exception_info, hpx::error_code, std::exception, or std::exception_ptr.- Throws
std::bad_alloc – (if one of the required allocations fails)
- Returns
The hostname of the locality where the exception was thrown. If the exception instance does not hold this information, the function will return and empty string.
- HPX_CXX_CORE_EXPORT std::int64_t get_error_process_id (hpx::exception_info const &xi) noexcept
Return the (operating system) process id of the locality where the exception was thrown.
The function hpx::get_error_process_id can be used to extract the diagnostic information element representing the process id as stored in the given exception instance.
See also
hpx::diagnostic_information(), hpx::get_error_host_name(), hpx::get_error_function_name(), hpx::get_error_file_name(), hpx::get_error_line_number(), hpx::get_error_os_thread(), hpx::get_error_thread_id(), hpx::get_error_thread_description(), hpx::get_error(), hpx::get_error_backtrace(), hpx::get_error_env(), hpx::get_error_what(), hpx::get_error_config(), hpx::get_error_state()
- Parameters
xi – The parameter
ewill be inspected for the requested diagnostic information elements which have been stored at the point where the exception was thrown. This parameter can be one of the following types: hpx::exception_info, hpx::error_code, std::exception, or std::exception_ptr.- Throws
nothing –
- Returns
The process id of the OS-process which threw the exception If the exception instance does not hold this information, the function will return 0.
- HPX_CXX_CORE_EXPORT std::string get_error_env (hpx::exception_info const &xi)
Return the environment of the OS-process at the point the exception was thrown.
The function hpx::get_error_env can be used to extract the diagnostic information element representing the environment of the OS-process collected at the point the exception was thrown.
See also
hpx::diagnostic_information(), hpx::get_error_host_name(), hpx::get_error_process_id(), hpx::get_error_function_name(), hpx::get_error_file_name(), hpx::get_error_line_number(), hpx::get_error_os_thread(), hpx::get_error_thread_id(), hpx::get_error_thread_description(), hpx::get_error(), hpx::get_error_backtrace(), hpx::get_error_what(), hpx::get_error_config(), hpx::get_error_state()
- Parameters
xi – The parameter
ewill be inspected for the requested diagnostic information elements which have been stored at the point where the exception was thrown. This parameter can be one of the following types: hpx::exception_info, hpx::error_code, std::exception, or std::exception_ptr.- Throws
std::bad_alloc – (if one of the required allocations fails)
- Returns
The environment from the point the exception was thrown. If the exception instance does not hold this information, the function will return an empty string.
- HPX_CXX_CORE_EXPORT std::string get_error_backtrace (hpx::exception_info const &xi)
Return the stack backtrace from the point the exception was thrown.
The function hpx::get_error_backtrace can be used to extract the diagnostic information element representing the stack backtrace collected at the point the exception was thrown.
See also
hpx::diagnostic_information(), hpx::get_error_host_name(), hpx::get_error_process_id(), hpx::get_error_function_name(), hpx::get_error_file_name(), hpx::get_error_line_number(), hpx::get_error_os_thread(), hpx::get_error_thread_id(), hpx::get_error_thread_description(), hpx::get_error(), hpx::get_error_env(), hpx::get_error_what(), hpx::get_error_config(), hpx::get_error_state()
- Parameters
xi – The parameter
ewill be inspected for the requested diagnostic information elements which have been stored at the point where the exception was thrown. This parameter can be one of the following types: hpx::exception_info, hpx::error_code, std::exception, or std::exception_ptr.- Throws
std::bad_alloc – (if one of the required allocations fails)
- Returns
The stack back trace from the point the exception was thrown. If the exception instance does not hold this information, the function will return an empty string.
- HPX_CXX_CORE_EXPORT std::size_t get_error_os_thread (hpx::exception_info const &xi) noexcept
Return the sequence number of the OS-thread used to execute HPX-threads from which the exception was thrown.
The function hpx::get_error_os_thread can be used to extract the diagnostic information element representing the sequence number of the OS-thread as stored in the given exception instance.
See also
hpx::diagnostic_information(), hpx::get_error_host_name(), hpx::get_error_process_id(), hpx::get_error_function_name(), hpx::get_error_file_name(), hpx::get_error_line_number(), hpx::get_error_thread_id(), hpx::get_error_thread_description(), hpx::get_error(), hpx::get_error_backtrace(), hpx::get_error_env(), hpx::get_error_what(), hpx::get_error_config(), hpx::get_error_state()
- Parameters
xi – The parameter
ewill be inspected for the requested diagnostic information elements which have been stored at the point where the exception was thrown. This parameter can be one of the following types: hpx::exception_info, hpx::error_code, std::exception, or std::exception_ptr.- Throws
nothing –
- Returns
The sequence number of the OS-thread used to execute the HPX-thread from which the exception was thrown. If the exception instance does not hold this information, the function will return std::size(-1).
- HPX_CXX_CORE_EXPORT std::size_t get_error_thread_id (hpx::exception_info const &xi) noexcept
Return the unique thread id of the HPX-thread from which the exception was thrown.
The function hpx::get_error_thread_id can be used to extract the diagnostic information element representing the HPX-thread id as stored in the given exception instance.
See also
hpx::diagnostic_information(), hpx::get_error_host_name(), hpx::get_error_process_id(), hpx::get_error_function_name(), hpx::get_error_file_name(), hpx::get_error_line_number(), hpx::get_error_os_thread() hpx::get_error_thread_description(), hpx::get_error(), hpx::get_error_backtrace(), hpx::get_error_env(), hpx::get_error_what(), hpx::get_error_config(), hpx::get_error_state()
- Parameters
xi – The parameter
ewill be inspected for the requested diagnostic information elements which have been stored at the point where the exception was thrown. This parameter can be one of the following types: hpx::exception_info, hpx::error_code, std::exception, or std::exception_ptr.- Throws
nothing –
- Returns
The unique thread id of the HPX-thread from which the exception was thrown. If the exception instance does not hold this information, the function will return std::size_t(0).
- HPX_CXX_CORE_EXPORT std::string get_error_thread_description (hpx::exception_info const &xi)
Return any additionally available thread description of the HPX-thread from which the exception was thrown.
The function hpx::get_error_thread_description can be used to extract the diagnostic information element representing the additional thread description as stored in the given exception instance.
See also
hpx::diagnostic_information(), hpx::get_error_host_name(), hpx::get_error_process_id(), hpx::get_error_function_name(), hpx::get_error_file_name(), hpx::get_error_line_number(), hpx::get_error_os_thread(), hpx::get_error_thread_id(), hpx::get_error_backtrace(), hpx::get_error_env(), hpx::get_error(), hpx::get_error_state(), hpx::get_error_what(), hpx::get_error_config()
- Parameters
xi – The parameter
ewill be inspected for the requested diagnostic information elements which have been stored at the point where the exception was thrown. This parameter can be one of the following types: hpx::exception_info, hpx::error_code, std::exception, or std::exception_ptr.- Throws
std::bad_alloc – (if one of the required allocations fails)
- Returns
Any additionally available thread description of the HPX-thread from which the exception was thrown. If the exception instance does not hold this information, the function will return an empty string.
- HPX_CXX_CORE_EXPORT std::string get_error_config (hpx::exception_info const &xi)
Return the HPX configuration information point from which the exception was thrown.
The function hpx::get_error_config can be used to extract the HPX configuration information element representing the full HPX configuration information as stored in the given exception instance.
See also
hpx::diagnostic_information(), hpx::get_error_host_name(), hpx::get_error_process_id(), hpx::get_error_function_name(), hpx::get_error_file_name(), hpx::get_error_line_number(), hpx::get_error_os_thread(), hpx::get_error_thread_id(), hpx::get_error_backtrace(), hpx::get_error_env(), hpx::get_error(), hpx::get_error_state() hpx::get_error_what(), hpx::get_error_thread_description()
- Parameters
xi – The parameter
ewill be inspected for the requested diagnostic information elements which have been stored at the point where the exception was thrown. This parameter can be one of the following types: hpx::exception_info, hpx::error_code, std::exception, or std::exception_ptr.- Throws
std::bad_alloc – (if one of the required allocations fails)
- Returns
Any additionally available HPX configuration information the point from which the exception was thrown. If the exception instance does not hold this information, the function will return an empty string.
- HPX_CXX_CORE_EXPORT std::string get_error_state (hpx::exception_info const &xi)
Return the HPX runtime state information at which the exception was thrown.
The function hpx::get_error_state can be used to extract the HPX runtime state information element representing the state the runtime system is currently in as stored in the given exception instance.
See also
hpx::diagnostic_information(), hpx::get_error_host_name(), hpx::get_error_process_id(), hpx::get_error_function_name(), hpx::get_error_file_name(), hpx::get_error_line_number(), hpx::get_error_os_thread(), hpx::get_error_thread_id(), hpx::get_error_backtrace(), hpx::get_error_env(), hpx::get_error(), hpx::get_error_what(), hpx::get_error_thread_description()
- Parameters
xi – The parameter
ewill be inspected for the requested diagnostic information elements which have been stored at the point where the exception was thrown. This parameter can be one of the following types: hpx::exception_info, hpx::error_code, std::exception, or std::exception_ptr.- Throws
std::bad_alloc – (if one of the required allocations fails)
- Returns
The point runtime state at the point at which the exception was thrown. If the exception instance does not hold this information, the function will return an empty string.
hpx::get_locality_id#
Defined in header hpx/runtime.hpp.
See Public API for a list of names and headers that are part of the public HPX API.
-
namespace hpx
Functions
- HPX_CXX_CORE_EXPORT std::uint32_t get_locality_id (error_code &ec=throws)
Return the number of the locality this function is being called from.
This function returns the id of the current locality.
Note
The returned value is zero based and its maximum value is smaller than the overall number of localities the current application is running on (as returned by get_num_localities()).
Note
As long as ec is not pre-initialized to hpx::throws this function doesn’t throw but returns the result code using the parameter ec. Otherwise, it throws an instance of hpx::exception.
Note
This function needs to be executed on a HPX-thread. It will fail otherwise (it will return -1).
- Parameters
ec – [in,out] this represents the error status on exit, if this is pre-initialized to hpx::throws the function will throw on error instead.
hpx::get_locality_name#
Defined in header hpx/runtime.hpp.
See Public API for a list of names and headers that are part of the public HPX API.
-
namespace hpx
Functions
- HPX_CXX_CORE_EXPORT std::string get_locality_name ()
Return the name of the locality this function is called on.
This function returns the name for the locality on which this function is called.
See also
future<std::string> get_locality_name(hpx::id_type const& id)
- Returns
This function returns the name for the locality on which the function is called. The name is retrieved from the underlying networking layer and may be different for different parcelports.
hpx::get_initial_num_localities, hpx::get_num_localities#
Defined in header hpx/runtime.hpp.
See Public API for a list of names and headers that are part of the public HPX API.
-
namespace hpx
Functions
- HPX_CXX_CORE_EXPORT std::uint32_t get_initial_num_localities ()
Return the number of localities which were registered at startup for the running application.
The function get_initial_num_localities returns the number of localities which were connected to the console at application startup.
See also
hpx::find_all_localities, hpx::get_num_localities
Note
As long as ec is not pre-initialized to hpx::throws this function doesn’t throw but returns the result code using the parameter ec. Otherwise, it throws an instance of hpx::exception.
- HPX_CXX_CORE_EXPORT hpx::future< std::uint32_t > get_num_localities ()
Asynchronously return the number of localities which are currently registered for the running application.
The function get_num_localities asynchronously returns the number of localities currently connected to the console. The returned future represents the actual result.
See also
hpx::find_all_localities, hpx::get_num_localities
Note
This function will return meaningful results only if called from an HPX-thread. It will return 0 otherwise.
- HPX_CXX_CORE_EXPORT std::uint32_t get_num_localities (launch::sync_policy, error_code &ec=throws)
Return the number of localities which are currently registered for the running application.
The function get_num_localities returns the number of localities currently connected to the console.
See also
hpx::find_all_localities, hpx::get_num_localities
Note
This function will return meaningful results only if called from an HPX-thread. It will return 0 otherwise.
Note
As long as ec is not pre-initialized to hpx::throws this function doesn’t throw but returns the result code using the parameter ec. Otherwise, it throws an instance of hpx::exception.
- Parameters
ec – [in,out] this represents the error status on exit, if this is pre-initialized to hpx::throws the function will throw on error instead.
hpx/runtime_local/get_os_thread_count.hpp#
Defined in header hpx/runtime_local/get_os_thread_count.hpp.
See Public API for a list of names and headers that are part of the public HPX API.
-
namespace hpx
Functions
- HPX_CXX_CORE_EXPORT std::size_t get_os_thread_count ()
Return the number of OS-threads running in the runtime instance the current HPX-thread is associated with.
- HPX_CXX_CORE_EXPORT std::size_t get_os_thread_count (threads::executor const &exec)
Return the number of worker OS- threads used by the given executor to execute HPX threads.
This function returns the number of cores used to execute HPX threads for the given executor. If the function is called while no HPX runtime system is active, it will return zero. If the executor is not valid, this function will fall back to retrieving the number of OS threads used by HPX.
- Parameters
exec – [in] The executor to be used.
-
namespace threads
hpx::get_thread_name#
Defined in header hpx/runtime.hpp.
See Public API for a list of names and headers that are part of the public HPX API.
-
namespace hpx
Functions
- HPX_CXX_CORE_EXPORT std::string get_thread_name ()
Return the name of the calling thread.
This function returns the name of the calling thread. This name uniquely identifies the thread in the context of HPX. If the function is called while no HPX runtime system is active, the result will be “<unknown>”.
hpx/runtime_local/get_worker_thread_num.hpp#
Defined in header hpx/runtime_local/get_worker_thread_num.hpp.
See Public API for a list of names and headers that are part of the public HPX API.
hpx/runtime_local/report_error.hpp#
Defined in header hpx/runtime_local/report_error.hpp.
See Public API for a list of names and headers that are part of the public HPX API.
-
namespace hpx
Functions
- HPX_CXX_CORE_EXPORT void report_error (std::size_t num_thread, std::exception_ptr const &e)
The function report_error reports the given exception to the console.
- HPX_CXX_CORE_EXPORT void report_error (std::exception_ptr const &e)
The function report_error reports the given exception to the console.
hpx/runtime_local/runtime_local.hpp#
Defined in header hpx/runtime_local/runtime_local.hpp.
See Public API for a list of names and headers that are part of the public HPX API.
-
namespace hpx
Functions
- HPX_CXX_CORE_EXPORT void set_error_handlers (hpx::util::runtime_configuration const &cfg)
-
class runtime#
Public Types
-
using notification_policy_type = threads::policies::callback_notifier#
Generate a new notification policy instance for the given thread name prefix
-
using hpx_main_function_type = int()#
The hpx_main_function_type is the default function type usable as the main HPX thread function.
Public Functions
-
virtual notification_policy_type get_notification_policy(char const *prefix, runtime_local::os_thread_type type)#
-
state get_state() const#
-
void set_state(state s)#
-
explicit runtime(hpx::util::runtime_configuration rtcfg, bool initialize)#
Construct a new HPX runtime instance.
-
virtual ~runtime()#
The destructor makes sure all HPX runtime services are properly shut down before exiting.
-
void starting()#
Manage runtime ‘stopped’ state.
-
void stopping()#
Call all registered on_exit functions.
-
bool stopped() const#
This accessor returns whether the runtime instance has been stopped.
-
util::thread_mapper &get_thread_mapper() const#
Return a reference to the internal PAPI thread manager.
-
virtual int run(hpx::function<hpx_main_function_type> const &func)#
Run the HPX runtime system, use the given function for the main thread and block waiting for all threads to finish.
Note
The parameter func is optional. If no function is supplied, the runtime system will simply wait for the shutdown action without explicitly executing any main thread.
- Parameters
func – [in] This is the main function of an HPX application. It will be scheduled for execution by the thread manager as soon as the runtime has been initialized. This function is expected to expose an interface as defined by the typedef hpx_main_function_type. This parameter is optional and defaults to none main thread function, in which case all threads have to be scheduled explicitly.
- Returns
This function will return the value as returned as the result of the invocation of the function object given by the parameter
func.
-
virtual int run()#
Run the HPX runtime system, initially use the given number of (OS) threads in the thread-manager and block waiting for all threads to finish.
- Returns
This function will always return 0 (zero).
-
virtual int start(hpx::function<hpx_main_function_type> const &func, bool blocking = false)#
Start the runtime system.
- Parameters
func – [in] This is the main function of an HPX application. It will be scheduled for execution by the thread manager as soon as the runtime has been initialized. This function is expected to expose an interface as defined by the typedef hpx_main_function_type.
blocking – [in] This allows to control whether this call blocks until the runtime system has been stopped. If this parameter is true the function runtime::start will call runtime::wait internally.
- Returns
If a blocking is a true, this function will return the value as returned as the result of the invocation of the function object given by the parameter
func. Otherwise, it will return zero.
-
virtual int start(bool blocking = false)#
Start the runtime system.
- Parameters
blocking – [in] This allows to control whether this call blocks until the runtime system has been stopped. If this parameter is true the function runtime::start will call runtime::wait internally .
- Returns
If a blocking is a true, this function will return the value as returned as the result of the invocation of the function object given by the parameter
func. Otherwise, it will return zero.
-
virtual int wait()#
Wait for the shutdown action to be executed.
- Returns
This function will return the value as returned as the result of the invocation of the function object given by the parameter
func.
-
virtual void stop(bool blocking = true)#
Initiate termination of the runtime system.
- Parameters
blocking – [in] This allows to control whether this call blocks until the runtime system has been fully stopped. If this parameter is false then this call will initiate the stop action but will return immediately. Use a second call to stop with this parameter set to true to wait for all internal work to be completed.
-
virtual int suspend()#
Suspend the runtime system.
-
virtual int resume()#
Resume the runtime system.
-
virtual int finalize(double)#
-
virtual bool is_networking_enabled()#
Return true if networking is enabled.
-
virtual hpx::threads::threadmanager &get_thread_manager()#
Allow access to the thread manager instance used by the HPX runtime.
-
virtual std::string here() const#
Returns a string of the locality endpoints (usable in debug output)
-
virtual bool report_error(std::size_t num_thread, std::exception_ptr const &e, bool terminate_all = true)#
Report a non-recoverable error to the runtime system.
- Parameters
num_thread – [in] The number of the operating system thread the error has been detected in.
e – [in] This is an instance encapsulating an exception which lead to this function call.
terminate_all – [in] signal whether all localities should be terminated
-
virtual bool report_error(std::exception_ptr const &e, bool terminate_all = true)#
Report a non-recoverable error to the runtime system.
Note
This function will retrieve the number of the current shepherd thread and forward to the report_error function above.
- Parameters
e – [in] This is an instance encapsulating an exception which lead to this function call.
terminate_all – [in] signal whether all localities should be terminated
-
virtual void add_pre_startup_function(startup_function_type f)#
Add a function to be executed inside a HPX thread before hpx_main but guaranteed to be executed before any startup function registered with add_startup_function.
Note
The difference to a startup function is that all pre-startup functions will be (system-wide) executed before any startup function.
- Parameters
f – The function ‘f’ will be called from inside a HPX thread before hpx_main is executed. This is very useful to set up the runtime environment of the application (install performance counters, etc.)
-
virtual void add_startup_function(startup_function_type f)#
Add a function to be executed inside a HPX thread before hpx_main
- Parameters
f – The function ‘f’ will be called from inside a HPX thread before hpx_main is executed. This is very useful to set up the runtime environment of the application (install performance counters, etc.)
-
virtual void add_pre_shutdown_function(shutdown_function_type f)#
Add a function to be executed inside a HPX thread during hpx::finalize, but guaranteed before any of the shutdown functions is executed.
Note
The difference to a shutdown function is that all pre-shutdown functions will be (system-wide) executed before any shutdown function.
- Parameters
f – The function ‘f’ will be called from inside a HPX thread while hpx::finalize is executed. This is very useful to tear down the runtime environment of the application (uninstall performance counters, etc.)
-
virtual void add_shutdown_function(shutdown_function_type f)#
Add a function to be executed inside a HPX thread during hpx::finalize
- Parameters
f – The function ‘f’ will be called from inside a HPX thread while hpx::finalize is executed. This is very useful to tear down the runtime environment of the application (uninstall performance counters, etc.)
-
virtual hpx::util::io_service_pool *get_thread_pool(char const *name)#
Access one of the internal thread pools (io_service instances) HPX is using to perform specific tasks. The three possible values for the argument
nameare “main_pool”, “io_pool”, “parcel_pool”, and “timer_pool”. For any other argument value the function will return zero.
-
virtual bool register_thread(char const *name, std::size_t num = 0, bool service_thread = true, error_code &ec = throws)#
Register an external OS-thread with HPX.
This function should be called from any OS-thread which is external to HPX (not created by HPX), but which needs to access HPX functionality, such as setting a value on a promise or similar.
‘main’, ‘io’, ‘timer’, ‘parcel’, ‘worker’
Note
The function will compose a thread name of the form ‘<name>-thread#<num>’ which is used to register the thread. It is the user’s responsibility to ensure that each (composed) thread name is unique. HPX internally uses the following names for the threads it creates, do not reuse those:
Note
This function should be called for each thread exactly once. It will fail if it is called more than once.
- Parameters
name – [in] The name to use for thread registration.
num – [in] The sequence number to use for thread registration. The default for this parameter is zero.
service_thread – [in] The thread should be registered as a service thread. The default for this parameter is ‘true’. Any service threads will be pinned to cores not currently used by any of the HPX worker threads.
ec – [in,out] this represents the error status on exit, if this is pre-initialized to hpx::throws the function will throw on error instead.
- Returns
This function will return whether the requested operation succeeded or not.
-
virtual bool unregister_thread()#
Unregister an external OS-thread with HPX.
This function will unregister any external OS-thread from HPX.
Note
This function should be called for each thread exactly once. It will fail if it is called more than once. It will fail as well if the thread has not been registered before (see register_thread).
- Returns
This function will return whether the requested operation succeeded or not.
-
virtual runtime_local::os_thread_data get_os_thread_data(std::string const &label) const#
Access data for a given OS thread that was previously registered by register_thread.
-
virtual bool enumerate_os_threads(hpx::function<bool(runtime_local::os_thread_data const&)> const &f) const#
Enumerate all OS threads that have registered with the runtime.
-
notification_policy_type::on_startstop_type on_start_func() const#
-
notification_policy_type::on_startstop_type on_stop_func() const#
-
notification_policy_type::on_error_type on_error_func() const#
-
notification_policy_type::on_startstop_type on_start_func(notification_policy_type::on_startstop_type&&)#
-
notification_policy_type::on_startstop_type on_stop_func(notification_policy_type::on_startstop_type&&)#
-
notification_policy_type::on_error_type on_error_func(notification_policy_type::on_error_type&&)#
-
virtual std::uint32_t get_locality_id(error_code &ec) const#
-
virtual std::uint32_t get_num_localities(hpx::launch::sync_policy, error_code &ec) const#
Public Static Functions
Protected Functions
-
void set_notification_policies(notification_policy_type &¬ifier, threads::detail::network_background_callback_type const &network_background_callback)#
-
void init()#
Common initialization for different constructors.
-
void init_global_data()#
Protected Attributes
-
on_exit_type on_exit_functions_#
-
long instance_number_#
-
notification_policy_type::on_startstop_type on_start_func_#
-
notification_policy_type::on_startstop_type on_stop_func_#
-
notification_policy_type::on_error_type on_error_func_#
-
int result_#
-
notification_policy_type main_pool_notifier_#
-
std::unique_ptr<util::io_service_pool> main_pool_#
-
notification_policy_type notifier_#
-
std::unique_ptr<hpx::threads::threadmanager> thread_manager_#
Protected Static Functions
-
static void deinit_global_data()#
Private Functions
-
void stop_helper(bool blocking, std::condition_variable &cond, std::mutex &mtx) const#
Helper function to stop the runtime.
- Parameters
blocking – [in] This allows to control whether this call blocks until the runtime system has been fully stopped. If this parameter is false then this call will initiate the stop action but will return immediately. Use a second call to stop with this parameter set to true to wait for all internal work to be completed.
cond –
mtx –
-
void init_tss_ex(char const *context, runtime_local::os_thread_type type, std::size_t local_thread_num, std::size_t global_thread_num, char const *pool_name, char const *postfix, bool service_thread, error_code &ec) const#
-
void init_tss_helper(char const *context, runtime_local::os_thread_type type, std::size_t local_thread_num, std::size_t global_thread_num, char const *pool_name, char const *postfix, bool service_thread) const#
-
void notify_finalize()#
-
void wait_finalize()#
-
void call_startup_functions(bool pre_startup)#
Private Members
-
std::list<startup_function_type> pre_startup_functions_#
-
std::list<startup_function_type> startup_functions_#
-
std::list<shutdown_function_type> pre_shutdown_functions_#
-
std::list<shutdown_function_type> shutdown_functions_#
-
bool stop_called_#
-
bool stop_done_#
-
using notification_policy_type = threads::policies::callback_notifier#
-
namespace threads
Functions
- HPX_CXX_CORE_EXPORT char const * get_stack_size_name (std::ptrdiff_t size)
Returns the stack size name.
Get the readable string representing the given stack size constant.
- Parameters
size – this represents the stack size
- HPX_CXX_CORE_EXPORT std::ptrdiff_t get_default_stack_size ()
Returns the default stack size.
Get the default stack size in bytes.
- HPX_CXX_CORE_EXPORT std::ptrdiff_t get_stack_size (thread_stacksize size)
Returns the stack size corresponding to the given stack size enumeration.
Get the stack size corresponding to the given stack size enumeration.
- Parameters
size – this represents the stack size
-
namespace util
Functions
- HPX_CXX_CORE_EXPORT bool retrieve_commandline_arguments (hpx::program_options::options_description const &app_options, hpx::program_options::variables_map &vm)
- HPX_CXX_CORE_EXPORT bool retrieve_commandline_arguments (std::string const &app_name, hpx::program_options::variables_map &vm)
hpx::register_thread, hpx::unregister_thread, hpx::get_os_thread_data, hpx::enumerate_os_threads, hpx::get_runtime_instance_number, hpx::register_on_exit, hpx::is_starting, hpx::tolerate_node_faults, hpx::is_running, hpx::is_stopped, hpx::is_stopped_or_shutting_down, hpx::get_num_worker_threads, hpx::get_system_uptime#
Defined in header hpx/runtime.hpp.
See Public API for a list of names and headers that are part of the public HPX API.
-
namespace hpx
Functions
- HPX_CXX_CORE_EXPORT bool register_thread (runtime *rt, char const *name, error_code &ec=throws)
Register the current kernel thread with HPX, this should be done once for each external OS-thread intended to invoke HPX functionality. Calling this function more than once will return false.
- HPX_CXX_CORE_EXPORT void unregister_thread (runtime *rt)
Unregister the thread from HPX, this should be done once in the end before the external thread exists.
- HPX_CXX_CORE_EXPORT runtime_local::os_thread_data get_os_thread_data (std::string const &label)
Access data for a given OS thread that was previously registered by register_thread. This function must be called from a thread that was previously registered with the runtime.
- HPX_CXX_CORE_EXPORT bool enumerate_os_threads (hpx::function< bool(os_thread_data const &)> const &f)
Enumerate all OS threads that have registered with the runtime.
- HPX_CXX_CORE_EXPORT std::size_t get_runtime_instance_number ()
Return the runtime instance number associated with the runtime instance the current thread is running in.
- HPX_CXX_CORE_EXPORT bool register_on_exit (hpx::function< void()> const &)
Register a function to be called during system shutdown.
- HPX_CXX_CORE_EXPORT bool is_starting ()
Test whether the runtime system is currently being started.
This function returns whether the runtime system is currently being started or not, e.g. whether the current state of the runtime system is hpx::state::startup
Note
This function needs to be executed on a HPX-thread. It will return false otherwise.
- HPX_CXX_CORE_EXPORT bool tolerate_node_faults ()
Test if HPX runs in fault-tolerant mode.
This function returns whether the runtime system is running in fault-tolerant mode
- HPX_CXX_CORE_EXPORT bool is_running ()
Test whether the runtime system is currently running.
This function returns whether the runtime system is currently running or not, e.g. whether the current state of the runtime system is hpx::state::running
Note
This function needs to be executed on a HPX-thread. It will return false otherwise.
- HPX_CXX_CORE_EXPORT bool is_stopped ()
Test whether the runtime system is currently stopped.
This function returns whether the runtime system is currently stopped or not, e.g. whether the current state of the runtime system is hpx::state::stopped
Note
This function needs to be executed on a HPX-thread. It will return false otherwise.
- HPX_CXX_CORE_EXPORT bool is_stopped_or_shutting_down ()
Test whether the runtime system is currently being shut down.
This function returns whether the runtime system is currently being shut down or not, e.g. whether the current state of the runtime system is hpx::state::stopped or hpx::state::shutdown
Note
This function needs to be executed on a HPX-thread. It will return false otherwise.
- HPX_CXX_CORE_EXPORT std::size_t get_num_worker_threads ()
Return the number of worker OS- threads used to execute HPX threads.
This function returns the number of OS-threads used to execute HPX threads. If the function is called while no HPX runtime system is active, it will return zero.
- HPX_CXX_CORE_EXPORT std::uint64_t get_system_uptime ()
Return the system uptime measure on the thread executing this call.
This function returns the system uptime measured in nanoseconds for the thread executing this call. If the function is called while no HPX runtime system is active, it will return zero.
-
namespace threads
hpx/runtime_local/service_executors.hpp#
Defined in header hpx/runtime_local/service_executors.hpp.
See Public API for a list of names and headers that are part of the public HPX API.
-
namespace hpx
-
namespace execution
-
namespace experimental
Enums
-
enum class service_executor_type : std::uint8_t#
Values:
-
enumerator io_thread_pool#
Selects creating a service executor using the I/O pool of threads
-
enumerator parcel_thread_pool#
Selects creating a service executor using the parcel pool of threads
-
enumerator timer_thread_pool#
Selects creating a service executor using the timer pool of threads
-
enumerator main_thread#
Selects creating a service executor using the main thread
-
enumerator io_thread_pool#
-
struct io_pool_executor : public hpx::execution::experimental::service_executor#
Public Functions
-
io_pool_executor()#
-
io_pool_executor()#
-
struct main_pool_executor : public hpx::execution::experimental::service_executor#
Public Functions
-
main_pool_executor()#
-
main_pool_executor()#
-
struct parcel_pool_executor : public hpx::execution::experimental::service_executor#
Public Functions
-
explicit parcel_pool_executor(char const *name_suffix = "-tcp")#
-
explicit parcel_pool_executor(char const *name_suffix = "-tcp")#
-
struct service_executor : public service_executor#
Subclassed by hpx::execution::experimental::io_pool_executor, hpx::execution::experimental::main_pool_executor, hpx::execution::experimental::parcel_pool_executor, hpx::execution::experimental::timer_pool_executor
Public Functions
-
explicit service_executor(service_executor_type t, char const *name_suffix = "")#
-
explicit service_executor(service_executor_type t, char const *name_suffix = "")#
-
struct timer_pool_executor : public hpx::execution::experimental::service_executor#
Public Functions
-
timer_pool_executor()#
-
timer_pool_executor()#
-
enum class service_executor_type : std::uint8_t#
-
namespace experimental
-
namespace execution
hpx::shutdown_function_type, hpx::register_pre_shutdown_function, hpx::register_shutdown_function#
Defined in header hpx/runtime.hpp.
See Public API for a list of names and headers that are part of the public HPX API.
-
namespace hpx
Typedefs
-
using shutdown_function_type = hpx::move_only_function<void()>#
The type of the function which is registered to be executed as a shutdown or pre-shutdown function.
Functions
- HPX_CXX_CORE_EXPORT void register_pre_shutdown_function (shutdown_function_type f)
Add a function to be executed by a HPX thread during hpx::finalize() but guaranteed before any shutdown function is executed (system-wide)
Any of the functions registered with register_pre_shutdown_function are guaranteed to be executed by an HPX thread during the execution of hpx::finalize() before any of the registered shutdown functions are executed (see: hpx::register_shutdown_function()).
See also
Note
If this function is called while the pre-shutdown functions are being executed, or after that point, it will raise an invalid_status exception.
- Parameters
f – [in] The function to be registered to run by an HPX thread as a pre-shutdown function.
- HPX_CXX_CORE_EXPORT void register_shutdown_function (shutdown_function_type f)
Add a function to be executed by a HPX thread during hpx::finalize() but guaranteed after any pre-shutdown function is executed (system-wide)
Any of the functions registered with register_shutdown_function are guaranteed to be executed by an HPX thread during the execution of hpx::finalize() after any of the registered pre-shutdown functions are executed (see: hpx::register_pre_shutdown_function()).
Note
If this function is called while the shutdown functions are being executed, or after that point, it will raise an invalid_status exception.
- Parameters
f – [in] The function to be registered to run by an HPX thread as a shutdown function.
-
using shutdown_function_type = hpx::move_only_function<void()>#
hpx::startup_function_type, hpx::register_pre_startup_function, hpx::register_startup_function#
Defined in header hpx/runtime.hpp.
See Public API for a list of names and headers that are part of the public HPX API.
-
namespace hpx
Typedefs
-
using startup_function_type = hpx::move_only_function<void()>#
The type of the function which is registered to be executed as a startup or pre-startup function.
Functions
- HPX_CXX_CORE_EXPORT void register_pre_startup_function (startup_function_type f)
Add a function to be executed by a HPX thread before hpx_main but guaranteed before any startup function is executed (system-wide).
Any of the functions registered with register_pre_startup_function are guaranteed to be executed by an HPX thread before any of the registered startup functions are executed (see hpx::register_startup_function()).
This function is one of the few API functions which can be called before the runtime system has been fully initialized. It will automatically stage the provided startup function to the runtime system during its initialization (if necessary).
See also
Note
If this function is called while the pre-startup functions are being executed or after that point, it will raise aninvalid_status exception.
- Parameters
f – [in] The function to be registered to run by an HPX thread as a pre-startup function.
- HPX_CXX_CORE_EXPORT void register_startup_function (startup_function_type f)
Add a function to be executed by a HPX thread before hpx_main but guaranteed after any pre-startup function is executed (system-wide).
Any of the functions registered with register_startup_function are guaranteed to be executed by an HPX thread after any of the registered pre-startup functions are executed (see: hpx::register_pre_startup_function()), but before hpx_main is being called.
This function is one of the few API functions which can be called before the runtime system has been fully initialized. It will automatically stage the provided startup function to the runtime system during its initialization (if necessary).
See also
Note
If this function is called while the startup functions are being executed or after that point, it will raise an invalid_status exception.
- Parameters
f – [in] The function to be registered to run by an HPX thread as a startup function.
-
using startup_function_type = hpx::move_only_function<void()>#
hpx/runtime_local/termination_detection.hpp#
Defined in header hpx/runtime_local/termination_detection.hpp.
See Public API for a list of names and headers that are part of the public HPX API.
-
namespace hpx
-
namespace local#
Functions
- HPX_CXX_CORE_EXPORT void termination_detection ()
Wait for all local HPX threads to complete execution.
This function blocks the calling thread until all HPX worker threads on the current locality have completed their work and become idle. It performs local termination detection by waiting for the thread manager to drain all pending tasks.
- Example:
#include <hpx/hpx_init.hpp> #include <hpx/runtime_local/termination_detection.hpp> int hpx_main() { // Launch some asynchronous work for (int i = 0; i < 100; ++i) { hpx::post([]{ /* do work */ }); } // Wait for all local threads to complete hpx::local::termination_detection(); return hpx::finalize(); }
Note
This function should be called from an HPX thread or after the HPX runtime has been initialized.
- HPX_CXX_CORE_EXPORT bool termination_detection (hpx::chrono::steady_duration const &timeout)
Wait for all local HPX threads to complete with a timeout.
This function blocks the calling thread until either all HPX worker threads have completed their work, or the specified timeout duration has elapsed.
See also
termination_detection()
- Example:
#include <hpx/hpx_init.hpp> #include <hpx/runtime_local/termination_detection.hpp> #include <chrono> int hpx_main() { // Launch some work hpx::post([]{ /* long running task */ }); // Wait up to 5 seconds if (!hpx::local::termination_detection(std::chrono::seconds(5))) { std::cerr << "Warning: Work did not complete within timeout\n"; // Implement fallback strategy } return hpx::finalize(); }
- Parameters
timeout – Maximum duration to wait for termination. The function will return false if this duration elapses before all threads complete.
- Throws
hpx::exception – if called when the runtime is not in a valid state.
- Returns
true if all threads completed before the timeout, false if the timeout elapsed.
- HPX_CXX_CORE_EXPORT bool termination_detection (hpx::chrono::steady_time_point const &deadline)
Wait for all local HPX threads to complete until a deadline.
This function blocks the calling thread until either all HPX worker threads have completed their work, or the specified deadline time point is reached.
See also
termination_detection(std::chrono::duration<double>)
- Example:
#include <hpx/hpx_init.hpp> #include <hpx/runtime_local/termination_detection.hpp> #include <chrono> int hpx_main() { auto deadline = std::chrono::steady_clock::now() + std::chrono::seconds(10); hpx::post([]{ /* work */ }); if (!hpx::local::termination_detection(deadline)) { std::cerr << "Deadline reached\n"; } return hpx::finalize(); }
- Parameters
deadline – Absolute time point when waiting should stop. The function will return false if this time is reached before all threads complete.
- Throws
hpx::exception – if called when the runtime is not in a valid state.
- Returns
true if all threads completed before the deadline, false if the deadline was reached.
- HPX_CXX_CORE_EXPORT bool termination_detection (hpx::stop_token stop_token, hpx::chrono::steady_duration const &timeout=hpx::chrono::steady_duration((hpx::chrono::steady_clock::duration::max)()))
Wait for all local HPX threads with cancellation support.
This function blocks the calling thread until all HPX worker threads have completed, the timeout elapses, or a stop is requested via the stop_token. This enables cooperative cancellation of the wait operation.
See also
termination_detection(std::chrono::duration<double>)
- Example:
#include <hpx/hpx_init.hpp> #include <hpx/runtime_local/termination_detection.hpp> #include <hpx/stop_token.hpp> #include <chrono> int hpx_main() { hpx::stop_source stop_src; // In shutdown handler hpx::thread shutdown_thread([&stop_src]() { hpx::this_thread::sleep_for(std::chrono::seconds(30)); stop_src.request_stop(); }); hpx::post([]{ /* work */ }); // Wait with cancellation support bool completed = hpx::local::termination_detection( stop_src.get_token(), std::chrono::minutes(1) ); if (!completed) { std::cerr << "Cancelled or timed out\n"; } shutdown_thread.join(); return hpx::finalize(); }
- Parameters
stop_token – Token that can be used to request cancellation of the wait operation.
timeout – Maximum duration to wait. Defaults to maximum duration (effectively infinite).
- Throws
hpx::exception – if called when the runtime is not in a valid state.
- Returns
true if all threads completed, false if timeout elapsed or stop was requested.
-
namespace local#
hpx/runtime_local/thread_hooks.hpp#
Defined in header hpx/runtime_local/thread_hooks.hpp.
See Public API for a list of names and headers that are part of the public HPX API.
-
namespace hpx
Functions
- HPX_CXX_CORE_EXPORT threads::policies::callback_notifier::on_startstop_type get_thread_on_start_func ()
Retrieve the currently installed start handler function. This is a function that will be called by HPX for each newly created thread that is made known to the runtime. HPX stores exactly one such function reference, thus the caller needs to make sure any newly registered start function chains into the previous one (see register_thread_on_start_func).
Note
This function can be called before the HPX runtime is initialized.
- Returns
The currently installed error handler function.
- HPX_CXX_CORE_EXPORT threads::policies::callback_notifier::on_startstop_type get_thread_on_stop_func ()
Retrieve the currently installed stop handler function. This is a function that will be called by HPX for each newly created thread that is made known to the runtime. HPX stores exactly one such function reference, thus the caller needs to make sure any newly registered stop function chains into the previous one (see register_thread_on_stop_func).
Note
This function can be called before the HPX runtime is initialized.
- Returns
The currently installed error handler function.
- HPX_CXX_CORE_EXPORT threads::policies::callback_notifier::on_error_type get_thread_on_error_func ()
Retrieve the currently installed error handler function. This is a function that will be called by HPX for each newly created thread that is made known to the runtime. HPX stores exactly one such function reference, thus the caller needs to make sure any newly registered error function chains into the previous one (see register_thread_on_error_func).
Note
This function can be called before the HPX runtime is initialized.
- Returns
The currently installed error handler function.
- HPX_CXX_CORE_EXPORT threads::policies::callback_notifier::on_startstop_type register_thread_on_start_func (threads::policies::callback_notifier::on_startstop_type &&f)
Set the currently installed start handler function. This is a function that will be called by HPX for each newly created thread that is made known to the runtime. HPX stores exactly one such function reference, thus the caller needs to make sure any newly registered start function chains into the previous one (see get_thread_on_start_func).
Note
This function can be called before the HPX runtime is initialized.
- Parameters
f – The function to install as the new start handler.
- Returns
The previously registered function of this category. It is the user’s responsibility to call that function if the callback is invoked by HPX.
- HPX_CXX_CORE_EXPORT threads::policies::callback_notifier::on_startstop_type register_thread_on_stop_func (threads::policies::callback_notifier::on_startstop_type &&f)
Set the currently installed stop handler function. This is a function that will be called by HPX for each newly created thread that is made known to the runtime. HPX stores exactly one such function reference, thus the caller needs to make sure any newly registered stop function chains into the previous one (see get_thread_on_stop_func).
Note
This function can be called before the HPX runtime is initialized.
- Parameters
f – The function to install as the new stop handler.
- Returns
The previously registered function of this category. It is the user’s responsibility to call that function if the callback is invoked by HPX.
- HPX_CXX_CORE_EXPORT threads::policies::callback_notifier::on_error_type register_thread_on_error_func (threads::policies::callback_notifier::on_error_type &&f)
Set the currently installed error handler function. This is a function that will be called by HPX for each newly created thread that is made known to the runtime. HPX stores exactly one such function reference, thus the caller needs to make sure any newly registered error function chains into the previous one (see get_thread_on_error_func).
Note
This function can be called before the HPX runtime is initialized.
- Parameters
f – The function to install as the new error handler.
- Returns
The previously registered function of this category. It is the user’s responsibility to call that function if the callback is invoked by HPX.
hpx/runtime_local/thread_pool_helpers.hpp#
Defined in header hpx/runtime_local/thread_pool_helpers.hpp.
See Public API for a list of names and headers that are part of the public HPX API.
-
namespace hpx
-
namespace resource#
Functions
- HPX_CXX_CORE_EXPORT std::size_t get_num_thread_pools ()
Return the number of thread pools currently managed by the resource_partitioner
- HPX_CXX_CORE_EXPORT std::size_t get_num_threads ()
Return the number of threads in all thread pools currently managed by the resource_partitioner
- HPX_CXX_CORE_EXPORT std::size_t get_num_threads (std::string const &pool_name)
Return the number of threads in the given thread pool currently managed by the resource_partitioner
- HPX_CXX_CORE_EXPORT std::size_t get_num_threads (std::size_t pool_index)
Return the number of threads in the given thread pool currently managed by the resource_partitioner
- HPX_CXX_CORE_EXPORT std::size_t get_pool_index (std::string const &pool_name)
Return the internal index of the pool given its name.
- HPX_CXX_CORE_EXPORT std::string const & get_pool_name (std::size_t pool_index)
Return the name of the pool given its internal index.
- HPX_CXX_CORE_EXPORT threads::thread_pool_base & get_thread_pool (std::string const &pool_name)
Return the name of the pool given its name.
- HPX_CXX_CORE_EXPORT threads::thread_pool_base & get_thread_pool (std::size_t pool_index)
Return the thread pool given its internal index.
- HPX_CXX_CORE_EXPORT bool pool_exists (std::string const &pool_name)
Return true if the pool with the given name exists.
- HPX_CXX_CORE_EXPORT bool pool_exists (std::size_t pool_index)
Return true if the pool with the given index exists.
-
namespace threads
Functions
- HPX_CXX_CORE_EXPORT std::int64_t get_thread_count (thread_schedule_state state=thread_schedule_state::unknown)
The function get_thread_count returns the number of currently known threads.
Note
If state == unknown this function will not only return the number of currently existing threads, but will add the number of registered task descriptions (which have not been converted into threads yet).
- Parameters
state – [in] This specifies the thread-state for which the number of threads should be retrieved.
- HPX_CXX_CORE_EXPORT std::int64_t get_thread_count (thread_priority priority, thread_schedule_state state=thread_schedule_state::unknown)
The function get_thread_count returns the number of currently known threads.
Note
If state == unknown this function will not only return the number of currently existing threads, but will add the number of registered task descriptions (which have not been converted into threads yet).
- Parameters
priority – [in] This specifies the thread-priority for which the number of threads should be retrieved.
state – [in] This specifies the thread-state for which the number of threads should be retrieved.
- HPX_CXX_CORE_EXPORT std::int64_t get_idle_core_count ()
The function get_idle_core_count returns the number of currently idling threads (cores).
- HPX_CXX_CORE_EXPORT mask_type get_idle_core_mask ()
The function get_idle_core_mask returns a bit-mask representing the currently idling threads (cores).
- HPX_CXX_CORE_EXPORT bool enumerate_threads (hpx::function< bool(thread_id_type)> const &f, thread_schedule_state state=thread_schedule_state::unknown)
The function enumerate_threads will invoke the given function f for each thread with a matching thread state.
- Parameters
f – [in] The function which should be called for each matching thread. Returning ‘false’ from this function will stop the enumeration process.
state – [in] This specifies the thread-state for which the threads should be enumerated.
-
namespace resource#
serialization#
See Public API for a list of names and headers that are part of the public HPX API.
hpx/serialization/base_object.hpp#
Defined in header hpx/serialization/base_object.hpp.
See Public API for a list of names and headers that are part of the public HPX API.
-
template<typename Derived, typename Base>
struct base_object_type<Derived, Base, std::enable_if_t<hpx::traits::is_intrusive_polymorphic_v<Derived>>># Public Functions
-
HPX_SERIALIZATION_SPLIT_MEMBER()#
-
HPX_SERIALIZATION_SPLIT_MEMBER()#
-
namespace hpx
-
namespace serialization
Functions
- template<typename Base, typename Derived> constexpr HPX_CXX_CORE_EXPORT base_object_type< Derived, Base > base_object (Derived &d) noexcept
- template<typename D, typename B> HPX_CXX_CORE_EXPORT output_archive & operator<< (output_archive &ar, base_object_type< D, B > t)
- template<typename D, typename B> HPX_CXX_CORE_EXPORT input_archive & operator>> (input_archive &ar, base_object_type< D, B > t)
- template<typename D, typename B> HPX_CXX_CORE_EXPORT output_archive & operator& (output_archive &ar, base_object_type< D, B > t)
- template<typename D, typename B> HPX_CXX_CORE_EXPORT input_archive & operator& (input_archive &ar, base_object_type< D, B > t)
-
template<typename Derived, typename Base, typename Enable = void>
struct base_object_type# Public Functions
-
namespace serialization
synchronization#
See Public API for a list of names and headers that are part of the public HPX API.
hpx::barrier#
Defined in header hpx/barrier.hpp.
See Public API for a list of names and headers that are part of the public HPX API.
-
namespace hpx
-
template<typename OnCompletion = detail::empty_oncompletion>
class barrier# - #include <barrier.hpp>
A barrier is a thread coordination mechanism whose lifetime consists of a sequence of barrier phases, where each phase allows at most an expected number of threads to block until the expected number of threads arrive at the barrier. [ Note: A barrier is useful for managing repeated tasks that are handled by multiple threads. - end note ] Each barrier phase consists of the following steps:
The expected count is decremented by each call to arrive or arrive_and_drop.
When the expected count reaches zero, the phase completion step is run. For the specialization with the default value of the CompletionFunction template parameter, the completion step is run as part of the call to arrive or arrive_and_drop that caused the expected count to reach zero. For other specializations, the completion step is run on one of the threads that arrived at the barrier during the phase.
When the completion step finishes, the expected count is reset to what was specified by the expected argument to the constructor, possibly adjusted by calls to arrive_and_drop, and the next phase starts.
Each phase defines a phase synchronization point. Threads that arrive at the barrier during the phase can block on the phase synchronization point by calling wait, and will remain blocked until the phase completion step is run. The phase completion step that is executed at the end of each phase has the following effects:
Invokes the completion function, equivalent to completion().
Unblocks all threads that are blocked on the phase synchronization point.
The end of the completion step strongly happens before the returns from all calls that were unblocked by the completion step. For specializations that do not have the default value of the CompletionFunction template parameter, the behavior is undefined if any of the barrier object’s member functions other than wait are called while the completion step is in progress.
Concurrent invocations of the member functions of barrier, other than its destructor, do not introduce data races. The member functions arrive and arrive_and_drop execute atomically.
CompletionFunction shall meet the Cpp17MoveConstructible (Table 28) and Cpp17Destructible (Table 32) requirements. std::is_nothrow_invocable_v<CompletionFunction&> shall be true.
The default value of the CompletionFunction template parameter is an unspecified type, such that, in addition to satisfying the requirements of CompletionFunction, it meets the Cpp17DefaultConstructible requirements (Table 27) and completion() has no effects.
barrier::arrival_token is an unspecified type, such that it meets the Cpp17MoveConstructible (Table 28), Cpp17MoveAssignable (Table 30), and Cpp17Destructible (Table 32) requirements.
Public Types
-
using arrival_token = bool#
Public Functions
-
inline explicit constexpr barrier(std::ptrdiff_t expected, OnCompletion completion = OnCompletion())#
Preconditions: expected >= 0 is true and expected <= max() is true.
Effects: Sets both the initial expected count for each barrier phase and the current expected count for the first phase to expected. Initializes completion with std::move(f). Starts the first phase. [Note: If expected is 0 this object can only be destroyed.- end note]
Throws: Any exception thrown by CompletionFunction’s move constructor.
-
~barrier() = default#
-
inline arrival_token arrive(std::ptrdiff_t update = 1)#
Preconditions: update > 0 is true, and update is less than or equal to the expected count for the current barrier phase.
Effects: Constructs an object of type arrival_token that is associated with the phase synchronization point for the current phase. Then, decrements the expected count by update.
Synchronization: The call to arrive strongly happens before the start of the phase completion step for the current phase.
Error conditions: Any of the error conditions allowed for mutex types([thread.mutex.requirements.mutex]). [Note: This call can cause the completion step for the current phase to start.- end note]
- Throws
system_error – when an exception is required ([thread.req.exception]).
- Returns
: The constructed arrival_token object.
-
inline void wait(arrival_token &&old_phase) const#
Preconditions: arrival is associated with the phase synchronization point for the current phase or the immediately preceding phase of the same barrier object.
Effects: Blocks at the synchronization point associated with HPX_MOVE(arrival) until the phase completion step of the synchronization point’s phase is run. [ Note: If arrival is associated with the synchronization point for a previous phase, the call returns immediately. - end note ]
- Throws
system_error – when an exception is required ([thread.req.exception]). Error conditions: Any of the error conditions allowed for mutex types ([thread.mutex.requirements.mutex]).
-
inline void arrive_and_wait()#
Effects: Equivalent to: wait(arrive()).
-
inline void arrive_and_drop()#
Preconditions: The expected count for the current barrier phase is greater than zero.
Effects: Decrements the initial expected count for all subsequent phases by one. Then decrements the expected count for the current phase by one.
Synchronization: The call to arrive_and_drop strongly happens before the start of the phase completion step for the current phase.
- Throws
system_error – when an exception is required ([thread.req.exception]).Error conditions: Any of the error conditions allowed for mutex types ([thread.mutex.requirements.mutex]). [Note: This call can cause the completion step for the current phase to start.- end note]
Public Static Functions
- static inline constexpr std::ptrdiff_t() max () noexcept
-
template<typename OnCompletion = detail::empty_oncompletion>
hpx::binary_semaphore#
Defined in header hpx/semaphore.hpp.
See Public API for a list of names and headers that are part of the public HPX API.
-
namespace hpx
-
class binary_semaphore#
- #include <binary_semaphore.hpp>
A binary semaphore is a semaphore object that has only two states. binary_semaphore is an alias for specialization of hpx::counting_semaphore with LeastMaxValue being 1. HPX’s implementation of binary_semaphore is more efficient than the default implementation of a counting semaphore with a unit resource count (hpx::counting_semaphore).
Public Functions
-
binary_semaphore(binary_semaphore const&) = delete#
-
binary_semaphore &operator=(binary_semaphore const&) = delete#
-
binary_semaphore(binary_semaphore&&) = delete#
-
binary_semaphore &operator=(binary_semaphore&&) = delete#
-
explicit binary_semaphore(std::ptrdiff_t value = 1)#
Constructs an object of type hpx::binary_semaphore with the internal counter initialized to value.
- Parameters
value – The initial value of the internal semaphore lock count. Normally this value should be zero (which is the default), values greater than zero are equivalent to the same number of signals pre-set, and negative values are equivalent to the same number of waits pre-set.
-
~binary_semaphore() = default#
-
void release(std::ptrdiff_t update = 1)#
Atomically increments the internal counter by the value of update. Any thread(s) waiting for the counter to be greater than 0, such as due to being blocked in acquire, will subsequently be unblocked.
Note
Synchronization: Strongly happens before invocations of try_acquire that observe the result of the effects.
-
bool try_acquire() noexcept#
Tries to atomically decrement the internal counter by 1 if it is greater than 0; no blocking occurs regardless.
- Returns
true if it decremented the internal counter, otherwise false
-
void acquire()#
Repeatedly performs the following steps, in order:
Evaluates try_acquire. If the result is true, returns.
Blocks on *this until counter is greater than zero.
- Throws
std::system_error –
- Returns
void.
-
bool try_acquire_until(hpx::chrono::steady_time_point const &abs_time)#
Tries to atomically decrement the internal counter by 1 if it is greater than 0; otherwise blocks until it is greater than 0 and can successfully decrement the internal counter, or the abs_time time point has been passed.
- Parameters
abs_time – the earliest time the function must wait until in order to fail
- Throws
std::system_error –
- Returns
true if it decremented the internal counter, otherwise false.
-
bool try_acquire_for(hpx::chrono::steady_duration const &rel_time)#
Tries to atomically decrement the internal counter by 1 if it is greater than 0; otherwise blocks until it is greater than 0 and can successfully decrement the internal counter, or the rel_time duration has been exceeded.
- Throws
std::system_error –
- Parameters
rel_time – the minimum duration the function must wait for to fail
- Returns
true if it decremented the internal counter, otherwise false
-
binary_semaphore(binary_semaphore const&) = delete#
-
class binary_semaphore#
hpx::condition_variable, hpx::condition_variable_any, hpx::cv_status#
Defined in header hpx/condition_variable.hpp.
See Public API for a list of names and headers that are part of the public HPX API.
-
namespace hpx
Enums
-
enum class cv_status#
The scoped enumeration hpx::cv_status describes whether a timed wait returned because of timeout or not. hpx::cv_status is used by the wait_for and wait_until member functions of hpx::condition_variable and hpx::condition_variable_any.
Values:
-
enumerator no_timeout#
The condition variable was awakened with notify_all, notify_one, or spuriously
-
enumerator timeout#
the condition variable was awakened by timeout expiration
-
enumerator error#
there was an error
-
enumerator no_timeout#
-
class condition_variable#
- #include <condition_variable.hpp>
The condition_variable class is a synchronization primitive that can be used to block a thread, or multiple threads at the same time, until another thread both modifies a shared variable (the condition), and notifies the condition_variable.
The thread that intends to modify the shared variable has to
acquire a hpx::mutex (typically via std::lock_guard)
perform the modification while the lock is held
execute notify_one or notify_all on the condition_variable (the lock does not need to be held for notification)
Even if the shared variable is atomic, it must be modified under the mutex in order to correctly publish the modification to the waiting thread. Any thread that intends to wait on condition_variable has to
acquire a std::unique_lock<hpx::mutex>, on the same mutex as used to protect the shared variable
either
check the condition, in case it was already updated and notified
execute wait, await_for, or wait_until. The wait operations atomically release the mutex and suspend the execution of the thread.
When the condition variable is notified, a timeout expires, or a spurious wakeup occurs, the thread is awakened, and the mutex is atomically reacquired. The thread should then check the condition and resume waiting if the wake up was spurious. or
use the predicated overload of wait, wait_for, and wait_until, which takes care of the three steps above.
hpx::condition_variable works only with std::unique_lock<hpx::mutex>. This restriction allows for maximal efficiency on some platforms. hpx::condition_variable_any provides a condition variable that works with any BasicLockable object, such as std::shared_lock.
Condition variables permit concurrent invocation of the wait, wait_for, wait_until, notify_one and notify_all member functions.
The class hpx::condition_variable is a StandardLayoutType. It is not CopyConstructible, MoveConstructible, CopyAssignable, or MoveAssignable.
Public Functions
-
inline condition_variable()#
Construct an object of type hpx::condition_variable.
-
~condition_variable() = default#
Destroys the object of type hpx::condition_variable.
IOW, ~condition_variable() can execute before a signaled thread returns from a wait. If this happens with condition_variable, that waiting thread will attempt to lock the destructed mutex. To fix this, there must be shared ownership of the data members between the condition_variable object and the member functions wait (wait_for, etc.).
Note
Preconditions: There is no thread blocked on *this. [Note: That is, all threads have been notified; they could subsequently block on the lock specified in the wait.This relaxes the usual rules, which would have required all wait calls to happen before destruction. Only the notification to unblock the wait needs to happen before destruction.The user should take care to ensure that no threads wait on *this once the destructor has been started, especially when the waiting threads are calling the wait functions in a loop or using the overloads of wait, wait_for, or wait_until that take a predicate. end note]
-
condition_variable(condition_variable const&) = delete#
-
condition_variable(condition_variable&&) = delete#
-
condition_variable &operator=(condition_variable const&) = delete#
-
condition_variable &operator=(condition_variable&&) = delete#
-
inline void notify_one(error_code &ec = throws) const#
If any threads are waiting on *this, calling notify_one unblocks one of the waiting threads.
- Parameters
ec – Used to hold error code value originated during the operation. Defaults to throws — A special ‘throw on error’ error_code.
- Returns
notify_one returns void.
-
inline void notify_all(error_code &ec = throws) const#
Unblocks all threads currently waiting for *this.
- Parameters
ec – Used to hold error code value originated during the operation. Defaults to throws — A special ‘throw on error’ error_code.
- Returns
notify_all returns void.
-
template<typename Mutex>
inline void wait(std::unique_lock<Mutex> &lock, error_code &ec = throws)# wait causes the current thread to block until the condition variable is notified or a spurious wakeup occurs, optionally looping until some predicate is satisfied (bool(pred())==true).
Atomically unlocks lock, blocks the current executing thread, and adds it to the list of threads waiting on *this. The thread will be unblocked when notify_all() or notify_one() is executed. It may also be unblocked spuriously. When unblocked, regardless of the reason, lock is reacquired and wait exits.
Note
1. Calling this function if lock.mutex() is not locked by the current thread is undefined behavior.
Calling this function if lock.mutex() is not the same mutex as the one used by all other threads that are currently waiting on the same condition variable is undefined behavior.
- Template Parameters
Mutex – Type of mutex to wait on.
- Parameters
lock – unique_lock that must be locked by the current thread
ec – Used to hold error code value originated during the operation. Defaults to throws — A special ‘throw on error’ error_code.
- Returns
wait returns void.
-
template<typename Mutex, typename Predicate>
inline void wait(std::unique_lock<Mutex> &lock, Predicate pred, error_code& = throws)# wait causes the current thread to block until the condition variable is notified or a spurious wakeup occurs, optionally looping until some predicate is satisfied (bool(pred())==true).
Equivalent to
while (!pred()) { wait(lock); }
This overload may be used to ignore spurious awakenings while waiting for a specific condition to become true. Note that lock must be acquired before entering this method, and it is reacquired after wait(lock) exits, which means that lock can be used to guard access to pred().
Note
1. Calling this function if lock.mutex() is not locked by the current thread is undefined behavior.
Calling this function if lock.mutex() is not the same mutex as the one used by all other threads that are currently waiting on the same condition variable is undefined behavior.
- Template Parameters
Mutex – Type of mutex to wait on.
Predicate – Type of predicate pred function.
- Parameters
lock – unique_lock that must be locked by the current thread
pred – Predicate which returns false if the waiting should be continued (bool(pred())==false). The signature of the predicate function should be equivalent to the following:
bool pred();
- Returns
wait returns void.
-
template<typename Mutex>
inline cv_status wait_until(std::unique_lock<Mutex> &lock, hpx::chrono::steady_time_point const &abs_time, error_code &ec = throws)# wait_until causes the current thread to block until the condition variable is notified, a specific time is reached, or a spurious wakeup occurs, optionally looping until some predicate is satisfied (bool(pred())==true).
Atomically releases lock, blocks the current executing thread, and adds it to the list of threads waiting on *this. The thread will be unblocked when notify_all() or notify_one() is executed, or when the absolute time point abs_time is reached. It may also be unblocked spuriously. When unblocked, regardless of the reason, lock is reacquired and wait_until exits.
Note
1. Calling this function if lock.mutex() is not locked by the current thread is undefined behavior.
Calling this function if lock.mutex() is not the same mutex as the one used by all other threads that are currently waiting on the same condition variable is undefined behavior.
- Template Parameters
Mutex – Type of mutex to wait on.
- Parameters
lock – unique_lock that must be locked by the current thread
abs_time – Represents the time when waiting should be stopped
ec – Used to hold error code value originated during the operation. Defaults to throws — A special ‘throw on error’ error_code.
- Returns
cv_status wait_until returns hpx::cv_status::timeout if the absolute timeout specified by abs_time was reached and hpx::cv_status::no_timeout otherwise.
-
template<typename Mutex, typename Predicate>
inline bool wait_until(std::unique_lock<Mutex> &lock, hpx::chrono::steady_time_point const &abs_time, Predicate pred, error_code &ec = throws)# wait_until causes the current thread to block until the condition variable is notified, a specific time is reached, or a spurious wakeup occurs, optionally looping until some predicate is satisfied (bool(pred())==true).
Equivalent to
This overload may be used to ignore spurious wakeups.while (!pred()) { if (wait_until(lock, abs_time) == hpx::cv_status::timeout) { return pred(); } } return true;
Note
1. Calling this function if lock.mutex() is not locked by the current thread is undefined behavior.
Calling this function if lock.mutex() is not the same mutex as the one used by all other threads that are currently waiting on the same condition variable is undefined behavior.
- Template Parameters
Mutex – Type of mutex to wait on.
Predicate – Type of predicate pred function.
- Parameters
lock – unique_lock that must be locked by the current thread
abs_time – Represents the time when waiting should be stopped
pred – Predicate which returns false if the waiting should be continued (bool(pred())==false). The signature of the predicate function should be equivalent to the following:
bool pred();ec – Used to hold error code value originated during the operation. Defaults to throws — A special ‘throw on error’ error_code.
- Returns
bool wait_until returns false if the predicate pred still evaluates to false after the abs_time timeout has expired, otherwise true. If the timeout had already expired, evaluates and returns the result of pred.
-
template<typename Mutex>
inline cv_status wait_for(std::unique_lock<Mutex> &lock, hpx::chrono::steady_duration const &rel_time, error_code &ec = throws)# Atomically releases lock, blocks the current executing thread, and adds it to the list of threads waiting on *this. The thread will be unblocked when notify_all() or notify_one() is executed, or when the relative timeout rel_time expires. It may also be unblocked spuriously. When unblocked, regardless of the reason, lock is reacquired and wait_for() exits.
The standard recommends that a steady clock be used to measure the duration. This function may block for longer than rel_time due to scheduling or resource contention delays.
Note
1. Calling this function if lock.mutex() is not locked by the current thread is undefined behavior.
Calling this function if lock.mutex() is not the same mutex as the one used by all other threads that are currently waiting on the same condition variable is undefined behavior.
Even if notified under lock, this overload makes no guarantees about the state of the associated predicate when returning due to timeout.
- Template Parameters
Mutex – Type of mutex to wait on.
- Parameters
lock – unique_lock that must be locked by the current thread
rel_time – represents the maximum time to spend waiting. Note that rel_time must be small enough not to overflow when added to hpx::chrono::steady_clock::now().
ec – Used to hold error code value originated during the operation. Defaults to throws — A special ‘throw on error’ error_code.
- Returns
cv_status hpx::cv_status::timeout if the relative timeout specified by rel_time expired, hpx::cv_status::no_timeout otherwise.
-
template<typename Mutex, typename Predicate>
inline bool wait_for(std::unique_lock<Mutex> &lock, hpx::chrono::steady_duration const &rel_time, Predicate pred, error_code &ec = throws)# Equivalent to.
This overload may be used to ignore spurious awakenings by looping until some predicate is satisfied (bool(pred())==true).return wait_until(lock, hpx::chrono::steady_clock::now() + rel_time, hpx::move(pred));
The standard recommends that a steady clock be used to measure the duration. This function may block for longer than rel_time due to scheduling or resource contention delays.
Note
1. Calling this function if lock.mutex() is not locked by the current thread is undefined behavior.
Calling this function if lock.mutex() is not the same mutex as the one used by all other threads that are currently waiting on the same condition variable is undefined behavior.
- Template Parameters
Mutex – Type of mutex to wait on.
Predicate – Type of predicate pred function.
- Parameters
lock – unique_lock that must be locked by the current thread
rel_time – represents the maximum time to spend waiting. Note that rel_time must be small enough not to overflow when added to hpx::chrono::steady_clock::now().
pred – Predicate which returns false if the waiting should be continued (bool(pred())==false). The signature of the predicate function should be equivalent to the following:
bool pred();ec – Used to hold error code value originated during the operation. Defaults to throws — A special ‘throw on error’ error_code.
- Returns
bool wait_for returns false if the predicate pred still evaluates to false after the rel_time timeout expired, otherwise true.
Private Types
-
class condition_variable_any#
- #include <condition_variable.hpp>
The condition_variable_any class is a generalization of hpx::condition_variable. Whereas hpx::condition_variable works only on std::unique_lock<std::mutex>, a condition_variable_any can operate on any lock that meets the BasicLockable requirements.
See hpx::condition_variable for the description of the semantics of condition variables. It is not CopyConstructible, MoveConstructible, CopyAssignable, or MoveAssignable.
Public Functions
-
inline condition_variable_any()#
Constructs an object of type hpx::condition_variable_any.
-
~condition_variable_any() = default#
Destroys the object of type hpx::condition_variable_any.
It is only safe to invoke the destructor if all threads have been notified. It is not required that they have exited their respective wait functions: some threads may still be waiting to reacquire the associated lock, or may be waiting to be scheduled to run after reacquiring it.
The programmer must ensure that no threads attempt to wait on *this once the destructor has been started, especially when the waiting threads are calling the wait functions in a loop or are using the overloads of the wait functions that take a predicate.
Preconditions: There is no thread blocked on *this. [Note: That is, all threads have been notified; they could subsequently block on the lock specified in the wait.This relaxes the usual rules, which would have required all wait calls to happen before destruction. Only the notification to unblock the wait needs to happen before destruction. The user should take care to ensure that no threads wait on *this once the destructor has been started, especially when the waiting threads are calling the wait functions in a loop or using the overloads of wait, wait_for, or wait_until that take a predicate. end note]
IOW, ~condition_variable_any() can execute before a signaled thread returns from a wait. If this happens with condition_variable_any, that waiting thread will attempt to lock the destructed mutex. To fix this, there must be shared ownership of the data members between the condition_variable_any object and the member functions wait (wait_for, etc.).
-
condition_variable_any(condition_variable_any const&) = delete#
-
condition_variable_any(condition_variable_any&&) = delete#
-
condition_variable_any &operator=(condition_variable_any const&) = delete#
-
condition_variable_any &operator=(condition_variable_any&&) = delete#
-
inline void notify_one(error_code &ec = throws) const#
If any threads are waiting on *this, calling notify_one unblocks one of the waiting threads.
The notifying thread does not need to hold the lock on the same mutex as the one held by the waiting thread(s); in fact doing so is a pessimization, since the notified thread would immediately block again, waiting for the notifying thread to release the lock. However, some implementations (in particular many implementations of pthreads) recognize this situation and avoid this “hurry up and wait” scenario by transferring the waiting thread from the condition variable’s queue directly to the queue of the mutex within the notify call, without waking it up.
Notifying while under the lock may nevertheless be necessary when precise scheduling of events is required, e.g. if the waiting thread would exit the program if the condition is satisfied, causing destruction of the notifying thread’s condition variable. A spurious wakeup after mutex unlock but before notify would result in notify called on a destroyed object.
Note
The effects of notify_one()/notify_all() and each of the three atomic parts of wait()/wait_for()/wait_until() (unlock+wait wakeup, and lock) take place in a single total order that can be viewed as modification order of an atomic variable: the order is specific to this individual condition variable. This makes it impossible for notify_one() to, for example, be delayed and unblock a thread that started waiting just after the call to notify_one() was made.
- Parameters
ec – Used to hold error code value originated during the operation. Defaults to throws — A special ‘throw on error’ error_code.
- Returns
notify_one returns void.
-
inline void notify_all(error_code &ec = throws) const#
Unblocks all threads currently waiting for *this.
The notifying thread does not need to hold the lock on the same mutex as the one held by the waiting thread(s); in fact doing so is a pessimization, since the notified thread would immediately block again, waiting for the notifying thread to release the lock.
Note
The effects of notify_one()/notify_all() and each of the three atomic parts of wait()/wait_for()/wait_until() (unlock+wait, wakeup, and lock) take place in a single total order that can be viewed as modification order of an atomic variable: the order is specific to this individual condition variable. This makes it impossible for notify_one() to, for example, be delayed and unblock a thread that started waiting just after the call to notify_one() was made.
- Parameters
ec – Used to hold error code value originated during the operation. Defaults to throws — A special ‘throw on error’ error_code.
- Returns
notify_all returns void.
-
template<typename Lock>
inline void wait(Lock &lock, error_code &ec = throws)# wait causes the current thread to block until the condition variable is notified or a spurious wakeup occurs, optionally looping until some predicate is satisfied (bool(pred())==true).
Atomically unlocks lock, blocks the current executing thread, and adds it to the list of threads waiting on *this. The thread will be unblocked when notify_all() or notify_one() is executed. It may also be unblocked spuriously. When unblocked, regardless of the reason, lock is reacquired and wait exits.
The effects of
notify_one()/notify_all()and each of the three atomic parts ofwait()/wait_for()/wait_until()(unlock+wait, wakeup, and lock)take place in a single total order that can be viewed as modification order of an atomic variable: the order is specific to this individual condition variable. This makes it impossible for notify_one() to, for example, be delayed and unblock a thread that started waiting just after the call tonotify_one()was made.Note
If these functions fail to meet the postconditions (lock is locked by the calling thread), std::terminate is called. For example, this could happen if re-locking the mutex throws an exception.
- Template Parameters
Lock – Type of lock.
- Parameters
lock – An object of type Lock that meets the BasicLockable requirements, which must be locked by the current thread
ec – Used to hold error code value originated during the operation. Defaults to throws — A special’throw on error’ error_code.
- Returns
wait returns void.
-
template<typename Lock, typename Predicate>
inline void wait(Lock &lock, Predicate pred, error_code& = throws)# wait causes the current thread to block until the condition variable is notified or a spurious wakeup occurs, optionally looping until some predicate is satisfied (bool(pred())==true).
Equivalent to
while (!pred()) { wait(lock); }
This overload may be used to ignore spurious awakenings while waiting for a specific condition to become true. Note that lock must be acquired before entering this method, and it is reacquired after wait(lock) exits, which means that lock can be used to guard access to pred().
The effects of
notify_one()/notify_all()and each of the three atomic parts ofwait()/wait_for()/wait_until()(unlock+wait, wakeup, and lock)take place in a single total order that can be viewed as modification order of an atomic variable: the order is specific to this individual condition variable. This makes it impossible for notify_one() to, for example, be delayed and unblock a thread that started waiting just after the call tonotify_one()was made.Note
If these functions fail to meet the postconditions (lock is locked by the calling thread), std::terminate is called. For example, this could happen if re-locking the mutex throws an exception.
- Template Parameters
Lock – Type of lock.
Predicate – Type of pred.
- Parameters
lock – an object of type Lock that meets the BasicLockable requirements, which must be locked by the current thread
pred – predicate which returns
falseif the waiting should be continued(bool(pred()) == false). The signature of the predicate function should be equivalent to the following:bool pred().
- Returns
wait returns void.
-
template<typename Lock>
inline cv_status wait_until(Lock &lock, hpx::chrono::steady_time_point const &abs_time, error_code &ec = throws)# wait_until causes the current thread to block until the condition variable is notified, a specific time is reached, or a spurious wakeup occurs, optionally looping until some predicate is satisfied
(bool(pred()) == true).Atomically releases lock, blocks the current executing thread, and adds it to the list of threads waiting on *this. The thread will be unblocked when notify_all() or notify_one() is executed, or when the absolute time point abs_time is reached. It may also be unblocked spuriously. When unblocked, regardless of the reason, lock is reacquired and wait_until exits.
Note
The effects of notify_one()/notify_all() and each of the three atomic parts of wait()/wait_for()/wait_until() (unlock+wait, wakeup, and lock) take place in a single total order that can be viewed as modification order of an atomic variable: the order is specific to this individual condition variable. This makes it impossible for notify_one() to, for example, be delayed and unblock a thread that started waiting just after the call to notify_one() was made.
- Template Parameters
Lock – Type of lock.
- Parameters
lock – an object of type Lock that meets the requirements of BasicLockable, which must be locked by the current thread
abs_time – represents the time when waiting should be stopped.
ec – used to hold error code value originated during the operation. Defaults to throws — A special ‘throw on error’ error_code.
- Returns
cv_status hpx::cv_status::timeout if the absolute timeout specified by abs_time was reached, hpx::cv_status::no_timeout otherwise.
-
template<typename Lock, typename Predicate>
inline bool wait_until(Lock &lock, hpx::chrono::steady_time_point const &abs_time, Predicate pred, error_code &ec = throws)# wait_until causes the current thread to block until the condition variable is notified, a specific time is reached, or a spurious wakeup occurs, optionally looping until some predicate is satisfied
(bool(pred()) == true).Equivalent to
while (!pred()) { if (wait_until(lock, timeout_time) == hpx::cv_status::timeout) { return pred(); } } return true;
This overload may be used to ignore spurious wakeups.
Note
The effects of notify_one()/notify_all() and each of the three atomic parts of wait()/wait_for()/wait_until() (unlock+wait, wakeup, and lock) take place in a single total order that can be viewed as modification order of an atomic variable: the order is specific to this individual condition variable. This makes it impossible for notify_one() to, for example, be delayed and unblock a thread that started waiting just after the call to notify_one() was made.
- Template Parameters
Lock – Type of lock.
Predicate – Type of pred.
- Parameters
lock – an object of type Lock that meets the requirements of BasicLockable, which must be locked by the current thread
abs_time – represents the time when waiting should be stopped.
pred – predicate which returns false if the waiting should be continued
(bool(pred()) == false). The signature of the predicate function should be equivalent to the following:bool pred();.ec – Used to hold error code value originated during the operation. Defaults to throws — A special ‘throw on error’ error_code.
- Returns
bool false if the predicate pred still evaluates to false after the abs_time timeout expired, otherwise true. If the timeout had already expired, evaluates and returns the result of pred.
-
template<typename Lock>
inline cv_status wait_for(Lock &lock, hpx::chrono::steady_duration const &rel_time, error_code &ec = throws)# Atomically releases lock, blocks the current executing thread, and adds it to the list of threads waiting on *this. The thread will be unblocked when notify_all() or notify_one() is executed, or when the relative timeout rel_time expires. It may also be unblocked spuriously. When unblocked, regardless of the reason, lock is reacquired and wait_for() exits.
The effects of notify_one()/notify_all() and each of the three atomic parts of wait()/wait_for()/wait_until() (unlock+wait, wakeup, and lock) take place in a single total order that can be viewed as modification order of an atomic variable: the order is specific to this individual condition variable. This makes it impossible for notify_one() to, for example, be delayed and unblock a thread that started waiting just after the call to notify_one() was made.
Note
Even if notified under lock, this overload makes no guarantees about the state of the associated predicate when returning due to timeout.
- Template Parameters
Lock – Type of lock.
- Parameters
lock – an object of type Lock that meets the BasicLockable requirements, which must be locked by the current thread.
rel_time – an object of type hpx::chrono::duration representing the maximum time to spend waiting. Note that rel_time must be small enough not to overflow when added to hpx::chrono::steady_clock::now().
ec – Used to hold error code value originated during the operation. Defaults to throws — A special ‘throw on error’ error_code.
- Returns
cv_status hpx::cv_status::timeout if the relative timeout specified by rel_time expired, hpx::cv_status::no_timeout otherwise.
-
template<typename Lock, typename Predicate>
inline bool wait_for(Lock &lock, hpx::chrono::steady_duration const &rel_time, Predicate pred, error_code &ec = throws)# Equivalent to.
This overload may be used to ignore spurious awakenings by looping until some predicate is satisfiedreturn wait_until(lock, hpx::chrono::steady_clock::now() + rel_time, std::move(pred));
(bool(pred()) == true).Note
The effects of notify_one()/notify_all() and each of the three atomic parts of wait()/wait_for()/wait_until() (unlock+wait, wakeup, and lock) take place in a single total order that can be viewed as modification order of an atomic variable: the order is specific to this individual condition variable. This makes it impossible for notify_one() to, for example, be delayed and unblock a thread that started waiting just after the call to notify_one() was made.
- Template Parameters
Lock – Type of lock.
Predicate – Type of pred.
- Parameters
lock – an object of type Lock that meets the BasicLockable requirements,which must be locked by the current thread.
rel_time – an object of type hpx::chrono::duration representing the maximum time to spend waiting. Note that rel_time must be small enough not to overflow when added to hpx::chrono::steady_clock::now().
pred – predicate which returns false if the waiting should be continued
(bool(pred()) == false). The signature of the predicate function should be equivalent to the following:bool pred();.ec – Used to hold error code value originated during the operation. Defaults to throws — A special ‘throw on error’ error_code.
- Returns
bool false if the predicate pred still evaluates to false after the rel_time timeout expired, otherwise true.
-
template<typename Lock, typename Predicate>
inline bool wait(Lock &lock, stop_token stoken, Predicate pred, error_code &ec = throws)# wait causes the current thread to block until the condition variable is notified or a spurious wakeup occurs, optionally looping until some predicate is satisfied (bool(pred())==true).
An interruptible wait: registers the condition_variable_any for the duration of wait(), to be notified if a stop request is made on the given stoken’s associated stop-state; it is then equivalent to
Note that the returned value indicates whether pred evaluated to true, regardless of whether there was a stop requested or not.while (!stoken.stop_requested()) { if (pred()) return true; wait(lock); } return pred();
Note
The effects of
notify_one()/notify_all()and each of the three atomic parts ofwait()/wait_for()/wait_until()(unlock+wait, wakeup, and lock)take place in a single total order that can be viewed as modification order of an atomic variable: the order is specific to this individual condition variable. This makes it impossible for notify_one() to, for example, be delayed and unblock a thread that started waiting just after the call tonotify_one()was made.- Template Parameters
Lock – Type of lock.
Predicate – Type of pred.
- Parameters
lock – an object of type Lock that meets the BasicLockable requirements, which must be locked by the current thread
stoken – a hpx::stop_token to register interruption for
pred – predicate which returns
falseif the waiting should be continued(bool(pred()) == false). The signature of the predicate function should be equivalent to the following:bool pred().ec – Used to hold error code value originated during the operation. Defaults to throws — A special ‘throw on error’ error_code.
- Returns
bool result of pred().
-
template<typename Lock, typename Predicate>
inline bool wait_until(Lock &lock, stop_token stoken, hpx::chrono::steady_time_point const &abs_time, Predicate pred, error_code &ec = throws)# wait_until causes the current thread to block until the condition variable is notified, a specific time is reached, or a spurious wakeup occurs, optionally looping until some predicate is satisfied
(bool(pred()) == true).An interruptible wait: registers the condition_variable_any for the duration of wait_until(), to be notified if a stop request is made on the given stoken’s associated stop-state; it is then equivalent to
while (!stoken.stop_requested()) { if (pred()) return true; if (wait_until(lock, timeout_time) == hpx::cv_status::timeout) return pred(); } return pred();
Note
The effects of notify_one()/notify_all() and each of the three atomic parts of wait()/wait_for()/wait_until() (unlock+wait, wakeup, and lock) take place in a single total order that can be viewed as modification order of an atomic variable: the order is specific to this individual condition variable. This makes it impossible for notify_one() to, for example, be delayed and unblock a thread that started waiting just after the call to notify_one() was made.
- Template Parameters
Lock – Type of lock.
Predicate – Type of pred.
- Parameters
lock – an object of type Lock that meets the requirements of BasicLockable, which must be locked by the current thread.
stoken – a hpx::stop_token to register interruption for.
abs_time – represents the time when waiting should be stopped.
pred – predicate which returns false if the waiting should be continued
(bool(pred()) == false). The signature of the predicate function should be equivalent to the following:bool pred();.ec – Used to hold error code value originated during the operation. Defaults to throws — A special ‘throw on error’ error_code.
- Returns
bool pred(), regardless of whether the timeout was met or stop was requested.
-
template<typename Lock, typename Predicate>
inline bool wait_for(Lock &lock, stop_token stoken, hpx::chrono::steady_duration const &rel_time, Predicate pred, error_code &ec = throws)# Equivalent to.
return wait_until(lock, std::move(stoken), hpx::chrono::steady_clock::now() + rel_time, std::move(pred));
Note
The effects of notify_one()/notify_all() and each of the three atomic parts of wait()/wait_for()/wait_until() (unlock+wait, wakeup, and lock) take place in a single total order that can be viewed as modification order of an atomic variable: the order is specific to this individual condition variable. This makes it impossible for notify_one() to, for example, be delayed and unblock a thread that started waiting just after the call to notify_one() was made.
- Template Parameters
Lock – Type of lock.
Predicate – Type of pred.
- Parameters
lock – an object of type Lock that meets the BasicLockable requirements, which must be locked by the current thread.
stoken – a hpx::stop_token to register interruption for.
rel_time – an object of type hpx::chrono::duration representing the maximum time to spend waiting. Note that rel_time must be small enough not to overflow when added to hpx::chrono::steady_clock::now().
pred – predicate which returns false if the waiting should be continued
(bool(pred()) == false). The signature of the predicate function should be equivalent to the following:bool pred();.ec – Used to hold error code value originated during the operation. Defaults to throws — A special ‘throw on error’ error_code.
- Returns
bool pred(), regardless of whether the timeout was met or stop was requested.
Private Types
-
inline condition_variable_any()#
-
enum class cv_status#
hpx::counting_semaphore#
Defined in header hpx/semaphore.hpp.
See Public API for a list of names and headers that are part of the public HPX API.
-
namespace hpx
-
template<std::ptrdiff_t LeastMaxValue = PTRDIFF_MAX>
class counting_semaphore# - #include <counting_semaphore.hpp>
A semaphore is a protected variable (an entity storing a value) or abstract data type (an entity grouping several variables that may or may not be numerical) which constitutes the classic method for restricting access to shared resources, such as shared memory, in a multiprogramming environment. Semaphores exist in many variants, though usually the term refers to a counting semaphore, since a binary semaphore is better known as a mutex. A counting semaphore is a counter for a set of available resources, rather than a locked/unlocked flag of a single resource. It was invented by Edsger Dijkstra. Semaphores are the classic solution to preventing race conditions in the dining philosophers problem, although they do not prevent resource deadlocks.
Counting semaphores can be used for synchronizing multiple threads as well: one thread waiting for several other threads to touch (signal) the semaphore, or several threads waiting for one other thread to touch this semaphore. Unlike hpx::mutex a counting_semaphore is not tied to threads of execution — acquiring a semaphore can occur on a different thread than releasing the semaphore, for example. All operations on counting_semaphore can be performed concurrently and without any relation to specific threads of execution, with the exception of the destructor which cannot be performed concurrently but can be performed on a different thread.
Semaphores are lightweight synchronization primitives used to constrain concurrent access to a shared resource. They are widely used to implement other synchronization primitives and, whenever both are applicable, can be more efficient than condition variables.
A counting semaphore is a semaphore object that models a non-negative resource count.
Class template counting_semaphore maintains an internal counter that is initialized when the semaphore is created. The counter is decremented when a thread acquires the semaphore, and is incremented when a thread releases the semaphore. If a thread tries to acquire the semaphore when the counter is zero, the thread will block until another thread increments the counter by releasing the semaphore.
Specializations of hpx::counting_semaphore are not DefaultConstructible, CopyConstructible, MoveConstructible, CopyAssignable, or MoveAssignable.
Note
counting_semaphore’s try_acquire() can spuriously fail.
- Template Parameters
LeastMaxValue – counting_semaphore allows more than one concurrent access to the same resource, for at least LeastMaxValue concurrent accessors. As its name indicates, the LeastMaxValue is the minimum max value, not the actual max value. Thus max() can yield a number larger than LeastMaxValue.
Public Functions
-
counting_semaphore(counting_semaphore const&) = delete#
-
counting_semaphore &operator=(counting_semaphore const&) = delete#
-
counting_semaphore(counting_semaphore&&) = delete#
-
counting_semaphore &operator=(counting_semaphore&&) = delete#
-
explicit counting_semaphore(std::ptrdiff_t value)#
Constructs an object of type hpx::counting_semaphore with the internal counter initialized to value.
- Parameters
value – The initial value of the internal semaphore lock count. Normally this value should be zero (which is the default), values greater than zero are equivalent to the same number of signals pre-set, and negative values are equivalent to the same number of waits pre-set.
-
~counting_semaphore() = default#
-
void release(std::ptrdiff_t update = 1)#
Atomically increments the internal counter by the value of update. Any thread(s) waiting for the counter to be greater than 0, such as due to being blocked in acquire, will subsequently be unblocked.
Note
Synchronization: Strongly happens before invocations of try_acquire that observe the result of the effects.
-
bool try_acquire() noexcept#
Tries to atomically decrement the internal counter by 1 if it is greater than 0; no blocking occurs regardless.
- Returns
true if it decremented the internal counter, otherwise false
-
void acquire()#
Repeatedly performs the following steps, in order:
Evaluates try_acquire. If the result is true, returns.
Blocks on *this until counter is greater than zero.
- Throws
std::system_error –
- Returns
void.
-
bool try_acquire_until(hpx::chrono::steady_time_point const &abs_time)#
Tries to atomically decrement the internal counter by 1 if it is greater than 0; otherwise blocks until it is greater than 0 and can successfully decrement the internal counter, or the abs_time time point has been passed.
- Parameters
abs_time – the earliest time the function must wait until in order to fail
- Throws
std::system_error –
- Returns
true if it decremented the internal counter, otherwise false.
-
bool try_acquire_for(hpx::chrono::steady_duration const &rel_time)#
Tries to atomically decrement the internal counter by 1 if it is greater than 0; otherwise blocks until it is greater than 0 and can successfully decrement the internal counter, or the rel_time duration has been exceeded.
- Throws
std::system_error –
- Parameters
rel_time – the minimum duration the function must wait for to fail
- Returns
true if it decremented the internal counter, otherwise false
-
template<typename Mutex = hpx::spinlock, int N = 0>
class counting_semaphore_var# - #include <counting_semaphore.hpp>
A semaphore is a protected variable (an entity storing a value) or abstract data type (an entity grouping several variables that may or may not be numerical) which constitutes the classic method for restricting access to shared resources, such as shared memory, in a multiprogramming environment. Semaphores exist in many variants, though usually the term refers to a counting semaphore, since a binary semaphore is better known as a mutex. A counting semaphore is a counter for a set of available resources, rather than a locked/unlocked flag of a single resource. It was invented by Edsger Dijkstra. Semaphores are the classic solution to preventing race conditions in the dining philosophers problem, although they do not prevent resource deadlocks.
Counting semaphores can be used for synchronizing multiple threads as well: one thread waiting for several other threads to touch (signal) the semaphore, or several threads waiting for one other thread to touch this semaphore. Unlike hpx::mutex a counting_semaphore_var is not tied to threads of execution — acquiring a semaphore can occur on a different thread than releasing the semaphore, for example. All operations on counting_semaphore_var can be performed concurrently and without any relation to specific threads of execution, with the exception of the destructor which cannot be performed concurrently but can be performed on a different thread.
Semaphores are lightweight synchronization primitives used to constrain concurrent access to a shared resource. They are widely used to implement other synchronization primitives and, whenever both are applicable, can be more efficient than condition variables.
A counting semaphore is a semaphore object that models a non-negative resource count.
Class template counting_semaphore_var maintains an internal counter that is initialized when the semaphore is created. The counter is decremented when a thread acquires the semaphore, and is incremented when a thread releases the semaphore. If a thread tries to acquire the semaphore when the counter is zero, the thread will block until another thread increments the counter by releasing the semaphore.
Specializations of hpx::counting_semaphore_var are not DefaultConstructible, CopyConstructible, MoveConstructible, CopyAssignable, or MoveAssignable.
Note
counting_semaphore_var’s try_acquire() can spuriously fail.
- Template Parameters
Mutex – Type of mutex
N – The initial value of the internal semaphore lock count.
Public Functions
-
explicit counting_semaphore_var(std::ptrdiff_t value = N)#
Constructs an object of type hpx::counting_semaphore_value with the internal counter initialized to N.
- Parameters
value – The initial value of the internal semaphore lock count. Normally this value should be zero, values greater than zero are equivalent to the same number of signals pre-set, and negative values are equivalent to the same number of waits pre-set. Defaults to N (which in turn defaults to zero).
-
counting_semaphore_var(counting_semaphore_var const&) = delete#
-
counting_semaphore_var &operator=(counting_semaphore_var const&) = delete#
-
void wait(std::ptrdiff_t count = 1)#
Wait for the semaphore to be signaled.
- Parameters
count – The value by which the internal lock count will be decremented. At the same time this is the minimum value of the lock count at which the thread is not yielded.
-
bool try_wait(std::ptrdiff_t count = 1)#
Try to wait for the semaphore to be signaled.
- Parameters
count – The value by which the internal lock count will be decremented. At the same time this is the minimum value of the lock count at which the thread is not yielded.
- Returns
try_wait returns true if the calling thread was able to acquire the requested amount of credits. try_wait returns false if not sufficient credits are available at this point in time.
-
void signal(std::ptrdiff_t count = 1)#
Signal the semaphore.
- Parameters
count – The value by which the internal lock count will be incremented.
-
std::ptrdiff_t signal_all()#
Unblock all acquirers.
- Returns
std::ptrdiff_t internal lock count after the operation.
-
void release(std::ptrdiff_t update = 1)#
Atomically increments the internal counter by the value of update. Any thread(s) waiting for the counter to be greater than 0, such as due to being blocked in acquire, will subsequently be unblocked.
Note
Synchronization: Strongly happens before invocations of try_acquire that observe the result of the effects.
-
bool try_acquire() noexcept#
Tries to atomically decrement the internal counter by 1 if it is greater than 0; no blocking occurs regardless.
- Returns
true if it decremented the internal counter, otherwise false
-
void acquire()#
Repeatedly performs the following steps, in order:
Evaluates try_acquire. If the result is true, returns.
Blocks on *this until counter is greater than zero.
- Throws
std::system_error –
- Returns
void.
-
bool try_acquire_until(hpx::chrono::steady_time_point const &abs_time)#
Tries to atomically decrement the internal counter by 1 if it is greater than 0; otherwise blocks until it is greater than 0 and can successfully decrement the internal counter, or the abs_time time point has been passed.
- Parameters
abs_time – the earliest time the function must wait until in order to fail
- Throws
std::system_error –
- Returns
true if it decremented the internal counter, otherwise false.
-
bool try_acquire_for(hpx::chrono::steady_duration const &rel_time)#
Tries to atomically decrement the internal counter by 1 if it is greater than 0; otherwise blocks until it is greater than 0 and can successfully decrement the internal counter, or the rel_time duration has been exceeded.
- Throws
std::system_error –
- Parameters
rel_time – the minimum duration the function must wait for to fail
- Returns
true if it decremented the internal counter, otherwise false
Public Static Functions
-
template<std::ptrdiff_t LeastMaxValue = PTRDIFF_MAX>
hpx/synchronization/event.hpp#
Defined in header hpx/synchronization/event.hpp.
See Public API for a list of names and headers that are part of the public HPX API.
-
namespace hpx
-
namespace lcos
-
namespace local
-
class event#
- #include <event.hpp>
Event semaphores can be used for synchronizing multiple threads that need to wait for an event to occur. When the event occurs, all threads waiting for the event are woken up.
Public Functions
-
inline event() noexcept#
Construct a new event semaphore.
-
inline bool occurred() const noexcept#
Check if the event has occurred.
-
inline void wait()#
Wait for the event to occur.
-
inline void set()#
Release all threads waiting on this semaphore.
-
inline void reset() noexcept#
Reset the event.
Private Functions
-
inline void wait_locked(std::unique_lock<mutex_type> &l)#
-
inline void set_locked(std::unique_lock<mutex_type> l)#
-
inline event() noexcept#
-
class event#
-
namespace local
-
namespace lcos
hpx::latch#
Defined in header hpx/latch.hpp.
See Public API for a list of names and headers that are part of the public HPX API.
-
namespace hpx
-
class latch#
- #include <latch.hpp>
Latches are a thread coordination mechanism that allow one or more threads to block until an operation is completed. An individual latch is a single-use object; once the operation has been completed, the latch cannot be reused.
Subclassed by hpx::lcos::local::latch
Public Functions
-
inline explicit latch(std::ptrdiff_t count)#
Initialize the latch
Requires: count >= 0. Synchronization: None Postconditions: counter_ == count.
-
~latch() = default#
Requires: No threads are blocked at the synchronization point.
Note
May be called even if some threads have not yet returned from wait() or count_down_and_wait(), provided that counter_ is 0.
Note
The destructor might not return until all threads have exited wait() or count_down_and_wait().
Note
It is the caller’s responsibility to ensure that no other thread enters wait() after one thread has called the destructor. This may require additional coordination.
-
inline void count_down(std::ptrdiff_t update)#
Decrements counter_ by n. Does not block.
Requires: counter_ >= n and n >= 0.
Synchronization: Synchronizes with all calls that block on this latch and with all try_wait calls on this latch that return true .
- Throws
Nothing. –
-
inline bool try_wait() const noexcept#
Returns: With very low probability false. Otherwise, counter == 0.
-
inline void wait() const#
If counter_ is 0, returns immediately. Otherwise, blocks the calling thread at the synchronization point until counter_ reaches 0.
- Throws
Nothing. –
Public Static Functions
- static inline constexpr std::ptrdiff_t() max () noexcept
Returns: The maximum value of counter that the implementation supports.
-
inline explicit latch(std::ptrdiff_t count)#
-
namespace lcos
-
namespace local
-
class latch : public hpx::latch#
- #include <latch.hpp>
A latch maintains an internal counter_ that is initialized when the latch is created. Threads may block at a synchronization point waiting for counter_ to be decremented to 0. When counter_ reaches 0, all such blocked threads are released.
Calls to countdown_and_wait() , count_down() , wait() , is_ready(), count_up() , and reset() behave as atomic operations.
Note
A hpx::latch is not an LCO in the sense that it has no global id, and it can’t be triggered using the action (parcel) mechanism. Use hpx::distributed::latch instead if this is required. It is just a low level synchronization primitive allowing to synchronize a given number of threads.
Public Functions
-
inline explicit latch(std::ptrdiff_t count)#
Initialize the latch
Requires: count >= 0. Synchronization: None Postconditions: counter_ == count.
-
~latch() = default#
Requires: No threads are blocked at the synchronization point.
Note
May be called even if some threads have not yet returned from wait() or count_down_and_wait(), provided that counter_ is 0.
Note
The destructor might not return until all threads have exited wait() or count_down_and_wait().
Note
It is the caller’s responsibility to ensure that no other thread enters wait() after one thread has called the destructor. This may require additional coordination.
-
inline void count_down_and_wait()#
Decrements counter_ by 1 . Blocks at the synchronization point until counter_ reaches 0.
Requires: counter_ > 0.
Synchronization: Synchronizes with all calls that block on this latch and with all is_ready calls on this latch that return true.
- Throws
Nothing. –
-
inline bool is_ready() const noexcept#
Returns: counter_ == 0. Does not block.
- Throws
Nothing. –
-
inline void abort_all() const#
-
inline void count_up(std::ptrdiff_t n)#
Increments counter_ by n. Does not block.
Requires: n >= 0.
- Throws
Nothing. –
-
inline void reset(std::ptrdiff_t n)#
Reset counter_ to n. Does not block.
Requires: n >= 0.
- Throws
Nothing. –
-
inline bool reset_if_needed_and_count_up(std::ptrdiff_t n, std::ptrdiff_t count)#
Effects: Equivalent to: if (is_ready()) reset(count); count_up(n); Returns: true if the latch was reset
-
inline explicit latch(std::ptrdiff_t count)#
-
class latch : public hpx::latch#
-
namespace local
-
class latch#
hpx::mutex, hpx::timed_mutex#
Defined in header hpx/mutex.hpp.
See Public API for a list of names and headers that are part of the public HPX API.
-
namespace hpx
-
class mutex#
- #include <mutex.hpp>
mutex class is a synchronization primitive that can be used to protect shared data from being simultaneously accessed by multiple threads. mutex offers exclusive, non-recursive ownership semantics:
A calling thread owns a mutex from the time that it successfully calls either lock or try_lock until it calls unlock.
When a thread owns a mutex, all other threads will block (for calls to lock) or receive a false return value (for try_lock) if they attempt to claim ownership of the mutex.
A calling thread must not own the mutex prior to calling lock or try_lock.
The behavior of a program is undefined if a mutex is destroyed while still owned by any threads, or a thread terminates while owning a mutex. The mutex class satisfies all requirements of Mutex and StandardLayoutType.
hpx::mutex is neither copyable nor movable.
Subclassed by hpx::timed_mutex
Public Functions
-
mutex(mutex const&) = delete#
hpx::mutex is neither copyable nor movable
-
inline HPX_HOST_DEVICE_CONSTEXPR mutex(char const*const = "") noexcept#
Constructs the mutex. The mutex is in unlocked state after the constructor completes.
Note
Because the default constructor is constexpr, static mutexes are initialized as part of static non-local initialization, before any dynamic non-local initialization begins. This makes it safe to lock a mutex in a constructor of any static object.
- Parameters
description – description of the mutex.
-
~mutex()#
Destroys the mutex. The behavior is undefined if the mutex is owned by any thread or if any thread terminates while holding any ownership of the mutex.
-
void lock(char const *description, error_code &ec = throws)#
Locks the mutex. If another thread has already locked the mutex, a call to lock will block execution until the lock is acquired. If lock is called by a thread that already owns the mutex, the behavior is undefined: for example, the program may deadlock. hpx::mutex can detect the invalid usage and throws a std::system_error with error condition resource_deadlock_would_occur instead of deadlocking. Prior unlock() operations on the same mutex synchronize- with (as defined in std::memory_order) this operation.
Note
lock() is usually not called directly: std::unique_lock, std::scoped_lock, and std::lock_guard are used to manage exclusive locking.
- Parameters
description – Description of the mutex
ec – Used to hold error code value originated during the operation. Defaults to throws — A special ‘throw on error’ error_code.
- Returns
void lock returns void.
-
inline void lock(error_code &ec = throws)#
Locks the mutex. If another thread has already locked the mutex, a call to lock will block execution until the lock is acquired. If lock is called by a thread that already owns the mutex, the behavior is undefined: for example, the program may deadlock. hpx::mutex can detect the invalid usage and throws a std::system_error with error condition resource_deadlock_would_occur instead of deadlocking. Prior unlock() operations on the same mutex synchronize - with(as defined in std::memory_order) this operation.
Note
lock() is usually not called directly: std::unique_lock, std::scoped_lock, and std::lock_guard are used to manage exclusive locking. This overload essentially calls
void lock(char const* description, error_code& ec =throws);with description asmutex::lock.- Parameters
ec – Used to hold error code value originated during the operation. Defaults to throws — A special ‘throw on error’ error_code.
- Returns
void lock returns void.
-
bool try_lock(char const *description, error_code &ec = throws)#
Tries to lock the mutex. Returns immediately. On successful lock acquisition returns true, otherwise returns false. This function is allowed to fail spuriously and return false even if the mutex is not currently locked by any other thread. If try_lock is called by a thread that already owns the mutex, the behavior is undefined. Prior unlock() operation on the same mutex synchronizes-with (as defined in std::memory_order) this operation if it returns true. Note that prior lock() does not synchronize with this operation if it returns false.
- Parameters
description – Description of the mutex
ec – Used to hold error code value originated during the operation. Defaults to throws — A special ‘throw on error’ error_code.
- Returns
bool try_lock returns true on successful lock acquisition, otherwise returns false.
-
inline bool try_lock(error_code &ec = throws)#
Tries to lock the mutex. Returns immediately. On successful lock acquisition returns true, otherwise returns false. This function is allowed to fail spuriously and return false even if the mutex is not currently locked by any other thread. If try_lock is called by a thread that already owns the mutex, the behavior is undefined. Prior unlock() operation on the same mutex synchronizes-with (as defined in std::memory_order) this operation if it returns true. Note that prior lock() does not synchronize with this operation if it returns false.
Note
This overload essentially calls
with description asvoid try_lock(char const* description, error_code& ec = throws);
mutex::try_lock.- Parameters
ec – Used to hold error code value originated during the operation. Defaults to throws — A special ‘throw on error’ error_code.
- Returns
bool try_lock returns true on successful lock acquisition, otherwise returns false.
-
void unlock(error_code &ec = throws)#
Unlocks the mutex. The mutex must be locked by the current thread of execution, otherwise, the behavior is undefined. This operation synchronizes-with (as defined in std::memory_order) any subsequent lock operation that obtains ownership of the same mutex.
- Parameters
ec – Used to hold error code value originated during the operation. Defaults to throws — A special ‘throw on error’ error_code.
- Returns
unlock returns void.
-
class timed_mutex : private hpx::mutex#
- #include <mutex.hpp>
The timed_mutex class is a synchronization primitive that can be used to protect shared data from being simultaneously accessed by multiple threads. In a manner similar to mutex, timed_mutex offers exclusive, non-recursive ownership semantics. In addition, timed_mutex provides the ability to attempt to claim ownership of a timed_mutex with a timeout via the member functions try_lock_for() and try_lock_until(). The timed_mutex class satisfies all requirements of TimedMutex and StandardLayoutType.
hpx::timed_mutex is neither copyable nor movable.
Public Functions
-
timed_mutex(timed_mutex const&) = delete#
hpx::timed_mutex is neither copyable nor movable
-
timed_mutex(timed_mutex&&) = delete#
-
timed_mutex &operator=(timed_mutex const&) = delete#
-
timed_mutex &operator=(timed_mutex&&) = delete#
-
timed_mutex(char const *const description = "")#
Constructs a timed_mutex. The mutex is in unlocked state after the call.
- Parameters
description – Description of the timed_mutex.
-
~timed_mutex()#
Destroys the timed_mutex. The behavior is undefined if the mutex is owned by any thread or if any thread terminates while holding any ownership of the mutex.
-
bool try_lock_until(hpx::chrono::steady_time_point const &abs_time, char const *description, error_code &ec = throws)#
Tries to lock the mutex. Blocks until specified abs_time has been reached or the lock is acquired, whichever comes first. On successful lock acquisition returns true, otherwise returns false. If abs_time has already passed, this function behaves like try_lock(). As with try_lock(), this function is allowed to fail spuriously and return false even if the mutex was not locked by any other thread at some point before abs_time. Prior unlock() operation on the same mutex synchronizes-with (as defined in std::memory_order) this operation if it returns true. If try_lock_until is called by a thread that already owns the mutex, the behavior is undefined.
- Parameters
abs_time – time point to block until
description – Description of the timed_mutex
ec – Used to hold error code value originated during the operation. Defaults to throws — A special ‘throw on error’ error_code.
- Returns
bool try_lock_until returns true if the lock was acquired successfully, otherwise false.
-
inline bool try_lock_until(hpx::chrono::steady_time_point const &abs_time, error_code &ec = throws)#
Tries to lock the mutex. Blocks until specified abs_time has been reached or the lock is acquired, whichever comes first. On successful lock acquisition returns true, otherwise returns false. If abs_time has already passed, this function behaves like try_lock(). As with try_lock(), this function is allowed to fail spuriously and return false even if the mutex was not locked by any other thread at some point before abs_time. Prior unlock() operation on the same mutex synchronizes-with (as defined in std::memory_order) this operation if it returns true. If try_lock_until is called by a thread that already owns the mutex, the behavior is undefined.
Note
This overload essentially calls
with description asbool try_lock_until( hpx::chrono::steady_time_point const& abs_time, char const* description, error_code& ec = throws);
mutex::try_lock_until.- Parameters
abs_time – time point to block until
ec – Used to hold error code value originated during the operation. Defaults to throws — A special ‘throw on error’ error_code.
- Returns
bool try_lock_until returns true if the lock was acquired successfully, otherwise false.
-
inline bool try_lock_for(hpx::chrono::steady_duration const &rel_time, char const *description, error_code &ec = throws)#
Tries to lock the mutex. Blocks until specified rel_time has elapsed or the lock is acquired, whichever comes first. On successful lock acquisition returns true, otherwise returns false. If rel_time is less or equal rel_time.zero(), the function behaves like try_lock(). This function may block for longer than rel_time due to scheduling or resource contention delays. As with try_lock(), this function is allowed to fail spuriously and return false even if the mutex was not locked by any other thread at some point during rel_time. Prior unlock() operation on the same mutex synchronizes-with (as defined in std::memory_order) this operation if it returns true. If try_lock_for is called by a thread that already owns the mutex, the behavior is undefined.
- Parameters
rel_time – minimum duration to block for
description – Description of the timed_mutex
ec – Used to hold error code value originated during the operation. Defaults to throws — A special ‘throw on error’ error_code.
- Returns
bool try_lock_for returns true if the lock was acquired successfully, otherwise false.
-
inline bool try_lock_for(hpx::chrono::steady_duration const &rel_time, error_code &ec = throws)#
Tries to lock the mutex. Blocks until specified rel_time has elapsed or the lock is acquired, whichever comes first. On successful lock acquisition returns true, otherwise returns false. If rel_time is less or equal rel_time.zero(), the function behaves like try_lock(). This function may block for longer than rel_time due to scheduling or resource contention delays. As with try_lock(), this function is allowed to fail spuriously and return false even if the mutex was not locked by any other thread at some point during rel_time. Prior unlock() operation on the same mutex synchronizes-with (as defined in std::memory_order) this operation if it returns true. If try_lock_for is called by a thread that already owns the mutex, the behavior is undefined.
Note
This overload essentially calls
with description asbool try_lock_for( hpx::chrono::steady_duration const& rel_time, char const* description, error_code& ec = throws)
mutex::try_lock_for.- Parameters
rel_time – minimum duration to block for
ec – Used to hold error code value originated during the operation. Defaults to throws — A special ‘throw on error’ error_code.
- Returns
bool try_lock_for returns true if the lock was acquired successfully, otherwise false.
-
void lock(char const *description, error_code &ec = throws)#
Locks the mutex. If another thread has already locked the mutex, a call to lock will block execution until the lock is acquired. If lock is called by a thread that already owns the mutex, the behavior is undefined: for example, the program may deadlock. hpx::mutex can detect the invalid usage and throws a std::system_error with error condition resource_deadlock_would_occur instead of deadlocking. Prior unlock() operations on the same mutex synchronize- with (as defined in std::memory_order) this operation.
Note
lock() is usually not called directly: std::unique_lock, std::scoped_lock, and std::lock_guard are used to manage exclusive locking.
- Parameters
description – Description of the mutex
ec – Used to hold error code value originated during the operation. Defaults to throws — A special ‘throw on error’ error_code.
- Returns
void lock returns void.
-
inline void lock(error_code &ec = throws)#
Locks the mutex. If another thread has already locked the mutex, a call to lock will block execution until the lock is acquired. If lock is called by a thread that already owns the mutex, the behavior is undefined: for example, the program may deadlock. hpx::mutex can detect the invalid usage and throws a std::system_error with error condition resource_deadlock_would_occur instead of deadlocking. Prior unlock() operations on the same mutex synchronize - with(as defined in std::memory_order) this operation.
Note
lock() is usually not called directly: std::unique_lock, std::scoped_lock, and std::lock_guard are used to manage exclusive locking. This overload essentially calls
void lock(char const* description, error_code& ec =throws);with description asmutex::lock.- Parameters
ec – Used to hold error code value originated during the operation. Defaults to throws — A special ‘throw on error’ error_code.
- Returns
void lock returns void.
-
bool try_lock(char const *description, error_code &ec = throws)#
Tries to lock the mutex. Returns immediately. On successful lock acquisition returns true, otherwise returns false. This function is allowed to fail spuriously and return false even if the mutex is not currently locked by any other thread. If try_lock is called by a thread that already owns the mutex, the behavior is undefined. Prior unlock() operation on the same mutex synchronizes-with (as defined in std::memory_order) this operation if it returns true. Note that prior lock() does not synchronize with this operation if it returns false.
- Parameters
description – Description of the mutex
ec – Used to hold error code value originated during the operation. Defaults to throws — A special ‘throw on error’ error_code.
- Returns
bool try_lock returns true on successful lock acquisition, otherwise returns false.
-
inline bool try_lock(error_code &ec = throws)#
Tries to lock the mutex. Returns immediately. On successful lock acquisition returns true, otherwise returns false. This function is allowed to fail spuriously and return false even if the mutex is not currently locked by any other thread. If try_lock is called by a thread that already owns the mutex, the behavior is undefined. Prior unlock() operation on the same mutex synchronizes-with (as defined in std::memory_order) this operation if it returns true. Note that prior lock() does not synchronize with this operation if it returns false.
Note
This overload essentially calls
with description asvoid try_lock(char const* description, error_code& ec = throws);
mutex::try_lock.- Parameters
ec – Used to hold error code value originated during the operation. Defaults to throws — A special ‘throw on error’ error_code.
- Returns
bool try_lock returns true on successful lock acquisition, otherwise returns false.
-
void unlock(error_code &ec = throws)#
Unlocks the mutex. The mutex must be locked by the current thread of execution, otherwise, the behavior is undefined. This operation synchronizes-with (as defined in std::memory_order) any subsequent lock operation that obtains ownership of the same mutex.
- Parameters
ec – Used to hold error code value originated during the operation. Defaults to throws — A special ‘throw on error’ error_code.
- Returns
unlock returns void.
-
timed_mutex(timed_mutex const&) = delete#
-
namespace threads
Typedefs
-
using thread_id_ref_type = thread_id_ref#
-
using thread_self = coroutines::detail::coroutine_self#
Functions
- HPX_CXX_CORE_EXPORT thread_id get_self_id () noexcept
The function get_self_id returns the HPX thread id of the current thread (or zero if the current thread is not a HPX thread).
- HPX_CXX_CORE_EXPORT thread_self * get_self_ptr () noexcept
The function get_self_ptr returns a pointer to the (OS thread specific) self reference to the current HPX thread.
-
using thread_id_ref_type = thread_id_ref#
-
class mutex#
hpx::no_mutex#
Defined in header hpx/mutex.hpp.
See Public API for a list of names and headers that are part of the public HPX API.
hpx::once_flag, hpx::call_once#
Defined in header hpx/mutex.hpp.
See Public API for a list of names and headers that are part of the public HPX API.
-
namespace hpx
Functions
- template<typename F, typename... Args> HPX_CXX_CORE_EXPORT void call_once (once_flag &flag, F &&f, Args &&... args)
Executes the Callable object f exactly once, even if called concurrently, from several threads.
In detail:
If, by the time call_once is called, flag indicates that f was already called, call_once returns right away (such a call to call_once is known as passive).
Otherwise, call_once invokes
std::forward<Callable>(f)with the argumentsstd::forward<Args>(args)… (as if byhpx::invoke). Unlike thehpx::threadconstructor orhpx::async, the arguments are not moved or copied because they don’t need to be transferred to another thread of execution. (such a call to call_once is known as active).If that invocation throws an exception, it is propagated to the caller of call_once, and the flag is not flipped so that another call will be attempted (such a call to call_once is known as exceptional).
If that invocation returns normally (such a call to call_once is known as returning), the flag is flipped, and all other calls to call_once with the same flag are guaranteed to be passive. All active calls on the same flag form a single total order consisting of zero or more exceptional calls, followed by one returning call. The end of each active call synchronizes-with the next active call in that order. The return from the returning call synchronizes-with the returns from all passive calls on the same flag: this means that all concurrent calls to call_once are guaranteed to observe any side-effects made by the active call, with no additional synchronization.
Note
If concurrent calls to call_once pass different functions f, it is unspecified which f will be called. The selected function runs in the same thread as the call_once invocation it was passed to. Initialization of function-local statics is guaranteed to occur only once even when called from multiple threads, and may be more efficient than the equivalent code using
hpx::call_once. The POSIX equivalent of this function is pthread_once.- Parameters
flag – an object, for which exactly one function gets executed
f – Callable object to invoke
args – arguments to pass to the function
- Throws
std::system_error – if any condition prevents calls to call_once from executing as specified or any exception thrown by f
-
struct once_flag#
- #include <once.hpp>
The class
hpx::once_flagis a helper structure forhpx::call_once. An object of typehpx::once_flagthat is passed to multiple calls tohpx::call_onceallows those calls to coordinate with each other such that only one of the calls will actually run to completion.hpx::once_flagis neither copyable nor movable.Public Functions
Friends
-
template<typename F, typename ...Args>
friend void call_once(once_flag &flag, F &&f, Args&&... args)# Executes the Callable object f exactly once, even if called concurrently, from several threads.
In detail:
If, by the time call_once is called, flag indicates that f was already called, call_once returns right away (such a call to call_once is known as passive).
Otherwise, call_once invokes
std::forward<Callable>(f)with the argumentsstd::forward<Args>(args)… (as if byhpx::invoke). Unlike thehpx::threadconstructor orhpx::async, the arguments are not moved or copied because they don’t need to be transferred to another thread of execution. (such a call to call_once is known as active).If that invocation throws an exception, it is propagated to the caller of call_once, and the flag is not flipped so that another call will be attempted (such a call to call_once is known as exceptional).
If that invocation returns normally (such a call to call_once is known as returning), the flag is flipped, and all other calls to call_once with the same flag are guaranteed to be passive. All active calls on the same flag form a single total order consisting of zero or more exceptional calls, followed by one returning call. The end of each active call synchronizes-with the next active call in that order. The return from the returning call synchronizes-with the returns from all passive calls on the same flag: this means that all concurrent calls to call_once are guaranteed to observe any side-effects made by the active call, with no additional synchronization.
Note
If concurrent calls to call_once pass different functions f, it is unspecified which f will be called. The selected function runs in the same thread as the call_once invocation it was passed to. Initialization of function-local statics is guaranteed to occur only once even when called from multiple threads, and may be more efficient than the equivalent code using
hpx::call_once. The POSIX equivalent of this function is pthread_once.- Parameters
flag – an object, for which exactly one function gets executed
f – Callable object to invoke
args – arguments to pass to the function
- Throws
std::system_error – if any condition prevents calls to call_once from executing as specified or any exception thrown by f
-
template<typename F, typename ...Args>
hpx::recursive_mutex#
Defined in header hpx/mutex.hpp.
See Public API for a list of names and headers that are part of the public HPX API.
-
namespace hpx
Typedefs
-
using recursive_mutex = detail::recursive_mutex_impl<>#
-
using recursive_mutex = detail::recursive_mutex_impl<>#
hpx/synchronization/sliding_semaphore.hpp#
Defined in header hpx/synchronization/sliding_semaphore.hpp.
See Public API for a list of names and headers that are part of the public HPX API.
-
namespace hpx
Typedefs
-
using sliding_semaphore = sliding_semaphore_var<>#
-
template<typename Mutex = hpx::spinlock>
class sliding_semaphore_var# - #include <sliding_semaphore.hpp>
A semaphore is a protected variable (an entity storing a value) or abstract data type (an entity grouping several variables that may or may not be numerical) which constitutes the classic method for restricting access to shared resources, such as shared memory, in a multiprogramming environment. Semaphores exist in many variants, though usually the term refers to a counting semaphore, since a binary semaphore is better known as a mutex. A counting semaphore is a counter for a set of available resources, rather than a locked/unlocked flag of a single resource. It was invented by Edsger Dijkstra. Semaphores are the classic solution to preventing race conditions in the dining philosophers problem, although they do not prevent resource deadlocks.
Sliding semaphores can be used for synchronizing multiple threads as well: one thread waiting for several other threads to touch (signal) the semaphore, or several threads waiting for one other thread to touch this semaphore. The difference to a counting semaphore is that a sliding semaphore will not limit the number of threads which are allowed to proceed, but will make sure that the difference between the (arbitrary) number passed to set and wait does not exceed a given threshold.
Public Functions
-
sliding_semaphore_var(sliding_semaphore_var const&) = delete#
-
sliding_semaphore_var &operator=(sliding_semaphore_var const&) = delete#
-
sliding_semaphore_var(sliding_semaphore_var&&) = delete#
-
sliding_semaphore_var &operator=(sliding_semaphore_var&&) = delete#
-
inline explicit sliding_semaphore_var(std::int64_t max_difference, std::int64_t lower_limit = 0) noexcept#
Construct a new sliding semaphore.
-
inline void set_max_difference(std::int64_t max_difference, std::int64_t lower_limit = 0) noexcept#
Set/Change the difference that will cause the semaphore to trigger
-
inline void wait(std::int64_t upper_limit)#
Wait for the semaphore to be signaled.
- Parameters
upper_limit – [in] The new upper limit. The calling thread will be suspended if the difference between this value and the largest lower_limit which was set by signal() is larger than the max_difference.
-
inline bool try_wait(std::int64_t upper_limit = 1)#
Try to wait for the semaphore to be signaled.
- Parameters
upper_limit – [in] The new upper limit. The calling thread will be suspended if the difference between this value and the largest lower_limit which was set by signal() is larger than the max_difference.
- Returns
The function returns true if the calling thread would not block if it was calling wait().
-
inline void signal(std::int64_t lower_limit)#
Signal the semaphore.
- Parameters
lower_limit – [in] The new lower limit. This will update the current lower limit of this semaphore. It will also re-schedule all suspended threads for which their associated upper limit is not larger than the lower limit plus the max_difference.
Private Types
-
using data_type = lcos::local::detail::sliding_semaphore_data<mutex_type>#
-
sliding_semaphore_var(sliding_semaphore_var const&) = delete#
-
using sliding_semaphore = sliding_semaphore_var<>#
hpx::spinlock#
Defined in header hpx/mutex.hpp.
See Public API for a list of names and headers that are part of the public HPX API.
-
namespace hpx
hpx::nostopstate, hpx::stop_callback, hpx::stop_source, hpx::stop_token, hpx::nostopstate_t#
Defined in header hpx/stop_token.hpp.
See Public API for a list of names and headers that are part of the public HPX API.
-
namespace hpx
Functions
-
template<typename Callback>
HPX_CXX_CORE_EXPORT stop_callback(stop_token, Callback) -> stop_callback<Callback># The stop_callback class template provides an RAII object type that registers a callback function for an associated hpx::stop_token object, such that the callback function will be invoked when the hpx::stop_token’s associated hpx::stop_source is requested to stop. Callback functions registered via stop_callback’s constructor are invoked either in the same thread that successfully invokes request_stop() for a hpx::stop_source of the stop_callback’s associated hpx::stop_token; or if stop has already been requested prior to the constructor’s registration, then the callback is invoked in the thread constructing the stop_callback. More than one stop_callback can be created for the same hpx::stop_token, from the same or different threads concurrently. No guarantee is provided for the order in which they will be executed, but they will be invoked synchronously; except for stop_callback(s) constructed after stop has already been requested for the hpx::stop_token, as described previously. If an invocation of a callback exits via an exception then hpx::terminate is called. hpx::stop_callback is not CopyConstructible, CopyAssignable, MoveConstructible, nor MoveAssignable. The template param Callback type must be both invocable and destructible. Any return value is ignored.
- inline HPX_CXX_CORE_EXPORT void swap (stop_token &lhs, stop_token &rhs) noexcept
- inline HPX_CXX_CORE_EXPORT void swap (stop_source &lhs, stop_source &rhs) noexcept
Variables
- constexpr HPX_CXX_CORE_EXPORT nostopstate_t nostopstate = {}
This is a constant object instance of hpx::nostopstate_t for use in constructing an empty hpx::stop_source, as a placeholder value in the non-default constructor.
-
struct nostopstate_t#
- #include <stop_token.hpp>
Unit type intended for use as a placeholder in hpx::stop_source non-default constructor, that makes the constructed hpx::stop_source empty with no associated stop-state.
Public Functions
-
explicit nostopstate_t() = default#
-
explicit nostopstate_t() = default#
-
template<typename Callback>
class stop_callback
-
class stop_source#
- #include <stop_token.hpp>
The stop_source class provides the means to issue a stop request, such as for hpx::jthread cancellation. A stop request made for one stop_source object is visible to all stop_sources and hpx::stop_tokens of the same associated stop-state; any hpx::stop_callback(s) registered for associated hpx::stop_token(s) will be invoked, and any hpx::condition_variable_any objects waiting on associated hpx::stop_token(s) will be awoken. Once a stop is requested, it cannot be withdrawn. Additional stop requests have no effect.
Note
For the purposes of hpx::jthread cancellation the stop_source object should be retrieved from the hpx::jthread object using get_stop_source(); or stop should be requested directly from the hpx::jthread object using request_stop(). This will then use the same associated stop-state as that passed into the hpx::jthread’s invoked function argument (i.e., the function being executed on its thread). For other uses, however, a stop_source can be constructed separately using the default constructor, which creates new stop-state.
Public Functions
-
inline stop_source()#
-
inline explicit stop_source(nostopstate_t) noexcept#
-
inline stop_source(stop_source const &rhs) noexcept#
-
stop_source(stop_source&&) noexcept = default#
-
inline stop_source &operator=(stop_source const &rhs) noexcept#
-
stop_source &operator=(stop_source&&) noexcept = default#
-
inline ~stop_source()#
-
inline void swap(stop_source &s) noexcept#
swaps two stop_source objects
-
inline stop_token get_token() const noexcept#
returns a stop_token for the associated stop-state
-
inline bool stop_possible() const noexcept#
checks whether associated stop-state can be requested to stop
-
inline bool stop_requested() const noexcept#
checks whether the associated stop-state has been requested to stop
-
inline bool request_stop() const noexcept#
makes a stop request for the associated stop-state, if any
Friends
-
inline friend bool operator==(stop_source const &lhs, stop_source const &rhs) noexcept#
-
inline friend bool operator!=(stop_source const &lhs, stop_source const &rhs) noexcept#
-
inline stop_source()#
-
class stop_token#
- #include <stop_token.hpp>
The stop_token class provides the means to check if a stop request has been made or can be made, for its associated hpx::stop_source object. It is essentially a thread-safe “view” of the associated stop-state. The stop_token can also be passed to the constructor of hpx::stop_callback, such that the callback will be invoked if the stop_token’s associated hpx::stop_source is requested to stop. And stop_token can be passed to the interruptible waiting functions of hpx::condition_variable_any, to interrupt the condition variable’s wait if stop is requested.
Note
A stop_token object is not generally constructed independently, but rather retrieved from a hpx::jthread or hpx::stop_source. This makes it share the same associated stop-state as the hpx::jthread or hpx::stop_source.
Public Types
-
template<typename Callback>
using callback_type = stop_callback<Callback>#
Public Functions
-
constexpr stop_token() noexcept = default#
-
stop_token(stop_token const &rhs) = default#
-
stop_token(stop_token&&) noexcept = default#
-
stop_token &operator=(stop_token const &rhs) = default#
-
stop_token &operator=(stop_token&&) noexcept = default#
-
~stop_token() = default#
-
inline void swap(stop_token &s) noexcept#
swaps two stop_token objects
-
inline bool stop_requested() const noexcept#
checks whether the associated stop-state has been requested to stop
-
inline bool stop_possible() const noexcept#
checks whether associated stop-state can be requested to stop
Private Functions
Friends
- friend class stop_callback
- friend class stop_source
- inline friend constexpr friend bool operator== (stop_token const &lhs, stop_token const &rhs) noexcept
- inline friend constexpr friend bool operator!= (stop_token const &lhs, stop_token const &rhs) noexcept
-
template<typename Callback>
-
namespace experimental
-
namespace p2300_stop_token#
Functions
-
template<typename Callback>
HPX_CXX_CORE_EXPORT in_place_stop_callback(in_place_stop_token, Callback) -> in_place_stop_callback<Callback>#
-
template<typename Callback>
class in_place_stop_callback
-
class in_place_stop_source#
Public Functions
-
inline in_place_stop_source() noexcept#
-
inline ~in_place_stop_source()#
-
in_place_stop_source(in_place_stop_source const&) = delete#
-
in_place_stop_source(in_place_stop_source&&) noexcept = delete#
-
in_place_stop_source &operator=(in_place_stop_source const&) = delete#
-
in_place_stop_source &operator=(in_place_stop_source&&) noexcept = delete#
-
inline in_place_stop_token get_token() const noexcept#
-
inline bool request_stop() noexcept#
-
inline bool stop_requested() const noexcept#
-
inline bool stop_possible() const noexcept#
Private Functions
Friends
- friend class in_place_stop_token
- friend class in_place_stop_callback
-
inline in_place_stop_source() noexcept#
-
class in_place_stop_token#
Public Types
-
template<typename Callback>
using callback_type = in_place_stop_callback<Callback>#
Public Functions
-
inline constexpr in_place_stop_token() noexcept#
-
~in_place_stop_token() = default#
-
in_place_stop_token(in_place_stop_token const &rhs) noexcept = default#
-
inline in_place_stop_token(in_place_stop_token &&rhs) noexcept#
-
in_place_stop_token &operator=(in_place_stop_token const &rhs) noexcept = default#
-
inline in_place_stop_token &operator=(in_place_stop_token &&rhs) noexcept#
-
inline bool stop_requested() const noexcept#
-
inline bool stop_possible() const noexcept#
-
inline void swap(in_place_stop_token &rhs) noexcept#
Private Functions
-
inline explicit in_place_stop_token(in_place_stop_source const *source) noexcept#
Private Members
-
in_place_stop_source const *source_#
Friends
- friend class in_place_stop_source
- friend class in_place_stop_callback
- inline friend constexpr friend bool operator== (in_place_stop_token const &lhs, in_place_stop_token const &rhs) noexcept
- inline friend constexpr friend bool operator!= (in_place_stop_token const &lhs, in_place_stop_token const &rhs) noexcept
-
inline friend void swap(in_place_stop_token &x, in_place_stop_token &y) noexcept#
-
template<typename Callback>
-
struct never_stop_token#
Public Types
-
template<typename>
using callback_type = callback_impl#
Public Static Functions
-
static inline constexpr bool stop_requested() noexcept#
-
static inline constexpr bool stop_possible() noexcept#
Friends
- inline friend constexpr friend bool operator== (never_stop_token, never_stop_token) noexcept
- inline friend constexpr friend bool operator!= (never_stop_token, never_stop_token) noexcept
-
struct callback_impl#
Public Functions
-
template<typename Callback>
inline explicit constexpr callback_impl(never_stop_token, Callback&&) noexcept#
-
template<typename Callback>
-
template<typename>
-
template<typename Callback>
-
template<typename Callback>
tag_invoke#
See Public API for a list of names and headers that are part of the public HPX API.
hpx::invoke#
Defined in header hpx/functional.hpp.
See Public API for a list of names and headers that are part of the public HPX API.
-
namespace hpx
Functions
- template<typename F, typename... Ts> constexpr HPX_CXX_CORE_EXPORT util::invoke_result_t< F, Ts &&... > invoke (F &&f, Ts &&... vs) noexcept(noexcept(HPX_INVOKE(HPX_FORWARD(F, f), HPX_FORWARD(Ts, vs)...)))
Invokes the given callable object f with the content of the argument pack vs
Note
This function is similar to
std::invoke(C++17)- Parameters
f – Requires to be a callable object. If f is a member function pointer, the first argument in the pack will be treated as the callee (this object).
vs – An arbitrary pack of arguments
- Throws
std::exception – like objects thrown by call to object f with the argument types vs.
- Returns
The result of the callable object when it’s called with the given argument types.
- template<typename R, typename F, typename... Ts> constexpr HPX_CXX_CORE_EXPORT R invoke_r (F &&f, Ts &&... vs) noexcept(noexcept(HPX_INVOKE(HPX_FORWARD(F, f), HPX_FORWARD(Ts, vs)...)))
- Template Parameters
R – The result type of the function when it’s called with the content of the given argument types vs.
hpx::is_invocable, hpx::is_invocable_r#
Defined in header hpx/type_traits.hpp.
See Public API for a list of names and headers that are part of the public HPX API.
-
namespace hpx
Variables
- template<typename F, typename... Ts> constexpr HPX_CXX_CORE_EXPORT bool is_invocable_v = is_invocable<F, Ts...>::value
- template<typename R, typename F, typename... Ts> constexpr HPX_CXX_CORE_EXPORT bool is_invocable_r_v = is_invocable_r<R, F, Ts...>::value
- template<typename F, typename... Ts> constexpr HPX_CXX_CORE_EXPORT bool is_nothrow_invocable_v = is_nothrow_invocable<F, Ts...>::value
-
template<typename F, typename ...Ts>
struct is_invocable : public hpx::detail::is_invocable_impl<F&&(Ts&&...)># - #include <is_invocable.hpp>
Determines whether F can be invoked with the arguments Ts…. Formally, determines whether
is well-formed when treated as an unevaluated operand, where INVOKE is the operation defined in Callable.INVOKE(std::declval<F>(), std::declval<Ts>()...)
F, R and all types in the parameter pack Ts shall each be a complete type, (possibly cv-qualified) void, or an array of unknown bound. Otherwise, the behavior is undefined. If an instantiation of a template above depends, directly or indirectly, on an incomplete type, and that instantiation could yield a different result if that type were hypothetically completed, the behavior is undefined.
-
template<typename R, typename F, typename ...Ts>
struct is_invocable_r : public hpx::detail::is_invocable_r_impl<F&&(Ts&&...), R># - #include <is_invocable.hpp>
Determines whether F can be invoked with the arguments Ts… to yield a result that is convertible to R and the implicit conversion does not bind a reference to a temporary object (since C++23). If R is cv void, the result can be any type. Formally, determines whether
is well-formed when treated as an unevaluated operand, where INVOKE is the operation defined in Callable. Determines whether F can be invoked with the arguments Ts…. Formally, determines whetherINVOKE<R>(std::declval<F>(), std::declval<Ts>()...)
is well-formed when treated as an unevaluated operand, where INVOKE is the operation defined in Callable.INVOKE(std::declval<F>(), std::declval<Ts>()...)
F, R and all types in the parameter pack Ts shall each be a complete type, (possibly cv-qualified) void, or an array of unknown bound. Otherwise, the behavior is undefined. If an instantiation of a template above depends, directly or indirectly, on an incomplete type, and that instantiation could yield a different result if that type were hypothetically completed, the behavior is undefined.
thread_pool_util#
See Public API for a list of names and headers that are part of the public HPX API.
hpx/thread_pool_util/thread_pool_suspension_helpers.hpp#
Defined in header hpx/thread_pool_util/thread_pool_suspension_helpers.hpp.
See Public API for a list of names and headers that are part of the public HPX API.
-
namespace hpx
-
namespace threads
Functions
- HPX_CXX_CORE_EXPORT hpx::future< void > resume_processing_unit (thread_pool_base &pool, std::size_t virt_core)
Resumes the given processing unit. When the processing unit has been resumed the returned future will be ready.
Note
Can only be called from an HPX thread. Use resume_processing_unit_cb or to resume the processing unit from outside HPX. Requires that the pool has threads::policies::enable_elasticity set.
- Parameters
pool – [in] The thread pool to resume a processing unit on.
virt_core – [in] The processing unit on the pool to be resumed. The processing units are indexed starting from 0.
- Returns
A
future<void>which is ready when the given processing unit has been resumed.
- HPX_CXX_CORE_EXPORT void resume_processing_unit_cb (thread_pool_base &pool, hpx::function< void()> callback, std::size_t virt_core, error_code &ec=throws)
Resumes the given processing unit. Takes a callback as a parameter which will be called when the processing unit has been resumed.
Note
Requires that the pool has threads::policies::enable_elasticity set.
- Parameters
pool – [in] The thread pool to resume a processing unit on.
callback – [in] Callback which is called when the processing unit has been suspended.
virt_core – [in] The processing unit to resume.
ec – [in,out] this represents the error status on exit, if this is pre-initialized to hpx::throws the function will throw on error instead.
- HPX_CXX_CORE_EXPORT hpx::future< void > suspend_processing_unit (thread_pool_base &pool, std::size_t virt_core)
Suspends the given processing unit. When the processing unit has been suspended the returned future will be ready.
Note
Can only be called from an HPX thread. Use suspend_processing_unit_cb or to suspend the processing unit from outside HPX. Requires that the pool has threads::policies::enable_elasticity set.
- Parameters
pool – [in] The thread pool to suspend a processing unit from.
virt_core – [in] The processing unit on the pool to be suspended. The processing units are indexed starting from 0.
- Throws
- Returns
A
future<void>which is ready when the given processing unit has been suspended.
- HPX_CXX_CORE_EXPORT void suspend_processing_unit_cb (hpx::function< void()> callback, thread_pool_base &pool, std::size_t virt_core, error_code &ec=throws)
Suspends the given processing unit. Takes a callback as a parameter which will be called when the processing unit has been suspended.
Note
Requires that the pool has threads::policies::enable_elasticity set.
- Parameters
pool – [in] The thread pool to suspend a processing unit from.
callback – [in] Callback which is called when the processing unit has been suspended.
virt_core – [in] The processing unit to suspend.
ec – [in,out] this represents the error status on exit, if this is pre-initialized to hpx::throws the function will throw on error instead.
- HPX_CXX_CORE_EXPORT hpx::future< void > resume_pool (thread_pool_base &pool)
Resumes the thread pool. When the all OS threads on the thread pool have been resumed the returned future will be ready.
Note
Can only be called from an HPX thread. Use resume_cb or resume_direct to suspend the pool from outside HPX.
- HPX_CXX_CORE_EXPORT void resume_pool_cb (thread_pool_base &pool, hpx::function< void()> callback, error_code &ec=throws)
Resumes the thread pool. Takes a callback as a parameter which will be called when all OS threads on the thread pool have been resumed.
- Parameters
pool – [in] The thread pool to resume.
callback – [in] called when the thread pool has been resumed.
ec – [in,out] this represents the error status on exit, if this is pre-initialized to hpx::throws the function will throw on error instead.
- HPX_CXX_CORE_EXPORT hpx::future< void > suspend_pool (thread_pool_base &pool)
Suspends the thread pool. When the all OS threads on the thread pool have been suspended the returned future will be ready.
Note
Can only be called from an HPX thread. Use suspend_cb or suspend_direct to suspend the pool from outside HPX. A thread pool cannot be suspended from an HPX thread running on the pool itself.
- HPX_CXX_CORE_EXPORT void suspend_pool_cb (thread_pool_base &pool, hpx::function< void()> callback, error_code &ec=throws)
Suspends the thread pool. Takes a callback as a parameter which will be called when all OS threads on the thread pool have been suspended.
Note
A thread pool cannot be suspended from an HPX thread running on the pool itself.
- Parameters
pool – [in] The thread pool to suspend.
callback – [in] called when the thread pool has been suspended.
ec – [in,out] this represents the error status on exit, if this is pre-initialized to hpx::throws the function will throw on error instead.
- Throws
hpx::exception – if called from an HPX thread which is running on the pool itself.
-
namespace threads
thread_support#
See Public API for a list of names and headers that are part of the public HPX API.
hpx::unlock_guard#
Defined in header hpx/mutex.hpp.
See Public API for a list of names and headers that are part of the public HPX API.
-
namespace hpx
-
template<typename Mutex>
class unlock_guard# - #include <unlock_guard.hpp>
The class
unlock_guardis a mutex wrapper that provides a convenient mechanism for releasing a mutex for the duration of a scoped block.unlock_guardperforms the opposite functionality oflock_guard. When alock_guardobject is created, it attempts to take ownership of the mutex it is given. When control leaves the scope in which thelock_guardobject was created, thelock_guardis destructed and the mutex is released. Accordingly, when anunlock_guardobject is created, it attempts to release the ownership of the mutex it is given. So, when control leaves the scope in which theunlock_guardobject was created, theunlock_guardis destructed and the mutex is owned again. In this way, the mutex is unlocked in the constructor and locked in the destructor, so that one can have an unlocked section within a locked one.
-
namespace util
Typedefs
-
using instead = hpx::unlock_guard<Mutex>#
-
using instead = hpx::unlock_guard<Mutex>#
-
template<typename Mutex>
threading#
See Public API for a list of names and headers that are part of the public HPX API.
hpx::jthread#
Defined in header hpx/jthread.hpp.
See Public API for a list of names and headers that are part of the public HPX API.
-
namespace hpx
Functions
- inline HPX_CXX_CORE_EXPORT void swap (jthread &lhs, jthread &rhs) noexcept
-
class jthread#
- #include <jthread.hpp>
The class jthread represents a single thread of execution. It has the same general behavior as hpx::thread, except that jthread automatically rejoins on destruction, and can be cancelled/stopped in certain situations. Threads begin execution immediately upon construction of the associated thread object (pending any OS scheduling delays), starting at the top-level function provided as a constructor argument. The return value of the top-level function is ignored and if it terminates by throwing an exception, hpx::terminate is called. The top-level function may communicate its return value or an exception to the caller via hpx::promise or by modifying shared variables (which may require synchronization, see hpx::mutex and hpx::atomic) Unlike hpx::thread, the jthread logically holds an internal private member of type hpx::stop_source, which maintains a shared stop-state. The jthread constructor accepts a function that takes a hpx::stop_token as its first argument, which will be passed in by the jthread from its internal stop_source. This allows the function to check if stop has been requested during its execution, and return if it has. hpx::jthread objects may also be in the state that does not represent any thread (after default construction, move from, detach, or join), and a thread of execution may be not associated with any jthread objects (after detach). No two hpx::jthread objects may represent the same thread of execution; hpx::jthread is not CopyConstructible or CopyAssignable, although it is MoveConstructible and MoveAssignable.
Public Functions
-
inline jthread() noexcept#
- template<typename F, typename... Ts> requires (!std::same_as< std::decay_t< F >, jthread >) explicit jthread(F &&f
-
inline bool joinable() const noexcept#
checks whether the thread is joinable, i.e. potentially running in parallel context
-
inline void join()#
waits for the thread to finish its execution
-
inline void detach()#
permits the thread to execute independently of the thread handle
-
inline native_handle_type native_handle() const#
returns the underlying implementation-defined thread handle
-
inline stop_source get_stop_source() noexcept#
returns a stop_source object associated with the shared stop state of the thread
-
inline stop_token get_stop_token() const noexcept#
returns a stop_token associated with the shared stop state of the thread
-
inline bool request_stop() const noexcept#
requests execution stop via the shared stop state of the thread
Public Members
-
Ts &&ts#
- Ts thread_ {[](stop_token st, F&& f, Ts&&... ts) -> void {using use_stop_token =typename is_invocable<F, stop_token, Ts...>::type;jthread::invoke(use_stop_token{}, HPX_FORWARD(F, f),HPX_MOVE(st), HPX_FORWARD(Ts, ts)...);},ssource_.get_token(), HPX_FORWARD(F, f),HPX_FORWARD(Ts, ts)...}{}~jthread(){if (joinable()){request_stop(); join();}}jthread(jthread const&) = delete
Public Static Functions
-
static inline unsigned int hardware_concurrency() noexcept#
returns the number of concurrent threads supported by the implementation
Private Static Functions
-
template<typename F, typename ...Ts>
static inline void invoke(std::false_type, F &&f, stop_token&&, Ts&&... ts)#
-
template<typename F, typename ...Ts>
static inline void invoke(std::true_type, F &&f, stop_token &&st, Ts&&... ts)#
-
inline jthread() noexcept#
hpx::thread, hpx::this_thread::yield, hpx::this_thread::get_id, hpx::this_thread::sleep_for, hpx::this_thread::sleep_until#
Defined in header hpx/thread.hpp.
See Public API for a list of names and headers that are part of the public HPX API.
-
namespace hpx
-
Functions
- HPX_CXX_CORE_EXPORT void set_thread_termination_handler (thread_termination_handler_type f)
- inline HPX_CXX_CORE_EXPORT void swap (thread &x, thread &y) noexcept
- inline HPX_CXX_CORE_EXPORT bool operator== (thread::id const &x, thread::id const &y) noexcept
- inline HPX_CXX_CORE_EXPORT bool operator!= (thread::id const &x, thread::id const &y) noexcept
- inline HPX_CXX_CORE_EXPORT bool operator< (thread::id const &x, thread::id const &y) noexcept
- inline HPX_CXX_CORE_EXPORT bool operator> (thread::id const &x, thread::id const &y) noexcept
- inline HPX_CXX_CORE_EXPORT bool operator<= (thread::id const &x, thread::id const &y) noexcept
- inline HPX_CXX_CORE_EXPORT bool operator>= (thread::id const &x, thread::id const &y) noexcept
- template<typename Char, typename Traits> HPX_CXX_CORE_EXPORT std::basic_ostream< Char, Traits > & operator<< (std::basic_ostream< Char, Traits > &out, thread::id const &id)
-
class thread#
- #include <thread.hpp>
The class thread represents a single thread of execution. Threads allow multiple functions to execute concurrently. Threads begin execution immediately upon construction of the associated thread object (pending any OS scheduling delays), starting at the top-level function provided as a constructor argument. The return value of the top-level function is ignored and if it terminates by throwing an exception, hpx::terminate is called. The top-level function may communicate its return value or an exception to the caller via hpx::promise or by modifying shared variables (which may require synchronization, see hpx::mutex and hpx::atomic) hpx::thread objects may also be in the state that does not represent any thread (after default construction, move from, detach, or join), and a thread of execution may not be associated with any thread objects (after detach). No two hpx::thread objects may represent the same thread of execution; hpx::thread is not CopyConstructible or CopyAssignable, although it is MoveConstructible and MoveAssignable.
Public Functions
-
thread() noexcept#
- template<typename F> inline requires (!std::same_as< std::decay_t< F >, thread >) explicit thread(F &&f)
-
template<typename F>
inline thread(threads::thread_pool_base *pool, F &&f)#
-
template<typename F, typename ...Ts>
inline thread(threads::thread_pool_base *pool, F &&f, Ts&&... vs)#
-
~thread()#
-
inline bool joinable() const noexcept#
Checks whether the thread is joinable, i.e. potentially running in parallel context
-
void join()#
waits for the thread to finish its execution
-
inline void detach()#
permits the thread to execute independently of the thread handle
-
inline native_handle_type native_handle() const#
returns the underlying implementation-defined thread handle
-
void interrupt(bool flag = true) const#
-
bool interruption_requested() const#
-
hpx::future<void> get_future(error_code &ec = throws) const#
Public Static Functions
-
static unsigned int hardware_concurrency() noexcept#
returns the number of concurrent threads supported by the implementation
Private Functions
-
void terminate(char const *function, char const *reason) const#
-
inline bool joinable_locked() const noexcept#
-
inline void detach_locked()#
-
void start_thread(threads::thread_pool_base *pool, hpx::move_only_function<void()> &&func)#
Private Static Functions
-
static threads::thread_result_type thread_function_nullary(hpx::move_only_function<void()> const &func)#
-
class id#
Public Functions
-
id() noexcept = default#
-
inline explicit id(threads::thread_id_ref_type const &i) noexcept#
-
inline explicit id(threads::thread_id_ref_type &&i) noexcept#
Friends
- friend class thread
-
id() noexcept = default#
-
thread() noexcept#
-
namespace this_thread
Functions
- HPX_CXX_CORE_EXPORT thread::id get_id () noexcept
Returns the id of the current thread.
- HPX_CXX_CORE_EXPORT void yield () noexcept
Provides a hint to the implementation to reschedule the execution of threads, allowing other threads to run.
Note
The exact behavior of this function depends on the implementation, in particular on the mechanics of the OS scheduler in use and the state of the system. For example, a first-in-first-out realtime scheduler (SCHED_FIFO in Linux) would suspend the current thread and put it on the back of the queue of the same-priority threads that are ready to run (and if there are no other threads at the same priority, yield has no effect).
- HPX_CXX_CORE_EXPORT void yield_to (thread::id) noexcept
- HPX_CXX_CORE_EXPORT threads::thread_priority get_priority () noexcept
- HPX_CXX_CORE_EXPORT std::ptrdiff_t get_stack_size () noexcept
- HPX_CXX_CORE_EXPORT void interruption_point ()
- HPX_CXX_CORE_EXPORT bool interruption_enabled ()
- HPX_CXX_CORE_EXPORT bool interruption_requested ()
- HPX_CXX_CORE_EXPORT void interrupt ()
- HPX_CXX_CORE_EXPORT void sleep_until (hpx::chrono::steady_time_point const &abs_time)
Blocks the execution of the current thread until specified abs_time has been reached.
It is recommended to use the clock tied to abs_time, in which case adjustments of the clock may be taken into account. Thus, the duration of the block might be more or less than
abs_time-Clock::now()at the time of the call, depending on the direction of the adjustment and whether it is honored by the implementation. The function also may block until after abs_time has been reached due to process scheduling or resource contention delays.- Parameters
abs_time – absolute time to block until
- inline HPX_CXX_CORE_EXPORT void sleep_for (hpx::chrono::steady_duration const &rel_time)
Blocks the execution of the current thread for at least the specified rel_time. This function may block for longer than rel_time due to scheduling or resource contention delays.
It is recommended to use a steady clock to measure the duration. If an implementation uses a system clock instead, the wait time may also be sensitive to clock adjustments.
- Parameters
rel_time – time duration to sleep
- HPX_CXX_CORE_EXPORT std::size_t get_thread_data ()
- HPX_CXX_CORE_EXPORT std::size_t set_thread_data (std::size_t)
-
class disable_interruption#
-
Private Functions
-
disable_interruption(disable_interruption const&)#
-
disable_interruption &operator=(disable_interruption const&)#
Private Members
-
bool interruption_was_enabled_#
Friends
- friend class restore_interruption
-
disable_interruption(disable_interruption const&)#
-
class restore_interruption#
-
Private Functions
-
restore_interruption(restore_interruption const&)#
-
restore_interruption &operator=(restore_interruption const&)#
Private Members
-
bool interruption_was_enabled_#
-
restore_interruption(restore_interruption const&)#
threading_base#
See Public API for a list of names and headers that are part of the public HPX API.
hpx::annotated_function#
Defined in header hpx/functional.hpp.
See Public API for a list of names and headers that are part of the public HPX API.
-
namespace hpx
Functions
- template<typename F> constexpr HPX_CXX_CORE_EXPORT F && annotated_function (F &&f, char const *=nullptr) noexcept
Returns a function annotated with the given annotation.
Annotating includes setting the thread description per thread id.
- Parameters
f – Function to annotate
- template<typename F> constexpr HPX_CXX_CORE_EXPORT F && annotated_function (F &&f, std::string const &) noexcept
hpx/threading_base/print.hpp#
Defined in header hpx/threading_base/print.hpp.
See Public API for a list of names and headers that are part of the public HPX API.
hpx/threading_base/register_thread.hpp#
Defined in header hpx/threading_base/register_thread.hpp.
See Public API for a list of names and headers that are part of the public HPX API.
-
namespace hpx
-
namespace threads
Functions
- template<typename F> HPX_CXX_CORE_EXPORT thread_function_type make_thread_function (F &&f)
- template<typename F, typename... Ts> HPX_CXX_CORE_EXPORT thread_function_type make_thread_function_nullary (F &&f, Ts &&... ts)
- HPX_CXX_CORE_EXPORT void register_thread (threads::thread_init_data &data, threads::thread_pool_base *pool, threads::thread_id_ref_type &id, error_code &ec=hpx::throws)
Create a new thread using the given data.
Note
As long as ec is not pre-initialized to hpx::throws this function doesn’t throw but returns the result code using the parameter ec. Otherwise, it throws an instance of hpx::exception.
- Parameters
data – [in] The data to use for creating the thread.
pool – [in] The thread pool to use for launching the work.
id – [out] The id of the newly created thread (if applicable)
ec – [in,out] This represents the error status on exit, if this is pre-initialized to hpx::throws the function will throw on error instead.
- Throws
invalid_status – if the runtime system has not been started yet.
- Returns
This function will return the internal id of the newly created HPX-thread.
- HPX_CXX_CORE_EXPORT threads::thread_id_ref_type register_thread (threads::thread_init_data &data, threads::thread_pool_base *pool, error_code &ec=hpx::throws)
- HPX_CXX_CORE_EXPORT void register_thread (threads::thread_init_data &data, threads::thread_id_ref_type &id, error_code &ec=throws)
Create a new thread using the given data on the same thread pool as the calling thread, or on the default thread pool if not on an HPX thread.
Note
As long as ec is not pre-initialized to hpx::throws this function doesn’t throw but returns the result code using the parameter ec. Otherwise, it throws an instance of hpx::exception.
- Parameters
data – [in] The data to use for creating the thread.
id – [out] The id of the newly created thread (if applicable)
ec – [in,out] This represents the error status on exit, if this is pre-initialized to hpx::throws the function will throw on error instead.
- Throws
invalid_status – if the runtime system has not been started yet.
- Returns
This function will return the internal id of the newly created HPX-thread.
- HPX_CXX_CORE_EXPORT threads::thread_id_ref_type register_thread (threads::thread_init_data &data, error_code &ec=throws)
- HPX_CXX_CORE_EXPORT thread_id_ref_type register_work (threads::thread_init_data &data, threads::thread_pool_base *pool, error_code &ec=hpx::throws)
Create a new work item using the given data.
Note
As long as ec is not pre-initialized to hpx::throws this function doesn’t throw but returns the result code using the parameter ec. Otherwise, it throws an instance of hpx::exception.
- Parameters
data – [in] The data to use for creating the thread.
pool – [in] The thread pool to use for launching the work.
ec – [in,out] This represents the error status on exit, if this is pre-initialized to hpx::throws the function will throw on error instead.
- Throws
invalid_status – if the runtime system has not been started yet.
- HPX_CXX_CORE_EXPORT thread_id_ref_type register_work (threads::thread_init_data &data, error_code &ec=throws)
Create a new work item using the given data on the same thread pool as the calling thread, or on the default thread pool if not on an HPX thread.
Note
As long as ec is not pre-initialized to hpx::throws this function doesn’t throw but returns the result code using the parameter ec. Otherwise, it throws an instance of hpx::exception.
- Parameters
data – [in] The data to use for creating the thread.
ec – [in,out] This represents the error status on exit, if this is pre-initialized to hpx::throws the function will throw on error instead.
- Throws
invalid_status – if the runtime system has not been started yet.
-
namespace threads
hpx::scoped_annotation#
Defined in header hpx/functional.hpp.
See Public API for a list of names and headers that are part of the public HPX API.
-
namespace hpx
-
struct scoped_annotation#
- #include <scoped_annotation.hpp>
scoped_annotation associates a
namewith a section of code (scope). It can be used to visualize code execution in profiling tools like Intel VTune, Apex Profiler, etc. That allows analyzing performance to figure out which part(s) of code is (are) responsible for performance degradation, etc.Public Functions
-
scoped_annotation(scoped_annotation const&) = delete#
-
scoped_annotation(scoped_annotation&&) = delete#
-
scoped_annotation &operator=(scoped_annotation const&) = delete#
-
scoped_annotation &operator=(scoped_annotation&&) = delete#
-
inline explicit constexpr scoped_annotation(char const*) noexcept#
-
inline ~scoped_annotation()#
-
scoped_annotation(scoped_annotation const&) = delete#
-
struct scoped_annotation#
hpx/threading_base/thread_data.hpp#
Defined in header hpx/threading_base/thread_data.hpp.
See Public API for a list of names and headers that are part of the public HPX API.
-
namespace hpx
-
namespace threads
Functions
- constexpr HPX_CXX_CORE_EXPORT thread_data * get_thread_id_data (thread_id_ref_type const &tid) noexcept
- constexpr HPX_CXX_CORE_EXPORT thread_data * get_thread_id_data (thread_id_type const &tid) noexcept
-
class thread_data : public thread_data_reference_counting#
- #include <thread_data.hpp>
A thread is the representation of a HPX thread. It’s a first class object in HPX. In our implementation this is a user level thread running on top of one of the OS threads spawned by the thread-manager.
A thread encapsulates:
A thread status word (see the functions thread::get_state and thread::set_state)
A function to execute (the thread function)
A frame (in this implementation this is a block of memory used as the threads stack)
A block of registers (not implemented yet)
Generally, threads are not created or executed directly. All functionality related to the management of threads is implemented by the thread-manager.
Public Types
-
using spinlock_pool = util::spinlock_pool<thread_data>#
Public Functions
-
thread_data(thread_data const&) = delete#
-
thread_data(thread_data&&) = delete#
-
thread_data &operator=(thread_data const&) = delete#
-
thread_data &operator=(thread_data&&) = delete#
-
inline thread_state get_state(std::memory_order const order = std::memory_order_acquire) const noexcept#
The get_state function queries the state of this thread instance.
Note
This function will seldom be used directly. Most of the time the state of a thread will be retrieved by using the function threadmanager::get_state.
- Returns
This function returns the current state of this thread. It will return one of the values as defined by the thread_state enumeration.
-
inline thread_state set_state(thread_schedule_state const state, thread_restart_state state_ex = thread_restart_state::unknown, std::memory_order const load_order = std::memory_order_acquire, std::memory_order const exchange_order = std::memory_order_acq_rel) const noexcept#
The set_state function changes the state of this thread instance.
Note
This function will seldom be used directly. Most of the time the state of a thread will have to be changed using the thread-manager. Moreover, changing the thread state using this function does not change its scheduling status. It only sets the thread’s status word. To change the thread’s scheduling status threadmanager::set_state should be used.
- Parameters
state – [in] The new state to be set for the thread.
state_ex – [in]
load_order – [in]
exchange_order – [in]
-
inline bool set_state_tagged(thread_schedule_state const newstate, thread_state const &prev_state, thread_state &new_tagged_state, std::memory_order exchange_order = std::memory_order_acq_rel) const noexcept#
-
inline bool restore_state(thread_state const new_state, thread_state const old_state, std::memory_order const load_order = std::memory_order_relaxed, std::memory_order const load_exchange = std::memory_order_acq_rel) const noexcept#
The restore_state function changes the state of this thread instance depending on its current state. It will change the state atomically only if the current state is still the same as passed as the second parameter. Otherwise, it won’t touch the thread state of this instance.
Note
This function will seldom be used directly. Most of the time the state of a thread will have to be changed using the threadmanager. Moreover, changing the thread state using this function does not change its scheduling status. It only sets the thread’s status word. To change the thread’s scheduling status threadmanager::set_state should be used.
- Parameters
new_state – [in] The new state to be set for the thread.
old_state – [in] The old state of the thread which still has to be the current state.
load_order – [in]
load_exchange – [in]
- Returns
This function returns true if the state has been changed successfully
-
inline bool restore_state(thread_schedule_state new_state, thread_restart_state const state_ex, thread_state old_state, std::memory_order const load_exchange = std::memory_order_acq_rel) const noexcept#
-
inline constexpr thread_priority get_priority() const noexcept#
-
inline void set_priority(thread_priority priority) noexcept#
-
inline constexpr bool interruption_requested() const noexcept#
-
inline constexpr bool interruption_enabled() const noexcept#
-
inline bool set_interruption_enabled(bool enable) noexcept#
-
inline void interrupt(bool const flag = true)#
-
bool interruption_point(bool throw_on_interrupt = true)#
-
void run_thread_exit_callbacks()#
-
void free_thread_exit_callbacks()#
-
inline constexpr bool is_stackless() const noexcept#
-
void destroy_thread() override#
-
inline thread_stacksize get_stack_size_enum() const noexcept#
-
template<typename ThreadQueue>
inline constexpr ThreadQueue &get_queue() noexcept#
-
inline coroutine_type::result_type operator()(hpx::execution_base::this_thread::detail::agent_storage *agent_storage)#
Execute the thread function.
- Returns
This function returns the thread state the thread should be scheduled from this point on. The thread manager will use the returned value to set the thread’s scheduling status.
-
inline coroutine_type::result_type invoke_directly()#
Directly execute the thread function (inline)
- Returns
This function returns the thread state the thread should be scheduled from this point on. The thread manager will use the returned value to set the thread’s scheduling status.
-
inline virtual thread_id_type get_thread_id() const#
-
virtual void init() = 0#
-
virtual void rebind(thread_init_data &init_data) = 0#
-
thread_data(thread_init_data &init_data, void *queue, std::ptrdiff_t stacksize, bool is_stackless = false, thread_id_addref addref = thread_id_addref::yes)#
-
~thread_data() override#
-
virtual void destroy() noexcept = 0#
Public Static Functions
-
static inline constexpr std::uint64_t get_component_id() noexcept#
Return the id of the component this thread is running in.
-
static inline constexpr threads::thread_description get_description() noexcept#
-
static inline constexpr threads::thread_description set_description(threads::thread_description) noexcept#
-
static inline constexpr threads::thread_description get_lco_description() noexcept#
-
static inline constexpr threads::thread_description set_lco_description(threads::thread_description) noexcept#
-
static inline constexpr std::uint32_t get_parent_locality_id() noexcept#
Return the locality of the parent thread.
-
static inline constexpr thread_id_type get_parent_thread_id() noexcept#
Return the thread id of the parent thread.
Protected Functions
-
inline thread_restart_state set_state_ex(thread_restart_state const new_state, std::memory_order const load_order = std::memory_order_acquire, std::memory_order const load_exchange = std::memory_order_acq_rel) const noexcept#
The set_state function changes the extended state of this thread instance.
Note
This function will seldom be used directly. Most of the time the state of a thread will have to be changed using the threadmanager.
- Parameters
new_state – [in] The new extended state to be set for the thread.
load_order – [in]
load_exchange – [in]
-
void rebind_base(thread_init_data &init_data)#
Private Members
-
thread_priority priority_#
-
bool requested_interrupt_#
-
bool enabled_interrupt_#
-
bool ran_exit_funcs_#
-
const bool is_stackless_#
-
thread_stacksize stacksize_enum_#
-
void *queue_#
-
namespace threads
hpx/threading_base/thread_description.hpp#
Defined in header hpx/threading_base/thread_description.hpp.
See Public API for a list of names and headers that are part of the public HPX API.
-
namespace hpx
-
namespace threads
Functions
- HPX_CXX_CORE_EXPORT std::ostream & operator<< (std::ostream &, thread_description const &)
- HPX_CXX_CORE_EXPORT std::string as_string (thread_description const &desc)
- HPX_CXX_CORE_EXPORT threads::thread_description get_thread_description (thread_id_type const &id, error_code &ec=throws)
The function get_thread_description is part of the thread related API allows to query the description of one of the threads known to the thread-manager.
Note
As long as ec is not pre-initialized to hpx::throws this function doesn’t throw but returns the result code using the parameter ec. Otherwise it throws an instance of hpx::exception.
- Parameters
id – [in] The thread id of the thread being queried.
ec – [in,out] this represents the error status on exit, if this is pre-initialized to hpx::throws the function will throw on error instead.
- Returns
This function returns the description of the thread referenced by the id parameter. If the thread is not known to the thread-manager the return value will be the string “<unknown>”.
- HPX_CXX_CORE_EXPORT threads::thread_description set_thread_description (thread_id_type const &id, threads::thread_description const &desc=threads::thread_description(), error_code &ec=throws)
- HPX_CXX_CORE_EXPORT threads::thread_description get_thread_lco_description (thread_id_type const &id, error_code &ec=throws)
- HPX_CXX_CORE_EXPORT threads::thread_description set_thread_lco_description (thread_id_type const &id, threads::thread_description const &desc=threads::thread_description(), error_code &ec=throws)
-
struct thread_description#
Public Types
Public Functions
-
thread_description() noexcept = default#
-
inline constexpr thread_description(char const*) noexcept#
-
template<typename F, typename = std::enable_if_t<!std::is_same_v<F, thread_description> && !traits::is_action_v<F>>>
inline explicit constexpr thread_description(F const&, char const* = nullptr) noexcept#
-
template<typename Action, typename = std::enable_if_t<traits::is_action_v<Action>>>
inline explicit constexpr thread_description(Action, char const* = nullptr) noexcept#
-
inline explicit constexpr operator bool() const noexcept#
Public Static Functions
-
static inline constexpr char const *get_description() noexcept#
-
static inline constexpr bool valid() noexcept#
Private Functions
-
void init_from_alternative_name(char const *altname)#
-
thread_description() noexcept = default#
-
namespace util
Typedefs
-
using instead = hpx::threads::thread_description
-
using instead = hpx::threads::thread_description
-
namespace threads
hpx/threading_base/thread_helpers.hpp#
Defined in header hpx/threading_base/thread_helpers.hpp.
See Public API for a list of names and headers that are part of the public HPX API.
-
namespace hpx
-
namespace this_thread
Functions
- HPX_CXX_CORE_EXPORT threads::thread_restart_state suspend (threads::thread_schedule_state state, threads::thread_id_type nextid, threads::thread_description const &description=threads::thread_description("this_thread::suspend"), hpx::error_code &ec=hpx::throws)
The function suspend will return control to the thread manager (suspends the current thread). It sets the new state of this thread to the thread state passed as the parameter.
Note
Must be called from within a HPX-thread.
- Throws
If –
&ec != &throws, never throws, but will set ec to an appropriate value when an error occurs. Otherwise, this function will throw an hpx::exception with an error code of hpx::error::yield_aborted if it is signaled with wait_aborted. If called outside a HPX-thread, this function will throw an hpx::exception with an error code of hpx::error::null_thread_id. If this function is called while the thread-manager is not running, it will throw an hpx::exception with an error code of hpx::error::invalid_status.
- inline HPX_CXX_CORE_EXPORT threads::thread_restart_state suspend (threads::thread_schedule_state state=threads::thread_schedule_state::pending, threads::thread_description const &description=threads::thread_description("this_thread::suspend"), hpx::error_code &ec=hpx::throws)
The function suspend will return control to the thread manager (suspends the current thread). It sets the new state of this thread to the thread state passed as the parameter.
Note
Must be called from within a HPX-thread.
- Throws
If –
&ec != &throws, never throws, but will set ec to an appropriate value when an error occurs. Otherwise, this function will throw an hpx::exception with an error code of hpx::error::yield_aborted if it is signaled with wait_aborted. If called outside a HPX-thread, this function will throw an hpx::exception with an error code of hpx::error::null_thread_id. If this function is called while the thread-manager is not running, it will throw an hpx::exception with an error code of hpx::error::invalid_status.
- HPX_CXX_CORE_EXPORT threads::thread_restart_state suspend (hpx::chrono::steady_time_point const &abs_time, threads::thread_id_type id, threads::thread_description const &description=threads::thread_description("this_thread::suspend"), hpx::error_code &ec=hpx::throws)
The function suspend will return control to the thread manager (suspends the current thread). It sets the new state of this thread to suspended and schedules a wakeup for this threads at the given time.
Note
Must be called from within a HPX-thread.
- Throws
If –
&ec != &throws, never throws, but will set ec to an appropriate value when an error occurs. Otherwise, this function will throw an hpx::exception with an error code of hpx::error::yield_aborted if it is signaled with wait_aborted. If called outside a HPX-thread, this function will throw an hpx::exception with an error code of hpx::error::null_thread_id. If this function is called while the thread-manager is not running, it will throw an hpx::exception with an error code of hpx::error::invalid_status.
- inline HPX_CXX_CORE_EXPORT threads::thread_restart_state suspend (hpx::chrono::steady_time_point const &abs_time, threads::thread_description const &description=threads::thread_description("this_thread::suspend"), hpx::error_code &ec=hpx::throws)
The function suspend will return control to the thread manager (suspends the current thread). It sets the new state of this thread to suspended and schedules a wakeup for this threads at the given time.
Note
Must be called from within a HPX-thread.
- Throws
If –
&ec != &throws, never throws, but will set ec to an appropriate value when an error occurs. Otherwise, this function will throw an hpx::exception with an error code of hpx::error::yield_aborted if it is signaled with wait_aborted. If called outside a HPX-thread, this function will throw an hpx::exception with an error code of hpx::error::null_thread_id. If this function is called while the thread-manager is not running, it will throw an hpx::exception with an error code of hpx::error::invalid_status.
- inline HPX_CXX_CORE_EXPORT threads::thread_restart_state suspend (hpx::chrono::steady_duration const &rel_time, threads::thread_description const &description=threads::thread_description("this_thread::suspend"), hpx::error_code &ec=hpx::throws)
The function suspend will return control to the thread manager (suspends the current thread). It sets the new state of this thread to suspended and schedules a wakeup for this threads after the given duration.
Note
Must be called from within a HPX-thread.
- Throws
If –
&ec != &throws, never throws, but will set ec to an appropriate value when an error occurs. Otherwise, this function will throw an hpx::exception with an error code of hpx::error::yield_aborted if it is signaled with wait_aborted. If called outside a HPX-thread, this function will throw an hpx::exception with an error code of hpx::error::null_thread_id. If this function is called while the thread-manager is not running, it will throw an hpx::exception with an error code of hpx::error::invalid_status.
- inline HPX_CXX_CORE_EXPORT threads::thread_restart_state suspend (hpx::chrono::steady_duration const &rel_time, threads::thread_id_type const &id, threads::thread_description const &description=threads::thread_description("this_thread::suspend"), hpx::error_code &ec=hpx::throws)
The function suspend will return control to the thread manager (suspends the current thread). It sets the new state of this thread to suspended and schedules a wakeup for this threads after the given duration.
Note
Must be called from within a HPX-thread.
- Throws
If –
&ec != &throws, never throws, but will set ec to an appropriate value when an error occurs. Otherwise, this function will throw an hpx::exception with an error code of hpx::error::yield_aborted if it is signaled with wait_aborted. If called outside a HPX-thread, this function will throw an hpx::exception with an error code of hpx::error::null_thread_id. If this function is called while the thread-manager is not running, it will throw an hpx::exception with an error code of hpx::error::invalid_status.
- inline HPX_CXX_CORE_EXPORT threads::thread_restart_state suspend (std::uint64_t ms, threads::thread_description const &description=threads::thread_description("this_thread::suspend"), hpx::error_code &ec=hpx::throws)
The function suspend will return control to the thread manager (suspends the current thread). It sets the new state of this thread to suspended and schedules a wakeup for this threads after the given time (specified in milliseconds).
Note
Must be called from within a HPX-thread.
- Throws
If –
&ec != &throws, never throws, but will set ec to an appropriate value when an error occurs. Otherwise, this function will throw an hpx::exception with an error code of hpx::error::yield_aborted if it is signaled with wait_aborted. If called outside a HPX-thread, this function will throw an hpx::exception with an error code of hpx::error::null_thread_id. If this function is called while the thread-manager is not running, it will throw an hpx::exception with an error code of hpx::error::invalid_status.
- HPX_CXX_CORE_EXPORT threads::thread_pool_base * get_pool (hpx::error_code &ec=hpx::throws)
Returns a pointer to the pool that was used to run the current thread
- Throws
If –
&ec != &throws, never throws, but will set ec to an appropriate value when an error occurs. Otherwise, this function will throw an hpx::exception with an error code of hpx::error::yield_aborted if it is signaled with wait_aborted. If called outside a HPX-thread, this function will throw an hpx::exception with an error code of hpx::error::null_thread_id. If this function is called while the thread-manager is not running, it will throw an hpx::exception with an error code of hpx::error::invalid_status.
-
namespace threads
Functions
- HPX_CXX_CORE_EXPORT thread_state set_thread_state (thread_id_type const &id, thread_schedule_state state=thread_schedule_state::pending, thread_restart_state stateex=thread_restart_state::signaled, thread_priority priority=thread_priority::normal, bool retry_on_active=true, hpx::error_code &ec=hpx::throws)
Set the thread state of the thread referenced by the thread_id id.
Note
If the thread referenced by the parameter id is in thread_state::active state this function schedules a new thread which will set the state of the thread as soon as it is not active anymore. The function returns thread_state::active in this case.
Note
As long as ec is not pre-initialized to hpx::throws this function doesn’t throw but returns the result code using the parameter ec. Otherwise, it throws an instance of hpx::exception.
- Parameters
id – [in] The thread id of the thread the state should be modified for.
state – [in] The new state to be set for the thread referenced by the id parameter.
stateex – [in] The new extended state to be set for the thread referenced by the id parameter.
priority – [in]
retry_on_active – [in]
ec – [in,out] this represents the error status on exit, if this is pre-initialized to hpx::throws the function will throw on error instead.
- Returns
This function returns the previous state of the thread referenced by the id parameter. It will return one of the values as defined by the thread_state enumeration. If the thread is not known to the thread-manager the return value will be thread_state::unknown.
- HPX_CXX_CORE_EXPORT thread_id_ref_type set_thread_state (thread_id_type const &id, hpx::chrono::steady_time_point const &abs_time, std::atomic< bool > *started, thread_schedule_state state=thread_schedule_state::pending, thread_restart_state stateex=thread_restart_state::timeout, thread_priority priority=thread_priority::normal, bool retry_on_active=true, hpx::error_code &ec=hpx::throws)
Set the thread state of the thread referenced by the thread_id id.
Set a timer to set the state of the given thread to the given new value after it expired (at the given time)
Note
As long as ec is not pre-initialized to hpx::throws this function doesn’t throw but returns the result code using the parameter ec. Otherwise, it throws an instance of hpx::exception.
- Parameters
id – [in] The thread id of the thread the state should be modified for.
abs_time – [in] Absolute point in time for the new thread to be run
started – [in,out] A helper variable allowing to track the state of the timer helper thread
state – [in] The new state to be set for the thread referenced by the id parameter.
stateex – [in] The new extended state to be set for the thread referenced by the id parameter.
priority – [in]
retry_on_active – [in]
ec – [in,out] this represents the error status on exit, if this is pre-initialized to hpx::throws the function will throw on error instead.
- Returns
- inline HPX_CXX_CORE_EXPORT thread_id_ref_type set_thread_state (thread_id_type const &id, hpx::chrono::steady_time_point const &abs_time, thread_schedule_state state=thread_schedule_state::pending, thread_restart_state stateex=thread_restart_state::timeout, thread_priority priority=thread_priority::normal, bool retry_on_active=true, hpx::error_code &=throws)
- inline HPX_CXX_CORE_EXPORT thread_id_ref_type set_thread_state (thread_id_type const &id, hpx::chrono::steady_duration const &rel_time, thread_schedule_state state=thread_schedule_state::pending, thread_restart_state stateex=thread_restart_state::timeout, thread_priority priority=thread_priority::normal, bool retry_on_active=true, hpx::error_code &ec=hpx::throws)
Set the thread state of the thread referenced by the thread_id id.
Set a timer to set the state of the given thread to the given new value after it expired (after the given duration)
Note
As long as ec is not pre-initialized to hpx::throws this function doesn’t throw but returns the result code using the parameter ec. Otherwise, it throws an instance of hpx::exception.
- Parameters
id – [in] The thread id of the thread the state should be modified for.
rel_time – [in] Time duration after which the new thread should be run
state – [in] The new state to be set for the thread referenced by the id parameter.
stateex – [in] The new extended state to be set for the thread referenced by the id parameter.
priority – [in]
retry_on_active – [in]
ec – [in,out] this represents the error status on exit, if this is pre-initialized to hpx::throws the function will throw on error instead.
- Returns
- HPX_CXX_CORE_EXPORT thread_state get_thread_state (thread_id_type const &id, hpx::error_code &ec=hpx::throws) noexcept
The function get_thread_backtrace is part of the thread related API allows to query the currently stored thread back trace (which is captured during thread suspension).
Note
As long as ec is not pre-initialized to hpx::throws this function doesn’t throw but returns the result code using the parameter ec. Otherwise, it throws an instance of hpx::exception. The function get_thread_state is part of the thread related API. It queries the state of one of the threads known to the thread-manager.
Note
As long as ec is not pre-initialized to hpx::throws this function doesn’t throw but returns the result code using the parameter ec. Otherwise, it throws an instance of hpx::exception.
- Parameters
id – [in] The thread id of the thread being queried.
ec – [in,out] this represents the error status on exit, if this is pre-initialized to hpx::throws the function will throw on error instead.
id – [in] The thread id of the thread the state should be modified for.
ec – [in,out] this represents the error status on exit, if this is pre-initialized to hpx::throws the function will throw on error instead.
- Returns
This function returns the currently captured stack back trace of the thread referenced by the id parameter. If the thread is not known to the thread-manager the return value will be the zero.
- Returns
This function returns the thread state of the thread referenced by the id parameter. If the thread is not known to the thread-manager the return value will be terminated.
- HPX_CXX_CORE_EXPORT std::size_t get_thread_phase (thread_id_type const &id, hpx::error_code &ec=hpx::throws) noexcept
The function get_thread_phase is part of the thread related API. It queries the phase of one of the threads known to the thread-manager.
Note
As long as ec is not pre-initialized to hpx::throws this function doesn’t throw but returns the result code using the parameter ec. Otherwise, it throws an instance of hpx::exception.
- Parameters
id – [in] The thread id of the thread the phase should be modified for.
ec – [in,out] this represents the error status on exit, if this is pre-initialized to hpx::throws the function will throw on error instead.
- Returns
This function returns the thread phase of the thread referenced by the id parameter. If the thread is not known to the thread-manager the return value will be ~0.
- HPX_CXX_CORE_EXPORT bool get_thread_interruption_enabled (thread_id_type const &id, hpx::error_code &ec=hpx::throws)
Returns whether the given thread can be interrupted at this point.
Note
As long as ec is not pre-initialized to hpx::throws this function doesn’t throw but returns the result code using the parameter ec. Otherwise, it throws an instance of hpx::exception.
- Parameters
id – [in] The thread id of the thread which should be queried.
ec – [in,out] this represents the error status on exit, if this is pre-initialized to hpx::throws the function will throw on error instead.
- Returns
This function returns true if the given thread can be interrupted at this point in time. It will return false otherwise.
- HPX_CXX_CORE_EXPORT bool set_thread_interruption_enabled (thread_id_type const &id, bool enable, hpx::error_code &ec=hpx::throws)
Set whether the given thread can be interrupted at this point.
Note
As long as ec is not pre-initialized to hpx::throws this function doesn’t throw but returns the result code using the parameter ec. Otherwise, it throws an instance of hpx::exception.
- Parameters
id – [in] The thread id of the thread which should receive the new value.
enable – [in] This value will determine the new interruption enabled status for the given thread.
ec – [in,out] this represents the error status on exit, if this is pre-initialized to hpx::throws the function will throw on error instead.
- Returns
This function returns the previous value of whether the given thread could have been interrupted.
- HPX_CXX_CORE_EXPORT bool get_thread_interruption_requested (thread_id_type const &id, hpx::error_code &ec=hpx::throws)
Returns whether the given thread has been flagged for interruption.
Note
As long as ec is not pre-initialized to hpx::throws this function doesn’t throw but returns the result code using the parameter ec. Otherwise, it throws an instance of hpx::exception.
- Parameters
id – [in] The thread id of the thread which should be queried.
ec – [in,out] this represents the error status on exit, if this is pre-initialized to hpx::throws the function will throw on error instead.
- Returns
This function returns true if the given thread was flagged for interruption. It will return false otherwise.
-
void interrupt_thread(thread_id_type const &id, bool flag, hpx::error_code &ec = hpx::throws)#
Flag the given thread for interruption.
Note
As long as ec is not pre-initialized to hpx::throws this function doesn’t throw but returns the result code using the parameter ec. Otherwise, it throws an instance of hpx::exception.
- Parameters
id – [in] The thread id of the thread which should be interrupted.
flag – [in] The flag encodes whether the thread should be interrupted (if it is true), or ‘uninterrupted’ (if it is false).
ec – [in,out] this represents the error status on exit, if this is pre-initialized to hpx::throws the function will throw on error instead.
- inline HPX_CXX_CORE_EXPORT void interrupt_thread (thread_id_type const &id, hpx::error_code &ec=hpx::throws)
- HPX_CXX_CORE_EXPORT void interruption_point (thread_id_type const &id, hpx::error_code &ec=hpx::throws)
Interrupt the current thread at this point if it was canceled. This will throw a thread_interrupted exception, which will cancel the thread.
Note
As long as ec is not pre-initialized to hpx::throws this function doesn’t throw but returns the result code using the parameter ec. Otherwise, it throws an instance of hpx::exception.
- Parameters
id – [in] The thread id of the thread which should be interrupted.
ec – [in,out] this represents the error status on exit, if this is pre-initialized to hpx::throws the function will throw on error instead.
-
threads::thread_priority get_thread_priority(thread_id_type const &id, hpx::error_code &ec = hpx::throws) noexcept#
Return priority of the given thread
Note
As long as ec is not pre-initialized to hpx::throws this function doesn’t throw but returns the result code using the parameter ec. Otherwise, it throws an instance of hpx::exception.
- Parameters
id – [in] The thread id of the thread whose priority is queried.
ec – [in,out] this represents the error status on exit, if this is pre-initialized to hpx::throws the function will throw on error instead.
- HPX_CXX_CORE_EXPORT std::ptrdiff_t get_stack_size (thread_id_type const &id, hpx::error_code &ec=hpx::throws) noexcept
Return stack size of the given thread
Note
As long as ec is not pre-initialized to hpx::throws this function doesn’t throw but returns the result code using the parameter ec. Otherwise, it throws an instance of hpx::exception.
- Parameters
id – [in] The thread id of the thread whose priority is queried.
ec – [in,out] this represents the error status on exit, if this is pre-initialized to hpx::throws the function will throw on error instead.
- HPX_CXX_CORE_EXPORT threads::thread_pool_base * get_pool (thread_id_type const &id, hpx::error_code &ec=hpx::throws)
Returns a pointer to the pool that was used to run the current thread
- Throws
If –
&ec != &throws, never throws, but will set ec to an appropriate value when an error occurs. Otherwise, this function will throw an hpx::exception with an error code of hpx::error::yield_aborted if it is signaled with wait_aborted. If called outside a HPX-thread, this function will throw an hpx::exception with an error code of hpx::error::null_thread_id. If this function is called while the thread-manager is not running, it will throw an hpx::exception with an error code of hpx::error::invalid_status.
-
namespace this_thread
hpx::get_worker_thread_num, hpx::get_local_worker_thread_num, hpx::get_local_worker_thread_num, hpx::get_thread_pool_num, hpx::get_thread_pool_num#
Defined in header hpx/runtime.hpp.
See Public API for a list of names and headers that are part of the public HPX API.
-
namespace hpx
Functions
- HPX_CXX_CORE_EXPORT std::size_t get_worker_thread_num () noexcept
Return the number of the current OS-thread running in the runtime instance the current HPX-thread is executed with.
This function returns the zero based index of the OS-thread which executes the current HPX-thread.
Note
The returned value is zero based and its maximum value is smaller than the overall number of OS-threads executed (as returned by get_os_thread_count()).
Note
This function needs to be executed on a HPX-thread. It will fail otherwise (it will return -1).
- HPX_CXX_CORE_EXPORT std::size_t get_worker_thread_num (error_code &ec) noexcept
Return the number of the current OS-thread running in the runtime instance the current HPX-thread is executed with.
This function returns the zero based index of the OS-thread which executes the current HPX-thread.
Note
The returned value is zero based and its maximum value is smaller than the overall number of OS-threads executed (as returned by get_os_thread_count()). It will return -1 if the current thread is not a known thread or if the runtime is not in running state.
Note
This function needs to be executed on a HPX-thread. It will fail otherwise (it will return -1).
- Parameters
ec – [in,out] this represents the error status on exit (obsolete, ignored).
- HPX_CXX_CORE_EXPORT std::size_t get_local_worker_thread_num () noexcept
Return the number of the current OS-thread running in the current thread pool the current HPX-thread is executed with.
This function returns the zero based index of the OS-thread on the current thread pool which executes the current HPX-thread.
Note
The returned value is zero based and its maximum value is smaller than the number of OS-threads executed on the current thread pool. It will return -1 if the current thread is not a known thread or if the runtime is not in running state.
Note
This function needs to be executed on a HPX-thread. It will fail otherwise (it will return -1).
- HPX_CXX_CORE_EXPORT std::size_t get_local_worker_thread_num (error_code &ec) noexcept
Return the number of the current OS-thread running in the current thread pool the current HPX-thread is executed with.
This function returns the zero based index of the OS-thread on the current thread pool which executes the current HPX-thread.
Note
The returned value is zero based and its maximum value is smaller than the number of OS-threads executed on the current thread pool. It will return -1 if the current thread is not a known thread or if the runtime is not in running state.
Note
This function needs to be executed on a HPX-thread. It will fail otherwise (it will return -1).
- Parameters
ec – [in,out] this represents the error status on exit (obsolete, ignored).
- HPX_CXX_CORE_EXPORT std::size_t get_thread_pool_num () noexcept
Return the number of the current thread pool the current HPX-thread is executed with.
This function returns the zero based index of the thread pool which executes the current HPX-thread.
Note
The returned value is zero based and its maximum value is smaller than the number of thread pools started by the runtime. It will return -1 if the current thread pool is not a known thread pool or if the runtime is not in running state.
Note
This function needs to be executed on a HPX-thread. It will fail otherwise (it will return -1).
- HPX_CXX_CORE_EXPORT std::size_t get_thread_pool_num (error_code &ec) noexcept
Return the number of the current thread pool the current HPX-thread is executed with.
This function returns the zero based index of the thread pool which executes the current HPX-thread.
Note
The returned value is zero based and its maximum value is smaller than the number of thread pools started by the runtime. It will return -1 if the current thread pool is not a known thread pool or if the runtime is not in running state.
Note
This function needs to be executed on a HPX-thread. It will fail otherwise (it will return -1).
- Parameters
ec – [in,out] this represents the error status on exit (obsolete, ignored).
-
namespace threads
hpx/threading_base/thread_pool_base.hpp#
Defined in header hpx/threading_base/thread_pool_base.hpp.
See Public API for a list of names and headers that are part of the public HPX API.
-
namespace hpx
-
namespace threads
Functions
- HPX_CXX_CORE_EXPORT std::ostream & operator<< (std::ostream &os, thread_pool_base const &thread_pool)
-
class thread_pool_base#
- #include <thread_pool_base.hpp>
The base class used to manage a pool of OS threads.
Public Functions
-
virtual void suspend_processing_unit_direct(std::size_t virt_core, error_code &ec = throws) = 0#
Suspends the given processing unit. Blocks until the processing unit has been suspended.
- Parameters
virt_core – [in] The processing unit on the pool to be suspended. The processing units are indexed starting from 0.
ec – [in,out] this represents the error status on exit, if this is pre-initialized to hpx::throws the function will throw on error instead.
-
virtual void resume_processing_unit_direct(std::size_t virt_core, error_code &ec = throws) = 0#
Resumes the given processing unit. Blocks until the processing unit has been resumed.
- Parameters
virt_core – [in] The processing unit on the pool to be resumed. The processing units are indexed starting from 0.
ec – [in,out] this represents the error status on exit, if this is pre-initialized to hpx::throws the function will throw on error instead.
-
virtual void resume_direct(error_code &ec = throws) = 0#
Resumes the thread pool. Blocks until all OS threads on the thread pool have been resumed.
- Parameters
ec – [in,out] this represents the error status on exit, if this is pre-initialized to hpx::throws the function will throw on error instead.
-
virtual void suspend_direct(error_code &ec = throws) = 0#
Suspends the thread pool. Blocks until all OS threads on the thread pool have been suspended.
Note
A thread pool cannot be suspended from an HPX thread running on the pool itself.
-
virtual void suspend_processing_unit_direct(std::size_t virt_core, error_code &ec = throws) = 0#
-
struct thread_pool_init_parameters#
Public Functions
-
inline thread_pool_init_parameters(std::string const &name, std::size_t index, policies::scheduler_mode mode, std::size_t num_threads, std::size_t thread_offset, hpx::threads::policies::callback_notifier ¬ifier, hpx::threads::policies::detail::affinity_data const &affinity_data, hpx::threads::detail::network_background_callback_type const &network_background_callback = hpx::threads::detail::network_background_callback_type(), std::size_t max_background_threads = static_cast<std::size_t>(-1), std::size_t max_idle_loop_count = HPX_IDLE_LOOP_COUNT_MAX, std::size_t max_busy_loop_count = HPX_BUSY_LOOP_COUNT_MAX, std::size_t shutdown_check_count = 10)#
Public Members
-
inline thread_pool_init_parameters(std::string const &name, std::size_t index, policies::scheduler_mode mode, std::size_t num_threads, std::size_t thread_offset, hpx::threads::policies::callback_notifier ¬ifier, hpx::threads::policies::detail::affinity_data const &affinity_data, hpx::threads::detail::network_background_callback_type const &network_background_callback = hpx::threads::detail::network_background_callback_type(), std::size_t max_background_threads = static_cast<std::size_t>(-1), std::size_t max_idle_loop_count = HPX_IDLE_LOOP_COUNT_MAX, std::size_t max_busy_loop_count = HPX_BUSY_LOOP_COUNT_MAX, std::size_t shutdown_check_count = 10)#
-
namespace threads
hpx/threading_base/threading_base_fwd.hpp#
Defined in header hpx/threading_base/threading_base_fwd.hpp.
See Public API for a list of names and headers that are part of the public HPX API.
-
namespace hpx
-
namespace threads
Functions
- HPX_CXX_CORE_EXPORT thread_data * get_self_id_data () noexcept
The function get_self_id_data returns the data of the HPX thread id associated with the current thread (or nullptr if the current thread is not a HPX thread).
- HPX_CXX_CORE_EXPORT thread_self & get_self ()
The function get_self returns a reference to the (OS thread specific) self reference to the current HPX thread.
- HPX_CXX_CORE_EXPORT thread_self * get_self_ptr () noexcept
The function get_self_ptr returns a pointer to the (OS thread specific) self reference to the current HPX thread.
- HPX_CXX_CORE_EXPORT thread_self_impl_type * get_ctx_ptr ()
The function get_ctx_ptr returns a pointer to the internal data associated with each coroutine.
- HPX_CXX_CORE_EXPORT thread_self * get_self_ptr_checked (error_code &ec=throws)
The function get_self_ptr_checked returns a pointer to the (OS thread specific) self reference to the current HPX thread.
- HPX_CXX_CORE_EXPORT thread_id_type get_self_id () noexcept
The function get_self_id returns the HPX thread id of the current thread (or zero if the current thread is not a HPX thread).
- HPX_CXX_CORE_EXPORT thread_id_type get_outer_self_id () noexcept
The function get_outer_self_id returns the HPX thread id of the current outer thread (or zero if the current thread is not a HPX thread). This usually returns the same as get_self_id, except for directly executed threads, in which case this returns the thread id of the outermost HPX thread.
- HPX_CXX_CORE_EXPORT thread_id_type get_parent_id () noexcept
The function get_parent_id returns the HPX thread id of the current thread’s parent (or zero if the current thread is not a HPX thread).
Note
This function will return a meaningful value only if the code was compiled with HPX_HAVE_THREAD_PARENT_REFERENCE being defined.
- HPX_CXX_CORE_EXPORT std::size_t get_parent_phase () noexcept
The function get_parent_phase returns the HPX phase of the current thread’s parent (or zero if the current thread is not a HPX thread).
Note
This function will return a meaningful value only if the code was compiled with HPX_HAVE_THREAD_PARENT_REFERENCE being defined.
- HPX_CXX_CORE_EXPORT std::ptrdiff_t get_self_stacksize () noexcept
The function get_self_stacksize returns the stack size of the current thread (or zero if the current thread is not a HPX thread).
- HPX_CXX_CORE_EXPORT thread_stacksize get_self_stacksize_enum () noexcept
The function get_self_stacksize_enum returns the stack size of the /.
- HPX_CXX_CORE_EXPORT std::uint32_t get_parent_locality_id () noexcept
The function get_parent_locality_id returns the id of the locality of the current thread’s parent (or zero if the current thread is not a HPX thread).
Note
This function will return a meaningful value only if the code was compiled with HPX_HAVE_THREAD_PARENT_REFERENCE being defined.
- HPX_CXX_CORE_EXPORT std::uint64_t get_self_component_id () noexcept
The function get_self_component_id returns the lva of the component the current thread is acting on
Note
This function will return a meaningful value only if the code was compiled with HPX_HAVE_THREAD_TARGET_ADDRESS being defined.
-
namespace policies#
-
namespace threads
threadmanager#
See Public API for a list of names and headers that are part of the public HPX API.
hpx/threadmanager/threadmanager.hpp#
Defined in header hpx/threadmanager/threadmanager.hpp.
See Public API for a list of names and headers that are part of the public HPX API.
-
namespace hpx
-
namespace threads
-
class threadmanager#
- #include <threadmanager.hpp>
The thread-manager class is the central instance of management for all (non-depleted) threads
Public Types
-
using pool_type = std::unique_ptr<thread_pool_base>#
Public Functions
-
threadmanager(hpx::util::runtime_configuration &rtcfg_, notification_policy_type ¬ifier, detail::network_background_callback_type network_background_callback = detail::network_background_callback_type())#
-
threadmanager(threadmanager const&) = delete#
-
threadmanager(threadmanager&&) = delete#
-
threadmanager &operator=(threadmanager const&) = delete#
-
threadmanager &operator=(threadmanager&&) = delete#
-
~threadmanager()#
-
void init() const#
-
void create_pools()#
-
void print_pools(std::ostream&) const#
FIXME move to private and add —hpx:printpools cmd line option.
-
thread_pool_base &default_pool() const#
-
thread_pool_base &get_pool(std::string const &pool_name) const#
-
thread_pool_base &get_pool(pool_id_type const &pool_id) const#
-
thread_pool_base &get_pool(std::size_t thread_index) const#
-
thread_id_ref_type register_work(thread_init_data &data, error_code &ec = throws) const#
The function register_work adds a new work item to the thread manager. It doesn’t immediately create a new thread, it just adds the task parameters (function, initial state and description) to the internal management data structures. The thread itself will be created when the number of existing threads drops below the number of threads specified by the constructors max_count parameter.
- Parameters
data – [in] The value of this parameter allows to specify a description of the thread to create. This information is used for logging purposes mainly, but might be useful for debugging as well. This parameter is optional and defaults to an empty string.
ec –
-
void register_thread(thread_init_data &data, thread_id_ref_type &id, error_code &ec = throws) const#
The function register_thread adds a new work item to the thread manager. It creates a new thread, adds it to the internal management data structures, and schedules the new thread, if appropriate.
- Parameters
data – [in] The value of this parameter allows to specify a description of the thread to create. This information is used for logging purposes mainly, but might be useful for debugging as well. This parameter is optional and defaults to an empty string.
id – [out] This parameter will hold the id of the created thread. This id is guaranteed to be validly initialized before the thread function is executed.
ec –
-
bool run() const#
Run the thread manager’s work queue. This function instantiates the specified number of OS threads in each pool. All OS threads are started to execute the function tfunc.
- Returns
The function returns true if the thread manager has been started successfully, otherwise it returns false.
-
void stop(bool blocking = true) const#
Forcefully stop the thread-manager.
- Parameters
blocking –
-
bool is_busy() const#
-
bool is_idle() const#
-
void wait() const#
-
template<typename StopToken>
inline bool wait_for(StopToken &&stop_token, hpx::chrono::steady_duration const &rel_time) const#
-
void suspend() const#
-
void resume() const#
-
hpx::state status() const#
Return whether the thread manager is still running This returns the “minimal state”, i.e. the state of the least advanced thread pool
-
std::int64_t get_thread_count(thread_schedule_state state = thread_schedule_state::unknown, thread_priority priority = thread_priority::default_, std::size_t num_thread = static_cast<std::size_t>(-1), bool reset = false) const#
return the number of HPX-threads with the given state
Note
This function locks the internal OS lock in the thread manager
-
mask_type get_idle_core_mask() const#
-
bool enumerate_threads(hpx::function<bool(thread_id_type)> const &f, thread_schedule_state state = thread_schedule_state::unknown) const#
-
void abort_all_suspended_threads() const#
-
bool cleanup_terminated(bool delete_all) const#
-
std::size_t get_os_thread_count() const#
Return the number of OS threads running in this thread-manager.
This function will return correct results only if the thread-manager is running.
-
void report_error(std::size_t num_thread, std::exception_ptr const &e) const#
API functions forwarding to notification policy.
This notifies the thread manager that the passed exception has been raised. The exception will be routed through the notifier and the scheduler (which will result in it being passed to the runtime object, which in turn will report it to the console, etc.).
-
mask_type get_used_processing_units() const#
Returns the mask identifying all processing units used by this thread manager.
-
hwloc_bitmap_ptr get_pool_numa_bitmap(std::string const &pool_name) const#
-
void set_scheduler_mode(threads::policies::scheduler_mode mode, hpx::threads::mask_cref_type pu_mask) const noexcept#
-
void add_scheduler_mode(threads::policies::scheduler_mode mode, hpx::threads::mask_cref_type pu_mask) const noexcept#
-
void add_remove_scheduler_mode(threads::policies::scheduler_mode to_add_mode, threads::policies::scheduler_mode to_remove_mode, hpx::threads::mask_cref_type pu_mask) const noexcept#
-
void remove_scheduler_mode(threads::policies::scheduler_mode mode, hpx::threads::mask_cref_type pu_mask) const noexcept#
-
void reset_thread_distribution() const noexcept#
Public Static Functions
-
static void deinit_tss()#
Private Functions
-
void create_scheduler_user_defined(hpx::resource::scheduler_function const&, thread_pool_init_parameters const&, policies::thread_queue_init_parameters const&)#
-
void create_scheduler_local(thread_pool_init_parameters const&, policies::thread_queue_init_parameters const&, std::size_t)#
-
void create_scheduler_local_priority_fifo(thread_pool_init_parameters const&, policies::thread_queue_init_parameters const&, std::size_t)#
-
void create_scheduler_local_priority_lifo(thread_pool_init_parameters const&, policies::thread_queue_init_parameters const&, std::size_t)#
-
void create_scheduler_static(thread_pool_init_parameters const&, policies::thread_queue_init_parameters const&, std::size_t)#
-
void create_scheduler_static_priority(thread_pool_init_parameters const&, policies::thread_queue_init_parameters const&, std::size_t)#
-
void create_scheduler_abp_priority_fifo(thread_pool_init_parameters const&, policies::thread_queue_init_parameters const&, std::size_t)#
-
void create_scheduler_abp_priority_lifo(thread_pool_init_parameters const&, policies::thread_queue_init_parameters const&, std::size_t)#
-
void create_scheduler_local_workrequesting_fifo(thread_pool_init_parameters const&, policies::thread_queue_init_parameters const&, std::size_t)#
-
void create_scheduler_local_workrequesting_lifo(thread_pool_init_parameters const&, policies::thread_queue_init_parameters const&, std::size_t)#
-
void create_scheduler_local_workrequesting_mc(thread_pool_init_parameters const&, policies::thread_queue_init_parameters const&, std::size_t)#
Private Members
-
mutable mutex_type mtx_#
-
pool_vector pools_#
-
notification_policy_type ¬ifier_#
-
detail::network_background_callback_type network_background_callback_#
-
using pool_type = std::unique_ptr<thread_pool_base>#
-
class threadmanager#
-
namespace threads
timed_execution#
See Public API for a list of names and headers that are part of the public HPX API.
hpx/timed_execution/timed_execution.hpp#
Defined in header hpx/timed_execution/timed_execution.hpp.
See Public API for a list of names and headers that are part of the public HPX API.
-
namespace hpx
-
namespace parallel
-
namespace execution
-
namespace execution
-
namespace parallel
hpx/timed_execution/timed_execution_fwd.hpp#
Defined in header hpx/timed_execution/timed_execution_fwd.hpp.
See Public API for a list of names and headers that are part of the public HPX API.
-
namespace hpx
-
namespace parallel
-
namespace execution
Variables
-
hpx::parallel::execution::post_after_t post_after#
-
hpx::parallel::execution::async_execute_at_t async_execute_at#
-
hpx::parallel::execution::async_execute_after_t async_execute_after#
-
hpx::parallel::execution::sync_execute_at_t sync_execute_at#
-
hpx::parallel::execution::sync_execute_after_t sync_execute_after#
-
struct async_execute_after_t : public hpx::functional::detail::tag_fallback<async_execute_after_t>#
- #include <timed_execution_fwd.hpp>
Customization point of asynchronous execution agent creation supporting timed execution.
This asynchronously creates a single function invocation f() using the associated executor at the given point in time.
Note
This calls exec.async_execute_after(rel_time, f, ts…), if available, otherwise it emulates timed scheduling by delaying calling execution::async_execute() on the underlying non-time-scheduled execution agent.
- Param exec
[in] The executor object to use for scheduling of the function f.
- Param rel_time
[in] The duration of time after which the given function should be scheduled to run.
- Param f
[in] The function which will be scheduled using the given executor.
- Param ts…
[in] Additional arguments to use to invoke f.
- Return
f(ts…)’s result through a future
-
struct async_execute_at_t : public hpx::functional::detail::tag_fallback<async_execute_at_t>#
- #include <timed_execution_fwd.hpp>
Customization point of asynchronous execution agent creation supporting timed execution.
This asynchronously creates a single function invocation f() using the associated executor at the given point in time.
Note
This calls exec.async_execute_at(abs_time, f, ts…), if available, otherwise it emulates timed scheduling by delaying calling execution::async_execute() on the underlying non-time-scheduled execution agent.
- Param exec
[in] The executor object to use for scheduling of the function f.
- Param abs_time
[in] The point in time the given function should be scheduled at to run.
- Param f
[in] The function which will be scheduled using the given executor.
- Param ts…
[in] Additional arguments to use to invoke f.
- Return
f(ts…)’s result through a future
-
struct post_after_t : public hpx::functional::detail::tag_fallback<post_after_t>#
- #include <timed_execution_fwd.hpp>
Customization point of asynchronous fire & forget execution agent creation supporting timed execution.
This asynchronously (fire & forget) creates a single function invocation f() using the associated executor at the given point in time.
Note
This calls exec.post_after(rel_time, f, ts…), if available, otherwise it emulates timed scheduling by delaying calling execution::post() on the underlying non-time-scheduled execution agent.
- Param exec
[in] The executor object to use for scheduling of the function f.
- Param rel_time
[in] The duration of time after which the given function should be scheduled to run.
- Param f
[in] The function which will be scheduled using the given executor.
- Param ts…
[in] Additional arguments to use to invoke f.
-
struct post_at_t : public hpx::functional::detail::tag_fallback<post_at_t>#
- #include <timed_execution_fwd.hpp>
Customization point of asynchronous fire & forget execution agent creation supporting timed execution.
This asynchronously (fire & forget) creates a single function invocation f() using the associated executor at the given point in time.
Note
This calls exec.post_at(abs_time, f, ts…), if available, otherwise it emulates timed scheduling by delaying calling execution::post() on the underlying non-time-scheduled execution agent.
- Param exec
[in] The executor object to use for scheduling of the function f.
- Param abs_time
[in] The point in time the given function should be scheduled at to run.
- Param f
[in] The function which will be scheduled using the given executor.
- Param ts…
[in] Additional arguments to use to invoke f.
-
struct sync_execute_after_t : public hpx::functional::detail::tag_fallback<sync_execute_after_t>#
- #include <timed_execution_fwd.hpp>
Customization point of synchronous execution agent creation supporting timed execution.
This synchronously creates a single function invocation f() using the associated executor at the given point in time.
Note
This calls exec.sync_execute_after(rel_time, f, ts…), if available, otherwise it emulates timed scheduling by delaying calling execution::sync_execute() on the underlying non-time-scheduled execution agent.
- Param exec
[in] The executor object to use for scheduling of the function f.
- Param rel_time
[in] The duration of time after which the given function should be scheduled to run.
- Param f
[in] The function which will be scheduled using the given executor.
- Param ts…
[in] Additional arguments to use to invoke f.
- Return
f(ts…)’s result
-
struct sync_execute_at_t : public hpx::functional::detail::tag_fallback<sync_execute_at_t>#
- #include <timed_execution_fwd.hpp>
Customization point of synchronous execution agent creation supporting timed execution.
This synchronously creates a single function invocation f() using the associated executor at the given point in time.
Note
This calls exec.sync_execute_at(abs_time, f, ts…), if available, otherwise it emulates timed scheduling by delaying calling execution::sync_execute() on the underlying non-time-scheduled execution agent.
- Param exec
[in] The executor object to use for scheduling of the function f.
- Param abs_time
[in] The point in time the given function should be scheduled at to run.
- Param f
[in] The function which will be scheduled using the given executor.
- Param ts…
[in] Additional arguments to use to invoke f.
- Return
f(ts…)’s result
-
template<executor_any BaseExecutor>
struct timed_executor#
-
hpx::parallel::execution::post_after_t post_after#
-
namespace execution
-
namespace parallel
hpx/timed_execution/timed_executors.hpp#
Defined in header hpx/timed_execution/timed_executors.hpp.
See Public API for a list of names and headers that are part of the public HPX API.
-
namespace hpx
-
namespace execution
-
namespace experimental
-
namespace experimental
-
namespace parallel
-
namespace execution
Typedefs
-
using sequenced_timed_executor = timed_executor<hpx::execution::sequenced_executor>#
-
using parallel_timed_executor = timed_executor<hpx::execution::parallel_executor>#
-
template<executor_any BaseExecutor>
struct timed_executor
-
using sequenced_timed_executor = timed_executor<hpx::execution::sequenced_executor>#
-
namespace execution
-
namespace execution
hpx/timed_execution/traits/is_timed_executor.hpp#
Defined in header hpx/timed_execution/traits/is_timed_executor.hpp.
See Public API for a list of names and headers that are part of the public HPX API.
-
namespace hpx
Variables
- template<typename Executor> HPX_CXX_CORE_EXPORT concept timed_executor = hpx::traits::is_timed_executor_v<Executor>
-
namespace parallel
-
namespace execution
Typedefs
-
template<typename T>
using is_timed_executor_t = typename is_timed_executor<T>::type#
Variables
- template<typename T> constexpr HPX_CXX_CORE_EXPORT bool is_timed_executor_v = is_timed_executor<T>::value
-
template<typename T>
-
namespace execution
timing#
See Public API for a list of names and headers that are part of the public HPX API.
hpx::chrono::high_resolution_clock#
Defined in header hpx/chrono.hpp.
See Public API for a list of names and headers that are part of the public HPX API.
-
namespace hpx
-
namespace chrono#
-
struct high_resolution_clock#
- #include <high_resolution_clock.hpp>
Class
hpx::chrono::high_resolution_clockrepresents the clock with the smallest tick period provided by the implementation. It may be an alias ofstd::chrono::system_clockorstd::chrono::steady_clock, or a third, independent clock.hpx::chrono::high_resolution_clockmeets the requirements of TrivialClock.
-
struct high_resolution_clock#
-
namespace chrono#
hpx::chrono::high_resolution_timer#
Defined in header hpx/chrono.hpp.
See Public API for a list of names and headers that are part of the public HPX API.
-
namespace hpx
-
namespace chrono
-
class high_resolution_timer#
- #include <high_resolution_timer.hpp>
high_resolution_timer is a timer object which measures the elapsed time
Public Functions
-
inline high_resolution_timer() noexcept#
-
inline explicit constexpr high_resolution_timer(double t) noexcept#
-
inline void restart() noexcept#
restarts the timer
-
inline double elapsed() const noexcept#
returns the elapsed time in seconds
-
inline high_resolution_timer() noexcept#
-
class high_resolution_timer#
-
namespace chrono
topology#
See Public API for a list of names and headers that are part of the public HPX API.
hpx/topology/cpu_mask.hpp#
Defined in header hpx/topology/cpu_mask.hpp.
See Public API for a list of names and headers that are part of the public HPX API.
-
namespace hpx
-
namespace threads
-
namespace threads
hpx/topology/topology.hpp#
Defined in header hpx/topology/topology.hpp.
See Public API for a list of names and headers that are part of the public HPX API.
-
namespace hpx
-
namespace threads
Typedefs
-
using hwloc_bitmap_ptr = std::shared_ptr<hpx_hwloc_bitmap_wrapper>#
Enums
-
enum hpx_hwloc_membind_policy#
Please see hwloc documentation for the corresponding enums HWLOC_MEMBIND_XXX.
Values:
-
enumerator membind_default#
-
enumerator membind_firsttouch#
-
enumerator membind_bind#
-
enumerator membind_interleave#
-
enumerator membind_replicate#
-
enumerator membind_nexttouch#
-
enumerator membind_mixed#
-
enumerator membind_user#
-
enumerator membind_default#
Functions
- HPX_CXX_CORE_EXPORT topology & create_topology ()
- inline HPX_CXX_CORE_EXPORT topology const & get_topology ()
Get the global topology instance.
- inline HPX_CXX_CORE_EXPORT std::size_t get_memory_page_size ()
-
struct hpx_hwloc_bitmap_wrapper#
Public Functions
-
HPX_NON_COPYABLE(hpx_hwloc_bitmap_wrapper)#
-
inline hpx_hwloc_bitmap_wrapper() noexcept#
-
inline explicit hpx_hwloc_bitmap_wrapper(void *bmp) noexcept#
-
inline ~hpx_hwloc_bitmap_wrapper()#
-
inline void reset(hwloc_bitmap_t bmp) noexcept#
-
inline explicit constexpr operator bool() const noexcept#
-
inline hwloc_bitmap_t get_bmp() const noexcept#
Private Members
-
hwloc_bitmap_t bmp_#
Friends
-
friend std::ostream &operator<<(std::ostream &os, hpx_hwloc_bitmap_wrapper const *bmp)#
-
HPX_NON_COPYABLE(hpx_hwloc_bitmap_wrapper)#
-
struct topology#
Public Functions
-
topology()#
-
~topology()#
-
inline std::size_t get_socket_number(std::size_t num_thread, [[maybe_unused]] error_code &ec = throws) const noexcept#
Return the Socket number of the processing unit the given thread is running on.
- Parameters
num_thread – [in]
ec – [in,out] this represents the error status on exit, if this is pre-initialized to hpx::throws the function will throw on error instead.
-
inline std::size_t get_numa_node_number(std::size_t num_thread, [[maybe_unused]] error_code &ec = throws) const noexcept#
Return the NUMA node number of the processing unit the given thread is running on.
- Parameters
num_thread – [in]
ec – [in,out] this represents the error status on exit, if this is pre-initialized to hpx::throws the function will throw on error instead.
-
mask_cref_type get_machine_affinity_mask(error_code &ec = throws) const noexcept#
Return a bit mask where each set bit corresponds to a processing unit available to the application.
- Parameters
ec – [in,out] this represents the error status on exit, if this is pre-initialized to hpx::throws the function will throw on error instead.
-
mask_type get_service_affinity_mask(mask_cref_type used_processing_units, error_code &ec = throws) const#
Return a bit mask where each set bit corresponds to a processing unit available to the service threads in the application.
- Parameters
used_processing_units – [in] This is the mask of processing units which are not available for service threads.
ec – [in,out] this represents the error status on exit, if this is pre-initialized to hpx::throws the function will throw on error instead.
-
mask_cref_type get_socket_affinity_mask(std::size_t num_thread, error_code &ec = throws) const#
Return a bit mask where each set bit corresponds to a processing unit available to the given thread inside the socket it is running on.
- Parameters
num_thread – [in]
ec – [in,out] this represents the error status on exit, if this is pre-initialized to hpx::throws the function will throw on error instead.
-
mask_cref_type get_numa_node_affinity_mask(std::size_t num_thread, error_code &ec = throws) const#
Return a bit mask where each set bit corresponds to a processing unit available to the given thread inside the NUMA domain it is running on.
- Parameters
num_thread – [in]
ec – [in,out] this represents the error status on exit, if this is pre-initialized to hpx::throws the function will throw on error instead.
-
mask_cref_type get_core_affinity_mask(std::size_t num_thread, error_code &ec = throws) const#
Return a bit mask where each set bit corresponds to a processing unit available to the given thread inside the core it is running on.
- Parameters
num_thread – [in]
ec – [in,out] this represents the error status on exit, if this is pre-initialized to hpx::throws the function will throw on error instead.
-
mask_cref_type get_thread_affinity_mask(std::size_t num_thread, error_code &ec = throws) const#
Return a bit mask where each set bit corresponds to a processing unit available to the given thread.
- Parameters
num_thread – [in]
ec – [in,out] this represents the error status on exit, if this is pre-initialized to hpx::throws the function will throw on error instead.
-
void set_thread_affinity_mask(mask_cref_type mask, error_code &ec = throws) const#
Use the given bit mask to set the affinity of the given thread. Each set bit corresponds to a processing unit the thread will be allowed to run on.
Note
Use this function on systems where the affinity must be set from inside the thread itself.
- Parameters
mask – [in]
ec – [in,out] this represents the error status on exit, if this is pre-initialized to hpx::throws the function will throw on error instead.
-
mask_type get_thread_affinity_mask_from_lva(void const *lva, error_code &ec = throws) const#
Return a bit mask where each set bit corresponds to a processing unit co-located with the memory the given address is currently allocated on.
- Parameters
lva – [in]
ec – [in,out] this represents the error status on exit, if this is pre-initialized to hpx::throws the function will throw on error instead.
-
void print_affinity_mask(std::ostream &os, std::size_t num_thread, mask_cref_type m, std::string const &pool_name) const#
Prints the given mask m to os in a human-readable form.
-
bool reduce_thread_priority(error_code &ec = throws) const#
Reduce thread priority of the current thread.
- Parameters
ec – [in,out] this represents the error status on exit, if this is pre-initialized to hpx::throws the function will throw on error instead.
-
std::size_t get_number_of_pus() const noexcept#
Return the number of available hardware processing units.
-
std::size_t get_number_of_numa_node_cores(std::size_t numa) const#
Return number of cores in given numa domain.
-
std::size_t get_number_of_numa_node_pus(std::size_t numa) const#
Return number of processing units in a given numa domain.
-
std::size_t get_number_of_socket_pus(std::size_t socket) const#
Return number of processing units in a given socket.
-
std::size_t get_number_of_core_pus(std::size_t core) const#
Return number of processing units in given core.
-
std::size_t get_number_of_socket_cores(std::size_t socket) const#
Return number of cores units in given socket.
-
inline std::size_t get_core_number(std::size_t num_thread, error_code& = throws) const#
-
std::size_t get_pu_number(std::size_t num_core, std::size_t num_pu, error_code &ec = throws) const#
-
std::size_t get_cache_size(mask_cref_type mask, int level) const#
Return the size of the cache associated with the given mask.
-
mask_type get_cpubind_mask(error_code &ec = throws) const#
-
mask_type get_cpubind_mask(std::thread &handle, error_code &ec = throws) const#
-
hwloc_bitmap_ptr cpuset_to_nodeset(mask_cref_type mask) const#
convert a cpu mask into a numa node mask in hwloc bitmap form
-
void write_to_log() const#
-
void *allocate(std::size_t len) const#
This is equivalent to malloc(), except that it tries to allocate page-aligned memory from the OS.
-
void *allocate_membind(std::size_t len, hwloc_bitmap_ptr const &bitmap, hpx_hwloc_membind_policy policy, int flags) const#
allocate memory with binding to a numa node set as specified by the policy and flags (see hwloc docs)
-
int get_numa_domain(void const *addr) const#
-
void deallocate(void *addr, std::size_t len) const noexcept#
Free memory that was previously allocated by allocate.
-
mask_type init_core_affinity_mask_from_core(std::size_t num_core, mask_cref_type default_mask = empty_mask) const#
-
hwloc_bitmap_t mask_to_bitmap(mask_cref_type mask, hwloc_obj_type_t htype, unsigned *count = nullptr) const#
-
mask_type bitmap_to_mask(hwloc_bitmap_t bitmap, hwloc_obj_type_t htype) const#
Public Static Functions
Private Functions
-
void extract_node_mask(hwloc_obj_t parent, mask_type &mask) const#
-
std::size_t extract_node_count_locked(hwloc_obj_t parent, hwloc_obj_type_t type, std::size_t count) const#
-
mask_type init_machine_affinity_mask() const#
-
void init_num_of_pus()#
Private Members
-
hwloc_topology_t topo = nullptr#
-
bool use_pus_as_cores_ = false#
-
mutable mutex_type topo_mtx#
-
mask_type machine_affinity_mask_ = mask_type()#
Private Static Attributes
-
static mask_type empty_mask#
-
topology()#
-
using hwloc_bitmap_ptr = std::shared_ptr<hpx_hwloc_bitmap_wrapper>#
-
namespace threads
util#
See Public API for a list of names and headers that are part of the public HPX API.
hpx/util/insert_checked.hpp#
Defined in header hpx/util/insert_checked.hpp.
See Public API for a list of names and headers that are part of the public HPX API.
-
namespace hpx
-
namespace util
Functions
- template<typename Iterator> constexpr HPX_CXX_CORE_EXPORT bool insert_checked (std::pair< Iterator, bool > const &r) noexcept
Helper function for writing predicates that test whether an std::map insertion succeeded. This inline template function negates the need to explicitly write the sometimes lengthy std::pair<Iterator, bool> type.
- Parameters
r – [in] The return value of a std::map insert operation.
- Returns
This function returns r.second.
- template<typename Iterator> HPX_CXX_CORE_EXPORT bool insert_checked (std::pair< Iterator, bool > const &r, Iterator &it)
Helper function for writing predicates that test whether an std::map insertion succeeded. This inline template function negates the need to explicitly write the sometimes lengthy std::pair<Iterator, bool> type.
- Parameters
r – [in] The return value of a std::map insert operation.
r – [out] A reference to an Iterator, which is set to r.first.
it – [out] on exit, will hold the iterator referring to the inserted element
- Returns
This function returns r.second.
-
namespace util
hpx/util/sed_transform.hpp#
Defined in header hpx/util/sed_transform.hpp.
See Public API for a list of names and headers that are part of the public HPX API.
-
namespace hpx
-
namespace util
Functions
-
bool parse_sed_expression(std::string const &input, std::string &search, std::string &replace)#
Parse a sed command.
Note
Currently, only supports search and replace syntax (s/search/replace/)
- Parameters
input – [in] The content to parse.
search – [out] If the parsing is successful, this string is set to the search expression.
replace – [out] If the parsing is successful, this string is set to the replace expression.
- Returns
true if the parsing was successful, false otherwise.
-
struct sed_transform#
- #include <sed_transform.hpp>
An unary function object which applies a sed command to its subject and returns the resulting string.
Note
Currently, only supports search and replace syntax (s/search/replace/)
-
bool parse_sed_expression(std::string const &input, std::string &search, std::string &replace)#
-
namespace util
actions#
See Public API for a list of names and headers that are part of the public HPX API.
hpx/actions/action_support.hpp#
Defined in header hpx/actions/action_support.hpp.
See Public API for a list of names and headers that are part of the public HPX API.
hpx/actions/actions_fwd.hpp#
Defined in header hpx/actions/actions_fwd.hpp.
See Public API for a list of names and headers that are part of the public HPX API.
hpx/actions/base_action.hpp#
Defined in header hpx/actions/base_action.hpp.
See Public API for a list of names and headers that are part of the public HPX API.
hpx/actions/transfer_action.hpp#
Defined in header hpx/actions/transfer_action.hpp.
See Public API for a list of names and headers that are part of the public HPX API.
hpx/actions/transfer_base_action.hpp#
Defined in header hpx/actions/transfer_base_action.hpp.
See Public API for a list of names and headers that are part of the public HPX API.
actions_base#
See Public API for a list of names and headers that are part of the public HPX API.
hpx/actions_base/actions_base_fwd.hpp#
Defined in header hpx/actions_base/actions_base_fwd.hpp.
See Public API for a list of names and headers that are part of the public HPX API.
-
namespace hpx
-
namespace actions#
-
namespace actions#
hpx/actions_base/actions_base_support.hpp#
Defined in header hpx/actions_base/actions_base_support.hpp.
See Public API for a list of names and headers that are part of the public HPX API.
-
namespace hpx
-
namespace actions
-
namespace actions
HPX_REGISTER_ACTION_DECLARATION, HPX_REGISTER_ACTION#
Defined in header hpx/components.hpp.
See Public API for a list of names and headers that are part of the public HPX API.
Defines
-
HPX_REGISTER_ACTION_DECLARATION(...)#
Declare the necessary component action boilerplate code.
The macro HPX_REGISTER_ACTION_DECLARATION can be used to declare all the boilerplate code which is required for proper functioning of component actions in the context of HPX.
The parameter action is the type of the action to declare the boilerplate for.
This macro can be invoked with an optional second parameter. This parameter specifies a unique name of the action to be used for serialization purposes. The second parameter has to be specified if the first parameter is not usable as a plain (non-qualified) C++ identifier, i.e. the first parameter contains special characters which cannot be part of a C++ identifier, such as ‘<’, ‘>’, or ‘:’.
namespace app { // Define a simple component exposing one action 'print_greeting' class HPX_COMPONENT_EXPORT server : public hpx::components::component_base<server> { void print_greeting () { hpx::cout << "Hey, how are you?\n" << std::flush; } // Component actions need to be declared, this also defines the // type 'print_greeting_action' representing the action. HPX_DEFINE_COMPONENT_ACTION(server, print_greeting, print_greeting_action); }; } // Declare boilerplate code required for each of the component actions. HPX_REGISTER_ACTION_DECLARATION(app::server::print_greeting_action)
- Example:
Note
This macro has to be used once for each of the component actions defined using one of the HPX_DEFINE_COMPONENT_ACTION macros. It has to be visible in all translation units using the action, thus it is recommended to place it into the header file defining the component.
-
HPX_REGISTER_ACTION_DECLARATION_(...)#
-
HPX_REGISTER_ACTION_DECLARATION_1(action)#
-
HPX_REGISTER_ACTION(...)#
Define the necessary component action boilerplate code.
The macro HPX_REGISTER_ACTION can be used to define all the boilerplate code which is required for proper functioning of component actions in the context of HPX.
The parameter action is the type of the action to define the boilerplate for.
This macro can be invoked with an optional second parameter. This parameter specifies a unique name of the action to be used for serialization purposes. The second parameter has to be specified if the first parameter is not usable as a plain (non-qualified) C++ identifier, i.e. the first parameter contains special characters which cannot be part of a C++ identifier, such as ‘<’, ‘>’, or ‘:’.
Note
This macro has to be used once for each of the component actions defined using one of the HPX_DEFINE_COMPONENT_ACTION or HPX_DEFINE_PLAIN_ACTION macros. It has to occur exactly once for each of the actions, thus it is recommended to place it into the source file defining the component.
Note
Only one of the forms of this macro HPX_REGISTER_ACTION or HPX_REGISTER_ACTION_ID should be used for a particular action, never both.
-
HPX_REGISTER_ACTION_ID(action, actionname, actionid)#
Define the necessary component action boilerplate code and assign a predefined unique id to the action.
The macro HPX_REGISTER_ACTION can be used to define all the boilerplate code which is required for proper functioning of component actions in the context of HPX.
The parameter action is the type of the action to define the boilerplate for.
The parameter actionname specifies an unique name of the action to be used for serialization purposes. The second parameter has to be usable as a plain (non-qualified) C++ identifier, it should not contain special characters which cannot be part of a C++ identifier, such as ‘<’, ‘>’, or ‘:’.
The parameter actionid specifies an unique integer value which will be used to represent the action during serialization.
Note
This macro has to be used once for each of the component actions defined using one of the HPX_DEFINE_COMPONENT_ACTION or global actions HPX_DEFINE_PLAIN_ACTION macros. It has to occur exactly once for each of the actions, thus it is recommended to place it into the source file defining the component.
Note
Only one of the forms of this macro HPX_REGISTER_ACTION or HPX_REGISTER_ACTION_ID should be used for a particular action, never both.
-
namespace hpx
-
namespace actions
-
namespace actions
hpx/actions_base/basic_action_fwd.hpp#
Defined in header hpx/actions_base/basic_action_fwd.hpp.
See Public API for a list of names and headers that are part of the public HPX API.
-
namespace hpx
-
namespace actions
-
template<typename Component, typename Signature, typename Derived>
struct basic_action# - #include <basic_action_fwd.hpp>
- Template Parameters
Component – component type
Signature – return type and arguments
Derived – derived action class
-
template<typename Component, typename Signature, typename Derived>
-
namespace actions
HPX_DEFINE_COMPONENT_ACTION#
Defined in header hpx/components.hpp.
See Public API for a list of names and headers that are part of the public HPX API.
Defines
-
HPX_DEFINE_COMPONENT_ACTION(...)#
Registers a member function of a component as an action type with HPX.
The macro HPX_DEFINE_COMPONENT_ACTION can be used to register a member function of a component as an action type named action_type.
The parameter component is the type of the component exposing the member function func which should be associated with the newly defined action type. The parameter
action_typeis the name of the action type to register with HPX.namespace app { // Define a simple component exposing one action 'print_greeting' class HPX_COMPONENT_EXPORT server : public hpx::components::component_base<server> { void print_greeting() const { hpx::cout << "Hey, how are you?\n" << std::flush; } // Component actions need to be declared, this also defines the // type 'print_greeting_action' representing the action. HPX_DEFINE_COMPONENT_ACTION(server, print_greeting, print_greeting_action); }; }
- Example:
The first argument must provide the type name of the component the action is defined for.
The second argument must provide the member function name the action should wrap.
The default value for the third argument (the typename of the defined action) is derived from the name of the function (as passed as the second argument) by appending ‘_action’. The third argument can be omitted only if the second argument with an appended suffix ‘_action’ resolves to a valid, unqualified C++ type name.
Note
The macro HPX_DEFINE_COMPONENT_ACTION can be used with 2 or 3 arguments. The third argument is optional.
-
namespace hpx
-
namespace actions
-
namespace actions
hpx/actions_base/lambda_to_action.hpp#
Defined in header hpx/actions_base/lambda_to_action.hpp.
See Public API for a list of names and headers that are part of the public HPX API.
hpx/actions_base/plain_action.hpp#
Defined in header hpx/actions_base/plain_action.hpp.
See Public API for a list of names and headers that are part of the public HPX API.
Defines
-
HPX_DEFINE_PLAIN_ACTION(...)#
Defines a plain action type.
namespace app { void some_global_function(double d) { cout << d; } // This will define the action type 'app::some_global_action' which // represents the function 'app::some_global_function'. HPX_DEFINE_PLAIN_ACTION(some_global_function, some_global_action); }
- Example:
Note
Usually this macro will not be used in user code unless the intent is to avoid defining the action_type in global namespace. Normally, the use of the macro HPX_PLAIN_ACTION is recommended.
Note
The macro HPX_DEFINE_PLAIN_ACTION can be used with 1 or 2 arguments. The second argument is optional. The default value for the second argument (the typename of the defined action) is derived from the name of the function (as passed as the first argument) by appending ‘_action’. The second argument can be omitted only if the first argument with an appended suffix ‘_action’ resolves to a valid, unqualified C++ type name.
-
HPX_DECLARE_PLAIN_ACTION(...)#
Declares a plain action type.
-
HPX_PLAIN_ACTION(...)#
Defines a plain action type based on the given function func and registers it with HPX.
The macro HPX_PLAIN_ACTION can be used to define a plain action (e.g. an action encapsulating a global or free function) based on the given function func. It defines the action type name representing the given function. This macro additionally registers the newly define action type with HPX.
The parameter
funcis a global or free (non-member) function which should be encapsulated into a plain action. The parameternameis the name of the action type defined by this macro.namespace app { void some_global_function(double d) { cout << d; } } // This will define the action type 'some_global_action' which // represents the function 'app::some_global_function'. HPX_PLAIN_ACTION(app::some_global_function, some_global_action)
- Example:
Note
The macro HPX_PLAIN_ACTION has to be used at global namespace even if the wrapped function is located in some other namespace. The newly defined action type is placed into the global namespace as well.
Note
The macro HPX_PLAIN_ACTION_ID can be used with 1, 2, or 3 arguments. The second and third arguments are optional. The default value for the second argument (the typename of the defined action) is derived from the name of the function (as passed as the first argument) by appending ‘_action’. The second argument can be omitted only if the first argument with an appended suffix ‘_action’ resolves to a valid, unqualified C++ type name. The default value for the third argument is hpx::components::factory_state::check.
Note
Only one of the forms of this macro HPX_PLAIN_ACTION or HPX_PLAIN_ACTION_ID should be used for a particular action, never both.
-
HPX_PLAIN_ACTION_ID(func, name, id)#
Defines a plain action type based on the given function func and registers it with HPX.
The macro HPX_PLAIN_ACTION_ID can be used to define a plain action (e.g. an action encapsulating a global or free function) based on the given function func. It defines the action type actionname representing the given function.
The parameter actionid specifies a unique integer value which will be used to represent the action during serialization.
The parameter
funcis a global or free (non-member) function which should be encapsulated into a plain action. The parameternameis the name of the action type defined by this macro.The second parameter has to be usable as a plain (non-qualified) C++ identifier, it should not contain special characters which cannot be part of a C++ identifier, such as ‘<’, ‘>’, or ‘:’.
namespace app { void some_global_function(double d) { cout << d; } } // This will define the action type 'some_global_action' which // represents the function 'app::some_global_function'. HPX_PLAIN_ACTION_ID(app::some_global_function, some_global_action, some_unique_id);
- Example:
Note
The macro HPX_PLAIN_ACTION_ID has to be used at global namespace even if the wrapped function is located in some other namespace. The newly defined action type is placed into the global namespace as well.
Note
Only one of the forms of this macro HPX_PLAIN_ACTION or HPX_PLAIN_ACTION_ID should be used for a particular action, never both.
-
namespace hpx
-
namespace actions
-
namespace traits
-
namespace actions
hpx/actions_base/preassigned_action_id.hpp#
Defined in header hpx/actions_base/preassigned_action_id.hpp.
See Public API for a list of names and headers that are part of the public HPX API.
-
namespace hpx
-
namespace actions
-
namespace actions
hpx/actions_base/traits/action_remote_result.hpp#
Defined in header hpx/actions_base/traits/action_remote_result.hpp.
See Public API for a list of names and headers that are part of the public HPX API.
-
namespace hpx
-
namespace traits
Typedefs
-
template<typename Result>
using action_remote_result_t = typename action_remote_result<Result>::type#
-
template<typename Result>
-
namespace traits
agas#
See Public API for a list of names and headers that are part of the public HPX API.
hpx/agas/addressing_service.hpp#
Defined in header hpx/agas/addressing_service.hpp.
See Public API for a list of names and headers that are part of the public HPX API.
-
namespace hpx
-
namespace agas#
-
struct addressing_service#
Public Types
-
using component_id_type = components::component_type#
-
using iterate_types_function_type = hpx::function<void(std::string const&, components::component_type), true>#
Public Functions
-
HPX_NON_COPYABLE(addressing_service)#
-
~addressing_service() = default#
-
void adjust_local_cache_size(std::size_t) const#
Adjust the size of the local AGAS Address resolution cache.
-
inline state get_status() const#
-
inline void set_status(state new_state)#
-
inline naming::gid_type const &get_local_locality(error_code& = throws) const#
-
inline bool is_bootstrap() const#
-
inline bool is_console() const#
Returns whether this addressing_service represents the console locality.
-
inline bool is_connecting() const#
Returns whether this addressing_service is connecting to a running application.
-
void register_server_instances()#
-
void garbage_collect_non_blocking(error_code &ec = throws)#
-
void garbage_collect(error_code &ec = throws)#
-
inline server::primary_namespace &get_local_primary_namespace_service()#
-
bool register_locality(parcelset::endpoints_type const &endpoints, naming::gid_type &prefix, std::uint32_t num_threads, error_code &ec = throws)#
Add a locality to the runtime.
-
parcelset::endpoints_type const &resolve_locality(naming::gid_type const &gid, error_code &ec = throws)#
Resolve a locality to its prefix.
- Returns
Returns an empty vector if the locality is not registered.
-
bool unregister_locality(naming::gid_type const &gid, error_code &ec = throws)#
Remove a locality from the runtime.
-
void remove_resolved_locality(naming::gid_type const &gid)#
remove given locality from locality cache
-
bool get_console_locality(naming::gid_type &locality, error_code &ec = throws)#
Get locality locality_id of the console locality.
Note
As long as ec is not pre-initialized to hpx::throws this function doesn’t throw but returns the result code using the parameter ec. Otherwise it throws an instance of hpx::exception.
- Parameters
locality – [out] The locality_id value uniquely identifying the console locality. This is valid only, if the return value of this function is true.
try_cache – [in] If this is set to true the console is first tried to be found in the local cache. Otherwise this function will always query AGAS, even if the console locality_id is already known locally.
ec – [in,out] this represents the error status on exit, if this is pre-initialized to hpx::throws the function will throw on error instead.
- Returns
This function returns true if a console locality_id exists and returns false otherwise.
-
bool get_localities(std::vector<naming::gid_type> &locality_ids, components::component_type type, error_code &ec = throws) const#
Query for the locality_ids of all known localities.
This function returns the locality_ids of all localities known to the AGAS server or all localities having a registered factory for a given component type.
Note
As long as ec is not pre-initialized to hpx::throws this function doesn’t throw but returns the result code using the parameter ec. Otherwise, it throws an instance of hpx::exception.
- Parameters
locality_ids – [out] The vector will contain the prefixes of all localities registered with the AGAS server. The returned vector holds the prefixes representing the runtime_support components of these localities.
type – [in] The component type will be used to determine the set of prefixes having a registered factory for this component. The default value for this parameter is components::component_enum_type::invalid, which will return prefixes of all localities.
ec – [in,out] this represents the error status on exit, if this is pre-initialized to hpx::throws the function will throw on error instead.
-
inline bool get_localities(std::vector<naming::gid_type> &locality_ids, error_code &ec = throws) const#
-
hpx::future<std::uint32_t> get_num_localities_async(components::component_type type = to_int(hpx::components::component_enum_type::invalid)) const#
Query for the number of all known localities.
This function returns the number of localities known to the AGAS server or the number of localities having a registered factory for a given component type.
Note
As long as ec is not pre-initialized to hpx::throws this function doesn’t throw but returns the result code using the parameter ec. Otherwise, it throws an instance of hpx::exception.
- Parameters
type – [in] The component type will be used to determine the set of prefixes having a registered factory for this component. The default value for this parameter is components::component_type::invalid, which will return prefixes of all localities.
ec – [in,out] this represents the error status on exit, if this is pre-initialized to hpx::throws the function will throw on error instead.
-
std::uint32_t get_num_localities(components::component_type type, error_code &ec = throws) const#
-
inline std::uint32_t get_num_localities(error_code &ec = throws) const#
-
std::uint32_t get_num_overall_threads(error_code &ec = throws) const#
-
std::vector<std::uint32_t> get_num_threads(error_code &ec = throws) const#
-
components::component_type get_component_id(std::string const &name, error_code &ec = throws) const#
Return a unique id usable as a component type.
This function returns the component type id associated with the given component name. If this is the first request for this component name a new unique id will be created.
Note
As long as ec is not pre-initialized to hpx::throws this function doesn’t throw but returns the result code using the parameter ec. Otherwise it throws an instance of hpx::exception.
- Parameters
name – [in] The component name (string) to get the component type for.
ec – [in,out] this represents the error status on exit, if this is pre-initialized to hpx::throws the function will throw on error instead.
- Returns
The function returns the currently associated component type. Any error results in an exception thrown from this function.
-
void iterate_types(iterate_types_function_type const &f, error_code &ec = throws) const#
-
std::string get_component_type_name(components::component_type id, error_code &ec = throws) const#
-
inline components::component_type register_factory(naming::gid_type const &locality_id, std::string const &name, error_code &ec = throws) const#
Register a factory for a specific component type.
This function allows to register a component factory for a given locality and component type.
Note
As long as ec is not pre-initialized to hpx::throws this function doesn’t throw but returns the result code using the parameter ec. Otherwise it throws an instance of hpx::exception.
- Parameters
locality_id – [in] The locality value uniquely identifying the given locality the factory needs to be registered for.
name – [in] The component name (string) to register a factory for the given component type for.
ec – [in,out] this represents the error status on exit, if this is pre-initialized to hpx::throws the function will throw on error instead.
- Returns
The function returns the currently associated component type. Any error results in an exception thrown from this function. The returned component type is the same as if the function get_component_id was called using the same component name.
-
components::component_type register_factory(std::uint32_t locality_id, std::string const &name, error_code &ec = throws) const#
-
bool get_id_range(std::uint64_t count, naming::gid_type &lower_bound, naming::gid_type &upper_bound, error_code &ec = throws)#
Get unique range of freely assignable global ids.
Every locality needs to be able to assign global ids to different components without having to consult the AGAS server for every id to generate. This function can be called to preallocate a range of ids usable for this purpose.
Note
This function assigns a range of global ids usable by the given locality for newly created components. Any of the returned global ids still has to be bound to a local address, either by calling bind or bind_range.
Note
As long as ec is not pre-initialized to hpx::throws this function doesn’t throw but returns the result code using the parameter ec. Otherwise it throws an instance of hpx::exception.
- Parameters
l – [in] The locality the locality id needs to be generated for. Repeating calls using the same locality results in identical locality_id values.
count – [in] The number of global ids to be generated.
lower_bound – [out] The lower bound of the assigned id range. The returned value can be used as the first id to assign. This is valid only, if the return value of this function is true.
upper_bound – [out] The upper bound of the assigned id range. The returned value can be used as the last id to assign. This is valid only, if the return value of this function is true.
ec – [in,out] this represents the error status on exit, if this is pre-initialized to hpx::throws the function will throw on error instead.
- Returns
This function returns true if a new range has been generated (it has been called for the first time for the given locality) and returns false if this locality already got a range assigned in an earlier call. Any error results in an exception thrown from this function.
-
inline bool bind_local(naming::gid_type const &id, naming::address const &addr, error_code &ec = throws)#
Bind a global address to a local address.
Every element in the HPX namespace has a unique global address (global id). This global address has to be associated with a concrete local address to be able to address an instance of a component using its global address.
Note
As long as ec is not pre-initialized to hpx::throws this function doesn’t throw but returns the result code using the parameter ec. Otherwise it throws an instance of hpx::exception.
Note
Binding a gid to a local address sets its global reference count to one.
- Parameters
id – [in] The global address which has to be bound to the local address.
addr – [in] The local address to be bound to the global address.
ec – [in,out] this represents the error status on exit, if this is pre-initialized to hpx::throws the function will throw on error instead.
- Returns
This function returns true, if this global id got associated with an local address. It returns false otherwise.
-
inline hpx::future<bool> bind_async(naming::gid_type const &id, naming::address const &addr, std::uint32_t locality_id)#
-
inline hpx::future<bool> bind_async(naming::gid_type const &id, naming::address const &addr, naming::gid_type const &locality)#
-
bool bind_range_local(naming::gid_type const &lower_id, std::uint64_t count, naming::address const &baseaddr, std::uint64_t offset, error_code &ec = throws)#
Bind unique range of global ids to given base address.
Every locality needs to be able to bind global ids to different components without having to consult the AGAS server for every id to bind. This function can be called to bind a range of consecutive global ids to a range of consecutive local addresses (separated by a given offset).
Note
As long as ec is not pre-initialized to hpx::throws this function doesn’t throw but returns the result code using the parameter ec. Otherwise it throws an instance of hpx::exception.
Note
Binding a gid to a local address sets its global reference count to one.
- Parameters
lower_id – [in] The lower bound of the assigned id range. The value can be used as the first id to assign.
count – [in] The number of consecutive global ids to bind starting at lower_id.
baseaddr – [in] The local address to bind to the global id given by lower_id. This is the base address for all additional local addresses to bind to the remaining global ids.
offset – [in] The offset to use to calculate the local addresses to be bound to the range of global ids.
ec – [in,out] this represents the error status on exit, if this is pre-initialized to hpx::throws the function will throw on error instead.
- Returns
This function returns true, if the given range was successfully bound. It returns false otherwise.
-
hpx::future<bool> bind_range_async(naming::gid_type const &lower_id, std::uint64_t count, naming::address const &baseaddr, std::uint64_t offset, naming::gid_type const &locality)#
-
inline hpx::future<bool> bind_range_async(naming::gid_type const &lower_id, std::uint64_t count, naming::address const &baseaddr, std::uint64_t offset, std::uint32_t locality_id)#
-
inline bool unbind_local(naming::gid_type const &id, error_code &ec = throws)#
Unbind a global address.
Remove the association of the given global address with any local address, which was bound to this global address. Additionally it returns the local address which was bound at the time of this call.
Note
You can unbind only global ids bound using the function bind. Do not use this function to unbind any of the global ids bound using bind_range.
Note
As long as ec is not pre-initialized to hpx::throws this function doesn’t throw but returns the result code using the parameter ec. Otherwise it throws an instance of hpx::exception.
Note
This function will raise an error if the global reference count of the given gid is not zero!
- Parameters
id – [in] The global address (id) for which the association has to be removed.
ec – [in,out] this represents the error status on exit, if this is pre-initialized to hpx::throws the function will throw on error instead.
- Returns
The function returns true if the association has been removed, and it returns false if no association existed. Any error results in an exception thrown from this function.
-
inline bool unbind_local(naming::gid_type const &id, naming::address &addr, error_code &ec = throws)#
Unbind a global address.
Remove the association of the given global address with any local address, which was bound to this global address. Additionally it returns the local address which was bound at the time of this call.
Note
You can unbind only global ids bound using the function bind. Do not use this function to unbind any of the global ids bound using bind_range.
Note
As long as ec is not pre-initialized to hpx::throws this function doesn’t throw but returns the result code using the parameter ec. Otherwise it throws an instance of hpx::exception.
Note
This function will raise an error if the global reference count of the given gid is not zero!
- Parameters
id – [in] The global address (id) for which the association has to be removed.
addr – [out] The local address which was associated with the given global address (id). This is valid only if the return value of this function is true.
ec – [in,out] this represents the error status on exit, if this is pre-initialized to hpx::throws the function will throw on error instead.
- Returns
The function returns true if the association has been removed, and it returns false if no association existed. Any error results in an exception thrown from this function.
-
inline bool unbind_range_local(naming::gid_type const &lower_id, std::uint64_t count, error_code &ec = throws)#
Unbind the given range of global ids.
Note
You can unbind only global ids bound using the function bind_range. Do not use this function to unbind any of the global ids bound using bind.
Note
As long as ec is not pre-initialized to hpx::throws this function doesn’t throw but returns the result code using the parameter ec. Otherwise it throws an instance of hpx::exception.
Note
This function will raise an error if the global reference count of the given gid is not zero!
- Parameters
lower_id – [in] The lower bound of the assigned id range. The value must the first id of the range as specified to the corresponding call to bind_range.
count – [in] The number of consecutive global ids to unbind starting at lower_id. This number must be identical to the number of global ids bound by the corresponding call to bind_range
ec – [in,out] this represents the error status on exit, if this is pre-initialized to hpx::throws the function will throw on error instead.
- Returns
This function returns true if a new range has been generated (it has been called for the first time for the given locality) and returns false if this locality already got a range assigned in an earlier call. Any error results in an exception thrown from this function.
-
bool unbind_range_local(naming::gid_type const &lower_id, std::uint64_t count, naming::address &addr, error_code &ec = throws)#
Unbind the given range of global ids.
Note
You can unbind only global ids bound using the function bind_range. Do not use this function to unbind any of the global ids bound using bind.
Note
As long as ec is not pre-initialized to hpx::throws this function doesn’t throw but returns the result code using the parameter ec. Otherwise it throws an instance of hpx::exception.
Note
This function will raise an error if the global reference count of the given gid is not zero!
- Parameters
lower_id – [in] The lower bound of the assigned id range. The value must the first id of the range as specified to the corresponding call to bind_range.
count – [in] The number of consecutive global ids to unbind starting at lower_id. This number must be identical to the number of global ids bound by the corresponding call to bind_range
addr – [out] The local address which was associated with the given global address (id). This is valid only if the return value of this function is true.
ec – [in,out] this represents the error status on exit, if this is pre-initialized to hpx::throws the function will throw on error instead.
- Returns
This function returns true if a new range has been generated (it has been called for the first time for the given locality) and returns false if this locality already got a range assigned in an earlier call.
-
hpx::future<naming::address> unbind_range_async(naming::gid_type const &lower_id, std::uint64_t count = 1)#
-
inline bool is_local_address_cached(naming::gid_type const &id, error_code &ec = throws)#
Test whether the given address refers to a local object.
This function will test whether the given address refers to an object living on the locality of the caller.
Note
As long as ec is not pre-initialized to hpx::throws this function doesn’t throw but returns the result code using the parameter ec. Otherwise it throws an instance of hpx::exception.
- Parameters
id – [in] The address to test.
ec – [in,out] this represents the error status on exit, if this is pre-initialized to hpx::throws the function will throw on error instead.
- Returns
This function returns true if the passed address refers to an object which lives on the locality of the caller.
-
bool is_local_address_cached(naming::gid_type const &id, naming::address &addr, error_code &ec = throws)#
-
bool is_local_address_cached(naming::gid_type const &id, naming::address &addr, std::pair<bool, components::pinned_ptr> &r, hpx::move_only_function<std::pair<bool, components::pinned_ptr>(naming::address const&)> &&f, error_code &ec = throws)#
-
inline bool resolve_local(naming::gid_type const &id, naming::address &addr, error_code &ec = throws)#
Resolve a given global address (id) to its associated local address.
This function returns the local address which is currently associated with the given global address (id).
Note
As long as ec is not pre-initialized to hpx::throws this function doesn’t throw but returns the result code using the parameter ec. Otherwise it throws an instance of hpx::exception.
- Parameters
id – [in] The global address (id) for which the associated local address should be returned.
addr – [out] The local address which currently is associated with the given global address (id), this is valid only if the return value of this function is true.
ec – [in,out] this represents the error status on exit, if this is pre-initialized to hpx::throws the function will throw on error instead.
- Returns
This function returns true if the global address has been resolved successfully (there exists an association to a local address) and the associated local address has been returned. The function returns false if no association exists for the given global address. Any error results in an exception thrown from this function.
-
inline bool resolve_local(hpx::id_type const &id, naming::address &addr, error_code &ec = throws)#
-
inline naming::address resolve_local(naming::gid_type const &id, error_code &ec = throws)#
-
inline naming::address resolve_local(hpx::id_type const &id, error_code &ec = throws)#
-
bool resolve_full_local(naming::gid_type const &id, naming::address &addr, error_code &ec = throws)#
-
inline bool resolve_full_local(hpx::id_type const &id, naming::address &addr, error_code &ec = throws)#
-
inline naming::address resolve_full_local(naming::gid_type const &id, error_code &ec = throws)#
-
inline naming::address resolve_full_local(hpx::id_type const &id, error_code &ec = throws)#
-
bool resolve_cached(naming::gid_type const &id, naming::address &addr, error_code &ec = throws)#
-
inline bool resolve_cached(hpx::id_type const &id, naming::address &addr, error_code &ec = throws)#
-
inline bool resolve_local(naming::gid_type const *gids, naming::address *addrs, std::size_t size, hpx::detail::dynamic_bitset<> &locals, error_code &ec = throws)#
-
bool resolve_full_local(naming::gid_type const *gids, naming::address *addrs, std::size_t size, hpx::detail::dynamic_bitset<> &locals, error_code &ec = throws)#
-
bool resolve_cached(naming::gid_type const *gids, naming::address *addrs, std::size_t size, hpx::detail::dynamic_bitset<> &locals, error_code &ec = throws)#
-
hpx::future_or_value<std::int64_t> incref_async(naming::gid_type const &gid, std::int64_t credits = 1, hpx::id_type const &keep_alive = hpx::invalid_id)#
Increment the global reference count for the given id.
Note
As long as ec is not pre-initialized to hpx::throws this function doesn’t throw but returns the result code using the parameter ec. Otherwise it throws an instance of hpx::exception.
- Parameters
gid – [in] The global address (id) for which the global reference count has to be incremented.
credits – [in] The number of reference counts to add for the given id.
keep_alive – [in] Id to keep alive (if valid)
ec – [in,out] this represents the error status on exit, if this is pre-initialized to hpx::throws the function will throw on error instead.
- Returns
Whether the operation was successful.
-
inline std::int64_t incref(naming::gid_type const &gid, std::int64_t credits = 1, error_code &ec = throws)#
-
void decref(naming::gid_type const &id, std::int64_t credits = 1, error_code &ec = throws)#
Decrement the global reference count for the given id.
Note
As long as ec is not pre-initialized to hpx::throws this function doesn’t throw but returns the result code using the parameter ec. Otherwise it throws an instance of hpx::exception.
- Parameters
id – [in] The global address (id) for which the global reference count has to be decremented.
t – [out] If this was the last outstanding global reference for the given gid (the return value of this function is zero), t will be set to the component type of the corresponding element. Otherwise t will not be modified.
credits – [in] The number of reference counts to add for the given id.
ec – [in,out] this represents the error status on exit, if this is pre-initialized to hpx::throws the function will throw on error instead.
- Returns
The global reference count after the decrement.
-
hpx::future<iterate_names_return_type> iterate_ids(std::string const &pattern) const#
Invoke the supplied hpx::function for every registered global name.
This function iterates over all registered global ids and returns every found entry matching the given name pattern. Any error results in an exception thrown (or reported) from this function.
- Parameters
pattern – [in] pattern (possibly using wildcards) to match all existing entries against
-
bool register_name(std::string const &name, naming::gid_type const &id, error_code &ec = throws) const#
Register a global name with a global address (id)
This function registers an association between a global name (string) and a global address (id) usable with one of the functions above (bind, unbind, and resolve).
Note
As long as ec is not pre-initialized to hpx::throws this function doesn’t throw but returns the result code using the parameter ec. Otherwise it throws an instance of hpx::exception.
- Parameters
name – [in] The global name (string) to be associated with the global address.
id – [in] The global address (id) to be associated with the global address.
ec – [in,out] this represents the error status on exit, if this is pre-initialized to hpx::throws the function will throw on error instead.
- Returns
The function returns true if the global name was registered. It returns false if the global name is not registered.
-
bool register_name(std::string const &name, hpx::id_type const &id, error_code &ec = throws) const#
-
hpx::future<hpx::id_type> unregister_name_async(std::string const &name) const#
Unregister a global name (release any existing association)
This function releases any existing association of the given global name with a global address (id).
Note
As long as ec is not pre-initialized to hpx::throws this function doesn’t throw but returns the result code using the parameter ec. Otherwise it throws an instance of hpx::exception.
- Parameters
name – [in] The global name (string) for which any association with a global address (id) has to be released.
ec – [in,out] this represents the error status on exit, if this is pre-initialized to hpx::throws the function will throw on error instead.
- Returns
The function returns true if an association of this global name has been released, and it returns false, if no association existed. Any error results in an exception thrown from this function.
-
hpx::id_type unregister_name(std::string const &name, error_code &ec = throws) const#
-
hpx::future<hpx::id_type> resolve_name_async(std::string const &name) const#
Query for the global address associated with a given global name.
This function returns the global address associated with the given global name.
This function returns true if it returned global address (id), which is currently associated with the given global name, and it returns false, if currently there is no association for this global name. Any error results in an exception thrown from this function.
Note
As long as ec is not pre-initialized to hpx::throws this function doesn’t throw but returns the result code using the parameter ec. Otherwise it throws an instance of hpx::exception.
- Parameters
name – [in] The global name (string) for which the currently associated global address has to be retrieved.
ec – [in,out] this represents the error status on exit, if this is pre-initialized to hpx::throws the function will throw on error instead.
- Returns
[out] The id currently associated with the given global name (valid only if the return value is true).
-
hpx::id_type resolve_name(std::string const &name, error_code &ec = throws) const#
-
future<hpx::id_type> on_symbol_namespace_event(std::string const &name, bool call_for_past_events = false) const#
Install a listener for a given symbol namespace event.
This function installs a listener for a given symbol namespace event. It returns a future which becomes ready as a result of the listener being triggered.
Note
The only event type which is currently supported is symbol_ns_bind, i.e. the listener is triggered whenever a global id is registered with the given name.
- Parameters
name – [in] The global name (string) for which the given event should be triggered.
evt – [in] The event for which a listener should be installed.
call_for_past_events – [in, optional] Trigger the listener even if the given event has already happened in the past. The default for this parameter is false.
- Returns
A future instance encapsulating the global id which is causing the registered listener to be triggered.
-
void update_cache_entry(naming::gid_type const &gid, gva const &gva, error_code &ec = throws)#
Warning
This function is for internal use only. It is dangerous and may break your code if you use it.
-
inline void update_cache_entry(naming::gid_type const &gid, naming::address const &addr, std::uint64_t count = 0, std::uint64_t offset = 0, error_code &ec = throws)#
Warning
This function is for internal use only. It is dangerous and may break your code if you use it.
-
bool get_cache_entry(naming::gid_type const &gid, gva &gva, naming::gid_type &idbase, error_code &ec = throws) const#
Warning
This function is for internal use only. It is dangerous and may break your code if you use it.
-
void remove_cache_entry(naming::gid_type const &id, error_code &ec = throws) const#
Warning
This function is for internal use only. It is dangerous and may break your code if you use it.
-
void clear_cache(error_code &ec = throws) const#
Warning
This function is for internal use only. It is dangerous and may break your code if you use it.
-
void start_shutdown(error_code &ec = throws)#
-
hpx::future<std::pair<hpx::id_type, naming::address>> begin_migration(hpx::id_type const &id)#
start/stop migration of an object
- Returns
Current locality and address of the object to migrate
-
std::pair<bool, components::pinned_ptr> was_object_migrated(naming::gid_type const &gid, hpx::move_only_function<components::pinned_ptr()> &&f)#
Maintain list of migrated objects.
-
hpx::future<void> mark_as_migrated(naming::gid_type const &gid, hpx::move_only_function<std::pair<bool, hpx::future<void>>()> &&f, bool expect_to_be_marked_as_migrating)#
Mark the given object as being migrated (if the object is unpinned). Delay migration until the object is unpinned otherwise.
-
void unmark_as_migrated(naming::gid_type const &gid_, hpx::move_only_function<void()> &&f)#
Remove the given object from the table of migrated objects.
Public Members
-
mutable hpx::shared_mutex gva_cache_mtx_#
-
std::shared_ptr<gva_cache_type> gva_cache_#
-
mutable mutex_type migrated_objects_mtx_ = mutex_type("addressing_service::migrated_objects_mtx")#
-
migrated_objects_table_type migrated_objects_table_#
-
mutable mutex_type console_cache_mtx_ = mutex_type("addressing_service::console_cache_mtx")#
-
mutex_type refcnt_requests_mtx_ = mutex_type("addressing_service::refcnt_requests_mtx")#
-
bool enable_refcnt_caching_#
-
std::shared_ptr<refcnt_requests_type> refcnt_requests_#
-
const service_mode service_type#
-
const runtime_mode runtime_type#
-
const bool caching_#
-
const bool range_caching_#
-
const threads::thread_priority action_priority_#
-
symbol_namespace symbol_ns_#
-
primary_namespace primary_ns_#
-
mutable hpx::shared_mutex resolved_localities_mtx_#
-
resolved_localities_type resolved_localities_#
Public Static Functions
Protected Functions
-
void launch_bootstrap(parcelset::endpoints_type const &endpoints, util::runtime_configuration &rtcfg)#
Private Functions
-
void send_refcnt_requests(std::unique_lock<mutex_type> &l, error_code &ec = throws)#
Assumes that refcnt_requests_mtx_ is locked.
-
void send_refcnt_requests_non_blocking(std::unique_lock<mutex_type> &l, error_code &ec)#
Assumes that refcnt_requests_mtx_ is locked.
-
std::vector<hpx::future<std::vector<std::int64_t>>> send_refcnt_requests_async(std::unique_lock<mutex_type> &l)#
Assumes that refcnt_requests_mtx_ is locked.
-
void send_refcnt_requests_sync(std::unique_lock<mutex_type> &l, error_code &ec)#
Assumes that refcnt_requests_mtx_ is locked.
-
using component_id_type = components::component_type#
-
struct addressing_service#
-
namespace agas#
agas_base#
See Public API for a list of names and headers that are part of the public HPX API.
hpx/agas_base/server/primary_namespace.hpp#
Defined in header hpx/agas_base/server/primary_namespace.hpp.
See Public API for a list of names and headers that are part of the public HPX API.
Variables
- HPX_ACTION_USES_MEDIUM_STACK(hpx::agas::server::primary_namespace::allocate_action) HPX_REGISTER_ACTION_DECLARATION(hpx typedef std::pair< hpx::id_type, hpx::naming::address > std_pair_address_id_type
-
namespace hpx
-
namespace agas
Functions
-
namespace server#
AGAS’s primary namespace maps 128-bit global identifiers (GIDs) to resolved addresses.
The following is the canonical description of the partitioning of AGAS’s primary namespace.
|-----MSB------||------LSB-----| BBBBBBBBBBBBBBBBBBBBBBBBBBBBBBBB |prefix||RC||----identifier----| MSB - Most significant bits (bit 64 to bit 127) LSB - Least significant bits (bit 0 to bit 63) prefix - Highest 32 bits (bit 96 to bit 127) of the MSB. Each locality is assigned a prefix. This creates a 96-bit address space for each locality. RC - Bit 88 to bit 92 of the MSB. This is the log2 of the number of reference counting credits on the GID. Bit 93 is used by the locking scheme for gid_types. Bit 94 is a flag which is set if the credit value is valid. Bit 95 is a flag that is set if a GID's credit count is ever split (e.g. if the GID is ever passed to another locality). - Bit 87 marks the gid such that it will not be stored in any of the AGAS caches. This is used mainly for ids which represent 'one-shot' objects (like promises). identifier - Bit 64 to bit 86 of the MSB, and the entire LSB. The content of these bits depends on the component type of the underlying object. For all user-defined components, these bits contain a unique 88-bit number which is assigned sequentially for each locality. For \a hpx#components#component_enum_type#runtime_support the high 24 bits are zeroed and the low 64 bits hold the LVA of the component.The following address ranges are reserved. Some are either explicitly or implicitly protected by AGAS. The letter x represents a single-byte wild card.
00000000xxxxxxxxxxxxxxxxxxxxxxxx Historically unused address space reserved for future use. xxxxxxxxxxxx0000xxxxxxxxxxxxxxxx Address space for LVA-encoded GIDs. 00000001xxxxxxxxxxxxxxxxxxxxxxxx Prefix of the bootstrap AGAS locality. 00000001000000010000000000000001 Address of the primary_namespace component on the bootstrap AGAS locality. 00000001000000010000000000000002 Address of the component_namespace component on the bootstrap AGAS locality. 00000001000000010000000000000003 Address of the symbol_namespace component on the bootstrap AGAS locality. 00000001000000010000000000000004 Address of the locality_namespace component on the bootstrap AGAS locality.
Note
The layout of the address space is implementation defined, and subject to change. Never write application code that relies on the internal layout of GIDs. AGAS only guarantees that all assigned GIDs will be unique.
Variables
-
static constexpr char const *const primary_namespace_service_name = "primary/"#
-
struct primary_namespace : public components::fixed_component_base<primary_namespace>#
Public Types
-
using base_type = components::fixed_component_base<primary_namespace>#
-
using gva_table_type = std::map<naming::gid_type, gva_table_data_type>#
Public Functions
-
inline mutex_type &mutex()#
-
void wait_for_migration_locked(std::unique_lock<mutex_type> &l, naming::gid_type const &id, error_code &ec)#
-
inline primary_namespace()#
-
void finalize() const#
-
void register_server_instance(char const *servicename, std::uint32_t locality_id = naming::invalid_locality_id, error_code &ec = throws)#
-
void unregister_server_instance(error_code &ec = throws) const#
-
resolved_type resolve_gid(naming::gid_type const &id)#
-
std::int64_t increment_credit(std::int64_t credits, naming::gid_type lower, naming::gid_type upper)#
-
std::vector<std::int64_t> decrement_credit(std::vector<hpx::tuple<std::int64_t, naming::gid_type, naming::gid_type>> const &requests)#
-
resolved_type resolve_gid_locked(std::unique_lock<mutex_type> &l, naming::gid_type const &gid, error_code &ec)#
Public Members
-
counter_data counter_data_#
Private Types
-
using migration_table_type = std::map<naming::gid_type, hpx::tuple<bool, std::size_t, lcos::local::detail::condition_variable>>#
-
using free_entry_allocator_type = util::internal_allocator<free_entry>#
-
using free_entry_list_type = std::list<free_entry, free_entry_allocator_type>#
Private Functions
-
resolved_type resolve_gid_locked_non_local(std::unique_lock<mutex_type> &l, naming::gid_type const &gid, error_code &ec)#
-
void increment(naming::gid_type const &lower, naming::gid_type const &upper, std::int64_t const &credits, error_code &ec)#
-
void resolve_free_list(std::unique_lock<mutex_type> &l, std::list<refcnt_table_type::iterator> const &free_list, free_entry_list_type &free_entry_list, naming::gid_type const &lower, naming::gid_type const &upper, error_code &ec)#
-
void decrement_sweep(free_entry_list_type &free_list, naming::gid_type const &lower, naming::gid_type const &upper, std::int64_t credits, error_code &ec)#
-
void free_components_sync(free_entry_list_type const &free_list, naming::gid_type const &lower, naming::gid_type const &upper, error_code &ec) const#
Private Members
-
mutex_type mutex_ = mutex_type("primary_namespace")#
-
gva_table_type gvas_#
-
refcnt_table_type refcnts_#
-
migration_table_type migrating_objects_#
-
struct counter_data#
Public Functions
-
HPX_NON_COPYABLE(counter_data)#
-
counter_data() = default#
-
void increment_bind_gid_count()#
-
void increment_resolve_gid_count()#
-
void increment_unbind_gid_count()#
-
void increment_increment_credit_count()#
-
void increment_decrement_credit_count()#
-
void increment_allocate_count()#
-
void increment_begin_migration_count()#
-
void increment_end_migration_count()#
-
void enable_all()#
Public Members
-
api_counter_data bind_gid_#
-
api_counter_data resolve_gid_#
-
api_counter_data unbind_gid_#
-
api_counter_data increment_credit_#
-
api_counter_data decrement_credit_#
-
api_counter_data allocate_#
-
api_counter_data begin_migration_#
-
api_counter_data end_migration_#
-
HPX_NON_COPYABLE(counter_data)#
-
using base_type = components::fixed_component_base<primary_namespace>#
-
static constexpr char const *const primary_namespace_service_name = "primary/"#
-
namespace server#
-
namespace agas
async_colocated#
See Public API for a list of names and headers that are part of the public HPX API.
hpx::get_colocation_id#
Defined in header hpx/runtime.hpp.
See Public API for a list of names and headers that are part of the public HPX API.
-
namespace hpx
Functions
-
hpx::id_type get_colocation_id(launch::sync_policy, hpx::id_type const &id, error_code &ec = throws)#
Return the id of the locality where the object referenced by the given id is currently located on.
The function hpx::get_colocation_id() returns the id of the locality where the given object is currently located.
See also
Note
As long as ec is not pre-initialized to hpx::throws this function doesn’t throw but returns the result code using the parameter ec. Otherwise it throws an instance of hpx::exception.
- Parameters
id – [in] The id of the object to locate.
ec – [in,out] this represents the error status on exit, if this is pre-initialized to hpx::throws the function will throw on error instead.
-
hpx::id_type get_colocation_id(launch::sync_policy, hpx::id_type const &id, error_code &ec = throws)#
async_distributed#
See Public API for a list of names and headers that are part of the public HPX API.
hpx::async (distributed)#
Defined in header hpx/async.hpp.
See Public API for a list of names and headers that are part of the public HPX API.
-
namespace hpx
Functions
-
template<typename Action, typename Target, typename ...Ts>
auto async(Action &&action, Target &&target, Ts&&... ts)# The distributed implementation of
hpx::asynccan be used by giving an action instance as argument instead of a function, and also by providing another argument with the locality ID or the target ID. The action executes asynchronously.- Template Parameters
Action – The type of action instance
Target – The type of target where the action should be executed
Ts – The type of any additional arguments
- Parameters
action – The action instance to be executed
target – The target where the action should be executed
ts – Additional arguments
- Returns
hpx::futurereferring to the shared state created by this call tohpx::async
-
template<typename Action, typename Target, typename ...Ts>
hpx/async_distributed/base_lco.hpp#
Defined in header hpx/async_distributed/base_lco.hpp.
See Public API for a list of names and headers that are part of the public HPX API.
-
namespace hpx
- template<> base_lco >
- template<> base_lco const >
-
namespace lcos
-
class base_lco#
- #include <base_lco.hpp>
The base_lco class is the common base class for all LCO’s implementing a simple set_event action
Subclassed by hpx::lcos::base_lco_with_value< Result, RemoteResult, ComponentTag >, hpx::lcos::base_lco_with_value< void, void, ComponentTag >
Public Types
-
typedef components::managed_component<base_lco> wrapping_type#
Public Functions
-
virtual void set_event() = 0#
-
virtual ~base_lco()#
Destructor, needs to be virtual to allow for clean destruction of derived objects
-
void set_event_nonvirt()#
The function set_event_nonvirt is called whenever a set_event_action is applied on a instance of a LCO. This function just forwards to the virtual function set_event, which is overloaded by the derived concrete LCO.
-
void set_exception_nonvirt(std::exception_ptr const &e)#
The function set_exception is called whenever a set_exception_action is applied on a instance of a LCO. This function just forwards to the virtual function set_exception, which is overloaded by the derived concrete LCO.
- Parameters
e – [in] The exception encapsulating the error to report to this LCO instance.
-
void connect_nonvirt(hpx::id_type const &id)#
The function connect_nonvirt is called whenever a connect_action is applied on a instance of a LCO. This function just forwards to the virtual function connect, which is overloaded by the derived concrete LCO.
- Parameters
id – [in] target id
-
void disconnect_nonvirt(hpx::id_type const &id)
The function disconnect_nonvirt is called whenever a disconnect_action is applied on a instance of a LCO. This function just forwards to the virtual function disconnect, which is overloaded by the derived concrete LCO.
- Parameters
id – [in] target id
- HPX_DEFINE_COMPONENT_DIRECT_ACTION (base_lco, set_event_nonvirt, set_event_action) HPX_DEFINE_COMPONENT_DIRECT_ACTION(base_lco
Each of the exposed functions needs to be encapsulated into an action type, allowing to generate all required boilerplate code for threads, serialization, etc.
The set_event_action may be used to unconditionally trigger any LCO instances, it carries no additional parameters. The set_exception_action may be used to transfer arbitrary error information from the remote site to the LCO instance specified as a continuation. This action carries 2 parameters:
- Parameters
std::exception_ptr – [in] The exception encapsulating the error to report to this LCO instance.
- set_exception_action HPX_DEFINE_COMPONENT_DIRECT_ACTION (base_lco, connect_nonvirt, connect_action) HPX_DEFINE_COMPONENT_DIRECT_ACTION(base_lco
The connect_action may be used to.
The set_exception_action may be used to
Public Static Functions
-
static components::component_type get_component_type() noexcept#
-
static void set_component_type(components::component_type type)#
-
typedef components::managed_component<base_lco> wrapping_type#
-
class base_lco#
hpx/async_distributed/base_lco_with_value.hpp#
Defined in header hpx/async_distributed/base_lco_with_value.hpp.
See Public API for a list of names and headers that are part of the public HPX API.
Defines
-
HPX_REGISTER_BASE_LCO_WITH_VALUE_DECLARATION(...)#
-
HPX_REGISTER_BASE_LCO_WITH_VALUE_DECLARATION_(...)#
-
HPX_REGISTER_BASE_LCO_WITH_VALUE_DECLARATION2(Value, RemoteValue, Name)#
-
HPX_REGISTER_BASE_LCO_WITH_VALUE_DECLARATION_1(Value)#
-
HPX_REGISTER_BASE_LCO_WITH_VALUE_DECLARATION_2(Value, Name)#
-
HPX_REGISTER_BASE_LCO_WITH_VALUE_DECLARATION_3(Value, RemoteValue, Name)#
-
HPX_REGISTER_BASE_LCO_WITH_VALUE_DECLARATION_4(Value, RemoteValue, Name, Tag)#
-
HPX_REGISTER_BASE_LCO_WITH_VALUE(...)#
-
HPX_REGISTER_BASE_LCO_WITH_VALUE_(...)#
-
HPX_REGISTER_BASE_LCO_WITH_VALUE_1(Value)#
-
HPX_REGISTER_BASE_LCO_WITH_VALUE_2(Value, Name)#
-
HPX_REGISTER_BASE_LCO_WITH_VALUE_3(Value, RemoteValue, Name)#
-
HPX_REGISTER_BASE_LCO_WITH_VALUE_4(Value, RemoteValue, Name, Tag)#
-
HPX_REGISTER_BASE_LCO_WITH_VALUE_ID(...)#
-
HPX_REGISTER_BASE_LCO_WITH_VALUE_ID_(...)#
-
HPX_REGISTER_BASE_LCO_WITH_VALUE_ID2(Value, RemoteValue, Name, ActionIdGet, ActionIdSet)#
-
HPX_REGISTER_BASE_LCO_WITH_VALUE_ID_4(Value, Name, ActionIdGet, ActionIdSet)#
-
HPX_REGISTER_BASE_LCO_WITH_VALUE_ID_5(Value, RemoteValue, Name, ActionIdGet, ActionIdSet)#
-
HPX_REGISTER_BASE_LCO_WITH_VALUE_ID_6(Value, RemoteValue, Name, ActionIdGet, ActionIdSet, Tag)#
-
namespace hpx
-
namespace components
-
namespace lcos
-
template<typename Result, typename RemoteResult, typename ComponentTag>
class base_lco_with_value : public hpx::lcos::base_lco, public ComponentTag# - #include <base_lco_with_value.hpp>
The base_lco_with_value class is the common base class for all LCO’s synchronizing on a value. The RemoteResult template argument should be set to the type of the argument expected for the set_value action.
- Template Parameters
RemoteResult – The type of the result value to be carried back to the LCO instance.
ComponentTag – The tag type representing the type of the component (either component_tag or managed_component_tag).
Public Types
-
using wrapping_type = typename detail::base_lco_wrapping_type<ComponentTag, base_lco_with_value>::type#
-
using base_type_holder = base_lco_with_value#
Public Functions
-
inline void set_value_nonvirt(RemoteResult &&result)#
The function set_value_nonvirt is called whenever a set_value_action is applied on this LCO instance. This function just forwards to the virtual function set_value, which is overloaded by the derived concrete LCO.
- Parameters
result – [in] The result value to be transferred from the remote operation back to this LCO instance.
-
inline Result get_value_nonvirt()#
The function get_result_nonvirt is called whenever a get_result_action is applied on this LCO instance. This function just forwards to the virtual function get_result, which is overloaded by the derived concrete LCO.
- HPX_DEFINE_COMPONENT_DIRECT_ACTION (base_lco_with_value, set_value_nonvirt, set_value_action) HPX_DEFINE_COMPONENT_DIRECT_ACTION(base_lco_with_value
The set_value_action may be used to trigger any LCO instances while carrying an additional parameter of any type.
RemoteResult is taken by rvalue ref. This allows for perfect forwarding. When the action thread function is created, the values are moved into the called function. If we took it by const lvalue reference, we would disable the possibility to further move the result to the designated destination.
- Parameters
RemoteResult – [in] The type of the result to be transferred back to this LCO instance. The get_value_action may be used to query the value this LCO instance exposes as its ‘result’ value.
Public Members
- get_value_nonvirt
Public Static Functions
-
static inline components::component_type get_component_type() noexcept#
-
static inline void set_component_type(components::component_type type)#
Protected Types
Protected Functions
-
~base_lco_with_value() override = default#
Destructor, needs to be virtual to allow for clean destruction of derived objects
-
inline virtual void set_event() override#
-
virtual void set_value(RemoteResult &&result) = 0#
-
virtual result_type get_value() = 0#
-
inline virtual result_type get_value(error_code&)#
-
template<typename ComponentTag>
class base_lco_with_value<void, void, ComponentTag> : public hpx::lcos::base_lco, public ComponentTag# - #include <base_lco_with_value.hpp>
The base_lco<void> specialization is used whenever the set_event action for a particular LCO doesn’t carry any argument.
- Template Parameters
void – This specialization expects no result value and is almost completely equivalent to the plain base_lco.
Public Types
-
using wrapping_type = typename detail::base_lco_wrapping_type<ComponentTag, base_lco_with_value>::type#
-
using base_type_holder = base_lco_with_value#
Public Functions
-
inline void get_value()#
Protected Functions
-
~base_lco_with_value() override = default#
Destructor, needs to be virtual to allow for clean destruction of derived objects
-
template<typename Result, typename RemoteResult, typename ComponentTag>
-
namespace traits
-
namespace components
hpx::dataflow (distributed)#
Defined in header hpx/async.hpp.
See Public API for a list of names and headers that are part of the public HPX API.
-
namespace hpx
Functions
-
template<typename Action, typename Target, typename ...Ts>
decltype(auto) dataflow(Action &&action, Target &&target, Ts&&... ts)# The distributed implementation of
hpx::dataflowcan be used by giving an action instance as argument instead of a function, and also by providing another argument with the locality ID or the target ID. The action executes asynchronously.Note
Its behavior is similar to
hpx::asyncwith the exception that if one of the arguments is a future, thenhpx::dataflowwill wait for the future to be ready to launch the thread.- Template Parameters
Action – The type of action instance
Target – The type of target where the action should be executed
Ts – The type of any additional arguments
- Parameters
action – The action instance to be executed
target – The target where the action should be executed
ts – Additional arguments
- Returns
hpx::futurereferring to the shared state created by this call tohpx::dataflow
-
template<typename Action, typename Target, typename ...Ts>
hpx::distributed::promise#
Defined in header hpx/future.hpp.
See Public API for a list of names and headers that are part of the public HPX API.
-
namespace hpx
-
namespace distributed
-
template<typename Result, typename RemoteResult>
class promise# - #include <promise.hpp>
A promise can be used by a single thread to invoke a (remote) action and wait for the result. The result is expected to be sent back to the promise using the LCO’s set_event action
A promise is one of the simplest synchronization primitives provided by HPX. It allows to synchronize on a eager evaluated remote operation returning a result of the type Result. The promise allows to synchronize exactly one thread (the one passed during construction time).
// Create the promise (the expected result is a id_type) hpx::distributed::promise<hpx::id_type> p; // Get the associated future future<hpx::id_type> f = p.get_future(); // initiate the action supplying the promise as a // continuation apply<some_action>(new continuation(p.get_id()), ...); // Wait for the result to be returned, yielding control // in the meantime. hpx::id_type result = f.get(); // ...
Note
The action executed by the promise must return a value of a type convertible to the type as specified by the template parameter RemoteResult
- Template Parameters
Result – The template parameter Result defines the type this promise is expected to return from promise::get.
RemoteResult – The template parameter RemoteResult defines the type this promise is expected to receive from the remote action.
-
template<typename Result, typename RemoteResult>
-
namespace lcos
-
template<typename Result, typename RemoteResult, typename ComponentTag>
class base_lco_with_value : public hpx::lcos::base_lco, public ComponentTag - #include <base_lco_with_value.hpp>
-
template<typename Action, typename Result = typename traits::promise_local_result<typename Action::remote_result_type>::type, bool DirectExecute = Action::direct_execution::value>
class packaged_action# - #include <packaged_action.hpp>
A packaged_action can be used by a single thread to invoke a (remote) action and wait for the result. The result is expected to be sent back to the packaged_action using the LCO’s set_event action
A packaged_action is one of the simplest synchronization primitives provided by HPX. It allows to synchronize on a eager evaluated remote operation returning a result of the type Result.
Note
The action executed using the packaged_action as a continuation must return a value of a type convertible to the type as specified by the template parameter Result.
- Template Parameters
Action – The template parameter Action defines the action to be executed by this packaged_action instance. The arguments arg0,… argN are used as parameters for this action.
Result – The template parameter Result defines the type this packaged_action is expected to return from its associated future packaged_action::get_future.
DirectExecute – The template parameter DirectExecute is an optimization aid allowing to execute the action directly if the target is local (without spawning a new thread for this). This template does not have to be supplied explicitly as it is derived from the template parameter Action.
-
template<typename Result, typename RemoteResult, typename ComponentTag>
-
namespace distributed
-
namespace lcos
hpx/async_distributed/packaged_action.hpp#
Defined in header hpx/async_distributed/packaged_action.hpp.
See Public API for a list of names and headers that are part of the public HPX API.
-
namespace hpx
-
namespace lcos
-
template<typename Action, typename Result = typename traits::promise_local_result<typename Action::remote_result_type>::type, bool DirectExecute = Action::direct_execution::value>
class packaged_action - #include <packaged_action.hpp>
-
template<typename Action, typename Result>
class packaged_action<Action, Result, false> : public hpx::distributed::promise<Result, hpx::traits::extract_action<Action>::remote_result_type># Subclassed by hpx::lcos::packaged_action< Action, Result, true >
Public Functions
-
inline packaged_action()#
-
template<typename ...Ts>
inline void post(naming::address &&addr, hpx::id_type const &id, Ts&&... vs)#
-
template<typename Callback, typename ...Ts>
inline void post_cb(hpx::id_type const &id, Callback &&cb, Ts&&... vs)#
-
template<typename Callback, typename ...Ts>
inline void post_cb(naming::address &&addr, hpx::id_type const &id, Callback &&cb, Ts&&... vs)#
-
template<typename ...Ts>
inline void post_p(naming::address &&addr, hpx::id_type const &id, hpx::launch policy, Ts&&... vs)#
-
template<typename Callback, typename ...Ts>
inline void post_p_cb(hpx::id_type const &id, hpx::launch policy, Callback &&cb, Ts&&... vs)#
-
template<typename Callback, typename ...Ts>
inline void post_p_cb(naming::address &&addr, hpx::id_type const &id, hpx::launch policy, Callback &&cb, Ts&&... vs)#
Protected Types
-
using remote_result_type = typename action_type::remote_result_type#
-
using base_type = hpx::distributed::promise<Result, remote_result_type>#
Protected Functions
-
template<typename ...Ts>
inline void do_post(naming::address &&addr, hpx::id_type const &id, hpx::launch policy, Ts&&... vs)#
-
template<typename ...Ts>
inline void do_post(hpx::id_type const &id, hpx::launch policy, Ts&&... vs)#
-
inline packaged_action()#
-
template<typename Action, typename Result>
class packaged_action<Action, Result, true> : public hpx::lcos::packaged_action<Action, Result, false># Public Functions
-
inline packaged_action()#
Construct a (non-functional) instance of an packaged_action. To use this instance its member function post needs to be directly called.
-
template<typename ...Ts>
inline void post(naming::address &&addr, hpx::id_type const &id, Ts&&... vs)#
Private Types
-
using action_type = typename packaged_action<Action, Result, false>::action_type#
-
inline packaged_action()#
-
template<typename Action, typename Result = typename traits::promise_local_result<typename Action::remote_result_type>::type, bool DirectExecute = Action::direct_execution::value>
-
namespace lcos
hpx::post (distributed)#
Defined in header hpx/async.hpp.
See Public API for a list of names and headers that are part of the public HPX API.
-
namespace hpx
Functions
-
template<typename Action, typename Target, typename ...Ts>
bool post(Action &&action, Target &&target, Ts&&... ts)# The distributed implementation of
hpx::postcan be used by giving an action instance as argument instead of a function, and also by providing another argument with the locality ID or the target ID.- Template Parameters
Action – The type of action instance
Target – The type of target where the action should be executed
Ts – The type of any additional arguments
- Parameters
action – The action instance to be executed
target – The target where the action should be executed
ts – Additional arguments
- Returns
trueif the action was successfully posted,falseotherwise.
-
template<typename Action, typename Target, typename ...Ts>
hpx/async_distributed/promise.hpp#
Defined in header hpx/async_distributed/promise.hpp.
See Public API for a list of names and headers that are part of the public HPX API.
-
template<>
class promise<void, hpx::util::unused_type> : public lcos::detail::promise_base<void, hpx::util::unused_type, lcos::detail::promise_data<void>># Public Functions
-
promise() = default#
constructs a promise object and a shared state.
-
template<typename Allocator>
inline promise(std::allocator_arg_t, Allocator const &a)# constructs a promise object and a shared state. The constructor uses the allocator a to allocate the memory for the shared state.
-
promise(promise &&other) noexcept = default#
constructs a new promise object and transfers ownership of the shared state of other (if any) to the newly- constructed object.
- Post
other has no shared state.
-
~promise() = default#
Abandons any shared state.
-
promise &operator=(promise &&other) noexcept = default#
Abandons any shared state (30.6.4) and then as if promise(HPX_MOVE(other)).swap(*this).
- Returns
*this.
-
inline void swap(promise &other) noexcept#
Exchanges the shared state of *this and other.
- Post
*this has the shared state (if any) that other had prior to the call to swap. other has the shared state (if any) that *this had prior to the call to swap.
-
inline void set_value()#
atomically stores the value r in the shared state and makes that state ready (30.6.4).
- Throws
future_error – if its shared state already has a stored value. if shared state has no stored value exception is raised. promise_already_satisfied if its shared state already has a stored value or exception. no_state if *this has no shared state.
-
promise() = default#
-
template<typename R, typename Allocator>
struct uses_allocator<hpx::distributed::promise<R>, Allocator> : public true_type# - #include <promise.hpp>
Requires: Allocator shall be an allocator (17.6.3.5)
-
namespace hpx
-
namespace distributed
Functions
-
template<typename Result, typename RemoteResult>
void swap(promise<Result, RemoteResult> &x, promise<Result, RemoteResult> &y) noexcept#
-
template<typename Result, typename RemoteResult>
class promise - #include <promise.hpp>
- template<> unused_type > : public lcos::detail::promise_base< void, hpx::util::unused_type, lcos::detail::promise_data< void > >
Public Functions
-
promise() = default#
constructs a promise object and a shared state.
-
template<typename Allocator>
inline promise(std::allocator_arg_t, Allocator const &a)# constructs a promise object and a shared state. The constructor uses the allocator a to allocate the memory for the shared state.
-
promise(promise &&other) noexcept = default#
constructs a new promise object and transfers ownership of the shared state of other (if any) to the newly- constructed object.
- Post
other has no shared state.
-
~promise() = default#
Abandons any shared state.
-
promise &operator=(promise &&other) noexcept = default#
Abandons any shared state (30.6.4) and then as if promise(HPX_MOVE(other)).swap(*this).
- Returns
*this.
-
inline void swap(promise &other) noexcept#
Exchanges the shared state of *this and other.
- Post
*this has the shared state (if any) that other had prior to the call to swap. other has the shared state (if any) that *this had prior to the call to swap.
-
inline void set_value()#
atomically stores the value r in the shared state and makes that state ready (30.6.4).
- Throws
future_error – if its shared state already has a stored value. if shared state has no stored value exception is raised. promise_already_satisfied if its shared state already has a stored value or exception. no_state if *this has no shared state.
-
promise() = default#
-
template<typename Result, typename RemoteResult>
-
namespace distributed
-
namespace std
- template<typename R, typename Allocator> promise< R >, Allocator > : public true_type
- #include <promise.hpp>
Requires: Allocator shall be an allocator (17.6.3.5)
hpx::sync (distributed)#
Defined in header hpx/async.hpp.
See Public API for a list of names and headers that are part of the public HPX API.
-
namespace hpx
Functions
-
template<typename Action, typename Target, typename ...Ts>
decltype(auto) sync(Action &&action, Target &&target, Ts&&... ts)# The distributed implementation of
hpx::synccan be used by giving an action instance as argument instead of a function, and also by providing another argument with the locality ID or the target ID. The action executes synchronously.- Template Parameters
Action – The type of action instance
Target – The type of target where the action should be executed
Ts – The type of any additional arguments
- Parameters
action – The action instance to be executed
target – The target where the action should be executed
ts – Additional arguments
- Returns
hpx::futurereferring to the shared state created by this call tohpx::sync
-
template<typename Action, typename Target, typename ...Ts>
hpx/async_distributed/transfer_continuation_action.hpp#
Defined in header hpx/async_distributed/transfer_continuation_action.hpp.
See Public API for a list of names and headers that are part of the public HPX API.
hpx/async_distributed/trigger_lco.hpp#
Defined in header hpx/async_distributed/trigger_lco.hpp.
See Public API for a list of names and headers that are part of the public HPX API.
-
namespace hpx
hpx/async_distributed/trigger_lco_fwd.hpp#
Defined in header hpx/async_distributed/trigger_lco_fwd.hpp.
See Public API for a list of names and headers that are part of the public HPX API.
-
namespace hpx
Functions
-
void trigger_lco_event(hpx::id_type id, naming::address &&addr, bool move_credits = true)#
Trigger the LCO referenced by the given id.
- Parameters
id – [in] This represents the id of the LCO which should be triggered.
addr – [in] This represents the addr of the LCO which should be triggered.
move_credits – [in] If this is set to true then it is ok to send all credits in id along with the generated message. The default value is true.
-
inline void trigger_lco_event(hpx::id_type const &id, bool move_credits = true)#
Trigger the LCO referenced by the given id.
- Parameters
id – [in] This represents the id of the LCO which should be triggered.
move_credits – [in] If this is set to true then it is ok to send all credits in id along with the generated message. The default value is true.
-
void trigger_lco_event(hpx::id_type id, naming::address &&addr, hpx::id_type const &cont, bool move_credits = true)#
Trigger the LCO referenced by the given id.
- Parameters
id – [in] This represents the id of the LCO which should be triggered.
addr – [in] This represents the addr of the LCO which should be triggered.
cont – [in] This represents the LCO to trigger after completion.
move_credits – [in] If this is set to true then it is ok to send all credits in id along with the generated message. The default value is true.
-
inline void trigger_lco_event(hpx::id_type const &id, hpx::id_type const &cont, bool move_credits = true)#
Trigger the LCO referenced by the given id.
- Parameters
id – [in] This represents the id of the LCO which should be triggered.
cont – [in] This represents the LCO to trigger after completion.
move_credits – [in] If this is set to true then it is ok to send all credits in id along with the generated message. The default value is true.
-
template<typename Result>
void set_lco_value(hpx::id_type id, naming::address &&addr, Result &&t, bool move_credits = true)# Set the result value for the LCO referenced by the given id.
- Parameters
id – [in] This represents the id of the LCO which should receive the given value.
addr – [in] This represents the addr of the LCO which should be triggered.
t – [in] This is the value which should be sent to the LCO.
move_credits – [in] If this is set to true then it is ok to send all credits in id along with the generated message. The default value is true.
-
template<typename Result>
std::enable_if_t<!std::is_same_v<std::decay_t<Result>, naming::address>> set_lco_value(hpx::id_type const &id, Result &&t, bool move_credits = true)# Set the result value for the (managed) LCO referenced by the given id.
- Parameters
id – [in] This represents the id of the LCO which should receive the given value.
t – [in] This is the value which should be sent to the LCO.
move_credits – [in] If this is set to true then it is ok to send all credits in id along with the generated message. The default value is true.
-
template<typename Result>
std::enable_if_t<!std::is_same_v<std::decay_t<Result>, naming::address>> set_lco_value_unmanaged(hpx::id_type const &id, Result &&t, bool move_credits = true)# Set the result value for the (unmanaged) LCO referenced by the given id.
- Parameters
id – [in] This represents the id of the LCO which should receive the given value.
t – [in] This is the value which should be sent to the LCO.
move_credits – [in] If this is set to true then it is ok to send all credits in id along with the generated message. The default value is true.
-
template<typename Result>
void set_lco_value(hpx::id_type id, naming::address &&addr, Result &&t, hpx::id_type const &cont, bool move_credits = true)# Set the result value for the LCO referenced by the given id.
- Parameters
id – [in] This represents the id of the LCO which should receive the given value.
addr – [in] This represents the addr of the LCO which should be triggered.
t – [in] This is the value which should be sent to the LCO.
cont – [in] This represents the LCO to trigger after completion.
move_credits – [in] If this is set to true then it is ok to send all credits in id along with the generated message. The default value is true.
-
template<typename Result>
std::enable_if_t<!std::is_same_v<std::decay_t<Result>, naming::address>> set_lco_value(hpx::id_type const &id, Result &&t, hpx::id_type const &cont, bool move_credits = true)# Set the result value for the (managed) LCO referenced by the given id.
- Parameters
id – [in] This represents the id of the LCO which should receive the given value.
t – [in] This is the value which should be sent to the LCO.
cont – [in] This represents the LCO to trigger after completion.
move_credits – [in] If this is set to true then it is ok to send all credits in id along with the generated message. The default value is true.
-
template<typename Result>
std::enable_if_t<!std::is_same_v<std::decay_t<Result>, naming::address>> set_lco_value_unmanaged(hpx::id_type const &id, Result &&t, hpx::id_type const &cont, bool move_credits = true)# Set the result value for the (unmanaged) LCO referenced by the given id.
- Parameters
id – [in] This represents the id of the LCO which should receive the given value.
t – [in] This is the value which should be sent to the LCO.
cont – [in] This represents the LCO to trigger after completion.
move_credits – [in] If this is set to true then it is ok to send all credits in id along with the generated message. The default value is true.
-
void set_lco_error(hpx::id_type id, naming::address &&addr, std::exception_ptr const &e, bool move_credits = true)#
Set the error state for the LCO referenced by the given id.
- Parameters
id – [in] This represents the id of the LCO which should receive the error value.
addr – [in] This represents the addr of the LCO which should be triggered.
e – [in] This is the error value which should be sent to the LCO.
move_credits – [in] If this is set to true then it is ok to send all credits in id along with the generated message. The default value is true.
-
void set_lco_error(hpx::id_type id, naming::address &&addr, std::exception_ptr &&e, bool move_credits = true)#
Set the error state for the LCO referenced by the given id.
- Parameters
id – [in] This represents the id of the LCO which should receive the error value.
addr – [in] This represents the addr of the LCO which should be triggered.
e – [in] This is the error value which should be sent to the LCO.
move_credits – [in] If this is set to true then it is ok to send all credits in id along with the generated message. The default value is true.
-
inline void set_lco_error(hpx::id_type const &id, std::exception_ptr const &e, bool move_credits = true)#
Set the error state for the LCO referenced by the given id.
- Parameters
id – [in] This represents the id of the LCO which should receive the error value.
e – [in] This is the error value which should be sent to the LCO.
move_credits – [in] If this is set to true then it is ok to send all credits in id along with the generated message. The default value is true.
-
inline void set_lco_error(hpx::id_type const &id, std::exception_ptr &&e, bool move_credits = true)#
Set the error state for the LCO referenced by the given id.
- Parameters
id – [in] This represents the id of the LCO which should receive the error value.
e – [in] This is the error value which should be sent to the LCO.
move_credits – [in] If this is set to true then it is ok to send all credits in id along with the generated message. The default value is true.
-
void set_lco_error(hpx::id_type id, naming::address &&addr, std::exception_ptr const &e, hpx::id_type const &cont, bool move_credits = true)#
Set the error state for the LCO referenced by the given id.
- Parameters
id – [in] This represents the id of the LCO which should receive the error value.
addr – [in] This represents the addr of the LCO which should be triggered.
e – [in] This is the error value which should be sent to the LCO.
cont – [in] This represents the LCO to trigger after completion.
move_credits – [in] If this is set to true then it is ok to send all credits in id along with the generated message. The default value is true.
-
void set_lco_error(hpx::id_type id, naming::address &&addr, std::exception_ptr &&e, hpx::id_type const &cont, bool move_credits = true)#
Set the error state for the LCO referenced by the given id.
- Parameters
id – [in] This represents the id of the LCO which should receive the error value.
addr – [in] This represents the addr of the LCO which should be triggered.
e – [in] This is the error value which should be sent to the LCO.
cont – [in] This represents the LCO to trigger after completion.
move_credits – [in] If this is set to true then it is ok to send all credits in id along with the generated message. The default value is true.
-
inline void set_lco_error(hpx::id_type const &id, std::exception_ptr const &e, hpx::id_type const &cont, bool move_credits = true)#
Set the error state for the LCO referenced by the given id.
- Parameters
id – [in] This represents the id of the LCO which should receive the error value.
e – [in] This is the error value which should be sent to the LCO.
cont – [in] This represents the LCO to trigger after completion.
move_credits – [in] If this is set to true then it is ok to send all credits in id along with the generated message. The default value is true.
-
inline void set_lco_error(hpx::id_type const &id, std::exception_ptr &&e, hpx::id_type const &cont, bool move_credits = true)#
Set the error state for the LCO referenced by the given id.
- Parameters
id – [in] This represents the id of the LCO which should receive the error value.
e – [in] This is the error value which should be sent to the LCO.
cont – [in] This represents the LCO to trigger after completion.
move_credits – [in] If this is set to true then it is ok to send all credits in id along with the generated message. The default value is true.
-
void trigger_lco_event(hpx::id_type id, naming::address &&addr, bool move_credits = true)#
checkpoint#
See Public API for a list of names and headers that are part of the public HPX API.
hpx/checkpoint/checkpoint.hpp#
Defined in header hpx/checkpoint/checkpoint.hpp.
See Public API for a list of names and headers that are part of the public HPX API.
This header defines the save_checkpoint and restore_checkpoint functions. These functions are designed to help HPX application developer’s checkpoint their applications. Save_checkpoint serializes one or more objects and saves them as a byte stream. Restore_checkpoint converts the byte stream back into instances of the objects.
-
namespace hpx
-
namespace util
Functions
-
inline std::ostream &operator<<(std::ostream &ost, checkpoint const &ckp)#
Operator<< Overload
This overload is the main way to write data from a checkpoint to an object such as a file. Inside the function, the size of the checkpoint will be written to the stream before the checkpoint’s data. The operator>> overload uses this to read the correct number of bytes. Be mindful of this additional write and read when you use different facilities to write out or read in data to a checkpoint!
- Parameters
ost – Output stream to write to.
ckp – Checkpoint to copy from.
- Returns
Operator<< returns the ostream object.
-
inline std::istream &operator>>(std::istream &ist, checkpoint &ckp)#
Operator>> Overload
This overload is the main way to read in data from an object such as a file to a checkpoint. It is important to note that inside the function, the first variable to be read is the size of the checkpoint. This size variable is written to the stream before the checkpoint’s data in the operator<< overload. Be mindful of this additional read and write when you use different facilities to read in or write out data from a checkpoint!
- Parameters
ist – Input stream to write from.
ckp – Checkpoint to write to.
- Returns
Operator>> returns the ostream object.
-
template<typename T, typename ...Ts, typename U = typename std::enable_if<!hpx::traits::is_launch_policy<T>::value && !std::is_same<typename std::decay<T>::type, checkpoint>::value>::type>
hpx::future<checkpoint> save_checkpoint(T &&t, Ts&&... ts)# Save_checkpoint
Save_checkpoint takes any number of objects which a user may wish to store and returns a future to a checkpoint object. This function can also store a component either by passing a shared_ptr to the component or by passing a component’s client instance to save_checkpoint. Additionally the function can take a policy as a first object which changes its behavior depending on the policy passed to it. Most notably, if a sync policy is used save_checkpoint will simply return a checkpoint object.
- Template Parameters
T – Containers passed to save_checkpoint to be serialized and placed into a checkpoint object.
Ts – More containers passed to save_checkpoint to be serialized and placed into a checkpoint object.
U – This parameter is used to make sure that T is not a launch policy or a checkpoint. This forces the compiler to choose the correct overload.
- Parameters
t – A container to restore.
ts – Other containers to restore Containers must be in the same order that they were inserted into the checkpoint.
- Returns
Save_checkpoint returns a future to a checkpoint with one exception: if you pass hpx::launch::sync as the first argument. In this case save_checkpoint will simply return a checkpoint.
-
template<typename T, typename ...Ts>
hpx::future<checkpoint> save_checkpoint(checkpoint &&c, T &&t, Ts&&... ts)# Save_checkpoint - Take a pre-initialized checkpoint
Save_checkpoint takes any number of objects which a user may wish to store and returns a future to a checkpoint object. This function can also store a component either by passing a shared_ptr to the component or by passing a component’s client instance to save_checkpoint. Additionally the function can take a policy as a first object which changes its behavior depending on the policy passed to it. Most notably, if a sync policy is used save_checkpoint will simply return a checkpoint object.
- Template Parameters
T – Containers passed to save_checkpoint to be serialized and placed into a checkpoint object.
Ts – More containers passed to save_checkpoint to be serialized and placed into a checkpoint object.
- Parameters
c – Takes a pre-initialized checkpoint to copy data into.
t – A container to restore.
ts – Other containers to restore Containers must be in the same order that they were inserted into the checkpoint.
- Returns
Save_checkpoint returns a future to a checkpoint with one exception: if you pass hpx::launch::sync as the first argument. In this case save_checkpoint will simply return a checkpoint.
-
template<typename T, typename ...Ts, typename U = typename std::enable_if<!std::is_same<typename std::decay<T>::type, checkpoint>::value>::type>
hpx::future<checkpoint> save_checkpoint(hpx::launch p, T &&t, Ts&&... ts)# Save_checkpoint - Policy overload
Save_checkpoint takes any number of objects which a user may wish to store and returns a future to a checkpoint object. This function can also store a component either by passing a shared_ptr to the component or by passing a component’s client instance to save_checkpoint. Additionally the function can take a policy as a first object which changes its behavior depending on the policy passed to it. Most notably, if a sync policy is used save_checkpoint will simply return a checkpoint object.
- Template Parameters
T – Containers passed to save_checkpoint to be serialized and placed into a checkpoint object.
Ts – More containers passed to save_checkpoint to be serialized and placed into a checkpoint object.
- Parameters
p – Takes an HPX launch policy. Allows the user to change the way the function is launched i.e. async, sync, etc.
t – A container to restore.
ts – Other containers to restore Containers must be in the same order that they were inserted into the checkpoint.
- Returns
Save_checkpoint returns a future to a checkpoint with one exception: if you pass hpx::launch::sync as the first argument. In this case save_checkpoint will simply return a checkpoint.
-
template<typename T, typename ...Ts>
hpx::future<checkpoint> save_checkpoint(hpx::launch p, checkpoint &&c, T &&t, Ts&&... ts)# Save_checkpoint - Policy overload & pre-initialized checkpoint
Save_checkpoint takes any number of objects which a user may wish to store and returns a future to a checkpoint object. This function can also store a component either by passing a shared_ptr to the component or by passing a component’s client instance to save_checkpoint. Additionally the function can take a policy as a first object which changes its behavior depending on the policy passed to it. Most notably, if a sync policy is used save_checkpoint will simply return a checkpoint object.
- Template Parameters
T – Containers passed to save_checkpoint to be serialized and placed into a checkpoint object.
Ts – More containers passed to save_checkpoint to be serialized and placed into a checkpoint object.
- Parameters
p – Takes an HPX launch policy. Allows the user to change the way the function is launched i.e. async, sync, etc.
c – Takes a pre-initialized checkpoint to copy data into.
t – A container to restore.
ts – Other containers to restore Containers must be in the same order that they were inserted into the checkpoint.
- Returns
Save_checkpoint returns a future to a checkpoint with one exception: if you pass hpx::launch::sync as the first argument. In this case save_checkpoint will simply return a checkpoint.
-
template<typename T, typename ...Ts, typename U = typename std::enable_if<!std::is_same<typename std::decay<T>::type, checkpoint>::value>::type>
checkpoint save_checkpoint(hpx::launch::sync_policy sync_p, T &&t, Ts&&... ts)# Save_checkpoint - Sync_policy overload
Save_checkpoint takes any number of objects which a user may wish to store and returns a future to a checkpoint object. This function can also store a component either by passing a shared_ptr to the component or by passing a component’s client instance to save_checkpoint. Additionally the function can take a policy as a first object which changes its behavior depending on the policy passed to it. Most notably, if a sync policy is used save_checkpoint will simply return a checkpoint object.
- Template Parameters
T – Containers passed to save_checkpoint to be serialized and placed into a checkpoint object.
Ts – More containers passed to save_checkpoint to be serialized and placed into a checkpoint object.
U – This parameter is used to make sure that T is not a checkpoint. This forces the compiler to choose the correct overload.
- Parameters
sync_p – hpx::launch::sync_policy
t – A container to restore.
ts – Other containers to restore Containers must be in the same order that they were inserted into the checkpoint.
- Returns
Save_checkpoint which is passed hpx::launch::sync_policy will return a checkpoint which contains the serialized values checkpoint.
-
template<typename T, typename ...Ts>
checkpoint save_checkpoint(hpx::launch::sync_policy sync_p, checkpoint &&c, T &&t, Ts&&... ts)# Save_checkpoint - Sync_policy overload & pre-init. checkpoint
Save_checkpoint takes any number of objects which a user may wish to store and returns a future to a checkpoint object. This function can also store a component either by passing a shared_ptr to the component or by passing a component’s client instance to save_checkpoint. Additionally the function can take a policy as a first object which changes its behavior depending on the policy passed to it. Most notably, if a sync policy is used save_checkpoint will simply return a checkpoint object.
- Template Parameters
T – Containers passed to save_checkpoint to be serialized and placed into a checkpoint object.
Ts – More containers passed to save_checkpoint to be serialized and placed into a checkpoint object.
- Parameters
sync_p – hpx::launch::sync_policy
c – Takes a pre-initialized checkpoint to copy data into.
t – A container to restore.
ts – Other containers to restore Containers must be in the same order that they were inserted into the checkpoint.
- Returns
Save_checkpoint which is passed hpx::launch::sync_policy will return a checkpoint which contains the serialized values checkpoint.
-
template<typename T, typename ...Ts, typename U = typename std::enable_if<!hpx::traits::is_launch_policy<T>::value && !std::is_same<typename std::decay<T>::type, checkpoint>::value>::type>
hpx::future<checkpoint> prepare_checkpoint(T const &t, Ts const&... ts)# prepare_checkpoint
prepare_checkpoint takes the containers which have to be filled from the byte stream by a subsequent restore_checkpoint invocation. prepare_checkpoint will calculate the necessary buffer size and will return an appropriately sized checkpoint object.
- Template Parameters
T – A container to restore.
Ts – Other containers to restore. Containers must be in the same order that they were inserted into the checkpoint.
- Parameters
t – A container to restore.
ts – Other containers to restore Containers must be in the same order that they were inserted into the checkpoint.
- Returns
prepare_checkpoint returns a properly resized checkpoint object that can be used for a subsequent restore_checkpoint operation.
-
template<typename T, typename ...Ts>
hpx::future<checkpoint> prepare_checkpoint(checkpoint &&c, T const &t, Ts const&... ts)# prepare_checkpoint
prepare_checkpoint takes the containers which have to be filled from the byte stream by a subsequent restore_checkpoint invocation. prepare_checkpoint will calculate the necessary buffer size and will return an appropriately sized checkpoint object.
- Template Parameters
T – A container to restore.
Ts – Other containers to restore. Containers must be in the same order that they were inserted into the checkpoint.
- Parameters
c – Takes a pre-initialized checkpoint to prepare
t – A container to restore.
ts – Other containers to restore Containers must be in the same order that they were inserted into the checkpoint.
- Returns
prepare_checkpoint returns a properly resized checkpoint object that can be used for a subsequent restore_checkpoint operation.
-
template<typename T, typename ...Ts, typename U = typename std::enable_if<!std::is_same<T, checkpoint>::value>::type>
hpx::future<checkpoint> prepare_checkpoint(hpx::launch p, T const &t, Ts const&... ts)# prepare_checkpoint
prepare_checkpoint takes the containers which have to be filled from the byte stream by a subsequent restore_checkpoint invocation. prepare_checkpoint will calculate the necessary buffer size and will return an appropriately sized checkpoint object.
- Template Parameters
T – A container to restore.
Ts – Other containers to restore. Containers must be in the same order that they were inserted into the checkpoint.
- Parameters
p – Takes an HPX launch policy. Allows the user to change the way the function is launched i.e. async, sync, etc.
t – A container to restore.
ts – Other containers to restore Containers must be in the same order that they were inserted into the checkpoint.
- Returns
prepare_checkpoint returns a properly resized checkpoint object that can be used for a subsequent restore_checkpoint operation.
-
template<typename T, typename ...Ts>
hpx::future<checkpoint> prepare_checkpoint(hpx::launch p, checkpoint &&c, T const &t, Ts const&... ts)# prepare_checkpoint
prepare_checkpoint takes the containers which have to be filled from the byte stream by a subsequent restore_checkpoint invocation. prepare_checkpoint will calculate the necessary buffer size and will return an appropriately sized checkpoint object.
- Template Parameters
T – A container to restore.
Ts – Other containers to restore. Containers must be in the same order that they were inserted into the checkpoint.
- Parameters
p – Takes an HPX launch policy. Allows the user to change the way the function is launched i.e. async, sync, etc.
c – Takes a pre-initialized checkpoint to prepare
t – A container to restore.
ts – Other containers to restore Containers must be in the same order that they were inserted into the checkpoint.
- Returns
prepare_checkpoint returns a properly resized checkpoint object that can be used for a subsequent restore_checkpoint operation.
-
template<typename T, typename ...Ts>
void restore_checkpoint(checkpoint const &c, T &t, Ts&... ts)# Restore_checkpoint
Restore_checkpoint takes a checkpoint object as a first argument and the containers which will be filled from the byte stream (in the same order as they were placed in save_checkpoint). Restore_checkpoint can resurrect a stored component in two ways: by passing in a instance of a component’s shared_ptr or by passing in an instance of the component’s client.
- Template Parameters
T – A container to restore.
Ts – Other containers to restore. Containers must be in the same order that they were inserted into the checkpoint.
- Parameters
c – The checkpoint to restore.
t – A container to restore.
ts – Other containers to restore Containers must be in the same order that they were inserted into the checkpoint.
- Returns
Restore_checkpoint returns void.
-
class checkpoint#
- #include <checkpoint.hpp>
Checkpoint Object
Checkpoint is the container object which is produced by save_checkpoint and is consumed by a restore_checkpoint. A checkpoint may be moved into the save_checkpoint object to write the byte stream to the pre-created checkpoint object.
Checkpoints are able to store all containers which are able to be serialized including components.
Public Functions
-
checkpoint() = default#
-
~checkpoint() = default#
-
checkpoint(checkpoint const &c) = default#
-
checkpoint(checkpoint &&c) noexcept = default#
-
checkpoint &operator=(checkpoint const &c) = default#
-
checkpoint &operator=(checkpoint &&c) noexcept = default#
-
inline const_iterator begin() const noexcept#
-
inline const_iterator end() const noexcept#
-
inline char *data() noexcept#
-
inline char const *data() const noexcept#
Private Functions
Friends
- friend class hpx::serialization::access
-
friend std::ostream &operator<<(std::ostream &ost, checkpoint const &ckp)#
Operator<< Overload
This overload is the main way to write data from a checkpoint to an object such as a file. Inside the function, the size of the checkpoint will be written to the stream before the checkpoint’s data. The operator>> overload uses this to read the correct number of bytes. Be mindful of this additional write and read when you use different facilities to write out or read in data to a checkpoint!
- Parameters
ost – Output stream to write to.
ckp – Checkpoint to copy from.
- Returns
Operator<< returns the ostream object.
-
friend std::istream &operator>>(std::istream &ist, checkpoint &ckp)#
Operator>> Overload
This overload is the main way to read in data from an object such as a file to a checkpoint. It is important to note that inside the function, the first variable to be read is the size of the checkpoint. This size variable is written to the stream before the checkpoint’s data in the operator<< overload. Be mindful of this additional read and write when you use different facilities to read in or write out data from a checkpoint!
- Parameters
ist – Input stream to write from.
ckp – Checkpoint to write to.
- Returns
Operator>> returns the ostream object.
-
template<typename T, typename ...Ts>
friend void restore_checkpoint(checkpoint const &c, T &t, Ts&... ts)# Restore_checkpoint
Restore_checkpoint takes a checkpoint object as a first argument and the containers which will be filled from the byte stream (in the same order as they were placed in save_checkpoint). Restore_checkpoint can resurrect a stored component in two ways: by passing in a instance of a component’s shared_ptr or by passing in an instance of the component’s client.
- Template Parameters
T – A container to restore.
Ts – Other containers to restore. Containers must be in the same order that they were inserted into the checkpoint.
- Parameters
c – The checkpoint to restore.
t – A container to restore.
ts – Other containers to restore Containers must be in the same order that they were inserted into the checkpoint.
- Returns
Restore_checkpoint returns void.
-
inline friend bool operator==(checkpoint const &lhs, checkpoint const &rhs)#
-
inline friend bool operator!=(checkpoint const &lhs, checkpoint const &rhs)#
-
checkpoint() = default#
-
inline std::ostream &operator<<(std::ostream &ost, checkpoint const &ckp)#
-
namespace util
collectives#
See Public API for a list of names and headers that are part of the public HPX API.
hpx/collectives/all_gather.hpp#
Defined in header hpx/collectives/all_gather.hpp.
See Public API for a list of names and headers that are part of the public HPX API.
-
namespace hpx
Top level HPX namespace.
-
namespace collectives#
Functions
-
template<typename T>
hpx::future<std::vector<std::decay_t<T>>> all_gather(char const *basename, T &&result, num_sites_arg num_sites = num_sites_arg(), this_site_arg this_site = this_site_arg(), generation_arg generation = generation_arg(), root_site_arg root_site = root_site_arg())# AllGather a set of values from different call sites
This function receives a set of values from all call sites operating on the given base name.
- Parameters
basename – The base name identifying the all_gather operation
result – The value to transmit to all participating sites from this call site.
num_sites – The number of participating sites (default: all localities).
this_site – The sequence number of this invocation (usually the locality id). This value is optional and defaults to whatever hpx::get_locality_id() returns.
generation – The generational counter identifying the sequence number of the all_gather operation performed on the given base name. This is optional and needs to be supplied only if the all_gather operation on the given base name has to be performed more than once. The generation number (if given) must be a positive number greater than zero.
root_site – The site that is responsible for creating the all_gather support object. This value is optional and defaults to ‘0’ (zero).
- Returns
This function returns a future holding a vector with all values send by all participating sites. It will become ready once the all_gather operation has been completed.
-
template<typename T>
hpx::future<std::vector<std::decay_t<T>>> all_gather(communicator comm, T &&result, this_site_arg this_site = this_site_arg(), generation_arg generation = generation_arg())# AllGather a set of values from different call sites
This function receives a set of values from all call sites operating on the given base name.
AllGather a set of values from different call sites
This function receives a set of values from all call sites operating on the given base name.
- Parameters
comm – A communicator object returned from create_communicator
result – The value to transmit to all participating sites from this call site.
this_site – The sequence number of this invocation (usually the locality id). This value is optional and defaults to whatever hpx::get_locality_id() returns.
generation – The generational counter identifying the sequence number of the all_reduce operation performed on the given base name. This is optional and needs to be supplied only if the all_reduce operation on the given base name has to be performed more than once. The generation number (if given) must be a positive number greater than zero.
comm – A communicator object returned from create_communicator
result – The value to transmit to all participating sites from this call site.
generation – The generational counter identifying the sequence number of the all_reduce operation performed on the given base name. This is optional and needs to be supplied only if the all_reduce operation on the given base name has to be performed more than once. The generation number (if given) must be a positive number greater than zero.
this_site – The sequence number of this invocation (usually the locality id). This value is optional and defaults to whatever hpx::get_locality_id() returns.
- Returns
This function returns a future holding a vector with all values send by all participating sites. It will become ready once the all_gather operation has been completed.
- Returns
This function returns a future holding a vector with all values send by all participating sites. It will become ready once the all_gather operation has been completed.
-
template<typename T>
std::vector<std::decay_t<T>> all_gather(hpx::launch::sync_policy, char const *basename, T &&result, num_sites_arg num_sites = num_sites_arg(), this_site_arg this_site = this_site_arg(), generation_arg generation = generation_arg(), root_site_arg root_site = root_site_arg())# AllGather a set of values from different call sites
This function receives a set of values from all call sites operating on the given base name.
- Parameters
policy – The execution policy specifying synchronous execution.
basename – The base name identifying the all_gather operation
result – The value to transmit to all participating sites from this call site.
num_sites – The number of participating sites (default: all localities).
this_site – The sequence number of this invocation (usually the locality id). This value is optional and defaults to whatever hpx::get_locality_id() returns.
generation – The generational counter identifying the sequence number of the all_gather operation performed on the given base name. This is optional and needs to be supplied only if the all_gather operation on the given base name has to be performed more than once. The generation number (if given) must be a positive number greater than zero.
root_site – The site that is responsible for creating the all_gather support object. This value is optional and defaults to ‘0’ (zero).
- Returns
This function returns a vector with all values send by all participating sites. This function executes synchronously and directly returns the result.
-
template<typename T>
std::vector<std::decay_t<T>> all_gather(hpx::launch::sync_policy, communicator comm, T &&result, this_site_arg this_site = this_site_arg(), generation_arg generation = generation_arg())# AllGather a set of values from different call sites
This function receives a set of values from all call sites operating on the given base name.
AllGather a set of values from different call sites
This function receives a set of values from all call sites operating on the given base name.
- Parameters
policy – The execution policy specifying synchronous execution.
comm – A communicator object returned from create_communicator
result – The value to transmit to all participating sites from this call site.
this_site – The sequence number of this invocation (usually the locality id). This value is optional and defaults to whatever hpx::get_locality_id() returns.
generation – The generational counter identifying the sequence number of the all_reduce operation performed on the given base name. This is optional and needs to be supplied only if the all_reduce operation on the given base name has to be performed more than once. The generation number (if given) must be a positive number greater than zero.
policy – The execution policy specifying synchronous execution.
comm – A communicator object returned from create_communicator
result – The value to transmit to all participating sites from this call site.
generation – The generational counter identifying the sequence number of the all_reduce operation performed on the given base name. This is optional and needs to be supplied only if the all_reduce operation on the given base name has to be performed more than once. The generation number (if given) must be a positive number greater than zero.
this_site – The sequence number of this invocation (usually the locality id). This value is optional and defaults to whatever hpx::get_locality_id() returns.
- Returns
This function returns a vector with all values send by all participating sites. This function executes synchronously and directly returns the result.
- Returns
This function returns a vector with all values send by all participating sites. This function executes synchronously and directly returns the result.
-
template<typename T>
-
namespace collectives#
hpx/collectives/all_reduce.hpp#
Defined in header hpx/collectives/all_reduce.hpp.
See Public API for a list of names and headers that are part of the public HPX API.
-
namespace hpx
Top level HPX namespace.
-
namespace collectives
Functions
-
template<typename T, typename F>
hpx::future<std::decay_t<T>> all_reduce(char const *basename, T &&result, F &&op, num_sites_arg num_sites = num_sites_arg(), this_site_arg this_site = this_site_arg(), generation_arg generation = generation_arg(), root_site_arg root_site = root_site_arg())# AllReduce a set of values from different call sites
This function receives a set of values from all call sites operating on the given base name.
- Parameters
basename – The base name identifying the all_reduce operation
result – The value to transmit to all participating sites from this call site.
op – Reduction operation to apply to all values supplied from all participating sites
num_sites – The number of participating sites (default: all localities).
generation – The generational counter identifying the sequence number of the all_reduce operation performed on the given base name. This is optional and needs to be supplied only if the all_reduce operation on the given base name has to be performed more than once. The generation number (if given) must be a positive number greater than zero.
this_site – The sequence number of this invocation (usually the locality id). This value is optional and defaults to whatever hpx::get_locality_id() returns.
root_site – The site that is responsible for creating the all_reduce support object. This value is optional and defaults to ‘0’ (zero).
- Returns
This function returns a future holding a vector with all values send by all participating sites. It will become ready once the all_reduce operation has been completed.
-
template<typename T, typename F>
hpx::future<std::decay_t<T>> all_reduce(communicator comm, T &&result, F &&op, this_site_arg this_site = this_site_arg(), generation_arg generation = generation_arg())# AllReduce a set of values from different call sites
This function receives a set of values from all call sites operating on the given base name.
AllReduce a set of values from different call sites
This function receives a set of values from all call sites operating on the given base name.
- Parameters
comm – A communicator object returned from create_communicator
result – The value to transmit to all participating sites from this call site.
op – Reduction operation to apply to all values supplied from all participating sites
this_site – The sequence number of this invocation (usually the locality id). This value is optional and defaults to whatever hpx::get_locality_id() returns.
generation – The generational counter identifying the sequence number of the all_reduce operation performed on the given base name. This is optional and needs to be supplied only if the all_reduce operation on the given base name has to be performed more than once. The generation number (if given) must be a positive number greater than zero.
comm – A communicator object returned from create_communicator
result – The value to transmit to all participating sites from this call site.
op – Reduction operation to apply to all values supplied from all participating sites
generation – The generational counter identifying the sequence number of the all_reduce operation performed on the given base name. This is optional and needs to be supplied only if the all_reduce operation on the given base name has to be performed more than once. The generation number (if given) must be a positive number greater than zero.
this_site – The sequence number of this invocation (usually the locality id). This value is optional and defaults to whatever hpx::get_locality_id() returns.
- Returns
This function returns a future holding a vector with all values send by all participating sites. It will become ready once the all_reduce operation has been completed.
- Returns
This function returns a future holding a vector with all values send by all participating sites. It will become ready once the all_reduce operation has been completed.
-
template<typename T, typename F>
decltype(auto) all_reduce(hpx::launch::sync_policy, char const *basename, T &&result, F &&op, num_sites_arg num_sites = num_sites_arg(), this_site_arg this_site = this_site_arg(), generation_arg generation = generation_arg(), root_site_arg root_site = root_site_arg())# AllReduce a set of values from different call sites
This function receives a set of values from all call sites operating on the given base name.
- Parameters
policy – The execution policy specifying synchronous execution.
basename – The base name identifying the all_reduce operation
result – The value to transmit to all participating sites from this call site.
op – Reduction operation to apply to all values supplied from all participating sites
num_sites – The number of participating sites (default: all localities).
this_site – The sequence number of this invocation (usually the locality id). This value is optional and defaults to whatever hpx::get_locality_id() returns.
generation – The generational counter identifying the sequence number of the all_reduce operation performed on the given base name. This is optional and needs to be supplied only if the all_reduce operation on the given base name has to be performed more than once. The generation number (if given) must be a positive number greater than zero.
root_site – The site that is responsible for creating the all_reduce support object. This value is optional and defaults to ‘0’ (zero).
- Returns
This function returns a vector with all values send by all participating sites. This function executes synchronously and directly returns the result.
-
template<typename T, typename F>
decltype(auto) all_reduce(hpx::launch::sync_policy, communicator comm, T &&result, F &&op, this_site_arg this_site = this_site_arg(), generation_arg generation = generation_arg())# AllReduce a set of values from different call sites
This function receives a set of values from all call sites operating on the given base name.
AllReduce a set of values from different call sites
This function receives a set of values from all call sites operating on the given base name.
- Parameters
policy – The execution policy specifying synchronous execution.
comm – A communicator object returned from create_communicator
result – The value to transmit to all participating sites from this call site.
op – Reduction operation to apply to all values supplied from all participating sites
this_site – The sequence number of this invocation (usually the locality id). This value is optional and defaults to whatever hpx::get_locality_id() returns.
generation – The generational counter identifying the sequence number of the all_reduce operation performed on the given base name. This is optional and needs to be supplied only if the all_reduce operation on the given base name has to be performed more than once. The generation number (if given) must be a positive number greater than zero.
policy – The execution policy specifying synchronous execution.
comm – A communicator object returned from create_communicator
result – The value to transmit to all participating sites from this call site.
op – Reduction operation to apply to all values supplied from all participating sites
generation – The generational counter identifying the sequence number of the all_reduce operation performed on the given base name. This is optional and needs to be supplied only if the all_reduce operation on the given base name has to be performed more than once. The generation number (if given) must be a positive number greater than zero.
this_site – The sequence number of this invocation (usually the locality id). This value is optional and defaults to whatever hpx::get_locality_id() returns.
- Returns
This function returns a vector with all values send by all participating sites. This function executes synchronously and directly returns the result.
- Returns
This function returns a vector with all values send by all participating sites. This function executes synchronously and directly returns the result.
-
template<typename T, typename F>
-
namespace collectives
hpx/collectives/all_to_all.hpp#
Defined in header hpx/collectives/all_to_all.hpp.
See Public API for a list of names and headers that are part of the public HPX API.
-
namespace hpx
Top level HPX namespace.
-
namespace collectives
Functions
-
template<typename T>
hpx::future<std::vector<T>> all_to_all(char const *basename, std::vector<T> &&local_result, num_sites_arg num_sites = num_sites_arg(), this_site_arg this_site = this_site_arg(), generation_arg generation = generation_arg(), root_site_arg root_site = root_site_arg())# AllToAll a set of values from different call sites
This function receives a set of values from all call sites operating on the given base name.
- Parameters
basename – The base name identifying the all_to_all operation
local_result – A vector of values to transmit to all participating sites from this call site.
num_sites – The number of participating sites (default: all localities).
this_site – The sequence number of this invocation (usually the locality id). This value is optional and defaults to whatever hpx::get_locality_id() returns.
generation – The generational counter identifying the sequence number of the all_to_all operation performed on the given base name. This is optional and needs to be supplied only if the all_to_all operation on the given base name has to be performed more than once. The generation number (if given) must be a positive number greater than zero.
root_site – The site that is responsible for creating the all_to_all support object. This value is optional and defaults to ‘0’ (zero).
- Returns
This function returns a future holding a vector with all values send by all participating sites. It will become ready once the all_to_all operation has been completed.
-
template<typename T>
hpx::future<std::vector<T>> all_to_all(communicator fid, std::vector<T> &&local_result, this_site_arg this_site = this_site_arg(), generation_arg generation = generation_arg())# AllToAll a set of values from different call sites
This function receives a set of values from all call sites operating on the given base name.
AllToAll a set of values from different call sites
This function receives a set of values from all call sites operating on the given base name.
- Parameters
fid – A communicator object returned from create_communicator
local_result – A vector of values to transmit to all participating sites from this call site.
this_site – The sequence number of this invocation (usually the locality id). This value is optional and defaults to whatever hpx::get_locality_id() returns.
generation – The generational counter identifying the sequence number of the all_to_all operation performed on the given base name. This is optional and needs to be supplied only if the all_to_all operation on the given base name has to be performed more than once. The generation number (if given) must be a positive number greater than zero.
fid – A communicator object returned from create_communicator
local_result – A vector of values to transmit to all participating sites from this call site.
generation – The generational counter identifying the sequence number of the all_to_all operation performed on the given base name. This is optional and needs to be supplied only if the all_to_all operation on the given base name has to be performed more than once. The generation number (if given) must be a positive number greater than zero.
this_site – The sequence number of this invocation (usually the locality id). This value is optional and defaults to whatever hpx::get_locality_id() returns.
- Returns
This function returns a future holding a vector with all values send by all participating sites. It will become ready once the all_to_all operation has been completed.
- Returns
This function returns a future holding a vector with all values send by all participating sites. It will become ready once the all_to_all operation has been completed.
-
template<typename T>
std::vector<T> all_to_all(hpx::launch::sync_policy, char const *basename, std::vector<T> &&local_result, num_sites_arg num_sites = num_sites_arg(), this_site_arg this_site = this_site_arg(), generation_arg generation = generation_arg(), root_site_arg root_site = root_site_arg())# AllToAll a set of values from different call sites
This function receives a set of values from all call sites operating on the given base name.
- Parameters
policy – The execution policy specifying synchronous execution.
basename – The base name identifying the all_to_all operation
local_result – A vector of values to transmit to all participating sites from this call site.
num_sites – The number of participating sites (default: all localities).
this_site – The sequence number of this invocation (usually the locality id). This value is optional and defaults to whatever hpx::get_locality_id() returns.
generation – The generational counter identifying the sequence number of the all_to_all operation performed on the given base name. This is optional and needs to be supplied only if the all_to_all operation on the given base name has to be performed more than once. The generation number (if given) must be a positive number greater than zero.
root_site – The site that is responsible for creating the all_to_all support object. This value is optional and defaults to ‘0’ (zero).
- Returns
This function returns a vector with all values send by all participating sites. This function executes synchronously and directly returns the result.
-
template<typename T>
std::vector<T> all_to_all(hpx::launch::sync_policy, communicator fid, std::vector<T> &&local_result, this_site_arg this_site = this_site_arg(), generation_arg generation = generation_arg())# AllToAll a set of values from different call sites
This function receives a set of values from all call sites operating on the given base name.
AllToAll a set of values from different call sites
This function receives a set of values from all call sites operating on the given base name.
- Parameters
policy – The execution policy specifying synchronous execution.
fid – A communicator object returned from create_communicator
local_result – A vector of values to transmit to all participating sites from this call site.
this_site – The sequence number of this invocation (usually the locality id). This value is optional and defaults to whatever hpx::get_locality_id() returns.
generation – The generational counter identifying the sequence number of the all_to_all operation performed on the given base name. This is optional and needs to be supplied only if the all_to_all operation on the given base name has to be performed more than once. The generation number (if given) must be a positive number greater than zero.
policy – The execution policy specifying synchronous execution.
fid – A communicator object returned from create_communicator
local_result – A vector of values to transmit to all participating sites from this call site.
generation – The generational counter identifying the sequence number of the all_to_all operation performed on the given base name. This is optional and needs to be supplied only if the all_to_all operation on the given base name has to be performed more than once. The generation number (if given) must be a positive number greater than zero.
this_site – The sequence number of this invocation (usually the locality id). This value is optional and defaults to whatever hpx::get_locality_id() returns.
- Returns
This function returns a vector with all values send by all participating sites. This function executes synchronously and directly returns the result.
- Returns
This function returns a vector with all values send by all participating sites. This function executes synchronously and directly returns the result.
-
template<typename T>
-
namespace collectives
hpx/collectives/argument_types.hpp#
Defined in header hpx/collectives/argument_types.hpp.
See Public API for a list of names and headers that are part of the public HPX API.
-
namespace hpx
Top level HPX namespace.
-
namespace collectives
Typedefs
-
using num_sites_arg = detail::argument_type<detail::num_sites_tag>#
The number of participating sites (default: all localities)
-
using this_site_arg = detail::argument_type<detail::this_site_tag>#
The local end of the communication channel.
-
using that_site_arg = detail::argument_type<detail::that_site_tag>#
The opposite end of the communication channel.
-
using generation_arg = detail::argument_type<detail::generation_tag>#
The generational counter identifying the sequence number of the operation performed on the given base name. It needs to be supplied only if the operation on the given base name has to be performed more than once. It must be a positive number greater than zero.
-
using root_site_arg = detail::argument_type<detail::root_site_tag, 0>#
The site that is responsible for creating the support object of the operation. It defaults to ‘0’ (zero).
-
using tag_arg = detail::argument_type<detail::tag_tag, 0>#
The tag identifying the concrete operation.
-
using arity_arg = detail::argument_type<detail::arity_tag, 2>#
The number of children each of the communication nodes is connected to (default: picked based on num_sites).
-
using num_sites_arg = detail::argument_type<detail::num_sites_tag>#
-
namespace collectives
hpx::distributed::barrier#
Defined in header hpx/barrier.hpp.
See Public API for a list of names and headers that are part of the public HPX API.
-
namespace hpx
Top level HPX namespace.
-
namespace distributed
Functions
-
explicit barrier(std::string const &base_name)#
Creates a barrier, rank is locality id, size is number of localities
A barrier base_name is created. It expects that hpx::get_num_localities() participate and the local rank is hpx::get_locality_id().
- Parameters
base_name – The name of the barrier
-
barrier(std::string const &base_name, std::size_t num)#
Creates a barrier with a given size, rank is locality id
A barrier base_name is created. It expects that num participate and the local rank is hpx::get_locality_id().
- Parameters
base_name – The name of the barrier
num – The number of participating threads
-
barrier(std::string const &base_name, std::size_t num, std::size_t rank)#
Creates a barrier with a given size and rank
A barrier base_name is created. It expects that num participate and the local rank is rank.
- Parameters
base_name – The name of the barrier
num – The number of participating threads
rank – The rank of the calling site for this invocation
-
barrier(std::string const &base_name, std::vector<std::size_t> const &ranks, std::size_t rank)#
Creates a barrier with a vector of ranks
A barrier base_name is created. It expects that ranks.size() and the local rank is rank (must be contained in ranks).
- Parameters
base_name – The name of the barrier
ranks – Gives a list of participating ranks (this could be derived from a list of locality ids
rank – The rank of the calling site for this invocation
-
void wait() const#
Wait until each participant entered the barrier. Must be called by all participants
- Returns
This function returns once all participants have entered the barrier (have called wait).
-
hpx::future<void> wait(hpx::launch::async_policy) const#
Wait until each participant entered the barrier. Must be called by all participants
- Returns
a future that becomes ready once all participants have entered the barrier (have called wait).
-
static void synchronize()#
Perform a global synchronization using the default global barrier The barrier is created once at startup and can be reused throughout the lifetime of an HPX application.
Note
This function currently does not support dynamic connection and disconnection of localities.
-
explicit barrier(std::string const &base_name)#
-
namespace distributed
hpx/collectives/broadcast.hpp#
Defined in header hpx/collectives/broadcast.hpp.
See Public API for a list of names and headers that are part of the public HPX API.
-
namespace hpx
Top level HPX namespace.
-
namespace collectives
Functions
-
template<typename T>
hpx::future<T> broadcast_to(char const *basename, T &&local_result, num_sites_arg num_sites = num_sites_arg(), this_site_arg this_site = this_site_arg(), generation_arg generation = generation_arg())# Broadcast a value to different call sites
This function sends a set of values to all call sites operating on the given base name.
- Parameters
basename – The base name identifying the broadcast operation
local_result – A value to transmit to all participating sites from this call site.
num_sites – The number of participating sites (default: all localities).
generation – The generational counter identifying the sequence number of the broadcast operation performed on the given base name. This is optional and needs to be supplied only if the broadcast operation on the given base name has to be performed more than once. The generation number (if given) must be a positive number greater than zero.
this_site – The sequence number of this invocation (usually the locality id). This value is optional and defaults to whatever hpx::get_locality_id() returns.
- Returns
This function returns a future holding the value that was sent to all participating sites. It will become ready once the broadcast operation has been completed.
-
template<typename T>
hpx::future<T> broadcast_to(communicator comm, T &&local_result, this_site_arg this_site = this_site_arg(), generation_arg generation = generation_arg())# Broadcast a value to different call sites
This function sends a set of values to all call sites operating on the given base name.
Note
The generation values from corresponding broadcast_to and broadcast_from have to match.
- Parameters
comm – A communicator object returned from create_communicator
local_result – A value to transmit to all participating sites from this call site.
this_site – The sequence number of this invocation (usually the locality id). This value is optional and defaults to whatever hpx::get_locality_id() returns.
generation – The generational counter identifying the sequence number of the broadcast operation performed on the given base name. This is optional and needs to be supplied only if the broadcast operation on the given base name has to be performed more than once. The generation number (if given) must be a positive number greater than zero.
- Returns
This function returns a future holding the value that was sent to all participating sites. It will become ready once the broadcast operation has been completed.
-
template<typename T>
hpx::future<T> broadcast_to(communicator comm, generation_arg generation, T &&local_result, this_site_arg this_site = this_site_arg())# Broadcast a value to different call sites
This function sends a set of values to all call sites operating on the given base name.
Note
The generation values from corresponding broadcast_to and broadcast_from have to match.
- Parameters
comm – A communicator object returned from create_communicator
local_result – A value to transmit to all participating sites from this call site.
generation – The generational counter identifying the sequence number of the broadcast operation performed on the given base name. This is optional and needs to be supplied only if the broadcast operation on the given base name has to be performed more than once. The generation number (if given) must be a positive number greater than zero.
this_site – The sequence number of this invocation (usually the locality id). This value is optional and defaults to whatever hpx::get_locality_id() returns.
- Returns
This function returns a future holding the value that was sent to all participating sites. It will become ready once the broadcast operation has been completed.
-
template<typename T>
hpx::future<T> broadcast_from(char const *basename, this_site_arg this_site = this_site_arg(), generation_arg generation = generation_arg(), root_site_arg root_site = root_site_arg())# Receive a value that was broadcast to different call sites
This function sends a set of values to all call sites operating on the given base name.
- Parameters
basename – The base name identifying the broadcast operation
generation – The generational counter identifying the sequence number of the broadcast operation performed on the given base name. This is optional and needs to be supplied only if the broadcast operation on the given base name has to be performed more than once. The generation number (if given) must be a positive number greater than zero.
this_site – The sequence number of this invocation (usually the locality id). This value is optional and defaults to whatever hpx::get_locality_id() returns.
root_site – The site responsible for broadcasting the value. This is optional and defaults to site
0(zero).
- Returns
This function returns a future holding the value that was sent to all participating sites. It will become ready once the broadcast operation has been completed.
-
template<typename T>
hpx::future<T> broadcast_from(communicator comm, this_site_arg this_site = this_site_arg(), generation_arg generation = generation_arg())# Receive a value that was broadcast to different call sites
This function sends a set of values to all call sites operating on the given base name.
Receive a value that was broadcast to different call sites
This function sends a set of values to all call sites operating on the given base name.
Note
The generation values from corresponding broadcast_to and broadcast_from have to match.
Note
The generation values from corresponding broadcast_to and broadcast_from have to match.
- Parameters
comm – A communicator object returned from create_communicator
this_site – The sequence number of this invocation (usually the locality id). This value is optional and defaults to whatever hpx::get_locality_id() returns.
generation – The generational counter identifying the sequence number of the broadcast operation performed on the given base name. This is optional and needs to be supplied only if the broadcast operation on the given base name has to be performed more than once. The generation number (if given) must be a positive number greater than zero.
comm – A communicator object returned from create_communicator
generation – The generational counter identifying the sequence number of the broadcast operation performed on the given base name. This is optional and needs to be supplied only if the broadcast operation on the given base name has to be performed more than once. The generation number (if given) must be a positive number greater than zero.
this_site – The sequence number of this invocation (usually the locality id). This value is optional and defaults to whatever hpx::get_locality_id() returns.
- Returns
This function returns a future holding the value that was sent to all participating sites. It will become ready once the broadcast operation has been completed.
- Returns
This function returns a future holding the value that was sent to all participating sites. It will become ready once the broadcast operation has been completed.
-
template<typename T>
decltype(auto) broadcast_to(hpx::launch::sync_policy, char const *basename, T &&local_result, num_sites_arg num_sites = num_sites_arg(), this_site_arg this_site = this_site_arg(), generation_arg generation = generation_arg())# Broadcast a value to different call sites
This function sends a set of values to all call sites operating on the given base name.
- Parameters
policy – The execution policy specifying synchronous execution.
basename – The base name identifying the broadcast operation
local_result – A value to transmit to all participating sites from this call site.
num_sites – The number of participating sites (default: all localities).
generation – The generational counter identifying the sequence number of the broadcast operation performed on the given base name. This is optional and needs to be supplied only if the broadcast operation on the given base name has to be performed more than once. The generation number (if given) must be a positive number greater than zero.
this_site – The sequence number of this invocation (usually the locality id). This value is optional and defaults to whatever hpx::get_locality_id() returns.
- Returns
This function returns a vector with all values send by all participating sites. This function executes synchronously and directly returns the result.
-
template<typename T>
decltype(auto) broadcast_to(hpx::launch::sync_policy, communicator comm, T &&local_result, this_site_arg this_site = this_site_arg(), generation_arg generation = generation_arg())# Broadcast a value to different call sites
This function sends a set of values to all call sites operating on the given base name.
Broadcast a value to different call sites
This function sends a set of values to all call sites operating on the given base name.
Note
The generation values from corresponding broadcast_to and broadcast_from have to match.
Note
The generation values from corresponding broadcast_to and broadcast_from have to match.
- Parameters
policy – The execution policy specifying synchronous execution.
comm – A communicator object returned from create_communicator
local_result – A value to transmit to all participating sites from this call site.
this_site – The sequence number of this invocation (usually the locality id). This value is optional and defaults to whatever hpx::get_locality_id() returns.
generation – The generational counter identifying the sequence number of the broadcast operation performed on the given base name. This is optional and needs to be supplied only if the broadcast operation on the given base name has to be performed more than once. The generation number (if given) must be a positive number greater than zero.
policy – The execution policy specifying synchronous execution.
comm – A communicator object returned from create_communicator
local_result – A value to transmit to all participating sites from this call site.
generation – The generational counter identifying the sequence number of the broadcast operation performed on the given base name. This is optional and needs to be supplied only if the broadcast operation on the given base name has to be performed more than once. The generation number (if given) must be a positive number greater than zero.
this_site – The sequence number of this invocation (usually the locality id). This value is optional and defaults to whatever hpx::get_locality_id() returns.
- Returns
This function returns a vector with all values send by all participating sites. This function executes synchronously and directly returns the result.
- Returns
This function returns a vector with all values send by all participating sites. This function executes synchronously and directly returns the result.
-
template<typename T>
T broadcast_from(hpx::launch::sync_policy, char const *basename, this_site_arg this_site = this_site_arg(), generation_arg generation = generation_arg(), root_site_arg root_site = root_site_arg())# Receive a value that was broadcast to different call sites
This function sends a set of values to all call sites operating on the given base name.
- Parameters
policy – The execution policy specifying synchronous execution.
basename – The base name identifying the broadcast operation
this_site – The sequence number of this invocation (usually the locality id). This value is optional and defaults to whatever hpx::get_locality_id() returns.
generation – The generational counter identifying the sequence number of the broadcast operation performed on the given base name. This is optional and needs to be supplied only if the broadcast operation on the given base name has to be performed more than once. The generation number (if given) must be a positive number greater than zero.
root_site – The site responsible for broadcasting the value. This is optional and defaults to site
0(zero).
- Returns
This function returns a vector with all values send by all participating sites. This function executes synchronously and directly returns the result.
-
template<typename T>
T broadcast_from(hpx::launch::sync_policy, communicator comm, this_site_arg this_site = this_site_arg(), generation_arg generation = generation_arg())# Receive a value that was broadcast to different call sites
This function sends a set of values to all call sites operating on the given base name.
Receive a value that was broadcast to different call sites
This function sends a set of values to all call sites operating on the given base name.
Note
The generation values from corresponding broadcast_to and broadcast_from have to match.
Note
The generation values from corresponding broadcast_to and broadcast_from have to match.
- Parameters
policy – The execution policy specifying synchronous execution.
comm – A communicator object returned from create_communicator
this_site – The sequence number of this invocation (usually the locality id). This value is optional and defaults to whatever hpx::get_locality_id() returns.
generation – The generational counter identifying the sequence number of the broadcast operation performed on the given base name. This is optional and needs to be supplied only if the broadcast operation on the given base name has to be performed more than once. The generation number (if given) must be a positive number greater than zero.
policy – The execution policy specifying synchronous execution.
comm – A communicator object returned from create_communicator
generation – The generational counter identifying the sequence number of the broadcast operation performed on the given base name. This is optional and needs to be supplied only if the broadcast operation on the given base name has to be performed more than once. The generation number (if given) must be a positive number greater than zero.
this_site – The sequence number of this invocation (usually the locality id). This value is optional and defaults to whatever hpx::get_locality_id() returns.
- Returns
This function returns a vector with all values send by all participating sites. This function executes synchronously and directly returns the result.
- Returns
This function returns a vector with all values send by all participating sites. This function executes synchronously and directly returns the result.
-
template<typename T>
-
namespace collectives
hpx/collectives/broadcast_direct.hpp#
Defined in header hpx/collectives/broadcast_direct.hpp.
See Public API for a list of names and headers that are part of the public HPX API.
-
namespace hpx
Top level HPX namespace.
-
namespace lcos
Functions
- template<typename Action, typename ArgN, ...> hpx::future< std::vector< decltype(Action(hpx::id_type, ArgN,...))> > broadcast (std::vector< hpx::id_type > const &ids, ArgN argN,...)
Perform a distributed broadcast operation.
The function hpx::lcos::broadcast performs a distributed broadcast operation resulting in action invocations on a given set of global identifiers. The action can be either a plain action (in which case the global identifiers have to refer to localities) or a component action (in which case the global identifiers have to refer to instances of a component type which exposes the action.
The given action is invoked asynchronously on all given identifiers, and the arguments ArgN are passed along to those invocations.
Note
If decltype(Action(…)) is void, then the result of this function is future<void>.
- Parameters
ids – [in] A list of global identifiers identifying the target objects for which the given action will be invoked.
argN – [in] Any number of arbitrary arguments (passed by const reference) which will be forwarded to the action invocation.
- Returns
This function returns a future representing the result of the overall reduction operation.
- template<typename Action, typename ArgN, ...> void broadcast_post (std::vector< hpx::id_type > const &ids, ArgN argN,...)
Perform an asynchronous (fire&forget) distributed broadcast operation.
The function hpx::lcos::broadcast_post performs an asynchronous (fire&forget) distributed broadcast operation resulting in action invocations on a given set of global identifiers. The action can be either a plain action (in which case the global identifiers have to refer to localities) or a component action (in which case the global identifiers have to refer to instances of a component type which exposes the action.
The given action is invoked asynchronously on all given identifiers, and the arguments ArgN are passed along to those invocations.
- Parameters
ids – [in] A list of global identifiers identifying the target objects for which the given action will be invoked.
argN – [in] Any number of arbitrary arguments (passed by const reference) which will be forwarded to the action invocation.
- template<typename Action, typename ArgN, ...> hpx::future< std::vector< decltype(Action(hpx::id_type, ArgN,..., std::size_t))> > broadcast_with_index (std::vector< hpx::id_type > const &ids, ArgN argN,...)
Perform a distributed broadcast operation.
The function hpx::lcos::broadcast_with_index performs a distributed broadcast operation resulting in action invocations on a given set of global identifiers. The action can be either a plain action (in which case the global identifiers have to refer to localities) or a component action (in which case the global identifiers have to refer to instances of a component type which exposes the action.
The given action is invoked asynchronously on all given identifiers, and the arguments ArgN are passed along to those invocations.
The function passes the index of the global identifier in the given list of identifiers as the last argument to the action.
Note
If decltype(Action(…)) is void, then the result of this function is future<void>.
- Parameters
ids – [in] A list of global identifiers identifying the target objects for which the given action will be invoked.
argN – [in] Any number of arbitrary arguments (passed by const reference) which will be forwarded to the action invocation.
- Returns
This function returns a future representing the result of the overall reduction operation.
- template<typename Action, typename ArgN, ...> void broadcast_post_with_index (std::vector< hpx::id_type > const &ids, ArgN argN,...)
Perform an asynchronous (fire&forget) distributed broadcast operation.
The function hpx::lcos::broadcast_post_with_index performs an asynchronous (fire&forget) distributed broadcast operation resulting in action invocations on a given set of global identifiers. The action can be either a plain action (in which case the global identifiers have to refer to localities) or a component action (in which case the global identifiers have to refer to instances of a component type which exposes the action.
The given action is invoked asynchronously on all given identifiers, and the arguments ArgN are passed along to those invocations.
The function passes the index of the global identifier in the given list of identifiers as the last argument to the action.
- Parameters
ids – [in] A list of global identifiers identifying the target objects for which the given action will be invoked.
argN – [in] Any number of arbitrary arguments (passed by const reference) which will be forwarded to the action invocation.
-
namespace lcos
hpx/collectives/channel_communicator.hpp#
Defined in header hpx/collectives/channel_communicator.hpp.
See Public API for a list of names and headers that are part of the public HPX API.
-
namespace hpx
Top level HPX namespace.
-
namespace collectives
Functions
-
hpx::future<channel_communicator> create_channel_communicator(char const *basename, num_sites_arg num_sites = num_sites_arg(), this_site_arg this_site = this_site_arg())#
Create a new communicator object usable with peer-to-peer channel-based operations
This functions creates a new communicator object that can be called in order to pre-allocate a communicator object usable with multiple invocations of channel-based peer-to-peer operations.
Note
The caller must ensure that the communicator object returned by this function is kept alive (i.e., does not go out of scope) until all participating sites have successfully connected. Destroying the communicator before all sites have reached the creation point may cause the remaining sites to hang indefinitely. Consider using a barrier or similar synchronization mechanism after creating the communicator to ensure all sites are connected before allowing it to be destroyed.
- Parameters
basename – The base name identifying the collective operation
num_sites – The number of participating sites (default: all localities).
this_site – The sequence number of this invocation (usually the locality id). This value is optional and defaults to whatever hpx::get_locality_id() returns.
- Returns
This function returns a future to a new communicator object usable with the collective operation.
-
channel_communicator create_channel_communicator(hpx::launch::sync_policy, char const *basename, num_sites_arg num_sites = num_sites_arg(), this_site_arg this_site = this_site_arg())#
Create a new communicator object usable with peer-to-peer channel-based operations
This functions creates a new communicator object that can be called in order to pre-allocate a communicator object usable with multiple invocations of channel-based peer-to-peer operations.
Note
The caller must ensure that the communicator object returned by this function is kept alive (i.e., does not go out of scope) until all participating sites have successfully connected. Destroying the communicator before all sites have reached the creation point may cause the remaining sites to hang indefinitely. Consider using a barrier or similar synchronization mechanism after creating the communicator to ensure all sites are connected before allowing it to be destroyed.
- Parameters
basename – The base name identifying the collective operation
num_sites – The number of participating sites (default: all localities).
this_site – The sequence number of this invocation (usually the locality id). This value is optional and defaults to whatever hpx::get_locality_id() returns.
- Returns
This function returns a new communicator object usable with the collective operation.
-
template<typename T>
hpx::future<void> set(channel_communicator comm, that_site_arg site, T &&value, tag_arg tag = tag_arg())# Send a value to the given site
This function sends a value to the given site based on the given communicator.
- Parameters
comm – The channel communicator object to use for the data transfer
site – The destination site
value – The value to send
tag – The (optional) tag identifying the concrete operation
- Returns
This function returns a future<void> that becomes ready once the data transfer operation has finished.
-
template<typename T>
hpx::future<T> get(channel_communicator comm, that_site_arg site, tag_arg tag = tag_arg())# Send a value to the given site
This function receives a value from the given site based on the given communicator.
- Parameters
comm – The channel communicator object to use for the data transfer
site – The source site
- Returns
This function returns a future<T> that becomes ready once the data transfer operation has finished. The future will hold the received value.
-
class channel_communicator#
- #include <channel_communicator.hpp>
A handle identifying the communication channel to use for get/set operations
-
hpx::future<channel_communicator> create_channel_communicator(char const *basename, num_sites_arg num_sites = num_sites_arg(), this_site_arg this_site = this_site_arg())#
-
namespace collectives
hpx/collectives/create_communicator.hpp#
Defined in header hpx/collectives/create_communicator.hpp.
See Public API for a list of names and headers that are part of the public HPX API.
-
namespace hpx
Top level HPX namespace.
-
namespace collectives
Functions
-
communicator create_communicator(char const *basename, num_sites_arg num_sites = num_sites_arg(), this_site_arg this_site = this_site_arg(), generation_arg generation = generation_arg(), root_site_arg root_site = root_site_arg())#
Create a new communicator object usable with any collective operation
This functions creates a new communicator object that can be called in order to pre-allocate a communicator object usable with multiple invocations of the collective operations (such as all_gather, all_reduce, all_to_all, broadcast, etc.).
- Parameters
basename – The base name identifying the collective operation
num_sites – The number of participating sites (default: all localities).
this_site – The sequence number of this invocation (usually the locality id). This value is optional and defaults to whatever hpx::get_locality_id() returns.
generation – The generational counter identifying the sequence number of the collective operation performed on the given base name. This is optional and needs to be supplied only if the collective operation on the given base name has to be performed more than once.
root_site – The site that is responsible for creating the collective support object. This value is optional and defaults to ‘0’ (zero).
- Returns
This function returns a new communicator object usable with the collective operation.
-
communicator create_local_communicator(char const *basename, num_sites_arg num_sites, this_site_arg this_site, generation_arg generation = generation_arg(), root_site_arg root_site = root_site_arg())#
Create a new communicator object usable with any local collective operation
This functions creates a new communicator object that can be called in order to pre-allocate a communicator object usable with multiple invocations of the collective operations (such as all_gather, all_reduce, all_to_all, broadcast, etc.).
- Parameters
basename – The base name identifying the collective operation
num_sites – The number of participating sites
this_site – The sequence number of this invocation (usually the sequence number of the object participating in the collective operation). This value must be in the range [0, num_sites).
generation – The generational counter identifying the sequence number of the collective operation performed on the given base name. This is optional and needs to be supplied only if the collective operation on the given base name has to be performed more than once.
root_site – The site that is responsible for creating the collective support object. This value is optional and defaults to ‘0’ (zero).
- Returns
This function returns a new communicator object usable for all local collective operations.
-
hierarchical_communicator create_hierarchical_communicator(char const *basename, num_sites_arg num_sites = num_sites_arg(), this_site_arg this_site = this_site_arg(), arity_arg arity = arity_arg(), generation_arg generation = generation_arg(), root_site_arg root_site = root_site_arg())#
Create a new communicator object usable with any collective operation
This functions creates a new hierarchical_communicator object that can be called in order to pre-allocate a communicator object usable with multiple invocations of any of the collective operations (such as all_gather, all_reduce, all_to_all, broadcast, etc.).
- Parameters
basename – The base name identifying the collective operation
num_sites – The number of participating sites (default: all localities).
this_site – The sequence number of this invocation (usually the locality id). This value is optional and defaults to whatever hpx::get_locality_id() returns.
arity – The arity of the hierarchical tree of communicators to create for the given endpoint. The default arity is 2.
generation – The generational counter identifying the sequence number of the collective operation performed on the given base name. This is optional and needs to be supplied only if the collective operation on the given base name has to be performed more than once.
root_site – The site that is responsible for creating the collective support object. This value is optional and defaults to ‘0’ (zero).
- Returns
This function returns a new communicator object usable with the collective operation.
-
struct communicator#
- #include <create_communicator.hpp>
A communicator instance represents the list of sites that participate in a particular collective operation.
Public Functions
-
void set_info(num_sites_arg num_sites, this_site_arg this_site) noexcept#
Store the number of used sites and the index of the current site for this communicator instance.
- Parameters
num_sites – The number of participating sites (default: all localities).
this_site – The sequence number of this site (usually the locality id).
-
std::pair<num_sites_arg, this_site_arg> get_info() const noexcept#
Retrieve the number of used sites and the index of the current site for this communicator instance.
-
bool is_root() const#
Return whether this communicator instance represents the root site of the communication operation.
-
void set_info(num_sites_arg num_sites, this_site_arg this_site) noexcept#
-
communicator create_communicator(char const *basename, num_sites_arg num_sites = num_sites_arg(), this_site_arg this_site = this_site_arg(), generation_arg generation = generation_arg(), root_site_arg root_site = root_site_arg())#
-
namespace collectives
hpx/collectives/exclusive_scan.hpp#
Defined in header hpx/collectives/exclusive_scan.hpp.
See Public API for a list of names and headers that are part of the public HPX API.
-
namespace hpx
Top level HPX namespace.
-
namespace collectives
Functions
-
template<typename T, typename F>
hpx::future<std::decay_t<T>> exclusive_scan(char const *basename, T &&result, F &&op, num_sites_arg num_sites = num_sites_arg(), this_site_arg this_site = this_site_arg(), generation_arg generation = generation_arg(), root_site_arg root_site = root_site_arg())# Exclusive scan a set of values from different call sites
This function performs an exclusive scan operation on a set of values received from all call sites operating on the given base name.
Note
The result returned on the root_site is always the same as the result returned on thus_site == 1 and is the same as the value provided by the root_site.
- Parameters
basename – The base name identifying the exclusive_scan operation
result – The value to transmit to all participating sites from this call site.
op – Reduction operation to apply to all values supplied from all participating sites
num_sites – The number of participating sites (default: all localities).
this_site – The sequence number of this invocation (usually the locality id). This value is optional and defaults to whatever hpx::get_locality_id() returns.
generation – The generational counter identifying the sequence number of the exclusive_scan operation performed on the given base name. This is optional and needs to be supplied only if the exclusive_scan operation on the given base name has to be performed more than once. The generation number (if given) must be a positive number greater than zero.
root_site – The site that is responsible for creating the exclusive_scan support object. This value is optional and defaults to ‘0’ (zero).
- Returns
For the participating site i this function returns a future the reduction (calculated according to the function op) of the values passed in by the participating sites 0, …, i-1. The value returned on participating site 0 is undefined. The value returned on participating site on process 1 is always the value passed in by participating site 1. The returned future will become ready once the exclusive_scan operation has been completed.
-
template<typename T, typename F>
hpx::future<std::decay_t<T>> exclusive_scan(communicator comm, T &&result, F &&op, this_site_arg this_site = this_site_arg(), generation_arg generation = generation_arg())# Exclusive scan a set of values from different call sites
This function performs an exclusive scan operation on a set of values received from all call sites operating on the given base name.
Exclusive scan a set of values from different call sites
This function performs an exclusive scan operation on a set of values received from all call sites operating on the given base name.
Note
The result returned on the root_site is always the same as the result returned on thus_site == 1 and is the same as the value provided by the root_site.
Note
The result returned on the root_site is always the same as the result returned on thus_site == 1 and is the same as the value provided by the root_site.
- Parameters
comm – A communicator object returned from create_communicator
result – The value to transmit to all participating sites from this call site.
op – Reduction operation to apply to all values supplied from all participating sites
this_site – The sequence number of this invocation (usually the locality id). This value is optional and defaults to whatever hpx::get_locality_id() returns.
generation – The generational counter identifying the sequence number of the exclusive_scan operation performed on the given base name. This is optional and needs to be supplied only if the exclusive_scan operation on the given base name has to be performed more than once. The generation number (if given) must be a positive number greater than zero.
comm – A communicator object returned from create_communicator
result – The value to transmit to all participating sites from this call site.
op – Reduction operation to apply to all values supplied from all participating sites
generation – The generational counter identifying the sequence number of the exclusive_scan operation performed on the given base name. This is optional and needs to be supplied only if the exclusive_scan operation on the given base name has to be performed more than once. The generation number (if given) must be a positive number greater than zero.
this_site – The sequence number of this invocation (usually the locality id). This value is optional and defaults to whatever hpx::get_locality_id() returns.
- Returns
For the participating site i this function returns a future the reduction (calculated according to the function op) of the values passed in by the participating sites 0, …, i-1. The value returned on participating site 0 is undefined. The value returned on participating site on process 1 is always the value passed in by participating site 1. The returned future will become ready once the exclusive_scan operation has been completed.
-
template<typename T, typename F>
decltype(auto) exclusive_scan(hpx::launch::sync_policy, char const *basename, T &&result, F &&op, num_sites_arg num_sites = num_sites_arg(), this_site_arg this_site = this_site_arg(), generation_arg generation = generation_arg(), root_site_arg root_site = root_site_arg())# Exclusive scan a set of values from different call sites
This function performs an exclusive scan operation on a set of values received from all call sites operating on the given base name.
Note
The result returned on the root_site is always the same as the result returned on thus_site == 1 and is the same as the value provided by the root_site.
- Parameters
policy – The execution policy specifying synchronous execution.
basename – The base name identifying the exclusive_scan operation
result – The value to transmit to all participating sites from this call site.
op – Reduction operation to apply to all values supplied from all participating sites
num_sites – The number of participating sites (default: all localities).
this_site – The sequence number of this invocation (usually the locality id). This value is optional and defaults to whatever hpx::get_locality_id() returns.
generation – The generational counter identifying the sequence number of the exclusive_scan operation performed on the given base name. This is optional and needs to be supplied only if the exclusive_scan operation on the given base name has to be performed more than once. The generation number (if given) must be a positive number greater than zero.
root_site – The site that is responsible for creating the exclusive_scan support object. This value is optional and defaults to ‘0’ (zero).
- Returns
For the participating site i this function returns a future the reduction (calculated according to the function op) of the values passed in by the participating sites 0, …, i-1. The value returned on participating site 0 is undefined. The value returned on participating site on process 1 is always the value passed in by participating site 1. The returned future will become ready once the exclusive_scan operation has been completed.
-
template<typename T, typename F>
decltype(auto) exclusive_scan(hpx::launch::sync_policy, communicator comm, T &&result, F &&op, this_site_arg this_site = this_site_arg(), generation_arg generation = generation_arg())# Exclusive scan a set of values from different call sites
This function performs an exclusive scan operation on a set of values received from all call sites operating on the given base name.
Exclusive scan a set of values from different call sites
This function performs an exclusive scan operation on a set of values received from all call sites operating on the given base name.
Note
The result returned on the root_site is always the same as the result returned on thus_site == 1 and is the same as the value provided by the root_site.
Note
The result returned on the root_site is always the same as the result returned on thus_site == 1 and is the same as the value provided by the root_site.
- Parameters
policy – The execution policy specifying synchronous execution.
comm – A communicator object returned from create_communicator
result – The value to transmit to all participating sites from this call site.
op – Reduction operation to apply to all values supplied from all participating sites
this_site – The sequence number of this invocation (usually the locality id). This value is optional and defaults to whatever hpx::get_locality_id() returns.
generation – The generational counter identifying the sequence number of the exclusive_scan operation performed on the given base name. This is optional and needs to be supplied only if the exclusive_scan operation on the given base name has to be performed more than once. The generation number (if given) must be a positive number greater than zero.
policy – The execution policy specifying synchronous execution.
comm – A communicator object returned from create_communicator
result – The value to transmit to all participating sites from this call site.
op – Reduction operation to apply to all values supplied from all participating sites
generation – The generational counter identifying the sequence number of the exclusive_scan operation performed on the given base name. This is optional and needs to be supplied only if the exclusive_scan operation on the given base name has to be performed more than once. The generation number (if given) must be a positive number greater than zero.
this_site – The sequence number of this invocation (usually the locality id). This value is optional and defaults to whatever hpx::get_locality_id() returns.
- Returns
For the participating site i this function returns a future the reduction (calculated according to the function op) of the values passed in by the participating sites 0, …, i-1. The value returned on participating site 0 is undefined. The value returned on participating site on process 1 is always the value passed in by participating site 1. The returned future will become ready once the exclusive_scan operation has been completed.
- Returns
For the participating site i this function returns the reduction (calculated according to the function op) of the values passed in by the participating sites 0, …, i-1. The value returned on participating site 0 is undefined. The value returned on participating site on process 1 is always the value passed in by participating site 1. The returned future will become ready once the exclusive_scan operation has been completed.
-
template<typename T, typename F>
-
namespace collectives
hpx/collectives/fold.hpp#
Defined in header hpx/collectives/fold.hpp.
See Public API for a list of names and headers that are part of the public HPX API.
-
namespace hpx
Top level HPX namespace.
-
namespace lcos
Functions
- template<typename Action, typename FoldOp, typename Init, typename ArgN, ...> hpx::future< decltype(Action(hpx::id_type, ArgN,...))> fold (std::vector< hpx::id_type > const &ids, FoldOp &&fold_op, Init &&init, ArgN argN,...)
Perform a distributed fold operation.
The function hpx::lcos::fold performs a distributed folding operation over results returned from action invocations on a given set of global identifiers. The action can be either a plain action (in which case the global identifiers have to refer to localities) or a component action (in which case the global identifiers have to refer to instances of a component type which exposes the action.
Note
The type of the initial value must be convertible to the result type returned from the invoked action.
- Parameters
ids – [in] A list of global identifiers identifying the target objects for which the given action will be invoked.
fold_op – [in] A binary function expecting two results as returned from the action invocations. The function (or function object) is expected to return the result of the folding operation performed on its arguments.
init – [in] The initial value to be used for the folding operation
argN – [in] Any number of arbitrary arguments (passed by value, by const reference or by rvalue reference) which will be forwarded to the action invocation.
- Returns
This function returns a future representing the result of the overall folding operation.
- template<typename Action, typename FoldOp, typename Init, typename ArgN, ...> hpx::future< decltype(Action(hpx::id_type, ArgN,..., std::size_t))> fold_with_index (std::vector< hpx::id_type > const &ids, FoldOp &&fold_op, Init &&init, ArgN argN,...)
Perform a distributed folding operation.
The function hpx::lcos::fold_with_index performs a distributed folding operation over results returned from action invocations on a given set of global identifiers. The action can be either plain action (in which case the global identifiers have to refer to localities) or a component action (in which case the global identifiers have to refer to instances of a component type which exposes the action.
The function passes the index of the global identifier in the given list of identifiers as the last argument to the action.
Note
The type of the initial value must be convertible to the result type returned from the invoked action.
- Parameters
ids – [in] A list of global identifiers identifying the target objects for which the given action will be invoked.
fold_op – [in] A binary function expecting two results as returned from the action invocations. The function (or function object) is expected to return the result of the folding operation performed on its arguments.
init – [in] The initial value to be used for the folding operation
argN – [in] Any number of arbitrary arguments (passed by value, by const reference or by rvalue reference) which will be forwarded to the action invocation.
- Returns
This function returns a future representing the result of the overall folding operation.
- template<typename Action, typename FoldOp, typename Init, typename ArgN, ...> hpx::future< decltype(Action(hpx::id_type, ArgN,...))> inverse_fold (std::vector< hpx::id_type > const &ids, FoldOp &&fold_op, Init &&init, ArgN argN,...)
Perform a distributed inverse folding operation.
The function hpx::lcos::inverse_fold performs an inverse distributed folding operation over results returned from action invocations on a given set of global identifiers. The action can be either a plain action (in which case the global identifiers have to refer to localities) or a component action (in which case the global identifiers have to refer to instances of a component type which exposes the action.
Note
The type of the initial value must be convertible to the result type returned from the invoked action.
- Parameters
ids – [in] A list of global identifiers identifying the target objects for which the given action will be invoked.
fold_op – [in] A binary function expecting two results as returned from the action invocations. The function (or function object) is expected to return the result of the folding operation performed on its arguments.
init – [in] The initial value to be used for the folding operation
argN – [in] Any number of arbitrary arguments (passed by value, by const reference or by rvalue reference) which will be forwarded to the action invocation.
- Returns
This function returns a future representing the result of the overall folding operation.
- template<typename Action, typename FoldOp, typename Init, typename ArgN, ...> hpx::future< decltype(Action(hpx::id_type, ArgN,..., std::size_t))> inverse_fold_with_index (std::vector< hpx::id_type > const &ids, FoldOp &&fold_op, Init &&init, ArgN argN,...)
Perform a distributed inverse folding operation.
The function hpx::lcos::inverse_fold_with_index performs an inverse distributed folding operation over results returned from action invocations on a given set of global identifiers. The action can be either plain action (in which case the global identifiers have to refer to localities) or a component action (in which case the global identifiers have to refer to instances of a component type which exposes the action.
The function passes the index of the global identifier in the given list of identifiers as the last argument to the action.
Note
The type of the initial value must be convertible to the result type returned from the invoked action.
- Parameters
ids – [in] A list of global identifiers identifying the target objects for which the given action will be invoked.
fold_op – [in] A binary function expecting two results as returned from the action invocations. The function (or function object) is expected to return the result of the folding operation performed on its arguments.
init – [in] The initial value to be used for the folding operation
argN – [in] Any number of arbitrary arguments (passed by value, by const reference or by rvalue reference) which will be forwarded to the action invocation.
- Returns
This function returns a future representing the result of the overall folding operation.
-
namespace lcos
hpx/collectives/gather.hpp#
Defined in header hpx/collectives/gather.hpp.
See Public API for a list of names and headers that are part of the public HPX API.
-
namespace hpx
Top level HPX namespace.
-
namespace collectives
Functions
-
template<typename T>
hpx::future<std::vector<decay_t<T>>> gather_here(char const *basename, T &&result, num_sites_arg num_sites = num_sites_arg(), this_site_arg this_site = this_site_arg(), generation_arg generation = generation_arg())# Gather a set of values from different call sites
This function receives a set of values from all call sites operating on the given base name.
- Parameters
basename – The base name identifying the gather operation
result – The value to transmit to the central gather point from this call site.
num_sites – The number of participating sites (default: all localities).
this_site – The sequence number of this invocation (usually the locality id). This value is optional and defaults to whatever hpx::get_locality_id() returns.
generation – The generational counter identifying the sequence number of the gather operation performed on the given base name. This is optional and needs to be supplied only if the gather operation on the given base name has to be performed more than once. The generation number (if given) must be a positive number greater than zero.
- Returns
This function returns a future holding a vector with all gathered values. It will become ready once the gather operation has been completed.
-
template<typename T>
hpx::future<std::vector<decay_t<T>>> gather_here(communicator comm, T &&result, this_site_arg this_site = this_site_arg(), generation_arg generation = generation_arg())# Gather a set of values from different call sites
This function receives a set of values from all call sites operating on the given base name.
Gather a set of values from different call sites
This function receives a set of values from all call sites operating on the given base name.
Note
The generation values from corresponding gather_here and gather_there have to match.
Note
The generation values from corresponding gather_here and gather_there have to match.
- Parameters
comm – A communicator object returned from create_communicator
result – The value to transmit to the central gather point from this call site.
this_site – The sequence number of this invocation (usually the locality id). This value is optional and defaults to whatever hpx::get_locality_id() returns.
generation – The generational counter identifying the sequence number of the gather operation performed on the given base name. This is optional and needs to be supplied only if the gather operation on the given base name has to be performed more than once. The generation number (if given) must be a positive number greater than zero.
comm – A communicator object returned from create_communicator
result – The value to transmit to the central gather point from this call site.
generation – The generational counter identifying the sequence number of the gather operation performed on the given base name. This is optional and needs to be supplied only if the gather operation on the given base name has to be performed more than once. The generation number (if given) must be a positive number greater than zero.
this_site – The sequence number of this invocation (usually the locality id). This value is optional and defaults to whatever hpx::get_locality_id() returns.
- Returns
This function returns a future holding a vector with all gathered values. It will become ready once the gather operation has been completed.
- Returns
This function returns a future holding a vector with all gathered values. It will become ready once the gather operation has been completed.
-
template<typename T>
hpx::future<void> gather_there(char const *basename, T &&result, this_site_arg this_site = this_site_arg(), generation_arg generation = generation_arg(), root_site_arg root_site = root_site_arg())# Gather a given value at the given call site
This function transmits the value given by result to a central gather site (where the corresponding gather_here is executed)
- Parameters
basename – The base name identifying the gather operation
result – The value to transmit to the central gather point from this call site.
this_site – The sequence number of this invocation (usually the locality id). This value is optional and defaults to whatever hpx::get_locality_id() returns.
generation – The generational counter identifying the sequence number of the gather operation performed on the given base name. This is optional and needs to be supplied only if the gather operation on the given base name has to be performed more than once. The generation number (if given) must be a positive number greater than zero.
root_site – The sequence number of the central gather point (usually the locality id). This value is optional and defaults to 0.
- Returns
This function returns a future holding a vector with all gathered values. It will become ready once the gather operation has been completed.
-
template<typename T>
hpx::future<void> gather_there(communicator comm, T &&result, this_site_arg this_site = this_site_arg(), generation_arg generation = generation_arg())# Gather a given value at the given call site
This function transmits the value given by result to a central gather site (where the corresponding gather_here is executed)
Gather a given value at the given call site
This function transmits the value given by result to a central gather site (where the corresponding gather_here is executed)
Note
The generation values from corresponding gather_here and gather_there have to match.
Note
The generation values from corresponding gather_here and gather_there have to match.
- Parameters
comm – A communicator object returned from create_communicator
result – The value to transmit to the central gather point from this call site.
this_site – The sequence number of this invocation (usually the locality id). This value is optional and defaults to whatever hpx::get_locality_id() returns.
generation – The generational counter identifying the sequence number of the gather operation performed on the given base name. This is optional and needs to be supplied only if the gather operation on the given base name has to be performed more than once. The generation number (if given) must be a positive number greater than zero.
comm – A communicator object returned from create_communicator
result – The value to transmit to the central gather point from this call site.
generation – The generational counter identifying the sequence number of the gather operation performed on the given base name. This is optional and needs to be supplied only if the gather operation on the given base name has to be performed more than once. The generation number (if given) must be a positive number greater than zero.
this_site – The sequence number of this invocation (usually the locality id). This value is optional and defaults to whatever hpx::get_locality_id() returns.
- Returns
This function returns a future holding a vector with all gathered values. It will become ready once the gather operation has been completed.
- Returns
This function returns a future holding a vector with all gathered values. It will become ready once the gather operation has been completed.
-
template<typename T>
decltype(auto) gather_here(hpx::launch::sync_policy, char const *basename, T &&result, num_sites_arg num_sites = num_sites_arg(), this_site_arg this_site = this_site_arg(), generation_arg generation = generation_arg())# Gather a set of values from different call sites
This function receives a set of values from all call sites operating on the given base name.
- Parameters
policy – The execution policy specifying synchronous execution.
basename – The base name identifying the gather operation
result – The value to transmit to the central gather point from this call site.
num_sites – The number of participating sites (default: all localities).
this_site – The sequence number of this invocation (usually the locality id). This value is optional and defaults to whatever hpx::get_locality_id() returns.
generation – The generational counter identifying the sequence number of the gather operation performed on the given base name. This is optional and needs to be supplied only if the gather operation on the given base name has to be performed more than once. The generation number (if given) must be a positive number greater than zero.
- Returns
This function returns a vector with all values send by all participating sites. This function executes synchronously and directly returns the result.
-
template<typename T>
decltype(auto) gather_here(hpx::launch::sync_policy, communicator comm, T &&result, this_site_arg this_site = this_site_arg(), generation_arg generation = generation_arg())# Gather a set of values from different call sites
This function receives a set of values from all call sites operating on the given base name.
Gather a set of values from different call sites
This function receives a set of values from all call sites operating on the given base name.
Note
The generation values from corresponding gather_here and gather_there have to match.
Note
The generation values from corresponding gather_here and gather_there have to match.
- Parameters
policy – The execution policy specifying synchronous execution.
comm – A communicator object returned from create_communicator
result – The value to transmit to the central gather point from this call site.
this_site – The sequence number of this invocation (usually the locality id). This value is optional and defaults to whatever hpx::get_locality_id() returns.
generation – The generational counter identifying the sequence number of the gather operation performed on the given base name. This is optional and needs to be supplied only if the gather operation on the given base name has to be performed more than once. The generation number (if given) must be a positive number greater than zero.
policy – The execution policy specifying synchronous execution.
comm – A communicator object returned from create_communicator
result – The value to transmit to the central gather point from this call site.
generation – The generational counter identifying the sequence number of the gather operation performed on the given base name. This is optional and needs to be supplied only if the gather operation on the given base name has to be performed more than once. The generation number (if given) must be a positive number greater than zero.
this_site – The sequence number of this invocation (usually the locality id). This value is optional and defaults to whatever hpx::get_locality_id() returns.
- Returns
This function returns a vector with all values send by all participating sites. This function executes synchronously and directly returns the result.
- Returns
This function returns a vector with all values send by all participating sites. This function executes synchronously and directly returns the result.
-
template<typename T>
void gather_there(hpx::launch::sync_policy, char const *basename, T &&result, this_site_arg this_site = this_site_arg(), generation_arg generation = generation_arg(), root_site_arg root_site = root_site_arg())# Gather a given value at the given call site
This function transmits the value given by result to a central gather site (where the corresponding gather_here is executed)
- Parameters
policy – The execution policy specifying synchronous execution.
basename – The base name identifying the gather operation
result – The value to transmit to the central gather point from this call site.
this_site – The sequence number of this invocation (usually the locality id). This value is optional and defaults to whatever hpx::get_locality_id() returns.
generation – The generational counter identifying the sequence number of the gather operation performed on the given base name. This is optional and needs to be supplied only if the gather operation on the given base name has to be performed more than once. The generation number (if given) must be a positive number greater than zero.
root_site – The sequence number of the central gather point (usually the locality id). This value is optional and defaults to 0.
- Returns
This function returns a vector with all values send by all participating sites. This function executes synchronously and directly returns the result.
-
template<typename T>
void gather_there(hpx::launch::sync_policy, communicator comm, T &&result, this_site_arg this_site = this_site_arg(), generation_arg generation = generation_arg())# Gather a given value at the given call site
This function transmits the value given by result to a central gather site (where the corresponding gather_here is executed)
Gather a given value at the given call site
This function transmits the value given by result to a central gather site (where the corresponding gather_here is executed)
Note
The generation values from corresponding gather_here and gather_there have to match.
Note
The generation values from corresponding gather_here and gather_there have to match.
- Parameters
policy – The execution policy specifying synchronous execution.
comm – A communicator object returned from create_communicator
result – The value to transmit to the central gather point from this call site.
this_site – The sequence number of this invocation (usually the locality id). This value is optional and defaults to whatever hpx::get_locality_id() returns.
generation – The generational counter identifying the sequence number of the gather operation performed on the given base name. This is optional and needs to be supplied only if the gather operation on the given base name has to be performed more than once. The generation number (if given) must be a positive number greater than zero.
policy – The execution policy specifying synchronous execution.
comm – A communicator object returned from create_communicator
result – The value to transmit to the central gather point from this call site.
generation – The generational counter identifying the sequence number of the gather operation performed on the given base name. This is optional and needs to be supplied only if the gather operation on the given base name has to be performed more than once. The generation number (if given) must be a positive number greater than zero.
this_site – The sequence number of this invocation (usually the locality id). This value is optional and defaults to whatever hpx::get_locality_id() returns.
- Returns
This function returns a vector with all values send by all participating sites. This function executes synchronously and directly returns the result.
- Returns
This function returns a vector with all values send by all participating sites. This function executes synchronously and directly returns the result.
-
template<typename T>
-
namespace collectives
hpx/collectives/inclusive_scan.hpp#
Defined in header hpx/collectives/inclusive_scan.hpp.
See Public API for a list of names and headers that are part of the public HPX API.
-
namespace hpx
Top level HPX namespace.
-
namespace collectives
Functions
-
template<typename T, typename F>
hpx::future<std::decay_t<T>> inclusive_scan(char const *basename, T &&result, F &&op, num_sites_arg num_sites = num_sites_arg(), this_site_arg this_site = this_site_arg(), generation_arg generation = generation_arg(), root_site_arg root_site = root_site_arg())# Inclusive inclusive_scan a set of values from different call sites
This function performs an inclusive scan operation on a set of values received from all call sites operating on the given base name.
- Parameters
basename – The base name identifying the inclusive_scan operation
result – The value to transmit to all participating sites from this call site.
op – Reduction operation to apply to all values supplied from all participating sites
num_sites – The number of participating sites (default: all localities).
this_site – The sequence number of this invocation (usually the locality id). This value is optional and defaults to whatever hpx::get_locality_id() returns.
generation – The generational counter identifying the sequence number of the inclusive_scan operation performed on the given base name. This is optional and needs to be supplied only if the inclusive_scan operation on the given base name has to be performed more than once. The generation number (if given) must be a positive number greater than zero.
root_site – The site that is responsible for creating the inclusive_scan support object. This value is optional and defaults to ‘0’ (zero).
- Returns
This function returns a future holding a vector with all values send by all participating sites. It will become ready once the inclusive_scan operation has been completed.
-
template<typename T, typename F>
hpx::future<std::decay_t<T>> inclusive_scan(communicator comm, T &&result, F &&op, this_site_arg this_site = this_site_arg(), generation_arg generation = generation_arg())# Inclusive inclusive_scan a set of values from different call sites
This function performs an inclusive scan operation on a set of values received from all call sites operating on the given base name.
Inclusive inclusive_scan a set of values from different call sites
This function performs an inclusive scan operation on a set of values received from all call sites operating on the given base name.
- Parameters
comm – A communicator object returned from create_communicator
result – The value to transmit to all participating sites from this call site.
op – Reduction operation to apply to all values supplied from all participating sites
this_site – The sequence number of this invocation (usually the locality id). This value is optional and defaults to whatever hpx::get_locality_id() returns.
generation – The generational counter identifying the sequence number of the inclusive_scan operation performed on the given base name. This is optional and needs to be supplied only if the inclusive_scan operation on the given base name has to be performed more than once. The generation number (if given) must be a positive number greater than zero.
comm – A communicator object returned from create_communicator
result – The value to transmit to all participating sites from this call site.
op – Reduction operation to apply to all values supplied from all participating sites
generation – The generational counter identifying the sequence number of the inclusive_scan operation performed on the given base name. This is optional and needs to be supplied only if the inclusive_scan operation on the given base name has to be performed more than once. The generation number (if given) must be a positive number greater than zero.
this_site – The sequence number of this invocation (usually the locality id). This value is optional and defaults to whatever hpx::get_locality_id() returns.
- Returns
This function returns a future holding a vector with all values send by all participating sites. It will become ready once the inclusive_scan operation has been completed.
- Returns
This function returns a future holding a vector with all values send by all participating sites. It will become ready once the inclusive_scan operation has been completed.
-
template<typename T, typename F>
decltype(auto) inclusive_scan(hpx::launch::sync_policy, char const *basename, T &&result, F &&op, num_sites_arg num_sites = num_sites_arg(), this_site_arg this_site = this_site_arg(), generation_arg generation = generation_arg(), root_site_arg root_site = root_site_arg())# Inclusive inclusive_scan a set of values from different call sites
This function performs an inclusive scan operation on a set of values received from all call sites operating on the given base name.
- Parameters
policy – The execution policy specifying synchronous execution.
basename – The base name identifying the inclusive_scan operation
result – The value to transmit to all participating sites from this call site.
op – Reduction operation to apply to all values supplied from all participating sites
num_sites – The number of participating sites (default: all localities).
this_site – The sequence number of this invocation (usually the locality id). This value is optional and defaults to whatever hpx::get_locality_id() returns.
generation – The generational counter identifying the sequence number of the inclusive_scan operation performed on the given base name. This is optional and needs to be supplied only if the inclusive_scan operation on the given base name has to be performed more than once. The generation number (if given) must be a positive number greater than zero.
root_site – The site that is responsible for creating the inclusive_scan support object. This value is optional and defaults to ‘0’ (zero).
- Returns
This function returns a vector with all values send by all participating sites. This function executes synchronously and directly returns the result.
-
template<typename T, typename F>
decltype(auto) inclusive_scan(hpx::launch::sync_policy, communicator comm, T &&result, F &&op, this_site_arg this_site = this_site_arg(), generation_arg generation = generation_arg())# Inclusive inclusive_scan a set of values from different call sites
This function performs an inclusive scan operation on a set of values received from all call sites operating on the given base name.
Inclusive inclusive_scan a set of values from different call sites
This function performs an inclusive scan operation on a set of values received from all call sites operating on the given base name.
- Parameters
policy – The execution policy specifying synchronous execution.
comm – A communicator object returned from create_communicator
result – The value to transmit to all participating sites from this call site.
op – Reduction operation to apply to all values supplied from all participating sites
this_site – The sequence number of this invocation (usually the locality id). This value is optional and defaults to whatever hpx::get_locality_id() returns.
generation – The generational counter identifying the sequence number of the inclusive_scan operation performed on the given base name. This is optional and needs to be supplied only if the inclusive_scan operation on the given base name has to be performed more than once. The generation number (if given) must be a positive number greater than zero.
policy – The execution policy specifying synchronous execution.
comm – A communicator object returned from create_communicator
result – The value to transmit to all participating sites from this call site.
op – Reduction operation to apply to all values supplied from all participating sites
generation – The generational counter identifying the sequence number of the inclusive_scan operation performed on the given base name. This is optional and needs to be supplied only if the inclusive_scan operation on the given base name has to be performed more than once. The generation number (if given) must be a positive number greater than zero.
this_site – The sequence number of this invocation (usually the locality id). This value is optional and defaults to whatever hpx::get_locality_id() returns.
- Returns
This function returns a vector with all values send by all participating sites. This function executes synchronously and directly returns the result.
- Returns
This function returns a vector with all values send by all participating sites. This function executes synchronously and directly returns the result.
-
template<typename T, typename F>
-
namespace collectives
hpx::distributed::latch#
Defined in header hpx/latch.hpp.
See Public API for a list of names and headers that are part of the public HPX API.
-
namespace hpx
Top level HPX namespace.
-
namespace distributed
-
class latch : public components::client_base<latch, hpx::lcos::server::latch>#
- #include <latch.hpp>
Latch is an implementation of a synchronization primitive that allows multiple threads to wait for a shared event to occur before proceeding. This latch can be invoked in a distributed application.
For a local only latch
See also
hpx::latch.
Public Functions
-
latch() = default#
-
explicit latch(std::ptrdiff_t count)#
Initialize the latch
Requires: count >= 0. Synchronization: None Postconditions: counter_ == count.
-
inline latch(hpx::id_type const &id)#
Extension: Create a client side representation for the existing server::latch instance with the given global id id.
-
inline latch(hpx::future<hpx::id_type> &&f)#
Extension: Create a client side representation for the existing server::latch instance with the given global id id.
Extension: Create a client side representation for the existing server::latch instance with the given global id id.
-
inline void count_down_and_wait()#
Decrements counter_ by 1 . Blocks at the synchronization point until counter_ reaches 0.
Requires: counter_ > 0.
Synchronization: Synchronizes with all calls that block on this latch and with all is_ready calls on this latch that return true.
- Throws
Nothing. –
-
inline void arrive_and_wait()#
Decrements counter_ by update . Blocks at the synchronization point until counter_ reaches 0.
Requires: counter_ > 0.
Synchronization: Synchronizes with all calls that block on this latch and with all is_ready calls on this latch that return true.
- Throws
Nothing. –
-
inline void count_down(std::ptrdiff_t n)#
Decrements counter_ by n. Does not block.
Requires: counter_ >= n and n >= 0.
Synchronization: Synchronizes with all calls that block on this latch and with all is_ready calls on this latch that return true .
- Throws
Nothing. –
-
inline bool is_ready() const noexcept#
Returns: counter_ == 0. Does not block.
- Throws
Nothing. –
-
inline bool try_wait() const noexcept#
Returns: counter_ == 0. Does not block.
- Throws
Nothing. –
-
inline void wait() const#
If counter_ is 0, returns immediately. Otherwise, blocks the calling thread at the synchronization point until counter_ reaches 0.
- Throws
Nothing. –
Private Types
-
typedef components::client_base<latch, hpx::lcos::server::latch> base_type#
-
latch() = default#
-
class latch : public components::client_base<latch, hpx::lcos::server::latch>#
-
namespace distributed
hpx/collectives/reduce.hpp#
Defined in header hpx/collectives/reduce.hpp.
See Public API for a list of names and headers that are part of the public HPX API.
-
namespace hpx
Top level HPX namespace.
-
namespace collectives
Functions
-
template<typename T, typename F>
hpx::future<std::decay_t<T>> reduce_here(char const *basename, T &&result, F &&op, num_sites_arg num_sites = num_sites_arg(), this_site_arg this_site = this_site_arg(), generation_arg generation = generation_arg())# Reduce a set of values from different call sites
This function receives a set of values from all call sites operating on the given base name.
- Parameters
basename – The base name identifying the all_reduce operation
result – A value to reduce on the central reduction point from this call site.
op – Reduction operation to apply to all values supplied from all participating sites
num_sites – The number of participating sites (default: all localities).
this_site – The sequence number of this invocation (usually the locality id). This value is optional and defaults to whatever hpx::get_locality_id() returns.
generation – The generational counter identifying the sequence number of the all_reduce operation performed on the given base name. This is optional and needs to be supplied only if the all_reduce operation on the given base name has to be performed more than once. The generation number (if given) must be a positive number greater than zero.
- Returns
This function returns a future holding a vector with all values send by all participating sites. It will become ready once the reduce operation has been completed.
-
template<typename T, typename F>
hpx::future<decay_t<T>> reduce_here(communicator comm, T &&result, F &&op, this_site_arg this_site = this_site_arg(), generation_arg generation = generation_arg())# Reduce a set of values from different call sites
This function receives a set of values that are the result of applying a given operator on values supplied from all call sites operating on the given base name.
Reduce a set of values from different call sites
This function receives a set of values that are the result of applying a given operator on values supplied from all call sites operating on the given base name.
Note
The generation values from corresponding reduce_here and reduce_there have to match.
Note
The generation values from corresponding reduce_here and reduce_there have to match.
- Parameters
comm – A communicator object returned from create_communicator
result – A value to reduce on the root_site from this call site.
op – Reduction operation to apply to all values supplied from all participating sites
this_site – The sequence number of this invocation (usually the locality id). This value is optional and defaults to whatever hpx::get_locality_id() returns.
generation – The generational counter identifying the sequence number of the all_reduce operation performed on the given base name. This is optional and needs to be supplied only if the all_reduce operation on the given base name has to be performed more than once. The generation number (if given) must be a positive number greater than zero.
comm – A communicator object returned from create_communicator
result – A value to reduce on the root_site from this call site.
op – Reduction operation to apply to all values supplied from all participating sites
generation – The generational counter identifying the sequence number of the all_reduce operation performed on the given base name. This is optional and needs to be supplied only if the all_reduce operation on the given base name has to be performed more than once. The generation number (if given) must be a positive number greater than zero.
this_site – The sequence number of this invocation (usually the locality id). This value is optional and defaults to whatever hpx::get_locality_id() returns.
- Returns
This function returns a future holding a value calculated based on the values send by all participating sites. It will become ready once the reduce operation has been completed.
- Returns
This function returns a future holding a value calculated based on the values send by all participating sites. It will become ready once the reduce operation has been completed.
-
template<typename T, typename F>
hpx::future<void> reduce_there(char const *basename, T &&result, this_site_arg this_site = this_site_arg(), generation_arg generation = generation_arg(), root_site_arg root_site = root_site_arg())# Reduce a given value at the given call site
This function transmits the value given by result to a central reduce site (where the corresponding reduce_here is executed)
- Parameters
basename – The base name identifying the reduction operation
result – A future referring to the value to transmit to the central reduction point from this call site.
this_site – The sequence number of this invocation (usually the locality id). This value is optional and defaults to whatever hpx::get_locality_id() returns.
generation – The generational counter identifying the sequence number of the all_reduce operation performed on the given base name. This is optional and needs to be supplied only if the all_reduce operation on the given base name has to be performed more than once. The generation number (if given) must be a positive number greater than zero.
root_site – The sequence number of the central reduction point (usually the locality id). This value is optional and defaults to 0.
- Returns
This function returns a future<void>. It will become ready once the reduction operation has been completed.
-
template<typename T>
hpx::future<void> reduce_there(communicator comm, T &&result, this_site_arg this_site = this_site_arg(), generation_arg generation = generation_arg())# Reduce a given value at the given call site
This function transmits the value given by result to a central reduce site (where the corresponding reduce_here is executed)
Reduce a given value at the given call site
This function transmits the value given by result to a central reduce site (where the corresponding reduce_here is executed)
Note
The generation values from corresponding reduce_here and reduce_there have to match.
Note
The generation values from corresponding reduce_here and reduce_there have to match.
- Parameters
comm – A communicator object returned from create_communicator
result – A value to reduce on the central reduction point from this call site.
this_site – The sequence number of this invocation (usually the locality id). This value is optional and defaults to whatever hpx::get_locality_id() returns.
generation – The generational counter identifying the sequence number of the all_reduce operation performed on the given base name. This is optional and needs to be supplied only if the all_reduce operation on the given base name has to be performed more than once. The generation number (if given) must be a positive number greater than zero.
comm – A communicator object returned from create_communicator
result – A value to reduce on the central reduction point from this call site.
generation – The generational counter identifying the sequence number of the all_reduce operation performed on the given base name. This is optional and needs to be supplied only if the all_reduce operation on the given base name has to be performed more than once. The generation number (if given) must be a positive number greater than zero.
this_site – The sequence number of this invocation (usually the locality id). This value is optional and defaults to whatever hpx::get_locality_id() returns.
- Returns
This function returns a future holding a value calculated based on the values send by all participating sites. It will become ready once the reduce operation has been completed.
- Returns
This function returns a future holding a value calculated based on the values send by all participating sites. It will become ready once the reduce operation has been completed.
-
template<typename T, typename F>
decltype(auto) reduce_here(hpx::launch::sync_policy, char const *basename, T &&result, F &&op, num_sites_arg num_sites = num_sites_arg(), this_site_arg this_site = this_site_arg(), generation_arg generation = generation_arg())# Reduce a set of values from different call sites
This function receives a set of values from all call sites operating on the given base name.
- Parameters
policy – The execution policy specifying synchronous execution.
basename – The base name identifying the all_reduce operation
result – A value to reduce on the central reduction point from this call site.
op – Reduction operation to apply to all values supplied from all participating sites
num_sites – The number of participating sites (default: all localities).
this_site – The sequence number of this invocation (usually the locality id). This value is optional and defaults to whatever hpx::get_locality_id() returns.
generation – The generational counter identifying the sequence number of the all_reduce operation performed on the given base name. This is optional and needs to be supplied only if the all_reduce operation on the given base name has to be performed more than once. The generation number (if given) must be a positive number greater than zero.
- Returns
The final reduced value after applying
opto all contributions.
-
template<typename T, typename F>
decltype(auto) reduce_here(hpx::launch::sync_policy, communicator comm, T &&result, F &&op, this_site_arg this_site = this_site_arg(), generation_arg generation = generation_arg())# Reduce a set of values from different call sites
This function receives a set of values that are the result of applying a given operator on values supplied from all call sites operating on the given base name.
Reduce a set of values from different call sites
This function receives a set of values that are the result of applying a given operator on values supplied from all call sites operating on the given base name.
Note
The generation values from corresponding reduce_here and reduce_there have to match.
Note
The generation values from corresponding reduce_here and reduce_there have to match.
- Parameters
policy – The execution policy specifying synchronous execution.
comm – A communicator object returned from create_communicator
result – A value to reduce on the root_site from this call site.
op – Reduction operation to apply to all values supplied from all participating sites
this_site – The sequence number of this invocation (usually the locality id). This value is optional and defaults to whatever hpx::get_locality_id() returns.
generation – The generational counter identifying the sequence number of the all_reduce operation performed on the given base name. This is optional and needs to be supplied only if the all_reduce operation on the given base name has to be performed more than once. The generation number (if given) must be a positive number greater than zero.
policy – The execution policy specifying synchronous execution.
comm – A communicator object returned from create_communicator
result – A value to reduce on the root_site from this call site.
op – Reduction operation to apply to all values supplied from all participating sites
generation – The generational counter identifying the sequence number of the all_reduce operation performed on the given base name. This is optional and needs to be supplied only if the all_reduce operation on the given base name has to be performed more than once. The generation number (if given) must be a positive number greater than zero.
this_site – The sequence number of this invocation (usually the locality id). This value is optional and defaults to whatever hpx::get_locality_id() returns.
- Returns
The final reduced value after applying
opto all contributions.- Returns
The final reduced value after applying
opto all contributions.
-
template<typename T>
void reduce_there(hpx::launch::sync_policy, char const *basename, T &&result, this_site_arg this_site = this_site_arg(), generation_arg generation = generation_arg(), root_site_arg root_site = root_site_arg())# Reduce a given value at the given call site
This function transmits the value given by result to a central reduce site (where the corresponding reduce_here is executed)
- Parameters
policy – The execution policy specifying synchronous execution.
basename – The base name identifying the reduction operation
result – A future referring to the value to transmit to the central reduction point from this call site.
this_site – The sequence number of this invocation (usually the locality id). This value is optional and defaults to whatever hpx::get_locality_id() returns.
generation – The generational counter identifying the sequence number of the all_reduce operation performed on the given base name. This is optional and needs to be supplied only if the all_reduce operation on the given base name has to be performed more than once. The generation number (if given) must be a positive number greater than zero.
root_site – The sequence number of the central reduction point (usually the locality id). This value is optional and defaults to 0.
-
template<typename T>
void reduce_there(hpx::launch::sync_policy, communicator comm, T &&result, this_site_arg this_site = this_site_arg(), generation_arg generation = generation_arg())# Reduce a given value at the given call site
This function transmits the value given by result to a central reduce site (where the corresponding reduce_here is executed)
Reduce a given value at the given call site
This function transmits the value given by result to a central reduce site (where the corresponding reduce_here is executed)
Note
The generation values from corresponding reduce_here and reduce_there have to match.
Note
The generation values from corresponding reduce_here and reduce_there have to match.
- Parameters
policy – The execution policy specifying synchronous execution.
comm – A communicator object returned from create_communicator
result – A value to reduce on the central reduction point from this call site.
this_site – The sequence number of this invocation (usually the locality id). This value is optional and defaults to whatever hpx::get_locality_id() returns.
generation – The generational counter identifying the sequence number of the all_reduce operation performed on the given base name. This is optional and needs to be supplied only if the all_reduce operation on the given base name has to be performed more than once. The generation number (if given) must be a positive number greater than zero.
policy – The execution policy specifying synchronous execution.
comm – A communicator object returned from create_communicator
result – A value to reduce on the central reduction point from this call site.
generation – The generational counter identifying the sequence number of the all_reduce operation performed on the given base name. This is optional and needs to be supplied only if the all_reduce operation on the given base name has to be performed more than once. The generation number (if given) must be a positive number greater than zero.
this_site – The sequence number of this invocation (usually the locality id). This value is optional and defaults to whatever hpx::get_locality_id() returns.
-
template<typename T, typename F>
-
namespace collectives
hpx/collectives/reduce_direct.hpp#
Defined in header hpx/collectives/reduce_direct.hpp.
See Public API for a list of names and headers that are part of the public HPX API.
-
namespace hpx
Top level HPX namespace.
-
namespace lcos
Functions
- template<typename Action, typename ReduceOp, typename ArgN, ...> hpx::future< decltype(Action(hpx::id_type, ArgN,...))> reduce (std::vector< hpx::id_type > const &ids, ReduceOp &&reduce_op, ArgN argN,...)
Perform a distributed reduction operation.
The function hpx::lcos::reduce performs a distributed reduction operation over results returned from action invocations on a given set of global identifiers. The action can be either a plain action (in which case the global identifiers have to refer to localities) or a component action (in which case the global identifiers have to refer to instances of a component type which exposes the action.
- Parameters
ids – [in] A list of global identifiers identifying the target objects for which the given action will be invoked.
reduce_op – [in] A binary function expecting two results as returned from the action invocations. The function (or function object) is expected to return the result of the reduction operation performed on its arguments.
argN – [in] Any number of arbitrary arguments (passed by by const reference) which will be forwarded to the action invocation.
- Returns
This function returns a future representing the result of the overall reduction operation.
- template<typename Action, typename ReduceOp, typename ArgN, ...> hpx::future< decltype(Action(hpx::id_type, ArgN,..., std::size_t))> reduce_with_index (std::vector< hpx::id_type > const &ids, ReduceOp &&reduce_op, ArgN argN,...)
Perform a distributed reduction operation.
The function hpx::lcos::reduce_with_index performs a distributed reduction operation over results returned from action invocations on a given set of global identifiers. The action can be either plain action (in which case the global identifiers have to refer to localities) or a component action (in which case the global identifiers have to refer to instances of a component type which exposes the action.
The function passes the index of the global identifier in the given list of identifiers as the last argument to the action.
- Parameters
ids – [in] A list of global identifiers identifying the target objects for which the given action will be invoked.
reduce_op – [in] A binary function expecting two results as returned from the action invocations. The function (or function object) is expected to return the result of the reduction operation performed on its arguments.
argN – [in] Any number of arbitrary arguments (passed by by const reference) which will be forwarded to the action invocation.
- Returns
This function returns a future representing the result of the overall reduction operation.
-
namespace lcos
hpx/collectives/scatter.hpp#
Defined in header hpx/collectives/scatter.hpp.
See Public API for a list of names and headers that are part of the public HPX API.
-
namespace hpx
Top level HPX namespace.
-
namespace collectives
Functions
-
template<typename T>
hpx::future<T> scatter_from(char const *basename, this_site_arg this_site = this_site_arg(), generation_arg generation = generation_arg(), root_site_arg root_site = root_site_arg())# Scatter (receive) a set of values to different call sites
This function receives an element of a set of values operating on the given base name.
- Parameters
basename – The base name identifying the scatter operation
this_site – The sequence number of this invocation (usually the locality id). This value is optional and defaults to whatever hpx::get_locality_id() returns.
generation – The generational counter identifying the sequence number of the all_gather operation performed on the given base name. This is optional and needs to be supplied only if the all_gather operation on the given base name has to be performed more than once. The generation number (if given) must be a positive number greater than zero.
root_site – The sequence number of the central scatter point (usually the locality id). This value is optional and defaults to 0.
- Returns
This function returns a future holding the scattered value. It will become ready once the scatter operation has been completed.
-
template<typename T>
hpx::future<T> scatter_from(communicator comm, this_site_arg this_site = this_site_arg(), generation_arg generation = generation_arg())# Scatter (receive) a set of values to different call sites
This function receives an element of a set of values operating on the given base name.
Scatter (receive) a set of values to different call sites
This function receives an element of a set of values operating on the given base name.
Note
The generation values from corresponding scatter_to and scatter_from have to match.
Note
The generation values from corresponding scatter_to and scatter_from have to match.
- Parameters
comm – A communicator object returned from create_communicator
this_site – The sequence number of this invocation (usually the locality id). This value is optional and defaults to whatever hpx::get_locality_id() returns.
generation – The generational counter identifying the sequence number of the all_gather operation performed on the given base name. This is optional and needs to be supplied only if the all_gather operation on the given base name has to be performed more than once. The generation number (if given) must be a positive number greater than zero.
comm – A communicator object returned from create_communicator
generation – The generational counter identifying the sequence number of the all_gather operation performed on the given base name. This is optional and needs to be supplied only if the all_gather operation on the given base name has to be performed more than once. The generation number (if given) must be a positive number greater than zero.
this_site – The sequence number of this invocation (usually the locality id). This value is optional and defaults to whatever hpx::get_locality_id() returns.
- Returns
This function returns a future holding the scattered value. It will become ready once the scatter operation has been completed.
- Returns
This function returns a future holding the scattered value. It will become ready once the scatter operation has been completed.
-
template<typename T>
hpx::future<T> scatter_to(char const *basename, std::vector<T> &&result, num_sites_arg num_sites = num_sites_arg(), this_site_arg this_site = this_site_arg(), generation_arg generation = generation_arg())# Scatter (send) a part of the value set at the given call site
This function transmits the value given by result to a central scatter site (where the corresponding scatter_from is executed)
- Parameters
basename – The base name identifying the scatter operation
result – The value to transmit to the central scatter point from this call site.
num_sites – The number of participating sites (default: all localities).
this_site – The sequence number of this invocation (usually the locality id). This value is optional and defaults to whatever hpx::get_locality_id() returns.
generation – The generational counter identifying the sequence number of the all_gather operation performed on the given base name. This is optional and needs to be supplied only if the all_gather operation on the given base name has to be performed more than once. The generation number (if given) must be a positive number greater than zero.
- Returns
This function returns a future holding the scattered value. It will become ready once the scatter operation has been completed.
-
template<typename T>
hpx::future<T> scatter_to(communicator comm, std::vector<T> &&result, this_site_arg this_site = this_site_arg(), generation_arg generation = generation_arg())# Scatter (send) a part of the value set at the given call site
This function transmits the value given by result to a central scatter site (where the corresponding scatter_from is executed)
Scatter (send) a part of the value set at the given call site
This function transmits the value given by result to a central scatter site (where the corresponding scatter_from is executed)
Note
The generation values from corresponding scatter_to and scatter_from have to match.
Note
The generation values from corresponding scatter_to and scatter_from have to match.
- Parameters
comm – A communicator object returned from create_communicator
result – The value to transmit to the central scatter point from this call site.
this_site – The sequence number of this invocation (usually the locality id). This value is optional and defaults to whatever hpx::get_locality_id() returns.
generation – The generational counter identifying the sequence number of the all_gather operation performed on the given base name. This is optional and needs to be supplied only if the all_gather operation on the given base name has to be performed more than once. The generation number (if given) must be a positive number greater than zero.
comm – A communicator object returned from create_communicator
result – The value to transmit to the central scatter point from this call site.
generation – The generational counter identifying the sequence number of the all_gather operation performed on the given base name. This is optional and needs to be supplied only if the all_gather operation on the given base name has to be performed more than once. The generation number (if given) must be a positive number greater than zero.
this_site – The sequence number of this invocation (usually the locality id). This value is optional and defaults to whatever hpx::get_locality_id() returns.
- Returns
This function returns a future holding the scattered value. It will become ready once the scatter operation has been completed.
- Returns
This function returns a future holding the scattered value. It will become ready once the scatter operation has been completed.
-
template<typename T>
T scatter_from(hpx::launch::sync_policy, char const *basename, this_site_arg this_site = this_site_arg(), generation_arg generation = generation_arg(), root_site_arg root_site = root_site_arg())# Scatter (receive) a set of values to different call sites
This function receives an element of a set of values operating on the given base name.
- Parameters
policy – The execution policy specifying synchronous execution.
basename – The base name identifying the scatter operation
this_site – The sequence number of this invocation (usually the locality id). This value is optional and defaults to whatever hpx::get_locality_id() returns.
generation – The generational counter identifying the sequence number of the all_gather operation performed on the given base name. This is optional and needs to be supplied only if the all_gather operation on the given base name has to be performed more than once. The generation number (if given) must be a positive number greater than zero.
root_site – The sequence number of the central scatter point (usually the locality id). This value is optional and defaults to 0.
- Returns
This function returns the scattered value. It executes synchronously and directly returns the result.
-
template<typename T>
T scatter_from(hpx::launch::sync_policy, communicator comm, this_site_arg this_site = this_site_arg(), generation_arg generation = generation_arg())# Scatter (receive) a set of values to different call sites
This function receives an element of a set of values operating on the given base name.
Scatter (receive) a set of values to different call sites
This function receives an element of a set of values operating on the given base name.
Note
The generation values from corresponding scatter_to and scatter_from have to match.
Note
The generation values from corresponding scatter_to and scatter_from have to match.
- Parameters
policy – The execution policy specifying synchronous execution.
comm – A communicator object returned from create_communicator
this_site – The sequence number of this invocation (usually the locality id). This value is optional and defaults to whatever hpx::get_locality_id() returns.
generation – The generational counter identifying the sequence number of the all_gather operation performed on the given base name. This is optional and needs to be supplied only if the all_gather operation on the given base name has to be performed more than once. The generation number (if given) must be a positive number greater than zero.
policy – The execution policy specifying synchronous execution.
comm – A communicator object returned from create_communicator
generation – The generational counter identifying the sequence number of the all_gather operation performed on the given base name. This is optional and needs to be supplied only if the all_gather operation on the given base name has to be performed more than once. The generation number (if given) must be a positive number greater than zero.
this_site – The sequence number of this invocation (usually the locality id). This value is optional and defaults to whatever hpx::get_locality_id() returns.
- Returns
This function returns the scattered value. It executes synchronously and directly returns the result.
- Returns
This function returns the scattered value. It executes synchronously and directly returns the result.
-
template<typename T>
T scatter_to(hpx::launch::sync_policy, char const *basename, std::vector<T> &&result, num_sites_arg num_sites = num_sites_arg(), this_site_arg this_site = this_site_arg(), generation_arg generation = generation_arg())# Scatter (send) a part of the value set at the given call site
This function transmits the value given by result to a central scatter site (where the corresponding scatter_from is executed)
- Parameters
policy – The execution policy specifying synchronous execution.
basename – The base name identifying the scatter operation
result – The value to transmit to the central scatter point from this call site.
num_sites – The number of participating sites (default: all localities).
this_site – The sequence number of this invocation (usually the locality id). This value is optional and defaults to whatever hpx::get_locality_id() returns.
generation – The generational counter identifying the sequence number of the all_gather operation performed on the given base name. This is optional and needs to be supplied only if the all_gather operation on the given base name has to be performed more than once. The generation number (if given) must be a positive number greater than zero.
- Returns
This function returns the scattered value. It executes synchronously and directly returns the result.
-
template<typename T>
T scatter_to(hpx::launch::sync_policy, communicator comm, std::vector<T> &&result, this_site_arg this_site = this_site_arg(), generation_arg generation = generation_arg())# Scatter (send) a part of the value set at the given call site
This function transmits the value given by result to a central scatter site (where the corresponding scatter_from is executed)
Scatter (send) a part of the value set at the given call site
This function transmits the value given by result to a central scatter site (where the corresponding scatter_from is executed)
Note
The generation values from corresponding scatter_to and scatter_from have to match.
Note
The generation values from corresponding scatter_to and scatter_from have to match.
- Parameters
policy – The execution policy specifying synchronous execution.
comm – A communicator object returned from create_communicator
result – The value to transmit to the central scatter point from this call site.
this_site – The sequence number of this invocation (usually the locality id). This value is optional and defaults to whatever hpx::get_locality_id() returns.
generation – The generational counter identifying the sequence number of the all_gather operation performed on the given base name. This is optional and needs to be supplied only if the all_gather operation on the given base name has to be performed more than once. The generation number (if given) must be a positive number greater than zero.
policy – The execution policy specifying synchronous execution.
comm – A communicator object returned from create_communicator
result – The value to transmit to the central scatter point from this call site.
generation – The generational counter identifying the sequence number of the all_gather operation performed on the given base name. This is optional and needs to be supplied only if the all_gather operation on the given base name has to be performed more than once. The generation number (if given) must be a positive number greater than zero.
this_site – The sequence number of this invocation (usually the locality id). This value is optional and defaults to whatever hpx::get_locality_id() returns.
- Returns
This function returns the scattered value. It executes synchronously and directly returns the result.
- Returns
This function returns the scattered value. It executes synchronously and directly returns the result.
-
template<typename T>
-
namespace collectives
components#
See Public API for a list of names and headers that are part of the public HPX API.
hpx/components/basename_registration.hpp#
Defined in header hpx/components/basename_registration.hpp.
See Public API for a list of names and headers that are part of the public HPX API.
-
namespace hpx
Functions
-
template<typename Client>
std::vector<Client> find_all_from_basename(std::string base_name, std::size_t num_ids)# Return all registered clients from all localities from the given base name.
This function locates all ids which were registered with the given base name. It returns a list of futures representing those ids.
Return all registered ids from all localities from the given base name.
This function locates all ids which were registered with the given base name. It returns a list of futures representing those ids.
Note
The futures embedded in the returned client objects will become ready even if the event (for instance, binding the name to an id) has already happened in the past. This is important in order to reliably retrieve ids from a name, even if the name was already registered.
Note
The futures will become ready even if the event (for instance, binding the name to an id) has already happened in the past. This is important in order to reliably retrieve ids from a name, even if the name was already registered.
- Template Parameters
Client – The client type to return
- Parameters
base_name – [in] The base name for which to retrieve the registered ids.
num_ids – [in] The number of registered ids to expect.
base_name – [in] The base name for which to retrieve the registered ids.
num_ids – [in] The number of registered ids to expect.
- Returns
A list of futures representing the ids which were registered using the given base name.
- Returns
A list of futures representing the ids which were registered using the given base name.
-
template<typename Client>
std::vector<Client> find_all_from_basename(hpx::launch::sync_policy policy, std::string base_name, std::size_t num_ids)#
-
template<typename Client>
std::vector<Client> find_from_basename(std::string base_name, std::vector<std::size_t> const &ids)# Return registered clients from the given base name and sequence numbers.
This function locates the ids which were registered with the given base name and the given sequence numbers. It returns a list of futures representing those ids.
Return registered ids from the given base name and sequence numbers.
This function locates the ids which were registered with the given base name and the given sequence numbers. It returns a list of futures representing those ids.
Note
The futures embedded in the returned client objects will become ready even if the event (for instance, binding the name to an id) has already happened in the past. This is important in order to reliably retrieve ids from a name, even if the name was already registered.
Note
The futures will become ready even if the event (for instance, binding the name to an id) has already happened in the past. This is important in order to reliably retrieve ids from a name, even if the name was already registered.
- Template Parameters
Client – The client type to return
- Parameters
base_name – [in] The base name for which to retrieve the registered ids.
ids – [in] The sequence numbers of the registered ids.
base_name – [in] The base name for which to retrieve the registered ids.
ids – [in] The sequence numbers of the registered ids.
- Returns
A list of futures representing the ids which were registered using the given base name and sequence numbers.
- Returns
A list of futures representing the ids which were registered using the given base name and sequence numbers.
-
template<typename Client>
std::vector<Client> find_from_basename(hpx::launch::sync_policy policy, std::string base_name, std::vector<std::size_t> const &ids)#
-
template<typename Client>
Client find_from_basename(std::string base_name, std::size_t sequence_nr)# Return registered id from the given base name and sequence number.
This function locates the id which was registered with the given base name and the given sequence number. It returns a future representing those id.
This function locates the id which was registered with the given base name and the given sequence number. It returns a future representing those id.
Note
The future embedded in the returned client object will become ready even if the event (for instance, binding the name to an id) has already happened in the past. This is important in order to reliably retrieve ids from a name, even if the name was already registered.
Note
The future will become ready even if the event (for instance, binding the name to an id) has already happened in the past. This is important in order to reliably retrieve ids from a name, even if the name was already registered.
- Template Parameters
Client – The client type to return
- Parameters
base_name – [in] The base name for which to retrieve the registered ids.
sequence_nr – [in] The sequence number of the registered id.
base_name – [in] The base name for which to retrieve the registered ids.
sequence_nr – [in] The sequence number of the registered id.
- Returns
A representing the id which was registered using the given base name and sequence numbers.
- Returns
A representing the id which was registered using the given base name and sequence numbers.
-
template<typename Client>
Client find_from_basename(hpx::launch::sync_policy policy, std::string base_name, std::size_t sequence_nr)#
-
template<typename Client, typename Stub, typename Data>
hpx::future<bool> register_with_basename(std::string base_name, components::client_base<Client, Stub, Data> &client, std::size_t sequence_nr)# Register the id wrapped in the given client using the given base name.
The function registers the object the given client refers to using the provided base name.
Note
The operation will fail if the given sequence number is not unique.
- Template Parameters
Client – The client type to register
- Parameters
base_name – [in] The base name for which to retrieve the registered ids.
client – [in] The client which should be registered using the given base name.
sequence_nr – [in, optional] The sequential number to use for the registration of the id. This number has to be unique system-wide for each registration using the same base name. The default is the current locality identifier. Also, the sequence numbers have to be consecutive starting from zero.
- Returns
A future representing the result of the registration operation itself.
-
template<typename Client>
Client unregister_with_basename(std::string base_name, std::size_t sequence_nr = ~static_cast<std::size_t>(0))# Unregister the given id using the given base name.
Unregister the given base name.
The function unregisters the given ids using the provided base name.
The function unregisters the given ids using the provided base name.
- Template Parameters
Client – The client type to return
- Parameters
base_name – [in] The base name for which to retrieve the registered ids.
sequence_nr – [in, optional] The sequential number to use for the un-registration. This number has to be the same as has been used with register_with_basename before.
base_name – [in] The base name for which to retrieve the registered ids.
sequence_nr – [in, optional] The sequential number to use for the un-registration. This number has to be the same as has been used with register_with_basename before.
- Returns
A future representing the result of the un-registration operation itself.
- Returns
A future representing the result of the un-registration operation itself.
-
template<typename Client>
hpx/components/basename_registration_fwd.hpp#
Defined in header hpx/components/basename_registration_fwd.hpp.
See Public API for a list of names and headers that are part of the public HPX API.
-
namespace hpx
Functions
-
hpx::future<bool> register_with_basename(std::string base_name, hpx::id_type const &id, std::size_t sequence_nr = ~static_cast<std::size_t>(0))#
Register the given id using the given base name.
The function registers the given ids using the provided base name.
Note
The operation will fail if the given sequence number is not unique.
- Parameters
base_name – [in] The base name for which to retrieve the registered ids.
id – [in] The id to register using the given base name.
sequence_nr – [in, optional] The sequential number to use for the registration of the id. This number has to be unique system-wide for each registration using the same base name. The default is the current locality identifier. Also, the sequence numbers have to be consecutive starting from zero.
- Returns
A future representing the result of the registration operation itself.
-
bool register_with_basename(hpx::launch::sync_policy, std::string base_name, hpx::id_type const &id, std::size_t sequence_nr = ~static_cast<std::size_t>(0), error_code &ec = throws)#
-
hpx::future<bool> register_with_basename(std::string base_name, hpx::future<hpx::id_type> f, std::size_t sequence_nr = ~static_cast<std::size_t>(0))#
Register the id wrapped in the given future using the given base name.
The function registers the object the given future refers to using the provided base name.
Note
The operation will fail if the given sequence number is not unique.
- Parameters
base_name – [in] The base name for which to retrieve the registered ids.
f – [in] The future which should be registered using the given base name.
sequence_nr – [in, optional] The sequential number to use for the registration of the id. This number has to be unique system-wide for each registration using the same base name. The default is the current locality identifier. Also, the sequence numbers have to be consecutive starting from zero.
- Returns
A future representing the result of the registration operation itself.
-
hpx::future<bool> register_with_basename(std::string base_name, hpx::id_type const &id, std::size_t sequence_nr = ~static_cast<std::size_t>(0))#
hpx::components::client#
Defined in header hpx/components.hpp.
See Public API for a list of names and headers that are part of the public HPX API.
-
namespace hpx
-
namespace components
-
template<typename Component, typename Data = void>
class client : public hpx::components::client_base<client<Component, void>, Component, void># - #include <client.hpp>
The client class is a wrapper that manages a distributed component. It extends
client_basewith specificComponentandDatatypes.- Template Parameters
Component – The type of the component.
Data – The type of the data associated with the client (default is void).
Public Functions
-
client() = default#
-
inline explicit client(future_type const &f) noexcept#
-
inline explicit client(future_type &&f) noexcept#
-
~client() = default#
-
inline client &operator=(future_type const &f) noexcept#
-
inline client &operator=(future_type &&f) noexcept#
-
template<typename Component, typename Data = void>
-
namespace components
hpx::components::client_base#
Defined in header hpx/components.hpp.
See Public API for a list of names and headers that are part of the public HPX API.
-
template<typename Derived>
struct is_client<Derived, std::void_t<typename Derived::is_client_tag>> : public true_type#
-
namespace hpx
-
namespace components
Functions
-
template<typename Derived, typename Stub, typename Data>
bool operator==(client_base<Derived, Stub, Data> const &lhs, client_base<Derived, Stub, Data> const &rhs)#
-
template<typename Derived, typename Stub, typename Data>
bool operator<(client_base<Derived, Stub, Data> const &lhs, client_base<Derived, Stub, Data> const &rhs)#
-
template<typename Derived, typename Stub, typename Data>
class client_base : public detail::make_stub::type<Stub># - #include <client_base.hpp>
This class template serves as a base class for client components, providing common functionality such as managing shared state, ID retrieval, and asynchronous operations.
- Template Parameters
Derived – The derived client component type.
Stub – The stub type used for communication.
Data – The extra data type used for additional information.
Public Types
-
using is_client_tag = void#
Public Functions
-
client_base() = default#
-
inline explicit client_base(id_type const &id)#
-
inline explicit client_base(id_type &&id)#
-
inline client_base(id_type const &id, bool make_unmanaged)#
-
inline client_base(id_type &&id, bool make_unmanaged)#
-
client_base(client_base const &rhs) = default#
-
client_base(client_base &&rhs) noexcept = default#
-
~client_base() = default#
-
inline client_base &operator=(hpx::id_type const &id)#
-
inline client_base &operator=(hpx::id_type &&id)#
-
inline client_base &operator=(hpx::future<hpx::id_type> &&f) noexcept#
-
client_base &operator=(client_base const &rhs) = default#
-
client_base &operator=(client_base &&rhs) noexcept = default#
-
inline bool valid() const noexcept#
-
inline explicit operator bool() const noexcept#
-
inline void free()#
-
inline hpx::id_type const &get_id(error_code &ec = hpx::throws) const#
-
inline hpx::shared_future<hpx::id_type> detach()#
-
inline id_type const &get(error_code &ec = hpx::throws) const#
-
inline bool is_ready() const noexcept#
-
inline bool has_value() const noexcept#
-
inline bool has_exception() const noexcept#
-
inline void wait() const#
-
template<typename F>
inline hpx::traits::future_then_result_t<Derived, F> then(launch l, F &&f) const#
-
template<typename F>
inline hpx::traits::future_then_result_t<Derived, F> then(launch::sync_policy l, F &&f) const#
Protected Functions
Protected Attributes
Private Static Functions
-
static inline bool register_as_helper(client_base const &f, std::string symbolic_name, bool manage_lifetime)#
-
template<typename Derived, typename Stub, typename Data>
-
namespace lcos
-
namespace serialization
Functions
-
template<typename Archive, typename Derived, typename Stub, typename Data>
void serialize(Archive &ar, ::hpx::components::client_base<Derived, Stub, Data> &f, unsigned version)#
-
template<typename Archive, typename Derived, typename Stub, typename Data>
-
namespace traits
- template<typename Derived> is_client_tag > > : public true_type
-
namespace components
hpx/components/get_ptr.hpp#
Defined in header hpx/components/get_ptr.hpp.
See Public API for a list of names and headers that are part of the public HPX API.
-
namespace hpx
Functions
Returns a future referring to the pointer to the underlying memory of a component.
The function hpx::get_ptr can be used to extract a future referring to the pointer to the underlying memory of a given component.
Note
This function will successfully return the requested result only if the given component is currently located on the calling locality. Otherwise, the function will raise an error.
Note
The component instance the returned pointer refers to can not be migrated as long as there is at least one copy of the returned shared_ptr alive.
- Parameters
id – [in] The global id of the component for which the pointer to the underlying memory should be retrieved.
- Template Parameters
Component – The type of the server side component.
- Returns
This function returns a future representing the pointer to the underlying memory for the component instance with the given id.
Returns a future referring to the pointer to the underlying memory of a component.
The function hpx::get_ptr can be used to extract a future referring to the pointer to the underlying memory of a given component.
Note
This function will successfully return the requested result only if the given component is currently located on the calling locality. Otherwise, the function will raise an error.
Note
The component instance the returned pointer refers to can not be migrated as long as there is at least one copy of the returned shared_ptr alive.
- Parameters
c – [in] A client side representation of the component for which the pointer to the underlying memory should be retrieved.
- Returns
This function returns a future representing the pointer to the underlying memory for the component instance with the given id.
Returns the pointer to the underlying memory of a component.
The function hpx::get_ptr_sync can be used to extract the pointer to the underlying memory of a given component.
Note
This function will successfully return the requested result only if the given component is currently located on the requesting locality. Otherwise, the function will raise and error.
Note
The component instance the returned pointer refers to can not be migrated as long as there is at least one copy of the returned shared_ptr alive.
Note
As long as ec is not pre-initialized to hpx::throws this function doesn’t throw but returns the result code using the parameter ec. Otherwise, it throws an instance of hpx::exception.
- Parameters
p – [in] The parameter p represents a placeholder type to turn make the call synchronous.
id – [in] The global id of the component for which the pointer to the underlying memory should be retrieved.
ec – [in,out] this represents the error status on exit, if this is pre-initialized to hpx::throws the function will throw on error instead.
- Template Parameters
Component – The only template parameter has to be the type of the server side component.
- Returns
This function returns the pointer to the underlying memory for the component instance with the given id.
Returns the pointer to the underlying memory of a component.
The function hpx::get_ptr_sync can be used to extract the pointer to the underlying memory of a given component.
Note
This function will successfully return the requested result only if the given component is currently located on the requesting locality. Otherwise, the function will raise and error.
Note
The component instance the returned pointer refers to can not be migrated as long as there is at least one copy of the returned shared_ptr alive.
Note
As long as ec is not pre-initialized to hpx::throws this function doesn’t throw but returns the result code using the parameter ec. Otherwise, it throws an instance of hpx::exception.
- Parameters
p – [in] The parameter p represents a placeholder type to turn make the call synchronous.
c – [in] A client side representation of the component for which the pointer to the underlying memory should be retrieved.
ec – [in,out] this represents the error status on exit, if this is pre-initialized to hpx::throws the function will throw on error instead.
- Returns
This function returns the pointer to the underlying memory for the component instance with the given id.
components_base#
See Public API for a list of names and headers that are part of the public HPX API.
hpx/components_base/agas_interface.hpp#
Defined in header hpx/components_base/agas_interface.hpp.
See Public API for a list of names and headers that are part of the public HPX API.
-
namespace hpx
-
namespace agas
Functions
-
bool is_console()#
-
bool register_name(launch::sync_policy, std::string const &name, naming::gid_type const &gid, error_code &ec = throws)#
-
bool register_name(launch::sync_policy, std::string const &name, hpx::id_type const &id, error_code &ec = throws)#
-
hpx::id_type unregister_name(launch::sync_policy, std::string const &name, error_code &ec = throws)#
-
hpx::id_type resolve_name(launch::sync_policy, std::string const &name, error_code &ec = throws)#
-
hpx::future<std::uint32_t> get_num_localities(naming::component_type type = naming::component_invalid)#
-
std::uint32_t get_num_localities(launch::sync_policy, naming::component_type type, error_code &ec = throws)#
-
inline std::uint32_t get_num_localities(launch::sync_policy, error_code &ec = throws)#
-
std::string get_component_type_name(naming::component_type type, error_code &ec = throws)#
-
std::vector<std::uint32_t> get_num_threads(launch::sync_policy, error_code &ec = throws)#
-
std::uint32_t get_num_overall_threads(launch::sync_policy, error_code &ec = throws)#
-
std::uint32_t get_locality_id(error_code &ec = throws)#
-
std::vector<std::uint32_t> get_all_locality_ids(naming::component_type type, error_code &ec = throws)#
-
inline std::vector<std::uint32_t> get_all_locality_ids(error_code &ec = throws)#
-
bool is_local_address_cached(naming::gid_type const &gid, error_code &ec = throws)#
-
bool is_local_address_cached(naming::gid_type const &gid, naming::address &addr, error_code &ec = throws)#
-
bool is_local_address_cached(naming::gid_type const &gid, naming::address &addr, std::pair<bool, components::pinned_ptr> &r, hpx::move_only_function<std::pair<bool, components::pinned_ptr>(naming::address const&)> &&f, error_code &ec = throws)#
-
inline bool is_local_address_cached(hpx::id_type const &id, error_code &ec = throws)#
-
inline bool is_local_address_cached(hpx::id_type const &id, naming::address &addr, error_code &ec = throws)#
-
inline bool is_local_address_cached(hpx::id_type const &id, naming::address &addr, std::pair<bool, components::pinned_ptr> &r, hpx::move_only_function<std::pair<bool, components::pinned_ptr>(naming::address const&)> &&f, error_code &ec = throws)#
-
void update_cache_entry(naming::gid_type const &gid, naming::address const &addr, std::uint64_t count = 0, std::uint64_t offset = 0, error_code &ec = throws)#
-
naming::address resolve(launch::sync_policy, hpx::id_type const &id, error_code &ec = throws)#
-
bool resolve_local(naming::gid_type const &gid, naming::address &addr, error_code &ec = throws)#
-
hpx::future<bool> bind(naming::gid_type const &gid, naming::address const &addr, std::uint32_t locality_id)#
-
bool bind(launch::sync_policy, naming::gid_type const &gid, naming::address const &addr, std::uint32_t locality_id, error_code &ec = throws)#
-
hpx::future<bool> bind(naming::gid_type const &gid, naming::address const &addr, naming::gid_type const &locality_)#
-
bool bind(launch::sync_policy, naming::gid_type const &gid, naming::address const &addr, naming::gid_type const &locality_, error_code &ec = throws)#
-
naming::address unbind(launch::sync_policy, naming::gid_type const &gid, std::uint64_t count = 1, error_code &ec = throws)#
-
bool bind_gid_local(naming::gid_type const &gid, naming::address const &addr, error_code &ec = throws)#
-
void unbind_gid_local(naming::gid_type const &gid, error_code &ec = throws)#
-
bool bind_range_local(naming::gid_type const &gid, std::size_t count, naming::address const &addr, std::size_t offset, error_code &ec = throws)#
-
void unbind_range_local(naming::gid_type const &gid, std::size_t count, error_code &ec = throws)#
-
void garbage_collect_non_blocking(error_code &ec = throws)#
-
void garbage_collect(error_code &ec = throws)#
-
void garbage_collect_non_blocking(hpx::id_type const &id, error_code &ec = throws)#
Invoke an asynchronous garbage collection step on the given target locality.
-
void garbage_collect(hpx::id_type const &id, error_code &ec = throws)#
Invoke a synchronous garbage collection step on the given target locality.
-
hpx::id_type get_console_locality(error_code &ec = throws)#
Return an id_type referring to the console locality.
-
naming::gid_type get_next_id(std::size_t count, error_code &ec = throws)#
-
void decref(naming::gid_type const &id, std::int64_t credits, error_code &ec = throws)#
-
hpx::future_or_value<std::int64_t> incref(naming::gid_type const &gid, std::int64_t credits, hpx::id_type const &keep_alive = hpx::invalid_id)#
-
std::int64_t incref(launch::sync_policy, naming::gid_type const &gid, std::int64_t credits = 1, hpx::id_type const &keep_alive = hpx::invalid_id, error_code &ec = throws)#
-
hpx::id_type get_colocation_id(launch::sync_policy, hpx::id_type const &id, error_code &ec = throws)#
-
hpx::future<hpx::id_type> on_symbol_namespace_event(std::string const &name, bool call_for_past_events)#
-
hpx::future<void> mark_as_migrated(naming::gid_type const &gid, hpx::move_only_function<std::pair<bool, hpx::future<void>>()> &&f, bool expect_to_be_marked_as_migrating)#
-
std::pair<bool, components::pinned_ptr> was_object_migrated(naming::gid_type const &gid, hpx::move_only_function<components::pinned_ptr()> &&f)#
-
void unmark_as_migrated(naming::gid_type const &gid, hpx::move_only_function<void()> &&f)#
-
std::map<std::string, hpx::id_type> find_symbols(hpx::launch::sync_policy, std::string const &pattern = "*")#
-
naming::component_type register_factory(std::uint32_t prefix, std::string const &name, error_code &ec = throws)#
-
naming::component_type get_component_id(std::string const &name, error_code &ec = throws)#
-
struct agas_interface_functions &agas_init()#
-
bool is_console()#
-
namespace agas
HPX_REGISTER_COMMANDLINE_MODULE#
Defined in header hpx/components.hpp.
See Public API for a list of names and headers that are part of the public HPX API.
Defines
-
HPX_DEFINE_COMPONENT_COMMANDLINE_OPTIONS(add_options_function)#
-
HPX_REGISTER_COMMANDLINE_MODULE(add_options_function)#
Macro to register a command-line module with the HPX runtime.
This macro facilitates the registration of a command-line module with the HPX runtime system. A command-line module typically provides additional command-line options that can be used to configure the HPX application.
- Parameters
add_options_function – The function that adds custom command-line options.
-
HPX_REGISTER_COMMANDLINE_MODULE_DYNAMIC(add_options_function)#
-
namespace hpx
-
namespace components
-
struct component_commandline : public component_commandline_base#
- #include <component_commandline.hpp>
The component_startup_shutdown provides a minimal implementation of a component’s startup/shutdown function provider.
Public Functions
-
inline hpx::program_options::options_description add_commandline_options() override#
Return any additional command line options valid for this component.
Note
This function will be executed by the runtime system during system startup.
- Returns
The module is expected to fill a options_description object with any additional command line options this component will handle.
-
inline hpx::program_options::options_description add_commandline_options() override#
-
namespace commandline_options_provider#
-
struct component_commandline : public component_commandline_base#
-
namespace components
HPX_REGISTER_STARTUP_MODULE#
Defined in header hpx/components.hpp.
See Public API for a list of names and headers that are part of the public HPX API.
Defines
-
HPX_DEFINE_COMPONENT_STARTUP_SHUTDOWN(startup_, shutdown_)#
-
HPX_REGISTER_STARTUP_SHUTDOWN_MODULE_(startup, shutdown)#
-
HPX_REGISTER_STARTUP_SHUTDOWN_MODULE(startup, shutdown)#
-
HPX_REGISTER_STARTUP_SHUTDOWN_MODULE_DYNAMIC(startup, shutdown)#
-
HPX_REGISTER_STARTUP_MODULE(startup)#
Macro to register a startup module with the HPX runtime.
This macro facilitates the registration of a startup module with the HPX runtime system. A startup module typically contains initialization code that should be executed when the HPX runtime starts.
- Parameters
startup – The name of the startup function to be registered.
-
HPX_REGISTER_STARTUP_MODULE_DYNAMIC(startup)#
-
HPX_REGISTER_SHUTDOWN_MODULE(shutdown)#
-
HPX_REGISTER_SHUTDOWN_MODULE_DYNAMIC(shutdown)#
-
namespace hpx
-
namespace components
-
template<bool (*Startup)(startup_function_type&, bool&), bool (*Shutdown)(shutdown_function_type&, bool&)>
struct component_startup_shutdown : public component_startup_shutdown_base# - #include <component_startup_shutdown.hpp>
The component_startup_shutdown class provides a minimal implementation of a component’s startup/shutdown function provider.
Public Functions
-
inline bool get_startup_function(startup_function_type &startup, bool &pre_startup) override#
Return any startup function for this component.
- Parameters
startup – [in, out] The module is expected to fill this function object with a reference to a startup function. This function will be executed by the runtime system during system startup.
pre_startup –
- Returns
Returns true if the parameter startup has been successfully initialized with the startup function.
-
inline bool get_shutdown_function(shutdown_function_type &shutdown, bool &pre_shutdown) override#
Return any startup function for this component.
- Parameters
shutdown – [in, out] The module is expected to fill this function object with a reference to a startup function. This function will be executed by the runtime system during system startup.
pre_shutdown –
- Returns
Returns true if the parameter shutdown has been successfully initialized with the shutdown function.
-
inline bool get_startup_function(startup_function_type &startup, bool &pre_startup) override#
-
template<bool (*Startup)(startup_function_type&, bool&), bool (*Shutdown)(shutdown_function_type&, bool&)>
-
namespace components
hpx/components_base/component_type.hpp#
Defined in header hpx/components_base/component_type.hpp.
See Public API for a list of names and headers that are part of the public HPX API.
Defines
-
HPX_COMPONENT_ENUM_TYPE_ENUM_DEPRECATION_MSG#
-
HPX_FACTORY_STATE_ENUM_DEPRECATION_MSG#
-
HPX_DEFINE_GET_COMPONENT_TYPE(component)#
-
HPX_DEFINE_GET_COMPONENT_TYPE_TEMPLATE(template_, component)#
-
HPX_DEFINE_GET_COMPONENT_TYPE_STATIC(component, type)#
-
HPX_DEFINE_COMPONENT_NAME(...)#
-
HPX_DEFINE_COMPONENT_NAME_(...)#
-
HPX_DEFINE_COMPONENT_NAME_2(Component, name)#
-
HPX_DEFINE_COMPONENT_NAME_3(Component, name, base_name)#
-
namespace hpx
-
namespace components
Typedefs
Enums
-
enum class component_enum_type : naming::component_type#
Values:
-
enumerator invalid#
-
enumerator runtime_support#
-
enumerator plain_function#
-
enumerator base_lco#
-
enumerator base_lco_with_value_unmanaged#
-
enumerator base_lco_with_value#
-
enumerator latch#
-
enumerator barrier#
-
enumerator promise#
-
enumerator agas_locality_namespace#
-
enumerator agas_primary_namespace#
-
enumerator agas_component_namespace#
-
enumerator agas_symbol_namespace#
-
enumerator last#
-
enumerator first_dynamic#
-
enumerator invalid#
Functions
-
constexpr naming::component_type to_int(component_enum_type t) noexcept#
-
constexpr int to_int(factory_state t) noexcept#
-
bool &enabled(component_type type)#
-
component_deleter_type &deleter(component_type type)#
-
bool enumerate_instance_counts(hpx::move_only_function<bool(component_type)> const &f)#
-
std::string get_component_type_name(component_type type)#
Return the string representation for a given component type id.
-
constexpr component_type get_base_type(component_type t) noexcept#
The lower short word of the component type is the type of the component exposing the actions.
-
constexpr component_type get_derived_type(component_type t) noexcept#
The upper short word of the component is the actual component type.
-
constexpr component_type derived_component_type(component_type derived, component_type base) noexcept#
A component derived from a base component exposing the actions needs to have a specially formatted component type.
-
constexpr bool types_are_compatible(component_type lhs, component_type rhs) noexcept#
Verify the two given component types are matching (compatible)
-
template<typename Component, typename Enable = void>
char const *get_component_name() noexcept#
-
template<typename Component, typename Enable = void>
char const *get_component_base_name() noexcept#
-
template<typename Component>
component_type get_component_type() noexcept#
-
template<typename Component>
void set_component_type(component_type type)#
Variables
-
constexpr component_enum_type component_invalid = component_enum_type::invalid#
-
constexpr component_enum_type component_runtime_support = component_enum_type::runtime_support#
-
constexpr component_enum_type component_plain_function = component_enum_type::plain_function#
-
constexpr component_enum_type component_base_lco = component_enum_type::base_lco#
-
constexpr component_enum_type component_base_lco_with_value_unmanaged = component_enum_type::base_lco_with_value_unmanaged#
-
constexpr component_enum_type component_base_lco_with_value = component_enum_type::base_lco_with_value#
-
constexpr component_enum_type component_latch = component_enum_type::latch#
-
constexpr component_enum_type component_barrier = component_enum_type::barrier#
-
constexpr component_enum_type component_promise = component_enum_type::promise#
-
constexpr component_enum_type component_agas_locality_namespace = component_enum_type::agas_locality_namespace#
-
constexpr component_enum_type component_agas_primary_namespace = component_enum_type::agas_primary_namespace#
-
constexpr component_enum_type component_agas_component_namespace = component_enum_type::agas_component_namespace#
-
constexpr component_enum_type component_agas_symbol_namespace = component_enum_type::agas_symbol_namespace#
-
constexpr component_enum_type component_last = component_enum_type::last#
-
constexpr component_enum_type component_first_dynamic = component_enum_type::first_dynamic#
-
constexpr factory_state factory_enabled = factory_state::enabled#
-
constexpr factory_state factory_disabled = factory_state::disabled#
-
constexpr factory_state factory_check = factory_state::check#
-
constexpr int component_type_mask = 0x3FF#
-
constexpr int component_type_shift = 10#
-
enum class component_enum_type : naming::component_type#
-
namespace components
hpx::components::component, hpx::components::component_base#
Defined in header hpx/components.hpp.
See Public API for a list of names and headers that are part of the public HPX API.
-
namespace hpx
-
namespace components
-
template<typename Component = void>
class abstract_component_base#
-
template<typename Component, typename Derived = void>
class abstract_managed_component_base#
-
template<typename Component>
class component# - #include <components_base_fwd.hpp>
The component class wraps around a given component type, adding additional type aliases and constructors. It inherits from the specified component type.
-
template<typename Component = void>
class component_base# - #include <components_base_fwd.hpp>
component_base serves as a base class for components. It provides common functionality needed by components, such as address and ID retrieval. The template parameter Component specifies the derived component type.
-
template<typename Component>
class fixed_component#
-
template<typename Component>
class fixed_component_base#
-
template<typename Component, typename Derived>
class managed_component# - #include <managed_component_base.hpp>
The managed_component template is used as an indirection layer for components allowing to gracefully handle the access to non-existing components.
Additionally, it provides memory management capabilities for the wrapping instances, and it integrates the memory management with the AGAS service. Every instance of a managed_component gets assigned a global id. The provided memory management allocates the managed_component instances from a special heap, ensuring fast allocation and avoids a full network round trip to the AGAS service for each of the allocated instances.
- Template Parameters
Component – Component type
Derived – Most derived component type
-
template<typename Component, typename Wrapper, typename CtorPolicy, typename DtorPolicy>
class managed_component_base#
-
template<typename Component = void>
-
namespace components
hpx/components_base/get_lva.hpp#
Defined in header hpx/components_base/get_lva.hpp.
See Public API for a list of names and headers that are part of the public HPX API.
-
namespace hpx
-
template<typename Component, typename Enable = void>
struct get_lva# - #include <get_lva.hpp>
The get_lva template is a helper structure allowing to convert a local virtual address as stored in a local address (returned from the function agas::addressing_service::resolve) to the address of the component implementing the action.
The default implementation uses the template argument Component to deduce the type wrapping the component implementing the action. This is used to get the needed address.
- Template Parameters
Component – This is the type of the component implementing the action to execute.
-
template<typename Component, typename Enable = void>
hpx/components_base/server/fixed_component_base.hpp#
Defined in header hpx/components_base/server/fixed_component_base.hpp.
See Public API for a list of names and headers that are part of the public HPX API.
-
namespace hpx
-
namespace components
-
template<typename Component>
class fixed_component
-
template<typename Component>
class fixed_component_base
-
template<typename Component>
-
namespace components
hpx/components_base/server/managed_component_base.hpp#
Defined in header hpx/components_base/server/managed_component_base.hpp.
See Public API for a list of names and headers that are part of the public HPX API.
-
namespace hpx
-
namespace components
Functions
-
template<typename Component, typename Derived>
void intrusive_ptr_add_ref(managed_component<Component, Derived> *p) noexcept#
-
template<typename Component, typename Derived>
void intrusive_ptr_release(managed_component<Component, Derived> *p) noexcept#
-
template<typename Component, typename Derived>
class managed_component - #include <managed_component_base.hpp>
-
template<typename Component, typename Wrapper, typename CtorPolicy, typename DtorPolicy>
class managed_component_base
-
namespace detail_adl_barrier#
-
template<typename DtorTag>
struct destroy_backptr#
- template<> managed_object_controls_lifetime >
- template<> managed_object_is_lifetime_controlled >
Public Static Functions
-
template<typename BackPtr>
static inline void call(BackPtr *back_ptr)
-
template<typename BackPtr>
-
template<typename BackPtrTag>
struct init#
- template<> construct_with_back_ptr >
- template<> construct_without_back_ptr >
-
template<typename DtorTag>
struct manage_lifetime#
- template<> managed_object_controls_lifetime >
- template<> managed_object_is_lifetime_controlled >
-
template<typename DtorTag>
-
template<typename Component, typename Derived>
-
namespace components
hpx/components_base/server/migration_support.hpp#
Defined in header hpx/components_base/server/migration_support.hpp.
See Public API for a list of names and headers that are part of the public HPX API.
-
namespace hpx
-
namespace components
-
template<typename BaseComponent, typename Mutex = hpx::spinlock>
struct migration_support : public BaseComponent# - #include <migration_support.hpp>
This hook has to be inserted into the derivation chain of any component for it to support migration.
Public Types
-
using decorates_action = void#
Public Functions
-
inline migration_support()#
-
template<typename T, typename ...Ts, typename = std::enable_if_t<!std::is_same_v<std::decay_t<T>, migration_support>>>
inline explicit migration_support(T &&t, Ts&&... ts)#
-
migration_support(migration_support const&) = default#
-
migration_support(migration_support&&) = default#
-
migration_support &operator=(migration_support const&) = default#
-
migration_support &operator=(migration_support&&) = default#
-
~migration_support() = default#
-
inline naming::gid_type get_base_gid(naming::gid_type const &assign_gid = naming::invalid_gid) const#
-
inline bool pin() noexcept#
-
inline bool unpin()#
-
inline void mark_as_migrated()#
Public Static Functions
-
static inline constexpr bool supports_migration() noexcept#
-
static inline constexpr void on_migrated() noexcept#
Protected Functions
-
inline threads::thread_result_type thread_function(threads::thread_function_type &&f, components::pinned_ptr, threads::thread_restart_state state)#
Private Types
-
using base_type = BaseComponent#
-
using decorates_action = void#
-
template<typename BaseComponent, typename Mutex = hpx::spinlock>
-
namespace components
compute#
See Public API for a list of names and headers that are part of the public HPX API.
hpx/compute/host/target_distribution_policy.hpp#
Defined in header hpx/compute/host/target_distribution_policy.hpp.
See Public API for a list of names and headers that are part of the public HPX API.
distribution_policies#
See Public API for a list of names and headers that are part of the public HPX API.
hpx/distribution_policies/binpacking_distribution_policy.hpp#
Defined in header hpx/distribution_policies/binpacking_distribution_policy.hpp.
See Public API for a list of names and headers that are part of the public HPX API.
-
namespace hpx
-
namespace components
Variables
-
constexpr char const *const default_binpacking_counter_name = "/runtime{locality/total}/count/component@"#
-
static const binpacking_distribution_policy binpacked = {}#
A predefined instance of the binpacking distribution_policy. It will represent the local locality and will place all items to create here.
-
struct binpacking_distribution_policy#
- #include <binpacking_distribution_policy.hpp>
This class specifies the parameters for a binpacking distribution policy to use for creating a given number of items on a given set of localities. The binpacking policy will distribute the new objects in a way such that each of the localities will equalize the number of overall objects of this type based on a given criteria (by default this criteria is the overall number of objects of this type).
Public Functions
-
inline binpacking_distribution_policy()#
Default-construct a new instance of a binpacking_distribution_policy. This policy will represent one locality (the local locality).
-
inline binpacking_distribution_policy operator()(std::vector<id_type> const &locs, char const *perf_counter_name = default_binpacking_counter_name) const#
Create a new default_distribution policy representing the given set of localities.
- Parameters
locs – [in] The list of localities the new instance should represent
perf_counter_name – [in] The name of the performance counter which should be used as the distribution criteria (by default the overall number of existing instances of the given component type will be used).
-
inline binpacking_distribution_policy operator()(std::vector<id_type> &&locs, char const *perf_counter_name = default_binpacking_counter_name) const#
Create a new default_distribution policy representing the given set of localities.
- Parameters
locs – [in] The list of localities the new instance should represent
perf_counter_name – [in] The name of the performance counter which should be used as the distribution criteria (by default the overall number of existing instances of the given component type will be used).
-
inline binpacking_distribution_policy operator()(id_type const &loc, char const *perf_counter_name = default_binpacking_counter_name) const#
Create a new default_distribution policy representing the given locality
- Parameters
loc – [in] The locality the new instance should represent
perf_counter_name – [in] The name of the performance counter that should be used as the distribution criteria (by default the overall number of existing instances of the given component type will be used).
-
template<typename Component, typename ...Ts>
inline hpx::future<hpx::id_type> create(Ts&&... vs) const# Create one object on one of the localities associated by this policy instance
- Parameters
vs – [in] The arguments which will be forwarded to the constructor of the new object.
- Returns
A future holding the global address which represents the newly created object
-
template<bool WithCount, typename Component, typename ...Ts>
inline hpx::future<std::vector<bulk_locality_result>> bulk_create(std::size_t count, Ts&&... vs) const# Create multiple objects on the localities associated by this policy instance
- Parameters
count – [in] The number of objects to create
vs – [in] The arguments which will be forwarded to the constructors of the new objects.
- Returns
A future holding the list of global addresses which represent the newly created objects
-
inline binpacking_distribution_policy()#
-
constexpr char const *const default_binpacking_counter_name = "/runtime{locality/total}/count/component@"#
-
namespace components
hpx/distribution_policies/colocating_distribution_policy.hpp#
Defined in header hpx/distribution_policies/colocating_distribution_policy.hpp.
See Public API for a list of names and headers that are part of the public HPX API.
-
namespace hpx
-
namespace components
Variables
-
static const colocating_distribution_policy colocated = {}#
A predefined instance of the co-locating distribution_policy. It will represent the local locality and will place all items to create here.
-
struct colocating_distribution_policy#
- #include <colocating_distribution_policy.hpp>
This class specifies the parameters for a distribution policy to use for creating a given number of items on the locality where a given object is currently placed.
Public Functions
-
constexpr colocating_distribution_policy() = default#
Default-construct a new instance of a colocating_distribution_policy. This policy will represent the local locality.
-
inline colocating_distribution_policy operator()(id_type const &id) const#
Create a new colocating_distribution_policy representing the locality where the given object is current located
- Parameters
id – [in] The global address of the object with which the new instances should be colocated on
-
template<typename Client, typename Stub, typename Data>
inline colocating_distribution_policy operator()(client_base<Client, Stub, Data> const &client) const# Create a new colocating_distribution_policy representing the locality where the given object is current located
- Parameters
client – [in] The client side representation of the object with which the new instances should be colocated on
-
template<typename Component, typename ...Ts>
inline hpx::future<hpx::id_type> create(Ts&&... vs) const# Create one object on the locality of the object this distribution policy instance is associated with
Note
This function is part of the placement policy implemented by this class
- Parameters
vs – [in] The arguments which will be forwarded to the constructor of the new object.
- Returns
A future holding the global address which represents the newly created object
-
template<bool WithCount, typename Component, typename ...Ts>
inline hpx::future<std::vector<bulk_locality_result>> bulk_create(std::size_t count, Ts&&... vs) const# Create multiple objects colocated with the object represented by this policy instance
Note
This function is part of the placement policy implemented by this class
- Parameters
count – [in] The number of objects to create
vs – [in] The arguments which will be forwarded to the constructors of the new objects.
- Returns
A future holding the list of global addresses which represent the newly created objects
-
template<typename Action, typename ...Ts>
inline async_result<Action>::type async(launch policy, Ts&&... vs) const#
-
template<typename Action, typename Callback, typename ...Ts>
inline async_result<Action>::type async_cb(launch policy, Callback &&cb, Ts&&... vs) const# Note
This function is part of the invocation policy implemented by this class
-
template<typename Action, typename Continuation, typename ...Ts>
inline bool apply(Continuation &&c, launch policy, Ts&&... vs) const# Note
This function is part of the invocation policy implemented by this class
-
template<typename Action, typename Continuation, typename Callback, typename ...Ts>
inline bool apply_cb(Continuation &&c, launch policy, Callback &&cb, Ts&&... vs) const# Note
This function is part of the invocation policy implemented by this class
Public Static Functions
-
template<typename Action>
struct async_result# - #include <colocating_distribution_policy.hpp>
Note
This function is part of the invocation policy implemented by this class
-
constexpr colocating_distribution_policy() = default#
-
static const colocating_distribution_policy colocated = {}#
-
namespace components
hpx/distribution_policies/default_distribution_policy.hpp#
Defined in header hpx/distribution_policies/default_distribution_policy.hpp.
See Public API for a list of names and headers that are part of the public HPX API.
-
namespace hpx
-
namespace components
Variables
-
static const default_distribution_policy default_layout = {}#
A predefined instance of the default distribution_policy. It will represent the local locality and will place all items to create here.
-
struct default_distribution_policy#
- #include <default_distribution_policy.hpp>
This class specifies the parameters for a simple distribution policy to use for creating (and evenly distributing) a given number of items on a given set of localities.
Public Functions
-
constexpr default_distribution_policy() = default#
Default-construct a new instance of a default_distribution_policy. This policy will represent one locality (the local locality).
-
inline default_distribution_policy operator()(std::vector<id_type> locs) const#
Create a new default_distribution policy representing the given set of localities.
- Parameters
locs – [in] The list of localities the new instance should represent
-
inline default_distribution_policy operator()(id_type loc) const#
Create a new default_distribution policy representing the given locality
- Parameters
loc – [in] The locality the new instance should represent
-
template<typename Component, typename ...Ts>
inline hpx::future<hpx::id_type> create(Ts&&... vs) const# Create one object on one of the localities associated by this policy instance
Note
This function is part of the placement policy implemented by this class
- Parameters
vs – [in] The arguments which will be forwarded to the constructor of the new object.
- Returns
A future holding the global address which represents the newly created object
-
template<bool WithCount, typename Component, typename ...Ts>
inline hpx::future<std::vector<bulk_locality_result>> bulk_create(std::size_t count, Ts&&... vs) const# Create multiple objects on the localities associated by this policy instance
Note
This function is part of the placement policy implemented by this class
- Parameters
count – [in] The number of objects to create
vs – [in] The arguments which will be forwarded to the constructors of the new objects.
- Returns
A future holding the list of global addresses that represent the newly created objects
-
template<typename Action, typename ...Ts>
inline async_result<Action>::type async(launch policy, Ts&&... vs) const#
-
template<typename Action, typename Callback, typename ...Ts>
inline async_result<Action>::type async_cb(launch policy, Callback &&cb, Ts&&... vs) const# Note
This function is part of the invocation policy implemented by this class
-
template<typename Action, typename Continuation, typename ...Ts>
inline bool apply(Continuation &&c, launch policy, Ts&&... vs) const# Note
This function is part of the invocation policy implemented by this class
-
template<typename Action, typename ...Ts>
inline bool apply(threads::thread_priority priority, Ts&&... vs) const#
-
template<typename Action, typename Continuation, typename Callback, typename ...Ts>
inline bool apply_cb(Continuation &&c, launch policy, Callback &&cb, Ts&&... vs) const# Note
This function is part of the invocation policy implemented by this class
-
template<typename Action, typename Callback, typename ...Ts>
inline bool apply_cb(launch policy, Callback &&cb, Ts&&... vs) const#
-
template<typename Action>
struct async_result# - #include <default_distribution_policy.hpp>
Note
This function is part of the invocation policy implemented by this class
-
constexpr default_distribution_policy() = default#
-
static const default_distribution_policy default_layout = {}#
-
namespace components
hpx/distribution_policies/target_distribution_policy.hpp#
Defined in header hpx/distribution_policies/target_distribution_policy.hpp.
See Public API for a list of names and headers that are part of the public HPX API.
-
namespace hpx
-
namespace components
Variables
-
static const target_distribution_policy target = {}#
A predefined instance of the target_distribution_policy. It will represent the local locality and will place all items to create here.
-
struct target_distribution_policy#
- #include <target_distribution_policy.hpp>
This class specifies the parameters for a simple distribution policy to use for creating (and evenly distributing) a given number of items on a given set of localities.
Public Functions
-
target_distribution_policy() = default#
Default-construct a new instance of a target_distribution_policy. This policy will represent one locality (the local locality).
-
inline target_distribution_policy operator()(id_type const &id) const#
Create a new target_distribution_policy representing the given locality
- Parameters
loc – [in] The locality the new instance should represent
-
template<typename Component, typename ...Ts>
inline hpx::future<hpx::id_type> create(Ts&&... vs) const# Create one object on one of the localities associated by this policy instance
Note
This function is part of the placement policy implemented by this class
- Parameters
vs – [in] The arguments which will be forwarded to the constructor of the new object.
- Returns
A future holding the global address which represents the newly created object
-
template<bool WithCount, typename Component, typename ...Ts>
inline hpx::future<std::vector<bulk_locality_result>> bulk_create(std::size_t count, Ts&&... vs) const# Create multiple objects on the localities associated by this policy instance
Note
This function is part of the placement policy implemented by this class
- Parameters
count – [in] The number of objects to create
vs – [in] The arguments which will be forwarded to the constructors of the new objects.
- Returns
A future holding the list of global addresses which represent the newly created objects
-
template<typename Action, typename ...Ts>
inline async_result<Action>::type async(launch policy, Ts&&... vs) const#
-
template<typename Action, typename Callback, typename ...Ts>
inline async_result<Action>::type async_cb(launch policy, Callback &&cb, Ts&&... vs) const# Note
This function is part of the invocation policy implemented by this class
-
template<typename Action, typename Continuation, typename ...Ts>
inline bool apply(Continuation &&c, launch policy, Ts&&... vs) const# Note
This function is part of the invocation policy implemented by this class
-
template<typename Action, typename Continuation, typename Callback, typename ...Ts>
inline bool apply_cb(Continuation &&c, launch policy, Callback &&cb, Ts&&... vs) const# Note
This function is part of the invocation policy implemented by this class
-
template<typename Action, typename Callback, typename ...Ts>
inline bool apply_cb(launch policy, Callback &&cb, Ts&&... vs) const#
-
template<typename Action>
struct async_result# - #include <target_distribution_policy.hpp>
Note
This function is part of the invocation policy implemented by this class
-
target_distribution_policy() = default#
-
static const target_distribution_policy target = {}#
-
namespace components
hpx/distribution_policies/unwrapping_result_policy.hpp#
Defined in header hpx/distribution_policies/unwrapping_result_policy.hpp.
See Public API for a list of names and headers that are part of the public HPX API.
-
namespace hpx
-
namespace components
-
struct unwrapping_result_policy#
- #include <unwrapping_result_policy.hpp>
This class is a distribution policy that can be using with actions that return futures. For those actions it is possible to apply certain optimizations if the action is invoked synchronously.
Public Functions
-
inline explicit unwrapping_result_policy(id_type const &id)#
-
template<typename Client, typename Stub, typename Data>
inline explicit unwrapping_result_policy(client_base<Client, Stub, Data> const &client)#
-
template<typename Action, typename ...Ts>
inline async_result<Action>::type async(launch policy, Ts&&... vs) const#
-
template<typename Action, typename ...Ts>
inline async_result<Action>::type async(launch::sync_policy, Ts&&... vs) const#
-
template<typename Action, typename Callback, typename ...Ts>
inline async_result<Action>::type async_cb(launch policy, Callback &&cb, Ts&&... vs) const#
-
template<typename Action, typename Continuation, typename ...Ts>
inline bool apply(Continuation &&c, launch policy, Ts&&... vs) const# Note
This function is part of the invocation policy implemented by this class
-
template<typename Action, typename Continuation, typename Callback, typename ...Ts>
inline bool apply_cb(Continuation &&c, launch policy, Callback &&cb, Ts&&... vs) const# Note
This function is part of the invocation policy implemented by this class
-
template<typename Action>
struct async_result#
-
inline explicit unwrapping_result_policy(id_type const &id)#
-
struct unwrapping_result_policy#
-
namespace components
executors_distributed#
See Public API for a list of names and headers that are part of the public HPX API.
hpx/executors_distributed/distribution_policy_executor.hpp#
Defined in header hpx/executors_distributed/distribution_policy_executor.hpp.
See Public API for a list of names and headers that are part of the public HPX API.
-
namespace hpx
-
namespace execution
-
namespace experimental
Functions
-
template<typename DistPolicy>
distribution_policy_executor(DistPolicy&&) -> distribution_policy_executor<std::decay_t<DistPolicy>>#
- template<typename DistPolicy> HPX_DEPRECATED_V (1, 9, "hpx::parallel::execution::make_distribution_policy_executor is " "deprecated, use " "hpx::parallel::execution::distribution_policy_executor instead") distribution_policy_executor< std
Create a new distribution_policy_executor from the given distribution_policy.
- Parameters
policy – The distribution_policy to create an executor from
-
template<typename DistPolicy>
class distribution_policy_executor - #include <distribution_policy_executor.hpp>
A distribution_policy_executor creates groups of parallel execution agents that execute in threads implicitly created by the executor and placed on any of the associated localities.
- Template Parameters
DistPolicy – The distribution policy type for which an executor should be created. The expression hpx::traits::is_distribution_policy_v<DistPolicy> must evaluate to true.
-
template<typename DistPolicy>
-
namespace experimental
-
namespace execution
init_runtime#
See Public API for a list of names and headers that are part of the public HPX API.
hpx::finalize, hpx::disconnect#
Defined in header hpx/init.hpp.
See Public API for a list of names and headers that are part of the public HPX API.
-
namespace hpx
Functions
-
int finalize(double shutdown_timeout, double localwait = -1.0, hpx::error_code &ec = throws)#
Main function to gracefully terminate the HPX runtime system.
The function hpx::finalize is the main way to (gracefully) exit any HPX application. It must be called at least once, but can be called multiple times as well. However, only the first invocation will have effect. It will notify all connected localities to finish execution. Only after all other localities have exited this function will return, allowing to exit the console locality as well.
During the execution of this function the runtime system will invoke all registered shutdown functions (see hpx::init) on all localities.
The default value (
-1.0) will try to find a globally set timeout value (can be set as the configuration parameterhpx.shutdown_timeout), and if that is not set or-1.0as well, it will disable any timeout, each connected locality will wait for all existing HPX-threads to terminate.The default value (
-1.0) will try to find a globally set wait time value (can be set as the configuration parameter “hpx.finalize_wait_time”), and if this is not set or-1.0as well, it will disable any addition local wait time before proceeding.This function will block and wait for all connected localities to exit before returning to the caller. It should be the last HPX-function called by any application.
Using this function is an alternative to hpx::disconnect, these functions do not need to be called both.
Note
As long as ec is not pre-initialized to hpx::throws this function doesn’t throw but returns the result code using the parameter ec. Otherwise, it throws an instance of hpx::exception.
- Parameters
shutdown_timeout – This parameter allows to specify a timeout (in microseconds), specifying how long any of the connected localities should wait for pending tasks to be executed. After this timeout, all suspended HPX-threads will be aborted. Note, that this function will not abort any running HPX-threads. In any case the shutdown will not proceed as long as there is at least one pending/running HPX-thread.
localwait – This parameter allows to specify a local wait time (in microseconds) before the connected localities will be notified and the overall shutdown process starts.
ec – [in,out] this represents the error status on exit, if this is pre-initialized to hpx::throws the function will throw on error instead.
- Returns
This function will always return zero.
-
inline int finalize(hpx::error_code &ec = throws)#
Main function to gracefully terminate the HPX runtime system.
The function hpx::finalize is the main way to (gracefully) exit any HPX application. It must be called at least once, but can be called multiple times as well. However, only the first invocation will have effect. It will notify all connected localities to finish execution. Only after all other localities have exited this function will return, allowing to exit the console locality as well.
During the execution of this function the runtime system will invoke all registered shutdown functions (see hpx::init) on all localities.
This function will block and wait for all connected localities to exit before returning to the caller. It should be the last HPX-function called by any application.
Using this function is an alternative to hpx::disconnect, these functions do not need to be called both.
Note
As long as ec is not pre-initialized to hpx::throws this function doesn’t throw but returns the result code using the parameter ec. Otherwise, it throws an instance of hpx::exception.
- Parameters
ec – [in,out] this represents the error status on exit, if this is pre-initialized to hpx::throws the function will throw on error instead.
- Returns
This function will always return zero.
-
void terminate()#
Terminate any application non-gracefully.
The function hpx::terminate is the non-graceful way to exit any application immediately. It can be called from any locality and will terminate all localities currently used by the application.
Note
This function will cause HPX to call
std::terminate()on all localities associated with this application. If the function is called not from an HPX thread it will fail and return an error using the argument ec.
-
int disconnect(double shutdown_timeout, double localwait = -1.0, hpx::error_code &ec = throws)#
Disconnect this locality from the application.
The function hpx::disconnect can be used to disconnect a locality from a running HPX application.
During the execution of this function the runtime system will invoke all registered shutdown functions (see hpx::init
) on this locality.
The default value (
-1.0) will try to find a globally set timeout value (can be set as the configuration parameter “hpx.shutdown_timeout”), and if that is not set or-1.0as well, it will disable any timeout, each connected locality will wait for all existing HPX-threads to terminate.The default value (
-1.0) will try to find a globally set wait time value (can be set as the configuration parameterhpx.finalize_wait_time), and if this is not set or-1.0as well, it will disable any addition local wait time before proceeding.This function will block and wait for this locality to finish executing before returning to the caller. It should be the last HPX-function called by any locality being disconnected.
Note
As long as ec is not pre-initialized to hpx::throws this function doesn’t throw but returns the result code using the parameter ec. Otherwise, it throws an instance of hpx::exception.
- Parameters
shutdown_timeout – This parameter allows to specify a timeout (in microseconds), specifying how long this locality should wait for pending tasks to be executed. After this timeout, all suspended HPX-threads will be aborted. Note, that this function will not abort any running HPX-threads. In any case the shutdown will not proceed as long as there is at least one pending/running HPX-thread.
localwait – This parameter allows to specify a local wait time (in microseconds) before the connected localities will be notified and the overall shutdown process starts.
ec – [in,out] this represents the error status on exit, if this is pre-initialized to hpx::throws the function will throw on error instead.
- Returns
This function will always return zero.
-
inline int disconnect(hpx::error_code &ec = throws)#
Disconnect this locality from the application.
The function hpx::disconnect can be used to disconnect a locality from a running HPX application.
During the execution of this function the runtime system will invoke all registered shutdown functions (see hpx::init) on this locality.
This function will block and wait for this locality to finish executing before returning to the caller. It should be the last HPX-function called by any locality being disconnected.
Note
As long as ec is not pre-initialized to hpx::throws this function doesn’t throw but returns the result code using the parameter ec. Otherwise, it throws an instance of hpx::exception.
- Parameters
ec – [in,out] this represents the error status on exit, if this is pre-initialized to hpx::throws the function will throw on error instead.
- Returns
This function will always return zero.
-
int stop(hpx::error_code &ec = throws)#
Stop the runtime system.
This function will block and wait for this locality to finish executing before returning to the caller. It should be the last HPX-function called on every locality. This function should be used only if the runtime system was started using
hpx::start.- Returns
The function returns the value, which has been returned from the user supplied main HPX function (usually
hpx_main).
-
int finalize(double shutdown_timeout, double localwait = -1.0, hpx::error_code &ec = throws)#
hpx/hpx_init.hpp#
Defined in header hpx/hpx_init.hpp.
See Public API for a list of names and headers that are part of the public HPX API.
-
namespace hpx
hpx::init#
Defined in header hpx/init.hpp.
See Public API for a list of names and headers that are part of the public HPX API.
-
namespace hpx_startup#
-
namespace hpx
Functions
-
inline int init(std::function<int(hpx::program_options::variables_map&)> f, int argc, char **argv, init_params const ¶ms = init_params())#
Main entry point for launching the HPX runtime system.
This is the main entry point for any HPX application. This function (or one of its overloads) should be called from the users
main()function. It will set up the HPX runtime environment and schedule the function given byfas a HPX thread. This overload will not callhpx_main.This is the main entry point for any HPX application. This function (or one of its overloads below) should be called from the users
main()function. It will set up the HPX runtime environment and schedule the function given byfas a HPX thread.Note
If the parameter
modeis not given (defaulted), the created runtime system instance will be executed in console or worker mode depending on the command line arguments passed inargc/argv. Otherwise, it will be executed as specified by the parametermode.- Parameters
f – [in] The function to be scheduled as an HPX thread. Usually this function represents the main entry point of any HPX application. If
fisnullptrthe HPX runtime environment will be started without invokingf.argc – [in] The number of command line arguments passed in
argv. This is usually the unchanged value as passed by the operating system (tomain()).argv – [in] The command line arguments for this application, usually that is the value as passed by the operating system (to
main()).params – [in] The parameters to the hpx::init function (See documentation of hpx::init_params)
- Returns
The function returns the value, which has been returned from the user supplied
f.
-
inline int init(std::function<int(int, char**)> f, int argc, char **argv, init_params const ¶ms = init_params())#
Main entry point for launching the HPX runtime system.
This is the main entry point for any HPX application. This function (or one of its overloads) should be called from the users
main()function. It will set up the HPX runtime environment and schedule the function given byfas a HPX thread. This overload will not callhpx_main.This is the main entry point for any HPX application. This function (or one of its overloads below) should be called from the users
main()function. It will set up the HPX runtime environment and schedule the function given byfas a HPX thread.Note
If the parameter
modeis not given (defaulted), the created runtime system instance will be executed in console or worker mode depending on the command line arguments passed inargc/argv. Otherwise, it will be executed as specified by the parametermode.- Parameters
f – [in] The function to be scheduled as an HPX thread. Usually this function represents the main entry point of any HPX application. If
fisnullptrthe HPX runtime environment will be started without invokingf.argc – [in] The number of command line arguments passed in
argv. This is usually the unchanged value as passed by the operating system (tomain()).argv – [in] The command line arguments for this application, usually that is the value as passed by the operating system (to
main()).params – [in] The parameters to the hpx::init function (See documentation of hpx::init_params)
- Returns
The function returns the value, which has been returned from the user supplied
f.
-
inline int init(int argc, char **argv, init_params const ¶ms = init_params())#
Main entry point for launching the HPX runtime system.
This is the main entry point for any HPX application. This function (or one of its overloads) should be called from the users
main()function. This overload expects a user-defined function namedhpx_mainat global scope, which will be used as the entry point for the HPX application.This is the main entry point for any HPX application. This function (or one of its overloads below) should be called from the users
main()function. It will set up the HPX runtime environment and schedule the function given byfas a HPX thread.Note
If the parameter
modeis not given (defaulted), the created runtime system instance will be executed in console or worker mode depending on the command line arguments passed inargc/argv. Otherwise, it will be executed as specified by the parametermode.- Parameters
argc – [in] The number of command line arguments passed in
argv. This is usually the unchanged value as passed by the operating system (tomain()).argv – [in] The command line arguments for this application, usually that is the value as passed by the operating system (to
main()).params – [in] The parameters to the hpx::init function (See documentation of hpx::init_params)
- Returns
The function returns the value, which has been returned from
hpx_main(or 0 when executed in worker mode).
-
inline int init(std::nullptr_t f, int argc, char **argv, init_params const ¶ms = init_params())#
Main entry point for launching the HPX runtime system.
This is the main entry point for any HPX application. This function (or one of its overloads below) should be called from the users
main()function. It will set up the HPX runtime environment and schedule the function given byfas a HPX thread. This overload will not callhpx_main.This is the main entry point for any HPX application. This function (or one of its overloads below) should be called from the users
main()function. It will set up the HPX runtime environment and schedule the function given byfas a HPX thread.Note
If the parameter
modeis not given (defaulted), the created runtime system instance will be executed in console or worker mode depending on the command line arguments passed inargc/argv. Otherwise, it will be executed as specified by the parametermode.- Parameters
f – [in] The function to be scheduled as an HPX thread. Usually this function represents the main entry point of any HPX application. If
fisnullptrthe HPX runtime environment will be started without invokingf.argc – [in] The number of command line arguments passed in
argv. This is usually the unchanged value as passed by the operating system (tomain()).argv – [in] The command line arguments for this application, usually that is the value as passed by the operating system (to
main()).params – [in] The parameters to the hpx::init function (See documentation of hpx::init_params)
- Returns
The function returns the value, which has been returned from the user supplied
f.
-
inline int init(init_params const ¶ms = init_params())#
Main entry point for launching the HPX runtime system.
This is a simplified main entry point, which can be used to set up the runtime for an HPX application (the runtime system will be set up in console mode or worker mode depending on the command line settings). This overload expects a user-defined function named
hpx_mainat global scope, which will be used as the entry point for the HPX application.This is a simplified main entry point, which can be used to set up the runtime for an HPX application (the runtime system will be set up in console mode or worker mode depending on the command line settings).
Note
The created runtime system instance will be executed in console or worker mode depending on the command line arguments passed in
argc/argv. If not command line arguments are passed, console mode is assumed.Note
If no command line arguments are passed the HPX runtime system will not support any of the default command line options as described in the section ‘HPX Command Line Options’.
- Parameters
params – [in] The parameters to the hpx::init function (See documentation of hpx::init_params)
- Returns
The function returns the value, which has been returned from
hpx_main(or 0 when executed in worker mode).
-
inline int init(std::function<int(hpx::program_options::variables_map&)> f, int argc, char **argv, init_params const ¶ms = init_params())#
hpx::init_params#
Defined in header hpx/init.hpp.
See Public API for a list of names and headers that are part of the public HPX API.
hpx/hpx_start.hpp#
Defined in header hpx/hpx_start.hpp.
See Public API for a list of names and headers that are part of the public HPX API.
-
namespace hpx
hpx::start#
Defined in header hpx/init.hpp.
See Public API for a list of names and headers that are part of the public HPX API.
-
namespace hpx_startup
-
namespace hpx
Functions
-
inline bool start(std::function<int(hpx::program_options::variables_map&)> f, int argc, char **argv, init_params const ¶ms = init_params())#
Main non-blocking entry point for launching the HPX runtime system.
This is the main, non-blocking entry point for any HPX application. This function (or one of its overloads below) should be called from the users
main()function. It will set up the HPX runtime environment and schedule the function given byfas a HPX thread. It will return immediately after that. Usehpx::waitandhpx::stopto synchronize with the runtime system’s execution. This overload will not callhpx_main.This is the main, non-blocking entry point for any HPX application. This function (or one of its overloads below) should be called from the users
main()function. It will set up the HPX runtime environment and schedule the function given byfas an HPX thread. It will return immediately after that. Usehpx::waitandhpx::stopto synchronize with the runtime system’s execution.Note
If the parameter
modeis not given (defaulted), the created runtime system instance will be executed in console or worker mode depending on the command line arguments passed inargc/argv. Otherwise, it will be executed as specified by the parametermode.- Parameters
f – [in] The function to be scheduled as an HPX thread. Usually this function represents the main entry point of any HPX application. If
fisnullptrthe HPX runtime environment will be started without invokingf.argc – [in] The number of command line arguments passed in
argv. This is usually the unchanged value as passed by the operating system (tomain()).argv – [in] The command line arguments for this application, usually that is the value as passed by the operating system (to
main()).params – [in] The parameters to the hpx::start function (See documentation of hpx::init_params)
- Returns
The function returns true if command line processing succeeded and the runtime system was started successfully. It will return false otherwise.
-
inline bool start(std::function<int(int, char**)> f, int argc, char **argv, init_params const ¶ms = init_params())#
Main non-blocking entry point for launching the HPX runtime system.
This is the main, non-blocking entry point for any HPX application. This function (or one of its overloads below) should be called from the users
main()function. It will set up the HPX runtime environment and schedule the function given byfas a HPX thread. It will return immediately after that. Usehpx::waitandhpx::stopto synchronize with the runtime system’s execution. This overload will not callhpx_main.This is the main, non-blocking entry point for any HPX application. This function (or one of its overloads below) should be called from the users
main()function. It will set up the HPX runtime environment and schedule the function given byfas an HPX thread. It will return immediately after that. Usehpx::waitandhpx::stopto synchronize with the runtime system’s execution.Note
If the parameter
modeis not given (defaulted), the created runtime system instance will be executed in console or worker mode depending on the command line arguments passed inargc/argv. Otherwise, it will be executed as specified by the parametermode.- Parameters
f – [in] The function to be scheduled as an HPX thread. Usually this function represents the main entry point of any HPX application. If
fisnullptrthe HPX runtime environment will be started without invokingf.argc – [in] The number of command line arguments passed in
argv. This is usually the unchanged value as passed by the operating system (tomain()).argv – [in] The command line arguments for this application, usually that is the value as passed by the operating system (to
main()).params – [in] The parameters to the hpx::start function (See documentation of hpx::init_params)
- Returns
The function returns true if command line processing succeeded and the runtime system was started successfully. It will return false otherwise.
-
inline bool start(int argc, char **argv, init_params const ¶ms = init_params())#
Main non-blocking entry point for launching the HPX runtime system.
This is the main, non-blocking entry point for any HPX application. This function (or one of its overloads below) should be called from the users
main()function. It will set up the HPX runtime environment and schedule the function given byfas a HPX thread. It will return immediately after that. Usehpx::waitandhpx::stopto synchronize with the runtime system’s execution. This overload will not callhpx_main.This is the main, non-blocking entry point for any HPX application. This function (or one of its overloads below) should be called from the users
main()function. It will set up the HPX runtime environment and schedule the function given byfas an HPX thread. It will return immediately after that. Usehpx::waitandhpx::stopto synchronize with the runtime system’s execution.Note
If the parameter
modeis not given (defaulted), the created runtime system instance will be executed in console or worker mode depending on the command line arguments passed inargc/argv. Otherwise, it will be executed as specified by the parametermode.- Parameters
argc – [in] The number of command line arguments passed in
argv. This is usually the unchanged value as passed by the operating system (tomain()).argv – [in] The command line arguments for this application, usually that is the value as passed by the operating system (to
main()).params – [in] The parameters to the hpx::start function (See documentation of hpx::init_params)
- Returns
The function returns true if command line processing succeeded and the runtime system was started successfully. It will return false otherwise.
-
inline bool start(std::nullptr_t f, int argc, char **argv, init_params const ¶ms = init_params())#
Main non-blocking entry point for launching the HPX runtime system.
This is the main, non-blocking entry point for any HPX application. This function (or one of its overloads below) should be called from the users
main()function. It will set up the HPX runtime environment and schedule the function given byfas a HPX thread. It will return immediately after that. Usehpx::waitandhpx::stopto synchronize with the runtime system’s execution. This overload will not callhpx_main.This is the main, non-blocking entry point for any HPX application. This function (or one of its overloads below) should be called from the users
main()function. It will set up the HPX runtime environment and schedule the function given byfas an HPX thread. It will return immediately after that. Usehpx::waitandhpx::stopto synchronize with the runtime system’s execution.Note
If the parameter
modeis not given (defaulted), the created runtime system instance will be executed in console or worker mode depending on the command line arguments passed inargc/argv. Otherwise, it will be executed as specified by the parametermode.- Parameters
f – [in] The function to be scheduled as an HPX thread. Usually this function represents the main entry point of any HPX application. If
fisnullptrthe HPX runtime environment will be started without invokingf.argc – [in] The number of command line arguments passed in
argv. This is usually the unchanged value as passed by the operating system (tomain()).argv – [in] The command line arguments for this application, usually that is the value as passed by the operating system (to
main()).params – [in] The parameters to the hpx::start function (See documentation of hpx::init_params)
- Returns
The function returns true if command line processing succeeded and the runtime system was started successfully. It will return false otherwise.
-
inline bool start(init_params const ¶ms = init_params())#
Main non-blocking entry point for launching the HPX runtime system.
This is a simplified main, non-blocking entry point, which can be used to set up the runtime for an HPX application (the runtime system will be set up in console mode or worker mode depending on the command line settings). It will return immediately after that. Use
hpx::waitandhpx::stopto synchronize with the runtime system’s execution.This is the main, non-blocking entry point for any HPX application. This function (or one of its overloads below) should be called from the users
main()function. It will set up the HPX runtime environment and schedule the function given byfas an HPX thread. It will return immediately after that. Usehpx::waitandhpx::stopto synchronize with the runtime system’s execution.Note
The created runtime system instance will be executed in console or worker mode depending on the command line arguments passed in
argc/argv. If not command line arguments are passed, console mode is assumed.Note
If no command line arguments are passed the HPX runtime system will not support any of the default command line options as described in the section ‘HPX Command Line Options’.
- Parameters
params – [in] The parameters to the hpx::start function (See documentation of hpx::init_params)
- Returns
The function returns true if command line processing succeeded and the runtime system was started successfully. It will return false otherwise.
-
inline bool start(std::function<int(hpx::program_options::variables_map&)> f, int argc, char **argv, init_params const ¶ms = init_params())#
hpx::suspend, hpx::resume#
Defined in header hpx/init.hpp.
See Public API for a list of names and headers that are part of the public HPX API.
-
namespace hpx
Functions
-
int suspend(error_code &ec = throws)#
Suspend the runtime system.
The function hpx::suspend is used to suspend the HPX runtime system. It can only be used when running HPX on a single locality. It will block waiting for all thread pools to be empty. This function only be called when the runtime is running, or already suspended in which case this function will do nothing.
Note
As long as ec is not pre-initialized to hpx::throws this function doesn’t throw but returns the result code using the parameter ec. Otherwise it throws an instance of hpx::exception.
- Parameters
ec – [in,out] this represents the error status on exit, if this is pre-initialized to hpx::throws the function will throw on error instead.
- Returns
This function will always return zero.
-
int resume(error_code &ec = throws)#
Resume the HPX runtime system.
The function hpx::resume is used to resume the HPX runtime system. It can only be used when running HPX on a single locality. It will block waiting for all thread pools to be resumed. This function only be called when the runtime suspended, or already running in which case this function will do nothing.
Note
As long as ec is not pre-initialized to hpx::throws this function doesn’t throw but returns the result code using the parameter ec. Otherwise it throws an instance of hpx::exception.
- Parameters
ec – [in,out] this represents the error status on exit, if this is pre-initialized to hpx::throws the function will throw on error instead.
- Returns
This function will always return zero.
-
int suspend(error_code &ec = throws)#
naming_base#
See Public API for a list of names and headers that are part of the public HPX API.
hpx/naming_base/unmanaged.hpp#
Defined in header hpx/naming_base/unmanaged.hpp.
See Public API for a list of names and headers that are part of the public HPX API.
-
namespace hpx
Functions
- HPX_CXX_EXPORT hpx::id_type unmanaged (hpx::id_type const &id)
The helper function hpx::unmanaged can be used to generate a global identifier which does not participate in the automatic garbage collection.
Note
This function allows to apply certain optimizations to the process of memory management in HPX. It however requires the user to take full responsibility for keeping the referenced objects alive long enough.
- Parameters
id – [in] The id to generated the unmanaged global id from This parameter can be itself a managed or a unmanaged global id.
- Returns
This function returns a new global id referencing the same object as the parameter id. The only difference is that the returned global identifier does not participate in the automatic garbage collection.
-
namespace naming#
parcelset#
See Public API for a list of names and headers that are part of the public HPX API.
hpx/parcelset/connection_cache.hpp#
Defined in header hpx/parcelset/connection_cache.hpp.
See Public API for a list of names and headers that are part of the public HPX API.
hpx/parcelset/message_handler_fwd.hpp#
Defined in header hpx/parcelset/message_handler_fwd.hpp.
See Public API for a list of names and headers that are part of the public HPX API.
hpx/parcelset/parcelhandler.hpp#
Defined in header hpx/parcelset/parcelhandler.hpp.
See Public API for a list of names and headers that are part of the public HPX API.
hpx/parcelset/parcelset_fwd.hpp#
Defined in header hpx/parcelset/parcelset_fwd.hpp.
See Public API for a list of names and headers that are part of the public HPX API.
parcelset_base#
See Public API for a list of names and headers that are part of the public HPX API.
hpx/parcelset_base/parcelport.hpp#
Defined in header hpx/parcelset_base/parcelport.hpp.
See Public API for a list of names and headers that are part of the public HPX API.
hpx/parcelset_base/parcelset_base_fwd.hpp#
Defined in header hpx/parcelset_base/parcelset_base_fwd.hpp.
See Public API for a list of names and headers that are part of the public HPX API.
Defines
-
HPX_PARCELPORT_BACKGROUND_MODE_ENUM_DEPRECATION_MSG#
-
namespace hpx
-
namespace parcelset#
Typedefs
-
using parcel_write_handler_type = hpx::function<void(std::error_code const&, parcelset::parcel const&)>#
The type of the function that can be registered as a parcel write handler using the function hpx::set_parcel_write_handler.
Note
A parcel write handler is a function which is called by the parcel layer whenever a parcel has been sent by the underlying networking library and if no explicit parcel handler function was specified for the parcel.
Enums
-
enum class parcelport_background_mode : std::uint8_t#
Type of background work to perform.
Values:
-
enumerator flush_buffers#
perform buffer flush operations
-
enumerator send#
perform send operations (includes buffer flush)
-
enumerator receive#
perform receive operations
-
enumerator all#
perform all operations
-
enumerator flush_buffers#
Functions
- inline HPX_CXX_EXPORT bool operator& (parcelport_background_mode lhs, parcelport_background_mode rhs)
- HPX_CXX_EXPORT char const * get_parcelport_background_mode_name (parcelport_background_mode mode)
Variables
- HPX_CXX_EXPORT parcel empty_parcel
-
constexpr parcelport_background_mode parcelport_background_mode_flush_buffers = parcelport_background_mode::flush_buffers#
-
constexpr parcelport_background_mode parcelport_background_mode_send = parcelport_background_mode::send#
-
constexpr parcelport_background_mode parcelport_background_mode_receive = parcelport_background_mode::receive#
-
constexpr parcelport_background_mode parcelport_background_mode_all = parcelport_background_mode::all#
-
using parcel_write_handler_type = hpx::function<void(std::error_code const&, parcelset::parcel const&)>#
-
namespace parcelset#
hpx/parcelset_base/set_parcel_write_handler.hpp#
Defined in header hpx/parcelset_base/set_parcel_write_handler.hpp.
See Public API for a list of names and headers that are part of the public HPX API.
performance_counters#
See Public API for a list of names and headers that are part of the public HPX API.
hpx/performance_counters/counter_creators.hpp#
Defined in header hpx/performance_counters/counter_creators.hpp.
See Public API for a list of names and headers that are part of the public HPX API.
-
namespace hpx
-
namespace performance_counters#
Functions
-
bool default_counter_discoverer(counter_info const&, discover_counter_func const&, discover_counters_mode, error_code&)#
Default discovery function for performance counters; to be registered with the counter types. It will pass the counter_info and the error_code to the supplied function.
-
bool locality_counter_discoverer(counter_info const&, discover_counter_func const&, discover_counters_mode, error_code&)#
Default discoverer function for performance counters; to be registered with the counter types. It is suitable to be used for all counters following the naming scheme:
/<objectname>(locality#<locality_id>/total)/<instancename>
-
bool locality_pool_counter_discoverer(counter_info const&, discover_counter_func const&, discover_counters_mode, error_code&)#
Default discoverer function for performance counters; to be registered with the counter types. It is suitable to be used for all counters following the naming scheme:
/<objectname>(locality#<locality_id>/pool#<pool_name>/total)/<instancename>
-
bool locality0_counter_discoverer(counter_info const&, discover_counter_func const&, discover_counters_mode, error_code&)#
Default discoverer function for AGAS performance counters; to be registered with the counter types. It is suitable to be used for all counters following the naming scheme:
/<objectname>{locality#0/total}/<instancename>
-
bool locality_thread_counter_discoverer(counter_info const&, discover_counter_func const&, discover_counters_mode, error_code&)#
Default discoverer function for performance counters; to be registered with the counter types. It is suitable to be used for all counters following the naming scheme:
/<objectname>(locality#<locality_id>/worker-thread#<threadnum>)/<instancename>
-
bool locality_pool_thread_counter_discoverer(counter_info const &info, discover_counter_func const &f, discover_counters_mode mode, error_code &ec)#
Default discoverer function for performance counters; to be registered with the counter types. It is suitable to be used for all counters following the naming scheme:
/<objectname>{locality#<locality_id>/pool#<poolname>/thread#<threadnum>}/<instancename>
-
bool locality_pool_thread_no_total_counter_discoverer(counter_info const &info, discover_counter_func const &f, discover_counters_mode mode, error_code &ec)#
Default discoverer function for performance counters; to be registered with the counter types. It is suitable to be used for all counters following the naming scheme:
/<objectname>{locality#<locality_id>/pool#<poolname>/thread#<threadnum>}/<instancename>
This is essentially the same as above just that locality#*/total is not supported.
-
bool locality_numa_counter_discoverer(counter_info const&, discover_counter_func const&, discover_counters_mode, error_code&)#
Default discoverer function for performance counters; to be registered with the counter types. It is suitable to be used for all counters following the naming scheme:
/<objectname>(locality#<locality_id>/numa-node#<threadnum>)/<instancename>
-
naming::gid_type locality_raw_counter_creator(counter_info const&, hpx::function<std::int64_t(bool)> const&, error_code&)#
Creation function for raw counters. The passed function is encapsulating the actual value to monitor. This function checks the validity of the supplied counter name, it has to follow the scheme:
/<objectname>(locality#<locality_id>/total)/<instancename>
-
naming::gid_type locality_raw_values_counter_creator(counter_info const&, hpx::function<std::vector<std::int64_t>(bool)> const&, error_code&)#
-
naming::gid_type agas_raw_counter_creator(counter_info const&, error_code&, char const*const)#
Creation function for raw counters. The passed function is encapsulating the actual value to monitor. This function checks the validity of the supplied counter name, it has to follow the scheme:
/agas(<objectinstance>/total)/<instancename>
-
bool agas_counter_discoverer(counter_info const&, discover_counter_func const&, discover_counters_mode, error_code&)#
Default discoverer function for performance counters; to be registered with the counter types. It is suitable to be used for all counters following the naming scheme:
/agas(<objectinstance>/total)/<instancename>
-
naming::gid_type local_action_invocation_counter_creator(counter_info const&, error_code&)#
-
bool local_action_invocation_counter_discoverer(counter_info const&, discover_counter_func const&, discover_counters_mode, error_code&)#
-
bool default_counter_discoverer(counter_info const&, discover_counter_func const&, discover_counters_mode, error_code&)#
-
namespace performance_counters#
hpx/performance_counters/counters.hpp#
Defined in header hpx/performance_counters/counters.hpp.
See Public API for a list of names and headers that are part of the public HPX API.
-
namespace hpx
-
namespace performance_counters
Typedefs
-
typedef hpx::function<naming::gid_type(counter_info const&, error_code&)> create_counter_func#
This declares the type of a function, which will be called by HPX whenever a new performance counter instance of a particular type needs to be created.
-
typedef hpx::function<bool(counter_info const&, error_code&)> discover_counter_func#
This declares a type of a function, which will be passed to a discover_counters_func in order to be called for each discovered performance counter instance.
-
typedef hpx::function<bool(counter_info const&, discover_counter_func const&, discover_counters_mode, error_code&)> discover_counters_func#
This declares the type of a function, which will be called by HPX whenever it needs to discover all performance counter instances of a particular type.
Enums
-
enum class counter_type#
Values:
-
enumerator text#
text shows a variable-length text string. It does not deliver calculated values.
Formula: None Average: None Type: Text
-
enumerator raw#
raw shows the last observed value only. It does not deliver an average.
Formula: None. Shows raw data as collected. Average: None Type: Instantaneous
-
enumerator monotonically_increasing#
monotonically_increasing shows the cumulatively accumulated observed value. It does not deliver an average.
Formula: None. Shows cumulatively accumulated data as collected. Average: None Type: Instantaneous
-
enumerator average_base#
average_base is used as the base data (denominator) in the computation of time or count averages for the counter_type::average_count and counter_type::average_timer counter types. This counter type collects the last observed value only.
Formula: None. This counter uses raw data in factional calculations without delivering an output. Average: SUM (N) / x Type: Instantaneous
-
enumerator average_count#
average_count shows how many items are processed, on average, during an operation. Counters of this type display a ratio of the items processed (such as bytes sent) to the number of operations completed. The ratio is calculated by comparing the number of items processed during the last interval to the number of operations completed during the last interval.
Formula: (N1 - N0) / (D1 - D0), where the numerator (N) represents the number of items processed during the last sample interval, and the denominator (D) represents the number of operations completed during the last two sample intervals. Average: (Nx - N0) / (Dx - D0) Type: Average
-
enumerator aggregating#
aggregating applies a function to an embedded counter instance. The embedded counter is usually evaluated repeatedly after a fixed (but configurable) time interval.
Formula: F(Nx)
-
enumerator average_timer#
average_timer measures the average time it takes to complete a process or operation. Counters of this type display a ratio of the total elapsed time of the sample interval to the number of processes or operations completed during that time. This counter type measures time in ticks of the system clock. The variable F represents the number of ticks per second. The value of F is factored into the equation so that the result is displayed in seconds.
Formula: ((N1 - N0) / F) / (D1 - D0), where the numerator (N) represents the number of ticks counted during the last sample interval, the variable F represents the frequency of the ticks, and the denominator (D) represents the number of operations completed during the last sample interval. Average: ((Nx - N0) / F) / (Dx - D0) Type: Average
-
enumerator elapsed_time#
elapsed_time shows the total time between when the component or process started and the time when this value is calculated. The variable F represents the number of time units that elapse in one second. The value of F is factored into the equation so that the result is displayed in seconds.
Formula: (D0 - N0) / F, where the nominator (D) represents the current time, the numerator (N) represents the time the object was started, and the variable F represents the number of time units that elapse in one second. Average: (Dx - N0) / F Type: Difference
-
enumerator histogram#
histogram exposes a histogram of the measured values instead of a single value as many of the other counter types. Counters of this type expose a counter_value_array instead of a counter_value. Those will also not implement the get_counter_value() functionality. The results are exposed through a separate get_counter_values_array() function.
The first three values in the returned array represent the lower and upper boundaries, and the size of the histogram buckets. All remaining values in the returned array represent the number of measurements for each of the buckets in the histogram.
-
enumerator raw_values#
raw_values exposes an array of measured values instead of a single value as many of the other counter types. Counters of this type expose a counter_value_array instead of a counter_value. Those will also not implement the get_counter_value() functionality. The results are exposed through a separate get_counter_values_array() function.
-
enumerator text
-
enumerator raw
-
enumerator monotonically_increasing
-
enumerator average_base
-
enumerator average_count
-
enumerator aggregating
-
enumerator average_timer
-
enumerator elapsed_time
-
enumerator histogram
-
enumerator raw_values
raw_values counter exposes an array of measured values instead of a single value as many of the other counter types. Counters of this type expose a counter_value_array instead of a counter_value. Those will also not implement the get_counter_value() functionality. The results are exposed through a separate get_counter_values_array() function.
-
enumerator text#
-
enum class counter_status#
Status and error codes used by the functions related to performance counters.
Values:
-
enumerator valid_data#
No error occurred, data is valid.
-
enumerator new_data#
Data is valid and different from last call.
-
enumerator invalid_data#
Some error occurred, data is not value.
-
enumerator already_defined#
The type or instance already has been defined.
-
enumerator counter_unknown#
The counter instance is unknown.
-
enumerator counter_type_unknown#
The counter type is unknown.
-
enumerator generic_error#
A unknown error occurred.
-
enumerator valid_data
-
enumerator new_data
-
enumerator invalid_data
-
enumerator already_defined
-
enumerator counter_unknown
-
enumerator counter_type_unknown
-
enumerator generic_error
-
enumerator valid_data#
Functions
-
char const *get_counter_type_name(counter_type state)#
Return the readable name of a given counter type.
-
inline bool status_is_valid(counter_status s)#
-
inline counter_status add_counter_type(counter_info const &info, error_code &ec)#
-
inline hpx::id_type get_counter(std::string const &name, error_code &ec)#
-
inline hpx::id_type get_counter(counter_info const &info, error_code &ec)#
Variables
-
constexpr const char counter_prefix[] = "/counters"#
-
constexpr std::size_t counter_prefix_len = std::size(counter_prefix) - 1#
-
struct counter_info#
Public Functions
-
inline explicit counter_info(counter_type type = counter_type::raw)#
Public Members
-
counter_type type_#
The type of the described counter.
-
counter_status status_#
The status of the counter object.
Private Functions
-
void serialize(serialization::output_archive &ar, unsigned int) const#
-
void serialize(serialization::input_archive &ar, unsigned int)#
Friends
- friend class hpx::serialization::access
-
inline explicit counter_info(counter_type type = counter_type::raw)#
-
struct counter_path_elements : public hpx::performance_counters::counter_type_path_elements#
- #include <counters.hpp>
A counter_path_elements holds the elements of a full name for a counter instance. Generally, a full name of a counter instance has the structure:
/objectname{parentinstancename::parentindex/instancename#instanceindex} /countername#parameters
i.e. /queue{localityprefix/thread#2}/length
Public Types
-
using base_type = counter_type_path_elements#
Public Functions
-
inline counter_path_elements()#
-
inline counter_path_elements(std::string const &objectname, std::string const &countername, std::string const ¶meters, std::string const &parentname, std::string const &instancename, std::int64_t parentindex = -1, std::int64_t instanceindex = -1, bool parentinstance_is_basename = false)#
-
inline counter_path_elements(std::string const &objectname, std::string const &countername, std::string const ¶meters, std::string const &parentname, std::string const &instancename, std::string const &subinstancename, std::int64_t parentindex = -1, std::int64_t instanceindex = -1, std::int64_t subinstanceindex = -1, bool parentinstance_is_basename = false)#
Public Members
-
bool parentinstance_is_basename_#
the parentinstancename_
Private Functions
-
void serialize(serialization::output_archive &ar, unsigned int)#
-
void serialize(serialization::input_archive &ar, unsigned int)#
Friends
- friend class hpx::serialization::access
-
using base_type = counter_type_path_elements#
-
struct counter_type_path_elements#
- #include <counters.hpp>
A counter_type_path_elements holds the elements of a full name for a counter type. Generally, a full name of a counter type has the structure:
/objectname/countername
i.e. /queue/length
Subclassed by hpx::performance_counters::counter_path_elements
Public Functions
-
counter_type_path_elements() = default#
Public Members
Protected Functions
-
void serialize(serialization::output_archive &ar, unsigned int) const#
-
void serialize(serialization::input_archive &ar, unsigned int)#
Friends
- friend class hpx::serialization::access
-
counter_type_path_elements() = default#
-
typedef hpx::function<naming::gid_type(counter_info const&, error_code&)> create_counter_func#
-
namespace performance_counters
hpx/performance_counters/counters_fwd.hpp#
Defined in header hpx/performance_counters/counters_fwd.hpp.
See Public API for a list of names and headers that are part of the public HPX API.
Defines
-
HPX_COUNTER_TYPE_UNSCOPED_ENUM_DEPRECATION_MSG#
-
HPX_COUNTER_STATUS_UNSCOPED_ENUM_DEPRECATION_MSG#
-
HPX_PERFORMANCE_COUNTER_V1#
-
HPX_DISCOVER_COUNTERS_MODE_UNSCOPED_ENUM_DEPRECATION_MSG#
-
namespace hpx
-
namespace performance_counters
Enums
-
enum class counter_type
Values:
-
enumerator text
text shows a variable-length text string. It does not deliver calculated values.
Formula: None Average: None Type: Text
-
enumerator raw
raw shows the last observed value only. It does not deliver an average.
Formula: None. Shows raw data as collected. Average: None Type: Instantaneous
-
enumerator monotonically_increasing
monotonically_increasing shows the cumulatively accumulated observed value. It does not deliver an average.
Formula: None. Shows cumulatively accumulated data as collected. Average: None Type: Instantaneous
-
enumerator average_base
average_base is used as the base data (denominator) in the computation of time or count averages for the counter_type::average_count and counter_type::average_timer counter types. This counter type collects the last observed value only.
Formula: None. This counter uses raw data in factional calculations without delivering an output. Average: SUM (N) / x Type: Instantaneous
-
enumerator average_count
average_count shows how many items are processed, on average, during an operation. Counters of this type display a ratio of the items processed (such as bytes sent) to the number of operations completed. The ratio is calculated by comparing the number of items processed during the last interval to the number of operations completed during the last interval.
Formula: (N1 - N0) / (D1 - D0), where the numerator (N) represents the number of items processed during the last sample interval, and the denominator (D) represents the number of operations completed during the last two sample intervals. Average: (Nx - N0) / (Dx - D0) Type: Average
-
enumerator aggregating
aggregating applies a function to an embedded counter instance. The embedded counter is usually evaluated repeatedly after a fixed (but configurable) time interval.
Formula: F(Nx)
-
enumerator average_timer
average_timer measures the average time it takes to complete a process or operation. Counters of this type display a ratio of the total elapsed time of the sample interval to the number of processes or operations completed during that time. This counter type measures time in ticks of the system clock. The variable F represents the number of ticks per second. The value of F is factored into the equation so that the result is displayed in seconds.
Formula: ((N1 - N0) / F) / (D1 - D0), where the numerator (N) represents the number of ticks counted during the last sample interval, the variable F represents the frequency of the ticks, and the denominator (D) represents the number of operations completed during the last sample interval. Average: ((Nx - N0) / F) / (Dx - D0) Type: Average
-
enumerator elapsed_time
elapsed_time shows the total time between when the component or process started and the time when this value is calculated. The variable F represents the number of time units that elapse in one second. The value of F is factored into the equation so that the result is displayed in seconds.
Formula: (D0 - N0) / F, where the nominator (D) represents the current time, the numerator (N) represents the time the object was started, and the variable F represents the number of time units that elapse in one second. Average: (Dx - N0) / F Type: Difference
-
enumerator histogram
histogram exposes a histogram of the measured values instead of a single value as many of the other counter types. Counters of this type expose a counter_value_array instead of a counter_value. Those will also not implement the get_counter_value() functionality. The results are exposed through a separate get_counter_values_array() function.
The first three values in the returned array represent the lower and upper boundaries, and the size of the histogram buckets. All remaining values in the returned array represent the number of measurements for each of the buckets in the histogram.
-
enumerator raw_values
raw_values exposes an array of measured values instead of a single value as many of the other counter types. Counters of this type expose a counter_value_array instead of a counter_value. Those will also not implement the get_counter_value() functionality. The results are exposed through a separate get_counter_values_array() function.
-
enumerator text
-
enumerator raw
-
enumerator monotonically_increasing
-
enumerator average_base
-
enumerator average_count
-
enumerator aggregating
-
enumerator average_timer
-
enumerator elapsed_time
-
enumerator histogram
-
enumerator raw_values
raw_values counter exposes an array of measured values instead of a single value as many of the other counter types. Counters of this type expose a counter_value_array instead of a counter_value. Those will also not implement the get_counter_value() functionality. The results are exposed through a separate get_counter_values_array() function.
-
enumerator text
-
enum class counter_status
Values:
-
enumerator valid_data
No error occurred, data is valid.
-
enumerator new_data
Data is valid and different from last call.
-
enumerator invalid_data
Some error occurred, data is not value.
-
enumerator already_defined
The type or instance already has been defined.
-
enumerator counter_unknown
The counter instance is unknown.
-
enumerator counter_type_unknown
The counter type is unknown.
-
enumerator generic_error
A unknown error occurred.
-
enumerator valid_data
-
enumerator new_data
-
enumerator invalid_data
-
enumerator already_defined
-
enumerator counter_unknown
-
enumerator counter_type_unknown
-
enumerator generic_error
-
enumerator valid_data
Functions
-
inline constexpr bool operator<(counter_type lhs, counter_type rhs) noexcept#
-
inline constexpr bool operator>(counter_type lhs, counter_type rhs) noexcept#
-
std::ostream &operator<<(std::ostream &os, counter_status rhs)#
-
counter_status get_counter_type_name(counter_type_path_elements const &path, std::string &result, error_code &ec = throws)#
Create a full name of a counter type from the contents of the given counter_type_path_elements instance.The generated counter type name will not contain any parameters.
-
counter_status get_full_counter_type_name(counter_type_path_elements const &path, std::string &result, error_code &ec = throws)#
Create a full name of a counter type from the contents of the given counter_type_path_elements instance. The generated counter type name will contain all parameters.
-
counter_status get_counter_name(counter_path_elements const &path, std::string &result, error_code &ec = throws)#
Create a full name of a counter from the contents of the given counter_path_elements instance.
-
counter_status get_counter_instance_name(counter_path_elements const &path, std::string &result, error_code &ec = throws)#
Create a name of a counter instance from the contents of the given counter_path_elements instance.
-
counter_status get_counter_type_path_elements(std::string const &name, counter_type_path_elements &path, error_code &ec = throws)#
Fill the given counter_type_path_elements instance from the given full name of a counter type.
-
counter_status get_counter_path_elements(std::string const &name, counter_path_elements &path, error_code &ec = throws)#
Fill the given counter_path_elements instance from the given full name of a counter.
-
counter_status get_counter_name(std::string const &name, std::string &countername, error_code &ec = throws)#
Return the canonical counter instance name from a given full instance name.
-
counter_status get_counter_type_name(std::string const &name, std::string &type_name, error_code &ec = throws)#
Return the canonical counter type name from a given (full) instance name.
- HPX_DEPRECATED_V (1, 9, HPX_DISCOVER_COUNTERS_MODE_UNSCOPED_ENUM_DEPRECATION_MSG) inline const expr discover_counters_mode discover_counters_minimal
-
counter_status complement_counter_info(counter_info &info, counter_info const &type_info, error_code &ec = throws)#
Complement the counter info if parent instance name is missing.
-
counter_status complement_counter_info(counter_info &info, error_code &ec = throws)#
-
counter_status add_counter_type(counter_info const &info, create_counter_func const &create_counter, discover_counters_func const &discover_counters, error_code &ec = throws)#
-
counter_status discover_counter_types(discover_counter_func const &discover_counter, discover_counters_mode mode = discover_counters_mode::minimal, error_code &ec = throws)#
Call the supplied function for each registered counter type.
-
counter_status discover_counter_types(std::vector<counter_info> &counters, discover_counters_mode mode = discover_counters_mode::minimal, error_code &ec = throws)#
Return a list of all available counter descriptions.
-
counter_status discover_counter_type(std::string const &name, discover_counter_func const &discover_counter, discover_counters_mode mode = discover_counters_mode::minimal, error_code &ec = throws)#
Call the supplied function for the given registered counter type.
-
counter_status discover_counter_type(counter_info const &info, discover_counter_func const &discover_counter, discover_counters_mode mode = discover_counters_mode::minimal, error_code &ec = throws)#
-
counter_status discover_counter_type(std::string const &name, std::vector<counter_info> &counters, discover_counters_mode mode = discover_counters_mode::minimal, error_code &ec = throws)#
Return a list of matching counter descriptions for the given registered counter type.
-
counter_status discover_counter_type(counter_info const &info, std::vector<counter_info> &counters, discover_counters_mode mode = discover_counters_mode::minimal, error_code &ec = throws)#
-
bool expand_counter_info(counter_info const&, discover_counter_func const&, error_code&)#
call the supplied function will all expanded versions of the supplied counter info.
This function expands all locality#* and worker-thread#* wild cards only.
-
counter_status remove_counter_type(counter_info const &info, error_code &ec = throws)#
Remove an existing counter type from the (local) registry.
Note
This doesn’t remove existing counters of this type, it just inhibits defining new counters using this type.
-
counter_status get_counter_type(std::string const &name, counter_info &info, error_code &ec = throws)#
Retrieve the counter type for the given counter name from the (local) registry.
-
hpx::future<hpx::id_type> get_counter_async(std::string name, error_code &ec = throws)#
Get the global id of an existing performance counter, if the counter does not exist yet, the function attempts to create the counter based on the given counter name.
-
hpx::future<hpx::id_type> get_counter_async(counter_info const &info, error_code &ec = throws)#
Get the global id of an existing performance counter, if the counter does not exist yet, the function attempts to create the counter based on the given counter info.
-
void get_counter_infos(counter_info const &info, counter_type &type, std::string &helptext, std::uint32_t &version, error_code &ec = throws)#
Retrieve the meta data specific for the given counter instance.
-
void get_counter_infos(std::string name, counter_type &type, std::string &helptext, std::uint32_t &version, error_code &ec = throws)#
Retrieve the meta data specific for the given counter instance.
Variables
-
constexpr counter_type counter_text = counter_type::text#
-
constexpr counter_type counter_raw = counter_type::raw#
-
constexpr counter_type counter_monotonically_increasing = counter_type::monotonically_increasing#
-
constexpr counter_type counter_average_base = counter_type::average_base#
-
constexpr counter_type counter_average_count = counter_type::average_count#
-
constexpr counter_type counter_aggregating = counter_type::aggregating#
-
constexpr counter_type counter_average_timer = counter_type::average_timer#
-
constexpr counter_type counter_elapsed_time = counter_type::elapsed_time#
-
constexpr counter_type counter_raw_values = counter_type::raw_values#
-
constexpr counter_type counter_histogram = counter_type::histogram#
-
constexpr counter_status status_valid_data = counter_status::valid_data#
-
constexpr counter_status status_new_data = counter_status::new_data#
-
constexpr counter_status status_invalid_data = counter_status::invalid_data#
-
constexpr counter_status status_already_defined = counter_status::already_defined#
-
constexpr counter_status status_counter_unknown = counter_status::counter_unknown#
-
constexpr counter_status status_counter_type_unknown = counter_status::counter_type_unknown#
-
constexpr counter_status status_generic_error = counter_status::generic_error#
-
struct counter_value#
Public Functions
-
template<typename T>
inline T get_value(error_code &ec = throws) const# Retrieve the ‘real’ value of the counter_value, converted to the requested type T.
Public Members
-
counter_status status_#
The status of the counter value.
-
bool scale_inverse_#
If true, value_ needs to be divided by scaling_, otherwise it has to be multiplied.
Private Functions
-
void serialize(serialization::output_archive &ar, unsigned int const) const#
-
void serialize(serialization::input_archive &ar, unsigned int const)#
Friends
- friend class hpx::serialization::access
-
template<typename T>
-
struct counter_values_array#
Public Functions
-
inline counter_values_array(std::vector<std::int64_t> &&values, std::int64_t scaling = 1, bool scale_inverse = false)#
-
inline counter_values_array(std::vector<std::int64_t> const &values, std::int64_t scaling = 1, bool scale_inverse = false)#
-
template<typename T>
inline T get_value(std::size_t index, error_code &ec = throws) const# Retrieve the ‘real’ value of the counter_value, converted to the requested type T.
Public Members
-
counter_status status_#
The status of the counter value.
-
bool scale_inverse_#
If true, value_ needs to be divided by scaling_, otherwise it has to be multiplied.
Private Functions
-
void serialize(serialization::output_archive &ar, unsigned int const) const#
-
void serialize(serialization::input_archive &ar, unsigned int const)#
Friends
- friend class hpx::serialization::access
-
inline counter_values_array(std::vector<std::int64_t> &&values, std::int64_t scaling = 1, bool scale_inverse = false)#
-
enum class counter_type
-
namespace performance_counters
hpx/performance_counters/manage_counter_type.hpp#
Defined in header hpx/performance_counters/manage_counter_type.hpp.
See Public API for a list of names and headers that are part of the public HPX API.
-
namespace hpx
-
namespace performance_counters
Functions
-
counter_status install_counter_type(std::string const &name, hpx::function<std::int64_t(bool)> const &counter_value, std::string const &helptext = "", std::string const &uom = "", counter_type type = counter_type::raw, error_code &ec = throws)#
Install a new generic performance counter type in a way, which will uninstall it automatically during shutdown.
The function install_counter_type will register a new generic counter type based on the provided function. The counter type will be automatically unregistered during system shutdown. Any consumer querying any instance of this this counter type will cause the provided function to be called and the returned value to be exposed as the counter value.
The counter type is registered such that there can be one counter instance per locality. The expected naming scheme for the counter instances is:
'/objectname{locality#<*>/total}/countername'where ‘<*>’ is a zero based integer identifying the locality the counter is created on.Note
As long as ec is not pre-initialized to hpx::throws this function doesn’t throw but returns the result code using the parameter ec. Otherwise it throws an instance of hpx::exception.
Note
The counter type registry is a locality based service. You will have to register each counter type on every locality where a corresponding performance counter will be created.
- Parameters
name – [in] The global virtual name of the counter type. This name is expected to have the format /objectname/countername.
counter_value – [in] The function to call whenever the counter value is requested by a consumer.
helptext – [in, optional] A longer descriptive text shown to the user to explain the nature of the counters created from this type.
uom – [in] The unit of measure for the new performance counter type.
type – [in] Type for the new performance counter type.
ec – [in,out] this represents the error status on exit, if this is pre-initialized to hpx::throws the function will throw on error instead.
- Returns
If successful, this function returns valid_data, otherwise it will either throw an exception or return an error_code from the enum counter_status (also, see note related to parameter ec).
-
counter_status install_counter_type(std::string const &name, hpx::function<std::vector<std::int64_t>(bool)> const &counter_value, std::string const &helptext = "", std::string const &uom = "", error_code &ec = throws)#
Install a new generic performance counter type returning an array of values in a way, that will uninstall it automatically during shutdown.
The function install_counter_type will register a new generic counter type that returns an array of values based on the provided function. The counter type will be automatically unregistered during system shutdown. Any consumer querying any instance of this this counter type will cause the provided function to be called and the returned array value to be exposed as the counter value.
The counter type is registered such that there can be one counter instance per locality. The expected naming scheme for the counter instances is:
'/objectname{locality#<*>/total}/countername'where ‘<*>’ is a zero based integer identifying the locality the counter is created on.Note
As long as ec is not pre-initialized to hpx::throws this function doesn’t throw but returns the result code using the parameter ec. Otherwise it throws an instance of hpx::exception.
Note
The counter type registry is a locality based service. You will have to register each counter type on every locality where a corresponding performance counter will be created.
- Parameters
name – [in] The global virtual name of the counter type. This name is expected to have the format /objectname/countername.
counter_value – [in] The function to call whenever the counter value (array of values) is requested by a consumer.
helptext – [in, optional] A longer descriptive text shown to the user to explain the nature of the counters created from this type.
uom – [in] The unit of measure for the new performance counter type.
ec – [in,out] this represents the error status on exit, if this is pre-initialized to hpx::throws the function will throw on error instead.
- Returns
If successful, this function returns valid_data, otherwise it will either throw an exception or return an error_code from the enum counter_status (also, see note related to parameter ec).
-
void install_counter_type(std::string const &name, counter_type type, error_code &ec = throws)#
Install a new performance counter type in a way, which will uninstall it automatically during shutdown.
The function install_counter_type will register a new counter type based on the provided counter_type_info. The counter type will be automatically unregistered during system shutdown.
Note
The counter type registry is a locality based service. You will have to register each counter type on every locality where a corresponding performance counter will be created.
Note
As long as ec is not pre-initialized to hpx::throws this function doesn’t throw but returns the result code using the parameter ec. Otherwise it throws an instance of hpx::exception.
- Parameters
name – [in] The global virtual name of the counter type. This name is expected to have the format /objectname/countername.
type – [in] The type of the counters of this counter_type.
ec – [in,out] this represents the error status on exit, if this is pre-initialized to hpx::throws the function will throw on error instead.
- Returns
If successful, this function returns valid_data, otherwise it will either throw an exception or return an error_code from the enum counter_status (also, see note related to parameter ec).
-
counter_status install_counter_type(std::string const &name, counter_type type, std::string const &helptext, std::string const &uom = "", std::uint32_t version = HPX_PERFORMANCE_COUNTER_V1, error_code &ec = throws)#
Install a new performance counter type in a way, which will uninstall it automatically during shutdown.
The function install_counter_type will register a new counter type based on the provided counter_type_info. The counter type will be automatically unregistered during system shutdown.
Note
The counter type registry is a locality based service. You will have to register each counter type on every locality where a corresponding performance counter will be created.
Note
As long as ec is not pre-initialized to hpx::throws this function doesn’t throw but returns the result code using the parameter ec. Otherwise it throws an instance of hpx::exception.
- Parameters
name – [in] The global virtual name of the counter type. This name is expected to have the format /objectname/countername.
type – [in] The type of the counters of this counter_type.
helptext – [in] A longer descriptive text shown to the user to explain the nature of the counters created from this type.
uom – [in] The unit of measure for the new performance counter type.
version – [in] The version of the counter type. This is currently expected to be set to HPX_PERFORMANCE_COUNTER_V1.
ec – [in,out] this represents the error status on exit, if this is pre-initialized to hpx::throws the function will throw on error instead.
- Returns
If successful, this function returns valid_data, otherwise it will either throw an exception or return an error_code from the enum counter_status (also, see note related to parameter ec).
-
counter_status install_counter_type(std::string const &name, counter_type type, std::string const &helptext, create_counter_func const &create_counter, discover_counters_func const &discover_counters, std::uint32_t version = HPX_PERFORMANCE_COUNTER_V1, std::string const &uom = "", error_code &ec = throws)#
Install a new generic performance counter type in a way, which will uninstall it automatically during shutdown.
The function install_counter_type will register a new generic counter type based on the provided counter_type_info. The counter type will be automatically unregistered during system shutdown.
Note
As long as ec is not pre-initialized to hpx::throws this function doesn’t throw but returns the result code using the parameter ec. Otherwise it throws an instance of hpx::exception.
Note
The counter type registry is a locality based service. You will have to register each counter type on every locality where a corresponding performance counter will be created.
- Parameters
name – [in] The global virtual name of the counter type. This name is expected to have the format /objectname/countername.
type – [in] The type of the counters of this counter_type.
helptext – [in] A longer descriptive text shown to the user to explain the nature of the counters created from this type.
version – [in] The version of the counter type. This is currently expected to be set to HPX_PERFORMANCE_COUNTER_V1.
create_counter – [in] The function which will be called to create a new instance of this counter type.
discover_counters – [in] The function will be called to discover counter instances which can be created.
uom – [in] The unit of measure of the counter type (default: “”)
ec – [in,out] this represents the error status on exit, if this is pre-initialized to hpx::throws the function will throw on error instead.
- Returns
If successful, this function returns valid_data, otherwise it will either throw an exception or return an error_code from the enum counter_status (also, see note related to parameter ec).
-
counter_status install_counter_type(std::string const &name, hpx::function<std::int64_t(bool)> const &counter_value, std::string const &helptext = "", std::string const &uom = "", counter_type type = counter_type::raw, error_code &ec = throws)#
-
namespace performance_counters
hpx/performance_counters/registry.hpp#
Defined in header hpx/performance_counters/registry.hpp.
See Public API for a list of names and headers that are part of the public HPX API.
-
namespace hpx
-
namespace performance_counters
-
class registry#
Public Functions
-
registry() = default#
-
void clear()#
Reset registry by deleting all stored counter types.
-
counter_status add_counter_type(counter_info const &info, create_counter_func const &create_counter, discover_counters_func const &discover_counters, error_code &ec = throws)#
Add a new performance counter type to the (local) registry.
-
counter_status discover_counter_types(discover_counter_func discover_counter, discover_counters_mode mode, error_code &ec = throws) const#
Call the supplied function for all registered counter types.
-
counter_status discover_counter_type(std::string const &fullname, discover_counter_func discover_counter, discover_counters_mode mode, error_code &ec = throws)#
Call the supplied function for the given registered counter type.
-
inline counter_status discover_counter_type(counter_info const &info, discover_counter_func const &f, discover_counters_mode mode, error_code &ec = throws)#
-
counter_status get_counter_create_function(counter_info const &info, create_counter_func &create_counter, error_code &ec = throws) const#
Retrieve the counter creation function which is associated with a given counter type.
-
counter_status get_counter_discovery_function(counter_info const &info, discover_counters_func &func, error_code &ec) const#
Retrieve the counter discovery function which is associated with a given counter type.
-
counter_status remove_counter_type(counter_info const &info, error_code &ec = throws)#
Remove an existing counter type from the (local) registry.
Note
This doesn’t remove existing counters of this type, it just inhibits defining new counters using this type.
-
counter_status create_raw_counter_value(counter_info const &info, std::int64_t *countervalue, naming::gid_type &id, error_code &ec = throws)#
Create a new performance counter instance of type raw_counter based on given counter value.
-
counter_status create_raw_counter(counter_info const &info, hpx::function<std::int64_t()> const &f, naming::gid_type &id, error_code &ec = throws)#
Create a new performance counter instance of type raw_counter based on given function returning the counter value.
-
counter_status create_raw_counter(counter_info const &info, hpx::function<std::int64_t(bool)> const &f, naming::gid_type &id, error_code &ec = throws)#
Create a new performance counter instance of type raw_counter based on given function returning the counter value.
-
counter_status create_raw_counter(counter_info const &info, hpx::function<std::vector<std::int64_t>()> const &f, naming::gid_type &id, error_code &ec = throws)#
Create a new performance counter instance of type raw_counter based on given function returning the counter value.
-
counter_status create_raw_counter(counter_info const &info, hpx::function<std::vector<std::int64_t>(bool)> const &f, naming::gid_type &id, error_code &ec = throws)#
Create a new performance counter instance of type raw_counter based on given function returning the counter value.
-
counter_status create_counter(counter_info const &info, naming::gid_type &id, error_code &ec = throws)#
Create a new performance counter instance based on given counter info.
-
counter_status create_statistics_counter(counter_info const &info, std::string const &base_counter_name, std::vector<std::size_t> const ¶meters, naming::gid_type &id, error_code &ec = throws)#
Create a new statistics performance counter instance based on given base counter name and given base time interval (milliseconds).
-
counter_status create_arithmetics_counter(counter_info const &info, std::vector<std::string> const &base_counter_names, naming::gid_type &id, error_code &ec = throws)#
Create a new arithmetics performance counter instance based on given base counter names.
-
counter_status create_arithmetics_counter_extended(counter_info const &info, std::vector<std::string> const &base_counter_names, naming::gid_type &id, error_code &ec = throws)#
Create a new extended arithmetics performance counter instance based on given base counter names.
-
counter_status add_counter(hpx::id_type const &id, counter_info const &info, error_code &ec = throws)#
Add an existing performance counter instance to the registry.
-
counter_status remove_counter(counter_info const &info, hpx::id_type const &id, error_code &ec = throws)#
remove the existing performance counter from the registry
-
counter_status get_counter_type(std::string const &name, counter_info &info, error_code &ec = throws)#
Retrieve counter type information for given counter name.
Protected Functions
-
counter_type_map_type::iterator locate_counter_type(std::string const &type_name)#
-
counter_type_map_type::const_iterator locate_counter_type(std::string const &type_name) const#
Private Types
-
using counter_type_map_type = std::map<std::string, counter_data>#
Private Members
-
counter_type_map_type countertypes_#
-
struct counter_data#
Public Functions
-
inline counter_data(counter_info const &info, create_counter_func const &create_counter, discover_counters_func const &discover_counters)#
Public Members
-
counter_info info_#
-
create_counter_func create_counter_#
-
discover_counters_func discover_counters_#
-
inline counter_data(counter_info const &info, create_counter_func const &create_counter, discover_counters_func const &discover_counters)#
-
registry() = default#
-
class registry#
-
namespace performance_counters
plugin_factories#
See Public API for a list of names and headers that are part of the public HPX API.
hpx/plugin_factories/binary_filter_factory.hpp#
Defined in header hpx/plugin_factories/binary_filter_factory.hpp.
See Public API for a list of names and headers that are part of the public HPX API.
Defines
-
HPX_REGISTER_BINARY_FILTER_FACTORY(BinaryFilter, pluginname)#
This macro is used create and to register a minimal component factory with Hpx.Plugin.
-
namespace hpx
-
namespace plugins
-
template<typename BinaryFilter>
struct binary_filter_factory : public binary_filter_factory_base# - #include <binary_filter_factory.hpp>
The message_handler_factory provides a minimal implementation of a message handler’s factory. If no additional functionality is required this type can be used to implement the full set of minimally required functions to be exposed by a message handler’s factory instance.
- Template Parameters
BinaryFilter – The message handler type this factory should be responsible for.
Public Functions
-
inline binary_filter_factory(util::section const *global, util::section const *local, bool isenabled)#
Construct a new factory instance.
Note
The contents of both sections has to be cloned in order to save the configuration setting for later use.
- Parameters
global – [in] The pointer to a hpx::util::section instance referencing the settings read from the [settings] section of the global configuration file (hpx.ini) This pointer may be nullptr if no such section has been found.
local – [in] The pointer to a hpx::util::section instance referencing the settings read from the section describing this component type: [hpx.components.<name>], where <name> is the instance name of the component as given in the configuration files.
isenabled –
-
~binary_filter_factory() override = default#
-
inline serialization::binary_filter *create(bool compress, serialization::binary_filter *next_filter = nullptr) override#
Create a new instance of a message handler
return Returns the newly created instance of the message handler supported by this factory
-
template<typename BinaryFilter>
-
namespace plugins
hpx/plugin_factories/message_handler_factory.hpp#
Defined in header hpx/plugin_factories/message_handler_factory.hpp.
See Public API for a list of names and headers that are part of the public HPX API.
hpx/plugin_factories/parcelport_factory.hpp#
Defined in header hpx/plugin_factories/parcelport_factory.hpp.
See Public API for a list of names and headers that are part of the public HPX API.
hpx/plugin_factories/plugin_registry.hpp#
Defined in header hpx/plugin_factories/plugin_registry.hpp.
See Public API for a list of names and headers that are part of the public HPX API.
Defines
-
HPX_REGISTER_PLUGIN_REGISTRY(...)#
This macro is used create and to register a minimal plugin registry with Hpx.Plugin.
-
HPX_REGISTER_PLUGIN_REGISTRY_(...)#
-
HPX_REGISTER_PLUGIN_REGISTRY_2(PluginType, pluginname)#
-
HPX_REGISTER_PLUGIN_REGISTRY_4(PluginType, pluginname, pluginsection, pluginsuffix)#
-
HPX_REGISTER_PLUGIN_REGISTRY_5(PluginType, pluginname, pluginstring, pluginsection, pluginsuffix)#
-
namespace hpx
-
namespace plugins
-
template<typename Plugin, char const *const Name, char const *const Section, char const *const Suffix>
struct plugin_registry : public plugin_registry_base# - #include <plugin_registry.hpp>
The plugin_registry provides a minimal implementation of a plugin’s registry. If no additional functionality is required this type can be used to implement the full set of minimally required functions to be exposed by a plugin’s registry instance.
- Template Parameters
Plugin – The plugin type this registry should be responsible for.
Public Functions
-
inline bool get_plugin_info(std::vector<std::string> &fillini) override#
Return the ini-information for all contained components.
- Parameters
fillini – [in] The module is expected to fill this vector with the ini-information (one line per vector element) for all components implemented in this module.
- Returns
Returns true if the parameter fillini has been successfully initialized with the registry data of all implemented in this module.
-
template<typename Plugin, char const *const Name, char const *const Section, char const *const Suffix>
-
namespace plugins
runtime_components#
See Public API for a list of names and headers that are part of the public HPX API.
HPX_REGISTER_COMPONENT#
Defined in header hpx/components.hpp.
See Public API for a list of names and headers that are part of the public HPX API.
Defines
-
HPX_REGISTER_COMPONENT(type, name, mode)#
Define a component factory for a component type.
This macro is used create and to register a minimal component factory for a component type which allows it to be remotely created using the hpx::new_<> function.
This macro can be invoked with one, two or three arguments
- Parameters
type – The type parameter is a (fully decorated) type of the component type for which a factory should be defined.
name – The name parameter specifies the name to use to register the factory. This should uniquely (system-wide) identify the component type. The name parameter must conform to the C++ identifier rules (without any namespace). If this parameter is not given, the first parameter is used.
mode – The mode parameter has to be one of the defined enumeration values of the enumeration hpx::components::factory_state. The default for this parameter is hpx::components::factory_state::enabled.
hpx/runtime_components/component_registry.hpp#
Defined in header hpx/runtime_components/component_registry.hpp.
See Public API for a list of names and headers that are part of the public HPX API.
Defines
-
HPX_REGISTER_MINIMAL_COMPONENT_REGISTRY(...)#
This macro is used create and to register a minimal component registry with Hpx.Plugin.
-
HPX_REGISTER_MINIMAL_COMPONENT_REGISTRY_(...)#
-
HPX_REGISTER_MINIMAL_COMPONENT_REGISTRY_2(ComponentType, componentname)#
-
HPX_REGISTER_MINIMAL_COMPONENT_REGISTRY_3(ComponentType, componentname, state)#
-
HPX_REGISTER_MINIMAL_COMPONENT_REGISTRY_DYNAMIC(...)#
-
HPX_REGISTER_MINIMAL_COMPONENT_REGISTRY_DYNAMIC_(...)#
-
HPX_REGISTER_MINIMAL_COMPONENT_REGISTRY_DYNAMIC_2(ComponentType, componentname)#
-
HPX_REGISTER_MINIMAL_COMPONENT_REGISTRY_DYNAMIC_3(ComponentType, componentname, state)#
-
namespace hpx
-
namespace components
-
template<typename Component, factory_state state>
struct component_registry : public component_registry_base# - #include <component_registry.hpp>
The component_registry provides a minimal implementation of a component’s registry. If no additional functionality is required this type can be used to implement the full set of minimally required functions to be exposed by a component’s registry instance.
- Template Parameters
Component – The component type this registry should be responsible for.
Public Functions
-
inline bool get_component_info(std::vector<std::string> &fillini, std::string const &filepath, bool is_static = false) override#
Return the ini-information for all contained components.
- Parameters
fillini – [in] The module is expected to fill this vector with the ini-information (one line per vector element) for all components implemented in this module.
filepath –
is_static –
- Returns
Returns true if the parameter fillini has been successfully initialized with the registry data of all implemented in this module.
-
inline void register_component_type() override#
Enables this type of registry and sets its destroy mechanism.
-
template<typename Component, factory_state state>
-
namespace components
hpx/runtime_components/components_fwd.hpp#
Defined in header hpx/runtime_components/components_fwd.hpp.
See Public API for a list of names and headers that are part of the public HPX API.
-
namespace hpx
Functions
-
components::server::runtime_support *get_runtime_support_ptr()#
-
components::server::runtime_support *get_runtime_support_ptr()#
-
namespace components#
hpx/runtime_components/derived_component_factory.hpp#
Defined in header hpx/runtime_components/derived_component_factory.hpp.
See Public API for a list of names and headers that are part of the public HPX API.
Defines
-
HPX_REGISTER_DERIVED_COMPONENT_FACTORY(...)#
This macro is used create and to register a minimal component factory with Hpx.Plugin. This macro may be used if the registered component factory is the only factory to be exposed from a particular module. If more than one factory needs to be exposed the HPX_REGISTER_COMPONENT_FACTORY and HPX_REGISTER_COMPONENT_MODULE macros should be used instead.
-
HPX_REGISTER_DERIVED_COMPONENT_FACTORY_(...)#
-
HPX_REGISTER_DERIVED_COMPONENT_FACTORY_3(ComponentType, componentname, basecomponentname)#
-
HPX_REGISTER_DERIVED_COMPONENT_FACTORY_4(ComponentType, componentname, basecomponentname, state)#
-
HPX_REGISTER_DERIVED_COMPONENT_FACTORY_DYNAMIC(...)#
-
HPX_REGISTER_DERIVED_COMPONENT_FACTORY_DYNAMIC_(...)#
-
HPX_REGISTER_DERIVED_COMPONENT_FACTORY_DYNAMIC_3(ComponentType, componentname, basecomponentname)#
-
HPX_REGISTER_DERIVED_COMPONENT_FACTORY_DYNAMIC_4(ComponentType, componentname, basecomponentname, state)#
hpx::new_#
Defined in header hpx/components.hpp.
See Public API for a list of names and headers that are part of the public HPX API.
-
namespace hpx
Functions
-
template<typename Component, typename ...Ts>
auto new_(id_type const &locality, Ts&&... vs)# Create one or more new instances of the given Component type on the specified locality.
This function creates one or more new instances of the given Component type on the specified locality and returns a future object for the global address which can be used to reference the new component instance.
Note
This function requires to specify an explicit template argument which will define what type of component(s) to create, for instance:
hpx::future<hpx::id_type> f = hpx::new_<some_component>(hpx::find_here(), ...); hpx::id_type id = f.get();
- Parameters
locality – [in] The global address of the locality where the new instance should be created on.
vs – [in] Any number of arbitrary arguments (passed by value, by const reference or by rvalue reference) which will be forwarded to the constructor of the created component instance.
- Returns
The function returns different types depending on its use:
If the explicit template argument Component represents a component type (
traits::is_component<Component>::valueevaluates to true), the function will return an hpx::future object instance which can be used to retrieve the global address of the newly created component.If the explicit template argument Component represents a client side object (
traits::is_client<Component>::valueevaluates to true), the function will return a new instance of that type which can be used to refer to the newly created component instance.
-
template<typename Component, typename ...Ts>
auto local_new(Ts&&... vs)# Create one new instance of the given Component type on the current locality.
This function creates one new instance of the given Component type on the current locality and returns a future object for the global address which can be used to reference the new component instance.
Note
This function requires to specify an explicit template argument which will define what type of component(s) to create, for instance:
hpx::future<hpx::id_type> f = hpx::local_new<some_component>(...); hpx::id_type id = f.get();
Note
The difference of this function to hpx::new_ is that it can be used in cases where the supplied arguments are non-copyable and non-movable. All operations are guaranteed to be local only.
- Parameters
vs – [in] Any number of arbitrary arguments (passed by value, by const reference or by rvalue reference) which will be forwarded to the constructor of the created component instance.
- Returns
The function returns different types depending on its use:
If the explicit template argument Component represents a component type (
traits::is_component<Component>::valueevaluates to true), the function will return an hpx::future object instance which can be used to retrieve the global address of the newly created component. If the first argument ishpx::launch::syncthe function will directly return anhpx::id_type.If the explicit template argument Component represents a client side object (
traits::is_client<Component>::valueevaluates to true), the function will return a new instance of that type which can be used to refer to the newly created component instance.
-
template<typename Component, typename ...Ts>
auto new_(id_type const &locality, std::size_t count, Ts&&... vs)# Create multiple new instances of the given Component type on the specified locality.
This function creates multiple new instances of the given Component type on the specified locality and returns a future object for the global address which can be used to reference the new component instance.
Note
This function requires to specify an explicit template argument which will define what type of component(s) to create, for instance:
hpx::future<std::vector<hpx::id_type> > f = hpx::new_<some_component[]>(hpx::find_here(), 10, ...); hpx::id_type id = f.get();
- Parameters
locality – [in] The global address of the locality where the new instance should be created on.
count – [in] The number of component instances to create
vs – [in] Any number of arbitrary arguments (passed by value, by const reference or by rvalue reference) which will be forwarded to the constructor of the created component instance.
- Returns
The function returns different types depending on its use:
If the explicit template argument Component represents an array of a component type (i.e. Component[], where
traits::is_component<Component>::valueevaluates to true), the function will return an hpx::future object instance which holds a std::vector<hpx::id_type>, where each of the items in this vector is a global address of one of the newly created components.If the explicit template argument Component represents an array of a client side object type (i.e. Component[], where
traits::is_client<Component>::valueevaluates to true), the function will return an hpx::future object instance which holds a std::vector<hpx::id_type>, where each of the items in this vector is a client side instance of the given type, each representing one of the newly created components.
-
template<typename Component, typename DistPolicy, typename ...Ts>
auto new_(DistPolicy const &policy, Ts&&... vs)# Create one or more new instances of the given Component type based on the given distribution policy.
This function creates one or more new instances of the given Component type on the localities defined by the given distribution policy and returns a future object for global address which can be used to reference the new component instance(s).
Note
This function requires to specify an explicit template argument which will define what type of component(s) to create, for instance:
hpx::future<hpx::id_type> f = hpx::new_<some_component>(hpx::default_layout, ...); hpx::id_type id = f.get();
- Parameters
policy – [in] The distribution policy used to decide where to place the newly created.
vs – [in] Any number of arbitrary arguments (passed by value, by const reference or by rvalue reference) which will be forwarded to the constructor of the created component instance.
- Returns
The function returns different types depending on its use:
If the explicit template argument Component represents a component type (
traits::is_component<Component>::valueevaluates to true), the function will return an hpx::future object instance which can be used to retrieve the global address of the newly created component.If the explicit template argument Component represents a client side object (
traits::is_client<Component>::valueevaluates to true), the function will return a new instance of that type which can be used to refer to the newly created component instance.
-
template<typename Component, typename DistPolicy, typename ...Ts>
auto new_(DistPolicy const &policy, std::size_t count, Ts&&... vs)# Create multiple new instances of the given Component type on the localities as defined by the given distribution policy.
This function creates multiple new instances of the given Component type on the localities defined by the given distribution policy and returns a future object for the global address which can be used to reference the new component instance.
Note
This function requires to specify an explicit template argument which will define what type of component(s) to create, for instance:
hpx::future<std::vector<hpx::id_type> > f = hpx::new_<some_component[]>(hpx::default_layout, 10, ...); hpx::id_type id = f.get();
- Parameters
policy – [in] The distribution policy used to decide where to place the newly created.
count – [in] The number of component instances to create
vs – [in] Any number of arbitrary arguments (passed by value, by const reference or by rvalue reference) which will be forwarded to the constructor of the created component instance.
- Returns
The function returns different types depending on its use:
If the explicit template argument Component represents an array of a component type (i.e. Component[], where
traits::is_component<Component>::valueevaluates to true), the function will return an hpx::future object instance which holds a std::vector<hpx::id_type>, where each of the items in this vector is a global address of one of the newly created components.If the explicit template argument Component represents an array of a client side object type (i.e. Component[], where
traits::is_client<Component>::valueevaluates to true), the function will return an hpx::future object instance which holds a std::vector<hpx::id_type>, where each of the items in this vector is a client side instance of the given type, each representing one of the newly created components.
-
template<typename Component, typename ...Ts>
runtime_distributed#
See Public API for a list of names and headers that are part of the public HPX API.
hpx/runtime_distributed.hpp#
Defined in header hpx/runtime_distributed.hpp.
See Public API for a list of names and headers that are part of the public HPX API.
-
namespace hpx
-
class runtime_distributed : public runtime#
- #include <runtime_distributed.hpp>
The runtime class encapsulates the HPX runtime system in a simple to use way. It makes sure all required parts of the HPX runtime system are properly initialized.
Public Functions
-
explicit runtime_distributed(util::runtime_configuration &rtcfg, int (*pre_main)(runtime_mode) = nullptr, void (*post_main)() = nullptr)#
Construct a new HPX runtime instance
- Parameters
rtcfg – Runtime configuration for this instance
pre_main – Function to be called before running the main action of this instance
post_main – Function to be called after running the main action of this instance
-
~runtime_distributed()#
The destructor makes sure all HPX runtime services are properly shut down before exiting.
-
int start(hpx::function<hpx_main_function_type> const &func, bool blocking = false) override#
Start the runtime system.
- Parameters
func – [in] This is the main function of an HPX application. It will be scheduled for execution by the thread manager as soon as the runtime has been initialized. This function is expected to expose an interface as defined by the typedef hpx_main_function_type.
blocking – [in] This allows to control whether this call blocks until the runtime system has been stopped. If this parameter is true the function runtime::start will call runtime::wait internally.
- Returns
If a blocking is a true, this function will return the value as returned as the result of the invocation of the function object given by the parameter
func. Otherwise it will return zero.
-
int start(bool blocking = false) override#
Start the runtime system.
- Parameters
blocking – [in] This allows to control whether this call blocks until the runtime system has been stopped. If this parameter is true the function runtime::start will call runtime::wait internally .
- Returns
If a blocking is a true, this function will return the value as returned as the result of the invocation of the function object given by the parameter
func. Otherwise it will return zero.
-
int wait() override#
Wait for the shutdown action to be executed.
- Returns
This function will return the value as returned as the result of the invocation of the function object given by the parameter
func.
-
void stop(bool blocking = true) override#
Initiate termination of the runtime system.
- Parameters
blocking – [in] This allows to control whether this call blocks until the runtime system has been fully stopped. If this parameter is false then this call will initiate the stop action but will return immediately. Use a second call to stop with this parameter set to true to wait for all internal work to be completed.
-
int finalize(double shutdown_timeout) override#
-
void stop_helper(bool blocking, std::condition_variable &cond, std::mutex &mtx)#
Stop the runtime system, wait for termination.
- Parameters
blocking – [in] This allows to control whether this call blocks until the runtime system has been fully stopped. If this parameter is false then this call will initiate the stop action but will return immediately. Use a second call to stop with this parameter set to true to wait for all internal work to be completed.
cond – Condition used to update all thread when done
mtx – Mutex used by this function to sync all threads
-
int suspend() override#
Suspend the runtime system.
-
int resume() override#
Resume the runtime system.
-
bool report_error(std::size_t num_thread, std::exception_ptr const &e, bool terminate_all = true) override#
Report a non-recoverable error to the runtime system.
- Parameters
num_thread – [in] The number of the operating system thread the error has been detected in.
e – [in] This is an instance encapsulating an exception which lead to this function call.
terminate_all – [in] Kill all localities attached to the currently running application (default: true)
-
bool report_error(std::exception_ptr const &e, bool terminate_all = true) override#
Report a non-recoverable error to the runtime system.
Note
This function will retrieve the number of the current shepherd thread and forward to the report_error function above.
- Parameters
e – [in] This is an instance encapsulating an exception which lead to this function call.
terminate_all – [in] Kill all localities attached to the currently running application (default: true)
-
int run(hpx::function<hpx_main_function_type> const &func) override#
Run the HPX runtime system, use the given function for the main thread and block waiting for all threads to finish.
Note
The parameter func is optional. If no function is supplied, the runtime system will simply wait for the shutdown action without explicitly executing any main thread.
- Parameters
func – [in] This is the main function of an HPX application. It will be scheduled for execution by the thread manager as soon as the runtime has been initialized. This function is expected to expose an interface as defined by the typedef hpx_main_function_type. This parameter is optional and defaults to none main thread function, in which case all threads have to be scheduled explicitly.
- Returns
This function will return the value as returned as the result of the invocation of the function object given by the parameter
func.
-
int run() override#
Run the HPX runtime system, initially use the given number of (OS) threads in the thread-manager and block waiting for all threads to finish.
- Returns
This function will always return 0 (zero).
-
bool is_networking_enabled() override#
-
template<typename F>
inline components::server::console_error_dispatcher::sink_type set_error_sink(F &&sink)#
-
performance_counters::registry &get_counter_registry()#
Allow access to the registry counter registry instance used by the HPX runtime.
-
performance_counters::registry const &get_counter_registry() const#
Allow access to the registry counter registry instance used by the HPX runtime.
-
void start_active_counters(error_code &ec = throws) const#
-
void stop_active_counters(error_code &ec = throws) const#
-
void reset_active_counters(error_code &ec = throws) const#
-
void reinit_active_counters(bool reset = true, error_code &ec = throws) const#
-
void evaluate_active_counters(bool reset = false, char const *description = nullptr, error_code &ec = throws) const#
-
void stop_evaluating_counters(bool terminate = false) const#
-
agas::addressing_service &get_agas_client()#
Allow access to the AGAS client instance used by the HPX runtime.
-
hpx::threads::threadmanager &get_thread_manager() override#
Allow access to the thread manager instance used by the HPX runtime.
-
std::string here() const override#
Returns a string of the locality endpoints (usable in debug output)
-
void init_id_pool_range()#
-
void initialize_agas()#
Initialize AGAS operation.
-
void add_pre_startup_function(startup_function_type f) override#
Add a function to be executed inside a HPX thread before hpx_main but guaranteed to be executed before any startup function registered with add_startup_function.
Note
The difference to a startup function is that all pre-startup functions will be (system-wide) executed before any startup function.
- Parameters
f – The function ‘f’ will be called from inside a HPX thread before hpx_main is executed. This is very useful to setup the runtime environment of the application (install performance counters, etc.)
-
void add_startup_function(startup_function_type f) override#
Add a function to be executed inside a HPX thread before hpx_main
- Parameters
f – The function ‘f’ will be called from inside a HPX thread before hpx_main is executed. This is very useful to setup the runtime environment of the application (install performance counters, etc.)
-
void add_pre_shutdown_function(shutdown_function_type f) override#
Add a function to be executed inside a HPX thread during hpx::finalize, but guaranteed before any of the shutdown functions is executed.
Note
The difference to a shutdown function is that all pre-shutdown functions will be (system-wide) executed before any shutdown function.
- Parameters
f – The function ‘f’ will be called from inside a HPX thread while hpx::finalize is executed. This is very useful to tear down the runtime environment of the application (uninstall performance counters, etc.)
-
void add_shutdown_function(shutdown_function_type f) override#
Add a function to be executed inside a HPX thread during hpx::finalize
- Parameters
f – The function ‘f’ will be called from inside a HPX thread while hpx::finalize is executed. This is very useful to tear down the runtime environment of the application (uninstall performance counters, etc.)
-
hpx::util::io_service_pool *get_thread_pool(char const *name) override#
Access one of the internal thread pools (io_service instances) HPX is using to perform specific tasks. The three possible values for the argument
nameare “main_pool”, “io_pool”, “parcel_pool”, and “timer_pool”. For any other argument value the function will return zero.
-
bool register_thread(char const *name, std::size_t num = 0, bool service_thread = true, error_code &ec = throws) override#
Register an external OS-thread with HPX.
-
notification_policy_type get_notification_policy(char const *prefix, runtime_local::os_thread_type type) override#
Generate a new notification policy instance for the given thread name prefix
-
std::uint32_t get_locality_id(error_code &ec) const override#
-
std::uint32_t get_num_localities(hpx::launch::sync_policy, error_code &ec) const override#
-
std::uint32_t get_num_localities(hpx::launch::sync_policy, components::component_type type, error_code &ec) const#
-
hpx::future<std::uint32_t> get_num_localities(components::component_type type) const#
Public Static Functions
-
static void register_counter_types()#
Install all performance counters related to this runtime instance.
Private Functions
-
threads::thread_result_type run_helper(hpx::function<runtime::hpx_main_function_type> const &func, int &result)#
-
void init_global_data()#
-
void deinit_global_data()#
-
void init_tss_helper(char const *context, runtime_local::os_thread_type type, std::size_t local_thread_num, std::size_t global_thread_num, char const *pool_name, char const *postfix, bool service_thread)#
-
void init_tss_ex(std::string const &locality, char const *context, runtime_local::os_thread_type type, std::size_t local_thread_num, std::size_t global_thread_num, char const *pool_name, char const *postfix, bool service_thread, error_code &ec) const#
Private Members
-
runtime_mode mode_#
-
agas::addressing_service agas_client_#
-
used_cores_map_type used_cores_map_#
-
std::unique_ptr<components::server::runtime_support> runtime_support_#
-
int (*pre_main_)(runtime_mode)#
-
void (*post_main_)()#
-
explicit runtime_distributed(util::runtime_configuration &rtcfg, int (*pre_main)(runtime_mode) = nullptr, void (*post_main)() = nullptr)#
-
class runtime_distributed : public runtime#
hpx/runtime_distributed/applier.hpp#
Defined in header hpx/runtime_distributed/applier.hpp.
See Public API for a list of names and headers that are part of the public HPX API.
-
namespace hpx
-
namespace applier#
-
class applier#
- #include <applier.hpp>
The applier class is used to decide whether a particular action has to be issued on a local or a remote resource. If the target component is local a new thread will be created, if the target is remote a parcel will be sent.
Public Functions
-
applier()#
-
void init(threads::threadmanager &tm)#
-
~applier() = default#
-
threads::threadmanager &get_thread_manager()#
Access the thread-manager instance associated with this applier.
This function returns a reference to the thread manager this applier instance has been created with.
-
naming::gid_type const &get_raw_locality(error_code &ec = throws) const#
Allow access to the locality of the locality this applier instance is associated with.
This function returns a reference to the locality this applier instance is associated with.
-
std::uint32_t get_locality_id(error_code &ec = throws) const#
Allow access to the id of the locality this applier instance is associated with.
This function returns a reference to the id of the locality this applier instance is associated with.
-
bool get_raw_remote_localities(std::vector<naming::gid_type> &locality_ids, components::component_type type = to_int(hpx::components::component_enum_type::invalid), error_code &ec = throws) const#
Return list of localities of all remote localities registered with the AGAS service for a specific component type.
This function returns a list of all remote localities (all localities known to AGAS except the local one) supporting the given component type.
- Parameters
locality_ids – [out] The reference to a vector of id_types filled by the function.
type – [in] The type of the component which needs to exist on the returned localities.
- Returns
The function returns true if there is at least one remote locality known to the AGAS service (!prefixes.empty()).
-
bool get_remote_localities(std::vector<hpx::id_type> &locality_ids, components::component_type type = to_int(hpx::components::component_enum_type::invalid), error_code &ec = throws) const#
-
bool get_raw_localities(std::vector<naming::gid_type> &locality_ids, components::component_type type = to_int(hpx::components::component_enum_type::invalid)) const#
Return list of locality_ids of all localities registered with the AGAS service for a specific component type.
This function returns a list of all localities (all localities known to AGAS except the local one) supporting the given component type.
- Parameters
locality_ids – [out] The reference to a vector of id_types filled by the function.
type – [in] The type of the component which needs to exist on the returned localities.
- Returns
The function returns true if there is at least one remote locality known to the AGAS service (!prefixes.empty()).
-
bool get_localities(std::vector<hpx::id_type> &locality_ids, error_code &ec = throws) const#
-
bool get_localities(std::vector<hpx::id_type> &locality_ids, components::component_type type, error_code &ec = throws) const#
-
applier()#
-
class applier#
-
namespace applier#
hpx/runtime_distributed/applier_fwd.hpp#
Defined in header hpx/runtime_distributed/applier_fwd.hpp.
See Public API for a list of names and headers that are part of the public HPX API.
-
namespace hpx
-
namespace applier
-
namespace applier
-
namespace applier#
The namespace applier contains all definitions needed for the class hpx::applier::applier and its related functionality. This namespace is part of the HPX core module.
hpx/runtime_distributed/copy_component.hpp#
Defined in header hpx/runtime_distributed/copy_component.hpp.
See Public API for a list of names and headers that are part of the public HPX API.
-
namespace hpx
-
namespace components
Functions
-
template<typename Component>
future<hpx::id_type> copy(hpx::id_type const &to_copy)# Copy given component to the specified target locality.
The function copy<Component> will create a copy of the component referenced by to_copy on the locality specified with target_locality. It returns a future referring to the newly created component instance.
Note
The new component instance is created on the locality of the component instance which is to be copied.
- Parameters
to_copy – [in] The global id of the component to copy
- Template Parameters
The – only template argument specifies the component type to create.
- Returns
A future representing the global id of the newly (copied) component instance.
-
template<typename Component>
future<hpx::id_type> copy(hpx::id_type const &to_copy, hpx::id_type const &target_locality)# Copy given component to the specified target locality.
The function copy<Component> will create a copy of the component referenced by to_copy on the locality specified with target_locality. It returns a future referring to the newly created component instance.
- Parameters
to_copy – [in] The global id of the component to copy
target_locality – [in ] The locality where the copy should be created.
- Template Parameters
The – only template argument specifies the component type to create.
- Returns
A future representing the global id of the newly (copied) component instance.
-
template<typename Derived, typename Stub, typename Data>
Derived copy(client_base<Derived, Stub, Data> const &to_copy, hpx::id_type const &target_locality = hpx::invalid_id)# Copy given component to the specified target locality.
The function copy will create a copy of the component referenced by the client side object to_copy on the locality specified with target_locality. It returns a new client side object future referring to the newly created component instance.
Note
If the second argument is omitted (or is invalid_id) the new component instance is created on the locality of the component instance which is to be copied.
- Parameters
to_copy – [in] The client side object representing the component to copy
target_locality – [in, optional] The locality where the copy should be created (default is same locality as source).
- Template Parameters
The – only template argument specifies the component type to create.
- Returns
A future representing the global id of the newly (copied) component instance.
-
template<typename Component>
-
namespace components
hpx::find_root_locality, hpx::find_all_localities, hpx::find_remote_localities#
Defined in header hpx/runtime.hpp.
See Public API for a list of names and headers that are part of the public HPX API.
-
namespace hpx
Functions
-
hpx::id_type find_root_locality(error_code &ec = throws)#
Return the global id representing the root locality.
The function find_root_locality() can be used to retrieve the global id usable to refer to the root locality. The root locality is the locality where the main AGAS service is hosted.
Note
Generally, the id of a locality can be used for instance to create new instances of components and to invoke plain actions (global functions).
Note
As long as ec is not pre-initialized to hpx::throws this function doesn’t throw but returns the result code using the parameter ec. Otherwise it throws an instance of hpx::exception.
Note
This function will return meaningful results only if called from an HPX-thread. It will return hpx::invalid_id otherwise.
- Parameters
ec – [in,out] this represents the error status on exit, if this is pre-initialized to hpx::throws the function will throw on error instead.
- Returns
The global id representing the root locality for this application.
-
std::vector<hpx::id_type> find_all_localities(error_code &ec = throws)#
Return the list of global ids representing all localities available to this application.
The function find_all_localities() can be used to retrieve the global ids of all localities currently available to this application.
See also
Note
Generally, the id of a locality can be used for instance to create new instances of components and to invoke plain actions (global functions).
Note
As long as ec is not pre-initialized to hpx::throws this function doesn’t throw but returns the result code using the parameter ec. Otherwise it throws an instance of hpx::exception.
Note
This function will return meaningful results only if called from an HPX-thread. It will return an empty vector otherwise.
- Parameters
ec – [in,out] this represents the error status on exit, if this is pre-initialized to hpx::throws the function will throw on error instead.
- Returns
The global ids representing the localities currently available to this application.
-
std::vector<hpx::id_type> find_remote_localities(error_code &ec = throws)#
Return the list of locality ids of remote localities supporting the given component type. By default this function will return the list of all remote localities (all but the current locality).
The function find_remote_localities() can be used to retrieve the global ids of all remote localities currently available to this application (i.e. all localities except the current one).
See also
Note
Generally, the id of a locality can be used for instance to create new instances of components and to invoke plain actions (global functions).
Note
As long as ec is not pre-initialized to hpx::throws this function doesn’t throw but returns the result code using the parameter ec. Otherwise it throws an instance of hpx::exception.
Note
This function will return meaningful results only if called from an HPX-thread. It will return an empty vector otherwise.
- Parameters
ec – [in,out] this represents the error status on exit, if this is pre-initialized to hpx::throws the function will throw on error instead.
- Returns
The global ids representing the remote localities currently available to this application.
-
hpx::id_type find_root_locality(error_code &ec = throws)#
hpx/runtime_distributed/find_here.hpp#
Defined in header hpx/runtime_distributed/find_here.hpp.
See Public API for a list of names and headers that are part of the public HPX API.
-
namespace hpx
Functions
-
hpx::id_type find_here(error_code &ec = throws)#
Return the global id representing this locality.
The function find_here() can be used to retrieve the global id usable to refer to the current locality.
Note
Generally, the id of a locality can be used for instance to create new instances of components and to invoke plain actions (global functions).
Note
As long as ec is not pre-initialized to hpx::throws this function doesn’t throw but returns the result code using the parameter ec. Otherwise it throws an instance of hpx::exception.
Note
This function will return meaningful results only if called from an HPX-thread. It will return hpx::invalid_id otherwise.
- Parameters
ec – [in,out] this represents the error status on exit, if this is pre-initialized to hpx::throws the function will throw on error instead.
- Returns
The global id representing the locality this function has been called on.
-
hpx::id_type find_here(error_code &ec = throws)#
hpx::find_locality#
Defined in header hpx/runtime.hpp.
See Public API for a list of names and headers that are part of the public HPX API.
-
namespace hpx
Functions
-
std::vector<hpx::id_type> find_all_localities(components::component_type type, error_code &ec = throws)#
Return the list of global ids representing all localities available to this application which support the given component type.
The function find_all_localities() can be used to retrieve the global ids of all localities currently available to this application which support the creation of instances of the given component type.
See also
Note
Generally, the id of a locality can be used for instance to create new instances of components and to invoke plain actions (global functions).
Note
As long as ec is not pre-initialized to hpx::throws this function doesn’t throw but returns the result code using the parameter ec. Otherwise it throws an instance of hpx::exception.
Note
This function will return meaningful results only if called from an HPX-thread. It will return an empty vector otherwise.
- Parameters
type – [in] The type of the components for which the function should return the available localities.
ec – [in,out] this represents the error status on exit, if this is pre-initialized to hpx::throws the function will throw on error instead.
- Returns
The global ids representing the localities currently available to this application which support the creation of instances of the given component type. If no localities supporting the given component type are currently available, this function will return an empty vector.
-
std::vector<hpx::id_type> find_remote_localities(components::component_type type, error_code &ec = throws)#
Return the list of locality ids of remote localities supporting the given component type. By default this function will return the list of all remote localities (all but the current locality).
The function find_remote_localities() can be used to retrieve the global ids of all remote localities currently available to this application (i.e. all localities except the current one) which support the creation of instances of the given component type.
See also
Note
Generally, the id of a locality can be used for instance to create new instances of components and to invoke plain actions (global functions).
Note
As long as ec is not pre-initialized to hpx::throws this function doesn’t throw but returns the result code using the parameter ec. Otherwise it throws an instance of hpx::exception.
Note
This function will return meaningful results only if called from an HPX-thread. It will return an empty vector otherwise.
- Parameters
type – [in] The type of the components for which the function should return the available remote localities.
ec – [in,out] this represents the error status on exit, if this is pre-initialized to hpx::throws the function will throw on error instead.
- Returns
The global ids representing the remote localities currently available to this application.
-
hpx::id_type find_locality(components::component_type type, error_code &ec = throws)#
Return the global id representing an arbitrary locality which supports the given component type.
The function find_locality() can be used to retrieve the global id of an arbitrary locality currently available to this application which supports the creation of instances of the given component type.
See also
Note
Generally, the id of a locality can be used for instance to create new instances of components and to invoke plain actions (global functions).
Note
As long as ec is not pre-initialized to hpx::throws this function doesn’t throw but returns the result code using the parameter ec. Otherwise it throws an instance of hpx::exception.
Note
This function will return meaningful results only if called from an HPX-thread. It will return hpx::invalid_id otherwise.
- Parameters
type – [in] The type of the components for which the function should return any available locality.
ec – [in,out] this represents the error status on exit, if this is pre-initialized to hpx::throws the function will throw on error instead.
- Returns
The global id representing an arbitrary locality currently available to this application which supports the creation of instances of the given component type. If no locality supporting the given component type is currently available, this function will return hpx::invalid_id.
-
std::vector<hpx::id_type> find_all_localities(components::component_type type, error_code &ec = throws)#
hpx/runtime_distributed/get_locality_name.hpp#
Defined in header hpx/runtime_distributed/get_locality_name.hpp.
See Public API for a list of names and headers that are part of the public HPX API.
-
namespace hpx
Functions
-
future<std::string> get_locality_name(hpx::id_type const &id)#
Return the name of the referenced locality.
This function returns a future referring to the name for the locality of the given id.
See also
std::string get_locality_name()
- Parameters
id – [in] The global id of the locality for which the name should be retrieved
- Returns
This function returns the name for the locality of the given id. The name is retrieved from the underlying networking layer and may be different for different parcel ports.
-
future<std::string> get_locality_name(hpx::id_type const &id)#
hpx/runtime_distributed/get_num_localities.hpp#
Defined in header hpx/runtime_distributed/get_num_localities.hpp.
See Public API for a list of names and headers that are part of the public HPX API.
-
namespace hpx
Functions
-
hpx::future<std::uint32_t> get_num_localities(components::component_type t)#
Asynchronously return the number of localities which are currently registered for the running application.
The function get_num_localities asynchronously returns the number of localities currently connected to the console which support the creation of the given component type. The returned future represents the actual result.
See also
hpx::find_all_localities, hpx::get_num_localities
Note
This function will return meaningful results only if called from an HPX-thread. It will return 0 otherwise.
- Parameters
t – The component type for which the number of connected localities should be retrieved.
-
std::uint32_t get_num_localities(launch::sync_policy, components::component_type t, error_code &ec = throws)#
Synchronously return the number of localities which are currently registered for the running application.
The function get_num_localities returns the number of localities currently connected to the console which support the creation of the given component type. The returned future represents the actual result.
See also
hpx::find_all_localities, hpx::get_num_localities
Note
This function will return meaningful results only if called from an HPX-thread. It will return 0 otherwise.
- Parameters
t – The component type for which the number of connected localities should be retrieved.
ec – [in,out] this represents the error status on exit, if this is pre-initialized to hpx::throws the function will throw on error instead.
-
hpx::future<std::uint32_t> get_num_localities(components::component_type t)#
hpx/runtime_distributed/migrate_component.hpp#
Defined in header hpx/runtime_distributed/migrate_component.hpp.
See Public API for a list of names and headers that are part of the public HPX API.
-
namespace hpx
-
namespace components
Functions
-
template<typename Component, typename DistPolicy>
future<hpx::id_type> migrate(hpx::id_type const &to_migrate, [[maybe_unused]] DistPolicy const &policy)# Migrate the given component to the specified target locality
The function migrate<Component> will migrate the component referenced by to_migrate to the locality specified with target_locality. It returns a future referring to the migrated component instance.
- Parameters
to_migrate – [in] The client side representation of the component to migrate.
policy – [in] A distribution policy which will be used to determine the locality to migrate this object to.
- Template Parameters
Component – Specifies the component type of the component to migrate.
DistPolicy – Specifies the distribution policy to use to determine the destination locality.
- Returns
A future representing the global id of the migrated component instance. This should be the same as migrate_to.
-
template<typename Derived, typename Stub, typename Data, typename DistPolicy>
Derived migrate(client_base<Derived, Stub, Data> const &to_migrate, DistPolicy const &policy)# Migrate the given component to the specified target locality
The function migrate<Component> will migrate the component referenced by to_migrate to the locality specified with target_locality. It returns a future referring to the migrated component instance.
- Parameters
to_migrate – [in] The client side representation of the component to migrate.
policy – [in] A distribution policy which will be used to determine the locality to migrate this object to.
- Template Parameters
Derived – Specifies the component type of the component to migrate.
DistPolicy – Specifies the distribution policy to use to determine the destination locality.
- Returns
A future representing the global id of the migrated component instance. This should be the same as migrate_to.
-
template<typename Component>
future<hpx::id_type> migrate(hpx::id_type const &to_migrate, hpx::id_type const &target_locality)# Migrate the component with the given id to the specified target locality
The function migrate<Component> will migrate the component referenced by to_migrate to the locality specified with target_locality. It returns a future referring to the migrated component instance.
- Parameters
to_migrate – [in] The global id of the component to migrate.
target_locality – [in] The locality where the component should be migrated to.
- Template Parameters
Component – Specifies the component type of the component to migrate.
- Returns
A future representing the global id of the migrated component instance. This should be the same as migrate_to.
-
template<typename Derived, typename Stub, typename Data>
Derived migrate(client_base<Derived, Stub, Data> const &to_migrate, hpx::id_type const &target_locality)# Migrate the given component to the specified target locality
The function migrate<Component> will migrate the component referenced by to_migrate to the locality specified with target_locality. It returns a future referring to the migrated component instance.
- Parameters
to_migrate – [in] The client side representation of the component to migrate.
target_locality – [in] The id of the locality to migrate this object to.
- Template Parameters
Derived – Specifies the component type of the component to migrate.
- Returns
A client side representation of representing of the migrated component instance. This should be the same as migrate_to.
-
template<typename Component, typename DistPolicy>
-
namespace components
hpx/runtime_distributed/runtime_fwd.hpp#
Defined in header hpx/runtime_distributed/runtime_fwd.hpp.
See Public API for a list of names and headers that are part of the public HPX API.
-
namespace hpx
Functions
-
runtime_distributed &get_runtime_distributed()#
-
runtime_distributed *&get_runtime_distributed_ptr()#
-
naming::gid_type const &get_locality()#
The function get_locality returns a reference to the locality prefix.
-
void start_active_counters(error_code &ec = throws)#
Start all active performance counters, optionally naming the section of code.
Note
As long as ec is not pre-initialized to hpx::throws this function doesn’t throw but returns the result code using the parameter ec. Otherwise it throws an instance of hpx::exception.
Note
The active counters are those which have been specified on the command line while executing the application (see command line option –hpx:print-counter)
- Parameters
ec – [in,out] this represents the error status on exit, if this is pre-initialized to hpx::throws the function will throw on error instead.
-
void reset_active_counters(error_code &ec = throws)#
Resets all active performance counters.
Note
As long as ec is not pre-initialized to hpx::throws this function doesn’t throw but returns the result code using the parameter ec. Otherwise it throws an instance of hpx::exception.
Note
The active counters are those which have been specified on the command line while executing the application (see command line option –hpx:print-counter)
- Parameters
ec – [in,out] this represents the error status on exit, if this is pre-initialized to hpx::throws the function will throw on error instead.
-
void reinit_active_counters(bool reset = true, error_code &ec = throws)#
Re-initialize all active performance counters.
Note
As long as ec is not pre-initialized to hpx::throws this function doesn’t throw but returns the result code using the parameter ec. Otherwise it throws an instance of hpx::exception.
Note
The active counters are those which have been specified on the command line while executing the application (see command line option –hpx:print-counter)
- Parameters
reset – [in] Reset the current values before re-initializing counters (default: true)
ec – [in,out] this represents the error status on exit, if this is pre-initialized to hpx::throws the function will throw on error instead.
-
void stop_active_counters(error_code &ec = throws)#
Stop all active performance counters.
Note
As long as ec is not pre-initialized to hpx::throws this function doesn’t throw but returns the result code using the parameter ec. Otherwise it throws an instance of hpx::exception.
Note
The active counters are those which have been specified on the command line while executing the application (see command line option –hpx:print-counter)
- Parameters
ec – [in,out] this represents the error status on exit, if this is pre-initialized to hpx::throws the function will throw on error instead.
-
void evaluate_active_counters(bool reset = false, char const *description = nullptr, error_code &ec = throws)#
Evaluate and output all active performance counters, optionally naming the point in code marked by this function.
Note
As long as ec is not pre-initialized to hpx::throws this function doesn’t throw but returns the result code using the parameter ec. Otherwise it throws an instance of hpx::exception.
Note
The output generated by this function is redirected to the destination specified by the corresponding command line options (see –hpx:print-counter-destination).
Note
The active counters are those which have been specified on the command line while executing the application (see command line option –hpx:print-counter)
- Parameters
reset – [in] this is an optional flag allowing to reset the counter value after it has been evaluated.
description – [in] this is an optional value naming the point in the code marked by the call to this function.
ec – [in,out] this represents the error status on exit, if this is pre-initialized to hpx::throws the function will throw on error instead.
-
serialization::binary_filter *create_binary_filter(char const *binary_filter_type, bool compress, serialization::binary_filter *next_filter = nullptr, error_code &ec = throws)#
Create an instance of a binary filter plugin.
Note
As long as ec is not pre-initialized to hpx::throws this function doesn’t throw but returns the result code using the parameter ec. Otherwise it throws an instance of hpx::exception.
- Parameters
binary_filter_type – [in] The type of the binary filter to create
compress – [in] The created filter should support compression
next_filter – [in] Use this as the filter to dispatch the invocation into.
ec – [in,out] this represents the error status on exit, if this is pre-initialized to hpx::throws the function will throw on error instead.
-
runtime_distributed &get_runtime_distributed()#
hpx/runtime_distributed/runtime_support.hpp#
Defined in header hpx/runtime_distributed/runtime_support.hpp.
See Public API for a list of names and headers that are part of the public HPX API.
-
namespace hpx
-
namespace agas
Functions
-
struct runtime_components_init_interface_functions &runtime_components_init()#
-
struct runtime_components_init_interface_functions &runtime_components_init()#
-
namespace components
Functions
-
struct counter_interface_functions &counter_init()#
-
class runtime_support : public hpx::components::stubs::runtime_support#
- #include <runtime_support.hpp>
The runtime_support class is the client side representation of a server::runtime_support component
Public Functions
-
inline runtime_support(hpx::id_type const &gid = hpx::invalid_id)#
Create a client side representation for the existing server::runtime_support instance with the given global id gid.
-
template<typename Component, typename ...Ts>
inline hpx::id_type create_component(Ts&&... vs)# Create a new component type using the runtime_support.
-
template<typename Component, typename ...Ts>
inline hpx::future<hpx::id_type> create_component_async(Ts&&... vs)# Asynchronously create a new component using the runtime_support.
-
template<bool WithCount, typename Component, typename ...Ts>
inline std::vector<hpx::id_type> bulk_create_component(std::size_t count, Ts&&... vs)# Asynchronously create N new default constructed components using the runtime_support
-
template<bool WithCount, typename Component, typename ...Ts>
inline hpx::future<std::vector<hpx::id_type>> bulk_create_components_async(std::size_t count, Ts&&... vs)# Asynchronously create a new component using the runtime_support.
-
inline int load_components() const#
-
inline void call_startup_functions(bool pre_startup) const#
-
inline hpx::future<void> shutdown_async(double timeout = -1) const#
Shutdown the given runtime system.
-
inline void shutdown(double timeout = -1) const#
-
inline void shutdown_all(double timeout = -1) const#
Shutdown the runtime systems of all localities.
-
inline void terminate() const#
-
inline void terminate_all() const#
Terminate the runtime systems of all localities.
Private Types
-
typedef stubs::runtime_support base_type#
-
inline runtime_support(hpx::id_type const &gid = hpx::invalid_id)#
-
struct counter_interface_functions &counter_init()#
-
namespace agas
hpx/runtime_distributed/server/copy_component.hpp#
Defined in header hpx/runtime_distributed/server/copy_component.hpp.
See Public API for a list of names and headers that are part of the public HPX API.
-
namespace hpx
-
namespace components
-
namespace server
Functions
-
template<typename Component>
struct copy_component_action : public hpx::actions::action<future<hpx::id_type> (*)(hpx::id_type const&, hpx::id_type const&), ©_component<Component>, copy_component_action<Component>>#
-
template<typename Component>
struct copy_component_action_here : public hpx::actions::action<hpx::id_type (*)(hpx::id_type const&), ©_component_here<Component>, copy_component_action_here<Component>>#
-
template<typename Component>
-
namespace server
-
namespace components
hpx/runtime_distributed/server/runtime_support.hpp#
Defined in header hpx/runtime_distributed/server/runtime_support.hpp.
See Public API for a list of names and headers that are part of the public HPX API.
-
namespace hpx
-
namespace components
-
namespace server
-
class runtime_support#
Public Types
-
using type_holder = runtime_support#
Public Functions
-
inline ~runtime_support()#
-
void delete_function_lists()#
-
void tidy()#
-
template<typename Component, typename T, typename ...Ts>
naming::gid_type create_component(T v, Ts... vs)#
-
template<typename Component, typename ...Ts>
std::vector<naming::gid_type> bulk_create_component(std::size_t count, Ts... vs)#
-
template<typename Component, typename ...Ts>
std::vector<naming::gid_type> bulk_create_component_with_count(std::size_t count, Ts... vs)#
-
void shutdown(double timeout, hpx::id_type const &respond_to)#
Gracefully shutdown this runtime system instance.
-
void shutdown_all(double timeout)#
Gracefully shutdown runtime system instances on all localities.
-
void terminate_all()#
Shutdown runtime system instances on all localities.
-
inline void terminate_all_act()#
-
int load_components()#
Load all components on this locality.
-
void call_startup_functions(bool pre_startup)#
-
void call_shutdown_functions(bool pre_shutdown)#
-
void garbage_collect()#
Force a garbage collection operation in the AGAS layer.
-
naming::gid_type create_performance_counter(performance_counters::counter_info const &info)#
Create the given performance counter instance.
-
void remove_from_connection_cache(naming::gid_type const &gid, parcelset::endpoints_type const &eps)#
Remove the given locality from our connection cache.
- HPX_DEFINE_COMPONENT_ACTION (runtime_support, terminate_act, terminate_action) HPX_DEFINE_COMPONENT_ACTION(runtime_support
termination detection
- terminate_all_action HPX_DEFINE_COMPONENT_ACTION (runtime_support, remove_from_connection_cache) void run()
Start the runtime_support component.
-
void wait()#
Wait for the runtime_support component to notify the calling thread.
This function will be called from the main thread, causing it to block while the HPX functionality is executed. The main thread will block until the shutdown_action is executed, which in turn notifies all waiting threads.
-
void stop(double timeout, hpx::id_type const &respond_to, bool remove_from_remote_caches)#
Notify all waiting (blocking) threads allowing the system to be properly stopped.
Note
This function can be called from any thread.
-
void stopped()#
called locally only
-
void notify_waiting_main()#
-
inline bool was_stopped() const#
-
void add_pre_startup_function(startup_function_type f)#
-
void add_startup_function(startup_function_type f)#
-
void add_pre_shutdown_function(shutdown_function_type f)#
-
void add_shutdown_function(shutdown_function_type f)#
-
void remove_here_from_connection_cache()#
-
void remove_here_from_console_connection_cache()#
Public Members
- terminate_all_act
Public Static Functions
-
static inline component_type get_component_type()#
-
static inline void set_component_type(component_type t)#
-
static inline constexpr void finalize()#
finalize() will be called just before the instance gets destructed
Protected Functions
-
int load_components(util::section &ini, naming::gid_type const &prefix, agas::addressing_service &agas_client, hpx::program_options::options_description &options, std::set<std::string> &startup_handled)#
-
bool load_component(hpx::util::plugin::dll &d, util::section &ini, std::string const &instance, std::string const &component, filesystem::path const &lib, naming::gid_type const &prefix, agas::addressing_service &agas_client, bool isdefault, bool isenabled, hpx::program_options::options_description &options, std::set<std::string> &startup_handled)#
-
bool load_component_dynamic(util::section &ini, std::string const &instance, std::string const &component, filesystem::path lib, naming::gid_type const &prefix, agas::addressing_service &agas_client, bool isdefault, bool isenabled, hpx::program_options::options_description &options, std::set<std::string> &startup_handled)#
-
bool load_startup_shutdown_functions(hpx::util::plugin::dll &d, error_code &ec)#
-
bool load_commandline_options(hpx::util::plugin::dll &d, hpx::program_options::options_description &options, error_code &ec)#
-
bool load_component_static(util::section &ini, std::string const &instance, std::string const &component, filesystem::path const &lib, naming::gid_type const &prefix, agas::addressing_service &agas_client, bool isdefault, bool isenabled, hpx::program_options::options_description &options, std::set<std::string> &startup_handled)#
-
bool load_startup_shutdown_functions_static(std::string const &mod, error_code &ec)#
-
bool load_commandline_options_static(std::string const &mod, hpx::program_options::options_description &options, error_code &ec)#
-
bool load_plugins(util::section &ini, hpx::program_options::options_description &options, std::set<std::string> &startup_handled)#
-
bool load_plugin(hpx::util::plugin::dll &d, util::section &ini, std::string const &instance, std::string const &component, filesystem::path const &lib, bool isenabled, hpx::program_options::options_description &options, std::set<std::string> &startup_handled)#
Private Types
-
using plugin_factory_type = plugin_factory#
-
using plugin_map_type = std::map<std::string, plugin_factory_type>#
Private Members
-
bool stop_called_#
-
bool stop_done_#
-
bool terminated_#
-
plugin_map_mutex_type p_mtx_#
-
plugin_map_type plugins_#
-
modules_map_type &modules_#
-
static_modules_type static_modules_#
-
std::list<startup_function_type> pre_startup_functions_#
-
std::list<startup_function_type> startup_functions_#
-
std::list<shutdown_function_type> pre_shutdown_functions_#
-
std::list<shutdown_function_type> shutdown_functions_#
-
struct plugin_factory#
Public Functions
-
using type_holder = runtime_support#
-
class runtime_support#
-
namespace server
-
namespace components
hpx/runtime_distributed/stubs/runtime_support.hpp#
Defined in header hpx/runtime_distributed/stubs/runtime_support.hpp.
See Public API for a list of names and headers that are part of the public HPX API.
-
namespace hpx
-
namespace components
-
namespace stubs
-
struct runtime_support#
Subclassed by hpx::components::runtime_support
Public Static Functions
-
template<typename Component, typename ...Ts>
static inline hpx::future<hpx::id_type> create_component_async(hpx::id_type const &gid, Ts&&... vs)# Create a new component type using the runtime_support with the given targetgid. This is a non-blocking call. The caller needs to call future::get on the result of this function to obtain the global id of the newly created object.
-
template<typename Component, typename ...Ts>
static inline hpx::id_type create_component(hpx::id_type const &gid, Ts&&... vs)# Create a new component type using the runtime_support with the given targetgid. Block for the creation to finish.
-
template<bool WithCount, typename Component, typename ...Ts>
static inline hpx::future<std::vector<hpx::id_type>> bulk_create_component_colocated_async(hpx::id_type const &gid, std::size_t count, Ts&&... vs)# Create multiple new components type using the runtime_support colocated with the given targetgid. This is a non-blocking call.
-
template<bool WithCount, typename Component, typename ...Ts>
static inline std::vector<hpx::id_type> bulk_create_component_colocated(hpx::id_type const &gid, std::size_t count, Ts&&... vs)# Create multiple new components type using the runtime_support colocated with the given targetgid. Block for the creation to finish.
-
template<bool WithCount, typename Component, typename ...Ts>
static inline hpx::future<std::vector<hpx::id_type>> bulk_create_component_async(hpx::id_type const &gid, std::size_t count, Ts&&... vs)# Create multiple new components type using the runtime_support on the given locality. This is a non-blocking call.
-
template<bool WithCount, typename Component, typename ...Ts>
static inline std::vector<hpx::id_type> bulk_create_component(hpx::id_type const &gid, std::size_t count, Ts&&... vs)# Create multiple new components type using the runtime_support on the given locality. Block for the creation to finish.
-
template<typename Component, typename ...Ts>
static inline hpx::future<hpx::id_type> create_component_colocated_async(hpx::id_type const &gid, Ts&&... vs)# Create a new component type using the runtime_support with the given targetgid. This is a non-blocking call. The caller needs to call future::get on the result of this function to obtain the global id of the newly created object.
-
template<typename Component, typename ...Ts>
static inline hpx::id_type create_component_colocated(hpx::id_type const &gid, Ts&&... vs)# Create a new component type using the runtime_support with the given targetgid. Block for the creation to finish.
-
static hpx::future<void> shutdown_async(hpx::id_type const &targetgid, double timeout = -1)#
Shutdown the given runtime system.
-
static void shutdown_all(hpx::id_type const &targetgid, double timeout = -1)#
Shutdown the runtime systems of all localities.
-
static void shutdown_all(double timeout = -1)#
-
static hpx::future<void> terminate_async(hpx::id_type const &targetgid)#
Retrieve configuration information.
Terminate the given runtime system
-
static void terminate_all(hpx::id_type const &targetgid)#
Terminate the runtime systems of all localities.
-
static void terminate_all()#
-
static hpx::future<hpx::id_type> create_performance_counter_async(hpx::id_type targetgid, performance_counters::counter_info const &info)#
-
static hpx::id_type create_performance_counter(hpx::id_type targetgid, performance_counters::counter_info const &info, error_code &ec = throws)#
-
template<typename Component, typename ...Ts>
-
struct runtime_support#
-
namespace stubs
-
namespace components
segmented_algorithms#
See Public API for a list of names and headers that are part of the public HPX API.
hpx/parallel/segmented_algorithms/adjacent_difference.hpp#
Defined in header hpx/parallel/segmented_algorithms/adjacent_difference.hpp.
See Public API for a list of names and headers that are part of the public HPX API.
-
namespace hpx
-
namespace parallel
-
namespace segmented#
Functions
- template<typename ExPolicy, typename FwdIter1, typename FwdIter2, typename Op> requires (hpx::is_execution_policy_v< ExPolicy > &&hpx::traits::is_iterator_v< FwdIter1 > &&hpx::traits::is_segmented_iterator_v< FwdIter1 > &&hpx::traits::is_iterator_v< FwdIter2 > &&hpx::traits::is_segmented_iterator_v< FwdIter2 >) hpx
- template<typename InIter1, typename InIter2, typename Op> requires (hpx::traits::is_iterator_v< InIter1 > &&hpx::traits::is_segmented_iterator_v< InIter1 > &&hpx::traits::is_iterator_v< InIter2 > &&hpx::traits::is_segmented_iterator_v< InIter2 >) InIter2 tag_invoke(hpx
-
namespace parallel
hpx/parallel/segmented_algorithms/adjacent_find.hpp#
Defined in header hpx/parallel/segmented_algorithms/adjacent_find.hpp.
See Public API for a list of names and headers that are part of the public HPX API.
-
namespace hpx
-
namespace parallel
-
namespace segmented
Functions
- template<typename InIter, typename Pred> requires (hpx::traits::is_iterator_v< InIter > &&hpx::traits::is_segmented_iterator_v< InIter >) InIter tag_invoke(hpx
- template<typename ExPolicy, typename SegIter, typename Pred> requires (hpx::is_execution_policy_v< ExPolicy > &&hpx::traits::is_iterator_v< SegIter > &&hpx::traits::is_segmented_iterator_v< SegIter >) hpx
-
namespace parallel
hpx/parallel/segmented_algorithms/all_any_none.hpp#
Defined in header hpx/parallel/segmented_algorithms/all_any_none.hpp.
See Public API for a list of names and headers that are part of the public HPX API.
-
namespace hpx
-
namespace parallel
-
namespace segmented
-
namespace parallel
hpx/parallel/segmented_algorithms/count.hpp#
Defined in header hpx/parallel/segmented_algorithms/count.hpp.
See Public API for a list of names and headers that are part of the public HPX API.
-
namespace hpx
-
namespace parallel
-
namespace segmented
-
namespace parallel
hpx/parallel/segmented_algorithms/exclusive_scan.hpp#
Defined in header hpx/parallel/segmented_algorithms/exclusive_scan.hpp.
See Public API for a list of names and headers that are part of the public HPX API.
-
namespace hpx
-
namespace parallel
-
namespace segmented
Functions
- template<typename InIter, typename OutIter, typename T, typename Op = std::plus<T>> requires (hpx::traits::is_iterator_v< InIter > &&hpx::traits::is_segmented_iterator_v< InIter > &&hpx::traits::is_iterator_v< OutIter > &&hpx::traits::is_segmented_iterator_v< OutIter > &&hpx::is_invocable_v< Op, typename std::iterator_traits< InIter >::value_type, typename std::iterator_traits< InIter >::value_type >) OutIter tag_invoke(hpx
- template<typename ExPolicy, typename FwdIter1, typename FwdIter2, typename T, typename Op = std::plus<T>> requires (hpx::is_execution_policy_v< ExPolicy > &&hpx::traits::is_iterator_v< FwdIter1 > &&hpx::traits::is_segmented_iterator_v< FwdIter1 > &&hpx::traits::is_iterator_v< FwdIter2 > &&hpx::traits::is_segmented_iterator_v< FwdIter2 > &&hpx::is_invocable_v< Op, typename std::iterator_traits< FwdIter1 >::value_type, typename std::iterator_traits< FwdIter1 >::value_type >) typename parallel
-
namespace parallel
hpx/parallel/segmented_algorithms/fill.hpp#
Defined in header hpx/parallel/segmented_algorithms/fill.hpp.
See Public API for a list of names and headers that are part of the public HPX API.
hpx/parallel/segmented_algorithms/for_each.hpp#
Defined in header hpx/parallel/segmented_algorithms/for_each.hpp.
See Public API for a list of names and headers that are part of the public HPX API.
-
namespace hpx
-
namespace parallel
-
namespace segmented
Functions
- template<typename InIter, typename Size, typename F> requires (hpx::traits::is_iterator_v< InIter > &&hpx::traits::is_segmented_iterator_v< InIter >) InIter tag_invoke(hpx
- template<typename ExPolicy, typename SegIter, typename Size, typename F> requires (hpx::is_execution_policy_v< ExPolicy > &&hpx::traits::is_iterator_v< SegIter > &&hpx::traits::is_segmented_iterator_v< SegIter >) hpx
-
namespace parallel
hpx/parallel/segmented_algorithms/generate.hpp#
Defined in header hpx/parallel/segmented_algorithms/generate.hpp.
See Public API for a list of names and headers that are part of the public HPX API.
-
namespace hpx
-
namespace parallel
-
namespace segmented
Functions
- template<typename SegIter, typename F> requires (hpx::traits::is_iterator_v< SegIter > &&hpx::traits::is_segmented_iterator_v< SegIter >) SegIter tag_invoke(hpx
-
namespace parallel
hpx/parallel/segmented_algorithms/inclusive_scan.hpp#
Defined in header hpx/parallel/segmented_algorithms/inclusive_scan.hpp.
See Public API for a list of names and headers that are part of the public HPX API.
-
namespace hpx
-
namespace parallel
-
namespace segmented
Functions
- template<typename InIter, typename OutIter, typename Op = std::plus<>> requires (hpx::traits::is_iterator_v< InIter > &&hpx::traits::is_segmented_iterator_v< InIter > &&hpx::traits::is_iterator_v< OutIter > &&hpx::traits::is_segmented_iterator_v< OutIter >) OutIter tag_invoke(hpx
- template<typename InIter, typename OutIter, typename Op, typename T> requires (hpx::traits::is_iterator_v< InIter > &&hpx::traits::is_segmented_iterator_v< InIter > &&hpx::traits::is_iterator_v< OutIter > &&hpx::traits::is_segmented_iterator_v< OutIter >) OutIter tag_invoke(hpx
- template<typename ExPolicy, typename FwdIter1, typename FwdIter2, typename Op, typename T> requires (hpx::is_execution_policy_v< ExPolicy > &&hpx::traits::is_iterator_v< FwdIter1 > &&hpx::traits::is_segmented_iterator_v< FwdIter1 > &&hpx::traits::is_iterator_v< FwdIter2 > &&hpx::traits::is_segmented_iterator_v< FwdIter2 >) typename parallel
-
namespace parallel
hpx/parallel/segmented_algorithms/minmax.hpp#
Defined in header hpx/parallel/segmented_algorithms/minmax.hpp.
See Public API for a list of names and headers that are part of the public HPX API.
-
namespace hpx
-
namespace parallel
-
namespace segmented
-
namespace parallel
hpx/parallel/segmented_algorithms/reduce.hpp#
Defined in header hpx/parallel/segmented_algorithms/reduce.hpp.
See Public API for a list of names and headers that are part of the public HPX API.
-
namespace hpx
-
namespace parallel
-
namespace segmented
Functions
- template<typename InIterB, typename InIterE, typename T, typename F> requires (hpx::traits::is_iterator_v< InIterB > &&hpx::traits::is_segmented_iterator_v< InIterB > &&hpx::traits::is_iterator_v< InIterE > &&hpx::traits::is_segmented_iterator_v< InIterE >) T tag_invoke(hpx
- template<typename ExPolicy, typename InIterB, typename InIterE, typename T, typename F> requires (hpx::is_execution_policy_v< ExPolicy > &&hpx::traits::is_iterator_v< InIterB > &&hpx::traits::is_segmented_iterator_v< InIterB > &&hpx::traits::is_iterator_v< InIterE > &&hpx::traits::is_segmented_iterator_v< InIterE >) typename parallel
-
namespace parallel
hpx/parallel/segmented_algorithms/replace.hpp#
Defined in header hpx/parallel/segmented_algorithms/replace.hpp.
See Public API for a list of names and headers that are part of the public HPX API.
hpx/parallel/segmented_algorithms/replace_copy.hpp#
Defined in header hpx/parallel/segmented_algorithms/replace_copy.hpp.
See Public API for a list of names and headers that are part of the public HPX API.
hpx/parallel/segmented_algorithms/transform.hpp#
Defined in header hpx/parallel/segmented_algorithms/transform.hpp.
See Public API for a list of names and headers that are part of the public HPX API.
-
namespace hpx
-
namespace parallel
-
namespace segmented
Functions
- template<typename SegIter, typename OutIter, typename F> requires (hpx::traits::is_iterator_v< SegIter > &&hpx::traits::is_segmented_iterator_v< SegIter > &&hpx::traits::is_iterator_v< OutIter > &&hpx::traits::is_segmented_iterator_v< OutIter >) hpx
- template<typename ExPolicy, typename SegIter, typename OutIter, typename F> requires (hpx::is_execution_policy_v< ExPolicy > &&hpx::traits::is_iterator_v< SegIter > &&hpx::traits::is_segmented_iterator_v< SegIter > &&hpx::traits::is_iterator_v< OutIter > &&hpx::traits::is_segmented_iterator_v< OutIter >) typename hpx
- template<typename InIter1, typename InIter2, typename OutIter, typename F> requires (hpx::traits::is_iterator_v< InIter1 > &&hpx::traits::is_segmented_iterator_v< InIter1 > &&hpx::traits::is_iterator_v< InIter2 > &&hpx::traits::is_segmented_iterator_v< InIter2 > &&hpx::traits::is_iterator_v< OutIter > &&hpx::traits::is_segmented_iterator_v< OutIter >) hpx
- template<typename ExPolicy, typename InIter1, typename InIter2, typename OutIter, typename F> requires (hpx::is_execution_policy_v< ExPolicy > &&hpx::traits::is_iterator_v< InIter1 > &&hpx::traits::is_segmented_iterator_v< InIter1 > &&hpx::traits::is_iterator_v< InIter2 > &&hpx::traits::is_segmented_iterator_v< InIter2 > &&hpx::traits::is_iterator_v< OutIter > &&hpx::traits::is_segmented_iterator_v< OutIter >) typename hpx
-
namespace parallel
hpx/parallel/segmented_algorithms/transform_exclusive_scan.hpp#
Defined in header hpx/parallel/segmented_algorithms/transform_exclusive_scan.hpp.
See Public API for a list of names and headers that are part of the public HPX API.
-
namespace hpx
-
namespace segmented
Functions
- template<typename InIter, typename OutIter, typename T, typename Op, typename Conv> requires (hpx::traits::is_iterator_v< InIter > &&hpx::traits::is_segmented_iterator_v< InIter > &&hpx::traits::is_iterator_v< OutIter > &&hpx::traits::is_segmented_iterator_v< OutIter >) OutIter tag_invoke(hpx
- template<typename ExPolicy, typename FwdIter1, typename FwdIter2, typename T, typename Op, typename Conv> requires (hpx::is_execution_policy_v< ExPolicy > &&hpx::traits::is_iterator_v< FwdIter1 > &&hpx::traits::is_segmented_iterator_v< FwdIter1 > &&hpx::traits::is_iterator_v< FwdIter2 > &&hpx::traits::is_segmented_iterator_v< FwdIter2 >) typename parallel
-
namespace segmented
hpx/parallel/segmented_algorithms/transform_inclusive_scan.hpp#
Defined in header hpx/parallel/segmented_algorithms/transform_inclusive_scan.hpp.
See Public API for a list of names and headers that are part of the public HPX API.
-
namespace hpx
-
namespace segmented
-
namespace segmented
hpx/parallel/segmented_algorithms/transform_reduce.hpp#
Defined in header hpx/parallel/segmented_algorithms/transform_reduce.hpp.
See Public API for a list of names and headers that are part of the public HPX API.
-
namespace hpx
-
namespace parallel
-
namespace segmented
Functions
- template<typename SegIter, typename T, typename Reduce, typename Convert> requires (hpx::traits::is_iterator_v< SegIter > &&hpx::traits::is_segmented_iterator_v< SegIter >) typename std
- template<typename ExPolicy, typename SegIter, typename T, typename Reduce, typename Convert> requires (hpx::is_execution_policy_v< ExPolicy > &&hpx::traits::is_iterator_v< SegIter > &&hpx::traits::is_segmented_iterator_v< SegIter >) typename parallel
- template<typename FwdIter1, typename FwdIter2, typename T, typename Reduce, typename Convert> requires (hpx::traits::is_iterator_v< FwdIter1 > &&hpx::traits::is_segmented_iterator_v< FwdIter1 > &&hpx::traits::is_iterator_v< FwdIter2 > &&hpx::traits::is_segmented_iterator_v< FwdIter2 >) T tag_invoke(hpx
-
namespace parallel
Contributing to HPX#
HPX development happens on Github. The following sections are a collection of useful information related to HPX development.
Contributing to HPX#
The main source of information to understand the process of how to contribute to HPX can be found in this document. This is a living document that is constantly updated with relevant information.
HPX governance model#
The HPX project is a meritocratic, consensus-based community project. Anyone with an interest in the project can join the community, contribute to the project design and participate in the decision making process. This document describes how that participation takes place and how to set about earning merit within the project community.
Release procedure for HPX#
Below is a step by step procedure for making an HPX release. We aim to produce two releases per year: one in March-April, and one in September-October.
This is a living document and may not be totally current or accurate. It is an attempt to capture current practices in making an HPX release. Please update it as appropriate.
One way to use this procedure is to print a copy and check off the lines as they are completed to avoid confusion.
Notify developers that a release is imminent.
For minor and major releases: create and check out a new branch at an appropriate point on
masterwith the namerelease-major.minor.X.majorandminorshould be the major and minor versions of the release. For patch releases: check out the correspondingrelease-major.minor.Xbranch.Write release notes in
docs/sphinx/releases/whats_new_$VERSION.rst. Keep adding merged PRs and closed issues to this until just before the release is made. Usetools/generate_pr_issue_list.shto generate the lists. Add the new release notes to the table of contents indocs/sphinx/releases.rst.Build the docs, and proof-read them. Update any documentation that may have changed, and correct any typos. Pay special attention to:
$HPX_SOURCE/README.rstUpdate grant information
docs/sphinx/releases/whats_new_$VERSION.rstdocs/sphinx/about_hpx/people.rstUpdate collaborators
Update grant information
This step does not apply to patch releases. For APEX:
Change the release branch to be the most current release tag available in the APEX
git_externalsection in the mainCMakeLists.txt. Please contact the maintainers of the respective packages to generate a new release to synchronize with the HPX release (APEX).
Make sure
HPX_VERSION_MAJOR/MINOR/SUBMINORinCMakeLists.txtcontain the correct values. Change them if needed.Change version references in CITATION.cff. There are two occurrences. Change year in the copyright file under
/libs/core/version/src/version.cpp.This step does not apply to patch releases. Remove features which have been deprecated for at least 2 releases. This involves removing build options which enable those features from the main CMakeLists.txt and also deleting all related code and tests from the main source tree.
The general deprecation policy involves a three-step process we have to go through in order to introduce a breaking change:
First release cycle: add a build option that allows for explicitly disabling any old (now deprecated) code.
Second release cycle: turn this build option OFF by default.
Third release cycle: completely remove the old code.
The main CMakeLists.txt contains a comment indicating for which version the breaking change was introduced first. In the case of deprecated features which don’t have a replacement yet, we keep them around in case (like Vc for example).
Update the minimum required versions if necessary (compilers, dependencies, etc.) in
prerequisites.rst. Update latest tested versions.Verify that the Jenkins setups for the release branch on Rostam are running and do not display any errors.
Repeat the following steps until satisfied with the release.
Change
HPX_VERSION_TAGinCMakeLists.txtto-rcN, whereNis the current iteration of this step. Start with-rc1.Create a pre-release on GitHub using the script
tools/roll_release.sh. This script automatically tag with the corresponding release number. The script requires that you have the STE||AR Group signing key.This step is not necessary for patch releases. Notify
hpx-users@stellar-group.orgof the availability of the release candidate. Ask users to test the candidate by checking out the release candidate tag.Allow at least a week for testing of the release candidate.
Use
git mergewhen possible, and fall back togit cherry-pickwhen needed. For patch releasesgit cherry-pickis most likely your only choice if there have been significant unrelated changes on master since the previous release.Go back to the first step when enough patches have been added.
If there are no more patches, continue to make the final release.
Update any occurrences of the latest stable release to refer to the version about to be released. For example,
quickstart.rstcontains instructions to check out the latest stable tag. Make sure that refers to the new version.Add a new entry to the RPM changelog (
cmake/packaging/rpm/Changelog.txt) with the new version number and a link to the corresponding changelog.Change
HPX_VERSION_TAGinCMakeLists.txtto an empty string.Add the release date to the caption of the current “What’s New” section in the docs, and change the value of
HPX_VERSION_DATEinCMakeLists.txt.Create a release on GitHub using the script
tools/roll_release.sh. This script automatically tag the with the corresponding release number. The script requires that you have the STE||AR Group signing key.Update the websites (hpx.stellar-group.org and stellar-group.org <https://stellar-group.org>). You can login on wordpress through this page <https://hpx.stellar-group.org/wp-login.php>. You can update the pages with the following:
Update links on the downloads page. Link to the release on GitHub.
Documentation links on the docs page (link to generated documentation on GitHub Pages). Follow the style of previous releases.
A new blog post announcing the release, which links to downloads and the “What’s New” section in the documentation (see previous releases for examples).
Merge release branch into master.
Post-release cleanup. Create a new pull request against master with the following changes:
Modify the release procedure if necessary.
Change
HPX_VERSION_TAGinCMakeLists.txtback to-trunk.Increment
HPX_VERSION_MINORinCMakeLists.txt.
Update Vcpkg (
https://github.com/Microsoft/vcpkg) to pull from latest release.Update version number in CONTROL
Update tag and SHA512 to that of the new release
Update spack (
https://github.com/spack/spack) with the latest HPX package.Update version number in
hpx/package.pyand SHA256 to that of the new release
Announce the release on hpx-users@stellar-group.org, stellar@cct.lsu.edu, allcct@cct.lsu.edu, faculty@csc.lsu.edu, faculty@ece.lsu.edu, the HPX Slack channel, the STEllAR-GROUP Discord channel, our list of external collaborators, isocpp.org, reddit.com, HPC Wire, Inside HPC, Heise Online, and a CCT press release.
Beer and pizza.
Testing HPX#
To ensure correctness of HPX, we ship a large variety of unit and regression tests. The tests are driven by the CTest tool and are executed automatically on each commit to the HPX Github repository. In addition, it is encouraged to run the test suite manually to ensure proper operation on your target system. If a test fails for your platform, we highly recommend submitting an issue on our HPX Issues tracker with detailed information about the target system.
Running tests manually#
Running the tests manually is as easy as typing make tests && make test.
This will build all tests and run them once the tests are built successfully.
After the tests have been built, you can invoke separate tests with the help of
the ctest command. You can list all available test targets using make help
| grep tests. Please see the CTest Documentation for further details.
Running performance tests#
We run performance tests on Piz Daint for each pull request using Jenkins. To
run those performance tests locally or on Piz Daint, a script is provided under
tools/perftests_ci/local_run.sh (to be run in the build directory specifying
the HPX source directory as the argument to the script, default is
$HOME/projects/hpx_perftests_ci.
Adding new performance tests#
To add a new performance test, you need to wrap the portion of code to benchmark
with hpx::util::perftests_report, passing the test name, the executor name
and the function to time (can be a lambda). This facility is used to output the
time results in a json format (format needed to compare the results and plot
them). To effectively print them at the end of your test, call
hpx::util::perftests_print_times. To see an example of use, see
future_overhead_report.cpp. Finally, you can add the test to the CI report
editing the hpx_targets variable for the executable name and the
hpx_test_options variable for the corresponding options to use for the run
in the performance test script .jenkins/cscs-perftests/launch_perftests.sh.
And then run the tools/perftests_ci/local_run.sh script to get a reference
json run (use the name of the test) to be added in the
tools/perftests_ci/perftest/references/daint_default directory.
Issue tracker#
If you stumble over a bug or missing feature in HPX, please submit an issue to our HPX Issues page. For more information on how to submit support requests or other means of getting in contact with the developers, please see the Support Website page.
Continuous testing#
In addition to manual testing, we run automated tests on various platforms. We also run tests on all pull requests using both CircleCI and a combination of CDash and pycicle. You can see the dashboards here: CircleCI HPX dashboard and CDash HPX dashboard .
Using docker for development#
Although it can often be useful to set up a local development environment with system-provided or self-built dependencies, Docker provides a convenient alternative to quickly get all the dependencies needed to start development of HPX. Our testing setup on CircleCI uses a docker image to run all tests.
To get started you need to install Docker using whatever means is most convenient on your system. Once you have Docker installed, you can pull or directly run the docker image. The image is based on Debian and Clang, and can be found on Docker Hub. To start a container using the HPX build environment, run:
$ docker run --interactive --tty stellargroup/build_env:latest bash
You are now in an environment where all the HPX build and runtime dependencies are present. You can install additional packages according to your own needs. Please see the Docker Documentation for more information on using Docker.
Warning
All changes made within the container are lost when the container is closed. If you want files to persist (e.g., the HPX source tree) after closing the container, you can bind directories from the host system into the container (see Docker Documentation (Bind mounts)).
Documentation#
This documentation is built using Sphinx, and an automatically generated API reference using Doxygen and Breathe.
We always welcome suggestions on how to improve our documentation, as well as pull requests with corrections and additions.
Prerequisites#
To build the HPX documentation, you need recent versions of the following packages:
python3sphinx 4.5.0(Python package)sphinx-book-theme(Python package)breathe 4.33.1(Python package)doxygensphinxcontrib-bibtexsphinx-copybutton
If the Python dependencies are not available through your system package
manager, you can install them using the Python package manager pip:
pip install --user "sphinx<5" sphinx-book-theme breathe sphinxcontrib-bibtex sphinx-copybutton
You may need to set the following CMake variables to make sure CMake can find the required dependencies.
Building documentation#
Enable building of the documentation by setting HPX_WITH_DOCUMENTATION=ON
during CMake configuration. To build the documentation, build the docs
target using your build tool. The default output format is HTML documentation.
You can choose alternative output formats (single-page HTML, PDF, and man) with
the HPX_WITH_DOCUMENTATION_OUTPUT_FORMATS CMake option.
Note
If you add new source files to the Sphinx documentation, you have to run CMake again to have the files included in the build.
Style guide#
The documentation is written using reStructuredText. These are the conventions used for formatting the documentation:
Use, at most, 80 characters per line.
Top-level headings use over- and underlines with
=.Sub-headings use only underlines with characters in decreasing level of importance:
=,-and..Use sentence case in headings.
Refer to common terminology using
:term:`Component`.Indent content of directives (
.. directive::) by three spaces.For C++ code samples at the end of paragraphs, use
::and indent the code sample by 4 spaces.For other languages (or if you don’t want a colon at the end of the paragraph), use
.. code-block:: languageand indent by three spaces as with other directives.
Use
.. list-table::to wrap tables with a lot of text in cells.
API documentation#
The source code is documented using Doxygen. If you add new API documentation
either to existing or new source files, make sure that you add the documented
source files to the doxygen_dependencies variable in
docs/CMakeLists.txt.
Adding new API documentation#
When you add new public APIs to HPX, follow these guidelines to ensure the documentation is correctly generated and easy to use.
Documenting headers#
At the top of a new header file, include the standard Doxygen documentation block. For example, if the new feature is called my_new_feature, you should:
List the name of the new file under
\file.Specify the page name with
\page(e.g.,hpx::my_new_feature).Reference the existing header that will include your new file under
\headerfile.
/// \file my_new_feature.hpp
/// \page hpx::my_new_feature
/// \headerfile hpx/existing_header_of_new_feature.hpp
Adding to the public API reference#
For the documentation to appear in the generated API reference, add your new API to
docs/sphinx/api/public_api.rst under the appropriate table (usually “Functions”) for
the relevant header (for example, hpx/existing_header_of_new_feature.hpp).
Including examples#
Do not inline examples in the API reference. If you want to provide an example of how to use the new API, there are two recommended options:
Documentation page option Edit an existing relevant manual page to explain the new functionality and include a code example. Use this option if you want to provide additional context about how the API works.
Standalone examples option Create a separate example under
docs/sphinx/examples/. Examples in this directory are typically more comprehensive and executable, making them suitable for richer or more complex scenarios.
Module structure#
This section explains the structure of an HPX module.
The tool create_library_skeleton.py
can be used to generate a basic skeleton. To create a library skeleton, run the
tool in the libs subdirectory with the module name as an argument:
$ ./create_library_skeleton <lib_name>
This creates a skeleton with the necessary files for an HPX module. It will not create any actual source files. The structure of this skeleton is as follows:
<lib_name>/README.rstCMakeLists.txtcmakedocs/index.rst
examples/CMakeLists.txt
include/hpx/<lib_name>
src/CMakeLists.txt
tests/CMakeLists.txtunit/CMakeLists.txt
regressions/CMakeLists.txt
performance/CMakeLists.txt
A README.rst should be always included which explains the basic purpose of
the library and a link to the generated documentation.
A main CMakeLists.txt is created in the root directory of the module. By
default it contains a call to add_hpx_module which takes care of most of the
boilerplate required for a module. You only need to fill in the source and
header files in most cases.
add_hpx_module requires a module name. Optional flags are:
Optional single-value arguments are:
INSTALL_BINARIES: Install the resulting library.
Optional multi-value arguments-are:
SOURCES: List of source files.HEADERS: List of header files.COMPAT_HEADERS: List of compatibility header files.DEPENDENCIES: Libraries that this module depends on, such as other modules.CMAKE_SUBDIRS: List of subdirectories to add to the module.
The include directory should contain only headers that other libraries need.
For each of those headers, an automatic header test to check for self
containment will be generated. Private headers should be placed under the
src directory. This allows for clear separation. The cmake subdirectory
may include additional CMake scripts needed to generate the respective build
configurations.
Compatibility headers (forwarding headers for headers whose location is changed
when creating a module, if moving them from the main library) should be placed
in an include_compatibility directory. This directory is not created by
default.
Documentation is placed in the docs folder. A empty skeleton for the index
is created, which is picked up by the main build system and will be part of the
generated documentation. Each header inside the include directory will
automatically be processed by Doxygen and included into the documentation.
Tests are placed in suitable subdirectories of tests.
When in doubt, consult existing modules for examples on how to structure the module.
Finding circular dependencies#
Our CI will perform a check to see if there are circular dependencies between
modules. In cases where it’s not clear what is causing the circular dependency,
running the cpp-dependencies tool manually can be helpful. It can give you
detailed information on exactly which files are causing the circular dependency.
If you do not have the cpp-dependencies tool already installed, one way of
obtaining it is by using our docker image. This way you will have exactly the
same environment as on the CI. See Using docker for development for details on how to use
the docker image.
To produce the graph produced by CI run the following command (HPX_SOURCE is
assumed to hold the path to the HPX source directory):
$ cpp-dependencies --dir $HPX_SOURCE/libs --graph-cycles circular_dependencies.dot
This will produce a dot file in the current directory. You can inspect this
manually with a text editor. You can also convert this to an image if you have
graphviz installed:
$ dot circular_dependencies.dot -Tsvg -o circular_dependencies.svg
This produces an svg file in the current directory which shows the circular
dependencies. Note that if there are no cycles the image will be empty.
You can use cpp-dependencies to print the include paths between two modules.
$ cpp-dependencies --dir $HPX_SOURCE/libs --shortest <from> <to>
prints all possible paths from the module <from> to the module <to>. For
example, as most modules depend on config, the following should give you a
long list of paths from algorithms to config:
$ cpp-dependencies --dir $HPX_SOURCE/libs --shortest algorithms config
The following should report that it can’t find a path between the two modules:
$ cpp-dependencies --dir $HPX_SOURCE/libs --shortest config algorithms
Releases#
List of supported releases#
HPX V2.0.0 (TBD)#
General changes#
Breaking changes#
Closed issues#
Closed pull requests#
HPX V1.11.0 (Jun 30, 2025)#
This release is the last version of HPX that supports C++17. Future versions of HPX will require compilation using C++20 or above.
General changes#
Added synchronous versions of all collective operations. Added global predefined communicator objects that are accessible through new APIs:
hpx::collectives::get_world_communicator()refers to all localities andhpx::collectives::get_local_communicator()refers to all threads on the calling locality. We unified the interfaces of the different communicator objects.Added
hpx::experimental::run_on_allallowing to run a given function (possibly concurrently) using a given execution policy.Added a helper object
hpx::runtime_managerthat simplifies the initialization of HPX without needing to modify themainfunction of the application.We improved the compatibility with various accelerator frameworks (SYCL, OneAPI).
Applied build system changes that allow building HPX without any prerequisites. This requires to pass
-DHPX_WITH_FETCH_HWLOC=Onand-DHPX_WITH_FETCH_BOOST=Onto the CMake configuration.We have performed a lot of code cleanup and refactoring to improve the overall code quality and decrease compile times.
Added the
hpx::containsandhpx::contains_subrangeparallel algorithms.Adapted many of HPX’ parallel algorithms to be usable with senders/receivers.
Breaking changes#
We have moved most of the APIs that were defined in the namespace
hpx::parallel::executionto the namespacehpx::execution::experimental. It was not possible to add compatibility facilities that will allow to continue using the old APIs, applications will have to be changed in order to continue functioning correctly.The CMake configuration parameter
HPX_WITH_RUN_MAIN_EVERYWHEREis now deprecated and will be removed in the future. Use the preprocessor macroHPX_HAVE_RUN_MAIN_EVERYWHEREon a target-by-target case instead.Removed the dysfunctional libfabric parcelport.
Removed features that were long deprecated (starting V1.8): -
hpx::flush,hpx::endl,hpx::async_flush,hpx::async_endl- Various enumerator types are now only available asclass enumrequiring explicit scoped use of the enumerator values - Various non-conforming overloads of parallel algorithms -hpx::for_loopand friends (now only available ashpx::experimental::for_loop)hpx::parallel::inductionis now only available ashpx::experimental::inductionhpx::parallel::reductionand friends are now only available ashpx::experimental::reductionhpx::assertion::source_locationis now only available ashpx::source_locationhpx::lcos::split_futureis now only available ashpx::split_futurehpx::lcos::waitand friends have been removed altogetherhpx::lcos::wait_anyand friends are now only available ashpx::wait_anyhpx::lcos::wait_someand friends are now only available ashpx::wait_somehpx::lcos::wait_eachand friends are now only available ashpx::wait_eachhpx::lcos::wait_alland friends are now only available ashpx::wait_allhpx::lcos::when_alland friends are now only available ashpx::when_allhpx::lcos::when_anyand friends are now only available ashpx::when_anyhpx::lcos::when_eachand friends are now only available ashpx::when_eachhpx::lcos::when_someand friends are now only available ashpx::when_somehpx::util::optionaland related facilities are now only available ashpx::optionalhpx::util::bindand related facilities are now only available ashpx::bindhpx::util::functionand friends are now only available ashpx::functionhpx::traits::is_bound_actionand related facilities are now only available ashpx::is_bound_actionhpx::traits::is_bind_expressionand related facilities are now only available ashpx::is_bind_expressionhpx::traits::is_placeholderand related facilities are now only available ashpx::is_placeholderhpx::lcos::futureand related facilities are now only available ashpx::futurehpx::memory::intrusive_ptris now only available ashpx::intrusive_ptrhpx::lcos::local::barrieris now only available ashpx::barrierhpx::lcos::barrieris now only available ashpx::distributed::barrierhpx::lcos::local::cpp20_binary_semaphoreis now only available ashpx::detail::binary_semaphorehpx::lcos::local::condition_variableand friends are now only available ashpx::condition_variablehpx::lcos::local::counting_semaphoreand friends are now only available ashpx::counting_semaphorehpx::lcos::local::cpp20_latchand is now only available ashpx::latchhpx::lcos::latchand is now only available ashpx::distributed::latchhpx::lcos::local::upgrade_lockand friends are now only available ashpx::upgrade_lockhpx::lcos::local::mutexand friends are now only available ashpx::mutexhpx::lcos::local::spinlockand friends are now only available ashpx::spinlockhpx::lcos::local::call_onceand friends are now only available ashpx::call_oncehpx::util::annotated_functionand is now only available ashpx::annotated_functionhpx::components::abstract_simple_component_baseand is now only available ashpx::components::abstract_component_basehpx::naming::id_typeand is now only available ashpx::id_type
Closed issues#
Issue #6699 - Catch lower-level runtime error
Issue #6696 - HPX master breaks with Kokkos
Issue #6691 - minimum_category doesn’t work with custom iterator categories
Issue #6681 - build break - missing ‘;’
Issue #6658 - CMake error upon building HPX manually
Issue #6648 - Asio V1.34 deprecates io_context::work
Issue #6640 - iterator_facade doesn’t work with custom iterator categories
Issue #6636 - problem with hpx::collectives::exclusive_scan
Issue #6623 - HPX serialization error with std::vector<std::vector<std::vector<float>>>
Issue #6616 - Add flux support to HPX to run on El Cap
Issue #6615 - Too many fails test after installed hpx
Issue #6605 - Partitionend vector copy constructor is broken
Issue #6586 - Bullet points in quick start/installing HPX section in documentation incorrectly rendered
Issue #6563 - Compilation issues on Grace Hopper
Issue #6544 - Errors in Public Distributed Api for all_to_all and gather_there
Issue #6519 - Option –hpx:queuing=local-priority-lifo is not configured
Issue #6501 - HPX 1.10 Failed Linking CXX executable for arm64-osx
Issue #5728 - Add optional fetch_content support for needed Boost libraries
Closed pull requests#
PR #6716 - Fixing some of the reported linker warnings
PR #6705 - Adding gcc/15 to jenkins
PR #6701 - Attempting to fix shutdown hang on exception_info
PR #6698 - Making sure .hpp.in files are not being installed
PR #6697 - Minor docs fix
PR #6695 - Adding missing ‘;’
PR #6693 - Adding llvm/19 and 20 and cmake/4 Jenkins
PR #6692 - Better implementation of minimal_category
PR #6690 - Fixing bad #include in example
PR #6689 - Fix unreachable code warning in wait_all
PR #6687 - lci pp: change default ndevices=2 and progress_type=worker; improve document
PR #6686 - lci pp: upgrade LCI autofetch target to 1.7.9
PR #6685 - Improve run_on_all implementation and tests
PR #6683 - Fix bad element comparison for reduce_by_key
PR #6682 - Add C++23 std::generator equivalence test and fix missing semicolon
PR #6680 - Add oneapi device init workaround
PR #6679 - Fix sycl deprecations
PR #6678 - Fix oneapi overloads
PR #6677 - Offer a runtime manager object
PR #6676 - Mention the HPX book
PR #6675 - Bump required version of JSON library
PR #6674 - Issue 6631
PR #6673 - Fix: FindTBB.cmake cannot find correct TBB library. #6504
PR #6672 - Update modules.rst
PR #6670 - Add base template template param to execution_policy
PR #6669 - Add execution policy support to run_on_all
PR #6667 - Making sure bound threads are rescheduled on their original core
PR #6666 - Improve documentation for reduction operations
PR #6664 - Fix CMake template when fetching Boost
PR #6663 - More run_on_all overloads
PR #6662 - Fix “unary minus operator applied to unsigned type” warning
PR #6661 - Adding simple experimental::run_on_all
PR #6659 - fix(reduce): Initialize accumulator with init instead of first element
PR #6656 - Add missing channel_communicator::get_info
PR #6652 - Adding channel-based ping-pong example
PR #6650 - Adding constructor overloads to partitioned_vector
PR #6649 - Remove the use of deprecated asio::io_context::work
PR #6645 - Fixing collectives::exclusive_scan
PR #6644 - Update result_type in set_union.hpp
PR #6643 - Update result_type in set_union.hpp
PR #6642 - Allowing to use custom iterator tags with iterator_facade
PR #6641 - Allowing for zip-iterator to refer to sequences of different length
PR #6639 - docs: Fix spelling in example dictionary
PR #6638 - Update set_union.hpp
PR #6637 - lci/mpi pp: fix the case when non-zero-copy data is larger than INT_MAX
PR #6635 - Adding simplified reduction overload
PR #6634 - Fixed issue 6634: Unqualified calls to insertion_sort
PR #6633 - Increase timeouts for CircleCI tests
PR #6630 - Fix CPUId test
PR #6628 - Link aclocal with aclocal-1.16 as hwloc asks for it
PR #6626 - Fixing MPI parcel port issue exposed by #6623
PR #6622 - Newbranch:HPX-Based Task Scheduler with CUDA-Quantum Integration & Benchmarking
PR #6621 - HPX-Based Task Scheduler with CUDA-Quantum Integration & Benchmarking
PR #6620 - new test: very big tchunk
PR #6619 - mpi pp: fix transmission chunk send
PR #6617 - Adding support for the Flux job scheduling environment
PR #6614 - Fix fallback to module mode for CMake finding Boost
PR #6613 - Fix partitioned_vector_handle_values test
PR #6612 - Fixing naming convention for pp constant
PR #6611 - Fix Hwloc fetch content
PR #6610 - Add docs for synchronous collective operations
PR #6609 - Update perftest CI reference measurements
PR #6608 - Partially support data parallel for_loop
PR #6607 - Cleaning up copy_component facility
PR #6606 - Making sure copy_component creates a new gid
PR #6600 - Fixing sync collectives
PR #6599 - Make HPX_HAVE_RUN_MAIN_EVERYWHERE application specific
PR #6598 - Adding synchronous collective operations
PR #6596 - Minor fixes and optimizations
PR #6595 - Rfa parallel
PR #6594 - Move get_stack_ptr to source
PR #6593 - Fix outdated documentation and missing flags
PR #6592 - HPX_HAVE_THREADS_GET_STACK_POINTER to match builtin_frame_address feature test
PR #6591 - Feature test for __builtin_frame_address
PR #6590 - Add device guard for noexcept
PR #6587 - Fix bullet points in Quickstart
PR #6585 - Fixed escape characters format to handle warning due to misinterpretation of syntax
PR #6583 - Execute feature test for at_quick_exit
PR #6582 - Accommodate for CircleCI reduce available number of cores to two
PR #6581 - Attempting to work around a Boost.Spirit problem
PR #6580 - mpi pp: fix messages larger than INT_MAX
PR #6578 - Remove leftovers from libfabric parcelport
PR #6577 - Download Boost from their own archives, not from Sourceforge
PR #6576 - Fix CMake warning issued since CMake V3.30
PR #6575 - Replace previously downloaded CDash conv.xsl with local version
PR #6570 - Update exception_list.hpp
PR #6569 - Update exception_list.hpp
PR #6567 - Fix vectorization error on copy algorithm
PR #6566 - lci pp: fix messages larger than INT_MAX
PR #6565 - Moving most of APIs from hpx::parallel::execution to hpx::execution::experimental
PR #6564 - Remove superfluous HPX_MOVE()
PR #6562 - Fix doc return type of broadcast_to
PR #6560 - Fixes for bit_cast on 32bit systems
PR #6559 - Making sure that all parcelport counters are unavailable if no networking is needed or configured
PR #6558 - Remove CSCS CI’s
PR #6556 - Set copyright year in generated files
PR #6553 - Fix omp vectorization pragma errors
PR #6551 - Update building_hpx.rst
PR #6550 - Partitioned vector updates
PR #6549 - Fix CMake conditionals checking ENV variables
PR #6548 - Update CONTRIBUTING.md
PR #6546 - Fix incorrect signature of distributed API functions
PR #6543 - Throwing an exception derived from std::bad_alloc on OOM conditions
PR #6539 - Use thread-safe cache in thread_local_caching_allocator
PR #6537 - Update README.rst
PR #6531 - More fixes for the Boost package
PR #6527 - Improve the LCI parcelport documentation
PR #6525 - Addressing cmake warnings issued starting V3.30
PR #6522 - Fixing distance test
PR #6520 - Adding optional handshakes to acknowledge the received data
PR #6518 - Make sure that –hpx:ini log settings take effect
PR #6512 - Minor cleanup of future_data
PR #6510 - Include Boost as CMake subproject
PR #6509 - Add components documentation
PR #6508 - Fix typo: s/unititiallized/uninitialized/
PR #6507 - Update LSU Jenkins libraries to match Rostam 3.0 with RHEL9
PR #6503 - Fix 2 tests on FreeBSD by initializing freebsd_environ
PR #6499 - Fix crash in get_executable_filename on FreeBSD
PR #6498 - Avoid rewriting defines.hpp
PR #6497 - Contains and contains_subrange parallel algorithm implementation GSOC 2024
PR #6496 - Prevent usage of CMake try_run on crosscompiling
PR #6494 - Add unit test cases and fixes for the S/R versions of the parallel algorithms
PR #6487 - Fixing security vulnerabilities reported by MSVC security checks
PR #6486 - Create codeql.yml
PR #6474 - Remove remnants of libfabric parcelport
PR #6473 - Add documentation for distributed implementations of post, async, sync and dataflow
PR #6471 - Add distance.cpp test in CMake
PR #6468 - Small vector relocation
PR #6448 - Standardising Benchmarks, with support for nanobench as an option for its backend
PR #6365 - Release V1.10.0
PR #6089 - Implementing p2079
List of older releases#
HPX V1.10.0 (May 29, 2024)#
General changes#
The HPX documentation has seen a major overhaul for this release. We finished documenting the public local HPX API, we have added migration guides from widely used parallelization platforms to HPX (OpenMP, TBB, and MPI).
We have added facilities enabling optimizations for trivially-relocatable types (see P1144 for more details).
We have added (and use) the
scope_xxxhelper facilities as specified by the C++ library fundamentals TS v3 (see: N4948).We have added configuration options that allow to build HPX without pre-installing any prerequisites. Use
HPX_WITH_FETCH_HWLOC=Onto have Portable Hardware Locality (HWLOC) installed for you. Similarly, settingHPX_WITH_FETCH_BOOST=Onduring configuration time will install the necessary Boost libraries (currently V1.84.0).We have performed a lot of code cleanup and refactoring to improve the overall code quality and decrease compile times.
The collective operations APIs have seen an unification, we have fixed issues and performance problems for the collectives.
The HPX executors have seen a streamlining and some consistency changes. We have applied many performance improvements to the executor implementations that directly positively impact the performance of our parallel algorithms.
We have added a new parcelport allowing to use Gasnet as a communication platform.
We have added optimizations to various parcelports improving overall communication performance. This includes - amongst other things - send immediate optimizations and receiver-side zero-copy optimizations.
Futures will now execute the associated task eagerly and inline on any wait operation if the task has not started running yet. This feature can be enabled using the
HPX_COROUTINES_WITH_THREAD_SCHEDULE_HINT_RUNS_AS_CHILD=Onconfiguration setting (which is Off by default).We have enabled using json files to supply configuration information through the command line. This feature can be enabled with the configuration option
HPX_COMMAND_LINE_HANDLING_WITH_JSON_CONFIGURATION_FILES=On. This functionality depends on the external JSon library, which can be built at configuration time by supplyingHPX_WITH_FETCH_JSON=Onto CMake.We have applied many fixes to our CUDA, ROCm, and SYCL build environments.
Breaking changes#
The CMake configuration keys
SOMELIB_ROOT(e.g.,BOOST_ROOT) have been renamed toSomelib_ROOT(e.g.,Boost_ROOT) to avoid warnings when using newer versions of CMake. Please update your scripts accordingly. For now, the old variable names are re-assigned to the new names and unset in the CMake cache.
Closed issues#
Issue #6466 - No access limitations to Wiki
Issue #6461 - handle_received_parcels may never return
Issue #6459 - Building HPX
Issue #6451 - HPX hangs at the very end
Issue #6446 - Issue on page /manual/getting_hpx.html
Issue #6443 - PR #6435 (parcel_layer_tweaks) broke Octo-Tiger
Issue #6440 - HPX does not compile with MSVC of Visual Studio 2022 17.9+
Issue #6437 - HPX 1.9.1 does not compile on Fedora with ‘#pragma message: [Parallel STL message]: “Vectorized algorithm unimplemented, redirected to serial
Issue #6419 - Enhancement of the macro functionalities within hpx
Issue #6417 - The current HPX master branch is still not compatible with Kokkos 4.0.1
Issue #6414 - Current HPX master causes segfaults within Octo-Tiger
Issue #6412 - Clangd (Language Server) throws error for __integer_pack at pack.hpp
Issue #6407 - Cannot build Kokkos 4.0.01 with current HPX master
Issue #6405 - Spack Build Error with ROCm 5.7.0
Issue #6398 - HPX sets affinity wrong with multiple processes per node and LCI parcelport enabled
Issue #6392 - [Feature] Install dependencies using CMake
Issue #6388 - HPX error: “Host not found” when running on Expanse with 128 nodes
Issue #6366 - serialize_buffer allocator support needs adjustments
Issue #6361 - HPX 1.9.1 does not compile on Fedora 40
Issue #6355 - Single page documentation is broken
Issue #6334 - Segmentation fault after adding a padding in one_size_heap_list
Issue #6329 - Log hpx threads on forced shutdown
Issue #6316 - Build breaks on FreeBSD
Issue #6299 - HPX does not use distributed localities on Fugaku
Issue #6298 - Update config for coroutines on ARM
Issue #6291 - Zero-copy receive optimization disabled the invocation of direct actions
Issue #6261 - Add optional reading of json files for command line options
Issue #6087 - Support for vcpkg on Linux is broken
Issue #5921 - hpx::info claims that async_mpi was not built, while cmake assures its existence
Issue #5893 - Tests fail on FreeBSD: Executable copyn_test does not exist
Issue #5833 - barrier lockup
Issue #5799 - Investigate CUDA compilation problems
Issue #5340 - Examples do not run on Mac OSX using the M1 chip
Closed pull requests#
PR #6493 - Fix distributed latch documentation
PR #6492 - Fix kokkos hpx nvcc compilation
PR #6491 - More fixes to handling bool arguments for collective operations
PR #6490 - Remove the default max cpu count
PR #6489 - Ensure TCP parcelport is deactivated if not needed
PR #6488 - Fixing handling of bool value type for collective operations
PR #6485 - Destructive interference size
PR #6484 - Improve performance counter error handling
PR #6482 - Generalize the notion of bitwise serialization
PR #6481 - Fixing use of HPX_WITH_CXX_STANDARD
PR #6480 - Remove equal_to from hpx::any
PR #6479 - Remove optimizations for certain built-in compiler intrinsics
PR #6478 - Fixing issues on MacOS
PR #6477 - lci pp: lci’s github repo name changed from LC to lci
PR #6476 - Fixing binary filter test target names
PR #6475 - Fix mac os github actions
PR #6472 - Troubleshoot CI hangs
PR #6469 - improve(lci pp): more options to control the LCI parcelport
PR #6467 - Bump jwlawson/actions-setup-cmake from 1.14 to 2.0
PR #6464 - Update docs of “Writing distributed applications” page
PR #6463 - Revert “Always return outermost thread id”
PR #6458 - Reduce test workload to fix CI/CD time-out
PR #6457 - replace boost::array with std::array and update file name
PR #6456 - Move APEX CI to rostam
PR #6455 - Fixing compilation if HPX_HAVE_THREAD_QUEUE_WAITTIME is defined
PR #6454 - Update perftests reference measurements
PR #6453 - Update supported platforms of Manual/Prerequisites page
PR #6452 - Fix nvcc crashes in transform_stream.cu and synchronize.cu
PR #6450 - Fix git tag name in Getting HPX page
PR #6449 - LCI parcelport: add yield to potentially infinite retry loop
PR #6447 - Use compressed ptr in schedulers when 128 atomics are not lockfree
PR #6445 - Fix agas addressing cache
PR #6444 - Update CTestConfig.cmake
PR #6442 - Update CMakeLists.txt
PR #6441 - Minor documentation fixes
PR #6439 - Optimizing use of certain #includes
PR #6438 - Bump jwlawson/actions-setup-cmake from 1.14 to 2.0
PR #6436 - Update docs
PR #6435 - Parcel layer tweaks
PR #6434 - improve termination detection: removing lock from critical path
PR #6433 - Use shared mutex for resolve_locality procedure
PR #6432 - Module cleanup up to level 30
PR #6429 - Making sure HPX_WITH_ASYNC_MPI is reported properly
PR #6427 - Modifying CMakeLists to copy libhwloc-15.dll to the binary folder in Windows, independently
PR #6425 - Fix macOS failing test
PR #6424 - Adding option for downloading Boost using CMake FetchContent
PR #6423 - Move adjacent_difference to numeric header file
PR #6422 - Adding steal-half functionalities to work-requesting scheduler
PR #6421 - Bump actions/checkout from 2 to 4
PR #6418 - Working around nvcc problems to use CTAD
PR #6416 - Change run_as_os_thread deprecation forwarding due to hipcc compilation issue
PR #6415 - Attempting to avoid segfault in OctoTiger during initialization
PR #6413 - Always return outermost thread id
PR #6411 - Minor refactoring and fixes to the LCI parcelport and pingpong_performance2 benchmark
PR #6410 - Adding scope_xxx from library fundamentals TS v3
PR #6409 - Working around CUDA issue
PR #6408 - Tightening up collective operation semantics
PR #6406 - Working around ROCm compiler issue
PR #6404 - Allow to disable use of [[no_unique_address]] attribute
PR #6403 - Fixing copyright year
PR #6402 - fix(lci pp): fix deadlocks with too many failed sends
PR #6401 - fix(lci pp): fix the null_thread_id bug in the LCI parcelport
PR #6400 - Fix the affinity setting bug when using LCI pp and multiple localities per node
PR #6397 - Change API header titles and info
PR #6396 - Making is_bitwise_serializable SFINAE-friendly
PR #6395 - Adapt amount of collective testing
PR #6394 - Adding option for installing Hwloc using CMake FetchContent
PR #6393 - Optionally disable caching allocator
PR #6391 - Cleaning up collective operations
PR #6390 - Making function local constexpr variables non-static
PR #6389 - Disable resolving hostnames if TCP is disabled
PR #6387 - Need to break out of the loop when searching the suffixes.
PR #6384 - Fixing allocation/deallocation mismatch in serialize_buffer
PR #6383 - Enable fork_join_executor to handle return values from scheduled functions
PR #6381 - Consistently treat conflicting parameters provided by executors and parameter objects
PR #6380 - Fixing setting an annotation for an execution policy
PR #6378 - Allowing to disable signal handlers
PR #6377 - Fix gasnet-related test failures
PR #6375 - Update LSU Jenkins with 2023-10 libraries
PR #6374 - Investigate builder gasnet failure
PR #6373 - Fixing communicator API, adding docs
PR #6372 - Fix resource partitioner tests for small thread count
PR #6371 - Fix jacobi omp examples.
PR #6370 - improve one_size_heap_list: use rwlock to speedup the allocation/free
PR #6369 - working issue with MPI_CC / CC conflict in automake
PR #6368 - Making sure serialize_buffer properly destroys buffer, if needed.
PR #6367 - Fix parallel relocation test
PR #6364 - Relocation variants
PR #6363 - Update the lci parcelport to use LCI v1.7.6
PR #6362 - Fixing compilation problems on 32 Linux systems
PR #6360 - Fix broken links in docs: PDF, Single HTML page, Dependency report
PR #6359 - Fix header file links in Public API page
PR #6358 - Fix CMake find_library for HWLOC
PR #6357 - Replace Custom Benchmarking Code with Nanobench
PR #6356 - Fixed matrix multiplication example output
PR #6354 - Fix broken links for header files in Public API page
PR #6353 - Enable using std::reference_wrapper with executor parameters
PR #6352 - Add Public distributed API documentation
PR #6350 - Make coverage work with Jenkins Github Branch Source plugin
PR #6349 - Moving hpx::threads::run_as_xxx to namespace hpx
PR #6348 - Adding –exclusive to launching tests on rostam
PR #6346 - changed chat link to discord
PR #6344 - uninitialized_relocate w/ type_support primitive
PR #6343 - Bump actions/checkout from 3 to 4
PR #6342 - Fix HPX-APEX cmake integration
PR #6341 - Fix shared_future_continuation_order regression test
PR #6340 - Log alive hpx threads on exit
PR #6339 - Add coverage testing on Jenkins
PR #6338 - Fixing HPX_CURRENT_SOURCE_LOCATION when std::source_location exists
PR #6337 - Remove aurianer, biddisco, and msimberg from codeowners
PR #6336 - More cleaning up for module levels 19-20
PR #6335 - Finalize the MPI docs of the Migration Guide
PR #6332 - More fixes for CMake V3.27
PR #6330 - Adding basic logging to collective operations
PR #6328 - Cleanup previous patch adapting to CMake V3.27
PR #6327 - Modernize modules in level 17 and 18
PR #6324 - P1144 Relocation primitives
PR #6321 - Ensure hpx_main is a proper thread_function
PR #6320 - Fixing cyclic dependencies in naming and agas modules
PR #6319 - Generate git tag if needed but it is not available
PR #6317 - Fixing linker problem on FreeBSD
PR #6315 - acknowledge triv-rel and nothrow-rel types
PR #6314 - Relocation algorithms Clean
PR #6313 - Trivial relocation of c-v-ref-array types
PR #6312 - Fixing warning/error
PR #6311 - Adding executor parallel invoke CPOs
PR #6310 - Define HPX_COMPUTE_CODE in builds with SYCL
PR #6309 - Making sure changed number of cores is propagated to executor
PR #6308 - openshmem-parcelport initial import
PR #6306 - The hpxcxx script was broken such that it could only compile for _release
PR #6305 - Adapting build system for CMake V3.27
PR #6304 - Fixing an integral type mismatch warning
PR #6303 - omp for default vectorization
PR #6301 - Add MPI migration guide
PR #6294 - Add internal reference counting to semaphores
PR #6286 - Simd helpers
PR #6280 - Add TBB to HPX documentation in Migration Guide
PR #6276 - Add dependabot.yml
PR #6275 - Revert “Move dependabot.yml into correct directory”
PR #6272 - set thread name for linux
PR #6271 - Uninitialised algorithms, move using std::memcpy
PR #6270 - Bump jwlawson/actions-setup-cmake from 1.9 to 1.14
PR #6269 - Bump actions/checkout from 2 to 3
PR #6268 - Move dependabot.yml into correct directory
PR #6265 - Create dependabot.yml
PR #6264 - hpx::is_trivially_relocatable trait implementation
PR #6263 - Adding support for reading json configuration files for command line options
PR #6249 - Implement the send immediate optimization for the MPI parcelport.
PR #6237 - Improve compilation performance
PR #6234 - Adding release notes page for next release
PR #6233 - Moving is_relocatable to namespace hpx
PR #6230 - gasnet based parcelport
PR #6226 - Re-enable dependency on segmented algorithms on CircleCI
PR #6220 - Add execution on
PR #6212 - Initial trait definition for relocatable
PR #6199 - added support for unseq, par_unseq for hpx::make_heap algorithm
PR #6173 - C++ modules
PR #6122 - Add Module support
PR #6099 - Futures attempt to execute threads directly if those have not started executing
PR #6050 - Investigating partitioned_vector problems
PR #5988 - Adding CI configuration for DGX-A100 at LSU
PR #5910 - Improve MPI initialization
PR #5845 - Adding local work requesting scheduler that is based on message passing internally
HPX V1.9.1 (August 4, 2023)#
General changes#
This point release fixes a couple of problems reported for the V1.9.0 release. Most importantly, we fixed various occasional hanging during startup and shutdown in distributed scenarios. We also added support for zero-copy serialization on the receiving side to the TCP, MPI, and LCI parcelports. Last but not least, we have added support for Visual Studio 2019 and gcc using MINGW on Windows, and also support for gcc V13 and clang V15.
HPX headers are now made consistently named the same as their standard library counterparts, e.g. #include <thread> now corresponds to #include <hpx/thread.hpp>. This significantly simplifies porting existing standards conforming codes to HPX.
A lot of work has been done to improve and optimize our network communication layers. Primary focus of this work was on the LCI parcelport, but we have also cleaned up and improved the MPI parcelport.
Additionally, we have continued working on our documentation. The main focus here was on completing the API documentation of the most important API functions. We have started adding migration guides for people interested in moving their codes away from other, commonplace parallelization frameworks like OpenMP.
Breaking changes#
None
Closed issues#
Issue #6155 - hpxcxx and hpxrun.py do not work if HPX_WITH_TESTS=OFF
Issue #6164 - HPX_WITH_DATAPAR_BACKEND=EVE causes compile errors with C++17
Issue #6175 - Make sure all our parallel algorithms accept the predicates by value
Issue #6194 - tests.regressions.threads.threads_all_1422 failed at Perlmutter
Issue #6198 - set_intersection/set_difference fails when run with execution::par
Issue #6214 - Broken Links to the Documentation page in readme.rst
Issue #6217 - hpx::make_heap does not terminate when exPolicy is par (or par_unseq) and size of vector is 4
Issue #6246 - HPX fails to compile under cxx 20 (fresh system)
Issue #6247 - HPX 1.9.0 does not compile with GCC on Windows
Issue #6282 - The “attach-debugger” option is broken on the current master branch.
Closed pull requests#
PR #6219 - Cleaning up #includes in hpx/ folder
PR #6223 - Move documentation from README.rst to index.rst files under libs directory
PR #6229 - Adding zero-copy support on the receiving end of the TCP and MPI parcel ports
PR #6231 - Remove deprecated email from release procedure
PR #6235 - Modernize more modules (levels 12-16)
PR #6236 - Attempt to resolve occasional shutdown hangs in distributed operation
PR #6239 - Fix Optimizing HPX applications page of Manual
PR #6241 - LCI parcelport: Refactor, add more variants, zero copy receives.
PR #6242 - updated deprecated headers
PR #6243 - Adding github action builders using VS2019
PR #6248 - Fix CUDA/HIP Jenkins pipelines
PR #6250 - Resolve gcc problems on Windows
PR #6251 - Attempting to fix problems in barrier causing hangs
PR #6253 - Modernize set_thread_name on Windows
PR #6256 - Fix nvcc/gcc-10 (Octo-Tiger) compilation issue
PR #6257 - Cmake Tests: Delete operator check for size_t arg
PR #6258 - Rewriting wait_some to circumvent data races causing hangs
PR #6260 - Add migration guide to manual
PR #6262 - Fixing wrong command line options in local command line handling
PR #6266 - Attempt to resolve occasional hang in run_loop
PR #6267 - Attempting to fix migration tests
PR #6278 - Making sure the future’s shared state doesn’t go out of scope prematurely
PR #6279 - Re-expose error names
PR #6281 - Creating directory for file copy
PR #6283 - Consistently #include unistd.h for _POSIX_VERSION
HPX V1.9.0 (May 2, 2023)#
General changes#
Added RISC-V 64bit support. HPX is now compatible with RISC-V architectures which have revolutionized the HPC world.
LCI parcelport has been optimized to transfer parcels with fewer messages and use the HPX resource partitioner for its progress thread allocation. It should generally provide better performance than before. It also removes its dependency on the MPI library.
HPX dependency on Boost was further relaxed by replacing headers from Boost.Range, Boost.Tokenizer and Boost.Lockfree.
Improvements took place on our parallel algorithms implementation.
Our Senders/Receivers (P2300) integration was extended:
Coroutines were integrated with senders/receivers.
get_completion_signaturesnow works with awaitable senders. -with_awaitable_sendersallows the passed senders to retrieve the value i.e. senders are transparently awaitable from within a coroutine. -when_all_vectorwas added.sync_waitandsync_wait_with_variantsender consumers were added. The user can now initiate the execution of their asynchronous pipeline by blocking the current thread that executes the main() function until the result is retrieved.The combinators for futures (a.k.a. async_combinators)
when_*,wait_*,wait_*_nothrowwere turned into CPOs allowing for end-user customization. For more information on the async_combinators refer to the documentation, https://hpx-docs.stellar-group.org/latest/html/libs/core/async_combinators/docs/index.html?highlight=combinators.The new datapar backend SVE allows simd and par_simd execution policies to exploit dataparalleism in the processors that have SVE vector registers like A64FX and Neoverse V1.
The documentation for parallel algorithms, container algorithms was further improved. The Public API page was vastly enriched.
Copy button shortkey was added at the top-right of code-blocks.
Pragma directive that reports warnings as errors on MSVC was fixed.
Command line argument
--hpx:loopback_networkwas added to facilitate debugging with networks.We added an HPX-SYCL integration, allowing users to obtain HPX futures for SYCL events. This effectively enables the integration of arbitrary asynchronous SYCL operations into the HPX task graph. Bolted on top of this integration, we further added an HPX-SYCL executor for ease of use.
Breaking changes#
Stopped supporting Clang V8, the minimal version supported is now Clang V10.
Stopped supporting gcc V8, the minimal version supported is now gcc V9.
Stopped supporting Visual Studio 2015, the minimal version supported is now Visual Studio 2019.
tag_policy_taget.al. were re-added after HPX V1.8.1 depracation.get_chunk_sizeandprocessing_units_countAPI is now expecting the time for one iteration as an argument.The list of all the namespace changes can be found here: HPX V1.9.0 Namespace changes.
Closed issues#
Issue #6203 - Compilation error with -mcpu=a64fx on Ookami
Issue #6196 - Incorrect log destination
Issue #6191 - installing HPX
Issue #6184 - Wrong processing_units_count of restricted_thread_pool_executor
Issue #6171 - Release Tag Name Request
Issue #6162 - Current master does not compile on ROSTAM
Issue #6156 - hpxcxx does not work if HPX_WITH_PKGCONFIG=OFF
Issue #6108 - cxx17_aligned_new.cpp on msvc fails due to wrong pragma directive
Issue #6045 - Can’t call nullary callables wrapped with hpx::unwrapping
Issue #6013 - Unable to build subprojects hpx_collectives/hpx_compute with MSVC
Issue #6008 - Missing constexpr default constructor for hpx::mutex
Issue #5999 - Add HPX Conda package to conda-forge
Issue #5998 - Serializing multiple arguments when applying distributed action results in segfault
Issue #5958 - HPX 1.8.0 and Blaze issues
Issue #5908 - Windows: duplicated symbols in static builds
Issue #5802 - Lost status is_ready from future
Issue #5767 - Performance drop on Piz Daint
Issue #5752 - Implement stride_view from P1899 (experimental)
Issue #5744 - HPX_WITH_FETCH_ASIO not working on Ookami
Issue #5561 - Possible race condition in helper thread / hpx::cout
Closed pull requests#
PR #6228 - Fixing algorithms for zero length sequences when run with s/r scheduler
PR #6227 - Reliably disable background work when no networking is enabled
PR #6225 - Make heap fails in par for small sized heaps #6217
PR #6222 - Add documentation for hpx::post
PR #6221 - Fix segmented algorithms tests
PR #6218 - Creating INSTALL component ‘runtime’ to enable installing binaries only
PR #6216 - added tests for set_difference, updated set_operation.hpp to fix #6198
PR #6213 - Modernize and streamline MPI parcelport
PR #6211 - Modernize modules of level 11, 12, and 13
PR #6210 - Fixing MPI parcelport initialization if MPI is initialized outside of HPX
PR #6209 - Prevent thread stealing during scheduler shutdown
PR #6208 - Fix the compilation warning in the MPI parcelport with gcc 11.2
PR #6207 - Automatically enable Boost.Context when compiling for arm64.
PR #6206 - Update CMakeLists.txt
PR #6205 - Do not generate hpxcxx if support for pkgconfig was disabled
PR #6204 - Use LRT_ instead of LAPP_ logging in barrier implementation
PR #6202 - Fixing Fedora build errors on Power systems
PR #6201 - Update the LCI parcelport documents
PR #6200 - Par link jobs
PR #6197 - LCI parcelport: add doc, upgrade to v1.7.4, refactor cmake autofetch.
PR #6195 - Change the default tag of autofetch LCI to v1.7.3.
PR #6192 - Fix page Writing single-node applications
PR #6189 - Making sure restricted_thread_pool_executor properly reports used number of cores
PR #6187 - Enable using for_loop with range generators
PR #6186 - thread_support/CMakeLists: Fix build issue
PR #6185 - Fix EVE datapar with cxx_standard less than 20
PR #6183 - Update CI integration for EVE
PR #6182 - Fixing performance regressions
PR #6181 - LCI parcelport: backlog queue, aggregation, separate devices, and more
PR #6180 - Fixing use of for_loop with rebound execution policy (using .with())
PR #6179 - Taking predicates for algorithms by value
PR #6178 - Changes needed to make chapel_hpx examples work
PR #6176 - Fixing warnings that were generated by PVS Studio
PR #6174 - Replace boost::integer::gcd with std::gcd
PR #6172 - [Docs] Fix example of how to run single/specific test(s)
PR #6170 - Adding missing fallback for processing_units_count customization point
PR #6169 - LCI parcelport: bypass the parcel queue and connection cache.
PR #6167 - Add create_local_communicator API function
PR #6166 - Add missing header for std::intmax_t
PR #6165 - Attempt to work around MSVC problem
PR #6161 - Update EVE integration
PR #6160 - More cleanup for module levels 0 to 10
PR #6159 - Fix minor spelling mistake in generate_issue_pr_list.sh
PR #6158 - Update documentation in writing single-node applications page
PR #6157 - Improve index_queue_spawning
PR #6154 - Avoid performing late command line handling twice in distributed runtime
PR #6152 - The -rd and -mr options didn’t work, and they should have been –rd and –mr
PR #6151 - Refactoring the Manual page in documentation
PR #6148 - Investigate the failure of the LCI parcelport.
PR #6147 - Make posix co-routine stacks non-executable
PR #6146 - Avoid ambiguities wrt tag_invoke
PR #6144 - General improvements to scheduling and related fixes
PR #6143 - Add list of new namespaces for new release
PR #6140 - Fixing background scheduler to properly exit in the end
PR #6139 - [P2300] execution: Cleanup coroutines integration and improve ADL isolation
PR #6137 - Adding example of a simple master/slave distributed application
PR #6136 - Deprecate execution::experimental::task_group in favor of experimental::task_group
PR #6135 - Fixing warnings reported by MSVC analysis
PR #6134 - Adding notification function for parcelports to be called after early parcel handling
PR #6132 - Fixing to_non_par() for parallel simd policies
PR #6131 - modernize modules from level 25
PR #6130 - Remove the mutex lock in the critical path of get_partitioner.
PR #6129 - Modernize module from levels 22, 23
PR #6127 - Working around gccV9 problem that prevent us from storing enum classes in bit fields
PR #6126 - Deprecate hpx::parallel::task_block in favor of hpx::experimental::task_block
PR #6125 - Making sure sync_wait compiles when used with an lvalue sender involving bulk
PR #6124 - Fixing use of any_sender in combination with when_all
PR #6123 - Fixed issues found by PVS-Studio
PR #6121 - Modernize modules of level 21, 22
PR #6120 - Use index_queue for parallel executors bulk_async_execute
PR #6119 - Update CMakeLists.txt
PR #6118 - Modernize modules from level 17, 18, 19, and 20
PR #6117 - Initialize buffer_allocate_time_ to 0
PR #6116 - Add new command line argument –hpx:loopback_network
PR #6115 - Modernize modules of levels 14, 15, and 16
PR #6114 - Enhance the formatting of the documentation
PR #6113 - Modernize modules in module level 11, 12, and 13
PR #6112 - Modernize modules from levels 9 and 10
PR #6111 - Modernize all modules from module level 8
PR #6110 - Use pragma error directive to report warnings as errors on msvc
PR #6109 - Modernize serialization module
PR #6107 - Modernize error module
PR #6106 - Modernizing modules of levels 0 to 5
PR #6105 - Optimizations on LCI parcelport: merge small messages; remove sender mutex lock.
PR #6104 - Adding parameters API: measure_iteration
PR #6103 - Document task_group and include in Public API
PR #6102 - Prevent warnings generated by clang-cl
PR #6101 - Using more fold expressions
PR #6100 - Deprecate hpx::parallel::reduce_by_key in favor of hpx::experimental::reduce_by_key
PR #6098 - Forking Boost.Lockfree
PR #6096 - Forking Boost.Tokenizer
PR #6095 - Replacing facilities from Boost.Range
PR #6094 - Removing object_semaphore
PR #6093 - Replace boost::string_ref with std::string_view
PR #6092 - Use C++17 static_assert where possible
PR #6091 - Replace artificial sequencing with fold expressions
PR #6090 - Fixing use of get_chunk_size customization point
PR #6088 - Add/fix Public API documentation
PR #6086 - Deprecate hpx::util::unlock_guard in favor of hpx::unlock_guard
PR #6085 - Add experimental sycl integration/executor
PR #6084 - Renaming hpx::apply and friends to hpx::post
PR #6083 - Using if constexpr instead of tag-dispatching, where possible
PR #6082 - Replace util::always_void_t with std::void_t
PR #6081 - Update github actions to avoid warnings
PR #6080 - Disable some tests that fail on LCI
PR #6079 - Adding more natvis files, correct existing
PR #6078 - Changing target name of memory_counters component
PR #6077 - Making default constructor of hpx::mutex constexpr
PR #6076 - Cleaning up functionality that was deprecated in V1.7
PR #6075 - Remove conditional code for gcc V7 and below
PR #6074 - Fixing compilation issues on gcc V8
PR #6073 - Fixing PAPI counter component compilation
PR #6072 - Adding ex::when_all_vector
PR #6071 - Making get_forward_progress_guarantee_t specializations constexpr
PR #6070 - Implement P2690 for our algorithms
PR #6069 - Do not check for cancellation during each iteration but only once per partition
PR #6068 - Prevent using task and non_task as a CPO
PR #6067 - Deprecated hpx::util::mem_fn in favor of hpx::mem_fn
PR #6066 - Create codeql.yml
PR #6064 - Adapting adjacent_difference for S/R execution
PR #6063 - Modernize iterator_support module
PR #6062 - Make sure wrapping executor does not go out of scope prematurely
PR #6061 - Minor fix in small_vector (from upstream)
PR #6060 - Allow to disable registering signal handlers
PR #6059 - [P2300] Fix: declval cannot be ODR used
PR #6058 - Avoid ambiguity for hpx::get used with std::variant
PR #6057 - Create a dedicated thread pool to run LCI_progress.
PR #6056 - Fix coroutine test for clang
PR #6055 - Patches needed to be able to build HPX 1.8.1 on various platforms
PR #6054 - Use MSVC specific attribute [[msvc::no_unique_address]]
PR #6052 - Deprecated hpx::util::invoke_fused in favor of hpx::invoke_fused
PR #6051 - Add non-contiguous index queue and use it in thread_pool_bulk_scheduler
PR #6049 - Crosscompile arm sve
PR #6048 - Deprecated hpx::util::invoke in favor of hpx::invoke
PR #6047 - Separating binary_semaphore into its own file
PR #6046 - Support using unwrapping with nullary function objects
PR #6044 - Generalize the use of then() and dataflow
PR #6043 - Clean up scan_partitioner
PR #6042 - Modernize dataflow API
PR #6041 - docs: document semaphores
PR #6040 - Add/Fix documentation of Public API page
PR #6039 - remove MPI dependency when only using LCI parcelport
PR #6038 - Clean up command line handling
PR #6037 - Avoid performing parcel related background work if networking is disabled
PR #6036 - Support new datapar backend : SVE
PR #6035 - Simplify datapar replace copy if
PR #6034 - Add/Fix documentation of Public API
PR #6033 - Support for data-parallelism for replace, replace_if, replace_copy, replace_copy_if algorithms
PR #6032 - Add documentation in public API
PR #6031 - Expose available cache sizes from topology object
PR #6030 - Adding parcelport initialization hook for resource partitioner operation
PR #6029 - Simplify startup code
PR #6027 - Add/Fix documentation in Public API page
PR #6026 - add option hpx:force_ipv4 to force resolving hostnames to ipv4 addresses
PR #6025 - build(docs): remove leftover sections
PR #6023 - Minor fixes on “How to build on Windows”
PR #6022 - build(doxy): don’t extract private members
PR #6021 - Adding pu_mask to thread_pool_bulk_scheduler
PR #6020 - docs: add cppref NamedRequirements support
PR #6018 - Unseq adaptation for for_each, transform, reduce, transform_reduce, etc.
PR #6017 - loop and transform_loop unseq adaptation
PR #6016 - Config and structural updates to support unseq implementation
PR #6015 - Integrating sync_wait & sync_wait_with_variant
PR #6012 - docs: add missing links to public api
PR #6009 - Fixing sender&receiver integration with for_each and for_loop
PR #6007 - docs: add docs for mutex.hpp
PR #6006 - Relax future::is_ready where possible
PR #6005 - reshuffle header tests to different instances
PR #6004 - Add documentation Public API
PR #6003 - Always exporting get_component_name implementations
PR #6002 - Making sure that default constructble arguments are properly constructed during deserialization
PR #5996 - Add back explicit template parameters to lock_guards for nvcc
PR #5994 - Fix CTRL+C on windows
PR #5993 - Using EVE requires C++20
PR #5992 - This properly terminates an application on Ctrl-C on Windows
PR #5991 - Support IPV6 on command line for explicit network initialization
PR #5990 - P2300 enhancements
PR #5989 - Fix missing documentation in Public API page
PR #5987 - Attempting to fix timed executor API
PR #5986 - Fix warnings when building docs
PR #5985 - Re-add deprecated tag_policy_tag et.al. types that were removed in V1.8.1
PR #5981 - docs: add docs for condition_variable.hpp
PR #5980 - More work on execution::read
PR #5979 - Remove support for clang-v8 and clang-v9, switch LSU clang-v13 to C++17
PR #5977 - fix: Compilation errors for -std=c++17 builders
PR #5975 - docs: fix & improve parallel algorithms documentation 5
PR #5974 - [P2300] Adapt get completion signatures for awaitable senders
PR #5973 - defaults boost.context on riscv64
PR #5972 - Fix documentation for container algorithms
PR #5971 - added logic to detect riscv compiler configured for 64 bit target
PR #5968 - adds risc-v 64 bit support
PR #5967 - Adding missing pieces to sync_wait, adding run_loop
PR #5966 - docs: fix & improve parallel algorithms documentation 4
PR #5965 - Fixing inspect problems, adding missing header file
PR #5962 - Changes in html page of documentation
PR #5961 - Prevent stalling during shutdown when running hello_world_distributed
PR #5955 - Fix documentation for container algorithms
PR #5952 - docs: fix & improve parallel algorithms documentation 3
PR #5950 - Change executors to directly implement the executor CPOs
PR #5949 - Converting async combinators into CPOs
PR #5948 - Adding support for pure sender/receiver based executors to parallel algorithms
PR #5945 - [P2300] Added fundamental coroutine_traits for S/R
PR #5883 - Optimization on LCI parcelport: uses LCI_putva
PR #5872 - Block fork join executor
PR #5855 - Adding performance test Jenkins builder at LSU
HPX V1.8.1 (Aug 5, 2022)#
This is a bugfix release with a few minor additions and resolved problems.
General changes#
This patch release adds a number of small new features and fixes a handful of problems discovered since the last release, in particular:
A lot of work has been done to improve vectorization support for our parallel algorithms. HPX now supports using EVE - the Expressive Vector Engine as a vectorization backend.
Added a simple average power consumption performance counter.
Added performance counters related to the use of zero-copy chunks in the networking layer.
More work was done towards full compatibility with the sender/receivers proposal P2300.
Fixing sync_wait to decay the result types
Fixed collective operations to properly avoid overalapping consecutive operations on the same communicator.
Simplified the implementation of our execution policies and added mapping functions between those.
Fixed performance issues with our implementation of small_vector.
Serialization now works with buffers of unsigned characters.
Fixing dangling reference in serialization of non-default constructible types
Fixed static linking on Windows.
Fixed support for M1/MacOS based architectures.
Fixed support for gentoo/musl.
Fixed hpx::counting_semaphore_var.
Properly check start and end bounds for hpx::for_loop
A lot of changes and fixes to the documentation (see https://hpx-docs.stellar-group.org).
Breaking changes#
No breaking changes have been introduced.
Closed issues#
Issue #5964 - component with multiple inheritance
Issue #5946 - dll_dlopen.hpp: error: RTLD_DI_ORIGIN was not declared in this scope with musl libc
Issue #5925 - Simplify implementation of execution policies
Issue #5924 - {what}: mmap() failed to allocate thread stack: HPX(unhandled_exception)
Issue #5912 - collectives all gather hangs if rank 0 is not involved
Issue #5902 - MPI parcelport issue on Fugaku
Issue #5900 - Unable to build hello_world_distributed.cpp.
Issue #5892 - Problems with HPX serialization as a standalone feature. Testcase provided.
Issue #5886 - Segfault when serializing non default constructible class with stl containers data members
Issue #5832 - Distributed execution crash
Issue #5768 - HPX hangs on Perlmutter
Issue #5735 - hpx::for_loop executes without checking start and end bounds
Issue #5700 - HPX(serialization_error)
Closed pull requests#
PR #5970 - Fixing component multiple inheritance
PR #5969 - Fixing sync_wait to avoid dangling references
PR #5963 - Fixing sync_wait to decay the result types
PR #5960 - docs: added name to documentation contributors list
PR #5959 - Fixing sync_wait to decay the result types
PR #5954 - refactor: rename itr to correct type (reduce)
PR #5954 - refactor: rename itr to correct type (reduce)
PR #5953 - Fixed property handling in hierarchical_spawning
PR #5951 - Fixing static linking (for Windows)
PR #5947 - Fix building on musl.
PR #5944 - added adaptive_static_chunk_size
PR #5943 - Fix sync_wait
PR #5942 - Fix doc warnings
PR #5941 - Fix sync_wait
PR #5940 - Protect collective operations against std::vector<bool> idiosyncrasies
PR #5939 - docs: fix & improve parallel algorithms documentation 2
PR #5938 - Properly implement generation support for collective operations
PR #5937 - Remove leftover files from PMR based small_vector
PR #5936 - Adding mapping functions between execution policies
PR #5935 - Fixing serialization to work with buffers of unsigned chars
PR #5934 - Attempting to fix datapar issues on CircleCI
PR #5933 - Fix documentation for ranges algorithms
PR #5932 - Remove mimalloc version constraint
PR #5931 - docs: fix & improve parallel algorithms documentation
PR #5930 - Add boost to hip builder
PR #5929 - Apply fixes to M1/MacOS related stack allocation to all relevant spots
PR #5928 - updated context_generic_context to accommodate arm64_arch_8/Apple architecture
PR #5927 - Public derivation for counting_semaphore_var
PR #5926 - Fix doxygen warnings when building documentation
PR #5923 - Fixing git checkout to reflect latest version tag
PR #5922 - A couple of unrelated changes in support of implementing P1673
PR #5920 - [P2300] enhancements: receiver_of, sender_of improvements
PR #5917 - Fixing various ‘held lock while suspending’ problems
PR #5916 - Fix minor doxygen parsing typo
PR #5915 - docs: fix broken api algo links
PR #5914 - Remove CSS rules - update sphinx version
PR #5911 - Removed references to hpx::vector in comments
PR #5909 - Remove stuff which is defined in the header
PR #5906 - Use BUILD_SHARED_LIBS correctly
PR #5905 - Fix incorrect usage of generator expressions
PR #5904 - Delete FindBZip2.cmake
PR #5901 - Fix #5900
PR #5899 - Replace PMR based version of small_vector
PR #5897 - Add missing “”
PR #5896 - Docs: Add serialization tutorial.
PR #5895 - Update to V1.9.0 on master
PR #5894 - Fix executor_with_thread_hooks example
PR #5890 - Adding simple average power consumption performance counter
PR #5889 - Par unseq/unseq adding
PR #5888 - Support for data-parallelism for reduce, transform reduce, transform_binary_reduce algorithms
PR #5887 - Fixing dangling reference in serialization of non-default constructible types
PR #5879 - New performance counters related to zero-copy chunks.
HPX V1.8.0 (May 18, 2022)#
With HPX parallel algorithms been fully adapted to C++20 the new release achieves full conformance with C++20 concurrency and parallelism facilities. HPX now supports all of the algorithms as specified by C++20. We have added support for vectorization to more of our algorithms. Much work has been done towards implementing P2300 (“std::execution”) and implementing the underlying senders/receivers facilities. Finally, The new release comes with a brand new documentation interface!
General changes#
The new documentation can now be found on our webpage: https://hpx-docs.stellar-group.org. This includes a completely new and user-friendly interface environment along with restructuring of certain components. The content in the “Quick start”, “Manual” and “Examples” was improved, while the “Build system” page was adapted to include necessary information for newcommers.
With the vectorization support available in modern hardware architectures HPX now provides new data-parallel vector execution policies
hpx::execution::simdandhpx::execution::par_simdthat enable significant speed-up of our parallel algorithm implementations. The following algorithms now support SIMD execution:copy,copy_ngenerateadjacent_difference,adjacent_findall_of,any_of,none_ofequal,mismatch,inner_productcount,count_iffill,fill_nfind,find_end,find_first_of,find_if,find_if_notfor_each,for_each_ngenerate,generate_n.
Based on top of P2300 the HPX parallel algorithms now support the pipeline syntax towards an effort to unify their usage along with senders/receivers. The HPX parallel algorithms can now bind with senders/receivers using the pipeline operator.
Several changes took place on the executors provided by HPX:
The executors now support the
num_coresoptions in order for the user to be able to specify the desired number of cores to be used in the correspodning execution.The
schedulerexecutor was implemented on top of senders/receivers and can be used with all HPX facilities that schedule new work, such as parallel algorithms,hpx::async,hpx::dataflow, etc.The performance of
fork_join_executorwas improved.The following algorithms have been added/adapted to be C++20 conformant:
min_elementmax_elementminmax_elementstarts_withends_withswap_rangesuniqueunique_copyrotaterotate_copysortshift_leftshift_rightstable_sortpartitionpartition_copystable_partitionadjacent_differencenth_elementpartial_sortpartial_sort_copy.
HPX_FORWARD/HPX_MOVEmacros were introduced that replaced thestd::moveandstd::forwardfacilities that in the library code.Hangs on distributed barrier were fixed.
The performance of
scan_partitionerwas improved.Support was added for
thread_priorityto theparallel_execution_policyRegarding senders/receivers and the P2300 proposal various actions took place.
stop_tokenwas adapted to the recent proposal version (in_place_stop_tokenwas introduced). Also hint, annotation, priority and stacksize properties were added to the scheduler executor. Stop support was added towhen_all. Support for completion signatures was added. The following schedulers and algorithms were added:get_completion_schedulerany_senderandunique_any_sendersplitsendertransform_mpisendertransfersenderlet_error,let_stoppedget_envand related environment queriesschedule,set_value,set_error,set_done,startandconnectare now proper customization points as defined in P2300.
Several namespaces were altered towards conformance with C++20. Compatibility layers have been added and the old versions will be removed in next releases. The namespace changes are the following:
hpx::parallel::induction/reductionwere movied into namespacehpx::experimentalfor_loopand friends were moved into namespacehpx::experimental.hpx::util::optionaland friends were moved into namespacehpx.hpx::lcos::barrierhas been moved into thehpx::distributednamespace andhpx::lcos::local::cpp20_barrierhas been renamed tobarrierand moved into thehpxnamespace.hpx::lcos::latchhas been moved into thehpx::distributednamespace andlcos::local::latchhas been moved into thehpxnamespace. Thecount_down_and_wait()functionality oflatchhas been renamed toarrive_and_wait().hpx::util::unique_function_nonserhas been renamed tohpx::move_only_function.hpx::util::unique_functionhas been renamed tohpx::distributed::move_only_function.hpx::util::functionhas been renamed tohpx::distributed::function.hpx::util::function_nonserhas been renamed tohpx::function.hpx::util::function_refhave been moved to namespacehpx.hpx::lcos::split_futurechanged namespace and is now used ashpx::split_future.hpx::lcos::local::counting_semaphorehas been deprecated andhpx::lcos::local::cpp20_counting_semaphorehas been renamed tohpx::counting_semaphore.hpx::lcos::local::cpp20_binary_semaphorehas been renamed tohpx::binary_semaphore.hpx::lcos::local::sliding_semaphorehas been renamed tohpx::sliding_semaphoreandhpx::lcos::local::sliding_semaphore_varhas been renamed tohpx::sliding_semaphore_var.hpx::lcos::local::spinlockhas been renamed tohpx::spinlock.hpx::lcos::local::mutexhas been renamed tohpx::mutex.hpx::lcos::local::timed_mutexhas been renamed tohpx::timed_mutex.hpx::lcos::local::no_mutexhas been renamed tohpx::no_mutex.hpx::lcos::local::recursive_mutexhas been renamed tohpx::recursive_mutex.hpx::lcos::local::shared_mutexhas been renamed tohpx::shared_mutex.hpx::lcos::local::upgrade_lockhas been renamed tohpx::upgrade_lock.hpx::lcos::local::upgrade_to_unique_lockhas been renamed tohpx::upgrade_to_unique_lock.hpx::lcos::local::condition_variablehas been renamed tohpx::condition_variable.hpx::lcos::local::condition_variable_varhas been renamed tohpx::condition_variable_var.hpx::lcos::local::once_flaghas been renamed tohpx::once_flag, and .hpx::lcos::local::call_oncehas been renamed tohpx::call_once.
The new LCI (Lightweight Communication Interface) parcelport was added that supports irregular and asynchronous applications like graph analysis, sparce linear algebra, modern parallel architectures etc. Major features include:
Support for advanced communication primitives like two sided send/recv and one sided remote put.
Better multi-threaded performance.
Explicit user control of communication resource.
Flexible signaling mechanisms (synchronizer, completion queue, active message handler).
The following CMake flags were added, mostly to support using HPX as a backend for SHAD (pnnl/SHAD). Please note that these options enable questionable functionalities, partially they even enable undefined behavior. Please only use any of them if you know what you’re doing:
HPX_SERIALIZATION_WITH_ALLOW_RAW_POINTER_SERIALIZATIONHPX_SERIALIZATION_WITH_ALL_TYPES_ARE_BITWISE_SERIALIZABLEHPX_SERIALIZATION_WITH_ALLOW_CONST_TUPLE_MEMBERS
Breaking changes#
Minimum required C++ standard library is C++17.
Support for GCC 7 and Clang 8.0.0 and below has been removed.
CUDA version required updated to 11.4.
CMake version required updated to 3.18.
The default version of Asio used was updated to 1.20.0.
The default version of APEX used was updated to 2.5.1.
APEX version was updated to 2.5.1.
tagged_pairandtagged_tuplewere removed.tag_dispatchwas renamed totag_invoke.hpx.max_backgroud_threadswas renamed tohpx.parcel.max_background_threads.The following CMake flags were removed after being deprecated for at least two releases:
HPX_SCHEDULER_MAX_TERMINATED_THREADSHPX_WITH_GOOGLE_PERFTOOLSHPX_WITH_INIT_START_OVERLOADS_COMPATIBILITYHPX_HAVE_{COROUTINE,PLUGIN}_GCC_HIDDEN_VISIBILITYHPX_TOP_LEVELHPX_WITH_COMPUTE_CUDAHPX_WITH_ASYNC_CUDA
annotate_functionwas renamed toscoped_annotation.execution::transformwas renamed toexecution::then.execution::detachwas renamed toexecution::start_detached.execution::on_senderwas renamed toexecution::schedule_on.execution::just_onwas renamed toexecution::just_transfer.execution::set_donewas renamed toexecution::set_stopped.
Closed issues#
Issue #5871 - distributed::channel.regsiter_as terminates the active task.
Issue #5856 - Performance counters do not compile
Issue #5828 - hpx::distributed:barrier errors
Issue #5812 - OctoTiger does not compile with HPX master and CUDA 11.5
Issue #5784 - HPX failing with co_await and hpx::when_all(futures)
Issue #5774 - CMake can’t find HPXCacheVariables.cmake
Issue #5764 - Fix HIP problem
Issue #5724 - Missing binary filter compression header
Issue #5721 - Cleanup after repository split
Issue #5701 - It seems that the tcp parcelport is running, and the MPI parcelport is ignored
Issue #5692 - Kokkos compilation fails when using both HPX and CUDA execution spaces with gcc 9.3.0
Issue #5686 - Rename annotate_function
Issue #5668 - HPX does not detect the C++ 20 standard using gcc 11.2
Issue #5666 - Compilation error using boost 1.76 and gcc 11.2.1
Issue #5653 - Implement P2248 for our algorithms
Issue #5647 - [User input needed] Remove (CUDA) compute functionality?
Issue #5590 - hello_world_distributed fails on startup with HPX stable, MPICH 3.3.2, on Deep Bayou
Issue #5570 - Rename tag_dispatch to tag_invoke
Issue #5566 - can’t build simple example: “Cannot use the dummy implementation of future_then_dispatch”
Issue #5565 - build failure: hpx::string_util::trim()
Issue #5553 - Github action to validate the cff file refs #5471
Issue #5504 - CMake does not work for HPX 1.7.0 on Piz Daint
Issue #5503 - Use contiguous index queue in bulk execution to reduce number of spawned tasks
Issue #5502 - C++20 std::coroutine cmake detection
Issue #5478 - hpx.dll built with vcpkg got functions pointing to the same location
Issue #5472 - Compilation error with cuda/11.3
Issue #5469 - Compiler warning about HPX_NODISCARD when building with APEX
Issue #5463 - Address minor comments of the C++17 PR bump
Issue #5456 - Use std::ranges::iter_swap where available
Issue #5404 - Build fails with error “Cannot open include file asio/io_context.hpp”
Issue #5381 - Add starts_with and ends_with algorithms
Issue #5344 - Further simplify tag_invoke helpers
Issue #5269 - Allow setting a label on executors/policies
Issue #5219 - (Re-)Implement executor API on top of sender/receiver infrastructure
Issue #5216 - Performance counter module not loading
Issue #5162 - Require C++17 support
Issue #5156 - Disentangle segmented algorithms
Issue #5118 - Lock held while suspending
Issue #5111 - Tests fail to build with binary_filter plugins enabled
Issue #5110 - Tests don’t get built
Issue #5105 - PAPI performance counters not available
Issue #5002 - hpx::lcos::barrier() results in deadlock
Issue #4992 - Clang-format the rest of the files
Issue #4987 - Use std::function in public APIs
Issue #4871 - HEP: conformance to C++20
Issue #4822 - Adapt parallel algorithms to C++20
Issue #4736 - Deprecate hpx::flush and hpx::endl
Issue #4558 - Prevent work-stealing from stalling
Issue #4495 - Add anchor links to table rows in documentation
Issue #4469 - New thread state: pending_low
Issue #4321 - After the modularization the libfabric parcelport does not compile
Issue #4308 - Using APEX on multinode jobs when HPX_WITH_NETWORKING = OFF
Issue #3995 - Use C++20 std::source_location where available, adapt ours to conform
Issue #3861 - Selected processor does not support ‘yield’ in ARM mode
Issue #3706 - Add shift_left and shift_right algorithms
Issue #3646 - Parallel algorithms should accept iterator/sentinel pairs
Issue #3636 - HPX Modularization
Issue #3546 - Modularization of HPX
Issue #3474 - Modernize CMake used in HPX
Issue #1836 - hpx::parallel does not have a sort implementation
Issue #1668 - Adapt all parallel algorithms to Ranges TS
Issue #1141 - Implement N4409 on top of HPX
Closed pull requests#
PR #5885 - Testing newer ASIO version
PR #5884 - Fix miscellaneous doc sections
PR #5882 - Fixing OctoTiger incompatibility introduced recently
PR #5881 - Fixing recent patch that disables ATOMIC_FLAG_INIT for C++20 and up
PR #5880 - refactor: convert counter_status enum to enum class
PR #5878 - Docs: Replaced non-existent create_reducer function with create_communicator
PR #5877 - Doc updates hpx runtime and resources
PR #5876 - Updates to documentation; grammar edits.
PR #5875 - Doc updates starting the hpx runtime
PR #5874 - Doc updates launching configuring
PR #5873 - Prevent certain generated files from being deleted on reconfigure
PR #5870 - Adding support for the PJM batch environment
PR #5867 - Update CMakeLists.txt
PR #5866 - add cmake option HPX_WITH_PARCELPORT_COUNTERS
PR #5864 - ATOMIC_INIT_FLAG is deprecated starting C++20
PR #5863 - Adding llvm 14.0.0 with boost 1.79.0 to Jenkins
PR #5861 - Let install step proceed on CircleCI even if the segmented algorithms fail
PR #5860 - Updating APEX tag
PR #5859 - Splitting documentation generation steps on CircleCI
PR #5854 - Fixing left-overs from changing counter_type to enum class
PR #5853 - Adding HPX dependency tool (adapted from Boostdep tool)
PR #5852 - Optimize LCI parcelport
PR #5851 - Forking dynamic_bitset from Boost
PR #5850 - Convert perf_counters::counter_type enum to enum class.
PR #5849 - Update LCI parcelport to LCI v1.7.1
PR #5848 - Fedora related fixes
PR #5847 - Fix API, troubleshooting & people
PR #5844 - Attempting to fix timeouts of segmented iterator tests
PR #5842 - change the default value of HPX_WITH_LCI_TAG to v1.7
PR #5841 - Move the split_future facilities into the namespace hpx
PR #5840 - wait_xxx_nothrow functions return whether one of the futures is exceptional
PR #5839 - Moving a list of synchronization primitives into namespace hpx
PR #5837 - Moving latch types to hpx and hpx::distributed namespaces
PR #5835 - Add missing compatibility layer for id_type::management_type values
PR #5834 - API docs changes
PR #5831 - Further improvement actions to rotate
PR #5830 - Exposing zero-copy serialization threshold through configuration option
PR #5829 - Attempting to fix failing barrier test
PR #5827 - Add back explicit template parameter to ignore_while_checking to compile with nvcc
PR #5826 - Reduce number of allocations while calling async_bulk_execute
PR #5825 - Steal from neighboring NUMA domain only
PR #5823 - Remove obsolete directories and adjust build system
PR #5822 - Clang-format remaining files
PR #5821 - Enable permissive- flag on Windows GitHub actions builders
PR #5820 - Convert throwmode enum to enum class
PR #5819 - Marking customization points for intrusive_ptr as noexcept
PR #5818 - Unconditionally use C++17 attributes
PR #5817 - Modernize naming modules
PR #5816 - Modernize cache module
PR #5815 - Reapply flyby changes from #5467
PR #5814 - Avoid test timeouts by reducing test sizes
PR #5813 - The CUDA problem is not fixed in V11.5 yet…
PR #5811 - Make sure reduction value is properly moved, when possible
PR #5810 - Improve error reporting during device initialization in HIP environments
PR #5809 - Converting scheduler enums into enum class
PR #5808 - Deprecate hpx::flush and friends
PR #5807 - Use C++20 std::source_location, if available
PR #5806 - Moving promise and packaged_task to new namespaces
PR #5805 - Attempting to fix a test failure when using the LCI parcelpor
PR #5803 - Attempt to fix CUDA related OctoTiger problems
PR #5800 - Add option to restrict MPI background work to subset of cores
PR #5798 - Adding MPI as a dependency to APEX
PR #5797 - Extend Sphinx role to support arbitrary text to display on a link
PR #5796 - Disable CUDA tests that cause NVCC to silently fail without error messages
PR #5795 - Avoid writing path and directories into HPXCacheVariables.cmake
PR #5793 - Remove features that are deprecated since V1.6
PR #5792 - Making sure num_cores is properly handled by parallel_executor
PR #5791 - Moving bind, bind_front, bind_back to namespace hpx
PR #5790 - Moving serializable function/move_only_function into namespace hpx::distributed
PR #5787 - Remove unneeded (and commented) tests
PR #5786 - Attempting to fix hangs in distributed barrier
PR #5785 - add cmake code to detect arm64 on macOS
PR #5783 - Moving function and function_ref into namespace hpx
PR #5781 - Updating used version of Visual Studio
PR #5780 - Update Piz Daint Jenkins configurations from gcc/clang 7 to 8
PR #5778 - Updated for_loop.hpp
PR #5777 - Update reference for foreach benchmark
PR #5775 - Move optional into namespace hpx
PR #5773 - Moving barrier to consolidated namespaces
PR #5772 - Adding missing docs for ranges::find_if and find_if_not algorithms
PR #5771 - Moving for_loop into namespace hpx::experimental
PR #5770 - Fixing HIP issues
PR #5769 - Slight improvement of small_vector performance
PR #5766 - Fixing a integral conversion warning
PR #5765 - Adding a sphinx role allowing to link to a file directly in github
PR #5763 - add num_cores facility
PR #5762 - Fix Public API main page
PR #5761 - Add missing inline to mpi_exception.hpp error_message function
PR #5760 - Update cdash build url
PR #5759 - Switch to use generic rostam SLURM partitions
PR #5758 - Adding support for P2300 completion signatures
PR #5757 - Fix missing links in Public API
PR #5756 - Add stop support to when_all
PR #5755 - Support for data-parallelism for mismatch algorithm
PR #5754 - Support for data-parallelism for equal algorithm
PR #5751 - Propagate MPI dependencies to command line handling
PR #5750 - Make sure required MPI initialization flags are properly applied and supported
PR #5749 - P2300 stop token
PR #5748 - Adding environmental query CPOs
PR #5747 - Renaming set_done to set_stopped (as per P2300)
PR #5745 - Modernize serialization module
PR #5743 - Add check for MPICH and set the correct env to support multi-threaded
PR #5742 - Remove obsolete files related to cpuid, etc.
PR #5741 - Support for data-parallelism for adjacent find
PR #5740 - Support for data-parallelism for find algorithms
PR #5739 - Enable the option to attach a debugger on a segmentation fault (linux)
PR #5738 - Fixing spell-checking errors
PR #5737 - Attempt to fix migrate_component issue
PR #5736 - Set commit status from Jenkins also for special branches
PR #5734 - Revert #5586
PR #5732 - Attempt to improve build-id reporting to cdash
PR #5731 - Randomly delay execution of bash scripts launched by Jenkins
PR #5729 - Workaround for CMake/Ninja generator OOM problem
PR #5727 - Moving compression plugins to components directory
PR #5726 - Moving/consolidating parcel coalescing plugin sources
PR #5725 - Making sure headers for serialization filters are being installed
PR #5723 - Moving more tests to modules
PR #5722 - Removing superfluous semicolons
PR #5720 - Moving parcelports into modules
PR #5719 - Moving more files to parcelset module
PR #5718 - build: refactor sphinx config file
PR #5717 - Creating parcelset modules
PR #5716 - Avoid duplicate definition error
PR #5715 - The new LCI parcelport for HPX
PR #5713 - Significantly reduce CI jobs run on Piz Daint
PR #5712 - Updating jenkins configuration for Rostam2.2
PR #5711 - Refactor manual sections
PR #5710 - Making task_group serializable
PR #5709 - Update the MPI cmake setup
PR #5707 - Better diagnose parcel bootstrap problems
PR #5704 - Test with hwloc 2.7.0 with GCC 11
PR #5703 - Fix counting_iterator container tests
PR #5702 - Attempting to fix CircleCI timeouts
PR #5699 - Update CI to use Boost 1.78.0
PR #5697 - Adding fork_join_executor to foreach_benchmark
PR #5696 - Modernize when_all and friends (when_any, when_some, when_each)
PR #5693 - Fix test errors with _GLIBCXX_DEBUG defined
PR #5691 - Rename annotate_function to scoped_annotation
PR #5690 - Replace tag_dispatch with tag_invoke in minmax segmented
PR #5688 - Remove more deprecated macros
PR #5687 - Add most important CMake options
PR #5685 - Fix future API
PR #5684 - Move lock registration to separate module and remove global lock registration
PR #5683 - Make hpx::wait_all etc. throw exceptions when waited futures hold exceptions and deprecate hpx::lcos::wait_all[_n] in favor of hpx::wait_all[_n]
PR #5682 - Fix macOS test exceptions
PR #5681 - docs: add links to hpx recepies
PR #5680 - Embed base execution policies to datapar execution policies
PR #5679 - Fix fork_join_executor with dynamic schedule
PR #5678 - Fix compilation of service executors with nvcc
PR #5677 - Remove compute_cuda module
PR #5676 - Don’t require up-to-date approvals for bors
PR #5675 - Add default template type parameters for algorithms
PR #5674 - Allow using any_sender in global variables
PR #5671 - Making sure task_group can be reused
PR #5670 - Relax constraints on execution::when_all
PR #5669 - Use HPX_WITH_CXX_STANDARD for controlling C++ version
PR #5667 - Attempt to fix compilation issues with Boost V1.76
PR #5664 - Change logging errors to warnings in schedulers
PR #5663 - Use dynamic bitsets by default for CPU masks
PR #5662 - Disambiguate namespace for MSVC
PR #5660 - Replacing remaining std::forward and std::move with HPX_FORWARD and HPX_MOVE
PR #5659 - Modernize hpx::future and related facilities
PR #5658 - Replace HPX_INLINE_CONSTEXPR_VARIABLE with inline constexpr
PR #5657 - Remove tagged, tagged_pair and tagged_tuple, remove tuple/pair specializations
PR #5656 - Rename on execution::schedule_from, rename just_on to just_transfer, and add transfer
PR #5655 - Avoid for module lists to grow indefinitely in cmake cache
PR #5649 - build: replace usage of Python’s reserved words and functions as variable names
PR #5648 - Modernize action modules and related code
PR #5646 - Fix ends_with test
PR #5645 - Add matrix multiplication example
PR #5644 - Rename execution::transform to execution::then and execution::detach to execution::start_detached
PR #5643 - Update performance test references
PR #5642 - Adapting adjacent_difference to work with proxy iterators
PR #5641 - Factorize perftests scripts
PR #5640 - Fixed links to sources in Sphinx documentation
PR #5639 - Fix generate datapar tests for Vc
PR #5638 - Simd all any none
PR #5637 - Use bors for merging pull requests
PR #5636 - Fix leftover std::holds_alternative usage
PR #5635 - Update container image tag in GitHub actions HIP configuration
PR #5633 - Moving packaged_task to module futures
PR #5632 - Tell Asio to use std::aligned_new only if available
PR #5631 - Adding tag parameter to channel communicator get/set
PR #5630 - Add partial_sort_copy and adapt partial sort to c++ 20
PR #5629 - Set HPX_WITH_FETCH_ASIO to OFF as available in the docker image
PR #5628 - Add Clang 13 CI configuration
PR #5627 - Replace alternative keyword
PR #5626 - docs: add support for BibTeX references in Sphinx docs
PR #5624 - Fix pkgconfig replacements involving CMAKE_INSTALL_PREFIX
PR #5623 - build: remove unused import from conf.py.in
PR #5622 - Remove HPX_WITH_VCPKG CMake option
PR #5621 - Replacing boost::container::small_vector
PR #5620 - Update Asio tag from 1.18.2 to 1.20.0
PR #5619 - Fix block_os_threads_1036 test
PR #5618 - Make sure condition variables are notified under a lock in the thread_pool_scheduler test
PR #5617 - Use advance_and_get_distance where required
PR #5616 - Remove separately building segmented algorithms on CircleCI
PR #5613 - Fix Vc datapar adjacent_difference
PR #5609 - docs: add anchor links to performance counter tables
PR #5608 - Fix header test error by adding missing numeric
PR #5607 - Fix simd adj diff
PR #5605 - Fix usage of HPX_INVOKE macro
PR #5604 - Make use of shell-session to allow non-copyable $
PR #5603 - Suppress some MSVC warnings in C++20 mode
PR #5602 - Test HPX_DATASTRUCTURES_WITH_ADAPT_STD_TUPLE=OFF to one CI configuration
PR #5601 - Test case for any_sender should use hpx::tuple
PR #5600 - Rename tag_dispatch back to tag_invoke
PR #5599 - Change theme, fix Quickstart & Examples
PR #5596 - Use precompiled headers in tests
PR #5595 - Drop semicolons for macro calls
PR #5594 - Adapt datapar generate
PR #5593 - Update any_sender to use tag_dispatch for execution customizations
PR #5592 - Add nth_element
PR #5591 - Remove unnecessary checks for C++17 for tests
PR #5589 - Add HPX_FORWARD/HPX_MOVE macros
PR #5588 - Fixing the output formatting for id_types
PR #5586 - Remove local functionality
PR #5585 - Delete GitExternal.cmake
PR #5584 - Serialization of hpx::tuple must use hpx::get
PR #5583 - fix coroutine_traits allocate calls, add unhandled_exception() implementation.
PR #5582 - Make more examples work with local runtime
PR #5581 - Add support for several performance tests in CI
PR #5580 - Adapt simd adj diff
PR #5579 - Split absolute paths for generated pkg-config files into -L/-l parts
PR #5577 - fix unit fill test for datapar with Vc
PR #5576 - Update forgotten “Full” names
PR #5575 - Change scan partitioner implementation
PR #5574 - Remove a few deprecated and unused CMake options
PR #5572 - Remove more guards for the distributed runtime
PR #5571 - Add workaround for libstc++ in string_util trim
PR #5569 - Use no_unique_address in sender adaptors
PR #5568 - Change try catch block to try_catch_exception_ptr
PR #5567 - Make default_agent::yield actually yield
PR #5564 - Adjacent
PR #5562 - More changes to overcome build problems on Windows after recent module rearrangements
PR #5560 - Update tests and examples
PR #5559 - Fixing cmake folder names after module restructuring
PR #5558 - Fixing wrong module dependencies
PR #5557 - Adding an example for the new channel_communicator API
PR #5556 - Remove leftover thread pool os executor tests
PR #5555 - Add option enabling serializing raw pointers
PR #5554 - Make sure command line aliasing is properly handled
PR #5552 - Modernizing some of the async facilities
PR #5551 - Fixing for local executions of actions to properly set task names
PR #5550 - Update CUDA module in clang-cuda configuration
PR #5549 - Fixing agent_ref::yield_k to actually call yield_k
PR #5548 - Making get_action_name() noexcept
PR #5547 - Fixing communication set
PR #5546 - Fixing shutdown problems caused by missing ref-counting
PR #5545 - Remove wrong move in thread_pool_scheduler_bulk.hpp
PR #5543 - Extend launch policy to carry stack size and scheduling hint in addition to priority
PR #5542 - Simplify execution CPOs
PR #5540 - Adapt partition, partition_copy and stable_partition to C++ 20
PR #5539 - Adapt mismatch to support sentinels
PR #5538 - Document specific sphinx version required for the documentation
PR #5537 - Test release and debug builds on Piz Daint
PR #5536 - This fixes referencing stale iterators during the execution of binary mismatch
PR #5535 - Rename simdpar to par_simd
PR #5534 - Fix Quick start & Manual Docs
PR #5533 - Fix annotate_function for std::string
PR #5532 - Update two remaining apex links from khuck to UO-OACISS
PR #5531 - Use contiguous_index_queue in thread_pool_scheduler
PR #5530 - Eagerly initialize a configurable number of threads on scheduler/thread queue init
PR #5529 - Update benchmarks and add support for scheduler_executor
PR #5528 - Add missing properties to executors/schedulers
PR #5527 - Set local thread/pool number in local/static_queue_scheduler
PR #5526 - Update Rostam HIP configuration to use 4.3.0
PR #5525 - Fix Building HPX in Quick start
PR #5524 - Upload image on cdash
PR #5523 - Modernize facilities related to hpx::sync
PR #5522 - Add sender overloads for remaining algorithms
PR #5521 - Minor changes that improve performance
PR #5520 - Update reference as perftests failing regularly
PR #5519 - Add transform_mpi sender adapter
PR #5518 - Add sender overloads to rotate/rotate_copy
PR #5517 - Fix coroutine integration
PR #5515 - Avoid deadlock in ignore_while_locked_1485 test
PR #5514 - Add split sender adapter
PR #5512 - Update Rostam HIP configuration
PR #5511 - Fix Asio target name for precompiled headers
PR #5510 - Add any_sender and unique_any_sender
PR #5509 - Test with Boost 1.77 on gcc/clang-newest configurations
PR #5508 - Minor release changes from 1.7.1
PR #5507 - Add missing commits from scheduler_executor PR
PR #5506 - Fix condition for checking if we should use our own variant
PR #5501 - Attempt to fix thread_pool_scheduler test
PR #5493 - Update Jenkins GitHub token to use StellarBot GitHub account
PR #5490 - Fix clang-format error on master
PR #5487 - Add get_completion_scheduler CPO and customize bulk for thread_pool_scheduler
PR #5484 - Add missing header to jacobi_component/server/solver.hpp
PR #5481 - Changing the APEX repository to the new location
PR #5479 - Fix version check for CUDA noexcept/result_of bug
PR #5477 - Require cxx17 minor comments
PR #5476 - Fix cmake format error
PR #5475 - Require CMake 3.18 as it is already a requirement for CUDA
PR #5474 - Make the cuda parameters of try_compile optional
PR #5473 - Update cuda arch and change cuda version
PR #5471 - Add corrected citation.cff
PR #5470 - Adapt stable_sort to C++ 20
PR #5468 - Experimentation to make the perftest report public
PR #5466 - Add shift_left and shift_right algorithms
PR #5465 - Adapt datapar fill
PR #5464 - Moving tag_dispatch to separate module
PR #5461 - Rename HPX_WITH_CUDA_COMPUTE with HPX_WITH_COMPUTE_CUDA
PR #5460 - Adapt sort to C++ 20
PR #5459 - Adapt rotate/rotate_copy to C++20
PR #5458 - Adapt unique and unique_copy to C++ 20
PR #5455 - Remove and clean up fallback sender implementations
PR #5454 - Make performance plot show even if similar performance
PR #5453 - Post 1.7.0 version bump
PR #5452 - Fix find_end parallel overload
PR #5450 - Change the print-bind output to be more precise
PR #5449 - Adapt swap_ranges to C++ 20
PR #5446 - Use more verbose names in sender algorithms
PR #5443 - Properly support ASAN with MSVC
PR #5441 - Adding reference counting to thread_data
PR #5429 - Scheduler executor
PR #5428 - Adapt datapar copy
PR #5421 - Update CI base image to use clang-format 11
PR #5410 - Add ranges starts_with and ends_with algorithms
PR #5383 - Tentatively remove runtime_registration_wrapper from cuda futures
PR #5377 - Fewer Asio includes and more precompiled headers
PR #5329 - Sender overloads for parallel algorithms
PR #5313 - Rearrange modules between libraries
PR #5283 - Require minimum C++17 and change CUDA handling
PR #5241 - Adapt min_element, max_element and minmax_element to C++20
HPX V1.7.1 (Aug 12, 2021)#
This is a bugfix release with a few minor fixes.
General changes#
Added a CMake option to assume that all types are bitwise serializable by default:
HPX_SERIALIZATION_WITH_ALL_TYPES_ARE_BITWISE_SERIALIZABLE. The default valueOFFcorresponds to the old behaviour.Added a version check for Asio. The minimum Asio version supported by HPX is 1.12.0.
Fixed a bug affecting usage of actions, where the internals of HPX relied on function addresses being unique. This was fixed by relying on variable addresses being unique instead.
Made
hpx::util::bindmore strict in checking the validity of placeholders.Small performance improvement to spinlocks.
Adapted the following parallel algorithms to C++20:
inclusive_scan,exclusive_scan,transform_inclusive_scan,transform_exclusive_scan.
Breaking changes#
The experimental
hpx::execution::simdparexecution policy (introduced in 1.7.0) was renamed tohpx::execution::par_simdfor consistency with the other parallel policies.
Closed issues#
Issue #5494 - Rename simdpar execution policy to par_simd
Issue #5488 - hpx::util::bind doesn’t bounds-check placeholders
Issue #5486 - Possible V1.7.1 release
Closed pull requests#
PR #5500 - Minor bug fix in transform exclusive and inclusive scan tests
PR #5499 - Rename simdpar to par_simd
PR #5489 - Adding bound-checking for bind placeholders
PR #5485 - Add Asio version check
PR #5482 - Change extra archive data to rely on uniqueness of a variable address, not a function address
PR #5448 - More fixes to enable for all types to be assumed to be bitwise copyable
PR #5445 - Improve performance of Spinlocks
PR #5444 - Adapt transform_inclusive_scan to C++ 20
PR #5440 - Adapt transform_exclusive_scan to C++ 20
PR #5439 - Adapt inclusive_scan to C++ 20
PR #5436 - Adapt exclusive_scan to C++20
HPX V1.7.0 (Jul 14, 2021)#
This release is again focused on C++20 conformance of algorithms. Additionally, many new experimental sender-based algorithms have been added based on the latest proposals.
General changes#
The following algorithms have been adapted to be C++20 conformant:
remove,remove_if,remove_copy,remove_copy_if,replace,replace_if,reverse, andlexicographical_compare.
When the compiler and standard library support the standard execution policies
std::execution::seq,std::execution::par, andstd::execution::par_unseqthey can now be used in all HPX parallel algorithms with equivalent behaviour to the non-task policieshpx::execution::seq,hpx::execution::par, andhpx::execution::par_unseq.Vc support has been fixed, after being broken in 1.6.0. In addition, HPX now experimentally supports GCC’s SIMD implementation, when available. The implementation can be used through the
hpx::execution::simdandhpx::execution::simdparexecution policies.The customization points
sync_execute,async_execute,then_execute,post,bulk_sync_execute,bulk_async_execute, andbulk_then_executeare now implemented usingtag_dispatch(previouslytag_invoke). Executors can still be implemented by providing the aforementioned functions as member functions of an executor.New functionality, enhancements, and fixes based on P0443r14 (executors proposal) and P1897 (sender-based algorithms) have been added to the
hpx::execution::experimentalnamespace. These can be accessed through thehpx/execution.hppandhpx/local/execution.hppheaders. In particular, the following sender-based algorithms have been added:detach,ensure_started,just,just_on,let_error,let_value,on,transform, andwhen_all.
Additionally, futures now implement the sender concept.
make_futurecan be used to turn a sender into a future. All functionality is experimental and can change without notice.All
hpx::initandhpx::startoverloads now takestd::functions instead ofhpx::util::function_nonser. No changes should be required in user code to accommodate this change.hpx::util::unwrappingand other related unwrapping functionality has been moved up into thehpxnamespace. Names inhpx::utilare still usable with a deprecation warning. This functionality can now be accessed through thehpx/unwrap.hppandhpx/local/unwrap.hppheaders.The default tag for APEX has been update from 2.3.1 to 2.4.0. In particular, this fixes a bug which could lead to hangs in distributed runs.
The dependency on Boost.Asio has been replaced with the standalone Asio available at chriskohlhoff/asio. By default, a system-installed Asio will be used.
ASIO_ROOTcan be given as a hint to tell CMake where to find Asio. Alternatively, Asio can be fetched automatically using CMake’s fetchcontent by settingHPX_WITH_FETCH_ASIO=ON. In general, dependencies on Boost have again been reduced.Modularization of the library has continued. In this release almost all functionality has been moved into modules. These changes do not generally affect user code. Warnings are still issued for headers that have moved.
hipBLAS is now optional when compiling with
hipcc. A warning instead of an error will be printed if hipBLAS is not found during configuration.Previously
HPX_COMPUTE_HOST_CODEwas defined in host code only if HPX was configured with CUDA or HIP. In this releaseHPX_COMPUTE_HOST_CODEis always defined in host code.An experimental
HPX_WITH_PRECOMPILED_HEADERSCMake option has been added to use precompiled headers when building HPX. This option should not be used on Windows.Numerous bug fixes.
Breaking changes#
The minimum required CMake version is now 3.17.
The minimum required Boost version is now 1.71.0.
The customization mechanism used to implement and extend sender functionality and algorithms has been renamed from
tag_invoketotag_dispatch. All customization of sender functionality should be done by overloadingtag_dispatch.The following compatibility options have been removed, along with their compatibility implementations: -
HPX_PROGRAM_OPTIONS_WITH_BOOST_PROGRAM_OPTIONS_COMPATIBILITY-HPX_WITH_ACTION_BASE_COMPATIBILITY-HPX_WITH_EMBEDDED_THREAD_POOLS_COMPATIBILITY-HPX_WITH_POOL_EXECUTOR_COMPATIBILITY. -HPX_WITH_PROMISE_ALIAS_COMPATIBILITY-HPX_WITH_REGISTER_THREAD_COMPATIBILITY-HPX_WITH_REGISTER_THREAD_OVERLOADS_COMPATIBILITY-HPX_WITH_THREAD_AWARE_TIMER_COMPATIBILITY-HPX_WITH_THREAD_EXECUTORS_COMPATIBILITY-HPX_WITH_THREAD_POOL_OS_EXECUTOR_COMPATIBILITYThe
HPX_WITH_THREAD_SCHEDULERSCMake option has been removed. All schedulers are now enabled when possible.HPX_WITH_INIT_START_OVERLOADS_COMPATIBILITYhas been turned off by default.
Closed issues#
Issue #5423 - Fix lvalue-ref qualified connect for
when_all-senderIssue #5412 - Link error
Issue #5397 - Performance regression in thread annotations
Issue #5395 - HPX 1.7.0-rc1 fails to build icw APEX + OTF2
Issue #5385 - HPX 1.7 crashes on Piz Daint > 64 nodes
Issue #5380 - CMake should search for asio package installed on the system
Issue #5378 - HPX 1.7.0 stopped building on Fedora
Issue #5369 - HPX 1.6 and master hangs on Summit for > 64 nodes
Issue #5358 - HPX init fails for single-core environments
Issue #5345 - Rename P2220 property CPOs?
Issue #5333 - HPX does not compile on the new Mac OSX using the M1 chip
Issue #5317 - Consider making hipblas optional
Issue #5306 - asio fails to build with CUDA 10.0
Issue #5294 -
execution::onshould be based onexecution::scheduleIssue #5275 - HPX V1.6.0 fails on Fedora release
Issue #5270 - HPX-1.6.0 fails to build on Windows 10
Issue #5257 - Allow triggering the output of OS thread affinity from configuration settings
Issue #5246 - HPX fails to build on ppc64le
Issue #5232 - Annotation using
hpx::util::annotated_functionnot workingIssue #5222 - Build and link errors with ittnotify enabled
Issue #5204 - Move algorithms to tag_fallback_dispatch
Issue #5163 - Remove module-specific compatibility and deprecation options
Issue #5161 - Bump required CMake version to 3.17
Issue #5143 - Searching for HPX-Application to generate work on multiple Nodes
Closed pull requests#
PR #5438 - Delete datapar/foreach_tests.hpp
PR #5437 - Add back explicit -pthread flags when available
PR #5435 - This adds support for systems that assume all types are bitwise serializable by default
PR #5434 - Update CUDA polling logging to be more verbose
PR #5433 - Fix
when_all_senderconnect for referencesPR #5432 - Add deprecation warnings for v1.8
PR #5431 - Rename the new P0443/P2300 executor to
thread_pool_schedulerPR #5430 - Revert “Adding the missing defined for
HPX_HAVE_DEPRECATION_WARNINGS”PR #5427 - Removing unneeded typedef
PR #5426 - Adding more concept checks for sender/receiver algorithms
PR #5425 - Adding the missing defined for
HPX_HAVE_DEPRECATION_WARNINGSPR #5424 - Disable Vc in final docker image created in CI
PR #5422 - Adding
execution::experimental::bulkalgorithmPR #5420 - Update logic to find threading library
PR #5418 - Reduce max size and number of files in ccache cache
PR #5417 - Final release notes for 1.7.0
PR #5416 - Adapt
uninitialized_value_constructanduninitialized_value_construct_nto C++ 20PR #5415 - Adapt
uninitialized_default_constructanduninitialized_default_construct_nto C++ 20PR #5414 - Improve integration of futures and senders
PR #5413 - Fixing sender/receiver code base to compile with MSVC
PR #5407 - Handle exceptions thrown during initialization of parcel handler
PR #5406 - Simplify dispatching to annotation handlers
PR #5405 - Fetch Asio automatically in perftests CI
PR #5403 - Create generic executor that adds annotations to any other executor
PR #5402 - Adapt
uninitialized_fillanduninitialized_fill_nto C++ 20PR #5401 - Modernize a variety of facilities related to parallel algorithms
PR #5400 - Fix sliding semaphore test
PR #5399 - Rename leftover
tag_fallback_invoketotag_fallback_dispatchPR #5398 - Improve logging in AGAS symbol namespace
PR #5396 - Introduce compatibility layer for collective operations
PR #5394 - Enable OTF2 in APEX CI configuration
PR #5393 - Update APEX tag
PR #5392 - Fixing wrong usage of
std::forwardPR #5391 - Fix forwarding in transform_receiver constructor
PR #5390 - Make sure shared priority scheduler steals tasks on the current NUMA domain when (core) stealing is enabled
PR #5389 - Adapt
uninitialized_moveanduninitialized_move_nto C++ 20PR #5388 - Fixing
gather_therefor used with lvalue reference argumentPR #5387 - Extend thread state logging and change default stealing parameters
PR #5386 - Attempt to fix the startup hang with nodes > 32
PR #5384 - Remove HPX 1.5.0 deprecations
PR #5382 - Prefer installed Asio before considering FetchContent
PR #5379 - Allow using pre-downloaded (not installed) versions of Asio and/or Apex
PR #5376 - Remove unnecessary explicit listing of library modules.rst files in CMakeLists.txt
PR #5375 - Slight performance improvement for
hpx::copyandhpx::moveet.al.PR #5374 - Remove unnecessary moves from future sender implementations
PR #5373 - More changes to clang-cuda Jenkins configuration
PR #5372 - Slight improvements to
min/max/minmax_elementalgorithmsPR #5371 - Adapt
uninitialized_copyanduninitialized_copy_nto C++ 20PR #5370 - Decay types in
just_sendervalue_typesto match stored typesPR #5367 - Disable pkgconfig by default again on macOS
PR #5365 - Use ccache for Jenkins builds on Piz Daint
PR #5363 - Update cudatoolkit module name in clang-cuda Jenkins configuration
PR #5362 - Adding
channel_communicatorPR #5361 - Fix compilation with MPI enabled
PR #5360 - Update APEX and asio tags
PR #5359 - Fix check for pu-step in single-core case
PR #5357 - Making sure collective operations can be reused by preallocating communicator
PR #5356 - Update API documentation
PR #5355 - Make the
sequenced_executorprocessing_units_countmember function constPR #5354 - Making sure
default_stack_sizeis defined whenever declaredPR #5353 - Add CUDA timestamp support to HPX Hardware Clock
PR #5352 - Adding missing includes
PR #5351 - Adding
enable_logging/disable_loggingAPI functionsPR #5350 - Adapt lexicographical_compare to C++20
PR #5349 - Update minimum boost version needed on the docs
PR #5348 - Rename
tag_invokeand related facilities totag_dispatchPR #5347 - Remove
make_prefix for executor propertiesPR #5346 - Remove and disable compatibility options for 1.7.0
PR #5343 - Fix timed_executor static cast conversion
PR #5342 - Refactor CUDA event polling
PR #5341 - Adding
make_with_annotationandget_annotationpropertiesPR #5339 - Making sure
hpx::util::hardware::timestamp()is always definedPR #5338 - Fixing
timed_executorspecializations of customization pointsPR #5335 - Make
partial_algorithmwork with any number of argumentsPR #5334 - Follow up
iter_sentinclude on #5225PR #5332 - Simplify
tag_invokeand friendsPR #5331 - More work on cleaning up executor CPOs
PR #5330 - Add option to disable pkgconfig generation
PR #5328 - Adapt data parallel support using std-simd
PR #5327 - Fix missing
ifdef HPX_SMT_PAUSEPR #5326 - Adding
resize()toserialize_bufferallowing to shrink its sizePR #5324 - Add get member functions to
async_rw_mutexproxy objects for explicitly getting the wrapped valuePR #5323 - Add
keep_futurealgorithmPR #5322 - Replace executor customization point implementations with
tag_invokePR #5321 - Seperate segmented algorithms for reduce
PR #5320 - Fix
is_sendertrait and other small fixes to p0443 traitsPR #5319 - gcc 11.1 c++20 build fixes
PR #5318 - Make hipblas dependency optional as not always available
PR #5316 - Attempt to fix checking for libatomic
PR #5315 - Add explicit keyword to fixture constructor
PR #5314 - Fix a race condition in async mpi affecting limiting executor
PR #5312 - Use local runtime and local headers in local-only modules and tests
PR #5311 - Add GCC 11 builder to jenkins
PR #5310 - Adding
hpx::execution::experimental::task_groupPR #5309 - Seperate datapar
PR #5308 - Seperate segmented algorithms for
find,find_if,find_if_notPR #5307 - Seperate segmented algorithms for
fillandgeneratePR #5304 - Fix compilation of sender CPOs with nvcc
PR #5300 - Remove
PRIVATEflag that was propagated into theLANGUAGESPR #5298 - Seperate datapar
PR #5297 - Specify exact cmake and ninja versions when loading them in jenkins jobs
PR #5295 - Update clang-newest configuration to use clang 12 and Boost 1.76.0
PR #5293 - Fix Clang 11 cuda_future test bug
PR #5292 - Add
async_rw_mutexbased on sendersPR #5291 - “Fix” termination detection
PR #5290 - Fixed source file line statements in examples documentation
PR #5289 - Allow splitting of futures holding
std::tuplePR #5288 - Move algorithms to
tag_fallback_invokePR #5287 - Move algorithms to
tag_fallback_invokePR #5285 - Fix clang-format failure on master
PR #5284 - Replacing
util::function_nonseron std::function inhpx_initPR #5282 - Update Boost for daint 20.11 after update
PR #5281 - Fix Segmentation fault on
foreach_datapar_zipiterPR #5280 - Avoid modulo by zero in
counting_iteratortestPR #5279 - Fix more GCC 10 deprecation warnings
PR #5277 - Small fixes and improvements to CUDA/MPI polling
PR #5276 - Fix typo in docs
PR #5274 - More P1897 algorithms
PR #5273 - Retry CDash submissions on failure
PR #5272 - Fix bogus deprecation warnings with GCC 10
PR #5271 - Correcting target ids for
symbol_namespace::iteratePR #5268 - Adding generic
require,require_concept, andquerypropertiesPR #5267 - Support annotations in
hpx::transform_reducePR #5266 - Making late command line options available for local runtime
PR #5265 - Leverage
no_unique_addressformember_packPR #5264 - Adopt format in more places
PR #5262 - Install HPX in Rostam Jenkins jobs
PR #5261 - Limit Rostam Jenkins jobs to marvin partition temporarily
PR #5260 - Separate segmented algorithms for transform_reduce
PR #5259 - Making sure late command line options are recognized as configuration options
PR #5258 - Allow for HPX algorithms being invoked with std execution policies
PR #5256 - Separate segmented algorithms for transform
PR #5255 - Future/sender adapters
PR #5254 - Fixing datapar
PR #5253 - Add utility to format ranges
PR #5252 - Remove uses of Boost.Bimap
PR #5251 - Banish
<iostream>from library headersPR #5250 - Try fixing vc circle ci
PR #5249 - Adding missing header
PR #5248 - Use old Piz Daint modules after upgrade
PR #5247 - Significantly speedup simple
for_each,for_loop, andtransformPR #5245 - P1897
operator|overloadsPR #5244 - P1897
when_allPR #5243 - Make sure
HPX_DEBUGis set based on HPX’s build type, not consuming project’s build typePR #5242 - Moving last files unrelated to parcel layer to modules
PR #5240 - change namespace for
transform_loop.hppPR #5238 - Make sure annotations are used in the binary transform
PR #5237 - Add P1897
just,just_on, andonalgorithmsPR #5236 - Add an example demonstrating the use of the
invoke_function_actionfacilityPR #5235 - Attempting to fix datapar compilation issues
PR #5234 - Fix small typo in
--hpx:localoption descriptionPR #5233 - Only find Boost.Iostreams if required for plugins
PR #5231 - Sort printed config options
PR #5230 - Fix C++20 replace algo adaptation misses
PR #5229 - Remove leftover Boost include from
sync_wait.hppPR #5228 - Print module name only if it has custom configuration settings
PR #5227 - Update .codespell_whitelist
PR #5226 - Use new docker image in all CircleCI steps
PR #5225 - Adapt reverse to C++20
PR #5224 - Separate segmented algorithms for
none_of,any_ofandall_ofPR #5223 - Fixing build system for ittnotify
PR #5221 - Moving LCO related files to modules
PR #5220 - Seperate segmented algorithms for
countandcount_ifPR #5218 - Seperate segmented algorithms for
adjacent_findPR #5217 - Add a HIP github action
PR #5215 - Update ROCm to 4.0.1 on Rostam
PR #5214 - Fix clang-format error in sender.hpp
PR #5213 - Removing ESSENTIAL option to the doc example
PR #5212 - Seperate segmented algorithms for
for_each_nPR #5211 - Minor adapted algos fixes
PR #5210 - Fixing
is_invocabledeprecation warningsPR #5209 - Moving more files into modules (actions, components, init_runtime, etc.)
PR #5208 - Add examples and explanation on when
tag_fallback/priorityare usefulPR #5207 - Always define
HPX_COMPUTE_HOST_CODEfor host codePR #5206 - Add formatting exceptions for libhpx to create_module_skeleton.py
PR #5205 - Moving all distribution policies into modules
PR #5203 - Move copy algorithms to
tag_fallback_invokePR #5202 - Make
HPX_WITH_PSEUDO_DEPENDENCIESa cache variablePR #5201 - Replaced
tag_invokewithtag_fallback_invokeforadjacent_findalgorithmPR #5200 - Moving files to (distributed) runtime module
PR #5199 - Update ICC module name on Piz Daint Jenkins configuration
PR #5198 - Add doxygen documentation for thread_schedule_hint
PR #5197 - Attempt to fix compilation of context implementations with unity build enabled
PR #5196 - Re-enable component tests
PR #5195 - Moving files related to colocation logic
PR #5194 - Another attempt at fixing the Fedora 35 problem
PR #5193 - Components module
PR #5192 - Adapt
replace(_if)to C++20PR #5190 - Set compatibility headers by default to on
PR #5188 - Bump Boost minimum version to 1.71.0
PR #5187 - Force CMake to set the
-std=c++XXflagPR #5186 - Remove message to print .cu extension whenever .cu files are encountered
PR #5185 - Remove some minor unnecessary CMake options
PR #5184 - Remove some leftover
HPX_WITH_*_SCHEDULERusesPR #5183 - Remove dependency on boost/iterators/iterator_categories.hpp
PR #5182 - Fixing Fedora 35 for Power architectures
PR #5181 - Bump version number and tag post 1.6.0 release
PR #5180 - Fix htts_v2 tests linking
PR #5179 - Make sure
--hpx:localcommand line option is respected with networking is off but distributed runtime is onPR #5177 - Remove module cmake options
PR #5176 - Starting to separate segmented algorithms:
for_eachPR #5174 - Don’t run segmented algorithms twice on CircleCI
PR #5173 - Fetching APEX using cmake FetchContent
PR #5172 - Add separate local-only entry point
PR #5171 - Remove
HPX_WITH_THREAD_SCHEDULERSCMake optionPR #5170 - Add
HPX_WITH_PRECOMPILED_HEADERSoptionPR #5166 - Moving some action tests to modules
PR #5165 - Require cmake 3.17
PR #5164 - Move
thread_pool_suspension_helperfiles to small utility modulePR #5160 - Adding checks ensuring modules are not cross-referenced from other module categories
PR #5158 - Replace boost::asio with standalone asio
PR #5155 - Allow logging when distributed runtime is off
PR #5153 - Components module
PR #5152 - Move more files to performance counter module
PR #5150 - Adapt
remove_copy(_if)to C++20PR #5144 - AGAS module
PR #5125 - Adapt
removeandremove_ifto C++20PR #5117 - Attempt to fix segfaults assumed to be caused by
future_datainstances going out of scope.PR #5099 - Allow mixing debug and release builds
PR #5092 - Replace spirit.qi with x3
PR #5053 - Add P0443r14 executor and a a few P1897 algorithms
PR #5044 - Add performance test in jenkins and reports
HPX V1.6.0 (Feb 17, 2021)#
General changes#
This release continues the focus on C++20 conformance with multiple new algorithms adapted to be C++20 conformant and becoming customization point objects (CPOs). We have also added experimental support for HIP, allowing previous CUDA features to now be compiled with hipcc and run on AMD GPUs.
The following algorithms have been adapted to be C++20 conformant:
adjacent_find,includes,inplace_merge,is_heap,is_heap_until,is_partitioned,is_sorted,is_sorted_until,merge,set_difference,set_intersection,set_symmetric_difference,set_union.Experimental HIP support can be enabled by compiling HPX with
hipcc. All CUDA functionality in HPX can now be used with HIP. The HIP functionality is for the time being exposed through the same API as the CUDA functionality, i.e. no changes are required in user code. The CUDA, and now HIP, functionality is in thehpx::cudanamespace.We have added
partial_sortbased on Francisco Tapia’s implementation.hpx::initandhpx::startgained new overloads taking anhpx::init_paramsstruct in 1.5.0. All overloads not taking anhpx::init_paramsare now deprecated.We have added an experimental
fork_join_executor. This executor can be used for OpenMP-style fork-join parallelism, where the latency of a parallel region is important for performance.The
parallel_executornow uses a hierarchical spawning scheme for bulk execution, which improves data locality and performance.hpx::dataflowcan now be used with executors that inject additional parameters into the call of the user-provided function.We have added experimental support for properties as proposed in P2220. Currently the only supported property is the scheduling hint on
parallel_executor.hpx::util::annotated_functioncan now be passed a dynamically generatedstd::string.In moving functionality to new namespaces, old names have been deprecated. A deprecation warning will be issued if you are using deprecated functionality, with instructions on how to correct or ignore the warning.
We have removed all support for C and Fortran from our build system.
We have further reduced the use of Boost types within HPX (
boost::system::error_codeandboost::detail::spinlock).We have enabled more warnings in our CI builds (unused variables and unused typedefs).
Breaking changes#
hpxMP support has been completely removed.
The
verbsparcelport has been removed.The following compatibility options have been disabled by default:
HPX_WITH_ACTION_BASE_COMPATIBILITY,HPX_WITH_REGISTER_THREAD_COMPATIBILITY,HPX_WITH_PROMISE_ALIAS_COMPATIBILITY,HPX_WITH_UNSCOPED_ENUM_COMPATIBILITY,HPX_PROGRAM_OPTIONS_WITH_BOOST_PROGRAM_OPTIONS_COMPATIBILITY,HPX_WITH_EMBEDDED_THREAD_POOLS_COMPATIBILITY,HPX_WITH_THREAD_POOL_OS_EXECUTOR_COMPATIBILITY,HPX_WITH_THREAD_EXECUTORS_COMPATIBILITY,HPX_THREAD_AWARE_TIMER_COMPATIBILITY,HPX_WITH_POOL_EXECUTOR_COMPATIBILITY. Unless noted here, the above functionalities do not come with replacements. Unscoped enumerations have been replaced by scoped enumerations. Previously deprecated unscoped enumerations are disabled byHPX_WITH_UNSCOPED_ENUM_COMPATIBILITY. Newly deprecated unscoped enumerations have been given deprecation warnings and replaced by scoped enumerations.hpx::promisehas been replaced withhpx::distributed::promise.hpx::program_optionsis a drop-in replacement forboost::program_options.hpx::execution::parallel_executornow has constructors which take a thread pool, covering the use case ofhpx::threads::executors::pool_executor. A pool can be supplied withhpx::resource::get_thread_pool.
Closed issues#
Issue #5148 -
runtime_support.hppdoes not work with newer clingIssue #5147 - Wrong results with parallel reduce
Issue #5129 - Missing specialization for
std::hash<hpx::thread::id>Issue #5126 - Use
std::stringfor task annotationsIssue #5115 - Don’t expect hwloc to always report Cores
Issue #5113 - Handle threadmanager exceptions during startup
Issue #5112 - libatomic problems causing unexpected fails
Issue #5089 - Remove non-BSL files
Issue #5088 - Unwrapping problem
Issue #5087 - Remove hpxMP support
Issue #5077 - PAPI counters are not accessible when HPX is installed
Issue #5075 - Make the structs in all
iter_sent.hpplower caseIssue #5067 - Bug
string_util/split.hppIssue #5049 - Change back the hipcc jenkins config to the fury partition on rostam
Issue #5038 - Not all examples link in the latest HPX master
Issue #5035 - Build with
HPX_WITH_EXAMPLESfailsIssue #5019 - Broken help string for hpx
Issue #5016 -
hpx::parallel::fillfails compilingIssue #5014 - Rename all
.ccto.cppand.hhto.hppIssue #4988 - MPI is not finalized if running with only one locality
Issue #4978 - Change feature test macros to expand to zero/one
Issue #4949 - Crash when not enabling TCP parcelport
Issue #4933 - Improve test coverage for unused variable warnings etc.
Issue #4878 - HPX mpi async might call
MPI_FINALIZEbefore app calls itIssue #4127 - Local runtime entry-points
Closed pull requests#
PR #5178 - Fix parallel
remove/remove_copy/transformnamespace references in docsPR #5169 - Attempt to get Piz Daint jenkins setup running after maintenance
PR #5168 - Remove include of itself
PR #5167 - Fixing deprecation warnings that slipped through the net
PR #5159 - Update APEX tag to 2.3.1
PR #5154 - Splitting unit tests on circleci to avoid timeouts
PR #5151 - Use C++20 on
clang-newestJenkins CI configurationPR #5149 - Rename
'module'symbols to avoid keyword conflictPR #5145 - Adjust handling of CUDA/HIP options in CMake
PR #5142 - Store annotated_function annotations as
std::stringsPR #5140 - Scheduler mode
PR #5139 - Fix path problem in pre-commit hook, add summary commit line
PR #5138 - Add program options variable map to resource partitioner init
PR #5137 - Remove the use of
boost::throw_exceptionPR #5136 - Make sure codespell checks run on CircleCI
PR #5132 - Fixing spelling errors
PR #5131 - Mark
counting_iteratormember functions asHPX_HOST_DEVICEPR #5130 - Adding specialization for
std::hash<hpx::thread::id>PR #5128 - Fixing environment handling for FreeBSD
PR #5127 - Fix typo in fibonacci documentation
PR #5123 - Reduce vector sizes in partial sort benchmarks when running in debug mode
PR #5122 - Making sure exceptions during runtime initialization are correctly reported
PR #5121 - Working around hwloc limitation on certain platforms
PR #5120 - Fixing compatibility warnings in
hpx::transformimplementationPR #5119 - Use
sequential_findand friends from separate detail headerPR #5116 - Fix compilation with timer pool off
PR #5114 - Fix 5112 - make sure libatomic is used when needed
PR #5109 - Remove default runtime mode argument from init overload, again
PR #5108 - Refactor
iter_sent.hppto make structs lowercasePR #5107 - Relax
dataflowinternalsPR #5106 - Change initialization of property CPOs to satisfy older nvcc versions
PR #5104 - Fix regeneration of two files that trigger unnecessary rebuilds
PR #5103 - Remove default runtime mode argument from start/init overloads
PR #5102 - Untie deprecated thread enums from the CMake option
PR #5101 - Update APEX tag for 1.6.0
PR #5100 - Bump minimum required Boost version to 1.66 and update CI configurations
PR #5098 - Minor fixes to public API listing
PR #5097 - Remove hpxMP support
PR #5096 - Remove fractals examples
PR #5095 - Use all AMD nodes again on rostam
PR #5094 - Attempt to remove macOS workaround for GH actions environment
PR #5093 - Remove verbs parcelport
PR #5091 - Avoid moving from lvalues
PR #5090 - Adopt C++20
std::endianPR #5085 - Update daint CI to use Boost 1.75.0
PR #5084 - Disable compatibility options for 1.6.0 release
PR #5083 - Remove duplicated call to the
limiting_executorinfuture_overheadtestPR #5079 - Add checks to make sure that MPI/CUDA polling is enabled/not disabled too early
PR #5078 - Add install lib directory to list of component search paths
PR #5076 - Fix a typo in the jenkins
clang-newestcmake configPR #5074 - Fixing warnings generated by MSVC
PR #5073 - Allow using noncopyable types with unwrapping
PR #5072 - Fix
is_convertibleargs inresult_typesPR #5071 - Fix unused parameters
PR #5070 - Fix unused variables warnings in hipcc
PR #5069 - Add support for sentinels to
adjacent_findPR #5068 - Fix string split function
PR #5066 - Adapt
searchto C++20 and Range TSPR #5065 - Fix
hpx::range::adjacent_finddoxygen function signaturesPR #5064 - Refactor runtime configuration, command line handling, and resource partitioner
PR #5063 - Limit the device code guards to the distributed parts of the
future_overheadbenchPR #5061 - Remove hipcc guards in examples and tests
PR #5060 - Fix deprecation warnings generated by msvc
PR #5059 - Add warning about suspending/resuming the runtime in multi-locality scenarios
PR #5057 - Fix unused variable warnings
PR #5056 - Fix
hpx::util::getPR #5055 - Remove hipcc guards
PR #5054 - Fix typo
PR #5051 - Adapt transform to C++20
PR #5050 - Replace old init overloads in tests and examples
PR #5048 - Limit jenkins hipcc to the reno node
PR #5047 - Limit cuda jenkins run to nodes with exclusively Nvidia GPUs
PR #5046 - Convert thread and future enums to class enums
PR #5043 - Improve
hpxrun.pyfor PhylanxPR #5042 - Add missing header to partial sort test
PR #5041 - Adding Francisco Tapia’s implementation of
partial_sortPR #5040 - Remove generated headers left behind from a previous configuration
PR #5039 - Fix GCC 10 release builds
PR #5037 - Add
is_invocabletypedefs to top-levelhpxnamespace and public API listPR #5036 - Deprecate
hpx::util::decayin favor ofstd::decayPR #5034 - Use versioned container image on CircleCI
PR #5033 - Implement P2220 properties module
PR #5032 - Do codespell comparison only on files changed from common ancestor
PR #5031 - Moving traits files to
actions_basePR #5030 - Add codespell version print in circleci
PR #5029 - Work around problems in GitHub actions macOS builder
PR #5028 - Moving move files to naming and naming_base
PR #5027 - Lessen constraints on certain algorithm arguments
PR #5025 - Adapt
is_sortedandis_sorted_untilto C++20PR #5024 - Moving
naming_baseto full modulesPR #5022 - Remove C language from
CMakeLists.txtPR #5021 - Warn about unused arguments given to
add_hpx_modulePR #5020 - Fixing help string
PR #5018 - Update CSCS jenkins configuration to clang 11
PR #5017 - Fixing broken backwards compatibility for
hpx::parallel::fillPR #5015 - Detect if generated global header conflicts with explicitly listed module headers
PR #5012 - Properly reset pointer tracking data in
output_archivePR #5011 - Inspect command line tweaks
PR #5010 - Creating AGAS module
PR #5009 - Replace
boost::system::error_codewithstd::error_codePR #5008 - Replace uses of
boost::detail::spinlockPR #5007 - Bump minimal Boost version to 1.65.0
PR #5006 - Adapt is_partitioned to C++20
PR #5005 - Making sure
reduce_by_keycompiles againPR #5004 - Fixing template specializations that make extra archive data types unique across module boundaries
PR #5003 - Relax
dataflowargument constraintsPR #5001 - Add
<random>inspect checkPR #4999 - Attempt to fix MacOS Github action error
PR #4997 - Fix unused variable and typedef warnings
PR #4996 - Adapt
adjacent_findto C++20PR #4995 - Test all schedulers in
cross_pool_injectiontest exceptshared_priority_queue_schedulerPR #4993 - Fix deprecation warnings
PR #4991 - Avoid unnecessarily including entire modules
PR #4990 - Fixing some warnings from HPX complaining about use of obsolete types
PR #4989 - add a *destroy* trait for ParcelPort plugins
PR #4986 - Remove serialization to functional module dependency
PR #4985 - Compatibility header generation
PR #4980 - Add ranges overloads to
for_loop(and variants)PR #4979 - Actually enable unity builds on Jenkins
PR #4977 - Cleaning up
debug::printfunctionalitiesPR #4976 - Remove indirection layer in
at_index_implPR #4975 - Remove indirection layer in
at_index_implPR #4973 - Avoid warnings/errors for older gcc complaining about multi-line comments
PR #4970 - Making set algorithms conform to C++20
PR #4969 - Moving
is_execution_policyand friends into namespacehpxPR #4968 - Enable deprecation warnings for 1.6.0 and move
anyfunctionality to hpx namespacePR #4967 - Define deprecation macros conditionally
PR #4966 - Add
clang-formatandcmake-formatversion printsPR #4965 - Making
is_heapandis_heap_untilconforming to C++20PR #4964 - Adding parallel
make_heapPR #4962 - Fix external timer function pointer exports
PR #4960 - Fixing folder names for module tests and examples
PR #4959 - Adding communications set
PR #4958 - Deprecate tuple and timing functionality
in hpx::utilPR #4957 - Fixing unity build option for parcelports
PR #4953 - Fixing MSVC problems after recent restructurings
PR #4952 - Make
parallel_executorusethread_pool_executorspawning mechanismPR #4948 - Clean up old artifacts better and more aggressively on Jenkins
PR #4947 - Add HIP support for AMD GPUs
PR #4945 - Enable
HPX_WITH_UNITY_BUILDoption on one of the Jenkins configurationsPR #4943 - Move public
hpx::parallel::executionfunctionality to hpx::executionPR #4938 - Post release cleanup
PR #4858 - Extending resilience APIs to support distributed invocations
PR #4744 - Fork-join executor
PR #4665 - Implementing sender, receiver, and
operation_stateconcepts in terms of P0443r13PR #4649 - Split libhpx into multiple libraries
PR #4642 - Implementing
operation_stateconcept in terms of P0443r13PR #4640 - Implementing receiver concept in terms of P0443r13
PR #4622 - Sanitizer fixes
HPX V1.5.1 (Sep 30, 2020)#
General changes#
This is a patch release. It contains the following changes:
Remove restriction on suspending runtime with multiple localities, users are now responsible for synchronizing work between localities before suspending.
Fixes several compilation problems and warnings.
Adds notes in the documentation explaining how to cite HPX.
Closed issues#
Issue #4971 - Parallel sort fails to compile with C++20
Issue #4950 - Build with HPX_WITH_PARCELPORT_ACTION_COUNTERS ON fails
Issue #4940 - Codespell report for “HPX” (on fossies.org)
Issue #4937 - Allow suspension of runtime for multiple localities
Closed pull requests#
PR #4982 - Add page about citing HPX to documentation
PR #4981 - Adding the missing include
PR #4974 - Remove leftover format export hack
PR #4972 - Removing use of get_temporary_buffer and return_temporary_buffer
PR #4963 - Renaming files to avoid warnings from the vs build system
PR #4951 - Fixing build if HPX_WITH_PARCELPORT_ACTION_COUNTERS=On
PR #4946 - Allow suspension on multiple localities
PR #4944 - Fix typos reported by fossies codespell report
PR #4941 - Adding some explanation to README about how to cite HPX
PR #4939 - Small changes
HPX V1.5.0 (Sep 02, 2020)#
General changes#
The main focus of this release is on APIs and C++20 conformance. We have added many new C++20 features and adapted multiple algorithms to be fully C++20 conformant. As part of the modularization we have begun specifying the public API of HPX in terms of headers and functionality, and aligning it more closely to the C++ standard. All non-distributed modules are now in place, along with an experimental option to completely disable distributed features in HPX. We have also added experimental asynchronous MPI and CUDA executors. Lastly this release introduces CMake targets for depending projects, performance improvements, and many bug fixes.
We have added the C++20 features
hpx::jthreadandhpx::stop_token.hpx::condition_variable_anynow exposes new functions supportinghpx::stop_token.We have added
hpx::stable_sortbased on Francisco Tapia’s implementation.We have adapted existing synchronization primitives to be fully conformant C++20:
hpx::barrier,hpx::latch,hpx::counting_semaphore, andhpx::binary_semaphore.We have started using customization point objects (CPOs) to make the corresponding algorithms fully conformant to C++20 as well as to make algorithm extension easier for the user.
all_of/any_of/none_of,copy,count,destroy,equal,fill,find,for_each,generate,mismatch,move,reduce,transform_reduceare using those CPOs (all in namespacehpx). We also have adapted their correspondinghpx::rangesversions to be conforming to C++20 in this release.We have adapted support for
co_awaitto C++20, in addition tohpx::futureit now also supportshpx::shared_future. We have also added allocator support for futures returned byco_return. It is no longer in theexperimentalnamespace.We added serialization support for
std::variantandstd::tuple.result_ofandis_callableare now deprecated and replaced byinvoke_resultandis_invocableto conform to C++20.We continued with the modularization, making it easier for us to add the new experimental
HPX_WITH_DISTRIBUTED_RUNTIMECMake option (see below) . An significant amount of headers have been deprecated. We adapted the namespaces and headers we could to be closer to the standard ones (Public API). Depending code should still compile, however warnings are now generated instructing to change the include statements accordingly.It is now possible to have a basic CUDA support including a helper function to get a future from a CUDA stream and target handling. They are available under the
hpx::cuda::experimentalnamespace and they can be enabled with the-DHPX_WITH_ASYNC_CUDA=ONCMake option.We added a new
hpx::mpi::experimentalnamespace for getting futures from an asynchronous MPI call and a new minimal MPI executorhpx::mpi::experimental::executor. These can be enabled with the-DHPX_WITH_ASYNC_MPI=OnCMake option.A polymorphic executor has been implemented to reduce compile times as a function accepting executors can potentially be instantiated only once instead of multiple times with different executors. It accepts the function signature as a template argument. It needs to be constructed from any other executor. Please note, that the function signatures that can be scheduled using
then_execute,bulk_sync_execute,bulk_async_executeandbulk_then_executeare slightly different (See the comment in PR #4514 for more details).The underlying executor of
block_executorhas been updated to a newer one.We have added a parameter to
auto_chunk_sizeto control the amount of iterations to measure.All executor parameter hooks can now be exposed through the executor itself. This will allow to deprecate the
.with()functionality on execution policies in the future. This is also a first step towards simplifying our executor APIs in preparation for the upcoming C++23 executors (senders/receivers).We have moved all of the existing APIs related to resiliency into the namespace
hpx::resiliency::experimental. Please note this is a breaking change without backwards-compatibility option. We have converted all of those APIs to be based on customization point objects. Two new executors have been added to enable easy integration of the existing resiliency features with other facilities (like the parallel algorithms):replay_executorandreplicate_executor.We have added performance counters type information (
aggregating,monotonically increasing,average count,average timer, etc.).HPX threads are now re-scheduled on the same worker thread they were suspended on to avoid cache misses from moving from one thread to the other. This behavior doesn’t prevent the thread from being stolen, however.
We have added a new configuration option
hpx.exception_verbosityto allow to control the level of verbosity of the exceptions (3 levels available).broadcast_to,broadcast_from,scatter_toandscatter_fromhave been added to the collectives, modernization ofgather_hereandgather_therewith futures taken by rvalue references. See the breaking change onall_to_allin the next section. None of the collectives need supporting macros anymore (e.g. specifying the data types used for a collective operation usingHPX_REGISTER_ALLGATHERand similar is not needed anymore).New API functions have been added: a) to get the number of cores which are idle (
hpx::get_idle_core_count) and b) returning a bitmask representing the currently idle cores (hpx::get_idle_core_mask).We have added an experimental option to only enable the local runtime, you can disable the distributed runtime with
HPX_WITH_DISTRIBUTED_RUNTIME=OFF. You can also enable the local runtime by using the--hpx:localruntime option.We fixed task annotations for actions.
The alias
hpx::promisetohpx::lcos::promiseis now deprecated. You can usehpx::lcos::promisedirectly instead.hpx::promisewill refer to the local-only promise in the future.We have added a
prepare_checkpointAPI function that calculates the amount of necessary buffer space for a particular set of arguments checkpointed.We have added
hpx::upgrade_lockandhpx::upgrade_to_unique_lock, which makehpx::shared_mutex(and similar) usable in more flexible ways.We have changed the CMake targets exposed to the user, it now includes
HPX::hpx,HPX::wrap_main(int mainas the first HPX thread of the application, see Starting the HPX runtime),HPX::plugin,HPX::component. The CMake variablesHPX_INCLUDE_DIRSandHPX_LIBRARIESare deprecated and will be removed in a future release, you should now link directly to theHPX::hpxCMake target.A new example is demonstrating how to create and use a wrapping executor (
quickstart/executor_with_thread_hooks.cpp)A new example is demonstrating how to disable thread stealing during the execution of parallel algorithms (
quickstart/disable_thread_stealing_executor.cpp)We now require for our CMake build system configuration files to be formatted using cmake-format.
We have removed more dependencies on various Boost libraries.
We have added an experimental option enabling unity builds of HPX using the
-DHPX_WITH_UNITY_BUILD=OnCMake option.Many bug fixes.
Breaking changes#
HPX now requires a C++14 capable compiler. We have set the HPX C++ standard automatically to C++14 and if it needs to be set explicitly, it should be specified through the
CMAKE_CXX_STANDARDsetting as mandated by CMake. TheHPX_WITH_CXX*variables are now deprecated and will be removed in the future.Building and using HPX is now supported only when using CMake V3.13 or later, Boost V1.64 or newer, and when compiling with clang V5, gcc V7, or VS2019, or later. Other compilers might still work but have not been tested thoroughly.
We have added a
hpx::init_paramsstruct to pass parameters for HPX initialization e.g. the resource partitioner callback to initialize thread pools (Using the resource partitioner).The
all_to_allalgorithm is renamed toall_gather, and the newall_to_allalgorithm is not compatible with the old one.We have moved all of the existing APIs related to resiliency into the namespace
hpx::resiliency::experimental.
Closed issues#
Issue #4918 - Rename distributed_executors module
Issue #4900 - Adding JOSS status badge to README
Issue #4897 - Compiler warning, deprecated header used by HPX itself
Issue #4886 - A future bound to an action executing on a different locality doesn’t capture exception state
Issue #4880 - Undefined reference to main build error when HPX_WITH_DYNAMIC_HPX_MAIN=OFF
Issue #4877 - hpx_main might not able to start hpx runtime properly
Issue #4850 - Issues creating templated component
Issue #4829 - Spack package & HPX_WITH_GENERIC_CONTEXT_COROUTINES
Issue #4820 - PAPI counters don’t work
Issue #4818 - HPX can’t be used with IO pool turned off
Issue #4816 - Build of HPX fails when find_package(Boost) is called before FetchContent_MakeAvailable(hpx)
Issue #4813 - HPX MPI Future failed
Issue #4811 - Remove HPX::hpx_no_wrap_main target before 1.5.0 release
Issue #4810 - In hpx::for_each::invoke_projected the hpx::util::decay is misguided
Issue #4787 - transform_inclusive_scan gives incorrect results for non-commutative operator
Issue #4786 - transform_inclusive_scan tries to implicitly convert between types, instead of using the provided conv function
Issue #4779 - HPX build error with GCC 10.1
Issue #4766 - Move HPX.Compute functionality to experimental namespace
Issue #4763 - License file name
Issue #4758 - CMake profiling results
Issue #4755 - Building HPX with support for PAPI fails
Issue #4754 - CMake cache creation breaks when using HPX with mimalloc
Issue #4752 - HPX MPI Future build failed
Issue #4746 - Memory leak when using dataflow icw components
Issue #4731 - Bug in stencil example, calculation of locality IDs
Issue #4723 - Build fail with NETWORKING OFF
Issue #4720 - Add compatibility headers for modules that had their module headers implicitly generated in 1.4.1
Issue #4719 - Undeprecate some module headers
Issue #4712 - Rename HPX_MPI_WITH_FUTURES option
Issue #4709 - Make deprecation warnings overridable in dependent projects
Issue #4691 - Suggestion to fix and enhance the thread_mapper API
Issue #4686 - Fix tutorials examples
Issue #4685 - HPX distributed map fails to compile
Issue #4680 - Build error with HPX_WITH_DYNAMIC_HPX_MAIN=OFF
Issue #4679 - Build error for hpx w/ Apex on Summit
Issue #4675 - build error with HPX_WITH_NETWORKING=OFF
Issue #4674 - Error running Quickstart tests on OS X
Issue #4662 - MPI initialization broken when networking off
Issue #4652 - How to fix distributed action annotation
Issue #4650 - thread descriptions are broken…again
Issue #4648 - Thread stacksize not properly set
Issue #4647 - Rename generated collective headers in modules
Issue #4639 - Update deprecation warnings in compatibility headers to point to collective headers
Issue #4628 - mpi parcelport totally broken
Issue #4619 - Fully document hpx_wrap behaviour and targets
Issue #4612 - Compilation issue with HPX 1.4.1 and 1.4.0
Issue #4594 - Rename modules
Issue #4578 - Default value for HPX_WITH_THREAD_BACKTRACE_DEPTH
Issue #4572 - Thread manager should be given a runtime_configuration
Issue #4571 - Add high-level documentation to new modules
Issue #4569 - Annoying warning when compiling - pls suppress or fix it.
Issue #4555 - HPX_HAVE_THREAD_BACKTRACE_ON_SUSPENSION compilation error
Issue #4543 - Segfaults in Release builds using sleep_for
Issue #4539 - Compilation Error when HPX_MPI_WITH_FUTURES=ON
Issue #4537 - Linking issue with libhpx_initd.a
Issue #4535 - API for checking if pool with a given name exists
Issue #4523 - Build of PR #4311 (git tag 9955e8e) fails
Issue #4519 - Documentation problem
Issue #4513 - HPXConfig.cmake contains ill-formed paths when library paths use backslashes
Issue #4507 - User-polling introduced by MPI futures module should be more generally usable
Issue #4506 - Make sure force_linking.hpp is not included in main module header
Issue #4501 - Fix compilation of PAPI tests
Issue #4497 - Add modules CI checks
Issue #4489 - Polymorphic executor
Issue #4476 - Use CMake targets defined by FindBoost
Issue #4473 - Add vcpkg installation instructions
Issue #4470 - Adapt hpx::future to C++20 co_await
Issue #4468 - Compile error on Raspberry Pi 4
Issue #4466 - Compile error on Windows, current stable:
Issue #4453 - Installing HPX on fedora with dnf is not adding cmake files
Issue #4448 - New std::variant serialization broken
Issue #4438 - Add performance counter flag is monotically increasing
Issue #4436 - Build problem: same code build and works with 1.4.0 but it doesn’t with 1.4.1
Issue #4429 - Function descriptions not supported in distributed
Issue #4423 - –hpx:ini=hpx.lock_detection=0 has no effect
Issue #4422 - Add performance counter metadata
Issue #4419 - Weird behavior for –hpx:print-counter-interval with large numbers
Issue #4401 - Create module repository
Issue #4400 - Command line options conflict related to performance counters
Issue #4349 - –hpx:use-process-mask option throw an exception on OS X
Issue #4345 - Move gh-pages branch out of hpx repo
Issue #4323 - Const-correctness error in assignment operator of compute::vector
Issue #4318 - ASIO breaks with C++2a concepts
Issue #4317 - Application runs even if –hpx:help is specified
Issue #4063 - Document hpxcxx compiler wrapper
Issue #3983 - Implement the C++20 Synchronization Library
Issue #3696 - C++11 constexpr support is now required
Issue #3623 - Modular HPX branch and an alternative project layout
Issue #2836 - The worst-case time complexity of parallel::sort seems to be O(N^2).
Closed pull requests#
PR #4936 - Minor documentation fixes part 2
PR #4935 - Add copyright and license to joss paper file
PR #4934 - Adding Semicolon in Documentation
PR #4932 - Fixing compiler warnings
PR #4931 - Small documentation formatting fixes
PR #4930 - Documentation Distributed HPX applications localvv with local_vv
PR #4929 - Add final version of the JOSS paper
PR #4928 - Add HPX_NODISCARD to enable_user_polling structs
PR #4926 - Rename distributed_executors module to executors_distributed
PR #4925 - Making transform_reduce conforming to C++20
PR #4923 - Don’t acquire lock if not needed
PR #4921 - Update the release notes for the release candidate 3
PR #4920 - Disable libcds release
PR #4919 - Make cuda event pool dynamic instead of fixed size
PR #4917 - Move chrono functionality to hpx::chrono namespace
PR #4916 - HPX_HAVE_DEPRECATION_WARNINGS needs to be set even when disabled
PR #4915 - Moving more action related files to actions modules
PR #4914 - Add alias targets with namespaces used for exporting
PR #4912 - Aggregate initialize CPOs
PR #4910 - Explicitly specify hwloc root on Jenkins CSCS builds
PR #4908 - Fix algorithms documentation
PR #4907 - Remove HPX::hpx_no_wrap_main target
PR #4906 - Fixing unused variable warning
PR #4905 - Adding specializations for simple for_loops
PR #4904 - Update boost to 1.74.0 for the newest jenkins configs
PR #4903 - Hide GITHUB_TOKEN environment variables from environment variable output
PR #4902 - Cancel previous pull requests builds before starting a new one with Jenkins
PR #4901 - Update public API list with updated algorithms
PR #4899 - Suggested changes for HPX V1.5 release notes
PR #4898 - Minor tweak to hpx::equal implementation
PR #4896 - Making generate() and generate_n conforming to C++20
PR #4895 - Update apex tag
PR #4894 - Fix exception handling for tasks
PR #4893 - Remove last use of std::result_of, removed in C++20
PR #4892 - Adding replay_executor and replicate_executor
PR #4889 - Restore old behaviour of not requiring linking to hpx_wrap when HPX_WITH_DYNAMIC_HPX_MAIN=OFF
PR #4887 - Making sure remotely thrown (non-hpx) exceptions are properly marshaled back to invocation site
PR #4885 - Adapting hpx::find and friends to C++20
PR #4884 - Adapting mismatch to C++20
PR #4883 - Adapting hpx::equal to be conforming to C++20
PR #4882 - Fixing exception handling for hpx::copy and adding missing tests
PR #4881 - Adds different runtime exception when registering thread with the HPX runtime
PR #4876 - Adding example demonstrating how to disable thread stealing during the execution of parallel algorithms
PR #4874 - Adding non-policy tests to all_of, any_of, and none_of
PR #4873 - Set CUDA compute capability on rostam Jenkins builds
PR #4872 - Force partitioned vector scan tests to run serially
PR #4870 - Making move conforming with C++20
PR #4869 - Making destroy and destroy_n conforming to C++20
PR #4868 - Fix miscellaneous header problems
PR #4867 - Add CPOs for for_each
PR #4865 - Adapting count and count_if to be conforming to C++20
PR #4864 - Release notes 1.5.0
PR #4863 - adding libcds-hpx tag to prepare for hpx1.5 release
PR #4862 - Adding version specific deprecation options
PR #4861 - Limiting executor improvements
PR #4860 - Making fill and fill_n compatible with C++20
PR #4859 - Adapting all_of, any_of, and none_of to C++20
PR #4857 - Improve libCDS integration
PR #4856 - Correct typos in the documentation of the hpx performance counters
PR #4854 - Removing obsolete code
PR #4853 - Adding test that derives component from two other components
PR #4852 - Fix mpi_ring test in distributed mode by ensuring all ranks run hpx_main
PR #4851 - Converting resiliency APIs to tag_invoke based CPOs
PR #4849 - Enable use of future_overhead test when DISTRIBUTED_RUNTIME is OFF
PR #4847 - Fixing ‘error prone’ constructs as reported by Codacy
PR #4846 - Disable Boost.Asio concepts support
PR #4845 - Fix PAPI counters
PR #4843 - Remove dependency on various Boost headers
PR #4841 - Rearrange public API headers
PR #4840 - Fixing TSS problems during thread termination
PR #4839 - Fix async_cuda build problems when distributed runtime is disabled
PR #4837 - Restore compatibility for old (now deprecated) copy algorithms
PR #4836 - Adding CPOs for hpx::reduce
PR #4835 - Remove using util::result_of from namespace hpx
PR #4834 - Fixing the calculation of the number of idle cores and the corresponding idle masks
PR #4833 - Allow thread function destructors to yield
PR #4832 - Fixing assertion in split_gids and memory leaks in 1d_stencil_7
PR #4831 - Making sure MPI_CXX_COMPILE_FLAGS is interpreted as a sequence of options
PR #4830 - Update documentation on using HPX::wrap_main
PR #4827 - Update clang-newest configuration to use clang 10
PR #4826 - Add Jenkins configuration for rostam
PR #4825 - Move all CUDA functionality to hpx::cuda::experimental namespace
PR #4824 - Add support for building master/release branches to Jenkins configuration
PR #4821 - Implement customization point for hpx::copy and hpx::ranges::copy
PR #4819 - Allow finding Boost components before finding HPX
PR #4817 - Adding range version of stable sort
PR #4815 - Fix a wrong #ifdef for IO/TIMER pools causing build errors
PR #4814 - Replace hpx::function_nonser with std::function in error module
PR #4809 - Foreach adapt
PR #4808 - Make internal algorithms functions const
PR #4807 - Add Jenkins configuration for running on Piz Daint
PR #4806 - Update documentation links to new domain name
PR #4805 - Applying changes that resolve time complexity issues in sort
PR #4803 - Adding implementation of stable_sort
PR #4802 - Fix datapar header paths
PR #4801 - Replace boost::shared_array<T> with std::shared_ptr<T[]> if supported
PR #4799 - Fixing #include paths in compatibility headers
PR #4798 - Include the main module header (fixes partially #4488)
PR #4797 - Change cmake targets
PR #4794 - Removing 128bit integer emulation
PR #4793 - Make sure global variable is handled properly
PR #4792 - Replace enable_if with HPX_CONCEPT_REQUIRES_ and add is_sentinel_for constraint
PR #4790 - Move deprecation warnings from base template to template specializations for result_of etc. structs
PR #4789 - Fix hangs during assertion handling and distributed runtime construction
PR #4788 - Fixing inclusive transform scan algorithm to properly handle initial value
PR #4785 - Fixing barrier test
PR #4784 - Fixing deleter argument bindings in serialize_buffer
PR #4783 - Add coveralls badge
PR #4782 - Make header tests parallel again
PR #4780 - Remove outdated comment about hpx::stop in documentation
PR #4776 - debug print improvements
PR #4775 - Checkpoint cleanup
PR #4771 - Fix compilation with HPX_WITH_NETWORKING=OFF
PR #4767 - Remove all force linking leftovers
PR #4765 - Fix 1d stencil index calculation
PR #4764 - Force some tests to run serially
PR #4762 - Update pointees in compatibility headers
PR #4761 - Fix running and building of execution module tests on CircleCI
PR #4760 - Storing hpx_options in global property to speed up summary report
PR #4759 - Reduce memory requirements for our main shared state
PR #4757 - Fix mimalloc linking on Windows
PR #4756 - Fix compilation issues
PR #4753 - Re-adding API functions that were lost during merges
PR #4751 - Revert “Create coverage reports and upload them to codecov.io”
PR #4750 - Fixing possible race condition during termination detection
PR #4749 - Deprecate result_of and friends
PR #4748 - Create coverage reports and upload them to codecov.io
PR #4747 - Changing #include for MPI parcelport
PR #4745 - Add is_sentinel_for trait implementation and test
PR #4743 - Fix init_globally example after runtime mode changes
PR #4742 - Update SUPPORT.md
PR #4741 - Fixing a warning generated for unity builds with msvc
PR #4740 - Rename local_lcos and basic_execution modules
PR #4739 - Undeprecate a couple of hpx/modulename.hpp headers
PR #4738 - Conditionally test schedulers in thread_stacksize_current test
PR #4734 - Fixing a bunch of codacy warnings
PR #4733 - Add experimental unity build option to CMake configuration
PR #4730 - Fixing compilation problems with unordered map
PR #4729 - Fix APEX build
PR #4727 - Fix missing runtime includes for distributed runtime
PR #4726 - Add more API headers
PR #4725 - Add more compatibility headers for deprecated module headers
PR #4724 - Fix 4723
PR #4721 - Attempt to fixing migration tests
PR #4717 - Make the compatilibility headers macro conditional
PR #4716 - Add hpx/runtime.hpp and hpx/distributed/runtime.hpp API headers
PR #4714 - Add hpx/future.hpp header
PR #4713 - Remove hpx/runtime/threads_fwd.hpp and hpx/util_fwd.hpp
PR #4711 - Make module deprecation warnings overridable
PR #4710 - Add compatibility headers and other fixes after module header renaming
PR #4708 - Add termination handler for parallel algorithms
PR #4707 - Use hpx::function_nonser instead of std::function internally
PR #4706 - Move header file to module
PR #4705 - Fix incorrect behaviour of cmake-format check
PR #4704 - Fix resource tests
PR #4701 - Fix missing includes for future::then specializations
PR #4700 - Removing obsolete memory component
PR #4699 - Add short descriptions to modules missing documentation
PR #4696 - Rename generated modules headers
PR #4693 - Overhauling thread_mapper for public consumption
PR #4688 - Fix thread stack size handling
PR #4687 - Adding all_gather and fixing all_to_all
PR #4684 - Miscellaneous compilation fixes
PR #4683 - Fix HPX_WITH_DYNAMIC_HPX_MAIN=OFF
PR #4682 - Fix compilation of pack_traversal_rebind_container.hpp
PR #4681 - Add missing hpx/execution.hpp includes for future::then
PR #4678 - Typeless communicator
PR #4677 - Forcing registry option to be accepted without checks.
PR #4676 - Adding scatter_to/scatter_from collective operations
PR #4673 - Fix PAPI counters compilation
PR #4671 - Deprecate hpx::promise alias to hpx::lcos::promise
PR #4670 - Explicitly instantiate get_exception
PR #4667 - Add stopValue in Sentinel struct instead of Iterator
PR #4666 - Add release build on Windows to GitHub actions
PR #4664 - Creating itt_notify module.
PR #4663 - Mpi fixes
PR #4659 - Making sure declarations match definitions in register_locks implementation
PR #4655 - Fixing task annotations for actions
PR #4653 - Making sure APEX is linked into every application, if needed
PR #4651 - Update get_function_annotation.hpp
PR #4646 - Runtime type
PR #4645 - Add a few more API headers
PR #4644 - Fixing support for mpirun (and similar)
PR #4643 - Fixing the fix for get_idle_core_count() API
PR #4638 - Remove HPX_API_EXPORT missed in previous cleanup
PR #4636 - Adding C++20 barrier
PR #4635 - Adding C++20 latch API
PR #4634 - Adding C++20 counting semaphore API
PR #4633 - Unify execution parameters customization points
PR #4632 - Adding missing bulk_sync_execute wrapper to example executor
PR #4631 - Updates to documentation; grammar edits.
PR #4630 - Updates to documentation; moved hyperlink
PR #4624 - Export set_self_ptr in thread_data.hpp instead of with forward declarations where used
PR #4623 - Clean up export macros
PR #4621 - Trigger an error for older boost versions on power architectures
PR #4617 - Ignore user-set compatibility header options if the module does not have compatibility headers
PR #4616 - Fix cmake-format warning
PR #4615 - Add handler for serializing custom exceptions
PR #4614 - Fix error message when HPX_IGNORE_CMAKE_BUILD_TYPE_COMPATIBILITY=OFF
PR #4613 - Make partitioner constructor private
PR #4611 - Making auto_chunk_size execute the given function using the given executor
PR #4610 - Making sure the thread-local lock registration data is moving to the core the suspended HPX thread is resumed on
PR #4609 - Adding an API function that exposes the number of idle cores
PR #4608 - Fixing moodycamel namespace
PR #4607 - Moving winsocket initialization to core library
PR #4606 - Local runtime module etc.
PR #4604 - Add config_registry module
PR #4603 - Deal with distributed modules in their respective CMakeLists.txt
PR #4602 - Small module fixes
PR #4598 - Making sure current_executor and service_executor functions are linked into the core library
PR #4597 - Adding broadcast_to/broadcast_from to collectives module
PR #4596 - Fix performance regression in block_executor
PR #4595 - Making sure main.cpp is built as a library if HPX_WITH_DYNAMIC_MAIN=OFF
PR #4592 - Futures module
PR #4591 - Adapting co_await support for C++20
PR #4590 - Adding missing exception test for for_loop()
PR #4587 - Move traits headers to hpx/modulename/traits directory
PR #4586 - Remove Travis CI config
PR #4585 - Update macOS test blacklist
PR #4584 - Attempting to fix missing symbols in stack trace
PR #4583 - Fixing bad static_cast
PR #4582 - Changing download url for Windows prerequisites to circumvent bandwidth limitations
PR #4581 - Adding missing using placeholder::_X
PR #4579 - Move get_stack_size_name and related functions
PR #4575 - Excluding unconditional definition of class backtrace from global header
PR #4574 - Changing return type of hardware_concurrency() to unsigned int
PR #4570 - Move tests to modules
PR #4564 - Reshuffle internal targets and add HPX::hpx_no_wrap_main target
PR #4563 - fix CMake option typo
PR #4562 - Unregister lock earlier to avoid holding it while suspending
PR #4561 - Adding test macros supporting custom output stream
PR #4560 - Making sure hash_any::operator()() is linked into core library
PR #4559 - Fixing compilation if HPX_WITH_THREAD_BACKTRACE_ON_SUSPENSION=On
PR #4557 - Improve spinlock implementation to perform better in high-contention situations
PR #4553 - Fix a runtime_ptr problem at shutdown when apex is enabled
PR #4552 - Add configuration option for making exceptions less noisy
PR #4551 - Clean up thread creation parameters
PR #4549 - Test FetchContent build on GitHub actions
PR #4548 - Fix stack size
PR #4545 - Fix header tests
PR #4544 - Fix a typo in sanitizer build
PR #4541 - Add API to check if a thread pool exists
PR #4540 - Making sure MPI support is enabled if MPI futures are used but networking is disabled
PR #4538 - Move channel documentation examples to examples directory
PR #4536 - Add generic allocator for execution policies
PR #4534 - Enable compatibility headers for thread_executors module
PR #4532 - Fixing broken url in README.rst
PR #4531 - Update scripts
PR #4530 - Make sure module API docs show up in correct order
PR #4529 - Adding missing template code to module creation script
PR #4528 - Make sure version module uses HPX’s binary dir, not the parent’s
PR #4527 - Creating actions_base and actions module
PR #4526 - Shared state for cv
PR #4525 - Changing sub-name sequencing for experimental namespace
PR #4524 - Add API guarantee notes to API reference documentation
PR #4522 - Enable and fix deprecation warnings in execution module
PR #4521 - Moves more miscellaneous files to modules
PR #4520 - Skip execution customization points when executor is known
PR #4518 - Module distributed lcos
PR #4516 - Fix various builds
PR #4515 - Replace backslashes by slashes in windows paths
PR #4514 - Adding polymorphic_executor
PR #4512 - Adding C++20 jthread and stop_token
PR #4510 - Attempt to fix APEX linking in external packages again
PR #4508 - Only test pull requests (not all branches) with GitHub actions
PR #4505 - Fix duplicate linking in tests (ODR violations)
PR #4504 - Fix C++ standard handling
PR #4503 - Add CMakelists file check
PR #4500 - Fix .clang-format version requirement comment
PR #4499 - Attempting to fix hpx_init linking on macOS
PR #4498 - Fix compatibility of pool_executor
PR #4496 - Removing superfluous SPDX tags
PR #4494 - Module executors
PR #4493 - Pack traversal module
PR #4492 - Update copyright year in documentation
PR #4491 - Add missing current_executor header
PR #4490 - Update GitHub actions configs
PR #4487 - Properly dispatch exceptions thrown from hpx_main to be rethrown from hpx::init/hpx::stop
PR #4486 - Fixing an initialization order problem
PR #4485 - Move miscellaneous files to their rightful modules
PR #4483 - Clean up imported CMake target naming
PR #4481 - Add vcpkg installation instructions
PR #4479 - Add hints to allow to specify MIMALLOC_ROOT
PR #4478 - Async modules
PR #4475 - Fix rp init changes
PR #4474 - Use #pragma once in headers
PR #4472 - Add more descriptive error message when using x86 coroutines on non-x86 platforms
PR #4467 - Add mimalloc find cmake script
PR #4465 - Add thread_executors module
PR #4464 - Include module
PR #4462 - Merge hpx_init and hpx_wrap into one static library
PR #4461 - Making thread_data test more realistic
PR #4460 - Suppress MPI warnings in version.cpp
PR #4459 - Make sure pkgconfig applications link with hpx_init
PR #4458 - Added example demonstrating how to create and use a wrapping executor
PR #4457 - Fixing execution of thread exit functions
PR #4456 - Move backtrace files to debugging module
PR #4455 - Move deadlock_detection and maintain_queue_wait_times source files into schedulers module
PR #4450 - Fixing compilation with std::filesystem enabled
PR #4449 - Fixing build system to actually build variant test
PR #4447 - This fixes an obsolete #include
PR #4446 - Resume tasks where they were suspended
PR #4444 - Minor CUDA fixes
PR #4443 - Add missing tests to CircleCI config
PR #4442 - Adding a tag to all auto-generated files allowing for tools to visually distinguish those
PR #4441 - Adding performance counter type information
PR #4440 - Fixing MSVC build
PR #4439 - Link HPX::plugin and component privately in hpx_setup_target
PR #4437 - Adding a test that verifies the problem can be solved using a trait specialization
PR #4434 - Clean up Boost dependencies and copy string algorithms to new module
PR #4433 - Fixing compilation issues (!) if MPI parcelport is enabled
PR #4431 - Ignore warnings about name mangling changing
PR #4430 - Add performance_counters module
PR #4428 - Don’t add compatibility headers to module API reference
PR #4426 - Add currently failing tests on GitHub actions to blacklist
PR #4425 - Clean up and correct minimum required versions
PR #4424 - Making sure hpx.lock_detection=0 works as advertized
PR #4421 - Making sure interval time stops underlying timer thread on termination
PR #4417 - Adding serialization support for std::variant (if available) and std::tuple
PR #4415 - Partially reverting changes applied by PR 4373
PR #4414 - Added documentation for the compiler-wrapper script hpxcxx.in in creating_hpx_projects.rst
PR #4413 - Merging from V1.4.1 release
PR #4412 - Making sure to issue a warning if a file specified using –hpx:options-file is not found
PR #4411 - Make test specific to HPX_WITH_SHARED_PRIORITY_SCHEDULER
PR #4407 - Adding minimal MPI executor
PR #4405 - Fix cross pool injection test, use default scheduler as falback
PR #4404 - Fix a race condition and clean-up usage of scheduler mode
PR #4399 - Add more threading modules
PR #4398 - Add CODEOWNERS file
PR #4395 - Adding a parameter to auto_chunk_size allowing to control the amount of iterations to measure
PR #4393 - Use appropriate cache-line size defaults for different platforms
PR #4391 - Fixing use of allocator for C++20
PR #4390 - Making –hpx:help behavior consistent
PR #4388 - Change the resource partitioner initialization
PR #4387 - Fix roll_release.sh
PR #4386 - Add warning messages for using thread binding options on macOS
PR #4385 - Cuda futures
PR #4384 - Make enabling dynamic hpx_main on non-Linux systems a configuration error
PR #4383 - Use configure_file for HPXCacheVariables.cmake
PR #4382 - Update spellchecking whitelist and fix more typos
PR #4380 - Add a helper function to get a future from a cuda stream
PR #4379 - Add Windows and macOS CI with GitHub actions
PR #4378 - Change C++ standard handling
PR #4377 - Remove Python scripts
PR #4374 - Adding overload for hpx::init/hpx::start for use with resource partitioner
PR #4373 - Adding test that verifies for 4369 to be fixed
PR #4372 - Another attempt at fixing the integral mismatch and conversion warnings
PR #4370 - Doc updates quick start
PR #4368 - Add a whitelist of words for weird spelling suggestions
PR #4366 - Suppress or fix clang-tidy-9 warnings
PR #4365 - Removing more Boost dependencies
PR #4363 - Update clang-format config file for version 9
PR #4362 - Fix indices typo
PR #4361 - Boost cleanup
PR #4360 - Move plugins
PR #4358 - Doc updates; generating documentation. Will likely need heavy editing.
PR #4356 - Remove some minor unused and unnecessary Boost includes
PR #4355 - Fix spellcheck step in CircleCI config
PR #4354 - Lightweight utility to hold a pack as members
PR #4352 - Minor fixes to the C++ standard detection for MSVC
PR #4351 - Move generated documentation to hpx-docs repo
PR #4347 - Add cmake policy - CMP0074
PR #4346 - Remove file committed by mistake
PR #4342 - Remove HCC and SYCL options from CMakeLists.txt
PR #4341 - Fix launch process test with APEX enabled
PR #4340 - Testing Cirrus CI
PR #4339 - Post 1.4.0 updates
PR #4338 - Spelling corrections and CircleCI spell check
PR #4333 - Flatten bound callables
PR #4332 - This is a collection of mostly minor (cleanup) fixes
PR #4331 - This adds the missing tests for async_colocated and async_continue_colocated
PR #4330 - Remove HPX.Compute host default_executor
PR #4328 - Generate global header for basic_execution module
PR #4327 - Use INTERNAL_FLAGS option for all examples and components
PR #4326 - Usage of temporary allocator in assignment operator of compute::vector
PR #4325 - Use hpx::threads::get_cache_line_size in prefetching.hpp
PR #4324 - Enable compatibility headers option for execution module
PR #4316 - Add clang format indentppdirectives
PR #4313 - Introduce index_pack alias to pack of size_t
PR #4312 - Fixing compatibility header for pack.hpp
PR #4311 - Dataflow annotations for APEX
PR #4309 - Update launching_and_configuring_hpx_applications.rst
PR #4306 - Fix schedule hint not being taken from executor
PR #4305 - Implementing hpx::functional::tag_invoke
PR #4304 - Improve pack support utilities
PR #4303 - Remove errors module dependency on datastructures
PR #4301 - Clean up thread executors
PR #4294 - Logging revamp
PR #4292 - Remove SPDX tag from Boost License file to allow for github to recognize it
PR #4291 - Add format support for std::tm
PR #4290 - Simplify compatible tuples check
PR #4288 - A lightweight take on boost::lexical_cast
PR #4287 - Forking boost::lexical_cast as a new module
PR #4277 - MPI_futures
PR #4270 - Refactor future implementation
PR #4265 - Threading module
PR #4259 - Module naming base
PR #4251 - Local workrequesting scheduler
PR #4250 - Inline execution of scoped tasks, if possible
PR #4247 - Add execution in module headers
PR #4246 - Expose CMake targets officially
PR #4239 - Doc updates miscellaneous (partially completed during Google Season of Docs)
PR #4233 - Remove project() from modules + fix CMAKE_SOURCE_DIR issue
PR #4231 - Module local lcos
PR #4207 - Command line handling module
PR #4206 - Runtime configuration module
PR #4141 - Doc updates examples local to remote (partially completed during Google Season of Docs)
PR #4091 - Split runtime into local and distributed parts
PR #4017 - Require C++14
HPX V1.4.1 (Feb 12, 2020)#
General changes#
This is a bugfix release. It contains the following changes:
Fix compilation issues on Windows, macOS, FreeBSD, and with gcc 10
Install missing
pdbfiles on WindowsAllow running tests using an installed version of HPX
Skip MPI finalization if HPX has not initialized MPI
Give a hard error when attempting to use IO counters on Windows
Closed issues#
Issue #4320 - HPX 1.4.0 does not compile with gcc 10
Issue #4336 - Building HPX 1.4.0 with IO Counters breaks (Windows)
Issue #4334 - HPX
DebugandRelWithDebinfobuilds on Windows not installing.pdbfilesIssue #4322 - Undefine VT1 and VT2 after boost includes
Issue #4314 - Compile error on 1.4.0
Issue #4307 -
ld: error: duplicate symbol: freebsd_environ
Closed pull requests#
PR #4376 - Attempt to fix some test build errors on Windows
PR #4357 - Adding missing
#includes to fix gcc V10 linker problemsPR #4353 - Skip
MPI_FinalizeifMPI_Initis not called from HPXPR #4343 - Give a hard error if IO counters are enabled on non-Linux systems
PR #4337 - Installing pdb files on Windows
PR #4335 - Adding capability to buildsystem to use an installed version of HPX
PR #4315 - Forcing exported symbols from composable_guard to be linked into core library
PR #4310 - Remove environment handling from
exception.cpp
HPX V1.4.0 (January 15, 2020)#
General changes#
We have added the collectives
all_to_allandall_reduce.We have added APIs for resiliency, which allows replication and replay for failed tasks. See the documentation for more details.
Components can now be checkpointed.
Performance improvements to schedulers and coroutines. A significant change is the addition of stackless coroutines. These are to be used for tasks that do not need to be suspended and can reduce overheads noticeably in applications with short tasks. A stackless coroutine can be created with the new stack size
thread_stacksize_nostack.We have added an implementation of
unique_any, which is a non-copyable version ofany.The
shared_priority_queue_schedulerhas been improved. It now has lower overheads than the default scheduler in many situations. Unlike the default scheduler it fully supports NUMA scheduling hints. Enable it with the command line option--hpx:queuing=shared-priority. This scheduler should still be considered experimental, but its use is encouraged in real applications to help us make it production ready.We have added the performance counters
background-receive-durationandbackground-receive-overheadfor inspecting the time and overhead spent on receiving parcels in the background.Compilation time has been further improved when
HPX_WITH_NETWORKING=OFF.We no longer require compiled Boost dependencies in certain configurations. This requires at least Boost 1.70, compiling on x86 with GCC 9, clang (libc++) 9, or VS2019 in C++17 mode. The dependency on Boost.Filesystem can explicitly be turned on with
HPX_FILESYSTEM_WITH_BOOST_FILESYSTEM_COMPATIBILITY=ON(it is off by default if the standard library supportsstd::filesystem). Boost.ProgramOptions has been copied into the HPX repository. We have a compatibility layer for users who must explicitly use Boost.ProgramOptions instead of the ProgramOptions provided by HPX. To remove the dependencyHPX_PROGRAM_OPTIONS_WITH_BOOST_PROGRAM_OPTIONS_COMPATIBILITYmust be explicitly set toOFF. This option will be removed in a future release. We have also removed several other header-only dependencies on Boost.It is now possible to use the process affinity mask set by tools like
numactland various batch environments with the command line option--hpx:use-process-mask. Enabling this option implies--hpx:ignore-batch-env.It is now possible to create standalone thread pools without starting the runtime. See the
standalone_thread_pool_executor.cpptest in theexecutionmodule for an example.Tasks annotated with
hpx::util::annotated_functionnow have their correct name when using APEX to generate OTF2 files.Cloning of APEX was defective in previous releases (it required manual intervention to check out the correct tag or branch). This has been fixed.
The option
HPX_WITH_MORE_THAN_64_THREADSis now ignored and will be removed in a future release. The value is instead derived directly fromHPX_WITH_MAX_CPU_COUNToption.We have deprecated compiling in C++11 mode. The next release will require a C++14 capable compiler.
We have deprecated support for the Vc library. This option will be replaced with SIMD support from the standard library in a future release.
We have significantly refactored our CMake setup. This is intended to be a non-breaking change and will allow for using HPX through CMake targets in the future.
We have continued modularizing the HPX library. In the process we have rearranged many header files into module-specific directories. All moved headers have compatibility headers which forward from the old location to the new location, together with a deprecation warning. The compatibility headers will eventually be removed.
We now enforce formatting with
clang-formaton the majority of our source files.We have added SPDX license tags to all files.
Many bugfixes.
Breaking changes#
The
HPX_WITH_THREAD_COMPATIBILITYoption and the associated compatibility layer has been removed.The
HPX_WITH_INCLUSIVE_SCAN_COMPATIBILITYoption and the associated compatibility layer has been removed.The
HPX_WITH_UNWRAPPED_COMPATIBLITYoption and the associated compatibility layer has been removed.
Closed issues#
Issue #4282 - Build Issues with Release on Windows
Issue #4278 - Build Issues with CMake 3.14.4
Issue #4273 - Clients of HPX 1.4.0-rc2 with APEX ar not linked to libhpx-apex
Issue #4269 - Building HPX 1.4.0-rc2 with support for APEX fails
Issue #4263 - Compilation fail on latest master
Issue #4232 - Configure of HPX project using CMake FetchContent fails
Issue #4223 - “Re-using the main() function as the main HPX entry point” doesn’t work
Issue #4220 - HPX won’t compile - error building
resource_partitionerIssue #4215 - HPX 1.4.0rc1 does not link on s390x
Issue #4204 - Trouble compiling HPX with Intel compiler
Issue #4199 - Refactor APEX to eliminate circular dependency
Issue #4187 - HPX can’t build on OSX
Issue #4185 - Simple debug output for development
Issue #4182 -
@HPX_CONF_PREFIX@is the empty stringIssue #4169 - HPX won’t build with APEX
Issue #4163 - Add back
HPX_LIBRARIESandHPX_INCLUDE_DIRSIssue #4161 - It should be possible to call
find_package(HPX)multiple timesIssue #4155 -
get_self_id()for stackless threads returnsinvalid_thread_idIssue #4151 - build error with MPI code
Issue #4150 - hpx won’t build on POWER9 with clang 8
Issue #4148 -
cacheline_datadelivers poor performance with C++17 compared to C++14Issue #4144 - target general in
HPX_LIBRARIESdoes not existIssue #4134 - CMake Error when
-DHPX_WITH_HPXMP=ONIssue #4132 - parallel fill leaves elements unfilled
Issue #4123 - PAPI performance counters are inaccessible
Issue #4118 -
static_chunk_sizeis not obeyed in scan algorithmsIssue #4115 - dependency chaining error with APEX
Issue #4107 - Initializing runtime without entry point function and command line arguments
Issue #4105 - Bug in
hpx:bind=numa-balancedIssue #4101 - Bound tasks
Issue #4100 - Add SPDX identifier to all files
Issue #4085 -
hpx_topologylibrary should depend on hwlocIssue #4067 - HPX fails to build on macOS
Issue #4056 - Building without thread manager idle backoff fails
Issue #4052 - Enforce
clang-formatstyle for modulesIssue #4032 - Simple hello world fails to launch correctly
Issue #4030 - Allow threads to skip context switching
Issue #4029 - Add support for mimalloc
Issue #4005 - Can’t link HPX when APEX enabled
Issue #4002 - Missing header for algorithm module
Issue #3989 - conversion from
longtounsigned intrequires a narrowing conversion on MSVCIssue #3958 -
/statistics/average@perf counter can’t be createdIssue #3953 - CMake errors from
HPX_AddPseudoDependenciesIssue #3941 - CMake error for APEX install target
Issue #3940 - Convert pseudo-doxygen function documentation into actual doxygen documentation
Issue #3935 - HPX compiler match too strict?
Issue #3929 - Buildbot failures on latest HPX stable
Issue #3912 - I recommend publishing a version that does not depend on the boost library
Issue #3890 -
hpx.ininot workingIssue #3883 - cuda compilation fails because of
-faligned-newIssue #3879 - HPX fails to configure with
-DHPX_WITH_TESTS=OFFIssue #3871 -
dataflowdoes not support void allocatorsIssue #3867 - Latest HTML docs placed in wrong directory on GitHub pages
Issue #3866 - Make sure all tests use
HPX_TEST*macros and notHPX_ASSERTIssue #3857 - CMake all-keyword or all-plain for
target_link_librariesIssue #3856 -
hpx_setup_targetadds rogue flagsIssue #3850 - HPX fails to build on POWER8 with Clang7
Issue #3848 - Remove
lvamember fromthread_init_dataIssue #3838 -
hpx::parallel::count/count_iffailing testsIssue #3651 -
hpx::parallel::transform_reducewith non const reference as lambda parameterIssue #3560 - Apex integration with HPX not working properly
Issue #3322 - No warning when mixing debug/release builds
Closed pull requests#
PR #4300 - Checks for
MPI_Initbeing called twicePR #4299 - Small CMake fixes
PR #4298 - Remove extra call to annotate function that messes up traces
PR #4296 - Fixing collectives locking problem
PR #4295 - Do not check
LICENSE_1_0.txtfor inspect violationsPR #4293 - Applying two small changes fixing carious MSVC/Windows problems
PR #4285 - Delete
apex.hppPR #4276 - Disable doxygen generation for
hpx/debugging/print.hppfilePR #4275 - Make sure APEX is linked to even when not explicitly referenced
PR #4272 - Fix pushing of documentation
PR #4271 - Updating APEX tag, don’t create new task_wrapper on
operator=of hpx_thread objectPR #4268 - Testing for noexcept function specializations in C++11/14 mode
PR #4267 - Fixing MSVC warning
PR #4266 - Make sure macOS Travis CI fails if build step fails
PR #4264 - Clean up compatibility header options
PR #4262 - Cleanup modules
CMakeLists.txtPR #4261 - Fixing HPX/APEX linking and dependencies for external projects like Phylanx
PR #4260 - Fix docs compilation problems
PR #4258 - Couple of minor changes
PR #4257 - Fix apex annotation for async dispatch
PR #4256 - Remove lambdas from assert expressions
PR #4255 - Ignoring lock in
all_to_allandall_reducePR #4254 - Adding action specializations for noexcept functions
PR #4253 - Move
partlit.hppto affinity modulePR #4252 - Make mismatching build types a hard error in CMake
PR #4249 - Scheduler improvement
PR #4248 - update hpxmp tag to v0.3.0
PR #4245 - Adding high performance channels
PR #4244 - Ignore lock in ignore_while_locked_1485 test
PR #4243 - Fix PAPI command line option documentation
PR #4242 - Ignore lock in target_distribution_policy
PR #4241 - Fix
start_stop_callbackstestPR #4240 - Mostly fix clang CUDA compilation
PR #4238 - Google Season of Docs updates to documentation; grammar edits.
PR #4237 - fixing annotated task to use the name, not the desc
PR #4236 - Move module print summary to modules
PR #4235 - Don’t use alignas in
cache_{aligned,line}_dataPR #4234 - Add basic overview sentence to all modules
PR #4230 - Add OS X builds to Travis CI
PR #4229 - Remove leftover queue compatibility checks
PR #4226 - Fixing APEX shutdown by explicitly shutting down throttling
PR #4225 - Allow
CMAKE_INSTALL_PREFIXto be a relative pathPR #4224 - Deprecate verbs parcelport
PR #4222 - Update
register_{thread,work}namespacesPR #4221 - Changing
HPX_GCC_VERSIONcheck from70000to70300PR #4218 - Google Season of Docs updates to documentation; grammar edits.
PR #4217 - Google Season of Docs updates to documentation; grammar edits.
PR #4216 - Fixing gcc warning on 32bit platforms (integer truncation)
PR #4214 - Apex callback refactoring
PR #4213 - Clean up allocator checks for dependent projects
PR #4212 - Google Season of Docs updates to documentation; grammar edits.
PR #4211 - Google Season of Docs updates to documentation; contributing to hpx
PR #4210 - Attempting to fix Intel compilation
PR #4209 - Fix CUDA 10 build
PR #4205 - Making sure that differences in
CMAKE_BUILD_TYPEare not reported on multi-configuration cmake generatorsPR #4203 - Deprecate Vc
PR #4202 - Fix CUDA configuration
PR #4200 - Making sure
hpx_wrapis not passed on to linker on non-Linux systemsPR #4198 - Fix
execution_agent.cppcompilation with GCC 5PR #4197 - Remove deprecated options for 1.4.0 release
PR #4196 - minor fixes for building on OSX Darwin
PR #4195 - Use full clone on CircleCI for pushing stable tag
PR #4193 - Add scheduling hints to hello_world_distributed
PR #4192 - Set up CUDA in HPXConfig.cmake
PR #4191 - Export allocators root variables
PR #4190 - Don’t use
constexprinthread_datawith GCC <= 6PR #4189 - Only use
quick_exitif availablePR #4188 - Google Season of Docs updates to documentation; writing single node hpx applications
PR #4186 - correct vc to cuda in cuda cmake
PR #4184 - Resetting some cached variables to make sure those are re-filled
PR #4183 - Fix
hpxcxxconfigurationPR #4181 - Rename base libraries var
PR #4180 - Move header left behind earlier to plugin module
PR #4179 - Moving
zip_iteratorandtransform_iteratorto iterator_support modulePR #4178 - Move checkpointing support to its own module
PR #4177 - Small const fix to
basic_executionmodulePR #4176 - Add back
HPX_LIBRARIESand friends toHPXConfig.cmakePR #4175 - Make Vc public and add it to
HPXConfig.cmakePR #4173 - Wait for runtime to be running before returning from hpx::start
PR #4172 - More protection against shutdown problems in error handling scenarios.
PR #4171 - Ignore lock in
condition_variable::waitPR #4170 - Adding APEX dependency to MPI parcelport
PR #4168 - Adding utility include
PR #4167 - Add a condition to setup the external libraries
PR #4166 - Add an
INTERNAL_FLAGSoption to link tohpx_internal_flagsPR #4165 - Forward
HPX_*cmake cache variables to external projectsPR #4164 - Affinity and batch environment modules
PR #4162 - Handle
quick exitPR #4160 - Using
target_link_librariesfor cmake versions >= 3.12PR #4159 - Make sure
HPX_WITH_NATIVE_TLSis forwarded to dependent projectsPR #4158 - Adding allocator imported target as a dependency of allocator module
PR #4157 - Add
hpx_memoryas a dependency of parcelport pluginsPR #4156 - Stackless coroutines now can refer to themselves (through get_self() and friends)
PR #4154 - Added CMake policy CMP0060 for HPX applications.
PR #4153 - add header
iomanipto tests and toolPR #4152 - Casting MPI tag value
PR #4149 - Add back private
m_descmember variable in program_options modulePR #4147 - Resource partitioner and threadmanager modules
PR #4146 - Google Season of Docs updates to documentation; creating hpx projects
PR #4145 - Adding basic support for stackless threads
PR #4143 - Exclude
test_client_1950from all targetPR #4142 - Add a new
thread_pool_executorPR #4140 - Google Season of Docs updates to documentation; why hpx
PR #4139 - Remove runtime includes from coroutines module
PR #4138 - Forking
boost::intrusive_ptrand adding it ashpx::intrusive_ptrPR #4137 - Fixing TSS destruction
PR #4136 - HPX.Compute modules
PR #4133 - Fix
block_executorPR #4131 - Applying fixes based on reports from PVS Studio
PR #4130 - Adding missing header to build system
PR #4129 - Fixing compilation if
HPX_WITH_DATAPAR_VCis enabledPR #4128 - Renaming
moveonly_anytounique_anyPR #4126 - Attempt to fix
basic_anyconstructor for gcc 7PR #4125 - Changing
extra_archive_dataimplementationPR #4124 - Don’t link to Boost.System unless required
PR #4122 - Add kernel launch helper utility (+saxpy demo) and merge in octotiger changes
PR #4121 - Fixing migration test if networking is disabled.
PR #4120 - Google Season of Docs updates to documentation; hpx build system v1
PR #4119 - Making sure
chunk_sizeandmax_chunkare actually applied to parallel algorithms if specifiedPR #4117 - Make CircleCI formatting check store diff
PR #4116 - Fix automatically setting C++ standard
PR #4114 - Module serialization
PR #4113 - Module datastructures
PR #4111 - Fixing performance regression introduced earlier
PR #4110 - Adding missing SPDX tags
PR #4109 - Overload for start without entry point/argv.
PR #4108 - Making sure C++ standard is properly detected and propagated
PR #4106 - use
std::roundfor guaranteed rounding without errorsPR #4104 - Extend
scheduler_modewith newwork_stealingand task assignment modesPR #4103 - Add this to lambda capture list
PR #4102 - Add spdx license and check
PR #4099 - Module coroutines
PR #4098 - Fix append module path in module CMakeLists template
PR #4097 - Function tests
PR #4096 - Removing return of
thread_result_typefrom functions not needing themPR #4095 - Stop-gap measure until cmake overhaul is in place
PR #4094 - Deprecate
HPX_WITH_MORE_THAN_64_THREADSPR #4093 - Fix initialization of
global_num_tasksinparallel_executorPR #4092 - Add support for mi-malloc
PR #4090 - Execution context
PR #4089 - Make counters in coroutines optional
PR #4087 - Making
hpx::util::anycompatible with C++17PR #4084 - Making sure destination array for
std::transformis properly resizedPR #4083 - Adapting
thread_queue_mcto behave even if no 128bit atomics are availablePR #4082 - Fix compilation on GCC 5
PR #4081 - Adding option allowing to force using Boost.FileSystem
PR #4080 - Updating module dependencies
PR #4079 - Add missing tests for iterator_support module
PR #4078 - Disable parcel-layer if networking is disabled
PR #4077 - Add missing include that causes build fails
PR #4076 - Enable compatibility headers for functional module
PR #4075 - Coroutines module
PR #4073 - Use
configure_filefor generated files in modulesPR #4071 - Fixing MPI detection for PMIx
PR #4070 - Fix macOS builds
PR #4069 - Moving more facilities to the collectives module
PR #4068 - Adding main HPX
#includedirectory to modulesPR #4066 - Switching the use of
message(STATUS "...")to hpx_infoPR #4065 - Move Boost.Filesystem handling to filesystem module
PR #4064 - Fix program_options test with older boost versions
PR #4062 - The
cpu_featurestool fails to compile on anything but x86 architecturesPR #4061 - Add
clang-formatchecking step for modulesPR #4060 - Making sure
HPX_IDLE_BACKOFF_TIME_MAXis always defined (even if its unused)PR #4059 - Renaming module
hpx_parallel_executorsintohpx_executionPR #4058 - Do not build networking tests when networking disabled
PR #4057 - Printing configuration summary for modules as well
PR #4055 - Google Season of Docs updates to documentation; hpx build systems
PR #4054 - Add troubleshooting section to manual
PR #4051 - Add more variations to
future_overheadtestPR #4050 - Creating plugin module
PR #4049 - Move missing modules tests
PR #4047 - Add boost/filesystem headers to inspect deprecated headers
PR #4045 - Module functional
PR #4043 - Fix preconditions and error messages for suspension functions
PR #4041 - Pass HPX_STANDARD on to dependent projects via HPXConfig.cmake
PR #4040 - Program options module
PR #4039 - Moving non-serializable
any(any_nonser) to datastructures modulePR #4038 - Adding MPark’s variant (V1.4.0) to HPX
PR #4037 - Adding resiliency module
PR #4036 - Add C++17 filesystem compatibility header
PR #4035 - Fixing support for mpirun
PR #4028 - CMake to target based directives
PR #4027 - Remove GitLab CI configuration
PR #4026 - Threading refactoring
PR #4025 - Refactoring thread queue configuration options
PR #4024 - Fix padding calculation in
cache_aligned_data.hppPR #4023 - Fixing Codacy issues
PR #4022 - Make sure process mask option is passed to
affinity_dataPR #4021 - Warn about compiling in C++11 mode
PR #4020 - Module concurrency
PR #4019 - Module topology
PR #4018 - Update deprecated header in
thread_queue_mc.hppPR #4015 - Avoid overwriting artifacts
PR #4014 - Future overheads
PR #4013 - Update URL to test output conversion script
PR #4012 - Fix CUDA compilation
PR #4011 - Fixing cyclic dependencies between modules
PR #4010 - Ignore stable tag on CircleCI
PR #4009 - Check circular dependencies in a circle ci step
PR #4008 - Extend cache aligned data to handle tuple-like data
PR #4007 - Fixing migration for components that have actions returning a client
PR #4006 - Move is_value_proxy.hpp to algorithms module
PR #4004 - Shorten CTest timeout on CircleCI
PR #4003 - Refactoring to remove (internal) dependencies
PR #4001 - Exclude tests from all target
PR #4000 - Module errors
PR #3999 - Enable support for compatibility headers for logging module
PR #3998 - Add process thread binding option
PR #3997 - Export handle_assert function
PR #3996 - Attempt to solve issue where
-latomicdoes not support 128bit atomicsPR #3993 - Make sure
__LINE__is an unsignedPR #3991 - Fix dependencies and flags for header tests
PR #3990 - Documentation tags fixes
PR #3988 - Adding missing solution folder for format module test
PR #3987 - Move runtime-dependent functions out of command line handling
PR #3986 - Fix CMake configuration with PAPI on
PR #3985 - Module timing
PR #3984 - Fix default behaviour of paths in
add_hpx_componentPR #3982 - Parallel executors module
PR #3981 - Segmented algorithms module
PR #3980 - Module logging
PR #3979 - Module util
PR #3978 - Fix
clang-tidystep on CircleCIPR #3977 - Fixing solution folders for moved components
PR #3976 - Module format
PR #3975 - Enable deprecation warnings on CircleCI
PR #3974 - Fix typos in documentation
PR #3973 - Fix compilation with GCC 9
PR #3972 - Add condition to clone apex + use of new cmake var APEX_ROOT
PR #3971 - Add testing module
PR #3968 - Remove unneeded file in hardware module
PR #3967 - Remove leftover PIC settings from main CMakeLists.txt
PR #3966 - Add missing export option in
add_hpx_modulePR #3965 - Change
current_function_helperback to non-constexprPR #3964 - Fixing merge problems
PR #3962 - Add a trait for
std::arrayfor unwrappingPR #3961 - Making
hpx::util::tuple<Ts...>andstd::tuple<Ts...>convertiblePR #3960 - fix compilation with CUDA 10 and GCC 6
PR #3959 - Fix C++11 incompatibility
PR #3957 - Algorithms module
PR #3956 - [
HPX_AddModule] Fix lower name var to upperPR #3955 - Fix CMake configuration with examples off and tests on
PR #3954 - Move components to separate subdirectory in root of repository
PR #3952 - Update
papi.cppPR #3951 - Exclude modules header tests from all target
PR #3950 - Adding
all_reducefacility to collectives modulePR #3949 - This adds a configuration file that will cause for stale issues to be automatically closed
PR #3948 - Fixing ALPS environment
PR #3947 - Add major compiler version check for building hpx as a binary package
PR #3946 - [Modules] Move the location of the generated headers
PR #3945 - Simplify tests and examples cmake
PR #3943 - Remove example module
PR #3942 - Add
NOEXPORToption toadd_hpx_{component,library}PR #3938 - Use https for CDash submissions
PR #3937 - Add
HPX_WITH_BUILD_BINARY_PACKAGEto the compiler check (refs #3935)PR #3936 - Fixing installation of binaries on windows
PR #3934 - Add set function for
sliding_semaphoremax_differencePR #3933 - Remove
cudadevrtfrom compile/link flags as it breaks downstream projectsPR #3932 - Fixing 3929
PR #3931 - Adding
all_to_allPR #3930 - Add test demonstrating the use of broadcast with component actions
PR #3928 - fixed number of tasks and number of threads for heterogeneous slurm environments
PR #3927 - Moving Cache module’s tests into separate solution folder
PR #3926 - Move unit tests to cache module
PR #3925 - Move version check to config module
PR #3924 - Add schedule hint executor parameters
PR #3923 - Allow aligning objects bigger than the cache line size
PR #3922 - Add Windows builds with Travis CI
PR #3921 - Add ccls cache directory to gitignore
PR #3920 - Fix
git_externalfetching of tagsPR #3905 - Correct rostambod url. Fix typo in doc
PR #3904 - Fix bug in context_base.hpp
PR #3903 - Adding new performance counters
PR #3902 - Add
add_hpx_modulefunctionPR #3901 - Factoring out container remapping into a separate trait
PR #3900 - Making sure errors during command line processing are properly reported and will not cause assertions
PR #3899 - Remove old compatibility bases from
make_actionPR #3898 - Make parameter size be of type
size_tPR #3897 - Making sure all tests are disabled if
HPX_WITH_TESTS=OFFPR #3895 - Add documentation for annotated_function
PR #3894 - Working around VS2019 problem with
make_actionPR #3892 - Avoid MSVC compatibility warning in internal allocator
PR #3891 - Removal of the default intel config include
PR #3888 - Fix
async_customizationdataflow example and Clarify what’s being testedPR #3887 - Add Doxygen documentation
PR #3882 - Minor docs fixes
PR #3880 - Updating APEX version tag
PR #3878 - Making sure symbols are properly exported from modules (needed for Windows/MacOS)
PR #3877 - Documentation
PR #3876 - Module hardware
PR #3875 - Converted typedefs in actions submodule to using directives
PR #3874 - Allow one to suppress target keywords in
hpx_setup_targetfor backwards compatibilityPR #3873 - Add scripts to create releases and generate lists of PRs and issues
PR #3872 - Fix latest HTML docs location
PR #3870 - Module cache
PR #3869 - Post 1.3.0 version bumps
PR #3868 - Replace the macro
HPX_ASSERTbyHPX_TESTin testsPR #3845 - Assertion module
PR #3839 - Make tuple serialization non-intrusive
PR #3832 - Config module
PR #3799 - Remove compat namespace and its contents
PR #3701 - MoodyCamel lockfree
PR #3496 - Disabling MPI’s (deprecated) C++ interface
PR #3192 - Move type info into
hpx::debugnamespace and add print helper functionsPR #3159 - Support Checkpointing Components
HPX V1.3.0 (May 23, 2019)#
General changes#
Performance improvements: the schedulers have significantly reduced overheads from removing false sharing and the parallel executor has been updated to create fewer futures.
HPX now defaults to not turning on networking when running on one locality. This means that you can run multiple instances on the same system without adding command line options.
Multiple issues reported by Clang sanitizers have been fixed.
We have added (back) single-page HTML documentation and PDF documentation.
We have started modularizing the HPX library. This is useful both for developers and users. In the long term users will be able to consume only parts of the HPX libraries if they do not require all the functionality that HPX currently provides.
We have added an implementation of
function_ref.The
barrierandlatchclasses have gained a few additional member functions.
Breaking changes#
Executable and library targets are now created without the
_exeand_libsuffix respectively. For example, the target1d_stencil_1_exeis now simply called1d_stencil_1.We have removed the following deprecated functionality:
queue,scoped_unlock, and support for input iterators in algorithms.We have turned off the compatibility layer for
unwrappedby default. The functionality will be removed in the next release. The option can still be turned on using the CMake optionHPX_WITH_UNWRAPPED_SUPPORT. Likewise,inclusive_scancompatibility overloads have been turned off by default. They can still be turned on withHPX_WITH_INCLUSIVE_SCAN_COMPATIBILITY.The minimum compiler and dependency versions have been updated. We now support GCC from version 5 onwards, Clang from version 4 onwards, and Boost from version 1.61.0 onwards.
The headers for preprocessor macros have moved as a result of the functionality being moved to a separate module. The old headers are deprecated and will be removed in a future version of HPX. You can turn off the warnings by setting
HPX_PREPROCESSOR_WITH_DEPRECATION_WARNINGS=OFFor turn off the compatibility headers completely withHPX_PREPROCESSOR_WITH_COMPATIBILITY_HEADERS=OFF.
Closed issues#
Issue #3863 - shouldn’t “-faligned-new” be a usage requirement?
Issue #3841 - Build error with msvc 19 caused by SFINAE and C++17
Issue #3836 - master branch does not build with idle rate counters enabled
Issue #3819 - Add debug suffix to modules built in debug mode
Issue #3817 -
HPX_INCLUDE_DIRScontains non-existent directoryIssue #3810 - Source groups are not created for files in modules
Issue #3805 - HPX won’t compile with
-DHPX_WITH_APEX=TRUEIssue #3792 - Barrier Hangs When Locality Zero not included
Issue #3778 - Replace
throw()withnoexceptIssue #3763 - configurable sort limit per task
Issue #3758 - dataflow doesn’t convert
future<future<T>>tofuture<T>Issue #3757 - When compiling undefined reference to
hpx::hpx_check_version_1_2HPX V1.2.1, Ubuntu 18.04.01 Server EditionIssue #3753 -
--hpx:list-counters=fullcrashesIssue #3746 - Detection of MPI with pmix
Issue #3744 - Separate spinlock from same cacheline as internal data for all LCOs
Issue #3743 - hpxcxx’s shebang doesn’t specify the python version
Issue #3738 - Unable to debug parcelport on a single node
Issue #3735 - Latest master: Can’t compile in MSVC
Issue #3731 -
util::boundseems broken on Clang with older libstdc++Issue #3724 - Allow to pre-set command line options through environment
Issue #3723 - examples/resource_partitioner build issue on master branch / ubuntu 18
Issue #3721 - faced a building error
Issue #3720 - Hello World example fails to link
Issue #3719 - pkg-config produces invalid output:
-l-pthreadIssue #3718 - Please make the python executable configurable through cmake
Issue #3717 - interested to contribute to the organisation
Issue #3699 - Remove ‘HPX runtime’ executable
Issue #3698 - Ignore all locks while handling asserts
Issue #3689 - Incorrect and inconsistent website structure http://stellar.cct.lsu.edu/downloads/.
Issue #3681 - Broken links on http://stellar.cct.lsu.edu/2015/05/hpx-archives-now-on-gmane/
Issue #3676 - HPX master built from source, cmake fails to link main.cpp example in docs
Issue #3673 - HPX build fails with
std::atomicmissing errorIssue #3670 - Generate PDF again from documentation (with Sphinx)
Issue #3643 - Warnings when compiling HPX 1.2.1 with gcc 9
Issue #3641 - Trouble with using ranges-v3 and
hpx::parallel::reduceIssue #3639 -
util::unwrappingdoes not work well with member functionsIssue #3634 - The build fails if
shared_future<>::thenis called with a thread executorIssue #3622 - VTune Amplifier 2019 not working with
use_itt_notify=1Issue #3616 - HPX Fails to Build with CUDA 10
Issue #3612 - False sharing of scheduling counters
Issue #3609 - executor_parameters timeout with gcc <= 7 and Debug mode
Issue #3601 - Misleading error message on power pc for rdtsc and rdtscp
Issue #3598 - Build of some examples fails when using Vc
Issue #3594 - Error: The number of OS threads requested (20) does not match the number of threads to bind (12): HPX(bad_parameter)
Issue #3592 - Undefined Reference Error
Issue #3589 - include could not find load file: HPX_Utils.cmake
Issue #3587 - HPX won’t compile on POWER8 with Clang 7
Issue #3583 - Fedora and openSUSE instructions missing on “Distribution Packages” page
Issue #3578 - Build error when configuring with
HPX_HAVE_ALGORITHM_INPUT_ITERATOR_SUPPORT=ONIssue #3575 - Merge openSUSE reproducible patch
Issue #3570 - Update HPX to work with the latest VC version
Issue #3567 - Build succeed and make failed for
hpx:coutIssue #3565 - Polymorphic simple component destructor not getting called
Issue #3559 - 1.2.0 is missing from download page
Issue #3554 - Clang 6.0 warning of hiding overloaded virtual function
Issue #3510 - Build on ppc64 fails
Issue #3482 - Improve error message when
HPX_WITH_MAX_CPU_COUNTis too low for given systemIssue #3453 - Two HPX applications can’t run at the same time.
Issue #3452 - Scaling issue on the change to 2 NUMA domains
Issue #3442 - HPX set_difference, set_intersection failure cases
Issue #3437 - Ensure parent_task pointer when child task is created and child/parent are on same locality
Issue #3255 - Suspension with lock for
--hpx:list-component-typesIssue #3034 - Use C++17 structured bindings for serialization
Issue #2999 - Change thread scheduling use of
size_tfor thread indexing
Closed pull requests#
PR #3865 - adds hpx_target_compile_option_if_available
PR #3864 - Helper functions that are useful in numa binding and testing of allocator
PR #3862 - Temporary fix to local_dataflow_boost_small_vector test
PR #3860 - Add cache line padding to intermediate results in for loop reduction
PR #3859 - Remove HPX_TLL_PUBLIC and HPX_TLL_PRIVATE from CMake files
PR #3858 - Add compile flags and definitions to modules
PR #3851 - update hpxmp release tag to v0.2.0
PR #3849 - Correct BOOST_ROOT variable name in quick start guide
PR #3847 - Fix attach_debugger configuration option
PR #3846 - Add tests for libs header tests
PR #3844 - Fixing source_groups in preprocessor module to properly handle compatibility headers
PR #3843 - This fixes the launch_process/launched_process pair of tests
PR #3842 - Fix macro call with ITTNOTIFY enabled
PR #3840 - Fixing SLURM environment parsing
PR #3837 - Fixing misplaced #endif
PR #3835 - make all latch members protected for consistency
PR #3834 - Disable transpose_block_numa example on CircleCI
PR #3833 - make latch counter_ protected for deriving latch in hpxmp
PR #3831 - Fix CircleCI config for modules
PR #3830 - minor fix: option HPX_WITH_TEST was not working correctly
PR #3828 - Avoid for binaries that depend on HPX to directly link against internal modules
PR #3827 - Adding shortcut for
hpx::get_ptr<>(sync, id)for a local, non-migratable objectsPR #3826 - Fix and update modules documentation
PR #3825 - Updating default APEX version to 2.1.3 with HPX
PR #3823 - Fix pkgconfig libs handling
PR #3822 - Change includes in hpx_wrap.cpp to more specific includes
PR #3821 - Disable barrier_3792 test when networking is disabled
PR #3820 - Assorted CMake fixes
PR #3815 - Removing left-over debug output
PR #3814 - Allow setting default scheduler mode via the configuration database
PR #3813 - Make the deprecation warnings issued by the old pp headers optional
PR #3812 - Windows requires to handle symlinks to directories differently from those linking files
PR #3811 - Clean up PP module and library skeleton
PR #3806 - Moving include path configuration to before APEX
PR #3804 - Fix latch
PR #3803 - Update hpxcxx to look at lib64 and use python3
PR #3802 - Numa binding allocator
PR #3801 - Remove duplicated includes
PR #3800 - Attempt to fix Posix context switching after lazy init changes
PR #3798 - count and count_if accepts different iterator types
PR #3797 - Adding a couple of
overridekeywords to overloaded virtual functionsPR #3796 - Re-enable testing all schedulers in shutdown_suspended_test
PR #3795 - Change
std::terminateto std::abort inSIGSEGVhandlerPR #3794 - Fixing #3792
PR #3793 - Extending migrate_polymorphic_component unit test
PR #3791 - Change
throw()tonoexceptPR #3790 - Remove deprecated options for 1.3.0 release
PR #3789 - Remove Boost filesystem compatibility header
PR #3788 - Disabled even more spots that should not execute if networking is disabled
PR #3787 - Bump minimal boost supported version to 1.61.0
PR #3786 - Bump minimum required versions for 1.3.0 release
PR #3785 - Explicitly set number of jobs for all ninja invocations on CircleCI
PR #3784 - Fix leak and address sanitizer problems
PR #3783 - Disabled even more spots that should not execute is networking is disabled
PR #3782 - Cherry-picked tuple and thread_init_data fixes from #3701
PR #3781 - Fix generic context coroutines after lazy stack allocation changes
PR #3780 - Rename hello world examples
PR #3776 - Sort algorithms now use the supplied chunker to determine the required minimal chunk size
PR #3775 - Disable Boost auto-linking
PR #3774 - Tag and push stable builds
PR #3773 - Enable migration of polymorphic components
PR #3771 - Fix link to stackoverflow in documentation
PR #3770 - Replacing constexpr if in brace-serialization code
PR #3769 - Fix SIGSEGV handler
PR #3768 - Adding flags to scheduler allowing to control thread stealing and idle back-off
PR #3767 - Fix help formatting in hpxrun.py
PR #3765 - Fix a couple of bugs in the thread test
PR #3764 - Workaround for SFINAE regression in msvc14.2
PR #3762 - Prevent MSVC from prematurely instantiating things
PR #3761 - Update python scripts to work with python 3
PR #3760 - Fix callable vtable for GCC4.9
PR #3759 - Rename
PAGE_SIZEtoPAGE_SIZE_because AppleClangPR #3755 - Making sure locks are not held during suspension
PR #3754 - Disable more code if networking is not available/not enabled
PR #3752 - Move
util::formatimplementation to source filePR #3751 - Fixing problems with
lcos::barrierand iostreamsPR #3750 - Change error message to take into account
use_guard_pagesettingPR #3749 - Fix lifetime problem in
run_as_hpx_threadPR #3748 - Fixed unusable behavior of the clang code analyzer.
PR #3747 - Added
PMIX_RANKto the defaults ofHPX_WITH_PARCELPORT_MPI_ENV.PR #3745 - Introduced
cache_aligned_dataandcache_line_datahelper structurePR #3742 - Remove more unused functionality from util/logging
PR #3740 - Fix includes in partitioned vector tests
PR #3739 - More fixes to make sure that
std::flushreally flushes all outputPR #3737 - Fix potential shutdown problems
PR #3736 - Fix
guided_pool_executorafter dataflow changes caused compilation failPR #3734 - Limiting executor
PR #3732 - More constrained bound constructors
PR #3730 - Attempt to fix deadlocks during component loading
PR #3729 - Add latch member function
count_upand reset, requested by hpxMPPR #3728 - Send even empty buffers on
hpx::endlandhpx::flushPR #3727 - Adding example demonstrating how to customize the memory management for a component
PR #3726 - Adding support for passing command line options through the
HPX_COMMANDLINE_OPTIONSenvironment variablePR #3722 - Document known broken OpenMPI builds
PR #3716 - Add barrier reset function, requested by hpxMP for reusing barrier
PR #3715 - More work on functions and vtables
PR #3714 - Generate single-page HTML, PDF, manpage from documentation
PR #3713 - Updating default APEX version to 2.1.2
PR #3712 - Update release procedure
PR #3710 - Fix the C++11 build, after #3704
PR #3709 - Move some component_registry functionality to source file
PR #3708 - Ignore all locks while handling assertions
PR #3707 - Remove obsolete hpx runtime executable
PR #3705 - Fix and simplify
make_ready_futureoverload setsPR #3704 - Reduce use of binders
PR #3703 - Ini
PR #3702 - Fixing CUDA compiler errors
PR #3700 - Added
barrier::incrementfunction to increase total number of threadPR #3697 - One more attempt to fix migration…
PR #3694 - Fixing component migration
PR #3693 - Print thread state when getting disallowed value in set_thread_state
PR #3692 - Only disable
constexprwith clang-cuda, not nvcc+gccPR #3691 - Link with libsupc++ if needed for thread_local
PR #3690 - Remove thousands separators in set_operations_3442 to comply with C++11
PR #3688 - Decouple serialization from function vtables
PR #3687 - Fix a couple of test failures
PR #3686 - Make sure tests.unit.build are run after install on CircleCI
PR #3685 - Revise quickstart CMakeLists.txt explanation
PR #3684 - Provide concept emulation for Ranges-TS concepts
PR #3683 - Ignore uninitialized chunks
PR #3682 - Ignore uninitialized chunks. Check proper indices.
PR #3680 - Ignore uninitialized chunks. Check proper range indices
PR #3679 - Simplify basic action implementations
PR #3678 - Making sure
HPX_HAVE_LIBATOMICis unset before checkingPR #3677 - Fix generated full version number to be usable in expressions
PR #3674 - Reduce functional utilities call depth
PR #3672 - Change new build system to use existing macros related to pseudo dependencies
PR #3669 - Remove indirection in
function_refwhen thread description is disabledPR #3668 - Unbreaking
async_*cb*testsPR #3667 - Generate version.hpp
PR #3665 - Enabling MPI parcelport for gitlab runners
PR #3664 - making clang-tidy work properly again
PR #3662 - Attempt to fix exception handling
PR #3661 - Move
lcos::latchto source filePR #3660 - Fix accidentally explicit gid_type default constructor
PR #3659 - Parallel executor latch
PR #3658 - Fixing execution_parameters
PR #3657 - Avoid dangling references in wait_all
PR #3656 - Avoiding lifetime problems with sync_put_parcel
PR #3655 - Fixing nullptr dereference inside of function
PR #3652 - Attempt to fix
thread_map_typedefinition with C++11PR #3650 - Allowing for end iterator being different from begin iterator
PR #3649 - Added architecture identification to cmake to be able to detect timestamp support
PR #3645 - Enabling sanitizers on gitlab runner
PR #3644 - Attempt to tackle timeouts during startup
PR #3642 - Cleanup parallel partitioners
PR #3640 - Dataflow now works with functions that return a reference
PR #3637 - Merging the executor-enabled overloads of
shared_future<>::thenPR #3633 - Replace deprecated boost endian macros
PR #3632 - Add instructions on getting HPX to documentation
PR #3631 - Simplify parcel creation
PR #3630 - Small additions and fixes to release procedure
PR #3629 - Modular pp
PR #3627 - Implement
util::function_refPR #3626 - Fix cancelable_action_client example
PR #3625 - Added automatic serialization for simple structs (see #3034)
PR #3624 - Updating the default order of priority for
thread_descriptionPR #3621 - Update copyright year and other small formatting fixes
PR #3620 - Adding support for gitlab runner
PR #3619 - Store debug logs and core dumps on CircleCI
PR #3618 - Various optimizations
PR #3617 - Fix link to the gpg key (#2)
PR #3615 - Fix unused variable warnings with networking off
PR #3614 - Restructuring counter data in scheduler to reduce false sharing
PR #3613 - Adding support for gitlab runners
PR #3610 - Don’t wait for
stop_conditionin main threadPR #3608 - Add inline keyword to
invalid_thread_iddefinition for nvccPR #3607 - Adding configuration key that allows one to explicitly add a directory to the component search path
PR #3606 - Add nvcc to exclude constexpress since is it not supported by nvcc
PR #3605 - Add
inlineto definition of checkpoint stream operators to fix link errorPR #3604 - Use format for string formatting
PR #3603 - Improve the error message for using to less
MAX_CPU_COUNTPR #3602 - Improve the error message for to small values of
MAX_CPU_COUNTPR #3600 - Parallel executor aggregated
PR #3599 - Making sure networking is disabled for default one-locality-runs
PR #3596 - Store thread exit functions in
forward_listinstead ofdequeto avoid allocationsPR #3590 - Fix typo/mistake in thread queue
cleanup_terminatedPR #3588 - Fix formatting errors in launching_and_configuring_hpx_applications.rst
PR #3586 - Make bind propagate value category
PR #3585 - Extend Cmake for building hpx as distribution packages (refs #3575)
PR #3584 - Untangle function storage from object pointer
PR #3582 - Towards Modularized HPX
PR #3580 - Remove extra
||in merge.hppPR #3577 - Partially revert “Remove vtable empty flag”
PR #3576 - Make sure empty startup/shutdown functions are not being used
PR #3574 - Make sure
DATAPARsettings are conveyed to depending projectsPR #3573 - Make sure HPX is usable with latest released version of Vc (V1.4.1)
PR #3572 - Adding test ensuring ticket 3565 is fixed
PR #3571 - Make empty
[unique_]functionvtable non-dependentPR #3566 - Fix compilation with dynamic bitset for CPU masks
PR #3563 - Drop
util::[unique_]functiontarget_typePR #3562 - Removing the target suffixes
PR #3561 - Replace executor traits return type deduction (keep non-SFINAE)
PR #3557 - Replace the last usages of boost::atomic
PR #3556 - Replace
boost::scoped_arraywithstd::unique_ptrPR #3552 - (Re)move APEX readme
PR #3548 - Replace
boost::scoped_ptrwithstd::unique_ptrPR #3547 - Remove last use of Boost.Signals2
PR #3544 - Post 1.2.0 version bumps
PR #3543 - added Ubuntu dependency list to readme
PR #3531 - Warnings, warnings…
PR #3527 - Add CircleCI filter for building all tags
PR #3525 - Segmented algorithms
PR #3517 - Replace
boost::regexwith C++11<regex>PR #3514 - Cleaning up the build system
PR #3505 - Fixing type attribute warning for
transfer_actionPR #3504 - Add support for rpm packaging
PR #3499 - Improving spinlock pools
PR #3498 - Remove thread specific ptr
PR #3486 - Fix comparison for expect_connecting_localities config entry
PR #3469 - Enable (existing) code for extracting stack pointer on Power platform
HPX V1.2.1 (Feb 19, 2019)#
General changes#
This is a bugfix release. It contains the following changes:
Fix compilation on ARM, s390x and 32-bit architectures.
Fix a critical bug in the
futureimplementation.Fix several problems in the CMake configuration which affects external projects.
Add support for Boost 1.69.0.
Closed issues#
Issue #3638 - Build HPX 1.2 with boost 1.69
Issue #3635 - Non-deterministic crashing on Stampede2
Issue #3550 - 1>e:000workhpxsrcthrow_exception.cpp(54): error C2440: ‘<function-style-cast>’: cannot convert from ‘boost::system::error_code’ to ‘hpx::exception’
Issue #3549 - HPX 1.2.0 does not build on i686, but release candidate did
Issue #3511 - Build on s390x fails
Issue #3509 - Build on armv7l fails
Closed pull requests#
PR #3695 - Don’t install CMake templates and packaging files
PR #3666 - Fixing yet another race in future_data
PR #3663 - Fixing race between setting and getting the value inside future_data
PR #3648 - Adding timestamp option for S390x platform
PR #3647 - Blind attempt to fix warnings issued by gcc V9
PR #3611 - Include GNUInstallDirs earlier to have it available for subdirectories
PR #3595 - Use GNUInstallDirs lib path in pkgconfig config file
PR #3593 - Add include(GNUInstallDirs) to HPXMacros.cmake
PR #3591 - Fix compilation error on arm7 architecture. Compiles and runs on Fedora 29 on Pi 3.
PR #3558 - Adding constructor exception(boost::system::error_code const&)
PR #3555 - cmake: make install locations configurable
PR #3551 - Fix uint64_t causing compilation fail on i686
HPX V1.2.0 (Nov 12, 2018)#
General changes#
Here are some of the main highlights and changes for this release:
Thanks to the work of our Google Summer of Code student, Nikunj Gupta, we now have a new implementation of
hpx_main.hppon supported platforms (Linux, BSD and MacOS). This is intended to be a less fragile drop-in replacement for the old implementation relying on preprocessor macros. The new implementation does not require changes if you are using the CMake or pkg-config. The old behaviour can be restored by settingHPX_WITH_DYNAMIC_HPX_MAIN=OFFduring CMake configuration. The implementation on Windows is unchanged.We have added functionality to allow passing scheduling hints to our schedulers. These will allow us to create executors that for example target a specific NUMA domain or allow for HPX threads to be pinned to a particular worker thread.
We have significantly improved the performance of our futures implementation by making the shared state atomic.
We have replaced Boostbook by Sphinx for our documentation. This means the documentation is easier to navigate with built-in search and table of contents. We have also added a quick start section and restructured the documentation to be easier to follow for new users.
We have added a new option to the
--hpx:threadscommand line option. It is now possible to usecoresto tell HPX to only use one worker thread per core, unlike the existing optionallwhich uses one worker thread per processing unit (processing unit can be a hyperthread if hyperthreads are available). The default value of--hpx:threadshas also been changed tocoresas this leads to better performance in most cases.All command line options can now be passed alongside configuration options when initializing HPX. This means that some options that were previously only available on the command line can now be set as configuration options.
HPXMP is a portable, scalable, and flexible application programming interface using the OpenMP specification that supports multi-platform shared memory multiprocessing programming in C and C++. HPXMP can be enabled within HPX by setting
DHPX_WITH_HPXMP=ONduring CMake configuration.Two new performance counters were added for measuring the time spent doing background work.
/threads/time/background-work-durationreturns the time spent doing background on a given thread or locality, while/threads/time/background-overheadreturns the fraction of time spent doing background work with respect to the overall time spent running the scheduler. The new performance counters are disabled by default and can be turned on by settingHPX_WITH_BACKGROUND_THREAD_COUNTERS=ONduring CMake configuration.The idling behaviour of HPX has been tweaked to allow for faster idling. This is useful in interactive applications where the HPX worker threads may not have work all the time. This behaviour can be tweaked and turned off as before with
HPX_WITH_THREAD_MANAGER_IDLE_BACKOFF=OFFduring CMake configuration.It is now possible to register callback functions for HPX worker thread events. Callbacks can be registered for starting and stopping worker threads, and for when errors occur.
Breaking changes#
The implementation of
hpx_main.hpphas changed. If you are using custom Makefiles you will need to make changes. Please see the documentation on using Makefiles for more details.The default value of
--hpx:threadshas changed fromalltocores. The new optioncoresonly starts one worker thread per core.We have dropped support for Boost 1.56 and 1.57. The minimal version of Boost we now test is 1.58.
Our
boost::format-based formatting implementation has been revised and replaced with a custom implementation. This changes the formatting syntax and requires changes if you are relying onhpx::util::formatorhpx::util::format_to. The pull request for this change contains more information: PR #3266.The following deprecated options have now been completely removed:
HPX_WITH_ASYNC_FUNCTION_COMPATIBILITY,HPX_WITH_LOCAL_DATAFLOW,HPX_WITH_GENERIC_EXECUTION_POLICY,HPX_WITH_BOOST_CHRONO_COMPATIBILITY,HPX_WITH_EXECUTOR_COMPATIBILITY,HPX_WITH_EXECUTION_POLICY_COMPATIBILITY, andHPX_WITH_TRANSFORM_REDUCE_COMPATIBILITY.
Closed issues#
Issue #3538 - numa handling incorrect for hwloc 2
Issue #3533 - Cmake version 3.5.1does not work (git ff26b35 2018-11-06)
Issue #3526 - Failed building hpx-1.2.0-rc1 on Ubuntu16.04 x86-64 Virtualbox VM
Issue #3512 - Build on aarch64 fails
Issue #3475 - HPX fails to link if the MPI parcelport is enabled
Issue #3462 - CMake configuration shows a minor and inconsequential failure to create a symlink
Issue #3461 - Compilation Problems with the most recent Clang
Issue #3460 - Deadlock when create_partitioner fails (assertion fails) in debug mode
Issue #3455 - HPX build failing with HWLOC errors on POWER8 with hwloc 1.8
Issue #3438 - HPX no longer builds on IBM POWER8
Issue #3426 - hpx build failed on MacOS
Issue #3424 - CircleCI builds broken for forked repositories
Issue #3422 - Benchmarks in tests.performance.local are not run nightly
Issue #3408 - CMake Targets for HPX
Issue #3399 - processing unit out of bounds
Issue #3395 - Floating point bug in hpx/runtime/threads/policies/scheduler_base.hpp
Issue #3378 - compile error with lcos::communicator
Issue #3376 - Failed to build HPX with APEX using clang
Issue #3366 - Adapted Safe_Object example fails for –hpx:threads > 1
Issue #3360 - Segmentation fault when passing component id as parameter
Issue #3358 - HPX runtime hangs after multiple (~thousands) start-stop sequences
Issue #3352 - Support TCP provider in libfabric ParcelPort
Issue #3342 - undefined reference to __atomic_load_16
Issue #3339 - setting command line options/flags from init cfg is not obvious
Issue #3325 - AGAS migrates components prematurely
Issue #3321 - hpx bad_parameter handling is awful
Issue #3318 - Benchmarks fail to build with C++11
Issue #3304 - hpx::threads::run_as_hpx_thread does not properly handle exceptions
Issue #3300 - Setting pu step or offset results in no threads in default pool
Issue #3297 - Crash with APEX when running Phylanx lra_csv with > 1 thread
Issue #3296 - Building HPX with APEX configuration gives compiler warnings
Issue #3290 - make tests failing at hello_world_component
Issue #3285 - possible compilation error when “using namespace std;” is defined before including “hpx” headers files
Issue #3280 - HPX fails on OSX
Issue #3272 - CircleCI does not upload generated docker image any more
Issue #3270 - Error when compiling CUDA examples
Issue #3267 -
tests.unit.host_.block_allocatorfails occasionallyIssue #3264 - Possible move to Sphinx for documentation
Issue #3263 - Documentation improvements
Issue #3259 -
set_parcel_write_handlertest fails occasionallyIssue #3258 - Links to source code in documentation are broken
Issue #3247 - Rare
tests.unit.host_.block_allocatortest failure on 1.1.0-rc1Issue #3244 - Slowing down and speeding up an interval_timer
Issue #3215 - Cannot build both tests and examples on MSVC with pseudo-dependencies enabled
Issue #3195 - Unnecessary customization point route causing performance penalty
Issue #3088 - A strange thing in parallel::sort.
Issue #2650 - libfabric support for passive endpoints
Issue #1205 - TSS is broken
Closed pull requests#
PR #3542 - Fix numa lookup from pu when using hwloc 2.x
PR #3541 - Fixing the build system of the MPI parcelport
PR #3540 - Updating HPX people section
PR #3539 - Splitting test to avoid OOM on CircleCI
PR #3537 - Fix guided exec
PR #3536 - Updating grants which support the LSU team
PR #3535 - Fix hiding of docker credentials
PR #3534 - Fixing #3533
PR #3532 - fixing minor doc typo –hpx:print-counter-at arg
PR #3530 - Changing APEX default tag to v2.1.0
PR #3529 - Remove leftover security options and documentation
PR #3528 - Fix hwloc version check
PR #3524 - Do not build guided pool examples with older GCC compilers
PR #3523 - Fix logging regression
PR #3522 - Fix more warnings
PR #3521 - Fixing argument handling in induction and reduction clauses for parallel::for_loop
PR #3520 - Remove docs symlink and versioned docs folders
PR #3519 - hpxMP release
PR #3518 - Change all steps to use new docker image on CircleCI
PR #3516 - Drop usage of deprecated facilities removed in C++17
PR #3515 - Remove remaining uses of Boost.TypeTraits
PR #3513 - Fixing a CMake problem when trying to use libfabric
PR #3508 - Remove memory_block component
PR #3507 - Propagating the MPI compile definitions to all relevant targets
PR #3503 - Update documentation colors and logo
PR #3502 - Fix bogus `throws` bindings in scheduled_thread_pool_impl
PR #3501 - Split parallel::remove_if tests to avoid OOM on CircleCI
PR #3500 - Support NONAMEPREFIX in add_hpx_library()
PR #3497 - Note that cuda support requires cmake 3.9
PR #3495 - Fixing dataflow
PR #3493 - Remove deprecated options for 1.2.0 part 2
PR #3492 - Add CUDA_LINK_LIBRARIES_KEYWORD to allow PRIVATE keyword in linkage t…
PR #3491 - Changing Base docker image
PR #3490 - Don’t create tasks immediately with hpx::apply
PR #3489 - Remove deprecated options for 1.2.0
PR #3488 - Revert “Use BUILD_INTERFACE generator expression to fix cmake flag exports”
PR #3487 - Revert “Fixing type attribute warning for transfer_action”
PR #3485 - Use BUILD_INTERFACE generator expression to fix cmake flag exports
PR #3483 - Fixing type attribute warning for transfer_action
PR #3481 - Remove unused variables
PR #3480 - Towards a more lightweight transfer action
PR #3479 - Fix FLAGS - Use correct version of target_compile_options
PR #3478 - Making sure the application’s exit code is properly propagated back to the OS
PR #3476 - Don’t print docker credentials as part of the environment.
PR #3473 - Fixing invalid cmake code if no jemalloc prefix was given
PR #3472 - Attempting to work around recent clang test compilation failures
PR #3471 - Enable jemalloc on windows
PR #3470 - Updates readme
PR #3468 - Avoid hang if there is an exception thrown during startup
PR #3467 - Add compiler specific fallthrough attributes if C++17 attribute is not available
PR #3466 - - bugfix : fix compilation with llvm-7.0
PR #3465 - This patch adds various optimizations extracted from the thread_local_allocator work
PR #3464 - Check for forked repos in CircleCI docker push step
PR #3463 - - cmake : create the parent directory before symlinking
PR #3459 - Remove unused/incomplete functionality from util/logging
PR #3458 - Fix a problem with scope of CMAKE_CXX_FLAGS and hpx_add_compile_flag
PR #3457 - Fixing more size_t -> int16_t (and similar) warnings
PR #3456 - Add #ifdefs to topology.cpp to support old hwloc versions again
PR #3454 - Fixing warnings related to silent conversion of size_t –> int16_t
PR #3451 - Add examples as unit tests
PR #3450 - Constexpr-fying bind and other functional facilities
PR #3446 - Fix some thread suspension timeouts
PR #3445 - Fix various warnings
PR #3443 - Only enable service pool config options if pools are enabled
PR #3441 - Fix missing closing brackets in documentation
PR #3439 - Use correct MPI CXX libraries for MPI parcelport
PR #3436 - Add projection function to find_* (and fix very bad bug)
PR #3435 - Fixing 1205
PR #3434 - Fix threads cores
PR #3433 - Add Heise Online to release announcement list
PR #3432 - Don’t track task dependencies for distributed runs
PR #3431 - Circle CI setting changes for hpxMP
PR #3430 - Fix unused params warning
PR #3429 - One thread per core
PR #3428 - This suppresses a deprecation warning that is being issued by MSVC 19.15.26726
PR #3427 - Fixes #3426
PR #3425 - Use source cache and workspace between job steps on CircleCI
PR #3421 - Add CDash timing output to future overhead test (for graphs)
PR #3420 - Add guided_pool_executor
PR #3419 - Fix typo in CircleCI config
PR #3418 - Add sphinx documentation
PR #3415 - Scheduler NUMA hint and shared priority scheduler
PR #3414 - Adding step to synchronize the APEX release
PR #3413 - Fixing multiple defines of APEX_HAVE_HPX
PR #3412 - Fixes linking with libhpx_wrap error with BSD and Windows based systems
PR #3410 - Fix typo in CMakeLists.txt
PR #3409 - Fix brackets and indentation in existing_performance_counters.qbk
PR #3407 - Fix unused param and extra ; warnings emitted by gcc 8.x
PR #3406 - Adding thread local allocator and use it for future shared states
PR #3405 - Adding DHPX_HAVE_THREAD_LOCAL_STORAGE=ON to builds
PR #3404 - fixing multiple definition of main() in linux
PR #3402 - Allow debug option to be enabled only for Linux systems with dynamic main on
PR #3401 - Fix cuda_future_helper.h when compiling with C++11
PR #3400 - Fix floating point exception scheduler_base idle backoff
PR #3398 - Atomic future state
PR #3397 - Fixing code for older gcc versions
PR #3396 - Allowing to register thread event functions (start/stop/error)
PR #3394 - Fix small mistake in primary_namespace_server.cpp
PR #3393 - Explicitly instantiate configured schedulers
PR #3392 - Add performance counters background overhead and background work duration
PR #3391 - Adapt integration of HPXMP to latest build system changes
PR #3390 - Make AGAS measurements optional
PR #3389 - Fix deadlock during shutdown
PR #3388 - Add several functionalities allowing to optimize synchronous action invocation
PR #3387 - Add cmake option to opt out of fail-compile tests
PR #3386 - Adding support for boost::container::small_vector to dataflow
PR #3385 - Adds Debug option for hpx initializing from main
PR #3384 - This hopefully fixes two tests that occasionally fail
PR #3383 - Making sure thread local storage is enable for hpxMP
PR #3382 - Fix usage of HPX_CAPTURE together with default value capture [=]
PR #3381 - Replace undefined instantiations of uniform_int_distribution
PR #3380 - Add missing semicolons to uses of HPX_COMPILER_FENCE
PR #3379 - Fixing #3378
PR #3377 - Adding build system support to integrate hpxmp into hpx at the user’s machine
PR #3375 - Replacing wrapper for __libc_start_main with main
PR #3374 - Adds hpx_wrap to HPX_LINK_LIBRARIES which links only when specified.
PR #3373 - Forcing cache settings in HPXConfig.cmake to guarantee updated values
PR #3372 - Fix some more c++11 build problems
PR #3371 - Adds HPX_LINKER_FLAGS to HPX applications without editing their source codes
PR #3370 - util::format: add type_specifier<> specializations for %!s(MISSING) and %!l(MISSING)s
PR #3369 - Adding configuration option to allow explicit disable of the new hpx_main feature on Linux
PR #3368 - Updates doc with recent hpx_wrap implementation
PR #3367 - Adds Mac OS implementation to hpx_main.hpp
PR #3365 - Fix order of hpx libs in HPX_CONF_LIBRARIES.
PR #3363 - Apex fixing null wrapper
PR #3361 - Making sure all parcels get destroyed on an HPX thread (TCP pp)
PR #3359 - Feature/improveerrorforcompiler
PR #3357 - Static/dynamic executable implementation
PR #3355 - Reverting changes introduced by #3283 as those make applications hang
PR #3354 - Add external dependencies to HPX_LIBRARY_DIR
PR #3353 - Fix libfabric tcp
PR #3351 - Move obsolete header to tests directory.
PR #3350 - Renaming two functions to avoid problem described in #3285
PR #3349 - Make idle backoff exponential with maximum sleep time
PR #3347 - Replace simple_component* with component* in the Documentation
PR #3346 - Fix CMakeLists.txt example in quick start
PR #3345 - Fix automatic setting of HPX_MORE_THAN_64_THREADS
PR #3344 - Reduce amount of information printed for unknown command line options
PR #3343 - Safeguard HPX against destruction in global contexts
PR #3341 - Allowing for all command line options to be used as configuration settings
PR #3340 - Always convert inspect results to JUnit XML
PR #3336 - Only run docker push on master on CircleCI
PR #3335 - Update description of hpx.os_threads config parameter.
PR #3334 - Making sure early logging settings don’t get mixed with others
PR #3333 - Update CMake links and versions in documentation
PR #3332 - Add notes on target suffixes to CMake documentation
PR #3331 - Add quickstart section to documentation
PR #3330 - Rename resource_partitioner test to avoid conflicts with pseudodependencies
PR #3328 - Making sure object is pinned while executing actions, even if action returns a future
PR #3327 - Add missing std::forward to tuple.hpp
PR #3326 - Make sure logging is up and running while modules are being discovered.
PR #3324 - Replace C++14 overload of std::equal with C++11 code.
PR #3323 - Fix a missing apex thread data (wrapper) initialization
PR #3320 - Adding support for -std=c++2a (define HPX_WITH_CXX2A=On)
PR #3319 - Replacing C++14 feature with equivalent C++11 code
PR #3317 - Fix compilation with VS 15.7.1 and /std:c++latest
PR #3316 - Fix includes for 1d_stencil_*_omp examples
PR #3314 - Remove some unused parameter warnings
PR #3313 - Fix pu-step and pu-offset command line options
PR #3312 - Add conversion of inspect reports to JUnit XML
PR #3311 - Fix escaping of closing braces in format specification syntax
PR #3310 - Don’t overwrite user settings with defaults in registration database
PR #3309 - Fixing potential stack overflow for dataflow
PR #3308 - This updates the .clang-format configuration file to utilize newer features
PR #3306 - Marking migratable objects in their gid to allow not handling migration in AGAS
PR #3305 - Add proper exception handling to run_as_hpx_thread
PR #3303 - Changed std::rand to a better inbuilt PRNG Generator
PR #3302 - All non-migratable (simple) components now encode their lva and component type in their gid
PR #3301 - Add nullptr_t overloads to resource partitioner
PR #3298 - Apex task wrapper memory bug
PR #3295 - Fix mistakes after merge of CircleCI config
PR #3294 - Fix partitioned vector include in partitioned_vector_find tests
PR #3293 - Adding emplace support to promise and make_ready_future
PR #3292 - Add new cuda kernel synchronization with hpx::future demo
PR #3291 - Fixes #3290
PR #3289 - Fixing Docker image creation
PR #3288 - Avoid allocating shared state for wait_all
PR #3287 - Fixing /scheduler/utilization/instantaneous performance counter
PR #3286 - dataflow() and future::then() use sync policy where possible
PR #3284 - Background thread can use relaxed atomics to manipulate thread state
PR #3283 - Do not unwrap ready future
PR #3282 - Fix virtual method override warnings in static schedulers
PR #3281 - Disable set_area_membind_nodeset for OSX
PR #3279 - Add two variations to the future_overhead benchmark
PR #3278 - Fix circleci workspace
PR #3277 - Support external plugins
PR #3276 - Fix missing parenthesis in hello_compute.cu.
PR #3274 - Reinit counters synchronously in reinit_counters test
PR #3273 - Splitting tests to avoid compiler OOM
PR #3271 - Remove leftover code from context_generic_context.hpp
PR #3269 - Fix bulk_construct with count = 0
PR #3268 - Replace constexpr with HPX_CXX14_CONSTEXPR and HPX_CONSTEXPR
PR #3266 - Replace boost::format with custom sprintf-based implementation
PR #3265 - Split parallel tests on CircleCI
PR #3262 - Making sure documentation correctly links to source files
PR #3261 - Apex refactoring fix rebind
PR #3260 - Isolate performance counter parser into a separate TU
PR #3256 - Post 1.1.0 version bumps
PR #3254 - Adding trait for actions allowing to make runtime decision on whether to execute it directly
PR #3253 - Bump minimal supported Boost to 1.58.0
PR #3251 - Adds new feature: changing interval used in interval_timer (issue 3244)
PR #3239 - Changing std::rand() to a better inbuilt PRNG generator.
PR #3234 - Disable background thread when networking is off
PR #3232 - Clean up suspension tests
PR #3230 - Add optional scheduler mode parameter to create_thread_pool function
PR #3228 - Allow suspension also on static schedulers
PR #3163 - libfabric parcelport w/o HPX_PARCELPORT_LIBFABRIC_ENDPOINT_RDM
PR #3036 - Switching to CircleCI 2.0
HPX V1.1.0 (Mar 24, 2018)#
General changes#
Here are some of the main highlights and changes for this release (in no particular order):
We have changed the way HPX manages the processing units on a node. We do not longer implicitly bind all available cores to a single thread pool. The user has now full control over what processing units are bound to what thread pool, each with a separate scheduler. It is now also possible to create your own scheduler implementation and control what processing units this scheduler should use. We added the
hpx::resource::partitionerthat manages all available processing units and assigns resources to the used thread pools. Thread pools can be now be suspended/resumed independently. This functionality helps in running HPX concurrently to code that is directly relying on OpenMP and/or MPI.We have continued to implement various parallel algorithms. HPX now almost completely implements all of the parallel algorithms as specified by the C++17 Standard. We have also continued to implement these algorithms for the distributed use case (for segmented data structures, such as
hpx::partitioned_vector).Added a compatibility layer for
std::thread,std::mutex, andstd::condition_variableallowing for the code to use those facilities where available and to fall back to the corresponding Boost facilities otherwise. The CMake configuration option-DHPX_WITH_THREAD_COMPATIBILITY=Oncan be used to force using the Boost equivalents.The parameter sequence for the
hpx::parallel::transform_inclusive_scanoverload taking one iterator range has changed (again) to match the changes this algorithm has undergone while being moved to C++17. The old overloads can be still enabled at configure time by passing-DHPX_WITH_TRANSFORM_REDUCE_COMPATIBILITY=Onto CMake.The parameter sequence for the
hpx::parallel::inclusive_scanoverload taking one iterator range has changed to match the changes this algorithm has undergone while being moved to C++17. The old overloads can be still enabled at configure time by passing-DHPX_WITH_INCLUSIVE_SCAN_COMPATIBILITY=Onto CMake.Added a helper facility
hpx::local_newwhich is equivalent tohpx::new_except that it creates components locally only. As a consequence, the used component constructor may accept non-serializable argument types and/or non-const references or pointers.Removed the (broken) component type
hpx::lcos::queue<T>. The old type is still available at configure time by passing-DHPX_WITH_QUEUE_COMPATIBILITY=Onto CMake.The parallel algorithms adopted for C++17 restrict the iterator categories usable with those to at least forward iterators. Our implementation of the parallel algorithms was supporting input iterators (and output iterators) as well by simply falling back to sequential execution. We have now made our implementations conforming by requiring at least forward iterators. In order to enable the old behavior use the compatibility option
-DHPX_WITH_ALGORITHM_INPUT_ITERATOR_SUPPORT=Onon the CMake command line.We have added the functionalities allowing for LCOs being implemented using (simple) components. Before LCOs had to always be implemented using managed components.
User defined components don’t have to be default-constructible anymore. Return types from actions don’t have to be default-constructible anymore either. Our serialization layer now in general supports non-default-constructible types.
We have added a new launch policy
hpx::launch::lazythat allows oneto defer the decision on what launch policy to use to the point of execution. This policy is initialized with a function (object) that – when invoked – is expected to produce the desired launch policy.
Breaking changes#
We have dropped support for the gcc compiler version V4.8. The minimal gcc version we now test on is gcc V4.9. The minimally required version of CMake is now V3.3.2.
We have dropped support for the Visual Studio 2013 compiler version. The minimal Visual Studio version we now test on is Visual Studio 2015.5.
We have dropped support for the Boost V1.51-V1.54. The minimal version of Boost we now test is Boost V1.55.
We have dropped support for the
hpx::util::unwrappedAPI.hpx::util::unwrappedwill stay functional to some degree, until it finally gets removed in a later version of HPX. The functional usage ofhpx::util::unwrappedshould be changed to the newhpx::util::unwrappingfunction whereas the immediate usage should be replaced tohpx::util::unwrap.The performance counter names referring to properties as exposed by the threading subsystem have changes as those now additionally have to specify the thread-pool. See the corresponding documentation for more details.
The overloads of
hpx::asyncthat invoke an action do not perform implicit unwrapping of the returned future anymore in case the invoked function does return a future in the first place. In this casehpx::asyncnow returns ahpx::future<future<T>>making its behavior conforming to its local counterpart.We have replaced the use of
boost::exception_ptrin our APIs with the equivalentstd::exception_ptr. Please change your codes accordingly. No compatibility settings are provided.We have removed the compatibility settings for
HPX_WITH_COLOCATED_BACKWARDS_COMPATIBILITYandHPX_WITH_COMPONENT_GET_GID_COMPATIBILITYas their life-cycle has reached its end.We have removed the experimental thread schedulers hierarchy_scheduler, periodic_priority_scheduler and throttling_scheduler in an effort to clean up and consolidate our thread schedulers.
Bug fixes (closed tickets)#
Here is a list of the important tickets we closed for this release.
PR #3250 - Apex refactoring with guids
PR #3249 - Updating People.qbk
PR #3246 - Assorted fixes for CUDA
PR #3245 - Apex refactoring with guids
PR #3242 - Modify task counting in thread_queue.hpp
PR #3240 - Fixed typos
PR #3238 - Readding accidentally removed std::abort
PR #3237 - Adding Pipeline example
PR #3236 - Fixing memory_block
PR #3233 - Make schedule_thread take suspended threads into account
Issue #3226 - memory_block is breaking, signaling SIGSEGV on a thread on creation and freeing
PR #3225 - Applying quick fix for hwloc-2.0
Issue #3224 - HPX counters crashing the application
PR #3223 - Fix returns when setting config entries
Issue #3222 - Errors linking libhpx.so
Issue #3221 - HPX on Mac OS X with HWLoc 2.0.0 fails to run
PR #3216 - Reorder a variadic array to satisfy VS 2017 15.6
PR #3214 - Changed prerequisites.qbk to avoid confusion while building boost
PR #3213 - Relax locks for thread suspension to avoid holding locks when yielding
PR #3212 - Fix check in sequenced_executor test
PR #3211 - Use preinit_array to set argc/argv in init_globally example
PR #3210 - Adapted parallel::{search | search_n} for Ranges TS (see #1668)
PR #3209 - Fix locking problems during shutdown
Issue #3208 - init_globally throwing a run-time error
PR #3206 - Addition of new arithmetic performance counter “Count”
PR #3205 - Fixing return type calculation for bulk_then_execute
PR #3204 - Changing std::rand() to a better inbuilt PRNG generator
PR #3203 - Resolving problems during shutdown for VS2015
PR #3202 - Making sure resource partitioner is not accessed if its not valid
PR #3201 - Fixing optional::swap
Issue #3200 - hpx::util::optional fails
PR #3199 - Fix sliding_semaphore test
PR #3198 - Set pre_main status before launching run_helper
PR #3197 - Update README.rst
PR #3194 - parallel::{fill|fill_n} updated for Ranges TS
PR #3193 - Updating Runtime.cpp by adding correct description of Performance counters during register
PR #3191 - Fix sliding_semaphore_2338 test
PR #3190 - Topology improvements
PR #3189 - Deleting one include of median from BOOST library to arithmetics_counter file
PR #3188 - Optionally disable printing of diagnostics during terminate
PR #3187 - Suppressing cmake warning issued by cmake > V3.11
PR #3185 - Remove unused scoped_unlock, unlock_guard_try
PR #3184 - Fix nqueen example
PR #3183 - Add runtime start/stop, resume/suspend and OpenMP benchmarks
Issue #3182 - bulk_then_execute has unexpected return type/does not compile
Issue #3181 - hwloc 2.0 breaks topo class and cannot be used
Issue #3180 - Schedulers that don’t support suspend/resume are unusable
PR #3179 - Various minor changes to support FLeCSI
PR #3178 - Fix #3124
PR #3177 - Removed allgather
PR #3176 - Fixed Documentation for “using_hpx_pkgconfig”
PR #3174 - Add hpx::iostream::ostream overload to format_to
PR #3172 - Fix lifo queue backend
PR #3171 - adding the missing unset() function to cpu_mask() for case of more than 64 threads
PR #3170 - Add cmake flag -DHPX_WITH_FAULT_TOLERANCE=ON (OFF by default)
PR #3169 - Adapted parallel::{count|count_if} for Ranges TS (see #1668)
PR #3168 - Changing used namespace for seq execution policy
Issue #3167 - Update GSoC projects
Issue #3166 - Application (Octotiger) gets stuck on hpx::finalize when only using one thread
Issue #3165 - Compilation of parallel algorithms with HPX_WITH_DATAPAR is broken
PR #3164 - Fixing component migration
PR #3162 - regex_from_pattern: escape regex special characters to avoid misinterpretation
Issue #3161 - Building HPX with hwloc 2.0.0 fails
PR #3160 - Fixing the handling of quoted command line arguments.
PR #3158 - Fixing a race with timed suspension (second attempt)
PR #3157 - Revert “Fixing a race with timed suspension”
PR #3156 - Fixing serialization of classes with incompatible serialize signature
PR #3154 - More refactorings based on clang-tidy reports
PR #3153 - Fixing a race with timed suspension
PR #3152 - Documentation for runtime suspension
PR #3151 - Use small_vector only from boost version 1.59 onwards
PR #3150 - Avoiding more stack overflows
PR #3148 - Refactoring component_base and base_action/transfer_base_action
PR #3147 - Move yield_while out of detail namespace and into own file
PR #3145 - Remove a leftover of the cxx11 std array cleanup
PR #3144 - Minor changes to how actions are executed
PR #3143 - Fix stack overhead
PR #3142 - Fix typo in config.hpp
PR #3141 - Fixing small_vector compatibility with older boost version
PR #3140 - is_heap_text fix
Issue #3139 - Error in is_heap_tests.hpp
PR #3138 - Partially reverting #3126
PR #3137 - Suspend speedup
PR #3136 - Revert “Fixing #2325”
PR #3135 - Improving destruction of threads
Issue #3134 - HPX_SERIALIZATION_SPLIT_FREE does not stop compiler from looking for serialize() method
PR #3133 - Make hwloc compulsory
PR #3132 - Update CXX14 constexpr feature test
PR #3131 - Fixing #2325
PR #3130 - Avoid completion handler allocation
PR #3129 - Suspend runtime
PR #3128 - Make docbook dtd and xsl path names consistent
PR #3127 - Add hpx::start nullptr overloads
PR #3126 - Cleaning up coroutine implementation
PR #3125 - Replacing nullptr with hpx::threads::invalid_thread_id
Issue #3124 - Add hello_world_component to CI builds
PR #3123 - Add new constructor.
PR #3122 - Fixing #3121
Issue #3121 - HPX_SMT_PAUSE is broken on non-x86 platforms when __GNUC__ is defined
PR #3120 - Don’t use boost::intrusive_ptr for thread_id_type
PR #3119 - Disable default executor compatibility with V1 executors
PR #3118 - Adding performance_counter::reinit to allow for dynamically changing counter sets
PR #3117 - Replace uses of boost/experimental::optional with util::optional
PR #3116 - Moving background thread APEX timer #2980
PR #3115 - Fixing race condition in channel test
PR #3114 - Avoid using util::function for thread function wrappers
PR #3113 - cmake V3.10.2 has changed the variable names used for MPI
PR #3112 - Minor fixes to exclusive_scan algorithm
PR #3111 - Revert “fix detection of cxx11_std_atomic”
PR #3110 - Suspend thread pool
PR #3109 - Fixing thread scheduling when yielding a thread id
PR #3108 - Revert “Suspend thread pool”
PR #3107 - Remove UB from thread::id relational operators
PR #3106 - Add cmake test for std::decay_t to fix cuda build
PR #3105 - Fixing refcount for async traversal frame
PR #3104 - Local execution of direct actions is now actually performed directly
PR #3103 - Adding support for generic counter_raw_values performance counter type
Issue #3102 - Introduce generic performance counter type returning an array of values
PR #3101 - Revert “Adapting stack overhead limit for gcc 4.9”
PR #3100 - Fix #3068 (condition_variable deadlock)
PR #3099 - Fixing lock held during suspension in papi counter component
PR #3098 - Unbreak broadcast_wait_for_2822 test
PR #3097 - Adapting stack overhead limit for gcc 4.9
PR #3096 - fix detection of cxx11_std_atomic
PR #3095 - Add ciso646 header to get _LIBCPP_VERSION for testing inplace merge
PR #3094 - Relax atomic operations on performance counter values
PR #3093 - Short-circuit all_of/any_of/none_of instantiations
PR #3092 - Take advantage of C++14 lambda capture initialization syntax, where possible
PR #3091 - Remove more references to Boost from logging code
PR #3090 - Unify use of yield/yield_k
PR #3089 - Fix a strange thing in parallel::detail::handle_exception. (Fix #2834.)
Issue #3088 - A strange thing in parallel::sort.
PR #3087 - Fixing assertion in default_distribution_policy
PR #3086 - Implement parallel::remove and parallel::remove_if
PR #3085 - Addressing breaking changes in Boost V1.66
PR #3084 - Ignore build warnings round 2
PR #3083 - Fix typo HPX_WITH_MM_PREFECTH
PR #3081 - Pre-decay template arguments early
PR #3080 - Suspend thread pool
PR #3079 - Ignore build warnings
PR #3078 - Don’t test inplace_merge with libc++
PR #3076 - Fixing 3075: Part 1
PR #3074 - Fix more build warnings
PR #3073 - Suspend thread cleanup
PR #3072 - Change existing symbol_namespace::iterate to return all data instead of invoking a callback
PR #3071 - Fixing pack_traversal_async test
PR #3070 - Fix dynamic_counters_loaded_1508 test by adding dependency to memory_component
PR #3069 - Fix scheduling loop exit
Issue #3068 - hpx::lcos::condition_variable could be suspect to deadlocks
PR #3067 - #ifdef out random_shuffle deprecated in later c++
PR #3066 - Make coalescing test depend on coalescing library to ensure it gets built
PR #3065 - Workaround for minimal_timed_async_executor_test compilation failures, attempts to copy a deferred call (in unevaluated context)
PR #3064 - Fixing wrong condition in wrapper_heap
PR #3062 - Fix exception handling for execution::seq
PR #3061 - Adapt MSVC C++ mode handling to VS15.5
PR #3060 - Fix compiler problem in MSVC release mode
PR #3059 - Fixing #2931
Issue #3058 - minimal_timed_async_executor_test_exe fails to compile on master (d6f505c)
PR #3057 - Fix stable_merge_2964 compilation problems
PR #3056 - Fix some build warnings caused by unused variables/unnecessary tests
PR #3055 - Update documentation for running tests
Issue #3054 - Assertion failure when using bulk hpx::new_ in asynchronous mode
PR #3052 - Do not bind test running to cmake test build rule
PR #3051 - Fix HPX-Qt interaction in Qt example.
Issue #3048 - nqueen example fails occasionally
PR #3047 - Fixing #3044
PR #3046 - Add OS thread suspension
PR #3042 - PyCicle - first attempt at a build toold for checking PR’s
PR #3041 - Fix a problem about asynchronous execution of parallel::merge and parallel::partition.
PR #3040 - Fix a mistake about exception handling in asynchronous execution of scan_partitioner.
PR #3039 - Consistently use executors to schedule work
PR #3038 - Fixing local direct function execution and lambda actions perfect forwarding
PR #3035 - Make parallel unit test names match build target/folder names
PR #3033 - Fix setting of default build type
Issue #3032 - Fix partitioner arg copy found in #2982
Issue #3031 - Errors linking libhpx.so due to missing references (master branch, commit 6679a8882)
PR #3030 - Revert “implement executor then interface with && forwarding reference”
PR #3029 - Run CI inspect checks before building
PR #3028 - Added range version of parallel::move
Issue #3027 - Implement all scheduling APIs in terms of executors
PR #3026 - implement executor then interface with && forwarding reference
PR #3025 - Fix typo uninitialized to uninitialized
PR #3024 - Inspect fixes
PR #3023 - P0356 Simplified partial function application
PR #3022 - Master fixes
PR #3021 - Segfault fix
PR #3020 - Disable command-line aliasing for applications that use user_main
PR #3019 - Adding enable_elasticity option to pool configuration
PR #3018 - Fix stack overflow detection configuration in header files
PR #3017 - Speed up local action execution
PR #3016 - Unify stack-overflow detection options, remove reference to libsigsegv
PR #3015 - Speeding up accessing the resource partitioner and the topology info
Issue #3014 - HPX does not compile on POWER8 with gcc 5.4
Issue #3013 - hello_world occasionally prints multiple lines from a single OS-thread
PR #3012 - Silence warning about casting away qualifiers in itt_notify.hpp
PR #3011 - Fix cpuset leak in hwloc_topology_info.cpp
PR #3010 - Remove useless decay_copy
PR #3009 - Fixing 2996
PR #3008 - Remove unused internal function
PR #3007 - Fixing wrapper_heap alignment problems
Issue #3006 - hwloc memory leak
PR #3004 - Silence C4251 (needs to have dll-interface) for future_data_void
Issue #3003 - Suspension of runtime
PR #3001 - Attempting to avoid data races in async_traversal while evaluating dataflow()
PR #3000 - Adding hpx::util::optional as a first step to replace experimental::optional
PR #2998 - Cleanup up and Fixing component creation and deletion
Issue #2996 - Build fails with HPX_WITH_HWLOC=OFF
PR #2995 - Push more future_data functionality to source file
PR #2994 - WIP: Fix throttle test
PR #2993 - Making sure –hpx:help does not throw for required (but missing) arguments
PR #2992 - Adding non-blocking (on destruction) service executors
Issue #2991 - run_as_os_thread locks up
Issue #2990 - –help will not work until all required options are provided
PR #2989 - Improve error messages caused by misuse of dataflow
PR #2988 - Improve error messages caused by misuse of .then
Issue #2987 - stack overflow detection producing false positives
PR #2986 - Deduplicate non-dependent thread_info logging types
PR #2985 - Adapted parallel::{all_of|any_of|none_of} for Ranges TS (see #1668)
PR #2984 - Refactor one_size_heap code to simplify code
PR #2983 - Fixing local_new_component
PR #2982 - Clang tidy
PR #2981 - Simplify allocator rebinding in pack traversal
PR #2979 - Fixing integer overflows
PR #2978 - Implement parallel::inplace_merge
Issue #2977 - Make hwloc compulsory instead of optional
PR #2976 - Making sure client_base instance that registered the component does not unregister it when being destructed
PR #2975 - Change version of pulled APEX to master
PR #2974 - Fix domain not being freed at the end of scheduling loop
PR #2973 - Fix small typos
PR #2972 - Adding uintstd.h header
PR #2971 - Fall back to creating local components using local_new
PR #2970 - Improve is_tuple_like trait
PR #2969 - Fix HPX_WITH_MORE_THAN_64_THREADS default value
PR #2968 - Cleaning up dataflow overload set
PR #2967 - Make parallel::merge is stable. (Fix #2964.)
PR #2966 - Fixing a couple of held locks during exception handling
PR #2965 - Adding missing #include
Issue #2964 - parallel merge is not stable
PR #2963 - Making sure any function object passed to dataflow is released after being invoked
PR #2962 - Partially reverting #2891
PR #2961 - Attempt to fix the gcc 4.9 problem with the async pack traversal
Issue #2959 - Program terminates during error handling
Issue #2958 - HPX_PLAIN_ACTION breaks due to missing include
PR #2957 - Fixing errors generated by mixing different attribute syntaxes
Issue #2956 - Mixing attribute syntaxes leads to compiler errors
Issue #2955 - Fix OS-Thread throttling
PR #2953 - Making sure any hpx.os_threads=N supplied through a –hpx::config file is taken into account
PR #2952 - Removing wrong call to cleanup_terminated_locked
PR #2951 - Revert “Make sure the function vtables are initialized before use”
PR #2950 - Fix a namespace compilation error when some schedulers are disabled
Issue #2949 - master branch giving lockups on shutdown
Issue #2947 - hpx.ini is not used correctly at initialization
PR #2946 - Adding explicit feature test for thread_local
PR #2945 - Make sure the function vtables are initialized before use
PR #2944 - Attempting to solve affinity problems on CircleCI
PR #2943 - Changing channel actions to be direct
PR #2942 - Adding split_future for std::vector
PR #2941 - Add a feature test to test for CXX11 override
Issue #2940 - Add split_future for future<vector<T>>
PR #2939 - Making error reporting during problems with setting affinity masks more verbose
PR #2938 - Fix this various executors
PR #2937 - Fix some typos in documentation
PR #2934 - Remove the need for “complete” SFINAE checks
PR #2933 - Making sure parallel::for_loop is executed in parallel if requested
PR #2932 - Classify chunk_size_iterator to input iterator tag. (Fix #2866)
Issue #2931 - –hpx:help triggers unusual error with clang build
PR #2930 - Add #include files needed to set _POSIX_VERSION for debug check
PR #2929 - Fix a couple of deprecated c++ features
PR #2928 - Fixing execution parameters
Issue #2927 - CMake warning: … cycle in constraint graph
PR #2926 - Default pool rename
Issue #2925 - Default pool cannot be renamed
Issue #2924 - hpx:attach-debugger=startup does not work any more
PR #2923 - Alloc membind
PR #2922 - This fixes CircleCI errors when running with –hpx:bind=none
PR #2921 - Custom pool executor was missing priority and stacksize options
PR #2920 - Adding test to trigger problem reported in #2916
PR #2919 - Make sure the resource_partitioner is properly destructed on hpx::finalize
Issue #2918 - hpx::init calls wrong (first) callback when called multiple times
PR #2917 - Adding util::checkpoint
Issue #2916 - Weird runtime failures when using a channel and chained continuations
PR #2915 - Introduce executor parameters customization points
Issue #2914 - Task assignment to current Pool has unintended consequences
PR #2913 - Fix rp hang
PR #2912 - Update contributors
PR #2911 - Fixing CUDA problems
PR #2910 - Improve error reporting for process component on POSIX systems
PR #2909 - Fix typo in include path
PR #2908 - Use proper container according to iterator tag in benchmarks of parallel algorithms
PR #2907 - Optionally force-delete remaining channel items on close
PR #2906 - Making sure generated performance counter names are correct
Issue #2905 - collecting idle-rate performance counters on multiple localities produces an error
Issue #2904 - build broken for Intel 17 compilers
PR #2903 - Documentation Updates– Adding New People
PR #2902 - Fixing service_executor
PR #2901 - Fixing partitioned_vector creation
PR #2900 - Add numa-balanced mode to hpx::bind, spread cores over numa domains
Issue #2899 - hpx::bind does not have a mode that balances cores over numa domains
PR #2898 - Adding missing #include and missing guard for optional code section
PR #2897 - Removing dependency on Boost.ICL
Issue #2896 - Debug build fails without -fpermissive with GCC 7.1 and Boost 1.65
PR #2895 - Fixing SLURM environment parsing
PR #2894 - Fix incorrect handling of compile definition with value 0
Issue #2893 - Disabling schedulers causes build errors
PR #2892 - added list serializer
PR #2891 - Resource Partitioner Fixes
Issue #2890 - Destroying a non-empty channel causes an assertion failure
PR #2889 - Add check for libatomic
PR #2888 - Fix compilation problems if HPX_WITH_ITT_NOTIFY=ON
PR #2887 - Adapt broadcast() to non-unwrapping async<Action>
PR #2886 - Replace Boost.Random with C++11 <random>
Issue #2885 - regression in broadcast?
Issue #2884 - linking
-latomicis not portablePR #2883 - Explicitly set -pthread flag if available
PR #2882 - Wrap boost::format uses
Issue #2881 - hpx not compiling with
HPX_WITH_ITTNOTIFY=OnIssue #2880 - hpx::bind scatter/balanced give wrong pu masks
PR #2878 - Fix incorrect pool usage masks setup in RP/thread manager
PR #2877 - Require
std::arrayby defaultPR #2875 - Deprecate use of BOOST_ASSERT
PR #2874 - Changed serialization of boost.variant to use variadic templates
Issue #2873 - building with parcelport_mpi fails on cori
PR #2871 - Adding missing support for throttling scheduler
PR #2870 - Disambiguate use of base_lco_with_value macros with channel
Issue #2869 - Difficulty compiling
HPX_REGISTER_CHANNEL_DECLARATION(double)PR #2868 - Removing unneeded assert
PR #2867 - Implement parallel::unique
Issue #2866 - The chunk_size_iterator violates multipass guarantee
PR #2865 - Only use sched_getcpu on linux machines
PR #2864 - Create redistribution archive for successful builds
PR #2863 - Replace casts/assignments with hard-coded memcpy operations
Issue #2862 - sched_getcpu not available on MacOS
PR #2861 - Fixing unmatched header defines and recursive inclusion of threadmanager
Issue #2860 - Master program fails with assertion ‘type == data_type_address’ failed: HPX(assertion_failure)
Issue #2852 - Support for ARM64
PR #2858 - Fix misplaced #if #endif’s that cause build failure without THREAD_CUMULATIVE_COUNTS
PR #2857 - Fix some listing in documentation
PR #2856 - Fixing component handling for lcos
PR #2855 - Add documentation for coarrays
PR #2854 - Support ARM64 in timestamps
PR #2853 - Update Table 17. Non-modifying Parallel Algorithms in Documentation
PR #2851 - Allowing for non-default-constructible component types
PR #2850 - Enable returning future<R> from actions where R is not default-constructible
PR #2849 - Unify serialization of non-default-constructable types
Issue #2848 - Components have to be default constructible
Issue #2847 - Returning a future<R> where R is not default-constructable broken
Issue #2846 - Unify serialization of non-default-constructible types
PR #2845 - Add Visual Studio 2015 to the tested toolchains in Appveyor
Issue #2844 - Change the appveyor build to use the minimal required MSVC version
Issue #2843 - multi node hello_world hangs
PR #2842 - Correcting Spelling mistake in docs
PR #2841 - Fix usage of std::aligned_storage
PR #2840 - Remove constexpr from a void function
Issue #2839 - memcpy buffer overflow: load_construct_data() and std::complex members
Issue #2835 -
constexprfunctions withvoidreturn type break compilation with CUDA 8.0Issue #2834 - One suspicion in parallel::detail::handle_exception
PR #2833 - Implement parallel::merge
PR #2832 - Fix a strange thing in parallel::util::detail::handle_local_exceptions. (Fix #2818)
PR #2830 - Break the debugger when a test failed
Issue #2831 -
parallel/executors/execution_fwd.hppcauses compilation failure in C++11 mode.PR #2829 - Implement an API for asynchronous pack traversal
PR #2828 - Split unit test builds on CircleCI to avoid timeouts
Issue #2827 - failure to compile hello_world example with -Werror
PR #2824 - Making sure promises are marked as started when used as continuations
PR #2823 - Add documentation for partitioned_vector_view
Issue #2822 - Yet another issue with wait_for similar to #2796
PR #2821 - Fix bugs and improve that about HPX_HAVE_CXX11_AUTO_RETURN_VALUE of CMake
PR #2820 - Support C++11 in benchmark codes of parallel::partition and parallel::partition_copy
PR #2819 - Fix compile errors in unit test of container version of parallel::partition
Issue #2818 - A strange thing in parallel::util::detail::handle_local_exceptions
Issue #2815 - HPX fails to compile with HPX_WITH_CUDA=ON and the new CUDA 9.0 RC
Issue #2814 - Using ‘gmakeN’ after ‘cmake’ produces error in src/CMakeFiles/hpx.dir/runtime/agas/addressing_service.cpp.o
PR #2813 - Properly support [[noreturn]] attribute if available
Issue #2812 - Compilation fails with gcc 7.1.1
PR #2811 - Adding hpx::launch::lazy and support for async, dataflow, and future::then
PR #2810 - Add option allowing to disable deprecation warning
PR #2809 - Disable throttling scheduler if HWLOC is not found/used
PR #2808 - Fix compile errors on some environments of parallel::partition
Issue #2807 - Difficulty building with
HPX_WITH_HWLOC=OffPR #2806 - Partitioned vector
PR #2805 - Serializing collections with non-default constructible data
PR #2802 - Fix FreeBSD 11
Issue #2801 - Rate limiting techniques in io_service
Issue #2800 - New Launch Policy: async_if
PR #2799 - Fix a unit test failure on GCC in tuple_cat
PR #2798 - bump minimum required cmake to 3.0 in test
PR #2797 - Making sure future::wait_for et.al. work properly for action results
Issue #2796 - wait_for does always in “deferred” state for calls on remote localities
Issue #2795 - Serialization of types without default constructor
PR #2794 - Fixing test for partitioned_vector iteration
PR #2792 - Implemented segmented find and its variations for partitioned vector
PR #2791 - Circumvent scary warning about placement new
PR #2790 - Fix OSX build
PR #2789 - Resource partitioner
PR #2788 - Adapt parallel::is_heap and parallel::is_heap_until to Ranges TS
PR #2787 - Unwrap hotfixes
PR #2786 - Update CMake Minimum Version to 3.3.2 (refs #2565)
Issue #2785 - Issues with masks and cpuset
PR #2784 - Error with reduce and transform reduce fixed
PR #2783 - StackOverflow integration with libsigsegv
PR #2782 - Replace boost::atomic with std::atomic (where possible)
PR #2781 - Check for and optionally use [[deprecated]] attribute
PR #2780 - Adding empty (but non-trivial) destructor to circumvent warnings
PR #2779 - Exception info tweaks
PR #2778 - Implement parallel::partition
PR #2777 - Improve error handling in gather_here/gather_there
PR #2776 - Fix a bug in compiler version check
PR #2775 - Fix compilation when HPX_WITH_LOGGING is OFF
PR #2774 - Removing dependency on Boost.Date_Time
PR #2773 - Add sync_images() method to spmd_block class
PR #2772 - Adding documentation for PAPI counters
PR #2771 - Removing boost preprocessor dependency
PR #2770 - Adding test, fixing deadlock in config registry
PR #2769 - Remove some other warnings and errors detected by clang 5.0
Issue #2768 - Is there iterator tag for HPX?
PR #2767 - Improvements to continuation annotation
PR #2765 - gcc split stack support for HPX threads #620
PR #2764 - Fix some uses of begin/end, remove unnecessary includes
PR #2763 - Bump minimal Boost version to 1.55.0
PR #2762 - hpx::partitioned_vector serializer
PR #2761 - Adding configuration summary to cmake output and –hpx:info
PR #2760 - Removing 1d_hydro example as it is broken
PR #2758 - Remove various warnings detected by clang 5.0
Issue #2757 - In case of a “raw thread” is needed per core for implementing parallel algorithm, what is good practice in HPX?
PR #2756 - Allowing for LCOs to be simple components
PR #2755 - Removing make_index_pack_unrolled
PR #2754 - Implement parallel::unique_copy
PR #2753 - Fixing detection of [[fallthrough]] attribute
PR #2752 - New thread priority names
PR #2751 - Replace boost::exception with proposed exception_info
PR #2750 - Replace boost::iterator_range
PR #2749 - Fixing hdf5 examples
Issue #2748 - HPX fails to build with enabled hdf5 examples
Issue #2747 - Inherited task priorities break certain DAG optimizations
Issue #2746 - HPX segfaulting with valgrind
PR #2745 - Adding extended arithmetic performance counters
PR #2744 - Adding ability to statistics counters to reset base counter
Issue #2743 - Statistics counter does not support resetting
PR #2742 - Making sure Vc V2 builds without additional HPX configuration flags
PR #2741 - Deprecate unwrapped and implement unwrap and unwrapping
PR #2740 - Coroutine stackoverflow detection for linux/posix; Issue #2408
PR #2739 - Add files via upload
PR #2738 - Appveyor support
PR #2737 - Fixing 2735
Issue #2736 - 1d_hydro example doesn’t work
Issue #2735 - partitioned_vector_subview test failing
PR #2734 - Add C++11 range utilities
PR #2733 - Adapting iterator requirements for parallel algorithms
PR #2732 - Integrate C++ Co-arrays
PR #2731 - Adding on_migrated event handler to migratable component instances
Issue #2729 - Add on_migrated() event handler to migratable components
Issue #2728 - Why Projection is needed in parallel algorithms?
PR #2727 - Cmake files for StackOverflow Detection
PR #2726 - CMake for Stack Overflow Detection
PR #2725 - Implemented segmented algorithms for partitioned vector
PR #2724 - Fix examples in Action documentation
PR #2723 - Enable lcos::channel<T>::register_as
Issue #2722 - channel register_as() failing on compilation
PR #2721 - Mind map
PR #2720 - reorder forward declarations to get rid of C++14-only auto return types
PR #2719 - Add documentation for partitioned_vector and add features in pack.hpp
Issue #2718 - Some forward declarations in execution_fwd.hpp aren’t C++11-compatible
PR #2717 - Config support for fallthrough attribute
PR #2716 - Implement parallel::partition_copy
PR #2715 - initial import of icu string serializer
PR #2714 - initial import of valarray serializer
PR #2713 - Remove slashes before CMAKE_FILES_DIRECTORY variables
PR #2712 - Fixing wait for 1751
PR #2711 - Adjust code for minimal supported GCC having being bumped to 4.9
PR #2710 - Adding code of conduct
PR #2709 - Fixing UB in destroy tests
PR #2708 - Add inline to prevent multiple definition issue
Issue #2707 - Multiple defined symbols for task_block.hpp in VS2015
PR #2706 - Adding .clang-format file
PR #2704 - Add a synchronous mapping API
Issue #2703 - Request: Add the .clang-format file to the repository
Issue #2702 - STEllAR-GROUP/Vc slower than VCv1 possibly due to wrong instructions generated
Issue #2701 - Datapar with STEllAR-GROUP/Vc requires obscure flag
Issue #2700 - Naming inconsistency in parallel algorithms
Issue #2699 - Iterator requirements are different from standard in parallel copy_if.
PR #2698 - Properly releasing parcelport write handlers
Issue #2697 - Compile error in addressing_service.cpp
Issue #2696 - Building and using HPX statically: undefined references from runtime_support_server.cpp
Issue #2695 - Executor changes cause compilation failures
PR #2694 - Refining C++ language mode detection for MSVC
PR #2693 - P0443 r2
PR #2692 - Partially reverting changes to parcel_await
Issue #2689 - HPX build fails when HPX_WITH_CUDA is enabled
PR #2688 - Make Cuda Clang builds pass
PR #2687 - Add an is_tuple_like trait for sequenceable type detection
PR #2686 - Allowing throttling scheduler to be used without idle backoff
PR #2685 - Add support of std::array to hpx::util::tuple_size and tuple_element
PR #2684 - Adding new statistics performance counters
PR #2683 - Replace boost::exception_ptr with std::exception_ptr
Issue #2682 - HPX does not compile with HPX_WITH_THREAD_MANAGER_IDLE_BACKOFF=OFF
PR #2681 - Attempt to fix problem in managed_component_base
PR #2680 - Fix bad size during archive creation
Issue #2679 - Mismatch between size of archive and container
Issue #2678 - In parallel algorithm, other tasks are executed to the end even if an exception occurs in any task.
PR #2677 - Adding include check for std::addressof
PR #2676 - Adding parallel::destroy and destroy_n
PR #2675 - Making sure statistics counters work as expected
PR #2674 - Turning assertions into exceptions
PR #2673 - Inhibit direct conversion from future<future<T>> –> future<void>
PR #2672 - C++17 invoke forms
PR #2671 - Adding uninitialized_value_construct and uninitialized_value_construct_n
PR #2670 - Integrate spmd multidimensional views for partitioned_vectors
PR #2669 - Adding uninitialized_default_construct and uninitialized_default_construct_n
PR #2668 - Fixing documentation index
Issue #2667 - Ambiguity of nested hpx::future<void>’s
Issue #2666 - Statistics Performance counter is not working
PR #2664 - Adding uninitialized_move and uninitialized_move_n
Issue #2663 - Seg fault in managed_component::get_base_gid, possibly cause by util::reinitializable_static
Issue #2662 - Crash in managed_component::get_base_gid due to problem with util::reinitializable_static
PR #2665 - Hide the
detailnamespace in doxygen per defaultPR #2660 - Add documentation to hpx::util::unwrapped and hpx::util::unwrapped2
PR #2659 - Improve integration with vcpkg
PR #2658 - Unify access_data trait for use in both, serialization and de-serialization
PR #2657 - Removing hpx::lcos::queue<T>
PR #2656 - Reduce MAX_TERMINATED_THREADS default, improve memory use on manycore cpus
PR #2655 - Mainteinance for emulate-deleted macros
PR #2654 - Implement parallel is_heap and is_heap_until
PR #2653 - Drop support for VS2013
PR #2652 - This patch makes sure that all parcels in a batch are properly handled
PR #2649 - Update docs (Table 18) - move transform to end
Issue #2647 - hpx::parcelset::detail::parcel_data::has_continuation_ is uninitialized
Issue #2644 - Some .vcxproj in the HPX.sln fail to build
Issue #2641 -
hpx::lcos::queueshould be deprecatedPR #2640 - A new throttling policy with public APIs to suspend/resume
PR #2639 - Fix a tiny typo in tutorial.
Issue #2638 - Invalid return type ‘void’ of constexpr function
PR #2636 - Add and use HPX_MSVC_WARNING_PRAGMA for #pragma warning
PR #2633 - Distributed define_spmd_block
PR #2632 - Making sure container serialization uses size-compatible types
PR #2631 - Add lcos::local::one_element_channel
PR #2629 - Move unordered_map out of parcelport into hpx/concurrent
PR #2628 - Making sure that shutdown does not hang
PR #2627 - Fix serialization
PR #2626 - Generate
cmake_variables.qbkandcmake_toolchains.qbkoutside of the source treePR #2625 - Supporting -std=c++17 flag
PR #2624 - Fixing a small cmake typo
PR #2622 - Update CMake minimum required version to 3.0.2 (closes #2621)
Issue #2621 - Compiling hpx master fails with /usr/bin/ld: final link failed: Bad value
PR #2620 - Remove warnings due to some captured variables
PR #2619 - LF multiple parcels
PR #2618 - Some fixes to libfabric that didn’t get caught before the merge
PR #2617 - Adding
hpx::local_newPR #2616 - Documentation: Extract all entities in order to autolink functions correctly
Issue #2615 - Documentation: Linking functions is broken
PR #2614 - Adding serialization for std::deque
PR #2613 - We need to link with boost.thread and boost.chrono if we use boost.context
PR #2612 - Making sure for_loop_n(par, …) is actually executed in parallel
PR #2611 - Add documentation to invoke_fused and friends NFC
PR #2610 - Added reduction templates using an identity value
PR #2608 - Fixing some unused vars in inspect
PR #2607 - Fixed build for mingw
PR #2606 - Supporting generic context for boost >= 1.61
PR #2605 - Parcelport libfabric3
PR #2604 - Adding allocator support to promise and friends
PR #2603 - Barrier hang
PR #2602 - Changes to scheduler to steal from one high-priority queue
Issue #2601 - High priority tasks are not executed first
PR #2600 - Compat fixes
PR #2599 - Compatibility layer for threading support
PR #2598 - V1.1
PR #2597 - Release V1.0
PR #2592 - First attempt to introduce spmd_block in hpx
PR #2586 - local_segment in segmented_iterator_traits
Issue #2584 - Add allocator support to promise, packaged_task and friends
PR #2576 - Add missing dependencies of cuda based tests
PR #2575 - Remove warnings due to some captured variables
Issue #2574 - MSVC 2015 Compiler crash when building HPX
Issue #2568 - Remove throttle_scheduler as it has been abandoned
Issue #2566 - Add an inline versioning namespace before 1.0 release
Issue #2565 - Raise minimal cmake version requirement
PR #2556 - Fixing scan partitioner
PR #2546 - Broadcast async
Issue #2543 - make install fails due to a non-existing .so file
PR #2495 - wait_or_add_new returning thread_id_type
Issue #2480 - Unable to register new performance counter
Issue #2471 - no type named ‘fcontext_t’ in namespace
Issue #2456 - Re-implement hpx::util::unwrapped
Issue #2455 - Add more arithmetic performance counters
PR #2454 - Fix a couple of warnings and compiler errors
PR #2453 - Timed executor support
PR #2447 - Implementing new executor API (P0443)
Issue #2439 - Implement executor proposal
Issue #2408 - Stackoverflow detection for linux, e.g. based on libsigsegv
PR #2377 - Add a customization point for put_parcel so we can override actions
Issue #2368 - HPX_ASSERT problem
Issue #2324 - Change default number of threads used to the maximum of the system
Issue #2266 - hpx_0.9.99 make tests fail
PR #2195 - Support for code completion in VIM
Issue #2137 - Hpx does not compile over osx
Issue #2092 - make tests should just build the tests
Issue #2026 - Build HPX with Apple’s clang
Issue #1932 - hpx with PBS fails on multiple localities
PR #1914 - Parallel heap algorithm implementations WIP
Issue #1598 - Disconnecting a locality results in segfault using heartbeat example
Issue #1404 - unwrapped doesn’t work with movable only types
Issue #1400 - hpx::util::unwrapped doesn’t work with non-future types
Issue #1205 - TSS is broken
Issue #1126 - vector<future<T> > does not work gracefully with dataflow, when_all and unwrapped
Issue #1056 - Thread manager cleanup
Issue #863 - Futures should not require a default constructor
Issue #856 - Allow runtimemode_connect to be used with security enabled
Issue #726 - Valgrind
Issue #701 - Add RCR performance counter component
Issue #528 - Add support for known failures and warning count/comparisons to hpx_run_tests.py
HPX V1.0.0 (Apr 24, 2017)#
General changes#
Here are some of the main highlights and changes for this release (in no particular order):
Added the facility
hpx::split_futurewhich allows one to convert afuture<tuple<Ts...>>into atuple<future<Ts>...>. This functionality is not available when compiling HPX with VS2012.Added a new type of performance counter which allows one to return a list of values for each invocation. We also added a first counter of this type which collects a histogram of the times between parcels being created.
Added new LCOs:
hpx::lcos::channelandhpx::lcos::local::channelwhich are very similar to the well known channel constructs used in the Go language.Added new performance counters reporting the amount of data handled by the networking layer on a action-by-action basis (please see PR #2289 for more details).
Added a new facility
hpx::lcos::barrier, replacing the equally named older one. The new facility has a slightly changed API and is much more efficient. Most notable, the new facility exposes a (global) functionhpx::lcos::barrier::synchronize()which represents a global barrier across all localities.We have started to add support for vectorization to our parallel algorithm implementations. This support depends on using an external library, currently either Vc Library or |boost_simd|_. Please see Issue #2333 for a list of currently supported algorithms. This is an experimental feature and its implementation and/or API might change in the future. Please see this blog-post for more information.
The parameter sequence for the
hpx::parallel::transform_reduceoverload taking one iterator range has changed to match the changes this algorithm has undergone while being moved to C++17. The old overload can be still enabled at configure time by specifying-DHPX_WITH_TRANSFORM_REDUCE_COMPATIBILITY=Onto CMake.The algorithm
hpx::parallel::inner_producthas been renamed tohpx::parallel::transform_reduceto match the changes this algorithm has undergone while being moved to C++17. The old inner_product names can be still enabled at configure time by specifying-DHPX_WITH_TRANSFORM_REDUCE_COMPATIBILITY=Onto CMake.Added versions of
hpx::get_ptrtaking client side representations for component instances as their parameter (instead of a global id).Added the helper utility
hpx::performance_counters::performance_counter_sethelping to encapsulate a set of performance counters to be managed concurrently.All execution policies and related classes have been renamed to be consistent with the naming changes applied for C++17. All policies now live in the namespace
hpx::parallel::execution. The ols names can be still enabled at configure time by specifying-DHPX_WITH_EXECUTION_POLICY_COMPATIBILITY=Onto CMake.The thread scheduling subsystem has undergone a major refactoring which results in significant performance improvements. We have also imroved the performance of creating
hpx::futureand of various facilities handling those.We have consolidated all of the code in HPX.Compute related to the integration of CUDA.
hpx::partitioned_vectorhas been enabled to be usable withhpx::compute::vectorwhich allows one to place the partitions on one or more GPU devices.Added new performance counters exposing various internals of the thread scheduling subsystem, such as the current idle- and busy-loop counters and instantaneous scheduler utilization.
Extended and improved the use of the ITTNotify hooks allowing to collect performance counter data and function annotation information from within the Intel Amplifier tool.
Breaking changes#
We have dropped support for the gcc compiler versions V4.6 and 4.7. The minimal gcc version we now test on is gcc V4.8.
We have removed (default) support for
boost::chronoin interfaces, uses of it have been replaced withstd::chrono. This facility can be still enabled at configure time by specifying-DHPX_WITH_BOOST_CHRONO_COMPATIBILITY=Onto CMake.The parameter sequence for the
hpx::parallel::transform_reduceoverload taking one iterator range has changed to match the changes this algorithm has undergone while being moved to C++17.The algorithm
hpx::parallel::inner_producthas been renamed tohpx::parallel::transform_reduceto match the changes this algorithm has undergone while being moved to C++17.the build options
HPX_WITH_COLOCATED_BACKWARDS_COMPATIBILITYandHPX_WITH_COMPONENT_GET_GID_COMPATIBILITYare now disabled by default. Please change your code still depending on the deprecated interfaces.
Bug fixes (closed tickets)#
Here is a list of the important tickets we closed for this release.
PR #2596 - Adding apex data
PR #2595 - Remove obsolete file
Issue #2594 - FindOpenCL.cmake mismatch with the official cmake module
PR #2592 - First attempt to introduce spmd_block in hpx
Issue #2591 - Feature request: continuation (then) which does not require the callable object to take a future<R> as parameter
PR #2588 - Daint fixes
PR #2587 - Fixing transfer_(continuation)_action::schedule
PR #2585 - Work around MSVC having an ICE when compiling with -Ob2
PR #2583 - changing 7zip command to 7za in roll_release.sh
PR #2582 - First attempt to introduce spmd_block in hpx
PR #2581 - Enable annotated function for parallel algorithms
PR #2580 - First attempt to introduce spmd_block in hpx
PR #2579 - Make thread NICE level setting an option
PR #2578 - Implementing enqueue instead of busy wait when no sender is available
PR #2577 - Retrieve -std=c++11 consistent nvcc flag
PR #2576 - Add missing dependencies of cuda based tests
PR #2575 - Remove warnings due to some captured variables
PR #2573 - Attempt to resolve resolve_locality
PR #2572 - Adding APEX hooks to background thread
PR #2571 - Pick up hpx.ignore_batch_env from config map
PR #2570 - Add commandline options –hpx:print-counters-locally
PR #2569 - Fix computeapi unit tests
PR #2567 - This adds another barrier::synchronize before registering performance counters
PR #2564 - Cray static toolchain support
PR #2563 - Fixed unhandled exception during startup
PR #2562 - Remove partitioned_vector.cu from build tree when nvcc is used
Issue #2561 - octo-tiger crash with commit 6e921495ff6c26f125d62629cbaad0525f14f7ab
PR #2560 - Prevent -Wundef warnings on Vc version checks
PR #2559 - Allowing CUDA callback to set the future directly from an OS thread
PR #2558 - Remove warnings due to float precisions
PR #2557 - Removing bogus handling of compile flags for CUDA
PR #2556 - Fixing scan partitioner
PR #2554 - Add more diagnostics to error thrown from find_appropriate_destination
Issue #2555 - No valid parcelport configured
PR #2553 - Add cmake cuda_arch option
PR #2552 - Remove incomplete datapar bindings to libflatarray
PR #2551 - Rename hwloc_topology to hwloc_topology_info
PR #2550 - Apex api updates
PR #2549 - Pre-include defines.hpp to get the macro HPX_HAVE_CUDA value
PR #2548 - Fixing issue with disconnect
PR #2546 - Some fixes around cuda clang partitioned_vector example
PR #2545 - Fix uses of the Vc2 datapar flags; the value, not the type, should be passed to functions
PR #2542 - Make HPX_WITH_MALLOC easier to use
PR #2541 - avoid recompiles when enabling/disabling examples
PR #2540 - Fixing usage of target_link_libraries()
PR #2539 - fix RPATH behaviour
Issue #2538 - HPX_WITH_CUDA corrupts compilation flags
PR #2537 - Add output of a Bazel Skylark extension for paths and compile options
PR #2536 - Add counter exposing total available memory to Windows as well
PR #2535 - Remove obsolete support for security
Issue #2534 - Remove command line option
--hpx:run-agas-serverPR #2533 - Pre-cache locality endpoints during bootstrap
PR #2532 - Fixing handling of GIDs during serialization preprocessing
PR #2531 - Amend uses of the term “functor”
PR #2529 - added counter for reading available memory
PR #2527 - Facilities to create actions from lambdas
PR #2526 - Updated docs: HPX_WITH_EXAMPLES
PR #2525 - Remove warnings related to unused captured variables
Issue #2524 - CMAKE failed because it is missing: TCMALLOC_LIBRARY TCMALLOC_INCLUDE_DIR
PR #2523 - Fixing compose_cb stack overflow
PR #2522 - Instead of unlocking, ignore the lock while creating the message handler
PR #2521 - Create
LPROGRESS_logging macro to simplify progress tracking and timingsPR #2520 - Intel 17 support
PR #2519 - Fix components example
PR #2518 - Fixing parcel scheduling
Issue #2517 - Race condition during Parcel Coalescing Handler creation
Issue #2516 - HPX locks up when using at least 256 localities
Issue #2515 - error: Install cannot find “/lib/hpx/libparcel_coalescing.so.0.9.99” but I can see that file
PR #2514 - Making sure that all continuations of a shared_future are invoked in order
PR #2513 - Fixing locks held during suspension
PR #2512 - MPI Parcelport improvements and fixes related to the background work changes
PR #2511 - Fixing bit-wise (zero-copy) serialization
Issue #2509 - Linking errors in hwloc_topology
PR #2508 - Added documentation for debugging with core files
PR #2506 - Fixing background work invocations
PR #2505 - Fix tuple serialization
Issue #2504 - Ensure continuations are called in the order they have been attached
PR #2503 - Adding serialization support for Vc v2 (datapar)
PR #2502 - Resolve various, minor compiler warnings
PR #2501 - Some other fixes around cuda examples
Issue #2500 - nvcc / cuda clang issue due to a missing -DHPX_WITH_CUDA flag
PR #2499 - Adding support for std::array to wait_all and friends
PR #2498 - Execute background work as HPX thread
PR #2497 - Fixing configuration options for spinlock-deadlock detection
PR #2496 - Accounting for different compilers in CrayKNL toolchain file
PR #2494 - Adding component base class which ties a component instance to a given executor
PR #2493 - Enable controlling amount of pending threads which must be available to allow thread stealing
PR #2492 - Adding new command line option –hpx:print-counter-reset
PR #2491 - Resolve ambiguities when compiling with APEX
PR #2490 - Resuming threads waiting on future with higher priority
Issue #2489 - nvcc issue because -std=c++11 appears twice
PR #2488 - Adding performance counters exposing the internal idle and busy-loop counters
PR #2487 - Allowing for plain suspend to reschedule thread right away
PR #2486 - Only flag HPX code for CUDA if HPX_WITH_CUDA is set
PR #2485 - Making thread-queue parameters runtime-configurable
PR #2484 - Added atomic counter for parcel-destinations
PR #2483 - Added priority-queue lifo scheduler
PR #2482 - Changing scheduler to steal only if more than a minimal number of tasks are available
PR #2481 - Extending command line option –hpx:print-counter-destination to support value ‘none’
PR #2479 - Added option to disable signal handler
PR #2478 - Making sure the sine performance counter module gets loaded only for the corresponding example
Issue #2477 - Breaking at a throw statement
PR #2476 - Annotated function
PR #2475 - Ensure that using %osthread% during logging will not throw for non-hpx threads
PR #2474 - Remove now superficial non_direct actions from base_lco and friends
PR #2473 - Refining support for ITTNotify
PR #2472 - Some fixes around hpx compute
Issue #2470 - redefinition of boost::detail::spinlock
Issue #2469 - Dataflow performance issue
PR #2468 - Perf docs update
PR #2466 - Guarantee to execute remote direct actions on HPX-thread
PR #2465 - Improve demo : Async copy and fixed device handling
PR #2464 - Adding performance counter exposing instantaneous scheduler utilization
PR #2463 - Downcast to future<void>
PR #2462 - Fixed usage of ITT-Notify API with Intel Amplifier
PR #2461 - Cublas demo
PR #2460 - Fixing thread bindings
PR #2459 - Make -std=c++11 nvcc flag consistent for in-build and installed versions
Issue #2457 - Segmentation fault when registering a partitioned vector
PR #2452 - Properly releasing global barrier for unhandled exceptions
PR #2451 - Fixing long shutdown times
PR #2450 - Attempting to fix initialization errors on newer platforms (Boost V1.63)
PR #2449 - Replace BOOST_COMPILER_FENCE with an HPX version
PR #2448 - This fixes a possible race in the migration code
- PR #2445 - Fixing dataflow et.al. for futures or future-ranges wrapped
into ref()
PR #2444 - Fix segfaults
PR #2443 - Issue 2442
Issue #2442 - Mismatch between #if/#endif and namespace scope brackets in this_thread_executers.hpp
Issue #2441 - undeclared identifier BOOST_COMPILER_FENCE
PR #2440 - Knl build
PR #2438 - Datapar backend
PR #2437 - Adapt algorithm parameter sequence changes from C++17
PR #2436 - Adapt execution policy name changes from C++17
Issue #2435 - Trunk broken, undefined reference to hpx::thread::interrupt(hpx::thread::id, bool)
PR #2434 - More fixes to resource manager
PR #2433 - Added versions of
hpx::get_ptrtaking client side representationsPR #2432 - Warning fixes
PR #2431 - Adding facility representing set of performance counters
PR #2430 - Fix parallel_executor thread spawning
PR #2429 - Fix attribute warning for gcc
Issue #2427 - Seg fault running octo-tiger with latest HPX commit
Issue #2426 - Bug in 9592f5c0bc29806fce0dbe73f35b6ca7e027edcb causes immediate crash in Octo-tiger
PR #2425 - Fix nvcc errors due to constexpr specifier
Issue #2424 - Async action on component present on hpx::find_here is executing synchronously
PR #2423 - Fix nvcc errors due to constexpr specifier
PR #2422 - Implementing hpx::this_thread thread data functions
PR #2421 - Adding benchmark for wait_all
Issue #2420 - Returning object of a component client from another component action fails
PR #2419 - Infiniband parcelport
Issue #2418 - gcc + nvcc fails to compile code that uses partitioned_vector
PR #2417 - Fixing context switching
PR #2416 - Adding fixes and workarounds to allow compilation with nvcc/msvc (VS2015up3)
PR #2415 - Fix errors coming from hpx compute examples
PR #2414 - Fixing msvc12
PR #2413 - Enable cuda/nvcc or cuda/clang when using add_hpx_executable()
PR #2412 - Fix issue in HPX_SetupTarget.cmake when cuda is used
PR #2411 - This fixes the core compilation issues with MSVC12
Issue #2410 -
undefined reference to opal_hwloc191_hwloc_.....PR #2409 - Fixing locking for channel and receive_buffer
PR #2407 - Solving #2402 and #2403
PR #2406 - Improve guards
PR #2405 - Enable parallel::for_each for iterators returning proxy types
PR #2404 - Forward the explicitly given result_type in the hpx invoke
Issue #2403 - datapar_execution + zip iterator: lambda arguments aren’t references
Issue #2402 - datapar algorithm instantiated with wrong type #2402
PR #2401 - Added support for imported libraries to HPX_Libraries.cmake
PR #2400 - Use CMake policy CMP0060
Issue #2399 - Error trying to push back vector of futures to vector
PR #2398 - Allow config #defines to be written out to custom config/defines.hpp
Issue #2397 - CMake generated config defines can cause tedious rebuilds category
Issue #2396 - BOOST_ROOT paths are not used at link time
PR #2395 - Fix target_link_libraries() issue when HPX Cuda is enabled
Issue #2394 - Template compilation error using HPX_WITH_DATAPAR_LIBFLATARRAY
PR #2393 - Fixing lock registration for recursive mutex
PR #2392 - Add keywords in target_link_libraries in hpx_setup_target
PR #2391 - Clang goroutines
Issue #2390 - Adapt execution policy name changes from C++17
PR #2389 - Chunk allocator and pool are not used and are obsolete
PR #2388 - Adding functionalities to datapar needed by octotiger
PR #2387 - Fixing race condition for early parcels
Issue #2386 - Lock registration broken for recursive_mutex
PR #2385 - Datapar zip iterator
PR #2384 - Fixing race condition in for_loop_reduction
PR #2383 - Continuations
PR #2382 - add LibFlatArray-based backend for datapar
PR #2381 - remove unused typedef to get rid of compiler warnings
PR #2380 - Tau cleanup
PR #2379 - Can send immediate
PR #2378 - Renaming copy_helper/copy_n_helper/move_helper/move_n_helper
Issue #2376 - Boost trunk’s spinlock initializer fails to compile
PR #2375 - Add support for minimal thread local data
PR #2374 - Adding API functions set_config_entry_callback
PR #2373 - Add a simple utility for debugging that gives suspended task backtraces
PR #2372 - Barrier Fixes
Issue #2370 - Can’t wait on a wrapped future
PR #2369 - Fixing stable_partition
PR #2367 - Fixing find_prefixes for Windows platforms
PR #2366 - Testing for experimental/optional only in C++14 mode
PR #2364 - Adding set_config_entry
PR #2363 - Fix papi
PR #2362 - Adding missing macros for new non-direct actions
PR #2361 - Improve cmake output to help debug compiler incompatibility check
PR #2360 - Fixing race condition in condition_variable
PR #2359 - Fixing shutdown when parcels are still in flight
Issue #2357 - failed to insert console_print_action into typename_to_id_t registry
PR #2356 - Fixing return type of get_iterator_tuple
PR #2355 - Fixing compilation against Boost 1 62
PR #2354 - Adding serialization for mask_type if CPU_COUNT > 64
PR #2353 - Adding hooks to tie in APEX into the parcel layer
Issue #2352 - Compile errors when using intel 17 beta (for KNL) on edison
PR #2351 - Fix function vtable get_function_address implementation
Issue #2350 - Build failure - master branch (4de09f5) with Intel Compiler v17
PR #2349 - Enabling zero-copy serialization support for std::vector<>
PR #2348 - Adding test to verify #2334 is fixed
PR #2347 - Bug fixes for hpx.compute and hpx::lcos::channel
PR #2346 - Removing cmake “find” files that are in the APEX cmake Modules
PR #2345 - Implemented parallel::stable_partition
PR #2344 - Making hpx::lcos::channel usable with basename registration
PR #2343 - Fix a couple of examples that failed to compile after recent api changes
Issue #2342 - Enabling APEX causes link errors
PR #2341 - Removing cmake “find” files that are in the APEX cmake Modules
PR #2340 - Implemented all existing datapar algorithms using Boost.SIMD
PR #2339 - Fixing 2338
PR #2338 - Possible race in sliding semaphore
PR #2337 - Adjust osu_latency test to measure window_size parcels in flight at once
PR #2336 - Allowing remote direct actions to be executed without spawning a task
PR #2335 - Making sure multiple components are properly initialized from arguments
Issue #2334 - Cannot construct component with large vector on a remote locality
PR #2332 - Fixing hpx::lcos::local::barrier
PR #2331 - Updating APEX support to include OTF2
PR #2330 - Support for data-parallelism for parallel algorithms
Issue #2329 - Coordinate settings in cmake
PR #2328 - fix LibGeoDecomp builds with HPX + GCC 5.3.0 + CUDA 8RC
PR #2326 - Making scan_partitioner work (for now)
Issue #2323 - Constructing a vector of components only correctly initializes the first component
PR #2322 - Fix problems that bubbled up after merging #2278
PR #2321 - Scalable barrier
PR #2320 - Std flag fixes
Issue #2319 - -std=c++14 and -std=c++1y with Intel can’t build recent Boost builds due to insufficient C++14 support; don’t enable these flags by default for Intel
PR #2318 - Improve handling of –hpx:bind=<bind-spec>
PR #2317 - Making sure command line warnings are printed once only
PR #2316 - Fixing command line handling for default bind mode
PR #2315 - Set id_retrieved if set_id is present
Issue #2314 - Warning for requested/allocated thread discrepancy is printed twice
Issue #2313 - –hpx:print-bind doesn’t work with –hpx:pu-step
Issue #2312 - –hpx:bind range specifier restrictions are overly restrictive
Issue #2311 - hpx_0.9.99 out of project build fails
PR #2310 - Simplify function registration
PR #2309 - Spelling and grammar revisions in documentation (and some code)
PR #2306 - Correct minor typo in the documentation
PR #2305 - Cleaning up and fixing parcel coalescing
PR #2304 - Inspect checks for stream related includes
PR #2303 - Add functionality allowing to enumerate threads of given state
PR #2301 - Algorithm overloads fix for VS2013
PR #2300 - Use <cstdint>, add inspect checks
PR #2299 - Replace boost::[c]ref with std::[c]ref, add inspect checks
PR #2297 - Fixing compilation with no hw_loc
PR #2296 - Hpx compute
PR #2295 - Making sure for_loop(execution::par, 0, N, …) is actually executed in parallel
PR #2294 - Throwing exceptions if the runtime is not up and running
PR #2293 - Removing unused parcel port code
PR #2292 - Refactor function vtables
PR #2291 - Fixing 2286
PR #2290 - Simplify algorithm overloads
PR #2289 - Adding performance counters reporting parcel related data on a per-action basis
Issue #2288 - Remove dormant parcelports
Issue #2286 - adjustments to parcel handling to support parcelports that do not need a connection cache
PR #2285 - add CMake option to disable package export
PR #2283 - Add more inspect checks for use of deprecated components
Issue #2282 - Arithmetic exception in executor static chunker
Issue #2281 - For loop doesn’t parallelize
PR #2280 - Fixing 2277: build failure with PAPI
PR #2279 - Child vs parent stealing
Issue #2277 - master branch build failure (53c5b4f) with papi
PR #2276 - Compile time launch policies
PR #2275 - Replace boost::chrono with std::chrono in interfaces
PR #2274 - Replace most uses of Boost.Assign with initializer list
PR #2273 - Fixed typos
PR #2272 - Inspect checks
PR #2270 - Adding test verifying -Ihpx.os_threads=all
PR #2269 - Added inspect check for now obsolete boost type traits
PR #2268 - Moving more code into source files
Issue #2267 - Add inspect support to deprecate Boost.TypeTraits
PR #2265 - Adding channel LCO
PR #2264 - Make support for std::ref mandatory
PR #2263 - Constrain tuple_member forwarding constructor
Issue #2262 - Test hpx.os_threads=all
Issue #2261 - OS X: Error: no matching constructor for initialization of ‘hpx::lcos::local::condition_variable_any’
Issue #2260 - Make support for std::ref mandatory
PR #2259 - Remove most of Boost.MPL, Boost.EnableIf and Boost.TypeTraits
PR #2258 - Fixing #2256
PR #2257 - Fixing launch process
Issue #2256 - Actions are not registered if not invoked
PR #2255 - Coalescing histogram
PR #2254 - Silence explicit initialization in copy-constructor warnings
PR #2253 - Drop support for GCC 4.6 and 4.7
PR #2252 - Prepare V1.0
PR #2251 - Convert to 0.9.99
PR #2249 - Adding iterator_facade and iterator_adaptor
Issue #2248 - Need a feature to yield to a new task immediately
PR #2246 - Adding split_future
PR #2245 - Add an example for handing over a component instance to a dynamically launched locality
Issue #2243 - Add example demonstrating AGAS symbolic name registration
Issue #2242 - pkgconfig test broken on CentOS 7 / Boost 1.61
Issue #2241 - Compilation error for partitioned vector in hpx_compute branch
PR #2240 - Fixing termination detection on one locality
Issue #2239 - Create a new facility lcos::split_all
Issue #2236 - hpx::cout vs. std::cout
PR #2232 - Implement local-only primary namespace service
Issue #2147 - would like to know how much data is being routed by particular actions
Issue #2109 - Warning while compiling hpx
Issue #1973 - Setting INTERFACE_COMPILE_OPTIONS for hpx_init in CMake taints Fortran_FLAGS
Issue #1864 - run_guarded using bound function ignores reference
Issue #1754 - Running with TCP parcelport causes immediate crash or freeze
Issue #1655 - Enable zip_iterator to be used with Boost traversal iterator categories
Issue #1591 - Optimize AGAS for shared memory only operation
Issue #1401 - Need an efficient infiniband parcelport
Issue #1125 - Fix the IPC parcelport
Issue #839 - Refactor ibverbs and shmem parcelport
Issue #702 - Add instrumentation of parcel layer
Issue #668 - Implement ispc task interface
Issue #533 - Thread queue/deque internal parameters should be runtime configurable
Issue #475 - Create a means of combining performance counters into querysets
HPX V0.9.99 (Jul 15, 2016)#
General changes#
As the version number of this release hints, we consider this release to be a preview for the upcoming HPX V1.0. All of the functionalities we set out to implement for V1.0 are in place; all of the features we wanted to have exposed are ready. We are very happy with the stability and performance of HPX and we would like to present this release to the community in order for us to gather broad feedback before releasing V1.0. We still expect for some minor details to change, but on the whole this release represents what we would like to have in a V1.0.
Overall, since the last release we have had almost 1600 commits while closing almost 400 tickets. These numbers reflect the incredible development activity we have seen over the last couple of months. We would like to express a big ‘Thank you!’ to all contributors and those who helped to make this release happen.
The most notable addition in terms of new functionality available with this release is the full implementation of object migration (i.e. the ability to transparently move HPX components to a different compute node). Additionally, this release of HPX cleans up many minor issues and some API inconsistencies.
Here are some of the main highlights and changes for this release (in no particular order):
We have fixed a couple of issues in AGAS and the parcel layer which have caused hangs, segmentation faults at exit, and a slowdown of applications over time. Fixing those has significantly increased the overall stability and performance of distributed runs.
We have started to add parallel algorithm overloads based on the C++ Extensions for Ranges (N4560) proposal. This also includes the addition of projections to the existing algorithms. Please see Issue #1668 for a list of algorithms which have been adapted to N4560.
We have implemented index-based parallel for-loops based on a corresponding standardization proposal (P0075R1). Please see Issue #2016 for a list of available algorithms.
We have added implementations for more parallel algorithms as proposed for the upcoming C++ 17 Standard. See Issue #1141 for an overview of which algorithms are available by now.
We have started to implement a new prototypical functionality with HPX.Compute which uniformly exposes some of the higher level APIs to heterogeneous architectures (currently CUDA). This functionality is an early preview and should not be considered stable. It may change considerably in the future.
We have pervasively added (optional) executor arguments to all API functions which schedule new work. Executors are now used throughout the code base as the main means of executing tasks.
Added
hpx::make_future<R>(future<T> &&)allowing to convert a future of any typeTinto a future of any other typeR, either based on default conversion rules of the embedded types or using a given explicit conversion function.We finally finished the implementation of transparent migration of components to another locality. It is now possible to trigger a migration operation without ‘stopping the world’ for the object to migrate. HPX will make sure that no work is being performed on an object before it is migrated and that all subsequently scheduled work for the migrated object will be transparently forwarded to the new locality. Please note that the global id of the migrated object does not change, thus the application will not have to be changed in any way to support this new functionality. Please note that this feature is currently considered experimental. See Issue #559 and PR #1966 for more details.
The
hpx::dataflowfacility is now usable with actions. Similarly tohpx::async, actions can be specified as an explicit template argument (hpx::dataflow<Action>(target, ...)) or as the first argument (hpx::dataflow(Action(), target, ...)). We have also enabled the use of distribution policies as the target for dataflow invocations. Please see Issue #1265 and PR #1912 for more information.Adding overloads of
gather_hereandgather_thereto accept the plain values of the data to gather (in addition to the existing overloads expecting futures).We have cleaned up and refactored large parts of the code base. This helped reducing compile and link times of HPX itself and also of applications depending on it. We have further decreased the dependency of HPX on the Boost libraries by replacing part of those with facilities available from the standard libraries.
Wherever possible we have removed dependencies of our API on Boost by replacing those with the equivalent facility from the C++11 standard library.
We have added new performance counters for parcel coalescing, file-IO, the AGAS cache, and overall scheduler time. Resetting performance counters has been overhauled and fixed.
We have introduced a generic client type
hpx::components::client<>and added support for using it withhpx::async. This removes the necessity to implement specific client types for every component type without losing type safety. This deemphasizes the need for using the low levelhpx::id_typefor referencing (possibly remote) component instances. The plan is to deprecate the direct use ofhpx::id_typein user code in the future.We have added a special iterator which supports automatic prefetching of one or more arrays for speeding up loop-like code (see
hpx::parallel::util::make_prefetcher_context()).We have extended the interfaces exposed from executors (as proposed by N4406) to accept an arbitrary number of arguments.
Breaking changes#
In order to move the dataflow facility to
namespace hpxwe added a definition ofhpx::dataflowwhich might create ambiguities in existing codes. The previous definition of this facility (hpx::lcos::local::dataflow) has been deprecated and is available only if the constant-DHPX_WITH_LOCAL_DATAFLOW_COMPATIBILITY=Onto CMake is defined at configuration time. Please explicitly qualify all uses of the dataflow facility if you enable this compatibility setting and encounter ambiguities.The adaptation of the C++ Extensions for Ranges (N4560) proposal imposes some breaking changes related to the return types of some of the parallel algorithms. Please see Issue #1668 for a list of algorithms which have already been adapted.
The facility
hpx::lcos::make_future_void()has been replaced byhpx::make_future<void>().We have removed support for Intel V13 and gcc 4.4.x.
We have removed (default) support for the generic
hpx::parallel::execution_poliybecause it was removed from the Parallelism TS (__cpp11_n4104__) while it was being added to the upcoming C++17 Standard. This facility can be still enabled at configure time by specifying-DHPX_WITH_GENERIC_EXECUTION_POLICY=Onto CMake.Uses of
boost::shared_ptrand related facilities have been replaced withstd::shared_ptrand friends. Uses ofboost::unique_lock,boost::lock_guardetc. have also been replaced by the equivalent (and equally named) tools available from the C++11 standard library.Facilities that used to expect an explicit
boost::unique_locknow take anstd::unique_lock. Additionally,condition_variableno longer aliasescondition_variable_any; its interface now only works withstd::unique_lock<local::mutex>.Uses of
boost::function,boost::bind,boost::tuplehave been replaced by the corresponding facilities in HPX (hpx::util::function,hpx::util::bind, andhpx::util::tuple, respectively).
Bug fixes (closed tickets)#
Here is a list of the important tickets we closed for this release.
PR #2250 - change default chunker of parallel executor to static one
PR #2247 - HPX on ppc64le
PR #2244 - Fixing MSVC problems
PR #2238 - Fixing small typos
PR #2237 - Fixing small typos
PR #2234 - Fix broken add test macro when extra args are passed in
PR #2231 - Fixing possible race during future awaiting in serialization
PR #2230 - Fix stream nvcc
PR #2229 - Fixed run_as_hpx_thread
PR #2228 - On prefetching_test branch : adding prefetching_iterator and related tests used for prefetching containers within lambda functions
PR #2227 - Support for HPXCL’s opencl::event
PR #2226 - Preparing for release of V0.9.99
PR #2225 - fix issue when compiling components with hpxcxx
PR #2224 - Compute alloc fix
PR #2223 - Simplify promise
PR #2222 - Replace last uses of boost::function by util::function_nonser
PR #2221 - Fix config tests
PR #2220 - Fixing gcc 4.6 compilation issues
PR #2219 - nullptr support for
[unique_]functionPR #2218 - Introducing clang tidy
PR #2216 - Replace NULL with nullptr
Issue #2214 - Let inspect flag use of NULL, suggest nullptr instead
PR #2213 - Require support for nullptr
PR #2212 - Properly find jemalloc through pkg-config
PR #2211 - Disable a couple of warnings reported by Intel on Windows
PR #2210 - Fixed host::block_allocator::bulk_construct
PR #2209 - Started to clean up new sort algorithms, made things compile for sort_by_key
PR #2208 - A couple of fixes that were exposed by a new sort algorithm
PR #2207 - Adding missing includes in /hpx/include/serialization.hpp
PR #2206 - Call package_action::get_future before package_action::apply
PR #2205 - The indirect_packaged_task::operator() needs to be run on a HPX thread
PR #2204 - Variadic executor parameters
PR #2203 - Delay-initialize members of partitioned iterator
PR #2202 - Added segmented fill for hpx::vector
Issue #2201 - Null Thread id encountered on partitioned_vector
PR #2200 - Fix hangs
PR #2199 - Deprecating hpx/traits.hpp
PR #2198 - Making explicit inclusion of external libraries into build
PR #2197 - Fix typo in QT CMakeLists
PR #2196 - Fixing a gcc warning about attributes being ignored
PR #2194 - Fixing partitioned_vector_spmd_foreach example
Issue #2193 - partitioned_vector_spmd_foreach seg faults
PR #2192 - Support Boost.Thread v4
PR #2191 - HPX.Compute prototype
PR #2190 - Spawning operation on new thread if remaining stack space becomes too small
PR #2189 - Adding callback taking index and future to when_each
PR #2188 - Adding new example demonstrating receive_buffer
PR #2187 - Mask 128-bit ints if CUDA is being used
PR #2186 - Make startup & shutdown functions unique_function
PR #2185 - Fixing logging output not to cause hang on shutdown
PR #2184 - Allowing component clients as action return types
Issue #2183 - Enabling logging output causes hang on shutdown
Issue #2182 - 1d_stencil seg fault
Issue #2181 - Setting small stack size does not change default
PR #2180 - Changing default bind mode to balanced
PR #2179 - adding prefetching_iterator and related tests used for prefetching containers within lambda functions
PR #2177 - Fixing 2176
Issue #2176 - Launch process test fails on OSX
PR #2175 - Fix unbalanced config/warnings includes, add some new ones
PR #2174 - Fix test categorization : regression not unit
Issue #2172 - Different performance results
Issue #2171 - “negative entry in reference count table” running octotiger on 32 nodes on queenbee
Issue #2170 - Error while compiling on Mac + boost 1.60
PR #2168 - Fixing problems with is_bitwise_serializable
Issue #2167 - startup & shutdown function should accept unique_function
Issue #2166 - Simple receive_buffer example
PR #2165 - Fix wait all
PR #2164 - Fix wait all
PR #2163 - Fix some typos in config tests
PR #2162 - Improve #includes
PR #2160 - Add inspect check for missing #include <list>
PR #2159 - Add missing finalize call to stop test hanging
PR #2158 - Algo fixes
PR #2157 - Stack check
Issue #2156 - OSX reports stack space incorrectly (generic context coroutines)
Issue #2155 - Race condition suspected in runtime
PR #2154 - Replace boost::detail::atomic_count with the new util::atomic_count
PR #2153 - Fix stack overflow on OSX
PR #2152 - Define is_bitwise_serializable as is_trivially_copyable when available
PR #2151 - Adding missing <cstring> for std::mem* functions
Issue #2150 - Unable to use component clients as action return types
PR #2149 - std::memmove copies bytes, use bytes*sizeof(type) when copying larger types
PR #2146 - Adding customization point for parallel copy/move
PR #2145 - Applying changes to address warnings issued by latest version of PVS Studio
Issue #2148 - hpx::parallel::copy is broken after trivially copyable changes
PR #2144 - Some minor tweaks to compute prototype
PR #2143 - Added Boost version support information over OSX platform
PR #2142 - Fixing memory leak in example
PR #2141 - Add missing specializations in execution policies
PR #2139 - This PR fixes a few problems reported by Clang’s Undefined Behavior sanitizer
PR #2138 - Revert “Adding fedora docs”
PR #2136 - Removed double semicolon
PR #2135 - Add deprecated #include check for hpx_fwd.hpp
PR #2134 - Resolved memory leak in stencil_8
PR #2133 - Replace uses of boost pointer containers
PR #2132 - Removing unused typedef
PR #2131 - Add several include checks for std facilities
PR #2130 - Fixing parcel compression, adding test
PR #2129 - Fix invalid attribute warnings
Issue #2128 - hpx::init seems to segfault
PR #2127 - Making executor_traits N-nary
PR #2126 - GCC 4.6 fails to deduce the correct type in lambda
PR #2125 - Making parcel coalescing test actually test something
Issue #2124 - Make a testcase for parcel compression
Issue #2123 - hpx/hpx/runtime/applier_fwd.hpp - Multiple defined types
Issue #2122 - Exception in primary_namespace::resolve_free_list
Issue #2121 - Possible memory leak in 1d_stencil_8
PR #2120 - Fixing 2119
Issue #2119 - reduce_by_key compilation problems
Issue #2118 - Premature unwrapping of boost::ref’ed arguments
PR #2117 - Added missing initializer on last constructor for thread_description
PR #2116 - Use a lightweight bind implementation when no placeholders are given
PR #2115 - Replace boost::shared_ptr with std::shared_ptr
PR #2114 - Adding hook functions for executor_parameter_traits supporting timers
Issue #2113 - Compilation error with gcc version 4.9.3 (MacPorts gcc49 4.9.3_0)
PR #2112 - Replace uses of safe_bool with explicit operator bool
Issue #2111 - Compilation error on QT example
Issue #2110 - Compilation error when passing non-future argument to unwrapped continuation in dataflow
Issue #2109 - Warning while compiling hpx
Issue #2109 - Stack trace of last bug causing issues with octotiger
Issue #2108 - Stack trace of last bug causing issues with octotiger
PR #2107 - Making sure that a missing parcel_coalescing module does not cause startup exceptions
PR #2106 - Stop using hpx_fwd.hpp
Issue #2105 - coalescing plugin handler is not optional any more
Issue #2104 - Make executor_traits N-nary
Issue #2103 - Build error with octotiger and hpx commit e657426d
PR #2102 - Combining thread data storage
PR #2101 - Added repartition version of 1d stencil that uses any performance counter
PR #2100 - Drop obsolete TR1 result_of protocol
PR #2099 - Replace uses of boost::bind with util::bind
PR #2098 - Deprecated inspect checks
PR #2097 - Reduce by key, extends #1141
PR #2096 - Moving local cache from external to hpx/util
PR #2095 - Bump minimum required Boost to 1.50.0
PR #2094 - Add include checks for several Boost utilities
Issue #2093 - /…/local_cache.hpp(89): error #303: explicit type is missing (“int” assumed)
PR #2091 - Fix for Raspberry pi build
PR #2090 - Fix storage size for util::function<>
PR #2089 - Fix #2088
Issue #2088 - More verbose output from cmake configuration
PR #2087 - Making sure init_globally always executes hpx_main
Issue #2086 - Race condition with recent HPX
PR #2085 - Adding #include checker
PR #2084 - Replace boost lock types with standard library ones
PR #2083 - Simplify packaged task
PR #2082 - Updating APEX version for testing
PR #2081 - Cleanup exception headers
PR #2080 - Make call_once variadic
Issue #2079 - With GNU C++, line 85 of hpx/config/version.hpp causes link failure when linking application
Issue #2078 - Simple test fails with _GLIBCXX_DEBUG defined
PR #2077 - Instantiate board in nqueen client
PR #2076 - Moving coalescing registration to TUs
PR #2075 - Fixed some documentation typos
PR #2074 - Adding flush-mode to message handler flush
PR #2073 - Fixing performance regression introduced lately
PR #2072 - Refactor local::condition_variable
PR #2071 - Timer based on boost::asio::deadline_timer
PR #2070 - Refactor tuple based functionality
PR #2069 - Fixed typos
Issue #2068 - Seg fault with octotiger
PR #2067 - Algorithm cleanup
PR #2066 - Split credit fixes
PR #2065 - Rename HPX_MOVABLE_BUT_NOT_COPYABLE to HPX_MOVABLE_ONLY
PR #2064 - Fixed some typos in docs
PR #2063 - Adding example demonstrating template components
Issue #2062 - Support component templates
PR #2061 - Replace some uses of lexical_cast<string> with C++11 std::to_string
PR #2060 - Replace uses of boost::noncopyable with HPX_NON_COPYABLE
PR #2059 - Adding missing for_loop algorithms
PR #2058 - Move several definitions to more appropriate headers
PR #2057 - Simplify assert_owns_lock and ignore_while_checking
PR #2056 - Replacing std::result_of with util::result_of
PR #2055 - Fix process launching/connecting back
PR #2054 - Add a forwarding coroutine header
PR #2053 - Replace uses of boost::unordered_map with std::unordered_map
PR #2052 - Rewrite tuple unwrap
PR #2050 - Replace uses of BOOST_SCOPED_ENUM with C++11 scoped enums
PR #2049 - Attempt to narrow down split_credit problem
PR #2048 - Fixing gcc startup hangs
PR #2047 - Fixing when_xxx and wait_xxx for MSVC12
PR #2046 - adding persistent_auto_chunk_size and related tests for for_each
PR #2045 - Fixing HPX_HAVE_THREAD_BACKTRACE_DEPTH build time configuration
PR #2044 - Adding missing service executor types
PR #2043 - Removing ambiguous definitions for is_future_range and future_range_traits
PR #2042 - Clarify that HPX builds can use (much) more than 2GB per process
PR #2041 - Changing future_iterator_traits to support pointers
Issue #2040 - Improve documentation memory usage warning?
PR #2039 - Coroutine cleanup
PR #2038 - Fix cmake policy CMP0042 warning MACOSX_RPATH
PR #2037 - Avoid redundant specialization of [unique_]function_nonser
PR #2036 - nvcc dies with an internal error upon pushing/popping warnings inside templates
Issue #2035 - Use a less restrictive iterator definition in hpx::lcos::detail::future_iterator_traits
PR #2034 - Fixing compilation error with thread queue wait time performance counter
Issue #2033 - Compilation error when compiling with thread queue waittime performance counter
Issue #2032 - Ambiguous template instantiation for is_future_range and future_range_traits.
PR #2031 - Don’t restart timer on every incoming parcel
PR #2030 - Unify handling of execution policies in parallel algorithms
PR #2029 - Make pkg-config .pc files use .dylib on OSX
PR #2028 - Adding process component
PR #2027 - Making check for compiler compatibility independent on compiler path
PR #2025 - Fixing inspect tool
PR #2024 - Intel13 removal
PR #2023 - Fix errors related to older boost versions and parameter pack expansions in lambdas
Issue #2022 - gmake fail: “No rule to make target /usr/lib46/libboost_context-mt.so”
PR #2021 - Added Sudoku example
Issue #2020 - Make errors related to init_globally.cpp example while building HPX out of the box
PR #2019 - Fixed some compilation and cmake errors encountered in nqueen example
PR #2018 - For loop algorithms
PR #2017 - Non-recursive at_index implementation
Issue #2016 - Add index-based for-loops
Issue #2015 - Change default bind-mode to balanced
PR #2014 - Fixed dataflow if invoked action returns a future
PR #2013 - Fixing compilation issues with external example
PR #2012 - Added Sierpinski Triangle example
Issue #2011 - Compilation error while running sample hello_world_component code
PR #2010 - Segmented move implemented for hpx::vector
Issue #2009 - pkg-config order incorrect on 14.04 / GCC 4.8
Issue #2008 - Compilation error in dataflow of action returning a future
PR #2007 - Adding new performance counter exposing overall scheduler time
PR #2006 - Function includes
PR #2005 - Adding an example demonstrating how to initialize HPX from a global object
PR #2004 - Fixing 2000
PR #2003 - Adding generation parameter to gather to enable using it more than once
PR #2002 - Turn on position independent code to solve link problem with hpx_init
Issue #2001 - Gathering more than once segfaults
Issue #2000 - Undefined reference to hpx::assertion_failed
Issue #1999 - Seg fault in hpx::lcos::base_lco_with_value<*>::set_value_nonvirt() when running octo-tiger
PR #1998 - Detect unknown command line options
PR #1997 - Extending thread description
PR #1996 - Adding natvis files to solution (MSVC only)
Issue #1995 - Command line handling does not produce error
PR #1994 - Possible missing include in test_utils.hpp
PR #1993 - Add missing LANGUAGES tag to a hpx_add_compile_flag_if_available() call in CMakeLists.txt
PR #1992 - Fixing shared_executor_test
PR #1991 - Making sure the winsock library is properly initialized
PR #1990 - Fixing bind_test placeholder ambiguity coming from boost-1.60
PR #1989 - Performance tuning
PR #1987 - Make configurable size of internal storage in util::function
PR #1986 - AGAS Refactoring+1753 Cache mods
PR #1985 - Adding missing task_block::run() overload taking an executor
PR #1984 - Adding an optimized LRU Cache implementation (for AGAS)
PR #1983 - Avoid invoking migration table look up for all objects
PR #1981 - Replacing uintptr_t (which is not defined everywhere) with std::size_t
PR #1980 - Optimizing LCO continuations
PR #1979 - Fixing Cori
PR #1978 - Fix test check that got broken in hasty fix to memory overflow
PR #1977 - Refactor action traits
PR #1976 - Fixes typo in README.rst
PR #1975 - Reduce size of benchmark timing arrays to fix test failures
PR #1974 - Add action to update data owned by the partitioned_vector component
PR #1972 - Adding partitioned_vector SPMD example
PR #1971 - Fixing 1965
PR #1970 - Papi fixes
PR #1969 - Fixing continuation recursions to not depend on fixed amount of recursions
PR #1968 - More segmented algorithms
Issue #1967 - Simplify component implementations
PR #1966 - Migrate components
Issue #1964 - fatal error: ‘boost/lockfree/detail/branch_hints.hpp’ file not found
Issue #1962 - parallel:copy_if has race condition when used on in place arrays
PR #1963 - Fixing Static Parcelport initialization
PR #1961 - Fix function target
Issue #1960 - Papi counters don’t reset
PR #1959 - Fixing 1958
Issue #1958 - inclusive_scan gives incorrect results with non-commutative operator
PR #1957 - Fixing #1950
PR #1956 - Sort by key example
PR #1955 - Adding regression test for #1946: Hang in wait_all() in distributed run
Issue #1954 - HPX releases should not use -Werror
PR #1953 - Adding performance analysis for AGAS cache
PR #1952 - Adapting test for explicit variadics to fail for gcc 4.6
PR #1951 - Fixing memory leak
Issue #1950 - Simplify external builds
PR #1949 - Fixing yet another lock that is being held during suspension
PR #1948 - Fixed container algorithms for Intel
PR #1947 - Adding workaround for tagged_tuple
Issue #1946 - Hang in wait_all() in distributed run
PR #1945 - Fixed container algorithm tests
Issue #1944 - assertion ‘p.destination_locality() == hpx::get_locality()’ failed
PR #1943 - Fix a couple of compile errors with clang
PR #1942 - Making parcel coalescing functional
Issue #1941 - Re-enable parcel coalescing
PR #1940 - Touching up make_future
PR #1939 - Fixing problems in over-subscription management in the resource manager
PR #1938 - Removing use of unified Boost.Thread header
PR #1937 - Cleaning up the use of Boost.Accumulator headers
PR #1936 - Making sure interval timer is started for aggregating performance counters
PR #1935 - Tagged results
PR #1934 - Fix remote async with deferred launch policy
Issue #1933 - Floating point exception in
statistics_counter<boost::accumulators::tag::mean>::get_counter_valuePR #1932 - Removing superfluous includes of boost/lockfree/detail/branch_hints.hpp
PR #1931 - fix compilation with clang 3.8.0
Issue #1930 - Missing online documentation for HPX 0.9.11
PR #1929 - LWG2485: get() should be overloaded for const tuple&&
PR #1928 - Revert “Using ninja for circle-ci builds”
PR #1927 - Using ninja for circle-ci builds
PR #1926 - Fixing serialization of std::array
Issue #1925 - Issues with static HPX libraries
Issue #1924 - Performance degrading over time
Issue #1923 - serialization of std::array appears broken in latest commit
PR #1922 - Container algorithms
PR #1921 - Tons of smaller quality improvements
Issue #1920 - Seg fault in hpx::serialization::output_archive::add_gid when running octotiger
Issue #1919 - Intel 15 compiler bug preventing HPX build
PR #1918 - Address sanitizer fixes
PR #1917 - Fixing compilation problems of parallel::sort with Intel compilers
PR #1916 - Making sure code compiles if HPX_WITH_HWLOC=Off
Issue #1915 - max_cores undefined if HPX_WITH_HWLOC=Off
PR #1913 - Add utility member functions for partitioned_vector
PR #1912 - Adding support for invoking actions to dataflow
PR #1911 - Adding first batch of container algorithms
PR #1910 - Keep cmake_module_path
PR #1909 - Fix mpirun with pbs
PR #1908 - Changing parallel::sort to return the last iterator as proposed by N4560
PR #1907 - Adding a minimum version for Open MPI
PR #1906 - Updates to the Release Procedure
PR #1905 - Fixing #1903
PR #1904 - Making sure std containers are cleared before serialization loads data
Issue #1903 - When running octotiger, I get: assertion
'(*new_gids_)[gid].size() == 1' failed: HPX(assertion_failure)Issue #1902 - Immediate crash when running hpx/octotiger with _GLIBCXX_DEBUG defined.
PR #1901 - Making non-serializable classes non-serializable
Issue #1900 - Two possible issues with std::list serialization
PR #1899 - Fixing a problem with credit splitting as revealed by #1898
Issue #1898 - Accessing component from locality where it was not created segfaults
PR #1897 - Changing parallel::sort to return the last iterator as proposed by N4560
Issue #1896 - version 1.0?
Issue #1895 - Warning comment on numa_allocator is not very clear
PR #1894 - Add support for compilers that have thread_local
PR #1893 - Fixing 1890
PR #1892 - Adds typed future_type for executor_traits
PR #1891 - Fix wording in certain parallel algorithm docs
Issue #1890 - Invoking papi counters give segfault
PR #1889 - Fixing problems as reported by clang-check
PR #1888 - WIP parallel is_heap
PR #1887 - Fixed resetting performance counters related to idle-rate, etc
Issue #1886 - Run hpx with qsub does not work
PR #1885 - Warning cleaning pass
PR #1884 - Add missing parallel algorithm header
PR #1883 - Add feature test for thread_local on Clang for TLS
PR #1882 - Fix some redundant qualifiers
Issue #1881 - Unable to compile Octotiger using HPX and Intel MPI on SuperMIC
Issue #1880 - clang with libc++ on Linux needs TLS case
PR #1879 - Doc fixes for #1868
PR #1878 - Simplify functions
PR #1877 - Removing most usage of Boost.Config
PR #1876 - Add missing parallel algorithms to algorithm.hpp
PR #1875 - Simplify callables
PR #1874 - Address long standing FIXME on using
std::unique_ptrwith incomplete typesPR #1873 - Fixing 1871
PR #1872 - Making sure PBS environment uses specified node list even if no PBS_NODEFILE env is available
Issue #1871 - Fortran checks should be optional
PR #1870 - Touch local::mutex
PR #1869 - Documentation refactoring based off #1868
PR #1867 - Embrace static_assert
PR #1866 - Fix #1803 with documentation refactoring
PR #1865 - Setting OUTPUT_NAME as target properties
PR #1863 - Use SYSTEM for boost includes
PR #1862 - Minor cleanups
PR #1861 - Minor Corrections for Release
PR #1860 - Fixing hpx gdb script
Issue #1859 - reset_active_counters resets times and thread counts before some of the counters are evaluated
PR #1858 - Release V0.9.11
PR #1857 - removing diskperf example from 9.11 release
PR #1856 - fix return in packaged_task_base::reset()
Issue #1842 - Install error: file INSTALL cannot find libhpx_parcel_coalescing.so.0.9.11
PR #1839 - Adding fedora docs
PR #1824 - Changing version on master to V0.9.12
PR #1818 - Fixing #1748
Issue #1815 - seg fault in AGAS
Issue #1803 - wait_all documentation
Issue #1796 - Outdated documentation to be revised
Issue #1759 - glibc munmap_chunk or free(): invalid pointer on SuperMIC
Issue #1753 - HPX performance degrades with time since execution begins
Issue #1748 - All public HPX headers need to be self contained
PR #1719 - How to build HPX with Visual Studio
Issue #1684 - Race condition when using –hpx:connect?
PR #1658 - Add serialization for std::set (as there is for std::vector and std::map)
PR #1641 - Generic client
Issue #1632 - heartbeat example fails on separate nodes
PR #1603 - Adds preferred namespace check to inspect tool
Issue #1559 - Extend inspect tool
Issue #1523 - Remote async with deferred launch policy never executes
Issue #1472 - Serialization issues
Issue #1457 - Implement N4392: C++ Latches and Barriers
PR #1444 - Enabling usage of moveonly types for component construction
Issue #1407 - The Intel 13 compiler has failing unit tests
Issue #1405 - Allow component constructors to take movable only types
Issue #1265 - Enable dataflow() to be usable with actions
Issue #1236 - NUMA aware allocators
Issue #802 - Fix Broken Examples
Issue #559 - Add hpx::migrate facility
Issue #449 - Make actions with template arguments usable and add documentation
Issue #279 - Refactor addressing_service into a base class and two derived classes
Issue #224 - Changing thread state metadata is not thread safe
Issue #55 - Uniform syntax for enums should be implemented
HPX V0.9.11 (Nov 11, 2015)#
Our main focus for this release was the design and development of a coherent set
of higher-level APIs exposing various types of parallelism to the application
programmer. We introduced the concepts of an executor, which can be used to
customize the where and when of execution of tasks in the context of
parallelizing codes. We extended all APIs related to managing parallel tasks to
support executors which gives the user the choce of either using one of the
predefined executor types or to provide its own, possibly application specific,
executor. We paid very close attention to align all of these changes with the
existing C++ Standards documents or with the ongoing proposals for
standardization.
This release is the first after our change to a new development policy. We
switched all development to be strictly performed on branches only, all direct
commits to our main branch (master) are prohibited. Any change has to go
through a peer review before it will be merged to master. As a result the
overall stability of our code base has significantly increased, the development
process itself has been simplified. This change manifests itself in a large
number of pull-requests which have been merged (please see below for a full list
of closed issues and pull-requests). All in all for this release, we closed
almost 100 issues and merged over 290 pull-requests. There have been over 1600
commits to the master branch since the last release.
General changes#
We are moving into the direction of unifying managed and simple components. As such, the classes
hpx::components::componentandhpx::components::component_basehave been added which currently just forward to the currently existing simple component facilities. The examples have been converted to only use those two classes.Added integration with the CircleCI hosted continuous integration service. This gives us constant and immediate feedback on the health of our master branch.
The compiler configuration subsystem in the build system has been reimplemented. Instead of using Boost.Config we now use our own lightweight set of cmake scripts to determine the available language and library features supported by the used compiler.
The API for creating instances of components has been consolidated. All component instances should be created using the
hpx::new_only. It allows one to instantiate both, single component instances and multiple component instances. The placement of the created components can be controlled by special distribution policies. Please see the corresponding documentation outlining the use ofhpx::new_.Introduced four new distribution policies which can be used with many API functions which traditionally expected to be used with a locality id. The new distribution policies are:
hpx::components::default_distribution_policywhich tries to place multiple component instances as evenly as possible.hpx::components::colocating_distribution_policywhich will refer to the locality where a given component instance is currently placed.hpx::components::binpacking_distribution_policywhich will place multiple component instances as evenly as possible based on any performance counter.hpx::components::target_distribution_policywhich allows one to represent a given locality in the context of a distrwibution policy.
The new distribution policies can now be also used with
hpx::async. This change also deprecateshpx::async_colocated(id, ...)which now is replaced by a distribution policy:hpx::async(hpx::colocated(id), ...).The
hpx::vectorandhpx::unordered_mapdata structures can now be used with the new distribution policies as well.The parallel facility
hpx::parallel::task_regionhas been renamed tohpx::parallel::task_blockbased on the changes in the corresponding standardization proposal N4411.Added extensions to the parallel facility
hpx::parallel::task_blockallowing to combine a task_block with an execution policy. This implies a minor breaking change as thehpx::parallel::task_blockis now a template.Added new LCOs:
hpx::lcos::latchandhpx::lcos::local::latchwhich semantically conform to the proposedstd::latch(see N4399).Added performance counters exposing data related to data transferred by input/output (filesystem) operations (thanks to Maciej Brodowicz).
Added performance counters allowing to track the number of action invocations (local and remote invocations).
Added new command line options –hpx:print-counter-at and –hpx:reset-counters.
The
hpx::vectorcomponent has been renamed tohpx::partitioned_vectorto make it explicit that the underlying memory is not contiguous.Introduced a completely new and uniform higher-level parallelism API which is based on executors. All existing parallelism APIs have been adapted to this. We have added a large number of different executor types, such as a numa-aware executor, a this-thread executor, etc.
Added support for the MingW toolchain on Windows (thanks to Eric Lemanissier).
HPX now includes support for APEX, (Autonomic Performance Environment for eXascale). APEX is an instrumentation and software adaptation library that provides an interface to TAU profiling / tracing as well as runtime adaptation of HPX applications through policy definitions. For more information and documentation, please see UO-OACISS/xpress-apex. To enable APEX at configuration time, specify
-DHPX_WITH_APEX=On. To also include support for TAU profiling, specify-DHPX_WITH_TAU=Onand specify the-DTAU_ROOT,-DTAU_ARCHand-DTAU_OPTIONScmake parameters.We have implemented many more of the Using parallel algorithms. Please see Issue #1141 for the list of all available parallel algorithms (thanks to Daniel Bourgeois and John Biddiscombe for contributing their work).
Breaking changes#
We are moving into the direction of unifying managed and simple components. In order to stop exposing the old facilities, all examples have been converted to use the new classes. The breaking change in this release is that performance counters are now a
hpx::components::component_baseinstead ofhpx::components::managed_component_base.We removed the support for stackless threads. It turned out that there was no performance benefit when using stackless threads. As such, we decided to clean up our codebase. This feature was not documented.
The CMake project name has changed from ‘hpx’ to ‘HPX’ for consistency and compatibility with naming conventions and other CMake projects. Generated config files go into <prefix>/lib/cmake/HPX and not <prefix>/lib/cmake/hpx.
The macro
HPX_REGISTER_MINIMAL_COMPONENT_FACTORYhas been deprecated. Please useHPX_REGISTER_COMPONENT. instead. The old macro will be removed in the next release.The obsolete distributing_factory and binpacking_factory components have been removed. The corresponding functionality is now provided by the
hpx::new_API function in conjunction with thehpx::default_layoutandhpx::binpackingdistribution policies (hpx::components::default_distribution_policyandhpx::components::binpacking_distribution_policy)The API function
hpx::new_colocatedhas been deprecated. Please use the consolidated APIhpx::new_in conjunction with the newhpx::colocateddistribution policy (hpx::components::colocating_distribution_policy) instead. The old API function will still be available for at least one release of HPX if the configuration variableHPX_WITH_COLOCATED_BACKWARDS_COMPATIBILITYis enabled.The API function
hpx::async_colocatedhas been deprecated. Please use the consolidated APIhpx::asyncin conjunction with the newhpx::colocateddistribution policy (hpx::components::colocating_distribution_policy) instead. The old API function will still be available for at least one release of HPX if the configuration variableHPX_WITH_COLOCATED_BACKWARDS_COMPATIBILITYis enabled.The obsolete remote_object component has been removed.
Replaced the use of Boost.Serialization with our own solution. While the new version is mostly compatible with Boost.Serialization, this change requires some minor code modifications in user code. For more information, please see the corresponding announcement on the hpx-users@stellar.cct.lsu.edu mailing list.
The names used by cmake to influence various configuration options have been unified. The new naming scheme relies on all configuration constants to start with
HPX_WITH_..., while the preprocessor constant which is used at build time starts withHPX_HAVE_.... For instance, the former cmake command line-DHPX_MALLOC=...now has to be specified a-DHPX_WITH_MALLOC=...and will cause the preprocessor constantHPX_HAVE_MALLOCto be defined. The actual name of the constant (i.e.MALLOC) has not changed. Please see the corresponding documentation for more details (CMake options).The
get_gid()functions exposed by the component base classeshpx::components::server::simple_component_base,hpx::components::server::managed_component_base, andhpx::components::server::fixed_component_basehave been replaced by two new functions:get_unmanaged_id()andget_id(). To enable the old function name for backwards compatibility, use the cmake configuration optionHPX_WITH_COMPONENT_GET_GID_COMPATIBILITY=On.All functions which were named
get_gid()but were returninghpx::id_typehave been renamed toget_id(). To enable the old function names for backwards compatibility, use the cmake configuration optionHPX_WITH_COMPONENT_GET_GID_COMPATIBILITY=On.
Bug fixes (closed tickets)#
Here is a list of the important tickets we closed for this release.
PR #1855 - Completely removing external/endian
PR #1854 - Don’t pollute CMAKE_CXX_FLAGS through find_package()
PR #1853 - Updating CMake configuration to get correct version of TAU library
PR #1852 - Fixing Performance Problems with MPI Parcelport
PR #1851 - Fixing hpx_add_link_flag() and hpx_remove_link_flag()
PR #1850 - Fixing 1836, adding parallel::sort
PR #1849 - Fixing configuration for use of more than 64 cores
PR #1848 - Change default APEX version for release
PR #1847 - Fix client_base::then on release
PR #1846 - Removing broken lcos::local::channel from release
PR #1845 - Adding example demonstrating a possible safe-object implementation to release
PR #1844 - Removing stubs from accumulator examples
PR #1843 - Don’t pollute CMAKE_CXX_FLAGS through find_package()
PR #1841 - Fixing client_base<>::then
PR #1840 - Adding example demonstrating a possible safe-object implementation
PR #1838 - Update version rc1
PR #1837 - Removing broken lcos::local::channel
PR #1835 - Adding explicit move constructor and assignment operator to hpx::lcos::promise
PR #1834 - Making hpx::lcos::promise move-only
PR #1833 - Adding fedora docs
Issue #1832 - hpx::lcos::promise<> must be move-only
PR #1831 - Fixing resource manager gcc5.2
PR #1830 - Fix intel13
PR #1829 - Unbreaking thread test
PR #1828 - Fixing #1620
PR #1827 - Fixing a memory management issue for the Parquet application
Issue #1826 - Memory management issue in hpx::lcos::promise
PR #1825 - Adding hpx::components::component and hpx::components::component_base
PR #1823 - Adding git commit id to circleci build
PR #1822 - applying fixes suggested by clang 3.7
PR #1821 - Hyperlink fixes
PR #1820 - added parallel multi-locality sanity test
PR #1819 - Fixing #1667
Issue #1817 - Hyperlinks generated by inspect tool are wrong
PR #1816 - Support hpxrx
PR #1814 - Fix async to dispatch to the correct locality in all cases
Issue #1813 - async(launch::…, action(), …) always invokes locally
PR #1812 - fixed syntax error in CMakeLists.txt
PR #1811 - Agas optimizations
PR #1810 - drop superfluous typedefs
PR #1809 - Allow HPX to be used as an optional package in 3rd party code
PR #1808 - Fixing #1723
PR #1807 - Making sure resolve_localities does not hang during normal operation
Issue #1806 - Spinlock no longer movable and deletes operator ‘=’, breaks MiniGhost
Issue #1804 - register_with_basename causes hangs
PR #1801 - Enhanced the inspect tool to take user directly to the problem with hyperlinks
Issue #1800 - Problems compiling application on smic
PR #1799 - Fixing cv exceptions
PR #1798 - Documentation refactoring & updating
PR #1797 - Updating the activeharmony CMake module
PR #1795 - Fixing cv
PR #1794 - Fix connect with hpx::runtime_mode_connect
PR #1793 - fix a wrong use of HPX_MAX_CPU_COUNT instead of HPX_HAVE_MAX_CPU_COUNT
PR #1792 - Allow for default constructed parcel instances to be moved
PR #1791 - Fix connect with hpx::runtime_mode_connect
Issue #1790 - assertion
action_.get()failed: HPX(assertion_failure) when running Octotiger with pull request 1786PR #1789 - Fixing discover_counter_types API function
Issue #1788 - connect with hpx::runtime_mode_connect
Issue #1787 - discover_counter_types not working
PR #1786 - Changing addressing_service to use std::unordered_map instead of std::map
PR #1785 - Fix is_iterator for container algorithms
PR #1784 - Adding new command line options:
PR #1783 - Minor changes for APEX support
PR #1782 - Drop legacy forwarding action traits
PR #1781 - Attempt to resolve the race between cv::wait_xxx and cv::notify_all
PR #1780 - Removing serialize_sequence
PR #1779 - Fixed #1501: hwloc configuration options are wrong for MIC
PR #1778 - Removing ability to enable/disable parcel handling
PR #1777 - Completely removing stackless threads
PR #1776 - Cleaning up util/plugin
PR #1775 - Agas fixes
PR #1774 - Action invocation count
PR #1773 - replaced MSVC variable with WIN32
PR #1772 - Fixing Problems in MPI parcelport and future serialization.
PR #1771 - Fixing intel 13 compiler errors related to variadic template template parameters for
lcos::when_testsPR #1770 - Forwarding decay to
std::PR #1769 - Add more characters with special regex meaning to the existing patch
PR #1768 - Adding test for receive_buffer
PR #1767 - Making sure that uptime counter throws exception on any attempt to be reset
PR #1766 - Cleaning up code related to throttling scheduler
PR #1765 - Restricting thread_data to creating only with intrusive_pointers
PR #1764 - Fixing 1763
Issue #1763 - UB in thread_data::operator delete
PR #1762 - Making sure all serialization registries/factories are unique
PR #1761 - Fixed #1751: hpx::future::wait_for fails a simple test
PR #1758 - Fixing #1757
Issue #1757 - pinning not correct using –hpx:bind
Issue #1756 - compilation error with MinGW
PR #1755 - Making output serialization const-correct
Issue #1753 - HPX performance degrades with time since execution begins
Issue #1752 - Error in AGAS
Issue #1751 - hpx::future::wait_for fails a simple test
PR #1750 - Removing hpx_fwd.hpp includes
PR #1749 - Simplify result_of and friends
PR #1747 - Removed superfluous code from message_buffer.hpp
PR #1746 - Tuple dependencies
Issue #1745 - Broken when_some which takes iterators
PR #1744 - Refining archive interface
PR #1743 - Fixing when_all when only a single future is passed
PR #1742 - Config includes
PR #1741 - Os executors
Issue #1740 - hpx::promise has some problems
PR #1739 - Parallel composition with generic containers
Issue #1738 - After building program and successfully linking to a version of hpx DHPX_DIR seems to be ignored
Issue #1737 - Uptime problems
PR #1736 - added convenience c-tor and begin()/end() to serialize_buffer
PR #1735 - Config includes
PR #1734 - Fixed #1688: Add timer counters for tfunc_total and exec_total
Issue #1733 - Add unit test for hpx/lcos/local/receive_buffer.hpp
PR #1732 - Renaming get_os_thread_count
PR #1731 - Basename registration
Issue #1730 - Use after move of thread_init_data
PR #1729 - Rewriting channel based on new gate component
PR #1728 - Fixing #1722
PR #1727 - Fixing compile problems with apply_colocated
PR #1726 - Apex integration
PR #1725 - fixed test timeouts
PR #1724 - Renaming vector
Issue #1723 - Drop support for intel compilers and gcc 4.4. based standard libs
Issue #1722 - Add support for detecting non-ready futures before serialization
PR #1721 - Unifying parallel executors, initializing from launch policy
PR #1720 - dropped superfluous typedef
Issue #1718 - Windows 10 x64, VS 2015 - Unknown CMake command “add_hpx_pseudo_target”.
PR #1717 - Timed executor traits for thread-executors
PR #1716 - serialization of arrays didn’t work with non-pod types. fixed
PR #1715 - List serialization
PR #1714 - changing misspellings
PR #1713 - Fixed distribution policy executors
PR #1712 - Moving library detection to be executed after feature tests
PR #1711 - Simplify parcel
PR #1710 - Compile only tests
PR #1709 - Implemented timed executors
PR #1708 - Implement parallel::executor_traits for thread-executors
PR #1707 - Various fixes to threads::executors to make custom schedulers work
PR #1706 - Command line option –hpx:cores does not work as expected
Issue #1705 - command line option –hpx:cores does not work as expected
PR #1704 - vector deserialization is speeded up a little
PR #1703 - Fixing shared_mutes
Issue #1702 - Shared_mutex does not compile with no_mutex cond_var
PR #1701 - Add distribution_policy_executor
PR #1700 - Executor parameters
PR #1699 - Readers writer lock
PR #1698 - Remove leftovers
PR #1697 - Fixing held locks
PR #1696 - Modified Scan Partitioner for Algorithms
PR #1695 - This thread executors
PR #1694 - Fixed #1688: Add timer counters for tfunc_total and exec_total
PR #1693 - Fix #1691: is_executor template specification fails for inherited executors
PR #1692 - Fixed #1662: Possible exception source in coalescing_message_handler
Issue #1691 - is_executor template specification fails for inherited executors
PR #1690 - added macro for non-intrusive serialization of classes without a default c-tor
PR #1689 - Replace value_or_error with custom storage, unify future_data state
Issue #1688 - Add timer counters for tfunc_total and exec_total
PR #1687 - Fixed interval timer
PR #1686 - Fixing cmake warnings about not existing pseudo target dependencies
PR #1685 - Converting partitioners to use bulk async execute
PR #1683 - Adds a tool for inspect that checks for character limits
PR #1682 - Change project name to (uppercase) HPX
PR #1681 - Counter shortnames
PR #1680 - Extended Non-intrusive Serialization to Ease Usage for Library Developers
PR #1679 - Working on 1544: More executor changes
PR #1678 - Transpose fixes
PR #1677 - Improve Boost compatibility check
PR #1676 - 1d stencil fix
Issue #1675 - hpx project name is not HPX
PR #1674 - Fixing the MPI parcelport
PR #1673 - added move semantics to map/vector deserialization
PR #1672 - Vs2015 await
PR #1671 - Adapt transform for #1668
PR #1670 - Started to work on #1668
PR #1669 - Add this_thread_executors
Issue #1667 - Apple build instructions in docs are out of date
PR #1666 - Apex integration
PR #1665 - Fixes an error with the whitespace check that showed the incorrect location of the error
Issue #1664 - Inspect tool found incorrect endline whitespace
PR #1663 - Improve use of locks
Issue #1662 - Possible exception source in coalescing_message_handler
PR #1661 - Added support for 128bit number serialization
PR #1660 - Serialization 128bits
PR #1659 - Implemented inner_product and adjacent_diff algos
PR #1658 - Add serialization for std::set (as there is for std::vector and std::map)
PR #1657 - Use of shared_ptr in io_service_pool changed to unique_ptr
Issue #1656 - 1d_stencil codes all have wrong factor
PR #1654 - When using runtime_mode_connect, find the correct localhost public ip address
PR #1653 - Fixing 1617
PR #1652 - Remove traits::action_may_require_id_splitting
PR #1651 - Fixed performance counters related to AGAS cache timings
PR #1650 - Remove leftovers of traits::type_size
PR #1649 - Shorten target names on Windows to shorten used path names
PR #1648 - Fixing problems introduced by merging #1623 for older compilers
PR #1647 - Simplify running automatic builds on Windows
Issue #1646 - Cache insert and update performance counters are broken
Issue #1644 - Remove leftovers of traits::type_size
Issue #1643 - Remove traits::action_may_require_id_splitting
PR #1642 - Adds spell checker to the inspect tool for qbk and doxygen comments
PR #1640 - First step towards fixing 688
PR #1639 - Re-apply remaining changes from limit_dataflow_recursion branch
PR #1638 - This fixes possible deadlock in the test ignore_while_locked_1485
PR #1637 - Fixing hpx::wait_all() invoked with two vector<future<T>>
PR #1636 - Partially re-apply changes from limit_dataflow_recursion branch
PR #1635 - Adding missing test for #1572
PR #1634 - Revert “Limit recursion-depth in dataflow to a configurable constant”
PR #1633 - Add command line option to ignore batch environment
PR #1631 - hpx::lcos::queue exhibits strange behavior
PR #1630 - Fixed endline_whitespace_check.cpp to detect lines with only whitespace
Issue #1629 - Inspect trailing whitespace checker problem
PR #1628 - Removed meaningless const qualifiers. Minor icpc fix.
PR #1627 - Fixing the queue LCO and add example demonstrating its use
PR #1626 - Deprecating get_gid(), add get_id() and get_unmanaged_id()
PR #1625 - Allowing to specify whether to send credits along with message
Issue #1624 - Lifetime issue
Issue #1623 - hpx::wait_all() invoked with two vector<future<T>> fails
PR #1622 - Executor partitioners
PR #1621 - Clean up coroutines implementation
Issue #1620 - Revert #1535
PR #1619 - Fix result type calculation for hpx::make_continuation
PR #1618 - Fixing RDTSC on Xeon/Phi
Issue #1617 - hpx cmake not working when run as a subproject
Issue #1616 - cmake problem resulting in RDTSC not working correctly for Xeon Phi creates very strange results for duration counters
Issue #1615 - hpx::make_continuation requires input and output to be the same
PR #1614 - Fixed remove copy test
Issue #1613 - Dataflow causes stack overflow
PR #1612 - Modified foreach partitioner to use bulk execute
PR #1611 - Limit recursion-depth in dataflow to a configurable constant
PR #1610 - Increase timeout for CircleCI
PR #1609 - Refactoring thread manager, mainly extracting thread pool
PR #1608 - Fixed running multiple localities without localities parameter
PR #1607 - More algorithm fixes to adjacentfind
Issue #1606 - Running without localities parameter binds to bogus port range
Issue #1605 - Too many serializations
PR #1604 - Changes the HPX image into a hyperlink
PR #1601 - Fixing problems with remove_copy algorithm tests
PR #1600 - Actions with ids cleanup
PR #1599 - Duplicate binding of global ids should fail
PR #1598 - Fixing array access
PR #1597 - Improved the reliability of connecting/disconnecting localities
Issue #1596 - Duplicate id binding should fail
PR #1595 - Fixing more cmake config constants
PR #1594 - Fixing preprocessor constant used to enable C++11 chrono
PR #1593 - Adding operator|() for hpx::launch
Issue #1592 - Error (typo) in the docs
Issue #1590 - CMake fails when CMAKE_BINARY_DIR contains ‘+’.
Issue #1589 - Disconnecting a locality results in segfault using heartbeat example
PR #1588 - Fix doc string for config option HPX_WITH_EXAMPLES
PR #1586 - Fixing 1493
PR #1585 - Additional Check for Inspect Tool to detect Endline Whitespace
Issue #1584 - Clean up coroutines implementation
PR #1583 - Adding a check for end line whitespace
PR #1582 - Attempt to fix assert firing after scheduling loop was exited
PR #1581 - Fixed adjacentfind_binary test
PR #1580 - Prevent some of the internal cmake lists from growing indefinitely
PR #1579 - Removing type_size trait, replacing it with special archive type
Issue #1578 - Remove demangle_helper
PR #1577 - Get ptr problems
Issue #1576 - Refactor async, dataflow, and future::then
PR #1575 - Fixing tests for parallel rotate
PR #1574 - Cleaning up schedulers
PR #1573 - Fixing thread pool executor
PR #1572 - Fixing number of configured localities
PR #1571 - Reimplement decay
PR #1570 - Refactoring async, apply, and dataflow APIs
PR #1569 - Changed range for mach-o library lookup
PR #1568 - Mark decltype support as required
PR #1567 - Removed const from algorithms
Issue #1566 - CMAKE Configuration Test Failures for clang 3.5 on debian
PR #1565 - Dylib support
PR #1564 - Converted partitioners and some algorithms to use executors
PR #1563 - Fix several #includes for Boost.Preprocessor
PR #1562 - Adding configuration option disabling/enabling all message handlers
PR #1561 - Removed all occurrences of boost::move replacing it with std::move
Issue #1560 - Leftover HPX_REGISTER_ACTION_DECLARATION_2
PR #1558 - Revisit async/apply SFINAE conditions
PR #1557 - Removing type_size trait, replacing it with special archive type
PR #1556 - Executor algorithms
PR #1555 - Remove the necessity to specify archive flags on the receiving end
PR #1554 - Removing obsolete Boost.Serialization macros
PR #1553 - Properly fix HPX_DEFINE_*_ACTION macros
PR #1552 - Fixed algorithms relying on copy_if implementation
PR #1551 - Pxfs - Modifying FindOrangeFS.cmake based on OrangeFS 2.9.X
Issue #1550 - Passing plain identifier inside HPX_DEFINE_PLAIN_ACTION_1
PR #1549 - Fixing intel14/libstdc++4.4
PR #1548 - Moving raw_ptr to detail namespace
PR #1547 - Adding support for executors to future.then
PR #1546 - Executor traits result types
PR #1545 - Integrate executors with dataflow
PR #1543 - Fix potential zero-copy for primarynamespace::bulk_service_async et.al.
PR #1542 - Merging HPX0.9.10 into pxfs branch
PR #1541 - Removed stale cmake tests, unused since the great cmake refactoring
PR #1540 - Fix idle-rate on platforms without TSC
PR #1539 - Reporting situation if zero-copy-serialization was performed by a parcel generated from a plain apply/async
PR #1538 - Changed return type of bulk executors and added test
Issue #1537 - Incorrect cpuid config tests
PR #1536 - Changed return type of bulk executors and added test
PR #1535 - Make sure promise::get_gid() can be called more than once
PR #1534 - Fixed async_callback with bound callback
PR #1533 - Updated the link in the documentation to a publically- accessible URL
PR #1532 - Make sure sync primitives are not copyable nor movable
PR #1531 - Fix unwrapped issue with future ranges of void type
PR #1530 - Serialization complex
Issue #1528 - Unwrapped issue with future<void>
Issue #1527 - HPX does not build with Boost 1.58.0
PR #1526 - Added support for boost.multi_array serialization
PR #1525 - Properly handle deferred futures, fixes #1506
PR #1524 - Making sure invalid action argument types generate clear error message
Issue #1522 - Need serialization support for boost multi array
Issue #1521 - Remote async and zero-copy serialization optimizations don’t play well together
PR #1520 - Fixing UB whil registering polymorphic classes for serialization
PR #1519 - Making detail::condition_variable safe to use
PR #1518 - Fix when_some bug missing indices in its result
Issue #1517 - Typo may affect CMake build system tests
PR #1516 - Fixing Posix context
PR #1515 - Fixing Posix context
PR #1514 - Correct problems with loading dynamic components
PR #1513 - Fixing intel glibc4 4
Issue #1508 - memory and papi counters do not work
Issue #1507 - Unrecognized Command Line Option Error causing exit status 0
Issue #1506 - Properly handle deferred futures
PR #1505 - Adding #include - would not compile without this
Issue #1502 -
boost::filesystem::existsthrows unexpected exceptionIssue #1501 - hwloc configuration options are wrong for MIC
PR #1504 - Making sure boost::filesystem::exists() does not throw
PR #1500 - Exit application on
--hpx:version/-vand--hpx:infoPR #1498 - Extended task block
PR #1497 - Unique ptr serialization
PR #1496 - Unique ptr serialization (closed)
PR #1495 - Switching circleci build type to debug
Issue #1494 -
--hpx:version/-vdoes not exit after printing version informationIssue #1493 - add an
hpx_prefix to libraries and components to avoid name conflictsIssue #1492 - Define and ensure limitations for arguments to async/apply
PR #1489 - Enable idle rate counter on demand
PR #1488 - Made sure
detail::condition_variablecan be safely destroyedPR #1487 - Introduced default (main) template implementation for
ignore_while_checkingPR #1486 - Add HPX inspect tool
Issue #1485 -
ignore_while_lockeddoesn’t support all Lockable typesPR #1484 - Docker image generation
PR #1483 - Move external endian library into HPX
PR #1482 - Actions with integer type ids
Issue #1481 - Sync primitives safe destruction
Issue #1480 - Move external/boost/endian into hpx/util
Issue #1478 - Boost inspect violations
PR #1479 - Adds serialization for arrays; some further/minor fixes
PR #1477 - Fixing problems with the Intel compiler using a GCC 4.4 std library
PR #1476 - Adding
hpx::lcos::latchandhpx::lcos::local::latchIssue #1475 - Boost inspect violations
PR #1473 - Fixing action move tests
Issue #1471 - Sync primitives should not be movable
PR #1470 - Removing
hpx::util::polymorphic_factoryPR #1468 - Fixed container creation
Issue #1467 - HPX application fail during finalization
Issue #1466 - HPX doesn’t pick up Torque’s nodefile on SuperMIC
Issue #1464 - HPX option for pre and post bootstrap performance counters
PR #1463 - Replacing
async_colocated(id, ...)withasync(colocated(id), ...)PR #1462 - Consolidated task_region with N4411
PR #1461 - Consolidate inconsistent CMake option names
Issue #1460 - Which malloc is actually used? or at least which one is HPX built with
Issue #1459 - Make cmake configure step fail explicitly if compiler version is not supported
Issue #1458 - Update
parallel::task_regionwith N4411PR #1456 - Consolidating
new_<>()Issue #1455 - Replace
async_colocated(id, ...)withasync(colocated(id), ...)PR #1454 - Removed harmful std::moves from return statements
PR #1453 - Use range-based for-loop instead of Boost.Foreach
PR #1452 - C++ feature tests
PR #1451 - When serializing, pass archive flags to traits::get_type_size
Issue #1450 - traits:get_type_size needs archive flags to enable zero_copy optimizations
Issue #1449 - “couldn’t create performance counter” - AGAS
Issue #1448 - Replace distributing factories with
new_<T[]>(...)PR #1447 - Removing obsolete remote_object component
PR #1446 - Hpx serialization
PR #1445 - Replacing travis with circleci
PR #1443 - Always stripping HPX command line arguments before executing start function
PR #1442 - Adding –hpx:bind=none to disable thread affinities
Issue #1439 - Libraries get linked in multiple times, RPATH is not properly set
PR #1438 - Removed superfluous typedefs
Issue #1437 -
hpx::init()should strip HPX-related flags from argvIssue #1436 - Add strong scaling option to htts
PR #1435 - Adding
async_cb,async_continue_cb, andasync_colocated_cbPR #1434 - Added missing install rule, removed some dead CMake code
PR #1433 - Add GitExternal and SubProject cmake scripts from eyescale/cmake repo
Issue #1432 - Add command line flag to disable thread pinning
PR #1431 - Fix #1423
Issue #1430 - Inconsistent CMake option names
Issue #1429 - Configure setting
HPX_HAVE_PARCELPORT_MPIis ignoredPR #1428 - Fixes #1419 (closed)
PR #1427 - Adding stencil_iterator and transform_iterator
PR #1426 - Fixes #1419
PR #1425 - During serialization memory allocation should honour allocator chunk size
Issue #1424 - chunk allocation during serialization does not use memory pool/allocator chunk size
Issue #1423 - Remove
HPX_STD_UNIQUE_PTRIssue #1422 - hpx:threads=all allocates too many os threads
PR #1420 - added .travis.yml
Issue #1419 - Unify enums:
hpx::runtime::stateandhpx::statePR #1416 - Adding travis builder
Issue #1414 - Correct directory for dispatch_gcc46.hpp iteration
Issue #1410 - Set operation algorithms
Issue #1389 - Parallel algorithms relying on scan partitioner break for small number of elements
Issue #1325 - Exceptions thrown during parcel handling are not handled correctly
Issue #1315 - Errors while running performance tests
Issue #1309 -
hpx::vectorpartitions are not easily extendable by applicationsPR #1300 - Added serialization/de-serialization to examples.tuplespace
Issue #1251 - hpx::threads::get_thread_count doesn’t consider pending threads
Issue #1008 - Decrease in application performance overtime; occasional spikes of major slowdown
Issue #1001 - Zero copy serialization raises assert
Issue #721 - Make HPX usable for Xeon Phi
Issue #524 - Extend scheduler to support threads which can’t be stolen
HPX V0.9.10 (Mar 24, 2015)#
General changes#
This is the 12th official release of HPX. It coincides with the 7th anniversary of the first commit to our source code repository. Since then, we have seen over 12300 commits amounting to more than 220000 lines of C++ code.
The major focus of this release was to improve the reliability of large scale runs. We believe to have achieved this goal as we now can reliably run HPX applications on up to ~24k cores. We have also shown that HPX can be used with success for symmetric runs (applications using both, host cores and Intel Xeon/Phi coprocessors). This is a huge step forward in terms of the usability of HPX. The main focus of this work involved isolating the causes of the segmentation faults at start up and shut down. Many of these issues were discovered to be the result of the suspension of threads which hold locks.
A very important improvement introduced with this release is the refactoring of the code representing our parcel-port implementation. Parcel- ports can now be implemented by 3rd parties as independent plugins which are dynamically loaded at runtime (static linking of parcel-ports is also supported). This refactoring also includes a massive improvement of the performance of our existing parcel-ports. We were able to significantly reduce the networking latencies and to improve the available networking bandwidth. Please note that in this release we disabled the ibverbs and ipc parcel ports as those have not been ported to the new plugin system yet (see Issue #839).
Another corner stone of this release is our work towards a complete implementation of __cpp11_n4104__ (Working Draft, Technical Specification for C++ Extensions for Parallelism). This document defines a set of parallel algorithms to be added to the C++ standard library. We now have implemented about 75% of all specified parallel algorithms (see [link hpx.manual.parallel.parallel_algorithms Parallel Algorithms] for more details). We also implemented some extensions to __cpp11_n4104__ allowing to invoke all of the algorithms asynchronously.
This release adds a first implementation of hpx::vector which is a
distributed data structure closely aligned to the functionality of
std::vector. The difference is that hpx::vector stores the data in
partitions where the partitions can be distributed over different localities. We
started to work on allowing to use the parallel algorithms with hpx::vector.
At this point we have implemented only a few of the parallel algorithms to
support distributed data structures (like hpx::vector) for testing purposes
(see Issue #1338 for a documentation of our progress).
Breaking changes#
With this release we put a lot of effort into changing the code base to be more compatible to C++11. These changes have caused the following issues for backward compatibility:
Move to Variadics- All of the API now uses variadic templates. However, this change required to modify the argument sequence for some of the exiting API functions (
hpx::async_continue,hpx::apply_continue,hpx::when_each,hpx::wait_each, synchronous invocation of actions).Changes to Macros- We also removed the macros
HPX_STD_FUNCTIONandHPX_STD_TUPLE. This shouldn’t affect any user code as we replacedHPX_STD_FUNCTIONwithhpx::util::function_nonserwhich was the default expansion used for this macro. All HPX API functions which expect ahpx::util::function_nonser(or ahpx::util::unique_function_nonser) can now be transparently called with a compatiblestd::functioninstead. Similarly,HPX_STD_TUPLEwas replaced by its default expansion as well:hpx::util::tuple.Changes to
hpx::unique_future-hpx::unique_future, which was deprecated in the previous release forhpx::futureis now completely removed from HPX. This completes the transition to a completely standards conforming implementation ofhpx::future.Changes to Supported Compilers. Finally, in order to utilize more C++11 semantics, we have officially dropped support for GCC 4.4 and MSVC 2012. Please see our Prerequisites page for more details.
Bug fixes (closed tickets)#
Here is a list of the important tickets we closed for this release.
Issue #1402 - Internal shared_future serialization copies
Issue #1399 - Build takes unusually long time…
Issue #1398 - Tests using the scan partitioner are broken on at least gcc 4.7 and intel compiler
Issue #1397 - Completely remove hpx::unique_future
Issue #1396 - Parallel scan algorithms with different initial values
Issue #1395 - Race Condition - 1d_stencil_8 - SuperMIC
Issue #1394 - “suspending thread while at least one lock is being held” - 1d_stencil_8 - SuperMIC
Issue #1393 - SEGFAULT in 1d_stencil_8 on SuperMIC
Issue #1392 - Fixing #1168
Issue #1391 - Parallel Algorithms for scan partitioner for small number of elements
Issue #1387 - Failure with more than 4 localities
Issue #1386 - Dispatching unhandled exceptions to outer user code
Issue #1385 - Adding Copy algorithms, fixing
parallel::copy_ifIssue #1384 - Fixing 1325
Issue #1383 - Fixed #504: Refactor Dataflow LCO to work with futures, this removes the dataflow component as it is obsolete
Issue #1382 -
is_sorted,is_sorted_untilandis_partitionedalgorithmsIssue #1381 - fix for CMake versions prior to 3.1
Issue #1380 - resolved warning in CMake 3.1 and newer
Issue #1379 - Compilation error with papi
Issue #1378 - Towards safer migration
Issue #1377 - HPXConfig.cmake should include
TCMALLOC_LIBRARYandTCMALLOC_INCLUDE_DIRIssue #1376 - Warning on uninitialized member
Issue #1375 - Fixing 1163
Issue #1374 - Fixing the MSVC 12 release builder
Issue #1373 - Modifying parallel search algorithm for zero length searches
Issue #1372 - Modifying parallel search algorithm for zero length searches
Issue #1371 - Avoid holding a lock during agas::incref while doing a credit split
Issue #1370 -
--hpx:bindthrows unexpected errorIssue #1369 - Getting rid of (void) in loops
Issue #1368 - Variadic templates support for tuple
Issue #1367 - One last batch of variadic templates support
Issue #1366 - Fixing symbolic namespace hang
Issue #1365 - More held locks
Issue #1364 - Add counters 1363
Issue #1363 - Add thread overhead counters
Issue #1362 - Std config removal
Issue #1361 - Parcelport plugins
Issue #1360 - Detuplify transfer_action
Issue #1359 - Removed obsolete checks
Issue #1358 - Fixing 1352
Issue #1357 - Variadic templates support for runtime_support and components
Issue #1356 - fixed coordinate test for intel13
Issue #1355 - fixed coordinate.hpp
Issue #1354 - Lexicographical Compare completed
Issue #1353 - HPX should set
Boost_ADDITIONAL_VERSIONSflagsIssue #1352 - Error: Cannot find action ‘’ in type registry: HPX(bad_action_code)
Issue #1351 - Variadic templates support for appliers
Issue #1350 - Actions simplification
Issue #1349 - Variadic when and wait functions
Issue #1348 - Added hpx_init header to test files
Issue #1347 - Another batch of variadic templates support
Issue #1346 - Segmented copy
Issue #1345 - Attempting to fix hangs during shutdown
Issue #1344 - Std config removal
Issue #1343 - Removing various distribution policies for hpx::vector
Issue #1342 - Inclusive scan
Issue #1341 - Exclusive scan
Issue #1340 - Adding
parallel::countfor distributed data structures, adding testsIssue #1339 - Update argument order for transform_reduce
Issue #1337 - Fix dataflow to handle properly ranges of futures
Issue #1336 - dataflow needs to hold onto futures passed to it
Issue #1335 - Fails to compile with msvc14
Issue #1334 - Examples build problem
Issue #1333 - Distributed transform reduce
Issue #1332 - Variadic templates support for actions
Issue #1331 - Some ambiguous calls of map::erase have been prevented by adding additional check in locality constructor.
Issue #1330 - Defining Plain Actions does not work as described in the documentation
Issue #1329 - Distributed vector cleanup
Issue #1328 - Sync docs and comments with code in hello_world example
Issue #1327 - Typos in docs
Issue #1326 - Documentation and code diverged in Fibonacci tutorial
Issue #1325 - Exceptions thrown during parcel handling are not handled correctly
Issue #1324 - fixed bandwidth calculation
Issue #1323 - mmap() failed to allocate thread stack due to insufficient resources
Issue #1322 - HPX fails to build aa182cf
Issue #1321 - Limiting size of outgoing messages while coalescing parcels
Issue #1320 - passing a future with launch::deferred in remote function call causes hang
Issue #1319 - An exception when tries to specify number high priority threads with abp-priority
Issue #1318 - Unable to run program with abp-priority and numa-sensitivity enabled
Issue #1317 - N4071 Search/Search_n finished, minor changes
Issue #1316 - Add config option to make -Ihpx.run_hpx_main!=1 the default
Issue #1314 - Variadic support for async and apply
Issue #1313 - Adjust when_any/some to the latest proposed interfaces
Issue #1312 - Fixing #857: hpx::naming::locality leaks parcelport specific information into the public interface
Issue #1311 - Distributed get’er/set’er_values for distributed vector
Issue #1310 - Crashing in hpx::parcelset::policies::mpi::connection_handler::handle_messages() on SuperMIC
Issue #1308 - Unable to execute an application with –hpx:threads
Issue #1307 - merge_graph linking issue
Issue #1306 - First batch of variadic templates support
Issue #1305 - Create a compiler wrapper
Issue #1304 - Provide a compiler wrapper for hpx
Issue #1303 - Drop support for GCC44
Issue #1302 - Fixing #1297
Issue #1301 - Compilation error when tried to use boost range iterators with wait_all
Issue #1298 - Distributed vector
Issue #1297 - Unable to invoke component actions recursively
Issue #1294 - HDF5 build error
Issue #1275 - The parcelport implementation is non-optimal
Issue #1267 - Added classes and unit tests for local_file, orangefs_file and pxfs_file
Issue #1264 - Error “assertion ‘!m_fun’ failed” randomly occurs when using TCP
Issue #1254 - thread binding seems to not work properly
Issue #1220 - parallel::copy_if is broken
Issue #1217 - Find a better way of fixing the issue patched by #1216
Issue #1168 - Starting HPX on Cray machines using aprun isn’t working correctly
Issue #1085 - Replace startup and shutdown barriers with broadcasts
Issue #981 - With SLURM, –hpx:threads=8 should not be necessary
Issue #857 - hpx::naming::locality leaks parcelport specific information into the public interface
Issue #850 - “flush” not documented
Issue #763 - Create buildbot instance that uses std::bind as HPX_STD_BIND
Issue #680 - Convert parcel ports into a plugin system
Issue #582 - Make exception thrown from HPX threads available from
hpx::initIssue #504 - Refactor Dataflow LCO to work with futures
Issue #196 - Don’t store copies of the locality network metadata in the gva table
HPX V0.9.9 (Oct 31, 2014, codename Spooky)#
General changes#
We have had over 1500 commits since the last release and we have closed over 200 tickets (bugs, feature requests, pull requests, etc.). These are by far the largest numbers of commits and resolved issues for any of the HPX releases so far. We are especially happy about the large number of people who contributed for the first time to HPX.
We completed the transition from the older (non-conforming) implementation of
hpx::futureto the new and fully conforming version by removing the old code and by renaming the typehpx::unique_futuretohpx::future. In order to maintain backwards compatibility with existing code which uses the typehpx::unique_futurewe support the configuration variableHPX_UNIQUE_FUTURE_ALIAS. If this variable is set toONwhile running cmake it will additionally define a template alias for this type.We rewrote and significantly changed our build system. Please have a look at the new (now generated) documentation here: Building HPX. Please revisit your build scripts to adapt to the changes. The most notable changes are:
HPX_NO_INSTALLis no longer necessary.For external builds, you need to set
HPX_DIRinstead ofHPX_ROOTas described here: Using HPX with CMake-based projects.IDEs that support multiple configurations (Visual Studio and XCode) can now be used as intended. that means no build dir.
Building HPX statically (without dynamic libraries) is now supported (
-DHPX_STATIC_LINKING=On).Please note that many variables used to configure the build process have been renamed to unify the naming conventions (see the section CMake options for more information).
This also fixes a long list of issues, for more information see Issue #1204.
We started to implement various proposals to the C++ Standardization committee related to parallelism and concurrency, most notably N4409 (Working Draft, Technical Specification for C++ Extensions for Parallelism), N4411 (Task Region Rev. 3), and N4313 (Working Draft, Technical Specification for C++ Extensions for Concurrency).
We completely remodeled our automatic build system to run builds and unit tests on various systems and compilers. This allows us to find most bugs right as they were introduced and helps to maintain a high level of quality and compatibility. The newest build logs can be found at HPX Buildbot Website.
Bug fixes (closed tickets)#
Here is a list of the important tickets we closed for this release.
Issue #1296 - Rename make_error_future to make_exceptional_future, adjust to N4123
Issue #1295 - building issue
Issue #1293 - Transpose example
Issue #1292 - Wrong abs() function used in example
Issue #1291 - non-synchronized shift operators have been removed
Issue #1290 - RDTSCP is defined as true for Xeon Phi build
Issue #1289 - Fixing 1288
Issue #1288 - Add new performance counters
Issue #1287 - Hierarchy scheduler broken performance counters
Issue #1286 - Algorithm cleanup
Issue #1285 - Broken Links in Documentation
Issue #1284 - Uninitialized copy
Issue #1283 - missing boost::scoped_ptr includes
Issue #1282 - Update documentation of build options for schedulers
Issue #1281 - reset idle rate counter
Issue #1280 - Bug when executing on Intel MIC
Issue #1279 - Add improved when_all/wait_all
Issue #1278 - Implement improved when_all/wait_all
Issue #1277 - feature request: get access to argc argv and variables_map
Issue #1276 - Remove merging map
Issue #1274 - Weird (wrong) string code in papi.cpp
Issue #1273 - Sequential task execution policy
Issue #1272 - Avoid CMake name clash for Boost.Thread library
Issue #1271 - Updates on HPX Test Units
Issue #1270 - hpx/util/safe_lexical_cast.hpp is added
Issue #1269 - Added default value for “LIB” cmake variable
Issue #1268 - Memory Counters not working
Issue #1266 - FindHPX.cmake is not installed
Issue #1263 - apply_remote test takes too long
Issue #1262 - Chrono cleanup
Issue #1261 - Need make install for papi counters and this builds all the examples
Issue #1260 - Documentation of Stencil example claims
Issue #1259 - Avoid double-linking Boost on Windows
Issue #1257 - Adding additional parameter to create_thread
Issue #1256 - added buildbot changes to release notes
Issue #1255 - Cannot build MiniGhost
Issue #1253 - hpx::thread defects
Issue #1252 - HPX_PREFIX is too fragile
Issue #1250 - switch_to_fiber_emulation does not work properly
Issue #1249 - Documentation is generated under Release folder
Issue #1248 - Fix usage of hpx_generic_coroutine_context and get tests passing on powerpc
Issue #1247 - Dynamic linking error
Issue #1246 - Make cpuid.cpp C++11 compliant
Issue #1245 - HPX fails on startup (setting thread affinity mask)
Issue #1244 - HPX_WITH_RDTSC configure test fails, but should succeed
Issue #1243 - CTest dashboard info for CSCS CDash drop location
Issue #1242 - Mac fixes
Issue #1241 - Failure in Distributed with Boost 1.56
Issue #1240 - fix a race condition in examples.diskperf
Issue #1239 - fix wait_each in examples.diskperf
Issue #1238 - Fixed #1237: hpx::util::portable_binary_iarchive failed
Issue #1237 - hpx::util::portable_binary_iarchive faileds
Issue #1235 - Fixing clang warnings and errors
Issue #1234 - TCP runs fail: Transport endpoint is not connected
Issue #1233 - Making sure the correct number of threads is registered with AGAS
Issue #1232 - Fixing race in wait_xxx
Issue #1231 - Parallel minmax
Issue #1230 - Distributed run of 1d_stencil_8 uses less threads than spec. & sometimes gives errors
Issue #1229 - Unstable number of threads
Issue #1228 - HPX link error (cmake / MPI)
Issue #1226 - Warning about struct/class thread_counters
Issue #1225 - Adding parallel::replace etc
Issue #1224 - Extending dataflow to pass through non-future arguments
Issue #1223 - Remaining find algorithms implemented, N4071
Issue #1222 - Merging all the changes
Issue #1221 - No error output when using mpirun with hpx
Issue #1219 - Adding new AGAS cache performance counters
Issue #1216 - Fixing using futures (clients) as arguments to actions
Issue #1215 - Error compiling simple component
Issue #1214 - Stencil docs
Issue #1213 - Using more than a few dozen MPI processes on SuperMike results in a seg fault before getting to hpx_main
Issue #1212 - Parallel rotate
Issue #1211 - Direct actions cause the future’s shared_state to be leaked
Issue #1210 - Refactored local::promise to be standard conformant
Issue #1209 - Improve command line handling
Issue #1208 - Adding parallel::reverse and parallel::reverse_copy
Issue #1207 - Add copy_backward and move_backward
Issue #1206 - N4071 additional algorithms implemented
Issue #1204 - Cmake simplification and various other minor changes
Issue #1203 - Implementing new launch policy for (local) async:
hpx::launch::fork.Issue #1202 - Failed assertion in connection_cache.hpp
Issue #1201 - pkg-config doesn’t add mpi link directories
Issue #1200 - Error when querying time performance counters
Issue #1199 - library path is now configurable (again)
Issue #1198 - Error when querying performance counters
Issue #1197 - tests fail with intel compiler
Issue #1196 - Silence several warnings
Issue #1195 - Rephrase initializers to work with VC++ 2012
Issue #1194 - Simplify parallel algorithms
Issue #1193 - Adding
parallel::equalIssue #1192 - HPX(out_of_memory) on including <hpx/hpx.hpp>
Issue #1191 - Fixing #1189
Issue #1190 - Chrono cleanup
Issue #1189 - Deadlock .. somewhere? (probably serialization)
Issue #1188 - Removed
future::get_status()Issue #1186 - Fixed FindOpenCL to find current AMD APP SDK
Issue #1184 - Tweaking future unwrapping
Issue #1183 - Extended
parallel::reduceIssue #1182 -
future::unwraphangs forlaunch::deferredIssue #1181 - Adding
all_of,any_of, andnone_ofand corresponding documentationIssue #1180 -
hpx::coutdefectIssue #1179 -
hpx::asyncdoes not work for member function pointers when called on types with self-defined unaryoperator*Issue #1178 - Implemented variadic
hpx::util::zip_iteratorIssue #1177 - MPI parcelport defect
Issue #1176 -
HPX_DEFINE_COMPONENT_CONST_ACTION_TPLdoes not have a 2-argument versionIssue #1175 - Create util::zip_iterator working with util::tuple<>
Issue #1174 - Error Building HPX on linux, root_certificate_authority.cpp
Issue #1173 - hpx::cout output lost
Issue #1172 - HPX build error with Clang 3.4.2
Issue #1171 -
CMAKE_INSTALL_PREFIXignoredIssue #1170 - Close hpx_benchmarks repository on Github
Issue #1169 - Buildbot emails have syntax error in url
Issue #1167 - Merge partial implementation of standards proposal N3960
Issue #1166 - Fixed several compiler warnings
Issue #1165 - cmake warns: “tests.regressions.actions” does not exist
Issue #1164 - Want my own serialization of hpx::future
Issue #1162 - Segfault in hello_world example
Issue #1161 - Use
HPX_ASSERTto aid the compilerIssue #1160 - Do not put -DNDEBUG into hpx_application.pc
Issue #1159 - Support Clang 3.4.2
Issue #1158 - Fixed #1157: Rename when_n/wait_n, add when_xxx_n/wait_xxx_n
Issue #1157 - Rename when_n/wait_n, add when_xxx_n/wait_xxx_n
Issue #1156 - Force inlining fails
Issue #1155 - changed header of printout to be compatible with python csv module
Issue #1154 - Fixing iostreams
Issue #1153 - Standard manipulators (like std::endl) do not work with hpx::ostream
Issue #1152 - Functions revamp
Issue #1151 - Suppressing cmake 3.0 policy warning for CMP0026
Issue #1150 - Client Serialization error
Issue #1149 - Segfault on Stampede
Issue #1148 - Refactoring mini-ghost
Issue #1147 - N3960 copy_if and copy_n implemented and tested
Issue #1146 - Stencil print
Issue #1145 - N3960 hpx::parallel::copy implemented and tested
Issue #1144 - OpenMP examples 1d_stencil do not build
Issue #1143 - 1d_stencil OpenMP examples do not build
Issue #1142 - Cannot build HPX with gcc 4.6 on OS X
Issue #1140 - Fix OpenMP lookup, enable usage of config tests in external CMake projects.
Issue #1139 - hpx/hpx/config/compiler_specific.hpp
Issue #1138 - clean up pkg-config files
Issue #1137 - Improvements to create binary packages
Issue #1136 - HPX_GCC_VERSION not defined on all compilers
Issue #1135 - Avoiding collision between winsock2.h and windows.h
Issue #1134 - Making sure, that hpx::finalize can be called from any locality
Issue #1133 - 1d stencil examples
Issue #1131 - Refactor unique_function implementation
Issue #1130 - Unique function
Issue #1129 - Some fixes to the Build system on OS X
Issue #1128 - Action future args
Issue #1127 - Executor causes segmentation fault
Issue #1124 - Adding new API functions:
register_id_with_basename,unregister_id_with_basename,find_ids_from_basename; adding testIssue #1123 - Reduce nesting of try-catch construct in
encode_parcels?Issue #1122 - Client base fixes
Issue #1121 - Update
hpxrun.py.inIssue #1120 - HTTS2 tests compile errors on v110 (VS2012)
Issue #1119 - Remove references to boost::atomic in accumulator example
Issue #1118 - Only build test thread_pool_executor_1114_test if
HPX_SCHEDULERis setIssue #1117 - local_queue_executor linker error on vc110
Issue #1116 - Disabled performance counter should give runtime errors, not invalid data
Issue #1115 - Compile error with Intel C++ 13.1
Issue #1114 - Default constructed executor is not usable
Issue #1113 - Fast compilation of logging causes ABI incompatibilities between different
NDEBUGvaluesIssue #1112 - Using thread_pool_executors causes segfault
Issue #1111 -
hpx::threads::get_thread_dataalways returns zeroIssue #1110 - Remove unnecessary null pointer checks
Issue #1109 - More tests adjustments
Issue #1108 - Clarify build rules for “libboost_atomic-mt.so”?
Issue #1107 - Remove unnecessary null pointer checks
Issue #1106 - network_storage benchmark improvements, adding legends to plots and tidying layout
Issue #1105 - Add more plot outputs and improve instructions doc
Issue #1104 - Complete quoting for parameters of some CMake commands
Issue #1103 - Work on test/scripts
Issue #1102 - Changed minimum requirement of window install to 2012
Issue #1101 - Changed minimum requirement of window install to 2012
Issue #1100 - Changed readme to no longer specify using MSVC 2010 compiler
Issue #1099 - Error returning futures from component actions
Issue #1098 - Improve storage test
Issue #1097 - data_actions quickstart example calls missing function decorate_action of data_get_action
Issue #1096 - MPI parcelport broken with new zero copy optimization
Issue #1095 - Warning C4005: _WIN32_WINNT: Macro redefinition
Issue #1094 - Syntax error for -DHPX_UNIQUE_FUTURE_ALIAS in master
Issue #1093 - Syntax error for -DHPX_UNIQUE_FUTURE_ALIAS
Issue #1092 - Rename unique_future<> back to future<>
Issue #1091 - Inconsistent error message
Issue #1090 - On windows 8.1 the examples crashed if using more than one os thread
Issue #1089 - Components should be allowed to have their own executor
Issue #1088 - Add possibility to select a network interface for the ibverbs parcelport
Issue #1087 - ibverbs and ipc parcelport uses zero copy optimization
Issue #1083 - Make shell examples copyable in docs
Issue #1082 - Implement proper termination detection during shutdown
Issue #1081 - Implement thread_specific_ptr for hpx::threads
Issue #1072 - make install not working properly
Issue #1070 - Complete quoting for parameters of some CMake commands
Issue #1059 - Fix more unused variable warnings
Issue #1051 - Implement when_each
Issue #973 - Would like option to report hwloc bindings
Issue #970 - Bad flags for Fortran compiler
Issue #941 - Create a proper user level context switching class for BG/Q
Issue #935 - Build error with gcc 4.6 and Boost 1.54.0 on hpx trunk and 0.9.6
Issue #934 - Want to build HPX without dynamic libraries
Issue #927 - Make hpx/lcos/reduce.hpp accept futures of id_type
Issue #926 - All unit tests that are run with more than one thread with CTest/hpx_run_test should configure hpx.os_threads
Issue #925 - regression_dataflow_791 needs to be brought in line with HPX standards
Issue #899 - Fix race conditions in regression tests
Issue #879 - Hung test leads to cascading test failure; make tests should support the MPI parcelport
Issue #865 - future<T> and friends shall work for movable only Ts
Issue #847 - Dynamic libraries are not installed on OS X
Issue #816 - First Program tutorial pull request
Issue #799 - Wrap lexical_cast to avoid exceptions
Issue #720 - broken configuration when using ccmake on Ubuntu
Issue #622 -
--hpx:hpxand--hpx:debug-hpx-logis nonsensicalIssue #525 - Extend barrier LCO test to run in distributed
Issue #515 - Multi-destination version of hpx::apply is broken
Issue #509 - Push Boost.Atomic changes upstream
Issue #503 - Running HPX applications on Windows should not require setting %PATH%
Issue #461 - Add a compilation sanity test
Issue #456 - hpx_run_tests.py should log output from tests that timeout
Issue #454 - Investigate threadmanager performance
Issue #345 - Add more versatile environmental/cmake variable support to hpx_find_* CMake macros
Issue #209 - Support multiple configurations in generated build files
Issue #190 - hpx::cout should be a std::ostream
Issue #189 - iostreams component should use startup/shutdown functions
Issue #183 - Use Boost.ICL for correctness in AGAS
Issue #44 - Implement real futures
HPX V0.9.8 (Mar 24, 2014)#
We have had over 800 commits since the last release and we have closed over 65 tickets (bugs, feature requests, etc.).
With the changes below, HPX is once again leading the charge of a whole new era of computation. By intrinsically breaking down and synchronizing the work to be done, HPX insures that application developers will no longer have to fret about where a segment of code executes. That allows coders to focus their time and energy to understanding the data dependencies of their algorithms and thereby the core obstacles to an efficient code. Here are some of the advantages of using HPX:
HPX is solidly rooted in a sophisticated theoretical execution model – ParalleX
HPX exposes an API fully conforming to the C++11 and the draft C++14 standards, extended and applied to distributed computing. Everything programmers know about the concurrency primitives of the standard C++ library is still valid in the context of HPX.
It provides a competitive, high performance implementation of modern, future-proof ideas which gives an smooth migration path from today’s mainstream techniques
There is no need for the programmer to worry about lower level parallelization paradigms like threads or message passing; no need to understand pthreads, MPI, OpenMP, or Windows threads, etc.
There is no need to think about different types of parallelism such as tasks, pipelines, or fork-join, task or data parallelism.
The same source of your program compiles and runs on Linux, BlueGene/Q, Mac OS X, Windows, and Android.
The same code runs on shared memory multi-core systems and supercomputers, on handheld devices and Intel® Xeon Phi™ accelerators, or a heterogeneous mix of those.
General changes#
A major API breaking change for this release was introduced by implementing
hpx::futureandhpx::shared_futurefully in conformance with the C++11 Standard. Whilehpx::shared_futureis new and will not create any compatibility problems, we revised the interface and implementation of the existinghpx::future. For more details please see the mailing list archive. To avoid any incompatibilities for existing code we named the type which implements thestd::futureinterface ashpx::unique_future. For the next release this will be renamed tohpx::future, making it full conforming to C++11 Standard.A large part of the code base of HPX has been refactored and partially re-implemented. The main changes were related to
The threading subsystem: these changes significantly reduce the amount of overheads caused by the schedulers, improve the modularity of the code base, and extend the variety of available scheduling algorithms.
The parcel subsystem: these changes improve the performance of the HPX networking layer, modularize the structure of the parcelports, and simplify the creation of new parcelports for other underlying networking libraries.
The API subsystem: these changes improved the conformance of the API to C++11 Standard, extend and unify the available API functionality, and decrease the overheads created by various elements of the API.
The robustness of the component loading subsystem has been improved significantly, allowing to more portably and more reliably register the components needed by an application as startup. This additionally speeds up general application initialization.
We added new API functionality like
hpx::migrateandhpx::copy_componentwhich are the basic building blocks necessary for implementing higher level abstractions for system-wide load balancing, runtime-adaptive resource management, and object-oriented checkpointing and state-management.We removed the use of C++11 move emulation (using Boost.Move), replacing it with C++11 rvalue references. This is the first step towards using more and more native C++11 facilities which we plan to introduce in the future.
We improved the reference counting scheme used by HPX which helps managing distributed objects and memory. This improves the overall stability of HPX and further simplifies writing real world applications.
The minimal Boost version required to use HPX is now V1.49.0.
This release coincides with the first release of HPXPI (V0.1.0), the first implementation of the XPI specification.
Bug fixes (closed tickets)#
Here is a list of the important tickets we closed for this release.
Issue #1086 - Expose internal boost::shared_array to allow user management of array lifetime
Issue #1083 - Make shell examples copyable in docs
Issue #1080 - /threads{locality#*/total}/count/cumulative broken
Issue #1079 - Build problems on OS X
Issue #1078 - Improve robustness of component loading
Issue #1077 - Fix a missing enum definition for ‘take’ mode
Issue #1076 - Merge Jb master
Issue #1075 - Unknown CMake command “add_hpx_pseudo_target”
Issue #1074 - Implement
apply_continue_callbackandapply_colocated_callbackIssue #1073 - The new
apply_colocatedandasync_colocatedfunctions lead to automatic registered functionsIssue #1071 - Remove deferred_packaged_task
Issue #1069 - serialize_buffer with allocator fails at destruction
Issue #1068 - Coroutine include and forward declarations missing
Issue #1067 - Add allocator support to util::serialize_buffer
Issue #1066 - Allow for MPI_Init being called before HPX launches
Issue #1065 - AGAS cache isn’t used/populated on worker localities
Issue #1064 - Reorder includes to ensure ws2 includes early
Issue #1063 - Add
hpx::runtime::suspendandhpx::runtime::resumeIssue #1062 - Fix
async_continueto properly handle return typesIssue #1061 - Implement
async_colocatedandapply_colocatedIssue #1060 - Implement minimal component migration
Issue #1058 - Remove
HPX_UTIL_TUPLEfrom code baseIssue #1057 - Add performance counters for threading subsystem
Issue #1055 - Thread allocation uses two memory pools
Issue #1053 - Work stealing flawed
Issue #1052 - Fix a number of warnings
Issue #1049 - Fixes for TLS on OSX and more reliable test running
Issue #1048 - Fixing after 588 hang
Issue #1047 - Use port ‘0’ for networking when using one locality
Issue #1046 -
composable_guardtest is broken when having more than one threadIssue #1045 - Security missing headers
Issue #1044 - Native TLS on FreeBSD via __thread
Issue #1043 -
asyncet.al. compute the wrong result typeIssue #1042 -
asyncet.al. implicitly unwrap reference_wrappersIssue #1041 - Remove redundant costly Kleene stars from regex searches
Issue #1040 - CMake script regex match patterns has unnecessary kleenes
Issue #1039 - Remove use of Boost.Move and replace with std::move and real rvalue refs
Issue #1038 - Bump minimal required Boost to 1.49.0
Issue #1037 - Implicit unwrapping of futures in async broken
Issue #1036 - Scheduler hangs when user code attempts to “block” OS-threads
Issue #1035 - Idle-rate counter always reports 100% idle rate
Issue #1034 - Symbolic name registration causes application hangs
Issue #1033 - Application options read in from an options file generate an error message
Issue #1032 -
hpx::id_typelocal reference counting is wrongIssue #1031 - Negative entry in reference count table
Issue #1030 - Implement condition_variable
Issue #1029 - Deadlock in thread scheduling subsystem
Issue #1028 - HPX-thread cumulative count performance counters report incorrect value
Issue #1027 - Expose
hpx::thread_interruptederror code as a separate exception typeIssue #1026 - Exceptions thrown in asynchronous calls can be lost if the value of the future is never queried
Issue #1025 -
future::wait_for/wait_untildo not remove callbackIssue #1024 - Remove dependence to boost assert and create hpx assert
Issue #1023 - Segfaults with tcmalloc
Issue #1022 - prerequisites link in readme is broken
Issue #1020 - HPX Deadlock on external synchronization
Issue #1019 - Convert using
BOOST_ASSERTtoHPX_ASSERTIssue #1018 - compiling bug with gcc 4.8.1
Issue #1017 - Possible crash in io_pool executor
Issue #1016 - Crash at startup
Issue #1014 - Implement Increment/Decrement Merging
Issue #1013 - Add more logging channels to enable greater control over logging granularity
Issue #1012 -
--hpx:debug-hpx-logand--hpx:debug-agas-loglead to non-thread safe writesIssue #1011 - After installation, running applications from the build/staging directory no longer works
Issue #1010 - Mergeable decrement requests are not being merged
Issue #1009 -
--hpx:list-symbolic-namescrashesIssue #1007 - Components are not properly destroyed
Issue #1006 - Segfault/hang in set_data
Issue #1003 - Performance counter naming issue
Issue #982 - Race condition during startup
Issue #912 - OS X: component type not found in map
Issue #663 - Create a buildbot slave based on Clang 3.2/OSX
Issue #636 - Expose
this_locality::apply<act>(p1, p2);for local executionIssue #197 - Add
--console=addressoption for PBS runsIssue #175 - Asynchronous AGAS API
HPX V0.9.7 (Nov 13, 2013)#
We have had over 1000 commits since the last release and we have closed over 180 tickets (bugs, feature requests, etc.).
General changes#
Ported HPX to BlueGene/Q
Improved HPX support for Xeon/Phi accelerators
Reimplemented
hpx::bind,hpx::tuple, andhpx::functionfor better performance and better compliance with the C++11 Standard. Addedhpx::mem_fn.Reworked
hpx::when_allandhpx::when_anyfor better compliance with the ongoing C++ standardization effort, added heterogeneous version for those functions. Addedhpx::when_any_swapped.Added
hpx::copyas a precursor for a migrate functionalityAdded
hpx::get_ptrallowing to directly access the memory underlying a given componentAdded the
hpx::lcos::broadcast,hpx::lcos::reduce, andhpx::lcos::foldcollective operationsAdded
hpx::get_locality_nameallowing to retrieve the name of any of the localities for the application.Added support for more flexible thread affinity control from the HPX command line, such as new modes for
--hpx:bind(balanced,scattered,compact), improved default settings when running multiple localities on the same node.Added experimental executors for simpler thread pooling and scheduling. This API may change in the future as it will stay aligned with the ongoing C++ standardization efforts.
Massively improved the performance of the HPX serialization code. Added partial support for zero copy serialization of array and bitwise-copyable types.
General performance improvements of the code related to threads and futures.
Bug fixes (closed tickets)#
Here is a list of the important tickets we closed for this release.
Issue #1005 - Allow one to disable array optimizations and zero copy optimizations for each parcelport
Issue #1004 - Generate new HPX logo image for the docs
Issue #1002 - If MPI parcelport is not available, running HPX under mpirun should fail
Issue #1001 - Zero copy serialization raises assert
Issue #1000 - Can’t connect to a HPX application running with the MPI parcelport from a non MPI parcelport locality
Issue #999 - Optimize
hpx::when_nIssue #998 - Fixed const-correctness
Issue #997 - Making serialize_buffer::data() type save
Issue #996 - Memory leak in hpx::lcos::promise
Issue #995 - Race while registering pre-shutdown functions
Issue #994 - thread_rescheduling regression test does not compile
Issue #992 - Correct comments and messages
Issue #991 - setcap cap_sys_rawio=ep for power profiling causes an HPX application to abort
Issue #989 - Jacobi hangs during execution
Issue #988 - multiple_init test is failing
Issue #986 - Can’t call a function called “init” from “main” when using
<hpx/hpx_main.hpp>Issue #984 - Reference counting tests are failing
Issue #983 - thread_suspension_executor test fails
Issue #980 - Terminating HPX threads don’t leave stack in virgin state
Issue #979 - Static scheduler not in documents
Issue #978 - Preprocessing limits are broken
Issue #977 - Make tests.regressions.lcos.future_hang_on_get shorter
Issue #976 - Wrong library order in pkgconfig
Issue #975 - Please reopen #963
Issue #974 - Option pu-offset ignored in fixing_588 branch
Issue #972 - Cannot use MKL with HPX
Issue #969 - Non-existent INI files requested on the command line via
--hpx:configdo not cause warnings or errors.Issue #968 - Cannot build examples in fixing_588 branch
Issue #967 - Command line description of
--hpx:queuingseems wrongIssue #966 -
--hpx:print-bindphysical core numbers are wrongIssue #965 - Deadlock when building in Release mode
Issue #963 - Not all worker threads are working
Issue #962 - Problem with SLURM integration
Issue #961 -
--hpx:print-bindoutputs incorrect informationIssue #960 - Fix cut and paste error in documentation of get_thread_priority
Issue #959 - Change link to boost.atomic in documentation to point to boost.org
Issue #958 - Undefined reference to intrusive_ptr_release
Issue #957 - Make tuple standard compliant
Issue #956 - Segfault with a3382fb
Issue #955 -
--hpx:nodesand--hpx:nodefilesdo not work with foreign nodesIssue #954 - Make order of arguments for hpx::async and hpx::broadcast consistent
Issue #953 - Cannot use MKL with HPX
Issue #952 -
register_[pre_]shutdown_functionnever throwIssue #951 - Assert when number of threads is greater than hardware concurrency
Issue #948 -
HPX_HAVE_GENERIC_CONTEXT_COROUTINESconflicts withHPX_HAVE_FIBER_BASED_COROUTINESIssue #947 - Need MPI_THREAD_MULTIPLE for backward compatibility
Issue #946 - HPX does not call
MPI_FinalizeIssue #945 - Segfault with
hpx::lcos::broadcastIssue #944 - OS X: assertion
pu_offset_ < hardware_concurrencyfailedIssue #943 - #include <hpx/hpx_main.hpp> does not work
Issue #942 - Make the BG/Q work with -O3
Issue #940 - Use separator when concatenating locality name
Issue #939 - Refactor MPI parcelport to use
MPI_Waitinstead of multipleMPI_TestcallsIssue #938 - Want to officially access
client_base::gid_Issue #937 -
client_base::gid_should be private``Issue #936 - Want doxygen-like source code index
Issue #935 - Build error with gcc 4.6 and Boost 1.54.0 on hpx trunk and 0.9.6
Issue #933 - Cannot build HPX with Boost 1.54.0
Issue #932 - Components are destructed too early
Issue #931 - Make HPX work on BG/Q
Issue #930 - make git-docs is broken
Issue #929 - Generating index in docs broken
Issue #928 - Optimize
hpx::util::static_for C++11 compilers supporting magic staticsIssue #924 - Make kill_process_tree (in process.py) more robust on Mac OSX
Issue #923 - Correct BLAS and RNPL cmake tests
Issue #922 - Cannot link against BLAS
Issue #921 - Implement
hpx::mem_fnIssue #920 - Output locality with
--hpx:print-bindIssue #919 - Correct grammar; simplify boolean expressions
Issue #918 - Link to hello_world.cpp is broken
Issue #917 - adapt cmake file to new boostbook version
Issue #916 - fix problem building documentation with xsltproc >= 1.1.27
Issue #915 - Add another TBBMalloc library search path
Issue #914 - Build problem with Intel compiler on Stampede (TACC)
Issue #913 - fix error messages in fibonacci examples
Issue #911 - Update OS X build instructions
Issue #910 - Want like to specify MPI_ROOT instead of compiler wrapper script
Issue #909 - Warning about void* arithmetic
Issue #908 - Buildbot for MIC is broken
Issue #906 - Can’t use
--hpx:bind=balancedwith multiple MPI processesIssue #905 -
--hpx:binddocumentation should describe full grammarIssue #904 - Add hpx::lcos::fold and hpx::lcos::inverse_fold collective operation
Issue #903 - Add
hpx::when_any_swapped()Issue #902 - Add
hpx::lcos::reducecollective operationIssue #901 - Web documentation is not searchable
Issue #900 - Web documentation for trunk has no index
Issue #898 - Some tests fail with GCC 4.8.1 and MPI parcel port
Issue #897 - HWLOC causes failures on Mac
Issue #896 - pu-offset leads to startup error
Issue #895 -
hpx::get_locality_namenot definedIssue #894 - Race condition at shutdown
Issue #893 -
--hpx:print-bindswitches std::cout to hexadecimal modeIssue #892 -
hwloc_topology_loadcan be expensive – don’t call multiple timesIssue #891 - The documentation for
get_locality_nameis wrongIssue #890 -
--hpx:print-bindshould not exitIssue #889 -
--hpx:debug-hpx-log=FILEdoes not workIssue #888 - MPI parcelport does not exit cleanly for –hpx:print-bind
Issue #887 - Choose thread affinities more cleverly
Issue #886 - Logging documentation is confusing
Issue #885 - Two threads are slower than one
Issue #884 - is_callable failing with member pointers in C++11
Issue #883 - Need help with is_callable_test
Issue #882 - tests.regressions.lcos.future_hang_on_get does not terminate
Issue #881 - tests/regressions/block_matrix/matrix.hh won’t compile with GCC 4.8.1
Issue #880 - HPX does not work on OS X
Issue #878 -
future::unwraptriggers assertionIssue #877 - “make tests” has build errors on Ubuntu 12.10
Issue #876 - tcmalloc is used by default, even if it is not present
Issue #875 - global_fixture is defined in a header file
Issue #874 - Some tests take very long
Issue #873 - Add block-matrix code as regression test
Issue #872 - HPX documentation does not say how to run tests with detailed output
Issue #871 - All tests fail with “make test”
Issue #870 - Please explicitly disable serialization in classes that don’t support it
Issue #868 - boost_any test failing
Issue #867 - Reduce the number of copies of
hpx::functionargumentsIssue #863 - Futures should not require a default constructor
Issue #862 - value_or_error shall not default construct its result
Issue #861 -
HPX_UNUSEDmacroIssue #860 - Add functionality to copy construct a component
Issue #859 -
hpx::endlshould flushIssue #858 - Create
hpx::get_ptr<>allowing to access component implementationIssue #855 - Implement
hpx::INVOKEIssue #854 -
hpx/hpx.hppdoes not includehpx/include/iostreams.hppIssue #853 - Feature request: null future
Issue #852 - Feature request: Locality names
Issue #851 -
hpx::coutoutput does not appear on screenIssue #849 - All tests fail on OS X after installing
Issue #848 - Update OS X build instructions
Issue #846 - Update hpx_external_example
Issue #845 - Issues with having both debug and release modules in the same directory
Issue #844 - Create configuration header
Issue #843 - Tests should use CTest
Issue #842 - Remove buffer_pool from MPI parcelport
Issue #841 - Add possibility to broadcast an index with hpx::lcos::broadcast
Issue #838 - Simplify
util::tupleIssue #837 - Adopt boost::tuple tests for
util::tupleIssue #836 - Adopt boost::function tests for
util::functionIssue #835 - Tuple interface missing pieces
Issue #833 - Partially preprocessing files not working
Issue #832 - Native papi counters do not work with wild cards
Issue #831 - Arithmetics counter fails if only one parameter is given
Issue #830 - Convert hpx::util::function to use new scheme for serializing its base pointer
Issue #829 - Consistently use
decay<T>instead ofremove_const< remove_reference<T>>Issue #828 - Update future implementation to N3721 and N3722
Issue #827 - Enable MPI parcelport for bootstrapping whenever application was started using mpirun
Issue #826 - Support command line option
--hpx:print-bindeven if--hpx::bindwas not usedIssue #825 - Memory counters give segfault when attempting to use thread wild cards or numbers only total works
Issue #824 - Enable lambda functions to be used with hpx::async/hpx::apply
Issue #823 - Using a hashing filter
Issue #822 - Silence unused variable warning
Issue #821 - Detect if a function object is callable with given arguments
Issue #820 - Allow wildcards to be used for performance counter names
Issue #819 - Make the AGAS symbolic name registry distributed
Issue #818 - Add future::then() overload taking an executor
Issue #817 - Fixed typo
Issue #815 - Create an lco that is performing an efficient broadcast of actions
Issue #814 - Papi counters cannot specify thread#* to get the counts for all threads
Issue #813 - Scoped unlock
Issue #811 - simple_central_tuplespace_client run error
Issue #810 - ostream error when << any objects
Issue #809 - Optimize parcel serialization
Issue #808 - HPX applications throw exception when executed from the build directory
Issue #807 - Create performance counters exposing overall AGAS statistics
Issue #795 - Create timed make_ready_future
Issue #794 - Create heterogeneous
when_all/when_any/etc.Issue #721 - Make HPX usable for Xeon Phi
Issue #694 - CMake should complain if you attempt to build an example without its dependencies
Issue #692 - SLURM support broken
Issue #683 - python/hpx/process.py imports epoll on all platforms
Issue #619 - Automate the doc building process
Issue #600 - GTC performance broken
Issue #577 - Allow for zero copy serialization/networking
Issue #551 - Change executable names to have debug postfix in Debug builds
Issue #544 - Write a custom .lib file on Windows pulling in hpx_init and hpx.dll, phase out hpx_init
Issue #534 -
hpx::initshould take functions bystd::functionand should accept all forms of hpx_mainIssue #508 - FindPackage fails to set FOO_LIBRARY_DIR
Issue #506 - Add cmake support to generate ini files for external applications
Issue #470 - Changing build-type after configure does not update boost library names
Issue #453 - Document
hpx_run_tests.pyIssue #445 - Significant performance mismatch between MPI and HPX in SMP for allgather example
Issue #443 - Make docs viewable from build directory
Issue #421 - Support multiple HPX instances per node in a batch environment like PBS or SLURM
Issue #316 - Add message size limitation
Issue #249 - Clean up locking code in big boot barrier
Issue #136 - Persistent CMake variables need to be marked as cache variables
HPX V0.9.6 (Jul 30, 2013)#
We have had over 1200 commits since the last release and we have closed roughly 140 tickets (bugs, feature requests, etc.).
General changes#
The major new features in this release are:
We further consolidated the API exposed by HPX. We aligned our APIs as much as possible with the existing C++11 Standard and related proposals to the C++ standardization committee (such as N3632 and N3857).
We implemented a first version of a distributed AGAS service which essentially eliminates all explicit AGAS network traffic.
We created a native ibverbs parcelport allowing to take advantage of the superior latency and bandwidth characteristics of Infiniband networks.
We successfully ported HPX to the Xeon Phi platform.
Support for the SLURM scheduling system was implemented.
Major efforts have been dedicated to improving the performance counter framework, numerous new counters were implemented and new APIs were added.
We added a modular parcel compression system allowing to improve bandwidth utilization (by reducing the overall size of the transferred data).
We added a modular parcel coalescing system allowing to combine several parcels into larger messages. This reduces latencies introduced by the communication layer.
Added an experimental executors API allowing to use different scheduling policies for different parts of the code. This API has been modelled after the Standards proposal N3562. This API is bound to change in the future, though.
Added minimal security support for localities which is enforced on the parcelport level. This support is preliminary and experimental and might change in the future.
We created a parcelport using low level MPI functions. This is in support of legacy applications which are to be gradually ported and to support platforms where MPI is the only available portable networking layer.
We added a preliminary and experimental implementation of a tuple-space object which exposes an interface similar to such systems described in the literature (see for instance The Linda Coordination Language).
Bug fixes (closed tickets)#
Here is a list of the important tickets we closed for this release. This is again a very long list of newly implemented features and fixed issues.
Issue #806 - make (all) in examples folder does nothing
Issue #805 - Adding the introduction and fixing DOCBOOK dependencies for Windows use
Issue #804 - Add stackless (non-suspendable) thread type
Issue #803 - Create proper serialization support functions for util::tuple
Issue #800 - Add possibility to disable array optimizations during serialization
Issue #798 - HPX_LIMIT does not work for local dataflow
Issue #797 - Create a parcelport which uses MPI
Issue #796 - Problem with Large Numbers of Threads
Issue #793 - Changing dataflow test case to hang consistently
Issue #792 - CMake Error
Issue #791 - Problems with local::dataflow
Issue #790 - wait_for() doesn’t compile
Issue #789 - HPX with Intel compiler segfaults
Issue #788 - Intel compiler support
Issue #787 - Fixed SFINAEd specializations
Issue #786 - Memory issues during benchmarking.
Issue #785 - Create an API allowing to register external threads with HPX
Issue #784 - util::plugin is throwing an error when a symbol is not found
Issue #783 - How does hpx:bind work?
Issue #782 - Added quotes around STRING REPLACE potentially empty arguments
Issue #781 - Make sure no exceptions propagate into the thread manager
Issue #780 - Allow arithmetics performance counters to expand its parameters
Issue #779 - Test case for 778
Issue #778 - Swapping futures segfaults
Issue #777 - hpx::lcos::details::when_xxx don’t restore completion handlers
Issue #776 - Compiler chokes on dataflow overload with launch policy
Issue #775 - Runtime error with local dataflow (copying futures?)
Issue #774 - Using local dataflow without explicit namespace
Issue #773 - Local dataflow with unwrap: functor operators need to be const
Issue #772 - Allow (remote) actions to return a future
Issue #771 - Setting HPX_LIMIT gives huge boost MPL errors
Issue #770 - Add launch policy to (local) dataflow
Issue #769 - Make compile time configuration information available
Issue #768 - Const correctness problem in local dataflow
Issue #767 - Add launch policies to async
Issue #766 - Mark data structures for optimized (array based) serialization
Issue #765 - Align hpx::any with N3508: Any Library Proposal (Revision 2)
Issue #764 - Align hpx::future with newest N3558: A Standardized Representation of Asynchronous Operations
Issue #762 - added a human readable output for the ping pong example
Issue #761 - Ambiguous typename when constructing derived component
Issue #760 - Simple components can not be derived
Issue #759 - make install doesn’t give a complete install
Issue #758 - Stack overflow when using locking_hook<>
Issue #757 - copy paste error; unsupported function overloading
Issue #756 - GTCX runtime issue in Gordon
Issue #755 - Papi counters don’t work with reset and evaluate API’s
Issue #753 - cmake bugfix and improved component action docs
Issue #752 - hpx simple component docs
Issue #750 - Add hpx::util::any
Issue #749 - Thread phase counter is not reset
Issue #748 - Memory performance counter are not registered
Issue #747 - Create performance counters exposing arithmetic operations
Issue #745 - apply_callback needs to invoke callback when applied locally
Issue #744 - CMake fixes
Issue #743 - Problem Building github version of HPX
Issue #742 - Remove HPX_STD_BIND
Issue #741 - assertion ‘px != 0’ failed: HPX(assertion_failure) for low numbers of OS threads
Issue #739 - Performance counters do not count to the end of the program or evaluation
Issue #738 - Dedicated AGAS server runs don’t work; console ignores -a option.
Issue #737 - Missing bind overloads
Issue #736 - Performance counter wildcards do not always work
Issue #735 - Create native ibverbs parcelport based on rdma operations
Issue #734 - Threads stolen performance counter total is incorrect
Issue #733 - Test benchmarks need to be checked and fixed
Issue #732 - Build fails with Mac, using mac ports clang-3.3 on latest git branch
Issue #731 - Add global start/stop API for performance counters
Issue #730 - Performance counter values are apparently incorrect
Issue #729 - Unhandled switch
Issue #728 - Serialization of hpx::util::function between two localities causes seg faults
Issue #727 - Memory counters on Mac OS X
Issue #725 - Restore original thread priority on resume
Issue #724 - Performance benchmarks do not depend on main HPX libraries
Issue #723 - [teletype]–hpx:nodes=``cat $PBS_NODEFILE`` works; –hpx:nodefile=$PBS_NODEFILE does not.[c++]
Issue #722 - Fix binding const member functions as actions
Issue #719 - Create performance counter exposing compression ratio
Issue #718 - Add possibility to compress parcel data
Issue #717 - strip_credit_from_gid has misleading semantics
Issue #716 - Non-option arguments to programs run using
pbsdshmust be before--hpx:nodes, contrary to directionsIssue #715 - Re-thrown exceptions should retain the original call site
Issue #714 - failed assertion in debug mode
Issue #713 - Add performance counters monitoring connection caches
Issue #712 - Adjust parcel related performance counters to be connection type specific
Issue #711 - configuration failure
Issue #710 - Error “timed out while trying to find room in the connection cache” when trying to start multiple localities on a single computer
Issue #709 - Add new thread state ‘staged’ referring to task descriptions
Issue #708 - Detect/mitigate bad non-system installs of GCC on Redhat systems
Issue #707 - Many examples do not link with Git HEAD version
Issue #706 -
hpx::initremoves portions of non-option command line arguments before last=signIssue #705 - Create rolling average and median aggregating performance counters
Issue #704 - Create performance counter to expose thread queue waiting time
Issue #703 - Add support to HPX build system to find librcrtool.a and related headers
Issue #699 - Generalize instrumentation support
Issue #698 - compilation failure with hwloc absent
Issue #697 - Performance counter counts should be zero indexed
Issue #696 - Distributed problem
Issue #695 - Bad perf counter time printed
Issue #693 -
--helpdoesn’t print component specific command line optionsIssue #692 - SLURM support broken
Issue #691 - exception while executing any application linked with hwloc
Issue #690 - thread_id_test and thread_launcher_test failing
Issue #689 - Make the buildbots use hwloc
Issue #687 - compilation error fix (hwloc_topology)
Issue #686 - Linker Error for Applications
Issue #684 - Pinning of service thread fails when number of worker threads equals the number of cores
Issue #682 - Add performance counters exposing number of stolen threads
Issue #681 - Add apply_continue for asynchronous chaining of actions
Issue #679 - Remove obsolete async_callback API functions
Issue #678 - Add new API for setting/triggering LCOs
Issue #677 - Add async_continue for true continuation style actions
Issue #676 - Buildbot for gcc 4.4 broken
Issue #675 - Partial preprocessing broken
Issue #674 - HPX segfaults when built with gcc 4.7
Issue #673 -
use_guard_pageshas inconsistent preprocessor guardsIssue #672 - External build breaks if library path has spaces
Issue #671 - release tarballs are tarbombs
Issue #670 - CMake won’t find Boost headers in layout=versioned install
Issue #669 - Links in docs to source files broken if not installed
Issue #667 - Not reading ini file properly
Issue #664 - Adapt new meanings of ‘const’ and ‘mutable’
Issue #661 - Implement BTL Parcel port
Issue #655 - Make HPX work with the “decltype” result_of
Issue #647 - documentation for specifying the number of high priority threads
--hpx:high-priority-threadsIssue #643 - Error parsing host file
Issue #642 - HWLoc issue with TAU
Issue #639 - Logging potentially suspends a running thread
Issue #634 - Improve error reporting from parcel layer
Issue #627 - Add tests for async and apply overloads that accept regular C++ functions
Issue #626 - hpx/future.hpp header
Issue #601 - Intel support
Issue #557 - Remove action codes
Issue #531 - AGAS request and response classes should use switch statements
Issue #529 - Investigate the state of hwloc support
Issue #526 - Make HPX aware of hyper-threading
Issue #518 - Create facilities allowing to use plain arrays as action arguments
Issue #473 - hwloc thread binding is broken on CPUs with hyperthreading
Issue #383 - Change result type detection for hpx::util::bind to use result_of protocol
Issue #341 - Consolidate route code
Issue #219 - Only copy arguments into actions once
Issue #177 - Implement distributed AGAS
Issue #43 - Support for Darwin (Xcode + Clang)
HPX V0.9.5 (Jan 16, 2013)#
We have had over 1000 commits since the last release and we have closed roughly 150 tickets (bugs, feature requests, etc.).
General changes#
This release is continuing along the lines of code and API consolidation, and overall usability inprovements. We dedicated much attention to performance and we were able to significantly improve the threading and networking subsystems.
We successfully ported HPX to the Android platform. HPX applications now not only can run on mobile devices, but we support heterogeneous applications running across architecture boundaries. At the Supercomputing Conference 2012 we demonstrated connecting Android tablets to simulations running on a Linux cluster. The Android tablet was used to query performance counters from the Linux simulation and to steer its parameters.
We successfully ported HPX to Mac OSX (using the Clang compiler). Thanks to Pyry Jahkola for contributing the corresponding patches. Please see the section macos_installation for more details.
We made a special effort to make HPX usable in highly concurrent use cases. Many
of the HPX API functions which possibly take longer than 100 microseconds to
execute now can be invoked asynchronously. We added uniform support for
composing futures which simplifies to write asynchronous code. HPX actions
(function objects encapsulating possibly concurrent remote function invocations)
are now well integrated with all other API facilities such like hpx::bind.
All of the API has been aligned as much as possible with established paradigms.
HPX now mirrors many of the facilities as defined in the C++11 Standard, such as
hpx::thread, hpx::function, hpx::future, etc.
A lot of work has been put into improving the documentation. Many of the API functions are documented now, concepts are explained in detail, and examples are better described than before. The new documentation index enables finding information with lesser effort.
This is the first release of HPX we perform after the move to Github This step has enabled a wider participation from the community and further encourages us in our decision to release HPX as a true open source library (HPX is licensed under the very liberal Boost Software License).
Bug fixes (closed tickets)#
Here is a list of the important tickets we closed for this release. This is by far the longest list of newly implemented features and fixed issues for any of HPX’ releases so far.
Issue #666 - Segfault on calling hpx::finalize twice
Issue #665 - Adding declaration num_of_cores
Issue #662 - pkgconfig is building wrong
Issue #660 - Need uninterrupt function
Issue #659 - Move our logging library into a different namespace
Issue #658 - Dynamic performance counter types are broken
Issue #657 - HPX v0.9.5 (RC1) hello_world example segfaulting
Issue #656 - Define the affinity of parcel-pool, io-pool, and timer-pool threads
Issue #654 - Integrate the Boost auto_index tool with documentation
Issue #653 - Make HPX build on OS X + Clang + libc++
Issue #651 - Add fine-grained control for thread pinning
Issue #650 - Command line no error message when using -hpx:(anything)
Issue #645 - Command line aliases don’t work in [teletype]``@file``[c++]
Issue #644 - Terminated threads are not always properly cleaned up
Issue #640 -
future_data<T>::set_on_completed_used without locksIssue #638 - hpx build with intel compilers fails on linux
Issue #637 - –copy-dt-needed-entries breaks with gold
Issue #635 - Boost V1.53 will add Boost.Lockfree and Boost.Atomic
Issue #633 - Re-add examples to final 0.9.5 release
Issue #632 - Example
thread_aware_timeris brokenIssue #631 - FFT application throws error in parcellayer
Issue #630 - Event synchronization example is broken
Issue #629 - Waiting on futures hangs
Issue #628 - Add an
HPX_ALWAYS_ASSERTmacroIssue #625 - Port coroutines context switch benchmark
Issue #621 - New INI section for stack sizes
Issue #618 - pkg_config support does not work with a HPX debug build
Issue #617 - hpx/external/logging/boost/logging/detail/cache_before_init.hpp:139:67: error: ‘get_thread_id’ was not declared in this scope
Issue #616 - Change wait_xxx not to use locking
Issue #615 - Revert visibility ‘fix’ (fb0b6b8245dad1127b0c25ebafd9386b3945cca9)
Issue #614 - Fix Dataflow linker error
Issue #613 - find_here should throw an exception on failure
Issue #612 - Thread phase doesn’t show up in debug mode
Issue #611 - Make stack guard pages configurable at runtime (initialization time)
Issue #610 - Co-Locate Components
Issue #609 - future_overhead
Issue #608 -
--hpx:list-counter-infosproblemIssue #607 - Update Boost.Context based backend for coroutines
Issue #606 - 1d_wave_equation is not working
Issue #605 - Any C++ function that has serializable arguments and a serializable return type should be remotable
Issue #604 - Connecting localities isn’t working anymore
Issue #603 - Do not verify any ini entries read from a file
Issue #602 - Rename argument_size to type_size/ added implementation to get parcel size
Issue #599 - Enable locality specific command line options
Issue #598 - Need an API that accesses the performance counter reporting the system uptime
Issue #597 - compiling on ranger
Issue #595 - I need a place to store data in a thread self pointer
Issue #594 - 32/64 interoperability
Issue #593 - Warn if logging is disabled at compile time but requested at runtime
Issue #592 - Add optional argument value to
--hpx:list-countersand--hpx:list-counter-infosIssue #591 - Allow for wildcards in performance counter names specified with
--hpx:print-counterIssue #590 - Local promise semantic differences
Issue #589 - Create API to query performance counter names
Issue #587 - Add get_num_localities and get_num_threads to AGAS API
Issue #586 - Adjust local AGAS cache size based on number of localities
Issue #585 - Error while using counters in HPX
Issue #584 - counting argument size of actions, initial pass.
Issue #581 - Remove
RemoteResulttemplate parameter forfuture<>Issue #580 - Add possibility to hook into actions
Issue #578 - Use angle brackets in HPX error dumps
Issue #576 - Exception incorrectly thrown when
--helpis usedIssue #575 - HPX(bad_component_type) with gcc 4.7.2 and boost 1.51
Issue #574 -
--hpx:connectcommand line parameter not working correctlyIssue #571 -
hpx::wait()(callback version) should pass the future to the callback functionIssue #570 -
hpx::waitshould operate onboost::arraysandstd::listsIssue #569 - Add a logging sink for Android
Issue #568 - 2-argument version of
HPX_DEFINE_COMPONENT_ACTIONIssue #567 - Connecting to a running HPX application works only once
Issue #565 - HPX doesn’t shutdown properly
Issue #564 - Partial preprocessing of new component creation interface
Issue #563 - Add
hpx::start/hpx::stopto avoid blocking main threadIssue #562 - All command line arguments swallowed by hpx
Issue #561 - Boost.Tuple is not move aware
Issue #558 -
boost::shared_ptr<>style semantics/syntax for client classesIssue #556 - Creation of partially preprocessed headers should be enabled for Boost newer than V1.50
Issue #555 -
BOOST_FORCEINLINEdoes not name a typeIssue #554 - Possible race condition in thread
get_id()Issue #552 - Move enable client_base
Issue #550 - Add stack size category ‘huge’
Issue #549 - ShenEOS run seg-faults on single or distributed runs
Issue #545 -
AUTOGLOBbroken for add_hpx_componentIssue #542 - FindHPX_HDF5 still searches multiple times
Issue #541 - Quotes around application name in hpx::init
Issue #539 - Race conditition occurring with new lightweight threads
Issue #535 - hpx_run_tests.py exits with no error code when tests are missing
Issue #530 - Thread description(<unknown>) in logs
Issue #523 - Make thread objects more lightweight
Issue #521 -
hpx::error_codeis not usable for lightweight error handlingIssue #520 - Add full user environment to HPX logs
Issue #519 - Build succeeds, running fails
Issue #517 - Add a guard page to linux coroutine stacks
Issue #516 - hpx::thread::detach suspends while holding locks, leads to hang in debug
Issue #514 - Preprocessed headers for <hpx/apply.hpp> don’t compile
Issue #513 - Buildbot configuration problem
Issue #512 - Implement action based stack size customization
Issue #511 - Move action priority into a separate type trait
Issue #510 - trunk broken
Issue #507 - no matching function for call to
boost::scoped_ptr<hpx::threads::topology>::scoped_ptr(hpx::threads::linux_topology*)Issue #505 - undefined_symbol regression test currently failing
Issue #502 - Adding OpenCL and OCLM support to HPX for Windows and Linux
Issue #501 - find_package(HPX) sets cmake output variables
Issue #500 - wait_any/wait_all are badly named
Issue #499 - Add support for disabling pbs support in pbs runs
Issue #498 - Error during no-cache runs
Issue #496 - Add partial preprocessing support to cmake
Issue #495 - Support HPX modules exporting startup/shutdown functions only
Issue #494 - Allow modules to specify when to run startup/shutdown functions
Issue #493 - Avoid constructing a string in make_success_code
Issue #492 - Performance counter creation is no longer synchronized at startup
Issue #491 - Performance counter creation is no longer synchronized at startup
Issue #490 - Sheneos on_completed_bulk seg fault in distributed
Issue #489 - compiling issue with g++44
Issue #488 - Adding OpenCL and OCLM support to HPX for the MSVC platform
Issue #487 - FindHPX.cmake problems
Issue #485 - Change distributing_factory and binpacking_factory to use bulk creation
Issue #484 - Change
HPX_DONT_USE_PREPROCESSED_FILEStoHPX_USE_PREPROCESSED_FILESIssue #483 - Memory counter for Windows
Issue #479 - strange errors appear when requesting performance counters on multiple nodes
Issue #477 - Create (global) timer for multi-threaded measurements
Issue #472 - Add partial preprocessing using Wave
Issue #471 - Segfault stack traces don’t show up in release
Issue #468 - External projects need to link with internal components
Issue #462 - Startup/shutdown functions are called more than once
Issue #458 - Consolidate hpx::util::high_resolution_timer and
hpx::util::high_resolution_clockIssue #457 - index out of bounds in
allgather_and_gateon 4 cores or moreIssue #448 - Make HPX compile with clang
Issue #447 - ‘make tests’ should execute tests on local installation
Issue #446 - Remove SVN-related code from the codebase
Issue #444 - race condition in smp
Issue #441 - Patched Boost.Serialization headers should only be installed if needed
Issue #439 - Components using
HPX_REGISTER_STARTUP_MODULEfail to compile with MSVCIssue #436 - Verify that no locks are being held while threads are suspended
Issue #435 - Installing HPX should not clobber existing Boost installation
Issue #434 - Logging external component failed (Boost 1.50)
Issue #433 - Runtime crash when building all examples
Issue #432 - Dataflow hangs on 512 cores/64 nodes
Issue #430 - Problem with distributing factory
Issue #424 - File paths referring to XSL-files need to be properly escaped
Issue #417 - Make dataflow LCOs work out of the box by using partial preprocessing
Issue #413 - hpx_svnversion.py fails on Windows
Issue #412 - Make hpx::error_code equivalent to hpx::exception
Issue #398 - HPX clobbers out-of-tree application specific CMake variables (specifically
CMAKE_BUILD_TYPE)Issue #394 - Remove code generating random port numbers for network
Issue #378 - ShenEOS scaling issues
Issue #354 - Create a coroutines wrapper for Boost.Context
Issue #349 - Commandline option
--localities=N/-lNshould be necessary only on AGAS localityIssue #334 - Add auto_index support to cmake based documentation toolchain
Issue #318 - Network benchmarks
Issue #317 - Implement network performance counters
Issue #310 - Duplicate logging entries
Issue #230 - Add compile time option to disable thread debugging info
Issue #171 - Add an INI option to turn off deadlock detection independently of logging
Issue #170 - OSHL internal counters are incorrect
Issue #103 - Better diagnostics for multiple component/action registerations under the same name
Issue #48 - Support for Darwin (Xcode + Clang)
Issue #21 - Build fails with GCC 4.6
HPX V0.9.0 (Jul 5, 2012)#
We have had roughly 800 commits since the last release and we have closed approximately 80 tickets (bugs, feature requests, etc.).
General changes#
Significant improvements made to the usability of HPX in large-scale, distributed environments.
Renamed
hpx::lcos::packaged_tasktohpx::lcos::packaged_actionto reflect the semantic differences to a packaged_task as defined by the C++11 Standard.HPX now exposes
hpx::threadwhich is compliant to the C++11 std::thread type except that it (purely locally) represents an HPX thread. This new type does not expose any of the remote capabilities of the underlying HPX-thread implementation.The type
hpx::lcos::futureis now compliant to the C++11 std::future<> type. This type can be used to synchronize both, local and remote operations. In both cases the control flow will ‘return’ to the future in order to trigger any continuation.The types
hpx::lcos::local::promiseandhpx::lcos::local::packaged_taskare now compliant to the C++11std::promise<>andstd::packaged_task<>types. These can be used to create a future representing local work only. Use the typeshpx::lcos::promiseandhpx::lcos::packaged_actionto wrap any (possibly remote) action into a future.hpx::threadandhpx::lcos::futureare now cancelable.Added support for sequential and logic composition of
hpx::lcos::futures. The member functionhpx::lcos::future::whenpermits futures to be sequentially composed. The helper functionshpx::wait_all,hpx::wait_any, andhpx::wait_ncan be used to wait for more than one future at a time.HPX now exposes
hpx::applyandhpx::asyncas the preferred way of creating (or invoking) any deferred work. These functions are usable with various types of functions, function objects, and actions and provide a uniform way to spawn deferred tasks.HPX now utilizes
hpx::util::bindto (partially) bind local functions and function objects, and also actions. Remote bound actions can have placeholders as well.HPX continuations are now fully polymorphic. The class
hpx::actions::forwarding_continuationis an example of how the user can write is own types of continuations. It can be used to execute any function as an continuation of a particular action.Reworked the action invocation API to be fully conformant to normal functions. Actions can now be invoked using
hpx::apply,hpx::async, or using theoperator()implemented on actions. Actions themselves can now be cheaply instantiated as they do not have any members anymore.Reworked the lazy action invocation API. Actions can now be directly bound using
hpx::util::bindby passing an action instance as the first argument.A minimal HPX program now looks like this:
#include <hpx/hpx_init.hpp> int hpx_main() { return hpx::finalize(); } int main() { return hpx::init(); }
This removes the immediate dependency on the Boost.Program_options library.
Note
This minimal version of an HPX program does not support any of the default command line arguments (such as –help, or command line options related to PBS). It is suggested to always pass
argcandargvto HPX as shown in the example below.In order to support those, but still not to depend on Boost.Program_options, the minimal program can be written as:
#include <hpx/hpx_init.hpp> // The arguments for hpx_main can be left off, which very similar to the // behavior of ``main()`` as defined by C++. int hpx_main(int argc, char* argv[]) { return hpx::finalize(); } int main(int argc, char* argv[]) { return hpx::init(argc, argv); }
Added performance counters exposing the number of component instances which are alive on a given locality.
Added performance counters exposing then number of messages sent and received, the number of parcels sent and received, the number of bytes sent and received, the overall time required to send and receive data, and the overall time required to serialize and deserialize the data.
Added a new component:
hpx::components::binpacking_factorywhich is equivalent to the existinghpx::components::distributing_factorycomponent, except that it equalizes the overall population of the components to create. It exposes two factory methods, one based on the number of existing instances of the component type to create, and one based on an arbitrary performance counter which will be queried for all relevant localities.Added API functions allowing to access elements of the diagnostic information embedded in the given exception:
hpx::get_locality_id,hpx::get_host_name,hpx::get_process_id,hpx::get_function_name,hpx::get_file_name,hpx::get_line_number,hpx::get_os_thread,hpx::get_thread_id, andhpx::get_thread_description.
Bug fixes (closed tickets)#
Here is a list of the important tickets we closed for this release:
Issue #71 - GIDs that are not serialized via
handle_gid<>should raise an exceptionIssue #105 - Allow for
hpx::util::functions to be registered in the AGAS symbolic namespaceIssue #107 - Nasty threadmanger race condition (reproducible in sheneos_test)
Issue #108 - Add millisecond resolution to HPX logs on Linux
Issue #110 - Shutdown hang in distributed with release build
Issue #116 - Don’t use TSS for the applier and runtime pointers
Issue #162 - Move local synchronous execution shortcut from hpx::function to the applier
Issue #172 - Cache sources in CMake and check if they change manually
Issue #178 - Add an INI option to turn off ranged-based AGAS caching
Issue #187 - Support for disabling performance counter deployment
Issue #202 - Support for sending performance counter data to a specific file
Issue #218 - boost.coroutines allows different stack sizes, but stack pool is unaware of this
Issue #231 - Implement movable
boost::bindIssue #232 - Implement movable
boost::functionIssue #236 - Allow binding
hpx::util::functionto actionsIssue #239 - Replace
hpx::functionwithhpx::util::functionIssue #240 - Can’t specify RemoteResult with lcos::async
Issue #242 - REGISTER_TEMPLATE support for plain actions
Issue #243 -
handle_gid<>support forhpx::util::functionIssue #245 -
*_c_cache codethrows an exception if the queried GID is not in the local cacheIssue #246 - Undefined references in dataflow/adaptive1d example
Issue #252 - Problems configuring sheneos with CMake
Issue #254 - Lifetime of components doesn’t end when client goes out of scope
Issue #259 - CMake does not detect that MSVC10 has lambdas
Issue #260 - io_service_pool segfault
Issue #261 - Late parcel executed outside of pxthread
Issue #263 - Cannot select allocator with CMake
Issue #264 - Fix allocator select
Issue #267 - Runtime error for hello_world
Issue #269 - pthread_affinity_np test fails to compile
Issue #270 - Compiler noise due to -Wcast-qual
Issue #275 - Problem with configuration tests/include paths on Gentoo
Issue #325 - Sheneos is 200-400 times slower than the fortran equivalent
Issue #331 -
hpx::initandhpx_main()should not depend on program_optionsIssue #333 - Add doxygen support to CMake for doc toolchain
Issue #340 - Performance counters for parcels
Issue #346 - Component loading error when running hello_world in distributed on MSVC2010
Issue #362 - Missing initializer error
Issue #363 - Parcel port serialization error
Issue #366 - Parcel buffering leads to types incompatible exception
Issue #368 - Scalable alternative to rand() needed for HPX
Issue #369 - IB over IP is substantially slower than just using standard TCP/IP
Issue #374 -
hpx::lcos::waitshould work with dataflows and arbitrary classes meeting the future interfaceIssue #375 - Conflicting/ambiguous overloads of
hpx::lcos::waitIssue #376 - Find_HPX.cmake should set CMake variable HPX_FOUND for out of tree builds
Issue #377 - ShenEOS interpolate bulk and interpolate_one_bulk are broken
Issue #379 - Add support for distributed runs under SLURM
Issue #382 - _Unwind_Word not declared in boost.backtrace
Issue #387 - Doxygen should look only at list of specified files
Issue #388 - Running
make installon an out-of-tree application is brokenIssue #391 - Out-of-tree application segfaults when running in qsub
Issue #392 - Remove HPX_NO_INSTALL option from cmake build system
Issue #396 - Pragma related warnings when compiling with older gcc versions
Issue #399 - Out of tree component build problems
Issue #400 - Out of source builds on Windows: linker should not receive compiler flags
Issue #401 - Out of source builds on Windows: components need to be linked with hpx_serialization
Issue #404 - gfortran fails to link automatically when fortran files are present
Issue #405 - Inability to specify linking order for external libraries
Issue #406 - Adapt action limits such that dataflow applications work without additional defines
Issue #415 -
locality_resultsis not a member ofhpx::components::serverIssue #425 - Breaking changes to
traits::*resultwrtstd::vector<id_type>Issue #426 - AUTOGLOB needs to be updated to support fortran
HPX V0.8.1 (Apr 21, 2012)#
This is a point release including important bug fixes for HPX V0.8.0 (Mar 23, 2012).
General changes#
HPX does not need to be installed anymore to be functional.
Bug fixes (closed tickets)#
Here is a list of the important tickets we closed for this point release:
Issue #295 - Don’t require install path to be known at compile time.
Issue #371 - Add hpx iostreams to standard build.
Issue #384 - Fix compilation with GCC 4.7.
Issue #390 - Remove keep_factory_alive startup call from ShenEOS; add shutdown call to H5close.
Issue #393 - Thread affinity control is broken.
Bug fixes (commits)#
Here is a list of the important commits included in this point release:
r7642 - External: Fix backtrace memory violation.
- r7775 - Components: Fix symbol visibility bug with component startup
providers. This prevents one components providers from overriding another components.
r7778 - Components: Fix startup/shutdown provider shadowing issues.
HPX V0.8.0 (Mar 23, 2012)#
We have had roughly 1000 commits since the last release and we have closed approximately 70 tickets (bugs, feature requests, etc.).
General changes#
Improved PBS support, allowing for arbitrary naming schemes of node-hostnames.
Finished verification of the reference counting framework.
Implemented decrement merging logic to optimize the distributed reference counting system.
Restructured the LCO framework. Renamed
hpx::lcos::eager_future<>andhpx::lcos::lazy_future<>intohpx::lcos::packaged_taskandhpx::lcos::deferred_packaged_task. Splithpx::lcos::promiseintohpx::lcos::packaged_taskandhpx::lcos::future. Added ‘local’ futures (in namespacehpx::lcos::local).Improved the general performance of local and remote action invocations. This (under certain circumstances) drastically reduces the number of copies created for each of the parameters and return values.
Reworked the performance counter framework. Performance counters are now created only when needed, which reduces the overall resource requirements. The new framework allows for much more flexible creation and management of performance counters. The new sine example application demonstrates some of the capabilities of the new infrastructure.
Added a buildbot-based continuous build system which gives instant, automated feedback on each commit to SVN.
Added more automated tests to verify proper functioning of HPX.
Started to create documentation for HPX and its API.
Added documentation toolchain to the build system.
Added dataflow LCO.
Changed default HPX command line options to have
hpx:prefix. For instance, the former option--threadsis now--hpx:threads. This has been done to make ambiguities with possible application specific command line options as unlikely as possible. See the section HPX Command Line Options for a full list of available options.Added the possibility to define command line aliases. The former short (one-letter) command line options have been predefined as aliases for backwards compatibility. See the section HPX Command Line Options for a detailed description of command line option aliasing.
Network connections are now cached based on the connected host. The number of simultaneous connections to a particular host is now limited. Parcels are buffered and bundled if all connections are in use.
Added more refined thread affinity control. This is based on the external library Portable Hardware Locality (HWLOC).
Improved support for Windows builds with CMake.
Added support for components to register their own command line options.
Added the possibility to register custom startup/shutdown functions for any component. These functions are guaranteed to be executed by an HPX thread.
Added two new experimental thread schedulers: hierarchy_scheduler and periodic_priority_scheduler. These can be activated by using the command line options
--hpx:queuing=hierarchyor--hpx:queuing=periodic.
Example applications#
Graph500 performance benchmark (thanks to Matthew Anderson for contributing this application).
GTC (Gyrokinetic Toroidal Code): a skeleton for particle in cell type codes.
Random Memory Access: an example demonstrating random memory accesses in a large array
ShenEOS example, demonstrating partitioning of large read-only data structures and exposing an interpolation API.
Sine performance counter demo.
Accumulator examples demonstrating how to write and use HPX components.
Quickstart examples (like hello_world, fibonacci, quicksort, factorial, etc.) demonstrating simple HPX concepts which introduce some of the concepts in HPX.
Load balancing and work stealing demos.
API changes#
Moved all local LCOs into a separate namespace
hpx::lcos::local(for instance,hpx::lcos::local_mutexis nowhpx::lcos::local::mutex).Replaced
hpx::actions::functionwithhpx::util::function. Cleaned up related code.Removed
hpx::traits::handle_gidand moved handling of global reference counts into the corresponding serialization code.Changed terminology:
prefixis now calledlocality_id, renamed the corresponding API functions (such ashpx::get_prefix, which is now calledhpx::get_locality_id).Adding
hpx::find_remote_localities, andhpx::get_num_localities.Changed performance counter naming scheme to make it more bash friendly. The new performance counter naming scheme is now
/object{parentname#parentindex/instance#index}/counter#parametersAdded
hpx::get_worker_thread_numreplacinghpx::threadmanager_base::get_thread_num.Renamed
hpx::get_num_os_threadstohpx::get_os_threads_count.Added
hpx::threads::get_thread_count.Restructured the Futures sub-system, renaming types in accordance with the terminology used by the C++11 ISO standard.
Bug fixes (closed tickets)#
Here is a list of the important tickets we closed for this release:
Issue #31 - Specialize handle_gid<> for examples and tests
Issue #72 - Fix AGAS reference counting
Issue #104 - heartbeat throws an exception when decrefing the performance counter it’s watching
Issue #111 - throttle causes an exception on the target application
Issue #142 - One failed component loading causes an unrelated component to fail
Issue #165 - Remote exception propagation bug in AGAS reference counting test
Issue #186 - Test credit exhaustion/splitting (e.g. prepare_gid and symbol NS)
Issue #188 - Implement remaining AGAS reference counting test cases
Issue #258 - No type checking of GIDs in stubs classes
Issue #271 - Seg fault/shared pointer assertion in distributed code
Issue #281 - CMake options need descriptive text
Issue #283 - AGAS caching broken (gva_cache needs to be rewritten with ICL)
Issue #285 - HPX_INSTALL root directory not the same as CMAKE_INSTALL_PREFIX
Issue #286 - New segfault in dataflow applications
Issue #289 - Exceptions should only be logged if not handled
Issue #290 - c++11 tests failure
Issue #293 - Build target for component libraries
Issue #296 - Compilation error with Boost V1.49rc1
Issue #298 - Illegal instructions on termination
Issue #299 - gravity aborts with multiple threads
Issue #301 - Build error with Boost trunk
Issue #303 - Logging assertion failure in distributed runs
Issue #304 - Exception ‘what’ strings are lost when exceptions from decode_parcel are reported
Issue #306 - Performance counter user interface issues
Issue #307 - Logging exception in distributed runs
Issue #308 - Logging deadlocks in distributed
Issue #309 - Reference counting test failures and exceptions
Issue #311 - Merge AGAS remote_interface with the runtime_support object
Issue #314 - Object tracking for id_types
Issue #315 - Remove handle_gid and handle credit splitting in id_type serialization
Issue #320 - applier::get_locality_id() should return an error value (or throw an exception)
Issue #321 - Optimization for id_types which are never split should be restored
Issue #322 - Command line processing ignored with Boost 1.47.0
Issue #323 - Credit exhaustion causes object to stay alive
Issue #324 - Duplicate exception messages
Issue #326 - Integrate Quickbook with CMake
Issue #329 - –help and –version should still work
Issue #330 - Create pkg-config files
Issue #337 - Improve usability of performance counter timestamps
Issue #338 - Non-std exceptions deriving from std::exceptions in tfunc may be sliced
Issue #339 - Decrease the number of send_pending_parcels threads
Issue #343 - Dynamically setting the stack size doesn’t work
Issue #351 - ‘make install’ does not update documents
Issue #353 - Disable FIXMEs in the docs by default; add a doc developer CMake option to enable FIXMEs
Issue #355 - ‘make’ doesn’t do anything after correct configuration
Issue #356 - Don’t use
hpx::util::static_in topology codeIssue #359 - Infinite recursion in hpx::tuple serialization
Issue #361 - Add compile time option to disable logging completely
Issue #364 - Installation seriously broken in r7443
HPX V0.7.0 (Dec 12, 2011)#
We have had roughly 1000 commits since the last release and we have closed approximately 120 tickets (bugs, feature requests, etc.).
General changes#
Completely removed code related to deprecated AGAS V1, started to work on AGAS V2.1.
Started to clean up and streamline the exposed APIs (see ‘API changes’ below for more details).
Revamped and unified performance counter framework, added a lot of new performance counter instances for monitoring of a diverse set of internal HPX parameters (queue lengths, access statistics, etc.).
Improved general error handling and logging support.
Fixed several race conditions, improved overall stability, decreased memory footprint, improved overall performance (major optimizations include native TLS support and ranged-based AGAS caching).
Added support for running HPX applications with PBS.
Many updates to the build system, added support for gcc 4.5.x and 4.6.x, added C++11 support.
Many updates to default command line options.
Added many tests, set up buildbot for continuous integration testing.
Better shutdown handling of distributed applications.
Example applications#
quickstart/factorial and quickstart/fibonacci, future-recursive parallel algorithms.
quickstart/hello_world, distributed hello world example.
quickstart/rma, simple remote memory access example
quickstart/quicksort, parallel quicksort implementation.
gtc, gyrokinetic torodial code.
bfs, breadth-first-search, example code for a graph application.
sheneos, partitioning of large data sets.
accumulator, simple component example.
balancing/os_thread_num, balancing/px_thread_phase, examples demonstrating load balancing and work stealing.
API changes#
Added
hpx::find_all_localities.Added
hpx::terminatefor non-graceful termination of applications.Added
hpx::lcos::asyncfunctions for simpler asynchronous programming.Added new AGAS interface for handling of symbolic namespace (
hpx::agas::*).Renamed
hpx::components::waittohpx::lcos::wait.Renamed
hpx::lcos::future_valuetohpx::lcos::promise.Renamed
hpx::lcos::recursive_mutextohpx::lcos::local_recursive_mutex,hpx::lcos::mutextohpx::lcos::local_mutexRemoved support for Boost versions older than V1.38, recommended Boost version is now V1.47 and newer.
Removed
hpx::process(this will be replaced by a real process implementation in the future).Removed non-functional LCO code (
hpx::lcos::dataflow,hpx::lcos::thunk,hpx::lcos::dataflow_variable).Removed deprecated
hpx::naming::full_address.
Bug fixes (closed tickets)#
Here is a list of the important tickets we closed for this release:
Issue #28 - Integrate Windows/Linux CMake code for HPX core
Issue #32 - hpx::cout() should be hpx::cout
Issue #33 - AGAS V2 legacy client does not properly handle error_code
Issue #60 - AGAS: allow for registerid to optionally take ownership of the gid
Issue #62 - adaptive1d compilation failure in Fusion
Issue #64 - Parcel subsystem doesn’t resolve domain names
Issue #83 - No error handling if no console is available
Issue #84 - No error handling if a hosted locality is treated as the bootstrap server
Issue #90 - Add general commandline option -N
Issue #91 - Add possibility to read command line arguments from file
Issue #92 - Always log exceptions/errors to the log file
Issue #93 - Log the command line/program name
Issue #95 - Support for distributed launches
Issue #97 - Attempt to create a bad component type in AMR examples
Issue #100 - factorial and factorial_get examples trigger AGAS component type assertions
Issue #101 - Segfault when hpx::process::here() is called in fibonacci2
Issue #102 - unknown_component_address in int_object_semaphore_client
Issue #114 - marduk raises assertion with default parameters
Issue #115 - Logging messages for SMP runs (on the console) shouldn’t be buffered
Issue #119 - marduk linking strategy breaks other applications
Issue #121 - pbsdsh problem
Issue #123 - marduk, dataflow and adaptive1d fail to build
Issue #124 - Lower default preprocessing arity
Issue #125 - Move hpx::detail::diagnostic_information out of the detail namespace
Issue #126 - Test definitions for AGAS reference counting
Issue #128 - Add averaging performance counter
Issue #129 - Error with endian.hpp while building adaptive1d
Issue #130 - Bad initialization of performance counters
Issue #131 - Add global startup/shutdown functions to component modules
Issue #132 - Avoid using auto_ptr
Issue #133 - On Windows hpx.dll doesn’t get installed
Issue #134 - HPX_LIBRARY does not reflect real library name (on Windows)
Issue #135 - Add detection of unique_ptr to build system
Issue #137 - Add command line option allowing to repeatedly evaluate performance counters
Issue #139 - Logging is broken
Issue #140 - CMake problem on windows
Issue #141 - Move all non-component libraries into $PREFIX/lib/hpx
Issue #143 - adaptive1d throws an exception with the default command line options
Issue #146 - Early exception handling is broken
Issue #147 - Sheneos doesn’t link on Linux
Issue #149 - sheneos_test hangs
Issue #154 - Compilation fails for r5661
Issue #155 - Sine performance counters example chokes on chrono headers
Issue #156 - Add build type to –version
Issue #157 - Extend AGAS caching to store gid ranges
Issue #158 - r5691 doesn’t compile
Issue #160 - Re-add AGAS function for resolving a locality to its prefix
Issue #168 - Managed components should be able to access their own GID
Issue #169 - Rewrite AGAS future pool
Issue #179 - Complete switch to request class for AGAS server interface
Issue #182 - Sine performance counter is loaded by other examples
Issue #185 - Write tests for symbol namespace reference counting
Issue #191 - Assignment of read-only variable in point_geometry
Issue #200 - Seg faults when querying performance counters
Issue #204 - –ifnames and suffix stripping needs to be more generic
Issue #205 - –list-* and –print-counter-* options do not work together and produce no warning
Issue #207 - Implement decrement entry merging
Issue #208 - Replace the spinlocks in AGAS with hpx::lcos::local_mutexes
Issue #210 - Add an –ifprefix option
Issue #214 - Performance test for PX-thread creation
Issue #216 - VS2010 compilation
Issue #222 - r6045 context_linux_x86.hpp
Issue #223 - fibonacci hangs when changing the state of an active thread
Issue #225 - Active threads end up in the FEB wait queue
Issue #226 - VS Build Error for Accumulator Client
Issue #228 - Move all traits into namespace hpx::traits
Issue #229 - Invalid initialization of reference in thread_init_data
Issue #235 - Invalid GID in iostreams
Issue #238 - Demangle type names for the default implementation of get_action_name
Issue #241 - C++11 support breaks GCC 4.5
Issue #247 - Reference to temporary with GCC 4.4
Issue #248 - Seg fault at shutdown with GCC 4.4
Issue #253 - Default component action registration kills compiler
Issue #272 - G++ unrecognized command line option
Issue #273 - quicksort example doesn’t compile
Issue #277 - Invalid CMake logic for Windows
Namespace changes#
HPX V1.9.0 Namespace changes#
The latest release includes amongst others changes in the namespaces so that HPX facilities correspond to the C++ Standard Library. The old namespaces are deprecated. Below is a comprehensive list of the namespace changes.
Old namespace |
New namespace |
|---|---|
|
|
|
|
|
|
|
|
|
|
|
|
|
|
|
|
|
|
|
|
|
|
|
|
|
Citing HPX#
Please cite HPX whenever you use it for publications. Use our paper in The
Journal of Open Source Software as the main citation for HPX:  . Use
the Zenodo entry for referring to the latest version of HPX:
. Use
the Zenodo entry for referring to the latest version of HPX: ![]() .
Entries for citing specific versions of HPX can also be found at
.
Entries for citing specific versions of HPX can also be found at ![]() .
.
HPX users#
A list of institutions and projects using HPX can be found on the HPX Users page.
About HPX#
History#
The development of High Performance ParalleX (HPX) began in 2007. At that time, Hartmut Kaiser became interested in the work done by the ParalleX group at the Center for Computation and Technology (CCT), a multi-disciplinary research institute at Louisiana State University (LSU). The ParalleX group was working to develop a new and experimental execution model for future high performance computing architectures. This model was christened ParalleX. The first implementations of ParalleX were crude, and many of those designs had to be discarded entirely. However, over time the team learned quite a bit about how to design a parallel, distributed runtime system which implements the concepts of ParalleX.
From the very beginning, this endeavour has been a group effort. In addition to a handful of interested researchers, there have always been graduate and undergraduate students participating in the discussions, design, and implementation of HPX. In 2011 we decided to formalize our collective research efforts by creating the STE||AR group (Systems Technology, Emergent Parallelism, and Algorithm Research). Over time, the team grew to include researchers around the country and the world. In 2014, the STE||AR Group was reorganized to become the international community it is today. This consortium of researchers aims to develop stable, sustainable, and scalable tools which will enable application developers to exploit the parallelism latent in the machines of today and tomorrow. Our goal of the HPX project is to create a high quality, freely available, open source implementation of ParalleX concepts for conventional and future systems by building a modular and standards conforming runtime system for SMP and distributed application environments. The API exposed by HPX is conformant to the interfaces defined by the C++ ISO Standard and adheres to the programming guidelines used by the Boost collection of C++ libraries. We steer the development of HPX with real world applications and aim to provide a smooth migration path for domain scientists.
To learn more about STE||AR and ParalleX, see People and Why HPX?.
People#
The STE||AR Group (pronounced as stellar) stands for “Systems Technology, Emergent Parallelism, and Algorithm Research”. We are an international group of faculty, researchers, and students working at various institutions around the world. The goal of the STE||AR Group is to promote the development of scalable parallel applications by providing a community for ideas, a framework for collaboration, and a platform for communicating these concepts to the broader community.
Our work is focused on building technologies for scalable parallel applications. HPX, our general purpose C++ runtime system for parallel and distributed applications, is no exception. We use HPX for a broad range of scientific applications, helping scientists and developers to write code which scales better and shows better performance compared to more conventional programming models such as MPI.
HPX is based on ParalleX which is a new (and still experimental) parallel execution model aiming to overcome the limitations imposed by the current hardware and the techniques we use to write applications today. Our group focuses on two types of applications - those requiring excellent strong scaling, allowing for a dramatic reduction of execution time for fixed workloads and those needing highest level of sustained performance through massive parallelism. These applications are presently unable (through conventional practices) to effectively exploit a relatively small number of cores in a multi-core system. By extension, these application will not be able to exploit high-end exascale computing systems which are likely to employ hundreds of millions of such cores by the end of this decade.
Critical bottlenecks to the effective use of new generation high performance computing (HPC) systems include:
Starvation: due to lack of usable application parallelism and means of managing it,
Overhead: reduction to permit strong scalability, improve efficiency, and enable dynamic resource management,
Latency: from remote access across system or to local memories,
Contention: due to multicore chip I/O pins, memory banks, and system interconnects.
The ParalleX model has been devised to address these challenges by enabling a new computing dynamic through the application of message-driven computation in a global address space context with lightweight synchronization. The work on HPX is centered around implementing the concepts as defined by the ParalleX model. HPX is currently targeted at conventional machines, such as classical Linux based Beowulf clusters and SMP nodes.
We fully understand that the success of HPX (and ParalleX) is very much the result of the work of many people. To see a list of who is contributing see our tables below.
HPX contributors#
Name |
Institution |
|
|---|---|---|
Hartmut Kaiser |
Center for Computation and Technology (CCT), Louisiana State University (LSU) |
|
Thomas Heller |
Department of Computer Science 3 - Computer Architecture, Friedrich-Alexander University Erlangen-Nuremberg (FAU) |
|
Agustin Berge |
|
|
Mikael Simberg |
|
|
John Biddiscombe |
|
|
Anton Bikineev |
Center for Computation and Technology (CCT), Louisiana State University (LSU) |
|
Martin Stumpf |
Department of Computer Science 3 - Computer Architecture, Friedrich-Alexander University Erlangen-Nuremberg (FAU) |
|
Bryce Adelstein Lelbach |
|
|
Shuangyang Yang |
Center for Computation and Technology (CCT), Louisiana State University (LSU) |
|
Jeroen Habraken |
|
|
Steven Brandt |
Center for Computation and Technology (CCT), Louisiana State University (LSU) |
|
Antoine Tran Tan |
|
|
Adrian S. Lemoine |
|
|
Maciej Brodowicz |
|
|
Giannis Gonidelis |
Center for Computation and Technology (CCT), Louisiana State University (LSU) |
|


Contributors to this document#
Name |
Institution |
|
|---|---|---|
Hartmut Kaiser |
Center for Computation and Technology (CCT), Louisiana State University (LSU) |
|
Thomas Heller |
Department of Computer Science 3 - Computer Architecture, Friedrich-Alexander University Erlangen-Nuremberg (FAU) |
|
Bryce Adelstein Lelbach |
|
|
Vinay C Amatya |
Center for Computation and Technology (CCT), Louisiana State University (LSU) |
|
Steven Brandt |
Center for Computation and Technology (CCT), Louisiana State University (LSU) |
|
Maciej Brodowicz |
|
|
Adrian S. Lemoine |
|
|
Rebecca Stobaugh |
|
|
Dimitra Karatza |
Faculty of Electrical Engineering, Mathematics & Computer Science, Delft University of Technology |
|
Bhumit Attarde |
|


Acknowledgements#
Thanks also to the following people who contributed directly or indirectly to the project through discussions, pull requests, documentation patches, etc.
Panos Syskakis for benchmarking and optimizing our parallel algorithms.
Shreyas Atre, for contributing fixes to our implementation of senders/receivers and extending our coroutines integration with senders/receivers.
Alexander Neumann, for contributing fixes to the cmake build system.
Dimitra Karatza, for her work on refactoring the documentation and providing a new user-friendly environment during and after Google Season of Docs 2021.
Srinivas Yadav, for his work on SIMD support in algorithms before and during Google Summer of Code 2021.
Akhil Nair, for his work on adapting algorithms to C++20 before and during Google Summer of Code 2021.
Alexander Toktarev, for updating the parallel algorithm customization points to use
tag_fallback_invokefor the default implementations.Brice Goglin, for reporting and helping fix issues related to the integration of hwloc in HPX.
Giannis Gonidelis, for his work on the ranges adaptation during the Google Summer of Code 2020.
Auriane Reverdell (Swiss National Supercomputing Centre), for her tireless work on refactoring our CMake setup and modularizing HPX.
Christopher Hinz, for his work on refactoring our CMake setup.
Weile Wei, for fixing HPX builds with CUDA on Summit.
Severin Strobl, for fixing our CMake setup related to linking and adding new entry points to the HPX runtime.
Rebecca Stobaugh, for her major documentation review and contributions during and after the 2019 Google Season of Documentation.
Jan Melech, for adding automatic serialization of simple structs.
Austin McCartney, for adding concept emulation of the Ranges TS bidirectional and random access iterator concepts.
Marco Diers, reporting and fixing issues related PMIx.
Maximilian Bremer, for reporting multiple issues and extending the component migration tests.
Piotr Mikolajczyk, for his improvements and fixes to the set and count algorithms.
Grant Rostig, for reporting several deficiencies on our web pages.
Jakub Golinowski, for implementing an HPX backend for OpenCV and in the process improving documentation and reporting issues.
Mikael Simberg (Swiss National Supercomputing Centre), for his tireless help cleaning up and maintaining HPX.
Tianyi Zhang, for his work on HPXMP.
Shahrzad Shirzad, for her contributions related to Phylanx.
Christopher Ogle, for his contributions to the parallel algorithms.
Surya Priy, for his work with statistic performance counters.
Anushi Maheshwari, for her work on random number generation.
Bruno Pitrus, for his work with parallel algorithms.
Nikunj Gupta, for rewriting the implementation of
hpx_main.hppand for his fixes for tests.Christopher Taylor, for his interest in HPX and the fixes he provided. Chris also contributed support for RISC-V architectures.
Shoshana Jakobovits, for her work on the resource partitioner.
Denis Blank, who re-wrote our unwrapped function to accept plain values arbitrary containers, and properly deal with nested futures.
Ajai V. George, who implemented several of the parallel algorithms.
Taeguk Kwon, who worked on implementing parallel algorithms as well as adapting the parallel algorithms to the Ranges TS.
Zach Byerly (Louisiana State University (LSU)), who in his work developing applications on top of HPX opened tickets and contributed to the HPX examples.
Daniel Estermann, for his work porting HPX to the Raspberry Pi.
Alireza Kheirkhahan (Louisiana State University (LSU)), who built and administered our local cluster as well as his work in distributed IO.
Abhimanyu Rawat, who worked on stack overflow detection.
David Pfander, who improved signal handling in HPX, provided his optimization expertise, and worked on incorporating the Vc vectorization into HPX.
Denis Demidov, who contributed his insights with VexCL.
Khalid Hasanov, who contributed changes which allowed to run HPX on 64Bit power-pc architectures.
Zahra Khatami (Louisiana State University (LSU)), who contributed the prefetching iterators and the persistent auto chunking executor parameters implementation.
Marcin Copik, who worked on implementing GPU support for C++AMP and HCC. He also worked on implementing a HCC backend for HPX.Compute.
Minh-Khanh Do, who contributed the implementation of several segmented algorithms.
Bibek Wagle (Louisiana State University (LSU)), who worked on fixing and analyzing the performance of the parcel coalescing plugin in HPX.
Lukas Troska, who reported several problems and contributed various test cases allowing to reproduce the corresponding issues.
Andreas Schaefer, who worked on integrating his library (LibGeoDecomp) with HPX. He reported various problems and submitted several patches to fix issues allowing for a better integration with LibGeoDecomp.
Satyaki Upadhyay, who contributed several examples to HPX.
Brandon Cordes, who contributed several improvements to the inspect tool.
Harris Brakmic, who contributed an extensive build system description for building HPX with Visual Studio.
Parsa Amini (Louisiana State University (LSU)), who refactored and simplified the implementation of AGAS in HPX and who works on its implementation and optimization.
Luis Martinez de Bartolome who implemented a build system extension for HPX integrating it with the Conan C/C++ package manager.
Vinay C Amatya (Louisiana State University (LSU)), who contributed to the documentation and provided some of the HPX examples.
Kevin Huck and Nick Chaimov (University of Oregon), who contributed the integration of APEX (Autonomic Performance Environment for eXascale) with HPX.
Francisco Jose Tapia, who helped with implementing the parallel sort algorithm for HPX.
Patrick Diehl, who worked on implementing CUDA support for our companion library targeting GPGPUs (HPXCL).
Eric Lemanissier contributed fixes to allow compilation using the MingW toolchain.
Nidhi Makhijani who helped cleaning up some enum consistencies in HPX and contributed to the resource manager used in the thread scheduling subsystem. She also worked on HPX in the context of the Google Summer of Code 2015.
Larry Xiao, Devang Bacharwar, Marcin Copik, and Konstantin Kronfeldner who worked on HPX in the context of the Google Summer of Code program 2015.
Daniel Bourgeois (Center for Computation and Technology (CCT)) who contributed to HPX the implementation of several parallel algorithms (as proposed by N4313).
Anuj Sharma and Christopher Bross (Department of Computer Science 3 - Computer Architecture), who worked on HPX in the context of the Google Summer of Code program 2014.
Martin Stumpf (Department of Computer Science 3 - Computer Architecture), who rebuilt our contiguous testing infrastructure (see the HPX Buildbot Website). Martin is also working on HPXCL (mainly all work related to OpenCL) and implementing an HPX backend for POCL, a portable computing language solution based on OpenCL.
Grant Mercer (University of Nevada, Las Vegas), who helped creating many of the parallel algorithms (as proposed by N4313).
Damond Howard (Louisiana State University (LSU)), who works on HPXCL (mainly all work related to CUDA).
Christoph Junghans (Los Alamos National Lab), who helped making our buildsystem more portable.
Antoine Tran Tan (Laboratoire de Recherche en Informatique, Paris), who worked on integrating HPX as a backend for NT2. He also contributed an implementation of an API similar to Fortran co-arrays on top of HPX.
John Biddiscombe (Swiss National Supercomputing Centre), who helped with the BlueGene/Q port of HPX, implemented the parallel sort algorithm, and made several other contributions.
Erik Schnetter (Perimeter Institute for Theoretical Physics), who greatly helped to make HPX more robust by submitting a large amount of problem reports, feature requests, and made several direct contributions.
Mathias Gaunard (Metascale), who contributed several patches to reduce compile time warnings generated while compiling HPX.
Andreas Buhr, who helped with improving our documentation, especially by suggesting some fixes for inconsistencies.
Patricia Grubel (New Mexico State University), who contributed the description of the different HPX thread scheduler policies and is working on the performance analysis of our thread scheduling subsystem.
Lars Viklund, whose wit, passion for testing, and love of odd architectures has been an amazing contribution to our team. He has also contributed platform specific patches for FreeBSD and MSVC12.
Agustin Berge, who contributed patches fixing some very nasty hidden template meta-programming issues. He rewrote large parts of the API elements ensuring strict conformance with the C++ ISO Standard.
Anton Bikineev for contributing changes to make using
boost::lexical_castsafer, he also contributed a thread safety fix to the iostreams module. He also contributed a complete rewrite of the serialization infrastructure replacing Boost.Serialization inside HPX.Pyry Jahkola, who contributed the Mac OS build system and build documentation on how to build HPX using Clang and libc++.
Mario Mulansky, who created an HPX backend for his Boost.Odeint library, and who submitted several test cases allowing us to reproduce and fix problems in HPX.
Rekha Raj, who contributed changes to the description of the Windows build instructions.
Jeremy Kemp how worked on an HPX OpenMP backend and added regression tests.
Alex Nagelberg for his work on implementing a C wrapper API for HPX.
Chen Guo, helvihartmann, Nicholas Pezolano, and John West who added and improved examples in HPX.
Joseph Kleinhenz, Markus Elfring, Kirill Kropivyansky, Alexander Neundorf, Bryant Lam, and Alex Hirsch who improved our CMake.
Tapasweni Pathak, Praveen Velliengiri, Jean-Loup Tastet, Michael Levine, Aalekh Nigam, HadrienG2, Prayag Verma, lslada, Alex Myczko, and Avyav Kumar who improved the documentation.
Jayesh Badwaik, J. F. Bastien, Christoph Garth, Christopher Hinz, Brandon Kohn, Mario Lang, Maikel Nadolski, pierrele, hendrx, Dekken, woodmeister123, xaguilar, Andrew Kemp, Dylan Stark, Matthew Anderson, Jeremy Wilke, Jiazheng Yuan, CyberDrudge, david8dixon, Maxwell Reeser, Raffaele Solca, Marco Ippolito, Jules Penuchot, Weile Wei, Severin Strobl, Kor de Jong, albestro, Jeff Trull, Yuri Victorovich, and Gregor Daiß who contributed to the general improvement of HPX.
HPX Funding Acknowledgements lists current and past funding sources for HPX. Special thanks to Google Summer of Code and Google Season of Docs for the continuous support they provide which helps us enhance both our code and our documentation.