
Building HPX
Contents
Building HPX#
Basic information#
The build system for HPX is based on CMake, a cross-platform build-generator tool which is not responsible for building the project but rather generates the files needed by your build tool (GNU make, Visual Studio, etc.) for building HPX. If CMake is not already installed in your system, you can download it and install it here: CMake Downloads.
Once CMake has been run, the build process can be started. The build process consists of the following parts:
The HPX core libraries (target
core): This forms the basic set of HPX libraries.HPX Examples (target
examples): This target is enabled by default and builds all HPX examples (disable by settingHPX_WITH_EXAMPLES:BOOL=Off). HPX examples are part of thealltarget and are included in the installation if enabled.HPX Tests (target
tests): This target builds the HPX test suite and is enabled by default (disable by settingHPX_WITH_TESTS:BOOL=Off). They are not built by thealltarget and have to be built separately.HPX Documentation (target
docs): This target builds the documentation, and is not enabled by default (enable by settingHPX_WITH_DOCUMENTATION:BOOL=On. For more information see Documentation.
The HPX build process is highly configurable through CMake, and various CMake variables influence the build process. A list with the most important CMake variables can be found in the section that follows, while the complete list of available CMake variables is in CMake options. These variables can be used to refine the recipes that can be found at Platform specific build recipes, a section that shows some basic steps on how to build HPX for a specific platform.
In order to use HPX, only the core libraries are required. In order to use the optional libraries, you need to specify them as link dependencies in your build (See Creating HPX projects).
Most important CMake options#
While building HPX, you are provided with multiple CMake options which correspond to different configurations. Below, there is a set of the most important and frequently used CMake options.
- HPX_WITH_MALLOC#
Use a custom allocator. Using a custom allocator tuned for multithreaded applications is very important for the performance of HPX applications. When debugging applications, it’s useful to set this to
system, as custom allocators can hide some memory-related bugs. Note that setting this to something other thansystemrequires an external dependency.
- HPX_WITH_CUDA#
Enable support for CUDA. Use
CMAKE_CUDA_COMPILERto set the CUDA compiler. This is a standard CMake variable, likeCMAKE_CXX_COMPILER.
- HPX_WITH_PARCELPORT_MPI#
Enable the MPI parcelport. This enables the use of MPI for the networking operations in the HPX runtime. The default value is
OFFbecause it’s not available on all systems and/or requires another dependency. However, it is the recommended parcelport.
- HPX_WITH_PARCELPORT_TCP#
Enable the TCP parcelport. Enables the use of TCP for networking in the runtime. The default value is
ON. However, it’s only recommended for debugging purposes, as it is slower than the MPI parcelport.
- HPX_WITH_PARCELPORT_LCI#
Enable the LCI parcelport. This enables the use of LCI for the networking operations in the HPX runtime. The default value is
OFFbecause it’s not available on all systems and/or requires another dependency. However, this experimental parcelport may provide better performance than the MPI parcelport. Please refer to Using the LCI parcelport for more information about the LCI parcelport.
- HPX_WITH_APEX#
Enable APEX integration. APEX can be used to profile HPX applications. In particular, it provides information about individual tasks in the HPX runtime.
- HPX_WITH_GENERIC_CONTEXT_COROUTINES#
Enable Boost. Context for task context switching. It must be enabled for non-x86 architectures such as ARM and Power.
- HPX_WITH_MAX_CPU_COUNT#
Set the maximum CPU count supported by HPX. The default value is 64, and should be set to a number at least as high as the number of cores on a system including virtual cores such as hyperthreads.
- HPX_WITH_CXX_STANDARD#
Set a specific C++ standard version e.g.
HPX_WITH_CXX_STANDARD=20. The default and minimum value is 17.
- HPX_WITH_EXAMPLES#
Build examples.
- HPX_WITH_TESTS#
Build tests.
For a complete list of available CMake variables that influence the build of HPX, see CMake options.
Build types#
CMake can be configured to generate project files suitable for builds that
have enabled debugging support or for an optimized build (without debugging
support). The CMake variable used to set the build type is
CMAKE_BUILD_TYPE (for more information see the CMake Documentation).
Available build types are:
Debug: Full debug symbols are available as well as additional assertions to help debugging. To enable the debug build type for the HPX API, the C++ Macro
HPX_DEBUGis defined.RelWithDebInfo: Release build with debugging symbols. This is most useful for profiling applications
Release: Release build. This disables assertions and enables default compiler optimizations.
RelMinSize: Release build with optimizations for small binary sizes.
Important
We currently don’t guarantee ABI compatibility between Debug and Release
builds. Please make sure that applications built against HPX use the same
build type as you used to build HPX. For CMake builds, this means that
the CMAKE_BUILD_TYPE variables have to match and for projects not using
CMake, the HPX_DEBUG macro has to be set in debug mode.
Platform specific build recipes#
Unix variants#
Once you have the source code and the dependencies and assuming all your dependencies are in paths known to CMake, the following gets you started:
First, set up a separate build directory to configure the project:
$ mkdir build && cd build
To configure the project you have the following options:
To build the core HPX libraries and examples, and install them to your chosen location (recommended):
$ cmake -DCMAKE_INSTALL_PREFIX=/install/path ..
Tip
If you want to change CMake variables for your build, it is usually a good idea to start with a clean build directory to avoid configuration problems. It is especially important that you use a clean build directory when changing between
ReleaseandDebugmodes.To install HPX to the default system folders, simply leave out the
CMAKE_INSTALL_PREFIXoption:
$ cmake ..If your dependencies are in custom locations, you may need to tell CMake where to find them by passing one or more options to CMake as shown below:
$ cmake -DBoost_ROOT=/path/to/boost
      -DHwloc_ROOT=/path/to/hwloc
      -DTcmalloc_ROOT=/path/to/tcmalloc
      -DJemalloc_ROOT=/path/to/jemalloc
      [other CMake variable definitions]
      /path/to/source/tree
For instance:
$ cmake -DBoost_ROOT=~/packages/boost -DHwloc_ROOT=/packages/hwloc -DCMAKE_INSTALL_PREFIX=~/packages/hpx ~/downloads/hpx_1.5.1
If you want to try HPX without using a custom allocator pass
-DHPX_WITH_MALLOC=systemto CMake:
$ cmake -DCMAKE_INSTALL_PREFIX=/install/path -DHPX_WITH_MALLOC=system ..
Note
Please pay special attention to the section about
HPX_WITH_MALLOC:STRINGas this is crucial for getting decent performance.Important
If you are building HPX for a system with more than 64 processing units, you must change the CMake variable
HPX_WITH_MAX_CPU_COUNT(to a value at least as big as the number of (virtual) cores on your system). Note that the default value is 64.Caution
Compiling and linking HPX needs a considerable amount of memory. It is advisable that at least 2 GB of memory per parallel process is available.
Once the configuration is complete, to build the project you run:
$ cmake --build . --target install
Windows#
Note
The following build recipes are mostly user-contributed and may be outdated. We always welcome updated and new build recipes.
To build HPX under Windows 10 x64 with Visual Studio 2015:
Download the CMake V3.19 installer (or latest version) from here
Download the hwloc V1.11.0 (or the latest version) from here and unpack it.
Download the latest Boost libraries from here and unpack them.
Build the Boost DLLs and LIBs by using these commands from Command Line (or PowerShell). Open CMD/PowerShell inside the Boost dir and type in:
.\bootstrap.batThis batch file will set up everything needed to create a successful build. Now execute:
.\b2.exe link=shared variant=release,debug architecture=x86 address-model=64 threading=multi --build-type=complete install
This command will start a (very long) build of all available Boost libraries. Please, be patient.
Open CMake-GUI.exe and set up your source directory (input field ‘Where is the source code’) to the base directory of the source code you downloaded from HPX’s GitHub pages. Here’s an example of CMake path settings, which point to the
Documents/GitHub/hpxfolder: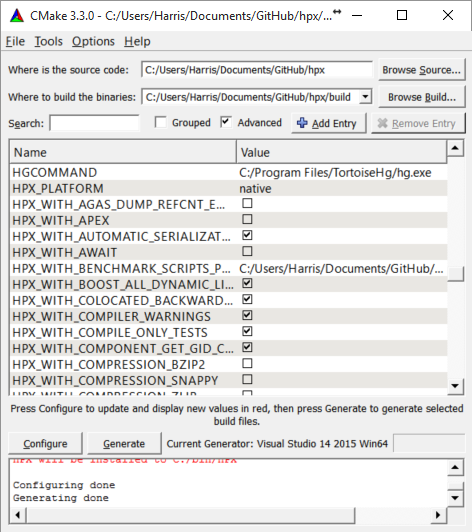
Fig. 3 Example CMake path settings.#
Inside ‘Where is the source-code’ enter the base directory of your HPX source directory (do not enter the “src” sub-directory!). Inside ‘Where to build the binaries’ you should put in the path where all the building processes will happen. This is important because the building machinery will do an “out-of-tree” build. CMake will not touch or change the original source files in any way. Instead, it will generate Visual Studio Solution Files, which will build HPX packages out of the HPX source tree.
Set new configuration variables (in CMake, not in Windows environment):
Boost_ROOT,Hwloc_ROOT,Asio_ROOT,CMAKE_INSTALL_PREFIX. The meaning of these variables is as follows:Boost_ROOTthe HPX root directory of the unpacked Boost headers/cpp files.Hwloc_ROOTthe HPX root directory of the unpacked Portable Hardware Locality files.Asio_ROOTthe HPX root directory of the unpacked ASIO files. Alternatively useHPX_WITH_FETCH_ASIOwith valueTrue.CMAKE_INSTALL_PREFIXthe HPX root directory where the future builds of HPX should be installed.Note
HPX is a very large software collection, so it is not recommended to use the default
C:\Program Files\hpx. Many users may prefer to use simpler paths without whitespace, likeC:\bin\hpxorD:\bin\hpxetc.
To insert new env-vars click on “Add Entry” and then insert the name inside “Name”, select
PATHas Type and put the path-name in the “Path” text field. Repeat this for the first three variables.This is how variable insertion will look:
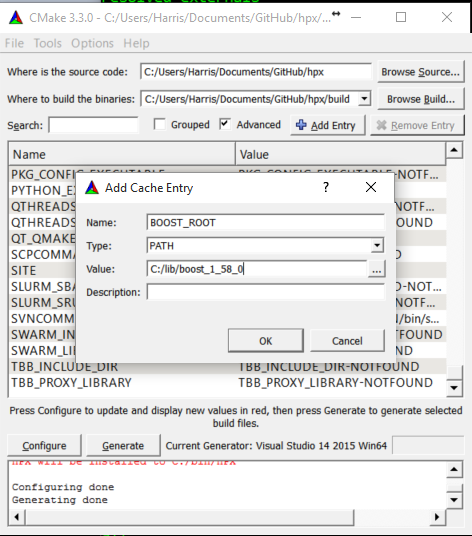
Fig. 4 Example CMake adding entry.#
Alternatively, users could provide
Boost_LIBRARYDIRinstead ofBoost_ROOT; the difference is thatBoost_LIBRARYDIRshould point to the subdirectory inside Boost root where all the compiled DLLs/LIBs are. For example,Boost_LIBRARYDIRmay point to thebin.v2subdirectory under the Boost rootdir. It is important to keep the meanings of these two variables separated from each other:Boost_DIRpoints to the ROOT folder of the Boost library.Boost_LIBRARYDIRpoints to the subdir inside the Boost root folder where the compiled binaries are.Click the ‘Configure’ button of CMake-GUI. You will be immediately presented with a small window where you can select the C++ compiler to be used within Visual Studio. This has been tested using the latest v14 (a.k.a C++ 2015) but older versions should be sufficient too. Make sure to select the 64Bit compiler.
After the generate process has finished successfully, click the ‘Generate’ button. Now, CMake will put new VS Solution files into the BUILD folder you selected at the beginning.
Open Visual Studio and load the
HPX.slnfrom your build folder.Go to
CMakePredefinedTargetsand build theINSTALLproject: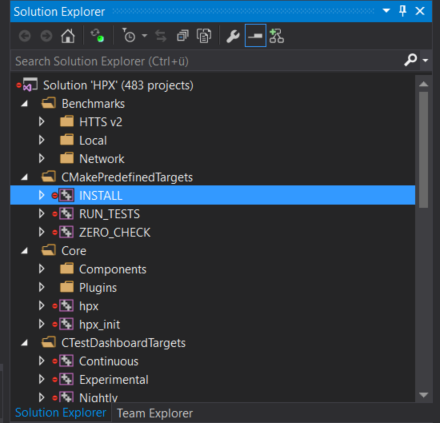
Fig. 5 Visual Studio INSTALL target.#
It will take some time to compile everything, and in the end you should see an output similar to this one:
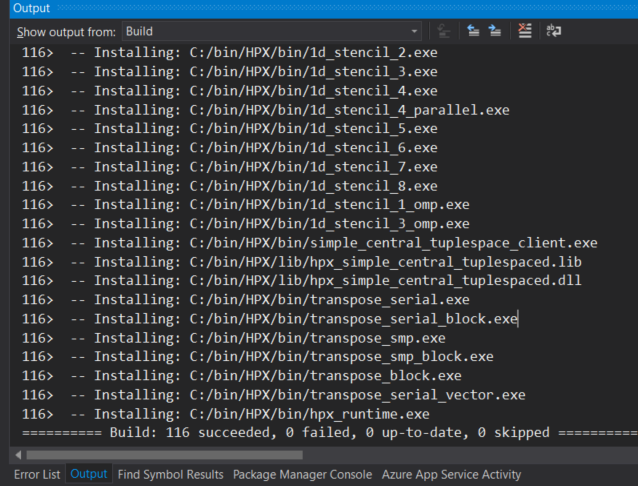
Fig. 6 Visual Studio build output.#